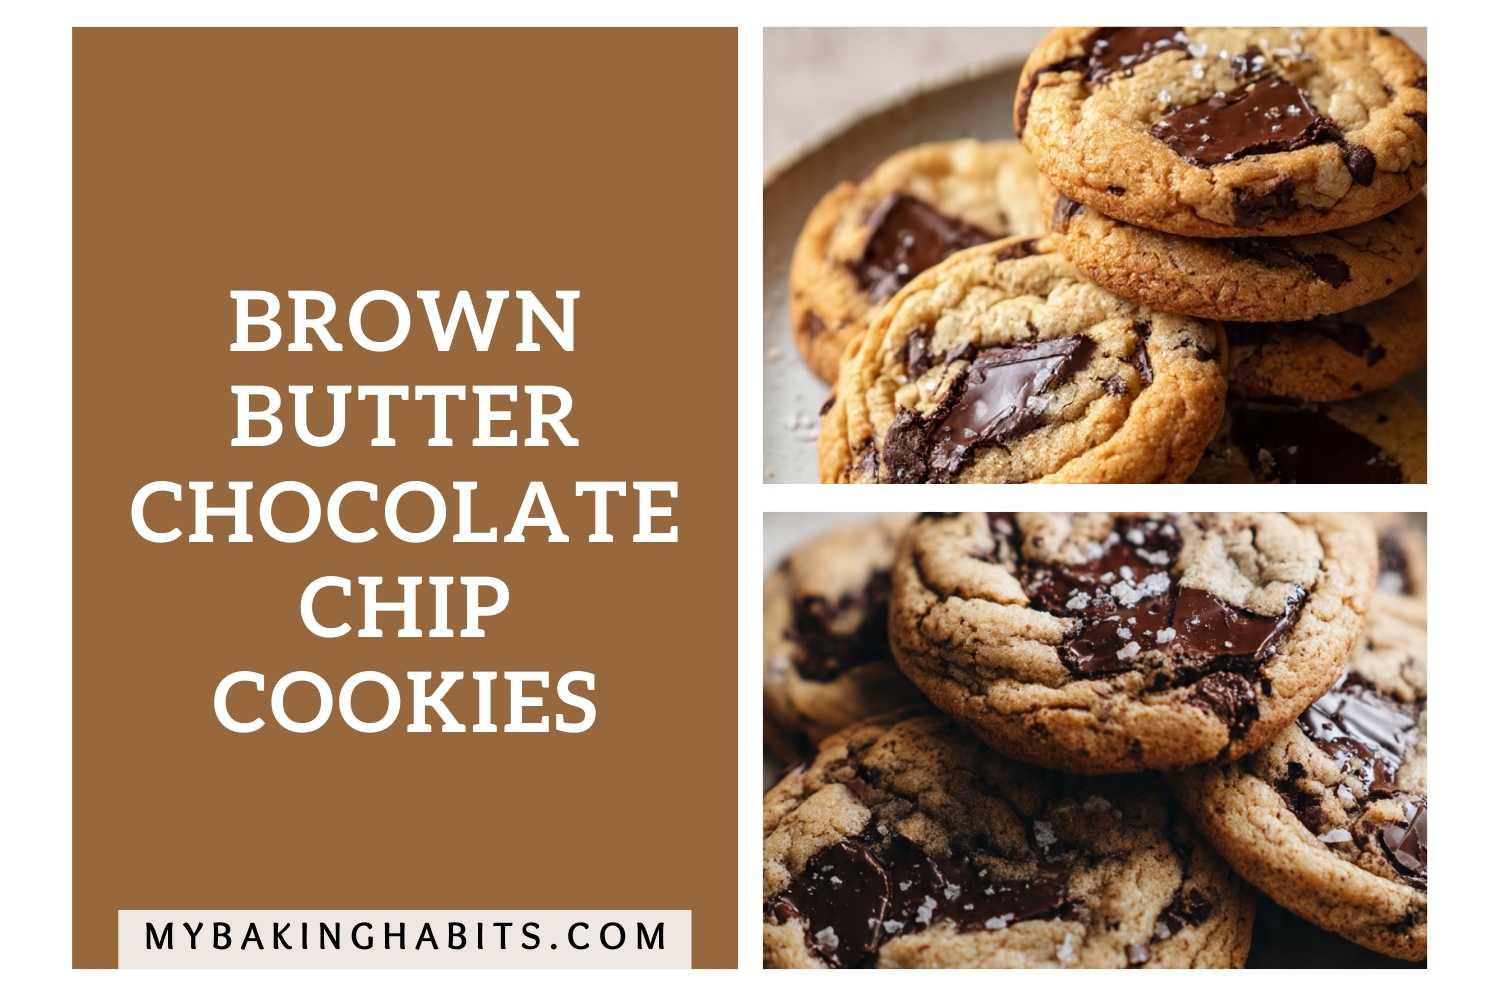
Brown Butter Chocolate Chip Cookies

The first time I browned butter for cookies, I stood at the stove convinced I was burning it. The foam kept rising, the milk solids darkened, and I almost pulled the pan too early. I didn’t. That smell — nutty, almost toffee-like, somewhere between caramel and toasted hazelnuts — is exactly what you’re after. And once you smell it, you’ll understand why I can’t go back to regular melted butter for chocolate chip cookies.
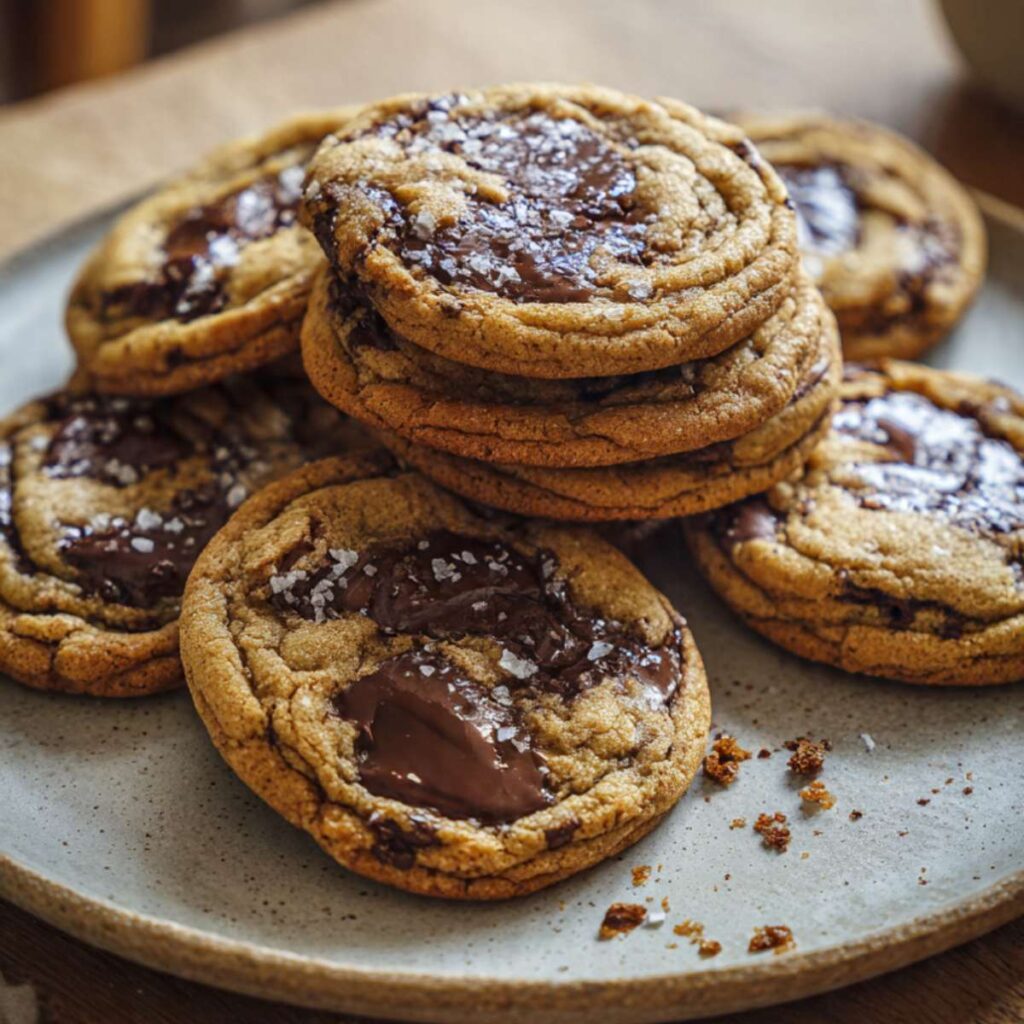
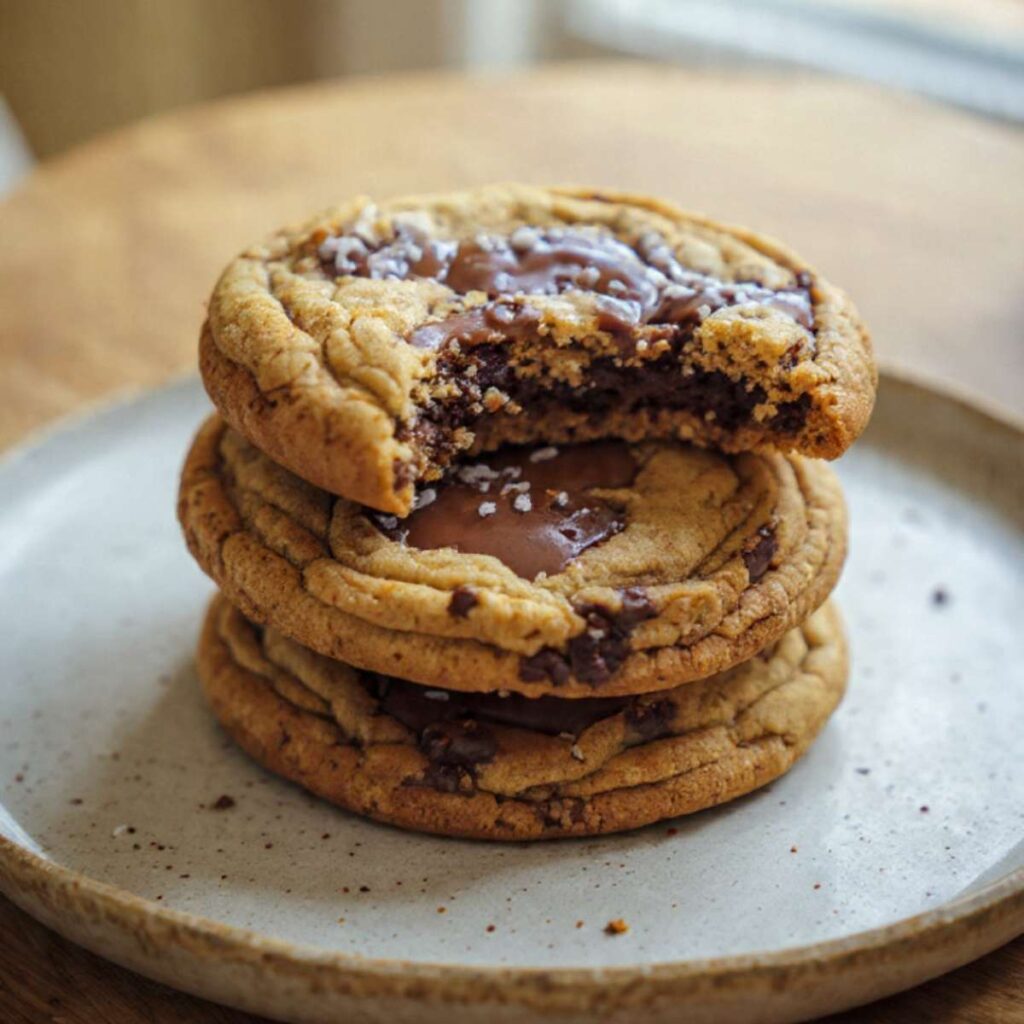
I’ve tested this recipe across six batches. The result: cookies with deep golden, rippled edges, a fudgy center that stays soft for three days, and wide pools of dark melted chocolate on top that set into glossy, slightly crackled puddles as they cool.
Chips vs. chunks was the first variable I tested. Standard chocolate chips are formulated to hold their shape in the oven — useful in some recipes, wrong here. When I switched to roughly chopped dark chocolate and pressed reserved pieces on top of each dough ball before baking, the chocolate melted into those wide glossy pools you see in the photos. Chips gave me polka dots. Chunks gave me that.
Sugar ratio was the second variable. Equal parts brown and white sugar produced a flatter, crispier cookie that dried out by day two. Shifting to three parts brown sugar to one part white — keeping more molasses in the dough — produced a cookie that stayed fudgy and soft for three days longer. That’s the version I kept.
Dough rest time was the third. Same-day dough baked into good cookies. Dough rested overnight in the fridge baked into noticeably more complex cookies — deeper caramel notes, slightly thicker spread, a crumb that held together better when broken. If you have time, rest the dough. If you don’t, these are still excellent.
One thing I don’t skip: flaky sea salt straight out of the oven. It cuts through the richness of the browned butter and makes every bite taste more intentional.
| Prep Time | Cook Time | Total Time | Yield | Difficulty |
| 15 min | 11–13 min | ~30 min | 12 large cookies | Easy |
Macros per cookie (calculated on 12 cookies using recipe quantities)
| Calories | Carbs | Fat | Protein |
| 387 kcal | 45g | 22g | 4g |
Ingredients & Tools
Ingredients
For the Dough
- 1 cup (226g) unsalted butter
- ¾ cup (150g) packed brown sugar
- ¼ cup (50g) granulated sugar
- 2 large eggs
- 2 tsp (10ml) pure vanilla extract
- 2 cups (240g) all-purpose flour
- ¾ tsp (4g) baking soda
- ½ tsp (3g) fine sea salt
For the Chocolate
- 1 ½ cups (255g) dark chocolate, roughly chopped into chunks
For the Finish
- Flaky sea salt, for topping
Before You Start
Pull your eggs out of the fridge 30 minutes before baking. Room temperature eggs incorporate more evenly into warm browned butter and give you a smoother, thicker dough. Cold eggs can cause the butter to seize and the mixture to look broken.
Roughly chop your chocolate before you start and divide it into two portions — about two-thirds for folding into the dough and one-third reserved for pressing on top. Having both portions ready before you begin means you’re not scrambling mid-step with warm dough sitting in the bowl.
Set the reserved chocolate chunks in a small bowl near your baking sheet. You’ll need them within seconds of scooping each dough ball.
Necessary Tools
Required:
- Light-colored medium saucepan (light interior lets you see the butter color change)
- Large mixing bowl
- Whisk
- Rubber spatula
- Kitchen scale (strongly recommended for accurate flour measurement)
- Cookie scoop or large spoon
- Baking sheet
- Parchment paper or silicone baking mat
- Cooling rack
Optional:
- Measuring cups and spoons (scale preferred — cups introduce measuring error)
- Stand mixer or hand mixer (whisking by hand works fine here)
- Instant-read thermometer (browned butter is ready around 300°F/150°C)
How to Make Brown Butter Chocolate Chip Cookies
Step 1: Brown the Butter for Deep, Nutty Flavor

Place your light-colored medium saucepan over medium heat. Add the 1 cup (226g) unsalted butter and let it melt completely, stirring every 30 seconds with a rubber spatula.
Once melted, the butter will begin to foam. Keep stirring. After 3–5 minutes, the foam will subside and you’ll see small amber-brown bits forming at the bottom of the pan. The smell shifts from plain butter to something toasty and nutty — almost like toffee. That’s your cue.
Pull the pan off the heat immediately. The bits at the bottom should be deep golden, not dark brown or black. Pour the browned butter into your large mixing bowl right away to stop the cooking. Scrape every drop from the pan — those toasty bits carry most of the flavor.
Let the butter cool for 8–10 minutes until it’s warm but not hot. If you add eggs to hot butter, they’ll scramble.
Don’t walk away during this step. The difference between perfectly browned and burnt is about 30 seconds.
Your butter should look: deep golden amber with a nutty aroma and visible brown specks suspended throughout.
Step 2: Brown Sugar and Granulated Sugar
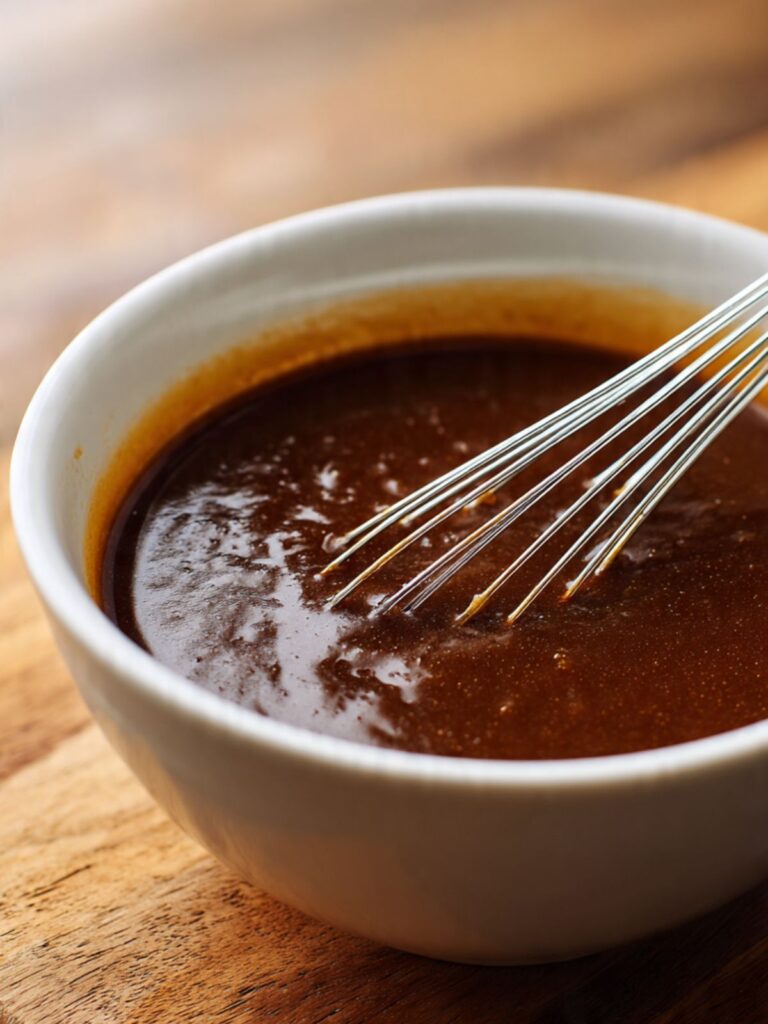
Add the ¾ cup (150g) packed brown sugar and ¼ cup (50g) granulated sugar directly into the warm browned butter. Whisk vigorously for about 1 minute until the mixture looks smooth, glossy, and uniform — no dry sugar pockets remaining.
The brown sugar does more than sweeten here. Its molasses content is hygroscopic, meaning it actively attracts and holds onto moisture. That’s what keeps these cookies soft and fudgy for days after baking.
Step 3: Eggs and Vanilla

Add 2 large eggs and 2 tsp (10ml) vanilla extract to the butter-sugar mixture. Whisk firmly for 60–90 seconds until the mixture thickens noticeably and looks shiny and ribbon-like.
The eggs provide the protein network that holds the cookie together as it bakes. Whisking long enough also incorporates a small amount of air, which helps the cookies rise slightly before spreading into those thick, rippled discs you see in the photos above.
Step 4: Flour, Baking Soda, Salt
Sprinkle 2 cups (240g) all-purpose flour, ¾ tsp (4g) baking soda, and ½ tsp (3g) fine sea salt directly into the bowl. Switch to your rubber spatula.
The baking soda reacts with the small amount of acidity in the brown sugar to give the cookies just enough lift to stay thick without turning cakey. The salt sharpens every other flavor in the dough — don’t skip it even with the flaky salt finish on top.
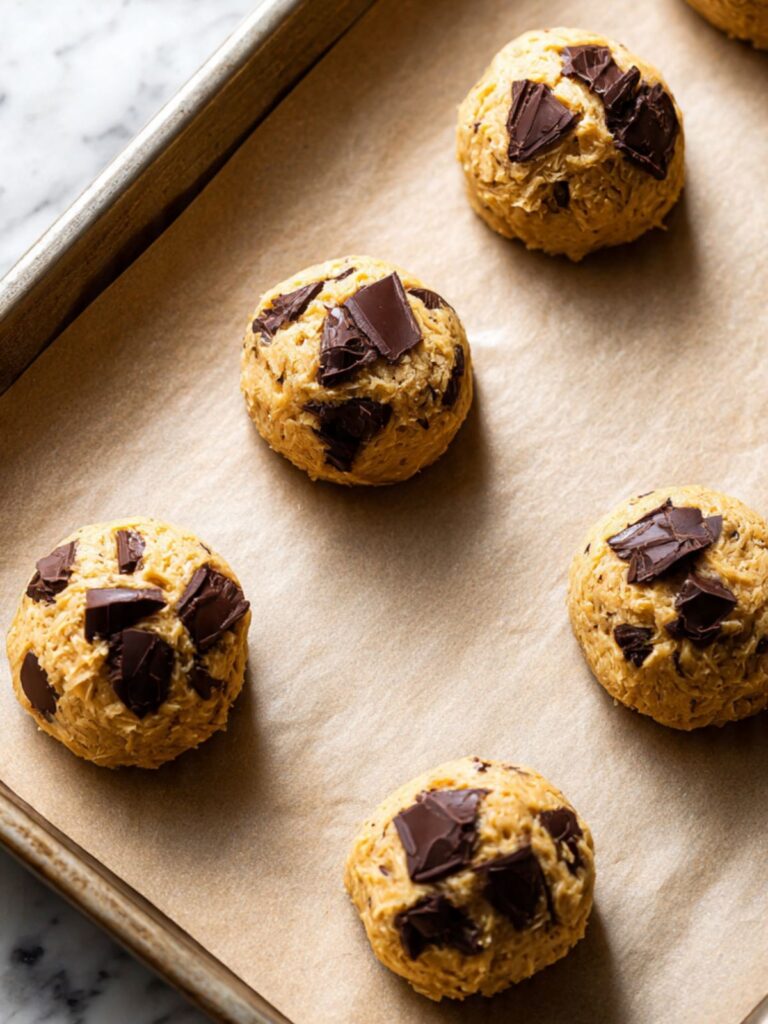
Step 5: Chocolate Chunks
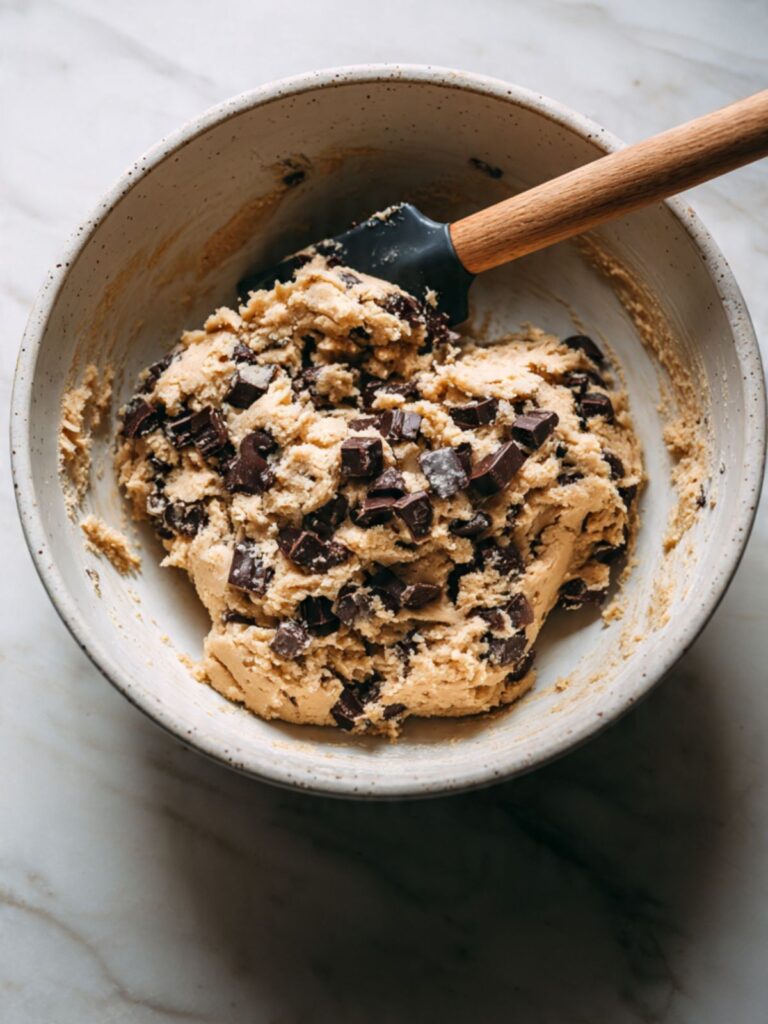
Reserve about ⅓ cup (55g) of your dark chocolate chunks and set them in the small bowl you prepared earlier. Fold the remaining 1 cup (170g) of chunks into the dough with your spatula, distributing them evenly so every scoop gets visible chocolate.
Step 6: Scoop, Top, and Prep for the Oven
Line your parchment-lined baking sheet and place it on the counter within reach of the dough bowl. Preheat your oven to 350°F (175°C) while you scoop.
Scoop the dough into large balls — about 3 tablespoons (roughly 75g) each — and place them at least 3 inches apart on the prepared sheet. Press 3–4 reserved chocolate chunks firmly onto the top of each dough ball, pushing them at least halfway in so they have full contact with the heat.
Don’t flatten the dough balls before baking. They spread naturally into those thick, rippled rounds on their own. Pressing them down before baking produces thinner, crispier cookies — not the fudgy centers shown in the photos above.
Bake one sheet at a time on the center rack. This ensures even heat distribution and consistent browning across every cookie.
The dough balls should look: tall and round, each one topped with dark chocolate pieces pressed firmly into the surface before they go in.
Step 7: Bake Until the Edges Set But the Centers Don’t
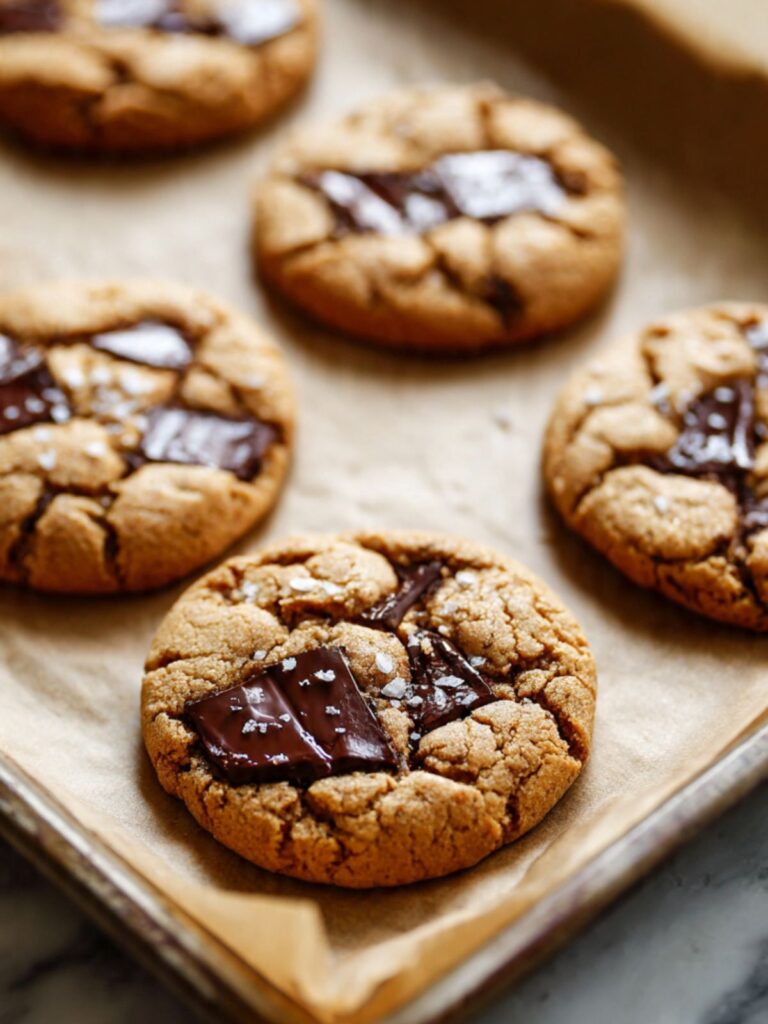
Bake for 11–13 minutes. Watch the edges, not the centers.
The edges should be: deep golden brown with visible rippled rings — set and slightly firm to the touch.
The centers should be: pale, puffy, and look underdone. They will finish cooking on the hot pan after you pull them from the oven. This is carryover cooking, and it’s non-negotiable for a fudgy center.
If the centers look fully set and matte in the oven, you’ve gone 2 minutes too long. Pull them earlier next time.
Every oven runs differently. Start checking at 11 minutes. The cookies in these photos were pulled at exactly 12 minutes.
Your cookies are done correctly when the edges show deep golden rippled rings and feel just set to the touch, while the centers still look pale, puffy, and slightly underdone — that’s exactly what you want coming out of the oven.
Step 8: Finish with Flaky Salt and Let Them Set
The moment your baking sheet comes out of the oven, set it flat on the stovetop or a heat-safe surface and immediately sprinkle flaky sea salt over each cookie while the chocolate is still molten.
As you can see in the photos, those large white flakes against the dark pooled chocolate are part of what makes these cookies look as good as they taste. Don’t skip this step.
Leave the cookies on the pan for 5 minutes. They’ll look too soft to move — that’s correct. The residual heat from the pan finishes the centers and firms up the edges without drying them out.
After 5 minutes, transfer to a cooling rack. The centers will look glossy and slightly sunken — that’s the fudgy interior setting into place.
Don’t move them before the 5-minute mark. The structure hasn’t been set yet and the cookies will fall apart.
The Science Behind the Best Brown Butter Chocolate Chip Cookies
These cookies aren’t complicated — but every ingredient is doing a specific job. Understanding why each element works the way it does means you can troubleshoot on the fly and nail the result every single time.
Why Brown Butter Changes Everything
Regular melted butter gives you a rich cookie. Browned butter gives you a complex one.
When butter heats past its melting point, the water evaporates and the milk solids begin to toast through the Maillard reaction — the same chemical process that browns bread crusts and seared meat. This creates hundreds of new flavor compounds that taste like toasted nuts, caramel, and toffee all at once.
There’s a structural bonus too. Browning the butter drives off moisture. Less water in the dough means less steam in the oven, which slows spread and contributes to that thick, fudgy center rather than a flat, crispy cookie.
The Role of the Brown Sugar Ratio
This recipe uses three parts brown sugar to one part white — and that ratio is intentional.
Brown sugar contains molasses, which is hygroscopic. It pulls moisture from the air and holds onto it inside the baked cookie. More brown sugar means a softer, more tender crumb that stays that way for days. White sugar, by contrast, promotes spread and crispiness. The small amount here is just enough to give the edges that deep golden color and slight crunch without drying out the center.
If you swap to equal parts, the cookies will be flatter and crispier. That’s a valid cookie — just not this one.
Egg Function: Structure, Richness, and Shine
Both whole eggs go into this dough, and the way you add them matters. Whisking the eggs into the warm butter-sugar mixture for a full 60–90 seconds does two things: it emulsifies the fat and liquid into a stable base, and it builds the protein network that holds the cookie together during baking.
That glossy, ribbon-like appearance after whisking is your visual confirmation that emulsification has happened. A broken or grainy mixture at this stage usually means the butter was too hot when the eggs went in — which is why the 8–10 minute cooling window in Step 1 matters.
Flour and Gluten: Why You Stop Mixing Early
All-purpose flour contains proteins that form gluten when they come into contact with moisture and agitation. A little gluten gives the cookie structure. Too much makes it tough.
The folding technique in Step 4 — gentle strokes from the bottom up, stopping the moment flour streaks disappear — keeps gluten development minimal. This is what gives you that tender, soft interior rather than a bready chew.
Spoon-and-level your flour if you’re measuring by volume. A packed cup of flour can weigh up to 160g instead of the intended 120g — that’s a 33% error that will make your cookies dense and dry.
Why Chunks Beat Chips Every Time
Chocolate chips are engineered to hold their shape. They contain added stabilizers that raise their melting point so they survive the oven intact.
Chunks cut from a dark chocolate bar have none of those stabilizers. They melt completely, spreading into the wide glossy pools you see on every cookie in these photos. Pressing reserved chunks on top — rather than folding all of them into the dough — means the chocolate is fully exposed to oven heat and melts into that visible, gooey surface layer.
For a complete breakdown of how chocolate percentage affects both flavor and spread across different cookie styles, my homemade chocolate chip cookies article covers that in detail.

Carryover Cooking and the Underbaked Pull
Pulling cookies from the oven when the centers still look soft is not a mistake — it’s the technique.
A hot baking sheet retains enough heat to continue cooking the cookie interior for 4–5 minutes after it leaves the oven. If you wait until the center looks fully set inside the oven, that carryover heat pushes it past done into dry and overbaked.
The fudgy, slightly sunken center visible in the broken cookie photo is the result of pulling at exactly the right moment and letting the pan do the rest of the work.
Troubleshooting & Pro-Tips
Common Mistakes
The cookies spread too thin and flat. This almost always comes down to one of three things: butter that was too warm when the dough came together, flour that was undermeasured, or dough that went onto a hot baking sheet. Let the browned butter cool fully before mixing. Weigh your flour. Always bake on a cool, room-temperature pan — if you’re doing multiple batches, let the sheet cool completely between rounds or use a second pan.
The cookies came out dry and cakey instead of fudgy. You either overbaked them or overmixed the dough after adding the flour. Pull the cookies when the centers still look underdone and puffy. They will finish on the pan. If your oven runs hot, start checking at 10 minutes. An oven thermometer is worth every penny.
The butter burned before it browned. The heat was too high. Brown butter needs medium heat and your full attention. A light-colored saucepan is non-negotiable — dark pans make it impossible to see the color of the milk solids. If the butter smells acrid or the bits look black instead of amber, start over. Burnt butter is bitter and it will carry through the entire cookie.
The dough looks greasy or broken after adding the eggs. The butter was still too hot when the eggs went in. Hot fat breaks the emulsion and you end up with a greasy, separated mess. Let the butter cool for the full 8–10 minutes — it should feel warm, not hot, when you touch the side of the bowl. If the dough looks broken, try whisking vigorously for another 60 seconds. Sometimes it comes back together.
The chocolate on top didn’t melt into pools. You used chips instead of chunks, or you didn’t press the reserved pieces firmly enough onto the dough balls before baking. Chips hold their shape by design. Use chopped dark chocolate bar and press the pieces at least halfway into the dough ball so they have full contact with the heat.
The cookies stuck to the pan. Always line with parchment or a silicone mat. Never grease the pan directly — a greased pan promotes excess spread and the cookies will be thinner and greasier on the bottom.
Expert Pro-Tips
Rest the dough for deeper flavor. The original recipe doesn’t require a rest, but if you have time, covering the dough and refrigerating it for 30–60 minutes before baking intensifies the flavor significantly. The rest allows the flour to fully hydrate and the sugars to deepen. Overnight in the fridge gives you an even richer, more complex cookie.
Use a cookie scoop for consistent sizing. Uniform dough balls bake evenly. If some balls are larger than others, smaller ones will overbake before the larger ones are done. A 3-tablespoon scoop gives you the bakery-size cookies shown in these photos.
Bang the pan once on the counter. Right when the cookies come out of the oven, lift the pan a few inches and drop it flat onto the counter. This deflates any excess puff in the center and creates a slightly denser, fudgier middle. It also encourages those rippled edges to form more dramatically.
Press extra chunks on immediately after baking too. If you want even more visible chocolate on top, press a few additional chunk pieces onto the cookies the moment they come out of the oven. The residual heat will melt them slightly and they’ll set as the cookie cools.
Salt while the chocolate is still molten. Flaky salt needs a sticky surface to adhere. If you wait until the cookies cool, the salt will slide off. Salt them within 30 seconds of pulling the pan from the oven.
Weigh everything. This recipe is forgiving but not infinitely so. Flour especially — a miscalculated cup can throw off the entire texture. A kitchen scale takes 10 seconds and removes all the guesswork.
How to Store Brown Butter Chocolate Chip Cookies
Room Temperature
Store baked cookies in an airtight container at room temperature for up to 5 days. Place a slice of white sandwich bread in the container — the cookies will absorb moisture from the bread and stay soft longer. Replace the bread slice after 2 days if needed.
Do not stack cookies directly on top of each other while they’re still warm. The residual heat creates steam inside the container and makes the bottoms soggy. Let them cool completely on the rack first.
Refrigerator
These cookies don’t need refrigeration and the fridge actually works against them — cold air dries out the crumb faster than room temperature storage does. If your kitchen is very warm or humid, a day or two in the fridge is fine, but bring them back to room temperature before eating. A cold cookie is a dense, waxy cookie. These are meant to be soft.
Freezer — Baked Cookies
Baked cookies freeze beautifully for up to 3 months. Let them cool completely, then layer them in an airtight freezer bag or container with parchment between each layer so they don’t freeze together. Thaw at room temperature for about 30 minutes. To reheat, microwave individual cookies for 15–20 seconds, or warm them in a 300°F (150°C) oven for 5–6 minutes until the centers are soft and the chocolate is molten again. Both methods work — the oven gives you slightly crisper edges, the microwave gives you faster gooey.
Freezer — Unbaked Dough
This is my preferred method. Scoop the dough into balls, press the reserved chocolate chunks on top, and freeze them on a parchment-lined baking sheet until solid — about 1 hour. Transfer to a freezer bag and store for up to 3 months.
Bake straight from frozen at 350°F (175°C) — no need to thaw. Add 2–3 minutes to the bake time and watch for the same visual cues: golden edges, soft and puffy center. Frozen dough balls also spread slightly less, giving you an even thicker cookie than the fresh-baked version.
Label the bag with the date and baking temperature so you’re not guessing later.
Serving Suggestion

These cookies are best eaten warm — either straight from the oven or reheated. A 10-second microwave blast brings a day-old cookie back to that fresh, gooey state.
Serve them on their own, alongside a cold glass of milk, or next to a strong cup of coffee or espresso. The bitterness of dark coffee cuts through the richness of the browned butter and makes the chocolate flavor sharper.
For a more indulgent serving, sandwich a scoop of vanilla ice cream between two cookies while they’re still slightly warm. The contrast of cold ice cream against the warm, fudgy cookie is one of those combinations that needs no explanation.
If you’re serving these at a gathering, pull them from the oven 20 minutes before guests arrive. They’ll still be warm, the chocolate will still be soft, and the smell alone will do most of the work.
Frequently Asked Questions
Why did my brown butter chocolate chip cookies spread too thin?
Spreading almost always comes down to one of three causes: butter that was too warm when the dough came together, flour that was undermeasured, or dough placed onto a hot baking sheet. Let the browned butter cool for the full 8–10 minutes before mixing. Weigh your flour — a packed cup can run 30–40g heavy, which throws off the entire texture. Always bake on a cool, room-temperature pan. If you’re running multiple batches, let the sheet cool completely between rounds or rotate to a second pan.
Can I make brown butter chocolate chip cookie dough ahead of time?
Yes — and resting the dough overnight is something I actively recommend. Refrigerating the dough for 30–60 minutes or up to 48 hours allows the flour to fully hydrate and the sugars to deepen into a more caramel-forward flavor. Pull the dough from the fridge 15–20 minutes before scooping so it softens enough to portion cleanly. The baked result will be slightly thicker and more complex than same-day dough.
What type of chocolate works best in brown butter chocolate chip cookies?
Dark chocolate bars in the 60–70% cacao range give the best balance of bitterness and sweetness against the brown sugar base. Chop them into irregular pieces — some fine, some large — so you get distributed chocolate throughout the dough and large gooey pools on top. Semi-sweet works well too. Milk chocolate is too sweet here and will make the cookies taste cloying rather than rich. Avoid chips — they contain stabilizers that prevent the full melt you see in these photos.
Can I use salted butter instead of unsalted?
You can, but reduce or eliminate the fine sea salt in the dough. Salted butter varies significantly in sodium content between brands, which makes it hard to control the final flavor. Unsalted butter gives you full control. If salted butter is all you have, skip the added salt in the dough entirely, taste before adding more, and keep the flaky salt finish — that’s where the salt impact matters most anyway.
Why did my cookies come out cakey and dry instead of fudgy?
Two likely causes: overbaking or overmixing after the flour went in. Pull the cookies when the centers still look puffy and underdone — they finish cooking on the hot pan for 5 minutes after you take them out. If the center looks fully set inside the oven, it will be dry once cooled. On the mixing side, stop folding the moment the last flour streak disappears. Every extra stroke develops gluten and pushes the texture toward bready rather than fudgy. Start checking at 10 minutes if your oven runs hot, and pull the moment the edges look set with a center that still has a faint jiggle.
Can I make these cookies gluten free?
Yes, with the right swap. Use a 1:1 gluten-free all-purpose flour blend that contains xanthan gum for binding — this is what holds the structure together in the absence of gluten development. The edges may not develop the same deep crispness and the crumb will be slightly more delicate, but the brown butter flavor holds up well. My gluten free chocolate chip cookies article walks through which blends perform best and what to expect from the texture.
More Recipes You’ll Love
If these brown butter chocolate chip cookies hit the spot, here are three more worth making:
- Chocolate Chip Cookie Bars— all the flavor of these cookies pressed into a pan and baked in one go. No scooping, no batches, done faster.
- Small Batch Chocolate Chip Cookies — the same brown butter method scaled down to 6 cookies. Perfect when you want fresh cookies without committing to a full batch.
- Brookie Recipe — half brownie, half cookie, baked together in one pan. If you love the fudgy center on these cookies, this one is worth bookmarking.

Brown Butter Chocolate Chip Cookies
Ingredients
Equipment
Method
- Place a light-colored medium saucepan over medium heat, add the butter, and cook stirring constantly until the milk solids turn deep amber and the butter smells nutty, about 3–5 minutes, then pour immediately into a large mixing bowl scraping all the browned bits, and cool for 8–10 minutes.
- Add the brown sugar and granulated sugar to the warm browned butter and whisk vigorously for 1 minute until smooth, glossy, and no dry sugar remains.
- Add the eggs and vanilla extract and whisk for 60–90 seconds until the mixture is thick, shiny, and falls off the whisk in a slow ribbon.
- Sprinkle the flour, baking soda, and fine sea salt over the mixture and fold gently with a rubber spatula just until no dry flour streaks remain, stopping immediately once combined.
- Reserve ⅓ cup (55g) of the chocolate chunks in a small bowl, then fold the remaining chunks into the dough until evenly distributed.
- Preheat oven to 350°F (175°C) and line a baking sheet with parchment paper.
- Scoop dough into balls of about 3 tablespoons (75g) each and space at least 3 inches apart on the prepared sheet.
- Press 3–4 reserved chocolate chunks firmly onto the top of each dough ball.
- Bake for 11–13 minutes until the edges are deep golden with rippled rings and the centers still look soft, puffy, and underdone.
- Immediately sprinkle flaky sea salt over each cookie, let cool on the pan for 5 minutes, then transfer to a cooling rack.