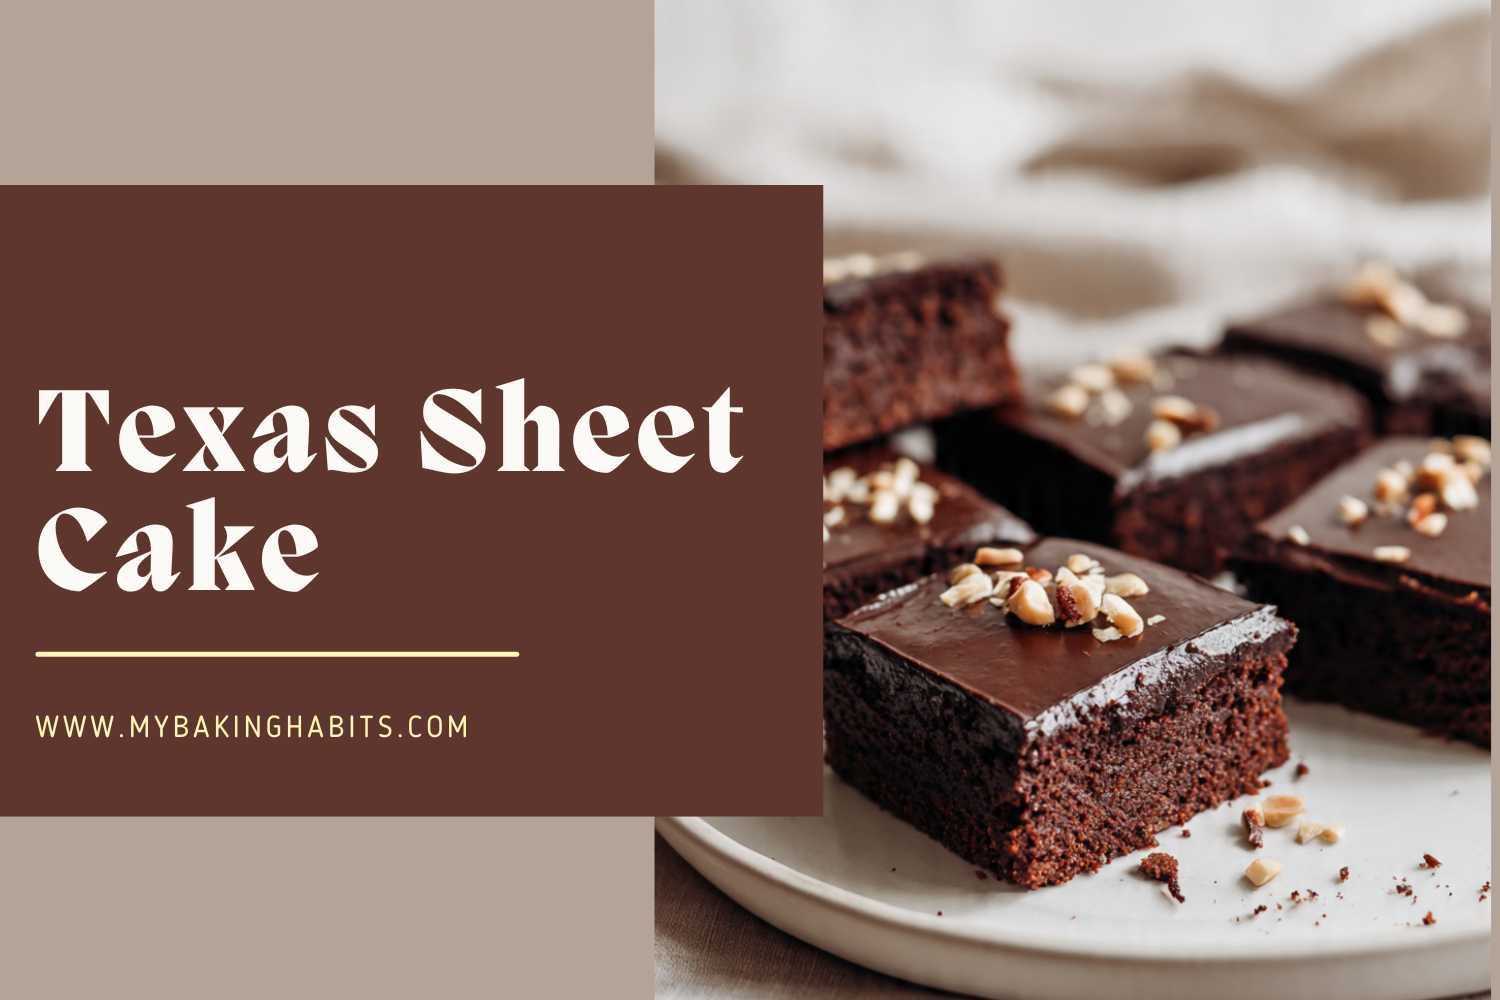
Moist Texas Sheet Cake Recipe
I have made this Texas sheet cake more than thirty times across three years of testing — potluck versions, birthday versions, one deeply caffeinated midnight version — and I have fixed every specific way it fails before it ever reaches the table. The problem with most Texas sheet cake recipes is not the cake itself. It is the icing: poured too late, made with lumpy unsifted powdered sugar, or built around the wrong cocoa.
Every one of those failures produces a different bad result, and every one of them is preventable if you know what to look for.
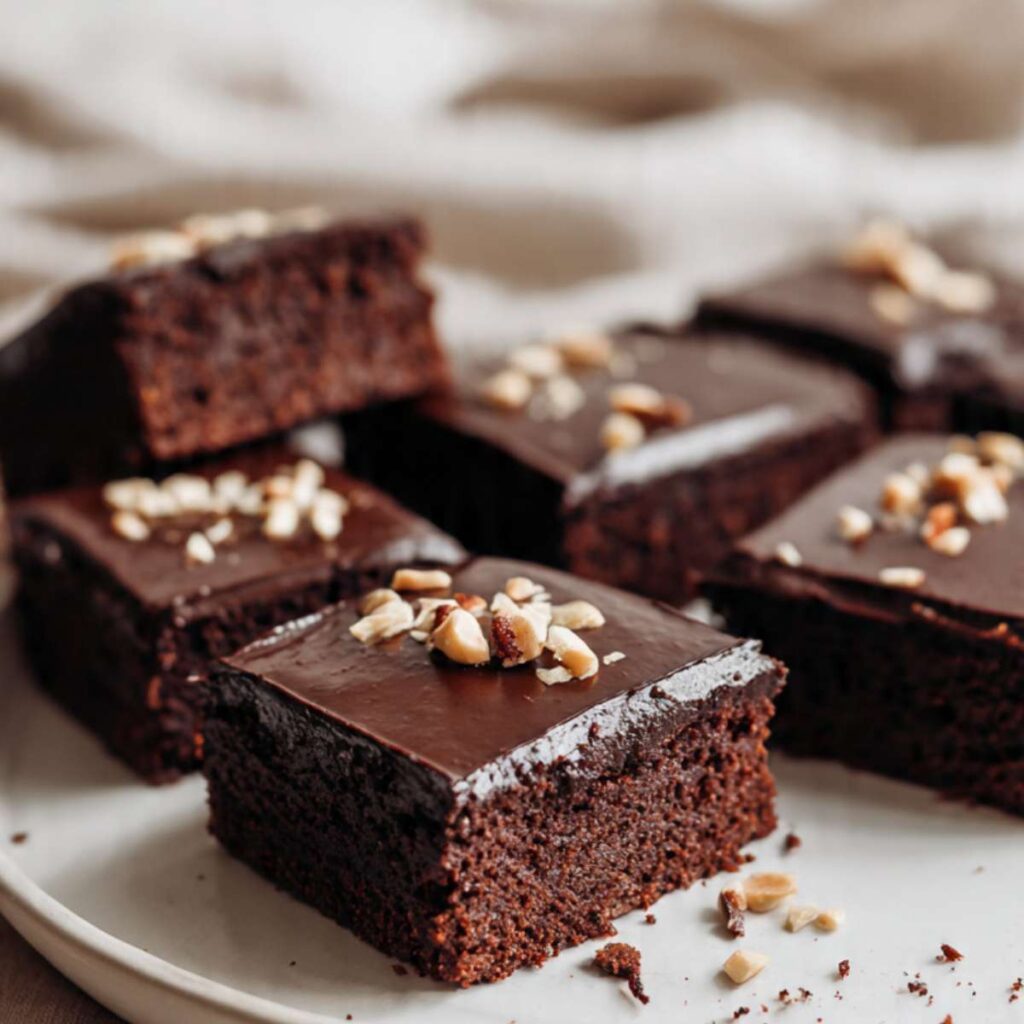
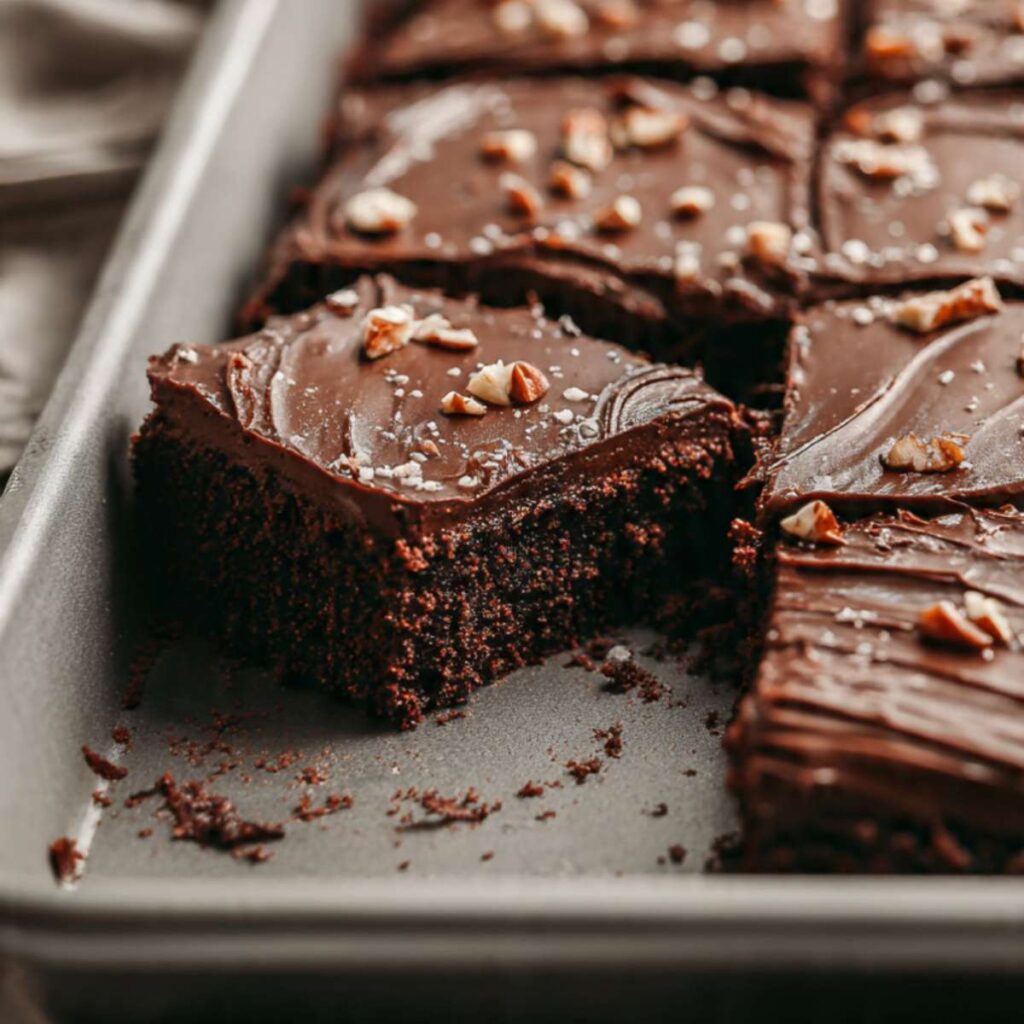
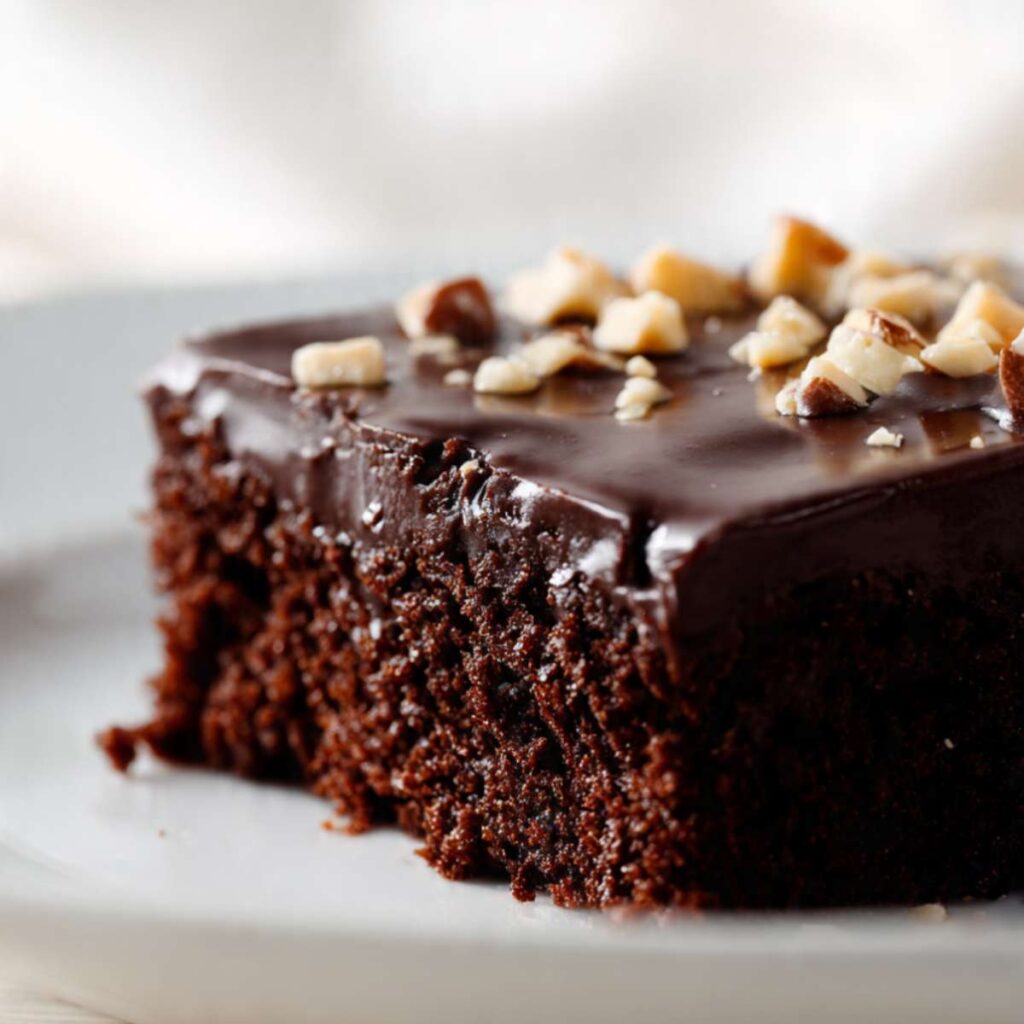
The crumb is what gets people when they first slice into it. It is dense and deeply chocolatey — not light and airy like a layer cake, not fudgy like a brownie. It is its own texture entirely: tight, moist, and tender all the way through, with no dry corners and no gummy center. If you look at the cross-section of the sliced square in the hero photo above, that fine, even dark crumb is exactly what you are working toward.
The icing sets into a smooth, thick fudge layer — the kind that cracks slightly when you slice through it and stays glossy for two days on the counter. The roughly chopped toasted pecans press gently into the warm icing and anchor there as it sets, adding a faint crunch against that soft cake.

I tested this with Dutch-process cocoa versus natural unsweetened cocoa — same recipe, same quantities, side by side. The Dutch-process version looked dramatic: deeply dark and nearly black. But the cake baked noticeably flatter and denser because baking soda needs an acid to activate, and Dutch-process cocoa has had its acidity neutralized. The natural cocoa version had better lift, a more open crumb, and the flavor that tastes like the Texas sheet cake I grew up eating. That is the version in this recipe, and the cocoa type is non-negotiable.
I tested the icing at three specific powdered sugar amounts: 3 cups (360g), 3½ cups (420g), and 4 cups (480g). At 3 cups, the icing was glossy and gorgeous but stayed fluid — it never set firm enough to slice cleanly and smeared across every cut. At 4 cups, it stiffened in the saucepan before I could spread it across the full pan and set with a slightly grainy surface texture. At 3½ cups (420g), the icing flowed exactly right across the hot cake, reached every edge in under 10 seconds, and set to the smooth, fudge-like finish visible in the photos. That is the number in this recipe.
No mixer. No chilling. No resting. This entire recipe comes together with one large mixing bowl, one saucepan, and a whisk. The batter goes straight from bowl to pan to oven.
🗒 Luna’s Note: I bake this in a light-colored aluminum half-sheet pan every single time. I tested it once in a dark non-stick pan and the bottom overbrowne before the center was done. Light aluminum is not optional here — it is the reason the cake bakes evenly from edge to edge.
| Prep Time | Cook Time | Total Time | Yield | Difficulty |
|---|---|---|---|---|
| 20 min | 25 min | 45 min + 1 hr cooling | 20 squares | Easy |
| Calories | Fat | Carbs | Sugar | Protein |
|---|---|---|---|---|
| ~310–370 kcal | ~14–17g | ~44–53g | ~33–42g | ~3g |
Macros are approximate and will vary based on ingredient brands, whether nuts are included, and serving size. Calculated with pecans included.
Ingredients & Tools for Texas Sheet Cake Recipe
For the Cake
- 2 cups (240g) all-purpose flour (spooned into the measuring cup and leveled — or weighed at 240g)
- 2 cups (400g) plain white granulated cane sugar
- ¼ cup (25g) natural unsweetened cocoa powder, checked for freshness — not Dutch-process
- 1 tsp (6g) baking soda, checked for freshness
- ½ tsp (3g) fine sea salt
- 1 cup (226g / 2 sticks) unsalted butter
- 1 cup (240ml) whole milk (3.5% fat)
- ¼ cup (25g) natural unsweetened cocoa powder (second addition — goes into the saucepan with the butter and milk)
- 2 large eggs (approximately 50g each without shell), room temperature
- 1 tsp (5ml) pure vanilla extract
For the Chocolate Fudge Icing
- ½ cup (113g / 1 stick) unsalted butter
- 6 tablespoons (90ml) whole milk (3.5% fat)
- 3 tablespoons (18g) natural unsweetened cocoa powder — not Dutch-process
- 3½ cups (420g) powdered sugar (confectioners sugar), sifted
- 1 tsp (5ml) pure vanilla extract
- ½ cup (55g) roughly chopped toasted pecans or toasted walnuts (optional — but visible in the photos)
- ½ tsp flaked sea salt such as Maldon (optional — for finishing, visible in the photos)
Before You Start
Eggs — room temperature: Pull your 2 large eggs from the refrigerator 30 minutes before you begin. Cold eggs added to a warm chocolate batter can cause the mixture to look streaky and uneven. If you are short on time, place the eggs in a bowl of warm (not hot) water for 10 minutes.
Cocoa powder — natural only: This recipe uses natural unsweetened cocoa powder in both the dry ingredients and the saucepan liquid. Natural cocoa is slightly acidic, and that acidity is what activates the baking soda and gives this cake its tender crumb and lift. Dutch-process cocoa has had its acidity neutralized — using it here without adjusting the leavening will produce a flatter, denser cake. Check your label before you start.
Freshness check — cocoa powder: Open the container and smell it. Fresh cocoa smells deeply chocolatey and slightly sharp. If it smells flat, dusty, or faintly like old cardboard, replace it. Stale cocoa is the most common reason Texas sheet cake tastes flat even when made correctly.
Freshness check — baking soda: Drop ½ tsp (3g) baking soda into a small bowl with a splash of hot water and a splash of white vinegar. It should bubble aggressively within 2 seconds. If it fizzes weakly or not at all, replace the box before you bake.
Flour measuring method: Spoon the flour into your measuring cup using a separate spoon and level it off with a straight edge. Do not scoop the cup directly into the bag — scooping packs in 20–30% more flour than the recipe calls for and will make the cake dry and dense. For guaranteed accuracy, weigh the flour at 240g on a kitchen scale.
Gram weight priority: For the most consistent results, use a kitchen scale set to grams. The gram weights in this recipe are what I tested with — they are the most reliable way to match my result exactly.
Powdered sugar — sift before measuring: Lumpy powdered sugar produces a grainy icing that will not spread smoothly. Sift it before adding it to the saucepan.
Nuts — toast before using: Raw pecans or walnuts taste flat against the deep chocolate icing. Spread them on a dry skillet over medium heat and toast for 3 to 4 minutes, stirring constantly, until they smell nutty and fragrant. Pour immediately onto a cutting board, cool for 5 minutes, then roughly chop. The chop size visible in the photos is approximately ¼ inch (6mm) pieces — not fine, not halved.
Pan preparation: You will need one 18×13 inch (46x33cm) rimmed half-sheet baking pan, light-colored aluminum. Grease the bottom and sides thoroughly with softened butter or non-stick spray. Do not use parchment — this cake is sliced and served directly from the pan. A dark non-stick pan will overbrown the bottom before the center is done. If you only have a glass or ceramic baking dish, reduce the oven temperature to 325°F (165°C). Glass and ceramic retain heat longer than aluminum — at 350°F (175°C) they will overbake the edges before the center sets. The bake time will also increase by 5 to 8 minutes — use the spring-back test, not the clock, to determine doneness.
Oven rack position: Position your oven rack in the middle of the oven before preheating. Top rack burns the surface before the interior sets. Bottom rack overbrowns the base.
Mixing method: This entire recipe comes together with a large mixing bowl, a sturdy whisk, and one medium saucepan. No electric mixer needed at any stage.
Timing note: The icing must go onto the cake the moment it comes out of the oven. Have all icing ingredients measured and ready before the cake goes into the oven. You do not have time to measure mid-bake.
Necessary Tools
Required:
- Kitchen scale (strongly recommended — gram weights are more accurate than volume)
- Large mixing bowl
- Medium saucepan (used twice — once for the cake liquid, once for the icing)
- Sturdy whisk
- Silicone spatula or wooden spoon
- 18×13 inch (46x33cm) rimmed half-sheet baking pan, light-colored aluminum
- Wire cooling rack
- Small skillet (for toasting nuts)
- Sharp knife for slicing
Optional:
- Oven thermometer (recommended — most home ovens run 15–25°F / 8–14°C off from the dial setting)
- Offset spatula (helpful for spreading the icing to the edges quickly)
- Fine mesh sieve (for sifting powdered sugar)
How to Make Texas Sheet Cake
This recipe uses the melt-and-mix method — no creaming, no electric mixer. The dry ingredients are combined first, a hot chocolate-butter liquid is poured in, then eggs are added last. Follow the order exactly — adding eggs to the hot liquid before it hits the dry ingredients will scramble them.
Step 1: Preparing the Oven and Pan
Position your oven rack in the middle slot before turning on the heat. Set the oven to 350°F (175°C) and allow it to fully preheat — at least 15 minutes. Most home ovens run 15–25°F (8–14°C) off from the dial setting. If you have an oven thermometer, confirm the actual temperature before the pan goes in.
While the oven heats, grease your 18×13 inch (46x33cm) rimmed light-colored aluminum half-sheet pan thoroughly with softened butter or non-stick spray. Coat the bottom and all four sides, paying extra attention to the corners where the cake is most likely to stick. Do not line with parchment — this cake is sliced and served directly from the pan.
This entire recipe uses no electric mixer at any stage — just a large mixing bowl, a sturdy whisk, and one medium saucepan. Have both ready before you begin mixing.
The pan should look evenly coated with a thin film — not pooling, not dry in any spot. Run your finger along a corner. If it comes away clean with no resistance, the pan needs more grease.
Do not use a dark non-stick pan — it absorbs more heat and will overbrown the bottom before the center sets. Do not use glass or ceramic at 350°F (175°C) — reduce the temperature to 325°F (165°C) if that is all you have, and add 5 to 8 minutes to the bake time.
Your oven should be fully preheated and your pan greased and ready before you begin mixing the batter.
Step 2: Combining the Dry Ingredients

In your large mixing bowl, add 2 cups (240g) all-purpose flour (spooned and leveled), 2 cups (400g) plain white granulated cane sugar, ¼ cup (25g) natural unsweetened cocoa powder, checked for freshness — not Dutch-process, 1 tsp (6g) baking soda, checked for freshness, and ½ tsp (3g) fine sea salt.
Whisk the dry ingredients together using your sturdy whisk for approximately 30 seconds, using wide circular strokes from the bottom of the bowl upward. You are not just combining — you are distributing the baking soda and cocoa evenly through the flour so the cake bakes with consistent color and lift throughout.
The granulated sugar in this step does more than sweeten — it is hygroscopic, meaning it actively retains moisture during and after baking. This is a significant reason this cake stays tender and moist for days after it comes out of the oven.
The mixture should look uniformly dark brown with no white flour streaks and no visible clumps of cocoa powder. If you see pale streaks, whisk for another 15 seconds and check again.
Do not add the eggs at this stage — they go in after the hot liquid has been combined with the dry ingredients and the mixture has cooled through contact. Adding them now will produce a thick, unworkable paste when the hot liquid hits.
Your dry ingredients are now evenly combined and ready for the chocolate liquid.
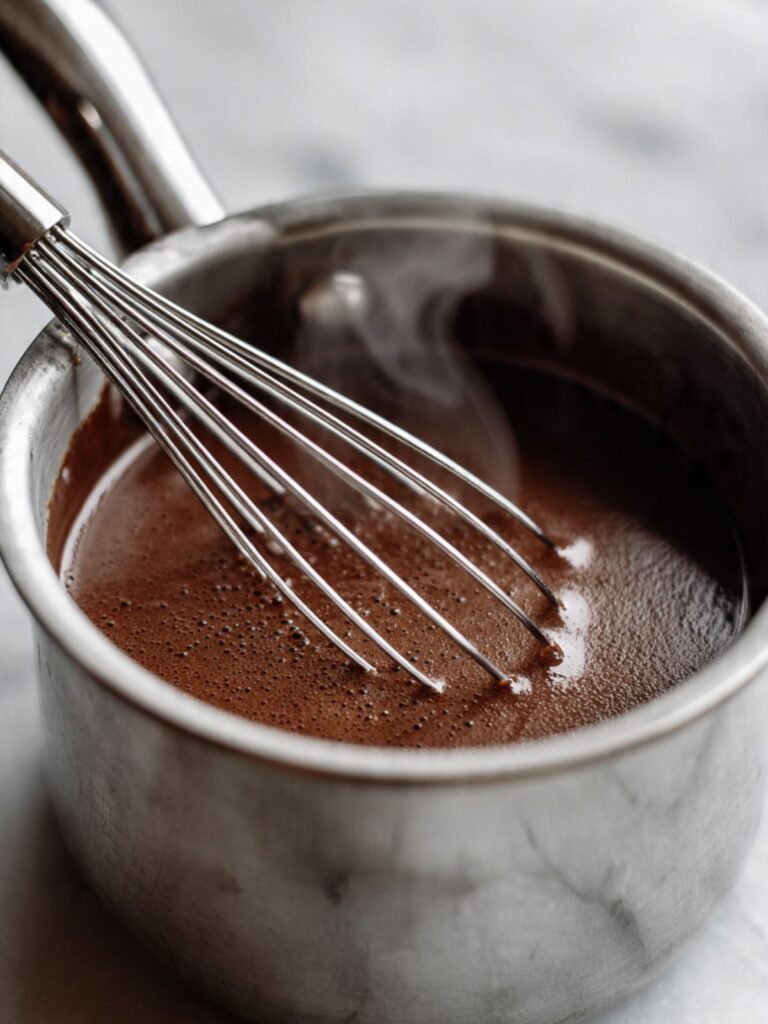
Step 3: Making the Chocolate Cake Liquid
In your medium saucepan over medium heat, combine 1 cup (226g / 2 sticks) unsalted butter, 1 cup (240ml) whole milk (3.5% fat), and the second ¼ cup (25g) natural unsweetened cocoa powder, checked for freshness — not Dutch-process.
Stir constantly with your whisk as the mixture heats — the butter will melt first, then the cocoa will begin to dissolve into the milk and butter. Keep the heat at medium and keep stirring. This process takes approximately 4 to 6 minutes.
The cocoa dissolves into the fat and milk here rather than into the dry flour mixture, which ensures the finished cake has a smooth, even chocolate flavor throughout with no dry cocoa pockets. This is the step that gives Texas sheet cake its distinctive rich, dark flavor compared to standard cocoa cakes where the cocoa goes straight into the dry mix.
The mixture should look completely smooth, glossy, and uniformly dark — like a thin hot chocolate with no visible graininess or separation. If you see butter floating separately on the surface, the heat is too high. Reduce it and whisk until the mixture comes back together.
Do not let this mixture boil — boiling milk scorches and develops an off flavor. Remove the saucepan from the heat the moment you see the first small bubbles forming at the edges.
Your chocolate liquid is ready when it looks glossy, smooth, and smells deeply of warm chocolate. Move immediately to Step 4.
Step 4: Combining the Batter and Adding the Eggs
Pour the warm chocolate liquid from the saucepan directly into the bowl of dry ingredients. Pour slowly and steadily, not all at once — a too-fast pour creates hot spots that can partially cook the flour at the bottom before it is incorporated.
A note on method order: standard melt-and-mix recipes cool the fat below 90°F (32°C) before adding eggs directly to the liquid. This Texas sheet cake deviates from that order by pouring the hot liquid into the dry ingredients first — which cools the mixture rapidly through contact with room-temperature flour and sugar — and then adding the eggs to the cooled combined batter. The result is the same safety outcome (eggs never hit fat hot enough to scramble) with the added benefit that the dry ingredients begin absorbing the chocolate liquid immediately, producing a more uniformly flavored crumb.
Using your sturdy whisk, stir from the bottom of the bowl upward in wide, deliberate strokes — approximately 20 to 25 strokes — until the batter looks completely smooth and uniform. The batter will be noticeably thin and pourable. This is correct for Texas sheet cake and is what produces the even, tender crumb visible in the side-profile photos. Do not add more flour to compensate.
Now add 2 large eggs (room temperature) and 1 tsp (5ml) pure vanilla extract. Whisk just until the eggs disappear into the batter — approximately 10 to 15 strokes. Stop as soon as the batter looks uniform.
The eggs provide structure through protein coagulation during baking — they are what holds the cake together when sliced into clean squares. The vanilla rounds out the chocolate flavor and adds depth without competing with the cocoa.
🗒 Luna’s Note: I always crack my eggs into a small bowl before adding them to the batter. One rogue shell fragment in a thin batter is much harder to fish out than in a thick dough.
The finished batter should look smooth, glossy, and thin enough to pour easily — similar in consistency to a thick chocolate milk. No lumps, no dry streaks, no visible egg whites.
Do not overmix after the eggs go in. Overmixing at this stage develops gluten in the already-hydrated flour, which produces a tough, dense crumb instead of the tender texture visible in the cross-section photos.
Your batter is complete. Move immediately to Step 5.
Step 5: Pouring and Baking the Cake
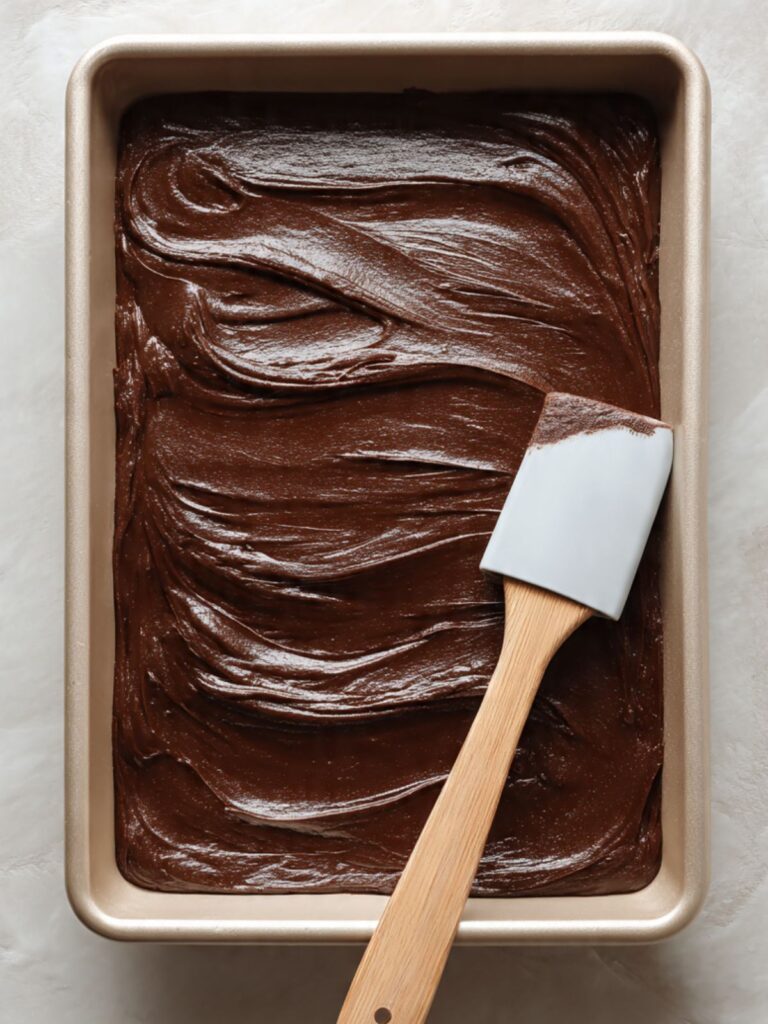
Pour the batter into your prepared 18×13 inch (46x33cm) greased half-sheet pan. Use your silicone spatula to guide the batter toward the corners and spread the surface flat. The batter is thin and self-levels quickly — you should not need more than 4 to 5 spatula strokes to get an even surface.
Place the pan on the middle rack of your 350°F (175°C) oven. Bake for 20 to 25 minutes — start checking at the 20-minute mark.
The cake is done when the surface looks completely set and matte across the entire pan — no wet or shiny patches in the center. Press the center of the cake lightly with one fingertip. It should spring back immediately and cleanly, leaving no indentation. The edges will have pulled very slightly from the sides of the pan.
The top of the finished cake should look exactly like the full pan overhead photo — evenly dark, completely smooth and matte across every square inch, with no wet center and no visible cracks from overbaking. This is the moment to pull it.
Do not open the oven before the 20-minute mark — the thin batter is sensitive to temperature drops and can sink in the center if the oven loses heat mid-bake. Do not overbake — an extra 5 minutes dries this cake out significantly and tightens the crumb.
🗒 Luna’s Note: I set two timers — one at 20 minutes to check and one at 25 minutes as a hard stop. The cake has never needed the full 25 minutes in my oven, but I never trust myself to remember without the backup timer.
The cake comes out of the oven and the icing goes on immediately. Do not let the cake cool before icing — move directly to Step 6.
Step 6: Making the Chocolate Fudge Icing
Start this step while the cake is in its last 5 to 8 minutes of baking. The icing and the cake must both be warm at the moment they meet — timing is everything.
In your medium saucepan (wiped clean from Step 3) over medium heat, combine ½ cup (113g / 1 stick) unsalted butter, 6 tablespoons (90ml) whole milk (3.5% fat), and 3 tablespoons (18g) natural unsweetened cocoa powder, checked for freshness — not Dutch-process.
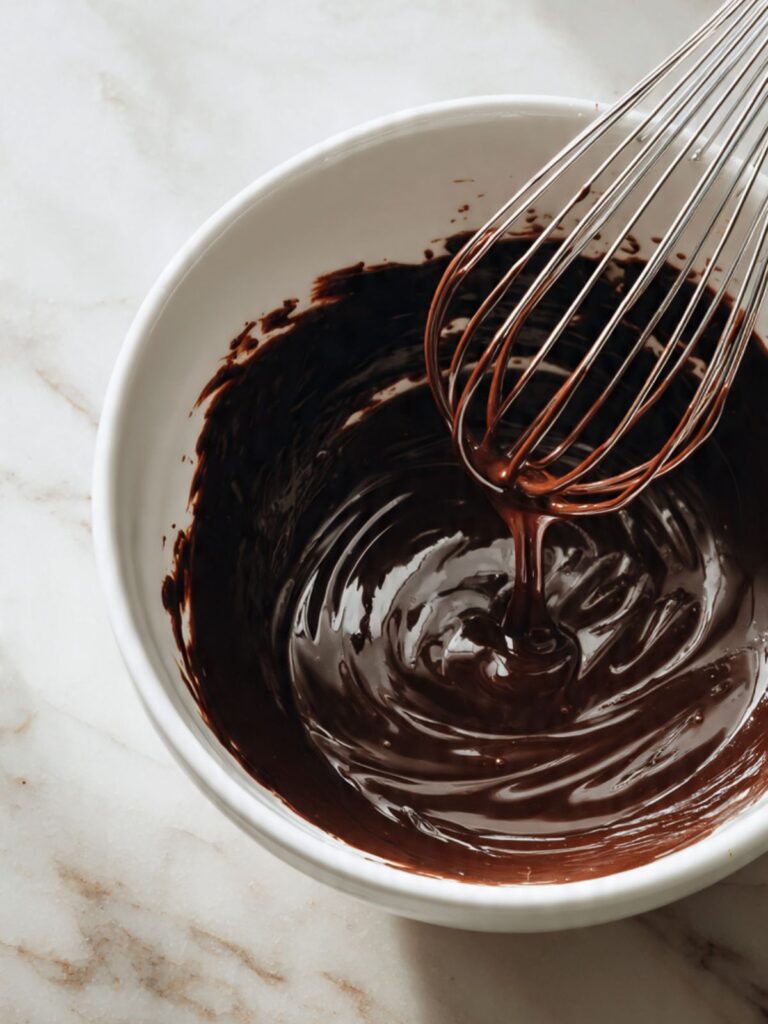
Whisk constantly over medium heat for 3 to 4 minutes until the butter is fully melted and the mixture is completely smooth and glossy — the same visual standard as the cake liquid in Step 3. Remove from heat.
Add 3½ cups (420g) sifted powdered sugar and 1 tsp (5ml) pure vanilla extract. Whisk vigorously from the bottom of the saucepan upward until the icing is completely smooth, thick, and glossy — approximately 30 to 45 seconds of active whisking. There should be zero lumps.
The powdered sugar must be sifted before it goes in. Unsifted powdered sugar contains clumps that do not dissolve into the warm icing and produce a grainy texture that sets permanently. Once the icing sets grainy, there is no fixing it.
The icing should look glossy and thick but still fluid enough to pour — it should fall from the whisk in a slow, thick ribbon, not drip in thin streams and not sit in a stiff mound. If it is too thick to pour, whisk in an additional tablespoon (15ml) of warm milk. If it is too thin, whisk in 2 to 3 tablespoons (15–22g) of additional sifted powdered sugar.
Do not let the icing sit — it begins to set as it cools. Move immediately to Step 7.
Step 7: Icing the Hot Cake and Adding the Nuts and Salt
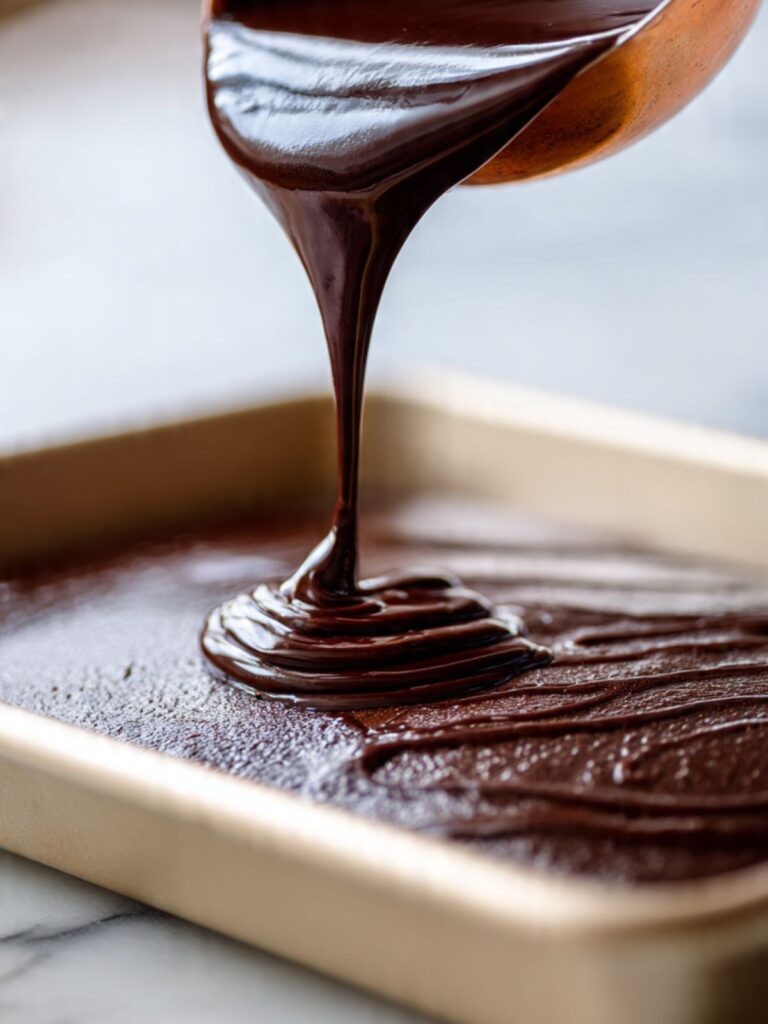
The moment the cake comes out of the oven, place the pan on a wire cooling rack. Pour the warm icing directly and immediately over the surface of the hot cake. Begin pouring from the center and work outward.
Using your offset spatula or silicone spatula, spread the icing gently toward the corners and edges with slow, smooth strokes — 6 to 8 strokes maximum. The heat from the cake will do most of the work — the icing flows easily on a hot surface. You are guiding it, not forcing it.
The heat from the cake melts the very top layer of the baked crumb slightly, allowing the icing to bond to the surface rather than sit on top of it. This is what creates the fudge-like set visible in the close-up slice photos — a distinct layer that is part of the cake, not a separate frosting sitting above it.
The iced surface should look like the overhead pan photo — completely smooth and glossy from edge to edge, with no bare cake visible anywhere and no thick pooling at the edges. As you can see in that overhead flat lay, every square has an unbroken, even icing surface across the full pan.
If you are using nuts, scatter ½ cup (55g) roughly chopped toasted pecans or walnuts over the surface of the icing immediately while it is still warm and fluid. If you are using flaked sea salt — visible as the white crystals alongside the nuts in the in-pan photos — scatter approximately ½ tsp (2g) Maldon-style flakes across the surface at the same time. Use Maldon or a similar large-flake salt only. Fine salt dissolves into the warm icing and disappears — it will not produce the visible crystals or faint crunch shown in the photos.
Press the nuts in very gently with your fingertips — just enough to anchor them. Do not wait — once the icing begins to set, the nuts and salt will not adhere properly.
Do not refrigerate to speed up the setting process — the temperature shock dulls the glossy surface finish and can cause condensation on the icing.
Your Texas sheet cake is iced, topped, and ready to rest. Move to Step 8.
Step 8: Resting and Portioning — Cutting 20 Even Squares
Leave the iced cake on the wire cooling rack undisturbed at room temperature for a minimum of 1 hour before cutting. Do not refrigerate to speed this up.
Here is what is happening during that hour: the cake carries residual heat from the oven for the first 15 to 20 minutes after it comes out. That carryover heat continues setting the crumb structure — the interior is still firming up while the icing is hardening on top. Cutting too early means the crumb has not fully set and slices will compress and tear rather than cut cleanly. The icing will still be fluid underneath and will smear across the cut surface. At 1 hour, both the crumb and the icing have completed their set and the knife will go through cleanly.
To cut 20 even squares from an 18×13 inch (46x33cm) half-sheet pan: score 4 cuts along the long dimension (creating 5 columns) and 3 cuts along the short dimension (creating 4 rows). 5 columns × 4 rows = 20 squares, each approximately 3.25 x 3.25 inches (8x8cm). Use a ruler or the tip of your knife to mark the cut lines lightly on the icing before making full cuts — this ensures even squares and prevents the icing from cracking asymmetrically across adjacent squares.
🗒 Luna’s Note: I use a bench scraper rather than a knife for the first score pass on the icing. One firm downward press along a ruler gives a cleaner icing line than dragging a knife blade. Then I finish with a sharp chef’s knife for the full cut through the crumb.
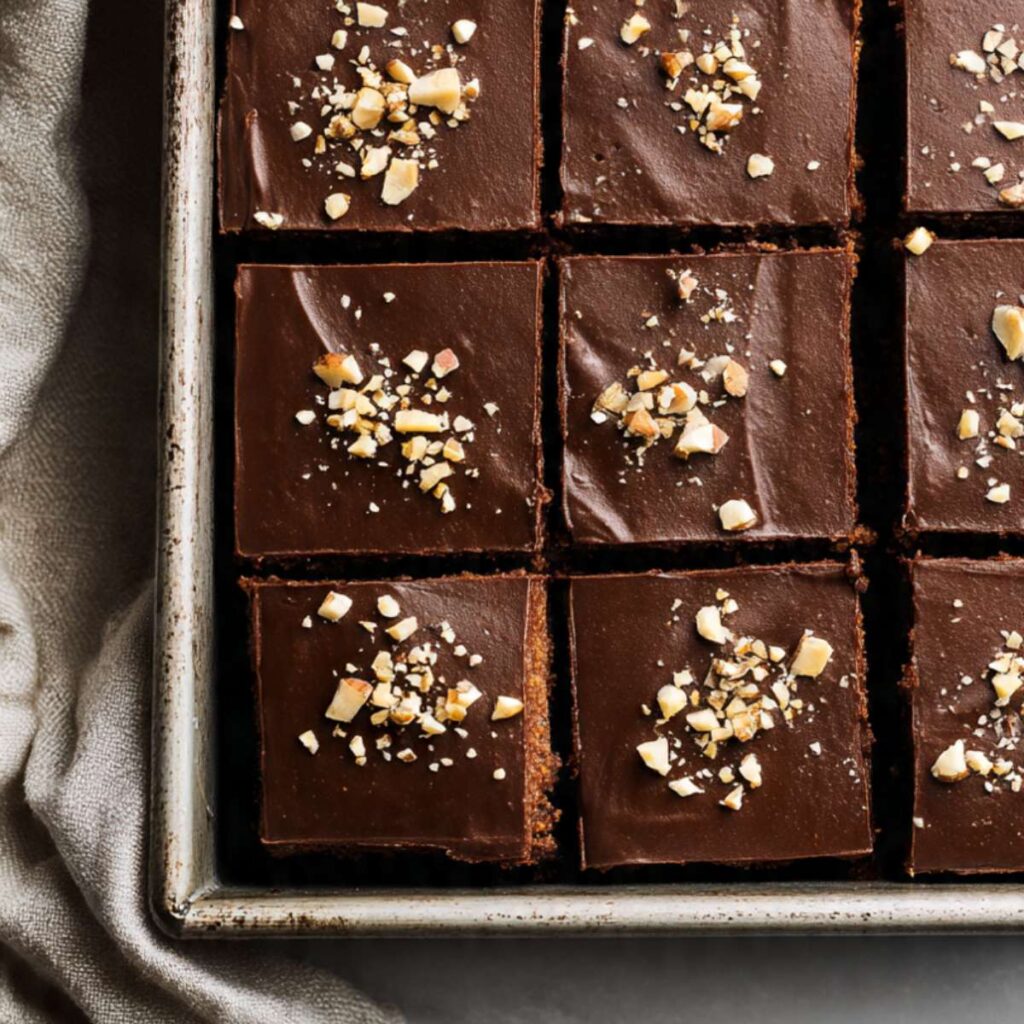
The cut squares should look exactly like the overhead pan photo — clean straight edges, unbroken icing surface on every square, and uniform size across all 20. Each square weighs approximately 95 to 105g with nuts, or 80 to 90g without.
Wipe the blade clean with a damp kitchen towel after every single cut. A blade coated in icing from the previous cut will drag and tear the next slice rather than cutting through it cleanly.
Your Texas sheet cake is cut, portioned, and ready to serve directly from the pan.
The Science Behind Texas Sheet Cake
Why Natural Cocoa Powder — Not Dutch-Process — Is Non-Negotiable Here
Natural unsweetened cocoa powder is slightly acidic, with a pH of around 5 to 6. Baking soda is a base. When they meet in the batter, they react and produce carbon dioxide bubbles — those bubbles are what gives this cake its lift and tender crumb. Dutch-process cocoa has been treated with an alkali to neutralize its acidity, raising its pH to around 7 or 8. That means when you use Dutch-process cocoa in a recipe that calls for baking soda, there is no acid for the baking soda to react with, no carbon dioxide is produced, and the cake bakes flat and dense. The difference is not subtle — I have tested both side by side, and the Dutch-process version produced a noticeably shorter, denser cake with a tighter, more compressed crumb. The natural cocoa version gave the open, moist crumb visible in the cross-section photos. This is the single most important ingredient decision in this recipe.
Why the Icing Goes On While the Cake Is Still Hot
Pouring warm icing onto a hot cake is not a shortcut — it is the technique that defines Texas sheet cake. When the hot icing meets the hot cake surface, two things happen simultaneously. First, the residual heat from the cake keeps the icing fluid long enough to flow and self-level across the entire surface without requiring heavy spreading. Second, the top layer of the baked cake absorbs a small amount of the warm icing before it sets — this is what creates the fused, fudge-like bond between cake and icing that you see in the close-up slice photos. The icing is not sitting on top of the cake as a separate layer the way a spread frosting would. It has partially melted into the surface. Allowing the cake to cool before icing produces a completely different result — the icing sets before it can flow, requires aggressive spreading that tears the cake surface, and never achieves that smooth, bonded finish. If you want the result in these photos, the timing is not flexible. For a deeper look at how chocolate-based frostings and icings behave differently depending on application temperature, my chocolate dump cake covers the same principle in a poured ganache context.
How the Thin Batter Produces a Moist Crumb Without Being Dense
Texas sheet cake batter is noticeably thinner than standard cake batter. That thinness is not an accident — it is the mechanism behind the texture. Because the batter spreads so evenly across a large pan, the cake bakes in a shallow, uniform layer approximately 1 to 1.5 inches (2.5–3.8cm) tall. That shallow depth means heat penetrates evenly from the top and bottom simultaneously, and the entire cake reaches the correct internal temperature at the same time — no dry edges waiting for the center to catch up, no underdone center while the edges overbake. The high sugar content reinforces this: sugar is hygroscopic, meaning it actively draws and retains moisture from the surrounding environment. Even after the cake cools completely, the sugar is still holding onto moisture within the crumb structure — which is why Texas sheet cake tastes as good on day two as it does the day it is made.
🗒 Luna’s Note: I have eaten this cake at room temperature, slightly warm, and straight from the fridge. The texture I keep coming back to is room temperature on day two — the icing has fully set, the crumb has settled, and the chocolate flavor has deepened overnight in a way that fresh-baked just does not match.
Texas Sheet Cake Troubleshooting & Pro-Tips
Common Mistakes
Using Dutch-Process Cocoa Instead of Natural Unsweetened Cocoa
Symptom: The cake bakes noticeably flatter and denser than expected. The crumb looks compressed and tight rather than open and moist. The chocolate flavor tastes deeper in color but flatter in actual taste.
Cause: Dutch-process cocoa has had its natural acidity neutralized. This recipe relies on the acid in natural cocoa to activate the baking soda. Without that reaction, no carbon dioxide is produced, and the cake has no lift mechanism.
Immediate fix: If you have already baked with Dutch-process cocoa and the cake is flat, there is no fix — the leavening window has passed. The cake is still edible but will be denser than intended.
Prevention: Check your cocoa label before you start. Natural unsweetened cocoa will say “natural” or simply “unsweetened cocoa powder.” Dutch-process will say “Dutch-process,” “alkalized,” or “European-style.” When in doubt, smell it — natural cocoa smells sharp and slightly fruity. Dutch-process smells darker and earthier.
Using the Wrong Pan Size
Symptom: The cake is significantly thicker than the photos show, takes much longer to bake, and the center is underdone when the edges are already set. Or the cake is paper-thin and overbakes in under 15 minutes.
Cause: This recipe is calibrated for an 18×13 inch (46x33cm) half-sheet pan. A 9×13 inch (23x33cm) pan produces a cake twice as thick that requires 35 to 45 minutes of baking time. A quarter-sheet pan produces a cake so thin it overbakes before the structure sets.
Immediate fix: If you used a 9×13 inch (23x33cm) pan, check doneness at 35 minutes by pressing the center — it should spring back cleanly. Add time in 5-minute increments until it does.
Prevention: Measure your pan before you start. An 18×13 inch (46x33cm) half-sheet pan is a standard size available at any kitchen supply store and most grocery stores. It is worth owning if you bake for groups regularly.
Expired or Weak Baking Soda
Symptom: The cake bakes flat with a dense, compressed crumb and no spring when pressed. The surface does not look set — it looks slightly sunken and tight.
Cause: Baking soda loses its potency after 3 to 6 months once opened. Even baking soda that is within its printed date can be weak if the box has been stored near moisture or heat.
Immediate fix: Once baked with dead baking soda, the cake cannot be fixed. It is still edible — dense, but edible.
Prevention: Run the freshness test before every bake. Drop ½ tsp (3g) baking soda into a small bowl with a splash of hot water and a splash of white vinegar. It should bubble aggressively within 2 seconds. Weak fizz or no fizz means replace the box.
Grainy or Stiff Icing
Symptom: The icing looks lumpy or grainy as you pour it. It sets with a rough, matte surface instead of the smooth, glossy finish in the photos. Or it stiffens before you can spread it to the edges.
Cause: Either the powdered sugar was not sifted before adding, or the icing cooled too long before being poured. Unsifted powdered sugar contains compressed clumps that do not dissolve in warm liquid. Cooled icing begins to set in the saucepan and loses its ability to flow.
Immediate fix: If the icing is too thick to pour but has not yet set, place the saucepan back over low heat and whisk in 1 tablespoon (15ml) of warm milk at a time until it loosens. Work quickly. If it has already set hard in the pan, it cannot be revived smoothly.
Prevention: Sift the powdered sugar before the cake goes into the oven. Have every icing ingredient pre-measured and ready. Make the icing during the last 5 to 8 minutes of the cake’s baking time — not before, not after.
Icing That Will Not Bond to the Cake Surface
Symptom: The icing sits on top of the cake as a separate layer rather than bonding to the surface. It slides or smears when sliced instead of cutting cleanly with the cake.
Cause: The cake was allowed to cool before the icing was applied. The hot cake surface is what allows the icing to partially absorb into the top crumb layer and create the fused, fudge-like bond visible in the photos.
Immediate fix: There is no way to re-bond icing to a cooled cake. The texture will be different from the intended result — the icing will function more like a poured glaze sitting on top rather than a true fudge layer. It still tastes good.
Prevention: Have the icing ready before the cake comes out of the oven. The moment the pan is on the cooling rack, the icing goes on. Thirty seconds of delay is acceptable. Two minutes is too long.
Cake Sticking to the Pan
Symptom: Squares break apart or leave chunks behind when lifted from the pan.
Cause: The pan was insufficiently greased, particularly in the corners. Or the cake was sliced before the icing had fully set and the squares were lifted rather than scooped.
Immediate fix: Run a thin offset spatula or butter knife under the stuck square to release it from the bottom. Accept that the first square out of any pan is always the hardest.
Prevention: Grease the pan thoroughly before the batter goes in — bottom and all four sides, paying extra attention to the corners. Allow the icing to set fully — at least 1 hour at room temperature — before slicing. Use a sharp knife and slice with one clean downward stroke rather than a sawing motion.
Humidity and Altitude Adjustments
High humidity (above 70% relative humidity): The icing may take longer to set and feel slightly tacky on the surface even after an hour. This is normal — give it an additional 30 to 60 minutes before slicing. Store covered loosely rather than tightly sealed, which traps surface moisture and softens the icing.
High altitude (above 3,500 feet / 1,067 meters): Reduce the baking soda by ¼ tsp (reduce from 1 tsp to ¾ tsp). Increase the flour by 2 tablespoons (16g). Reduce the sugar by 2 tablespoons (25g). Increase the oven temperature to 365°F (185°C) and begin checking for doneness at 18 minutes. Leavening gases expand faster at altitude and the cake can over-rise and then collapse if not adjusted.
Expert Pro-Tips
Pre-measure every icing ingredient before the cake goes into the oven. The icing takes less than 10 minutes to make and must be poured the moment the cake comes out. If you are measuring powdered sugar while the cake is cooling on the rack, you have already waited too long. Set out the butter, milk, cocoa, sifted powdered sugar, and vanilla in separate bowls before you start the batter.
Wipe the knife clean between every cut. The icing is sticky and the crumb is moist — a knife coated in icing from the previous cut drags and tears the next slice. Keep a damp kitchen towel next to the pan and wipe the blade after every single cut. This is what produces the clean, defined edges visible in the overhead pan photo.
Score the icing lightly before making full cuts. Once the icing has set, run the tip of your knife along the cut lines with light pressure before making the full downward slice. This breaks the icing surface cleanly without cracking it across adjacent squares — a common problem when cutting straight through a fully set icing layer without scoring first.
How to Store Texas Sheet Cake
Room Temperature
Texas sheet cake stores exceptionally well at room temperature — better than most cakes — because the high sugar content in both the crumb and the icing actively retains moisture. The cake does not dry out the way a standard layer cake does.
Store the cake directly in the pan, covered loosely with aluminum foil or a sheet of plastic wrap laid flat across the top. Do not press the covering tightly against the icing surface — it will stick and pull the icing when removed. Do not use an airtight container that traps condensation against the icing surface, which softens it and causes it to lose its smooth finish.
The cake keeps at room temperature for up to 4 days. Day one the icing is freshly set and glossy. Day two the crumb has settled and the chocolate flavor has deepened — this is genuinely the best day to eat it. Days three and four it remains moist and flavorful, though the icing loses some of its surface sheen.
If you have sliced the cake and removed individual squares, store the remaining squares in a single layer in a lidded hard-sided container with a sheet of parchment between layers if stacking. Do not stack more than two layers — the icing on the bottom layer will compress and stick to the base of the square above it.
Refrigerator
Refrigerating Texas sheet cake is not recommended for daily storage. Cold air dries the crumb faster than room temperature storage does, and the icing surface develops condensation when the cake is brought back to room temperature, which softens the top and dulls the finish.
That said, if your kitchen runs warm (above 75°F / 24°C) or humid, refrigeration is the better option. Cover the pan loosely with foil — not plastic wrap pressed against the icing — and refrigerate for up to 1 week. Before serving, allow individual squares to sit at room temperature for 20 to 30 minutes. The crumb tightens in the cold and needs time to relax before the texture is at its best.
🗒 Luna’s Note: I live in a warm kitchen for most of the year and I always refrigerate after day two. The texture on a cold square straight from the fridge is actually excellent — the icing firms up almost like a chocolate truffle shell. I eat it that way on purpose sometimes.
Freezer — Baked
Texas sheet cake freezes well, though the icing texture changes slightly after thawing — it loses some of its glossy surface finish and becomes slightly more matte. The flavor and crumb are unaffected.
To freeze individual squares: allow the cake to cool and the icing to set completely — at least 1 hour at room temperature. Slice into squares and wrap each square individually in plastic wrap, pressing gently to remove air pockets. Place wrapped squares in a zip-lock freezer bag or a lidded freezer-safe container. Freeze for up to 2 months.
To thaw: remove individual squares from the freezer and unwrap them. Place on a plate at room temperature for 45 minutes to 1 hour. Do not microwave to thaw — the icing melts unevenly and pools rather than setting back to its original texture. Do not thaw in the refrigerator — the condensation that forms during refrigerator thawing softens the icing surface permanently.
To freeze the whole unsliced cake: this is not recommended. The icing surface becomes difficult to protect during freezing without damaging it, and thawing a full half-sheet pan takes 3 to 4 hours at room temperature with uneven results across the surface.
Freezer — Unbaked
The batter for Texas sheet cake cannot be made ahead and frozen unbaked. The baking soda begins reacting with the natural cocoa the moment the warm liquid hits the dry ingredients — by the time a frozen batter thaws, the leavening has already spent itself and the cake will bake flat.
The batter also cannot be refrigerated for later use for the same reason. Make the batter, pour it immediately, and bake it within 10 minutes of mixing.
Serving Suggestion
I cut this into squares and serve it straight from the pan at room temperature — no plates required if I am feeding a crowd, which is usually why I made it in the first place. A half-sheet of Texas sheet cake on a counter with a stack of napkins disappears faster than anything else I make.
🗒 Luna’s Note: My favorite way to serve this is slightly warm — I cut a square and give it 12 seconds in the microwave. The icing softens just enough to go slightly molten at the edges while the crumb stays tender. A cold glass of whole milk next to it and that is genuinely one of the best things I make.
When I want to dress it up slightly, I serve squares on individual plates with a small scoop of vanilla ice cream alongside. The contrast between the cold, creamy ice cream and the rich, dense chocolate crumb is worth the extra step. The icing handles the temperature difference well — it does not melt immediately the way a buttercream would.
Frequently Asked Questions About Texas Sheet Cake
What makes Texas sheet cake different from regular chocolate cake?
Texas sheet cake is baked in a large, shallow rimmed half-sheet pan rather than round or square cake pans, which produces a thin, even crumb that bakes quickly and stays moist all the way to the edges. The defining difference is the icing technique — a warm poured chocolate fudge icing is applied directly to the hot cake the moment it comes out of the oven, which allows it to bond to the surface and set into a fudge-like layer rather than a separate frosting. Standard chocolate cake uses a spread frosting applied to a cooled cake, which sits on top as a distinct layer. The melt-and-mix batter method and the hot icing application together produce a texture and finish that no other chocolate cake method replicates.
Why is it called Texas sheet cake?
The name comes from both the pan and the portion size. Sheet cake refers to the large, flat rimmed baking pan — a half-sheet pan — that the cake is baked and served from directly. The “Texas” part reflects the state’s reputation for large-format, generous, feed-a-crowd cooking. The cake is designed to serve 20 or more people from a single pan with no assembly, no layering, and no special equipment beyond a whisk and a saucepan. Whether it actually originated in Texas is debated — versions of the recipe appear in community cookbooks across the American South from the mid-20th century — but the name has stuck because it captures exactly what the cake is: big, straightforward, and unapologetically generous.
Can I make Texas sheet cake ahead of time?
Yes — this easy Texas sheet cake actually improves by day two. Make the cake fully, ice it, add the nuts, and allow it to cool and set completely at room temperature for at least 1 hour before covering. Store covered loosely with foil directly in the pan at room temperature for up to 4 days. The crumb settles overnight and the chocolate flavor deepens in a way that freshly baked does not match. If you are making it for an event, baking the day before is genuinely the better choice. Do not make the batter ahead — the baking soda begins reacting with the cocoa the moment the warm liquid hits the dry ingredients and the leavening will be spent before the batter reaches the oven.
Why did my Texas sheet cake icing turn out grainy?
Grainy icing is caused by unsifted powdered sugar. Powdered sugar compresses in storage and forms hard clumps that do not dissolve in the warm butter and milk mixture — they incorporate as gritty particles and set that way permanently. Sift the powdered sugar through a fine mesh sieve before it goes into the saucepan. The second cause is adding powdered sugar to a mixture that has cooled too much — the sugar needs warmth to dissolve smoothly. Make the icing during the last 5 to 8 minutes of the cake’s baking time, add the powdered sugar immediately after removing from heat, and whisk vigorously until completely smooth before pouring. For more on how chocolate-based icings and frostings behave, my chocolate chip cookie brownies covers a similar poured chocolate topping with the same smoothness requirements.
Can I make Texas sheet cake without nuts?
Yes — the nuts are completely optional. The cake and icing are fully developed recipes without them. The photos show roughly chopped toasted pecans scattered on top, but omitting them does not change the batter, the icing, or the baking time in any way. If you want the visual of nuts without the commitment, press a small cluster onto each square after slicing rather than scattering across the whole pan — that way individual squares can go out with or without. If you want to add something in place of nuts for texture, a light scatter of flaked sea salt over the warm icing is an excellent alternative — it cuts the sweetness and adds a subtle crunch without competing with the chocolate.
How do I know when Texas sheet cake is done?
Texas sheet cake is done when the surface looks completely set and matte across the entire pan with no wet or shiny patches in the center, and when the center springs back immediately and cleanly when pressed lightly with one fingertip. Start checking at 20 minutes. The edges will have pulled very slightly from the sides of the pan. Do not wait for a toothpick to come out completely clean — at that point the cake is overbaked and the crumb will be dry. The correct internal temperature at the center is approximately 200–205°F (93–96°C) if you are using an instant-read thermometer. Pull it at the spring-back test regardless of color — the dark cocoa makes visual color assessment unreliable for this recipe.
Can I double or halve this Texas sheet cake recipe?
This recipe already fills a full 18×13 inch (46x33cm) half-sheet pan and yields 20 squares — doubling it would require two pans baked separately, not one larger pan. Bake each pan as a separate batch. The batter cannot sit while the first pan bakes — make the batter for the second pan fresh while the first is in the oven. To halve the recipe, use a 9×13 inch (23x33cm) pan and increase the bake time to 30 to 35 minutes. When halving, reduce the baking soda to ½ tsp rather than the mathematical ½ of 1 tsp — leavening does not scale perfectly linearly, and the full halved amount can produce a slightly soapy aftertaste in a smaller batch. At high altitude, reduce leavening further — see the Troubleshooting section for altitude adjustments.
More Chocolate Desserts You’ll Love
- Chocolate Mug Cake — a single-serving deep chocolate cake ready in under 2 minutes, with a tender crumb and no leftovers to manage
- Brookie Recipe — half brownie, half chocolate chip cookie baked together in one pan, with a fudgy chocolate base and a golden cookie layer on top

Texas Sheet Cake
Ingredients
Equipment
Method
- Position the oven rack in the middle slot and preheat to 350°F (175°C), then grease an 18×13 inch (46x33cm) rimmed light-colored aluminum half-sheet pan thoroughly with softened butter or non-stick spray on the bottom and all four sides — do not line with parchment.
- In a large mixing bowl, whisk together 2 cups (240g) all-purpose flour, 2 cups (400g) granulated sugar, ¼ cup (25g) natural unsweetened cocoa powder, 1 tsp (6g) baking soda, and ½ tsp (3g) fine sea salt for 30 seconds until no white streaks remain and the mixture looks uniformly dark brown.
- In a medium saucepan over medium heat, combine 1 cup (226g) unsalted butter, 1 cup (240ml) whole milk, and ¼ cup (25g) natural unsweetened cocoa powder, whisking constantly for 4 to 6 minutes until the butter is fully melted and the mixture is completely smooth and glossy — remove from heat the moment you see small bubbles forming at the edges, do not boil.
- Pour the warm chocolate liquid slowly into the bowl of dry ingredients and whisk with wide strokes from the bottom upward for approximately 20 to 25 strokes until the batter is completely smooth and thin — this order cools the hot liquid through contact with room-temperature flour and sugar before the eggs go in, which prevents scrambling without the standard melt-and-mix cooling wait.
- Add 2 large room-temperature eggs and 1 tsp (5ml) pure vanilla extract to the batter and whisk just until fully incorporated — approximately 10 to 15 strokes — stopping as soon as no streaks remain; do not overmix.
- Pour the batter into the prepared pan, spread flat with a silicone spatula in 4 to 5 strokes, and bake on the middle rack at 350°F (175°C) for 20 to 25 minutes until the surface looks completely set and matte and the center springs back cleanly when pressed with one fingertip — start checking at 20 minutes.
- During the last 5 to 8 minutes of baking, make the icing: combine ½ cup (113g) unsalted butter, 6 tablespoons (90ml) whole milk, and 3 tablespoons (18g) natural unsweetened cocoa powder in the same saucepan over medium heat, whisking constantly for 3 to 4 minutes until smooth and glossy, then remove from heat, add 3½ cups (420g) sifted powdered sugar and 1 tsp (5ml) pure vanilla extract, and whisk vigorously for 30 to 45 seconds until completely smooth and thick but still pourable.
- The moment the cake comes out of the oven, place the pan on a wire cooling rack and immediately pour the warm icing over the hot cake surface, spreading gently with an offset spatula in 6 to 8 slow strokes from the center outward until the icing reaches all four edges.
- If using nuts, immediately scatter ½ cup (55g) roughly chopped toasted pecans or walnuts over the warm icing and press in very gently to anchor — if using flaked sea salt, scatter approximately ½ tsp (2g) Maldon-style flakes across the surface at the same time.
- Allow the cake to cool at room temperature for a minimum of 1 hour until the icing is fully set — the carryover heat from the cake continues setting the crumb during the first 15 to 20 minutes, so do not cut early — then slice into 20 even squares by scoring 4 cuts along the long side and 3 cuts along the short side, wiping the blade clean with a damp towel after every cut.