
One-Bowl Chocolate Dump Cake
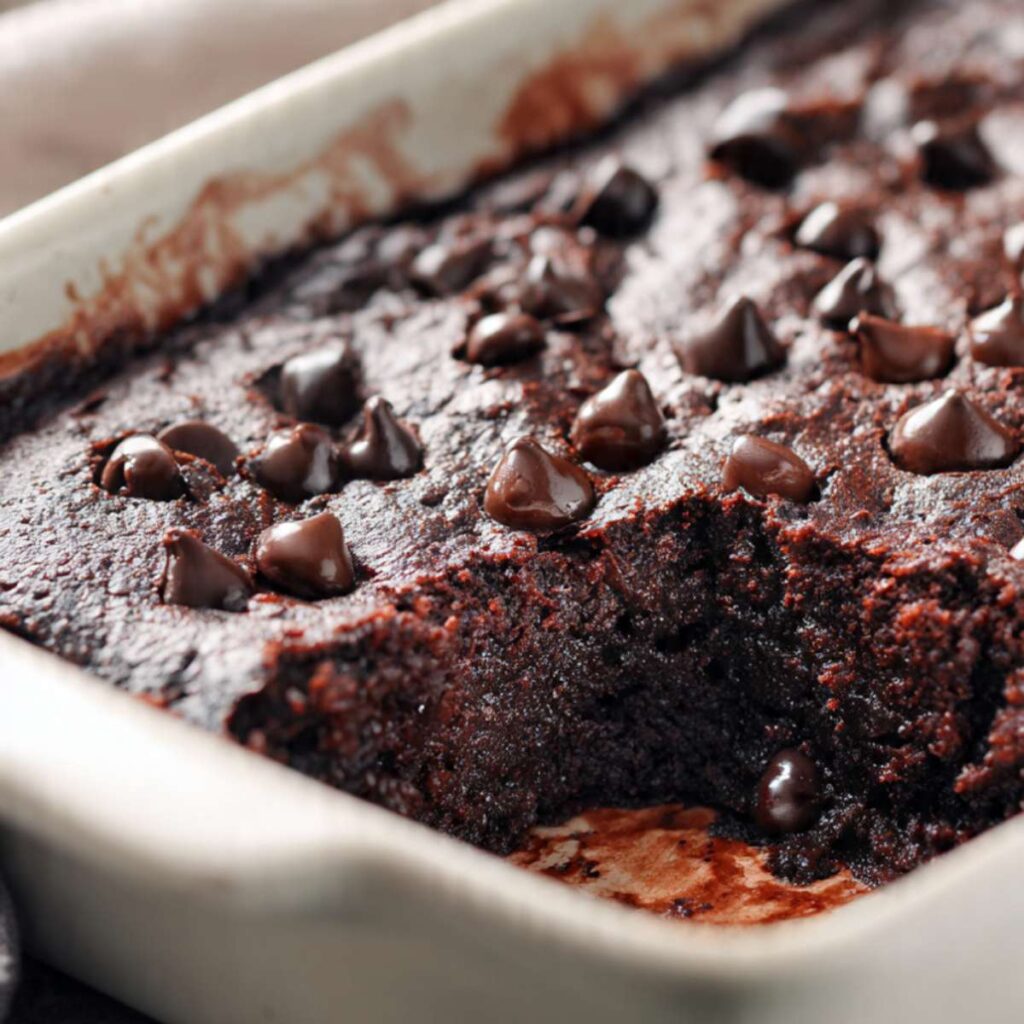
I have made this chocolate dump cake fourteen times across three weeks of testing, and I kept going back to it because the first batch exposed every way it could go wrong. I wanted the inside to look like what you see in the hero photo — that dark, fudgy interior with melted chocolate chips pooled across the surface in a ceramic pan — without underbaking the edges into raw batter. It took me several rounds to nail the balance, and I am giving you every variable I fixed.
The texture you are getting here is not light, not cakey, not airy. The center stays dense and fudgy, almost brownie-like, and when you scoop it warm the melted chips pull apart in ribbons the way you can see in the wooden spoon photo. The edges firm up more than the center, which gives you two textures in one pan — something I find more satisfying than a uniform crumb.
No chilling required. No electric mixer needed. This entire recipe comes together with one large mixing bowl and a silicone spatula. From dry ingredients to pan to oven in under 15 minutes.
🗒 Luna’s Note: The first time I made this I pulled it at the 28-minute mark because the toothpick came out clean. The center had lost all the gooeyness I wanted. Now I pull at 25–27 minutes and check the surface, not the toothpick. A set, slightly shiny top with a center that resists but does not spring back is the right cue for this cake.
I tested this with melted butter versus neutral oil. The oil version was slightly moister at room temperature the next day, but it tasted flat. The melted butter version had a richer, deeper chocolate flavor and produced the shiny, slightly cracked surface you can see in the overhead pan photo. That is the version I kept.
I tested this with Dutch-process cocoa versus natural unsweetened cocoa. Dutch-process cocoa is treated with an alkali that neutralizes its acidity — it produces a smoother, milder chocolate flavor and a darker color, but it does not react with the baking powder in this recipe the way natural cocoa does. The natural unsweetened cocoa version had a stronger chocolate punch and the crumb held together more reliably. Natural cocoa is the one to use here.
| Prep Time | 10 minutes | Cook Time | 25–27 minutes |
| Total Time | 35–37 minutes | Yield | 9 squares |
| Difficulty | Easy | Method | One-bowl, no mixer |
| Pan | 8×8 inch (20x20cm) light-colored ceramic or aluminum | Oven Temp | 350°F (175°C) |
| Calories (per serving) | Total Fat | Carbohydrates | Sugar | Protein |
|---|---|---|---|---|
| ~410 kcal | ~22g | ~33g | ~22g | ~6g |
Macros are calculated from gram weights and are estimates. Actual values will vary based on the specific brands used, especially the chocolate chips.
Ingredients & Tools
Ingredients for Chocolate Dump Cake
- 1 cup (125g) all-purpose flour (spooned into the measuring cup and leveled — or weighed at 125g)
- ¾ cup (150g) plain white granulated cane sugar
- ½ cup (40g) natural unsweetened cocoa powder (not Dutch-process)
- ½ teaspoon (2g) baking powder, checked for freshness
- ½ teaspoon (3g) fine sea salt
- 2 large eggs (approximately 50g each without shell), room temperature
- ½ cup (113g) unsalted butter, melted and cooled to below 90°F (32°C)
- ½ cup (120ml) whole milk (3.5% fat), room temperature
- 1½ cups (255g) semi-sweet chocolate chips (45–55% cacao), such as Nestle Toll House or Ghirardelli
Before You Start
Scale over cups. For the most accurate results, use a kitchen scale set to grams. Volume measurements like cups and tablespoons can vary by 20–30% depending on how the ingredient is scooped or packed. The gram weights in this recipe are the numbers I tested with — they are the most reliable way to get the same result I got.
Flour. Spoon the flour into the measuring cup from the bag using a separate spoon, then level with the straight edge of a knife. Never scoop the cup directly into the bag — scooping packs in 20–30% more flour than the recipe calls for and will produce a dry, dense cake instead of the fudgy center shown in the photos. For guaranteed accuracy, weigh at 125g on a kitchen scale.
Natural unsweetened cocoa powder. This recipe requires natural unsweetened cocoa powder — not Dutch-process. Dutch-process cocoa has been treated with an alkali that raises its pH to 7–8, which neutralizes its acidity. It does not react with the baking powder in this recipe the same way, and it produces a flatter, milder chocolate flavor than what is visible in the depth of color in the stacked slice photo. Natural unsweetened cocoa has a pH of around 5 — it is sharper, more intense, and chemically active in this batter. When you open the tin, it should smell strongly and sharply of chocolate. If it smells faint, dusty, or flat, replace it before baking. Hershey’s Natural Unsweetened and Ghirardelli Unsweetened Cocoa are reliable widely available options.
Butter — melt and cool before anything else. Melt the ½ cup (113g) of unsalted butter gently over low heat or in the microwave in 20-second increments. Pour it directly into your large mixing bowl — this becomes your working vessel for the entire recipe. Set it aside and let it cool for 10 to 15 minutes before adding any other ingredients. The butter must read below 90°F (32°C) before the eggs go in. To check without a thermometer, press a drop against the inside of your wrist — it should feel neutral, not warm. If it feels warm, wait another 5 minutes and check again. Hot butter will begin cooking the eggs on contact and the batter will look scrambled and grainy before it ever reaches the oven.
Eggs. Pull 2 large eggs from the fridge 30 minutes before baking and set them on the counter. Cold eggs do not blend smoothly into a butter-based batter and can cause the mixture to look greasy or broken before the flour goes in. In an emergency, place the eggs still in their shells into a bowl of warm — not hot — water for 10 minutes. Large eggs weigh approximately 50g each without the shell — if you are unsure of your egg size, weigh them. Medium eggs weigh 44g and will reduce the moisture content of the batter slightly.
Whole milk. Set the ½ cup (120ml) of whole milk (3.5% fat) on the counter at the same time as the eggs — 20 to 30 minutes is enough. Cold milk added to cooled melted butter can cause the fat to seize into white clumps before the dry ingredients go in. The milk should feel neutral to the touch, not cold, before it goes into the bowl.
Baking powder — test before you use it. Drop 1 teaspoon (4g) of your baking powder into ½ cup (120ml) of hot water. It should bubble immediately and vigorously within 2 seconds. If the reaction is weak, slow, or absent, the baking powder is past its prime — replace it before continuing. Baking powder loses potency after 6 to 12 months once opened. A cake baked with expired baking powder will bake flat with no lift at the edges and a heavier, more compressed crumb than what is shown in the photos.
Chocolate chips. Use semi-sweet chocolate chips in the 45–55% cacao range — Nestle Toll House or Ghirardelli are the brands I tested with. Milk chocolate chips are too sweet and will make the already-rich batter cloying. Chips above 60% cacao will set firmer after baking and taste sharper than the soft, melted, pooled chips visible in the overhead pan photo. Check the chips for bloom before using — a white or grey chalky coating on the surface. Bloomed chips are safe to eat and will still melt, but they may not melt as smoothly or look as glossy on the finished surface as unaffected chips. Use fresh chips for the cleanest visual result.
Pan — material matters for this recipe. This recipe was tested in a light-colored ceramic 8×8 inch (20x20cm) baking dish — the pan shown in all five photos. The result you see in the images came from that ceramic pan. Here is what to adjust based on what you have:
- Light-colored ceramic (tested pan): Grease with unsalted butter, covering the bottom, all four sides, and every corner. No adjustment to temperature or time needed — follow the recipe exactly as written.
- Light-colored aluminum: Aluminum releases heat faster than ceramic. Reduce the bake time by 2 to 3 minutes and start the press test at 22 minutes rather than 25. The edges will set slightly faster than in the ceramic test pan.
- Dark non-stick metal: Reduce the oven temperature to 325°F (163°C) and start checking at 20 minutes. Dark pans absorb significantly more radiant heat and will overbrown the bottom before the center has a chance to set.
- Glass: Glass behaves similarly to ceramic but retains heat even longer. Reduce oven temperature by 25°F (15°C) to 325°F (163°C) and follow ceramic timing.
- 9×13 inch (23x33cm) pan: The batter spreads significantly thinner. Reduce bake time to 18 to 20 minutes and start checking at 18 minutes. The result will be less fudgy and more uniformly set throughout.
Do not use parchment for this recipe. The batter is meant to stay in the pan and be scooped warm directly from the dish — parchment is not needed and will interfere with the greased surface. If you skip greasing the corners, that is where sticking happens first.
Mixing method. This entire recipe comes together with the large mixing bowl you already have the cooled butter in and a silicone spatula — no electric mixer needed at any stage. Overmixing is the primary failure risk for this cake. Once the wet and dry ingredients come together, fold only until no dry streaks remain — then stop immediately. Every additional stroke past that point develops gluten and tightens the crumb.
Oven rack. Position the rack in the middle of the oven before preheating. Top rack burns the surface before the center sets. Bottom rack overbrowns the base. Middle rack is the only correct position for this recipe.
Necessary Tools
Required:
- 8×8 inch (20x20cm) light-colored ceramic or aluminum square baking dish
- Large mixing bowl
- Silicone spatula
- Kitchen scale (strongly recommended)
- Wire cooling rack — for resting the pan after baking
- Measuring cups and spoons
- Whisk (for combining dry ingredients)
Optional but useful:
- Oven thermometer — confirms actual oven temperature
- Instant-read thermometer — confirms butter has cooled below 90°F (32°C) before eggs go in
How to Make Chocolate Dump Cake
This recipe uses the one-bowl, melt-and-mix method — but with one deliberate deviation from the standard one-bowl order. In most one-bowl recipes, wet ingredients go in first and dry ingredients are folded in on top. Here, the dry ingredients go into the bowl first, the wet ingredients are added into a well in the center, and everything is folded together in one motion.
The reason: cocoa powder and flour clump badly when they hit wet fat directly. Building the well keeps the dry ingredients loose and evenly distributed until the fold begins, which means fewer strokes are needed to reach a smooth batter — and fewer strokes means less gluten development, which protects the fudgy texture. Follow the order exactly as written. No creaming, no alternating additions, no mixer at any stage.
Step 1: Oven On, Pan Greased, Everything Ready
Position the oven rack in the middle slot and heat the oven to 350°F (175°C). Do not mix the batter and then wait for the oven — this batter goes into a hot oven the moment it is mixed. While the oven heats, grease your 8×8 inch (20x20cm) baking dish thoroughly with unsalted butter. Use your fingers or a folded paper towel to work the butter into the bottom, all four sides, and every corner. Pay particular attention to the corners — that is where the batter makes the most contact with bare ceramic or aluminum, and ungreased corners are where sticking begins.
Most home ovens run 15–25°F (8–14°C) off from the dial setting. If you have an oven thermometer, place it on the middle rack now and confirm the actual temperature before the pan goes in. A low oven will produce a cake with a gummy, underbaked center even at the correct time — you will pull it at 27 minutes thinking it is done and find the interior still liquid under the set surface.
The pan should feel uniformly slick with no dry patches visible anywhere — run your finger across every surface including the corners and sides before moving on. Any bare spot is a sticking point.
Do not put the batter together before this step is complete. A greased pan and a preheated oven must both be ready before you touch the mixing bowl.
Step 2: The Dry Ingredients Go In First — Whisk Until Completely Even
Pour the cooled melted butter into your large mixing bowl if you have not already done so — this is your working bowl for the entire recipe. Add 1 cup (125g) all-purpose flour (spooned and leveled, or weighed), ¾ cup (150g) plain white granulated cane sugar, ½ cup (40g) natural unsweetened cocoa powder, ½ teaspoon (2g) baking powder checked for freshness, and ½ teaspoon (3g) fine sea salt directly into the bowl on top of the cooled butter.
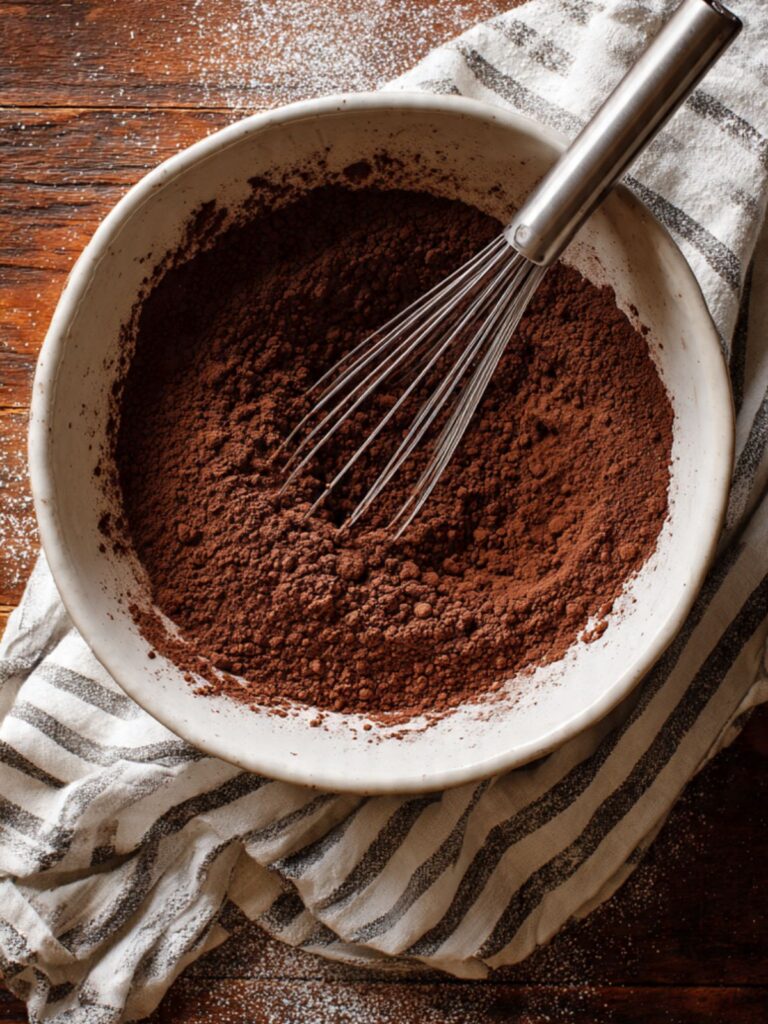
Wait — do not stir yet. Pick up your whisk and whisk the dry ingredients together first, working quickly in 20 to 25 wide circular strokes, before the butter underneath has a chance to incorporate. The goal is an evenly combined dry mixture sitting above the butter layer — no pale flour patches, no dark cocoa streaks, no white salt granules visible anywhere in the dry mix.
The dry mixture should look uniformly deep brown and smell strongly and sharply of chocolate — if you can still see pale flour streaks or white patches after 25 strokes, whisk for another 10 and check again. Uneven dry ingredients mean pockets of concentrated salt or cocoa in the finished cake.
🗒 Luna’s Note: I always whisk the dry ingredients directly in the same bowl I use for the finished batter — with the cooled butter already in the bottom. One less thing to wash. A wide, deep bowl gives you enough room to fold the batter without it climbing the sides when you get to Step 4.
Do not rush this step. The sugar, cocoa, flour, salt, and baking powder need to be fully distributed before any liquid contact happens — once the wet ingredients go in, you have a limited number of strokes to work with and you cannot fix uneven dry ingredients after the fold begins.
Step 3: Build the Well — Wet Ingredients Go Into the Center
Using your silicone spatula, push the dry ingredients from the center of the bowl outward toward the sides to create a well — a clear depression in the middle that exposes the butter layer at the bottom. The well does not need to be perfectly round or deep. It just needs to give the wet ingredients a landing zone at the center of the bowl so they do not sit on top of the dry mix and create clumps before folding begins.
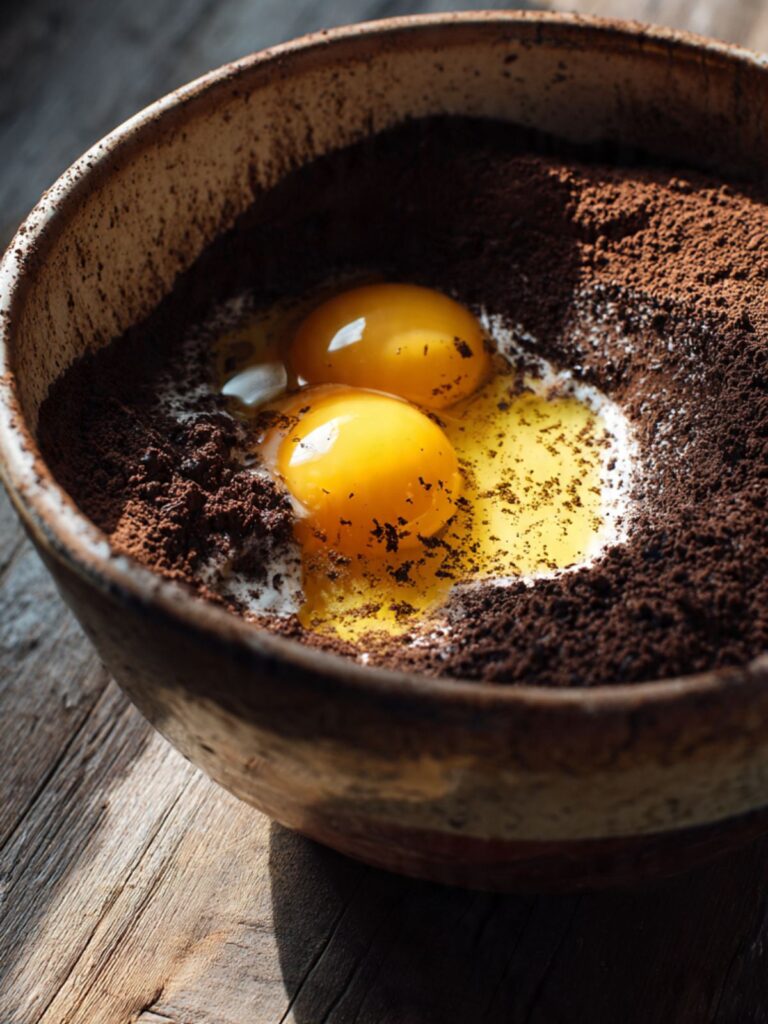
Add 2 large eggs (room temperature, approximately 50g each without the shell), ½ cup (120ml) whole milk (3.5% fat, room temperature) directly into the well. Before adding the butter — which is already in the bowl — confirm it has cooled below 90°F (32°C). Press a drop against the inside of your wrist. It should feel completely neutral. If it feels warm at all, wait 5 more minutes before proceeding to the fold.
The well should show the butter layer at the bottom with the eggs and milk sitting visibly in the center and the dry ingredients banked up around the edges — three clearly distinct zones before the fold begins. If the eggs and milk have already started pulling the dry ingredients in from the sides, move immediately to Step 4 without delay.
Do not whisk at this stage. Set the whisk down and pick up the silicone spatula. Every action from this point forward is a fold — not a stir, not a whisk, not a beat.
Step 4: The Fold — Count Your Strokes
Using the silicone spatula, fold the wet and dry ingredients together with slow, deliberate strokes from the bottom of the bowl upward — not stirring in circles. Each stroke should travel from the bottom of the bowl, up through the center, and fold the batter over itself at the top. Scrape the bottom of the bowl completely on every stroke to pull the dry ingredients sitting underneath up through the wet.
Count your strokes out loud if it helps. At 10 strokes the batter will still look streaky and uneven — that is correct, keep going. At 15 strokes most of the dry streaks will be gone. At 20 to 25 strokes the batter should look completely uniform, thick, dark, and paste-like.
Stop folding the moment you no longer see dry flour. Do not take one more stroke past that point. The batter will be significantly thicker than a standard cake batter — it will not pour. It will drop heavily and slowly off the spatula in a thick, dense mound and hold its shape briefly before settling. This is exactly correct.

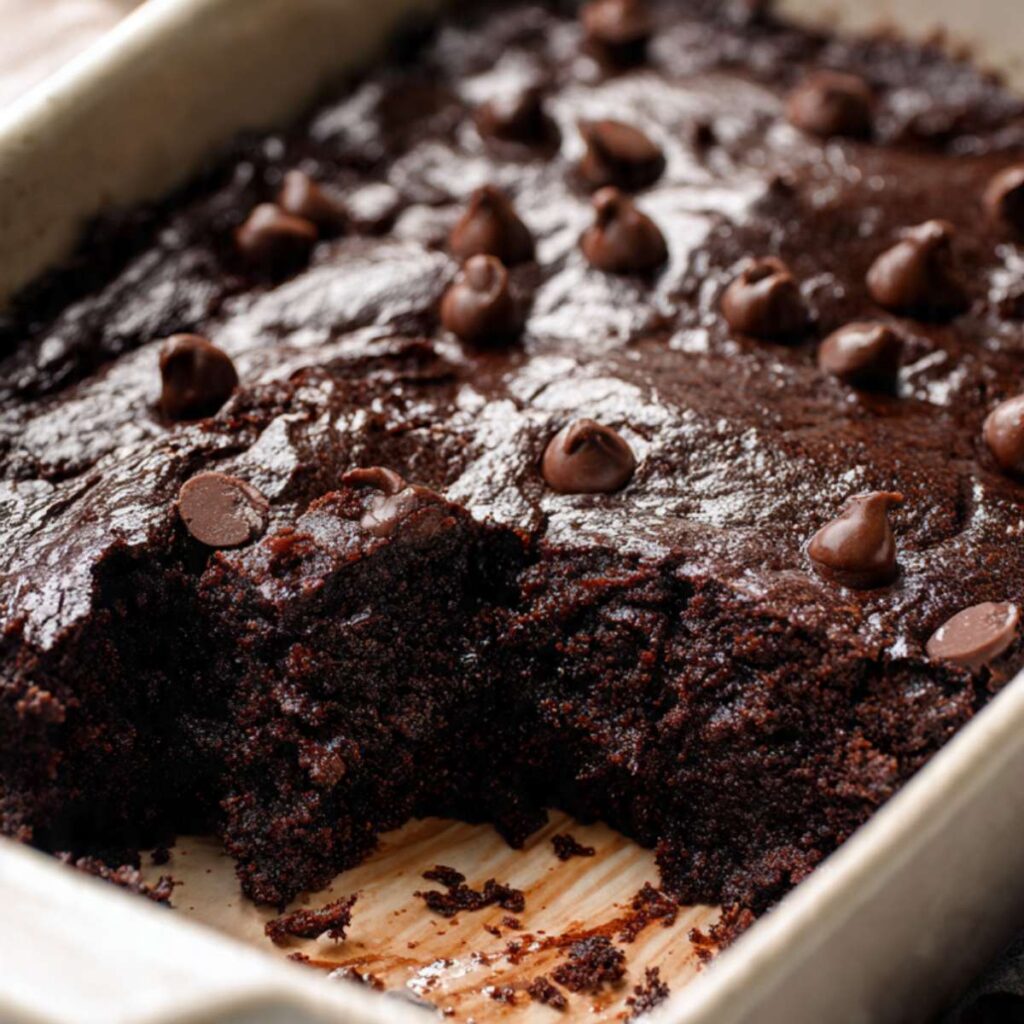
The batter should look like the darkest, thickest brownie batter you have ever seen — dense, uniform, and almost paste-like. As you can see in the stacked slice photo, the finished crumb is tight and compact with no large air pockets — that texture starts here, with a batter this thick. If your batter looks thin or pourable, the flour was under-measured or the milk was over-measured. Do not continue to the next step with a runny batter.
Do not overmix. Every stroke past the point where the flour disappears develops gluten and tightens the crumb — producing a tough, dense cake instead of the soft, fudgy interior visible in the cut slice photos. If you lose count and are not sure whether you have overmixed, look at the batter: smooth, thick, and uniform means you are within the correct range. Shiny and elastic-looking means you have gone too far.
Step 5: Into the Pan — Batter Reaches Every Corner
Scrape the entire batter into the prepared 8×8 inch (20x20cm) baking dish using the silicone spatula. Start at the center and use the flat face of the spatula to push the batter outward toward each edge and corner in slow, deliberate passes. The batter is thick and will resist spreading — do not try to rush it. Work it slowly from the center outward until it reaches all four corners and the surface looks roughly even across the whole pan.
The surface does not need to be perfectly smooth. Slight ridges and a lightly uneven top are completely fine — they will settle in the oven during the first few minutes of baking. What matters is that the batter reaches every corner and that no area is significantly thicker or thinner than another, which would cause uneven baking.
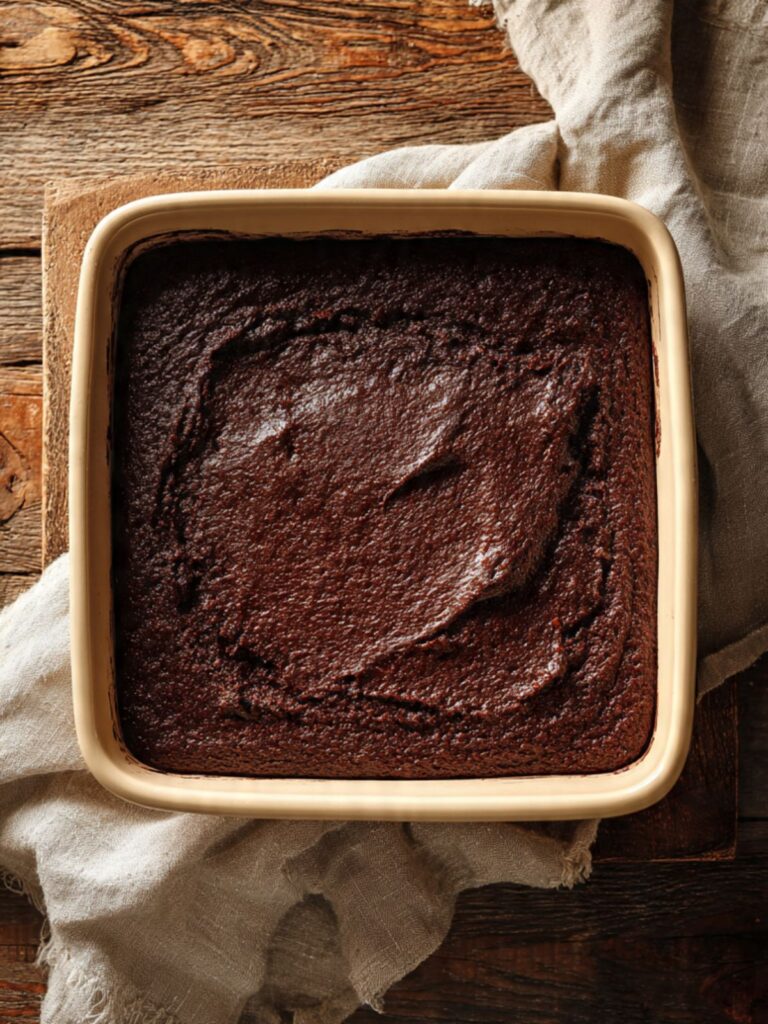
As you can see in the overhead pan photo, the batter fills the dish completely edge to edge with a slightly textured surface — this is exactly what yours should look like before the chips go on. If your batter has pulled away from one of the corners or looks significantly thinner on one side, redistribute it now before the chips go on.
Do not press the batter down or smooth it aggressively. Compressing the batter reduces the small amount of lift the baking powder creates during the first minutes in the oven and produces a flatter, denser result than what is shown in the photos.
Step 6: The Chocolate Chip Layer — Coverage Is the Goal
Scatter 1½ cups (255g) semi-sweet chocolate chips (45–55% cacao, such as Nestle Toll House or Ghirardelli) evenly across the entire surface of the batter. Work methodically from one edge of the pan to the other in parallel rows so that the coverage is consistent across the whole surface. The chips should cover nearly every square inch of the batter — bare patches mean some scoops will come out with almost no melted chocolate.
Do not press the chips into the batter. They sit on the surface before baking. Some will sink slightly as the batter settles and heats — that is normal and expected, and it creates pockets of melted chocolate through the interior rather than only on top.
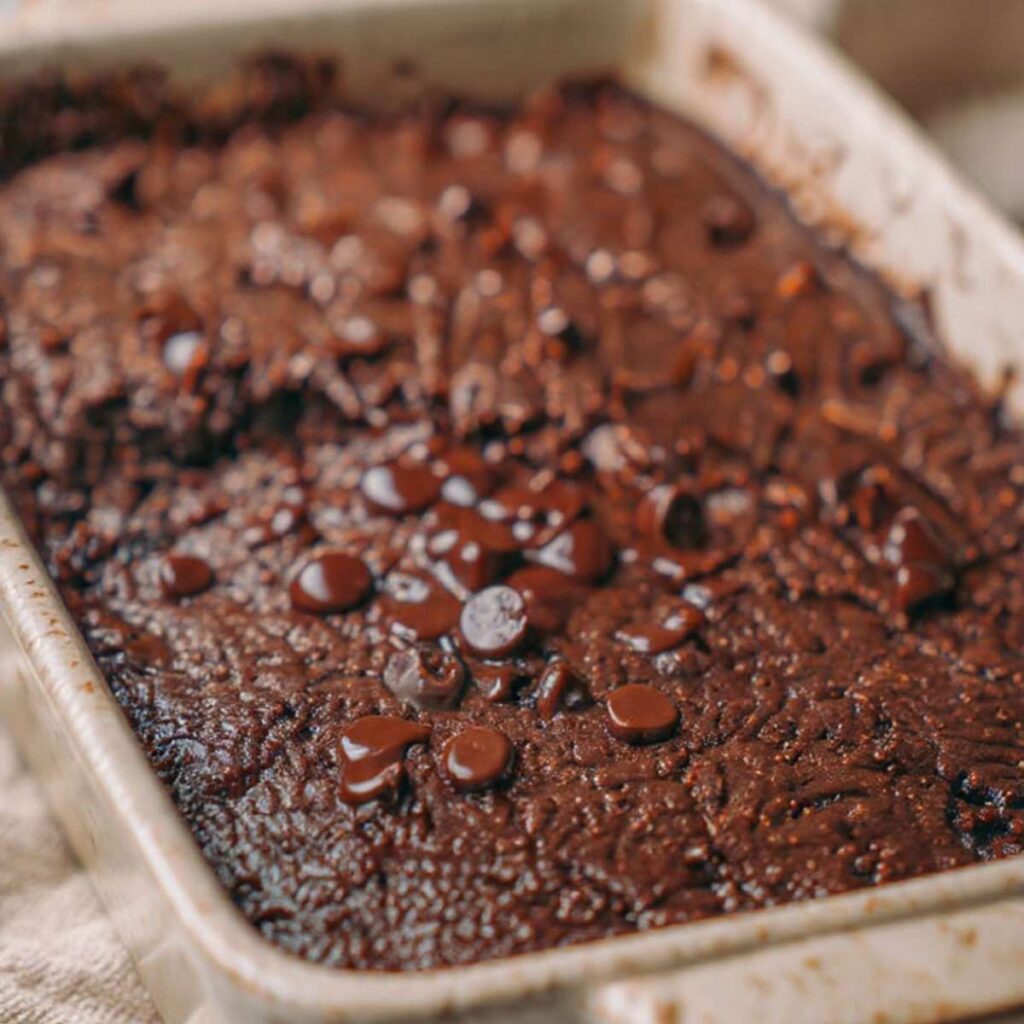
The surface should look like the overhead pan photo — dense, nearly wall-to-wall chip coverage with almost no visible batter showing through. This is the correct amount at 1½ cups (255g). If your surface has large bare patches, add a small handful more chips to fill them before the pan goes in.
🗒 Luna’s Note: I weigh the chips to exactly 255g every time. When I eyeball a cup and a half I always go short, and sparse chip coverage means some scoops come out with barely any melted chocolate. The difference between 200g and 255g of chips is visible in every photo. Weigh them.
Step 7: The Bake — Surface Cues, Not the Toothpick
Place the pan on the middle rack of the preheated 350°F (175°C) oven. Set a timer for 23 minutes. Do not open the oven before that timer goes off — opening the door early releases heat rapidly and can cause the partially set center to sink before the egg proteins have coagulated enough to hold their structure. A sunken center that collapses during baking cannot be recovered.
At the 23-minute mark, open the oven and observe without touching. The edges of the cake should look darker and more matte than the center. The chips across the surface should look fully melted, glossy, and slightly pooled rather than sitting as distinct raised points. Close the oven and set a 2-minute timer.
At 25 minutes, perform the press test. Open the oven and gently press the center of the cake with one finger. The surface should feel set — it should resist your finger and not leave a wet indent or feel liquid underneath. The center will still feel soft but should have a structure to it. The edges will feel noticeably firmer than the center.
The correctly baked surface looks exactly like the overhead pan photo — a set, slightly shiny top with melted glossy chips pooled across it and edges that look darker and more matte than the center. If your surface matches this description and the press test passes, pull the pan immediately.
Do not use a toothpick as your doneness test for this recipe. A toothpick that comes out clean means the interior has already dried past the fudgy stage — protein coagulation is complete and the starch has set fully. For this cake, a toothpick with thick, fudgy crumbs clinging to it — not wet batter, not clean — is actually the correct result at the optimal pull point. The press test is the only reliable doneness signal here.
If the center still feels completely liquid at 25 minutes, close the oven, add 2 minutes, and recheck. Do not go past 30 minutes total — at that point the fudgy center is gone and the cake will bake dry regardless of cooling method.
Step 8: Rest — Carryover Heat Finishes the Work
Remove the pan from the oven and set it immediately on a wire cooling rack. Set a timer for 10 minutes. Do not move the pan, do not scoop from it, do not press the center again during this window.
The pan — particularly a ceramic or glass pan — continues to conduct heat into the base and sides of the cake after it leaves the oven. This carryover heat is what finishes setting the structure of the center without the oven drying it out further. The 10-minute rest is not optional and it is not approximate — it is the window between a cake that falls apart in the spoon and one that scoops cleanly with soft, gooey interior intact.
If you scoop before 10 minutes, the interior will be too liquid to hold any shape and will pool flat in the bowl. If you wait more than 20 to 25 minutes before scooping warm, the center will have firmed past the gooey stage shown in the wooden spoon pull photo and will read more like a set brownie than a molten scoop.
After exactly 10 minutes, the edges should look fully set and slightly pulled from the sides of the pan. The chips across the top should still be visibly glossy and yielding. The center should still look softer than the edges — this is the correct moment to serve warm. If you want cut squares instead of warm scoops, let the cake cool fully in the pan for 45 to 60 minutes.
For cut squares: run a sharp knife across the surface in a 3×3 grid — three rows across, three rows down — giving you 9 squares each approximately 2⅔ inches (6.5cm) wide. Wipe the knife clean between every cut. A knife with batter on the blade drags and compresses the soft crumb on the next cut, producing ragged edges instead of the clean sides visible in the stacked slice photo.
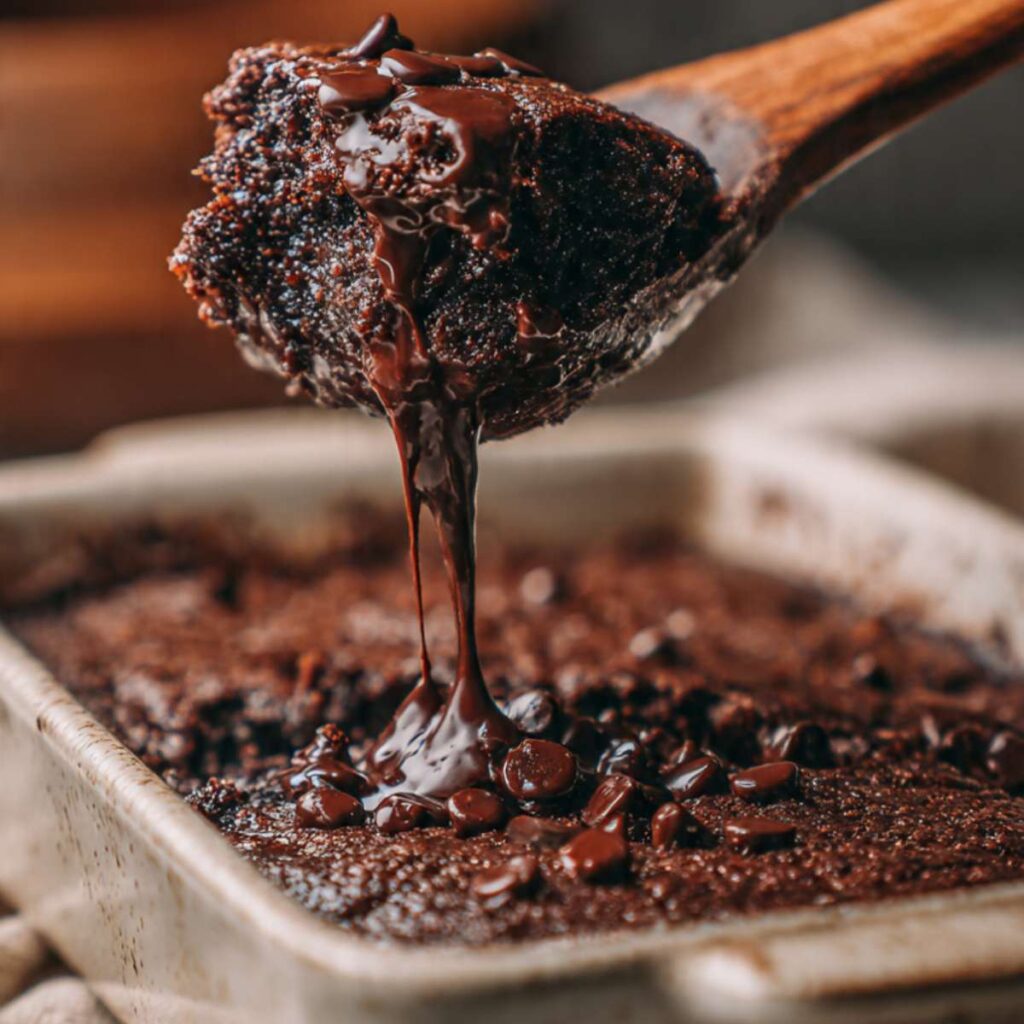
🗒 Luna’s Note: I serve this cake directly from the pan with a large spoon at the 10-minute mark. The center comes out like a warm chocolate pudding with pieces of soft cake attached — exactly what the wooden spoon pull photo shows. If I want clean squares for a more composed presentation, I let it cool for the full 60 minutes and cut with a thin sharp knife wiped between every pass.
The Science Behind This Fudgy Chocolate Texture
Three specific decisions in this recipe produce the dense, gooey, molten-centered result visible in the photos. Each one is doing a precise job. Understanding why they work makes it easier to troubleshoot when something goes wrong.
Natural Cocoa Powder and the Leavening Reaction
Natural unsweetened cocoa powder is acidic — it has a pH of around 5. That acidity is not just a flavor note. It reacts directly with the baking powder in this recipe to produce carbon dioxide bubbles during baking. Those bubbles create the small amount of lift that keeps the edges from becoming a solid, compressed block while allowing the center to stay dense and soft.
Dutch-process cocoa has been alkalized to a neutral pH of 7–8. It does not trigger the same reaction with baking powder. A dump cake made with Dutch-process cocoa and the same quantity of baking powder will bake flatter at the edges, denser throughout, and will taste noticeably milder — not the sharp, punchy chocolate flavor visible in the depth of color in the stacked slice photo.
The cocoa powder is also doing 80% of the flavor work in this recipe. Freshness matters here more than in most recipes — stale cocoa smells faint and produces a flat, underwhelming cake regardless of technique.
Starch Gelatinization and the Fudgy Center
When the batter hits the heat of the oven, the starch granules in the flour begin absorbing water and swelling — a process called starch gelatinization. In a standard cake with more flour and more aeration from a creamed butter method, this produces an open, springy crumb. In this recipe, the low flour ratio — just 1 cup (125g) for a full 8×8 inch pan — means the starch network is thin and underdeveloped compared to the fat and sugar content surrounding it.
The result is a structure that sets just enough to hold its shape at the edges and resist the press test at the surface, but stays dense, moist, and almost molten in the center. This is the same science that makes a brownie fudgier than a cake — less flour, more fat, less structure. The chocolate chips melt into that soft starch matrix and pool rather than sitting as discrete pockets, which is why the wooden spoon pull shows liquid chocolate streaming rather than a chip dropping out whole.
Protein Coagulation and the Press Test Doneness Window
The eggs in this recipe are doing two jobs. First, they provide structure — the egg proteins coagulate, meaning they set and firm up, at around 145°F (63°C). Second, they provide fat from the yolks and moisture from the whites, which contribute to the dense, moist crumb rather than a dry one.
The press test works as a doneness cue because it is measuring protein coagulation directly. When the center still feels liquid under the surface, the egg proteins have not yet set — the cake needs more time. When the center resists your finger but still feels soft, the proteins have coagulated enough to hold the structure without the starch drying out. When the center feels firm and springy, the proteins have over-set and the fudgy texture is gone.
A toothpick bypasses this window entirely — it measures whether the batter has dried enough to stop sticking to a probe, which happens after the optimal fudgy stage has passed. For this recipe, the press test is the only reliable doneness signal.
🗒 Luna’s Note: I started using the press test for all my fudgy bakes after I overbaked this cake twice in a row using a toothpick. The difference between a toothpick-clean result and a press-test result in this recipe is about 3 to 4 minutes — and those 3 minutes are the entire margin between fudgy and dry.
Chocolate Dump Cake Troubleshooting & Pro-Tips
Common Mistakes
The cake baked dry and lost the fudgy center. The most common cause is overbaking — specifically, using a toothpick as the doneness cue. A toothpick that comes out clean means the interior has dried past the fudgy stage. The correct cue is the press test: the surface resists your finger but the center still feels soft. If you are already past this point, there is no fix for the current bake — but the cake will still taste good served warm with a scoop of vanilla ice cream on top, which masks the drier texture. Next time, start checking at 23 minutes and pull the moment the press test passes.
The wrong cocoa powder was used. Dutch-process cocoa produces a flatter, milder cake that does not have the sharp chocolate flavor or the correct edge lift visible in the photos. If you baked with Dutch-process and the result looks darker but tastes underwhelming, that is the cause. There is no fix after baking — the leavening reaction either happened or it did not. For future batches, check the label: natural unsweetened cocoa will have a pH around 5 listed, or will say “natural” explicitly. Hershey’s Natural Unsweetened and Ghirardelli Unsweetened are reliable options that are widely available.
The wrong pan size produced a thin, dry cake. This recipe was tested in an 8×8 inch (20x20cm) pan. If you baked it in a 9×13 inch (23x33cm) pan without adjusting the time, the batter spread too thin and the edges overbaked while the center barely had enough mass to stay moist. A 9×13 pan requires reducing the bake time to 18 to 20 minutes and checking early. A dark non-stick pan requires reducing the oven temperature by 25°F (15°C) — dark pans absorb significantly more heat and overbrown the bottom before the center sets.
The batter was too thin and the cake baked flat. A runny batter means either the flour was under-measured or the milk was over-measured. Scooping flour directly from the bag instead of spooning and leveling is the most common cause — it can pack 20 to 30% less flour into the cup than the recipe requires. A correctly mixed batter is thick, paste-like, and drops heavily from the spatula. It does not pour. If the batter looked thin before it went in, the result will be a flat, dry cake with no fudgy center. Next time, weigh the flour at 125g.
The cake was gummy and undercooked in the center. If the press test showed the surface was set but the interior was still liquid after scooping, the oven temperature was likely lower than the dial indicated. Most home ovens run 15 to 25°F (8 to 14°C) cold. An oven running at 325°F (163°C) when the dial reads 350°F (175°C) will produce a cake that looks done on the surface while the center is still raw batter. An oven thermometer is the only reliable way to confirm actual temperature. If you do not have one, add 5 minutes to the bake time and recheck.
The baking powder did not produce any lift at the edges. Expired baking powder is the cause. Baking powder loses potency after 6 to 12 months once opened. A cake baked with dead leavening will have no lift at the edges and will bake as a flat, uniform slab rather than the slightly domed, textured result in the photos. Test before every bake: drop 1 teaspoon (4g) into ½ cup (120ml) of hot water — it should bubble immediately and vigorously. If the reaction is weak or slow, replace the tin before continuing.
The center sank during baking or collapsed after coming out of the oven. A sunken center in this cake has three possible causes. First, the oven door was opened before the 23-minute mark — cold air rushes in and causes the partially set center to collapse before the protein structure has coagulated enough to hold its shape. The center will not recover once it sinks. Second, the baking powder was over-measured — too much leavening causes the batter to rise rapidly in the first half of the bake and then collapse before the structure sets. Measure the baking powder level, not heaped, and confirm freshness with the hot water test. Third, the batter was underbaked and scooped too early — if the press test was not performed and the cake came out before the surface had set, the center will collapse as it cools. The fix for a sunken cake is cosmetic: scoop it warm directly into bowls and serve immediately. The texture is still fudgy and the flavor is unaffected. Do not try to return it to the oven — the edges will overbake before the center recovers.
The eggs scrambled into the batter. This happens when the melted butter was still too warm when the eggs were added. Egg proteins begin to set at 145°F (63°C) — butter that has not cooled below 90°F (32°C) will begin cooking the eggs on contact. The result is visible immediately: small white or yellow curds appear in the batter that do not dissolve when folded. There is no fix once this happens — the batter must be discarded. Next time, melt the butter, pour it into the mixing bowl, and let it sit for 10 to 15 minutes before adding any other ingredients. Confirm with an instant-read thermometer or the wrist test.
High altitude and humidity adjustments. At altitudes above 3,500 feet (1,065m), gases expand faster in the oven and the cake can rise and then collapse in the center. Reduce the baking powder to ¼ teaspoon (1g) and increase the flour by 2 tablespoons (16g) to compensate. Bake at 375°F (190°C) and start checking at 20 minutes. In high humidity environments, the cocoa powder and flour will absorb ambient moisture and the batter may feel slightly looser than expected — add 1 tablespoon (8g) of flour to compensate and ensure the batter holds its thick, paste-like consistency before it goes into the pan.
Expert Pro-Tips
Weigh the chocolate chips, not the cup. A cup of chocolate chips measured by volume can vary by 30 to 40g depending on how tightly the chips are packed. At 1½ cups, that variance means the difference between dense chip coverage across the whole surface — as shown in the overhead pan photo — and sparse, patchy coverage that leaves some scoops with barely any melted chocolate. Weigh to 255g every time.
Let the butter cool in the mixing bowl, not a separate container. Pour the melted butter directly into the large mixing bowl and let it cool there for 10 to 15 minutes while the oven preheats. The bowl itself will absorb some of the heat and the butter cools faster in a wide vessel than in a small cup. When you are ready to mix, the bowl with the cooled butter is already your working vessel — pour the dry ingredients in on top and go from there.
Score the surface lightly before cutting into squares. If you are serving this as cut squares rather than warm scoops, run a sharp knife lightly across the surface in a 3×3 grid pattern immediately after the 10-minute rest. This gives you a guide for clean cuts once the cake has cooled fully — approximately 45 to 60 minutes. Cutting without a guide produces uneven squares and the soft interior drags and smears along the knife blade.
How to Store Chocolate Dump Cake
Room Temperature
Once the cake has cooled completely in the pan — at least 45 to 60 minutes after coming out of the oven — cover the pan tightly with plastic wrap pressed directly onto the surface of the cake. Do not use aluminum foil as the primary cover — foil does not seal tightly enough against the surface and allows air to dry out the top layer overnight. Store at room temperature for up to 2 days.
Day 1: the cake at room temperature reads like a dense, set brownie — the center is firmer than when warm but still noticeably softer and more moist than the edges. The chips on top will have set but will still feel slightly yielding when pressed.
Day 2: the edges firm up further and lose most of their moisture. The center is still denser and softer than the edges but has set past the gooey stage it had when warm. Both days are good — just different from the warm-scoop version. Do not store in a zip-lock bag — the cake will sweat inside the bag and the top becomes sticky and wet within a few hours.
Refrigerator
The refrigerator is not recommended for the first 2 days if you are prioritizing texture. Cold temperatures firm the chocolate chips completely and tighten the crumb significantly — the cake loses the soft, dense quality that makes it worth eating and becomes harder and more compact than it should be.
If you need to store beyond 2 days, refrigeration is the right call. Transfer cut squares to a lidded hard-sided container with a sheet of parchment between layers to prevent sticking. Refrigerate for up to 5 days. Before serving, bring individual squares to room temperature for 20 to 30 minutes, or warm briefly in the microwave at 50% power for 20 to 30 seconds — this brings the chips back to a melted, soft state and restores most of the original texture.
🗒 Luna’s Note: My preferred way to reheat a refrigerated square is 25 seconds at 50% power in the microwave, then 10 seconds more if the center still feels cold. Any longer and the edges get rubbery. A cold square heated too fast loses the fudgy center completely — low power and short bursts are the only way to bring it back correctly.
Freezer — Baked
This cake freezes well once fully cooled and cut into individual squares. Wrap each square individually in a layer of plastic wrap, pressing the wrap against all six sides to eliminate air contact. Place the wrapped squares into a freezer-safe zip-lock bag or a lidded hard-sided freezer container. Freeze for up to 2 months.
To thaw, transfer the wrapped squares to the refrigerator overnight — approximately 8 hours. Do not thaw at room temperature — the condensation that forms as the cake warms causes the surface to become wet and the crumb to turn gummy. Once thawed, reheat in the microwave at 50% power in 20-second increments until the center feels warm and the chips are soft again. The texture after freezing and reheating is approximately 85 to 90% of the fresh result — slightly less gooey at the center but still dense and chocolatey.
Freezer — Unbaked
This batter does not freeze well in its unbaked state. The leavening reacts the moment it contacts moisture — freezing the mixed batter means the baking powder has already begun its reaction and will not produce the correct lift when eventually baked. Mix and bake on the same day. If you want to prepare ahead, measure and combine the dry ingredients and store them in a sealed container at room temperature for up to 3 days. Measure the wet ingredients on baking day and combine fresh.
Serving Suggestion
I serve this cake warm from the pan at the 10-minute mark with a large spoon and no ceremony — scooped directly into bowls the way you would serve a self-saucing pudding. A scoop of good vanilla ice cream placed on top while the cake is still warm is the version I make for anyone I want to impress. The ice cream melts into the molten chocolate center and pools at the base of the bowl in a way that tastes significantly better than the sum of its parts.
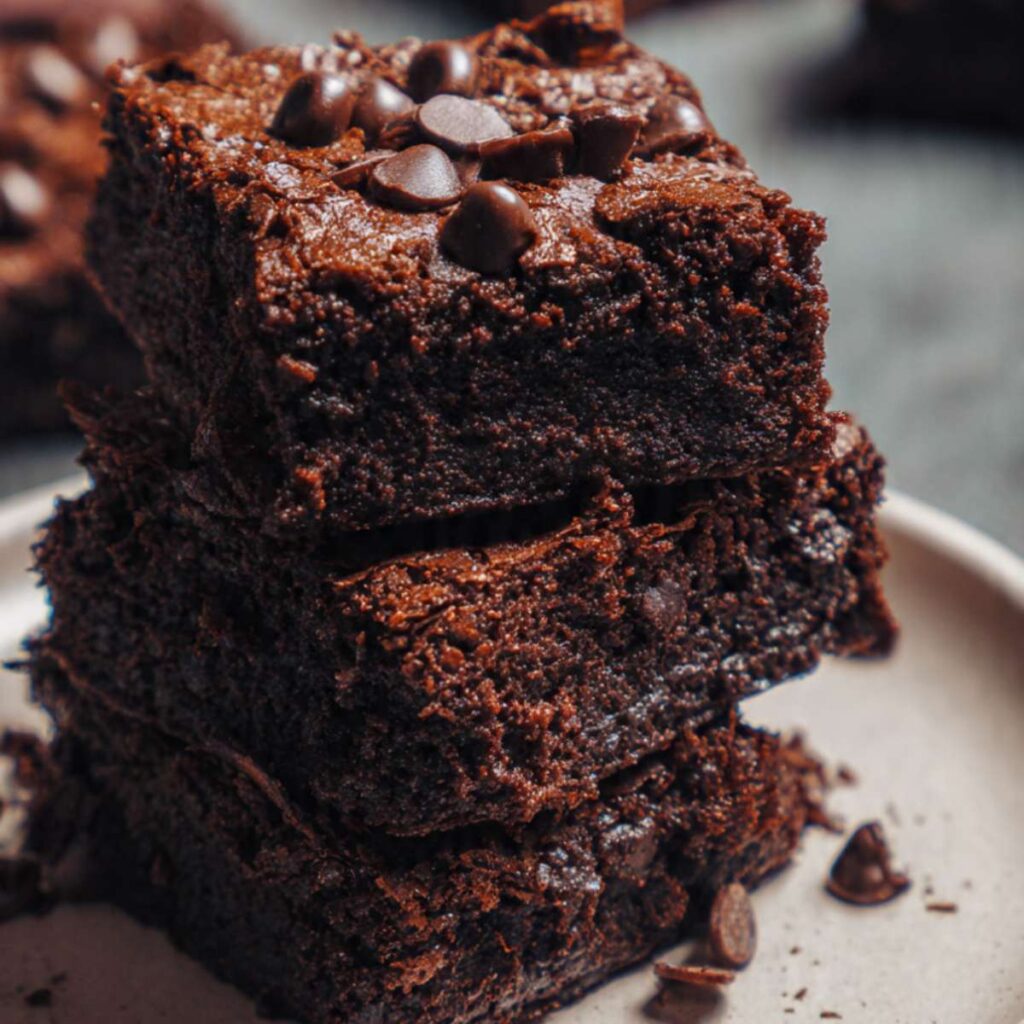
If I am cutting squares for a more composed presentation — as shown in the stacked slice photo — I let the cake cool fully for 45 to 60 minutes, cut with a sharp knife wiped clean between each cut, and serve on a plate with a dusting of natural unsweetened cocoa powder over the top.
Frequently Asked Questions About Chocolate Dump Cake
What is a chocolate dump cake?
A chocolate dump cake is a one-bowl baked dessert where all the ingredients are combined directly in the mixing bowl — no creaming, no alternating additions, no electric mixer — and the batter is dumped into the pan in one step. The name refers to the mixing method, not the quality of the result. This specific version produces a dense, fudgy, brownie-like texture with a soft center and melted chocolate chips pooled across the top — significantly different from a boxed dump cake made with canned filling and dry cake mix. Everything here is made from scratch in under 15 minutes of active time.
What makes a dump cake different from a regular cake?
A regular cake relies on the creamed butter method — fat and sugar are beaten together to trap air, which expands in the oven and produces a light, open crumb structure. A dump cake skips that aeration step entirely. The result is a denser, moister, more compact texture that sits closer to a brownie than a layer cake. In this recipe, the low flour ratio and the melt-and-mix method work together to produce a crumb with very little gluten development and very little air — which is exactly what creates the fudgy, dense interior visible in the stacked slice photo.
Can I make chocolate dump cake ahead of time?
You can, with one important distinction. The baked cake holds well at room temperature for up to 2 days covered with plastic wrap pressed directly onto the surface. The texture shifts from warm and molten to firm and brownie-like as it cools — both are good, just different. What you cannot do is mix the batter ahead of time and bake it later. The baking powder begins reacting the moment it contacts the wet ingredients, and a batter that sits unbaked for an hour will have lost most of its leavening power before it reaches the oven. If you want to prep ahead, measure and combine the dry ingredients up to 3 days in advance and store them sealed at room temperature. Add the wet ingredients on baking day.
Can I substitute oil for butter in chocolate dump cake?
Yes, but the result will be different in two specific ways. Oil produces a slightly moister crumb at room temperature the following day because oil does not solidify at room temperature the way butter does. However, oil has no flavor of its own — the rich, deep chocolate flavor in this cake comes partly from the butter, and an oil-based version will taste noticeably flatter. If you need a dairy-free version, use ½ cup (105g) of a neutral-flavored oil such as refined coconut oil or vegetable oil and replace the whole milk with full-fat oat milk or almond milk. The texture will be slightly less rich but the cake will still bake correctly. For the version shown in the photos, unsalted butter is the right choice. If you want to explore more easy one-bowl chocolate desserts, my chocolate mug cake uses oil as the fat and shows exactly what that texture difference looks like in a single serving.
Can I use a box mix for chocolate dump cake?
You can replace the dry ingredients in this recipe with a box of chocolate cake mix — but the result will not match what is shown in the photos. Box mixes contain leavening, emulsifiers, and flavor agents calibrated for a standard cake texture — light, airy, and springy. The fudgy, dense, brownie-like interior in these photos comes specifically from the low flour ratio and the absence of the creaming method. A box mix version will bake up softer, lighter, and more cakey than the version here. If your goal is the gooey, molten-centered result visible in the wooden spoon pull photo, the from-scratch version is the one to use.
How do I know when a chocolate dump cake is done?
Use the press test, not the toothpick test. At 25 to 27 minutes at 350°F (175°C), gently press the center of the cake with one finger. The surface should feel set and resist your finger — it should not leave a wet indent. The center will still feel soft but should have structure underneath. The edges will look slightly matte and more set than the center, and the chips across the top will look melted and glossy. A toothpick that comes out clean means the cake has baked past the fudgy stage — protein coagulation is complete and the starch has dried out. For this recipe, the press test is the only reliable doneness signal. If the center still feels completely liquid at 25 minutes, add 2 minutes and check again. Do not go past 30 minutes.
Can I double this recipe, and does the bake time change?
You can double the recipe, but do not bake it in one deeper pan — the extra mass means the center will not bake through at the correct rate and the edges will overbake before the interior sets. Instead, bake two separate 8×8 inch (20x20cm) pans side by side on the same middle rack, rotating them once at the 15-minute mark for even heat distribution. The bake time stays at 25 to 27 minutes because the batter depth in each individual pan is unchanged.
Note the leavening math carefully: the original recipe uses ½ teaspoon (2g) of baking powder. When doubling, do not double the leavening to a full 1 teaspoon — use ¾ teaspoon (3g) total across the doubled batch, split evenly between the two pans at approximately ⅜ teaspoon each, or round to a scant ½ teaspoon per pan. Leavening does not scale linearly — doubling it exactly produces a cake that rises too fast, then collapses in the center before the structure sets. The ¾ teaspoon total is the correct amount. If you enjoy easy one-pan chocolate desserts that scale well, my pumpkin dump cake uses the same two-pan doubling method and the same leavening rule applies there too.

One Bowl Chocolate Dump Cake
Ingredients
Equipment
Method
- Position the oven rack in the middle slot and heat the oven to 350°F (175°C), then grease an 8×8 inch (20x20cm) light-colored ceramic or aluminum baking dish thoroughly with unsalted butter, covering the bottom, all four sides, and the corners.
- In a large mixing bowl, whisk together 1 cup (125g) all-purpose flour, ¾ cup (150g) plain white granulated cane sugar, ½ cup (40g) natural unsweetened cocoa powder, ½ tsp (2g) baking powder, and ½ tsp (3g) fine sea salt with 20 to 25 wide circular strokes until the color looks completely even with no pale flour patches or dark cocoa streaks.
- Make a well in the center of the dry ingredients and add 2 large room-temperature eggs, ½ cup (113g) unsalted butter melted and cooled to below 90°F (32°C), and ½ cup (120ml) room-temperature whole milk directly into the well — confirm the butter is below 90°F (32°C) before adding the eggs.
- Using a silicone spatula, fold the wet and dry ingredients together with slow deliberate strokes from the bottom of the bowl upward, counting 20 to 25 strokes, and stop the moment no dry flour streaks remain — the batter should be thick, dense, and paste-like, dropping heavily from the spatula rather than pouring.
- Scrape the entire batter into the prepared baking dish and use the flat face of the spatula to spread it from the center outward toward each edge and corner until the surface looks roughly even and the batter reaches all four corners.
- Scatter 1½ cups (255g) semi-sweet chocolate chips evenly across the entire surface of the batter in rows from one edge to the other so the chips cover nearly every square inch — do not press them into the batter.
- Bake on the middle rack at 350°F (175°C) for 25 to 27 minutes without opening the oven before the 23-minute mark, then gently press the center with one finger — the surface should feel set and resist your finger while the center still feels soft, and the chips should look melted and glossy; if the center still feels liquid, add 2 minutes and recheck.
- Remove the pan from the oven, set it on a wire rack, and rest for exactly 10 minutes before scooping warm directly from the pan — or cool fully for 45 to 60 minutes before cutting into 9 squares with a sharp knife wiped clean between each cut.