Pumpkin Dump Cake Recipe

The first time I made pumpkin dump cake, I did not believe it was going to work. A box of cake mix poured dry over a pumpkin custard filling, butter melted on top, no stirring, no mixing, no technique. It looked wrong going into the oven. It came out looking exactly like the photos. That was batch one. I have made it eleven more times since then, and I have changed almost nothing from that first attempt — which is either a sign that the recipe is already right, or a sign that I should have moved on to something harder. I kept it.
What I did change was the filling ratio. The first version I tried used a full cup of granulated white sugar in the pumpkin layer. It tasted like pumpkin pie filling poured under cake mix — sweet, one-dimensional, and heavier than it needed to be. Swapping most of that sugar for packed light brown sugar and adding a real measure of pumpkin pie spice instead of individual spices changed the flavor depth significantly. The filling tastes like something you made from scratch, not from a can and a box.
I tested yellow cake mix against spice cake mix across four batches. Yellow wins. Spice cake mix sounds logical — pumpkin and spice, obvious pairing — but in practice it creates a flavor collision. The pumpkin filling already carries the cinnamon, ginger, and clove. Adding a second spiced layer on top muddies both. Yellow cake mix stays neutral and lets the pumpkin flavor lead. I would not go back to spice cake mix in this recipe.
I tested the butter application two ways: poured melted versus sliced cold. The cold-sliced-butter version is what most dump cake recipes call for. I found it inconsistent — cold butter slices do not always melt evenly in the oven, leaving dry pockets of unmixed cake mix on the surface. Melting the butter and drizzling it evenly over the cake mix produced a more uniform streusel topping every single time. The surface in the photos is the melted-butter version.
No mixer. No chilling. No separate streusel prep — the topping forms on its own in the oven. The pumpkin filling goes in first, the dry cake mix goes straight on top, butter goes over that, and the oven does the rest. Start to finish, including the 15 minutes of cooling time before serving, this is a 70-minute recipe.
🗒 Luna’s Note: I always use a kitchen scale to weigh the butter before melting — 113g is exactly one stick. Eyeballing melted butter in a measuring cup almost always gives you more than you need, and extra butter makes the topping greasy instead of crisp.
| Prep Time | Cook Time | Total Time | Yield | Difficulty |
|---|---|---|---|---|
| 10 min | 50 min | 60 min + 15 min cool | 12 servings | Easy |
| Calories | Fat | Carbs | Sugar | Protein |
|---|---|---|---|---|
| ~420 kcal | ~22g | ~54g | ~36g | ~6g |
Macros are approximate and will vary based on ingredient brands and serving size.
Ingredients & Tools
For the Pumpkin Filling
- 1 can (15 oz / 425g) 100% pure pumpkin purée — not pumpkin pie filling
- 1 can (12 oz / 354ml) full-fat evaporated milk — not sweetened condensed milk
- 3 large eggs (approximately 50g each without shell), room temperature
- 1 cup (200g) packed light brown sugar
- 2 tsp (5g) pumpkin pie spice, checked for freshness
- 1 tsp (5ml) pure vanilla extract — not imitation
- ½ tsp (3g) fine sea salt
For the Topping
- 1 box (15.25 oz / 432g) yellow cake mix, such as Betty Crocker or Pillsbury — not spice cake mix, not white cake mix
- 1 cup (113g) unsalted butter, melted — weighed before melting
- 1 cup (100g) pecan halves, roughly chopped — raw (see pro-tip for toasting upgrade)
- ¼ cup (50g) packed light brown sugar
For Serving
- Whipped cream or one scoop of vanilla ice cream per serving
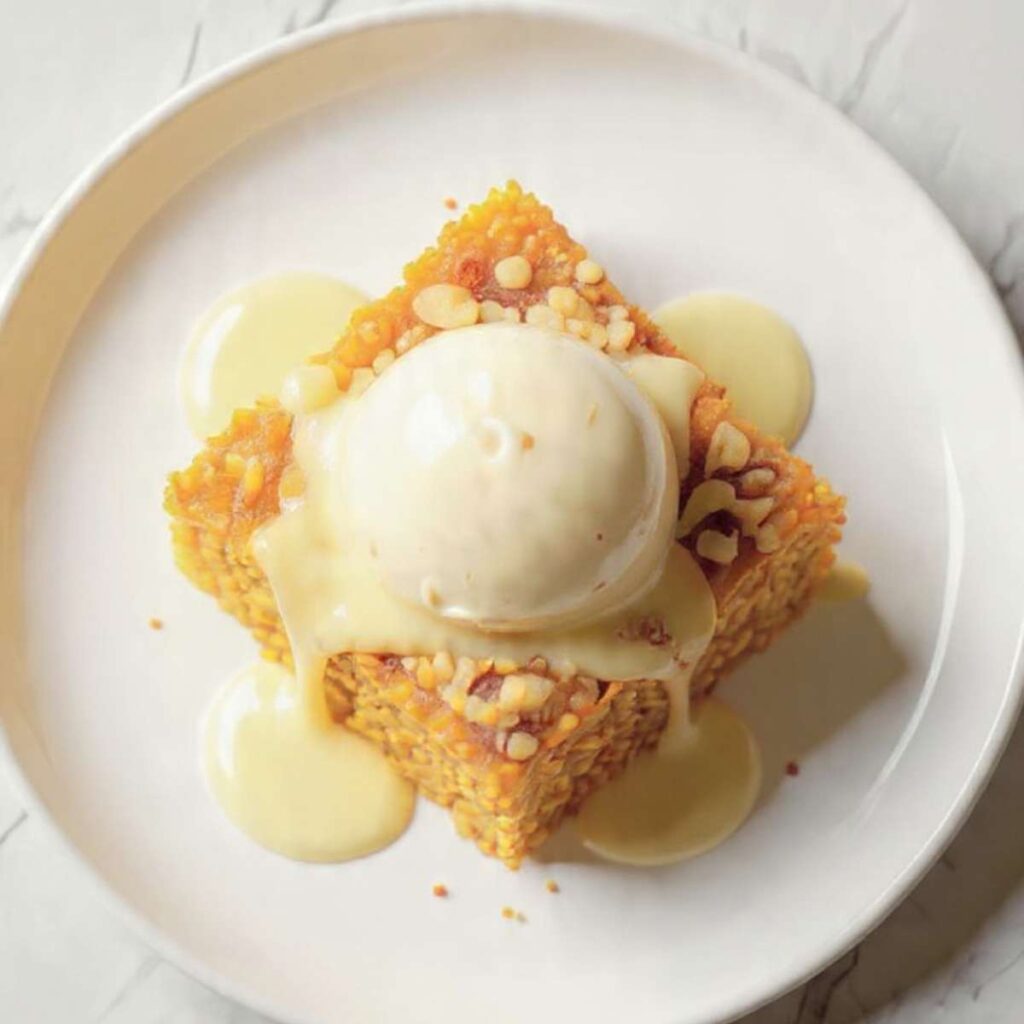
- Vanilla cream sauce or caramel sauce, optional — for the ice cream version shown in Images 3–5
Before You Start
No mixer needed. This entire recipe comes together with a large mixing bowl, a whisk, and a silicone spatula. The only equipment that does any real work is your oven.
No chilling required — the filling goes into the pan immediately after mixing and straight into the oven. There is no resting step.
Weigh the butter before melting. 113g is exactly one standard stick. Melt it in a small saucepan over low heat or in the microwave in 30-second increments — do not let it bubble or brown. Pour it while it is still warm and liquid so it distributes evenly.
For the most accurate results, use a kitchen scale set to grams. Volume measurements like cups and tablespoons can vary by 20–30% depending on how an ingredient is packed or poured. The gram weights in this recipe are the numbers I tested with — they are the most reliable way to get the same result I got.
Use 100% pure pumpkin purée — not pumpkin pie filling. These are sold side by side on the same shelf and the cans look almost identical. Pumpkin pie filling already contains sugar and spices. If you use it here, the filling will be oversweetened and the spice level will be out of control. Read the label before opening.
Evaporated milk is not sweetened condensed milk. They live in the same aisle, they are both sold in small cans, and they are completely different products. Evaporated milk is unsweetened, thinner, and dairy-forward. Sweetened condensed milk is thick, very sweet, and will turn this filling into something closer to fudge. Use full-fat evaporated milk only.
Bring your eggs to room temperature. Eggs pulled from the fridge need 30 minutes at room temperature, or place them in a bowl of warm (not hot) water for 10 minutes. Cold eggs do not blend smoothly into the pumpkin filling and can leave streaks of unincorporated egg white in the baked layer.
Check your pumpkin pie spice for freshness. Ground spices lose potency after 12–18 months. Rub a small amount between your fingers — it should smell sharp, warm, and complex. If it smells faint or dusty, replace it before using. Stale spice is the single most common reason a pumpkin dessert tastes flat.
Brown sugar freshness check. If your brown sugar has hardened, place a damp paper towel over it and microwave in 20-second increments until it is pliable enough to pack. Hardened brown sugar cannot be measured accurately by volume.
Pecans: Raw pecans go rancid faster than most nuts, especially if stored in a warm pantry. Smell them before chopping — fresh pecans smell nutty and clean. Rancid pecans smell sour or bitter, like old cooking oil. If they smell off, replace them. Rancid pecans do not improve in the oven.
Position your oven rack in the middle of the oven before preheating. The top rack will burn the streusel topping before the pumpkin filling has time to set. The bottom rack produces the opposite problem — the bottom of the filling overcooks while the topping stays pale. Middle rack only.
Pan: You need a 9×13 inch (23×33cm) baking pan. Light-colored aluminum produces the most even bake — the pumpkin layer sets at the same rate as the topping browns. Dark non-stick pans absorb more heat and can overbrown the bottom of the filling before the topping sets. Glass or ceramic pans retain heat longer — if using either, reduce the oven temperature by 25°F (15°C) and add 5–8 minutes to the bake time.
Parchment or grease? Grease the pan with non-stick spray or a thin layer of softened butter. Do not line with parchment — the filling needs direct contact with the pan to set properly at the edges, and parchment creates a barrier that slows this down.
Necessary Tools
- 9×13 inch (23×33cm) baking pan — light-colored aluminum recommended
- Large mixing bowl
- Whisk
- Silicone spatula
- Kitchen scale
- Small saucepan or microwave-safe bowl (for melting butter)
- Measuring cups and spoons
- Oven thermometer (recommended — most home ovens run 15–25°F / 8–14°C off)
How to Make Pumpkin Dump Cake
This is a layer-and-bake method — no mixer, no creaming, no separate topping prep. Every component goes into the pan in sequence and the oven does the rest.
Step 1: Preheat the Oven and Prepare the Pan
Preheat your oven to 350°F (175°C) and position the rack in the middle position. Most home ovens run 15–25°F (8–14°C) off — if you have an oven thermometer, confirm the actual temperature before the pan goes in. A low oven is the most common reason the pumpkin layer stays wet and never fully sets.
Grease your 9×13 inch (23×33cm) light-colored aluminum baking pan with non-stick spray or a thin layer of softened butter, coating the bottom and all four sides evenly. Do not line with parchment — the filling needs direct pan contact at the edges to set correctly.
The pan should look evenly coated with no dry spots — run your finger along the corner seams to confirm coverage there too, since corners are where filling tends to stick most.
Set the prepared pan aside while you build the filling. The oven needs the full preheat time — do not rush this step.
Step 2: Whisking the Pumpkin Filling Until Smooth and Cohesive
Add the 100% pure pumpkin purée (15 oz / 425g), full-fat evaporated milk (12 oz / 354ml), 3 large room-temperature eggs, 1 cup (200g) packed light brown sugar, 2 tsp (5g) pumpkin pie spice, 1 tsp (5ml) pure vanilla extract, and ½ tsp (3g) fine sea salt to your large mixing bowl.
The full-fat evaporated milk — with approximately 60% of its water removed during processing — carries more fat per volume than whole milk, which gives the filling body and helps the custard set evenly from edge to center without curdling.
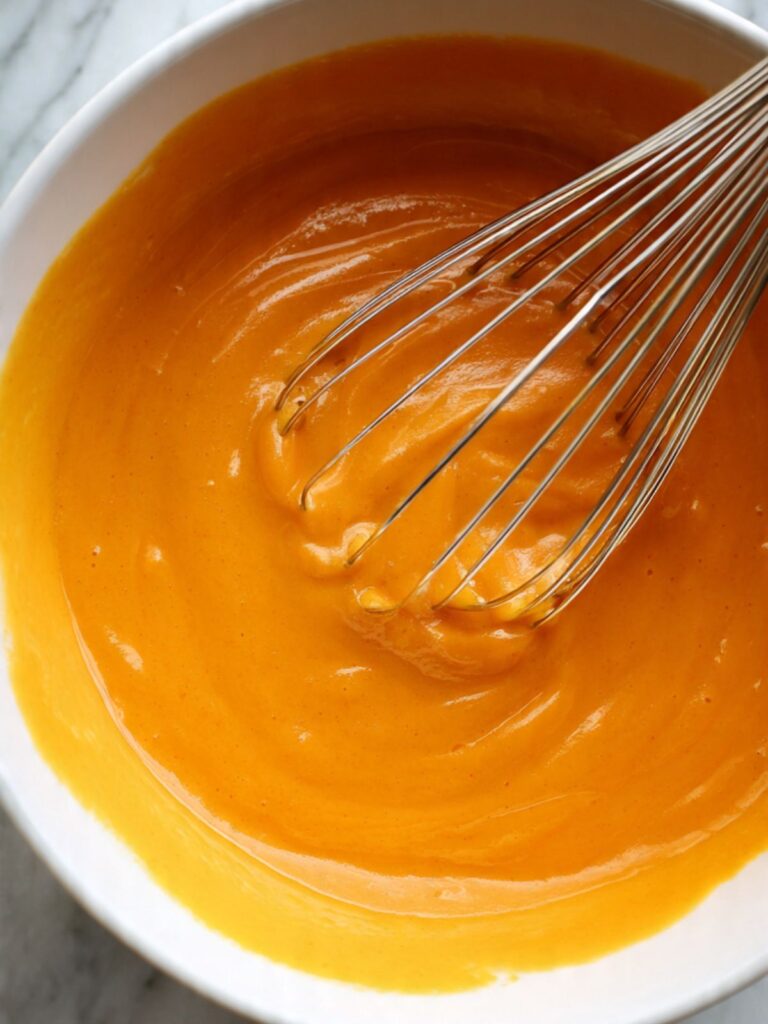
Whisk everything together for 60–90 seconds until the mixture is completely smooth, uniform in color, and no streaks of egg white or pumpkin purée remain. The filling should look like a deep amber-orange custard — glossy, cohesive, and pourable without being watery.
⚠️ Baker's Warning: Do not undermix the filling. If streaks of egg white remain when the filling goes into the pan, those areas will bake up as rubbery, pale patches in the finished layer — visible when you cut into the cake and unpleasant in texture. Whisk until the color is absolutely uniform throughout.
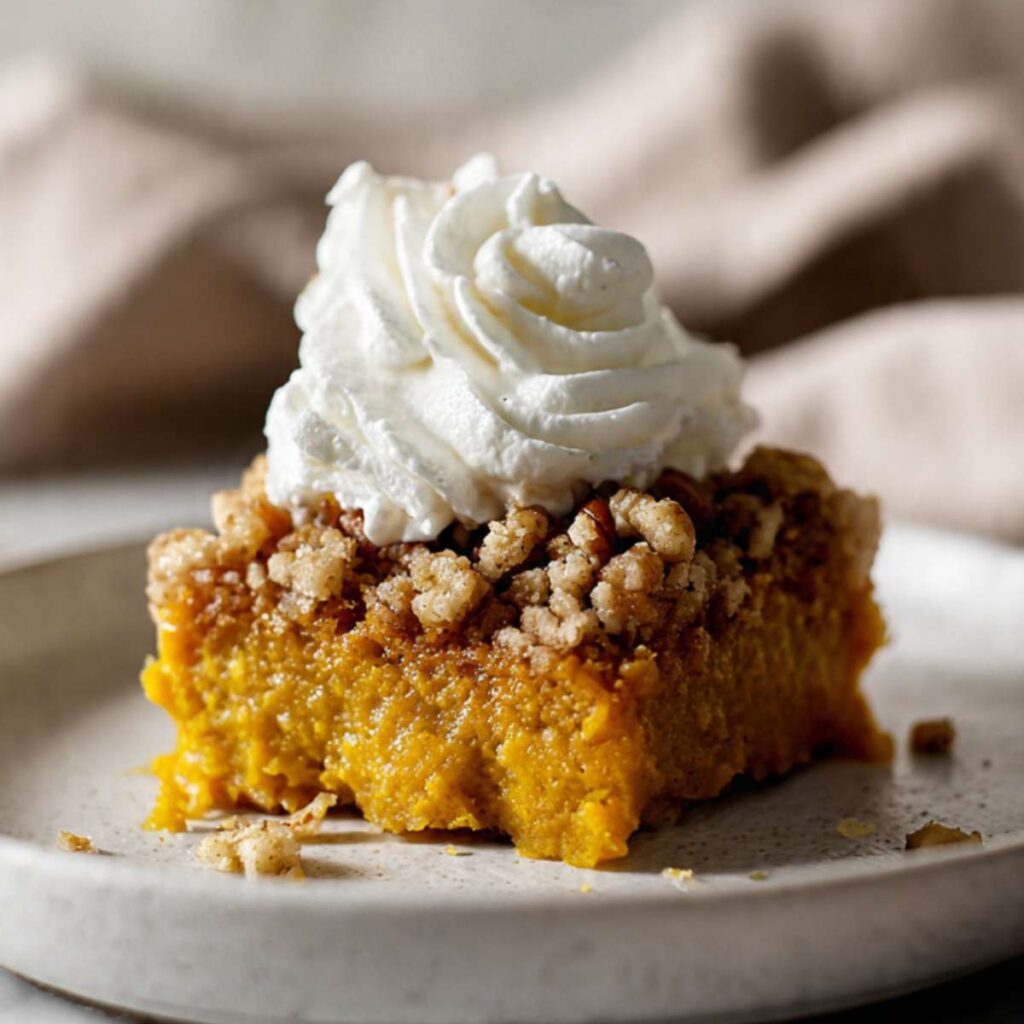
The finished filling should look exactly like the deep amber-orange layer visible in the plated photos — rich, smooth, and deeply colored from the brown sugar and pumpkin. If it looks pale or unevenly colored, keep whisking.
Pour the filling into the prepared pan and use your spatula to spread it into an even layer that reaches all four corners. The filling should settle flat on its own within a few seconds — if it does not level out, tilt the pan gently.
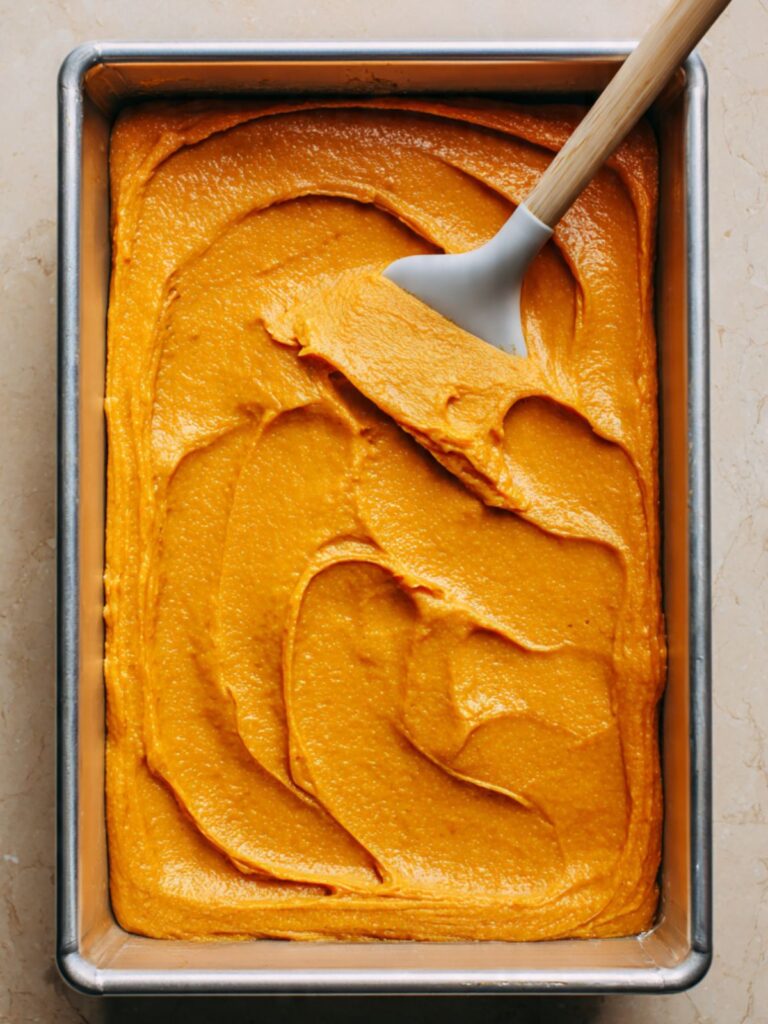
Your filling is in the pan — the next step goes directly on top of it without any stirring.
Step 3: Layering the Dry Cake Mix Over the Filling
Open your box of yellow cake mix (15.25 oz / 432g) and pour the entire contents directly over the pumpkin filling in an even layer. Do not stir. Do not mix. Do not tap the pan to settle the cake mix down into the filling.
The dry cake mix stays separate because the butter-to-dry-ingredient ratio is too low to form a cohesive batter — instead it behaves like a crumble topping, which is exactly what produces the streusel texture shown in the photos.
Use your spatula or clean fingers to spread the dry cake mix into a flat, even layer that covers the filling from edge to edge. The goal is complete coverage — no exposed pumpkin filling showing through. If your cake mix has any lumps from the box, break them up with your fingers now before the butter goes on.
⚠️ Baker's Warning: Resist the urge to stir the cake mix into the filling at this stage — if you do, the two layers will combine into a dense, gummy batter that bakes up nothing like the soft pumpkin base and crisp streusel topping as visible in the cross-section of the plated hero slice — the deep amber-orange pumpkin layer sitting cleanly beneath the golden pecan streusel — that separation only exists because the two layers never mixed. If you stir, both layers disappear into each other and the result is a dense, uniform batter with no contrast.
The cake mix layer should look like a dry, even blanket completely covering the orange filling underneath — no orange visible, no thick spots or thin spots.
The pan is ready for the pecans and brown sugar before the butter goes on. Move directly to the next step.
Step 4: Adding the Pecan Streusel Topping
Scatter 1 cup (100g) roughly chopped pecan halves evenly across the dry cake mix layer. Follow immediately with ¼ cup (50g) packed light brown sugar, distributing it as evenly as possible over the pecans and cake mix.
The pecan pieces should be roughly chopped — not finely ground, not left as whole halves. Medium-rough pieces approximately ¼ inch (6mm) in size give you the visible, textured topping shown in the close-up shots. Whole halves stay too large and do not integrate into the streusel as the butter melts through. Fine pieces disappear into the topping and lose their textural contrast.
🗒 Luna’s Note: I always toast my pecans for 5 minutes at 350°F (175°C) before chopping them when I have the time. Toasted pecans have a deeper, nuttier flavor that raw pecans cannot match — and since the topping is where all the texture lives in this recipe, that extra flavor layer matters. If you are short on time, raw pecans work fine.
The surface should look like an even scatter of pecan pieces and brown sugar across the full cake mix layer — as shown in the overhead image, with pieces distributed all the way to the edges of the pan.
The butter goes on next — and how you apply it determines whether the topping bakes up crisp and golden or stays dry and floury in patches.
Step 5: Drizzling the Melted Butter Evenly Across the Surface
Pour the 1 cup (113g) melted unsalted butter slowly and evenly over the entire surface of the cake mix, pecans, and brown sugar. Use a slow, controlled pour — work in a grid pattern across the pan rather than pouring it all in one spot and hoping it spreads. The goal is complete, even coverage.
Every part of the dry cake mix layer needs butter contact to bake correctly. Areas that receive butter will bake into a golden, slightly crisp streusel. Areas that do not receive butter will stay dry and floury — a chalky, unpleasant texture that readers often mistake for a recipe failure when it is actually an application problem.
⚠️ Baker's Warning: If you see significant dry white patches of cake mix after the butter is applied — areas where no butter has reached — use a spoon to redistribute a small amount of butter from the edges toward the dry center. Do not stir. Just redirect the surface butter gently. Patches of unbaked dry cake mix will still be chalky and raw-tasting after 50 minutes in the oven regardless of how long you bake it.
After the butter is applied, the surface should look mostly moistened and glossy — some dry patches between pecan pieces are normal and will bake out, but large white flour-dry areas need attention before the pan goes in.
The pan is ready for the oven. Do not cover it.
Step 6: Baking Until the Topping Is Golden and the Filling Is Set
Place the pan on the middle rack of your preheated 350°F (175°C) oven. Do not cover the pan — the top needs direct heat to develop the golden streusel shown in the photos.
Bake for 45–55 minutes. Start checking at 45 minutes. The cake is done when the topping is deep golden brown across most of the surface, the pecan pieces look toasted and fragrant, and — most importantly — the filling layer beneath is fully set with no liquid jiggle when you shake the pan gently.
To check doneness: insert a toothpick or thin skewer into the center of the pan, going through the topping and into the pumpkin layer. The toothpick should come out with moist crumbs — not wet, not clean. Wet filling means the pumpkin custard has not fully set and needs more time. A bone-dry toothpick means it has been in the oven too long and the filling will be dry and dense rather than custardy.
⚠️ Baker's Warning: Do not open the oven door before 45 minutes. The pumpkin filling is a custard-based layer — it sets through gentle, consistent heat. Opening the door early drops the oven temperature suddenly, which can cause the filling to set unevenly — firm at the edges and still liquid at the center even after the full bake time.
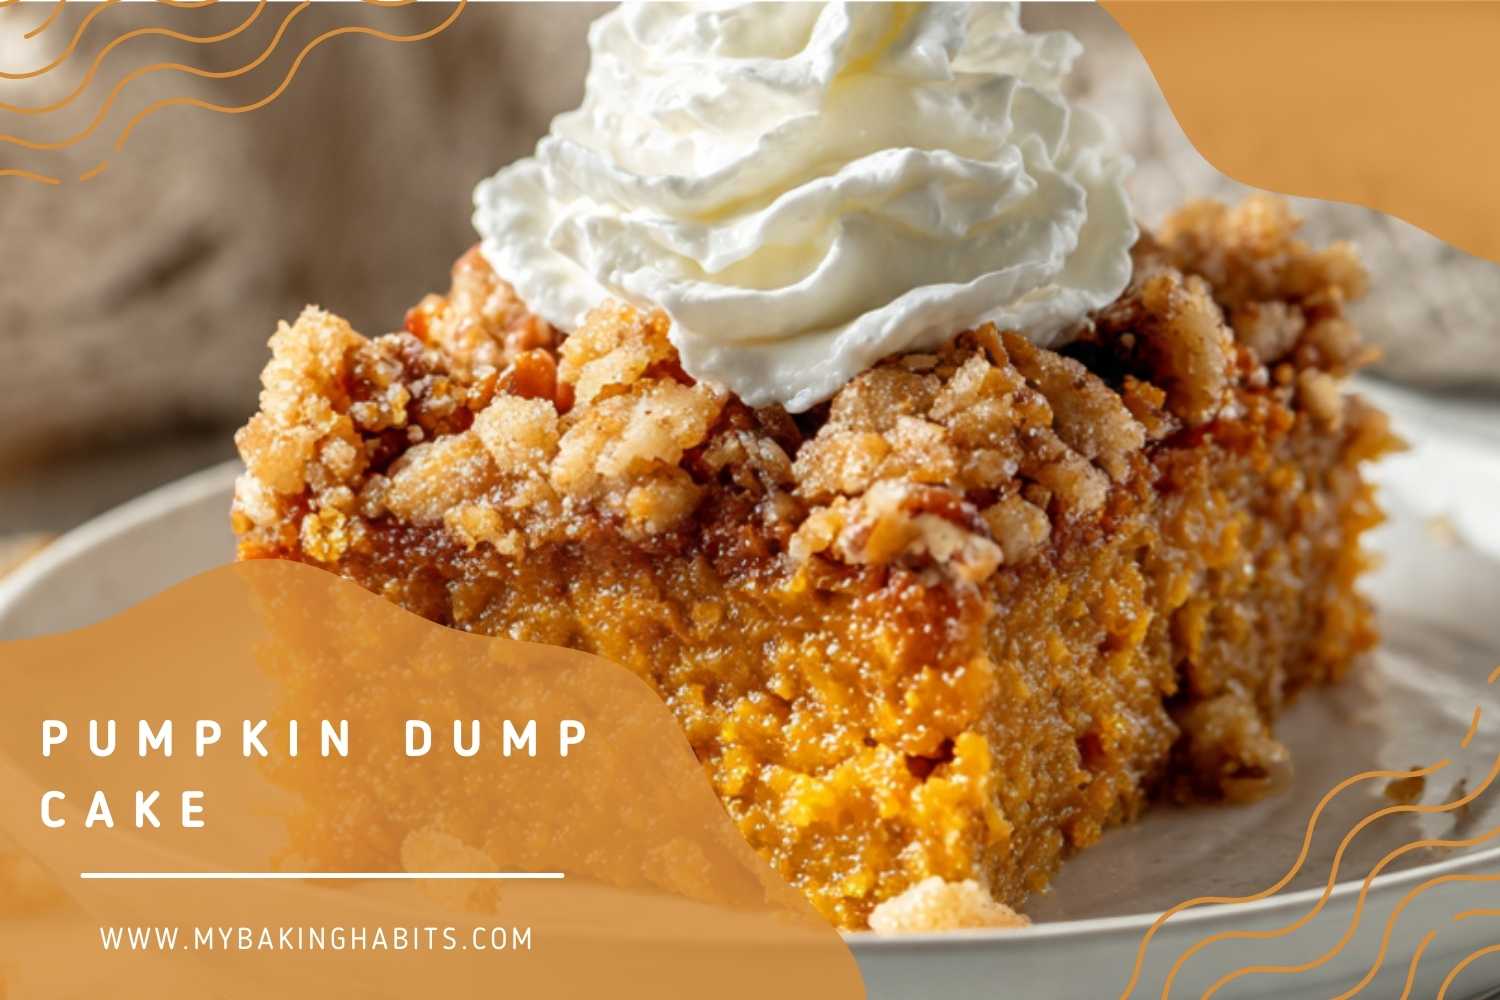
The finished surface should look exactly like the topping visible in the hero images — deep golden brown with darker toasted pecan flecks throughout, no large white or pale patches of uncooked cake mix visible anywhere.
Pull the pan from the oven and set it on a wire rack. Do not serve immediately — move to the cooling step.
Step 7: Cooling Before Serving
Cool the pumpkin dump cake in the pan on a wire rack for a minimum of 15 minutes before cutting and serving. During this time, the pumpkin filling layer continues to set as the temperature drops — the custard firms slightly and holds its shape when cut rather than collapsing into a wet pile on the plate.
⚠️ Baker's Warning: Cutting into the cake before 15 minutes means the filling is still too loose to hold a clean slice. The topping will separate, the filling will run, and the plate will look nothing like the structured rectangular slice shown in the photos. Set a timer and wait.
Fifteen minutes gives you a warm, custardy slice that holds its shape on the plate. Thirty minutes gives you a slightly firmer slice with cleaner edges — better if you are serving guests and presentation matters. Fully cooled to room temperature gives you the cleanest cut of all, though the texture shifts from warm-custardy to denser and more chilled-pudding-like.
After 15 minutes of cooling, the filling should look set at the edges — pulling away very slightly from the pan sides — and the topping should be firm enough that pressing it gently with a fingertip leaves no indentation.
Serve warm with a large piped swirl of whipped cream, or with a scoop of vanilla ice cream and a generous pour of vanilla cream sauce — both presentations are shown in the provided photos and both work equally well with this recipe.
The Science Behind Pumpkin Dump Cake
Why the Pumpkin Layer Bakes Like a Custard, Not a Cake
The first time I baked this, I checked the pan at 45 minutes and the center still looked completely liquid — not underdone, just liquid, like I had opened the oven too early on a crème brûlée. I added 10 more minutes, then 5 more, and the center finally set. I did not understand at the time why the center took so much longer than the edges. The answer is protein coagulation.
Egg proteins begin to set at approximately 145°F (63°C) and are fully coagulated by around 180°F (82°C). The pumpkin filling is a custard — not a cake batter — and custards set from the outside in. The edges are in direct contact with the hot metal pan and reach coagulation temperature first. The center, insulated by the surrounding filling, takes longer. This is not a recipe problem. It is physics. Which is why the toothpick test from the dead center of the pan is the only reliable doneness check — the edges will always look done before the center is ready.
The evaporated milk slows this process slightly in a useful way — its reduced water content means the filling carries more fat and protein per volume than whole milk would, which gives the center a little more time to catch up to the edges before either side overcooks.
How the Dump Cake Method Creates a Streusel Topping Without Any Mixing
The streusel topping in this recipe is not premixed — it assembles itself in the oven through a process that relies on fat migration. When the melted butter is poured over the dry cake mix, it begins to saturate the flour, sugar, and starch particles on contact. In the oven, that saturated mixture does not behave like batter — it behaves like a crumble topping, because the ratio of butter to dry ingredients is too low to form a cohesive batter structure.
As the oven heat rises, the butter migrates downward through the cake mix layer, pulled by gravity and drawn toward the moisture in the pumpkin filling below. This creates two distinct zones: a lower zone where butter and filling moisture meet and produce a slightly denser, more cake-like layer at the boundary between filling and topping; and an upper zone where the cake mix, pecans, and brown sugar sit with only enough butter to produce the golden, crumbly streusel texture visible in the photos. The Maillard reaction — the browning of proteins and sugars above 280°F (138°C) — is responsible for the deep golden color and toasted flavor of the finished topping.
This is also why even butter coverage is the most technically important step in this recipe. Butter that pools in one area produces a dense, wet patch in the topping rather than uniform streusel. Butter that misses a section entirely leaves raw, chalky flour that no amount of bake time will fix — the Maillard reaction cannot happen without fat present to carry the heat to the dry ingredients.
If you want to explore more dump cake variations built on this same layering principle, my peach dump cake uses the same method with a fruit filling base and a slightly different topping ratio — a useful comparison for understanding how the filling type changes the bake time and texture.
Why Brown Sugar Keeps the Filling Soft and Moist for Days
Brown sugar’s hygroscopic properties — its ability to draw and hold moisture from the surrounding environment — are what keep the pumpkin filling soft and custardy even on Day 2 and Day 3. Brown sugar contains molasses, and molasses is hygroscopic by nature. It actively pulls water molecules from the air and holds them within the baked structure, slowing the rate at which the filling dries out after baking.
This is a meaningful functional difference from white granulated sugar in this recipe. White sugar does not have the same moisture-retaining capacity — a pumpkin filling made with all white sugar will taste fine the day it is baked but will be noticeably drier and denser by the following day. The molasses in brown sugar also contributes the deep caramel-adjacent flavor note that gives the filling its complexity — the flavor you taste in the first bite that makes it seem like more than just pumpkin and spice.
The ¼ cup (50g) of brown sugar in the topping serves a second function beyond flavor. As it melts and caramelizes in the oven heat, it acts as a binding agent for the cake mix and pecan pieces around it — pulling the loose crumble together into the cohesive, slightly chewy-crisp streusel clusters visible in the close-up topping shots rather than a pile of separate, dusty crumbs.
🗒 Luna’s Note: I have made this with dark brown sugar instead of light and the flavor difference is real — darker, more molasses-forward, almost reminiscent of a gingerbread note underneath the pumpkin spice. If that sounds appealing to you, it works. I keep the light brown sugar version as the base recipe because it lets the pumpkin flavor lead rather than compete.
Pumpkin Dump Cake Troubleshooting & Pro-Tips
Common Mistakes
Why Your Pumpkin Layer Tastes Oversweetened and Spiced Out of Control
The cause here is almost always pumpkin pie filling used in place of 100% pure pumpkin purée. Pumpkin pie filling is already sweetened and pre-spiced by the manufacturer — it is designed to go directly into a pie shell with nothing added. When you add it to a recipe that already calls for brown sugar and pumpkin pie spice, the result is a filling that is aggressively sweet, over-spiced, and one-dimensional in flavor. The labels look similar. The cans are often shelved next to each other. This is the most common single mistake in every pumpkin baking recipe, and it is completely avoidable — read the label before opening.
The fix if you have already used pie filling: there is no corrective action once the filling is mixed and in the pan. The bake will be edible but noticeably oversweetened. The prevention is reading the label every time — even if you have made this before, because both products are sold by the same brands in nearly identical packaging and it is easy to grab the wrong one automatically.
Why Your Topping Has Chalky, Raw-Tasting Dry Patches
This is a pan preparation failure — specifically, uneven butter coverage. Dry patches of cake mix that receive no butter during application do not bake into streusel. They sit in the oven as dry flour and starch for the full bake time and come out exactly as they went in: chalky, raw-tasting, and floury. No amount of additional baking time will fix a patch that received no butter, because the Maillard reaction that creates the golden, toasted streusel flavor requires fat to carry heat to the dry ingredients.
The specific cause is almost always pouring all the butter into one area of the pan and assuming it will spread on its own — it will not spread evenly enough across a full 9×13 inch pan. The immediate fix if you notice large dry white patches before the pan goes in: use a spoon to redirect butter from the edges toward the dry areas. The prevention is pouring the butter slowly in a deliberate grid pattern across the full surface before the pan goes in.
Why Your Pumpkin Filling Is Still Wet and Loose After the Full Bake Time
A filling that is wet and unset after 55 minutes almost always traces back to one of three causes: oven temperature running significantly low, the wrong milk product used, or the pan size being wrong.
A low oven — common in home ovens that have not been calibrated — means the pumpkin custard never reaches the protein coagulation temperature it needs to set. Confirm your oven temperature with an oven thermometer before concluding there is a recipe problem. Sweetened condensed milk used in place of evaporated milk creates a filling that is so dense and sugar-heavy that it resists setting in the normal bake time and produces a wet, fudge-like center. A pan smaller than 9×13 inches produces a thicker filling layer that requires significantly longer bake time to set through to the center — if you used an 8×8 or 9×9 pan, add 15–20 minutes and reduce the temperature by 25°F (15°C) to prevent the topping from burning before the filling sets.
Why Your Streusel Topping Is Burnt While the Filling Is Still Wet
This is an oven rack position problem combined with a temperature issue. The topping and the filling cook at different rates — the topping browns via the Maillard reaction at the surface, while the filling sets slowly through protein coagulation from the outside in. If your rack is too high, the surface browning happens faster than the filling can set below it, producing a burnt topping over an undercooked filling.
Move the rack to the true middle position before preheating. If the topping is browning too fast after 35 minutes — looking dark before the 45-minute check window — tent the pan loosely with aluminum foil and continue baking until the filling sets. Remove the foil for the last 5 minutes to allow the topping to re-crisp slightly.
Why Your Pumpkin Dump Cake Is Soggy at the Bottom
A soggy bottom layer means the filling was either underbaked or the pan was covered during baking. Covering the pan traps steam from the filling and prevents the bottom from drying out and setting correctly — the moisture has nowhere to go and pools at the base of the pumpkin layer. Always bake uncovered.
Underbaking is the second cause — the toothpick test should return moist crumbs, not wet filling. If the toothpick comes out coated in liquid pumpkin, add 8–10 minutes and test again. The filling sets from the edges inward — the center is always the last area to fully coagulate, so test from dead center, not from the sides.
Why Your Pumpkin Layer Is Dry, Dense, and Grainy Instead of Custardy
The filling in this recipe is a baked custard. Custard overbakes easily — the window between perfectly set and overcooked is narrow. A filling that looks done at 45 minutes may be at its peak. A filling left in until 65–70 minutes will have overcooked egg proteins that squeeze out moisture as they contract, producing a dry, dense, slightly rubbery layer instead of the soft, moist interior shown in the photos.
The specific cause is baking past the toothpick-with-moist-crumbs stage — a toothpick that comes out completely clean means the filling has gone too far. The consequence is irreversible once it happens: there is no fix for an overbaked custard filling. The prevention is starting the toothpick check at 45 minutes without exception, and pulling the pan the moment the toothpick returns moist crumbs — not wet filling, not completely clean. That narrow window is the target.
In a dark pan, this window closes faster — another reason to use light-colored aluminum only.
How Humidity and Altitude Affect This Recipe
In high humidity environments (above 70% relative humidity), the dry cake mix layer will absorb moisture from the air more quickly than in dry climates. This can cause the topping to feel softer and less crisp than expected, even when fully baked. Bake in high humidity at 355–360°F (180°C) to encourage faster surface browning before the moisture softens the topping. Store leftovers in the refrigerator rather than at room temperature — room temperature storage in humid climates accelerates softening significantly.
At high altitude (above 3,500 feet / 1,067 meters), liquids evaporate faster and the pumpkin filling may set more quickly than expected. Reduce the oven temperature by 15°F (8°C) to slow the bake and give the center time to set before the edges overbake. Check doneness at 40 minutes rather than 45 — the bake window tightens at altitude.
Expert Pro-Tips
Toast the pecans before adding them to the topping. Spread the chopped pecans on a dry baking sheet and toast at 350°F (175°C) for 5 minutes before the dump cake goes in. Toasted pecans have a deeper, more complex nuttiness that raw pecans cannot develop during the dump cake bake time alone — the butter and cake mix insulate them from direct heat, so they roast only partially in the oven. Toasting first guarantees full flavor development in the finished topping.
Pour the butter in a slow, deliberate grid pattern — never all at once. Hold the measuring cup about 6 inches above the pan surface and move it in rows from left to right, then front to back, covering the full surface before any single area gets a second pass. This is the single technique that separates a uniform golden streusel from a patchy, unevenly baked topping. It takes 30 extra seconds and makes a visible difference in the finished result.
Use a kitchen scale to confirm your pan size before starting. A 9×13 inch pan holds approximately 14–15 cups of liquid volume. If your pan holds significantly less, it is smaller than labeled — this matters because a filling that is too deep for the pan will not set correctly in the standard bake time. Fill the pan with water and measure if you are unsure.
For the cleanest slices, refrigerate for 30 minutes after the initial 15-minute cool. The pumpkin layer slices significantly more cleanly when cold — the custard firms enough to hold a straight edge when the knife goes through. Wipe the knife clean between each cut. Reheat individual slices in the microwave for 30–45 seconds before serving if you prefer the warm version shown in the photos.
Add ½ teaspoon (1g) of black pepper to the pumpkin filling. This is not a flavor you will identify as pepper — it disappears completely into the spice profile. What it does is sharpen the pumpkin pie spice, particularly the ginger and cinnamon notes, making the filling taste more complex and less one-dimensional. I add it every time and I notice immediately when I forget.
How to Store Pumpkin Dump Cake
Room Temperature
Pumpkin dump cake can be stored at room temperature for up to 2 days, but only in cool, dry conditions — below 70°F (21°C) and below 60% relative humidity. The pumpkin filling is a baked custard made with eggs and evaporated milk, which means it sits in the food safety grey zone for room temperature storage. Two days is the outer limit, not a comfortable default.
Cover the pan tightly with plastic wrap pressed directly onto the surface of the cake — not stretched across the top of the pan with an air gap underneath. If the plastic wrap is stretched across the top of the pan rather than pressed directly onto the cake surface, the air gap underneath will make the streusel topping absorb moisture overnight and turn soft and soggy by morning. Direct contact keeps the streusel texture closer to how it came out of the oven.
Do not store in a zip-lock bag or transfer to a lidded container with vertical sides — the topping will compress and stick. Keep it in the pan it was baked in, covered, on the counter away from heat sources.
Refrigerator
Refrigeration is the recommended storage method for this recipe. The pumpkin filling is a custard and behaves best — both in food safety terms and in texture terms — when kept cold. Cover the pan tightly with plastic wrap and refrigerate for up to 4 days.
The topping will soften slightly in the refrigerator as the streusel absorbs moisture from the filling over time — this is normal and does not affect flavor. To partially restore the crisp texture, reheat individual slices uncovered in a 325°F (165°C) oven for 8–10 minutes rather than the microwave. The microwave reheats the filling beautifully but steams the topping soft. The oven gives you back some of the original texture contrast.
Pull the pan from the refrigerator 10 minutes before reheating — cold ceramic or glass pans brought directly to oven heat can crack. Aluminum pans can go in cold without issue.
🗒 Luna’s Note: I actually prefer this cold, straight from the refrigerator, with a scoop of vanilla ice cream. The chilled pumpkin layer firms into something close to a dense pumpkin cheesecake in texture — completely different from the warm custardy version, and genuinely good in its own right. Day 2 cold is one of those situations where the leftover is better than the original.
Freezer — Baked
Pumpkin dump cake freezes well when handled correctly. Cut the fully cooled cake into individual portions and wrap each slice tightly in plastic wrap, then place the wrapped slices in a freezer-safe zip-lock bag with as much air pressed out as possible. Freeze for up to 2 months.
Thaw individual slices overnight in the refrigerator — do not thaw at room temperature, as the custard filling can develop an uneven texture when it thaws too quickly. Once thawed, reheat uncovered in a 325°F (165°C) oven for 10–12 minutes. The topping will not be as crisp as freshly baked, but the filling reheats beautifully and the flavor is essentially identical to Day 1.
Do not freeze the cake in the pan — the filling contracts slightly as it freezes and can pull away from the pan edges, making it difficult to portion cleanly after thawing.
Freezer — Unbaked
This recipe is not suitable for freezing unbaked. The pumpkin filling is a liquid custard before baking — it cannot be frozen in the pan without separating as it thaws, and the dry cake mix topping would absorb moisture from the filling during the freeze-thaw cycle, eliminating the textural contrast that makes the recipe work. Make it fresh and freeze leftovers after baking if needed.
Serving Suggestion
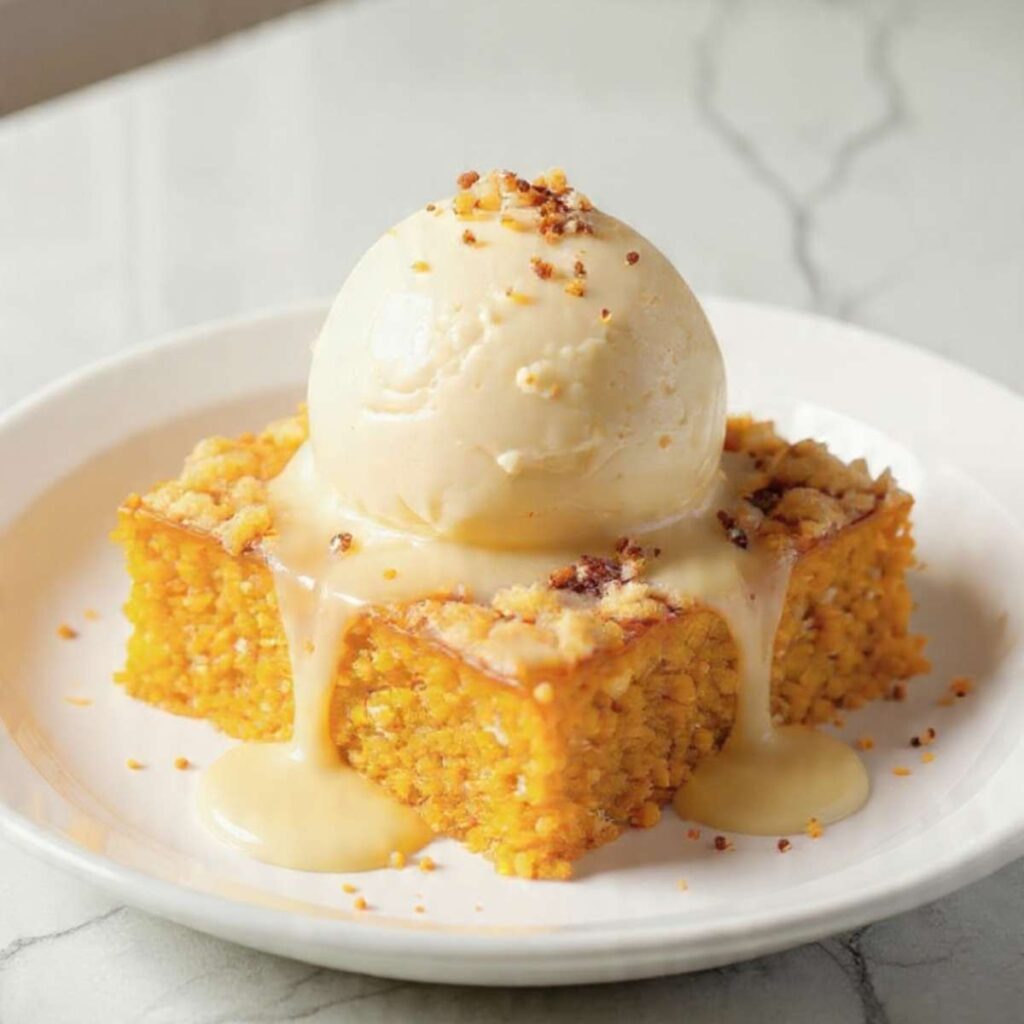
Serve this warm — pulled from the oven after the 15-minute rest, while the pumpkin filling is still soft and custardy and the topping has that fresh-baked contrast between crisp streusel and toasted pecans. The temperature difference between the warm filling and a cold scoop of vanilla ice cream placed directly on top is exactly the experience shown in the ice cream photos — the ice cream begins to melt at the edges immediately, pooling into the streusel and running down the sides of the slice in a way that is genuinely difficult to improve on.
I make this every year starting the first week of October, usually the first cool evening when turning the oven on for an hour actually sounds appealing rather than like a punishment. It is the recipe I bring when someone needs a dessert that feeds twelve people, requires no decorating skill, and can be made entirely from pantry staples. The pumpkin dump cake has never once failed to disappear completely.
The whipped cream version — a large piped swirl directly on the warm slice — is the more casual, weeknight presentation. Both are shown in the photos for a reason: both work, and the choice is entirely about what you have on hand and what the moment calls for. A Tuesday dinner at home calls for whipped cream straight from the can. A dinner party calls for the ice cream and cream sauce.
I have a strong preference for the ice cream version. Whipped cream from a can is fine — I keep a can in my fridge at all times — but the ice cream melting into the streusel while the filling is still warm is one of those combinations that is genuinely difficult to argue with.
Day 2 cold from the refrigerator is a different dessert entirely — denser, firmer, more concentrated in flavor, closer to a chilled pumpkin custard bar than the warm, yielding original. I find I like it better cold. This recipe is one of the few where I make a full pan knowing I will enjoy the leftovers more than the first serving.
This does not travel well as a warm dessert — the filling is too soft to transport without the slices collapsing. Make it where you plan to serve it, or transport it cold in the pan and reheat at the destination.
Frequently Asked Questions About Pumpkin Dump Cake
Can I make pumpkin dump cake ahead of time?
Pumpkin dump cake can be made up to 2 days ahead and stored covered in the refrigerator. The filling holds its texture well when cold — it firms slightly and slices more cleanly than the warm version. The topping softens gradually over time as it absorbs moisture from the filling, so for the best streusel texture, reheat individual slices uncovered in a 325°F (165°C) oven for 8–10 minutes before serving rather than the microwave. Assemble and bake the full recipe, cool completely, cover tightly with plastic wrap, and refrigerate until needed.
Can I use spice cake mix instead of yellow cake mix for pumpkin dump cake?
Spice cake mix works but produces a noticeably different result — and not necessarily a better one. The pumpkin filling in this recipe already carries a full measure of pumpkin pie spice, which contains cinnamon, ginger, clove, and nutmeg. Adding a spice cake mix on top creates a double layer of the same spice profile, which muddies the flavor and makes the overall dessert taste heavier and more one-dimensional than the yellow cake mix version. Yellow cake mix stays neutral, lets the pumpkin filling lead, and produces the cleaner flavor shown in this recipe. If you prefer spice cake mix, reduce the pumpkin pie spice in the filling from 2 teaspoons to 1 teaspoon to compensate for the second spice layer.
Why is my pumpkin dump cake still jiggly in the middle?
A jiggly center after the full bake time almost always means the oven temperature ran lower than the dial indicated, the filling layer is too thick due to a smaller pan, or the recipe was checked too early and the door was opened before the custard had time to set. Egg-based custard fillings set through protein coagulation — a process that requires sustained heat at 350°F (175°C) for the full bake window. Confirm your oven temperature with an oven thermometer, return the pan to the oven for 8–10 additional minutes, and test from the dead center of the pan with a toothpick — moist crumbs mean done, wet liquid means it needs more time. For a more detailed look at how dump cake bake times work across different filling types, my peach dump cake covers the same custard-setting principles with a fruit-based filling as comparison.
Do I need to refrigerate pumpkin dump cake?
Yes — refrigeration is strongly recommended for this recipe beyond the first 2 days. The pumpkin filling contains eggs and evaporated milk, both of which are perishable dairy and protein components that fall into the food safety grey zone at room temperature beyond 48 hours. In cool, dry conditions the cake is safe at room temperature for up to 2 days, but refrigerating from the start is the safer and more practical default — the filling texture actually improves slightly when cold, firming into a denser, more sliceable custard layer. Cover tightly with plastic wrap pressed directly onto the surface and refrigerate for up to 4 days.
Can I make pumpkin dump cake without nuts?
Yes — the pecans are entirely optional and the recipe works without them. Omitting the pecans removes the textural contrast between the soft filling and the crunchy topping, so the finished dessert will have a more uniform soft texture throughout. To partially compensate, add an extra 2 tablespoons (25g) of packed light brown sugar to the topping in place of the nuts — the additional sugar caramelizes in the oven and creates slightly more surface crunch than the cake mix alone. The flavor is unaffected by omitting the pecans. If nut allergy is the reason for omitting, confirm that your cake mix brand is manufactured in a nut-free facility, as some yellow cake mix products are processed on shared equipment with tree nuts.
Can I double this pumpkin dump cake recipe?
Doubling this recipe requires two separate 9×13 inch (23×33cm) pans baked simultaneously — do not attempt to fit a doubled filling into one larger pan, as the filling layer will be too deep to set correctly in the standard bake time. Multiply all filling and topping ingredients by exactly 2. The bake time does not change — two separate pans at the same depth bake in the same window as one. Rotate the pans front to back at the 25-minute mark if your oven has uneven heat distribution. There is no leavening in this recipe, so the standard non-linear leavening scaling rule does not apply here.
How does altitude or humidity affect pumpkin dump cake?
In high humidity environments above 70% relative humidity, the dry cake mix layer absorbs moisture from the air during assembly, which can produce a topping that bakes up softer and less crisp than expected. Bake at 355–360°F (180°C) to encourage faster surface browning and store leftovers in the refrigerator immediately rather than at room temperature. At high altitude above 3,500 feet (1,067 meters), the custard filling sets faster due to lower atmospheric pressure and faster liquid evaporation — reduce the oven temperature by 15°F (8°C) and begin checking doneness at 40 minutes rather than 45 to avoid an overbaked, grainy filling center.
More Dump Cakes You’ll Love
- Chocolate Dump Cake — a deeply fudgy chocolate base under a brownie-adjacent topping — the dump cake method applied to the richest possible filling.
- Pineapple Upside Down Dump Cake — caramelized pineapple and maraschino cherries under a golden cake mix topping, with all the retro charm of the original and none of the fuss.

Pumpkin Dump Cake
Ingredients
Equipment
Method
- Step 1 — Preheat and Prepare: Preheat oven to 350°F (175°C) with rack in the middle position. Grease a 9×13 inch (23×33cm) light-colored aluminum baking pan with non-stick spray or softened butter, coating bottom and all four sides. Do not line with parchment.
- Step 2 — Make the Pumpkin Filling: Add pumpkin purée, evaporated milk, room-temperature eggs, packed light brown sugar, pumpkin pie spice, pure vanilla extract, and fine sea salt to a large mixing bowl. Whisk for 60–90 seconds until completely smooth, uniform in color, and no streaks of egg white remain. Pour into prepared pan and spread to all four corners with a spatula.
- Step 3 — Add the Cake Mix Layer: Pour the full box of yellow cake mix evenly over the pumpkin filling. Do not stir. Spread into a flat, even layer covering the filling completely from edge to edge. Break up any lumps with clean fingers.
- Step 4 — Add Pecan Streusel Topping: Scatter roughly chopped pecan halves evenly across the cake mix layer. Distribute ¼ cup (50g) packed light brown sugar evenly over the pecans and cake mix.
- Step 5 — Drizzle the Butter: Pour melted unsalted butter slowly in a deliberate grid pattern across the full surface — left to right, front to back — ensuring complete, even coverage. Do not pour all butter into one spot. Redirect any large dry white patches with a spoon before the pan goes in.
- Step 6 — Bake: Place pan on middle rack and bake uncovered at 350°F (175°C) for 45–55 minutes. Start checking at 45 minutes. The cake is done when the topping is deep golden brown, pecan pieces look toasted, and a toothpick inserted into the center of the pumpkin layer returns moist crumbs — not wet filling. Do not open the oven door before 45 minutes.
- Step 7 — Cool and Serve: Cool in the pan on a wire rack for a minimum of 15 minutes before cutting. Serve warm with piped whipped cream or a scoop of vanilla ice cream and cream sauce. For cleanest slices, refrigerate 30 minutes after initial cooling and wipe knife clean between cuts.