Apple Dump Cake Recipe

The first time I made apple dump cake, I used canned apple pie filling. The result was fine. Edible, even. But the apple layer was one flat, uniform mass — no texture variation, no distinct fruit pieces, nothing that looked like the photos I had in my head. I switched to fresh apples on the second batch and the difference was immediate. Large chunky wedges that hold their shape, a syrup that builds from the apple juices and brown sugar as everything bakes, a caramelized bottom that canned filling will never give you. That version has been the recipe ever since.
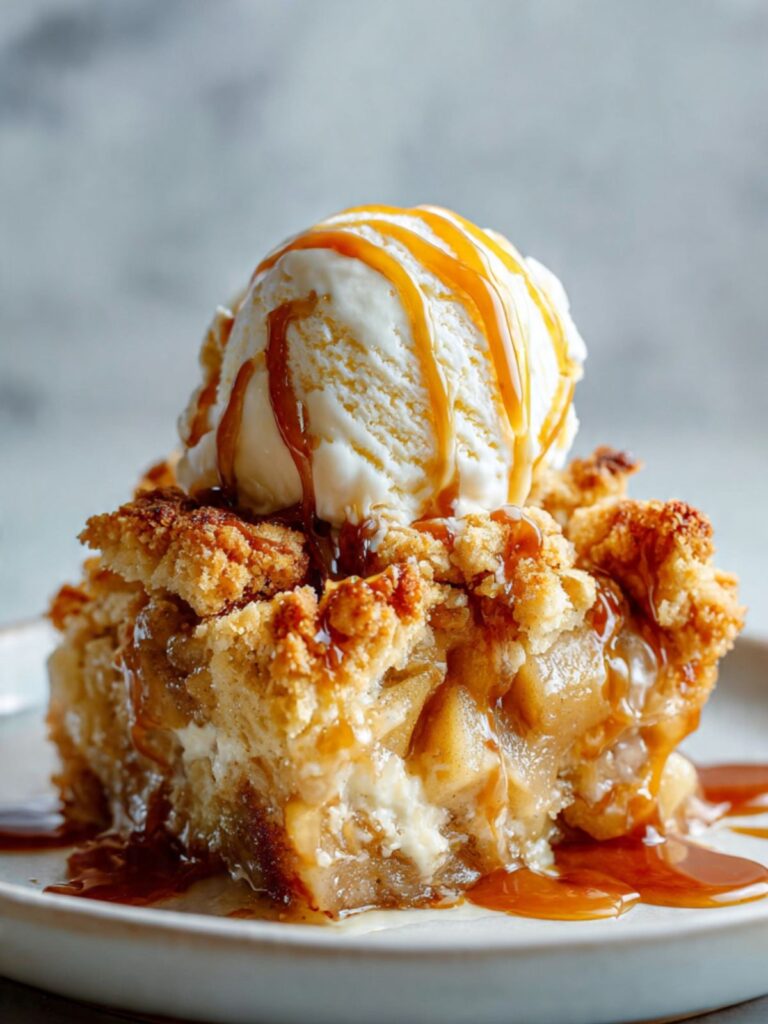
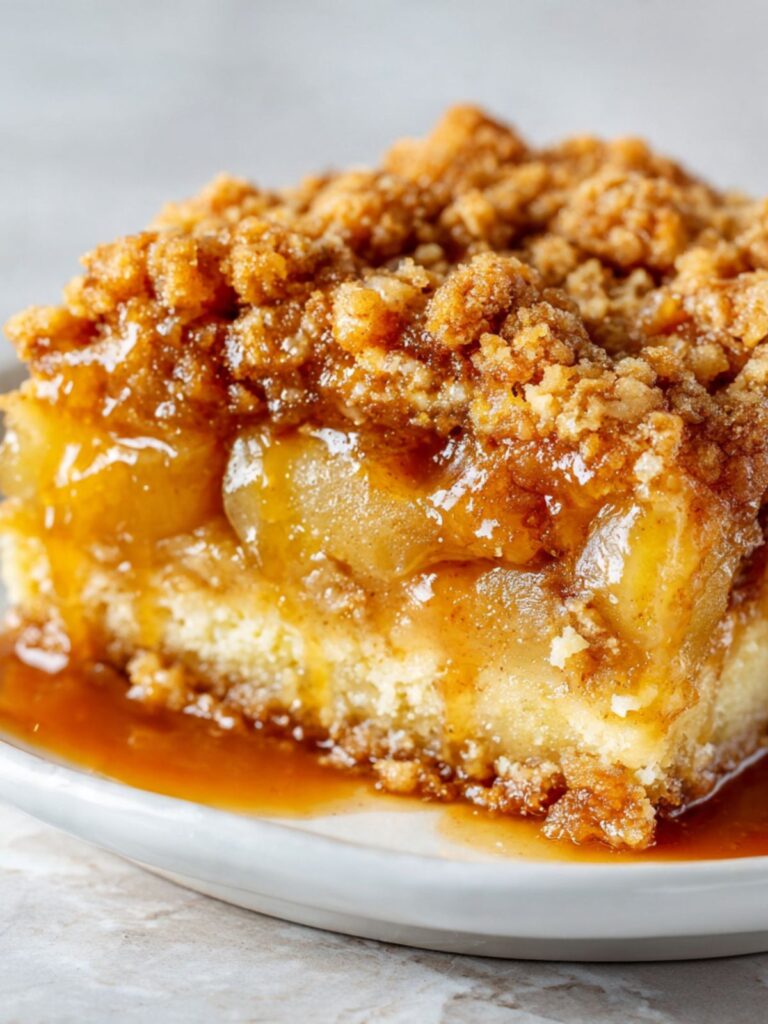
This is a three-layer dessert, and understanding those layers before you start changes how you approach the whole thing. At the bottom, the cake mix that sits directly against the fruit absorbs the apple juices and bakes into a soft, pale cake stratum — this is not a mistake, it is the point. Above that, thick wedges of cinnamon-spiced apple in amber syrup. On top, pebbled clumps of butter-saturated cake mix that bake into a golden crumble. When you cut into it and see all three layers at once, you understand why this recipe has been in people’s weeknight rotation for decades.
The crumble topping is what this dessert is really about. When you break into it with a spoon, the peaks crackle and give way — golden and slightly crisp on the exposed tops, softer and butter-dense underneath where they sat against the apple layer. The apple wedges below are translucent and jammy, holding their shape in a thick spiced syrup that pools on the plate when the square is cut. With warm caramel running over cold ice cream into those gaps — that is the full picture.
I tested this with both melted and sliced cold butter. The melted version — poured in overlapping passes across the dry cake mix — produced the irregular, pebbled crumble surface you see in the photos. Sliced cold butter produced a slightly flakier peak texture but less even coverage. Melted butter is the standard in this recipe. Cold butter is the upgrade for when you want more distinct crumble definition — I have included it as a pro-tip.
No mixer. No creaming. No separate bowls for wet and dry. The entire method is layering — apples go in first, dry cake mix goes over them, melted butter goes over that, and the oven does the rest. Total hands-on time is about 15 minutes. The hardest part is waiting for it to cool enough to cut cleanly.
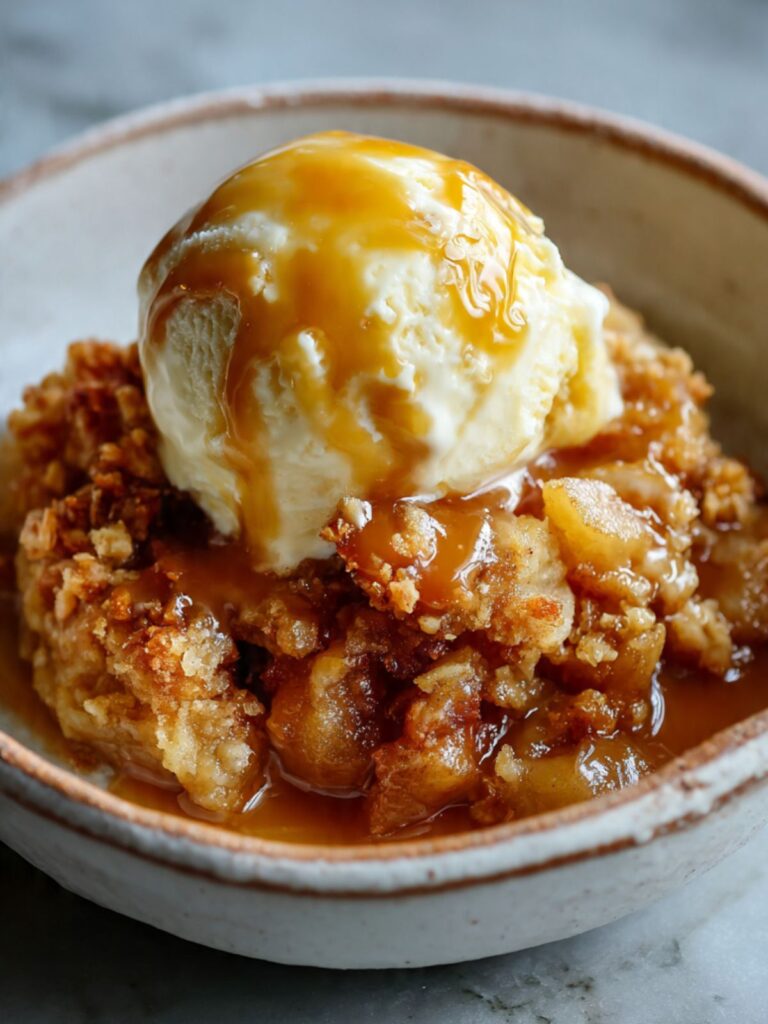
A scoop of vanilla ice cream and a drizzle of caramel sauce are not optional styling choices here — they are structural to how this dessert tastes. The cold ice cream against the warm apple layer, the caramel cutting through the buttery crumble top, the apple syrup pooling on the plate. Serve it warm, not room temperature.
🗒 Luna’s Note: I have made this recipe twice in one week. Both times because someone in the room asked for it again before the pan was finished. That is the only metric I trust for a recipe like this.
| Prep Time | Cook Time | Cooling Time | Total Time | Yield | Difficulty |
|---|---|---|---|---|---|
| 15 min | 45–50 min | 20 min (for clean cuts) | ~1 hr 25 min | 12 squares | Easy |
| Calories | Fat | Carbs | Sugar | Protein | Sodium |
|---|---|---|---|---|---|
| ~420 kcal | ~16g | ~68g | ~42g | ~3g | ~310mg |
Macros are approximate and will vary based on ingredient brands and exact serving size. Calculated for one square (1/12 of the full pan) without ice cream or caramel drizzle — those are served to taste.
Ingredients & Tools for Apple Dump Cake Recipe
For the Apple Layer
- 3 lbs (1,360g) Granny Smith apples — approximately 6–7 medium apples — peeled, cored, and sliced into ¾-inch (2cm) wedges. Do not slice thinner — thin slices turn to mush during the 45-minute bake and lose the distinct wedge shape visible in the cross-section photo. Honeycrisp works as a second choice; both hold their structure under heat. Do not use Red Delicious or Fuji — they break down too quickly and produce a watery, sauce-like layer instead of distinct fruit pieces.
- ¼ cup (55g) light brown sugar, packed — not dark brown sugar. Dark brown sugar has a stronger molasses flavor that competes with the cinnamon and caramel. Pack it firmly into the measuring cup or weigh it.
- 1½ tsp ground cinnamon, checked for freshness — open the jar and smell it before measuring. It should smell sharp and spicy. If it smells faintly of nothing, it is too old and the apple layer will taste flat. Ground spices lose most of their potency within 6 months of opening.
- ¼ tsp ground nutmeg, freshly grated if possible — pre-ground nutmeg fades faster than any other spice. A microplane and a whole nutmeg gives you a noticeably more aromatic result.
- 1 tbsp (15ml) fresh lemon juice — from approximately ½ a lemon. Do not use bottled lemon juice. The acid brightens the apple flavor and prevents browning while you prep; bottled juice has a cooked, flat flavor that does not do either job as well.
- 1 tsp (5ml) pure vanilla extract — not imitation. Imitation vanilla has a chemical aftertaste that becomes more noticeable in simple recipes with few competing flavors.
- ¼ tsp fine sea salt — not coarse salt, not table salt with iodine. Fine sea salt dissolves evenly through the fruit layer and balances the sugar without leaving salt pockets.
For the Topping
- 1 box (15.25 oz / 432g) yellow cake mix — standard box size, dry and unmixed. Do not use butter cake mix, French vanilla mix, or spice cake mix — the flavor profile changes significantly. I use Betty Crocker Super Moist Yellow Cake Mix or Pillsbury Moist Supreme Yellow Cake Mix. Both produce the pebbled, golden crumble topping shown in the pan photos. White cake mix works but produces a slightly paler topping.
- ½ cup (1 stick / 113g) unsalted butter, melted and slightly cooled — not salted butter, not margarine, not coconut oil. Unsalted butter gives you control over the salt level in this recipe. The butter must be melted — not softened, not browned — and poured evenly over the dry cake mix. It is the only liquid the topping receives. Do not substitute oil; oil does not produce the same golden crumble texture because it lacks the milk solids that contribute to browning.
For Serving (Mandatory — Not Optional)
- Vanilla ice cream — one large scoop per serving, added immediately before serving while the cake is still warm. The temperature contrast between the warm apple layer and the cold ice cream is part of how this dessert is meant to taste. Any high-quality vanilla bean ice cream works; I use Häagen-Dazs Vanilla Bean.
- Salted caramel sauce — approximately 2 tablespoons per serving, drizzled over the ice cream and cake immediately before serving. Store-bought works well here — Trader Joe’s Fleur de Sel Caramel Sauce or Ghirardelli Sea Salt Caramel Sauce are my go-to options. The salt in the caramel cuts through the sweetness of the cake layer and the ice cream in a way that plain caramel does not.
Before You Start
No room temperature prep required. This recipe uses melted butter and no eggs or dairy in the batter — there are no temperature-sensitive ingredients to bring up before you begin. The butter needs to be melted and slightly cooled, which takes about 5 minutes on the stovetop or 45 seconds in the microwave in 15-second increments.
Apple prep is the longest step. Peeling, coring, and slicing 3 pounds of apples takes approximately 10–12 minutes. Do this first, before anything else. As soon as the apples are sliced, toss them immediately with the lemon juice — this stops browning and starts building the syrup base. Do not let sliced apples sit exposed to air for more than a few minutes.
Pan size is non-negotiable. This recipe is written and tested for a 9×13 inch (23x33cm) glass baking dish. A glass dish is specified because the images in this article were shot in glass — and more importantly, because glass heats more slowly and evenly than metal for a fruit-based bake, which prevents the apple layer from scorching before the topping sets. If you use a dark metal pan, reduce the oven temperature by 25°F (15°C) and start checking at 40 minutes. If you use a ceramic dish, add 5–8 minutes to the bake time. Do not use a 9×9 or 8×8 pan — the fruit and topping depth will be too great and the center will not bake through in the stated time.
Do not grease the pan. The butter from the topping migrates down during baking and provides enough fat at the base to prevent sticking. Greasing adds unnecessary fat and can cause the bottom apple layer to fry rather than steam-bake.
Measuring the cake mix. Do not scoop from the box with the measuring cup — you will compact it. Pour the entire box directly into the pan over the apple layer as instructed in the method. One standard 15.25 oz box is the exact quantity for a 9×13 pan. Do not attempt to use a partial box or a different size.
Oven position. Place your oven rack in the middle position before preheating. Top rack will over-brown the crumble before the apple layer softens. Bottom rack will cause the sugars in the apple layer to scorch.
Cake mix freshness check. Before you open the box, check the best-by date printed on the side panel. An expired cake mix has degraded leavening — the baking powder inside breaks down over time and the topping will bake flatter and denser than the pebbled crumble shown in the photos. Also confirm the box seal is unbroken — a box that has absorbed moisture will have lumpy, pre-hydrated mix that will not distribute evenly over the apple layer.
Spice freshness check — do this before you start prep. Open your cinnamon and nutmeg jars and smell them directly. Ground cinnamon should smell sharp, warm, and almost peppery. Ground nutmeg should smell sweet and resinous. If either smells faint or neutral, the spice is spent — replace it before you proceed. The apple layer in this recipe gets its entire warm flavor profile from these two spices. Old spice produces a flat, sugary apple layer with no warmth.
Gram weight priority. For the apple layer sugar and butter, use a kitchen scale set to grams. The gram weights in this recipe are the numbers I tested with — they produce the amber syrup and golden crumble shown in the photos.
Necessary Tools
Required:
- 9×13 inch (23x33cm) glass baking dish — Pyrex or Anchor Hocking are the standard options. The glass sides let you monitor the apple layer as it bakes without lifting the dish.
- Large mixing bowl — for tossing the apples with spices and sugar. At least 4-quart capacity to give the apples room to toss without spilling.
- Vegetable peeler — for peeling the apples cleanly and quickly.
- Sharp chef’s knife and cutting board — for coring and slicing the apples into ¾-inch wedges.
- Kitchen scale — for weighing the apples (3 lbs / 1,360g), butter (113g), and brown sugar (55g). Volume measurements for butter and sugar are reliable here, but weighing the apples removes the guesswork entirely.
- Small saucepan or microwave-safe bowl — for melting the butter.
- Measuring spoons — for cinnamon, nutmeg, vanilla, salt, and lemon juice.
- Rubber spatula or large spoon — for spreading the apple layer evenly in the pan.
- Wire cooling rack — for resting the pan after baking.
- Sharp knife and ruler or bench scraper — for portioning into clean 3×3 inch squares once cooled.
Optional but recommended:
- Oven thermometer — most home ovens run 15–25°F (8–14°C) off their displayed temperature. For a recipe that relies on consistent caramelization at the edges, an accurate oven temperature matters. A $10 oven thermometer is the single highest-return tool investment in any kitchen.
- Apple corer — speeds up prep significantly if you are working with firm apples.
- Microplane grater — for freshly grating whole nutmeg directly into the apple mixture. The difference in aroma between fresh-grated and pre-ground nutmeg in this recipe is noticeable.
- Ice cream scoop — for portioning the vanilla ice cream cleanly onto each serving square.
How to Make Apple Dump Cake
Step 1: The Oven Is at Temperature and the Pan Is in Position
Set your oven to 350°F (175°C) and position the rack in the middle of the oven before you turn it on — not after. Most home ovens take 15–20 minutes to fully stabilize at temperature, and a rack moved after preheating causes a brief temperature drop that affects how the topping sets in the first critical minutes of baking. If you own an oven thermometer, clip it to the middle rack now and confirm the actual temperature before the pan goes in — most home ovens run 15–25°F (8–14°C) hotter or cooler than the dial reads.
The oven thermometer should read within 10°F (6°C) of your target 350°F (175°C) — if it reads more than 25°F (14°C) off in either direction, adjust the dial accordingly and allow another 10 minutes to stabilize before the pan goes in.
Do not grease the 9×13 inch (23x33cm) glass baking dish. Set it on the counter next to your workspace so it is ready to receive the apple layer the moment the apples are tossed and spiced. Having the pan in position before you start the apple prep prevents the sliced apples from sitting exposed to air longer than necessary.
The oven and pan are ready — move immediately to the apple prep so the lemon juice can start working on the cut fruit.
Step 2: The Apple Wedges Are Coated, the Syrup Has Formed, and the Bowl Smells Like Fall
Peel, core, and slice all 3 lbs (1,360g) of Granny Smith apples into ¾-inch (2cm) wedges — not thinner. Work quickly and transfer each sliced apple directly into your large mixing bowl as you go. As soon as all the apples are in the bowl, add the ¼ cup (55g) packed light brown sugar, 1½ tsp ground cinnamon, ¼ tsp ground nutmeg, 1 tbsp (15ml) fresh lemon juice, 1 tsp pure vanilla extract, and ¼ tsp fine sea salt all at once.
The lemon juice does two things simultaneously: it coats the apple surfaces to slow oxidative browning while you finish prep, and its acid begins drawing juice from inside the apple cells through osmosis — combined with the brown sugar pulling moisture from the fruit’s surface, this is how the thin syrup forms at the bottom of the bowl before the apples even reach the oven. That syrup is not a byproduct. It is the flavor base of the entire apple layer and it goes into the pan with the apples — every drop.
Toss everything together with a large spoon or rubber spatula until every apple wedge is evenly coated. You are looking for a consistent amber-brown coating on every surface — no dry white sugar sitting at the bottom of the bowl, no uncoated apple faces. This takes about 60 seconds of active tossing. The lemon juice will begin dissolving the brown sugar immediately and a thin syrup will start forming at the bottom of the bowl. That syrup goes into the pan with the apples — do not drain it.
🗒 Luna’s Note: I always taste one apple wedge at this stage. The coating should taste noticeably sweet, warmly spiced, and bright from the lemon. If the cinnamon is faint, your spice is old — add another ¼ tsp before the pan goes together.
⚠️ Baker’s Warning: Do not slice the apples thinner than ¾ inch (2cm). Thinner slices release more water faster during baking, which creates an overly wet bottom layer that steams the cake mix from below rather than allowing it to bake into the pebbled crumble topping you can see in the overhead pan photo. The apple wedges should look substantial going into the pan — they will soften significantly during baking but retain their shape.
The spice-tossed apple wedges in the process shot showing the mixing bowl — the amber coating and the syrup pooling at the base — is exactly what you are aiming for at the end of this step. If your bowl looks drier or paler than that, toss for another 30 seconds.
The apple layer is ready — transfer it immediately to the prepared pan.
Step 3: The Apple Layer Is Even, Packed Corner to Corner, and Ready for the Cake Mix

Pour all of the spiced apple mixture into the 9×13 inch (23x33cm) glass baking dish, including every drop of the syrup that collected at the bottom of the mixing bowl. Spread the apple wedges into an even layer using a rubber spatula, making sure they are distributed from corner to corner with no large gaps. The reason even distribution matters here is that every section of dry cake mix sitting above the apple layer needs a moisture source directly beneath it. An uneven apple layer — thick in the center, thin at the edges — produces uneven topping hydration: the thick spots bake into dense, dark clumps and the thin spots stay pale and floury regardless of how evenly you pour the butter.
The apples should sit in a relatively flat, packed layer — not piled in the center with thin edges. This even distribution is what produces the consistent fruit layer visible in the side-view pan photo showing the full depth of the bake.
The apple layer should look full and generously packed — amber-coated wedges filling the pan from glass wall to glass wall, with no bare pan visible at any corner or edge. The syrup from the toss should be visible between the wedges, not absorbed entirely.
The apple layer will fill the pan to approximately 1 to 1¼ inches (2.5–3cm) deep at this stage. It will look like a lot of apple — this is correct. The fruit compresses and softens significantly during baking, and the finished fruit layer will be approximately ¾ to 1 inch deep in the final bake.
Do not press the apples down or compact them. They need some air space between the wedges for the syrup to circulate and caramelize as the temperature rises.
The apple base is in — move directly to adding the dry cake mix layer without delay.
Step 4: The Cake Mix Layer Is Spread Evenly Over the Apples, Edge to Edge, No Gaps
Open the 15.25 oz (432g) box of yellow cake mix and pour the entire contents directly and evenly over the apple layer. Do not mix the cake mix with anything first — it goes in completely dry, straight from the box. The dry cake mix is not just a topping material — it contains the leavening, the sugar, the starch, and the fat-binding structure that will produce the crumble. It needs to stay dry and separated from the apple layer until the oven heat drives the two moisture sources — butter from above and fruit juice from below — into it simultaneously. Pre-mixing eliminates that separation and produces a dense, uniform batter rather than a crumble.
Spread it into an even layer using your spatula or the back of a large spoon, covering the apple layer from edge to edge with no gaps. Every part of the apple surface should be covered by an even thickness of dry cake mix — approximately ½ inch (1.3cm) deep across the full pan.
Pay particular attention to the corners and the edges where the pan meets the glass walls. These areas receive the most direct heat during baking and are where the butter will concentrate and caramelize most aggressively. If the cake mix layer is thin at the edges, those areas will over-brown before the center is done.
The cake mix layer should look like a uniform pale yellow powder covering every visible apple surface — no dark spots of apple showing through, no bare pan corners. The layer depth should be approximately ½ inch (1.3cm) across the entire surface, slightly thicker at the center than the edges is acceptable, but no section should be paper-thin.
⚠️ Baker’s Warning: Do not stir the cake mix into the apple layer, even slightly. The dump cake method works because the dry cake mix and the melted butter stay in distinct layers — the butter saturates the dry mix from above while the fruit juices hydrate it from below, creating the pebbled crumble texture visible on the surface of the finished bake. Any mixing at this stage collapses the layer structure and produces a dense, gummy top rather than a crumble.
The process shot showing the dry cake mix being spread over the apple layer is the visual reference for this step — the clear boundary between the amber apple layer below and the pale dry mix above is exactly what the assembled pan should look like before the butter goes on.
The dry layer is set — pour the butter immediately.
Step 5: The Butter Is Distributed Across the Cake Mix in Overlapping Passes — the Pan Goes In Now
Melt the ½ cup (1 stick / 113g) of unsalted butter completely — either in a small saucepan over low heat or in the microwave in three 15-second increments, stirring between each. The butter should be fully liquid with no solid pieces remaining, but not bubbling or foaming. Let it cool for 2 minutes after melting — pouring very hot butter onto the dry cake mix causes it to clump unevenly in the spots where it first lands, rather than spreading across the surface.
Pour the melted butter slowly and evenly over the entire surface of the dry cake mix layer. Move the stream of butter back and forth across the length of the pan in overlapping passes, covering as much of the surface as possible. You will not be able to cover every square inch — there will be dry white patches of cake mix visible after the butter is poured. This is correct.
⚠️ Baker’s Warning: Do not drizzle extra butter over the dry white patches to cover them — the pale areas are intentional. Adding more butter than the ½ cup (113g) called for will over-saturate the cake mix, and the topping will bake into a flat, oily solid layer with no crumble texture, no peaks, and no surface variation. It will look like a baked batter, not a crumble, and there is no fix once the pan is in the oven.
The pan should show a patchwork of golden-pooled butter and pale dry cake mix — roughly 60–70% of the surface covered by visible butter pools, 30–40% still showing dry white powder. This uneven coverage is correct and intentional. A fully saturated, uniformly wet surface means too much butter was used.
Those dry patches are where the fruit juices will migrate up through the cake mix during baking and hydrate the layer from below. The combination of top-down butter saturation and bottom-up fruit juice hydration is what creates the landscape of pebbled golden clumps and fruit-juice craters visible in the top-down overhead pan photo — the shiny butter-saturated peaks and the translucent fruit-window valleys.
🗒 Luna’s Note: I pour the butter in a slow figure-eight pattern across the pan. It takes about 20 seconds and covers more surface area than pouring in one spot. Still won’t be perfect — and it doesn’t need to be.
The pan is assembled — it goes straight into the preheated oven now.
Step 6: The Edges Are Dark, the Surface Is Pebbled Gold, and the Juices Are Bubbling Through
Place the assembled pan on the middle rack of the preheated 350°F (175°C) oven. Bake for 45 to 50 minutes — start checking at 43 minutes, especially if your oven runs hot.
The cake is done when all four of these conditions are met simultaneously:
1. Edge color: The perimeter of the pan shows deep cinnamon-brown caramelization — the sugar from the apple layer has bubbled up through the cake mix at the edges and concentrated into a dark, glossy ring pulling slightly away from the glass walls. Pale golden edges mean the apple syrup has not fully caramelized — it needs more time.
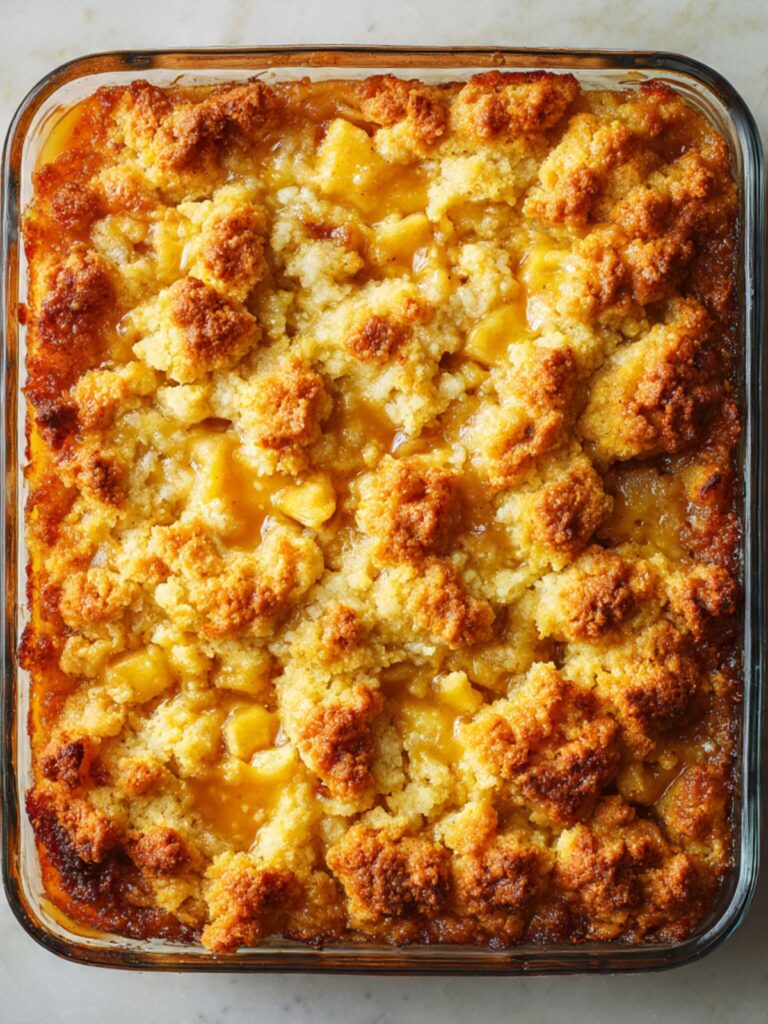
2. Surface texture: The top is a landscape of irregular golden-brown pebbled clumps — some peaks darker, some valleys paler where fruit juice has bubbled through. The surface should look like the overhead pan photo: uneven, textured, and crackled in places where the butter met the fruit syrup.
3. Center activity: Fruit juices should be visibly bubbling up through the “crater” gaps in the topping across the whole surface — not just at the edges. Bubbling only at the edges means the center is still too cool and needs another 5 minutes.
4. Aroma: The kitchen should smell of caramelized apple and browned butter — not raw flour. A floury or neutral smell means the topping has not yet fully baked through.
⚠️ Baker’s Warning: Do not open the oven door before the 43-minute mark. Opening early causes a temperature drop that stalls the caramelization at the edges and leaves the center topping pale and undercooked. The fruit juices take time to fully penetrate and hydrate the cake mix — disrupting the oven temperature in the first 40 minutes resets that process.
Once all four conditions are met, pull the pan from the oven and place it on a wire cooling rack immediately — do not leave it in the oven on residual heat.
Step 7: The Layers Have Set — Choose Your Serving Style Before You Cut
This recipe produces two different experiences depending on when you serve it, and both are correct. Decide which you want before the pan comes out of the oven.
For warm scoops: Rest the pan on a wire cooling rack for 10 minutes only. At this point the apple layer is still loose and molten — it will not hold a clean square when cut, but it scoops beautifully with a large spoon directly into a bowl. The layers will be visible but fluid. Serve immediately with ice cream and caramel sauce. This is the version for when you want it now and you do not care about clean edges.
During both rest periods, the glass dish continues conducting heat into the bottom apple layer even off the heat. This is carryover cooking — the fruit sugars are still caramelizing, the pectin in the apple wedges is still setting, and the bottom cake stratum is still firming from the residual heat stored in the glass. For the warm scoop version, this 10-minute window is not optional rest time — it is active cooking time happening off the burner. For the clean square version, the 20-minute room temperature rest followed by 15 minutes in the fridge brings the apple layer’s pectin fully to its set point, which is why the squares hold their shape when lifted.
For clean cut squares: Rest the pan on a wire cooling rack for a full 20 minutes at room temperature, then transfer to the refrigerator for 15 minutes. The apple layer firms as it cools and the cake mix topping sets into a sliceable structure. Use a sharp knife wiped clean between each cut to portion into 12 equal squares (4 cuts lengthwise × 3 cuts across). Serve at room temperature or briefly warmed — 20 seconds in the microwave per square brings it back to the temperature shown in the plated photos.
For clean squares: the surface should feel firm to a light finger press and the caramelized edge should be fully set and not tacky. When you run a knife along the edge before cutting, it should meet light resistance from the apple layer rather than sliding through liquid. If the knife sinks through with no resistance, return the pan to the refrigerator for another 10 minutes.
⚠️ Baker’s Warning: Do not attempt to cut clean squares before the full 20-minute room temperature rest and 15-minute refrigerator rest. If you cut too early, the apple layer beneath the set surface is still molten — the knife will push through the crumble top and the apple layer will collapse and run sideways, leaving you with broken crumble pieces floating in apple syrup rather than the distinct layered square visible in the plated photos.
🗒 Luna’s Note: I almost always do the warm scoop version the first night and save the cut squares for the next day. The cut version is actually better after an overnight rest in the refrigerator — the layers compress and the flavors deepen. Reheat individual squares at 325°F (160°C) for 8 minutes in the oven rather than the microwave if you have the time. The topping re-crisps slightly and it tastes nearly as good as fresh from the oven.
Step 8: The Plate Is Warm, the Ice Cream Is Cold, the Caramel Is Fluid — Serve Immediately
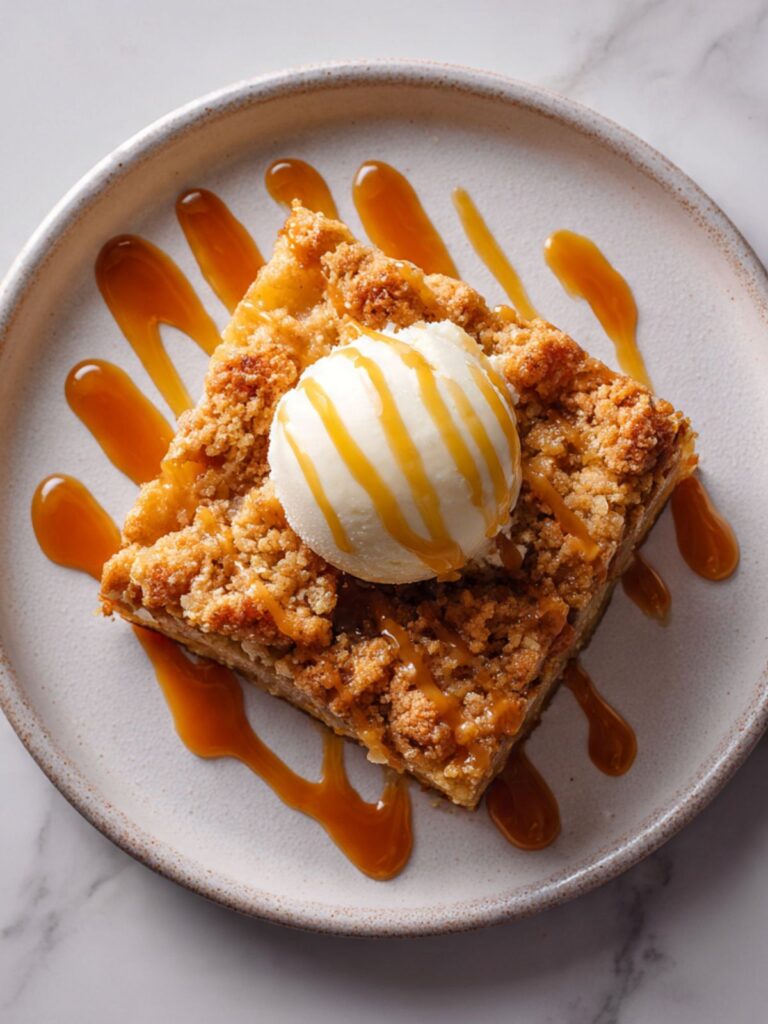
Place one square or one generous scoop into a bowl or onto a white ceramic plate. Add one large scoop of vanilla ice cream directly on top of the warm cake — not beside it. The ice cream should begin melting on contact with the warm apple layer, which is the effect visible in the plated photos. Drizzle approximately 2 tablespoons of salted caramel sauce over the ice cream and down the sides of the cake square, letting it pool slightly on the plate.
The finished plate should show the caramel moving — actively running down the side of the ice cream scoop and pooling in the crater gaps of the crumble surface. If the caramel has already set and is sitting as a solid drizzle on top of cold surfaces, the cake was not warm enough when plated or the caramel was not warmed before drizzling. Rewarm the cake square for 20 seconds and warm the caramel sauce again before plating the next serving.
Serve immediately. Once the ice cream begins to melt into the caramel and the apple syrup, the plate becomes a single unified dessert — warm, cold, caramelized, spiced, and creamy all at once. Do not let it sit on the plate for more than 3 minutes before eating.
The finished result should look like the plated photos: a square or scoop of golden crumble on top, visible amber apple layer underneath, caramel running in thin lines over the white ice cream. If the topping looks pale or powdery rather than golden and crackled, the cake was pulled slightly early — the flavor will still be good, but extend the bake time by 5 minutes on the next batch.
This is the finished result — serve it now, while the contrast between warm and cold is at its maximum.
The Science Behind Apple Dump Cake
Why the Dry Cake Mix Becomes a Crumble — Not a Cake
I noticed something on my first batch that confused me until I thought it through. I poured the dry cake mix over the apples expecting it to bake into something that looked like cake — an even, risen layer with a uniform crumb. What came out of the oven looked nothing like that. The top was irregular, pebbled, clumped in some places and open in others, with glossy spots where the butter had pooled and dull spots where the fruit juice had pushed through. It looked like a crumble topping, not a cake layer. I did not understand why until I mapped out what was actually happening inside the pan.
Standard cake batter produces an even, risen crumb because all the ingredients — fat, liquid, leavening, flour — are mixed together before baking. The mixing distributes everything uniformly, the leavening produces CO₂ bubbles that expand in heat, and the result is a consistent aerated structure. In a dump cake, none of that mixing happens. The dry cake mix sits in a layer with no pre-mixed liquid and no uniform fat distribution. The butter lands on the surface in uneven patches — heavy where you poured it, absent where you did not. The fruit juices migrate upward through the dry mix from below. Some areas of the cake mix get saturated from both directions and bake into dense, golden clumps. Other areas get only partial hydration and stay looser, more powdery, more crumble-like. The leavening in the cake mix still activates wherever moisture reaches it, creating small lift events that produce the irregular bumps and peaks you see on the surface.
The result — that specific pebbled, clumped, crackled landscape on top — is not a baking failure. It is the direct visual record of exactly how the moisture moved through the pan during baking. Every golden peak is a butter-saturated spot. Every translucent crater is where apple juice bubbled through. This is a recipe that shows its own process on its surface, which is why it looks the way it does and why it cannot look any other way when made correctly.
What the Apple Layer Is Actually Doing During Baking
The apple layer in this recipe is doing two jobs simultaneously, and understanding both explains why the ingredient choices matter as much as they do.
The first job is structural. Granny Smith and Honeycrisp apples contain high levels of pectin — a natural polysaccharide found in the cell walls of firm fruit. Pectin is what gives jams their set and what keeps firm apples from collapsing into applesauce under heat. As the apple wedges bake at 350°F (175°C), the pectin in the cell walls softens gradually but does not dissolve completely. This is why the apple wedges in the cross-section photo retain their shape — translucent and fully softened, but still recognizable as distinct pieces rather than a uniform mash. Softer apple varieties like Red Delicious and Fuji have lower pectin content and higher water content; they break down completely at this temperature and time, producing a watery, structureless layer.
The second job is flavor. As the apple juices release during baking, they combine with the brown sugar and cinnamon coating to form an amber fruit syrup. This syrup does two things: it migrates upward into the dry cake mix layer, hydrating it from below and contributing sweetness and apple flavor to the topping; and it concentrates at the edges of the pan where the heat is most intense, caramelizing into the deep brown, glossy ring you see pulling from the glass walls. That edge caramelization is where the most complex flavor in this dessert lives — bitter at the very edge, deeply sweet just inside it, fruity throughout. If you love the edge pieces, you already understand this intuitively. Now you know why.
🗒 Luna’s Note: I always use Granny Smith over Honeycrisp when I can find them. Honeycrisp is sweeter and the apple layer ends up tasting closer to candy than fruit. Granny Smith has the tartness that balances the brown sugar and caramel sauce — the finished dessert tastes more like apple and less like sugar. For a similar dump cake approach with a different fruit, my Peach Dump Cake uses the same layered method with fresh peaches and produces an equally thick, jammy fruit layer.
Why Melted Butter — and Why the Amount Is Exact
The ½ cup (113g) of melted butter in this recipe is not an approximation. It is the specific quantity needed to hydrate enough of the cake mix surface to produce the golden crumble texture visible in the photos — no more and no less.
Butter is approximately 80% fat and 18–20% water, with the remainder being milk solids. When melted butter is poured over dry cake mix and placed in a hot oven, three things happen in sequence. The water component of the butter activates the leavening agents in the cake mix — baking powder and baking soda — which produce the small lift events that create the irregular bumps on the surface. The fat component coats the flour and sugar particles in the cake mix, creating a barrier that slows moisture absorption and produces a crumble texture rather than a unified batter. The milk solids undergo the Maillard reaction — the same browning process that creates the crust on bread and the sear on meat — at the areas of highest heat concentration, producing the deep golden color on the topping peaks.
Using more than ½ cup (113g) of butter overwhelms the dry cake mix and produces a greasy, dense topping that does not crumble — it sits as a solid, sodden layer with no textural variation. Using less produces dry white patches that never fully hydrate or brown, leaving raw-tasting floury spots across the surface. The exact quantity lands you in the narrow range where some areas get full butter coverage and some do not — which is precisely what creates the variation between the golden crumble peaks and the fruit-juice valleys that define the finished surface.
Apple Dump Cake Troubleshooting & Pro-Tips
Common Mistakes
1. The Apple Layer Is Uniform and Saucy — No Distinct Fruit Pieces
Symptom: The apple layer is uniform, saucy, and flat — no distinct fruit pieces visible in the cross-section, and the finished dessert tastes more like sugar syrup than apple. The bottom layer is wet and slightly gummy rather than the amber, jammy fruit layer shown in the photos.
Cause: Canned apple pie filling is pre-cooked, pre-thickened, and pre-sweetened. It does not release the natural pectin-rich juices that fresh apples produce during baking — juices that are responsible for both the flavor of the apple layer and the upward moisture migration that hydrates the cake mix from below. The thickeners already present in canned filling (modified cornstarch) also interfere with the texture of the bottom cake stratum.
Fix if already in the pan: If you have already assembled with canned filling, bake as directed but reduce the oven time to 38–42 minutes — canned filling contains less moisture than fresh apples and the edges will caramelize faster. The result will be edible but the texture and flavor will be noticeably different from the photos.
Prevention: Use 3 lbs (1,360g) of fresh Granny Smith or Honeycrisp apples, peeled and sliced into ¾-inch wedges, tossed with the spice and sugar mixture before layering. This is the non-negotiable ingredient choice for the result shown in the images.
2. The Edges Are Scorched Before the Center Topping Is Done glass baking dish
Symptom: The edges of the apple layer scorch and turn bitter before the center topping is fully golden. The bottom apple layer has dark spots or a burnt sugar smell. The topping looks done on the outside but the center is still pale and floury.
Cause: Metal pans — especially dark non-stick — conduct heat significantly faster than glass. The apple sugar layer at the base of the pan reaches caramelization temperature too quickly, pushing past amber into burnt territory before the cake mix topping has had time to hydrate and brown evenly. Glass heats more slowly and evenly, which is exactly what a recipe with a high-sugar fruit base and a dry mix topping needs.
Fix if already baking in a metal pan: Check the pan at 35 minutes. If the edges are already deeply browned and the center is still pale, tent the pan loosely with aluminum foil and continue baking for another 8–12 minutes — the foil will slow edge browning while allowing the center to catch up.
Prevention: Use a 9×13 inch (23x33cm) glass baking dish — Pyrex or Anchor Hocking. If you must use metal, reduce the oven temperature to 325°F (160°C) and begin checking at 40 minutes.
3. Large Dry White Patches Across the Topping After Baking
Symptom: After the full bake time, sections of the topping are pale, powdery, and taste of raw flour. The surface has wide areas that never browned or crumbled.
Cause: The butter was not distributed evenly enough across the cake mix surface, and those areas received insufficient moisture from either the butter above or the fruit juices below. This is most common when the butter is poured in one spot rather than distributed across the whole pan, or when the apple layer beneath has gaps that leave sections of cake mix without an upward moisture source.
Fix if already baked: Remove the pan from the oven. Drizzle 2–3 tablespoons of additional melted butter over the pale patches specifically, return to the oven at 350°F (175°C) for another 8–10 minutes until those sections brown. Watch closely — the already-done areas will continue to darken.
Prevention: Pour the melted butter in slow overlapping passes across the entire length and width of the pan — a figure-eight pattern works well. Ensure the apple layer beneath is spread evenly corner to corner so every section of cake mix has a moisture source from below. Some dry patches are normal and correct — large pale sections covering more than 20% of the surface area are the problem.
4. The Bottom Layer Is Watery and Falls Apart When Servedis soggy
Symptom: When you cut into the cooled cake, the bottom layer is wet, gummy, and falls apart. The apple layer has excess liquid pooling on the plate when served. The finished texture is closer to apple soup with a topping than a structured layered dessert.
Cause: Two possible causes. First: the apples were sliced too thin (under ½ inch / 1.3cm), which causes them to release significantly more water than thick wedges during baking. Second: the apple variety used had a high water content — Fuji, Gala, and McIntosh all release more moisture under heat than Granny Smith or Honeycrisp. In either case, the excess moisture prevents the bottom cake stratum from setting into the distinct pale layer visible in the cross-section photo.
Fix if already baked: Return the pan to the oven at 325°F (160°C) for an additional 10–15 minutes uncovered — the extended heat will evaporate excess moisture from the surface. Alternatively, serve the warm scoop version immediately rather than attempting to cut clean squares.
Prevention: Slice apples to exactly ¾ inch (2cm) thickness and use Granny Smith or Honeycrisp exclusively. Do not add any additional liquid — the lemon juice and vanilla are the only liquids in the apple toss, and they are already accounted for in the syrup that forms.
5. The Topping Baked Into a Solid, Dense Layer — No Crumble Texture
Symptom: The top layer bakes into a flat, solid, cake-like surface rather than the irregular pebbled clumps shown in the overhead pan photo. It looks more like a baked batter than a crumble.
Cause: Too much butter, or the cake mix was stirred into the apple layer before baking. Either scenario eliminates the layer separation that produces crumble texture. Too much butter fully saturates all of the dry cake mix, removing the variation between hydrated and partially hydrated zones. Stirring the cake mix into the apples creates a uniform wet mixture that bakes as a single layer.
Fix if already baked: There is no fix for an overbaked solid topping — the texture is set. The flavor will still be good. Serve it as a warm apple cake rather than a dump cake — scoop it into bowls, top with ice cream and caramel, and call it intentional. Nobody will complain.
Prevention: Use exactly ½ cup (113g / 1 stick) of melted butter — no more. Do not stir at any point after the cake mix layer is added.
6. The Edges Are Burnt but the Center Is Still Pale and Underdone
Symptom: The outer 2 inches of the pan are dark brown to black and taste bitter. The center surface is still pale and the apple layer underneath it is not fully bubbling.
Cause: Oven temperature is too high, or the pan was placed on the top rack rather than the middle rack. Both concentrate heat at the edges before the center has time to bake through.
Fix mid-bake: Tent the outer edges of the pan with strips of aluminum foil — fold them over the edges of the glass dish only, leaving the center exposed. Continue baking until the center bubbles and the covered edges stop darkening. Check every 5 minutes.
Prevention: Confirm oven temperature with an oven thermometer before baking. Place the pan on the middle rack only. If your oven is known to run hot, reduce temperature to 335°F (168°C) and add 5 minutes to the bake time.
7. Adjustments for High Humidity and High Altitude
High humidity (above 70% relative humidity): In humid climates, the dry cake mix layer absorbs moisture from the air before it even goes into the oven, which can make the topping denser and reduce the crumble effect. Assemble the pan quickly — do not let the dry cake mix layer sit exposed for more than 5 minutes before pouring the butter and getting the pan into the oven. The finished cake may also feel slightly stickier on the surface even when fully baked — this is surface moisture from the environment, not underbaking.
High altitude (above 3,500 feet / 1,067 meters): At high altitude, liquids evaporate more quickly and the apple layer may dry out faster than the topping browns. Add 2 tablespoons (30ml) of water to the apple toss mixture in addition to the lemon juice. Increase the oven temperature by 15°F (8°C) to 365°F (185°C) and begin checking at 40 minutes. The bake time may be shorter at altitude due to the faster moisture evaporation from the fruit layer.
Expert Pro-Tips
Pro-Tip 1 — Slice the apples on the thick side, not the thin side. When in doubt about the ¾-inch target, cut thicker rather than thinner. Apples that are slightly too thick will soften fully and hold their shape — the finished layer looks exactly like the cross-section photo, with distinct wedges in amber syrup. Apples that are slightly too thin will break down into a purée and produce a uniform, textureless base. Err toward thick every time.
Pro-Tip 2 — Add a layer of brown sugar directly on top of the dry cake mix before the butter. After spreading the dry cake mix evenly, scatter 2 tablespoons (25g) of light brown sugar across the surface before pouring the butter. The sugar dissolves into the butter as it melts and creates a deeper caramel color on the topping peaks — closer to the rich golden-brown surface visible in the pan photos. This is not in the base recipe because it works perfectly without it, but it is a one-step upgrade that noticeably improves the visual result.
Pro-Tip 3 — Use cold butter cut into thin slices instead of melted butter for a different topping texture. Instead of melting the butter, slice the cold stick into thin ¼-inch (6mm) pats and distribute them across the surface of the dry cake mix, covering as much of the surface as possible. Cold butter melts more slowly in the oven, which means it releases its fat gradually rather than all at once — the result is a slightly flakier, more distinct crumble texture on the peaks rather than the poured-butter version’s smoother clumps. Both are correct. The melted butter version is shown in the photos and is the tested standard. The cold butter version is a legitimate variation that some bakers prefer.
Pro-Tip 4 — Rest overnight for the best flavor. This recipe improves significantly after a full overnight rest in the refrigerator. The apple layer firms and the spiced syrup deepens in flavor as the cinnamon and nutmeg continue to bloom into the fruit. Reheat individual portions at 325°F (160°C) for 8 minutes — the topping re-crisps at the edges and the apple layer warms through evenly without drying out. The day-two version is genuinely better than fresh from the oven, which is unusual for a fruit bake and worth knowing.
Pro-Tip 5 — Warm the caramel sauce before drizzling. Cold caramel sauce poured straight from the jar is thick and sets quickly on contact with the warm cake — it sits on the surface rather than running into the crevices of the crumble topping. Warm it for 15–20 seconds in the microwave first, just until it becomes pourable and fluid. Warm caramel moves through the crumble, pools in the apple layer craters, and runs down the side of the ice cream scoop the way you see in the plated photos. This single step changes the presentation from assembled to intentional.
How to Store Apple Dump Cake
Room Temperature
Apple dump cake can sit at room temperature for up to 2 hours after baking — this is the window for the warm scoop serving experience. Beyond 2 hours, the apple layer begins to weep excess moisture into the bottom cake stratum and the topping softens from the steam trapped under it. Do not cover the pan with plastic wrap while it is still warm — the condensation that forms on the underside of the wrap drips back onto the topping and turns the crumble surface soggy within 30 minutes.
Once the cake has cooled completely to room temperature — approximately 45 minutes to 1 hour after coming out of the oven — it can be stored at room temperature in the pan covered loosely with aluminum foil for up to 24 hours. Aluminum foil allows a small amount of air circulation that plastic wrap does not, which keeps the topping texture closer to its baked state. Do not use plastic wrap for room temperature storage of this recipe.
After 24 hours at room temperature, the apple layer continues to release moisture and the topping becomes noticeably softer. Move to the refrigerator at that point.
Refrigerator
Refrigerator storage is strongly recommended for anything beyond the first 24 hours. Once fully cooled, cover the pan tightly with aluminum foil and refrigerate for up to 4 days. The cold temperature firms the apple layer and actually improves the structure of the cut squares — the layers compress slightly overnight and hold their shape more cleanly when portioned.
Before serving refrigerated cake, two options:
Whole pan reheat: Remove the foil, place the pan in a 325°F (160°C) oven for 15–18 minutes until the apple layer is warmed through and the topping edges begin to re-crisp. Cover loosely with foil for the first 10 minutes, then uncover for the final 5–8 minutes to allow the topping surface to regain some texture.
Individual square reheat: Place one square on an oven-safe plate and reheat at 325°F (160°C) for 8 minutes. This method produces a better topping texture than the microwave. If you are short on time, microwave on 50% power for 60–90 seconds — full power microwaving makes the topping rubbery and the apple layer explosively hot on the outside while still cold in the center.
🗒 Luna’s Note: I prefer refrigerated and reheated over fresh from the oven. The apple flavor deepens overnight and the syrup thickens into something closer to a proper caramel apple filling. If you are making this for a dinner party, bake it the day before and reheat it. It is more relaxed and it actually tastes better.
Do not refrigerate the cake with the ice cream already added — add ice cream and caramel only at the moment of serving.
Freezer — Baked
Apple dump cake freezes well, though the topping texture changes slightly after thawing. Portion the fully cooled cake into individual squares first — freezing and thawing the whole pan produces uneven results as the outer portions thaw faster than the center and the topping absorbs excess moisture unevenly.
To freeze individual portions: Wrap each square tightly in a double layer of plastic wrap, pressing the wrap directly against all surfaces to minimize air contact. Place the wrapped squares in a zip-lock freezer bag or a lidded freezer-safe container. Label with the date. Freeze for up to 2 months.
To thaw: Transfer individual squares from the freezer to the refrigerator the night before serving — allow 8–10 hours for full thaw. Do not thaw at room temperature; the apple layer thaws faster than the dense topping and the moisture differential causes the base to become wet and the topping to remain partially frozen.
To reheat from frozen (if needed): Place the still-frozen square on an oven-safe dish and reheat at 325°F (160°C) for 18–22 minutes, covered with foil for the first 15 minutes and uncovered for the final 3–7 minutes. The topping will not be as crumble-textured as fresh — it will be softer and denser — but the apple flavor and the overall dessert experience hold up well. Add ice cream and caramel at serving as usual.
Texture note: The pebbled crumble surface of the topping becomes slightly more compressed after freezing and thawing. It will not look identical to the overhead pan photo after reheating from frozen — the peaks flatten slightly. The flavor is not affected.
Freezer — Unbaked
Freezing the assembled unbaked dump cake is not recommended. The dry cake mix layer absorbs moisture from the apple layer during freezing, which eliminates the distinct layer separation that produces the crumble topping. By the time the pan thaws and bakes, the cake mix has already partially hydrated from the fruit — the result is a denser, less textured topping without the pebbled surface visible in the photos. Assemble and bake fresh. The 15-minute assembly time makes this easy enough that there is no meaningful advantage to freezing it unbaked.
Serving Suggestion
This is a warm dessert. Not warm-adjacent, not room temperature with ice cream on top — warm. The specific experience this recipe is built around requires the apple layer to be heated through to the point where it is just short of bubbling, the caramel sauce to be fluid enough to run into the crumble crevices, and the ice cream to begin melting on contact. If any of those three conditions are not met, you are eating a different dessert.
I serve this in wide, shallow bowls on nights when dinner ran long and nobody has energy for anything complicated. One square reheated, one scoop of Häagen-Dazs Vanilla Bean placed directly in the center while the cake is still steaming, caramel warmed for 15 seconds in a small bowl and poured over everything at the table rather than in the kitchen. The caramel hitting the cold ice cream at the table is the moment — watch it run.
For a group, I keep the pan warm in a 200°F (95°C) oven with the foil off and set out the ice cream, caramel sauce, and a large serving spoon and let people portion their own. The self-serve version always gets more ice cream and more caramel than I would have plated, which turns out to be the correct amount.
This is what I bring when someone asks for something homemade and I want to spend 15 minutes on it and have it look like I spent two hours. The crumble top does the work visually. The caramel and ice cream do the rest.
Day 2 note: Day 2 reheated from the refrigerator is genuinely the better version. The apple syrup thickens overnight into something closer to a proper caramel apple filling, the spices deepen, and the three-layer structure firms into cleaner, more defined slices. The day-one version is warmer and more dramatic. The day-two version tastes more intentional.
Honest limitation: This recipe does not travel. Cut squares collapse in a takeout container, the apple layer continues releasing moisture in transit, and the crumble topping softens within 20 minutes of being covered. Make it where you are serving it. It is a 15-minute assembly — there is no reason to make it somewhere else.
Frequently Asked Questions About Apple Dump Cake
Can I use canned apple pie filling instead of fresh apples?
You can, but the result will be different from the photos. Canned filling is pre-cooked and pre-thickened — it does not release the natural fruit juices that hydrate the cake mix layer from below, which is what builds the layered texture. Use two 21 oz cans, reduce added sugar to 1 tablespoon, omit the lemon juice, and reduce bake time to 38–42 minutes.
Can I make apple dump cake ahead of time?
Yes — and it improves with time. Bake completely, cool, cover with foil, and refrigerate up to 4 days. The cinnamon and nutmeg bloom deeper into the apple syrup overnight, and the layers firm into cleaner squares. Reheat the whole pan at 325°F (160°C) for 15–18 minutes or individual squares for 8 minutes. Add ice cream only at serving.
What can I use instead of yellow cake mix?
White cake mix works and produces a slightly paler topping. Spice cake mix amplifies the cinnamon-apple flavor but adds sweetness. Butter cake mix produces a denser, less crumbly result because of higher fat content in the mix. Do not use angel food mix — it contains no fat and will not crumble regardless of butter quantity. Use a standard 15.25 oz (432g) box, completely dry.
Why does my dump cake have a soggy bottom layer?
A soggy bottom layer comes from apples that released too much water — either sliced too thin or from a high-moisture variety like Fuji, Gala, or McIntosh. It also happens when the cake is cut before the 20-minute rest, which is when the apple pectin sets into a firm layer. For managing moisture in a different fruit base, my Pineapple Upside Down Dump Cake covers the same issue.
Can I double this apple dump cake recipe?
Yes. Multiply all ingredients by two except start spices at 1.5x — taste the apple toss and add the rest only if needed, since spices intensify non-linearly in fruit-based recipes. Use two separate 9×13 inch glass dishes, not one larger pan — a single deeper pan traps steam and prevents even topping browning. Bake time stays the same at 45–50 minutes.
How do I adjust this recipe for high altitude or high humidity?
At high altitude above 3,500 feet (1,067m), add 2 tablespoons of water to the apple toss, increase oven temperature to 365°F (185°C), and begin checking at 40 minutes — faster moisture evaporation can dry the apple layer before the topping browns. In high humidity above 70%, assemble and bake immediately — exposed dry cake mix absorbs ambient moisture and loses its crumble potential within minutes.
Can I make this recipe gluten-free or dairy-free?
Gluten-free: substitute King Arthur Gluten-Free Yellow Cake Mix — it produces a nearly identical crumble texture because the leavening ratios match the standard mix. Do not use a gluten-free flour blend — leavening ratios differ and the topping will not brown correctly. Dairy-free: replace butter with ½ cup (113g) refined coconut oil. The topping will be slightly less golden since coconut oil lacks milk solids for Maillard browning, but the crumble texture holds.
More Recipes You’ll Love
If this apple dump cake is your kind of dessert — minimal effort, maximum payoff, fruit and butter and something golden on top — these three recipes are next on your list.
My Chocolate Dump Cake follows the same no-mix layered method but uses a rich chocolate base with chocolate cake mix and butter for a deeply fudgy result that sets into clean squares when cooled.
The Peanut Butter Cup Dump Cake takes the dump cake structure in a different direction — peanut butter, chocolate, and a cake mix topping that bakes into a dense, peanut-butter-scented crumble that is difficult to stop eating at one square.
And if you want to stay in the fruit dump cake category, Pumpkin Dump Cake uses canned pumpkin in place of the fruit layer, spiced with warm fall flavors and topped with the same buttered cake mix crumble — it is the version I make every November when I want something that smells like autumn and takes 15 minutes to put together.

Apple Dump Cake Recipe
Ingredients
Equipment
Method
- Position the oven rack in the middle position and preheat to 350°F (175°C). Set a 9×13 inch (23x33cm) glass baking dish on the counter — do not grease it.
- Peel, core, and slice all 3 lbs (1,360g) of Granny Smith apples into ¾-inch (2cm) wedges, transferring them directly into a large mixing bowl as you work. Add the ¼ cup (55g) light brown sugar, 1½ tsp ground cinnamon, ¼ tsp ground nutmeg, 1 tbsp (15ml) fresh lemon juice, 1 tsp pure vanilla extract, and ¼ tsp fine sea salt all at once and toss until every apple wedge is evenly coated and a thin syrup forms at the bottom of the bowl — about 60 seconds of active tossing.
- Pour the entire apple mixture including all accumulated syrup into the prepared glass baking dish and spread into an even layer from corner to corner using a rubber spatula — the layer should be approximately 1 to 1¼ inches (2.5–3cm) deep with no large gaps. Do not press or compact the apples.
- Open the 15.25 oz (432g) box of yellow cake mix and pour the entire contents directly and evenly over the apple layer without mixing anything first. Spread into an even layer approximately ½ inch (1.3cm) deep using the spatula or the back of a large spoon, covering the apple surface completely from edge to edge and paying particular attention to the corners.
- Melt the ½ cup (113g) unsalted butter completely — stovetop over low heat or microwave in three 15-second increments — and let it cool for 2 minutes. Pour slowly and evenly over the dry cake mix surface in overlapping passes covering the full pan — some dry white patches will remain and this is correct. Do not stir.
- Bake on the middle rack at 350°F (175°C) for 45 to 50 minutes, beginning to check at 43 minutes. The cake is done when the edges are deep cinnamon-brown and pulling from the glass walls, the surface is a landscape of golden-brown pebbled clumps, and fruit juices are visibly bubbling through the surface craters across the entire pan — not just at the edges. Do not open the oven before the 43-minute mark.
- Remove from the oven and place on a wire cooling rack. For warm scoops, rest for 10 minutes and serve directly from the pan with a large spoon. For clean cut squares, rest for 20 minutes at room temperature then refrigerate for 15 minutes before cutting into 12 equal squares with a sharp knife wiped clean between each cut.
- Place one square or one generous scoop into a wide shallow bowl or onto a white ceramic plate. Add one large scoop of vanilla ice cream directly on top, drizzle approximately 2 tablespoons of warmed salted caramel sauce over the ice cream and cake, and serve immediately.