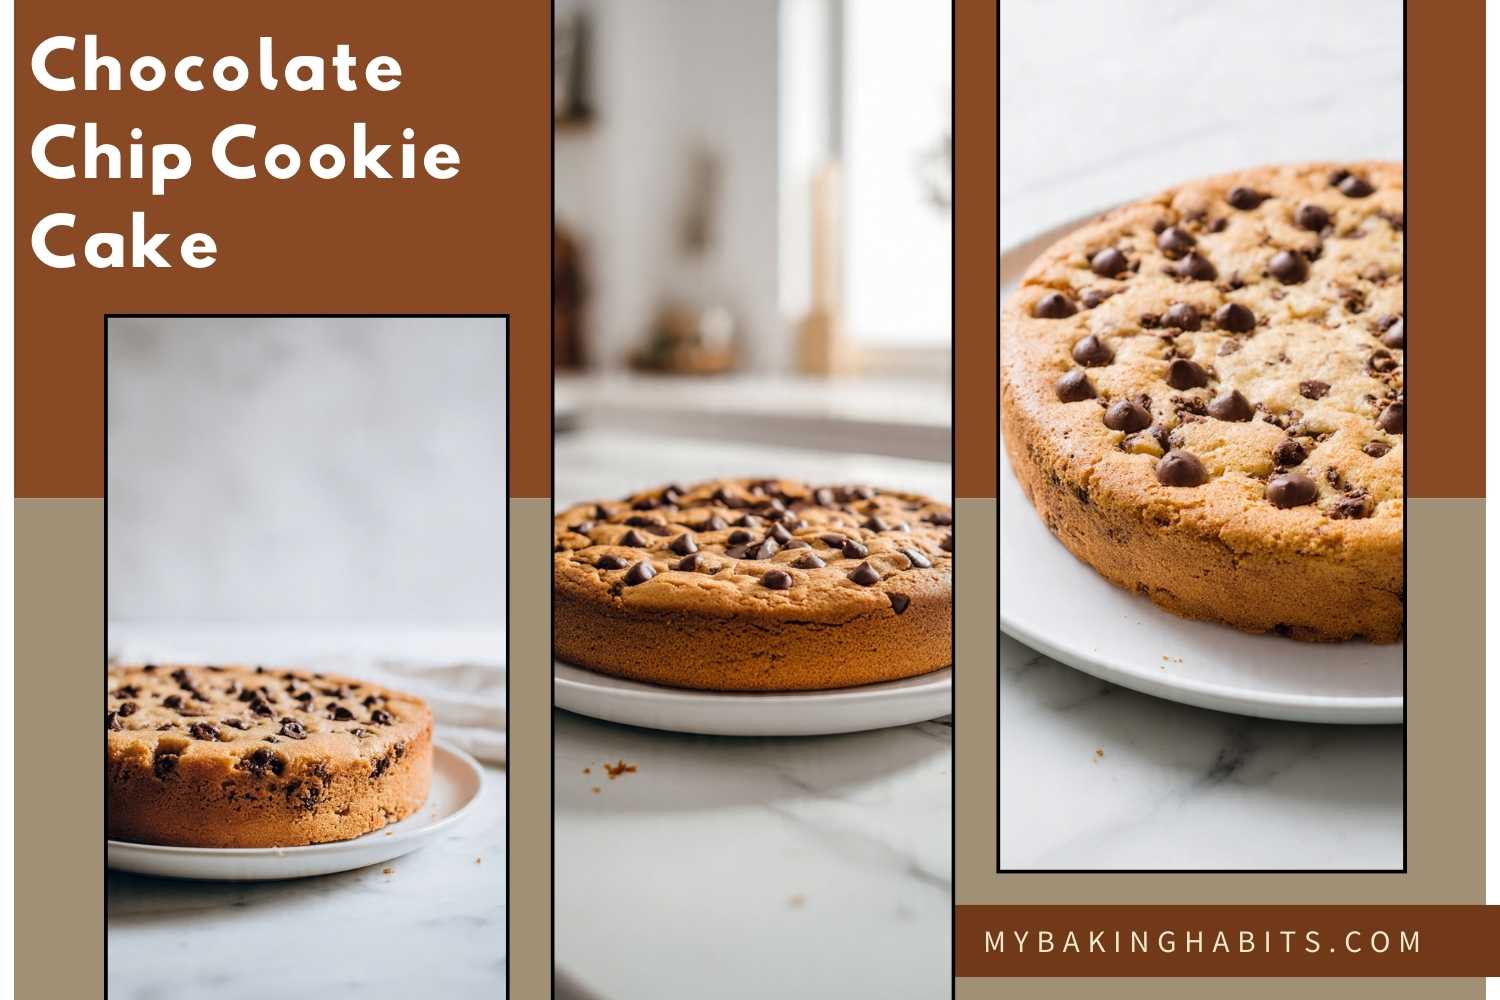
No-Chill Chocolate Chip Cookie Cake
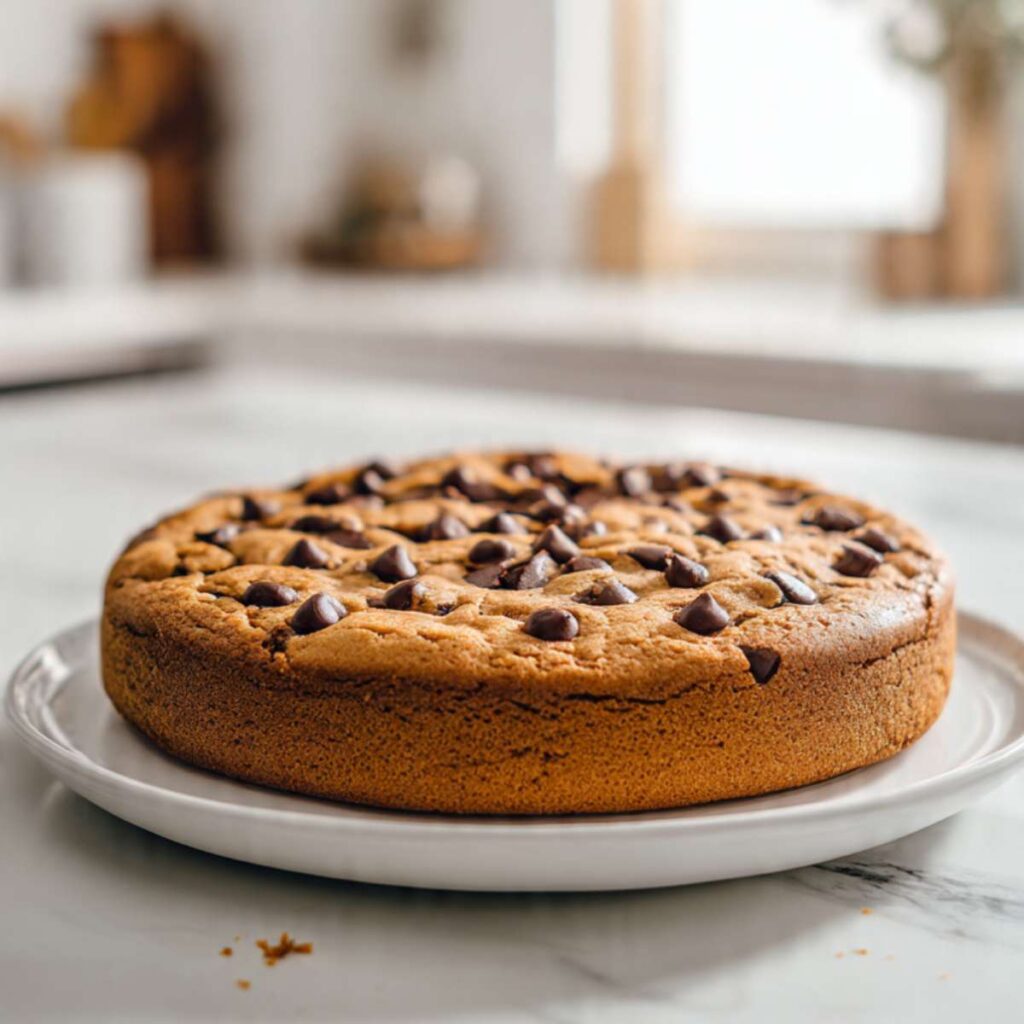
The only recipe in this format on my blog is this one: a full batch of chocolate chip cookie dough pressed into a round pan, baked as a single unit, and sliced like a cake. I have made it in my Los Angeles kitchen more than thirty times — adjusting the sugar ratio, testing different pan sizes, changing the bake temperature by increments — until I understood exactly what produces the thick, soft-centered result you see in the photos above.
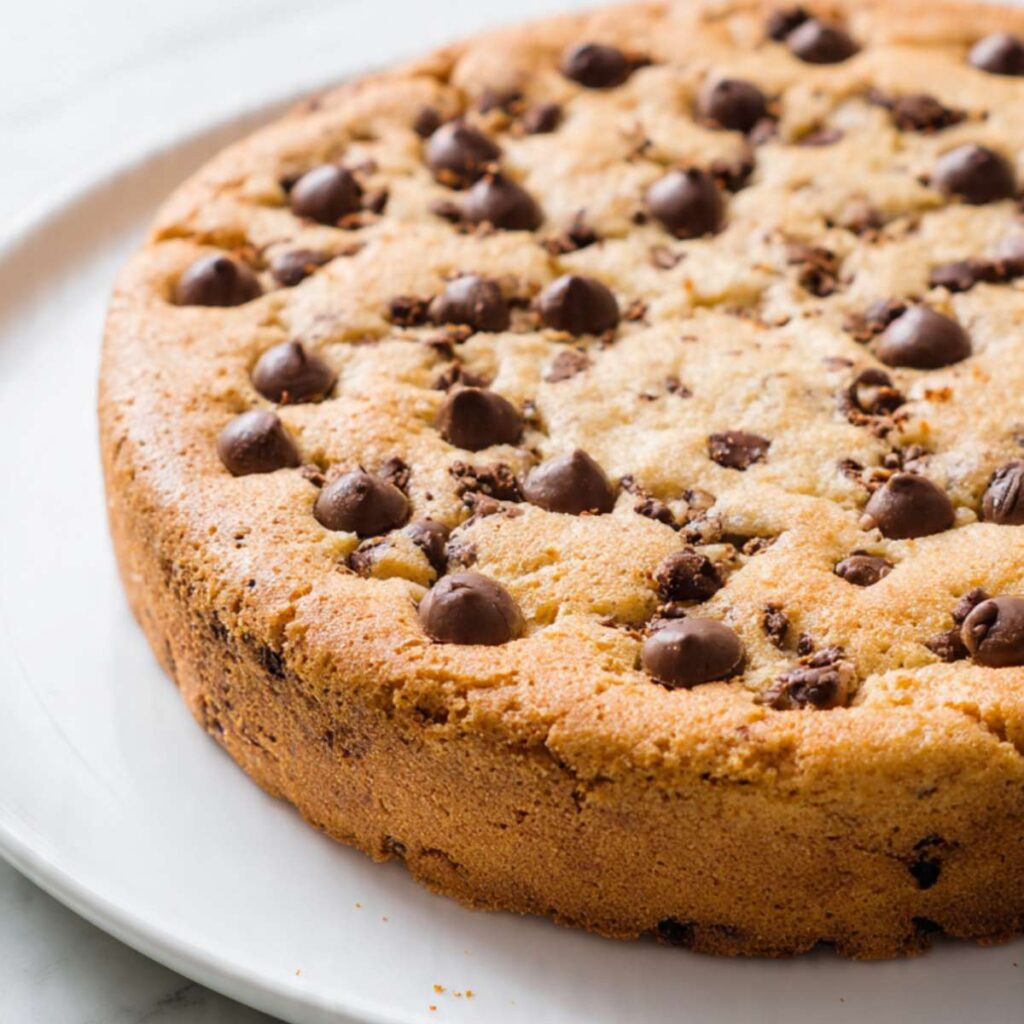
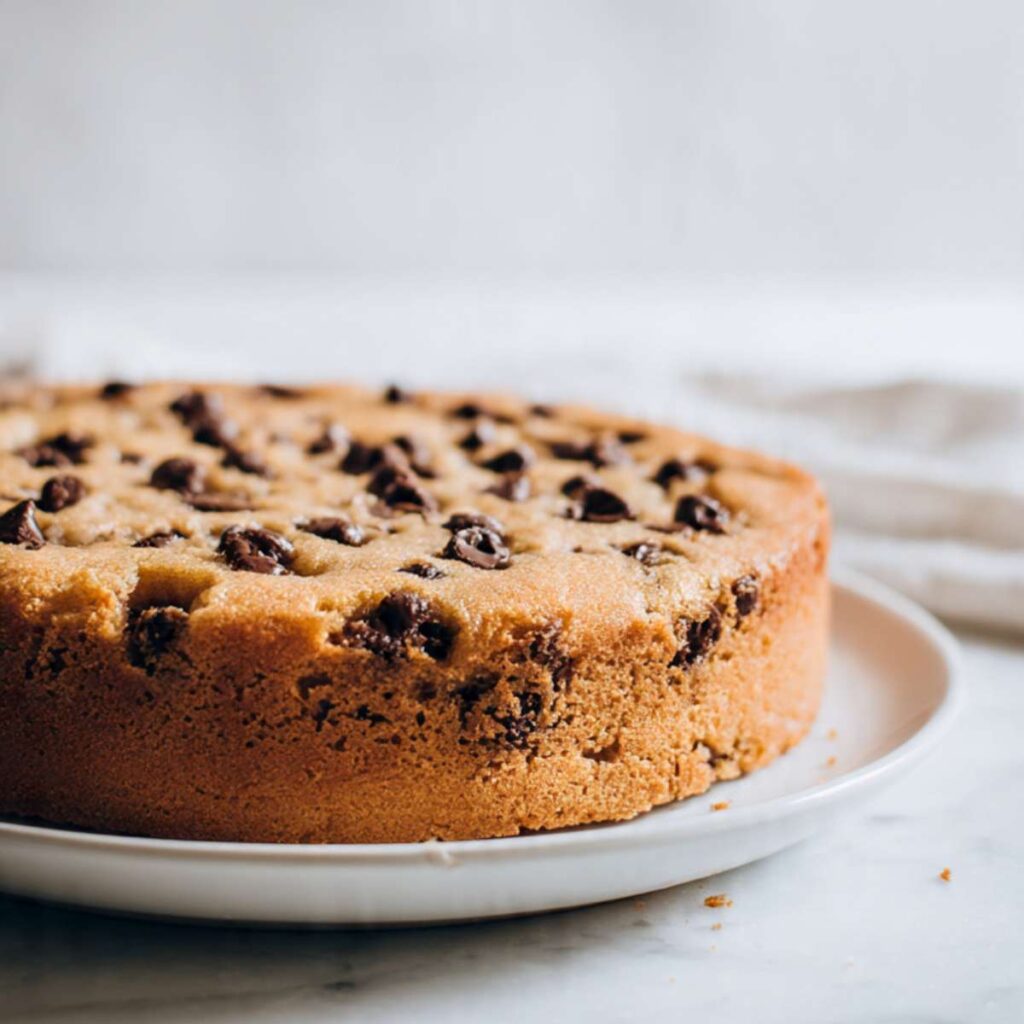
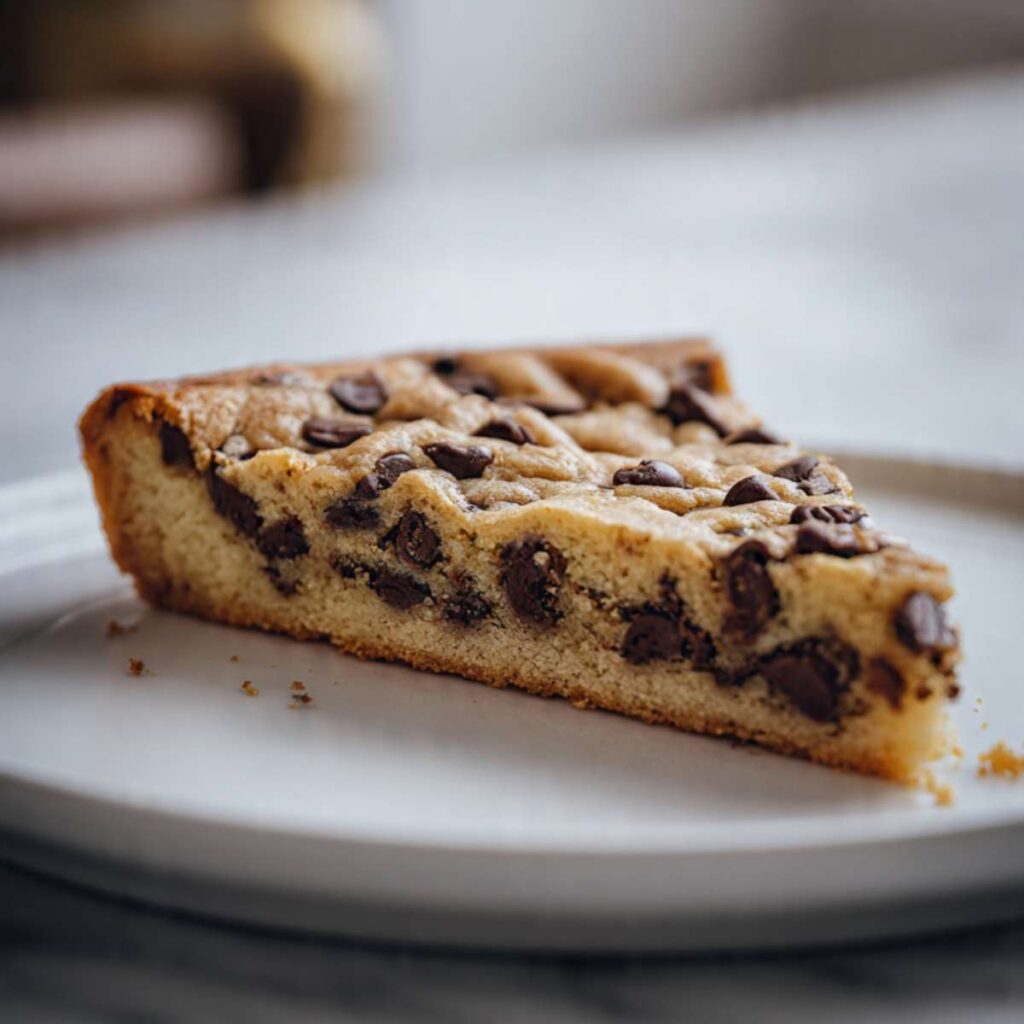
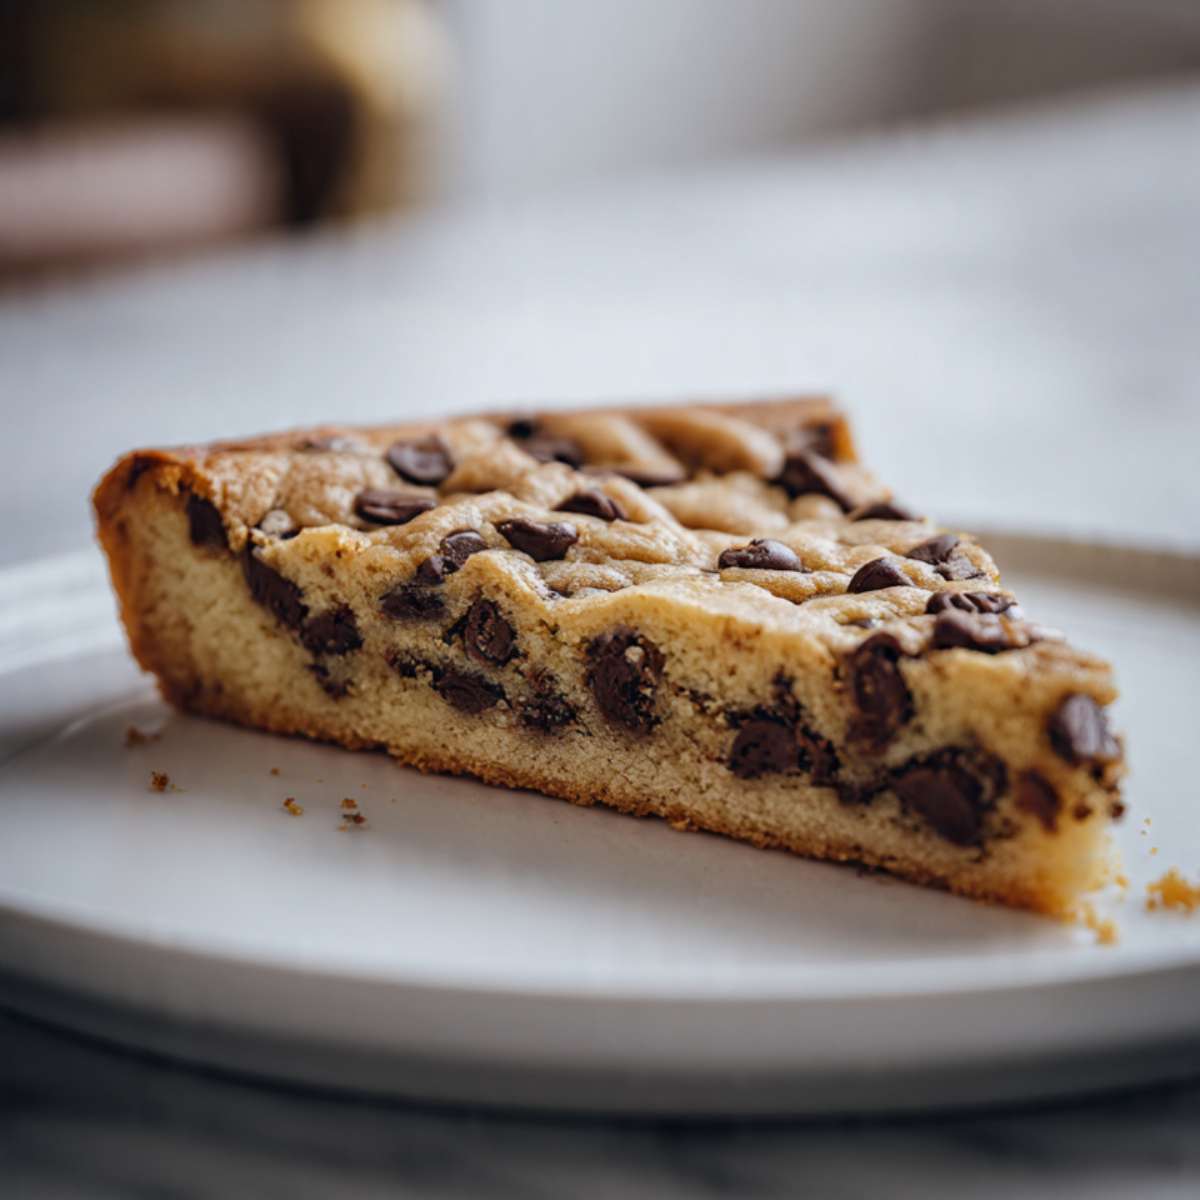
What you get is a giant cookie baked in a round pan, sliced like a cake. The edges come out with a faint golden-brown set and a slightly crisp bite. The center stays dense and tender — not cakey, not fudgy, not dry. Every bite has semi-melted chocolate chips throughout, with extra chips pressed into the top so the surface looks intentional even before it gets near a piping bag.
🗒 Luna’s Note: I always press the reserved chips onto the top surface right after the dough is leveled in the pan — not during mixing, not after sitting. The chips stay proud and visible on the finished surface only when they go on immediately before the pan enters the oven.
I tested the sugar ratio across four batches. Equal parts brown and white sugar gave me a crackled surface but a slightly crisper center than I wanted. Moving to three parts brown sugar to one part white fixed that — the brown sugar’s molasses content keeps the center dense and soft for days, and the small amount of white sugar still gives just enough structure at the edges. The matte finish you see on the top surface is correct. It is not underbaked. That is what a brown-sugar-dominant cookie cake looks like.
I tested bake temperature at 325°F versus 350°F. At 325°F the center took too long to set and the edges dried out waiting. At 350°F the edges developed their golden color right as the center came to the correct pull point — slightly underdone in the middle with a toothpick that comes out with a few moist crumbs. That is the version in these photos and the version I kept.
This recipe uses a stand mixer or hand mixer — creamed butter is what gives this cookie cake its height and structure. No chilling required. The batter goes straight from the bowl into the pan.
| Yield | Prep Time | Bake Time | Cooling Time | Total Time |
|---|---|---|---|---|
| 12 slices | 15 minutes | 22–25 minutes | 30 minutes in pan before slicing | ~1 hour 10 minutes |
| Calories | Fat | Carbohydrates | Protein | Sugar | Sodium |
|---|---|---|---|---|---|
| ~420 kcal | ~23g | ~50g | ~4g | ~30g | ~272mg |
Ingredients & Tools
For the Cookie Cake
- 2¼ cups (270g) all-purpose flour, spooned into the measuring cup and leveled — do not pack
- 1 tsp (4g) baking soda, checked for freshness
- ¾ tsp (4.5g) fine sea salt
- 1 cup (226g) unsalted butter, softened to 65–68°F
- ¾ cup (165g) packed light brown sugar
- ¼ cup (50g) plain white granulated sugar
- 1 large egg + 1 large egg yolk, room temperature
- 2 tsp (10ml) pure vanilla extract
- 1¾ cups (300g) semi-sweet chocolate chips, divided — 1½ cups (255g) folded into the dough, ¼ cup (45g) pressed onto the top before baking
For the Chocolate Buttercream (Optional — Birthday/Party Version)
- ½ cup (113g) unsalted butter, softened to 65–68°F
- 1½ cups (180g) powdered sugar, sifted
- 3 tbsp (18g) unsweetened cocoa powder, sifted
- 2–3 tbsp (30–45ml) heavy cream, added one tablespoon at a time
- Rainbow sprinkles for topping
Ingredient Notes
Butter — softened, not melted: Butter at 65–68°F holds its shape when pressed but leaves an indent easily. This is the temperature that creams properly and builds the structure this cookie cake needs to stay thick. Butter that is too warm — above 72°F — will cream into a greasy, broken mixture and the cookie cake will spread flat rather than staying domed. In my Los Angeles kitchen in summer, I pull butter from the fridge 20 minutes before I start, not longer. If yours has softened too far, return it to the fridge for 10 minutes.
Flour — spooned and leveled only: Never scoop directly from the bag. Scooping compacts flour and adds 20–30g more than the recipe intends. That extra flour produces a dry, crumbly cookie cake with a pale, undercooked-looking center that is actually just overbaked. Spoon flour into the measuring cup, then level with a straight edge — or weigh it at 270g.
Baking soda — freshness test: Drop ¼ tsp into 2 tablespoons of white vinegar. It should fizz immediately and vigorously. Weak or no fizz means the baking soda is spent — a fresh box costs less than the batch of butter and chocolate chips you will waste on a flat, dense result.
Brown sugar — packed: Spoon it into the cup and pack it firmly. Hold the cup over the bag and press with your fingers until the sugar holds the shape of the cup when turned out. Loosely measured brown sugar throws off the moisture content and produces a drier, crisper cookie cake than the one shown in these photos.
White granulated sugar — no substitutions: Use plain white granulated cane sugar only. Do not substitute coconut sugar, raw sugar, turbinado, or any less-refined alternative. Coconut sugar and turbinado contain residual molasses and added moisture that will push the dough closer to 100% brown sugar behavior — the edges will not develop their structure and the cookie cake will be too soft to slice cleanly. Do not substitute a 1:1 blend of the two sugars with a single sugar type — the ratio between them is doing specific structural work.
Egg + yolk: The extra yolk adds fat without adding extra whites. Egg whites produce steam and lift — more whites means a more cakey result. The yolk keeps the crumb dense and the center tender. Use both at room temperature — cold eggs seize the creamed butter and break the emulsion, producing a curdled batter that bakes up uneven.
Semi-sweet chocolate chips: The chips visible in these photos are standard semi-sweet chips — 45–55% cacao — not chunks, not mini chips, not bittersweet. Chunks melt more aggressively and pool rather than holding their shape. Mini chips distribute too finely and disappear into the crumb. Standard semi-sweet chips give the distinct, visible pockets of chocolate you see throughout the cross-section photo. Ghirardelli Semi-Sweet Chocolate Chips or Nestlé Toll House Semi-Sweet Morsels both work reliably at this cacao range. Do not substitute dark chocolate chips above 60% cacao — the higher cacao percentage produces a noticeably bitter bite that competes with the brown sugar base.
Necessary Tools
- Stand mixer fitted with the paddle attachment, or hand mixer with beaters
- 9-inch round light-colored aluminum cake pan or 9-inch springform pan
- Parchment paper cut to fit the base of the pan
- Kitchen scale (strongly recommended — gram weights are given for every ingredient)
- Mixing bowls — one medium for dry ingredients, one large if using a hand mixer
- Silicone spatula
- Whisk
- Wire cooling rack
- Piping bag fitted with a star tip (Wilton 1M) — only for the frosted variant
- Oven thermometer (optional but strongly recommended — most home ovens run 15–25°F off their dial setting, which directly affects whether the edges and center reach their correct pull points at the same time)
Before You Start
- Pull butter from the fridge 20 minutes before starting — target 65–68°F. Press a finger into the center — it should leave a clean indent without the butter collapsing.
- Pull eggs from the fridge 30 minutes before starting, or place them in a bowl of warm water for 10 minutes.
- Preheat your oven to 350°F (175°C) at least 20 minutes before baking. Most home ovens take longer to fully stabilize than their preheat signal suggests. If you have an oven thermometer, use it — my oven runs 15°F hot and I bake at the dial setting that reads 365°F to hit the actual 350°F.
- Line your 9-inch pan with parchment cut to fit the base. Grease the sides with a thin layer of butter or non-stick spray. The parchment lets you lift the whole cookie cake out cleanly after cooling.
- Gram weights take priority over volume measurements throughout this recipe. If you have a kitchen scale, use it.
- No chilling required — the dough goes directly from the mixing bowl into the pan. Do not refrigerate the dough before pressing it into the pan unless it feels unusually soft or sticky (see Troubleshooting). Chilling is not part of this recipe and is not needed for thickness — the creamed butter method handles structure without it.
- This recipe uses a stand mixer or hand mixer. Have your equipment set up before you start — creamed butter should not sit and warm while you hunt for the paddle attachment.
How to Make Chocolate Chip Cookie Cake
Step 1: Preparing the Pan and Preheating the Oven
Position your oven rack in the middle of the oven and heat to 350°F (175°C). Middle rack gives even heat circulation — the top rack runs hotter and will set the surface before the center is done, and the bottom rack will over-brown the base. Most home ovens run 15–25°F (8–14°C) hotter or cooler than their dial setting. If you have an oven thermometer, set it on the middle rack now and confirm the actual temperature before the pan goes in. My oven runs 15°F hot — I bake at the dial position that reads 365°F to hit the actual 350°F.
While the oven heats, press a sheet of parchment paper into the base of your 9-inch round light-colored aluminum cake pan or springform pan, then lightly grease the exposed sides with butter or non-stick spray. Light-colored aluminum is important — dark non-stick pans absorb more heat and will over-brown the edges and base of this cookie cake before the center reaches the correct pull point. If you only have a dark pan, reduce the oven temperature by 25°F (14°C) and start checking at 20 minutes.
The pan should look fully lined at the base with clean, flat parchment and lightly coated sides — no gaps at the edges where the parchment meets the pan.
Do not skip the parchment. Greasing alone is not sufficient for a cookie cake this thick — the base will stick and tear when you try to lift it after cooling. Set the prepared pan aside while you make the dough. Your pan is ready — now move to the dry ingredients.
Step 2: Whisking the Dry Ingredients to an Even Blend
In a medium mixing bowl, add your 2¼ cups (270g) all-purpose flour (spooned and leveled), 1 tsp (4g) baking soda, and ¾ tsp (4.5g) fine sea salt. Whisk together for 20 full seconds — count them. Whisking distributes the baking soda evenly through the flour so it does not create pockets of rise in one area and flat spots in another. A cookie cake with unevenly distributed leavening will dome off-center and develop an uneven crumb.
The dry mixture should look uniform and pale — no visible clumps of baking soda, no streaks. If you see white lumps, whisk for another 10 seconds and check again.
Do not substitute stirring with a spoon here — a whisk breaks up any baking soda clumps that a spoon will leave intact. Set the bowl aside. Your dry ingredients are ready — move to creaming the butter and sugars.
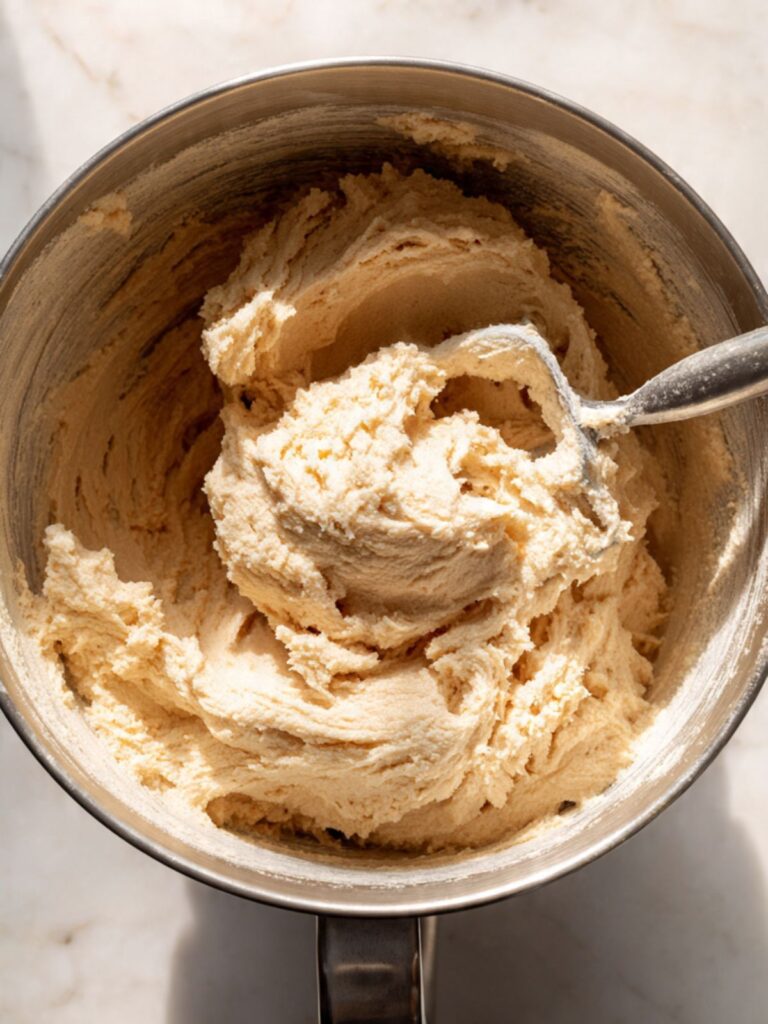
Step 3: Creaming the Butter and Both Sugars Until Pale and Fluffy
In the bowl of your stand mixer fitted with the paddle attachment — or in a large mixing bowl if using a hand mixer — add your 1 cup (226g) unsalted butter softened to 65–68°F, ¾ cup (165g) packed light brown sugar, and ¼ cup (50g) plain white granulated sugar. Beat on medium speed (speed 4 on a KitchenAid) for exactly 3 minutes — set a timer. The brown sugar provides the molasses content that keeps this cookie cake dense and soft at the center. The small amount of white granulated sugar gives just enough structure at the edges for a clean slice. Together, they are what produces the matte, golden surface visible in the photos — not a crackled, shiny top, which would require equal or higher white sugar.
Do not rush this step. Under-creamed butter produces a dense, flat cookie cake that spreads sideways rather than holding its height. The creaming process incorporates air into the fat, and that air is what gives this cookie cake its structure in the oven before the flour sets.
After 3 minutes, the mixture should look noticeably paler than when you started — a warm caramel color lightening toward a pale tan — and the volume should have increased slightly. The texture should feel light and fluffy when you stop the mixer and press a small amount between your fingers, with no visible sugar granules remaining.
If it still looks dark and dense after 3 minutes, beat for another 60 seconds and check again. Your butter and sugar are creamed — add the eggs next.
Step 4: Adding the Eggs and Vanilla Without Breaking the Emulsion
With the mixer running on low speed, add your 1 large egg first and beat until fully incorporated — about 20 seconds. Then add your 1 large egg yolk and beat for another 20 seconds. Finally add your 2 tsp (10ml) pure vanilla extract and beat for 10 seconds more. Add each addition separately — dropping both eggs in at once overwhelms the emulsion and the batter will look curdled and broken rather than smooth. The extra yolk adds fat without additional egg white. More egg white means more steam in the oven, which produces a cakey, open crumb — the opposite of the dense, tender center visible in the cross-section photo. Room temperature eggs incorporate smoothly into the creamed butter. Cold eggs will seize the fat and curdle the batter — a curdled batter bakes up with an uneven, greasy crumb.
The batter should look smooth, glossy, and cohesive after each addition — not grainy, not broken, not streaked with unmixed egg. If it looks slightly curdled after the first egg, beat on medium for 30 seconds before adding the yolk. A slightly curdled batter at this stage usually comes back together once the flour goes in, but a fully broken batter will not.
🗒 Luna’s Note: I always crack my eggs into a small bowl before adding them to the mixer. If a shell falls in, I can fish it out without stopping to dig through the batter.
Your batter is smooth and ready — fold in the dry ingredients next.
Step 5: Adding the Dry Ingredients Without Developing Gluten
Remove the bowl from the stand mixer. Add the entire dry ingredient mixture to the butter mixture at once. Using your silicone spatula — not the mixer — fold from the bottom of the bowl upward in wide, deliberate strokes. Count 20 strokes from the moment the flour touches the batter. Stop folding the moment no dry flour streaks remain.
Do not use the mixer for this step. If you mix the flour with the stand mixer — even on the lowest speed for 30 extra seconds — the dough will feel noticeably stiffer and more elastic when you try to press it into the pan, and the finished cookie cake will have a dense, rubbery chew instead of the tender crumb shown in the cross-section photo.
The difference is gluten development, and it cannot be undone once it happens. Mixing flour on the mixer — even on the lowest speed — develops gluten far faster than hand-folding. Overdeveloped gluten produces a tough, chewy cookie cake with a bread-like texture rather than the tender crumb shown in these photos. Gluten development is why this step requires a spatula and a gentle hand, not speed or power.
After 20 strokes, the dough should look thick, cohesive, and slightly stiff — it will hold its shape when you press the spatula against the side of the bowl. No dry flour patches should be visible anywhere. If you see dry patches, fold for 3 more strokes only, then stop.
Your dough is fully mixed — add the chocolate chips now.
Step 6: Folding In the Chocolate Chips and Building the Top Layer
Add 1½ cups (255g) semi-sweet chocolate chips to the dough. Fold with the same silicone spatula using the same bottom-upward strokes — approximately 10 strokes — until the chips are evenly distributed through the dough. Reserve the remaining ¼ cup (45g) semi-sweet chocolate chips — these go on the top surface before baking, not into the dough. Chips folded completely into the dough get buried as the cookie cake spreads in the oven. The chips pressed onto the top surface stay visible and proud, which is exactly what you see in the hero photos above. As you can see in the overhead photo, the chips on the top surface are sitting proud of the dough rather than embedded — that coverage density is what you are aiming for when you press them on in the next step.
The dough should look thick and heavily studded with chips — it will be stiff enough to hold its shape when scooped with a spoon. If the dough feels very soft or sticky, your butter may have been too warm. Refrigerate the dough for 15 minutes before pressing into the pan.
Your dough is ready — press it into the pan now.
Step 7: Pressing the Dough Into the Pan and Finishing the Top

Transfer the entire batch of dough into your prepared 9-inch pan. Using your fingers or the flat bottom of a measuring cup, press the dough into an even layer that reaches all the way to the edges of the pan. The layer should be uniform in thickness — if the center is thicker than the edges, the center will be underbaked when the edges are done. Take 60 seconds to press and even it out properly.
Once the dough is evenly spread, scatter your reserved ¼ cup (45g) semi-sweet chocolate chips across the entire top surface and press each chip gently into the dough with your fingertip so they are anchored but still sitting proud. Do not press them fully flush — you want them visible on the surface, exactly as shown in the photos.
This full batch of dough fills a 9-inch pan to approximately 1.5 inches in depth and yields exactly 12 slices when cut into wedges — 6 cuts through the center, like a pizza. Each slice is approximately 130–140g before the optional frosting.
The top surface should look evenly covered with chips across the full diameter — not clustered in the center, not bare at the edges. The dough layer should be flat and level from edge to edge when viewed from the side.
Your pan is loaded and ready — into the oven now.
Step 8: Baking to a Golden Edge With a Soft, Set Center
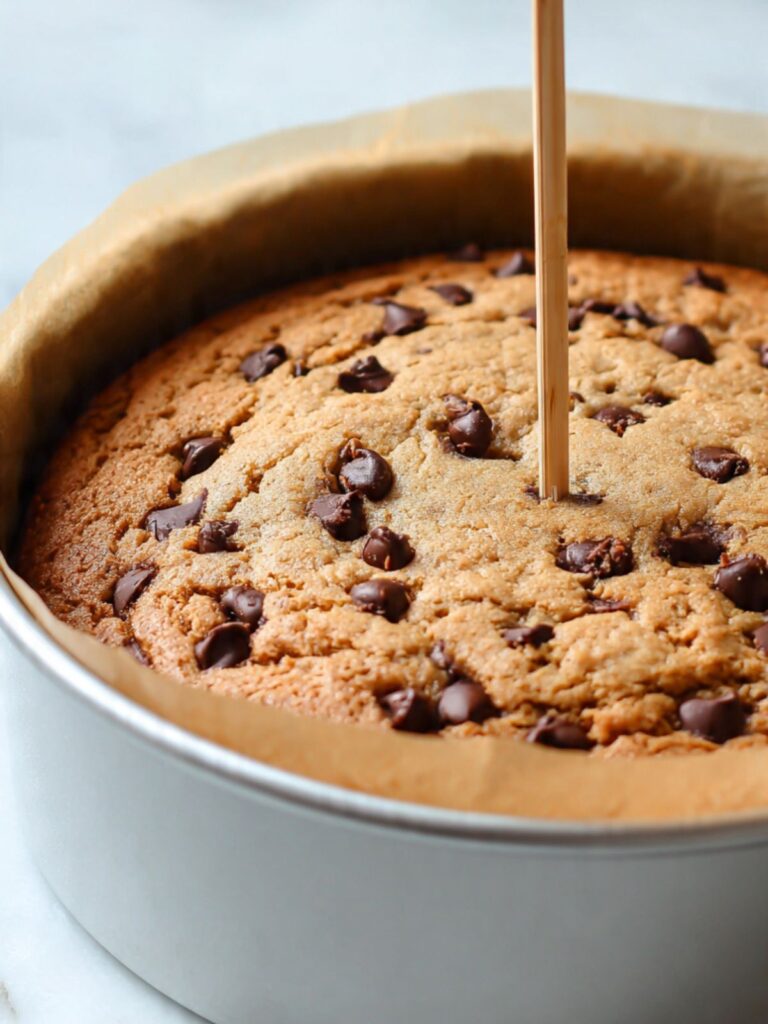
Place the pan on the middle rack of your 350°F (175°C) oven. Bake for 22–25 minutes — start checking at 22 minutes. The correct pull moment is when the edges look fully set and deep golden brown and the center still looks slightly underdone and matte — not wet, not shiny, but not fully firm either.
Insert a toothpick into the center at the 22-minute mark. It should come out with a few moist crumbs attached — not wet batter, not completely clean. A completely clean toothpick means the center has already overbaked and the cookie cake will be dry and crumbly rather than tender. Do not open the oven door before 20 minutes — the sudden temperature drop can cause the center to sink.
The edges should look deep golden and pulled very slightly from the sides of the pan. The center surface should look set and matte — this is correct. The matte finish is not underbaking. It is the brown-sugar-dominant recipe doing exactly what it is supposed to do.
Leave the cookie cake in the pan — do not attempt to unmold it yet. Move to the cooling step now.
Step 9: Cooling in the Pan Before Slicing
Leave the cookie cake in the pan on a wire cooling rack for exactly 30 minutes. Do not slice before 30 minutes. The interior of this cookie cake continues to set as it cools — the center that looked slightly underdone when you pulled it from the oven will firm to the correct dense, tender texture during this resting time. This is carryover cooking: the residual heat stored in the pan and the cookie cake itself continues to cook the interior after the oven is off. Slicing before 30 minutes means the center is still molten underneath the set surface — the knife will drag through it and the slices will collapse and lose their shape entirely.
After 30 minutes, run a thin knife or offset spatula around the inside edge of the pan to release any stuck spots. If using a springform pan, release the clasp and lift the ring. If using a standard cake pan, use the parchment to lift the cookie cake out onto the cooling rack. Allow it to cool for a further 15 minutes on the rack before slicing if you want clean, defined slices. If you prefer a warm, gooey center, slice at the 30-minute mark — the slices will be soft but the structure will hold.
After 30 minutes in the pan, the edges should feel fully firm when pressed and the center should feel set but give slightly under gentle pressure — not liquid, not rock hard. This is the correct texture.
🗒 Luna’s Note: I always use a springform pan for this recipe. The ring releases without any prying, and I can lift the parchment cleanly without disturbing the edges.
If decorating with chocolate buttercream, the cookie cake must be fully cool to room temperature — approximately 1 hour total from oven — before frosting. Warm cookie cake will melt the buttercream on contact and it will slide off rather than holding its piped shape.
Optional Step 10: Making and Piping the Chocolate Buttercream
Skip this step if serving the cookie cake plain.
In the bowl of your stand mixer fitted with the paddle attachment, beat your ½ cup (113g) unsalted butter softened to 65–68°F on medium speed for 2 minutes until pale and fluffy. Add your 1½ cups (180g) sifted powdered sugar and 3 tbsp (18g) sifted unsweetened cocoa powder all at once. Mix on the lowest speed for 30 seconds to prevent a powdered sugar cloud, then increase to medium and beat for 1 minute. Add 2 tbsp (30ml) heavy cream and beat for another 60 seconds. Check the consistency — it should hold a stiff peak for 5 seconds when you lift the beater. If it is too stiff to pipe smoothly, add the remaining 1 tbsp (15ml) heavy cream and beat for 30 seconds more.
Transfer the buttercream to a piping bag fitted with a Wilton 1M star tip. Pipe a shell border around the perimeter of the cookie cake — starting at the outer edge, squeeze with steady pressure, pull forward slightly, and release. Repeat, overlapping each shell slightly with the last. Scatter rainbow sprinkles across the center surface immediately after piping, before the buttercream crusts.
The buttercream should hold defined ridges in the shell pattern and not slump or melt at room temperature. If it looks greasy or is not holding shape, your butter was too warm — refrigerate the frosted cookie cake for 15 minutes to firm it.
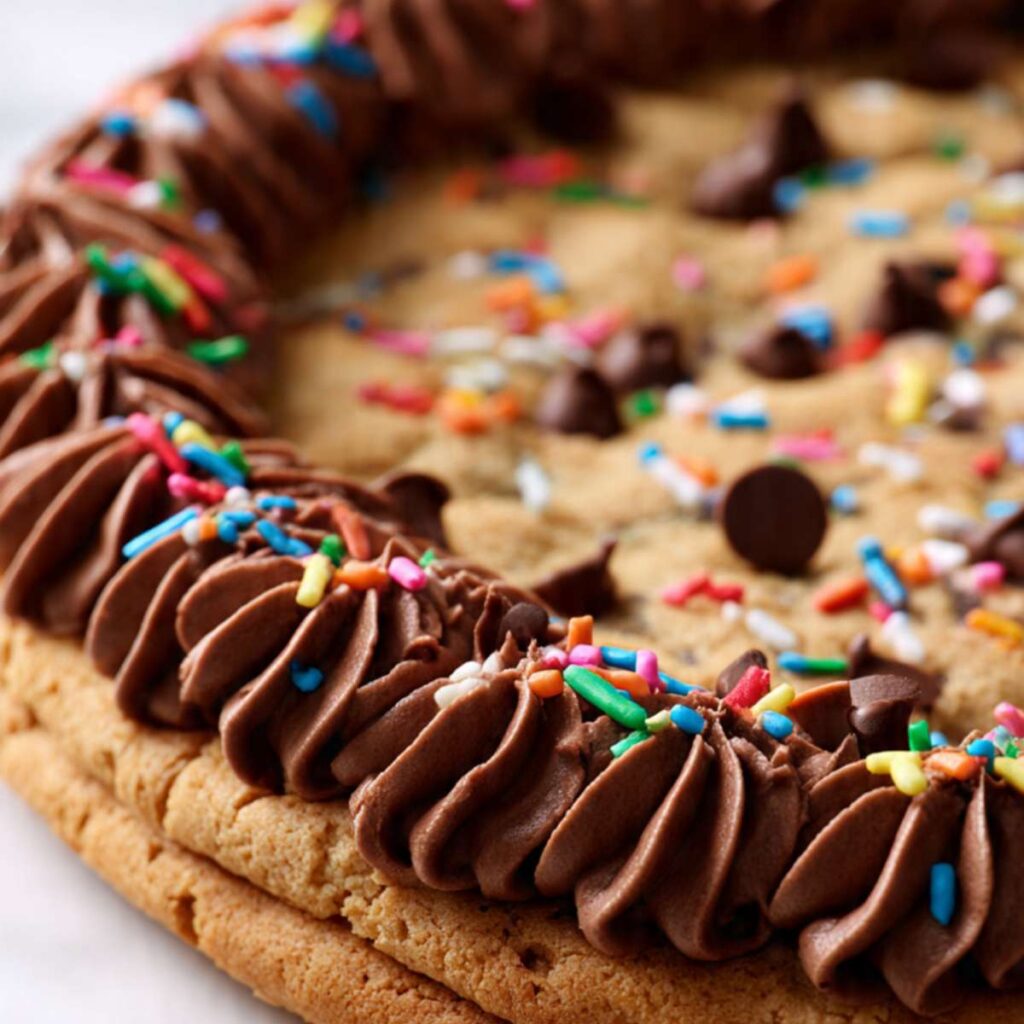
As you can see in the close-up decorated photo, the shell border sits cleanly at the edge with the sprinkles scattered evenly across the center surface — aim for that coverage density when decorating your own.
The Science Behind Chocolate Chip Cookie Cake
Why Brown Sugar Keeps This Cookie Cake Soft for Days
Brown sugar is white granulated sugar with molasses added back in — light brown sugar contains approximately 3.5% molasses by weight. That molasses is hygroscopic, meaning it actively pulls moisture from the air and holds it inside the baked crumb. In a standard drop cookie, this mechanism keeps individual cookies soft at room temperature for three to five days.
In a cookie cake — a much thicker, denser mass of the same dough — the effect is amplified. The interior of this cookie cake stays tender and moist longer than a thinner baked good because there is simply more crumb holding more moisture. This is also why the surface of this cookie cake looks matte rather than crackled — a crackled, shiny top requires a higher ratio of white granulated sugar, which dissolves differently and produces a different surface chemistry.
The matte finish is not a sign of underbaking. It is the direct result of a brown-sugar-dominant formula doing exactly what it is designed to do. If you swap equal parts white sugar into this recipe expecting a crackle, you will get one — but you will also get a drier, crisper center that does not match what is shown in these photos. For more on how sugar ratios control cookie texture, the breakdown in my chocolate chip cookie bars article covers the same mechanism applied to a sheet pan format.
How Creamed Butter Builds the Height This Cookie Cake Holds
Creaming butter and sugar together is not just mixing — it is aeration. When the paddle attachment drives sugar crystals through softened butter at medium speed, each crystal cuts microscopic air pockets into the fat. Those air pockets expand in the heat of the oven before the flour structure sets around them, and that expansion is what gives this cookie cake its lift and domed center. A cookie cake made with melted butter — even browned butter — does not have those pre-formed air pockets going into the oven. It spreads flatter, bakes thinner, and produces a different texture entirely.
The creamed butter method is what allows this recipe to bake in a 9-inch pan at nearly 1.5 inches of height without a leavening agent carrying all the load. The baking soda contributes lift, but the air incorporated during creaming is doing at least as much structural work. This is why butter temperature is so critical at this step — butter above 72°F is too soft to hold air pockets and creams into a greasy paste rather than a light, fluffy mixture. Butter below 60°F is too firm and the sugar crystals cannot cut through it efficiently.
Why the Extra Egg Yolk Controls the Crumb Structure
A standard cookie recipe uses one whole egg per batch. This recipe uses one whole egg plus one additional yolk, with no extra white. The distinction matters. Egg whites are primarily water and protein — in the oven, that water turns to steam, which creates lift and an open, cakey crumb structure. Egg yolks are primarily fat and emulsifiers — specifically lecithin, which binds fat and water molecules together and produces a tight, tender, cohesive crumb. By adding a yolk without its accompanying white, this recipe increases the fat and emulsifier content without adding more steam-producing water. The result is the dense, tight crumb structure visible in the cross-section photo — distinct chocolate chip pockets in a cohesive dough, not an open, airy bake. If you replace the egg-plus-yolk with two whole eggs, you will get a noticeably cakier result with a more open crumb. It will still taste good. It will not match these photos.
Why Pulling It Early Is the Most Important Step
The internal temperature of this cookie cake at the correct pull point — toothpick with moist crumbs, edges set, center matte — is approximately 185–190°F (85–88°C) at the center. The target finished temperature for a fully set cookie is closer to 200°F (93°C). That gap is closed entirely by carryover cooking: the residual heat stored in the dense dough and the metal pan continues to drive the internal temperature upward for the full 30 minutes the cookie cake rests in the pan after the oven is off.
🗒 Luna’s Note: I started using a springform pan specifically for this recipe after losing the bottom of two cookie cakes to a standard cake pan. The residual heat in the springform ring during the 30-minute rest is what finishes the center — releasing the ring early lets heat escape too fast.
A cookie cake pulled at the correct visual cue and rested for the full 30 minutes arrives at the right finished texture without ever overbaking in the oven. A cookie cake left in the oven until the center looks fully set has already overshot — by the time it finishes carryover cooking in the pan, the center will be dry and crumbly rather than dense and tender. The matte finish on the surface sets before the interior reaches its finished temperature. Trusting the visual cue and the rest time is the single technique that separates a dry result from the one shown in these photos.
Chocolate Chip Cookie Cake Troubleshooting & Pro-Tips
The Cookie Cake Tastes Flat, Metallic, or Soapy
A flat, metallic, or soapy aftertaste means the baking soda was either stale, over-measured, or the wrong leavening was used entirely. Stale baking soda has lost its reactivity — it still adds bulk to the dough but does not produce the CO₂ gas that creates lift, and the residual sodium bicarbonate that did not react leaves a mineral flavor in the finished bake. Over-measured baking soda — even by ¼ teaspoon — produces the same soapy result. And baking powder is not a direct substitute for baking soda in this recipe: baking powder contains cream of tartar and cornstarch and produces a different reaction rate and flavor entirely. Fix: test baking soda freshness before every batch — drop ¼ tsp into 2 tablespoons of white vinegar and confirm immediate, vigorous fizzing. If the fizz is weak or delayed, replace the box. Measure baking soda by spooning it into the measuring spoon and leveling — never scooping directly from the box, which compacts it.
The Edges Are Dark and Dry but the Center Is Still Raw
The oven temperature was too high, or the pan was too dark. A dark non-stick pan absorbs significantly more radiant heat than a light-colored aluminum pan and transfers it directly to the base and edges before the center has time to catch up. The result is over-browned, dry edges with a raw center that cannot be fixed without burning the outside further. Prevention: always use a light-colored aluminum pan for this recipe. If you only have a dark pan, reduce the oven temperature by 25°F (14°C) and add 3–4 minutes to the bake time, checking from the bottom of the time range. A foil tent over the pan in the last 5 minutes of baking can protect the edges while the center finishes.
The Center Is Wet and Sunken After Cooling
The center sank and stayed wet because the cookie cake was underbaked before it came out of the oven. A matte, slightly underdone-looking center is correct at the pull point — but if the toothpick came out with wet batter rather than moist crumbs, the dough needed more time. The distinction is important: moist crumbs cling to the toothpick and look like soft dough particles. Wet batter coats the toothpick in a liquid smear. If yours sank, return it to the oven for 5 minutes at 350°F (175°C), cover loosely with foil to prevent the edges from over-browning, and check again. Prevention: insert the toothpick at the very center of the pan — not halfway between the edge and the center, which will always read done before the true center is ready.
The Cookie Cake Spread Flat Instead of Staying Thick
The dough spread because the butter was too warm when it went into the mixer, or the creaming step was not long enough to build proper aeration. Butter above 72°F creams into a greasy paste rather than a light, aerated mixture — it looks creamed but holds no air. In the oven, there are no air pockets to support the structure, and the dough melts outward instead of rising. A second cause is under-creaming — stopping the mixer before the 3-minute mark leaves the sugar granules partially intact and the fat under-aerated. Prevention: confirm butter temperature before creaming — press a finger into the center, it should leave a clean indent without the butter collapsing or feeling greasy. Cream for the full 3 minutes and check the color and volume change before moving on.
The Texture Is Tough and Bread-Like Instead of Tender
The dough was overmixed after the flour was added. Gluten — the protein network that gives bread its chew — develops rapidly once flour hits wet ingredients and mixing begins. Even 30 seconds of mixer time after the flour goes in can produce enough gluten development to make this cookie cake noticeably tougher than it should be. Prevention: always fold the flour in by hand with a silicone spatula. Count 20 strokes. Stop the moment no dry flour patches remain — do not fold for tidiness or to make the dough look more uniform. A slightly rough-looking dough that is not overmixed will bake more tenderly than a smooth dough that has been worked too long.
The Cookie Cake Stuck to the Pan and Tore When Removed
The parchment was not used, or it was not pressed flat against the base of the pan. Cookie dough at this thickness bonds strongly to unlined metal during baking — the sugars caramelize against the pan surface and create a seal that breaks the cookie cake when you try to lift it. Greasing alone is not enough. Prevention: always line the base of the pan with a parchment round cut to fit exactly. Grease the sides separately. After the 30-minute rest, run a thin offset spatula around the inside edge before attempting to lift. If using a standard cake pan rather than a springform, use the parchment overhang as handles to lift the cookie cake straight up and out.
The Buttercream Is Sliding Off the Surface
The cookie cake was not fully cool when the buttercream was applied. A cookie cake that feels cool on the outside can still be warm at the center — and that residual heat is enough to soften buttercream on contact and cause it to slip rather than hold. Prevention: allow the cookie cake to cool for a full hour at room temperature before piping. If you are working in a warm kitchen — above 75°F (24°C) — refrigerate the cookie cake for 15 minutes before decorating. After piping, if the buttercream looks soft or is not holding its shell ridges, refrigerate the decorated cookie cake for 20 minutes to firm before serving.
Pro-Tips
Use a springform pan if you have one. The release mechanism removes the ring without any prying or tilting, and the parchment lifts the cookie cake straight off the base without disturbing the edges. A standard cake pan works, but the springform makes the unmolding step significantly cleaner.
Press the reserved chips on top right before the pan goes into the oven — not during dough assembly. Chips set aside for more than 10 minutes at room temperature in a warm kitchen begin to soften slightly and do not sit as proud on the surface after baking.
For cleaner slices, use a sharp chef’s knife wiped with a damp cloth between each cut. Cookie cake at room temperature cuts more cleanly than warm cookie cake — if you sliced at the 30-minute mark for a warm result, expect soft, slightly ragged edges on the slices. Both are correct. They are just different eating experiences.
If you are baking at altitude above 3,500 feet, reduce the baking soda to ¾ tsp (3g), increase the flour by 2 tablespoons (15g), and increase the oven temperature to 375°F (190°C). High altitude lowers air pressure, which causes leavening gases to expand faster — without these adjustments the cookie cake will dome aggressively in the center and crack across the top surface.
Humidity note: In high-humidity environments, brown sugar clumps and packs more densely than in dry climates. Break up any clumps before measuring and pack firmly to the correct level. Excess moisture in the brown sugar adds water to the dough and can produce a slightly stickier, softer result — refrigerate the dough for 15 minutes before pressing into the pan if it feels unusually wet.
How to Store Chocolate Chip Cookie Cake
Room Temperature
Store the cookie cake in a lidded hard-sided container at room temperature for up to 4 days. If the cookie cake is too large to fit in a container whole, slice it first and layer the slices with parchment between each layer to prevent them from sticking together. Do not use zip-lock bags — the soft sides compress the slices and flatten the edges, and the frosted variant will have its piped border completely destroyed within an hour. Do not wrap tightly in plastic wrap directly against the surface of an unfrosted cookie cake — the wrap traps steam and makes the top surface tacky. If you do not have a lidded container large enough, tent loosely with foil instead. The cookie cake tastes best on day 1 and day 2. By day 3 the edges begin to firm slightly while the center stays soft — still good, just a different texture than fresh.
Refrigerator
Refrigeration is not recommended for the plain cookie cake. The cold environment firms the butter in the crumb and produces a dense, almost waxy texture that does not reflect how this cookie cake is meant to eat. If you must refrigerate — for instance, if you have applied the chocolate buttercream and your kitchen is warmer than 75°F — store it covered loosely with foil or in a lidded container and bring it to room temperature for 45 minutes before serving. Cold buttercream is stiff and the cookie cake will taste compressed and dry straight from the fridge. The frosted version can be refrigerated for up to 5 days — but always allow it to come fully to room temperature before eating.
Freezer — Baked
The baked cookie cake freezes well for up to 2 months. Freeze it undecorated — buttercream does not freeze cleanly and the sprinkles bleed color as the frosting thaws. Allow the cookie cake to cool completely to room temperature before freezing — at least 1 hour from the oven. Wrap the whole cookie cake tightly in two layers of plastic wrap, then place it in a zip-lock freezer bag and press out all the air before sealing. To thaw, transfer to the counter and unwrap — leave it uncovered so condensation does not collect on the surface and make it soggy. Thaw at room temperature for 2–3 hours. Once thawed, decorate if desired and serve within 24 hours. The texture after thawing is very close to fresh — the brown sugar content helps it retain moisture through the freeze-thaw cycle better than a white-sugar-dominant recipe would.
🗒 Luna’s Note: I always freeze the cookie cake in pre-cut slices when I know I will not finish it in one sitting. Individual slices thaw in 45 minutes and I can pull exactly what I need without defrosting the whole thing.
Freezer — Unbaked Dough
The dough can be frozen before baking for up to 3 months. Press the dough into the parchment-lined pan as directed in Step 7, then wrap the entire pan tightly in two layers of plastic wrap and freeze flat. Do not press the reserved chips onto the top before freezing — add them after the dough comes out of the freezer and just before it goes into the oven. To bake from frozen, unwrap the pan and let the dough sit at room temperature for 30 minutes while the oven preheats to 350°F (175°C). Press the reserved chips onto the top surface, then bake for 28–32 minutes — the extra time accounts for the cold dough mass. Begin checking at 28 minutes using the same toothpick and visual cues as the fresh version.
Serving Suggestion
Serve this cookie cake at room temperature — not warm, not cold. At room temperature the crumb is at its most tender and the chocolate chip pockets are soft without being fully liquid. I serve this in wedges on a flat plate, exactly like a cake slice, with a scoop of vanilla bean ice cream alongside. The contrast between the dense, room-temperature cookie cake and the cold ice cream is the combination I come back to every time. This is the dessert I bring to birthday dinners when the person does not want a traditional layer cake — it slices cleanly, it travels well on a plate, and it lands on the table looking more considered than a pan of brownies without requiring any more effort.
Frequently Asked Questions About Chocolate Chip Cookie Cake
What is a chocolate chip cookie cake?
A chocolate chip cookie cake is a full batch of cookie dough baked in a round pan and sliced like a cake. It has the same flavor and crumb structure as a classic chocolate chip cookie — dense, tender, with semi-melted chocolate chip pockets — but the pan format produces a thicker, more uniform bake with a softer center than any individual drop cookie can achieve.
Can I make a cookie cake ahead of time?
Yes. Bake fully, cool to room temperature, and store for up to 2 days before serving. If decorating with chocolate buttercream, pipe the border the day of serving only — buttercream held longer loses its defined edges. The unbaked dough can also be frozen in the pan for up to 3 months and baked from frozen with 6–8 extra minutes. For more make-ahead cookie storage, see my homemade chocolate chip cookies article.
How long does a cookie cake last?
At room temperature in a lidded hard-sided container, this cookie cake stays at its best for 2 days and remains good for up to 4 days. By day 3 the edges firm slightly while the center stays soft. The frosted version, refrigerated, lasts up to 5 days — bring to room temperature for 45 minutes before serving.
Can I use store-bought cookie dough for a cookie cake?
Store-bought dough works but produces a noticeably different result. Commercial dough spreads more aggressively and contains more leavening for faster rise — in a round pan the result is flatter, crisper, and drier than this from-scratch version. It will bake faster — start checking at 18 minutes. A workable shortcut, but the crumb structure and height will not match these photos.
How do I decorate a cookie cake?
The best chocolate chip cookie cake decoration is a piped chocolate buttercream shell border around the perimeter with sprinkles across the center — exactly as shown in the decorated photo. Use a Wilton 1M star tip. The cookie cake must be fully cool before piping — at least 1 hour from the oven — or the buttercream will melt on contact and slide.
Can I double this recipe for a bigger cookie cake?
Doubling works in a 13×9-inch pan — but use only 1½ tsp (6g) of baking soda, not 2 tsp. Leavening does not scale linearly: too much baking soda causes a metallic aftertaste and aggressive doming. Bake time increases to 28–34 minutes at 350°F (175°C). Everything else doubles directly. Do not use a larger round pan — the geometry changes the edge-to-center ratio.
How does altitude or humidity affect this cookie cake?
Above 3,500 feet, reduce baking soda to ¾ tsp (3g), add 2 tablespoons (15g) of flour, and increase oven temperature to 375°F (190°C) — lower air pressure causes leavening gases to expand faster than the structure can set. In high humidity, the brown sugar absorbs ambient moisture and the dough may feel slack — refrigerate for 15 minutes before pressing into the pan.
More Cookie Recipes You’ll Love
- Brown Butter Chocolate Chip Cookies — the same semi-sweet chips in a nutty, caramel-depth dough made with browned butter instead of creamed butter. A completely different flavor profile from the same core ingredients.
- Small Batch Chocolate Chip Cookies — when you want the cookie experience without a full batch. Yields 6 cookies with the same thick, soft-centered result.
- Chewy Chocolate Chip Cookies — drop-cookie format with maximum chew engineered through bread flour and a higher brown sugar ratio.
No-Chill Chocolate Chip Cookie Cake
Ingredients
Equipment
Method
- Position oven rack in the middle and heat to 350°F (175°C), then line a 9-inch round light-colored aluminum cake pan or springform pan with a parchment round cut to fit the base and lightly grease the exposed sides with butter or non-stick spray.
- In a medium bowl, whisk together 2¼ cups (270g) all-purpose flour (spooned and leveled), 1 tsp (4g) baking soda, and ¾ tsp (4.5g) fine sea salt for 20 full seconds until no clumps remain, then set aside.
- In the bowl of a stand mixer fitted with the paddle attachment, beat 1 cup (226g) unsalted butter softened to 65–68°F, ¾ cup (165g) packed light brown sugar, and ¼ cup (50g) plain white granulated sugar on medium speed for exactly 3 minutes until the mixture is pale, fluffy, and noticeably increased in volume.
- With the mixer on low speed, add 1 large room-temperature egg and beat for 20 seconds, then add 1 large room-temperature egg yolk and beat for 20 seconds more, then add 2 tsp (10ml) pure vanilla extract and beat for 10 seconds until fully incorporated and the batter looks smooth and glossy.
- Remove the bowl from the mixer and add the entire dry ingredient mixture at once, then fold with a silicone spatula using wide bottom-upward strokes, counting 20 strokes and stopping the moment no dry flour streaks remain — do not use the mixer for this step.
- Add 1½ cups (255g) semi-sweet chocolate chips and fold with the same spatula for approximately 10 strokes until evenly distributed, reserving the remaining ¼ cup (45g) chips for the top.
- Transfer the dough to the prepared pan and press into an even layer reaching all the way to the edges using your fingers or the flat bottom of a measuring cup, then scatter the reserved ¼ cup (45g) chips across the top surface and press each one gently into the dough so they are anchored but still sitting proud.
- Bake on the middle rack at 350°F (175°C) for 22–25 minutes until the edges are deep golden brown and fully set and a toothpick inserted at the true center comes out with a few moist crumbs — not wet batter, not completely clean — then remove from the oven immediately.
- Place the pan on a wire cooling rack and cool in the pan for exactly 30 minutes before unmolding or slicing — do not cut before 30 minutes or the center will still be molten underneath the set surface.
- To make the optional chocolate buttercream, beat ½ cup (113g) softened unsalted butter on medium speed for 2 minutes, then add 1½ cups (180g) sifted powdered sugar and 3 tbsp (18g) sifted cocoa powder and mix on low for 30 seconds before increasing to medium for 1 minute, then add 2–3 tbsp (30–45ml) heavy cream one tablespoon at a time and beat until the buttercream holds a stiff peak for 5 seconds when the beater is lifted.
- Once the cookie cake is fully cool (at least 1 hour from the oven), transfer buttercream to a piping bag fitted with a Wilton 1M star tip and pipe a shell border around the perimeter, then scatter rainbow sprinkles across the center surface immediately before the buttercream crusts.