
Shortbread Cookies Recipe
Every December and every time someone in my life needs something reliable and genuinely good, I make shortbread cookies — and I have made this specific recipe more than thirty times to get it exactly right.
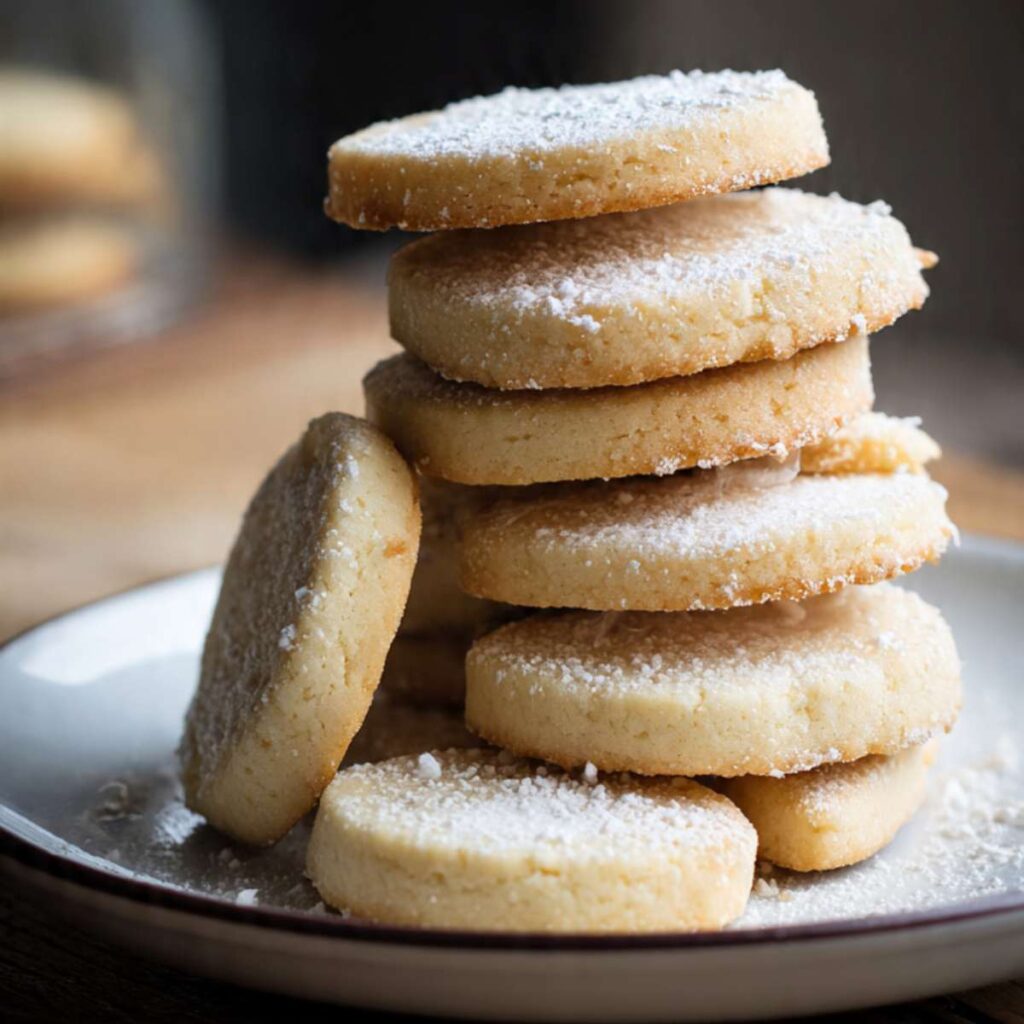
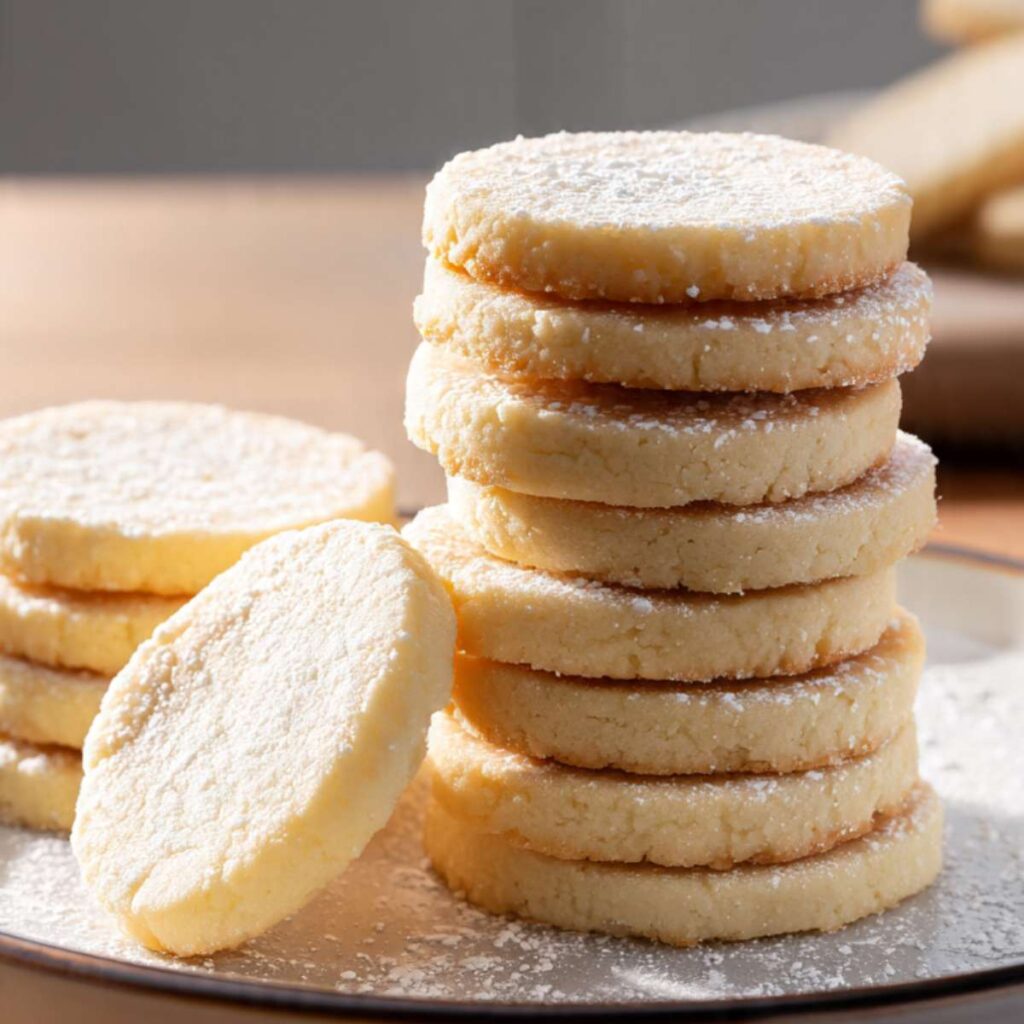
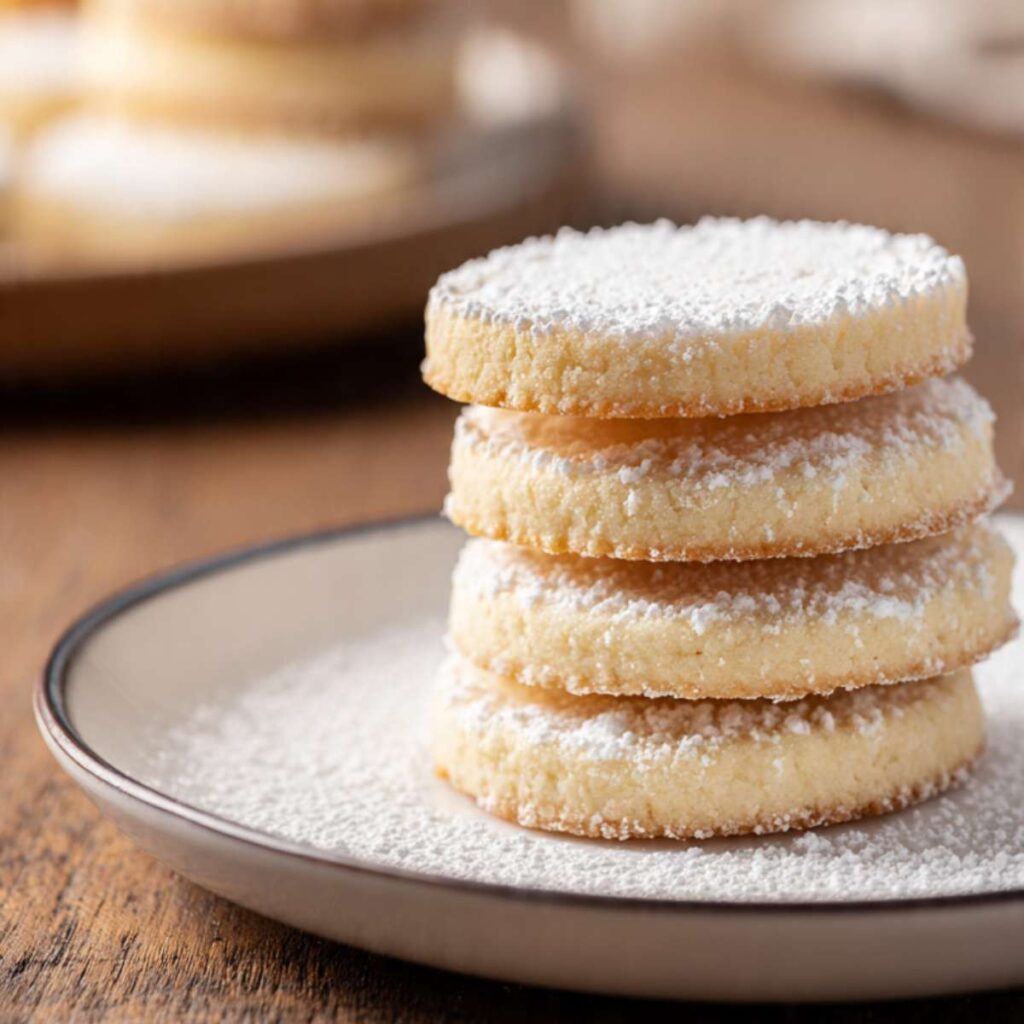
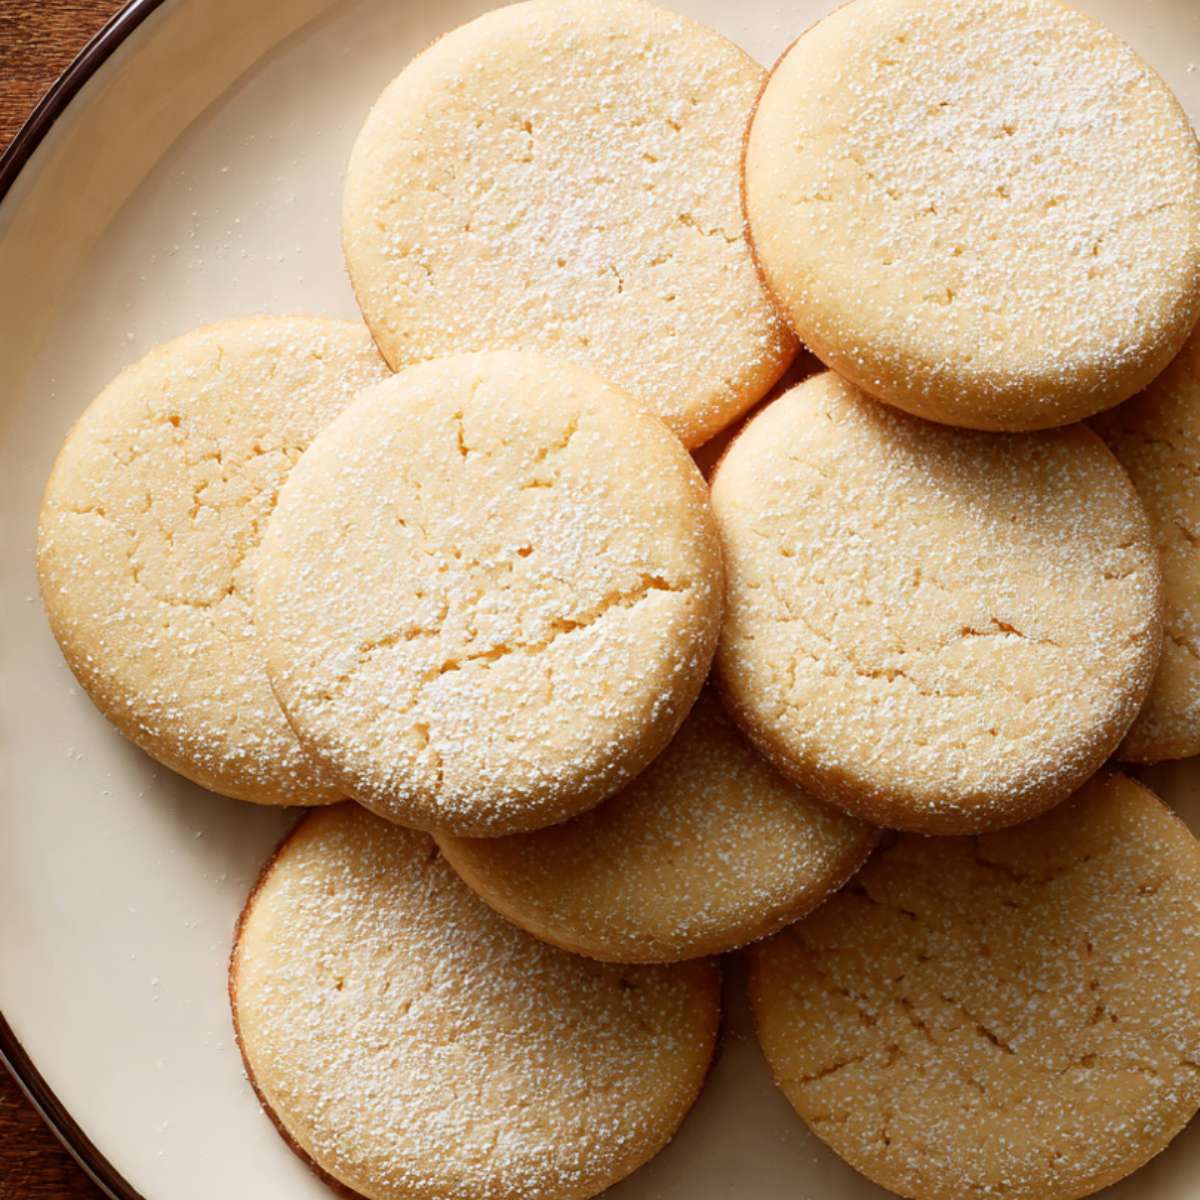
The cookies in these photos have crisp, clean edges that hold their cut shape without spreading a single millimeter. The tops stay completely pale ivory, the bottoms develop just a faint golden set, and every bite has that pure, rich butter flavor that shortbread is supposed to have. There is no egg, no leavening, no vanilla overload — just butter, flour, sugar, a pinch of salt, and a small amount of vanilla that rounds out the flavor without announcing itself. The texture is dense and firm, not crumbly, not dry. It snaps clean when you break it and melts slowly from the heat of your mouth.
There is no dairy butter in this recipe — wait, that is the opposite. Let me be direct: this recipe is all about the butter. Every other ingredient exists to support it. That is why the butter temperature and mixing method matter more here than in almost any other cookie recipe I write about.
I tested this with butter at three different temperatures. Butter at 55°F (13°C) — still slightly cool — produced a crumbly dough that barely came together and gave a sandy, rough-edged cookie. Butter at 72°F (22°C) — too warm — made the dough greasy, soft, and prone to spreading in the oven. Butter at 65–68°F (18–20°C) — the sweet spot — gave me a smooth, pliable dough that rolled cleanly and held its shape through the entire bake. That is the version in these photos, and that is the version I kept.
I also tested mixing time. Beating the butter and sugar for 3 full minutes on medium speed produced a pale, aerated mixture — and the resulting cookies were slightly puffed and soft instead of firm and crisp. Mixing for just 60 to 90 seconds, until the mixture looked smooth and just barely pale, gave me the dense, snappy texture visible in every photo. Shortbread is not supposed to be airy. Stop early.
No chilling required. No stand mixer required. One bowl. This dough goes from the counter to the oven in about 15 minutes, and it comes out looking exactly like what you see here.
🗒 Luna’s Note: I keep a ruler on my counter when I make shortbread. Half an inch sounds easy to eyeball but it is not — a 3/8-inch cookie and a 5/8-inch cookie will bake completely differently at the same temperature and time. Two minutes with a ruler saves a batch.
| Prep Time | Cook Time | Total Time | Yield | Difficulty |
|---|---|---|---|---|
| 15 min | 15 min | 30 min | 18 cookies | Easy |
| Calories | Fat | Carbs | Sugar | Protein |
|---|---|---|---|---|
| ~118 kcal | ~7g | ~13g | ~4g | ~1g |
Macros are approximate and will vary based on ingredient brands and serving size.
Ingredients & Tools for Shortbread Cookies Recipe
For the Cookies
- ½ cup (113g) unsalted butter, softened to room temperature (65–68°F / 18–20°C) — if the butter looks shiny or your finger slides through it rather than leaving a clean indent, it is too warm and will cause spreading
- 1 cup (120g) all-purpose flour (spooned into the measuring cup and leveled — never scooped directly from the bag) — or weighed at 120g on a kitchen scale
- ¼ cup (50g) plain white granulated cane sugar — do not substitute coconut sugar, raw sugar, or any liquid sweetener; the crystal structure of granulated sugar is what gives these cookies their firm, snappy texture
- ¼ tsp (1.5g) fine sea salt — not table salt, not kosher salt; fine sea salt dissolves evenly into the dough without creating salty pockets
- ½ tsp (2.5ml) pure vanilla extract — not imitation vanilla; in a recipe this simple, the vanilla is not a background note — it is audible
For the Finish
- 2 tablespoons (15g) sifted powdered sugar — for dusting after cooling; sift it or it will clump and dust unevenly
Before You Start
Butter temperature — this is the most important prep step in this recipe. Pull your butter from the fridge 60 to 90 minutes before you plan to mix. At a cool room temperature of 65–68°F (18–20°C), that timing is reliable. In a warm kitchen above 72°F (22°C), check at 45 minutes. Press your finger into the center of the butter — it should leave a clean, defined indent without the butter feeling greasy or slick. If your finger slides through without resistance and the surface looks shiny, the butter is too warm. Put it back in the fridge for 10 minutes and check again.
Flour measuring method. Spoon the flour into your measuring cup using a separate spoon and level it off with a straight edge. Do not scoop the cup directly into the flour bag — scooping packs 20–30% more flour than the recipe needs and will make the cookies dry, crumbly, and difficult to roll. For guaranteed accuracy, weigh the flour at 120g on a kitchen scale. Gram weight always takes priority over volume in this recipe.
Powdered sugar clumping check: Before dusting, sift the powdered sugar through your fine mesh sieve even if the bag looks fine. Powdered sugar absorbs moisture from the air and clumps invisibly — what looks like loose powder in the bag will dust in uneven patches and white clumps if not sifted first. Sifting takes 20 seconds and guarantees the even white veil visible in every finished photo.
Gram weight priority. For the most consistent results, use a kitchen scale set to grams. The gram weights in this recipe are what I tested with — they are the most reliable way to match the cookies shown in these photos.
Mixing method. This recipe can be made with a hand mixer set to low-medium speed or with a large mixing bowl and a sturdy silicone spatula. A stand mixer works but makes it easy to over-mix — if you use one, keep it on the lowest speed and watch the mixture closely. Mixing by hand with a spatula is actually my preferred method for shortbread because it is nearly impossible to over-aerate the butter.
No chilling required. This dough goes straight from the bowl to the rolling surface. You do not need to chill it before rolling or cutting. If your kitchen is warm and the dough feels soft after mixing, rest it on the counter for 5 minutes — not in the fridge. Cold dough cracks when rolled.
Pan preparation. Line a light-colored aluminum baking sheet with parchment paper. Do not grease the pan and do not use foil. Greasing adds fat to the bottom of the cookie and changes the texture. Foil conducts heat unevenly and will overbrown the bottoms before the centers are set. Parchment only.
Oven rack position. Position your oven rack in the middle of the oven before preheating. Top rack browns the tops before the bottoms are set. Bottom rack overbrowns the bottoms. Middle rack only.
Oven temperature note. Most home ovens run 15–25°F (8–14°C) off from what the dial says. If you have an oven thermometer, confirm the actual temperature reads 325°F (163°C) before the pan goes in. This lower-than-standard baking temperature is intentional — it is what keeps the tops pale and the texture firm rather than browned and hard.
Necessary Tools
Required:
- Kitchen scale (strongly recommended — gram weights are more accurate than volume)
- Large mixing bowl
- Sturdy silicone spatula or hand mixer
- Rolling pin
- Round cookie cutter, 2.5 inches (6.5cm) — plain or fluted edge
- Light-colored aluminum baking sheet
- Parchment paper
- Wire cooling rack
- Fine mesh sieve or small sifter (for powdered sugar finish)
Optional:
- Oven thermometer (recommended — most ovens run 15–25°F off)
- Ruler (for checking ½ inch dough thickness — more reliable than eyeballing)
- Bench scraper (for lifting and transferring cut cookies cleanly)
How to Make Shortbread Cookies
This recipe uses the creamed butter method — shortbread variation. The key difference from standard creaming is intentional restraint. You are not building air into this dough. You are combining fat and sugar until they are just smooth and unified — nothing more. Every extra second of mixing works against you here.
Step 1: Preheating the Oven and Preparing the Pan for an Even, Pale Bake
Position your oven rack in the middle of the oven. Set the oven to 325°F (163°C) and allow it to preheat fully — this takes most home ovens 15 to 20 minutes. Do not rush this step. A fully preheated oven is what gives these cookies their even, pale bake with just a faint golden set on the bottom.
While the oven heats, line your light-colored aluminum baking sheet with a single sheet of parchment paper, pressing it flat to the surface. If the parchment curls at the edges, crease it gently against the pan edge to flatten it.
The pan should look flat, fully lined with parchment, and ready before any dough touches it. If you are using an oven thermometer, place it on the middle rack now so it reads the actual temperature before the pan goes in.
Do not skip preheating to save time — an under-heated oven causes these cookies to spread before the edges can set, and you will lose the clean, defined shape visible in every photo here.
Your pan is ready. Move to the butter.
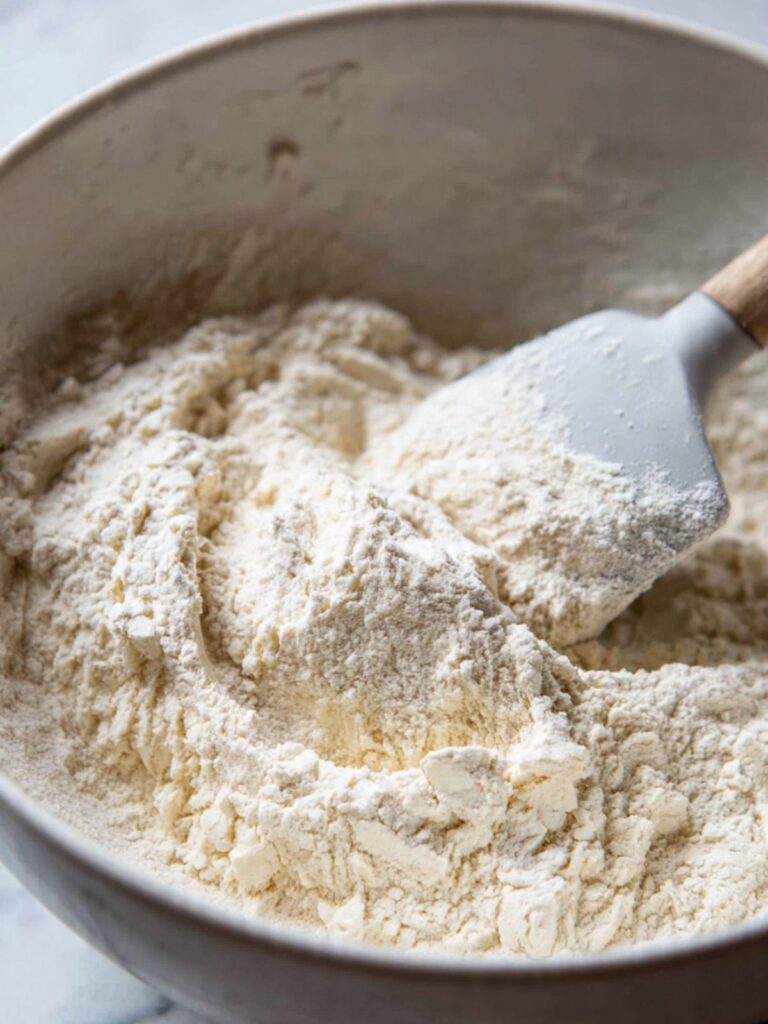
Step 2: Combining the Butter and Sugar Until Smooth — Not Fluffy
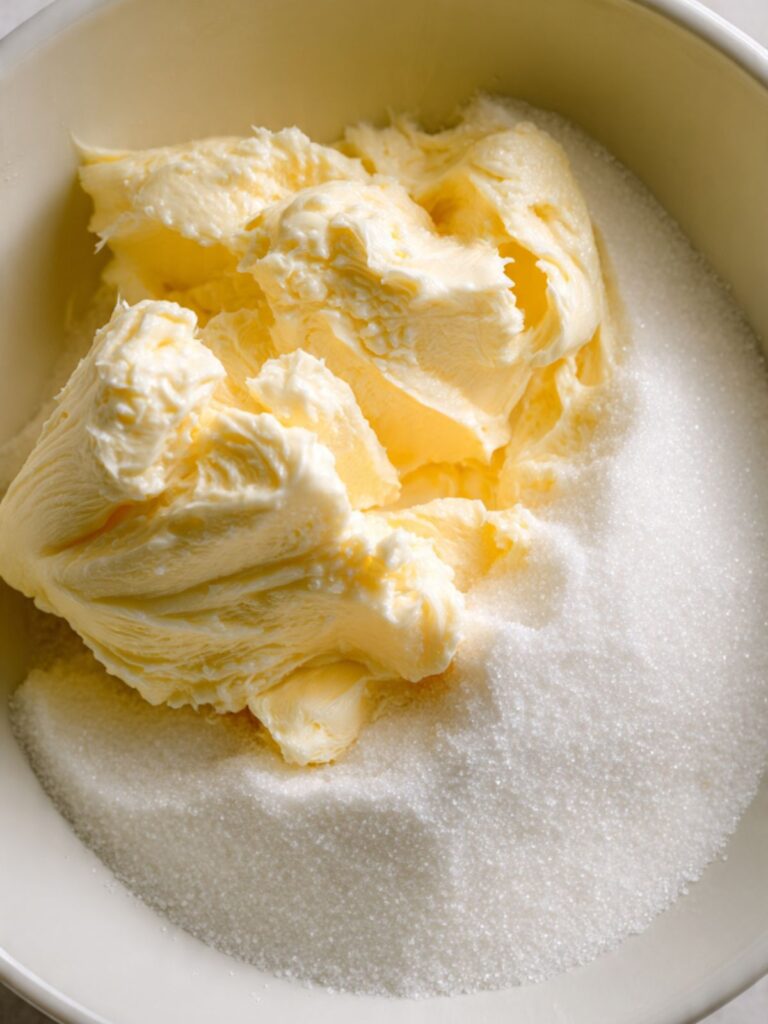
In your large mixing bowl, using a sturdy silicone spatula or a hand mixer set to the lowest speed, add your ½ cup (113g) unsalted butter, softened to room temperature (65–68°F / 18–20°C) and your ¼ cup (50g) plain white granulated cane sugar.
The granulated sugar does two things in shortbread: it sweetens the dough and its crystal structure creates that characteristic firm, snappy texture when baked. Powdered sugar would produce a more tender, melt-in-your-mouth shortbread — that is a different cookie. Plain white granulated cane sugar is non-negotiable here.
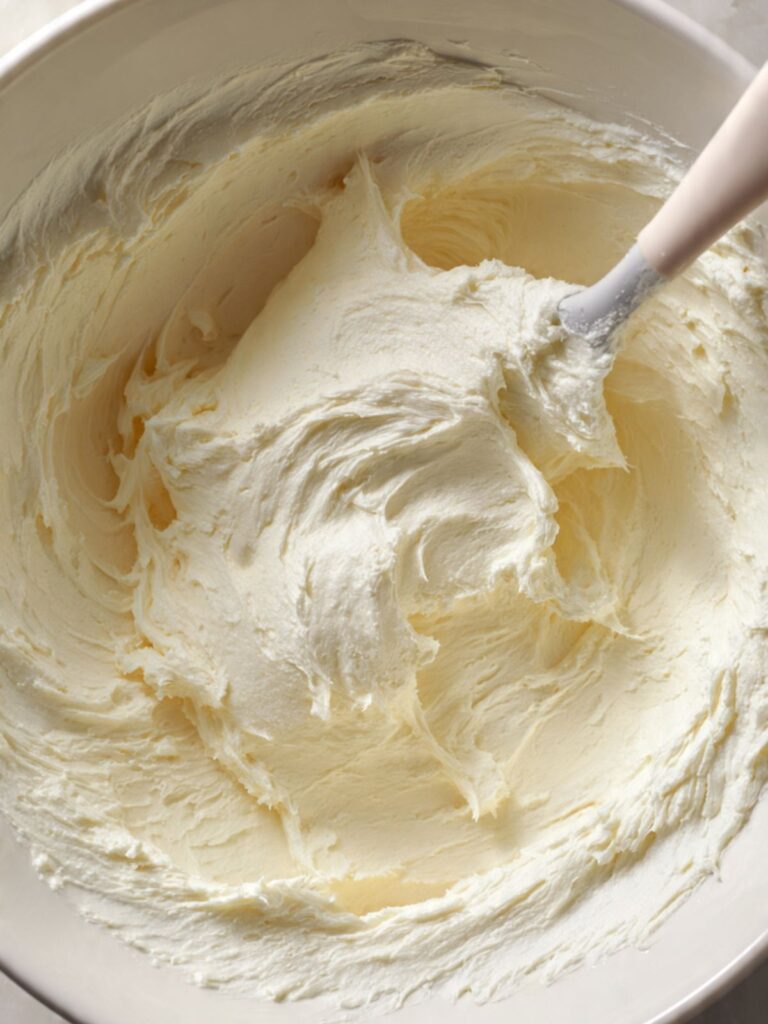
Using your spatula, press and fold the butter and sugar together using firm strokes — not whipping, not beating in circles. If using a hand mixer, keep it on the lowest speed setting and run it for no more than 60 to 90 seconds total. You are looking for the mixture to come together into a smooth, slightly pale, unified mass. Stop the moment it looks cohesive.
The mixture should look smooth, lightly pale — just one shade lighter than the butter started — and hold together when pressed between your fingers. It should not look white, fluffy, or doubled in volume. If it looks airy, you have gone too far.
Do not over-mix at this stage. Over-aeration is the single most common shortbread mistake. A cookie made from over-aerated dough will puff slightly in the oven and come out soft and cakey instead of dense and crisp — nothing like the firm, snappy texture in the stacked cookie photos.
Your butter and sugar mixture is ready. Add the dry ingredients next.
🗒 Luna’s Note: I always use a silicone spatula for shortbread instead of my hand mixer. It is physically harder to over-mix with a spatula, and I get a better feel for when the dough is exactly right. The mixer is faster, but faster is not what shortbread needs.
Step 3: Adding the Dry Ingredients and Bringing the Dough Together Without Developing Gluten
Add your ½ tsp (2.5ml) pure vanilla extract directly to the butter and sugar mixture and fold it in with 3 to 4 strokes of the spatula until absorbed.
Then add your 1 cup (120g) all-purpose flour (spooned and leveled — or weighed at 120g) and your ¼ tsp (1.5g) fine sea salt on top of the butter mixture.
The fine sea salt is not just for flavor here — salt weakens gluten bonds slightly, which helps keep the texture tender rather than tough. It dissolves evenly into the dough without creating salty pockets the way coarser salts can.
Now fold the flour in using slow, deliberate strokes from the bottom of the bowl upward — not stirring in circles. Aim for 15 to 20 strokes maximum. The dough will look shaggy and uneven at first, then gradually come together into a smooth, thick mass. Stop folding the moment no dry flour streaks remain.
The dough should look thick, smooth, and slightly matte — not sticky, not greasy, not crumbly. When you press a small piece between your fingers, it should hold together cleanly without cracking. If it crumbles when pressed, the butter was too cold. If it feels greasy and soft, the butter was too warm.
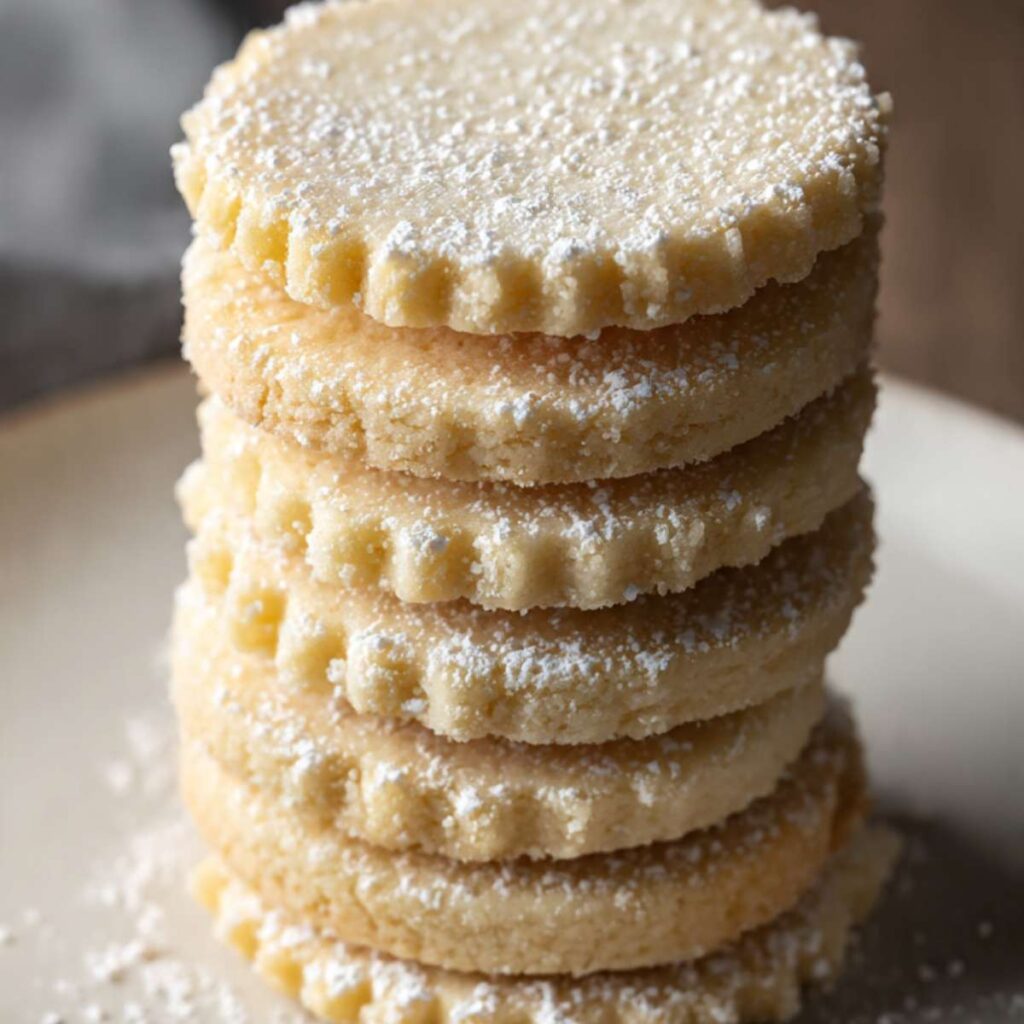
As you can see in the stacked cookie images, the finished cookie has a very tight, dense interior with no open crumb — that texture starts here, in this step, by not overworking the dough.
Do not knead the dough, do not press it repeatedly, and do not add liquid if it looks slightly dry. Shortbread dough is stiffer than drop cookie dough — that is correct. Work it only until it comes together.
Your dough is ready to roll.
Step 4: Rolling the Dough to a Precise Half-Inch Thickness for an Even Bake
Turn the dough out onto a clean, lightly floured surface. Using your rolling pin, roll the dough out to exactly ½ inch (1.25cm) thick. Work from the center outward, rotating the dough 90 degrees after every two passes of the rolling pin to prevent it from sticking and to keep the thickness even across the entire surface.
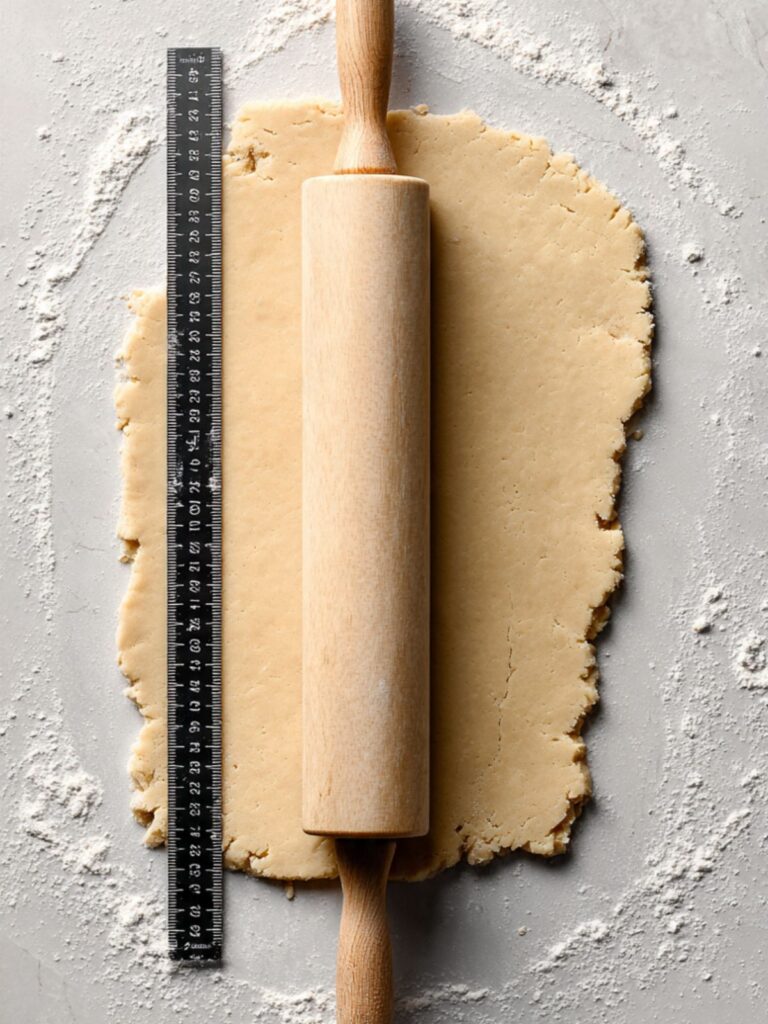
If you have a ruler, use it. Place it flat against the edge of the dough and measure. Half an inch is thicker than it looks — most bakers roll too thin on the first attempt and end up with cookies that overbake and lose the firm, dense center visible in the cross-section photos.
If the dough tears slightly at the edges as you roll, press it back together with your fingertips and continue. Minor edge cracking is normal in a dough with no egg and no liquid — it does not affect the finished cookie.
The rolled dough should look uniform in thickness across the entire surface — no thin edges, no thick center. When you press it gently with one finger, it should feel firm and smooth, not sticky or soft.
Do not flour the surface heavily — a light dusting is all you need. Too much flour worked into the surface of the dough during rolling will change the ratio of flour to butter in the outer layer of the cookies and produce dry, dusty edges.
Your dough is rolled and ready to cut.
Step 5: Cutting the Cookies and Transferring Them to the Pan
Using your 2.5-inch (6.5cm) round cookie cutter — plain or fluted edge — press straight down into the dough with firm, even pressure and lift straight back up. Do not twist the cutter as you press down. Twisting compresses the edges and prevents the cookies from holding their clean shape during baking.
Cut as many rounds as possible from the first roll. Then gather the scraps, press them together gently, re-roll to ½ inch, and cut again. The second-roll cookies will be very slightly less tender than the first-roll cookies because re-rolling develops a small amount of additional gluten — but the difference is minor and both batches bake identically.
Each cut round from a 2.5-inch (6.5cm) cutter at ½-inch (1.25cm) thickness weighs approximately 16g. The total dough batch weighs approximately 287g, which yields exactly 18 cookies at this size. If you have dough left over after 18 cuts, your dough was rolled thicker than ½ inch in places. If you run short before 18, it was rolled thinner. Use a ruler and re-roll scraps to match.
Using a bench scraper or thin spatula, lift each cut cookie carefully and transfer it to your prepared parchment-lined baking sheet. Space them 1 inch (2.5cm) apart — these cookies do not spread, but the space allows even air circulation around each one during baking.
The cookies on the pan should look exactly like the unbaked rounds in the overhead photo — flat, uniform in size, with clean edges and no fingerprint distortion from handling. If the edges look ragged or the shape is uneven, press the cutter more firmly and lift more carefully.
Do not press the dough balls flat with your palm. Do not reshape by hand after cutting — the cutter gives you the clean edge. Handle each cookie as little as possible after cutting.
Your pan is loaded and ready for the oven.
Step 6: Baking Until the Bottoms Are Faintly Golden and the Tops Stay Pale
Place the loaded baking sheet on the middle rack of your fully preheated 325°F (163°C) oven. Set a timer for 13 minutes and begin checking at that point.
The 325°F (163°C) temperature is doing specific work here: it is low enough to set the interior and develop the faint golden color on the bottom without triggering the Maillard browning reaction on the top surface. Every degree above this matters — baking at 350°F (175°C) will begin to color the tops before the centers are set, which produces a different cookie than what you see in these photos.
Bake for 13 to 16 minutes total — the exact time depends on your oven and the precise thickness of your cookies. The visual cues matter more than the clock here.
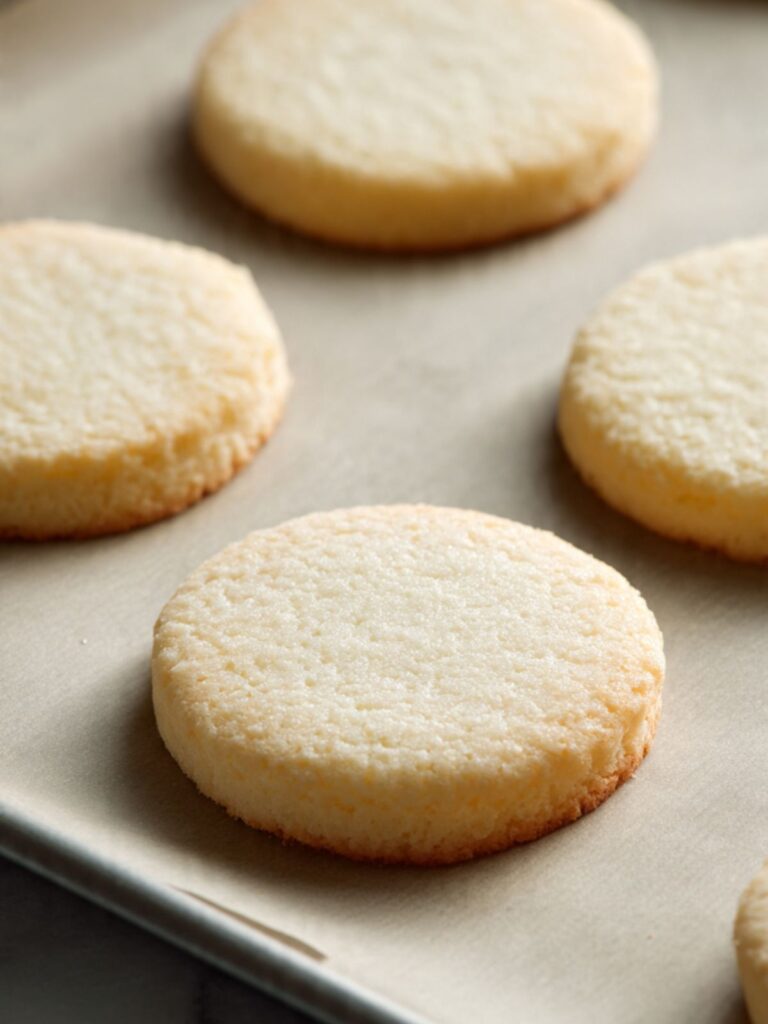
Pull the pan the moment you see these two things simultaneously: the bottoms have developed a faint, even golden color — just one shade past pale ivory — and the tops remain completely pale, with no browning whatsoever. This is exactly the bake profile visible in the photos. The bottom of the cookies visible in image 2 shows this precise finish — barely golden, not dark, not deep brown.
The cookies should look set at the edges with completely pale tops and a faint golden underside — if the tops are beginning to show any color at all, they are overbaked. Pull immediately.
Do not open the oven before 13 minutes — opening the door drops the oven temperature and can cause uneven baking across the pan. Do not bake until the tops show color — by the time the tops color, the bottoms are already too dark and the interior has lost its tender density.
As you can see in the stacked photos, the finished cookies have a defined edge height with no spread — that structure is only preserved by pulling them at the right moment and letting carryover heat finish the work on the pan.
Do not move the cookies yet.
Step 7: Resting on the Pan So Carryover Heat Sets the Structure
Remove the baking sheet from the oven and place it on your wire cooling rack. Leave the cookies on the hot pan for exactly 5 minutes — do not move them, do not transfer them to the rack yet, and do not stack them.
The pan retains heat after coming out of the oven, and that residual heat continues to set the interior of the cookies during this 5-minute window. This is carryover cooking — the same principle that applies to every baked good. Moving the cookies before 5 minutes disrupts the base before it has fully set and can cause cracks across the bottom. Waiting longer than 8 minutes starts to dry out the underside.
Set a timer. Do not guess.
After 5 minutes, the cookies should feel firm enough to lift cleanly without bending. They will still feel slightly fragile — this is correct. They firm up fully as they cool to room temperature over the next 15 to 20 minutes.
After the 5-minute pan rest, transfer the cookies to the wire cooling rack using a thin spatula or bench scraper. Place them in a single layer — do not stack warm cookies. They need airflow around all sides to cool evenly and reach their full crisp texture.
Do not dust with powdered sugar yet. The sugar will dissolve and disappear into the surface of a warm cookie. It needs a completely cool, dry surface to stay visible and dry.
🗒 Luna’s Note: I always let these cool for a full 20 minutes before I even think about the powdered sugar. I have rushed it twice. Both times the sugar vanished into the surface within 10 minutes and the cookies looked plain instead of finished.
Step 8: Finishing With Powdered Sugar Once the Cookies Are Completely Cool
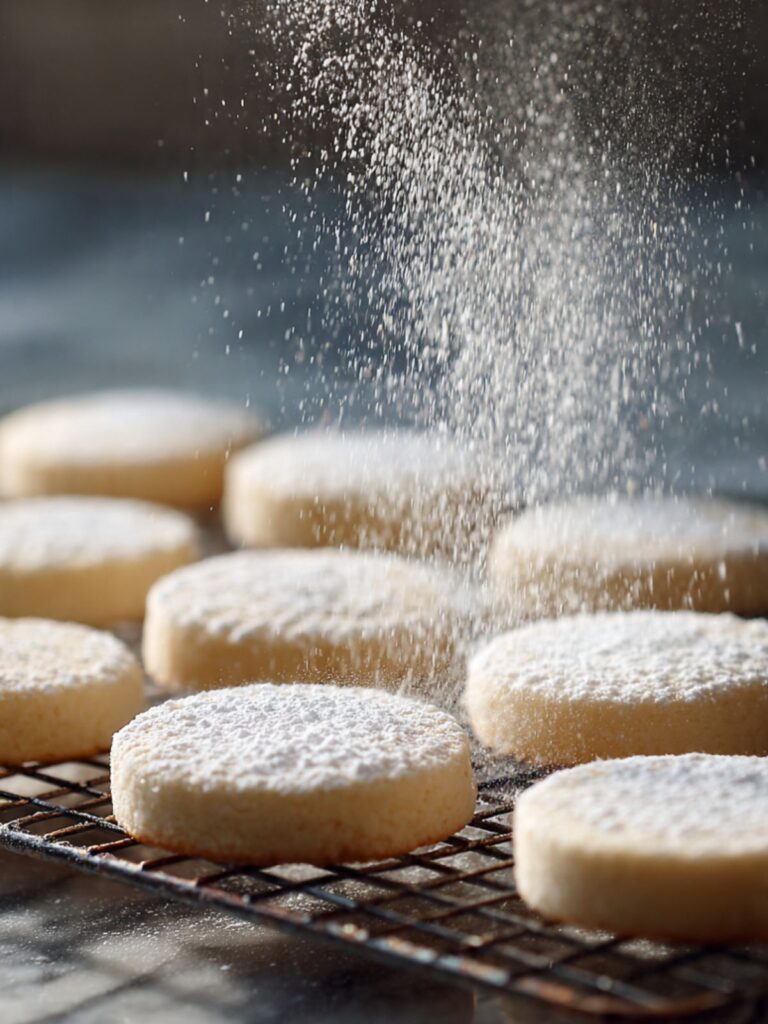
Once the cookies have cooled completely to room temperature — at least 20 minutes on the wire rack, ideally 30 — hold your fine mesh sieve or small sifter 6 to 8 inches (15–20cm) above the cookies and tap it gently while moving it in slow circles over the surface.
Sifting is not optional here. Unsifted powdered sugar contains microscopic clumps from ambient moisture absorption — those clumps fall in uneven patches and leave visible white mounds on the cookie surface rather than the fine, even dusting visible in every photo here.
Use your 2 tablespoons (15g) sifted powdered sugar distributed evenly across all 18 cookies. You are looking for a thin, even white veil — not a heavy coating, not bare patches. This is the finish visible across all five photos: a fine, dry, even dusting that sits on the surface without clumping or dissolving.
The finished cookies should look exactly like the overhead plate photo — a uniform fine white dusting across every surface, no visible wet spots where the sugar has dissolved, and clean edges with the faint golden side visible beneath the dusted top.
Do not dust with powdered sugar and then stack the cookies immediately — the sugar will transfer to the underside of the cookie above and leave bare patches on top. Let the dusting set for 2 to 3 minutes before stacking or plating.
Your shortbread cookies are finished.
The Science Behind Shortbread Cookies
Shortbread has only four core ingredients, which means there is nowhere for a mistake to hide. Understanding why each one behaves the way it does is what separates a batch that looks like these photos from one that spreads flat, crumbles apart, or comes out hard and dry.

Why Butter Temperature Controls Everything in This Dough
Shortbread is a high-fat dough — butter makes up more than 40% of the total ingredient weight. At the right temperature, butter fat exists in a semi-crystalline state where the solid fat crystals are dispersed evenly through the liquid fat. This is what gives the dough its smooth, pliable consistency and what allows it to hold a clean cut edge without spreading in the oven.
When butter is too warm, those fat crystals melt and the fat becomes fully liquid. A dough made with over-softened butter has no structural backbone — it spreads in the oven before the flour proteins have time to set, which is why warm-butter shortbread comes out flat and greasy rather than thick and crisp.
When butter is too cold, the fat crystals are too rigid to distribute evenly and the dough tears and crumbles instead of coming together. The 65–68°F (18–20°C) window is not a suggestion — it is the specific temperature range where fat crystallization supports the dough structure you see in these photos.
🗒 Luna’s Note: On days when my kitchen runs warm, I cube the butter and let it sit for only 30 to 40 minutes instead of the full 60 to 90. A warm kitchen softens butter faster than you expect and the difference between correct and too-soft is about 15 minutes. I check it early and adjust.
Why Shortbread Gets Its Snap From Minimal Gluten Development
Gluten is the elastic protein network that forms when flour proteins — glutenin and gliadin — bond together in the presence of water and mechanical action. In most baked goods, some gluten development is desirable because it provides structure and chew. In shortbread, it is the enemy.
Shortbread dough contains no water, no eggs, and no liquid beyond the vanilla extract — and vanilla adds an almost negligible amount of moisture. This means gluten development is naturally limited from the start. The high butter content reinforces this by coating the flour particles in fat before they can fully hydrate and bond, physically blocking gluten network formation. This fat-coating effect is called shortening action — it is where the word “shortbread” comes from. The fat literally shortens, or interrupts, the gluten strands.
This is why over-mixing shortbread is so damaging. Every extra stroke of the spatula gives the limited moisture in the dough more opportunity to activate gluten. The difference between 20 folds and 40 folds is the difference between the tender, snappy texture visible in the broken-edge photo and a tough, hard cookie that resists biting. For more on how mixing technique affects texture in butter-based cookies, see my sugar cookies recipe — the same gluten development principle applies there, just with a slightly different fat ratio.
Why the Low Oven Temperature Is What Keeps the Tops Pale
Standard cookies bake at 350–375°F (175–190°C). Shortbread bakes at 325°F (163°C). The 25°F (14°C) difference is significant and intentional.
The Maillard reaction — the chemical process that browns food and develops flavor — accelerates above 280°F (138°C) and produces visible surface color relatively quickly at standard baking temperatures. In shortbread, the goal is to bake the cookies through completely without triggering significant Maillard browning on the surface. A lower oven temperature slows the rate of browning while still allowing the starch in the flour to gelatinize and the fat to set, which gives the cookies their firm, dry interior texture.
The result is what you see in every photo here: tops that are completely pale ivory, edges that are just barely set to a faint golden color, and an interior that is dense and dry rather than soft and moist. If you bake shortbread at 350°F (175°C), the tops will begin to color before the centers are fully set — you will get a browned surface and a slightly underdone interior, which is the opposite of what shortbread is supposed to be.
Shortbread Cookies Troubleshooting & Pro-Tips
Common Mistakes
Using the Wrong Butter or Sugar Type
The symptom: cookies that taste flat, overly salty, or come out with a completely different texture than the crisp, snappy result shown in the photos.
The cause is ingredient substitution. Salted butter contains 1.5–2% salt by weight — in a recipe with only 4 core ingredients, that additional salt throws the entire flavor balance off and can make the cookies taste unpleasantly salty. Margarine and butter-flavored shortening do not have the same fat crystal structure as real dairy butter and will not produce the same snappy, melt-on-contact texture. Powdered sugar substituted for granulated sugar produces a softer, more tender cookie — completely different from the firm, classic shortbread in these photos. These substitutions are not minor variations. They produce a different cookie.
The immediate fix: if you already used salted butter, reduce any added salt to a single pinch and taste the raw dough before rolling. If you used margarine, bake the batch and note the texture difference — it will be softer and less defined. There is no fix after the fact for powdered sugar — the texture outcome is locked in at mixing.
Prevention: use ½ cup (113g) unsalted butter only, ¼ cup (50g) plain white granulated cane sugar only, and ¼ tsp (1.5g) fine sea salt as written. Do not substitute.
My Shortbread Bottoms Are Too Dark
The symptom: the bottoms are deep golden brown or dark, while the tops are still pale — the cookies taste slightly bitter on the underside.
The cause is almost always the pan. A dark non-stick baking sheet absorbs significantly more radiant heat than a light-colored aluminum pan and transfers that heat directly into the bottom of the cookie. Glass and ceramic baking dishes also retain heat differently and can overbrown bottoms. Baking on the bottom oven rack produces the same result.
The immediate fix: if you catch it early, slide a second empty baking sheet underneath the one in the oven — double-panning insulates the bottom of the cookies and slows bottom browning for the remaining bake time.
Prevention: always use a light-colored aluminum baking sheet lined with parchment. Always bake on the middle rack. If you only have a dark pan, reduce the oven temperature by 25°F (14°C) to 300°F (149°C) and add 2 to 3 minutes to the bake time.
My Shortbread Dough Is Too Crumbly to Roll
The symptom: the dough tears apart when you try to roll it, crumbles at the edges, and refuses to hold together when cut.
The specific cause is almost always one of two things: the butter was too cold when you mixed, or the flour was over-measured. Cold butter does not distribute evenly through the flour — instead of coating the flour particles in fat, it sits in hard pieces that cannot bind the dough together. Over-measured flour tips the ratio too far toward dry ingredients, and there is not enough butter to hold everything cohesive.
The immediate fix: if the dough is crumbly before rolling, press it together firmly with your hands and let it rest on the counter for 5 minutes. The warmth of your hands and a short rest at room temperature will soften the butter slightly and allow the dough to come together. Do not add water or milk — adding liquid to shortbread dough activates gluten and changes the texture permanently.
Prevention: pull butter 60 to 90 minutes before mixing, verify it passes the finger-press test before using, and always spoon-and-level your flour or weigh it at 120g.
My Shortbread Spread Flat and Lost Its Shape
The symptom: the cookies spread outward in the oven, lose their clean cut edge, and come out thin and flat instead of holding the ½-inch thickness visible in the photos.
The cause is over-softened butter. Butter above 70°F (21°C) has lost enough of its crystalline fat structure that it cannot support the dough during baking — the fat melts before the flour proteins set, and the cookie collapses outward. A warm kitchen, a warm rolling surface, or handling the dough too much before baking can all push the butter temperature past the safe zone.
The immediate fix: if your cut cookies look soft and shiny on the pan before going in, slide the pan into the fridge for 10 minutes before baking. Cold cookies hold their shape better going into the oven.
Prevention: check butter temperature before mixing using the finger-press test. Work quickly when rolling and cutting. Keep the rolling surface cool. If your kitchen is above 75°F (24°C), consider chilling the cut cookies on the pan for 10 minutes before baking as a standard step.
My Shortbread Came Out Tough and Hard
The symptom: the cookies are difficult to bite through, feel dense in an unpleasant way rather than firm and snappy, and do not have the tender quality visible in the stacked photos.
The cause is over-mixing. Every extra stroke of the spatula after the flour goes in develops more gluten, and gluten in shortbread produces toughness rather than structure. A dough that was mixed for 40 strokes instead of 20 will produce noticeably harder cookies — the difference is real and measurable.
The immediate fix: there is no fix once the dough is over-mixed. Bake the batch and note the texture difference. The cookies will still be edible — just not ideal.
Prevention: count your strokes after the flour goes in. Stop at 20 strokes or the moment no dry flour streaks remain — whichever comes first. Use a silicone spatula rather than a hand mixer, which makes it much harder to accidentally over-mix.
My Shortbread Cracked Across the Top During Baking
The symptom: visible cracks or fissures across the surface of the cookies that were not there before baking.
The cause is dough that was slightly too dry — usually from over-measured flour or butter that was slightly too cold and did not fully coat the flour particles. When dry dough expands from heat in the oven, it has less elasticity to accommodate the expansion, so it fractures at the surface.
The immediate fix: surface cracks do not affect the flavor or texture of shortbread. The powdered sugar finish conceals minor cracking completely — as visible in the finished photos, the surface looks smooth and even under the dusting.
Prevention: weigh your flour at exactly 120g rather than measuring by volume, and confirm butter temperature before mixing.
My Powdered Sugar Disappeared Into the Surface
The symptom: the powdered sugar looked perfect immediately after dusting but dissolved into the cookie surface within minutes, leaving little to no visible finish.
The cause is dusting warm cookies. Warm cookies release steam as they cool, and that steam dissolves powdered sugar on contact. This happens even when the cookies feel dry to the touch — the interior is still releasing moisture.
The immediate fix: none once it has happened. Re-dust after the cookies are fully cool and completely room temperature — at least 20 to 30 minutes on the wire rack.
Prevention: wait the full 20 to 30 minutes before dusting. If you are in a hurry, the powdered sugar can always be added right before serving rather than during cooling.
Altitude and Humidity Note
In high humidity above 70% relative humidity, powdered sugar absorbs moisture from the air and can turn tacky on the surface of finished cookies within 30 to 60 minutes. Dust only immediately before serving if you are baking in a humid environment.
At high altitude above 3,500 feet (1,067 meters), shortbread is relatively forgiving compared to leavened baked goods because it contains no baking soda or baking powder. However, butter melts faster at altitude due to lower air pressure. Chill your cut cookies on the pan for 10 minutes before baking to compensate, and reduce oven temperature by 15°F (8°C) — bake at 310°F (154°C) and check at 12 minutes.
Expert Pro-Tips
Use a ruler every time you roll. Half an inch is deceptively hard to eyeball consistently. A cookie rolled to 3/8 inch will overbake in the same time a ½-inch cookie takes to set. Two minutes with a ruler guarantees every cookie in the batch bakes identically — this is the single most reliable way to get consistent results across 18 cookies.
Cut straight down — never twist. When pressing the cookie cutter into the dough, apply firm, even downward pressure and lift straight back up. Twisting the cutter compresses and seals the dough at the cut edge, which prevents the cookie from rising evenly and produces a slightly dense, compressed edge rather than the clean, defined border visible in the photos.
Press extra powdered sugar around the edges before stacking. The side edges of the cookies get less dusting coverage than the tops because the sifter angle misses them. Before stacking for photos or serving, hold each cookie by its base and tip it slightly to dust the edges directly. The fully dusted cookies in the stacked photos have that even white coating on the sides too — it does not happen by accident.
How to Store Shortbread Cookies
Room Temperature
Store completely cooled shortbread cookies in a hard-sided lidded container — a tin, a glass jar with a lid, or a rigid plastic container with a tight-fitting lid. Place a sheet of parchment paper between each layer of cookies to prevent them from scratching against each other and disturbing the powdered sugar finish.
Do not use zip-lock bags. The flexible sides of a zip-lock bag press against the cookies every time the bag is moved or stacked, and the powdered sugar finish will transfer to the bag interior and leave the cookies looking bare and unfinished. The cookies will also flatten slightly at the edges from the pressure.
Do not store shortbread with other cookies in the same container — shortbread absorbs odors and moisture from neighboring baked goods. A soft cookie stored alongside shortbread will transfer its moisture and soften the shortbread within 24 hours.
Properly stored at room temperature in a sealed hard-sided container, these cookies stay crisp and fresh for 5 to 7 days. By day 3 they are at peak texture — the initial slight surface dryness from baking has fully settled and the butter flavor has deepened. By day 6 or 7 they are still perfectly crisp but the powdered sugar finish may need a light re-dusting before serving.
🗒 Luna’s Note: I store mine in a vintage tin that belonged to my grandmother. Tins are genuinely the best container for shortbread — they maintain a stable environment without trapping moisture the way plastic does, and they stack without putting pressure on the cookies. If you bake shortbread regularly, a dedicated tin is worth having.
Refrigerator
Refrigerating shortbread is not recommended for standard storage. The refrigerator environment is humid, and shortbread absorbs that ambient moisture through even a tightly sealed container — the cookies will soften and lose their characteristic crisp texture within 24 to 48 hours.
If you need to hold the dough rather than the baked cookies, wrap the unrolled dough tightly in plastic wrap and refrigerate for up to 3 days. When you are ready to bake, let the dough sit at room temperature for 20 to 30 minutes before rolling — cold dough cracks when rolled and will not give you the clean edges visible in the photos.
Freezer — Baked
Baked shortbread cookies freeze exceptionally well. Wait until the cookies are completely cool before freezing — do not freeze warm cookies, as the steam released during cooling will form ice crystals inside the container and soften the cookies.
Do not dust with powdered sugar before freezing. The powdered sugar will dissolve during thawing and leave a wet, patchy finish. Freeze the undusted cookies and add the powdered sugar finish after thawing.
Wrap each cookie individually in a small piece of plastic wrap, then place the wrapped cookies in a single layer inside a zip-lock freezer bag or rigid freezer container. Freeze for up to 2 months.
To thaw: remove the cookies from the freezer and unwrap them. Place them in a single layer on a wire rack at room temperature for 20 to 30 minutes. Do not microwave — microwaving shortbread makes it soft and chewy rather than crisp. Once fully thawed and at room temperature, dust with powdered sugar and serve. The texture after thawing is nearly identical to fresh-baked.
Freezer — Unbaked Dough
Shortbread dough freezes well at two stages: before rolling or after cutting.
Before rolling: Shape the dough into a flat disk, wrap tightly in plastic wrap, then wrap again in foil. Freeze for up to 3 months. To use: thaw overnight in the refrigerator, then allow to sit at room temperature for 30 to 40 minutes before rolling. The dough should pass the finger-press test before you roll — if it still feels cold and stiff, give it another 10 minutes.
After cutting: Place the cut unbaked cookies on a parchment-lined baking sheet and freeze until solid — about 1 hour. Transfer the frozen rounds to a zip-lock freezer bag and freeze for up to 3 months. Bake directly from frozen at 325°F (163°C) — add 3 to 5 minutes to the bake time and watch for the same visual cues: faint golden bottom, completely pale top.
Serving Suggestion
I serve these on a small ceramic plate with a pot of strong black tea — Earl Grey specifically, because the bergamot in Earl Grey has a quiet citrus note that cuts through the richness of the butter without competing with it. These cookies do not need anything alongside them, but that combination is the one I come back to every time.
They also work well on a simple dessert plate after a dinner where the main course was rich and heavy — the clean, unadorned butter flavor of shortbread is a genuinely good palate reset. I have served them at the end of a long holiday dinner when no one had room for cake and they disappeared faster than anything else on the table.
Frequently Asked Questions About Shortbread Cookies
What makes shortbread cookies different from regular cookies?
Shortbread cookies contain no eggs, no leavening, and no liquid beyond a small amount of vanilla extract. Standard cookies rely on eggs for structure and moisture, and leavening for lift — shortbread relies entirely on the fat content of butter to create its characteristic texture. The high ratio of butter to flour coats the flour particles before gluten can fully develop, which is what produces that dense, snappy, melt-on-contact texture rather than the soft, chewy structure of a standard drop cookie. The absence of eggs also means shortbread holds its cut shape precisely during baking, which is why it is the standard choice for shaped and decorated cookies where clean edges matter.
Why is my shortbread crumbly?
Crumbly shortbread is almost always caused by one of three things: butter that was too cold when mixed, flour that was over-measured, or dough that was not worked enough to fully come together. When butter is too cold, it cannot coat the flour particles evenly and the dough lacks the cohesion to hold together when rolled or cut. When flour is over-measured by scooping directly from the bag, the ratio of dry ingredients to fat tips out of balance and there is not enough butter to bind everything. The fix is to weigh your flour at exactly 120g, confirm your butter is at 65–68°F (18–20°C) before mixing, and fold the dough until it is fully unified — no dry patches, no crumbly edges. If the dough is crumbly after mixing, press it together firmly with your hands and rest it for 5 minutes before rolling.
Can I make shortbread cookies ahead of time?
Yes — shortbread is one of the best make-ahead cookies in the baking repertoire. Baked shortbread cookies stay crisp and fresh at room temperature in a hard-sided lidded container for 5 to 7 days, which means you can bake a full batch several days before you need them and they will be at peak texture by the time you serve them. The unbaked dough can be refrigerated for up to 3 days or frozen for up to 3 months — thaw overnight in the refrigerator and allow to come to room temperature for 30 minutes before rolling. If making ahead for an event, hold the powdered sugar finish until the day of serving so it looks fresh and dry rather than settled.
Why does shortbread use granulated sugar instead of powdered sugar?
The type of sugar directly controls the final texture of the cookie. Granulated sugar has larger crystals that do not fully dissolve into the butter during the short mixing time — those undissolved crystals remain in the dough and create a slightly grainy, firm texture when baked, which is the characteristic snap of a classic shortbread. Powdered sugar, which contains cornstarch and has a much finer particle size, dissolves completely into the butter and produces a softer, more tender, melt-in-your-mouth texture. Both are valid shortbread styles, but they are genuinely different cookies. This recipe uses plain white granulated cane sugar specifically because the images show the classic firm, snappy shortbread style — not the softer powdered sugar variation. For a comparison of how sugar type affects texture across different butter-based cookies, see my cut out sugar cookies recipe.
How do I keep shortbread cookies from spreading?
Shortbread spreads when the butter is too warm at the time of baking. Butter above 70°F (21°C) loses the semi-crystalline fat structure that holds the dough together — the fat melts before the flour proteins can set in the oven heat, and the cookie collapses outward. Three things cause this: butter that was over-softened before mixing, a warm kitchen that raised the dough temperature during rolling and cutting, or handling the cut cookies too much before transferring to the pan. The fix is to confirm butter temperature before mixing using the finger-press test, work quickly when rolling and cutting, and if your kitchen is above 75°F (24°C), slide the loaded pan into the fridge for 10 minutes before baking. The gluten development in the dough also plays a role — a properly mixed dough has enough structure from the flour to resist spreading even when the butter softens.
Can I use salted butter instead of unsalted in shortbread cookies?
You can, but it is not recommended and the result will taste noticeably different. Salted butter contains approximately 1.5–2% salt by weight — in a recipe with only four core ingredients and no other competing flavors, that extra salt pushes the finished cookie from pleasantly rich to overly salty. If salted butter is the only option you have, reduce the added fine sea salt from ¼ tsp (1.5g) to a single pinch and taste the raw dough before rolling. The gluten development and fat crystallization behavior of the dough will not be affected by the salt level — only the flavor balance changes. Unsalted butter gives you full control over the salt, which is why it is always the standard for baked goods where butter is the primary flavor.
Can I double the shortbread cookie recipe?
Yes — shortbread scales well because it contains no leavening that requires ratio adjustment. To double the recipe, multiply every ingredient by exactly 2: 1 cup (226g) unsalted butter, 2 cups (240g) all-purpose flour, ½ cup (100g) plain white granulated cane sugar, ½ tsp (3g) fine sea salt, and 1 tsp (5ml) pure vanilla extract. Bake in two separate batches on two separate pans — do not crowd both batches onto one pan, as reduced air circulation will cause uneven baking and the cookies closest to the pan edges will overbake before the center cookies are done. Bake time stays the same at 13 to 16 minutes per batch. Note that leavening does not apply here, but if you ever scale a recipe that uses baking soda or baking powder, those do not scale linearly — increase by only 1.5x when doubling, not 2x.
How do high altitude and humidity affect shortbread cookies?
In high humidity above 70% relative humidity, the powdered sugar finish absorbs moisture from the air and turns tacky within 30 to 60 minutes of dusting. Dust only immediately before serving rather than during cooling if you are baking in a humid environment. The dough itself is relatively stable in humidity because it contains no hygroscopic brown sugar or honey. At high altitude above 3,500 feet (1,067 meters), shortbread is more forgiving than leavened cookies because there is no carbon dioxide expansion to manage — however, butter melts faster at altitude due to lower atmospheric pressure. Chill your cut cookies on the pan for 10 minutes before baking, reduce oven temperature by 15°F (8°C) to 310°F (154°C), and begin checking at 12 minutes rather than 13.
More Cookies You’ll Love
- Brown butter Chocolate Chip Cookies — rich, nutty brown butter dough with fudgy centers and crisp edges — the next step after mastering a butter-forward cookie
- Molasses Cookies — deeply spiced, chewy centers with a crackled sugar crust — a completely different texture from shortbread but the same no-fuss, one-bowl approach
Shortbread Cookies Recipe
Ingredients
Equipment
Method
- Position the oven rack in the middle of the oven, heat to 325°F (163°C), and allow to fully preheat for 15 to 20 minutes, then line a light-colored aluminum baking sheet with parchment paper and set aside.
- In a large mixing bowl using a sturdy silicone spatula or hand mixer on the lowest speed, combine ½ cup (113g) unsalted butter softened to 65–68°F (18–20°C) and ¼ cup (50g) plain white granulated cane sugar, pressing and folding until the mixture looks smooth and just barely pale — no more than 60 to 90 seconds — do not beat until fluffy.
- Add ½ tsp (2.5ml) pure vanilla extract and fold in with 3 to 4 strokes, then add 1 cup (120g) all-purpose flour and ¼ tsp (1.5g) fine sea salt on top and fold with slow strokes from the bottom of the bowl upward for 15 to 20 strokes until no dry flour streaks remain and the dough is thick, smooth, and holds together when pressed.
- Turn the dough out onto a lightly floured surface and roll to exactly ½ inch (1.25cm) thick, working from the center outward and rotating the dough 90 degrees after every two passes of the rolling pin.
- Using a 2.5-inch (6.5cm) round cookie cutter, press straight down with firm even pressure and lift straight up without twisting, cut as many rounds as possible, then gather scraps, re-roll to ½ inch, and cut again.
- Transfer cut cookies to the prepared parchment-lined baking sheet using a bench scraper or thin spatula, spacing them 1 inch (2.5cm) apart.
- Bake on the middle rack at 325°F (163°C) for 13 to 16 minutes, pulling the pan the moment the bottoms show a faint even golden color and the tops remain completely pale — do not wait for the tops to color.
- Place the baking sheet on a wire cooling rack and leave the cookies on the hot pan for exactly 5 minutes without moving them, then transfer to the wire rack in a single layer and cool completely for 20 to 30 minutes.
- Once cookies are completely cool, hold a fine mesh sieve 6 to 8 inches (15–20cm) above the cookies and tap gently while moving in slow circles to dust evenly with 2 tablespoons (15g) sifted powdered sugar, then allow the dusting to set for 2 to 3 minutes before stacking or serving.