
Thick & Soft Sugar Cookies Recipe
There is a specific kind of afternoon that calls for sugar cookies — not frosted, not decorated, not dressed up in any way. Just thick, buttery rounds rolled in granulated sugar and pulled from the oven while the centers are still soft. I have made this sugar cookies recipe more than fifteen times across two months of testing, and I fixed every version that came out flat, dry, or forgettable before I landed on this one.
The problem with most sugar cookie recipes is not the ingredients — it is the technique gaps. Butter at the wrong temperature. Flour packed too hard into the cup. No sugar coating on the outside. Every one of those things quietly kills an otherwise good cookie.
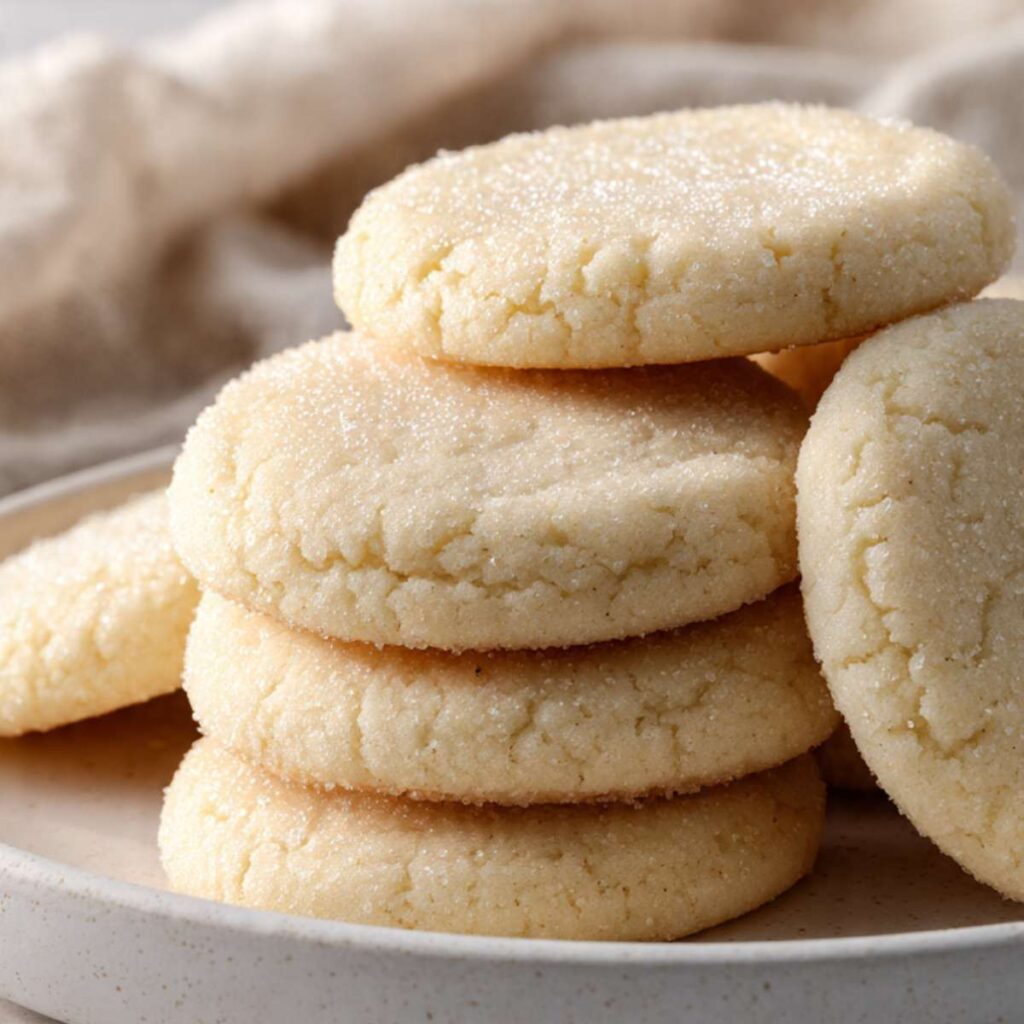
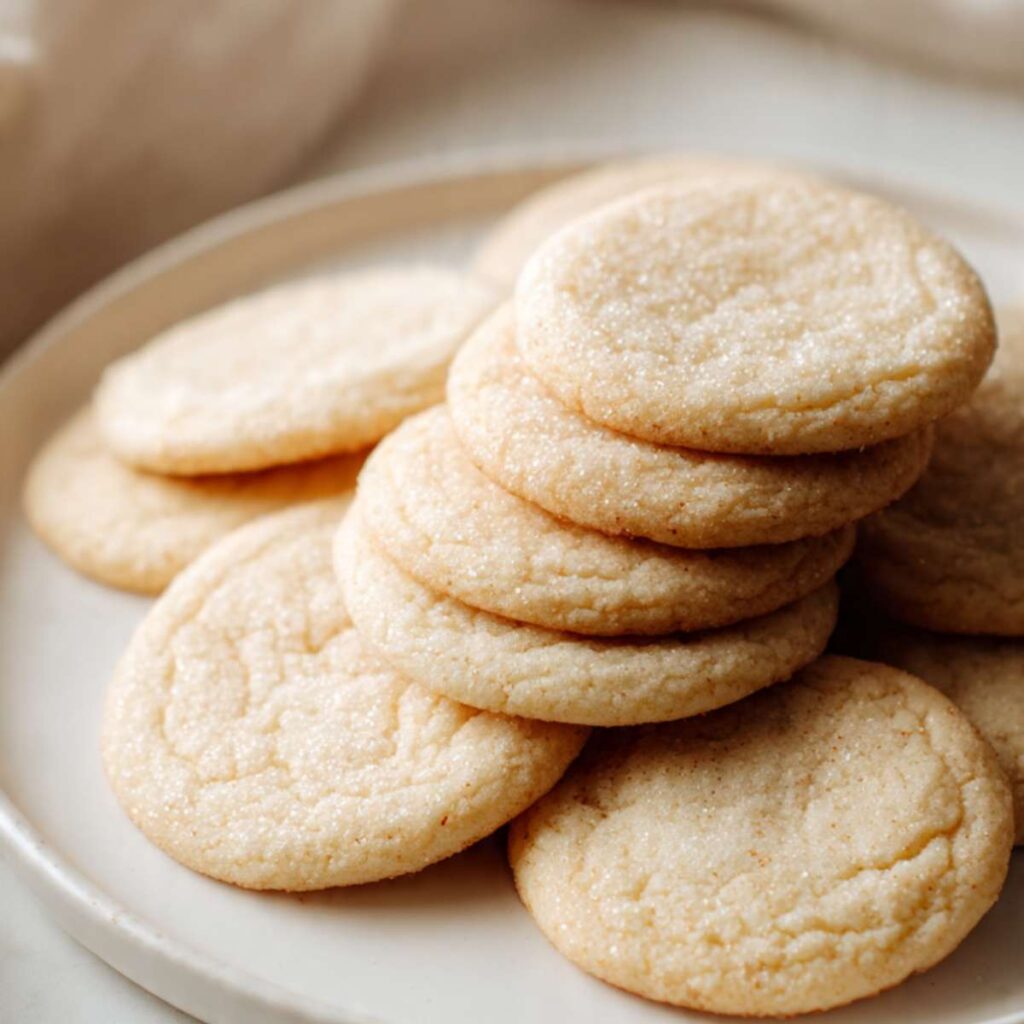
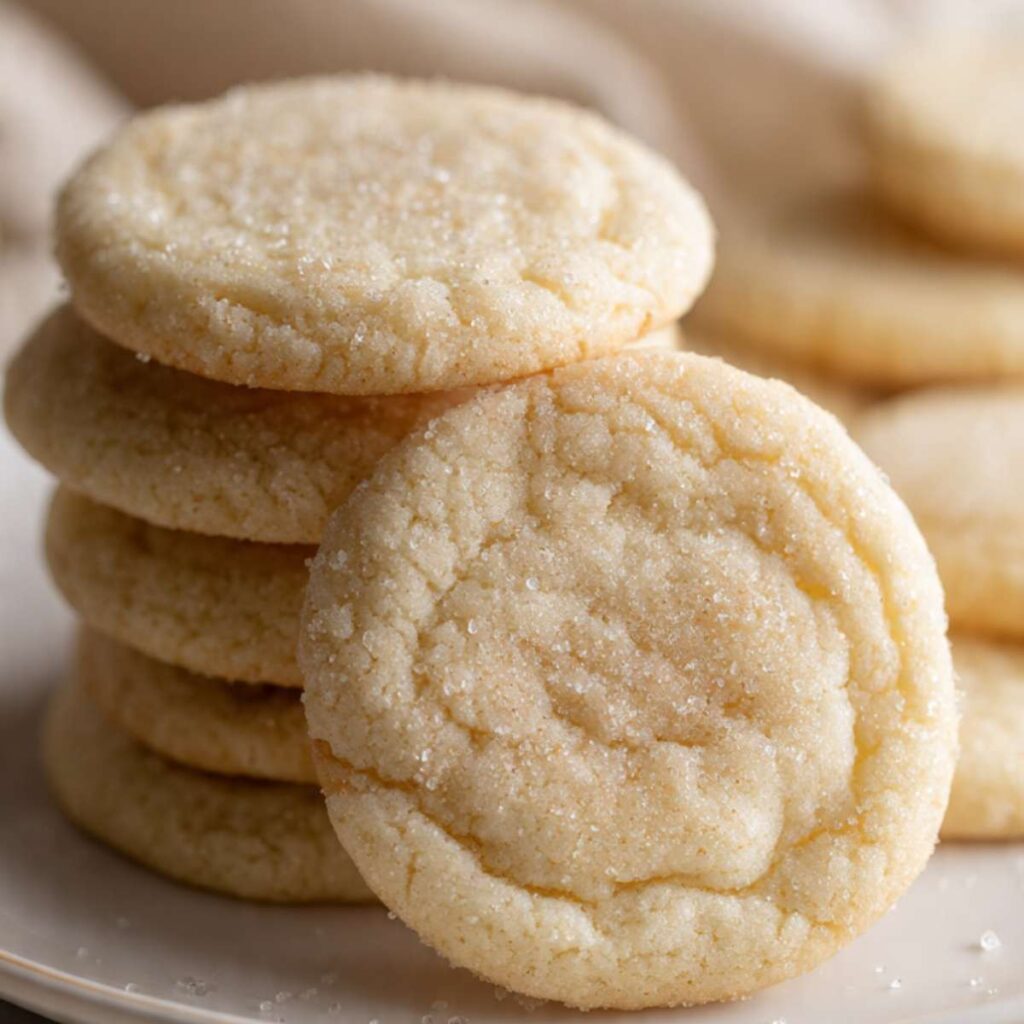
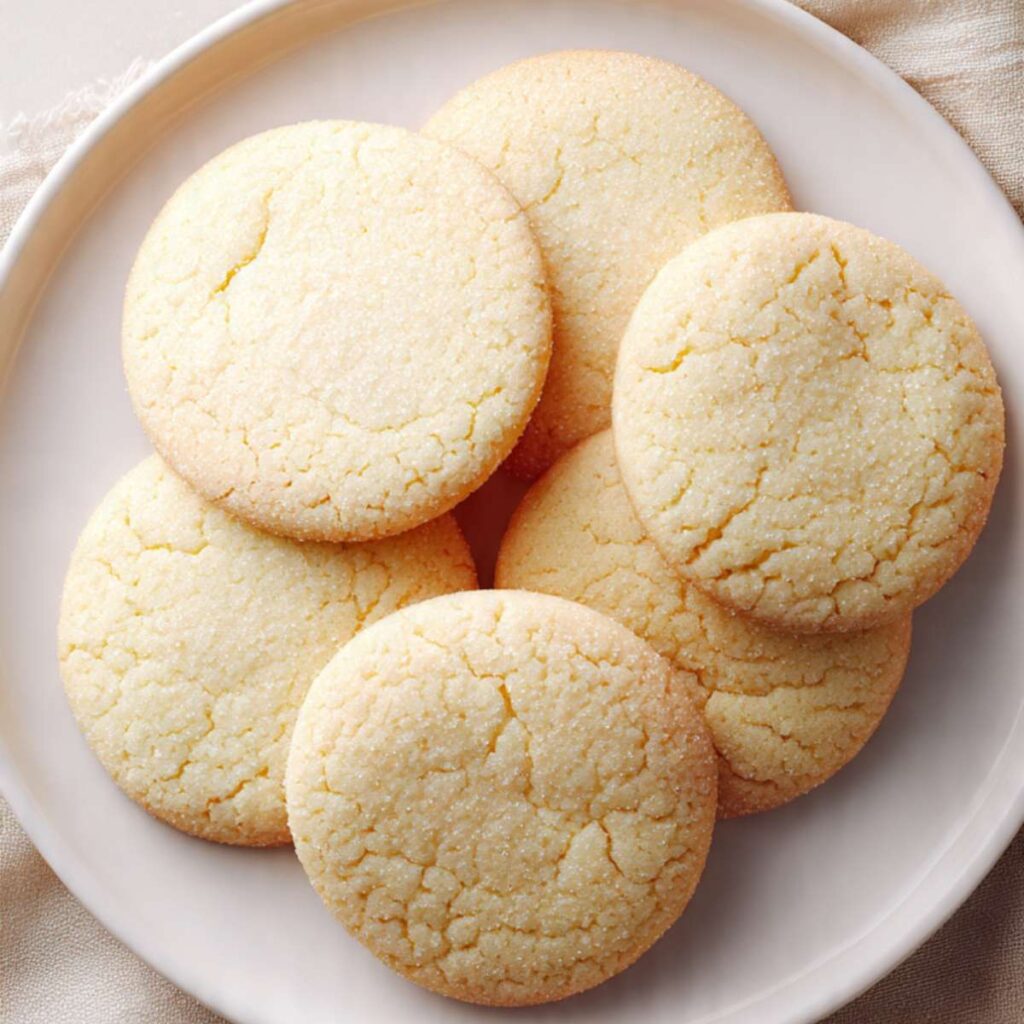
These are thick, soft cookies with pale cream-colored centers that stay pillowy for days. The edges set firm enough to hold their shape but never turn hard or dry. Every surface is coated in granulated sugar before baking — that is what creates the sparkly, crinkled crust you can see in the stacked photo. The inside stays dense and buttery, not cakey, not crumbly. One bite and the sugar coating gives way to a soft, vanilla-scented center.
There is no dairy butter replacement in this recipe — butter is the fat, the flavor, and the structure all in one. The type and temperature of that butter matter more in a sugar cookie than in almost any other drop cookie, because there are no competing flavors to hide mistakes.
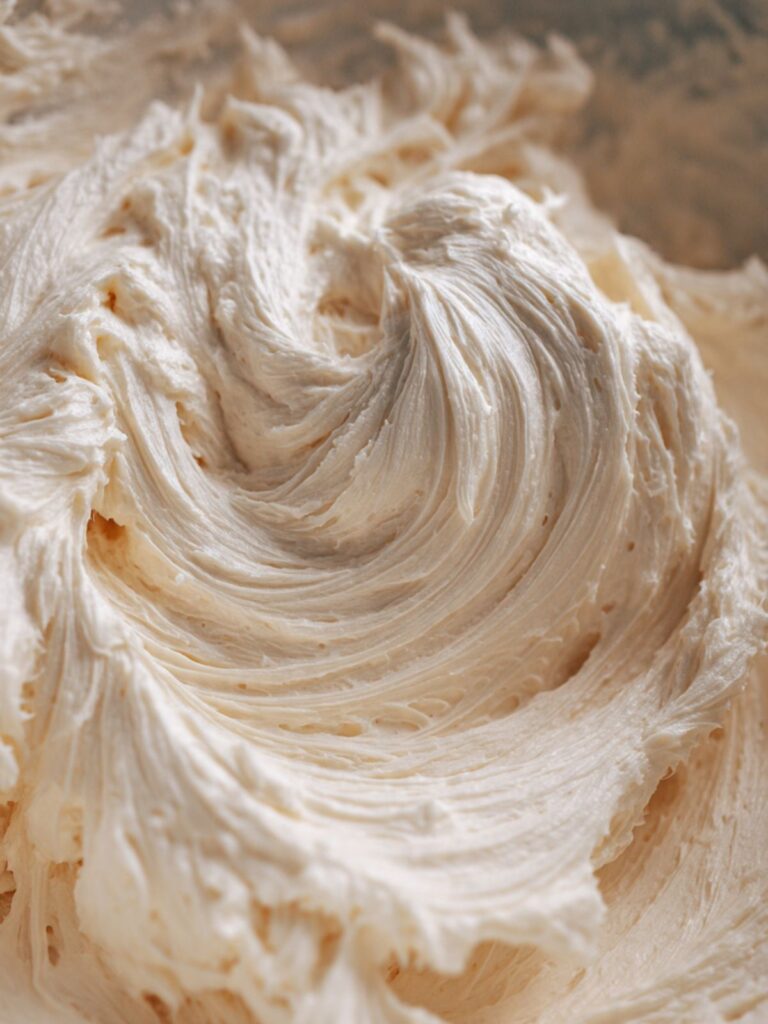
I tested this with melted butter versus softened butter. Melted butter produced cookies that spread too thin and baked up crisp rather than soft. The centers had no pillow. Softened butter, creamed with the sugar for 2 full minutes, trapped enough air to keep the cookies thick and domed all the way through. That version is what you see in every photo here.
I tested with and without vanilla extract. Without vanilla, the cookies tasted flat — sweet, but one-dimensional. One teaspoon of pure vanilla extract added a warm, buttery depth that made the whole cookie taste more intentional. It is a small addition with an outsized impact on flavor.
No chilling required. No mixer stand required — a hand mixer works fine. One bowl for the wet ingredients. The dry ingredients go in last. Start to finish, these are ready in about 30 minutes.
🗒 Luna’s Note: I roll every dough ball in granulated sugar right before it goes on the pan — not before portioning, right before placement. If you roll too early and let them sit, the sugar absorbs into the dough and loses its sparkle. The crinkled crust in the photos only happens when the sugar is still dry and separate when the cookie hits the hot oven.
| Prep Time | Cook Time | Total Time | Yield | Difficulty |
|---|---|---|---|---|
| 15 min | 10–12 min | ~30 min | 20 cookies | Easy |
| Calories | Fat | Carbs | Sugar | Protein | Sodium |
|---|---|---|---|---|---|
| ~120 kcal | ~6g | ~15g | ~8g | ~2g | ~40mg |
Macros are approximate and will vary based on ingredient brands and exact cookie size.
Sugar Cookies Ingredients & Tools
Ingredients
For the Cookies
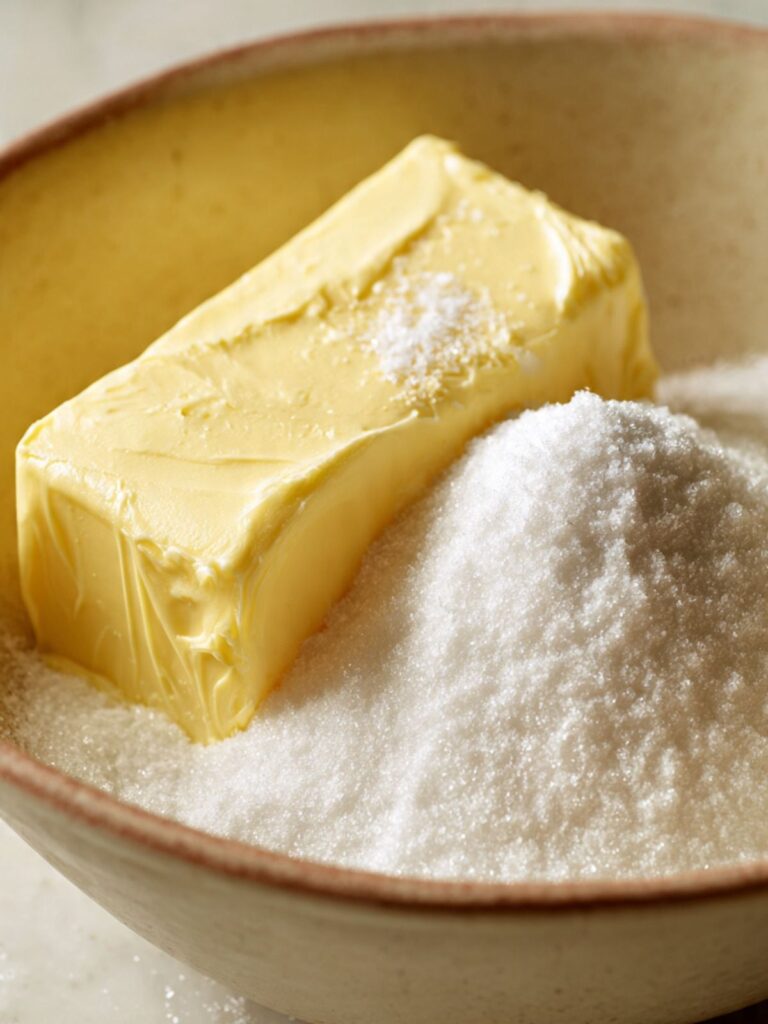
- ½ cup (113g) unsalted butter, softened to room temperature (65–68°F / 18–20°C) — not melted, not cold
- ¾ cup (150g) plain white granulated cane sugar — do not substitute coconut sugar, raw sugar, or any liquid sweetener
- 1 large egg (approximately 50g without shell), room temperature
- 1 teaspoon (5ml) pure vanilla extract — not imitation. Vanilla is the primary flavor in this recipe. Imitation vanilla uses synthetic vanillin and the difference is immediately noticeable in a cookie with no competing flavors.
- 1½ cups (180g) all-purpose flour (spooned into the measuring cup and leveled) — or weighed at 180g
- 1 teaspoon (4g) baking powder, checked for freshness
- ¼ teaspoon (1.5g) fine sea salt
For Rolling
- 2 tablespoons (25g) plain white granulated cane sugar — kept separate from the dough sugar
Before You Start
Temperature prep: Pull your butter from the fridge 60–90 minutes before mixing. At 65–68°F (18–20°C), butter pressed with your finger should leave a clean indent without the surface looking shiny or greasy. If your finger slides through it or the butter looks glossy, it is too warm — refrigerate it for 10 minutes and test again. Butter that is too warm will produce flat, greasy cookies that spread before the edges can set.
Pull your egg from the fridge 30 minutes before mixing. A cold egg added to creamed butter will break the emulsification and cause the mixture to look curdled and uneven. If you forgot, place the egg in a bowl of warm (not hot) water for 10 minutes.
Pure vanilla extract is a pantry ingredient — use it at room temperature directly from the bottle. No prep needed.
Flour measuring method: Spoon the flour into your measuring cup using a separate spoon and level it off with a straight edge. Do not scoop the cup directly into the flour bag — scooping packs 20–30% more flour than the recipe needs and will produce dry, dense cookies. For guaranteed accuracy, weigh the flour at 180g on a kitchen scale. Gram weight always takes priority over volume in this recipe.
Gram weight priority: For the most consistent results, use a kitchen scale set to grams. The gram weights in this recipe are what I tested with — they are the most reliable way to match my result.
Mixing method: This recipe requires a hand mixer or stand mixer fitted with the paddle attachment for the creaming step. Mixing the butter and sugar by hand will not incorporate enough air and the cookies will bake up flat and dense. Once the dry ingredients go in, switch to a silicone spatula — the mixer is done at that point.
Oven position: Position your oven rack in the middle of the oven before preheating. Top rack burns the tops. Bottom rack burns the bottoms.
Leavening freshness check: Drop 1 teaspoon (4g) of your baking powder into ½ cup (120ml) of hot water. It should bubble immediately and vigorously. If it fizzes weakly or sinks without reacting, replace the can before baking — expired baking powder produces flat, dense cookies with no lift.
Rolling sugar prep: Measure your 2 tablespoons (25g) of rolling sugar into a small shallow bowl before you begin portioning. Keep it completely separate from the dough sugar. Roll each dough ball immediately before placing it on the pan — not in advance. Sugar rolled on early absorbs into the dough surface and loses the sparkle and crinkle visible in the photos.
No chilling required: This dough goes straight from the bowl to the oven. No resting, no refrigeration needed before baking.
Necessary Tools
Required:
- Kitchen scale (strongly recommended — gram weights are more accurate than volume)
- Large mixing bowl
- Hand mixer or stand mixer with paddle attachment
- Silicone spatula
- Light-colored aluminum baking sheet — dark non-stick pans absorb more heat and will overbrown the bottoms of these pale cookies
- Parchment paper
- Cookie scoop (2-tablespoon / 40–45g capacity) — ensures consistent sizing and even bake time
- Small shallow bowl (for rolling sugar)
- Wire cooling rack
Optional:
- Instant-read thermometer (optional but useful — confirms butter is at 65–68°F / 18–20°C before creaming begins)
- Kitchen timer
How to Make Sugar Cookies
This recipe uses the creamed butter method — fat and sugar are beaten together first to trap air, which gives these cookies their thick, domed shape and soft center. Follow the ingredient addition order exactly. Every step matters here.
Step 1: Preheating the Oven and Preparing the Pan
Set your oven to 350°F (175°C) and position the rack in the middle of the oven. While the oven heats, line your light-colored aluminum baking sheet with parchment paper. Do not grease the parchment — these cookies have enough butter to release cleanly without extra grease, and greasing adds fat to the bottom that can cause overbrowning.
Do not substitute foil for parchment — foil conducts heat directly into the cookie base and causes the bottoms to overbrown before the centers set, even at the correct oven temperature. Do not bake directly on an unlined pan — the cookies will stick and the bottoms will scorch.
Most home ovens run 15–25°F (8–14°C) hotter or cooler than the dial reads. If you have an oven thermometer, confirm the actual temperature before the first pan goes in. A 25°F difference at 350°F is enough to overbrown the bottoms of these pale cookies before the centers have time to set.
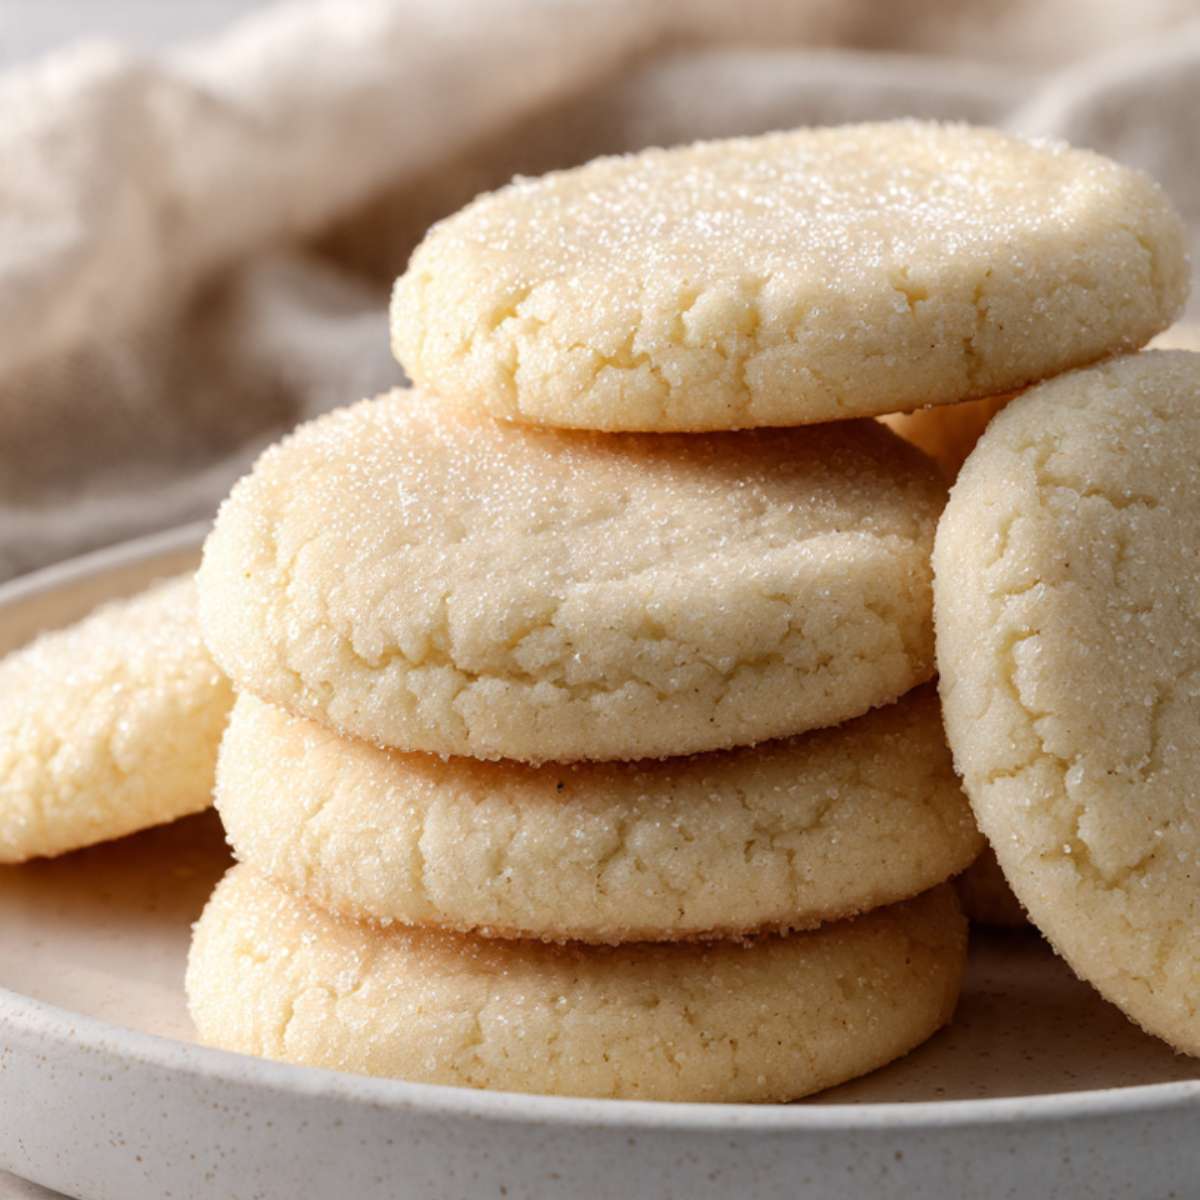
The pan should look like the cooling rack photo — flat, fully lined parchment with no bubbles or overlapping edges. A wrinkled parchment sheet causes uneven bottoms.
Do not skip preheating. Sugar cookies dropped onto a pan in a cold oven spread flat before the structure has time to set. The oven must be fully at temperature before any dough goes in.
Your pan is ready when the parchment lies flat and the oven has reached 350°F (175°C). Set it aside and move to Step 2.
Step 2: Creaming the Butter and Sugar Until Pale and Aerated
In your large mixing bowl, using your hand mixer or stand mixer fitted with the paddle attachment, add your ½ cup (113g) unsalted butter, softened to room temperature (65–68°F / 18–20°C) and your ¾ cup (150g) plain white granulated cane sugar.
Beat on medium speed for exactly 2 minutes — set a timer. The granulated sugar does two things in this recipe: it aerates the dough during creaming — the sharp crystal edges cut through the butter fat and create thousands of tiny air pockets that expand in the oven and give these cookies their thick, domed profile — and it drives the crinkled, sparkly surface crust you can see on every cookie in the stacked photos. Substituting it with any other sweetener eliminates both of these functions simultaneously.
The mixture should look pale, slightly fluffy, and uniform — not grainy, not yellow, not dense. If it still looks yellow and dense after 2 minutes, beat for another 30 seconds and check again.
Do not rush this step and do not overmix past 3 minutes total. Under-creaming means not enough air is trapped — the cookies will bake flat. Over-creaming past 3 minutes incorporates too much air and produces a cakey, puffed texture instead of the soft, dense center visible in the photos.
Your butter and sugar mixture should look pale, smooth, and pull away from the bowl sides cleanly. Move to Step 3.
Step 3: Adding the Egg and Vanilla Until the Dough Looks Glossy
With the mixer still on medium speed, add your 1 large egg (approximately 50g without shell), room temperature and your 1 teaspoon (5ml) pure vanilla extract.
The egg provides structure — the proteins in the egg white set during baking and hold the cookie together. The yolk adds richness and helps the butter and water-based ingredients bind smoothly. Pure vanilla extract adds the warm, buttery flavor note that makes these taste like a real sugar cookie rather than just a sweet dough.
Beat on medium speed for 30–45 seconds, just until fully combined. Scrape down the sides and bottom of the bowl with your silicone spatula before moving on. Do not skip the scrape — unmixed butter pooled at the bottom of the bowl produces streaks of unincorporated fat in the dough, and those streaks bake into greasy, uneven patches in the finished cookie where the texture is different from the rest of the batch.
The mixture should look glossy, smooth, and uniform with no visible streaks of butter or egg white remaining. If you see streaks, scrape and mix for another 15 seconds.
Do not add a cold egg here. A cold egg shocks the creamed butter and causes the mixture to look broken or curdled — the fat separates and the texture never fully recovers, even after the flour goes in. Room temperature egg only.
Your dough base should look glossy and cohesive. Move to Step 4.
Step 4: Adding the Dry Ingredients Without Developing Gluten
Set the mixer aside. You will not use it again. Switch to your silicone spatula.
Add your 1½ cups (180g) all-purpose flour (spooned and leveled), your 1 teaspoon (4g) baking powder, checked for freshness, and your ¼ teaspoon (1.5g) fine sea salt directly to the bowl.
The baking powder is a double-acting leavening agent — it produces its first rise when it contacts the wet ingredients and its second rise when it hits the heat of the oven. This double action is what gives these cookies their domed, thick profile rather than a flat disc. Fine sea salt sharpens every other flavor in the dough — cookies made without it taste one-dimensional and overly sweet.
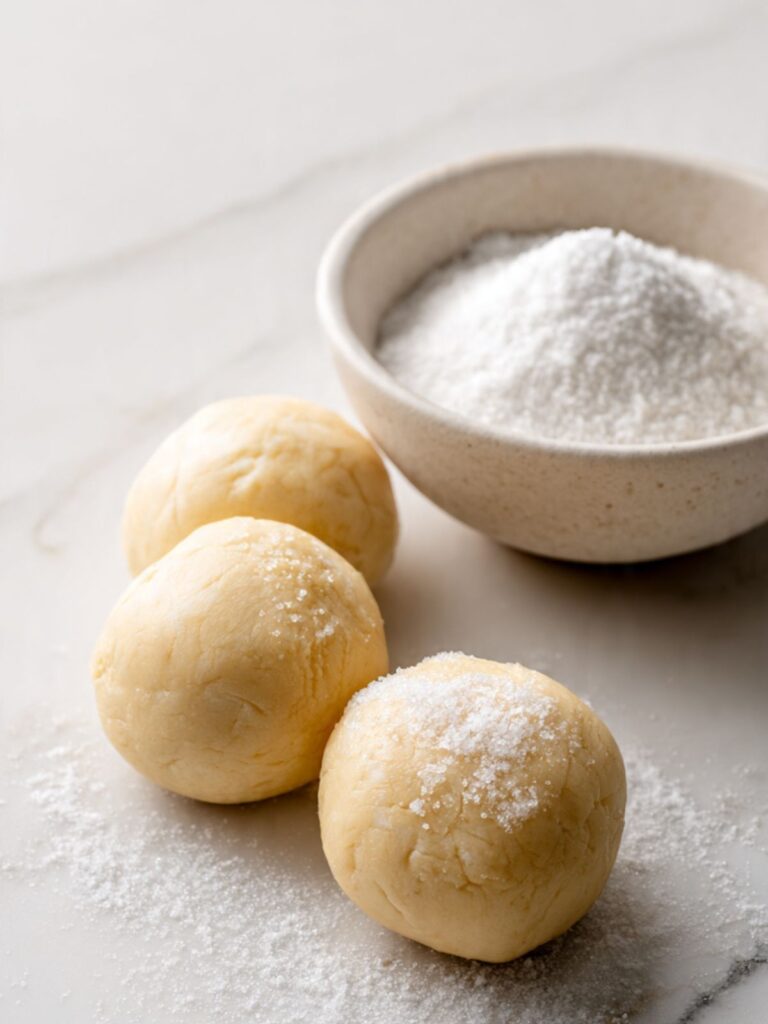
Fold with slow, deliberate strokes from the bottom of the bowl upward — not stirring in circles. Count approximately 20–25 strokes. Stop the moment no dry flour streaks remain visible. The dough at this stage should look exactly like a soft, scoopable cookie dough — not a batter, not a paste. If you look at the dough balls in the pre-bake overhead shot, that uniform, slightly matte, holdable texture is what you are working toward at the end of this step.
The dough should pull away cleanly from the sides of the bowl and hold a clean mound when scooped — if it feels sticky or wet, your flour was under-measured. If it feels dry and crumbly, your flour was over-packed.
Do not overmix after the flour goes in. Every additional stroke past the point of full incorporation develops gluten — the elastic protein network in flour that makes bread chewy. In a sugar cookie, excess gluten development produces a tough, dense bite instead of the soft, pillowy center visible in the photos.
Your dough is ready when it looks uniform, soft, and scoopable. Move to Step 5.
Step 5: Portioning and Rolling Each Cookie in Sugar
Place your small shallow bowl of 2 tablespoons (25g) plain white granulated cane sugar within reach of your baking sheet.
Using your 2-tablespoon cookie scoop, portion the dough into balls of approximately 40–45g each. Weigh the first ball on your kitchen scale, use it as your calibration, then portion the remaining cookies to match. This batch yields exactly 20 cookies at this scoop size — if you have significantly more or fewer, your scoop size was inconsistent and bake times will vary across the batch.
Roll each dough ball in the rolling sugar immediately before placing it on the parchment — do not roll all of them at once and let them sit. The sugar coating must be dry and separate when it hits the hot oven. That is the exact condition that creates the crinkled, sparkly crust visible on every cookie in the stacked close-up photo. Sugar that has absorbed into the dough surface before baking produces a matte finish, not a crinkle.
Place each sugar-coated ball on the parchment-lined pan, spacing them at least 2 inches (5cm) apart. As you can see in the cooling rack photo, the finished cookies are approximately 2.5–3 inches (6–7.5cm) in diameter — they spread moderately during baking, and crowding the pan prevents even spreading and airflow.
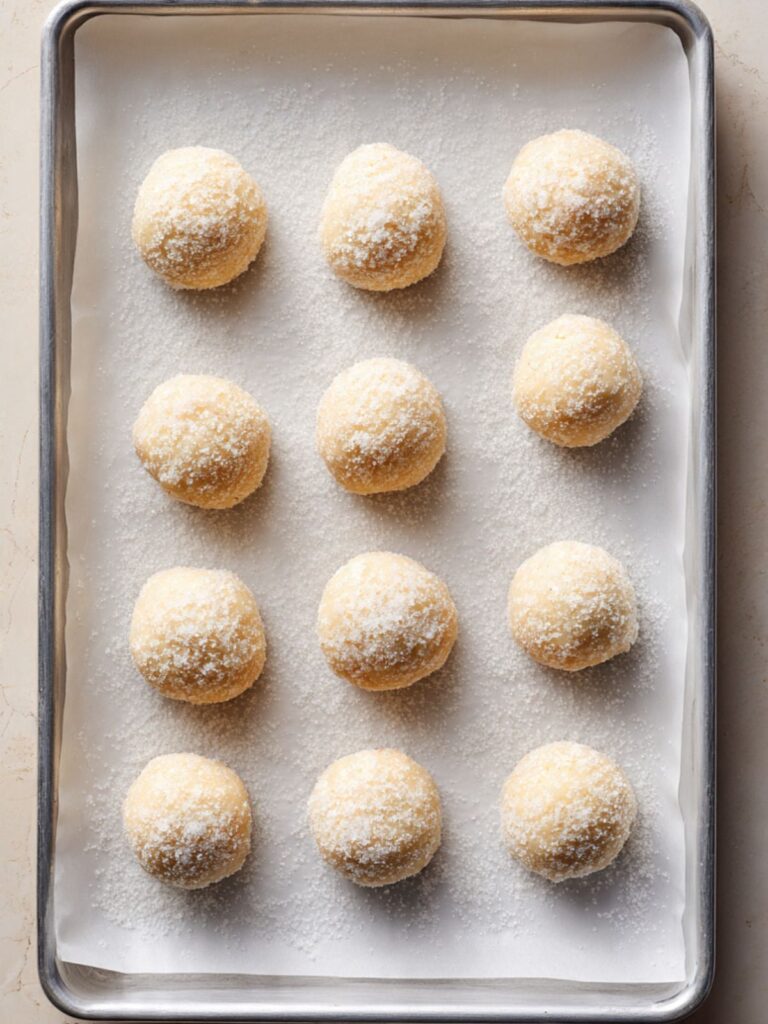
The pan should have 10–12 evenly spaced dough balls, each coated in a visible layer of granulated sugar, with no balls touching. If your pan cannot fit 10 with proper spacing, bake in two batches.
Do not press the dough balls flat. The rounded, domed shape going into the oven is what produces the thick, soft center. Pressing them down produces a thinner, crispier cookie.
Your pan is loaded and ready. Move to Step 6.
Step 6: Baking Until the Edges Are Just Set and the Centers Look Underdone
Place the pan on the middle rack of your preheated 350°F (175°C) oven. Set a timer for 10 minutes.
At 10 minutes, open the oven and assess. You are looking for the exact moment the edges look set and very lightly golden — just a whisper of color — while the centers still look pale, slightly puffy, and not quite done. This is the correct moment to pull them.
The doneness cue for these cookies is specific: the edges should appear firm and just barely set, with a faint suggestion of color at the very base. The centers should still look soft and slightly underdone — exactly as you see in the cookies on the cooling rack photo, where the surface shows a fine crinkle but the center still looks pillowy and pale. If the centers look fully set and matte, they are overbaked — pull at 10 minutes regardless.
Do not wait for the centers to look done in the oven. Sugar cookies finish cooking on the hot pan after they come out. A cookie that looks done in the oven will be dry and firm once it cools.
Bake time is 10–12 minutes at 350°F (175°C). The range depends on your oven — start checking at 10 minutes and pull no later than 12. Dark pans run hot and may need 9–10 minutes. Light-colored aluminum pans at 10–11 minutes is the target window.
Your cookies should come out looking pale with just-set edges and slightly puffy, crinkled tops. Move to Step 7.
Step 7: Resting on the Pan So Carryover Heat Sets the Centers
Leave the cookies on the hot pan for exactly 5 minutes after pulling from the oven. Do not move them, do not transfer them, do not press them. Set a timer.
The pan continues to conduct heat into the cookie base during this 5-minute window. This carryover cooking is what sets the centers without the oven drying them out. The cookies look underdone when they come out — that is intentional. The residual heat from the pan finishes the job. Moving them before 5 minutes breaks the structural base and the cookie will crack across the bottom. Waiting more than 8 minutes starts to over-dry the bottoms against the hot pan.
🗒 Luna’s Note: I pull these at exactly 10 minutes and set a 5-minute phone timer the second the pan lands on the counter. The centers always look too soft when I open the oven. They are not. Five minutes on the pan and they come out with that exact pillowy, set texture you see in the photos. I have overbaked these by waiting too long — trust the timer, not your eyes.
After 5 minutes, use a thin spatula to transfer the cookies to your wire cooling rack. The edges will firm up as they cool to room temperature — approximately 15–20 minutes. The centers stay soft.
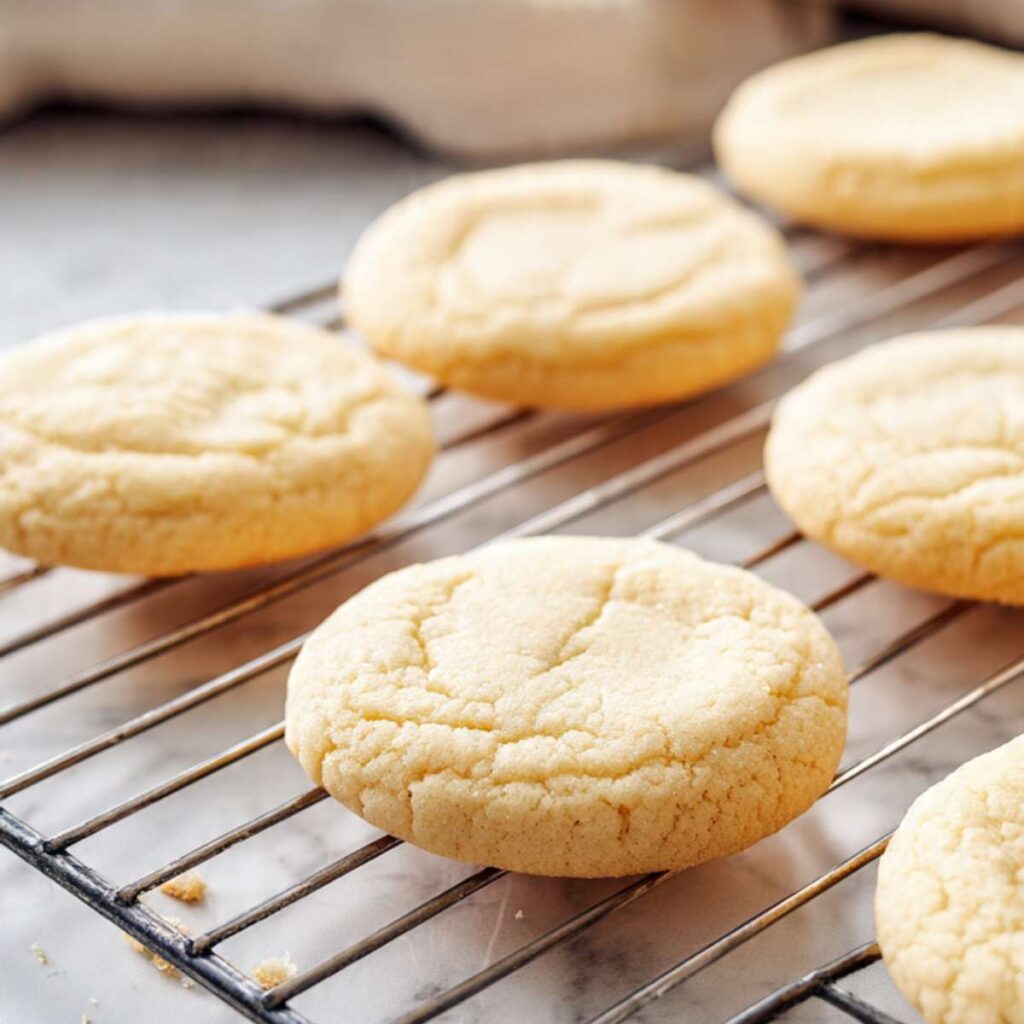
The cookies should look exactly like the cooling rack photo — set edges with a fine crinkle across the sugared surface, centers that still look slightly soft. This is correct and exactly what you want. If the centers look completely firm and dry on the rack, they were overbaked.
Your cookies are done. They are ready to eat warm or fully cooled.
The Science Behind Sugar Cookies
Why Butter Temperature Controls Everything About These Cookies
Butter is not just a fat in this recipe — it is the structural foundation of the entire cookie. When butter is at the correct temperature of 65–68°F (18–20°C) and beaten with sugar, the sharp edges of the sugar crystals cut through the fat and create thousands of tiny air pockets. Those air pockets expand in the oven and give these cookies their thick, domed profile. This process is called aeration, and it only works within a narrow temperature window.
Butter that is too warm — above 70°F (21°C) — is too soft to hold the air pockets. The fat melts before the edges set and the cookies spread flat and greasy. Butter that is too cold — still firm from the fridge — resists the sugar crystals and produces a dense, undermixed dough that bakes up tight and heavy. The pale, pillowy cookies in the stacked photo are the direct result of butter at exactly the right temperature, beaten for exactly the right amount of time.
🗒 Luna’s Note: I use an instant-read thermometer to check my butter before I start creaming. It sounds fussy but it takes 3 seconds and it has saved me from flat cookies more times than I can count. 65°F on the thermometer means the creaming step will work exactly as it should.
Why Granulated Sugar Creates That Crinkled, Sparkly Crust
The rolling sugar on the outside of these cookies does something specific and deliberate in the oven. When the dough ball hits 350°F (175°C), the surface begins to dry out slightly before the interior fully sets. The granulated sugar coating stays separate from the cookie structure during this window, which is why it crinkles and sparkles rather than absorbing into a smooth, matte surface.
This is sugar hygroscopicity working in reverse — normally sugar draws moisture from the air and keeps baked goods soft, but in the oven environment, the dry heat pulls surface moisture out of the dough faster than the sugar can absorb it. The result is the visible crinkle pattern you can see across every cookie surface in the overhead plate photo. If you roll the dough balls in sugar and let them sit at room temperature before baking, the sugar absorbs the surface moisture from the dough and that crinkle disappears entirely. If you are looking for a related soft cookie with a different sugar coating technique, my snickerdoodle cookies use a cinnamon-sugar roll with a slightly different surface result worth comparing.
Why Pulling Them Early Is the Most Important Step in This Recipe
Sugar cookies finish cooking after they leave the oven. The pan retains heat — a light-colored aluminum pan at 350°F (175°C) stays hot enough to continue cooking the cookie base for several minutes after it comes out. This residual heat transfer is called carryover cooking, and it is the single most important concept in this recipe.
A cookie that looks done in the oven — fully set center, no visible softness — has already gone past the ideal internal temperature. Egg proteins coagulate at 145°F (63°C) and starch gelatinization is complete well before the surface looks dry. By the time the center looks visually set through the oven window, the interior has already moved past the soft, pillowy stage and into dry and firm territory. Pull when the edges are just set and the centers still look underdone. The 5-minute rest on the hot pan finishes the job every time.
Sugar Cookies Troubleshooting & Pro-Tips
Common Mistakes
Wrong Sugar Type — Cookies That Spread Flat, Turn Crispy, or Lose the Crinkled Crust
The symptom is cookies that spread too flat, bake up crispy rather than soft, or come out with a smooth matte surface instead of the sparkly, crinkled finish in the photos. The cause is substituting the plain white granulated cane sugar with coconut sugar, raw sugar, turbinado, or any liquid sweetener. Each of these has a different crystal structure, different moisture content, and a different melting point than plain granulated sugar. Coconut sugar melts faster and produces a darker, flatter cookie. Raw sugar and turbinado have larger crystals that do not dissolve evenly during creaming and do not produce the same surface crinkle. The immediate fix: there is no fix once baked. The prevention: use plain white granulated cane sugar exactly as written — both in the dough and as the rolling coating. This is the one ingredient in this recipe that has no reliable substitute.
Wrong Butter Temperature — Cookies Spread Flat and Greasy
The symptom is cookies that spread into thin, flat discs with greasy edges and no dome. The cause is almost always butter that was too warm when it went into the mixer — above 70°F (21°C) — or butter that was melted rather than softened. Warm butter cannot trap air during creaming and collapses under the heat of the oven before the edges set. The immediate fix if this has already happened: refrigerate the remaining dough for 20 minutes before portioning and baking the rest of the batch. The prevention: always check butter temperature before creaming. It should feel cool to the touch, leave a clean finger indent, and look matte — not shiny or greasy.
Wrong Pan Type — Overbrown Bottoms with Pale Tops
The symptom is cookies with dark, overbaked bottoms and centers that still look underdone. The cause is a dark non-stick baking pan. Dark pans absorb significantly more radiant heat than light-colored aluminum and transfer that heat directly into the cookie base — the bottoms cook faster than the tops can catch up. The immediate fix: reduce oven temperature by 25°F (15°C) if you must use a dark pan. The prevention: always bake these on a light-colored aluminum baking sheet lined with parchment paper. That combination gives the most even, pale bake shown in the photos.
Too Much Flour — Dry, Dense, Crumbly Cookies
The symptom is cookies that feel dry and crumbly when you bite into them and do not hold the soft center visible in the photos. The cause is flour that was scooped directly from the bag rather than spooned and leveled — or flour that was not weighed. Scooping packs 20–30% more flour into the cup than the recipe requires. One extra tablespoon of flour per cup is enough to turn a soft sugar cookie into a dry, tight one. The immediate fix: there is no fix once baked. The prevention: spoon and level every time, or weigh at 180g. Gram weight eliminates this variable entirely.
Expired Baking Powder — Flat Cookies with No Dome
The symptom is cookies that bake up thin and flat with no lift, even when the butter temperature and flour measurement were correct. The cause is baking powder that has lost its potency — it expires within 6–12 months of opening. Unlike baking soda, baking powder contains its own acid and does not require an acidic ingredient to activate, but it does lose its ability to produce CO2 bubbles over time. The freshness test: drop 1 teaspoon (4g) into ½ cup (120ml) of hot water. It should bubble immediately and vigorously. Weak or no bubbling means replace the can. The prevention: check freshness before every bake and replace every 6–12 months.
Sugar Coating Has No Crinkle — Matte Surface Instead of Sparkle
The symptom is cookies that bake up with a smooth, matte surface and no visible sparkle or crinkle — they look like plain cookies rather than the sugar-coated result in the photos. The cause is rolling the dough balls in sugar too early and letting them sit before baking. The surface moisture from the dough absorbs the sugar crystals and they lose their separation from the dough structure. The immediate fix: roll each ball immediately before placing it on the pan — no more than 30 seconds between rolling and placement. The prevention: set up your rolling sugar bowl directly next to the pan so the workflow is roll, place, roll, place with no delay.
Overmixing After the Flour Goes In — Tough, Dense Cookies
The symptom is cookies that feel tight and dense rather than soft and pillowy, with a slightly chewy resistance rather than a tender give. The cause is overmixing after the flour was added. Every stroke past the point of full incorporation develops gluten — the elastic protein network that makes bread chewy. In a sugar cookie, that gluten development fights against the tender, soft texture the recipe is designed to produce. The immediate fix: there is no fix once the dough is mixed. The prevention: switch to a silicone spatula the moment the dry ingredients go in, count your strokes, and stop at 20–25 or the moment no dry flour streaks remain — whichever comes first.
Humidity and Altitude Adjustments
In high humidity above 70% relative humidity, these cookies may spread slightly more and take longer to look set on the surface. The sugar coating may also lose some sparkle as it absorbs ambient moisture from the air before baking. Refrigerate scooped, rolled dough balls for 15 minutes before baking in humid conditions. The cold dough will spread less and hold the dome better.
At high altitude above 3,500 feet (1,067 meters), leavening gases expand faster and liquids evaporate more quickly. Reduce baking powder by ¼ teaspoon, increase flour by 1 tablespoon (8g), and reduce sugar by 1 tablespoon (12g). Oven temperature may need to increase by 15–25°F (8–14°C) and bake time may decrease by 1–2 minutes. Check at 9 minutes.
Expert Pro-Tips
Roll each dough ball immediately before it goes on the pan — not in advance. The 30-second window between rolling and placement is the difference between the crinkled, sparkly crust in the photos and a matte, absorbed finish. Set your rolling sugar bowl directly beside the pan so the motion is seamless.
Press 4–5 extra granulated sugar crystals onto the top of each ball right before the pan goes into the oven. The top of the dough ball loses some sugar contact when you set it down on the parchment. A quick press of extra crystals on the crown ensures the sparkle is visible across the entire surface of the finished cookie, exactly as shown in the overhead plate photo.
Bake one test cookie first. Before you load the full pan, bake a single cookie for 10 minutes and assess the result. If it spreads too much, your butter was too warm — refrigerate the remaining dough for 15 minutes. If it domes but does not spread enough, your flour may be slightly over-measured. One test cookie costs you 10 minutes and saves the entire batch.
How to Store Sugar Cookies
Room Temperature
Store fully cooled cookies in a lidded hard-sided container — a cookie tin or a rigid plastic container with a snap-on lid. Place a sheet of parchment paper between each layer of cookies. Do not use zip-lock bags for these cookies — the soft structure compresses under the weight and the sugar coating gets crushed and sticks to the bag surface. Do not use an open basket or plate left on the counter — exposed air dries the surface within a few hours and the centers lose their soft texture.
At room temperature these cookies stay soft and fresh for 4–5 days. Day 1 and Day 2 are peak texture — the centers are at their softest and the sugar coating still has some crinkle. By Day 3 the surface smooths slightly but the interior stays soft. By Day 5 the edges begin to firm up more noticeably. They are still good — just slightly less pillowy than fresh.
Do not store these cookies with strongly scented foods. Sugar cookies are neutral in flavor and will absorb nearby odors — garlic, onions, coffee — through a shared container or proximity in a small kitchen.
Refrigerator
I do not recommend refrigerating these cookies. The fridge environment is dry and cold, and both conditions work against the soft, pillowy texture this recipe is built around. Cold air pulls moisture out of the cookie crumb faster than room temperature air does, and the sugar coating loses its crinkle and sparkle within a few hours in the fridge. Room temperature storage in a lidded hard-sided container will keep these fresher and softer for longer than refrigeration.
If you live in a very hot or humid climate where room temperature exceeds 80°F (27°C), refrigeration is the safer option. In that case, store in a lidded container and bring cookies to room temperature for 20–30 minutes before eating — cold sugar cookies taste flat and dense because the butter fat firms up in the fridge and mutes the flavor.
Freezer — Baked Cookies
Baked cookies freeze well for up to 2 months. Wrap each cookie individually in plastic wrap first — this prevents freezer burn and keeps the sugar coating from sticking to adjacent cookies. Then place the individually wrapped cookies in a zip-lock freezer bag or rigid freezer-safe container and press out as much air as possible before sealing.
To thaw: remove from the freezer and unwrap. Let sit at room temperature for 30–45 minutes. Do not microwave to thaw — the sugar coating melts unevenly and the texture turns gummy in spots. After thawing, the centers will be slightly more dense than fresh-baked but the flavor holds well. The sugar coating will be less sparkly after freezing and thawing — this is normal and does not affect the taste.
Freezer — Unbaked Dough
This dough freezes beautifully before baking. Portion the dough into balls using your cookie scoop but do not roll them in sugar yet — add the rolling sugar right before baking, not before freezing. Arrange the unrolled dough balls on a parchment-lined pan and freeze until solid, approximately 1–2 hours. Transfer the frozen dough balls to a zip-lock freezer bag. They keep for up to 3 months.
To bake from frozen: do not thaw. Roll each frozen dough ball in granulated sugar straight from the freezer and place on a parchment-lined pan. Bake at 350°F (175°C) for 13–15 minutes — add 3 minutes to the standard bake time. The doneness cues are the same: pull when edges are just set and centers still look slightly underdone.
🗒 Luna’s Note: I keep a bag of portioned, unrolled dough balls in my freezer at almost all times. When I want fresh sugar cookies without committing to a full batch, I pull out four or five balls, roll them in sugar, and bake straight from frozen. Thirteen minutes and they come out exactly like a fresh batch. It is one of the most useful baking habits I have.
Serving Suggestion
I serve these at room temperature, never warm — the sugar coating has its best texture and crinkle once the cookie has fully cooled on the rack. I stack them on a wide, shallow plate exactly the way you see in the photos, which makes the sugar crust visible from every angle. A cold glass of whole milk is the pairing I come back to every time. The buttery, vanilla-scented cookie against cold milk is one of those combinations that does not need improving.
These also work well on a dessert table alongside frosted versions — if you want to dress them up, my sugar cookies with frosting uses this same base recipe with a vanilla buttercream finish that turns them into something more occasion-worthy without changing the cookie itself.
Frequently Asked Questions About Sugar Cookies
How do you keep sugar cookies soft?
The key to keeping sugar cookies soft is storage method and pull timing. Store fully cooled cookies in a lidded hard-sided container with parchment between layers at room temperature — the enclosed environment traps just enough ambient moisture to keep the crumb soft for 4–5 days. The more important factor is pulling the cookies from the oven at the right moment: edges just set, centers still looking slightly underdone. Cookies that are fully set in the oven before they come out have already lost the moisture that makes them soft. Carryover cooking on the hot pan finishes the job without drying them out.
Why are my sugar cookies flat?
Flat sugar cookies are almost always a butter temperature problem. Butter that is too warm — above 70°F (21°C) — cannot hold the air pockets created during creaming, and the fat melts into the dough before the edges have a chance to set in the oven. The cookies spread outward instead of rising upward. Check that your butter left a clean finger indent without looking shiny or greasy before creaming. A secondary cause is expired baking powder — if the leavening has lost its potency, there is no CO2 production to give the cookies their dome. Run the freshness test before every bake.
Can I make sugar cookies ahead of time?
Yes — two ways. First, bake the full batch and store in a lidded hard-sided container at room temperature for up to 5 days. The texture on Day 2 is actually slightly better than Day 1 as the moisture redistributes through the crumb. Second, freeze portioned, unrolled dough balls for up to 3 months and bake directly from frozen at 350°F (175°C) for 13–15 minutes — rolling in sugar right before they go into the oven, not before freezing. Both methods work well and the flavor holds reliably through both storage approaches.
Can I substitute butter in sugar cookies?
Butter can be partially substituted but not replaced entirely without changing the character of the cookie. Replacing up to half the butter with a neutral-flavored coconut oil produces a cookie that is slightly crisper and less rich — the flavor loses the dairy depth that makes these taste buttery. Replacing all the butter with coconut oil produces a flatter, less structured cookie because coconut oil does not cream the same way butter does and cannot trap air during mixing. Margarine is not a reliable substitute — the water content is higher than butter and produces spreading and a greasy texture. For the soft, thick result shown in the photos, unsalted butter at the correct temperature is the only fat that works as written.
Why do sugar cookies crack on top?
First — the fine, crinkled surface pattern across these specific cookies is intentional and correct. That is the granulated sugar coating expanding at a different rate than the cookie interior as the dough spreads, and it is exactly what you want to see. If you are seeing deep, jagged cracks rather than a fine crinkle, the cause is usually too much flour — a dry dough resists spreading and instead fractures under the pressure of the expanding leavening gas.
Check your flour measurement using the spoon-and-level method or weigh at 180g. A correctly measured dough spreads gently and produces the fine, even crinkle pattern visible in the overhead plate photo. My cut out sugar cookies recipe uses a slightly higher flour ratio intentionally to prevent spreading — that article explains the flour-to-spread relationship in more detail.
Can I freeze sugar cookie dough?
Yes — this dough freezes exceptionally well for up to 3 months. Portion into balls using your cookie scoop, arrange on a parchment-lined pan, and freeze until solid before transferring to a freezer bag. Do not roll in sugar before freezing — the sugar absorbs moisture from the dough during freezer storage and the coating loses its crinkle effect. Roll each ball in granulated sugar directly from frozen, immediately before it goes onto the baking pan. Bake at 350°F (175°C) for 13–15 minutes without thawing first. The doneness cues are the same as a fresh batch.
How do I adjust this recipe for high altitude or high humidity?
At high altitude above 3,500 feet (1,067 meters), reduce baking powder by ¼ teaspoon, increase flour by 1 tablespoon (8g), reduce sugar by 1 tablespoon (12g), and check the cookies at 9 minutes — bake time may decrease slightly as leavening gases expand faster at altitude. In high humidity above 70% relative humidity, refrigerate your portioned, rolled dough balls for 15 minutes before baking — the chilled dough spreads more slowly and holds the dome better in a moisture-heavy environment. The sugar coating may also appear less sparkly in high humidity as it absorbs ambient moisture from the air before the oven heat can set it.
Can I double this sugar cookies recipe?
Yes, with one adjustment. Multiply all ingredients by 2 except the baking powder — use only 1½ teaspoons (6g) instead of 2 teaspoons (8g) for a doubled batch. Leavening does not scale linearly and doubling it exactly produces cookies with a soapy, chemical aftertaste. Bake in separate batches on separate pans — do not crowd two batches onto one pan as this restricts airflow and causes uneven spreading. Bake time stays the same at 10–12 minutes per pan. Salt and vanilla scale linearly and can be doubled exactly.
Thick & Soft Sugar Cookies Recipe
Ingredients
Equipment
Method
- Position the oven rack in the middle and preheat to 350°F (175°C), then line a light-colored aluminum baking sheet with parchment paper and set aside.
- In a large mixing bowl using a hand mixer or stand mixer fitted with the paddle attachment, beat the ½ cup (113g) unsalted butter and ¾ cup (150g) plain white granulated cane sugar on medium speed for exactly 2 minutes until pale, slightly fluffy, and uniform.
- Add the 1 large room temperature egg and 1 teaspoon (5ml) pure vanilla extract and beat on medium speed for 30–45 seconds until fully combined and glossy, then scrape down the sides and bottom of the bowl with a silicone spatula.
- Add the 1½ cups (180g) all-purpose flour, 1 teaspoon (4g) baking powder, and ¼ teaspoon (1.5g) fine sea salt and fold with a silicone spatula using slow strokes from the bottom of the bowl upward for approximately 20–25 strokes until no dry flour streaks remain and the dough looks soft, thick, and scoopable.
- Place 2 tablespoons (25g) plain white granulated cane sugar in a small shallow bowl, scoop dough into 40–45g balls using a 2-tablespoon cookie scoop, roll each ball in the sugar immediately before placing on the prepared pan, and space the balls at least 2 inches (5cm) apart.
- Bake on the middle rack at 350°F (175°C) for 10–12 minutes until the edges look just set and very lightly golden while the centers still appear pale, slightly puffy, and underdone.
- Leave the cookies on the hot pan for exactly 5 minutes without moving them, then transfer to a wire cooling rack and cool for 15–20 minutes until the edges firm up while the centers stay soft.