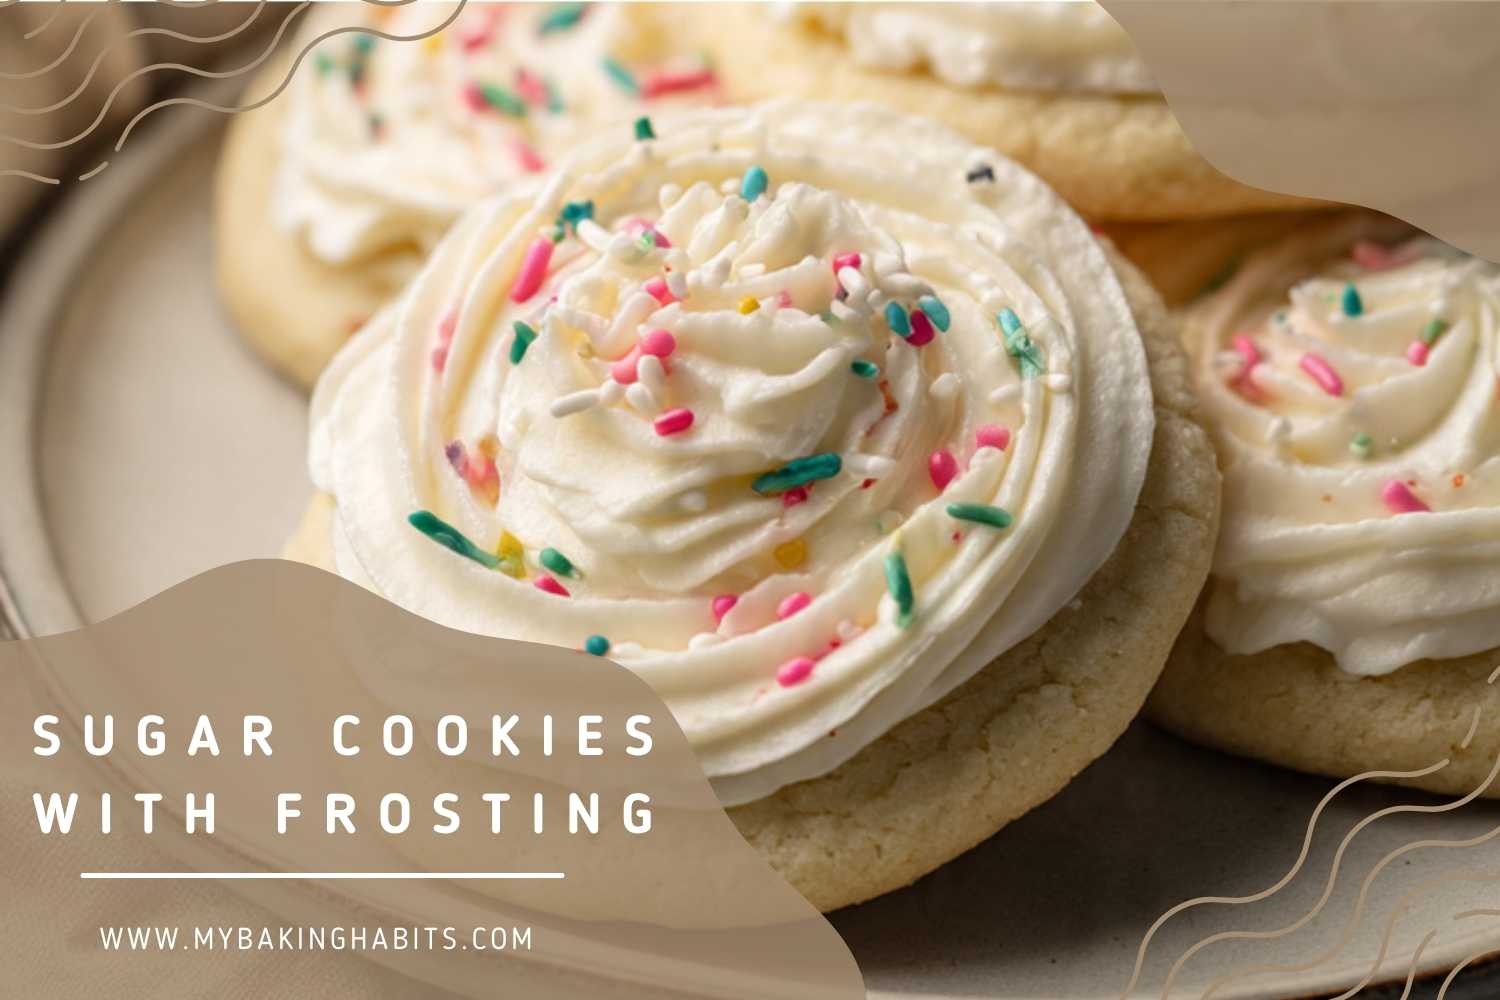
Bakery-Style Sugar Cookies with Frosting
Most sugar cookies are an afterthought to the frosting — thin, dry, and just firm enough to hold the icing without crumbling. These are not those cookies. Not the kind you spread thin with a knife — a thick, swirled rosette of vanilla buttercream piped high enough that the cookie underneath almost disappears. These sugar cookies with frosting are soft through the center, just barely set at the edges, and built to hold that frosting without cracking or crumbling when you pick them up.
The dough uses sour cream, and that is the detail that matters most. Sour cream does two things: it keeps the cookies soft for days after baking, and it prevents the spread that turns thick sugar cookies into flat, wide discs. No chilling required. The cookies bake thick and domed at 350°F (175°C) in 10 to 12 minutes, and the frosting takes about 5 minutes to make in the same stand mixer bowl.
I tested this recipe six times across two weeks before I was happy with the texture. The first two batches used a standard sugar cookie formula — 2 sticks of butter, 2 eggs, no sour cream. The cookies tasted good but flattened to about half the height shown in the photos and the centers were denser than the bakery-style result I was after. Adding ½ cup (120g) of full-fat sour cream to the third batch was the fix — the cookies domed, held their shape through the full bake, and stayed soft at the center exactly as intended.
The fourth and fifth batches confirmed the flour weight — 330g is the threshold above which the dough stiffens and the cookies lose their softness. Batch six confirmed the frosting ratio: 3 cups of powdered sugar to 4 tablespoons of butter gives you a buttercream stiff enough to pipe a clean rosette that holds its swirl without sliding.
No chilling required. No rolling pin, no cookie cutters, no resting time. You need a stand mixer or hand mixer to cream the butter properly — that step is what builds the structure that keeps these cookies thick. Skip the mixer and you will get flat, dense cookies instead of the soft, domed result shown above.
🗒 Luna’s Note: I always frost these within an hour of baking. The cookies are fully cooled but still have a slight warmth that helps the buttercream set against the surface — it grips instead of sliding. Wait longer and the surface firms up too much for the rosette to adhere cleanly.
| Prep Time | Cook Time | Total Time | Yield | Difficulty |
|---|---|---|---|---|
| 20 minutes | 12 minutes | 45 minutes | 18 cookies | Easy |
| Calories | Fat | Carbs | Sugar | Protein |
|---|---|---|---|---|
| ~285 kcal | ~13g | ~40g | ~28g | ~3g |
Macros are approximate and will vary based on ingredient brands and serving size.
Ingredients & Tools for Sugar Cookies with Frosting Recipe
For the Cookies
- 2¾ cups (330g) all-purpose flour (spooned into the measuring cup and leveled — do not pack)
- 1 tsp (4g) baking powder, checked for freshness
- ½ tsp (3g) fine sea salt
- ½ cup (113g) unsalted butter, softened to 65–68°F (18–20°C) — not melted, not cold
- 1 cup (200g) plain white granulated cane sugar
- 1 large egg plus 1 egg yolk, room temperature
- ½ cup (120g) full-fat sour cream, room temperature
- 2 tsp (10ml) pure vanilla extract
For the Vanilla Buttercream Frosting
- ½ cup (113g) unsalted butter, softened to 65–68°F (18–20°C)
- 3 cups (360g) powdered sugar, sifted
- 2–3 tbsp (30–45ml) whole milk or heavy cream
- 1½ tsp (7.5ml) pure vanilla extract
- Pinch of fine sea salt
- Rainbow sprinkles, for topping
Before You Start
Read through all of these before you touch anything. Every one of these has caused a batch to fail.
- Position your oven rack in the middle of the oven before you start mixing anything. Top rack position burns the tops before the centers set. Bottom rack position burns the bottoms before the edges firm up. Middle rack is the only position that gives these cookies even heat from both directions.
- Gram weights are more reliable than volume for this recipe. Flour especially — a packed cup of flour adds up to 30g more than a correctly measured cup, which will make the dough stiff and the cookies dry. Use a kitchen scale if you have one.
- Butter temperature matters for both the cookies and the frosting. For the cookies, butter at 65–68°F (18–20°C) creams into a smooth, pale mass that holds air. Too warm and it greases the dough instead of aerating it — the cookies will spread flat. Too cold and it will not cream properly — the dough will be lumpy and the cookies will be dense. Press your finger into the butter: it should leave a clean indent without the butter feeling greasy or slick.
- Sour cream must be full-fat and room temperature. Low-fat sour cream has a higher water content and will cause more spread. Cold sour cream does not incorporate smoothly and can cause the dough to look curdled.
- Both eggs must be room temperature. Cold eggs cause the creamed butter to seize and separate. Set them in a bowl of warm water for 10 minutes if you forgot to take them out early.
- Sift the powdered sugar for the frosting. Unsifted powdered sugar leaves lumps that no amount of mixing will fully smooth out once the buttercream is made.
- Cool the cookies completely before frosting. Even slightly warm cookies will melt the buttercream on contact — the rosette will slide and lose its shape.
- Oven thermometer check: Most home ovens run 15–25°F (8–14°C) off from the dial setting. If you have an oven thermometer, confirm the actual temperature before the first batch goes in.
Necessary Tools
- Stand mixer fitted with the paddle attachment, or a hand mixer with a large mixing bowl
- Two light-colored aluminum baking sheets
- Parchment paper (do not substitute foil or grease the pan — foil conducts heat too aggressively and causes dark bottoms)
- Kitchen scale (strongly recommended)
- Medium cookie scoop — 1.5 tablespoon capacity, 45g (optional but strongly recommended — portioning by eye produces uneven cookies that bake at different rates. If you do not have a scoop, use a kitchen scale to weigh 45g portions and roll by hand.)
- Wire cooling rack
- Oven thermometer (optional but strongly recommended — most home ovens run 15–25°F off from the dial reading, which directly affects whether these cookies dome or spread flat)
- Piping bag fitted with a Wilton 1M open star tip (or any large open star tip)
- Fine mesh sieve for sifting powdered sugar
- Rubber spatula
How to Make Sugar Cookies with Frosting
Step 1: Setting Up the Oven and Pans
Position your oven rack in the middle position and heat to 350°F (175°C). Line two light-colored aluminum baking sheets with parchment paper and set them aside. Do not grease the pans — greased pans cause the cookie edges to fry against the metal and spread outward instead of holding their domed shape. Do not use dark pans — dark pans absorb more radiant heat and will brown the bottoms before the centers are set. Do not use silicone mats — silicone insulates the cookie bottom and slows the base set, which causes the cookies to spread more and dome less than parchment-lined pans at the same temperature.
Most home ovens run 15–25°F (8–14°C) hotter or cooler than the dial reads. If you have an oven thermometer clipped to the middle rack, confirm the actual temperature before the first batch goes in. A 25°F difference at this bake temp will flatten these cookies and dry out the edges before the centers have time to set.
The oven must be fully preheated before any pan goes in — not just signaled. Signal means the preheat beep. Full preheat means the oven has held that temperature for at least 10 minutes after the signal. If the cookies go into an under-preheated oven, the butter will melt before the structure sets and the cookies will spread flat instead of baking up domed and thick.
Both pans should look flat, clean, and fully lined with parchment that reaches the edges — no gaps, no bunching at the corners, no bare pan surface visible. If the parchment is buckling, crease the corners so it lies flat.
Your pans are ready — move directly to making the dough.
Step 2: Whisking the Dry Ingredients
In a medium bowl, whisk together your 2¾ cups (330g) all-purpose flour (spooned and leveled), 1 tsp (4g) baking powder, and ½ tsp (3g) fine sea salt. Use a standard balloon whisk and give it 20 full rotations — this distributes the baking powder evenly through the flour so every cookie in the batch gets the same lift.
The baking powder is the leavening agent that gives these cookies their domed, thick center — it creates carbon dioxide gas during baking that pushes the dough upward instead of outward. Check the freshness of your baking powder before this step: drop ½ tsp into hot water. If it bubbles vigorously, it is active. If it sits flat, replace it — stale baking powder will produce flat, dense cookies that no amount of technique can fix.
The flour mixture should look uniform pale white with no visible clumps — no streaks of baking powder or salt anywhere in the bowl. A clump of baking powder in one section of the dough means uneven rise across the batch — some cookies will dome correctly while others bake up flat and pale, and you will not know which until the pan comes out of the oven.
Set the bowl aside and move to the stand mixer.
Step 3: Creaming the Butter and Sugar Until Pale and Fluffy
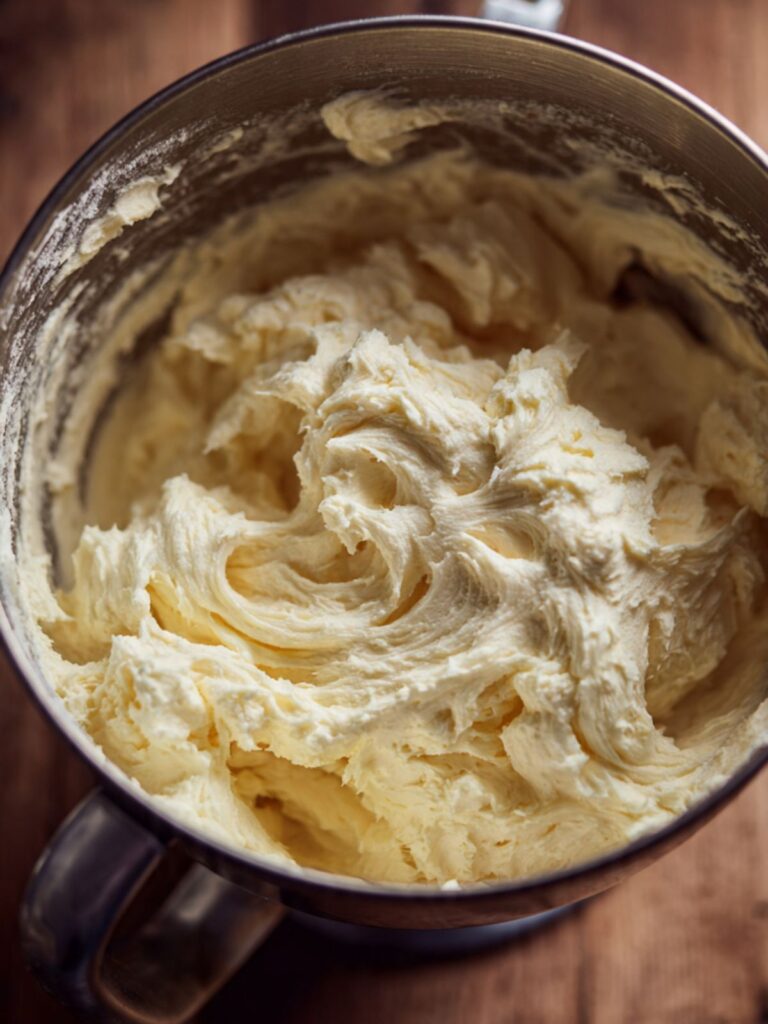
In the bowl of your stand mixer fitted with the paddle attachment — or in a large mixing bowl with your hand mixer — add your ½ cup (113g) unsalted butter, softened to 65–68°F (18–20°C) and 1 cup (200g) plain white granulated cane sugar. Beat on medium speed (speed 4 on a KitchenAid) for exactly 3 minutes — set a timer. Do not estimate.
During this time, the butter and sugar will visibly transform. At 30 seconds the mixture looks grainy and pale yellow. At 90 seconds it begins to lighten in color. At 3 minutes it should be pale ivory, nearly doubled in volume, and look almost whipped. This is the creaming stage, and it is the most important step in the recipe. The granulated sugar crystals cut thousands of tiny air pockets into the butter during this process — those air pockets fill with carbon dioxide gas during baking when the leavening activates, and that gas expansion is what lifts the cookie upward rather than outward. Under-creamed butter means the structure is not there, and the cookies will spread flat and dense instead of baking up thick and domed.
The mixture should look pale ivory — not yellow — and hold a soft ribbon for 2 seconds when you lift the paddle. If it still looks yellow and dense at 3 minutes, beat for another 60 seconds and check again.
Do not skip the timer. Do not estimate by eye alone at this step.
Step 4: Adding the Eggs, Sour Cream, and Vanilla
With the mixer on low speed, add your 1 large egg first and mix for 20 seconds until just combined, then add your 1 egg yolk and mix for another 20 seconds. Adding them separately prevents the fat in the butter from being shocked by too much liquid at once, which causes the mixture to look broken and curdled. The extra egg yolk contributes additional fat and lecithin — the natural emulsifier in egg yolk that binds the fat and water in the batter into a smooth, cohesive dough and adds a subtle richness to the finished cookie that a whole second egg cannot replicate.
Scrape down the sides and bottom of the bowl with your rubber spatula, then add your ½ cup (120g) full-fat sour cream, room temperature and 2 tsp (10ml) pure vanilla extract. Mix on low for 20 seconds until just incorporated.
The sour cream is the ingredient that separates these cookies from standard sugar cookies. Its fat content keeps the cookies tender and soft at the center for days after baking. Its mild acidity reacts with the baking powder to give an extra boost of lift. And its thickness — much higher than milk or cream — prevents the dough from spreading in the oven. There is no substitute that produces the same result. Greek yogurt (full-fat) is the closest option, but expect slightly less spread control and a marginally more tangy flavor.
The batter should look smooth, thick, and glossy — slightly denser than cake batter. Some very small lumps from the sour cream are normal and will bake out. If the mixture looks completely broken and soupy, the sour cream was too cold — this is recoverable; continue to the flour step.
Scrape down the bowl once more before the next step.
Step 5: Adding the Flour Without Overworking the Dough
With the mixer on its lowest speed, add the flour mixture in three additions — roughly one-third at a time — allowing each addition to mostly disappear before adding the next. Do not dump all the flour in at once. Adding in thirds prevents clouds of flour escaping the bowl and, more importantly, prevents the gluten network from forming too quickly.
After the last addition, stop the mixer the moment no streaks of dry flour are visible. Count 10 slow folds with the rubber spatula from the bottom of the bowl upward to finish incorporating any unmixed flour at the edges. Stop at 10. Overmixing past this point develops gluten — the protein structure in the flour — and the finished cookies will be tough and chewy rather than soft and tender.
🗒 Luna’s Note: In my LA kitchen, this dough comes together fast — the warm ambient temperature means the butter stays soft through the whole mixing process. If your kitchen is above 75°F (24°C), the dough may feel slightly tacky. That is normal. Resist the urge to add more flour — extra flour is the most common reason these cookies come out dry.
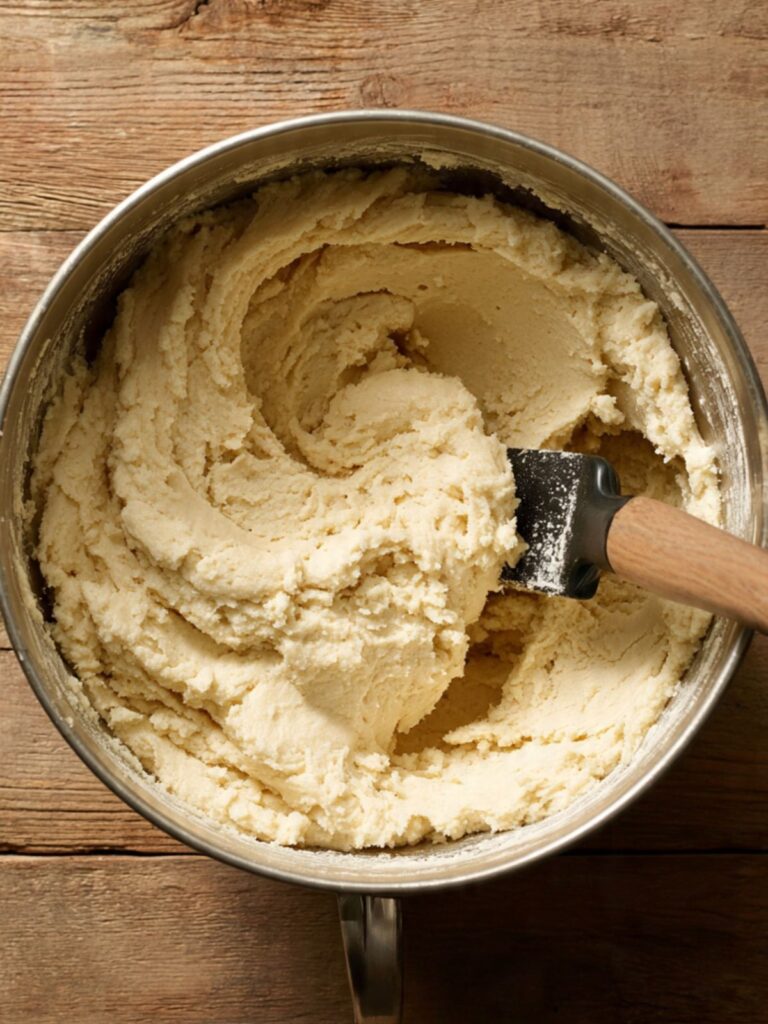
The finished dough should look thick, smooth, and slightly sticky — it will not look like cut-out sugar cookie dough. It should hold its shape when scooped but feel soft, not stiff. If it feels dry or crumbly, the flour was packed into the measuring cup. Add 1 tablespoon of sour cream and fold gently to recover.
Do not chill the dough. Move directly to portioning.
Step 6: Portioning the Dough for Even, Bakery-Sized Cookies
Using your medium cookie scoop — 1.5 tablespoon capacity — scoop a level portion of dough and roll it briefly between your palms into a smooth ball. Weigh the first ball on your kitchen scale: it should read 45g. Use that as your calibration for the remaining portions. Place the dough balls on the prepared parchment-lined baking sheet, spacing them at least 2 inches (5cm) apart. This batch yields 18 cookies at this scoop size.
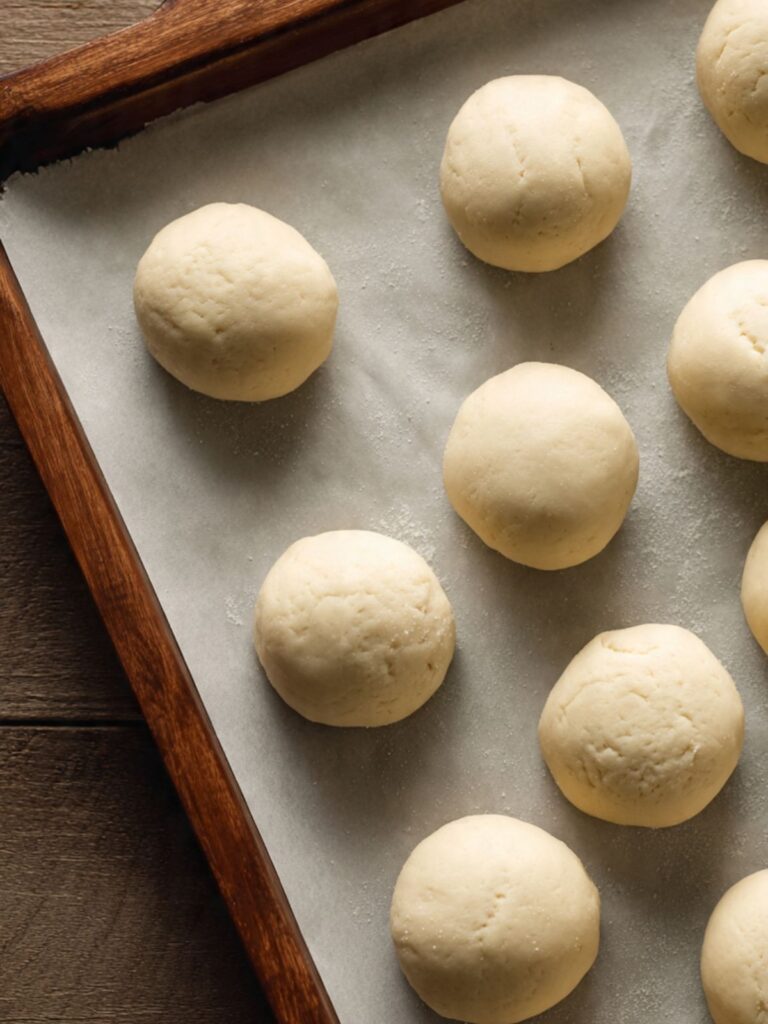
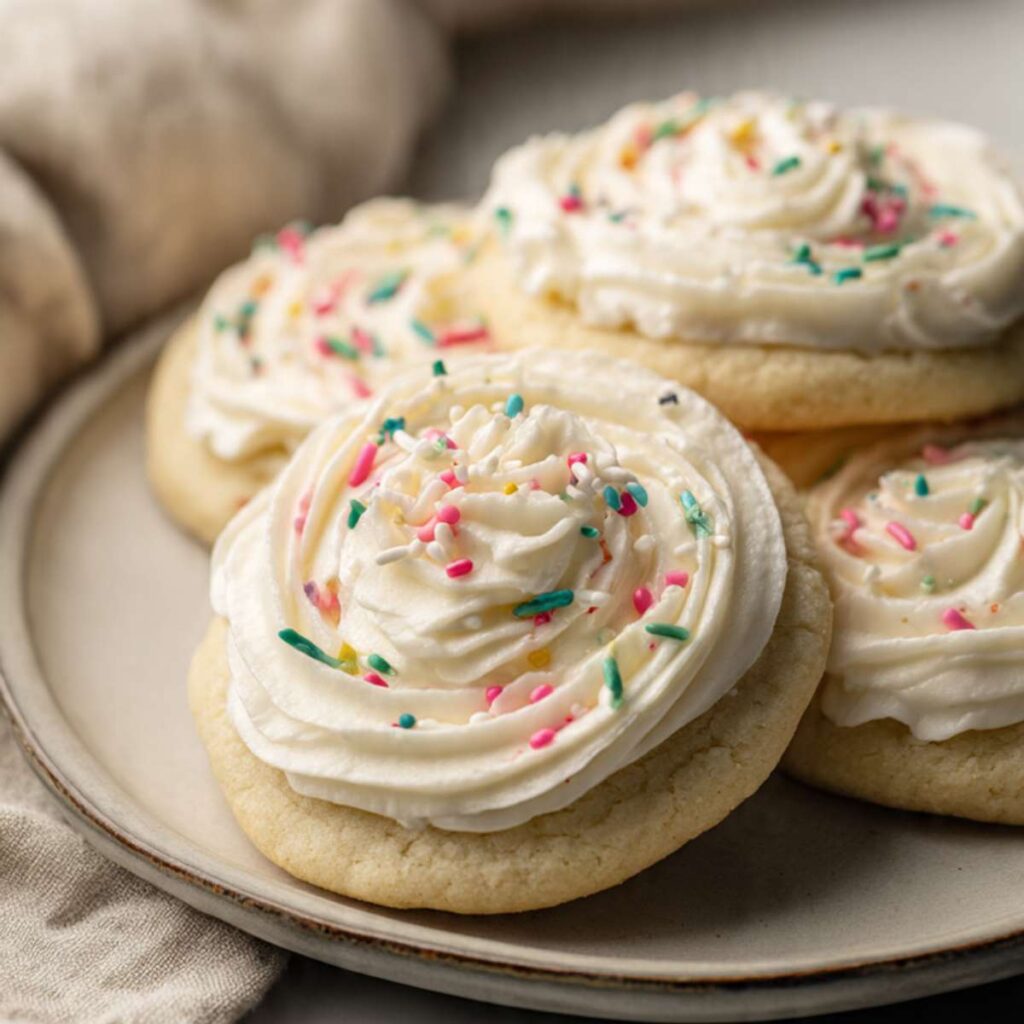
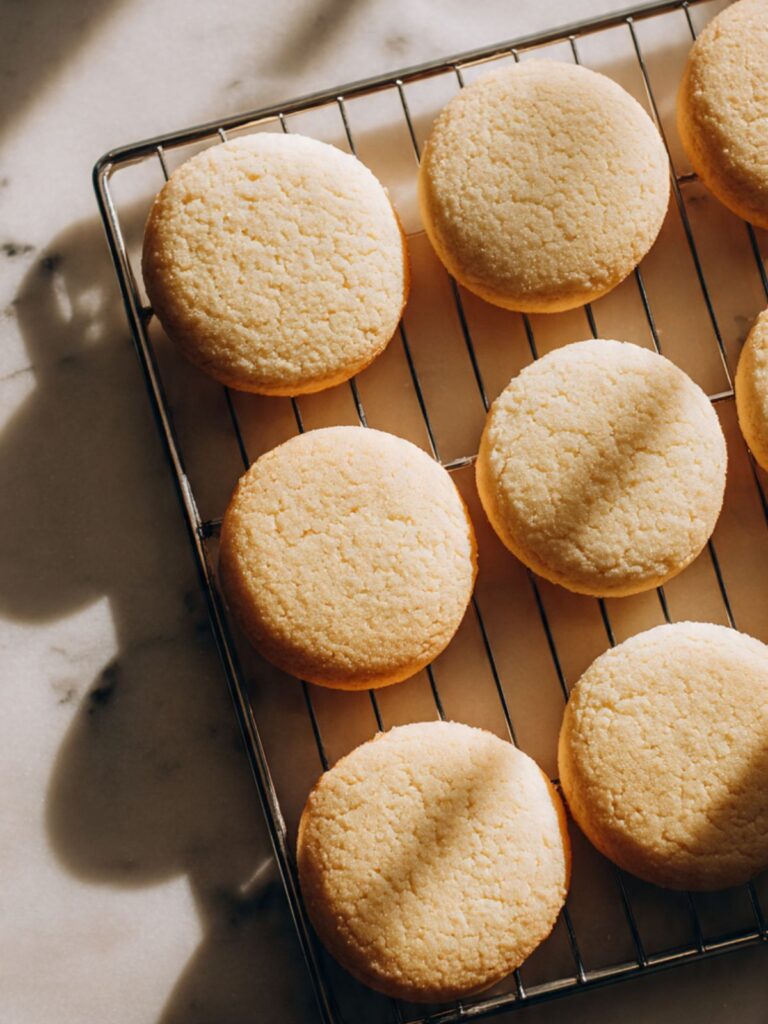
Do not flatten the dough balls. They will spread and dome naturally in the oven — pressing them down at this stage removes the height that makes these cookies look like the ones in the photos above. As you can see in the overhead images, each cookie bakes up with a gentle, even dome — that dome starts here, with a ball of dough that goes into the oven completely round and untouched.
Bake one sheet at a time on the middle rack. Do not stack two sheets in the oven simultaneously — the airflow difference between the top and bottom rack changes the bake on the lower sheet and produces unevenly baked cookies across the batch.
Each dough ball should look smooth and round, holding its shape without spreading on the cold pan. If the balls are spreading before the pan goes in, the butter was too warm — refrigerate the pan with the portioned dough for 15 minutes before baking.
Step 7: Baking Until the Edges Set and the Centers Are Still Soft
Slide the first pan onto the middle rack and bake at 350°F (175°C) for 10 to 12 minutes. Start checking at the 10-minute mark. The cookies are done the moment the edges look set and very lightly golden and the centers still look slightly puffed and soft — they will not look fully done. That is correct. Do not wait for the centers to look baked through.
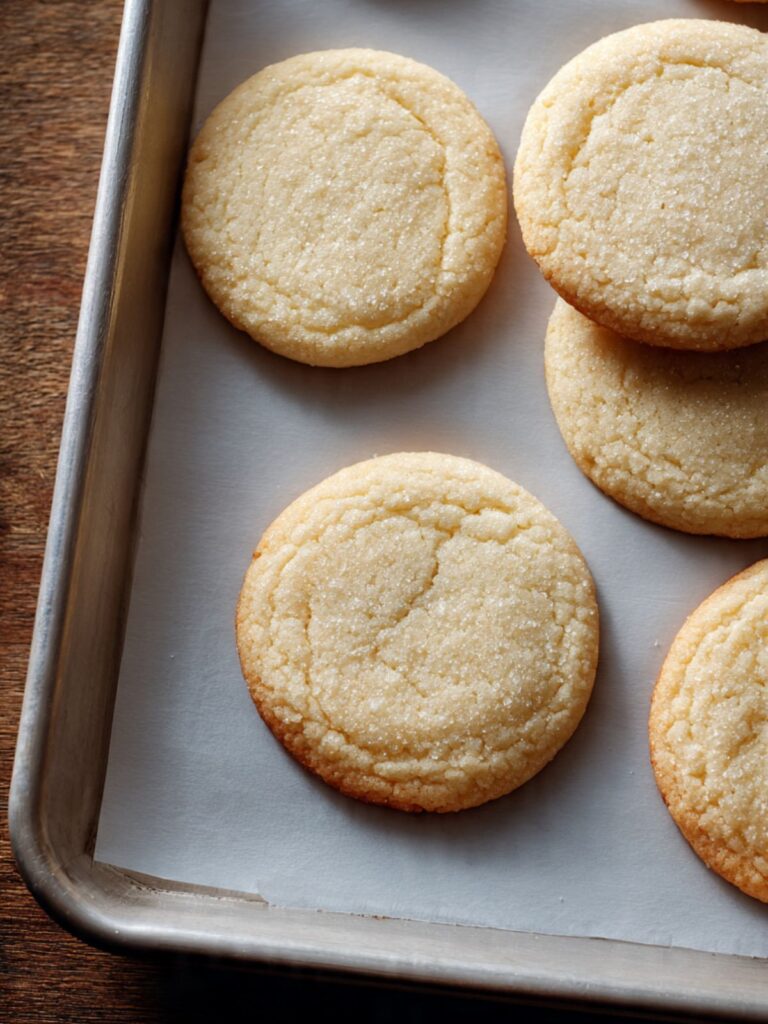
The center of each cookie should still look slightly underdone when the pan comes out. Carryover heat from the hot pan will continue cooking the centers for the full 5-minute rest that follows. Cookies pulled at the correct moment and rested properly will be soft and thick through the center. Cookies left in the oven until the centers look set will be dry and slightly crisp — they will have baked past the window.
Do not open the oven door before the 10-minute mark. Opening the door causes a temperature drop that can flatten the dome before the structure has fully set.
The edges should look defined and just barely golden. The tops should look matte and pale — not shiny, not wet. The centers should look slightly puffed and soft, exactly like the cookies visible in the close-up photos above. If the edges are golden and the centers look fully set, the cookies were in 1 to 2 minutes too long.
Step 8: Resting on the Pan — Do Not Skip This Step
Pull the pan from the oven and set it on a flat, heat-safe surface. Leave the cookies on the hot pan for exactly 5 minutes — set a timer. Do not move them before 5 minutes are up.
The hot aluminum pan continues to conduct heat into the cookie base during this rest period. This carryover heat finishes setting the center without the oven drying out the edges. Moving the cookies before 5 minutes breaks the structural base before it has fully set — you will see this as a cookie that looks done on the outside but collapses slightly in the center when lifted. Waiting more than 8 minutes on the pan starts to over-dry the bottoms. Five minutes is the window.
After exactly 5 minutes, transfer the cookies to a wire cooling rack using a thin spatula. They will feel soft — that is correct. They will firm up as they cool. Let them cool completely on the rack — a minimum of 30 minutes — before frosting. A warm cookie will melt the buttercream on contact and the rosette will slide and lose its definition.
After the 5-minute rest, the cookies should feel set at the edges and still slightly soft in the center when pressed very gently. They should lift cleanly from the parchment without sticking or tearing. If they stick, leave them on the pan for 1 more minute.
While the cookies cool, make the frosting.
Step 9: Making the Vanilla Buttercream Frosting
In the clean bowl of your stand mixer fitted with the paddle attachment — or a large bowl with your hand mixer — beat your ½ cup (113g) unsalted butter, softened to 65–68°F (18–20°C) on medium speed for 2 minutes until pale and smooth. The butter should lighten noticeably in color before any other ingredients go in. Under-beaten butter at this stage produces a dense, heavy buttercream that will not pipe cleanly.
If the buttercream looks curdled or broken at any point — soupy, greasy, or cottage-cheese-like — do not panic and do not add more powdered sugar. The most common cause is butter that was slightly too cold when it went in. Continue beating on medium speed for 60 more seconds. In most cases the friction of the paddle warms the butter just enough to bring the emulsion back together. If it is still broken after 90 seconds of beating, set the bowl over a pan of warm water for 10 seconds — just enough to raise the temperature slightly — then beat again.
Reduce the mixer to its lowest speed and add your 3 cups (360g) powdered sugar, sifted, in three additions — roughly 1 cup at a time — allowing each addition to mostly disappear before adding the next. Add 2 tablespoons (30ml) of whole milk or heavy cream, your 1½ tsp (7.5ml) pure vanilla extract, and a pinch of fine sea salt. The salt is not optional — it cuts the sweetness and keeps the frosting from tasting flat and one-dimensional.
Once all ingredients are in, increase the mixer to medium-high speed and beat for 2 full minutes. The frosting will look rough and grainy at the 30-second mark — keep going. At 2 minutes it should be smooth, bright white, and thick enough to hold a stiff peak when you lift the paddle.
Check the consistency now: lift the paddle — the frosting should hold a peak that stands upright for at least 5 seconds without drooping. If it droops immediately, add the remaining 1 tablespoon of milk and beat for 30 more seconds. If it looks too loose to pipe, add 2 tablespoons of sifted powdered sugar and beat again.
🗒 Luna’s Note: I always add the salt to the buttercream even when a recipe does not call for it. Without it, three cups of powdered sugar tastes like pure sweet — the salt rounds it out and makes the vanilla flavor readable.
The finished buttercream should look bright white, hold a clean stiff peak for 5 seconds, and feel smooth with no graininess when rubbed between two fingers. If you can feel grit, the powdered sugar was not sifted — press on and the grit will mostly dissolve, but sift next time.
Step 10: Piping the Frosting and Adding Sprinkles
Fit your piping bag with the Wilton 1M open star tip. Spoon the buttercream into the piping bag, filling it no more than two-thirds full — an overfilled bag is hard to control and puts pressure on the seam. Twist the top of the bag closed and squeeze out any air pockets before starting.
Hold the piping bag straight up and down — perpendicular to the cookie surface — with the tip about ½ inch (1.5cm) above the center of the cookie. Apply steady, even pressure and pipe a small center dot first, then move the tip in a tight spiral outward, overlapping slightly with each ring. Release pressure before lifting the tip to avoid a peaked tail. The rosette should cover most of the cookie surface and stand approximately ½ inch (1.5cm) tall — matching what you see in the close-up photo above.
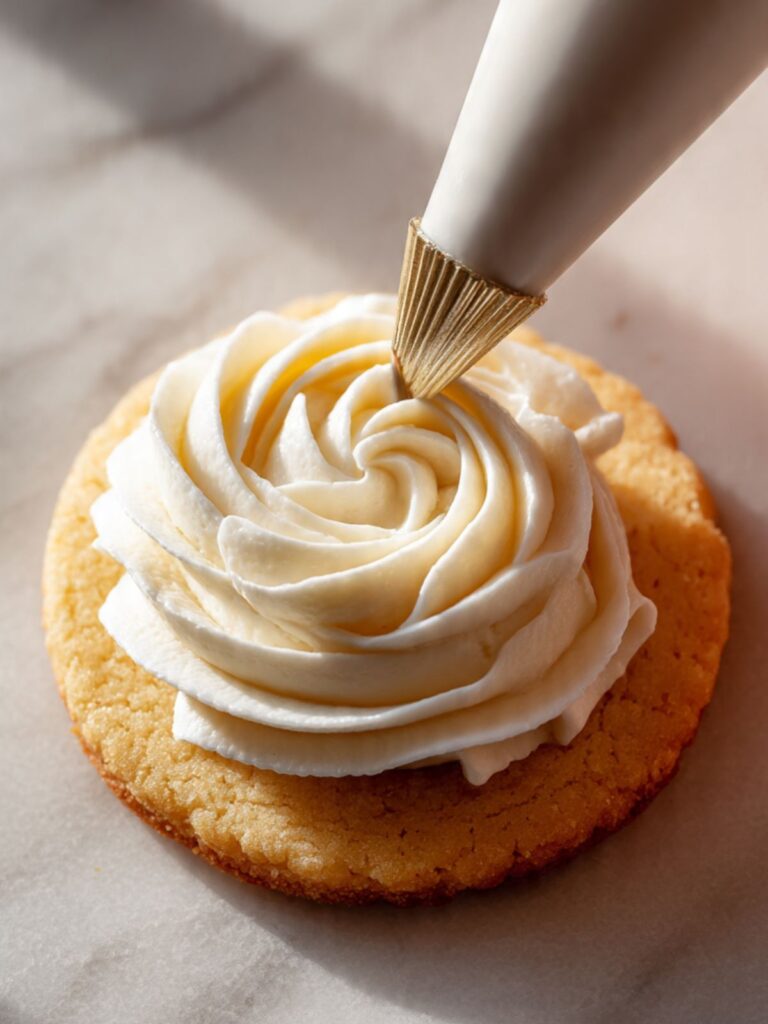
Do not overfill the piping bag past two-thirds full and do not let the bag go untwisted between cookies — an overfilled or untwisted bag builds uneven back-pressure that causes the frosting to surge unevenly through the tip. The result is a lopsided rosette that squashes flat on one side rather than the even swirl visible in the close-up photo above. If the rosette starts collapsing as you pipe, the buttercream has warmed too much from the heat of your hands — refrigerate the filled piping bag for 10 minutes and try again.
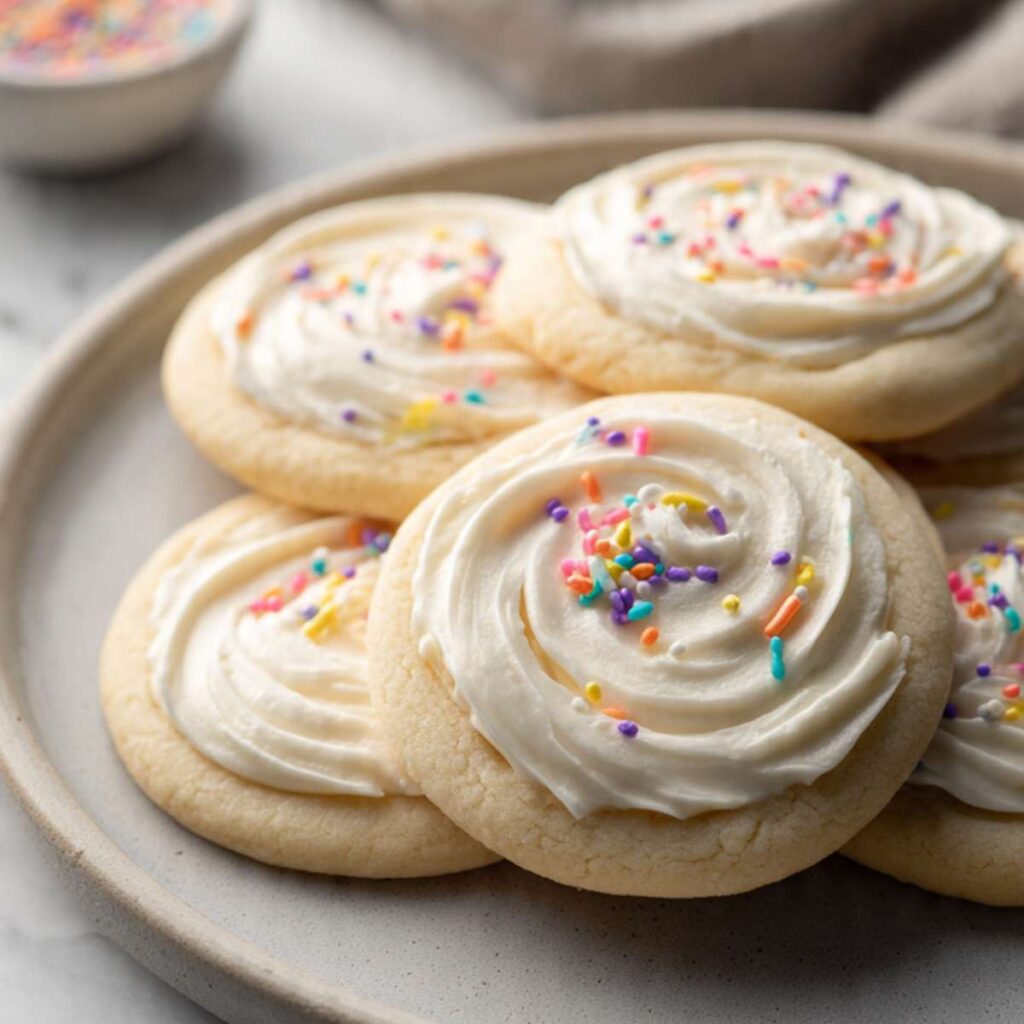
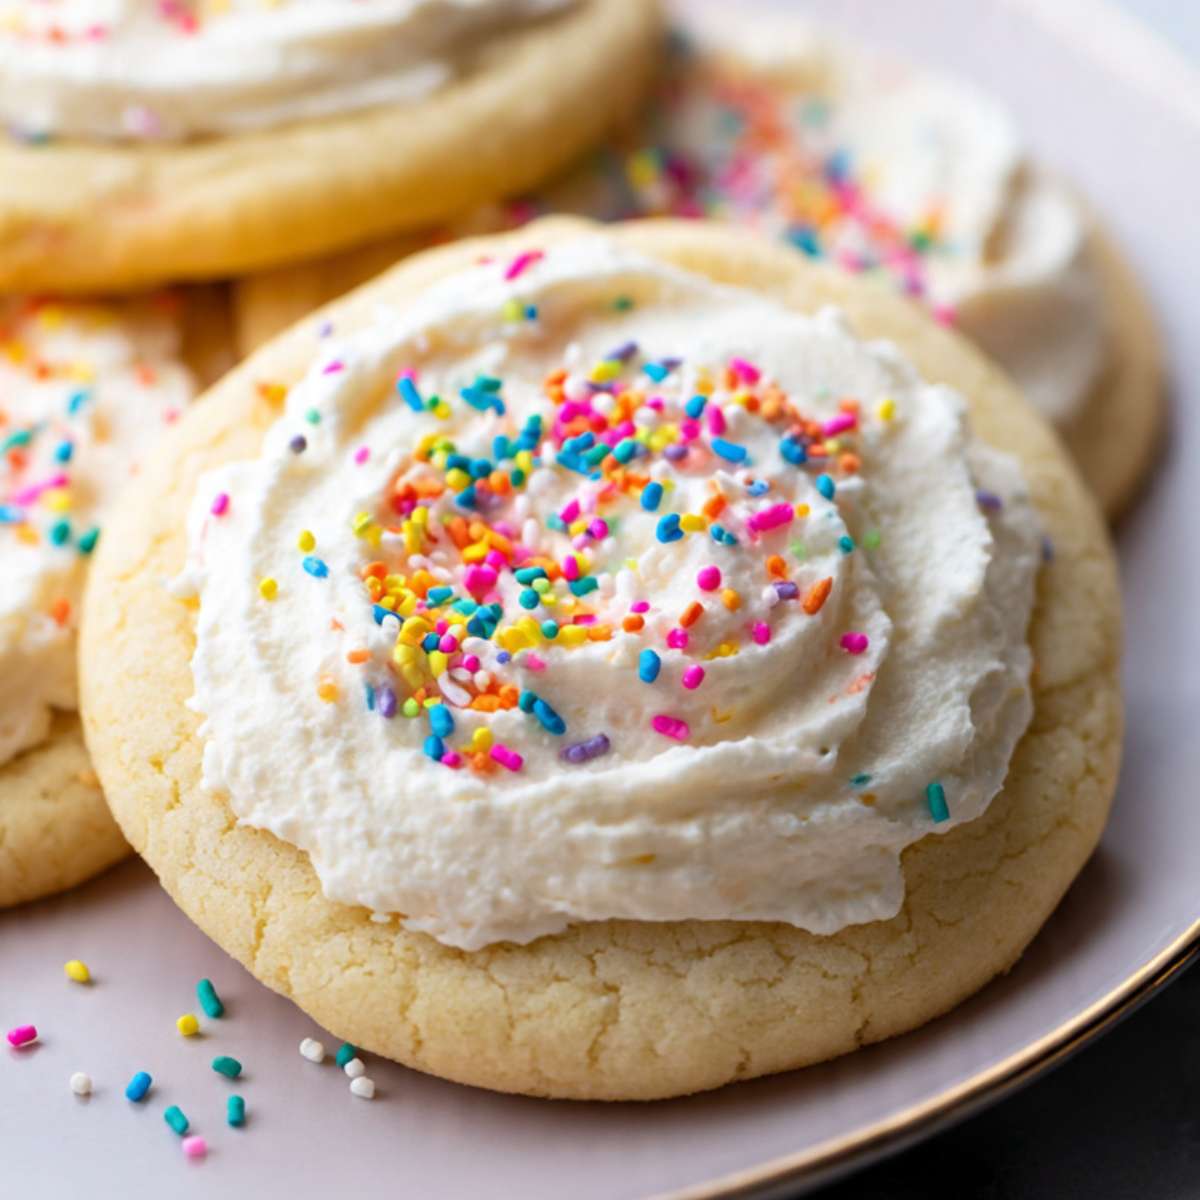
Immediately scatter rainbow sprinkles over each frosted cookie while the buttercream is still soft. Sprinkles pressed into set buttercream will not adhere cleanly and will fall off when the cookie is handled. Add the sprinkles within 2 minutes of piping each cookie — do not frost the full batch and then go back to add sprinkles.
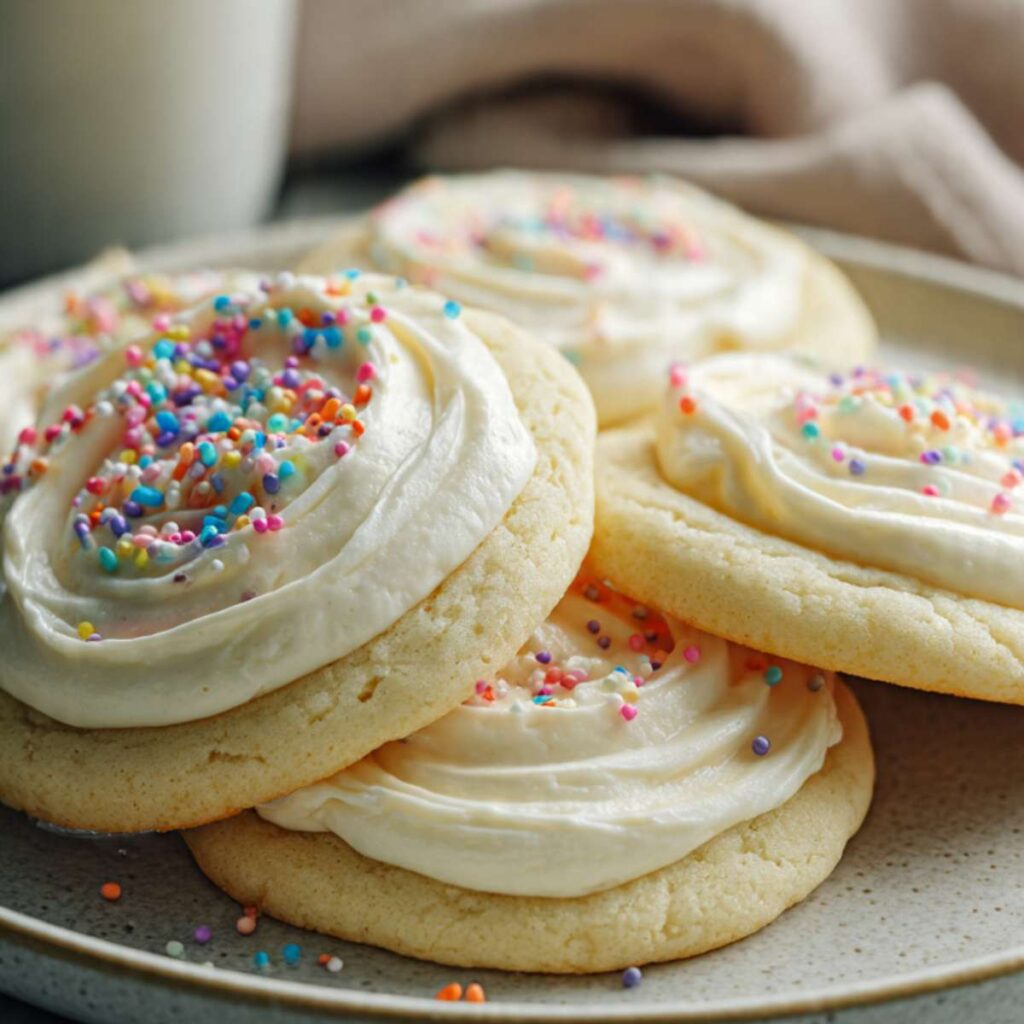
If you do not have a piping bag or the 1M tip, spread the frosting with an offset spatula in a thick, generous layer — it will look different from the rosette style shown in the photos but will taste identical.
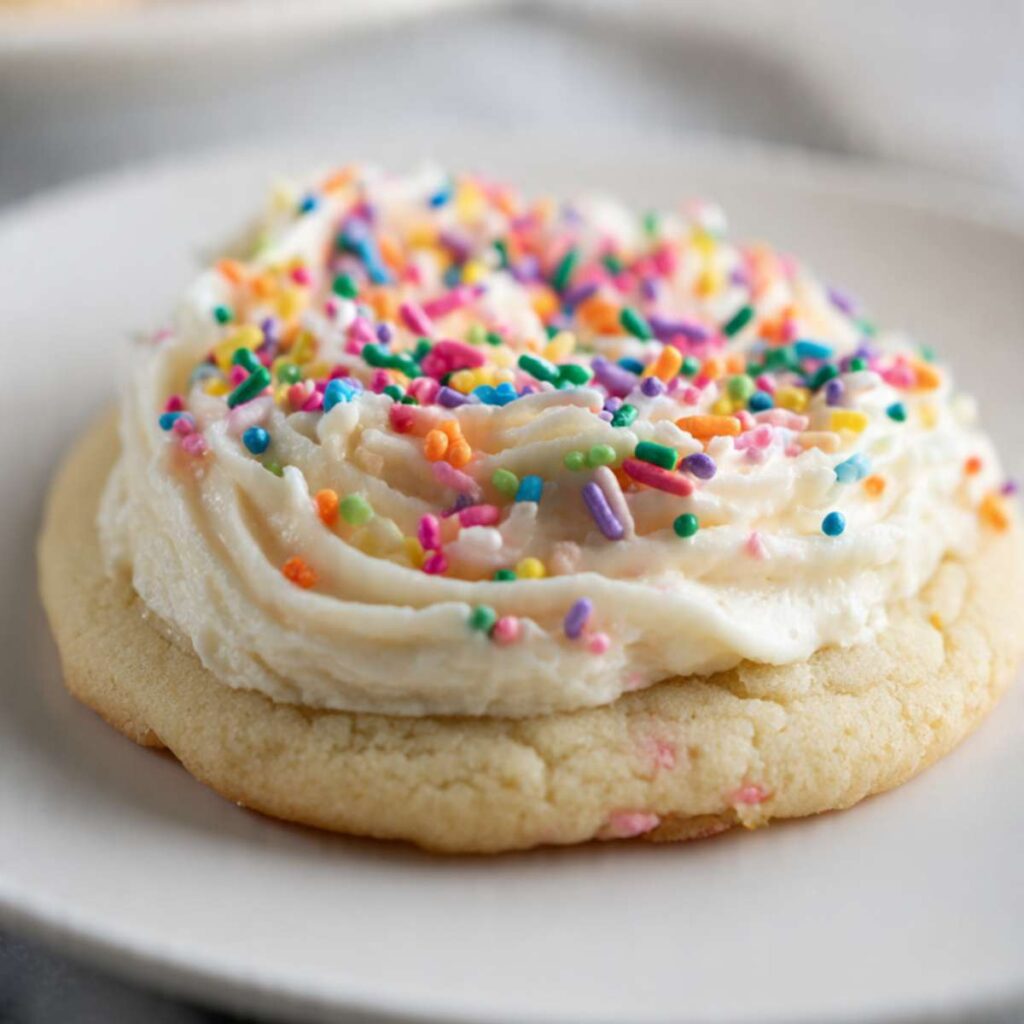
The finished cookie should look like the ones in the photos: a generous swirl of white frosting covering the full top surface, scattered with rainbow sprinkles, with the pale golden cookie edge just visible around the frosting border. The frosting should stand proud of the cookie surface — not spread flat, not sliding off the edge.
The Science Behind Soft Sugar Cookies
Why Your Cookies Are Flat and Dense When You Used Low-Fat Sour Cream or Margarine
Symptom: The cookies baked up flat and wide with no dome, a greasy or compressed texture at the center, and edges that look thin and slightly translucent rather than soft and matte. The finished cookie does not look like the thick, pillowy result shown in the photos.
Cause: Low-fat sour cream has a significantly higher water content than full-fat — that extra water creates steam in the oven that pushes the cookie outward and downward instead of allowing the structure to set. The fat deficit also means less coating of the flour proteins, which produces a tighter, denser crumb. Margarine has a different fat-to-water ratio than unsalted butter and contains emulsifiers that change how the dough behaves during creaming and baking — the air pockets form differently and the cookie spreads more aggressively.
Fix: There is no in-the-moment fix if low-fat sour cream or margarine was already used — the dough behaves differently from the moment it is mixed. If the cookies are already baked, serve them as they are — the flavor will be acceptable but the texture will not match what is shown in the photos.
Prevention: Use full-fat sour cream only — the label must read “full-fat” or show a fat content of at least 14g per serving. For butter, use unsalted butter only, not margarine, not butter-flavored shortening. These are not interchangeable ingredients in this recipe — the fat content and water content of each is what controls the final texture.
Why Your Cookies Have Dark Bottoms or Uneven Baking
Symptom: The bottoms of the cookies are dark brown or nearly burnt while the tops are still pale and the centers still feel soft. Alternatively, some cookies in the same batch are darker than others, or the cookies at the edges of the pan look more done than the ones in the center.
Cause: Dark pans are the most common cause. Dark-colored non-stick baking sheets absorb significantly more radiant heat than light-colored aluminum — the bottom of the cookie reaches a much higher temperature before the top has had time to set. The result is a burnt base with an underbaked center. Uneven baking within the same pan is caused either by hot spots in the oven or by using a silicone baking mat instead of parchment — silicone insulates the bottom of the cookie and slows the bottom set, which changes the bake unevenly across the batch.
Fix: If the bottoms are already too dark, slide a piece of fresh parchment under the remaining cookies on the pan before the next batch goes in. For future batches on a dark pan, reduce the oven temperature to 325°F (163°C) and extend the bake time by 2 to 3 minutes — the lower temperature compensates for the pan’s higher heat absorption. For silicone mat batches, switch to parchment.
Prevention: Always bake on a light-colored aluminum baking sheet lined with parchment paper. Never use a dark non-stick pan, foil-lined pan, or silicone mat for these cookies. Rotate the pan 180 degrees at the 6-minute mark if your oven has known hot spots — a quarter turn distributes any uneven heat before the bottoms have set.
Why Your Cookies Did Not Rise and Baked Up Flat and Dense With No Dome
Symptom: The cookies came out of the oven with no dome — flat across the entire surface, dense in the center, and with a compressed texture rather than the soft, pillowy result in the photos. The edges may look set but the center feels heavy and does not spring back when pressed.
Cause: Expired or stale baking powder is the most likely cause. Baking powder loses its leavening power over time — a can that has been open for more than 6 months may test as still active but produce noticeably less lift than fresh powder. The carbon dioxide output is reduced, and there is not enough gas expansion to push the cookie upward during baking. The dome never forms because the structure never had the lift it needed.
Fix: If the cookies are already baked, there is no fix — a flat batch cannot be re-leavened. Test your baking powder before the next batch: drop ½ teaspoon into a small bowl of hot water. If it bubbles vigorously within 5 seconds, it is still active. If it sits flat or produces only a few slow bubbles, replace it immediately. Fresh baking powder makes a visible and significant difference.
Prevention: Write the date on your baking powder can the day you open it. Replace it after 6 months regardless of whether it still passes the water test — leavening power degrades gradually, and a can that is borderline active will produce borderline results. Store baking powder in a cool, dry place away from steam — keeping it above the stove accelerates degradation.
Why Your Cookies Spread Too Flat
Symptom: The cookies baked into wide, thin discs with no dome. The edges are lacy or slightly crisp and the centers are flat rather than thick and soft. The finished cookie looks nothing like the domed, bakery-style result in the photos.
Cause: The most common cause is butter that was too warm when it was creamed. Butter above 70°F (21°C) cannot hold the air pockets created during creaming — they collapse before baking begins, and the cookie spreads laterally instead of rising. The second most common cause is an oven that was not fully preheated. Fat melts before the structure sets in an under-preheated oven, and the cookie spreads before the edges have a chance to firm up. Using low-fat sour cream is a third cause — see the first entry above.
Fix: If the portioned dough balls are already on the pan and spreading before the oven, refrigerate the pan for 15 minutes before baking — this firms the butter back to the correct temperature. For the next batch, check butter temperature before creaming: it should hold a clean indent without feeling greasy or slick.
Prevention: Always verify butter temperature with an instant-read thermometer — 65–68°F (18–20°C) is the target. Wait a full 10 minutes after the oven’s preheat signal before any pan goes in. Preheat signal means the oven has reached temperature — full preheat means it has held that temperature long enough to stabilize.
Why Your Cookies Came Out Dry and Crumbly
Symptom: The baked cookies feel dry and crumble when you pick them up. The center does not feel soft — it feels compressed and slightly dense. The edges may be darker than the pale golden color shown in the photos and the cookie does not have the soft pull you expect when you bite into it.
Cause: Two likely causes. First, the flour was measured by scooping the measuring cup directly into the flour bag — this packs up to 30g of extra flour into each cup, which dries the dough significantly. Second, the cookies were left in the oven until the centers looked fully set, then rested on the hot pan — the combination of over-baking plus carryover cooking drove out all the residual moisture.
Fix: For the current batch, store the cookies in an airtight hard-sided container with a slice of plain white sandwich bread. The bread releases moisture into the container and the cookies will soften noticeably within 4 hours. For future batches, weigh the flour — 330g is the target — and pull the pan at the moment the edges look set and the centers still look slightly underdone.
Prevention: Spoon flour into the measuring cup and level with a straight edge, or use a kitchen scale. Always pull cookies when the centers look 80 percent done — not fully done. The 5-minute rest on the hot pan finishes the job.
Why Your Buttercream Is Grainy or Gritty
Symptom: The frosting feels gritty when you spread or taste it. It looks slightly rough rather than smooth and glossy and feels sandy between your fingers.
Cause: The powdered sugar was not sifted before it went into the mixer. Powdered sugar contains compressed lumps and a small amount of cornstarch that does not fully dissolve in the butter — those lumps create grit that beating alone cannot fully eliminate.
Fix: If the frosting is already made, beat it on medium-high speed for an additional 3 minutes. Most of the grit will dissolve with extended beating. For severe cases, press the frosting through a fine mesh sieve — labor-intensive but produces a smooth result.
Prevention: Always sift powdered sugar before adding it to the bowl. A 30-second sift eliminates the problem entirely. This applies to every buttercream, every time.
Why Your Frosting Is Too Soft to Pipe
Symptom: The buttercream looks smooth but will not hold a rosette shape when piped. The swirl droops immediately or spreads flat on the cookie surface within a few minutes of piping.
Cause: Either too much liquid was added, or the butter was too warm when it was beaten. Warm butter produces a greasy, slack buttercream that cannot hold structure. Liquid added beyond the recipe amount thins the frosting past the point where it can hold a piped shape.
Fix: Add sifted powdered sugar 2 tablespoons at a time, beating on medium speed after each addition, until the frosting holds a stiff peak for 5 seconds. If the butter was too warm, refrigerate the entire bowl of frosting for 15 minutes, then re-beat on medium for 60 seconds. Do not add more powdered sugar until after the chill — cold frosting thickens on its own.
Prevention: Add liquid one tablespoon at a time and test the consistency before adding more. The frosting is ready when it holds a clean stiff peak for 5 seconds with no drooping.
Altitude and Humidity Notes
At altitudes above 3,500 feet (1,067m), leavening gases expand faster than they do at sea level — cookies can dome too quickly then collapse before the structure sets. Reduce the baking powder to ¾ tsp (3g), increase the flour by 2 tablespoons (15g), and bake at 375°F (190°C) instead of 350°F (175°C) to set the structure faster before the gas escapes.
In high-humidity environments above 70% relative humidity, powdered sugar absorbs moisture from the air quickly. The buttercream will soften faster after piping and rainbow sprinkles may bleed color into the frosting within a few hours of decorating. Frost and decorate the cookies as close to serving time as possible and store in a cool, dry environment.
Expert Pro-Tips
- Make the frosting first, then bake the cookies. Finished buttercream holds at room temperature for up to 2 hours — having it ready means you can frost the moment the cookies are cool enough, rather than waiting for both to be ready simultaneously.
- Twist the piping bag closed between each cookie to maintain even pressure through the tip and prevent air pockets from breaking the swirl mid-rotation. An untwisted bag loses back-pressure and produces flat, uneven rosettes rather than the defined swirl visible in the photos.
- Use parchment, not a silicone mat. Silicone mats insulate the cookie bottom and slow the base set — cookies baked on silicone mats at the same temperature spread more and dome less than cookies baked on parchment. The difference is visible in the finished height.
- Rotate the pan at the 6-minute mark if your oven has known hot spots. A 180-degree turn at the halfway point is enough to even out any uneven browning before the bottoms set permanently.
- Add the sprinkles immediately after piping, not after the frosting sets. Buttercream that has been exposed to air for more than 5 minutes begins to form a thin skin — sprinkles pressed into set buttercream will not adhere cleanly and will fall off when the cookie is handled or stacked.
How to Store Sugar Cookies with Frosting
Room Temperature Storage
Store frosted sugar cookies in a single layer in an airtight container — a hard-sided container with a snap-lock lid, not a zip-lock bag. Stacking frosted cookies directly on top of each other will smear the rosettes and press the sprinkles into the frosting beneath. If you need to stack them, place a sheet of parchment paper between each layer and accept that the rosette definition will be partially lost.
At room temperature, frosted cookies stay soft and fresh for up to 3 days. Day 1 is the peak — the buttercream is at its best texture and the cookie base is at its softest. Day 2 the cookie firms very slightly but the center remains soft. By Day 3 the edges begin to dry out at the point where the frosting does not fully cover the cookie. If you plan to serve these beyond Day 2, refrigerate them instead.
Do not store these cookies in a container with a loose-fitting lid or uncovered on a plate — exposed cookies develop a dry, slightly tacky surface on the frosting within a few hours as the powdered sugar begins to absorb moisture from the air.
Refrigerator Storage
Frosted cookies can be refrigerated in an airtight hard-sided container for up to 6 days. The cold temperature firms the buttercream significantly — refrigerated frosting will feel stiff and slightly waxy straight from the fridge. Always bring refrigerated cookies to room temperature before serving: set them on the counter for 20 to 30 minutes. The buttercream softens back to its correct creamy texture as it warms, and the cookie base loosens from its cold-firmed state.
Do not refrigerate cookies uncovered — the fridge environment is dry and will pull moisture out of the cookie base within 24 hours, producing a dry, compressed crumb that no amount of warming will fully restore.
Freezing Frosted Cookies
Frosted cookies can be frozen, but the process requires care to protect the rosettes. Arrange the frosted, decorated cookies on a parchment-lined baking sheet in a single layer and freeze uncovered for 1 hour — this flash-freeze firms the buttercream so it does not smear during storage. Once the frosting is firm, transfer the cookies to an airtight freezer-safe container or zip-lock freezer bag with parchment between each layer. Freeze for up to 2 months.
To thaw: transfer the container to the refrigerator overnight, then bring to room temperature for 30 minutes before serving. Do not thaw at room temperature directly from the freezer — the rapid temperature change causes condensation on the frosting surface, which makes the sprinkle colors bleed into the buttercream.
Freezing Unbaked Dough
The cookie dough freezes well before baking. Portion the dough into balls, arrange on a parchment-lined baking sheet, and freeze uncovered for 1 hour until solid. Transfer the frozen dough balls to a zip-lock freezer bag and freeze for up to 3 months. Bake directly from frozen — add 2 to 3 minutes to the bake time and watch for the same doneness cues: edges set and lightly golden, centers still slightly soft and puffed.
Do not freeze the dough as a single mass — it will not thaw evenly and the outer layer will overbake before the center is ready.
Make-Ahead Options
The cookie dough can be made up to 24 hours ahead and refrigerated in an airtight container. Bring it to room temperature for 20 minutes before portioning — cold dough is stiffer and harder to scoop cleanly, and cold dough balls take 1 to 2 minutes longer to bake.
The buttercream can be made up to 3 days ahead and stored in an airtight container in the refrigerator. Before using, bring it to room temperature for 30 minutes then re-beat on medium speed for 60 seconds to restore its pipeable consistency. If it looks broken or greasy after re-beating, add 1 tablespoon of sifted powdered sugar and beat for another 30 seconds.
Serving Suggestion
Serve these cookies at room temperature — the buttercream is at its correct creamy texture and the cookie base is at its softest when both have been sitting at room temperature for at least 20 minutes after refrigerator storage, or when freshly frosted and rested for 30 minutes after baking.

I pair these with a strong cup of black coffee — the bitterness cuts through the sweetness of the buttercream in a way that milk or tea does not. For a crowd, arrange them on a flat platter in a single layer with the rosettes facing up so the sprinkle colors are visible. These are the cookie I bring when someone’s child has a birthday and a layer cake feels like more than the moment calls for — one per person, frosted thick, and nobody asks for the cake.
🗒 Luna’s Note: I always make a half batch of extra buttercream when I’m serving these at a gathering. Rosettes get bumped in transit and a small piping bag in my bag lets me touch up any damaged cookies before they go on the table.
Frequently Asked Questions About Sugar Cookies with Frosting
What makes sugar cookies soft and fluffy?
Soft, fluffy sugar cookies require three things working together: properly creamed butter that holds air pockets for lift, baking powder that expands those pockets in the oven, and an ingredient that inhibits gluten development to keep the crumb tender. In this recipe, full-fat sour cream handles that third role — its fat coats the flour proteins before they can bond into tough gluten chains, and its mild acidity slows gluten development further. Pulling the cookies from the oven when the centers still look slightly underdone is the final piece — carryover heat from the hot pan finishes the center without the oven drying it out. The result is a cookie that stays soft at room temperature for up to three days.
How do you make buttercream frosting for sugar cookies?
Beat softened unsalted butter on medium speed for 2 minutes until pale and smooth, then add sifted powdered sugar in three additions on the lowest mixer speed. Add 2 tablespoons of whole milk or heavy cream, pure vanilla extract, and a pinch of fine sea salt, then beat on medium-high for 2 full minutes until bright white and holding a stiff peak for 5 seconds. The two non-negotiables: butter must be softened to 65–68°F (18–20°C) — warm butter produces a greasy buttercream that cannot hold a piped rosette — and powdered sugar must be sifted before it goes in, because unsifted sugar leaves grit that extended beating cannot fully eliminate. This recipe produces enough frosting to pipe generous rosettes on 18 cookies.
Can you make sugar cookies ahead of time?
Yes — there are three points in this recipe where you can work ahead. The cookie dough can be made up to 24 hours ahead, portioned into balls, and refrigerated — add 1 to 2 minutes to the bake time when baking from cold. The buttercream can be made up to 3 days ahead and refrigerated in an airtight container — bring it to room temperature for 30 minutes and re-beat for 60 seconds before piping to restore pipeable consistency. The fully baked, unfrosted cookies can be made 2 days ahead and stored at room temperature in an airtight hard-sided container — frost the day of serving for the best rosette definition and sprinkle color. For the longest shelf life without freezing, unfrosted cookies keep well for up to 4 days — see the shortbread cookies recipe if you want a cookie base that naturally holds its texture for longer.
Why did my sugar cookies spread?
Sugar cookies spread too much when the butter is too warm at the creaming stage, the oven is not fully preheated, or low-fat sour cream was used instead of full-fat. Butter above 70°F (21°C) cannot hold the air pockets created during creaming — those pockets collapse before baking begins and the cookie spreads flat instead of rising. An under-preheated oven melts the fat before the edge structure can set, with the same result. Low-fat sour cream has more water than full-fat, which creates steam that pushes the cookie outward. If your portioned dough balls are already spreading on the cold pan before baking, refrigerate the pan for 15 minutes to firm the butter back to the correct temperature before the pan goes in.
How long do frosted sugar cookies last?
Frosted sugar cookies stored in an airtight hard-sided container at room temperature stay soft and fresh for up to 3 days — Day 1 is peak quality. Refrigerated in an airtight container they last up to 6 days — bring them to room temperature for 20 to 30 minutes before serving to allow the buttercream to soften back to its correct creamy texture. Frozen with a flash-freeze step first they keep for up to 2 months — arrange on a parchment-lined baking sheet, freeze for 1 hour until the frosting is firm, then transfer to a freezer-safe container with parchment between each layer. The limiting factor is the cookie base, not the frosting — the base begins to dry out at the edges by Day 3 at room temperature.
Can I double this sugar cookies with frosting recipe, and does it scale well?
This recipe doubles reliably for the cookie dough — all ingredients scale 1:1 when doubling. The one exception is baking powder: leavening does not scale linearly. For a double batch, use 1¾ tsp (7g) of baking powder rather than the full 2 tsp that a straight doubling would suggest — too much baking powder produces a metallic, slightly bitter taste and can cause the cookies to over-rise then collapse. The buttercream doubles without any adjustment needed. Do not attempt to triple this recipe in a single mixing session — a stand mixer bowl cannot handle triple the volume of dough without the paddle losing contact with the bottom of the bowl, which under-creams the butter and produces an inconsistent result across the batch.
How does altitude or humidity affect these cookies?
At altitudes above 3,500 feet (1,067m), leavening gases expand faster and escape before the cookie structure sets — the cookies may dome briefly then collapse into a flat, dense result. Reduce the baking powder to ¾ tsp (3g), add 2 tablespoons (15g) of flour to the dough, and increase the oven temperature to 375°F (190°C) to set the structure before the gas escapes. In high-humidity environments above 70% relative humidity, the powdered sugar in the buttercream absorbs moisture from the air rapidly — the frosting softens faster after piping and rainbow sprinkles may bleed color into the buttercream within a few hours. In humid conditions, frost and decorate the cookies as close to serving time as possible and store in a cool, air-conditioned space rather than at open room temperature.
More Cookie Recipes You’ll Love
If these sugar cookies with frosting hit the spot, these are the recipes to try next:
- Snickerdoodle Cookies — another soft, thick drop cookie with a tangy cream of tartar bite and a cinnamon-sugar crust that crackles when you press it.
- Molasses Cookies — deep, spiced, and chewy at the center with the same pull-early technique that keeps these sugar cookies soft.
- Peanut Butter Chocolate Chip Cookies — thick, domed, and no chilling required — the same soft center texture in a completely different flavor direction.
Sugar Cookies with Frosting
Ingredients
Equipment
Method
- Position oven rack in the middle and heat to 350°F (175°C), then line two light-colored aluminum baking sheets with parchment paper and set aside.
- In a medium bowl, whisk together 2¾ cups (330g) all-purpose flour, 1 tsp (4g) baking powder, and ½ tsp (3g) fine sea salt for 20 full rotations until evenly combined, then set aside.
- In the bowl of a stand mixer fitted with the paddle attachment, beat ½ cup (113g) softened unsalted butter and 1 cup (200g) granulated sugar on medium speed for exactly 3 minutes until pale ivory and nearly doubled in volume.
- With the mixer on low, add 1 large egg and mix for 20 seconds, then add 1 egg yolk and mix for another 20 seconds, then scrape down the bowl.
- Add ½ cup (120g) full-fat sour cream and 2 tsp (10ml) pure vanilla extract and mix on low for 20 seconds until just incorporated, then scrape down the bowl again.
- With the mixer on its lowest speed, add the flour mixture in three additions, allowing each to mostly disappear before adding the next, then stop the mixer the moment no dry streaks remain and finish with 10 folds of a rubber spatula from the bottom of the bowl upward.
- Using a 1.5-tablespoon cookie scoop, portion the dough into 45g balls, roll briefly between your palms, and space at least 2 inches (5cm) apart on the prepared pans — do not flatten.
- Bake one sheet at a time on the middle rack at 350°F (175°C) for 10 to 12 minutes, pulling the pan the moment the edges look set and lightly golden and the centers still look slightly puffed and soft.
- Leave cookies on the hot pan for exactly 5 minutes, then transfer to a wire rack and cool completely for a minimum of 30 minutes before frosting.
- In the clean bowl of the stand mixer, beat ½ cup (113g) softened unsalted butter on medium speed for 2 minutes until pale, then add 3 cups (360g) sifted powdered sugar in three additions on the lowest speed, followed by 2 tbsp (30ml) milk or cream, 1½ tsp (7.5ml) vanilla extract, and a pinch of fine sea salt, then increase to medium-high and beat for 2 full minutes until bright white and holding a stiff peak.
- Fit a piping bag with a Wilton 1M open star tip, fill two-thirds full with buttercream, and pipe a rosette swirl onto each cooled cookie starting from the center and spiraling outward, then immediately scatter rainbow sprinkles over each cookie while the frosting is still soft.