
Cut Out Sugar Cookies Recipe

I make these cut out sugar cookies more than any other cookie on this site. I’ve tested this recipe over a dozen times, and the version I’m sharing is the one I keep coming back to — thick, soft centers, smooth edges that hold their shape, and a surface that takes icing cleanly without crumbling.
These are not crispy cookies. The center stays soft and almost pillowy, with a mild buttery sweetness that doesn’t compete with the icing. The edges are smooth and matte — no spreading, no lacy frills. When you bite in, the texture is tender all the way through.
I tested this with chilling the dough before rolling versus chilling the already-cut cookies on the baking sheet. Pre-chilling the whole dough block made it easier to roll, but the cut shapes still spread slightly in the oven. Chilling the cut cookies directly on the pan gave me sharper edges and better shape retention. That’s the version I kept.
I also tested baking at 375°F versus 350°F (190°C versus 175°C). The higher temp browned the edges before the center set properly. At 350°F, the cookies baked pale and even all the way through — which is exactly what you want for soft sugar cookies you plan to decorate.

Ingredients
For the Cookie Dough
- 2 ¾ cups (330g) all-purpose flour, plus more for dusting
- 1 cup (200g) granulated sugar
- ¾ cup (170g) unsalted butter, softened to room temperature
- 1 large egg, room temperature
- 2 tablespoons (30ml) whole milk
- 1 teaspoon (5ml) pure vanilla extract
- ½ teaspoon (2g) baking powder
- ¼ teaspoon (1.5g) fine sea salt
For Decorating
- Icing or frosting of choice (royal icing or simple powdered sugar glaze)
- Pastel food coloring — pink and mint/teal as shown in images
- Nonpareils and mixed sprinkles
Before You Start
Make sure your butter and egg are fully at room temperature before you begin. Cold butter won’t cream properly, and you’ll end up with a lumpy, uneven dough. I pull mine out about 45 minutes before I start mixing.
Necessary Tools
Required:
- Stand mixer or hand mixer
- Large mixing bowl
- Separate bowl for dry ingredients
- Measuring cups and spoons
- Kitchen scale (recommended for accuracy)
- Rolling pin
- Heart-shaped and square cookie cutters, approximately 3–3.5 inches
- Two rimmed baking sheets
- Parchment paper
- Cooling rack
Optional but helpful:
- Bench scraper (for lifting cut shapes cleanly)
- Offset spatula (for spreading icing smoothly)
- Piping bags and small round tips (for outlined icing)
- Ruler or dough thickness guides (for consistent ¼ inch thickness)
My reasoning:
Everything in the required list is genuinely necessary to execute this recipe correctly. You cannot cream butter properly without a mixer — doing it by hand is possible but takes significantly longer and risks under-creaming, which affects the final texture. The separate bowl for dry ingredients is not optional here because adding baking powder and salt directly into the wet mixture without pre-mixing leads to uneven distribution — you can end up with a bite that tastes salty or a cookie that rises unevenly. Two baking sheets matter because this recipe yields 18 cookies and most standard cutters won’t fit all of them on one pan — crowding forces you to bake in more batches and the second batch often overbakes while you’re waiting.
The kitchen scale is listed as required because flour measurement is the single biggest variable in this dough. Spooning and leveling is better than scooping, but weighing to exactly 330g removes all guesswork. Parchment paper is non-negotiable — it prevents sticking, promotes even browning on the bottom, and makes transferring the chilled cookies into the oven without disturbing their shape much easier.
The bench scraper is optional because careful hands can lift cut shapes without it, but it makes a real difference when the dough is soft and the shapes are large. The offset spatula is optional because a butter knife spreads icing adequately — but for the smooth, flat flood finish shown in the images, an offset spatula gives you far more control. Piping bags and round tips are optional because not every reader wants outlined icing — a simple flood with a spoon works fine for the pastel look in most of the images. The ruler and dough thickness guides are optional because an experienced baker can eyeball ¼ inch — but for a first-time cut out cookie baker, inconsistent thickness is the most common cause of uneven baking, so it’s worth listing.
How to Make Cut Out Sugar Cookies
Step 1: Cream the Butter and Sugar Until Pale and Fluffy
In the bowl of your stand mixer fitted with the paddle attachment, combine ¾ cup (170g) softened unsalted butter and 1 cup (200g) granulated sugar. Beat on medium speed for 3 full minutes. The butter starts out yellow and grainy-looking. By the time it’s ready, it should look pale, almost white, and doubled in volume — smooth like soft frosting with no visible sugar granules.
This step is not just mixing. It’s building air into the dough. That air is what gives these cookies their soft, tender crumb instead of a dense, compact one. Don’t rush it.
Stop and scrape down the sides of the bowl halfway through. If you skip this, you’ll get unmixed butter sitting at the bottom.
Step 2: Add the Wet Ingredients
With the mixer on low, add 1 large egg, 2 tablespoons (30ml) whole milk, and 1 teaspoon (5ml) pure vanilla extract one at a time. Once everything is in, increase to medium speed and mix for about 1 minute.
At first the mixture will look broken and curdled. That’s normal. Keep mixing and it will come together into a smooth, creamy, evenly combined mixture with no streaks of egg visible.
Don’t skip the milk. That small amount of liquid loosens the dough just enough to keep the final cookie tender instead of tight and dry.
Step 3: Mix in the Dry Ingredients
In a separate bowl, whisk together 2 ¾ cups (330g) all-purpose flour, ½ teaspoon (2g) baking powder, and ¼ teaspoon (1.5g) fine sea salt.
Add the dry ingredients into the butter mixture in three additions, mixing on low between each. Mix just until no dry flour streaks remain and the dough pulls away cleanly from the sides of the bowl.
The moment the dough comes together, stop the mixer. Overmixing develops gluten, and too much gluten means tough, dense cookies instead of soft ones. The dough should feel soft, smooth, and slightly tacky — not sticky, not crumbly.
If it clings to your fingers, add flour one teaspoon at a time. Keep additions minimal.
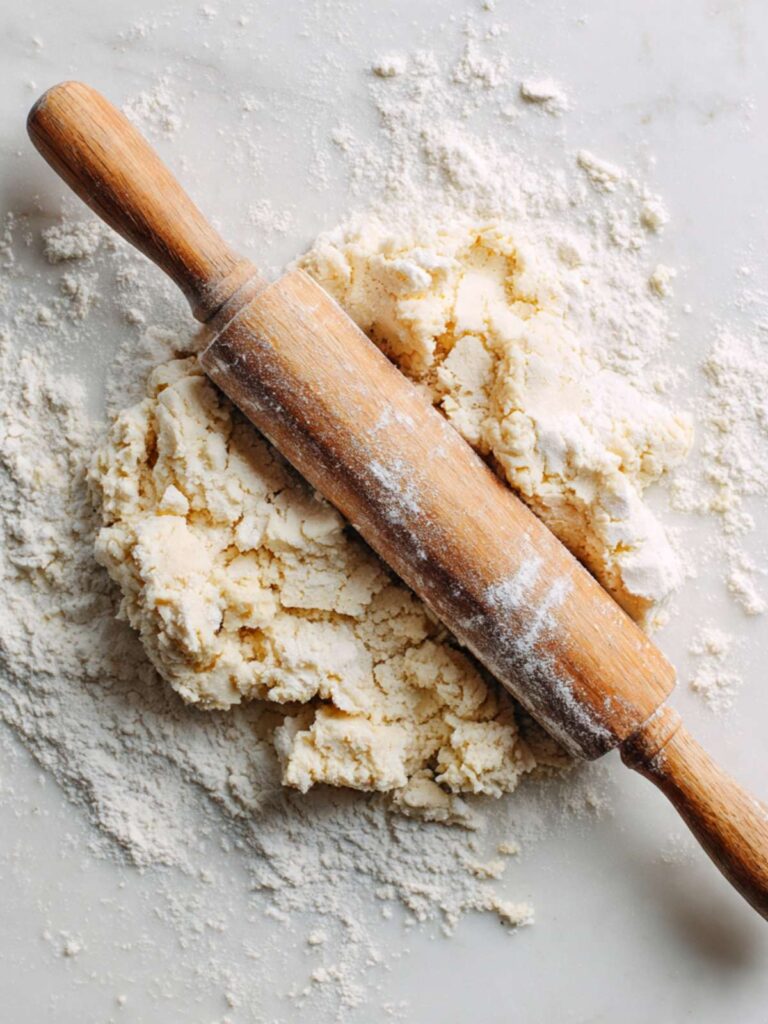
Step 4: Roll the Dough to an Even ¼ Inch Thickness
Lightly flour your counter and your rolling pin. Turn the dough out and roll it to ¼ inch (6mm) thick. This is the exact thickness that gives you the pillowy, soft-centered cookies you see in the photos — thick enough to stay tender inside, thin enough to bake through evenly.
Keep your rolling even. If one side is thicker than the other, those cookies will bake unevenly — some overdone, some underdone on the same sheet.
If the dough sticks, lift it gently with a bench scraper and dust a little more flour underneath. If edges crack, press them back together with your fingers and keep rolling. A few cracks at the edges are normal and don’t affect the final cookie.
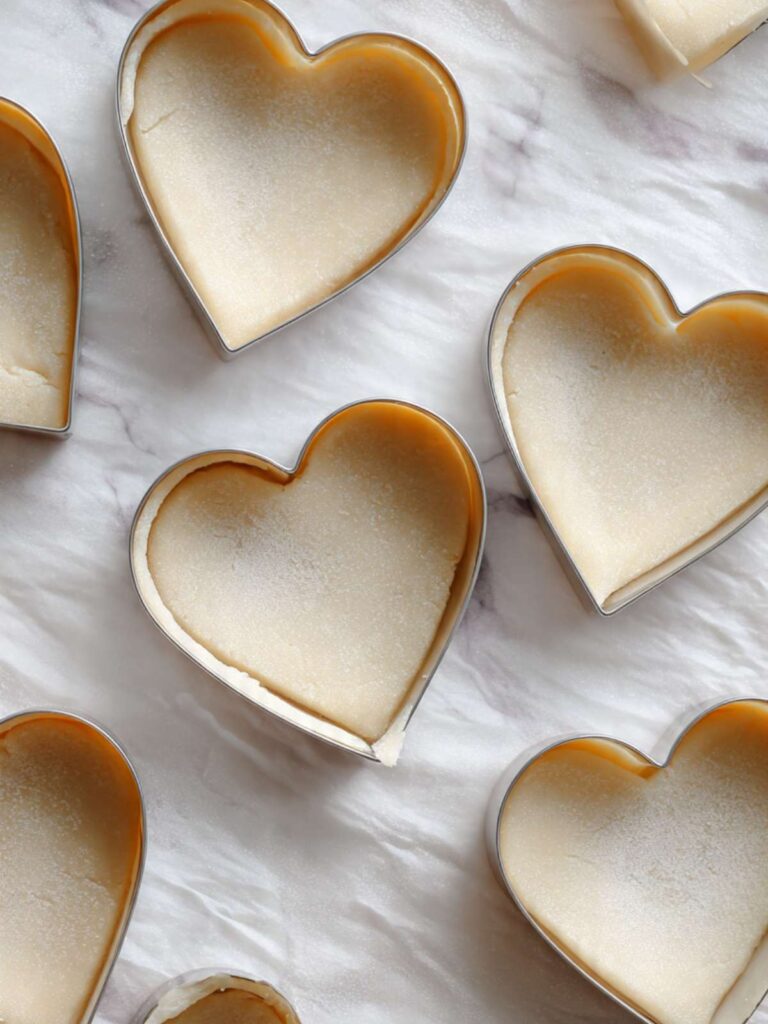
Step 5: Cut the Shapes and Transfer to the Baking Sheet
Press your cookie cutters straight down into the dough with firm, even pressure. Do not twist the cutter. Twisting drags the dough and roughens the edges — you’ll lose the clean, smooth outline you can see in image.
Lift each shape carefully and place it on a parchment-lined baking sheet. Leave about 1 inch of space between cookies. These don’t spread much, but spacing helps hot air circulate evenly around each one for a consistent bake.
Use a bench scraper to lift shapes that feel too soft to move by hand. It gets under the dough cleanly without distorting the shape.
Step 6: Chill the Cut Cookies Before Baking
Slide the entire baking sheet — cookies and all — into the refrigerator for 10 to 15 minutes. Don’t skip this step.
Cold dough holds its shape in the oven. Warm dough relaxes and spreads. As you can see in the photos, these cookies have clean, defined edges with no blurring or puffing out of shape. That result comes directly from baking them cold.
When the chill time is up, the dough should feel noticeably firmer to the touch — not soft and warm like when you first cut it.
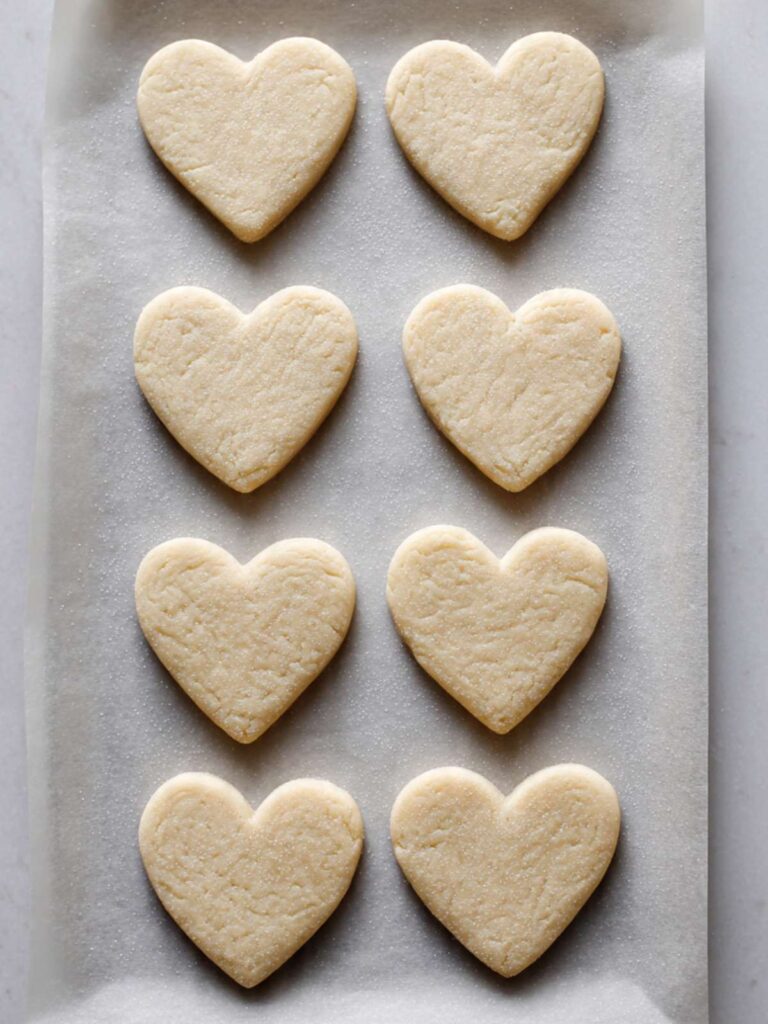
Step 7: Bake Until Pale and Just Set
Place the chilled baking sheet in a preheated oven at 350°F (175°C) and bake for 8 to 10 minutes.
Watch closely starting at the 8-minute mark. You are not waiting for color. You are waiting for the cookies to look set and matte on top, with only the faintest hint of golden color at the very edges. The centers will still look slightly soft — that’s correct.
As you can see in image, the finished cookies are nearly white on the sides with a very pale cream top. That’s the exact visual cue you’re aiming for. If the tops start turning golden, they’re already overdone.
Do not open the oven repeatedly during baking. Every time you open the door, heat escapes and the bake time becomes unpredictable.
Step 8: Cool Completely Before Decorating
When the cookies come out of the oven, leave them on the baking sheet for 5 minutes. They’re too fragile to move immediately. After 5 minutes, transfer them to a wire cooling rack and let them cool completely — at least 30 minutes.
Do not decorate warm cookies. Warm cookies melt icing and make it slide off the edges before it sets. I’ve made this mistake more than once. It always ends the same way.

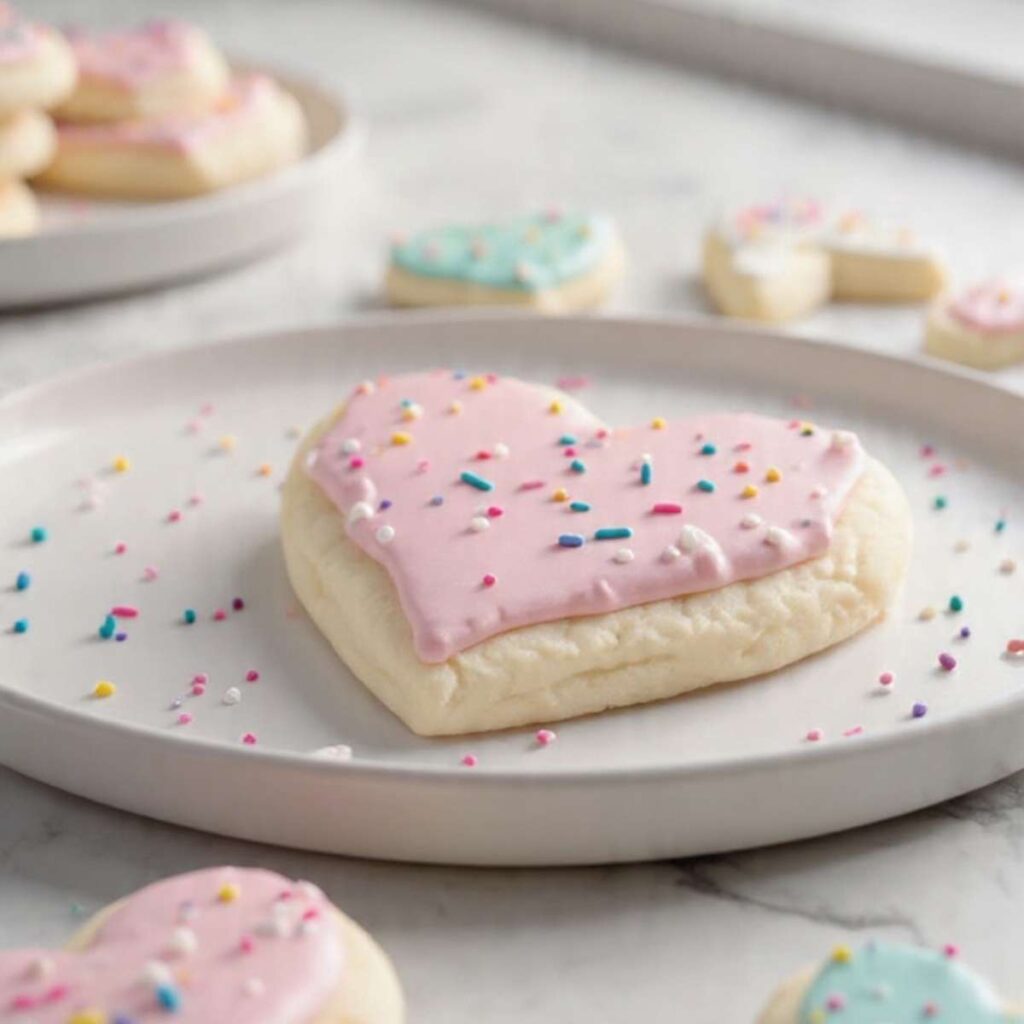
Step 9: Ice and Decorate
Once the cookies are fully cool, spread or pipe your icing on top. For the clean pastel look in the images, I use a simple powdered sugar glaze tinted with gel food coloring — pink for the hearts, mint for the squares.
While the icing is still wet, scatter nonpareils or mixed sprinkles on top and press them gently so they sink in slightly. Then leave the cookies flat and undisturbed until the icing sets completely — at least 1 hour at room temperature.
Do not stack decorated cookies until the icing is fully dry and hard to the touch. Stacking too soon smears the icing and pulls sprinkles off onto the cookie below.


The Science Behind Soft Cut Out Sugar Cookies
Why Creaming Matters More Than You Think
The 3-minute creaming step is doing more than just mixing butter and sugar together. When you beat softened butter with sugar at medium speed, the sharp edges of the sugar crystals cut tiny air pockets into the fat. Those pockets expand in the oven and give the cookie its lift and tender crumb.
Under-cream and you get a flat, dense cookie. Over-cream and you incorporate too much air, which can cause the cookies to puff and then collapse unevenly. Three minutes on medium is the window that gives you consistent results every time.
What the Milk Is Actually Doing
Two tablespoons of milk sounds like almost nothing. But that small amount of liquid changes the final texture significantly. Milk adds just enough moisture to keep the dough pliable without making it sticky. It also contributes a tiny amount of fat and protein, which helps the cookies stay soft after baking instead of drying out on the counter.
Skip it and the dough becomes tight and harder to roll. The baked cookies turn slightly dry at the edges — not terrible, but not the soft, pillowy result you’re after.
Why Baking Powder and Not Baking Soda
This recipe uses baking powder, not baking soda. The difference matters for cut out cookies. Baking soda requires an acid to activate and produces a more aggressive spread and browning. Baking powder activates with heat alone and produces a gentler, more controlled lift.
That controlled lift is what keeps these cookies thick without puffing them into domed mounds. It’s also why the edges stay smooth and defined.
The Real Reason Chilling Works
When you chill the cut cookies before baking, you’re doing two things at once. First, you’re firming up the butter so it melts more slowly in the oven — that slower melt means less spread. Second, you’re relaxing any gluten that developed during mixing and rolling. Relaxed gluten holds its shape better under heat.
The result is a cookie that bakes up with the same outline it had when it went into the oven. No blurred edges, no unexpected spreading, no shape distortion. Ten to fifteen minutes in the fridge is a small investment for a noticeably cleaner result.
Why You Pull Them Out While They Still Look Underdone
Carryover cooking is the reason these cookies need to come out of the oven before they look fully done. The baking sheet retains heat after it leaves the oven, and the cookies continue cooking on the pan for the first 4 to 5 minutes of cooling.
If you wait until the tops look fully set and dry in the oven, the centers will be overdone by the time they cool. Pulling them at the 8 to 10 minute mark — when the edges are just barely set and the center still looks soft — gives you a perfectly cooked cookie once they finish on the pan.
Troubleshooting & Pro-Tips
Common Mistakes
The cookies spread and lose their shape. This almost always comes down to skipping or shortening the chill time. Warm dough spreads fast in the oven. Make sure the cut cookies go into the fridge for the full 10 to 15 minutes before baking. Also check that your butter was not too soft when you started creaming — butter that is greasy or melted at the edges will make the dough too slack from the start.
The edges are rough and jagged instead of smooth. You twisted the cookie cutter when cutting. Press straight down with firm, even pressure and lift straight up. No twisting, no rocking. A sharp cutter also makes a cleaner cut than a dull one — if your cutters are old and slightly bent, that shows up in the edges.
The cookies turned out dry and crumbly. Two possible causes. Either too much flour was added during rolling, or the cookies were overbaked. Measure flour by spooning it into the measuring cup and leveling off — never scoop directly from the bag, which packs the flour and adds up to 20% more than the recipe intends. And always pull the cookies when the edges look just barely set, not when the tops look fully dry.
The dough keeps sticking to the counter. Add flour in very small amounts — one teaspoon at a time — and lift the dough with a bench scraper to redistribute it. If the dough is warm from handling, pop it back in the fridge for 5 minutes before continuing to roll. Warm dough always sticks more.
The icing slides off the cookies. The cookies were not fully cool before decorating. Even cookies that feel cool on the outside can still be warm in the center. Give them a full 30 minutes on the wire rack before you start icing. If your kitchen is warm, 45 minutes is safer.
The cookies came out puffy and domed instead of flat. Too much baking powder, or the baking powder is old and unevenly active. Measure precisely — ½ teaspoon exactly. Also make sure your baking powder is fresh. A container that has been open for more than 6 months may not be reliable.
Expert Pro-Tips
Use a kitchen scale. Flour measurement is the most common source of error in this recipe. Spooning and leveling is better than scooping, but weighing to 330g is exact every single time. A basic kitchen scale costs very little and removes the biggest variable in this dough.
Roll between two sheets of parchment. Instead of flouring the counter, place the dough between two sheets of parchment paper and roll directly on top. The dough won’t stick, you won’t add any extra flour, and the cookies stay softer. Peel off the top sheet, cut your shapes, and transfer.
Re-roll scraps only once. Every time you re-roll the dough, you develop more gluten. Cookies cut from the first roll are the most tender. Cookies cut from the third re-roll will be noticeably tougher. Gather all your scraps, press them together once, and cut as many shapes as you can from that one re-roll.
Chill the baking sheet too. If your kitchen runs warm, slide the empty baking sheet into the fridge while you’re rolling and cutting. A cold pan under cold dough gives you the best edge definition.
Gel food coloring over liquid. For the pastel icing shown in the images, gel coloring gives you vibrant, consistent color without thinning the icing. Liquid food coloring adds water to the icing and can make it too runny to flood cleanly. A toothpick dipped into gel coloring is all you need for a soft pastel shade.
Add sprinkles immediately after flooding. The window for sprinkles to stick properly is narrow — about 60 to 90 seconds after you flood the icing. After that, the surface starts to crust and sprinkles sit on top instead of embedding slightly. Work one cookie at a time if you need to.
How to Store Cut Out Sugar Cookies
At Room Temperature
Store fully decorated and dried cookies in an airtight container at room temperature for up to 5 days. Place a sheet of parchment paper between each layer to protect the icing and prevent sprinkles from transferring between cookies.
Keep the container away from direct sunlight and heat. A warm kitchen shelf speeds up the drying of the icing and can make the cookies stale faster than they should.
Do not store decorated cookies in the fridge unless your icing contains dairy. Refrigerator air is dry and pulls moisture out of the cookies over time, leaving them harder and less tender than when they were fresh.
In the Refrigerator
Undecorated baked cookies can be stored in the fridge in an airtight container for up to 1 week. Stack them with parchment between layers. Pull them out about 15 minutes before decorating so they come back to room temperature — cold cookies can cause some icings to set unevenly on contact.
Raw dough can also be refrigerated. Wrap it tightly in plastic wrap and store for up to 3 days. When you’re ready to bake, let it sit on the counter for 10 minutes before rolling — fully cold dough can crack at the edges when you try to roll it too soon.
In the Freezer
Freezing undecorated baked cookies is the method I recommend most. Bake the cookies, cool them completely, and freeze them in a single layer on a baking sheet for 1 hour. Once frozen solid, transfer them to a zip-lock freezer bag with parchment between layers. They keep well for up to 3 months.
To thaw, pull them out and leave them at room temperature for 30 to 45 minutes before decorating. They thaw quickly and taste just as fresh as the day they were baked.
Freezing raw dough also works well. Shape the dough into a flat disc, wrap tightly in plastic wrap, then again in foil, and freeze for up to 3 months. Thaw overnight in the refrigerator before rolling.
I don’t recommend freezing fully decorated cookies. The icing can weep and discolor as it thaws, and sprinkles can bleed color into the icing surface.
Serving Suggestions
These cookies are best served at room temperature after the icing has fully set and hardened. I like to arrange them on a flat plate by shape and color. The pink hearts and mint squares together make a simple, clean presentation without needing anything extra.
They pair well with a cold glass of milk, a cup of hot tea, or a latte. For parties, I stack them loosely on a tiered stand and let people pick their favorite shape and color. For gifting, I pack them flat in a cookie box lined with parchment, no more than two layers deep.

Frequently Asked Questions
Why did my cut out sugar cookies spread in the oven?
The most common reason is skipping the chill step. Warm dough spreads fast the moment it hits oven heat. Always chill the cut cookies on the baking sheet for 10 to 15 minutes before baking — not the dough ball, but the already-cut shapes on the pan. Butter that was too soft or slightly melted before creaming can also cause spreading. Your butter should be soft enough to leave an indent when pressed, but not greasy or shiny at the edges.
Can I make the dough ahead of time?
Yes. The dough keeps well in the refrigerator for up to 3 days wrapped tightly in plastic wrap. For longer storage, freeze it for up to 3 months. When you’re ready to use refrigerated dough, let it sit at room temperature for about 10 minutes before rolling — fully cold dough cracks at the edges when you try to roll it straight from the fridge.
Do I have to chill the dough before rolling?
You don’t have to chill the dough block before rolling, but you must chill the cut shapes before baking. I skip the pre-roll chill entirely in this recipe and go straight to rolling after mixing. The critical chill happens after cutting — that’s what protects the shape in the oven. If your kitchen is very warm and the dough feels soft and sticky right after mixing, a 15-minute fridge rest before rolling will make it easier to handle.
Can I use salted butter instead of unsalted?
You can, but reduce or eliminate the added salt in the recipe. Salted butter varies in sodium content between brands, so using unsalted gives you more control over the final flavor. These cookies are meant to be lightly sweet and buttery — too much salt shifts the balance noticeably. If unsalted butter is not available, use salted and skip the ¼ teaspoon of fine sea salt.
What kind of icing works best for decorating these cookies?
For the smooth, flat pastel finish you see in the images, a simple powdered sugar glaze works well for beginners. Mix powdered sugar with a small amount of milk and gel food coloring until it reaches a consistency that flows slowly off a spoon. For sharper edges and more defined designs like the outlined heart, royal icing made with meringue powder gives you better control and dries harder. Royal icing is also better for cookies you plan to stack or package as gifts.
How do I get clean edges on my cut out cookies?
Three things work together to give you clean edges. First, press the cutter straight down and lift straight up — no twisting. Second, chill the cut shapes before baking so the edges hold their definition in the oven. Third, make sure your dough is rolled to an even thickness so the edges bake at the same rate as the center. A bench scraper helps transfer cut shapes to the baking sheet without distorting them.
Can I add flavor variations to this dough?
Yes. The base dough is mild and takes flavoring well. Almond extract in place of or alongside vanilla is a classic pairing with sugar cookies — start with ¼ teaspoon since almond extract is stronger than vanilla. Lemon zest adds a fresh, bright note without changing the texture. A small amount of cinnamon works well for fall-themed batches. Keep any additions small so they complement rather than overpower the buttery base flavor.
How do I know when the cookies are done baking?
You are not looking for color — you are looking for structure. The cookies are done when the edges look set and matte and the surface no longer looks wet or shiny. The centers will still appear slightly soft. That’s correct. They finish cooking on the hot baking sheet during the first few minutes of cooling. If the tops are turning golden, the cookies are already overdone and will be firmer than intended once cool.
More Recipes You’ll Love
If you enjoyed making these cut out sugar cookies, here are a few more recipes from the site worth trying next: Link
- Soft Frosted Sugar Cookies — thick, drop-style sugar cookies topped with a generous layer of buttercream frosting. No cutters needed.
- Shortbread Cookies — fewer ingredients, crispier texture, and a more pronounced butter flavor. A good contrast to this soft cut out version.

Cut Out Sugar Cookies Recipe
Ingredients
Equipment
Method
- Preheat oven to 350°F (175°C). Line two baking sheets with parchment paper.
- Beat softened butter and sugar in a stand mixer on medium speed for 3 minutes until pale and fluffy.
- Add egg, milk, and vanilla extract. Mix on medium until smooth and fully combined, about 1 minute.
- In a separate bowl, whisk together flour, baking powder, and salt.
- Add dry ingredients to the butter mixture in three additions, mixing on low just until a soft dough forms and no flour streaks remain.
- Lightly flour the counter and roll dough to ¼ inch (6mm) thick.
- Cut shapes with cookie cutters pressing straight down without twisting. Transfer to prepared baking sheets.
- Chill cut cookies on the baking sheet in the refrigerator for 10 to 15 minutes.
- Bake for 8 to 10 minutes until edges look just set and tops appear matte. Do not wait for browning.
- Cool on the baking sheet for 5 minutes then transfer to a wire rack to cool completely.
- Spread or pipe icing onto cooled cookies. Add sprinkles immediately while icing is wet.
- Let icing dry completely before stacking or storing.