Samoas Cookies (Toasted Coconut, Caramel, Dark Chocolate)
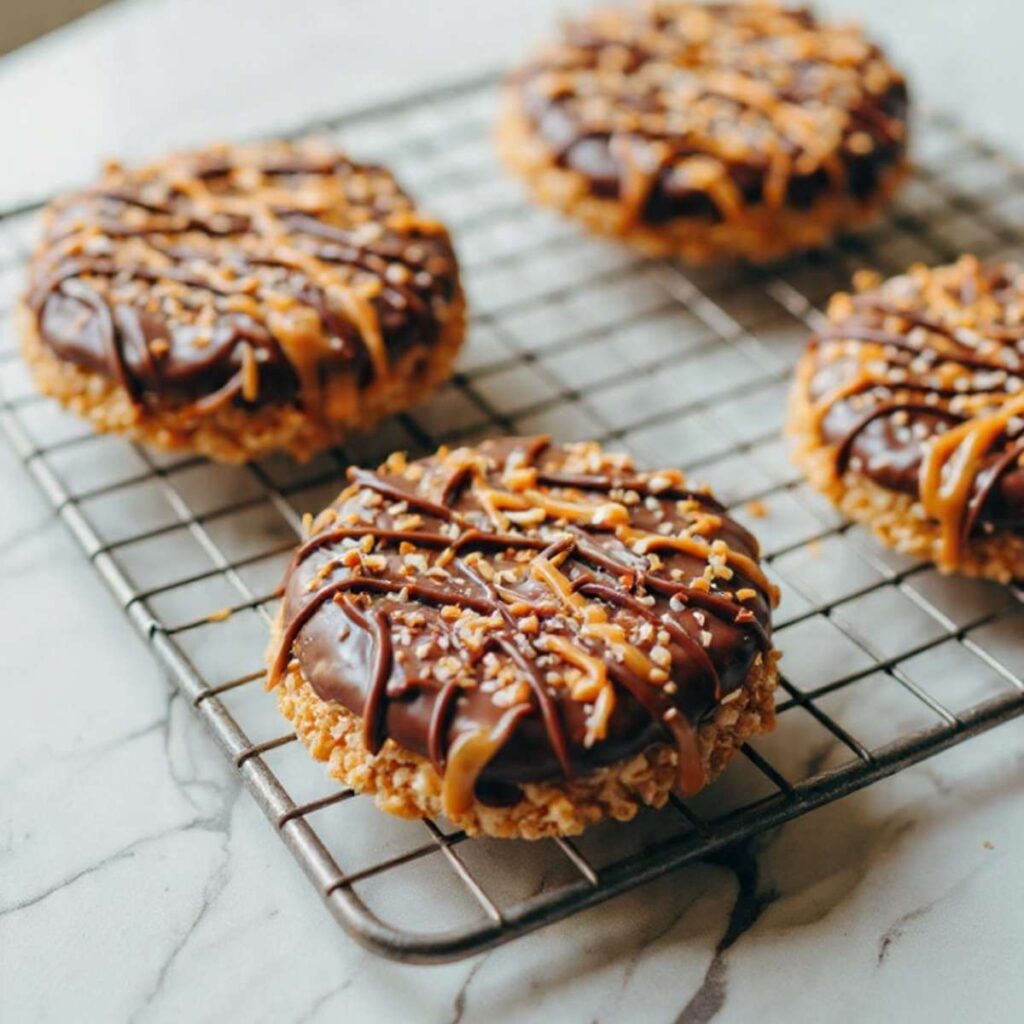
Samoas cookies have the most technically specific finish of any Girl Scout cookie — a toasted coconut ring, a soft-ball stage caramel binder, a dark chocolate cap, a caramel drizzle on top, and a toasted coconut garnish pressed in while the chocolate is still wet. Getting all five components to work together in a home kitchen without a mold, a thermometer, or professional equipment is where most from-scratch versions fall apart. I tested eleven batches across three weekends in my Los Angeles kitchen to solve exactly that — and this version holds its ring shape through the full bake, develops the caramelized amber base you see on the bottom of every cookie in these photos, and finishes with both a thick dark chocolate top and a caramel drizzle.
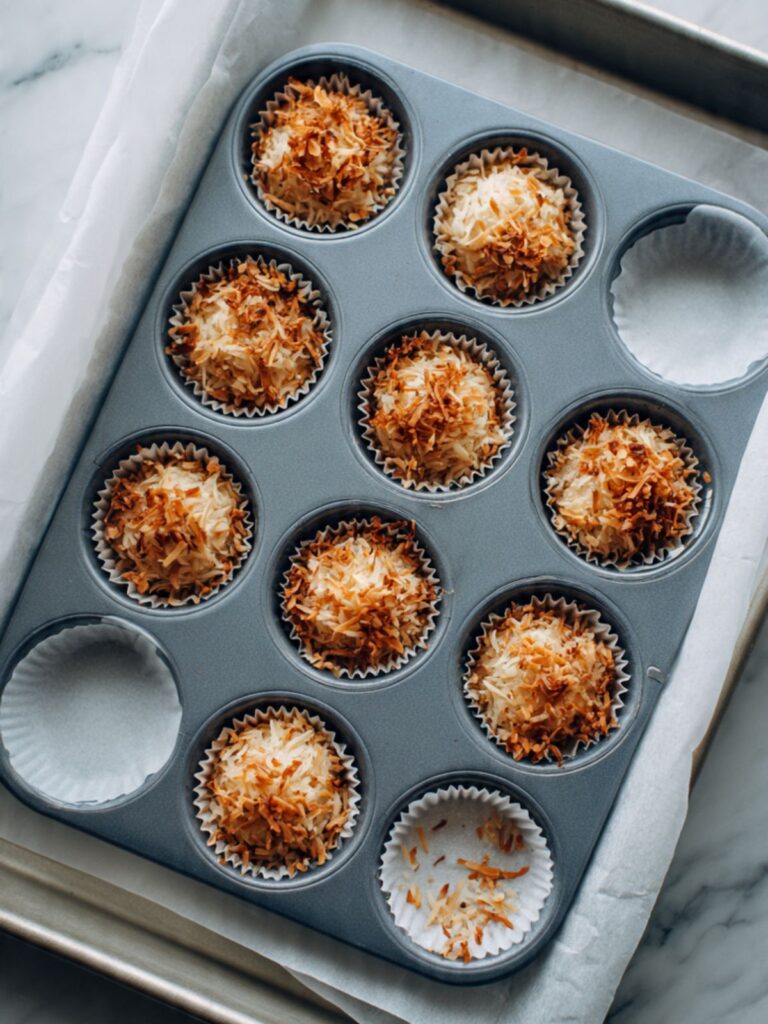
🗒 Luna’s Note: My first three batches used a metal donut pan. The caramel fused to the metal and every cookie came out in pieces. The moment I switched to a silicone ring mold, the coconut released cleanly every single time — the pan is not optional.
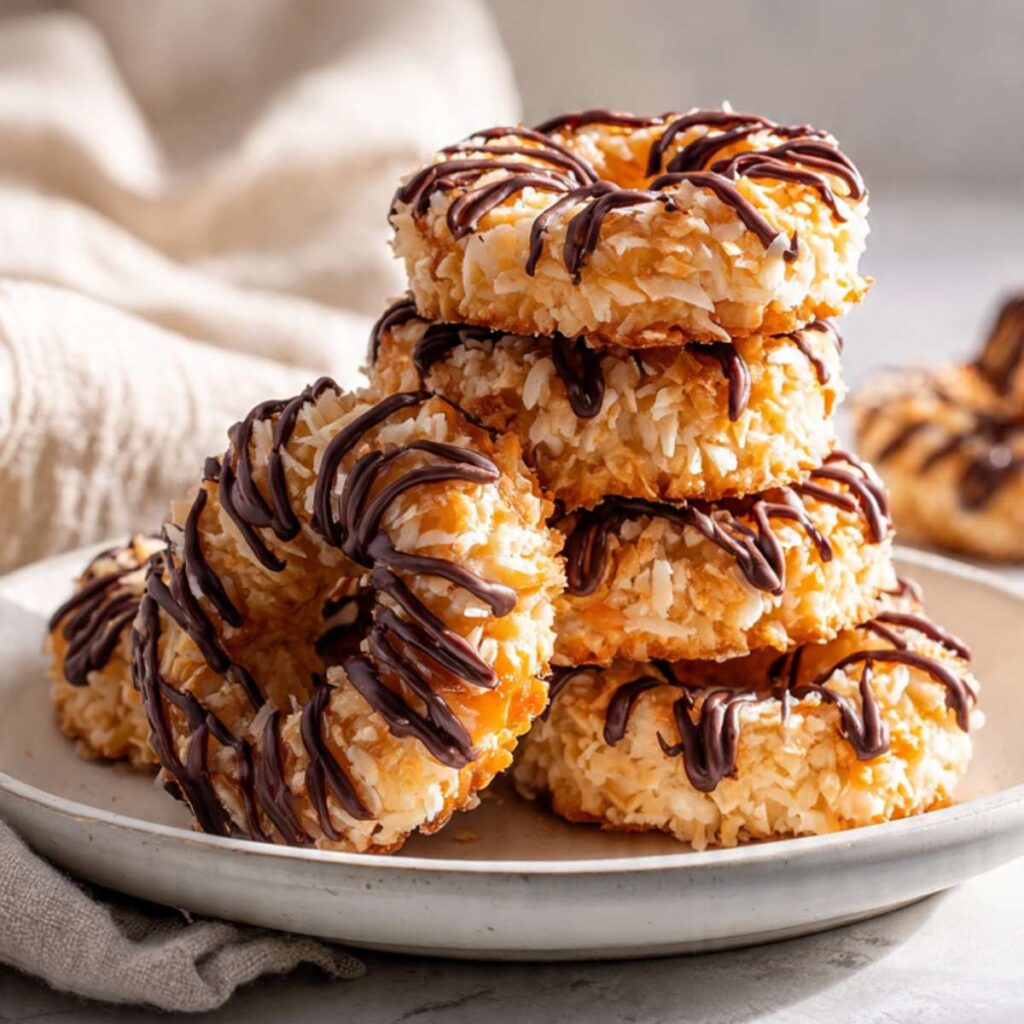
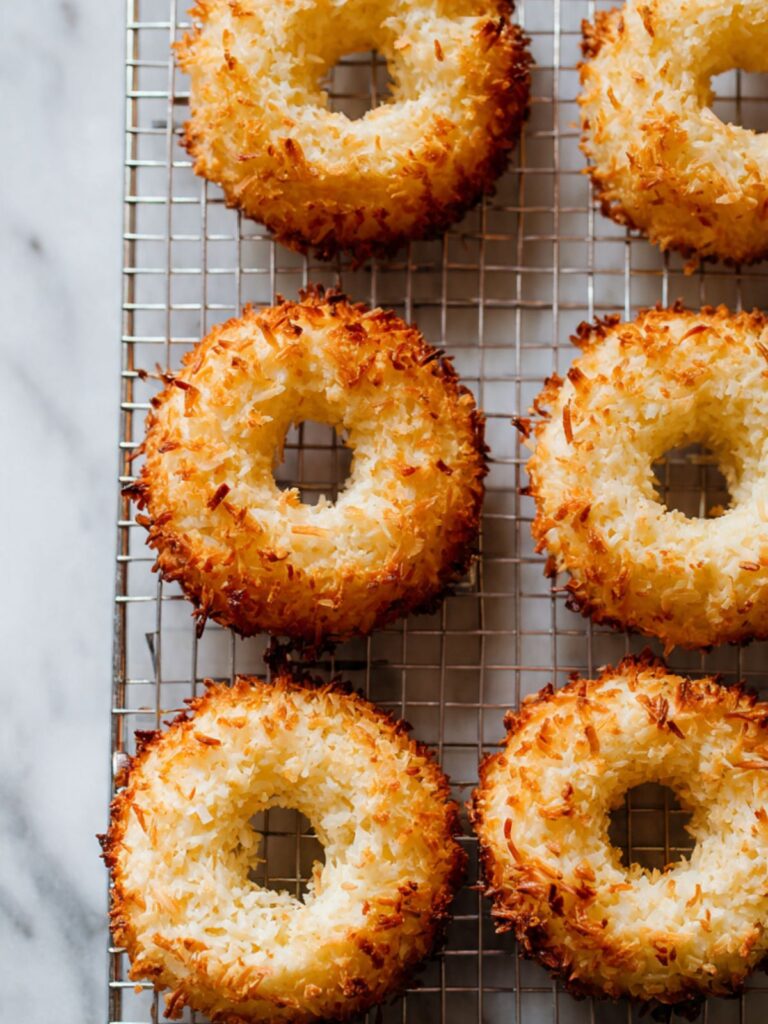
The texture is exactly what the photos show. The coconut toasts directly in the oven so the outer edge and base go deep amber and slightly crisp while the interior stays dense and chewy. The caramel binder is cooked to soft-ball stage — 235–240°F (113–115°C) — so it sets firm enough that the rings hold their shape when unmolded but still gives you that chewy, sticky pull when you bite through. The dark chocolate cap sets to a faint snap. The caramel drizzle underneath keeps the center soft.
I engineered this recipe specifically to match what you see in these photos — test your oven on the first bake and adjust the time by a minute either way until you nail your version.
I tested the coconut quantity between 2½ cups (213g) and 3 cups (255g) per batch. At 2½ cups the rings pressed too loosely into the molds and the caramel binder overwhelmed the coconut — the finished cookie tasted like chewy caramel candy rather than a samoa. At 3 cups the ratio clicked: dense, textured, fully coconut-forward with just enough caramel to hold everything together. Three cups at 255g is the version in these photos.
I tested bake temperature at 325°F (163°C) versus 350°F (177°C). At 350°F the coconut edges scorched and the caramel at the base darkened past amber before the interiors fully set. At 325°F the coconut toasted evenly — pale cream at the tops, deep golden amber at the base — with no scorching at the edges. Every photo in this article was shot from the 325°F batch.
No mixer required. No chilling required. You will need a silicone donut mold — standard 3-inch diameter, 16-cavity or two 8-cavity molds. The caramel binder comes together on the stovetop in under ten minutes. A candy thermometer is required for the caramel — it is the one tool that makes the result repeatable.
| Prep Time | Cook Time | Total Time | Yield | Difficulty |
|---|---|---|---|---|
| 25 min | 14 min | 39 min | 16 cookies | Intermediate |
| Calories | Fat | Carbs | Sugar | Protein |
|---|---|---|---|---|
| ~244 kcal | ~17g | ~22g | ~19g | ~2g |
Macros are approximate and will vary based on ingredient brands and serving size.
Ingredients & Tools for Samoas Cookies Recipe
For the Coconut Cookie Rings
- 3 cups (255g) sweetened shredded coconut — Baker’s Angel Flake or equivalent medium-shred sweetened coconut. Do not use desiccated coconut or unsweetened coconut — desiccated is too dry and will not bind, unsweetened will not develop the same caramel sweetness in the final cookie.
- ⅔ cup (130g) plain white granulated cane sugar — no substitutes. Brown sugar, coconut sugar, or raw sugar will change the caramel set point and the texture of the finished ring.
- ¼ cup (57g) unsalted butter, cut into small cubes — temperature does not need to be softened here as it melts directly into the caramel, but do not use frozen butter. Frozen butter lowers the caramel temperature mid-cook and extends the time to reach soft-ball stage.
- ¼ cup (60ml) heavy whipping cream (36% fat minimum) — do not use half-and-half or light cream. Lower fat content changes the caramel texture and the rings will be too soft to hold their shape.
- 1 tsp (4g) pure vanilla extract — not imitation
- ¼ tsp (1.5g) fine sea salt
- 2 large egg whites (approximately 30g each), room temperature — pull from the refrigerator 30 minutes before you begin. Cold whites are more viscous and will streak through the warm caramel mixture rather than coating evenly.
For the Caramel Drizzle
- ¼ cup (50g) plain white granulated cane sugar
- 2 tbsp (30ml) heavy whipping cream (36% fat minimum), warmed
- 1 tbsp (14g) unsalted butter
- Pinch of fine sea salt
For the Chocolate Finish
- 4 oz (113g) dark chocolate, 60–70% cacao, finely chopped — a bar chocolate like Ghirardelli or Lindt melts more smoothly than chips. If using chips, choose a brand with no added wax or palm oil, which prevents clean melting.
- 1 tsp (4g) neutral-flavored coconut oil — refined coconut oil only. Virgin coconut oil adds a coconut flavor that competes with the cookie. The oil thins the chocolate so it spreads cleanly across the ring top.
For the Garnish
2 tbsp (15g) finely chopped toasted coconut or coconut toffee bits — this is the finishing sprinkle visible on the cookies in the cooling rack photo. Toast raw shredded coconut in a dry pan over medium heat for 3–4 minutes, stirring constantly, until golden. Alternatively, use store-bought coconut toffee bits.
Before You Start
Temperature prep: Pull your 2 large egg whites from the refrigerator 30 minutes before you begin. Cold egg whites are more viscous and will streak through the warm caramel mixture rather than coating the coconut evenly — room temperature whites fold in smoothly in the 8–10 strokes the recipe calls for. They are ready when they feel cool but not cold against your wrist.
Gram weights take priority over volume measurements throughout this recipe. Coconut compresses unpredictably in a measuring cup — 3 cups can range from 220g to 280g depending on how tightly it is packed. Weigh it at 255g every time and your caramel-to-coconut ratio will be consistent across every batch.
Mixing method: No mixer required. This is a stovetop-and-fold recipe. A medium heavy-bottomed saucepan and a sturdy silicone spatula are your primary tools from start to finish.
No chilling required. The coconut-caramel mixture goes directly from the stovetop into the molds and into the oven. There is no dough resting step and no refrigerator time before baking.
Mold preparation: Lightly grease all 16 cavities of a silicone donut mold — 3-inch diameter — with a thin coat of neutral oil or cooking spray. Silicone releases the caramel-bound coconut cleanly with a light grease only. Do not use a metal donut pan — the caramel fuses to metal on contact and the rings will not release intact. This is not interchangeable with equipment you already own.
Oven rack position: Middle rack only. Position it before preheating. Top rack will scorch the coconut tops before the base sets. Bottom rack will scorch the caramel base before the tops color.
Coconut freshness check: Open the bag and smell it. Fresh sweetened shredded coconut smells clean and faintly sweet. Stale coconut smells faintly sour or waxy — it will not toast evenly and the caramel flavor will be flat in the finished cookie. If your bag has been open for more than 3 months, use a fresh one.
Butter note: Both the caramel binder and the caramel drizzle use butter that goes directly into a hot pan — no softening required. Do not use butter straight from the freezer. Frozen butter drops the caramel temperature mid-cook and you will need extra time on the heat to compensate, which increases the risk of overcooking past the soft-ball stage.
Caramel timing: The caramel binder moves fast once it reaches temperature. Have your coconut weighed, your egg whites loosened with a fork, and your mold cavities greased before the pan goes on the heat. You will not have time to measure or prepare anything once the caramel comes to a boil.
Thermometer note: A candy thermometer or instant-read thermometer is required for the caramel binder. The difference between a samoa that holds its ring and one that collapses is 10°F on the thermometer — color alone is not precise enough at this margin. Clip the thermometer to the pan before the mixture comes to a boil and do not rely on visual cues alone.
Chocolate chips freshness check: If your dark chocolate bar or chips have a white or grey film on the surface, that is chocolate bloom — a harmless separation of cocoa butter. Bloomed chocolate is still safe to use but may take slightly longer to melt smoothly and may not set with as clean a snap. Fresh chocolate will give the best finish.
Necessary Tools
Required:
- Medium heavy-bottomed saucepan (2–3 quart)
- Sturdy silicone spatula
- Silicone donut mold (3-inch diameter, 16-cavity or two 8-cavity molds)
- Half-sheet baking pan (18×13 inch), light-colored aluminum
- Parchment paper
- Kitchen scale (strongly recommended)
- Candy thermometer or instant-read thermometer — required for the caramel binder
- Small microwave-safe bowl or double boiler for chocolate
- Wire cooling rack
Optional but useful:
- Oven thermometer — most home ovens run 15–25°F (8–14°C) off. Recommended for the first bake.
- Piping bag or squeeze bottle — for controlled caramel drizzle
- Offset spatula — for spreading chocolate cleanly across ring tops
How to Make Samoas Cookies
This is a stovetop-and-mold method. The caramel binder is cooked first on the stovetop, the coconut and egg whites are folded in while the mixture is warm, and the whole thing is pressed into silicone ring molds before going into the oven. The chocolate finish and caramel drizzle are applied after the cookies cool completely. Read through all steps before you begin — the caramel moves fast and preparation is everything.
Step 1: Preheating the Oven and Preparing the Molds for a Clean Release
Position your oven rack in the middle of the oven and heat to 325°F (163°C). Most home ovens run 15–25°F (8–14°C) off — if you have an oven thermometer, confirm the actual temperature before the molds go in. A hotter oven will scorch the caramel at the base of the rings before the coconut finishes toasting on the sides and top.
Lightly grease all 16 cavities of your silicone donut mold with a thin coat of neutral oil or cooking spray. Set the greased mold on top of your light-colored aluminum half-sheet pan — this keeps the mold stable and flat during filling and gives the cookie bases even, consistent heat from below. Do not use a dark baking pan — dark metal absorbs more radiant heat and will over-brown the caramel base before the coconut tops have taken on any color. Do not skip the parchment sheet under the mold — without it the caramel that seeps through the mold base during baking will bond directly to the pan and make cleanup significantly harder.
The mold should sit completely flat on the pan with no wobble before you begin the caramel — you will be pressing warm, sticky coconut mixture directly into the cavities with both hands and the mold cannot shift while you work.
⚠️ Do not use a metal donut pan in place of the silicone mold — the caramel-bound coconut fuses to metal at baking temperature and will not release intact. Every ring in the finished cookie photos came out of a silicone mold.
Your oven is preheating and your mold is ready on the pan — start the caramel immediately so both are ready at the same time.
Step 2: Cooking the Caramel Binder to Soft-Ball Stage
In your medium heavy-bottomed saucepan over medium heat, combine your ⅔ cup (130g) plain white granulated cane sugar, ¼ cup (57g) unsalted butter cut into small cubes, and ¼ cup (60ml) heavy whipping cream. The granulated sugar is what drives the caramel set — it dissolves into the butter and cream and cooks to a precise temperature that determines whether the finished rings hold their shape or collapse when unmolded. Substituting brown sugar or coconut sugar changes the set point and the rings will be too soft to release cleanly.
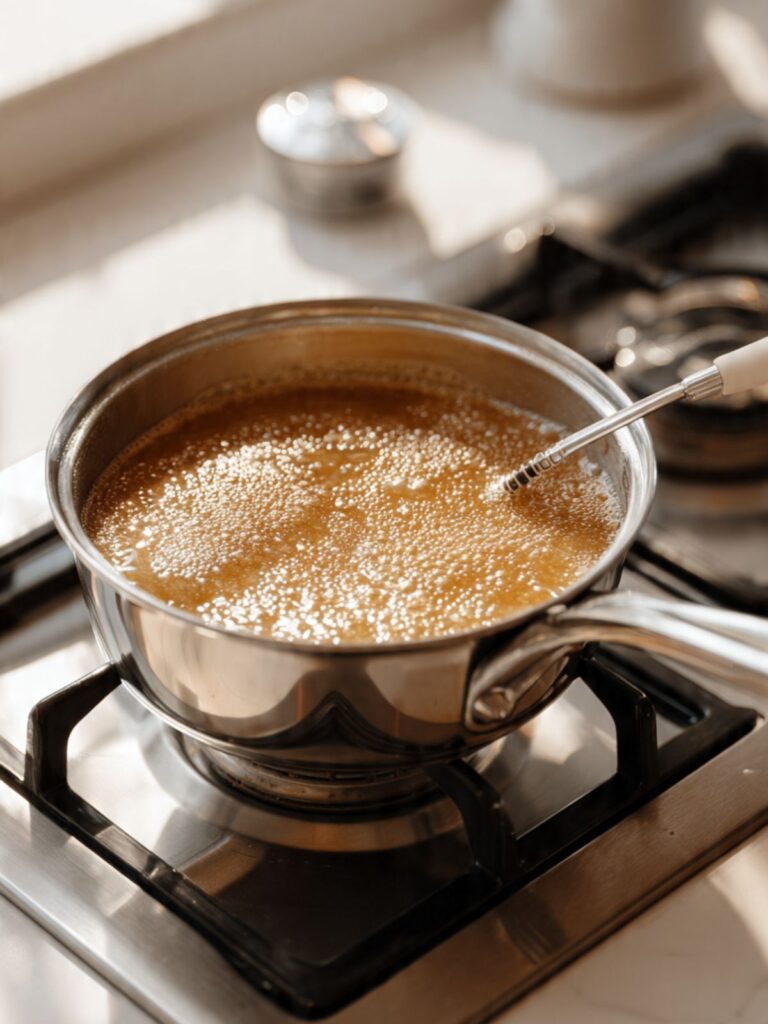
Stir constantly with your silicone spatula as the butter melts and the sugar dissolves. Once the mixture comes to a full rolling boil, stop stirring and clip your candy thermometer to the side of the pan — bulb fully submerged but not touching the bottom. Cook without stirring until the temperature reads 235–240°F (113–115°C). This is the soft-ball stage — the exact point at which the caramel will set firm enough to bind the coconut into a ring that holds its shape through baking and unmolding.
The mixture should be a pale amber color — like light honey — and smell of warm, sweet toasted sugar. Always trust the thermometer over the color at this stage. The caramel will look lighter in the pan than it does in the finished cookie — the color deepens during baking. If you wait for a darker color in the pan before pulling, you will overshoot the soft-ball stage and the finished rings will set too hard and brittle.
⚠️ Do not walk away from the caramel once it reaches a boil. Sugar moves from soft-ball to firm-ball stage in under two minutes at this heat level. Missing the temperature window by even 10°F produces a caramel that sets too hard — the finished cookies will be brittle instead of chewy. If the mixture smells sharp or acrid at any point, or darkens past amber toward reddish-brown, pull the pan immediately — scorched caramel cannot be saved.
Remove the pan from heat the moment it hits 235–240°F (113–115°C). Add your 1 tsp (4g) pure vanilla extract and ¼ tsp (1.5g) fine sea salt and stir once to combine — the mixture will bubble briefly. Move immediately to Step 3.
Step 3: Folding in the Coconut and Egg Whites Until Every Strand Is Coated
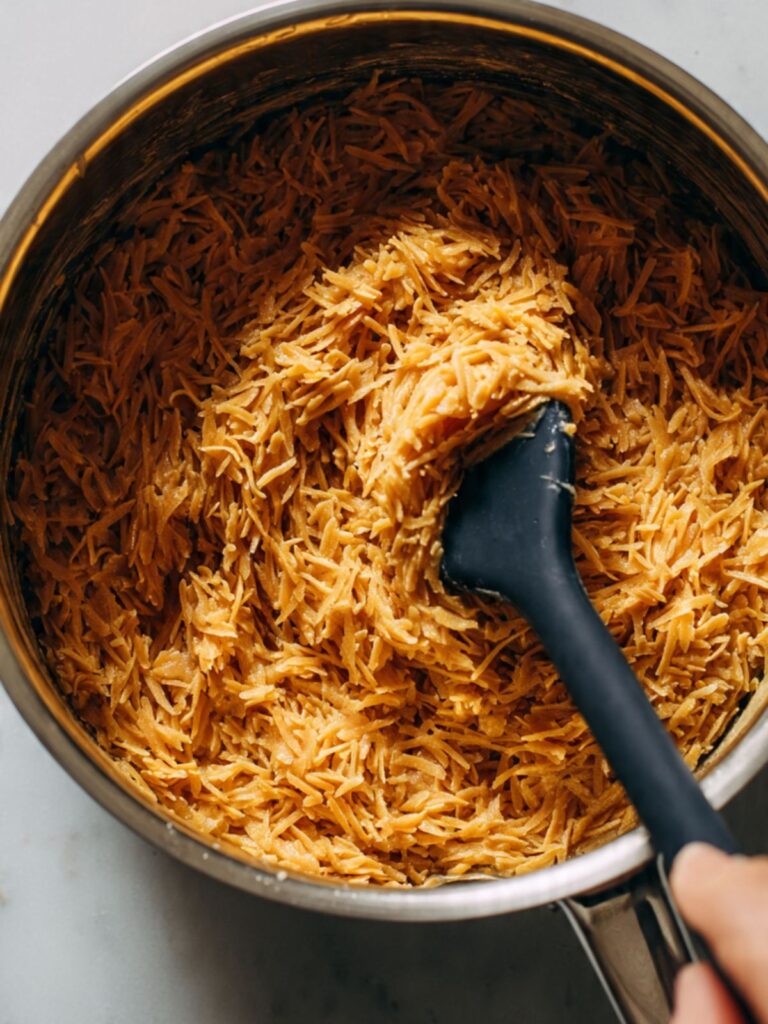
Working quickly while the caramel is still fluid, add your 3 cups (255g) sweetened shredded coconut to the pan in one addition. Fold with your silicone spatula using slow, wide strokes from the bottom of the pan upward — approximately 15 strokes — until every strand of coconut is fully coated in the caramel. Do not stir aggressively in circles — you are coating each strand evenly, not compressing the mixture.
Add your 2 large egg whites at room temperature immediately after the coconut is coated. Fold them in with 8–10 additional strokes until no white streaks remain. The egg whites bind the coconut strands to each other as their proteins set in the oven — they are what gives each ring its structural integrity across the bake, not just the caramel.
🗒 Luna’s Note: I always whisk the egg whites with a fork for 10 seconds before adding them — just enough to break them up so they fold in evenly in those 8–10 strokes. You are not whipping them, just loosening them so they coat rather than streak.
The finished mixture should look glossy and deeply amber-coated — every strand of coconut should be visibly caramel-coated with no dry, pale, uncoated shreds showing. If you can still see dry coconut, fold for 5 more strokes. If the mixture looks wet and loose rather than sticky and cohesive, the caramel may have been undercooked — reduce the bake time by 1–2 minutes on this batch and verify temperature on the next.
⚠️ Work fast — the caramel thickens as it cools and becomes difficult to fold evenly within 3–4 minutes of leaving the heat. If the mixture stiffens before you finish pressing into the molds, set the pan back on low heat for 30 seconds to loosen it slightly, then continue pressing.
The coconut mixture is fully combined — move immediately to pressing it into the molds before the caramel sets.
Step 4: Pressing the Mixture Firmly into the Ring Molds
Using a tablespoon or small cookie scoop, portion approximately 2 tablespoons (35g) of the coconut mixture per cavity. Weigh the first portion on your kitchen scale, use that as your calibration reference, and portion the remaining 15 rings to match. This batch yields exactly 16 rings at this portion size.
Press the mixture firmly into each cavity using the back of a spoon or your fingertips dampened with cold water. The coconut needs to be compacted enough that the ring holds its shape when unmolded — press firmly around the entire circumference of each ring, including the inner wall of the center hole. The top surface should be level with the top of the mold cavity, not mounded above it. Rewet your fingertips every 3–4 cavities — the caramel is sticky and dry fingers will pull the mixture rather than compress it.
The finished cookies show a clean, open center hole and uniform height across every ring — that comes entirely from pressing the mixture flat to the top of the mold and keeping the center hole fully clear. Use a dampened fingertip to clear any coconut that falls into the center hole as you press each cavity.
⚠️ If coconut partially closes the center hole during baking — which happens when the inner mold wall was not pressed firmly enough — use a round skewer or the tip of a chopstick to re-open it while the cookie is still warm and pliable, within the first 2 minutes out of the oven. After 5 minutes the caramel is set and the hole cannot be reopened without cracking the ring.
⚠️ Do not under-fill the cavities — rings that are too thin will dry out during baking and crack when unmolded. Fill each cavity completely with firm, even pressure to the top of the mold wall.
The molds are filled and sitting flat on your half-sheet pan — slide them into the preheated 325°F (163°C) oven now.
Step 5: Baking Until the Coconut Is Golden Amber and the Base Is Fully Set
Bake at 325°F (163°C) for 12–14 minutes — start checking at 12 minutes. The cookies are done when the coconut at the outer edges and base has gone deep golden amber and the tops are pale cream to light gold. The base should look set and slightly caramelized when you gently lift one edge of the silicone mold to peek underneath — not pale and soft, not dark brown.
The finished rings show a two-tone coconut profile that is visible in every stacked photo in this article — pale cream to light gold at the tops, deep golden amber at the base and outer edges. This gradient is exactly what you are looking for at the 12-minute mark. If the tops are still completely white, give them 1–2 more minutes. If the outer edges are going dark brown before the tops take on any color, your oven is running hot — drop to 315°F (157°C) on the next batch.
⚠️ Do not overbake — coconut moves from golden to scorched quickly, especially at the base where the caramel concentrates. Pull the pan the moment the edges and base are deep amber. The carryover heat from the hot pan will continue developing the base color during the rest period.
Remove the pan from the oven and leave the silicone mold in place on the pan. Do not attempt to unmold yet — the caramel is still molten at the base and the rings will collapse and distort if moved too soon.
Leave the cookies in the mold on the pan for exactly 10 minutes. The carryover heat from the pan continues to conduct into the caramel base during this time, finishing the set. Moving the rings before 10 minutes means the base has not fully firmed — they will distort when unmolded. Waiting more than 15 minutes makes the caramel too firm and the silicone harder to peel away cleanly. Set a timer.
Step 6: Unmolding the Rings and Cooling Them Completely
After exactly 10 minutes, gently peel the silicone mold away from each ring. Work from the outer edge inward — press down gently on the mold base around each cavity and the ring will release and pop free. Place each unmolded ring flat-side down on your wire cooling rack.
The base of each ring should show a deep amber, slightly glossy caramel layer — set and firm to the touch, not tacky or soft. The coconut on the sides and top should be fully toasted and hold its shape without any flex when you pick the ring up. If the base looks pale and the ring feels soft or bends when lifted, it needed 1–2 more minutes in the oven or more time resting in the mold before unmolding.
⚠️ Do not stack the rings at this stage — the caramel base is still warm and tacky and stacked rings will fuse together. Keep them in a single layer on the rack.
Allow the rings to cool completely on the wire rack — approximately 30 minutes at room temperature. The rings must be fully cool before the chocolate finish goes on. Warm cookies will melt the chocolate on contact and it will run down the sides of the ring rather than sitting as a clean cap on the top surface.
The rings are cool and fully set — move to the chocolate finish now.
Step 7: Melting the Chocolate and Applying the Finish
In a small microwave-safe bowl, combine your 4 oz (113g) finely chopped dark chocolate (60–70% cacao) and 1 tsp (4g) refined coconut oil. Microwave at 50% power in 20-second bursts, stirring between each burst, until the chocolate is fully melted and the mixture is smooth and pourable. This typically takes 3–4 bursts. Do not microwave at full power — dark chocolate at this cacao percentage scorches fast and seized chocolate cannot be thinned back to a workable consistency.
Alternatively, melt over a double boiler — set a heatproof bowl over a saucepan with 1 inch of simmering water, making sure the bowl does not touch the water. Stir until fully smooth and remove from heat.
Allow the melted chocolate to cool for 2–3 minutes after the last microwave burst before applying. The ideal application temperature for dark chocolate is 88–90°F (31–32°C). Chocolate applied too hot — above 100°F (38°C) — is too fluid and runs down the sides of the ring rather than sitting as a cap on the top. If you have an instant-read thermometer, check it. If you do not, test by touching a small amount to your lower lip — it should feel just barely warm, not hot.
The correctly tempered chocolate should look glossy and fluid and coat the back of a spoon in a thin, even layer that does not immediately drip off. If it looks grainy, lumpy, or has seized, the chocolate either overheated or contacted moisture — start with a fresh batch. Do not try to rescue seized chocolate with additional oil or cream for this application — the set will not be clean.
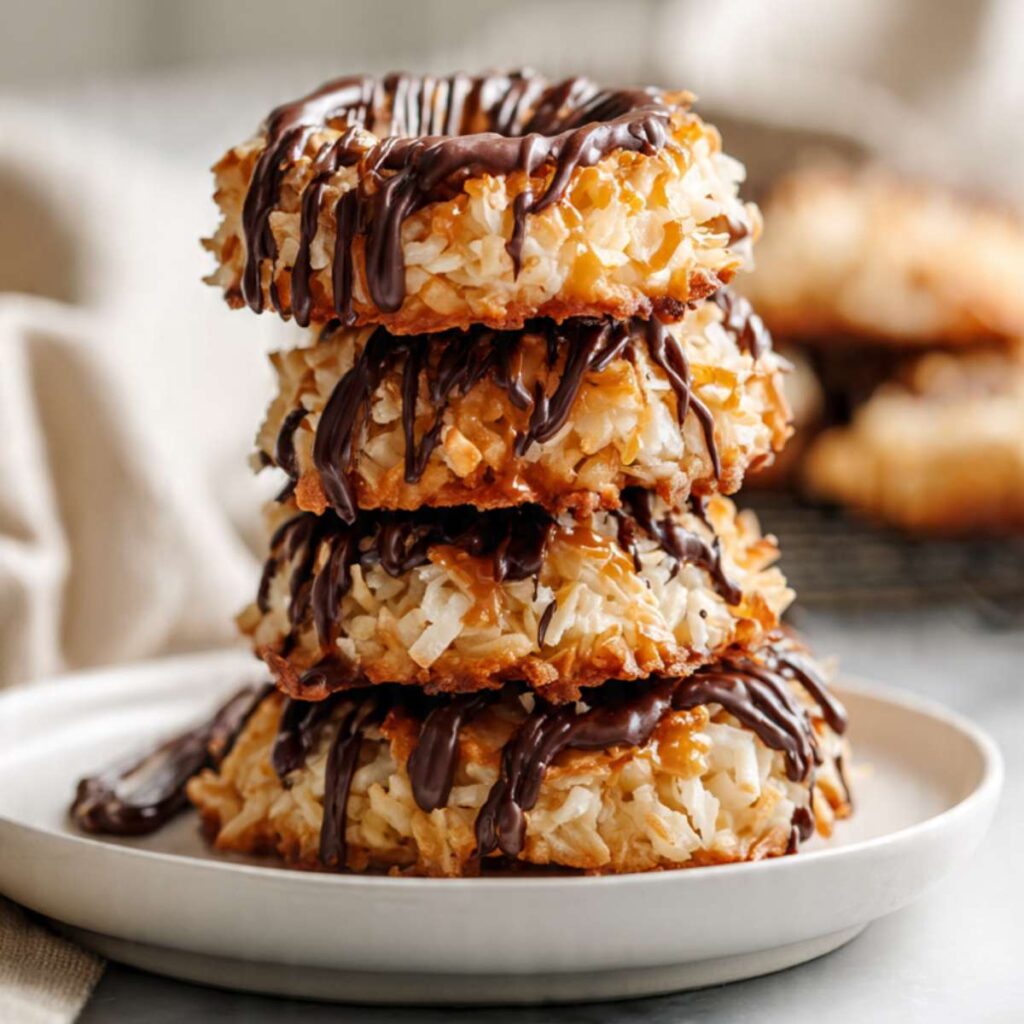
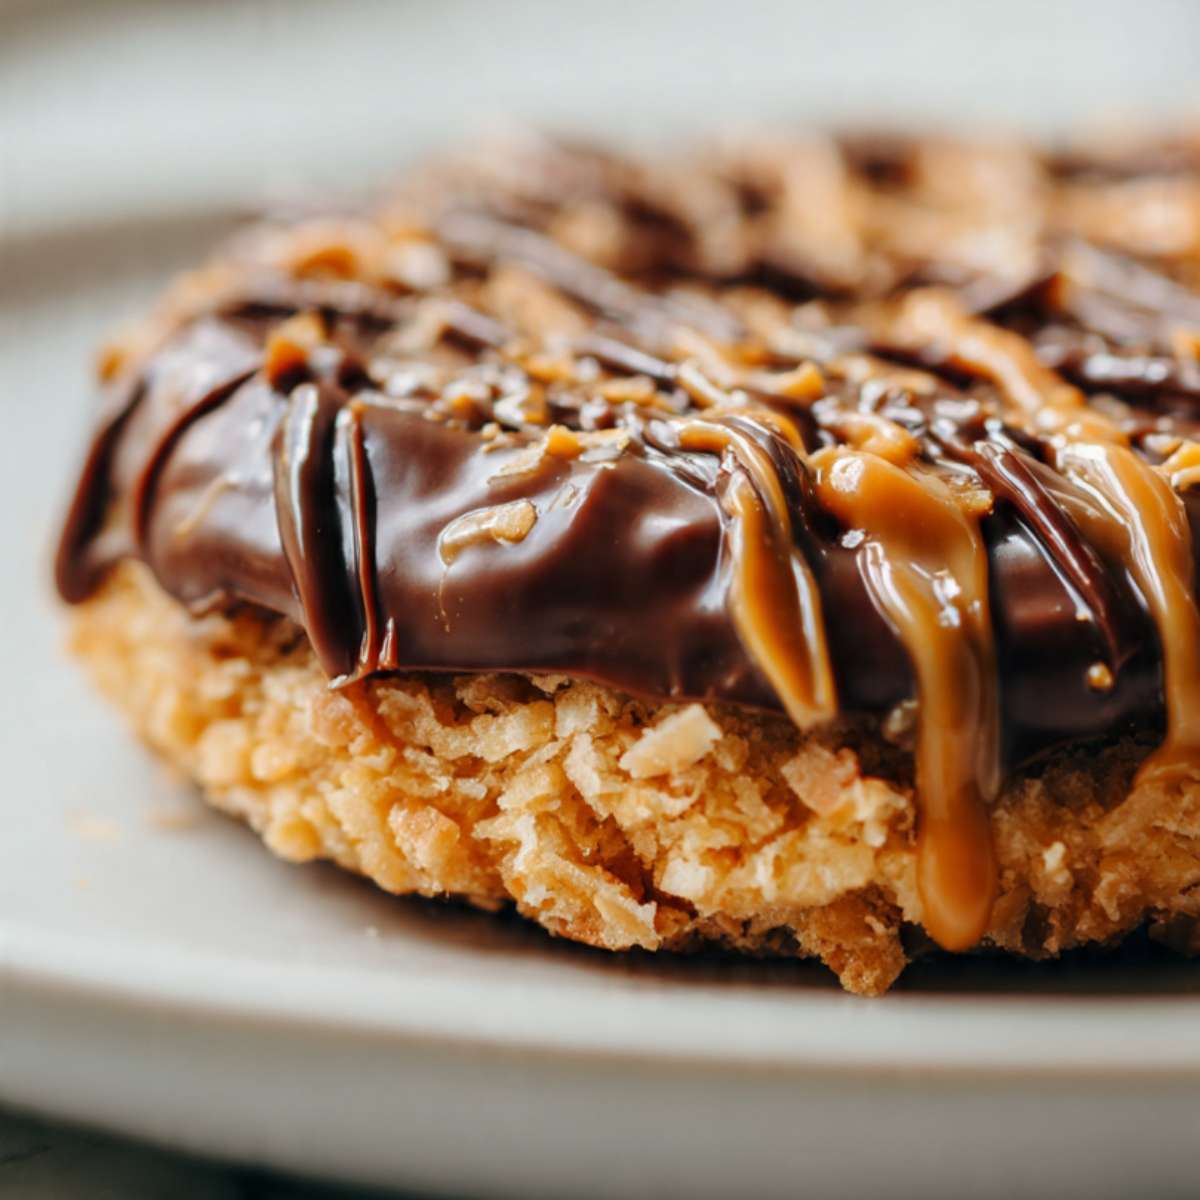
Spoon approximately 1½ teaspoons of melted chocolate onto the top of each ring. Use the back of the spoon or a small offset spatula to spread it evenly across the top surface, letting it reach the outer coconut edge and pool slightly inward toward the center hole. This is the thick chocolate cap visible across the close-up and stacked cookie photos — full top coverage that holds its shape against the coconut, not a thin coating.
🗒 Luna’s Note: I spread the chocolate right to the outer coconut rim but not over it — keeping that clean edge where the chocolate meets the coconut is what makes the finished cookie look deliberate rather than rushed.
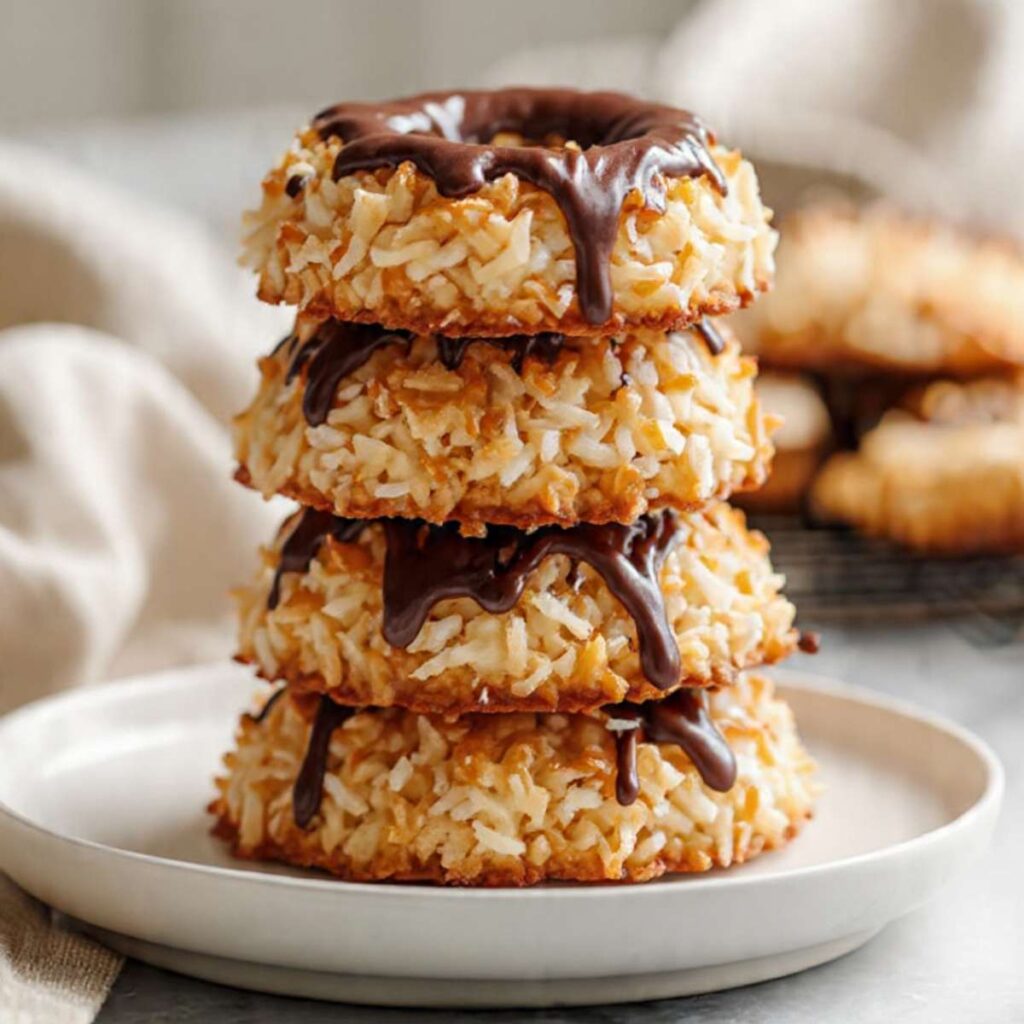
For the drizzle-only finish visible in the wider stack shots where the coconut body stays visible: transfer the melted chocolate to a piping bag or a small zip-lock bag with one corner snipped and drizzle thin lines across the top of each ring. This uses less chocolate and is faster — but gives a lighter finish than the full top coverage shown in the close-up photo.
Leave the chocolate untouched while you make the caramel drizzle.
Step 8: Making the Caramel Drizzle and Layering It Over the Chocolate
In a small clean saucepan over medium heat, add your ¼ cup (50g) plain white granulated cane sugar. Cook without stirring until the edges begin to melt and turn pale gold — approximately 2–3 minutes. Once the edges are melting and the center is still granular, swirl the pan gently rather than stirring to encourage even melting. Continue until the sugar is fully melted and the color shifts from pale gold to a deep amber — the color of dark honey, which happens at approximately 350°F (177°C). This is the correct point to pull the pan.
Do not let the color go past deep amber into reddish-brown — that is the beginning of scorching and the finished caramel will taste bitter rather than sweet and toasty. Scorched caramel smells sharp and acrid rather than sweet. If you see smoke or smell anything sharp, pour it out immediately and start again.
Remove from heat and carefully add your 2 tbsp (30ml) warmed heavy whipping cream — the mixture will bubble aggressively for 3–4 seconds. Stir in your 1 tbsp (14g) unsalted butter and a pinch of fine sea salt until the mixture is completely smooth and fluid. Allow the caramel to cool for 3–4 minutes until it thickens slightly but is still pourable.
Transfer to a piping bag or small squeeze bottle. Test the consistency by drizzling a line across a piece of parchment — it should hold a visible raised line that does not flatten within 10 seconds. If it flattens immediately, wait another 60 seconds and test again. If it has thickened too much to drizzle smoothly, warm for 10 seconds and test again.
Drizzle in thin lines across the chocolate top of each ring while the chocolate is still wet — the caramel partially sinks into the wet chocolate and the two layers bond as they set together. This is the amber-over-dark layering visible in the close-up cookie photo where both layers are clearly distinct but fused at the interface.
The caramel drizzle must go on while the chocolate is still wet. If the chocolate has already started to set before the caramel goes on, the two layers will not bond and will separate when the cookie is bitten or stored. Move directly from chocolate application to caramel drizzle without pausing.
Step 9: Adding the Garnish and Setting the Finished Cookies
While the chocolate and caramel are still wet, sprinkle your 2 tbsp (15g) finely chopped toasted coconut or coconut toffee bits evenly over the top of each ring. Press very lightly with a dry fingertip so the garnish adheres into the wet surface as the chocolate sets. This is the finishing layer visible on the cookies resting on the cooling rack in the article — the chopped toasted coconut catches the light and gives the top a textured, layered finish that distinguishes the finished cookie from a plain chocolate-drizzled ring.
Allow the finished cookies to sit undisturbed at room temperature for 20–25 minutes until the chocolate sets completely. In a warm kitchen above 75°F (24°C) where the chocolate is not firming, transfer the rack to the refrigerator for 10 minutes to speed the set — then remove and bring back to room temperature before serving.
The chocolate top is fully set when it no longer looks wet and has shifted from glossy to a faint matte sheen at the surface. Press the edge of one ring gently — a fully set chocolate top will give a faint resistance and a clean snap when bitten through, exactly as visible in the tall stacked cookie photo where the chocolate layer holds its edge cleanly against the coconut body without cracking or flaking.
Your samoas cookies are finished — 16 rings with a toasted coconut body, a caramel-bound amber base, a dark chocolate cap, a caramel drizzle, and a toasted coconut garnish pressed into the surface.
The Science Behind Samoas Cookies
Soft-Ball Stage Caramel and Why Temperature Controls the Finished Texture

The caramel binder in this recipe is not just a sweetener — it is the structural glue that holds every ring together through the bake, the unmolding, and the chocolate finish. The temperature you cook it to determines the final texture of the cookie in a direct, measurable way.
When sugar, butter, and cream are cooked together and brought to 235–240°F (113–115°C), the sugar reaches what confectioners call the soft-ball stage. At this temperature, enough water has evaporated from the mixture that the remaining sugar concentration is high enough to set firm when cooled — but not so high that it becomes hard and brittle. A caramel cooked to 230°F (110°C) contains too much remaining water and sets too soft — the rings will feel tacky and will not hold their shape when unmolded. A caramel cooked to 250°F (121°C) reaches the firm-ball stage and sets hard — the finished cookies will be brittle and difficult to bite through.
This is why a thermometer is not optional in this recipe. Estimating caramel temperature by color alone is not reliable enough at this precision level. The difference between a soft-ball and a firm-ball caramel is 10°F — a margin that color cannot consistently distinguish. If you make these cookies regularly, a candy thermometer is the single tool that makes the result repeatable.
🗒 Luna’s Note: I tested this recipe without a thermometer twice, estimating by color. Both batches came out with rings that were either too soft or too firm. Every reliable batch I’ve made since uses a thermometer clipped to the pan from the moment the mixture comes to a boil.
For a deeper look at how sugar stages affect texture in other cookies, the shortbread cookies recipe breaks down how fat and sugar interact at different ratios — a useful companion read if you want to understand why cookie texture varies so much across recipes.
The Maillard Reaction and Moisture Loss — How Oven Heat Transforms Coconut
The coconut in these samoas cookies does not simply bake — it undergoes two distinct flavor and texture transformations in the oven, and both are visible in the photos.
The first transformation is the Maillard reaction. When the proteins and sugars in the coconut shreds reach approximately 280°F (138°C) at the surface, they begin to brown and develop new flavor compounds — nutty, toasted, and slightly caramelized. This is what produces the deep amber color at the base and edges of every ring visible in these photos. The Maillard reaction is a surface phenomenon — the coconut shreds in direct contact with the hot mold base and the hot oven air brown first, while the interior shreds stay pale.
The second transformation is moisture loss. Sweetened shredded coconut contains added sugar syrup that keeps the shreds soft and pliable. As the oven heat drives out this moisture, the shreds firm up and bind more tightly together. This is what gives the finished ring its structural integrity — the caramel binder and the dehydrated coconut shreds lock together into a dense, self-supporting ring. This is also why overbaking is a risk: past the point of full moisture loss, the shreds continue to brown and eventually scorch.
The two-tone color profile visible across these photos — pale cream at the tops, amber at the base — is not a flaw. It is the natural result of baking in a mold where the base is in direct contact with conducted heat from the pan, while the top faces the gentler convective heat of the oven air. That gradient is the visual indicator that the bake is correct.
Egg White Protein Coagulation — How Structure Forms Without Dairy Butter
The two egg whites in this recipe play a specific structural role that butter, cream, or additional caramel cannot replicate. Egg white proteins begin to coagulate — set and firm — at approximately 145°F (63°C). In the oven at 325°F (163°C), the egg white proteins distributed throughout the coconut mixture set fully within the first 6–8 minutes of baking. This protein network acts as a secondary binder alongside the caramel — holding the individual coconut shreds in place even as the caramel softens slightly at peak oven temperature.
The reason egg whites are used rather than whole eggs is specifically about moisture control. Egg yolks contain fat and water that would add richness but also additional moisture — and moisture is what competes with the caramel concentration and softens the ring structure. Egg whites are approximately 90% water by weight, but that water evaporates almost completely during baking, leaving only the protein network behind. The result is a cookie that is chewy and dense rather than soft and sticky — which is the exact texture profile these photos show.
This is also why room temperature egg whites matter. Cold egg whites are more viscous and do not distribute evenly through the warm caramel-coconut mixture — they fold in as streaks rather than coating every shred. Room temperature whites are thinner and coat the coconut evenly in the 8–10 folds the recipe specifies. You can see the result of even distribution in hero photos — every ring has a uniform texture from edge to edge with no soft spots or uneven browning.
Samoas Cookies Troubleshooting & Pro-Tips
Common Mistakes
I used a different type of coconut and the rings did not hold together
Desiccated coconut — the fine, dry, unsweetened variety sold in Indian and South Asian grocery stores — does not behave like sweetened shredded coconut in this recipe. Desiccated coconut is too dry to absorb the caramel binder and the finished mixture will feel crumbly and loose rather than cohesive and sticky. The rings will crumble when pressed into the molds and will not hold their shape through baking. Unsweetened shredded coconut is a closer substitute but still produces a noticeably less sweet, less chewy ring — the caramel binder sweetness that defines the samoa flavor profile is partially carried by the sweetened coconut itself. Use Baker’s Angel Flake or an equivalent sweetened medium-shred coconut for the result shown in these photos.
The coconut burned at the base before the tops colored
Your oven is running hotter than 325°F (163°C) or the baking pan is too dark. Dark pans absorb significantly more radiant heat than light-colored aluminum and concentrate it at the base of the mold — the caramel at the bottom scorches before the tops have any color at all. Switch to a light-colored aluminum half-sheet pan and verify your oven temperature with an oven thermometer before the next batch. If your oven runs consistently hot and you cannot calibrate it, drop to 310°F (154°C) and extend the bake time by 2–3 minutes. The correct base color is deep golden amber — not dark brown, not black at any edge.
The rings collapsed when I unmolded them
The caramel binder was either undercooked or the rings were unmolded too soon. If the caramel did not reach 235°F (113°C), it retains too much water and never sets firm enough to hold the ring shape. If the rings were pulled from the mold before the full 10-minute rest, the caramel base was still molten underneath the set coconut surface — the ring looks done on top but is liquid at the base and will distort the moment pressure is applied during unmolding. On your next batch, verify temperature with a thermometer and set a timer for the full 10 minutes before touching the mold. If rings have already collapsed, press them back into the mold cavities while still warm and allow to cool fully in the mold — they will re-set as flat cookies rather than rings but the flavor is identical.
The coconut mixture stiffened in the pan before I finished pressing into the molds
The caramel cooled too quickly — this happens in cold kitchens or when the work surface is very cold. Caramel thickens fast below 75°F (24°C) ambient temperature and becomes difficult to press within 3–4 minutes of leaving the heat. Return the pan to low heat for 30 seconds and stir gently — the mixture will loosen enough to press. For future batches, have all mold cavities greased and ready before the caramel goes on the heat, and work as quickly as possible after folding in the coconut and egg whites.
The chocolate seized and turned grainy when I melted it
Either moisture entered the chocolate or it overheated. A single drop of water from a wet bowl, a wet spatula, or steam rising from nearby warm cookies is enough to cause seizing — the sugar particles in the chocolate absorb the water and clump together, pulling the cocoa butter out of suspension. Dry every tool thoroughly before it contacts the chocolate. Use 50% microwave power only — never full power on dark chocolate at this cacao percentage. Seized chocolate cannot be rescued for a smooth finish — start with a fresh batch. The coconut oil in this recipe (1 tsp per 4 oz) acts as a thinning agent and provides some protection against mild overheating, but it cannot prevent seizing from moisture contamination.
The chocolate cap and caramel drizzle separated when I bit into the cookie or stored it overnight
The two layers did not bond during the setting window. The caramel drizzle must be applied while the chocolate is still wet — if the chocolate has already started to set, the caramel sits on top of a partially crystallized surface and the two layers never fuse. Once the cookie is bitten or the temperature changes slightly during storage, the layers separate cleanly. To fix this on your current batch, warm a toothpick and run it gently through the set caramel drizzle to scratch the surface, then apply a second thin layer of melted chocolate over the top and allow to re-set. For future batches, make the caramel drizzle simultaneously with the chocolate finish — have the caramel cooling in a piping bag before you start spreading the chocolate, so you can drizzle immediately after the last cookie is coated.
The caramel drizzle pooled flat and disappeared into the chocolate instead of sitting on top
The caramel was too warm when drizzled. Fresh caramel straight off the heat is too fluid to hold a drizzle line — it needs 3–4 minutes to cool and thicken. Test by drizzling a line across a piece of parchment — if it holds a visible raised line that does not flatten within 10 seconds, it is ready. If it flattens immediately, wait another 60 seconds and test again.
The rings taste too sweet and the coconut flavor is muted
Sweetened shredded coconut combined with the caramel binder is intentionally sweet — this is the samoa flavor profile. If the sweetness is too pronounced, reduce the caramel binder sugar by 1 tablespoon (12g) on your next batch. Do not reduce by more than 2 tablespoons total or the caramel will not reach the correct set point. Alternatively, switch to a 70% cacao dark chocolate for the finish — the higher cocoa content provides more bitterness to offset the sweetness.
Expert Pro-Tips
Use a silicone mold on a half-sheet pan for stable transport. The filled silicone mold is floppy and impossible to move safely without a rigid surface underneath. Always set the mold on the pan before filling — never after.
Dampen your fingertips with cold water when pressing the mixture. The caramel is sticky and will pull at dry skin. Cold water creates a thin barrier that lets you press firmly without the mixture adhering. Rewet your fingers every 3–4 cavities.
Make the caramel drizzle while the chocolate is still wet. The two layers bond better when caramel lands on wet chocolate — they partially merge at the interface and the garnish adheres to both when sprinkled on top. If the chocolate sets fully before the caramel drizzle is applied, the layers will separate when the cookie is bitten.
At high altitude (above 3,500 feet / 1,067m), reduce the caramel target temperature by 2°F for every 1,000 feet above sea level. Water boils at a lower temperature at altitude, which means sugar concentrations are reached at lower thermometer readings than at sea level. At 5,000 feet (1,524m), cook the caramel binder to 231–236°F (111–113°C) rather than 235–240°F (113–115°C). In high humidity conditions (above 70% relative humidity), both the caramel binder and the chocolate finish will take longer to set — the caramel draws moisture from humid air and the chocolate may not firm to a snap at room temperature. Run an air conditioner or fan during the setting step and store finished cookies in a rigid airtight container immediately after the chocolate sets.
How to Store Samoas Cookies
Room Temperature Storage
Store finished samoas cookies in a single layer in an airtight container — a rigid plastic or glass container with a tight-fitting lid. Do not stack the cookies directly on top of each other without a barrier. The caramel base and the chocolate top are both tacky enough that direct stacking will cause the cookies to fuse together and the chocolate finish to pull away when separated. If you need to layer them, place a sheet of parchment paper between each layer.
Do not store in a zip-lock bag — the flexible walls allow the cookies to press against each other and the chocolate finish will crack or transfer onto adjacent cookies.
At room temperature, samoas cookies keep well for 4 days. The coconut body stays dense and chewy through day 3. By day 4 the coconut begins to dry slightly at the edges and the caramel base firms further — still good but past peak texture. Day 1 and day 2 are the best eating window.
Do not store near a heat source or in direct sunlight — the chocolate top will soften and the caramel drizzle will become tacky even in an airtight container if ambient temperature exceeds 75°F (24°C).
Refrigerator Storage
Refrigeration is not recommended as the primary storage method for these cookies. Cold air accelerates chocolate bloom — a harmless but visually unappealing white or grey film that forms on the chocolate surface when cocoa butter separates and re-crystallizes. The chocolate finish on these cookies is thin enough that bloom can appear within 24 hours of refrigeration.
If your kitchen is consistently above 75°F (24°C) and the chocolate finish is softening at room temperature, refrigerate in a rigid airtight container with parchment between layers. Allow the cookies to come to room temperature for 15–20 minutes before serving — cold caramel is significantly firmer and less chewy than room-temperature caramel, and the full texture of the cookie does not come through until it warms up.
Freezer Storage
Samoas cookies freeze well for up to 6 weeks. Freeze them after the chocolate and caramel have fully set but before the garnish softens. Arrange in a single layer on a parchment-lined tray and freeze uncovered for 1 hour until the chocolate top is completely hard — this flash-freeze step prevents the chocolate and caramel drizzle from smearing during storage. Transfer to a rigid airtight container or a heavy-duty zip-lock freezer bag with parchment between layers.
To thaw, remove from the freezer and place on a wire rack at room temperature for 25–30 minutes. Do not microwave — the caramel base will liquefy and the ring structure will collapse. Do not thaw in the refrigerator — see the bloom note above.
Freezing the unbaked mixture: The coconut-caramel mixture can be pressed into molds and frozen unbaked for up to 4 weeks. Freeze in the molds until solid, then pop out, wrap individually in plastic wrap, and store in a freezer bag. To bake from frozen, add 3–4 minutes to the bake time and do not thaw first — thawed unbaked rings will lose their shape before the oven sets them.
Serving Suggestion
Serve samoas cookies at room temperature — not warm, not cold. The caramel base needs to be at room temperature to deliver its full chew, and the chocolate top needs to be firm enough to give that faint snap when bitten.
🗒 Luna’s Note: I serve these on a flat white plate with a small cup of black coffee alongside — the bitterness cuts through the sweetness of the caramel and coconut in a way that makes the chocolate layer taste more complex than it does on its own. It is the combination I always come back to.
These are the right cookies for a cookie exchange, a holiday dessert table, or any occasion where you want something that looks considerably more involved than it actually is. The ring shape and the layered finish do most of the visual work for you.
Frequently Asked Questions About Samoas Cookies
What are samoas cookies made of?
Samoas cookies are made of a toasted sweetened shredded coconut ring bound with soft-ball stage caramel, finished with a dark chocolate top, a caramel drizzle, and a toasted coconut garnish. The coconut body uses three cups of sweetened medium-shred coconut per batch of 16 rings. The binder is cooked from granulated sugar, unsalted butter, and heavy whipping cream to 235–240°F (113–115°C). Two egg whites provide secondary protein structure. The chocolate finish uses 60–70% cacao dark chocolate thinned with refined coconut oil.
Are samoas the same as caramel delights?
Yes — samoas and caramel delights are the same Girl Scout cookie sold under two different names depending on which licensed bakery produces them for your region. ABC Bakers calls them caramel delights and Little Brownie Bakers calls them samoas. The cookie is identical in structure: a toasted coconut ring with a caramel binder, dark chocolate finish, and caramel drizzle. This homemade version replicates that profile without the palm oil and artificial preservatives found in the commercial version — the toasted coconut flavor is noticeably more pronounced when made fresh.
How do you keep homemade samoas from falling apart?
Homemade samoas hold together when two variables are controlled: caramel temperature and unmolding timing. The caramel binder must reach 235–240°F (113–115°C) — the soft-ball stage — before the coconut is folded in. Below this temperature the caramel retains too much water and the rings will not hold their shape. The rings must also rest in the mold for a full 10 minutes after coming out of the oven — the caramel base is still molten underneath the set coconut surface until this rest is complete. A candy thermometer and a timer solve both problems reliably on the first bake.
Can I make samoas cookies ahead of time?
Yes — these cookies are an excellent make-ahead option. The fully finished cookies keep for 4 days at room temperature in a rigid airtight container with parchment between layers. For longer lead time, flash-freeze the finished cookies in a single layer for 1 hour then transfer to a rigid container — they keep frozen for up to 6 weeks and thaw at room temperature in 25–30 minutes with no texture loss. The unbaked coconut-caramel rings can also be pressed into molds and frozen for up to 4 weeks — bake directly from frozen, adding 3–4 minutes to the bake time. The caramel binder itself can be made up to 2 hours ahead and rewarmed gently over low heat before adding the coconut.
Can you freeze samoas cookies?
Yes — samoas cookies freeze well for up to 6 weeks. Flash-freeze the finished cookies in a single layer on a parchment-lined tray for 1 hour before transferring to a rigid airtight container with parchment between layers — this prevents the chocolate top and caramel drizzle from smearing during storage. Thaw at room temperature on a wire rack for 25–30 minutes. Do not microwave to thaw — the caramel base will liquefy and the ring will lose its shape. The unbaked coconut-caramel mixture can also be frozen pressed into molds for up to 4 weeks — bake directly from frozen and add 3–4 minutes to the bake time without thawing first.
What chocolate is best for samoas cookies?
A 60–70% cacao dark chocolate bar gives the closest result to the commercial samoa finish — deep, slightly bitter, and firm enough to set with a faint snap at room temperature. Ghirardelli 60% cacao bittersweet baking bars and Lindt 70% Excellence bars both melt cleanly and set well. Do not use milk chocolate — it is too sweet against the caramel and coconut and sets too soft in warm conditions. Semi-sweet chocolate chips work as a substitute but many brands contain stabilizers that affect how cleanly the chocolate melts and sets. If using chips, choose a brand with a short ingredient list and no added palm oil or wax.
Can I double this recipe, and does it work at high altitude?
This recipe doubles reliably — multiply all ingredients by two and make the caramel binder in two separate batches rather than one large batch, since a double-volume caramel is harder to bring to temperature evenly in a standard home saucepan. Bake in two separate batches on separate pans — do not crowd a single pan. At high altitude above 3,500 feet (1,067m), reduce the caramel target temperature by 2°F per 1,000 feet above sea level — at 5,000 feet (1,524m) cook to 231–236°F (111–113°C) rather than 235–240°F (113–115°C). In high humidity above 70% relative humidity, the chocolate finish will take longer to set and the caramel drizzle will remain tacky longer — store cookies in a rigid airtight container as soon as the chocolate is firm.
More Recipes You’ll Love
If you made these samoas cookies and want to keep baking in the same coconut-chocolate-caramel territory, these are the recipes I would make next:
- Oatmeal Chocolate Chip Cookies — chewy, deeply flavored cookies with the same dense, satisfying texture as the coconut body in these samoas. A natural next bake if you love a cookie with real chew.
- Peanut Butter Chocolate Chip Cookies — another no-mixer cookie with a similarly dense, chewy interior and a chocolate finish. If the samoa texture is what you are after, peanut butter chocolate chip cookies hit the same notes from a different angle.
Samoas Cookies Recipe
Ingredients
Equipment
Method
- Position oven rack in the middle and heat to 325°F (163°C), then lightly grease all 16 cavities of a silicone donut mold (3-inch diameter) with neutral oil or cooking spray and set the mold on a light-colored aluminum half-sheet pan.
- In a medium heavy-bottomed saucepan over medium heat, combine ⅔ cup (130g) granulated sugar, ¼ cup (57g) unsalted butter, and ¼ cup (60ml) heavy whipping cream, stirring constantly until the butter melts and sugar dissolves.
- Once the mixture reaches a full rolling boil, stop stirring, clip a candy thermometer to the pan, and cook without stirring until the temperature reads 235–240°F (113–115°C) — the soft-ball stage.
- Remove the pan from heat, stir in 1 tsp (4g) pure vanilla extract and ¼ tsp (1.5g) fine sea salt, then immediately add 3 cups (255g) sweetened shredded coconut and fold with a silicone spatula in 15 slow strokes until every strand is fully coated.
- Add 2 large room-temperature egg whites and fold in 8–10 strokes until no streaks of white remain.
- Working quickly, portion approximately 2 tablespoons (35g) of coconut mixture per mold cavity, press firmly and evenly with dampened fingertips until level with the top of the cavity, and keep the center hole clear.
- Bake at 325°F (163°C) for 12–14 minutes until the coconut at the base and edges is deep golden amber and the tops are pale cream to light gold.
- Remove from the oven and leave the rings in the mold on the pan for exactly 10 minutes, then gently peel the silicone mold away from each ring and transfer flat-side down to a wire cooling rack.
- Allow rings to cool completely at room temperature for approximately 30 minutes before applying the chocolate finish.
- In a small microwave-safe bowl, combine 4 oz (113g) finely chopped dark chocolate and 1 tsp (4g) refined coconut oil, then microwave at 50% power in 20-second bursts, stirring between each, until fully melted and smooth.
- Spoon approximately 1½ teaspoons of melted chocolate onto the top of each ring and spread with the back of a spoon or small offset spatula to cover the top surface evenly.
- In a small clean saucepan over medium heat, cook ¼ cup (50g) granulated sugar without stirring until fully melted and deep amber, then remove from heat, carefully stir in 2 tbsp (30ml) warmed heavy cream, 1 tbsp (14g) butter, and a pinch of salt until smooth, and allow to cool 3–4 minutes until slightly thickened but still pourable.
- Transfer caramel to a piping bag or squeeze bottle and drizzle in thin lines over the wet chocolate top of each ring.
- Immediately sprinkle 2 tbsp (15g) finely chopped toasted coconut or coconut toffee bits over the wet chocolate and caramel, pressing lightly to adhere.
- Allow cookies to set at room temperature for 20–25 minutes until the chocolate is fully firm, then serve or store in a rigid airtight container with parchment between layers.