Peach Dump Cake (Golden, Jammy, Crumbly-Topped)
There is something specific about opening a can of peaches in heavy syrup and knowing that in 55 minutes you will have something that smells like it came from a Southern kitchen and took all day. No mixer, no batter, no careful timing. Just four ingredients layered in a dish and an oven that does everything else.
I’ve tested this recipe across three different summers, and every time I bring it to the table warm, people assume I’ve been baking for hours. The peach syrup caramelizes as it heats, the dry cake mix absorbs the butter and turns into a coarse, clumped crumble on top, and the whole thing comes out of the oven looking deeply golden with fruit bubbling up around the edges. The texture contrast is what makes this easy peach dump cake work — juicy, glossy peaches on the bottom, crumble on top.
🗒 Luna’s Note: I started keeping two cans of sliced peaches in heavy syrup in my pantry specifically so I can make this on a weeknight without a grocery run. It’s one of the only desserts I make that requires zero planning.
I tested this with one can of peaches versus two. One can left the bottom of the dish patchy and dry in spots — the syrup didn’t distribute fully, and the topping had nowhere to absorb moisture on one side. Two full 15 oz cans gave me an even, glossy base with enough syrup to bubble up through the topping as it baked. Two cans is the version I kept.
I also tested cold butter sliced thin versus melted butter poured over the top. Melted butter soaked through the dry cake mix too quickly in some spots and left others dry and powdery. Cold butter sliced into ¼-inch pats distributed more gradually as the oven warmed up, giving a more even golden topping across the full surface. Cold butter is the right call every time.
The cinnamon is optional, but I don’t skip it. A light dusting over the top before baking settles into the coarse crumble as it cooks and gives every bite a faint warm spice that cuts through the sweetness of the syrup.
| Prep Time | Cook Time | Total Time | Yield | Difficulty |
|---|---|---|---|---|
| 10 min | 45 min | 55 min | 8 servings | Easy |
| Calories | Fat | Carbs | Protein |
|---|---|---|---|
| ~370 kcal | 16g | 56g | 3g |
Macros are approximate and will vary based on ingredient brands and serving size.
INGREDIENTS & TOOLS
Ingredients
For the Peach Layer
- Two 15 oz (425g each / 850g total) cans sliced peaches in heavy syrup, undrained
For the Topping
- One 15.25 oz box yellow cake mix (such as Duncan Hines Classic Yellow)
- ½ cup (113g) unsalted butter, cold, sliced into ¼-inch pats
- ½ tsp (1g) ground cinnamon
For Serving
- Vanilla ice cream (optional)
Before You Start
- Slice the cold butter into ¼-inch pats before you begin — have them ready on the cutting board so layering is fast and even
- Open both cans of peaches but do not drain them — the syrup goes in with the fruit
- Set your baking dish on the counter and preheat the oven first — never assemble into a cold or partially heated oven
- I use Del Monte Sliced Peaches in Heavy Syrup — consistently good syrup-to-fruit ratio and widely available at most grocery stores. Any brand works as long as the label says heavy syrup, not juice or water.
Necessary Tools
- Kitchen scale
- Oven
- 8×8-inch (20×20 cm) ceramic or glass baking dish
- Kitchen knife (for slicing butter)
- Cutting board
- Spoon or silicone spatula (for spreading peaches)
- Measuring cups and spoons (optional — scale preferred)
- Oven thermometer (optional — worth using if your oven runs hot or cold)
How to Make Peach Dump Cake
Step 1: Heating the Oven for an Even, Golden Bake
Place your 8×8-inch (20×20 cm) ceramic or glass baking dish on the counter, then set your oven to 350°F (175°C) and allow it to fully preheat before the dish goes in. This matters more than it sounds. A cold or partially heated oven means the butter starts melting before the oven is hot enough to set the topping — you get uneven browning and a greasy surface instead of a coarse, clumped crumble.
Give the oven a full 10–15 minutes to reach temperature. Do not rush this step and do not start layering until the oven is fully up to heat — assembling too early means the butter begins softening at room temperature before it ever reaches the oven, which throws off the gradual absorption that makes the topping work.
Don’t slide the dish in while the oven is still climbing to temperature. A fully preheated oven is not optional for this recipe.
Your oven should read 350°F (175°C) on an oven thermometer and the baking dish should be sitting empty on the counter, ready to receive the peach layer.
Step 2: Building the Peach Base for Maximum Juiciness
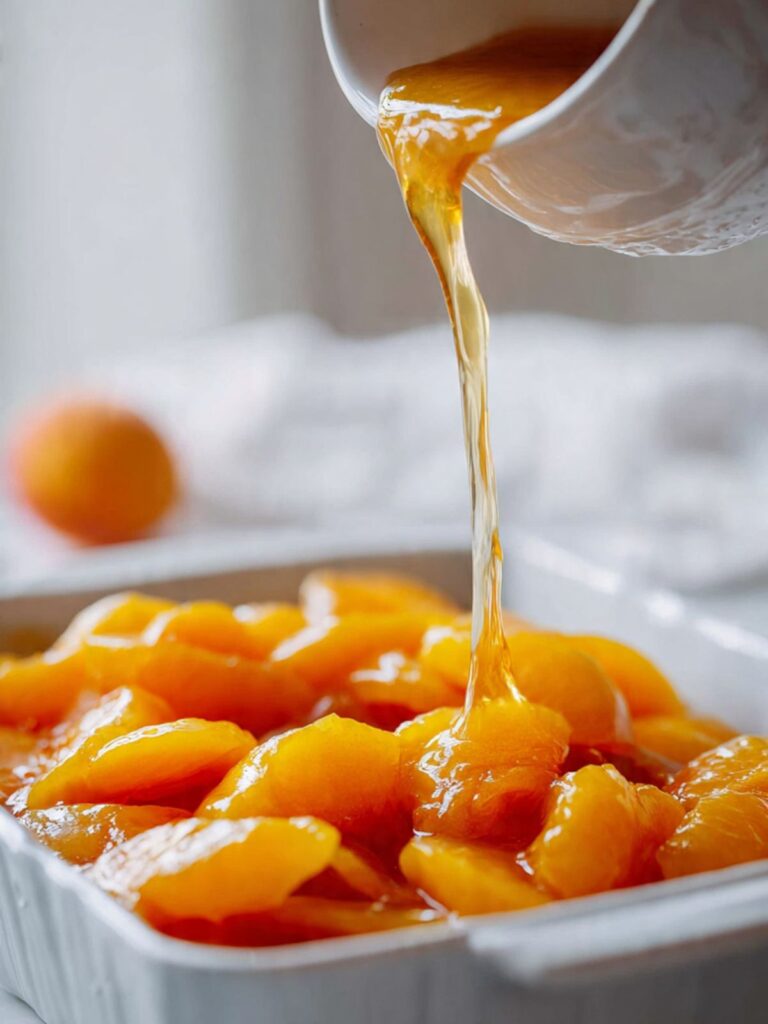
Open both 15 oz (425g each / 850g total) cans of sliced peaches in heavy syrup — do not drain them. Pour everything into your 8×8-inch (20×20 cm) ceramic or glass baking dish, syrup and all. The syrup is not an excess — it is the moisture source that keeps the bottom layer jammy and prevents the fruit from drying out under 45 minutes of heat.
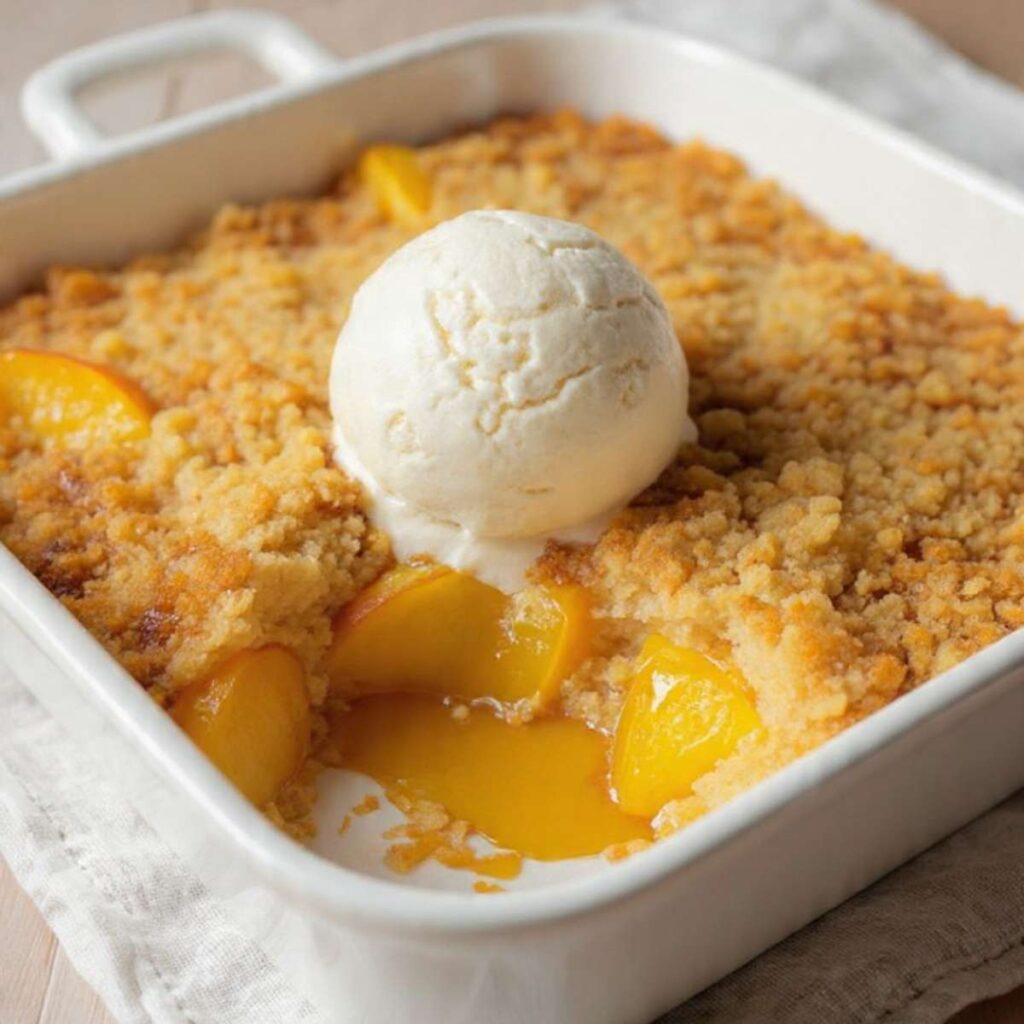
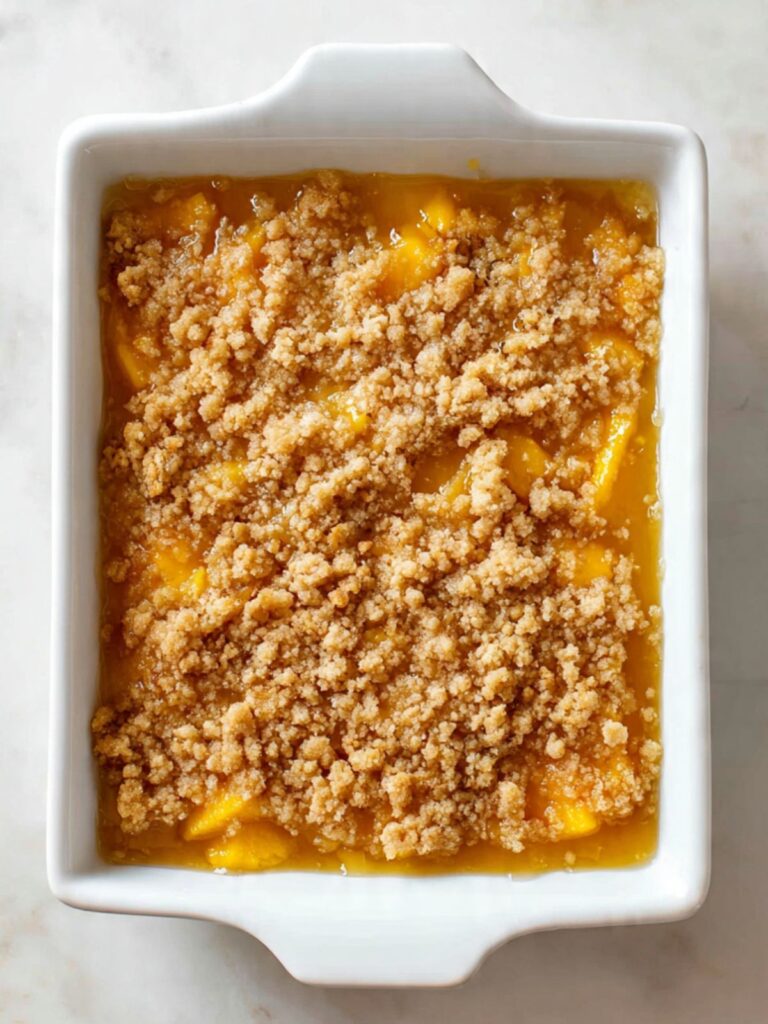
The two 15 oz (425g each) cans sliced peaches in heavy syrup bring concentrated dissolved sugar into the dish that does two things simultaneously as it heats: it converts to steam that rises through the cake mix layer above, and it caramelizes at the edges of the dish where it makes direct contact with the hot ceramic. Both of those processes are what give you the deep amber, glossy filling visible in the images.
Use a spoon or silicone spatula to spread the peaches into an even layer so the entire bottom of the dish is covered. As you can see in the overhead baking dish photo, the peaches should sit in a thick, glossy layer with syrup pooled around and between each slice.
Don’t shake the dish to level the peaches — use the spatula to physically move them into the corners. Shaking leaves gaps at the edges where the topping will dry out.
Your peach layer should look fully glossy and evenly distributed with no dry patches of exposed baking dish visible anywhere across the bottom.
Step 3: Layering the Dry Cake Mix for a Coarse, Clumped Crumble
Open your one 15.25 oz box yellow cake mix (such as Duncan Hines Classic Yellow) and sprinkle it evenly over the peach layer straight from the box — dry, unmixed, exactly as it comes. The box blend contains all-purpose flour, sugar, baking powder, salt, and a small amount of emulsified fat already built into the blend. These are the raw components that will absorb butter from above and steam from below, transforming from a flat powder layer into a coarse, clumped crumble without any mixing required.
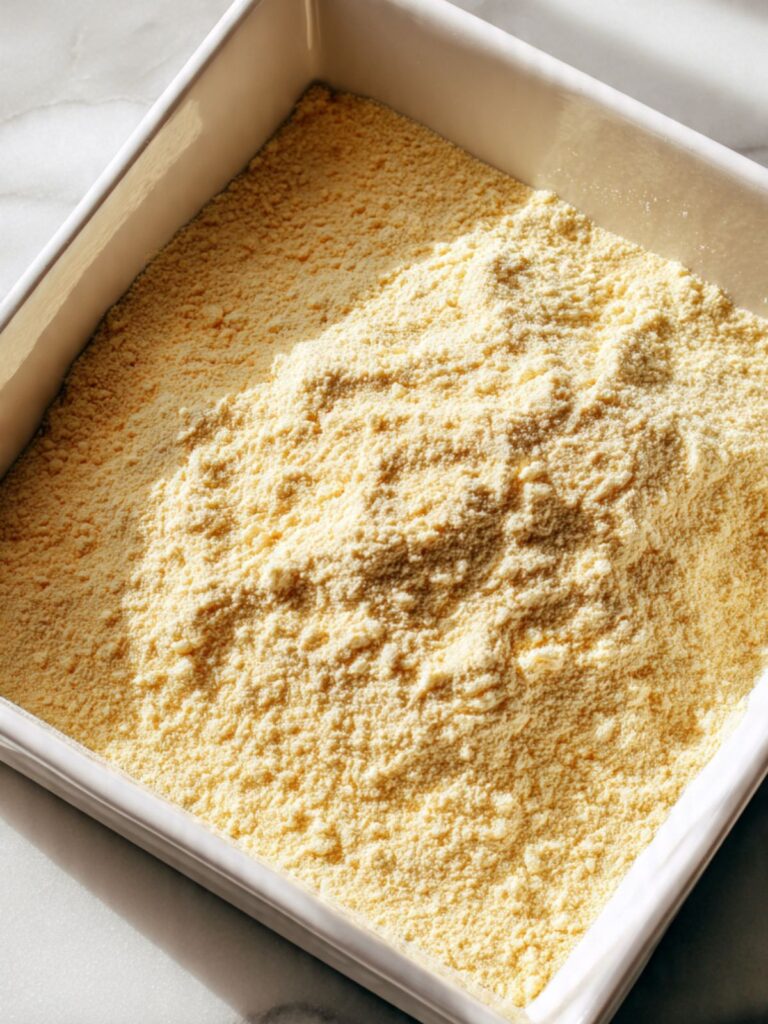
Start at one edge of the dish and work your way across in a steady back-and-forth motion so no area gets a thicker or thinner layer than another. The goal is a completely flat, even surface of dry powder that fully hides the peach layer below.
Do not stir, fold, or press the cake mix down into the peaches. The moment the two layers combine before baking, you lose the textural separation that makes this canned peach dump cake work — the crumble top and the jammy fruit bottom need to stay as separate layers going into the oven.
The surface should look completely powdery and flat, with no peach or syrup visible through the top.
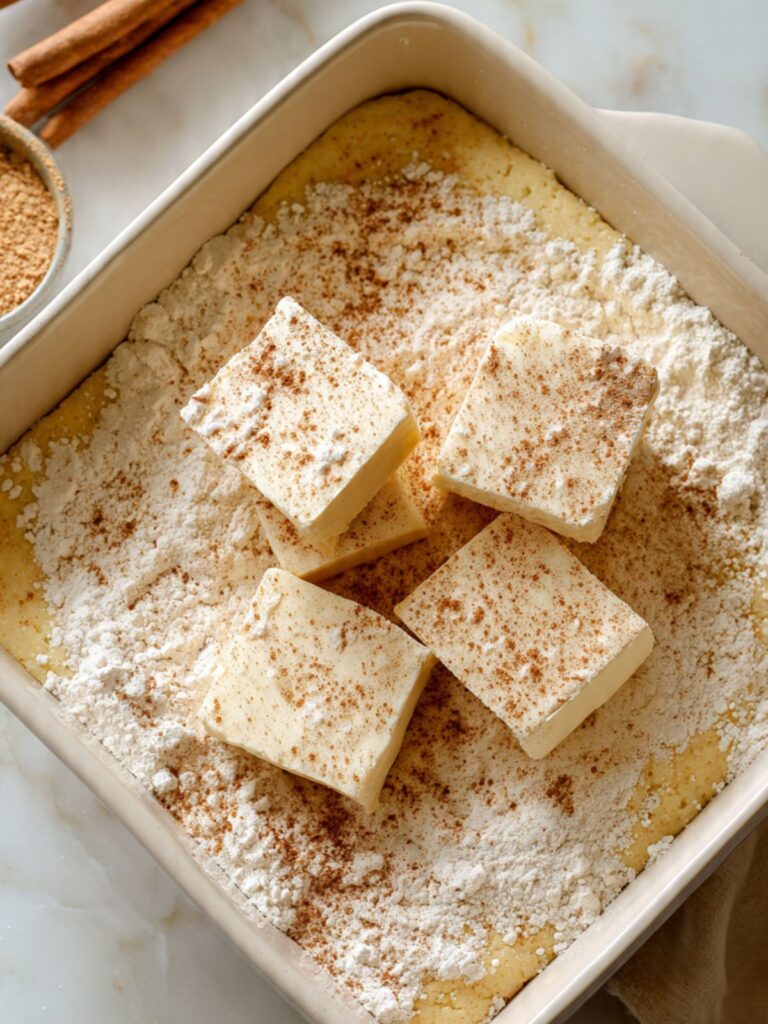
Step 4: Placing the Butter for an Even Golden Crust
Take your ½ cup (113g) cold unsalted butter — already sliced into ¼-inch pats on your cutting board — and place them across the surface of the dry cake mix. Work in rows, spacing the pats roughly 1 inch apart, covering as much of the surface as you can from edge to edge and corner to corner.
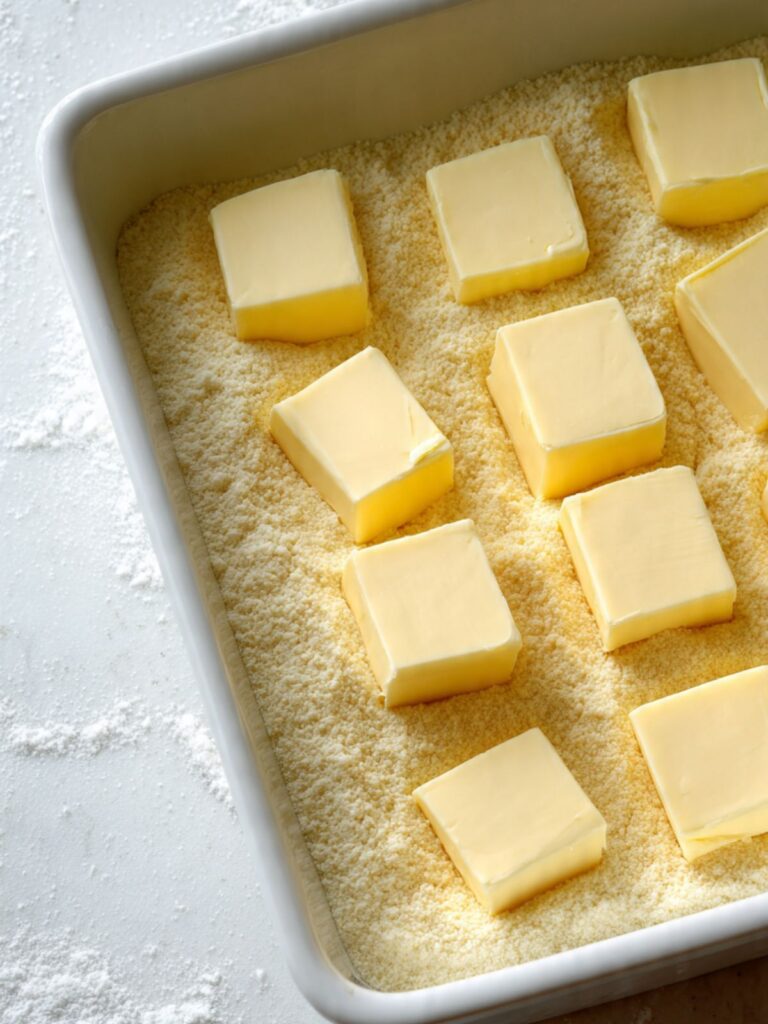
The butter is the only fat source the topping has. Where butter lands, the cake mix absorbs it gradually as the oven heats and turns golden and clumped. Where butter does not reach, the dry mix stays powdery and raw. This is the single most impactful step in the whole recipe — take an extra 30 seconds to cover the surface as thoroughly as you can.
Do not melt the butter before placing it. Cold butter pats release fat gradually and evenly as the oven temperature climbs, which gives consistent lateral absorption across the whole surface. Melted butter floods specific areas immediately and leaves others completely untouched.
Your ½ cup (113g) cold unsalted butter pats should be spread across the full surface in a relatively even grid, with no large uncovered patches of dry cake mix visible between them.
Step 5: Adding the Cinnamon and Baking Until Deep Golden
If you are using cinnamon — and I recommend it — lightly sprinkle ½ tsp (1g) ground cinnamon over the butter pats and cake mix surface now. You should still see the cake mix underneath. This is a finishing layer, not a coating.
Slide the dish into your fully preheated 350°F (175°C) oven on the center rack. Bake for 43–47 minutes. The topping is done when it is deep golden brown across the full surface, with the peach syrup visibly bubbling up around the edges and in any gaps between butter pats.
🗒 Luna’s Note: I check at 40 minutes and rotate the dish 180 degrees if one side is browning faster than the other. Ceramic dishes hold heat unevenly depending on where they sit in the oven.
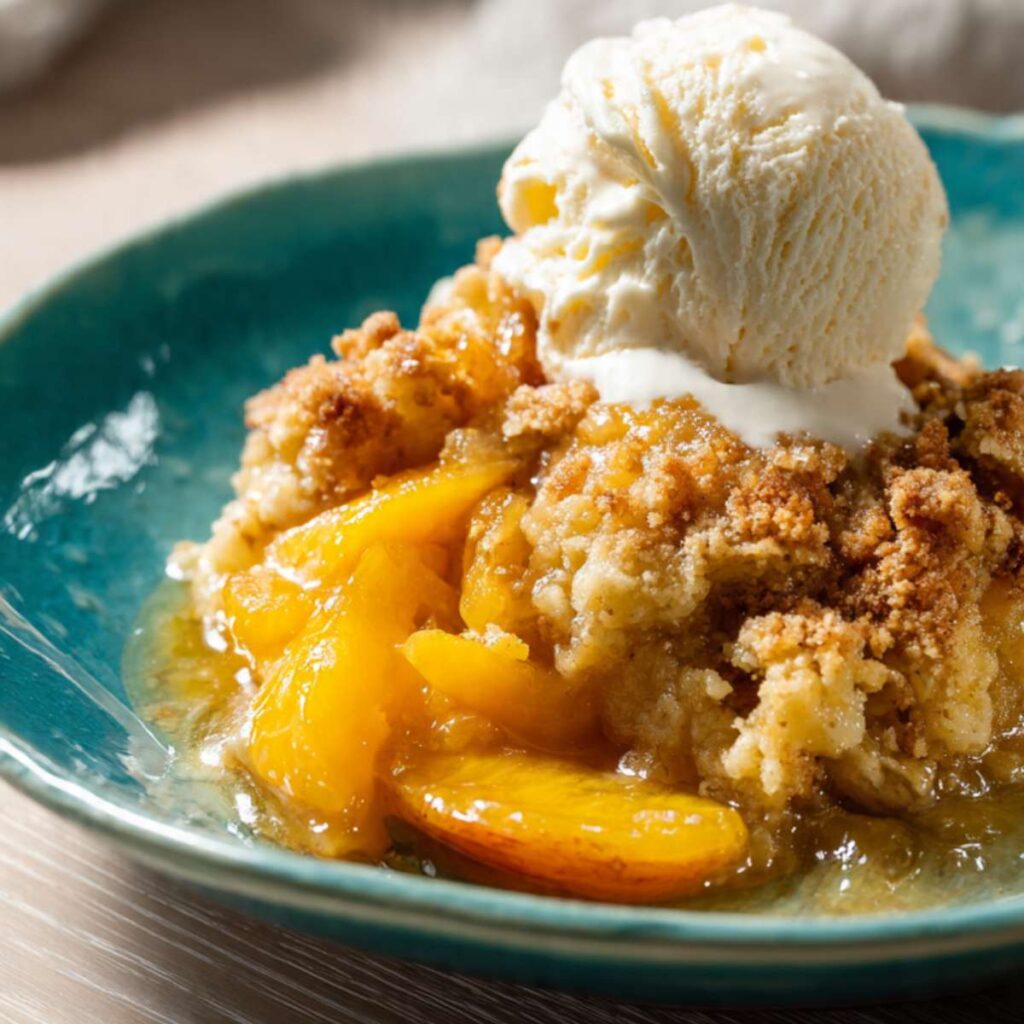
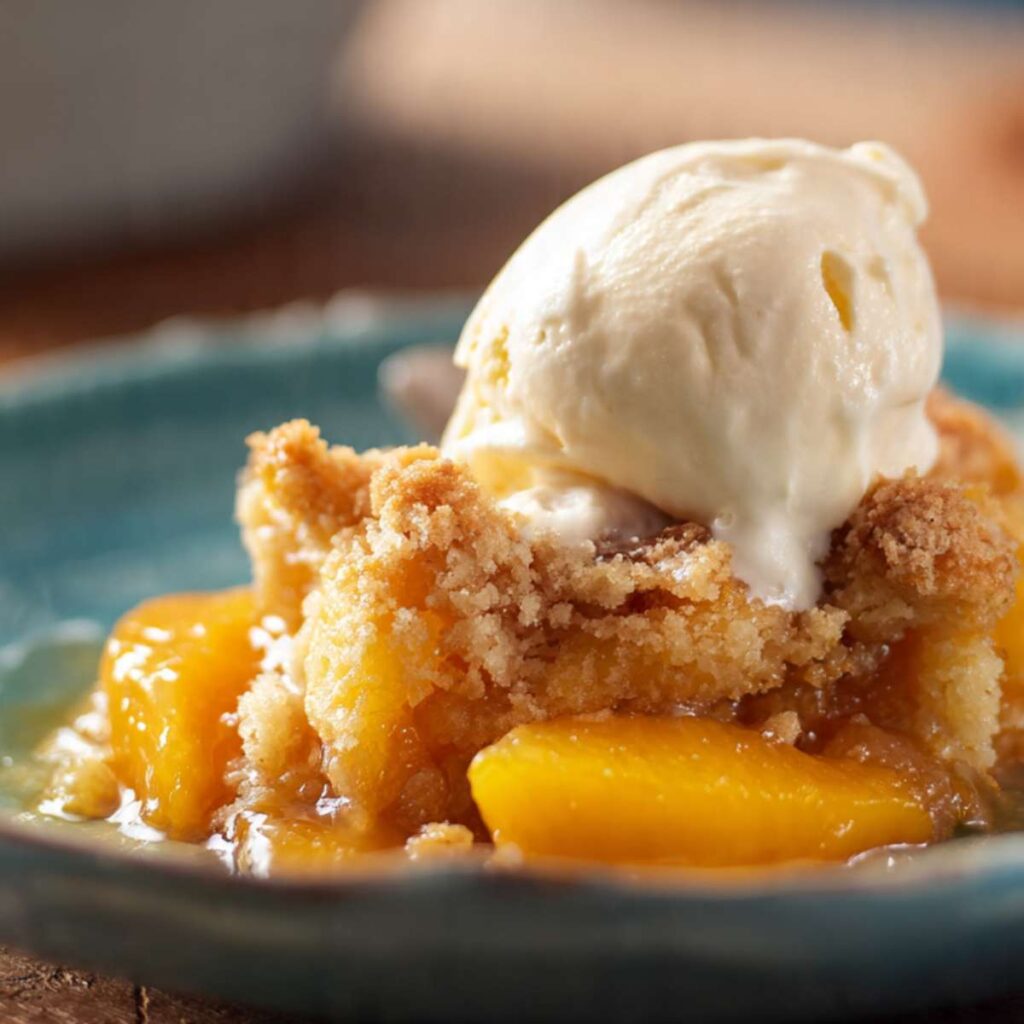
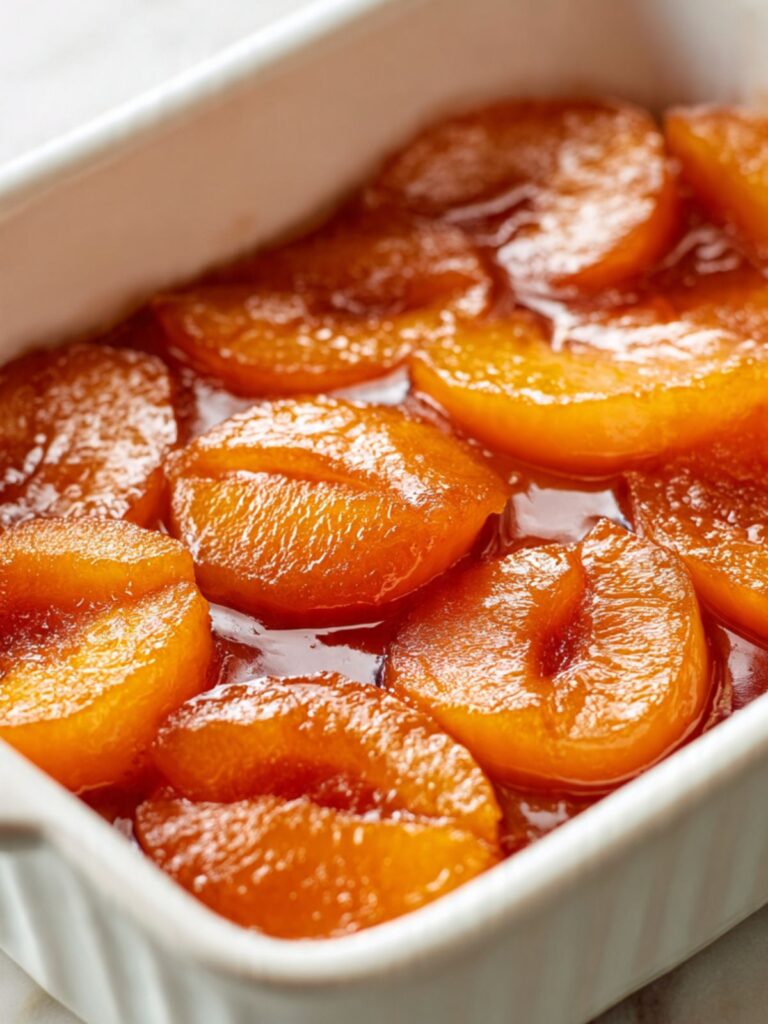
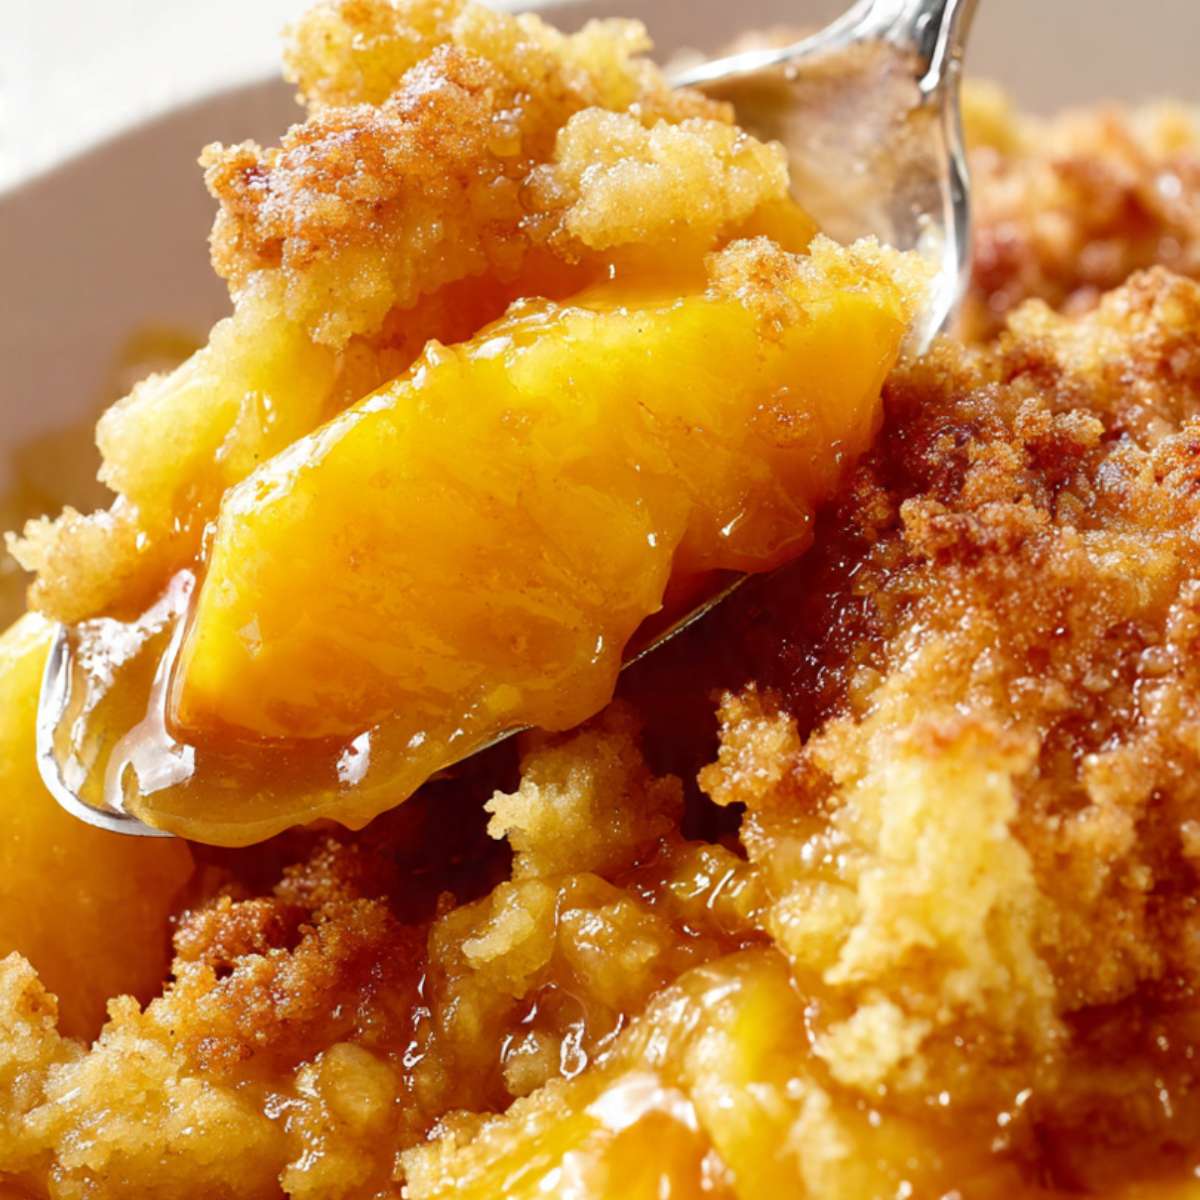
Do not pull the dish when the top just starts to turn golden — that is underdone. You want the full surface deeply golden and coarse-textured, not pale yellow or smooth. As you can see in the extreme close-up spoon shot, the finished topping has a deep amber-brown color with visible clumped, granular texture and caramelized edges where the syrup has bubbled up through the gaps. That is your target.
Your finished cake should have a uniformly deep golden, coarse crumble topping with bubbling amber syrup visible at the edges and no powdery dry spots anywhere on the surface.

Step 6: Resting the Cake So the Filling Sets
Remove the baking dish from the oven and place it on a heat-safe surface. Let it rest uncovered for 10 minutes before scooping.
This rest period is not optional. The peach syrup comes out of the oven at a full boil — it is thin, loose, and will run everywhere the moment you scoop into it. Ten minutes of carryover cooking lets the syrup thicken back down to a glossy, jammy consistency that clings to the peaches instead of pooling across the plate. The sugar concentration increases relative to the free liquid as the temperature drops, which is what pulls the filling from soupy to spoonable.
Don’t cover the dish while it rests — trapping steam turns the coarse, clumped crumble topping soft and wet in under 5 minutes.
After 10 minutes, the filling should look thick and glossy, the bubbling should have stopped completely, and the topping should still feel slightly warm and textured when you tap it lightly with the back of a spoon.
The Science Behind the Best Peach Dump Cake
Why Heavy Syrup Is the Secret to a Jammy Peach Layer
Canned peaches packed in heavy syrup contain a significantly higher concentration of dissolved sugar than peaches packed in juice or water. When that syrup heats up inside a sealed baking environment, two things happen simultaneously. First, the water in the syrup converts to steam, which rises through the cake mix layer and hydrates it from below. Second, the sugar in the syrup caramelizes at the edges of the dish where it makes direct contact with the hot ceramic — this is what produces the deep amber, almost toffee-like color you see bubbling up around the perimeter in the overhead baking dish shot.
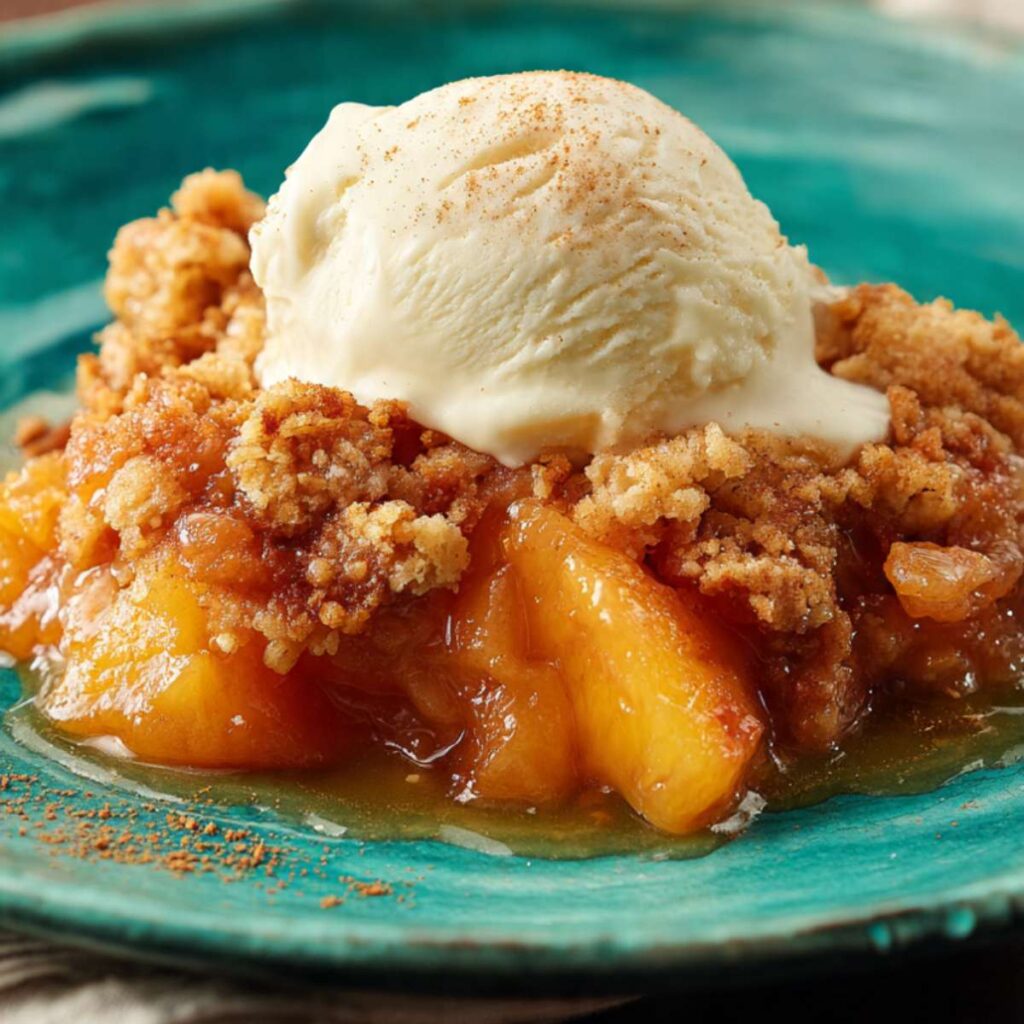
The result is a peach layer that finishes thick, glossy, and intensely flavored — not watery or thin. If you swap heavy syrup for juice-packed peaches, you lose a significant portion of that sugar concentration, and the filling comes out noticeably thinner and less caramelized. The difference in the bowl is visible — heavy syrup gives you that dark amber pooled syrup you see in the teal bowl serving shots. Juice-packed gives you something pale and loose.
🗒 Luna’s Note: I once tested this with fresh peaches tossed in sugar to mimic the syrup. The flavor was good but the texture was wrong — the filling stayed too loose because fresh peach juice doesn’t have the same viscosity as heavy syrup. Canned is the right call for this specific recipe. For a different take on the dump cake method with a chocolate base, the chocolate dump cake post covers how moisture levels shift when you change the fruit layer entirely — the same principle applies here.
How Dry Cake Mix Becomes a Coarse Crumble Without Any Mixing
Yellow cake mix is not just flour and sugar. A standard 15.25 oz box contains all-purpose flour, sugar, leavening agents — baking powder and sometimes baking soda — salt, and a small amount of emulsified fat already built into the blend. When cold butter pats are placed on top of the dry mix and the dish goes into a hot oven, the butter melts slowly and spreads laterally through the powder layer via capillary action — the same process that pulls liquid through a paper towel.
As the butter moves through the dry mix, it coats the flour and sugar particles and creates irregular clumps. The leavening agents activate from the steam rising up from the peach layer below. The fat and sugar then hit the Maillard reaction threshold — around 280–330°F (138–166°C) — and the surface turns deep golden and develops the coarse, clumped texture you see in the extreme close-up spoon shot. No mixing, no rubbing, no separate streusel prep. The layering does all of it.
This is why butter coverage is so critical in this peach dump cake with yellow cake mix. The Maillard reaction only happens where fat is present. Dry patches with no butter contact stay powdery and raw because they never reach the fat content or temperature needed to brown. Full coverage is not optional — it is the mechanism behind the topping.
Why the Rest Period Changes the Texture of the Filling
When the dish comes out of the oven, the peach syrup is at a rolling boil — easily above 200°F (93°C). At that temperature, the dissolved sugars are fully liquid and the filling has almost no viscosity. Scooping immediately gives you a soupy, broken result where the fruit and syrup separate on the plate.
As the filling cools during the 10-minute rest, carryover cooking continues to work on the sugar solution. The water activity drops and the sugar concentration increases relative to the liquid phase — the syrup thickens as it cools because the ratio of dissolved sugar to free water shifts. By the time 10 minutes have passed, the filling has tightened into that glossy, spoonable consistency you see in the served bowl shots, where the syrup coats each peach slice and pools slightly at the base of the bowl rather than running off the fruit entirely.
Gluten development plays no role in this recipe — there is no mixing, no batter, no structure built through agitation. The thickening is entirely sugar-driven, which is why the rest period is the only window you have to let it happen. Covering the dish during this rest traps steam and softens the topping — always rest it uncovered on a heat-safe surface.
Troubleshooting & Pro-Tips
Common Mistakes
The topping is still powdery and raw in spots after 45 minutes. This is a butter coverage problem. The Maillard reaction only occurs where fat is present — dry cake mix with no butter contact never reaches the fat ratio or temperature needed to brown, so those areas stay raw and powdery no matter how long the dish stays in the oven. The fix is simple: before the dish goes in next time, take an extra 60 seconds to check for large uncovered patches and fill them in with additional pats. If your dish is already in the oven and you catch this at the 25-minute mark, you can carefully lay a few extra thin pats over the dry spots and continue baking. Do not try to fix it by pressing the dry mix down — that compacts the topping and produces a dense, doughy layer instead of a coarse crumble.
The peach filling came out watery and thin instead of glossy and jammy. Two likely causes. First, the peaches were drained before going in — even partially draining the cans removes the concentrated sugar syrup that caramelizes and thickens during baking. Always pour both cans in completely undrained. Second, the cake was scooped too soon. Carryover cooking continues to thicken the syrup for the full 10 minutes after the dish leaves the oven — scooping at 3–4 minutes gives you a loose, soupy result that looks undercooked even when the bake itself was perfect. The syrup needs that rest window to tighten from a thin boiling liquid into a glossy, spoonable filling.
The top browned too fast and the edges look dark before the center is done. This is an oven hot spot issue, not a recipe issue. Ceramic dishes absorb and hold radiant heat unevenly depending on where they sit in the oven. At the 30-minute mark, rotate the dish 180 degrees so the side facing the back of the oven moves to the front. If the top is browning faster than you want across the whole surface, tent a loose piece of aluminum foil over the dish for the final 10 minutes. Do not seal the foil tight — you want air circulation underneath, not a steam trap that softens the crumble topping before it finishes crisping.
The filling looks very loose and saucy even after the 10-minute rest. Some brands run higher syrup volume relative to fruit than others. If your filling is looser than what you see in the images after the full rest, drain one can slightly before your next bake — pour off about ¼ cup (60ml) of syrup from one can before adding it to the dish. Do not drain both cans and never drain completely — the syrup is still the primary moisture source for the topping and the filling.
3 Expert Pro-Tips
Use a light-colored ceramic or glass baking dish, not dark metal. Dark metal pans absorb more radiant heat and transfer it faster to the bottom of the dish. For a fruit-based dessert with a high sugar content like this one, that means the peach syrup caramelizes too aggressively at the bottom and can scorch before the topping is fully baked through. A white ceramic or clear glass dish distributes heat more gently and gives you better control over both layers simultaneously. The white square ceramic baking dish in the overhead image is exactly the right vessel — that even, golden topping across the full surface is partly a function of the dish material, not just the bake time.
Slice your butter as thin and even as you can — aim for ¼-inch pats. Thick uneven chunks of butter take longer to melt at the center than at the edges. By the time a thick pat fully melts, the edges of that same pat have already soaked through the cake mix and created a greasy, over-saturated spot. Thin, even ¼-inch pats melt at a consistent rate across their full surface area, which means the fat distributes laterally in a more even spread and the topping browns uniformly. A sharp knife and 30 seconds of patience at the cutting board before you start layering makes a visible difference in how the topping bakes.
Do not skip the cinnamon — but measure it. Half a teaspoon is the correct amount for this recipe. Less than that and the warm spice note gets buried entirely under the sweetness of the heavy syrup and the vanilla already built into the yellow cake mix. More than ¾ tsp and the cinnamon starts to dominate, which competes with the peach rather than supporting it. The light, even dusting you see on the ice cream scoop in the teal plate serving shot — and the faint warm color visible across the crumble surface — is exactly what ½ tsp (1g) ground cinnamon looks like distributed across an 8×8-inch (20×20 cm) surface. That is your visual target before the dish goes in.
How to Store Peach Dump Cake
Room Temperature
Peach dump cake can sit at room temperature for up to 2 hours after baking — long enough to serve warm at a gathering without refrigerating between helpings. Beyond 2 hours, the high moisture content of the peach syrup makes it unsafe to leave out. Do not leave it on the counter overnight.
Store in the baking dish covered tightly with plastic wrap or aluminum foil, or transfer to an airtight container. Do not stack or layer scooped portions on top of each other — the coarse crumble topping will compress under the weight and lose its texture entirely. Keep at room temperature only if you plan to finish it within the same 2-hour window.
Refrigerator
This is the correct storage method for anything beyond same-day serving. Transfer leftovers to an airtight container or cover the baking dish tightly with plastic wrap and refrigerate for up to 4 days.
The topping will soften in the fridge as it absorbs moisture from the peach layer — this is normal and unavoidable. The coarse, clumped crumble texture will not survive refrigeration intact, but the flavor holds well across 4 days. To bring back some of the texture, reheat individual portions in a 350°F (175°C) oven for 8–10 minutes rather than microwaving. The microwave reheats faster but creates steam inside the container that turns the topping soft and flat all the way through.
🗒 Luna’s Note: I reheat leftover portions in a small oven-safe dish at 350°F (175°C) for about 8 minutes. The topping does not fully crisp back up but it gets warm and slightly textured again — close enough for a weeknight leftover, especially with a fresh scoop of ice cream on top.
Freezer — Baked
Peach dump cake freezes adequately but not ideally. The peach layer holds up well — the fruit and syrup freeze and thaw without significant texture loss. The topping is the problem. After freezing and thawing, the coarse crumble layer absorbs moisture from the fruit and becomes dense and slightly gummy rather than clumped and golden.
If you do freeze it, wrap individual portions tightly in plastic wrap, then place in a zip-top freezer bag with as much air removed as possible. Freeze for up to 2 months. Thaw overnight in the refrigerator, then reheat in a 350°F (175°C) oven for 12–15 minutes. Manage expectations on the topping texture — it will be noticeably softer and more compact than the fresh-baked version shown in the images.
Freezer — Unbaked
This is not a recipe that benefits from freezing unbaked. The dry cake mix layer begins absorbing moisture from the peach syrup the moment the two layers make contact. During the freezing and thawing process, that absorption accelerates — by the time the dish goes into the oven, the topping is already partially hydrated and will bake up dense and flat rather than coarse and clumped.
The make-ahead move that actually works for this recipe is ingredient staging, not pre-assembly. Pre-slice the ½ cup (113g) cold unsalted butter into ¼-inch pats and refrigerate them in a small covered container for up to 3 days. Open both cans of sliced peaches in heavy syrup and have them ready beside the dish. When you are ready to bake, assembly takes under 10 minutes and the dish goes straight into the oven fresh — which is always the better result.
Serving Suggestion
I serve this warm, about 10 minutes out of the oven, with a single scoop of vanilla ice cream placed directly on top of the coarse crumble. The ice cream starts melting the moment it hits the warm cake — it runs down through the clumped topping and pools slightly into the peach syrup at the edges of the bowl, which is exactly what you see in the teal bowl serving shots. That combination of warm jammy peach, coarse golden crumble, and cold melting ice cream in the same spoonful is the whole point of this dessert.
🗒 Luna’s Note: I dust a small pinch of ground cinnamon over the ice cream scoop right before serving — the same cinnamon already baked into the cake below. It costs three seconds and makes the plate look like you thought about it.
Frequently Asked Questions
What is the difference between a dump cake and a cobbler?
A cobbler has a true batter or biscuit topping that is mixed separately and spooned or poured over the fruit before baking. Because the topping is mixed, gluten development occurs — the proteins in the flour bond together and give the topping structure, producing something closer to a soft cake or a drop biscuit with a defined crumb. A dump cake uses dry boxed cake mix layered directly over the fruit with no mixing at all. There is zero gluten development in the topping because nothing is ever agitated — the butter melts through the dry mix and creates a coarse, clumped crumble that is closer in texture to a streusel than a batter. The fruit layer behaves similarly in both — juicy, syrupy, soft — but the topping texture and the assembly method are completely different.
Can I use fresh peaches instead of canned peaches in heavy syrup?
You can, but the result will be different and requires adjustments. Fresh peaches do not carry the concentrated sugar syrup that makes the bottom layer glossy, thick, and caramelized. Without that dissolved sugar, the caramelization at the edges of the dish does not happen the same way, and the filling stays pale and loose rather than turning amber and jammy. If you use fresh peaches, add ¾ cup (150g) granulated sugar and ½ cup (120ml) water or peach nectar tossed with the sliced fruit before layering. Peel and slice approximately 4–5 medium fresh peaches — about 900g total — to replace two 15 oz (425g each) cans. The filling will be lighter in color and less intensely flavored than the canned version, but the fruit flavor will be brighter and more fragrant in peak peach season.
Why is my dump cake still powdery on top after baking?
Powdery spots are almost always a butter coverage problem. The Maillard reaction only occurs where fat is present — dry cake mix that did not receive a butter pat never reaches the fat content or temperature needed to brown, so those areas stay raw no matter how long the dish stays in the oven. Slice your butter thinner and space the pats closer together before baking, aiming to cover as much of the dry surface as possible from edge to edge. A secondary cause is an oven that runs cool — if your oven temperature is off by 25°F (14°C) or more, the butter may not melt and spread fully before the bake time is up, leaving large areas of the topping without enough fat absorption to brown. An oven thermometer is worth using if powdery tops are a recurring issue across multiple bakes.
Can I make peach dump cake ahead of time?
You can bake it up to one day ahead and reheat it, but do not assemble it unbaked in advance. The dry cake mix layer begins absorbing moisture from the peach syrup the moment they make contact — by the time you bake it the next day, the topping will be partially hydrated and will bake up dense and flat rather than coarse and clumped. Carryover absorption continues even in the refrigerator, so pre-assembly overnight makes the problem worse, not better. If you want to get ahead, pre-slice the butter into ¼-inch pats and refrigerate them, and have the cans open and ready. Assembly takes under 10 minutes, so baking fresh is always the better option. If you have already baked it, reheat individual portions in a 350°F (175°C) oven for 8–10 minutes before serving. For more make-ahead strategies across the dump cake family, the pumpkin dump cake post covers overnight prep options that apply equally well to fruit-based versions like this one.
Do I need to refrigerate peach dump cake?
Yes — after the first 2 hours at room temperature, it needs to go in the refrigerator. The high moisture content from the peach syrup makes it unsuitable for extended countertop storage, and the sugar concentration in the filling means it enters the bacterial growth zone quickly at room temperature. Cover the baking dish tightly with plastic wrap or transfer to an airtight container and refrigerate for up to 4 days. The coarse crumble topping will soften as it sits — this is unavoidable — but reheating in the oven at 350°F (175°C) for 8–10 minutes recovers more texture than the microwave can. Carryover heat from the oven reheat also helps re-crisp the top surface slightly, which the microwave never does.
Can I substitute a different flavor of cake mix?
Yes, and it changes the flavor profile meaningfully. White cake mix produces a more neutral topping that lets the peach flavor come through more clearly — good if you want the fruit to lead. Spice cake mix adds warm cinnamon and nutmeg notes that work well with peaches in the fall. Butter pecan cake mix gives the topping a nuttier, richer flavor that pairs well with the caramelized amber syrup. The one swap I would avoid is chocolate cake mix — the bitterness of cocoa competes directly with the sweetness of the peach layer and the result reads as two desserts fighting each other rather than one cohesive dish. Whatever variety you use, keep the quantity identical: one full 15.25 oz box. Changing the box size changes the dry-to-butter ratio and affects how evenly the topping browns.
Can I make peach dump cake in a 9×13-inch dish?
Yes — scale up to three 15 oz (425g) cans of sliced peaches in heavy syrup undrained, one full 15.25 oz box of yellow cake mix, and ¾ cup (170g) cold unsalted butter sliced into ¼-inch pats. Bake at the same 350°F (175°C) but check at 45 minutes and extend to 50–55 minutes if needed — the larger surface area means more topping to brown and more syrup to bubble through. The 9×13 version serves 12–14. If you are scaling to a different dish size entirely, my pan size converter tool calculates adjusted ingredient quantities automatically.
More Dump Cakes You’ll Love
- Pineapple Upside Down Dump Cake — sweet caramelized pineapple rings on the bottom, yellow cake mix and butter on top, baked until the topping turns golden and coarse. A classic combination ready in under an hour.
Peach Dump Cake
Ingredients
Equipment
Method
- Place your 8×8-inch (20×20 cm) ceramic or glass baking dish on the counter, then preheat your oven to 350°F (175°C) and allow it to fully heat before placing the dish inside.
- Pour both 15 oz (425g each) cans of sliced peaches in heavy syrup, completely undrained, into the baking dish and spread into an even layer using a spoon or spatula so the entire bottom is covered with no dry patches.
- Sprinkle the full 15.25 oz box of dry yellow cake mix evenly over the peach layer in a steady back-and-forth motion until the peaches are completely hidden and the surface looks flat and powdery with no fruit visible through the top.
- Place the cold ½ cup (113g) unsalted butter pats across the surface of the dry cake mix in rows spaced roughly 1 inch apart, covering as much of the surface as possible from edge to edge and corner to corner.
- Sprinkle ½ tsp (1g) ground cinnamon evenly over the butter pats and cake mix surface — you should still see the cake mix underneath.
- Bake on the center rack for 43–47 minutes until the topping is deep golden brown across the full surface and the peach syrup is visibly bubbling up around the edges and through any gaps between butter pats.
- Remove from the oven and rest uncovered on a heat-safe surface for 10 minutes to allow carryover cooking to thicken the peach filling before scooping.
- Scoop into bowls while warm and serve with vanilla ice cream if desired.