Jam-Filled Thumbprint Cookies
I have made these thumbprint cookies in my kitchen more than fifteen times across three separate rounds of testing, and I fixed every version that came out too dry, too crumbly, or spread too flat before I landed on this one. The dough is a shortbread-style base — butter, sugar, flour, and nothing else doing heavy lifting — which means every variable matters more than it would in a more forgiving recipe.
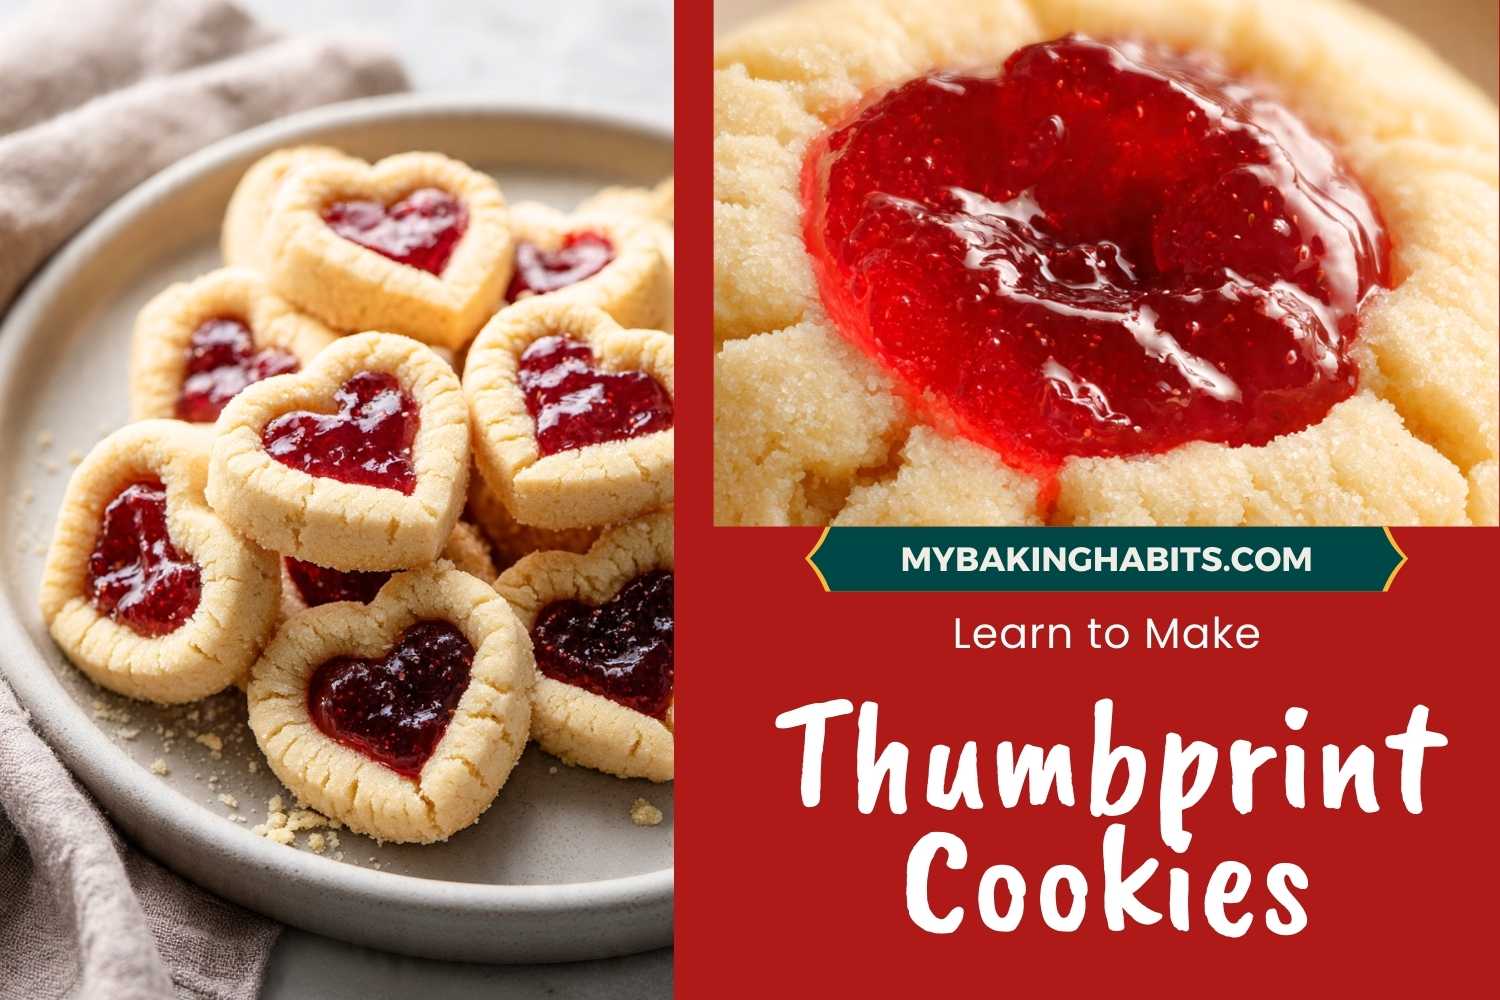
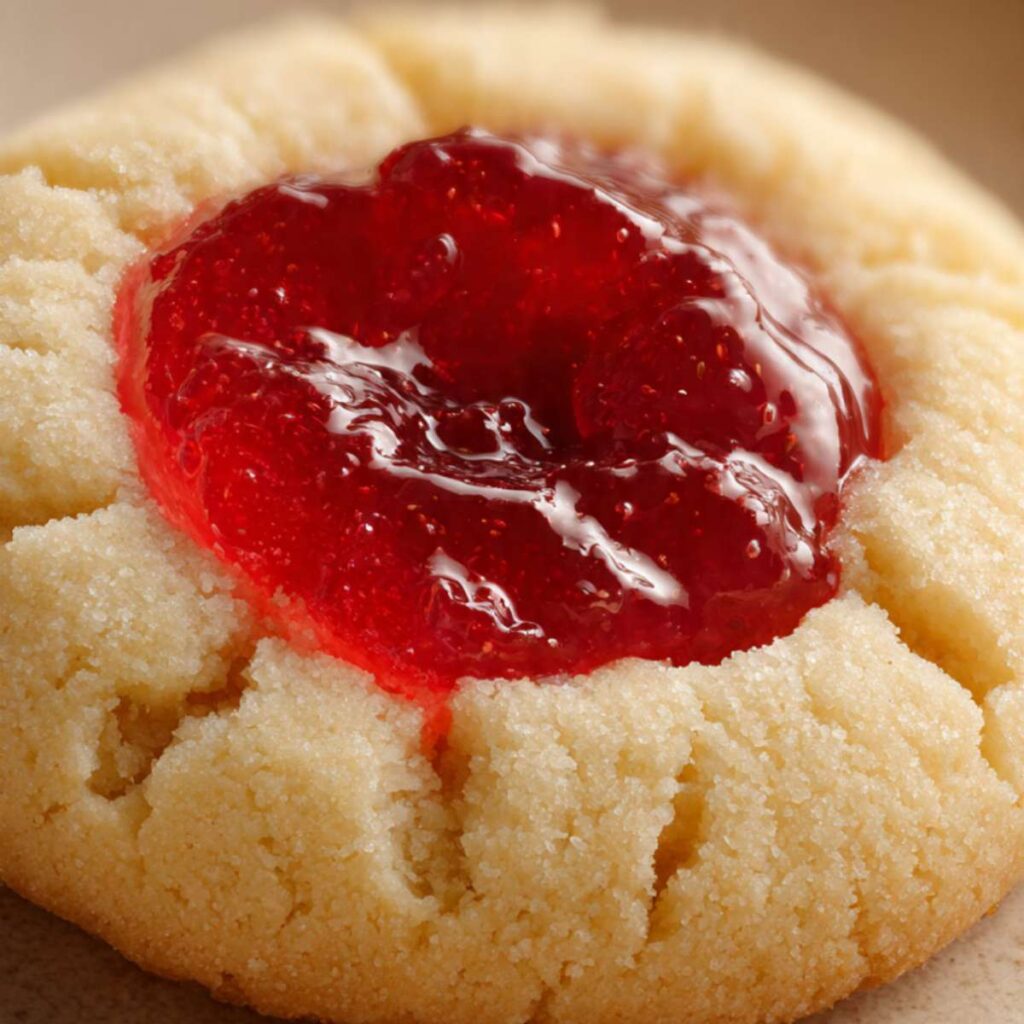
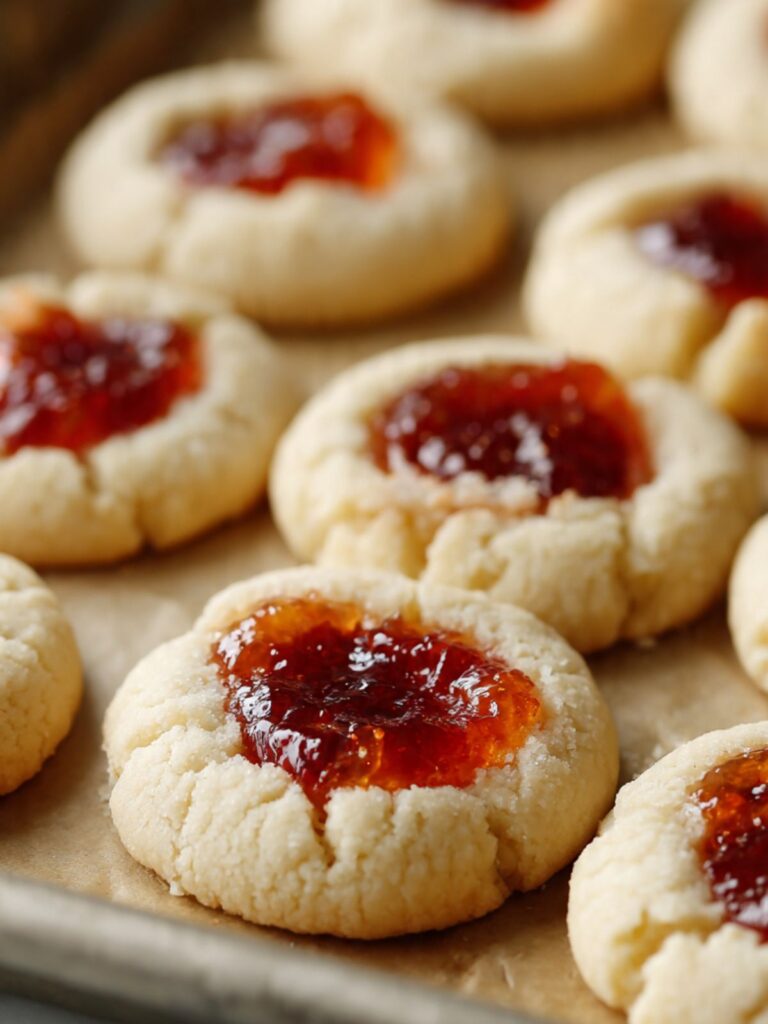
The cookies in these photos are what you are working toward: domed, pale, and matte on the outside with a sandy, slightly crumbly exterior and a jammy center that stays glossy and slightly sticky after baking. The edges crack naturally from the thumb pressure — that is not a mistake, that is the texture. The tops stay cream-colored, not golden. If yours come out golden on top, they went too long.
There is no egg in this dough. No leavening either. This is a pure shortbread base, which is why the butter temperature and the flour measurement are the two things that will make or break your batch.
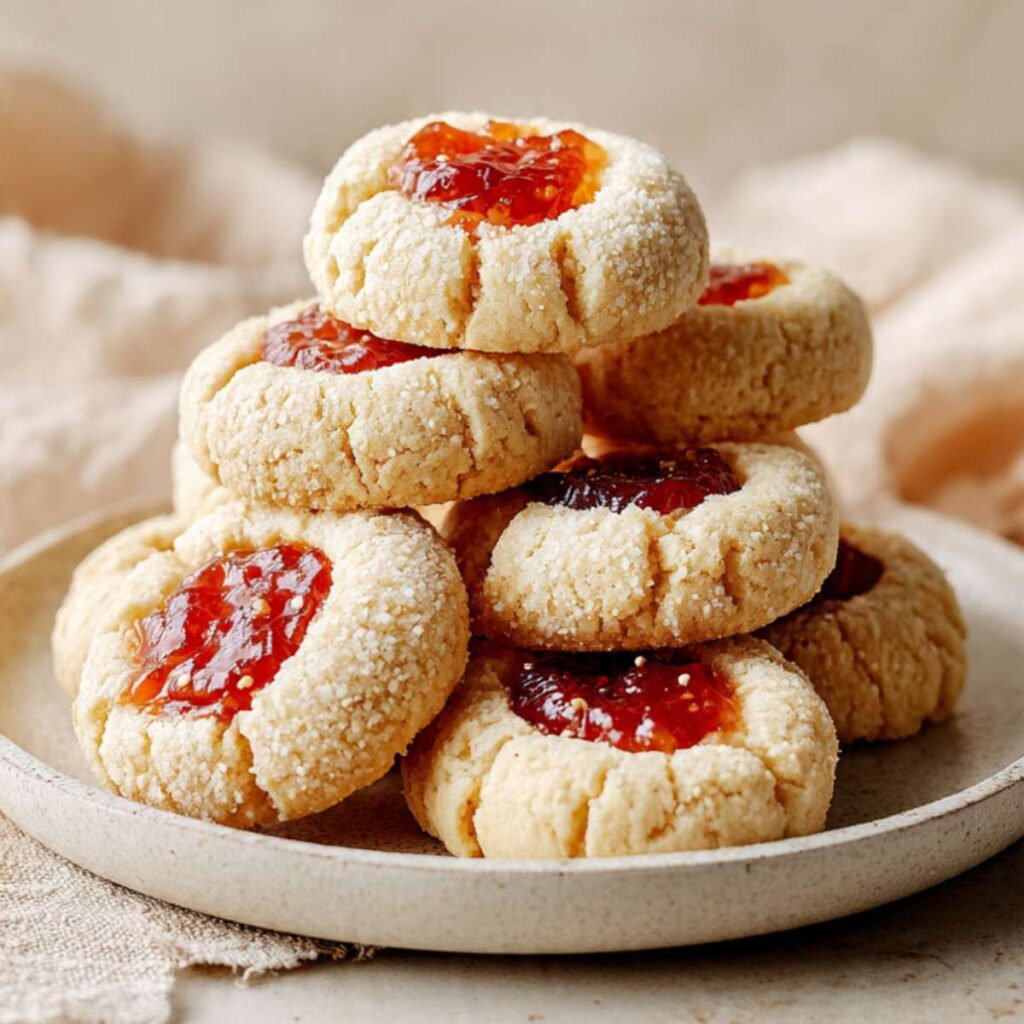
🗒 Luna’s Note: I always roll half my batch in granulated sugar before pressing the thumbprint — it gives that sparkly, slightly crisp exterior you can see in the stacked plate photo. The other half I leave plain. Both versions bake identically, but the sugared ones photograph better every single time.
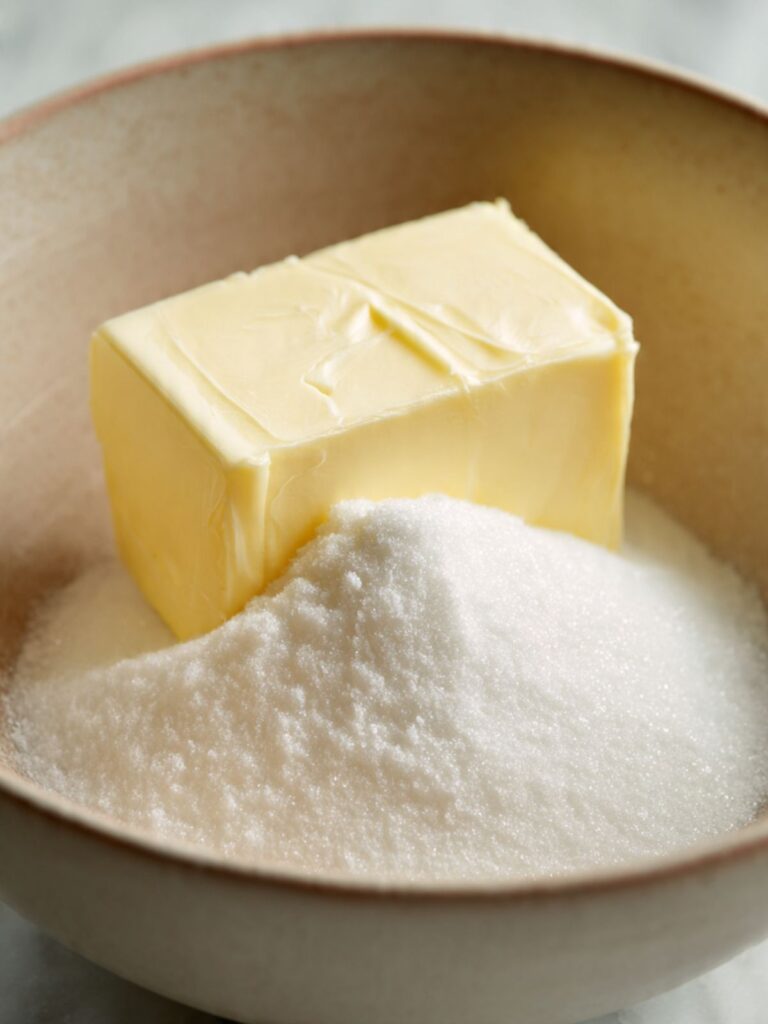
I tested this with cold butter versus properly softened butter. Cold butter did not mix smoothly with the sugar — the dough stayed sandy and dry, and the cookies crumbled when I pressed the thumbprint. Softened butter at 65–68°F (18–20°C) mixed into a smooth, cohesive dough that held its shape through shaping, pressing, and filling without a single crack through the sides.
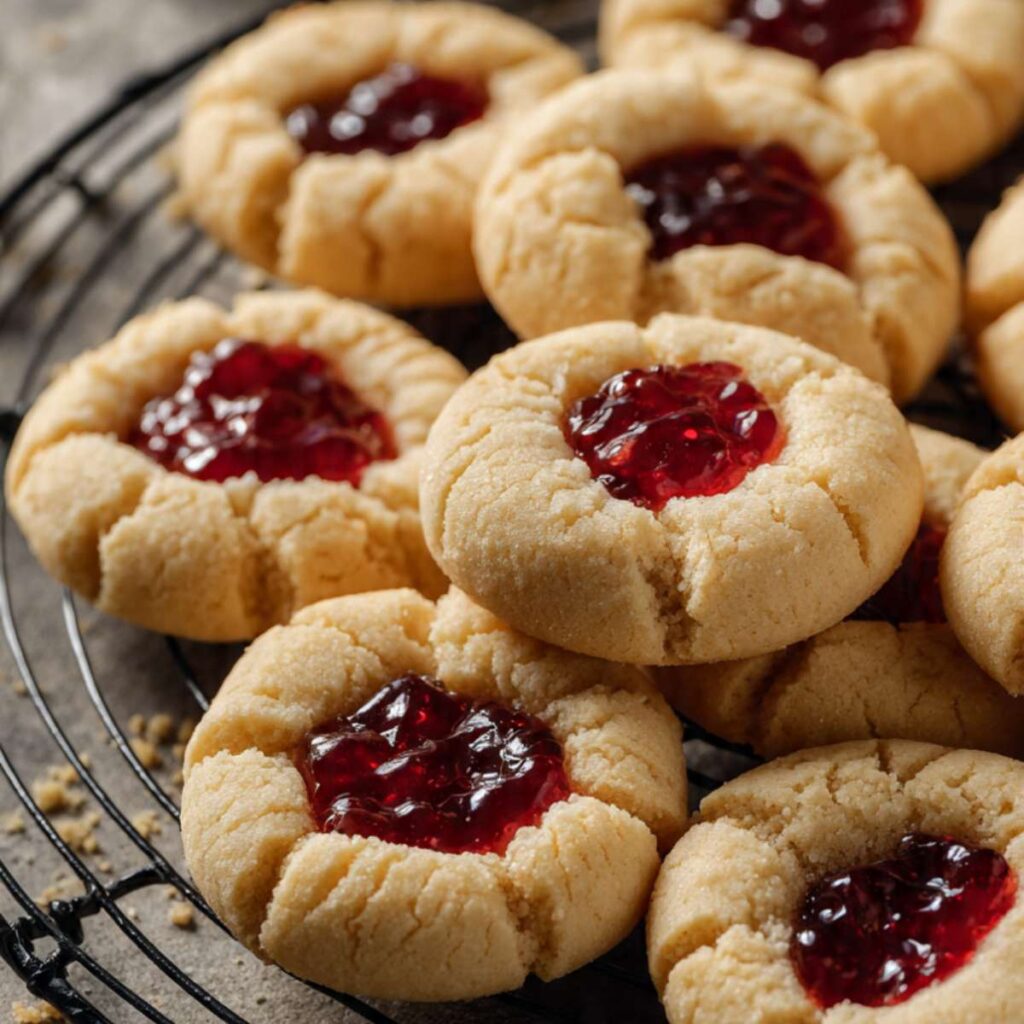
I tested the flour at 1 cup (120g) versus 1¼ cups (150g). The higher flour version produced drier, more crumbly cookies that cracked badly at the edges and fell apart when bitten. The 1 cup (120g) version gave the soft, slightly sandy texture visible in the close-up photo — where the cookie holds its dome and the jam sits flush in the center without the dough walls collapsing.
These are easy thumbprint cookies in the truest sense — No chilling required. No mixer needed. One bowl, a silicone spatula, and about 27 minutes start to finish.
| Prep Time | Cook Time | Total Time | Yield | Difficulty |
|---|---|---|---|---|
| 15 min | 12 min | 27 min | 24 small cookies | Easy |
| Calories | Fat | Carbs | Sugar | Protein | Sodium |
|---|---|---|---|---|---|
| ~95 kcal | ~5g | ~12g | ~5g | ~1g | ~25mg |
Macros are approximate and will vary based on ingredient brands, jam type, and serving size. Calculated from gram weights using USDA FoodData Central data.
Ingredients & Tools
For the Cookies
- ½ cup (113g) unsalted butter, softened to room temperature (65–68°F / 18–20°C) — not melted, not cold from the fridge
- ⅓ cup (67g) plain white granulated cane sugar — do not substitute coconut sugar, raw sugar, or any liquid sweetener
- ½ tsp pure vanilla extract
- 1 cup (120g) all-purpose flour (spooned into the measuring cup and leveled) — or weighed at 120g for guaranteed accuracy
- ¼ tsp fine sea salt
- 3–4 tablespoons (60–80g) thick fruit jam — raspberry, strawberry, or apricot — not jelly, not preserves
Optional — Sugar Coating
- 2 tablespoons (25g) plain white granulated cane sugar — for rolling dough balls before pressing. The sugar granules stay on through pressing and baking and produce the sparkly, slightly crisp exterior visible on the stacked cookies in the plate photo. They do not dissolve or fall off in the oven.
Optional — Powdered Sugar Glaze
- 2 tablespoons (15g) powdered sugar, sifted
- 1 teaspoon (5ml) water
Before You Start
No chilling required. This dough goes straight from the bowl to the oven. You do not need to rest it, refrigerate it, or wait at any point between mixing and baking — as long as your butter was at the correct temperature when you started. If your kitchen is very warm (above 78°F / 26°C), refrigerate the portioned and filled dough balls on the pan for 10 minutes before baking as a precaution against spreading.
Temperature prep — this is the most important step before you touch anything else.
Pull your butter from the fridge 60–90 minutes before you plan to mix. At a cool kitchen temperature of 65–68°F (18–20°C), that window is enough. In a warm kitchen above 75°F (24°C), 30–45 minutes is sufficient. To check readiness: press one finger into the butter. It should leave a clean indent without the butter feeling greasy or slick. If the butter looks shiny or your finger slides through it, it has gone too warm — refrigerate it for 10 minutes and check again. Butter that is too warm produces flat, greasy cookies that spread before the edges can set.
Flour measuring method. Spoon the flour into your measuring cup using a separate spoon and level it off with a straight edge. Do not scoop the measuring cup directly into the flour bag — scooping packs in 20–30% more flour than the recipe needs and produces a dry, crumbly dough that cracks badly when you press the thumbprint. For guaranteed accuracy, weigh the flour at exactly 120g on a kitchen scale. Gram weight always takes priority over volume in this recipe.
Gram weight priority. For the most consistent results, use a kitchen scale set to grams. The gram weights in this recipe are what I tested with — they are the most reliable way to match the result shown in the photos.
Mixing method. This entire recipe comes together with a large mixing bowl and a sturdy silicone spatula or wooden spoon — no electric mixer needed. Mixing by hand gives you more control over the dough and prevents the one thing that ruins thumbprint cookies: overmixing.
Pan prep. Line a light-colored aluminum baking sheet with parchment paper. Do not grease the parchment and do not use foil. Foil conducts heat differently and browns the cookie bottoms too fast. A dark non-stick baking sheet absorbs more heat and will overbrown the bottoms before the centers are set — if a dark pan is all you have, reduce the oven temperature by 25°F (15°C) and start checking at 10 minutes.
Oven rack position. Position your oven rack in the middle of the oven before preheating. Top rack burns the tops. Bottom rack burns the bottoms. Middle rack gives even heat on both sides.
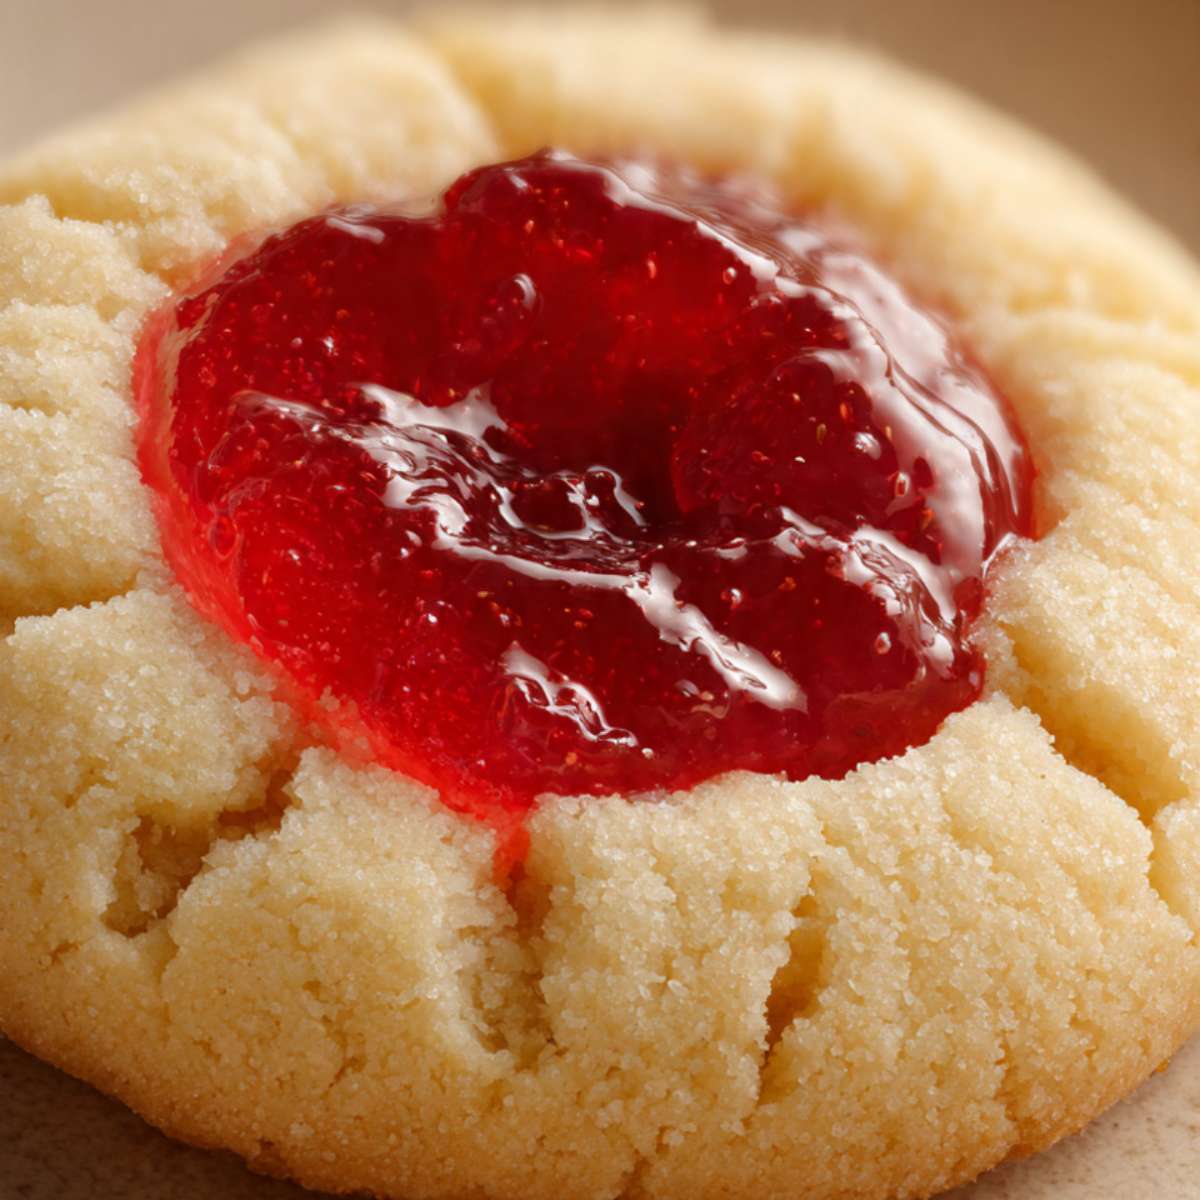
Jam selection note. Use a thick fruit jam — not jelly and not preserves. Jelly is too loose and will run out of the well during baking. Chunky preserves can sit too high in the well and caramelize unevenly. A smooth, thick jam sits in place, bubbles gently, and sets back to glossy as it cools — exactly as visible in the close-up photo.
Ingredient freshness checks.
- Ground spices older than 6 months? This recipe has no spices, but check your vanilla extract — imitation vanilla has a noticeably sharp, artificial aftertaste that comes through clearly in a simple dough like this one. Use pure vanilla extract only.
- Flour smelling off? Specialty flours go rancid, but standard all-purpose stores well up to one year. If yours has been open longer than a year, smell it before using — rancid flour smells like old cardboard.
Necessary Tools
Required:
- Kitchen scale (strongly recommended — gram weights are more accurate than volume)
- Large mixing bowl
- Sturdy silicone spatula or wooden spoon
- Light-colored aluminum baking sheet
- Parchment paper
- Tablespoon measure or 1-tablespoon cookie scoop (for consistent portioning)
- Wire cooling rack
Optional:
- Oven thermometer (recommended — most home ovens run 15–25°F / 8–14°C off from the dial setting)
- Small spoon or piping bag (for filling the jam wells neatly)
- Small fine-mesh sieve (for dusting powdered sugar glaze evenly, if using)
How to Make Thumbprint Cookies
This recipe uses a one-bowl, no-mixer method — a simplified creamed butter technique where the butter and sugar are combined by hand rather than with electric beaters. This intentionally limits aeration, which is exactly what produces the dense, sandy, shortbread-style texture visible in the photos rather than a cakey, puffed-up cookie.
Step 1: Preheating the Oven and Preparing the Pan for Even Baking
In your oven, position the rack in the middle position before turning the heat on. Preheat to 350°F (175°C) and allow a full 15 minutes for the oven to reach temperature — most home ovens take longer than the preheat indicator suggests. If you have an oven thermometer, confirm the actual temperature before the pan goes in. Most home ovens run 15–25°F (8–14°C) off from what the dial reads, and in a recipe with a 12-minute bake window, that difference matters.
This entire recipe uses a one-bowl, no-mixer method — a silicone spatula or wooden spoon is all you need. No electric mixer required at any point.
Line your light-colored aluminum baking sheet with parchment paper. Do not grease it. The parchment creates a non-stick surface and regulates the heat reaching the cookie bottoms — greasing adds extra fat that encourages spreading and overbrowning.
The pan should be at room temperature — never put cookie dough on a warm pan from a previous batch. A warm pan starts melting the butter in the dough before the cookies even reach the oven, which causes spreading and flattening.
Your preheated oven and parchment-lined pan are ready. Move to Step 2.
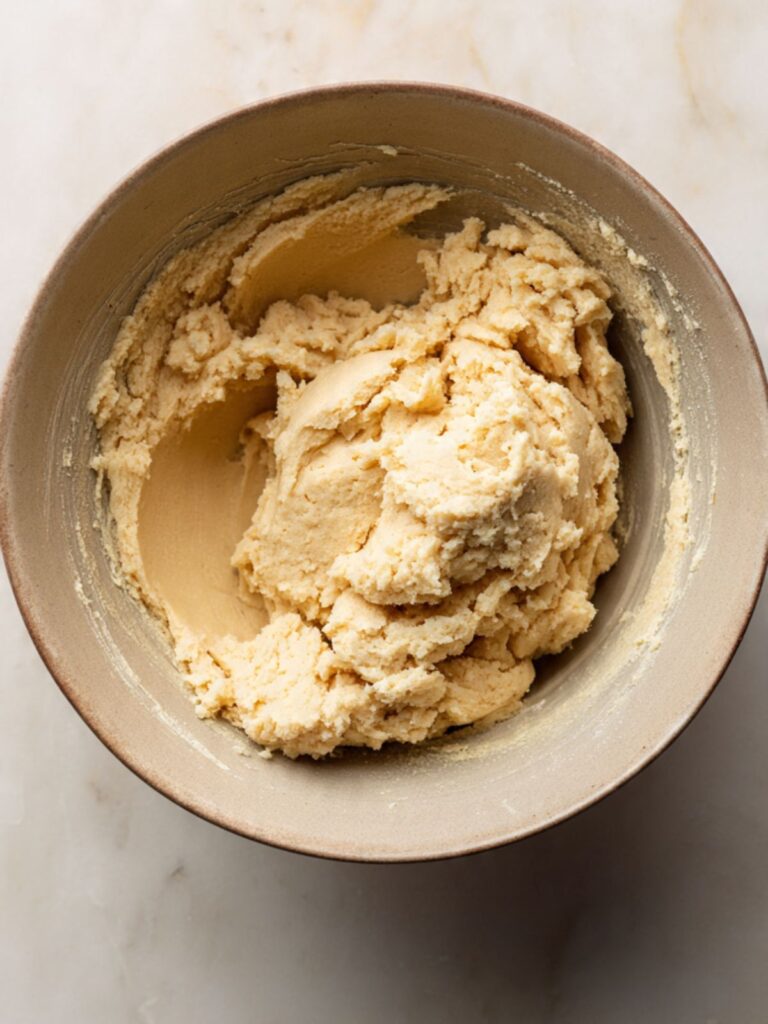
Step 2: Combining the Butter and Sugar Until Smooth and Cohesive
In your large mixing bowl, using your sturdy silicone spatula, combine your ½ cup (113g) unsalted butter, softened to room temperature (65–68°F / 18–20°C) and your ⅓ cup (67g) plain white granulated cane sugar.
The granulated sugar serves two functions here. First, it dissolves partially into the butter during mixing, which creates a smooth, cohesive dough rather than a sandy, crumbly one. Second, it controls how the cookie exterior sets in the oven — the sugar crystals at the surface are what produce the very faint crispness around the outside edge while the center stays soft. Substituting coconut sugar or raw sugar changes the crystal structure and produces a different surface texture and a slightly greasier feel.
Press and stir the butter and sugar together with the spatula in firm, circular strokes — approximately 40 to 50 strokes — working the mixture against the bottom and sides of the bowl until no separate streaks of butter or sugar remain.
The mixture should look pale, smooth, and slightly glossy — not grainy, not shiny-wet, and not still visibly separated into butter chunks and sugar. If it still looks grainy after 50 strokes, your butter may be slightly too cold. Keep mixing for another 20 strokes and check again.
Do not try to rush this step with a warm bowl or by softening the butter in the microwave — microwave-softened butter melts unevenly and produces greasy, flat cookies. Your butter-sugar mixture is ready. Move to Step 3.
Step 3: Adding the Vanilla and Flour Without Developing Gluten
Add your ½ tsp pure vanilla extract directly to the butter-sugar mixture and stir to combine — about 10 strokes. Pure vanilla extract adds depth to a dough this simple. Imitation vanilla has a sharper, more artificial note that comes through clearly when the dough has no spices or other flavors to mask it.
Now add your 1 cup (120g) all-purpose flour, spooned and leveled and ¼ tsp fine sea salt together directly into the bowl. Fine sea salt balances the sweetness and sharpens the butter flavor — without it, the cookies taste flat and one-dimensional.
Fold the flour into the butter mixture using slow, deliberate strokes from the bottom of the bowl upward — not stirring in fast circles. Count approximately 25 to 30 strokes. Stop the moment the flour is fully incorporated and no dry streaks remain.
The dough should look soft, smooth, and slightly matte — it should hold together cleanly when you press a small piece between your fingers without crumbling, and it should not feel sticky or wet. If it crumbles when pressed, the butter was too cold or the flour was slightly over-measured — press it together firmly with your hands for 30 seconds and it will come together.
Do not overmix after the flour goes in. Every extra stroke develops more gluten, and gluten makes these cookies tough and chewy instead of the soft, sandy texture visible in the photos. Your dough is ready. Move to Step 4.
Step 4: Portioning and Rolling the Dough Into Uniform Balls
Using your tablespoon measure or 1-tablespoon cookie scoop, portion the dough into 24 equal pieces at approximately 1 tablespoon (18g) each. Weigh the first ball on your kitchen scale — it should register 17–19g. Use that as your calibration and portion the remaining 23 balls to match. Consistent sizing means consistent baking — undersized cookies will overbake before the larger ones are done.
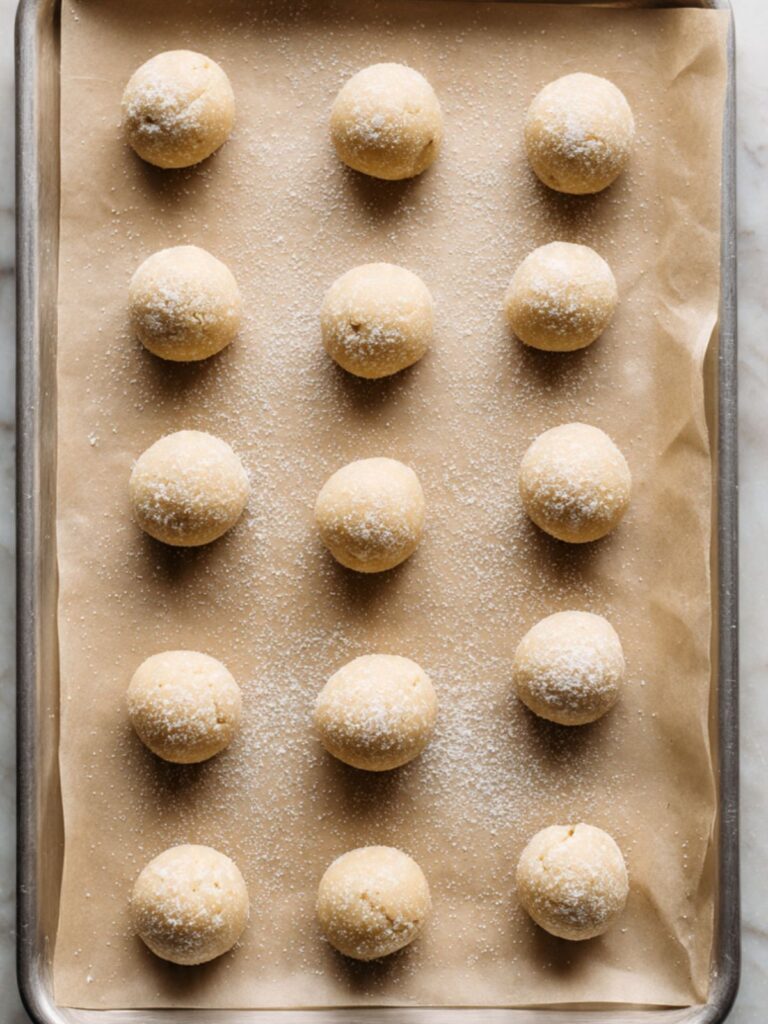
Roll each portion between your palms in a smooth, circular motion until it forms a clean, round ball with no cracks on the surface. If the dough cracks while rolling, cup your hands slightly and apply gentle, even pressure — do not squeeze hard.
If you are using the optional sugar coating (which produces the sparkly exterior visible in the stacked plate photo): place your 2 tablespoons (25g) plain white granulated cane sugar in a small shallow bowl and roll each dough ball gently through the sugar before placing it on the pan. The sugar coating is applied before pressing — not after.
Place each ball on your parchment-lined baking sheet, spacing them at least 1½ inches (4cm) apart. These cookies do not spread aggressively, but they need air circulation between them to bake evenly.
As you can see in the stacked cookie photo, the dough balls going onto the pan should be smooth and round — no flat spots, no cracks running across the surface. Cracks before pressing mean the dough is too dry or the butter was too cold.
Your 24 dough balls are evenly spaced on the pan. Move to Step 5.
Step 5: Pressing the Thumbprints Without Cracking the Edges
Using your thumb — or the rounded end of a teaspoon if you prefer a cleaner well — press firmly and deliberately into the center of each dough ball. Press straight down, not at an angle. Go approximately halfway through the cookie — deep enough to hold the jam without it overflowing, but not so deep that you press through to the parchment.
The edges will crack slightly as you press. This is correct and visible in every cookie in the photos. What you are preventing is large, jagged cracks that split the cookie wall open — those happen when the dough is too cold or too dry. If you see large cracks, wet your fingertip very lightly and gently smooth them closed before baking.
The well should be approximately ½ inch (1.25cm) wide and ¼ inch (0.6cm) deep — wide enough to hold ½ teaspoon of jam, deep enough that the jam does not immediately spill over the sides when spooned in.
Do not flatten the dome of the cookie while pressing. The domed shape is what gives the finished cookie its soft center. A flattened cookie bakes through faster and produces a drier result. Your thumbprints are pressed and ready. Move to Step 6.
Step 6: Filling the Wells With Jam Neatly and Precisely
Using a small spoon, fill each thumbprint well with approximately ½ teaspoon (3–4g) of thick fruit jam. Work from the center of the well outward. The total jam used across 24 cookies will be 3–4 tablespoons (60–80g) — spoon it in gradually rather than measuring each cookie individually.
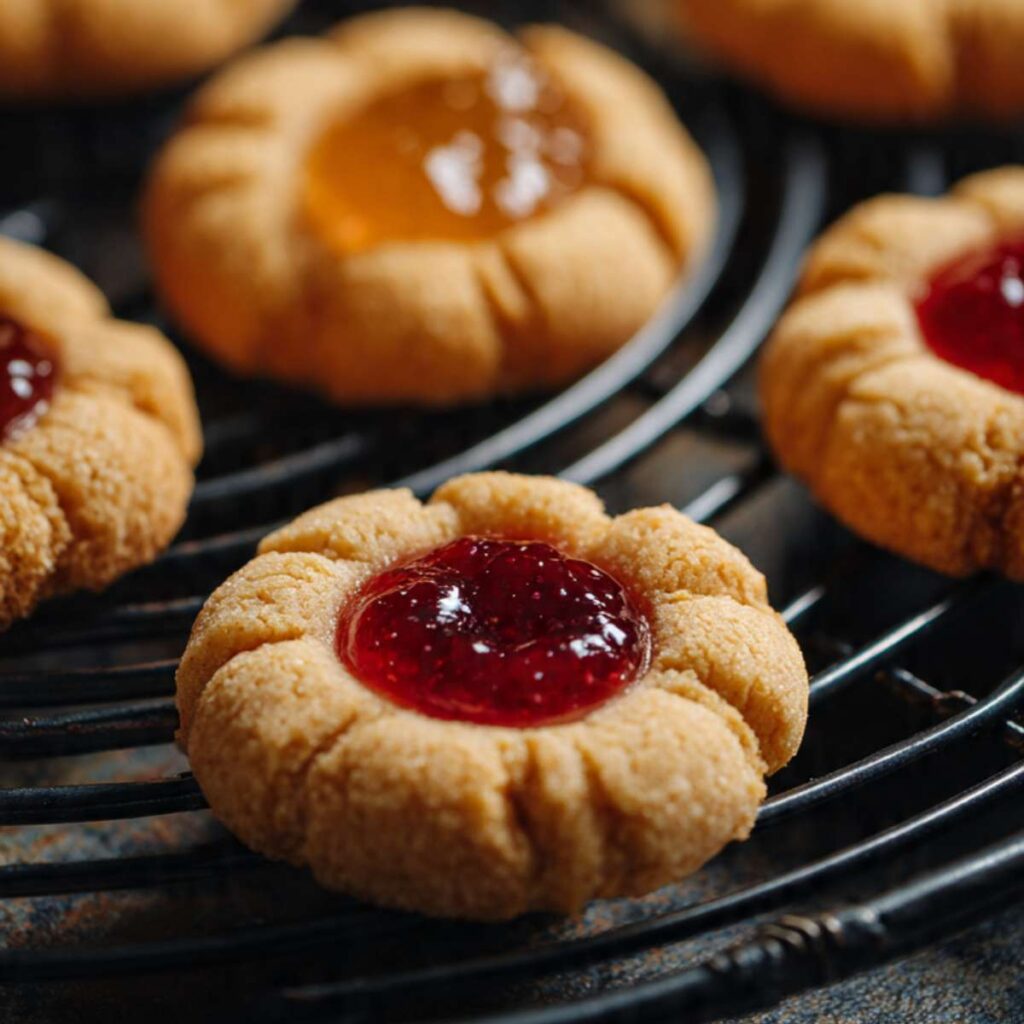
The jam is the flavor centerpiece of this cookie. A thick jam — raspberry, strawberry, or apricot — sits in the well, bubbles gently during baking, and sets back to a glossy, jewel-toned finish as it cools. The deep red and orange jams visible across the images show both options: raspberry and strawberry give a brighter, more tart center; apricot gives a warmer, honeyed sweetness.
Do not overfill. The jam should sit just below the rim of the well — not mounded above it. Overfilling causes the jam to bubble over the edges during baking, spread across the cookie surface, and caramelize into a sticky, burnt ring around the base.
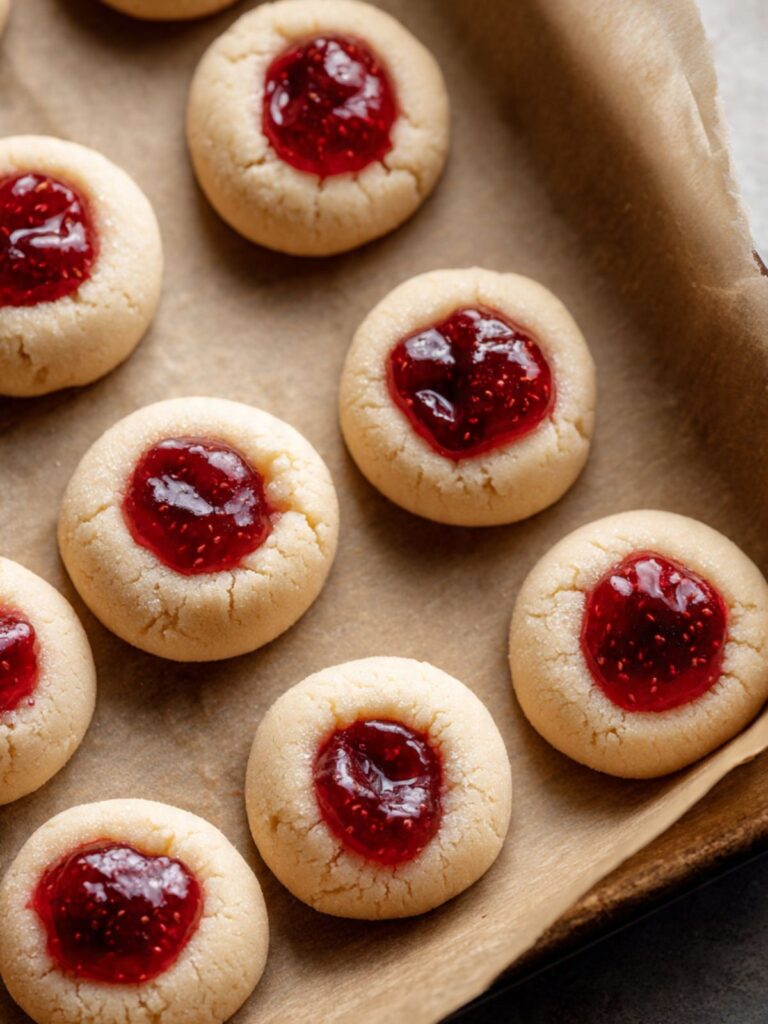
The filled pan should look like the close-up photo — each well holding a neat, slightly domed portion of jam that sits inside the cookie wall without touching the edges. If the jam is touching the edges before the pan goes in, you have overfilled. Remove a small amount with the tip of your spoon.
Your cookies are filled and ready for the oven. Move to Step 7.
Step 7: Baking Until the Edges Are Set and the Correct Color Is Reached
Place the filled pan on the middle rack of your preheated 350°F (175°C) oven. Bake for 10 to 12 minutes. Start checking at the 10-minute mark.
The correct color depends on whether you rolled your cookies in sugar or left them plain — and this distinction matters for pulling them at the right moment.
Plain cookies (no sugar coating): The tops stay pale cream-colored and matte all the way through the bake. Pull the pan when the tops are still pale and the bottoms are lightly golden when you lift one cookie with a thin spatula. If the tops are turning golden on an uncoated cookie, they have gone too long.
Sugar-rolled cookies: The granulated sugar coating toasts slightly in the oven and the exterior turns a warm golden-tan — exactly as visible in the close-up photo and the stacked cookies photo. This golden color is from the sugar, not the dough. Do not pull sugar-rolled cookies early because the exterior looks darker than you expected. The correct pull point is still the bottom: lightly golden, with the jam bubbling gently and the very center of the cookie still feeling slightly soft to a light touch at the 10-minute mark.
Both versions bake for the same 10-to-12-minute window. The visual on top is different. The bottom check is the same.
Do not open the oven door before 10 minutes. Opening early drops the oven temperature and causes the cookies to bake unevenly — the jam will not set properly and the dough around the edges will look pale and underdone even when the bake time is complete.
The correctly baked cookie looks exactly like the cooling rack image — set at the edges with fine radiating cracks, jam bubbling gently in the center, center still slightly soft when touched very lightly. The tops of plain cookies stay pale. The tops of sugar-rolled cookies turn warm golden-tan from the sugar coating — this is correct and expected, not a sign of overbaking.
Do not overbake waiting for any additional visual confirmation beyond the bottom check and the center touch test. Your cookies are done. Move to Step 8.
Step 8: Resting on the Pan and Cooling Before Serving
Leave the cookies on the hot pan for exactly 5 minutes after pulling from the oven. Do not move them. The pan continues conducting heat into the cookie base during this time — this is carryover cooking, and it is finishing the baking process without the dry heat of the oven. The centers are still setting during these 5 minutes. Moving the cookies before 5 minutes breaks the structural base, especially around the jam well. Waiting more than 8 minutes starts to over-dry the bottoms. Set a timer.
After 5 minutes, transfer the cookies to a wire cooling rack using a thin spatula and allow them to cool completely — approximately 20 minutes. The jam needs this time to set from glossy-liquid back to the thick, slightly sticky, jewel-toned finish visible in the photos. Do not bite into them straight off the pan — the jam is hot enough to burn.
If using the optional powdered sugar glaze: Whisk together your 2 tablespoons (15g) sifted powdered sugar and 1 teaspoon (5ml) water until smooth. The glaze should fall from the spoon in a thin, slow ribbon — not pool on impact. Drizzle it lightly over fully cooled cookies using a spoon or a small piping bag. Do not glaze warm cookies — the glaze will melt and absorb into the surface rather than setting on top.
🗒 Luna’s Note: I let mine cool directly on the rack for the full 20 minutes before I touch them. The jam is still loose at 10 minutes and will dent if you stack them too soon. I learned this the hard way when an entire batch of perfectly baked cookies came off the rack looking like someone had pressed their thumb into the jam a second time.
The fully cooled cookie should look exactly like the hero image — domed and pale on top, set jam center that holds its shape when the cookie is lifted, fine cracks at the edges, and a bottom that is lightly golden but not dark. This is the finished cookie.
The Science Behind Thumbprint Cookies
Why Butter Temperature Controls Everything in a Shortbread-Style Dough
Classic Thumbprint cookies have no eggs, no leavening, and no liquid beyond the vanilla — which means the butter is doing nearly every structural job in the dough. At the correct temperature of 65–68°F (18–20°C), butter exists in a semi-crystalline state where the fat molecules are partially solid and partially fluid. This is the state that allows the butter to coat the flour proteins evenly during mixing, which is what produces the soft, sandy crumb visible when you bite through the cookie in the close-up photo.
When butter is too cold, it does not distribute evenly and the dough stays crumbly and dry. When it is too warm, the fat goes fully liquid, coats too much of the flour, and suppresses gluten development entirely — producing a flat, greasy cookie that spreads across the pan before the edges can set. The 65–68°F (18–20°C) window is not a suggestion. It is the temperature at which butter does its job correctly in a dough this simple.
🗒 Luna’s Note: I keep a cheap instant-read thermometer on my counter specifically for checking butter temperature. Pressing my finger into it and guessing worked fine until it did not — one warm afternoon I had butter at 74°F and lost an entire batch to flat, oily cookies. The thermometer costs less than one batch of ingredients.
How Gluten Development Determines the Texture of the Finished Cookie
All-purpose flour contains two proteins — glutenin and gliadin — that bond together in the presence of water and mechanical action to form gluten, an elastic network that gives baked goods their structure and chew. In a bread recipe, you want maximum gluten development. In a thumbprint cookie, you want minimum. The butter in this dough coats the flour proteins before mixing begins, which physically blocks water from reaching them and limits gluten formation from the start — this fat-coating effect is why shortbread-style cookies have that characteristic tender, slightly crumbly texture rather than the chewy pull of a standard drop cookie.
The instruction to stop mixing at 25 to 30 strokes after the flour goes in is not arbitrary — every additional stroke increases the chance that friction and moisture activate more gluten bonds, tightening the crumb and moving the texture away from the soft, sandy result visible in the photos toward something tougher and drier. If you want to read more about how gluten development affects cookie texture differently across recipes, my sugar cookies recipe covers the same principle applied to a rolled dough where a slightly higher gluten level is actually desirable for clean edges.
Why the Jam Sets Glossy Instead of Burning at 350°F (175°C)
Fruit jam is mostly sugar and water with pectin as the setting agent. When jam hits oven heat, the water content begins evaporating and the sugar concentration increases — this is the same process that happens when you cook jam on the stovetop to thicken it. At 350°F (175°C) with a 10-to-12-minute bake time, the jam reaches a temperature high enough to bubble gently and concentrate slightly, but not high enough to push the sugar past caramelization point, which begins at approximately 320°F (160°C) internally.
The jam stays below that threshold because the cookie dough surrounding it acts as an insulating wall, slowing the heat transfer to the center of the well. This is why the jam in the photos looks glossy and jewel-toned rather than dark and caramelized — and it is also why overfilling is a problem. Jam that overflows the well onto the exposed pan surface has no insulating dough around it, reaches caramelization temperature faster, and burns into a sticky, dark ring around the base of the cookie before the bake time is complete.
Thumbprint Cookies Troubleshooting & Pro-Tips
Common Mistakes
Using the Wrong Jam Type — Jelly or Loose Preserves Instead of Thick Jam
The symptom is jam that runs out of the well during baking, spreads across the surface of the cookie, caramelizes into a dark sticky film around the base, and in some cases bonds the cookie to the parchment.
The specific cause is using jelly instead of jam, or using a very thin, runny preserve. Jelly is made from fruit juice only — it has no fruit solids and a much lower viscosity than jam. At 350°F (175°C) it liquefies completely within the first few minutes and flows immediately out of the well before the dough can set around it. Thin preserves behave the same way.
The immediate fix: if you notice overflow during the first 5 minutes of baking, reduce the oven temperature to 325°F (163°C) for the remainder of the bake. This slows the jam’s liquefaction enough to keep most of it in the well. Use a toothpick immediately after pulling from the oven to push any overflow back toward the center while it is still liquid.
The prevention: use a thick, smooth fruit jam — the kind that holds its shape on a spoon and does not drip quickly at room temperature. Test it before filling: scoop ½ teaspoon onto a cold plate. It should hold a mound for at least 5 seconds before spreading. If it spreads immediately, it is too thin for this recipe.
Using a Dark Pan, Greased Pan, or Foil Instead of Parchment
The symptom varies by the wrong choice made: dark pan produces cookies with burnt, dark bottoms and pale underdone centers. Greased pan produces cookies that spread wider and flatter than expected with greasy, crispy bottom edges. Foil instead of parchment produces uneven browning — hot spots where the foil contacts the pan directly conduct too much heat, and the cookie bottoms brown in patches rather than evenly.
The specific cause is pan material and surface preparation. Light-colored aluminum reflects heat and produces even, gentle browning on the bottom of the cookie. Dark non-stick pans absorb heat aggressively and concentrate it at the base. Greasing adds extra fat to the pan surface that the cookie dough absorbs during baking, encouraging spreading and edge crisping. Foil does not insulate the way parchment does.
The immediate fix: if using a dark pan, reduce the oven temperature to 325°F (163°C) and check the cookies at 9 minutes. If the bottoms have already overbrowened, nothing can be done to the current batch — but the tops and centers may still be correctly baked and the cookies are edible.
The prevention: use a light-colored aluminum baking sheet lined with parchment paper, ungreased. This is the single pan setup that produces the result shown in the photos. Every other combination introduces a variable that the bake time and temperature were not calibrated for.
Why Your Cookies Are Dry and Crumbly
The symptom is a dough that falls apart when you try to roll it into balls, cookies that crack badly across the sides during pressing, and a finished cookie that breaks when you pick it up rather than holding its shape cleanly.
The specific cause is almost always one of two things: flour was over-measured by scooping directly from the bag instead of spooning and leveling, or the butter was too cold when mixing began and never fully incorporated into the sugar. Either way, the fat-to-flour ratio is off and the dough does not have enough cohesion to hold together.
The immediate fix: if the dough is already mixed and crumbling, add ½ teaspoon (2.5ml) of water or milk at a time, pressing the dough together firmly between additions, until it holds a clean ball when pressed. Do not add more than 1½ teaspoons total or the texture will shift noticeably.
The prevention: weigh your flour at exactly 120g and pull your butter from the fridge 60–90 minutes before mixing. Both eliminate the two most common causes before they happen.
Why Your Cookies Spread Too Flat
The symptom is cookies that looked like proper dough balls going into the oven but came out thin, wide, and greasy-looking with the jam overflowing the edges.
The specific cause is butter that was too warm at the time of mixing — above 70°F (21°C). Butter at this temperature has lost enough of its fat-crystal structure that it cannot hold the cookie dough in a dome shape during baking. The fat melts immediately when it hits oven heat, and the cookie spreads outward before the edges can set.
The immediate fix: there is no recovery once they are in the oven. Pull them at the 10-minute mark regardless and let them cool — they will be thin but still edible.
The prevention: check butter temperature before mixing. It should leave a clean indent under finger pressure without feeling greasy or slick. If your kitchen is warm, refrigerate the portioned dough balls on the pan for 10 minutes before filling and baking.
Why Your Thumbprint Cracks Badly When Pressed
The symptom is large, jagged cracks radiating from the press point that split the cookie wall open rather than the fine, controlled cracks visible in the photos.
The specific cause is dough that is too cold, too dry, or both. Cold dough does not flex — it fractures. Dry dough fractures for the same reason — not enough fat acting as a lubricant between the flour particles.
The immediate fix: let the dough balls rest at room temperature for 5 minutes before pressing. Wet the tip of your thumb very lightly before pressing — barely damp, not wet. This adds just enough surface moisture to smooth the cracks as pressure is applied.
The prevention: ensure butter was fully softened and flour was not over-measured. Both produce a dough flexible enough to press without fracturing.
Why Your Jam Overflows and Burns Around the Edges
The symptom is jam that has spread out of the well during baking, caramelized into a dark sticky ring around the cookie base, and fused the cookie to the parchment.
The specific cause is overfilling — more than ½ teaspoon (3–4g) of jam per well. A note on image fidelity: the extreme close-up photo in this article shows the jam having crept very slightly to the edge of the well — this minimal spread is normal and acceptable. What you are preventing is the jam flowing completely out of the well and pooling on the pan surface. That level of overflow is too much and causes burning.
The immediate fix: use a toothpick or skewer tip to push overflow jam back toward the center immediately after pulling the pan from the oven, while the jam is still liquid. It resets as it cools.
The prevention: fill each well to just below the rim — ½ teaspoon per cookie is the correct amount. A thick jam will spread minimally to the well edge as shown in the photo. A thin jam will flow completely out. Use a thick jam every time.
Why Your Cookies Taste Flat and One-Dimensional
The symptom is a finished cookie that tastes like plain flour and sugar with no depth — the butter flavor is muted and the jam tastes overly sweet rather than bright and fruity.
The specific cause is missing or incorrect salt, or imitation vanilla extract instead of pure. In a dough this simple — no spices, no brown sugar, no chocolate — fine sea salt is the only flavor amplifier. Without it, everything tastes flat. Imitation vanilla has a sharp synthetic note that does not round out in a butter-forward dough the way pure vanilla does.
The immediate fix: a very light pinch of flaked sea salt pressed gently onto the jam surface immediately after baking adds brightness to an already-baked batch and partially compensates.
The prevention: fine sea salt and pure vanilla extract — both, every time.
Humidity and Altitude Adjustments
In high humidity above 70% relative humidity, the dough may feel slightly tackier than expected and the cookies may take 1–2 extra minutes to set on the bottom. Refrigerate the portioned and pressed dough balls for 15 minutes before filling and baking. Baked cookies may feel slightly soft on the surface even when fully done — this is surface moisture from the air, not underbaking.
At high altitude above 3,500 feet (1,067 meters), the lack of leavening is an advantage — there is no CO2 to over-expand. Add 1 tablespoon (8g) extra flour per batch to compensate for faster moisture evaporation. Check cookies at 9 minutes rather than 10 as they may set slightly faster.
Expert Pro-Tips
Roll your dough balls in granulated sugar before pressing for the sparkly exterior visible in the stacked plate photo. Place 2 tablespoons (25g) of plain white granulated cane sugar in a shallow bowl and roll each ball gently through it before placing it on the pan. The sugar granules stay on through pressing and baking — they do not fall off or dissolve. The result is the slightly crisp, sparkly exterior visible in Images 1 through 3, where the sugar coating gives the cookie a more polished, bakery-style appearance without any extra work.
Use a round measuring teaspoon instead of your thumb for a perfectly uniform well. A ½ teaspoon measure pressed straight down gives a cleaner, more consistent well that holds the jam more neatly — especially useful if you are making these for a gathering where uniformity matters.
Fill the jam before baking, not after. Some recipes instruct pressing and baking first, then filling. That method produces a drier cookie because the well closes slightly during baking. Filling before baking keeps the well open, allows the jam to warm and set with the dough, and produces the glossy, integrated jam center visible in the photos rather than a jam that sits visibly on top of a pre-baked depression.
How to Store Thumbprint Cookies
Room Temperature
Store fully cooled thumbprint cookies in a lidded hard-sided container — a tin, a plastic container with a snap-on lid, or a glass container with a lid. Place a single layer of parchment paper between each layer of cookies to prevent the jam centers from sticking to the cookies above them. The jam stays slightly tacky at room temperature and will bond to anything it touches directly.
Do not use zip-lock bags. Bags compress the cookies under their own weight, flatten the domed tops, and cause the jam centers to stick to the bag surface. Do not use an open plate covered with plastic wrap — the wrap contacts the jam and pulls it when removed.
At room temperature, these cookies stay soft and fresh for 3 to 4 days. By day 2 the exterior softens slightly from the moisture in the jam migrating outward into the dough — this is normal and actually makes the cookie slightly more tender than on day 1. By day 4 the texture begins to dry at the edges. Consume by day 4 for best results.
🗒 Luna’s Note: I deliberately make these a day ahead when I am serving them to guests. The day-2 texture — where the butter flavor has deepened and the jam has softened the dough slightly around the edges — is genuinely better than day 1. Fresh out of the oven is great, but rested overnight is better.
Refrigerator
Refrigeration is not recommended for these cookies. The cold temperature firms the butter in the dough and makes the cookies noticeably harder and less tender. The jam also thickens and loses its glossy appearance in the fridge. If your kitchen runs very warm — above 78°F (26°C) — and you are concerned about the jam, refrigerating in a lidded container is acceptable, but bring the cookies to room temperature for at least 20 minutes before serving. Cold cookies do not taste the same as room-temperature ones.
Freezer — Baked
Baked thumbprint cookies freeze well for up to 2 months. Allow cookies to cool completely — a full hour at room temperature — before freezing. The jam must be fully set before freezing or it will smear during wrapping.
Wrap each cookie individually in a small square of plastic wrap, pressing gently to conform to the shape without crushing the jam center. Place wrapped cookies in a single layer in a zip-lock freezer bag or a rigid freezer-safe container. Squeeze out as much air as possible before sealing.
To thaw: remove cookies from the freezer and unwrap them onto a plate. Thaw at room temperature for 30 to 45 minutes. Do not microwave — microwaving makes the jam superheated and the dough rubbery. The texture after thawing is very close to fresh — the jam returns to glossy and the dough softens back to its original tenderness within 30 minutes.
Freezer — Unbaked Dough
The dough freezes well at the ball stage — before pressing and before filling. Portion the dough into balls, roll in sugar if using, and arrange in a single layer on a parchment-lined baking sheet. Freeze uncovered for 1 hour until solid, then transfer to a zip-lock freezer bag. Freeze for up to 2 months.
To bake from frozen: remove dough balls from the freezer, place on a parchment-lined baking sheet, and allow to rest at room temperature for 15 minutes. Press the thumbprints and fill with jam while the dough is still slightly cold — it actually holds the well shape better when partially chilled. Bake at 350°F (175°C) for 12 to 14 minutes — 2 minutes longer than the fresh dough bake time to account for the residual chill.
Do not press and fill the dough balls before freezing — the well collapses during freezing and thawing, and the jam becomes watery when frozen and thawed inside the dough.
Serving Suggestion
I serve these on a wide, flat plate with at least two jam flavors represented — raspberry and apricot side by side, the red and orange centers alternating across the plate. The contrast is purely visual but it makes the whole plate look more considered without any extra effort.
🗒 Luna’s Note: My favorite way to serve these is alongside a pot of Earl Grey tea in the afternoon. The bergamot in the tea cuts through the butter richness and makes the jam flavor sharper and brighter. It is a combination I stumbled onto by accident and have not changed since.
These also work well on a holiday cookie tray where their small size and jewel-toned centers make them visually distinct from every other cookie on the plate. At roughly 1½ to 2 inches (4–5cm) in diameter, they are two-bite cookies — small enough that guests take two or three without thinking about it.
Frequently Asked Questions About Thumbprint Cookies
Why do my thumbprint cookies crack?
Thumbprint cookies crack at the edges when the dough is too cold, too dry, or both. Cold dough does not flex — it fractures under pressure the same way cold clay does. Dry dough has the same problem because there is not enough fat distributed through the flour particles to act as a lubricant during pressing. The fix is to ensure your butter was fully softened to 65–68°F (18–20°C) before mixing and your flour was spooned and leveled — or weighed at exactly 120g — rather than scooped. Fine cracks radiating from the press point are normal and visible in the photos. Large, jagged cracks that split the cookie wall are a dough consistency issue — let the dough balls rest 5 minutes at room temperature and wet your thumb lightly before pressing.
What jam is best for thumbprint cookies?
For jam thumbprint cookies, a thick smooth fruit jam works best — raspberry, strawberry, and apricot are the three most reliable choices and all three are visible across the photos in this article. The key word is thick. Jelly is too loose and runs out of the well during baking. Chunky preserves sit unevenly and can caramelize in patches. A smooth, thick jam stays in place, bubbles gently at 350°F (175°C), and sets back to a jewel-toned, slightly sticky finish as it cools — exactly the result shown in the close-up photo. Test your jam before filling: scoop ½ teaspoon onto a cold plate. It should hold a mound for at least 5 seconds. If it spreads flat immediately, it is too thin.
Can I make thumbprint cookies ahead of time?
Yes — and I recommend it. These cookies are genuinely better on day 2 than day 1. As they rest overnight in a lidded hard-sided container at room temperature, the moisture from the jam migrates into the surrounding dough, which softens the exterior and deepens the butter flavor. Make them the day before you plan to serve them, store in a single layer with parchment between layers, and bring to room temperature 20 minutes before serving. The make-ahead window is up to 3 days at room temperature and up to 2 months frozen.
Can I use gluten-free flour in thumbprint cookies?
Yes, with some adjustment. A 1:1 gluten-free all-purpose flour blend — such as Bob’s Red Mill 1-to-1 or King Arthur Measure for Measure — works reliably in this recipe at the same weight of 120g. The texture will be slightly more crumbly than the standard version because gluten-free blends do not form the same protein network as all-purpose flour. Press the dough balls more gently to avoid cracking, and handle them carefully after baking until fully cooled — they are more fragile at the warm stage than standard cookies. Do not use almond flour as a direct swap — its fat content is completely different and produces a flat, oily cookie that will not hold the thumbprint shape. Rice flour alone also does not work — it produces a gritty, sandy texture rather than the soft result shown in the photos.
Can I freeze thumbprint cookies?
Yes — both baked cookies and unbaked dough balls freeze well for up to 2 months. For baked cookies, cool completely, wrap each one individually in plastic wrap, and store in a rigid freezer-safe container. Thaw at room temperature for 30 to 45 minutes — do not microwave. For unbaked dough, freeze the portioned balls before pressing and filling. Bake from the partially thawed state after a 15-minute rest — press and fill just before they go into the oven, and add 2 extra minutes to the bake time. My shortbread cookies recipe uses the same freeze-the-dough approach and the results are identical to fresh-baked every time.
Why are my thumbprint cookies dry?
Dry thumbprint cookies are almost always overbaked. These cookies do not brown on top — the tops of plain cookies stay pale cream-colored regardless of whether they are correctly done or overdone. Sugar-rolled cookies turn golden-tan from the sugar coating, not from the dough itself. The only reliable doneness signal is the bottom: lightly golden when you lift one cookie with a thin spatula at the 10-minute mark, with the center still feeling slightly soft to a very light touch. Pull them at that moment. They finish setting through carryover cooking on the hot pan during the 5-minute rest. A dry cookie that is already baked cannot be rehydrated — storing overnight in a lidded container with a small piece of bread can help draw some ambient moisture back into the dough.
How do thumbprint cookies turn out at high altitude or in humid climates?
At high altitude above 3,500 feet (1,067 meters), add 1 extra tablespoon (8g) of flour to the dough to compensate for faster moisture evaporation, and start checking your cookies at 9 minutes rather than 10. The absence of leavening in this recipe is an advantage at altitude — there is no CO2 to over-expand and cause collapse. In high humidity above 70% relative humidity, the dough will feel slightly tackier than usual and may take 1–2 extra minutes to set on the bottom. Refrigerate the portioned, pressed, and filled cookies on the pan for 15 minutes before baking to firm up the dough and reduce spreading. Baked cookies in humid climates may feel slightly soft on the surface even when fully done — this is surface moisture from the air, not underbaking.
Can I double thumbprint cookies recipe?
Yes — this recipe doubles cleanly. Multiply all ingredients by 2. There is no leavening in this recipe, so you do not need to worry about the non-linear scaling issue that affects baking soda and baking powder. Salt scales linearly — double it, then taste and adjust if needed. Bake in two separate batches on two separate pans rather than crowding everything onto one pan — crowding reduces air circulation and produces uneven baking. The bake time stays the same at 10 to 12 minutes per pan.
More Cookies You’ll Love
- Sugar Cookies With Frosting — soft, thick sugar cookies topped with a smooth, spreadable vanilla frosting that sets without cracking — the cookie tray companion to these thumbprints.
Jam-Filled Thumbprint Cookies
Ingredients
Equipment
Method
- Position the oven rack in the middle position and preheat to 350°F (175°C), allowing a full 15 minutes for the oven to reach temperature, then line a light-colored aluminum baking sheet with parchment paper and set aside.
- In a large mixing bowl, combine ½ cup (113g) unsalted butter softened to room temperature and ⅓ cup (67g) plain white granulated cane sugar and stir firmly with a silicone spatula for 40 to 50 strokes until the mixture looks pale, smooth, and slightly glossy with no visible butter chunks or sugar streaks remaining.
- Add ½ tsp pure vanilla extract and stir for 10 strokes to combine, then add 1 cup (120g) all-purpose flour spooned and leveled and ¼ tsp fine sea salt and fold gently for 25 to 30 strokes until the flour is fully incorporated and no dry streaks remain — stop mixing the moment the dough comes together.
- Scoop the dough into 24 portions at approximately 1 tablespoon (18g) each and roll each portion between your palms into a smooth round ball — if using the optional sugar coating, roll each ball through 2 tablespoons (25g) granulated sugar before placing on the pan — then arrange on the prepared baking sheet spaced at least 1½ inches (4cm) apart.
- Press your thumb or the rounded back of a ½ teaspoon measure firmly and straight down into the center of each dough ball to create a well approximately ½ inch (1.25cm) wide and ¼ inch (0.6cm) deep, pressing until the well is deep enough to hold jam without overflowing — fine cracks at the edges are normal and expected.
- Fill each well with approximately ½ teaspoon (3–4g) of thick fruit jam using a small spoon, filling just below the rim of the well without mounding above it, for a total of 3–4 tablespoons (60–80g) of jam across all 24 cookies.
- Bake on the middle rack at 350°F (175°C) for 10 to 12 minutes, starting to check at the 10-minute mark — pull the pan when the bottoms are lightly golden and the tops remain pale cream-colored and the centers still feel slightly soft when touched very lightly — do not wait for the tops to brown.
- Leave the cookies on the hot pan for exactly 5 minutes without moving them to allow carryover cooking to finish setting the centers, then transfer to a wire cooling rack and cool completely for at least 20 minutes before serving — if using the optional glaze, whisk 2 tablespoons (15g) sifted powdered sugar with 1 teaspoon (5ml) water until smooth and drizzle over fully cooled cookies only.