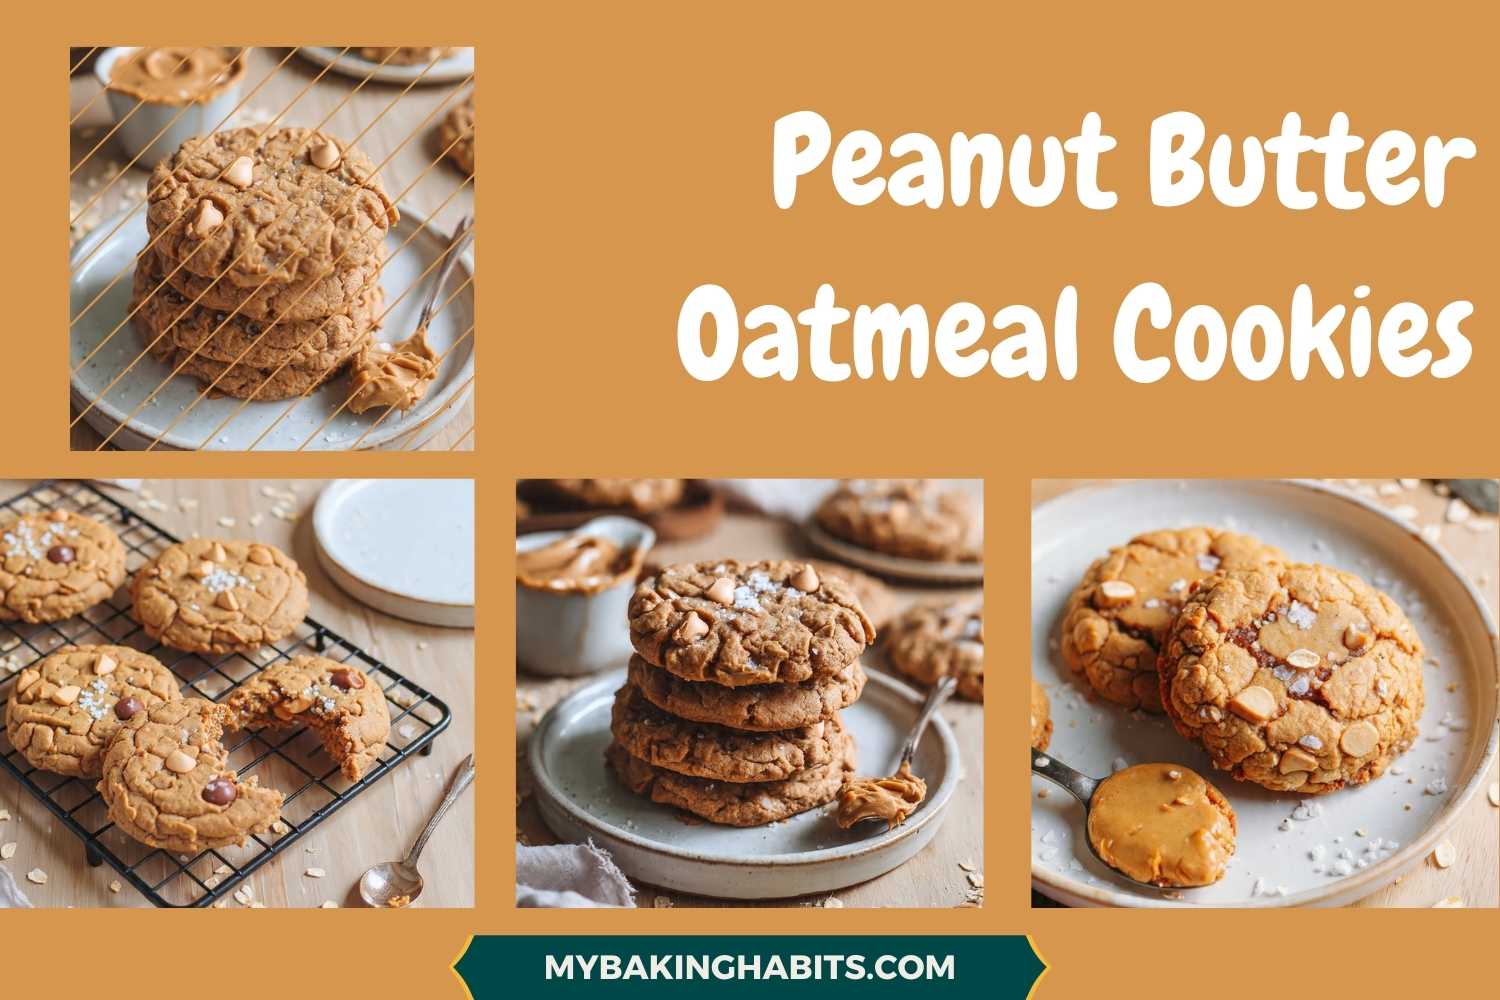
Thick & Chewy Peanut Butter Oatmeal Cookies
I have made these peanut butter oatmeal cookies across more than fifteen batches of testing in my kitchen, and what I was chasing the whole time was a specific result: a cookie thick enough to have a real center, chewy enough that it stays that way two days after baking, and peanut butter flavor that does not fade once the cookies cool. Every batch got me closer to what you see in the photos above.
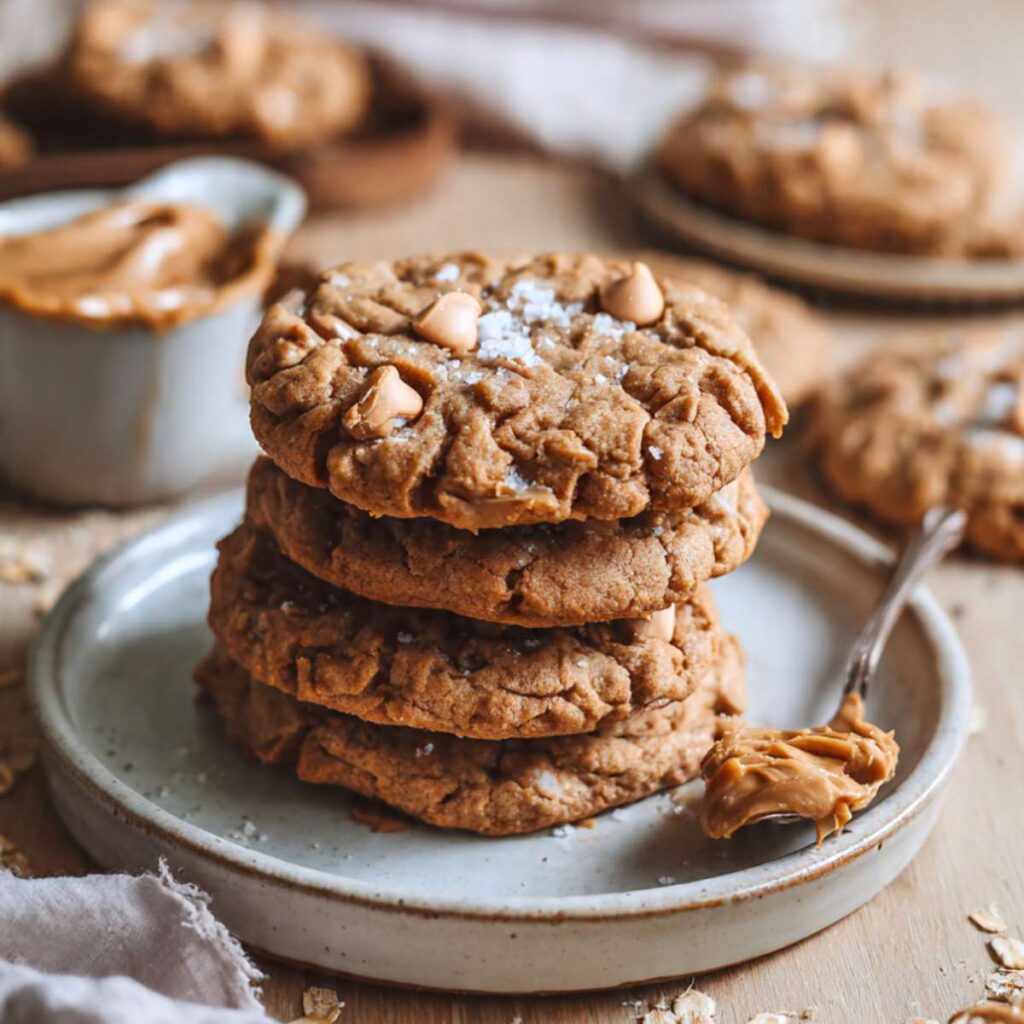
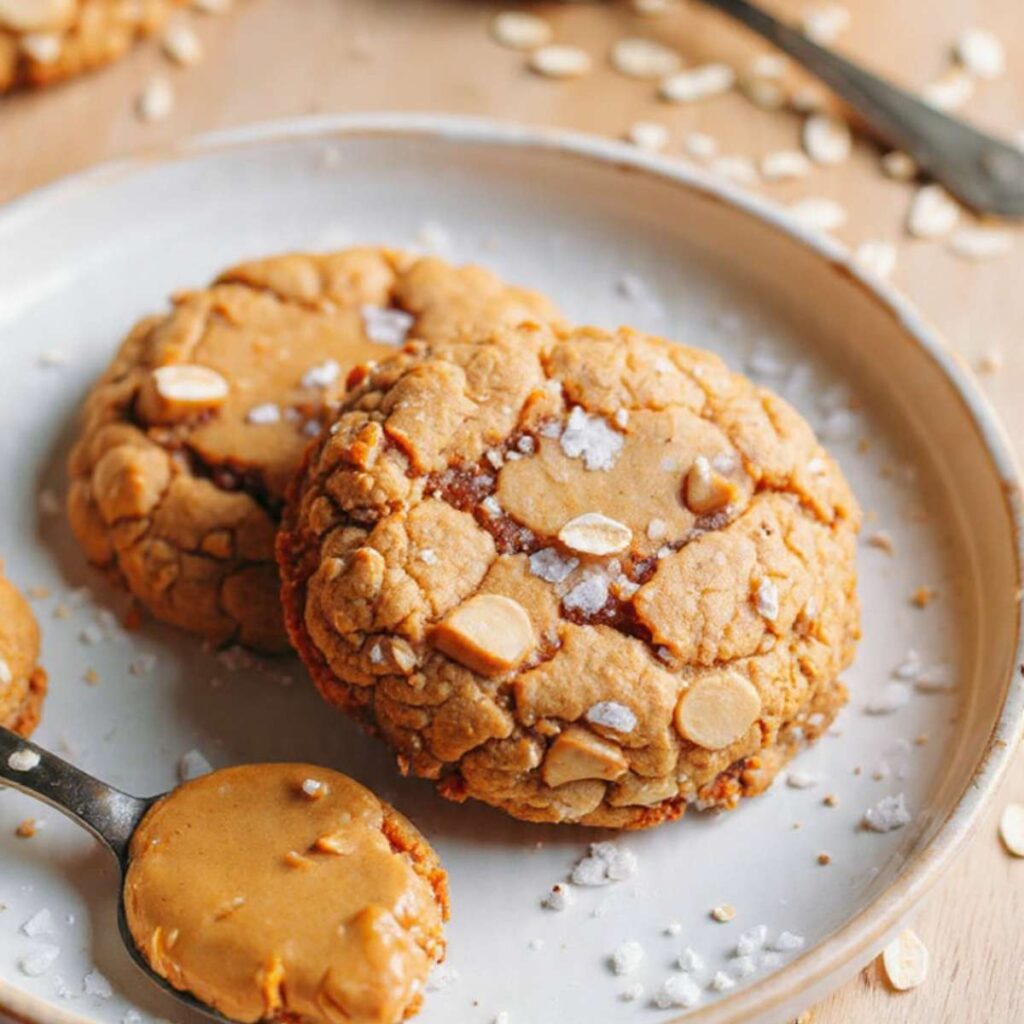
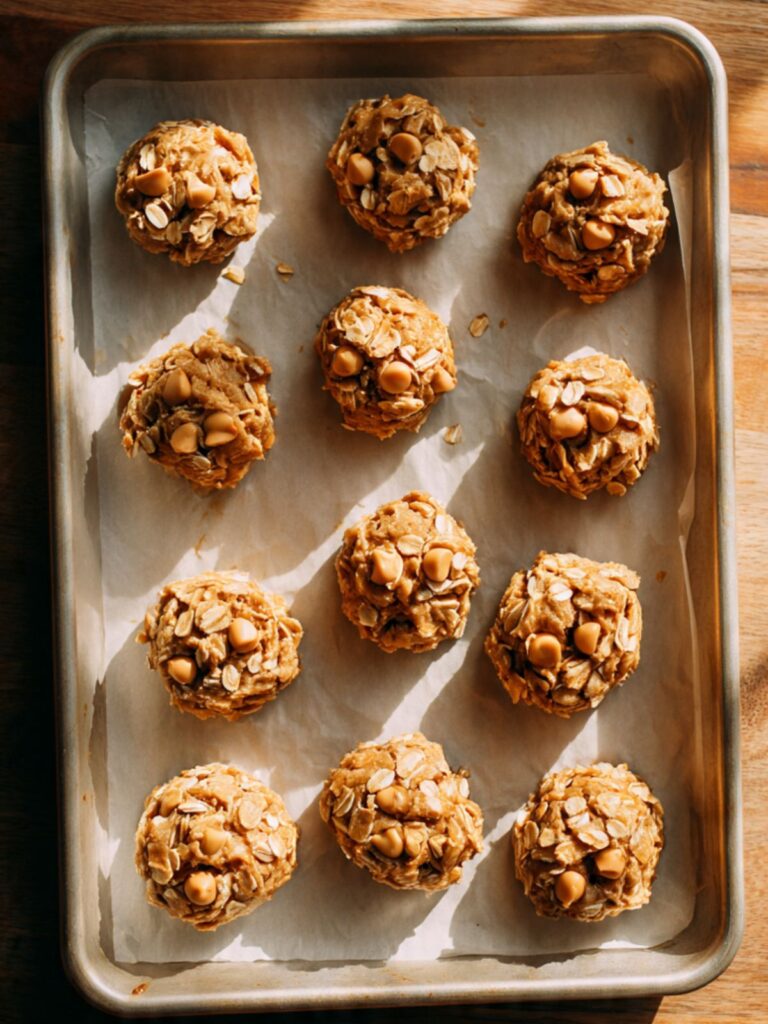
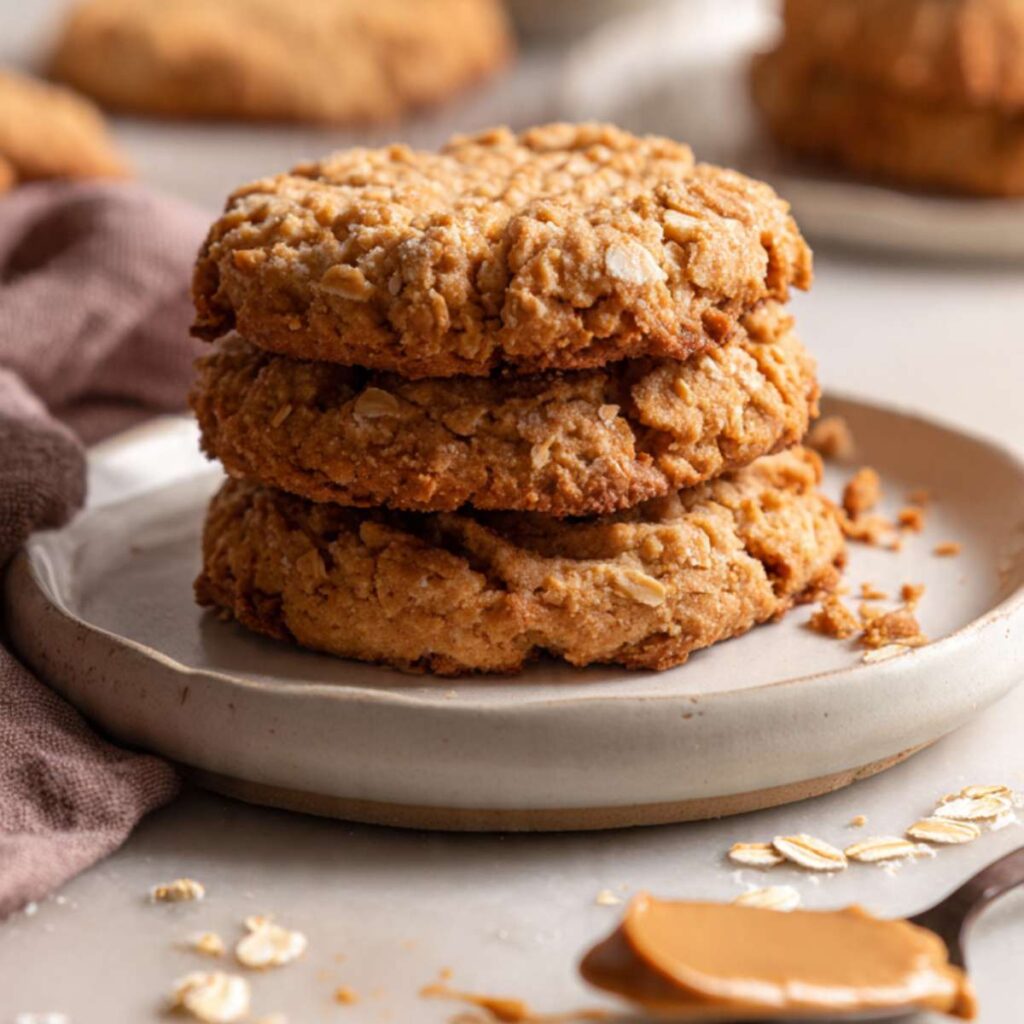
The texture here is not subtle. The edges set firm with a faint crackle while the center stays dense and chewy — not soft in a raw-dough way, but in the way a good oatmeal cookie should be. You get visible oats in every bite, peanut butter chips that hold their shape through the bake, and a hit of flaky salt on top that makes the whole thing taste more complex than a one-bowl dough has any right to.
The peanut butter type matters more in this recipe than in almost any other cookie I make. Both the peanut butter and the unsalted butter are load-bearing here — they work together as the fat base that holds the oats and chips in place through the entire bake. Use creamy commercial peanut butter such as Jif or Skippy. Natural peanut butter where the oil separates will produce a crumbly, unworkable dough that cannot be scooped regardless of how long you mix it.
🗒 Luna’s Note: I keep a jar of Jif in my pantry specifically for baking. The consistency is identical every time I open a new jar — that predictability is what I need when I am testing for texture.
I tested this with old-fashioned rolled oats versus quick oats. Quick oats fully absorb into the dough and disappear — you lose the chew, the texture, and the visible oat pieces you can see on the surface of every cookie in these photos. Old-fashioned rolled oats give the dough structure and stay distinct through the bake. That is the version this recipe is built around.
I also tested with different scoop sizes. A standard 1.5-tablespoon scoop produced cookies that spread thinner and baked crispier throughout — no soft center. Portioning at 2 tablespoons (45g) per cookie produced the thick, domed profile visible in the stacked photos. That is the scoop size in this recipe and the reason the bake time is 10 to 12 minutes rather than 8 to 9.
No chilling required. No electric mixer needed. One bowl, one spatula, and about 30 minutes from start to warm cookie.
| Prep Time | Cook Time | Total Time | Servings | Difficulty |
|---|---|---|---|---|
| 15 minutes | 10–12 minutes | ~30 minutes | 10–12 large cookies | Easy |
| Calories | Carbs | Fat | Protein | Sugar |
|---|---|---|---|---|
| ~226 kcal | ~25g | ~12g | ~6g | ~15g |

Ingredients & Tools for Peanut Butter Oatmeal Cookies Recipe
For the Cookies
- ½ cup (128g) creamy commercial peanut butter, such as Jif or Skippy
- ¼ cup (57g) unsalted butter, softened to room temperature (65–68°F / 18–20°C)
- ½ cup (100g) plain white granulated cane sugar
- 1 large egg (approximately 50g without shell), room temperature
- ¾ cup (90g) all-purpose flour (spooned into the measuring cup and leveled — or weighed at 90g)
- ½ tsp (3g) baking soda, checked for freshness
- ¼ tsp (1.5g) fine sea salt
- 1 cup (90g) old-fashioned rolled oats (not quick oats or instant oats)
- ½ cup (85g) peanut butter chips, such as Reese’s brand
- Flaky sea salt, such as Maldon — for topping
Before You Start
Peanut butter type is non-negotiable. Use creamy commercial peanut butter such as Jif or Skippy — not natural peanut butter where the oil separates. Natural peanut butter has inconsistent fat content and will produce a crumbly dough that cannot be scooped. This is the single most common failure point in this recipe.
Soften the butter correctly. Pull your unsalted butter from the fridge 60 to 90 minutes before baking and leave it at room temperature (65–68°F / 18–20°C). Press your finger into the butter — it should leave a clean indent without the butter feeling greasy or slick. If the butter looks shiny or your finger slides through it, it is too warm and will make the dough loose and hard to scoop.
Bring the egg to room temperature. A cold egg does not incorporate smoothly into a fat-based dough. Pull it from the fridge 30 minutes before baking, or place it in a bowl of warm (not hot) water for 10 minutes if you are short on time.
Use old-fashioned rolled oats only. Quick oats and instant oats absorb too much moisture and disappear into the dough. You lose the chew and the visible oat texture shown in every photo in this article. Old-fashioned rolled oats are the correct choice — do not substitute.
Check your baking soda for freshness. Drop ½ tsp (3g) into a small bowl with a splash of hot water and white vinegar. It should bubble aggressively within 2 seconds. If it fizzes weakly or not at all, replace the box before baking — expired baking soda produces flat, dense cookies with no crackle.
Measure flour by weight or by spooning. If you do not have a kitchen scale, spoon the flour into your measuring cup and level it off with a straight edge. Scooping directly from the bag packs 20 to 30% more flour than spooning. Extra flour makes the dough stiff and produces a dry, crumbly cookie instead of the chewy center visible in the broken cookie photo.
This entire recipe comes together with a large mixing bowl and a silicone spatula — no electric mixer needed. The dough is mixed by hand in one bowl from start to finish.
Position your oven rack in the middle position before preheating. Middle rack gives even heat distribution from both the top and bottom elements.
Necessary Tools
Required:
- Large mixing bowl
- Silicone spatula or wooden spoon
- Kitchen scale (strongly recommended) or measuring cups and spoons
- Light-colored aluminum baking sheet — dark non-stick pans absorb more heat and will overbrown the bottoms before the centers set
- Parchment paper — do not grease the pan or use foil; parchment prevents sticking and allows the cookies to release cleanly
- Wire cooling rack
- Cookie scoop or spoon (2-tablespoon / 45g capacity)
Optional:
- Oven thermometer — most home ovens run 15 to 25°F (8 to 14°C) off from the dial setting; an oven thermometer confirms your actual baking temperature
How to Make Peanut Butter Oatmeal Cookies
This recipe uses the one-bowl method — wet ingredients first, dry ingredients folded in second, oats and chips last. No electric mixer needed at any point. The steps move quickly once the butter is softened, so have everything measured and ready before you start.
Step 1: Preheating the Oven and Setting Up the Pan
Before anything goes into a bowl, get the oven running. Position the oven rack in the middle slot — not the top, not the bottom. Top rack burns the tops of cookies before the centers set. Bottom rack burns the bottoms. Middle rack is the only position that gives even heat from both directions.
Heat the oven to 350°F (175°C). Line your light-colored aluminum baking sheet with parchment paper and set it near the oven. Do not grease the parchment and do not use foil — foil conducts heat too aggressively and will overbrown the cookie bottoms before the centers finish. Parchment creates a slight buffer between the hot pan surface and the cookie base, which is what allows the bottoms to set evenly rather than burning at the contact point.
If you have an oven thermometer, place it on the middle rack now. Most home ovens run 15 to 25°F (8 to 14°C) off from the dial — an oven that reads 350°F might actually be running at 330°F or 370°F. Either throws the bake time and spread off in ways that are hard to predict without measuring.
The oven needs to hold 350°F (175°C) for at least 5 minutes before the pan goes in — not just until the preheat tone sounds. Set a timer for 15 minutes from when you turned it on, then start mixing.
Do not skip the preheat time. A cold or partially heated oven lets the fat in the dough melt before the structure sets, and the cookies spread wide and flat instead of holding the thick, domed shape visible in the stacked photos above.
The pan is ready. The oven is heating. Move to Step 2.
Step 2: Combining the Peanut Butter, Butter, and Sugar Into the Fat Base
Equipment: Large mixing bowl, silicone spatula.
Quantities: ½ cup (128g) creamy commercial peanut butter such as Jif or Skippy, ¼ cup (57g) unsalted butter softened to room temperature (65–68°F / 18–20°C), ½ cup (100g) plain white granulated cane sugar.
Add all three to your large mixing bowl. The peanut butter and softened butter are working together here as the combined fat base — peanut butter provides the primary binding and flavor, while the unsalted butter adds tenderness and helps the sugar dissolve more evenly. The granulated sugar will partially dissolve into the fat during this step, which is what sets up the slight surface crackle you see on the finished cookies. Substituting coconut sugar or raw sugar here changes the crystal structure and removes that crackle.
Press and stir with the spatula using firm strokes from the bottom of the bowl upward — approximately 40 to 50 strokes — until no visible streaks of butter remain and the mixture looks uniform and thick.
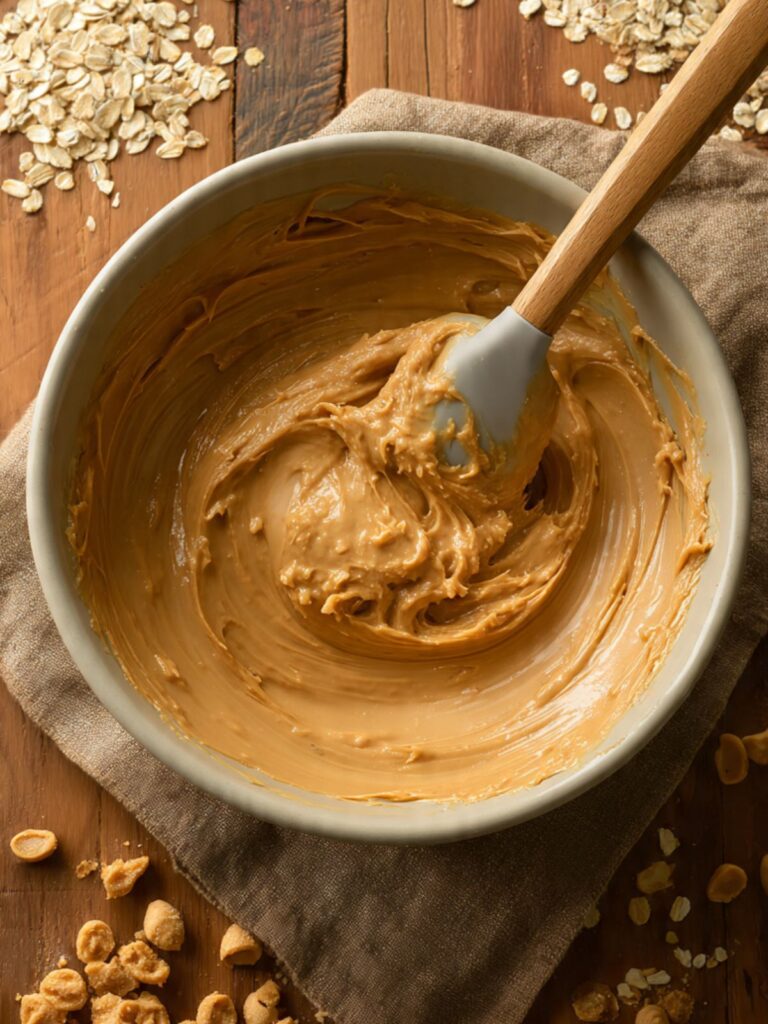
The mixture should look smooth and cohesive, holding its shape when you press the spatula against the side of the bowl. No yellow butter streaks, no greasy patches, no visible sugar granules sitting unmixed at the bottom. If you can still see distinct streaks of butter, fold for another 20 strokes and check again.
Do not use natural peanut butter at this stage — and if you are unsure whether yours is natural or commercial, check the jar. Natural peanut butter has oil pooled at the surface and a separated, grainy layer at the bottom. Commercial peanut butter like Jif or Skippy is smooth and uniform from top to bottom. Natural peanut butter in this dough produces a mixture that looks combined but falls apart entirely once oats go in.
The fat-sugar base is ready. Move directly to Step 3.
Step 3: Adding the Egg Until the Mixture Looks Glossy
Crack the room-temperature large egg (approximately 50g without shell) directly into the bowl. The egg has two jobs: it binds the dough and it emulsifies the fat and sugar into a cohesive mixture — meaning it makes the fat and water-based ingredients combine smoothly into a single uniform texture instead of sitting separately. A cold egg resists this process and the mixture will look streaky and broken even after mixing. Room temperature egg incorporates cleanly.
Stir with wide circular strokes from the bottom of the bowl upward — approximately 25 to 30 strokes. The mixture will look streaky and separated at first. Keep going.
When it is ready, the entire mixture will shift in appearance — it goes from looking patchy and inconsistent to smooth and glossy, slightly thicker than before. No egg streaks, no separated patches. That glossy shift is the visual confirmation that emulsification has happened. If it still looks streaky after 30 strokes, scrape the sides and bottom of the bowl and mix for another 10.
Do not rush this step. An under-incorporated egg produces an uneven dough where some scoops bake differently than others.
The egg is fully in. Move to Step 4.
Step 4: Folding in the Dry Ingredients Without Developing Gluten
Do not overmix after this step — that warning applies from the moment the flour touches the bowl.
Add the following directly into the bowl on top of the wet mixture: ¾ cup (90g) all-purpose flour spooned and leveled, ½ tsp (3g) baking soda checked for freshness, ¼ tsp (1.5g) fine sea salt.
Fold with the spatula using slow, deliberate strokes from the bottom of the bowl upward — not stirring in circles, which would activate the gluten more aggressively. Stop the moment no dry flour is visible — approximately 15 to 20 strokes is all this takes.
The baking soda is reacting with the slight natural acidity in the peanut butter right now. That reaction produces carbon dioxide bubbles that will give the cookies their lift during baking and create the craggy, crackled surface you can see across the tops of every finished cookie. Without active baking soda, the cookies bake flat and smooth — the crackled tops will not form.
The dough should look thick, heavy, and slightly rough — not smooth, not sticky, not wet. A small amount of visual unevenness in the texture is correct at this stage. If dry flour patches are still visible after 20 strokes, fold for 3 to 5 more strokes only. Then stop.
Overmixing past this point develops gluten — the elastic protein network in flour — and moves the finished texture from chewy toward tough and dense. The soft, slightly underdone center visible in the cookie broken open on the cooling rack comes from minimal mixing at this stage, not extra.
Dry ingredients are in. Move directly to Step 5.
Step 5: Folding in the Oats and Peanut Butter Chips
Equipment: Same bowl, same spatula.
Quantities: 1 cup (90g) old-fashioned rolled oats, ½ cup (85g) peanut butter chips such as Reese’s brand.
Add both to the bowl. Fold with wide, slow strokes from the bottom upward — approximately 15 to 20 strokes — rotating the bowl a quarter turn every 5 strokes to reach every part of the dough. The oats are what give the finished cookies their structure, chew, and the rough, textured surface you can see clearly when the cookies are laid flat on the plate. The peanut butter chips hold their shape through the bake and create the cream-colored pockets visible across the tops in the hero photos.
🗒 Luna’s Note: I press a few extra peanut butter chips onto the top of each dough ball right before the pan goes into the oven. It takes 20 seconds and guarantees visible chips on the surface of every finished cookie — chips folded into the dough get partially buried as the cookies spread.
The dough should look chunky, packed with oats, and hold together when you press a small amount between your fingers — not crumbly, not sticky, not loose. Every section of the bowl should have oats and chips distributed throughout. If the oats look concentrated in one area, fold for 3 to 5 more strokes and check again.
Do not overfold at this stage. Old-fashioned rolled oats absorb moisture quickly — working the dough too long after they go in makes the texture gummy rather than chewy, and the oats begin to break down into smaller pieces, losing the distinct flat flake that gives the cookie its texture.
The dough is fully mixed and ready to portion. Move to Step 6.
Step 6: Portioning the Dough Into Tall, Domed Mounds
Equipment: Cookie scoop or spoon (2-tablespoon / 45g capacity), kitchen scale for first-portion calibration, prepared baking sheet.
Scoop 2 tablespoons (45g) of dough and place it as a tall mound on the parchment-lined baking sheet. Weigh the first one on your kitchen scale — 45g is the target. Use that first portion as the reference and match the remaining cookies to it by eye. Space each mound at least 2 inches (5cm) apart — these cookies spread moderately during baking.
Keep the dough tall. Do not press the mounds flat, do not smooth the tops, and do not round them into perfect spheres. The irregular, rough shape going into the oven is exactly what creates the craggy, textured surface you see on the finished cookies. Smooth, pressed dough balls bake into smooth, uniform cookies — visually different from what is shown here.
The pan should have 10 to 12 evenly sized tall mounds spaced 2 inches (5cm) apart. If you have significantly more or fewer than 10 to 12, your scoop size was inconsistent and some cookies will finish before others — making it impossible to pull the entire pan at the right moment.
These cookies bake out to approximately 3 to 3.5 inches (7.5 to 9cm) in diameter — that finished size comes directly from the 45g portion going in tall rather than being pressed flat. A smaller scoop produces a smaller, thinner cookie with a different bake time. If you change the portion size, adjust the bake time accordingly and start checking 1 to 2 minutes earlier.
The pan is portioned. Move directly to the oven.
Step 7: Baking Until the Edges Are Set and the Centers Still Look Soft
Equipment: Preheated oven at 350°F (175°C), middle rack.
Place the pan on the middle rack. Bake for 10 to 12 minutes — set a timer for 10 minutes and start checking at that mark.
At 10 minutes, open the oven and look at the edges. They should be golden brown and set — defined, firm at the border, with a slight crackle forming across the surface. The centers should still look puffy, matte, and slightly underdone. Not shiny, not wet-looking, but not firm either. That soft, slightly underdone center is the correct pull point. Do not wait for the centers to firm up in the oven.
If the edges are still pale and soft at 10 minutes, close the oven and give the cookies another 1 to 2 minutes. Check again. Pull the moment the edges look golden and set.
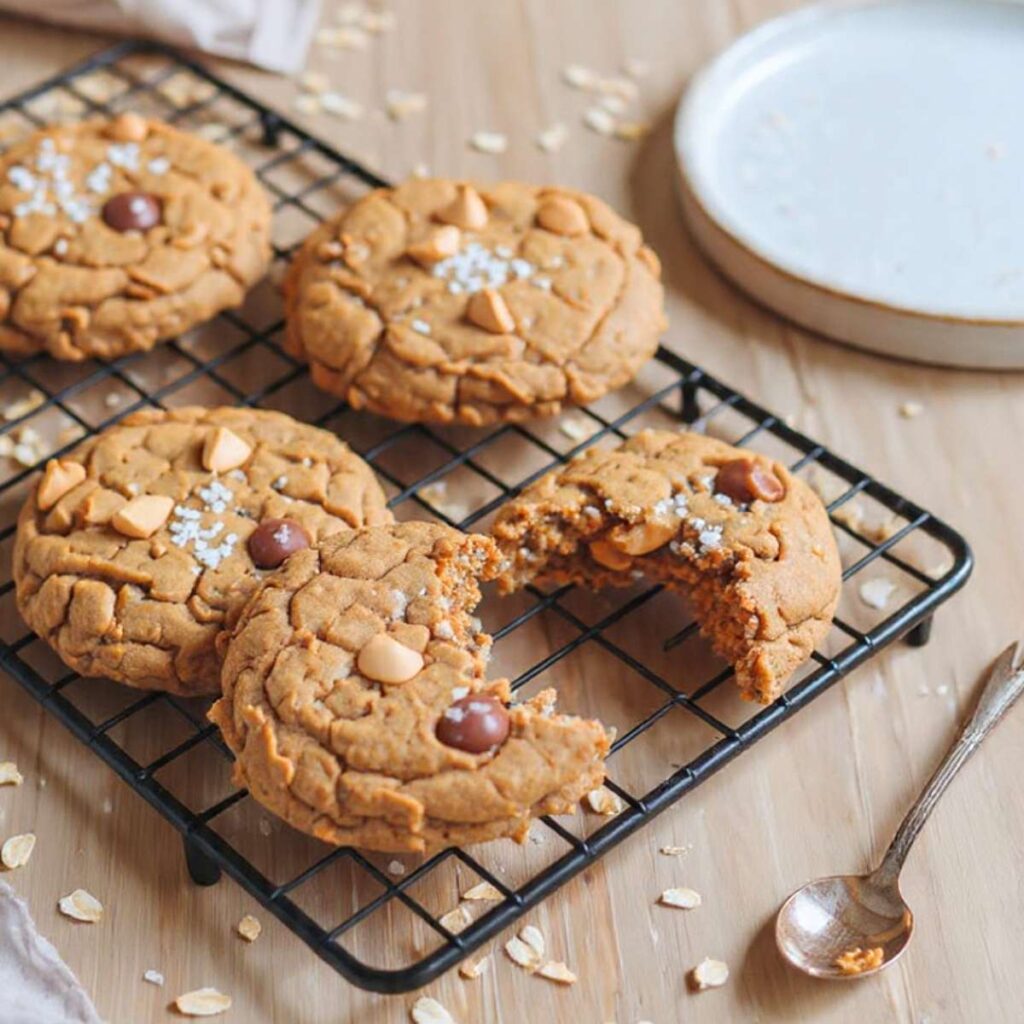
The correct visual at pull time: golden, set edges with a craggy crackle forming on the surface, and centers that look like they need another minute. They do not — carryover cooking on the hot pan is going to finish them. The broken cookie on the cooling rack in the photos shows exactly what the interior looks like after resting: dense, chewy, and fully set without being dry. That interior does not come from baking until the center looks done. It comes from pulling early and trusting the rest.
Do not open the oven before 10 minutes. Opening early releases heat and can cause uneven baking across the pan. And do not bake past 12 minutes unless the edges genuinely look underset — a pale, soft edge at 12 minutes means your oven is running low and needs another 1 to 2 minutes, not that the timing is wrong.
The pan comes out of the oven the moment the edges look set. Move immediately to Step 8.
Step 8: Resting, Adding the Flaky Salt, and Cooling
Equipment: Wire cooling rack, flaky sea salt such as Maldon.
The moment the pan comes out of the oven, pinch a small amount of flaky sea salt and sprinkle it over the top of each cookie while they are still hot. The heat from the cookie surface grabs the salt crystals and holds them in place. If you wait until the cookies cool to add the salt, it sits loosely on the surface and falls off when you pick up the cookie.
Then set a timer for exactly 5 minutes. Leave the cookies on the hot pan and do not move them.
During these 5 minutes, the pan is still conducting heat into the base of every cookie — this is carryover cooking, and it is finishing the centers off the heat rather than in the oven. Moving the cookies before the 5 minutes is up breaks the structural base. The cookies are fragile immediately out of the oven and will crack across the bottom if transferred too early. Waiting beyond 8 minutes starts to over-dry the bottoms from continued contact with the hot pan surface.
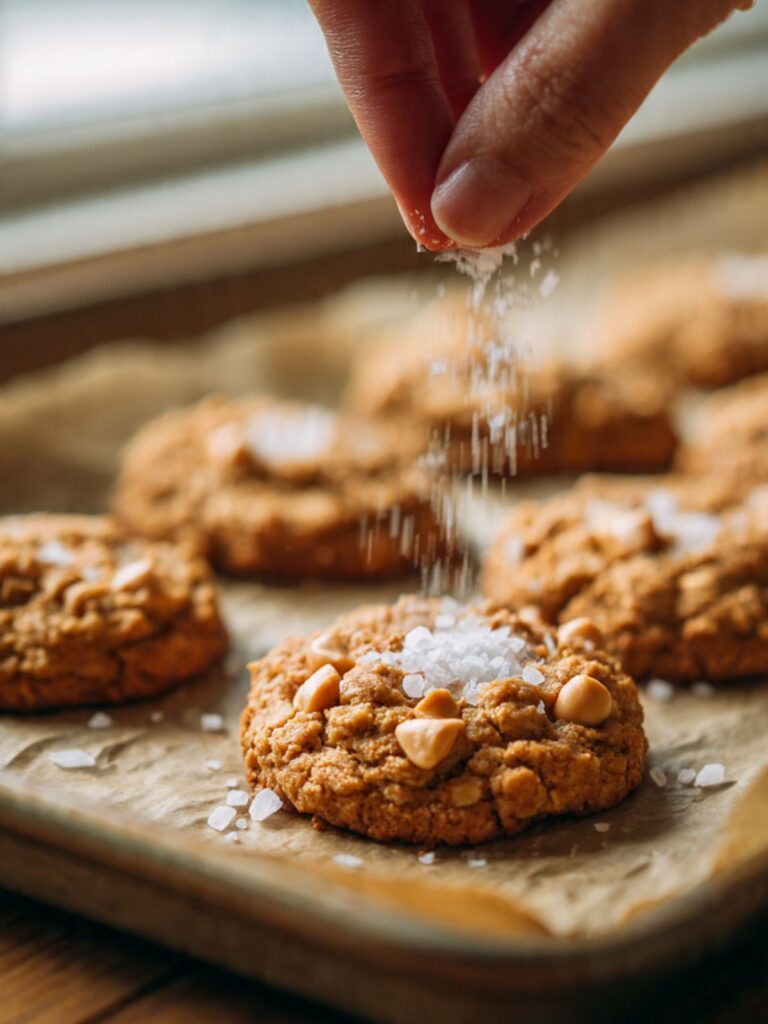
🗒 Luna’s Note: I add the flaky salt before I even set the pan down. Hot cookies, immediate salt, then the timer. That order is faster and the salt adheres better than if I pause to set the pan down first and come back.
After the 5-minute rest, use a thin spatula to transfer the cookies to a wire cooling rack. They should look exactly like what you see in the cooling rack photos — set edges with a craggy, crackled top, centers that still look slightly soft. As they cool on the rack over the next 15 to 20 minutes, the edges will firm up to a slight crunch while the centers settle into the dense, chewy texture you can see in the broken-open cookie. This texture takes the full cooling time to develop. Do not cut into one to check at 5 minutes — the center will look underdone and it is not.
The cookies are done. Cool fully on the rack before storing.
The Science Behind Peanut Butter Oatmeal Cookies
Why Commercial Peanut Butter Keeps This Dough Together
The fat in creamy commercial peanut butter such as Jif or Skippy stays uniform and evenly distributed at room temperature because it contains a small amount of fully hydrogenated vegetable oil — a stabilizer added during manufacturing to prevent oil separation. This is different from partially hydrogenated oils, which are trans fats. The stabilizer keeps the fat consistent from the top of the jar to the bottom, which is exactly what this dough needs. When you combine commercial peanut butter with softened unsalted butter and granulated sugar, the stable peanut butter fat coats the sugar crystals and creates a cohesive base that holds the oats and chips in place through the entire bake.
Natural peanut butter cannot do this — the separated oil produces a greasy, loose mixture that looks combined but falls apart the moment flour and oats go in. The dense, thick cookie you see in these photos is a direct result of using the right peanut butter from the start. If you want to read more about how fat ratios control cookie texture, my peanut butter chocolate chip cookies article covers the same principle in a slightly different dough.
How Old-Fashioned Rolled Oats Create Chew Without Density
Old-fashioned rolled oats are steamed and pressed flat before packaging — they are partially cooked before they ever touch your dough. That partial cooking matters because it slows down moisture absorption during baking. Instead of drawing water out of the dough immediately and turning dense, the oats absorb moisture gradually as the oven temperature rises, which keeps the surrounding dough from drying out before the cookies have time to set.
As the cookies bake at 350°F (175°C), the oats undergo the Maillard reaction alongside the sugars — proteins and sugars browning together above 280°F (138°C), creating new flavor compounds and the golden color visible on the cookie surfaces. The flat structure of rolled oats also creates small air pockets throughout the dough that give the finished cookie an open, yielding bite rather than a compressed, solid block. Quick oats are cut smaller and pre-cooked further, which means they absorb moisture immediately and break down completely during baking — the surface texture shown in the photos is gone, the visible oat character disappears, and the chew drops out entirely. Old-fashioned rolled oats only.
🗒 Luna’s Note: I buy old-fashioned rolled oats in bulk and store them in a sealed glass jar. Old oats smell faintly sour — like cardboard left in water. Fresh oats smell clean and slightly nutty. The smell test takes two seconds and tells you whether the batch is worth baking.
Why Pulling the Cookies Before the Centers Look Done Is Not a Mistake
Carryover cooking is the reason every baking recipe that tells you to “pull before it looks done” is not giving you bad advice. Residual heat stored in the pan and in the cookie itself continues to raise the internal temperature for 4 to 6 minutes after the pan leaves the oven. In a thick drop cookie, this off-heat cooking is not a minor variable — it is the mechanism that finishes the center.
Protein coagulation — the process by which the egg proteins in the dough set and solidify — happens gradually between 140°F and 160°F (60°C and 71°C). In the oven, the edges reach this temperature first and set firm while the center is still catching up. When you pull the pan at the soft-center stage and let carryover heat finish the job, the center proteins set slowly and evenly without losing moisture to the oven heat. The result is the dense, chewy interior visible in the broken-open cookie resting on the cooling rack. If instead you bake until the center looks fully set in the oven, the proteins have already coagulated beyond the point where they hold moisture — the cookie is technically done, but the texture is dry and tight rather than chewy. Pulling early is not underbaking. It is using the pan as the final stage of the bake rather than the oven.
Peanut Butter Oatmeal Cookies Troubleshooting & Pro-Tips
Common Mistakes
You Used Natural Peanut Butter Instead of Creamy Commercial
Symptom: The dough looks combined while mixing but falls apart when you try to scoop it. The baked cookies crumble at the edges and have a greasy, sandy texture instead of a chewy one.
Cause: Natural peanut butter where the oil separates does not have stable fat distribution. The separated oil coats other ingredients without binding them, and the dough never builds the cohesive structure that creamy commercial peanut butter provides. This is the most common reason this dough fails.
Immediate fix: There is no mid-batch correction once natural peanut butter is in the dough — the fat structure cannot be fixed after mixing. Discard the batch and start fresh with Jif, Skippy, or another commercial brand.
Salvage note: if the cookies are already baked and crumbly, crumble them entirely over vanilla ice cream. The sandy, oat-forward texture actually works well as a topping.
Prevention: Before you open the jar, look at the surface. Creamy commercial peanut butter is smooth and fully uniform from the top of the jar to the bottom — no oil separation, no layering. If there is oil pooled at the surface, it is natural peanut butter and it will not work here.
You Used a Dark Non-Stick Pan or Skipped the Parchment
Symptom: The cookie bottoms are overbrown or burnt while the centers and tops still look underdone. Or the cookies stick to the pan and break apart when you try to lift them.
Cause: Dark non-stick pans absorb heat faster than light-colored aluminum and concentrate it directly on the base of the cookie before the center has time to set. Skipping parchment removes the buffer between the hot metal surface and the cookie base, and also eliminates the clean-release surface the cookie needs to lift off intact.
Immediate fix: If the bottoms are already burning, remove the cookies from the pan immediately rather than completing the 5-minute rest — slide them straight onto the cooling rack. If they are sticking, run a thin offset spatula under each cookie with a firm, flat stroke rather than prying upward.
Salvage note: cookies with overbrown bottoms are still edible. Serve them bottom-down on a plate and no one will know.
Prevention: Always use a light-colored aluminum baking sheet lined with parchment. If you only own a dark non-stick pan, reduce the oven temperature by 25°F (14°C) to 325°F (163°C) and start checking the cookies at 9 minutes instead of 10.
Your Cookies Spread Too Flat
Symptom: The cookies spread into thin, wide discs during baking with no domed center. The edges are crisp and lacy rather than defined with a soft center.
Cause: Butter that was too warm going into the dough is the most common cause. Butter above 70°F (21°C) is too soft to hold shape and causes the fat to run before the cookie structure sets in the oven. The second most common cause is a dark or overly hot pan — the fat melts before the edges can firm up.
Immediate fix: Flat cookies are flat — there is nothing to do mid-bake. Pull them at the correct time so they do not overbrown on top of spreading.
Salvage note: flat peanut butter oatmeal cookies are excellent crumbled into a parfait layered with Greek yogurt and honey. The thin, crisp texture works better as a topping than a whole cookie.
Prevention: Check butter temperature before mixing — press a finger in and it should leave a clean indent without the surface looking greasy or shiny. If the butter looks too soft, refrigerate it for 10 to 15 minutes before using. Always use a light-colored aluminum pan.
Your Baking Soda Was Expired
Symptom: The cookies bake up flat and dense with no crackle across the surface. The edges look pale and the finished cookie feels heavy and compact throughout rather than having the slight lift and open texture of the cookies in the photos.
Cause: Baking soda loses potency after 3 to 6 months once opened. In this recipe, baking soda reacts with the natural acidity in the peanut butter to produce carbon dioxide — those gas bubbles are what lifts the centers slightly and creates the craggy, crackled surface. Without an active leavener, that reaction does not happen.
Immediate fix: If the cookies are already in the oven, nothing can be done. Bake to the correct time and note the texture difference.
Salvage note: dense, flat peanut butter oatmeal cookies still taste good — use them as the base for ice cream sandwiches. The flat shape and firm texture actually hold filling better than the thick domed version.
Prevention: Always test baking soda before using. Drop ½ tsp (3g) into a small bowl with a splash of hot water and white vinegar. It should bubble aggressively within 2 seconds. If it fizzes weakly or not at all, replace the box. A new box costs less than one failed batch.
Your Cookies Are Dry and Crumbly Instead of Chewy
Symptom: The finished cookies feel dry when you bite into them and break apart at the edges rather than bending. The centers are tight and dense rather than soft and yielding.
Cause: Two equal possibilities — too much flour, or overbaking. Scooping flour directly from the bag packs 20 to 30% more into the measuring cup than spooning and leveling does. One extra tablespoon per cup is enough to dry the dough significantly. Overbaking past the soft-center pull point removes the residual moisture that carryover cooking would otherwise have set into a chewy center.
Immediate fix: For already-baked dry cookies, place them in a lidded hard-sided container with a single slice of plain white bread. Seal the lid. The bread releases moisture into the container and the cookies will soften noticeably within 24 hours.
Prevention: Weigh flour at 90g on a kitchen scale, or spoon it into the measuring cup and level with a straight edge — never scoop directly from the bag. Pull the pan at 10 to 12 minutes the moment the edges look set and golden but the centers still look slightly soft.
Your Cookie Bottoms Are Burnt or Overbrown
Symptom: The bottoms of the cookies are dark brown to black while the tops and centers still look pale and underdone. The bottoms taste bitter.
Cause: Dark non-stick pan, bottom oven rack, or both. Dark pans concentrate heat at the base of the cookie. The bottom rack sits closest to the heating element and amplifies this effect. Together they can burn cookie bottoms in as little as 8 minutes at 350°F (175°C).
Immediate fix: Remove the cookies from the pan immediately rather than completing the rest time — transfer straight to the cooling rack. The tops may still be acceptable.
Prevention: Light-colored aluminum pan, middle rack, parchment lining — all three together. If you own only a dark pan, drop the oven to 325°F (163°C) and check at 9 minutes.
High Altitude and High Humidity Adjustments
High altitude above 3,500 feet (1,067m): Leavening acts more aggressively at altitude because lower atmospheric pressure allows gas bubbles to expand faster. Reduce the baking soda from ½ tsp (3g) to ¼ tsp (1.5g). Increase the oven temperature by 15°F (8°C) to 365°F (185°C). Start checking at 9 minutes rather than 10.
High humidity: Flour and oats absorb moisture from the air in humid environments before baking even begins, which makes the dough stickier than expected and can cause the cookies to spread more than shown in the photos. If the dough feels unusually soft or sticky when you start scooping, refrigerate it for 15 minutes — this firms the fat back up and restores the dough’s ability to hold its mound shape going into the oven. Store baked cookies in a lidded hard-sided container, not a zip-lock bag, which traps humidity against the surface and causes the flaky salt to dissolve.
Expert Pro-Tips
Press extra peanut butter chips onto each dough ball immediately before the pan goes into the oven. Chips folded into the dough get partially buried as the cookies spread during baking. Pressing 4 to 5 chips onto the visible top surface of each mound right before it goes in guarantees the cream-colored chip pockets visible across the tops of every finished cookie in these photos — this takes 20 seconds and is the difference between a cookie that looks like it came from a bakery and one that looks like chips happened to land on top.
Rotate the baking sheet 180 degrees at the 6-minute mark. Most home ovens have hot spots — one side runs hotter than the other. A half-rotation at the midpoint gives every cookie equal time on the hot and cooler sides of the oven and produces even browning across the full pan. If you have noticed uneven results in previous bakes, this single habit fixes most of it.
Use a cookie scoop rather than a spoon for consistent portioning. A 2-tablespoon (45g) scoop produces identical dough balls every time, which means every cookie on the pan reaches the correct doneness at the same moment. Hand-portioned mounds vary by 5 to 10g per cookie — enough that some will be done at 10 minutes while others need 12, making it impossible to pull the pan at the right moment for all of them at once.
How to Store Peanut Butter Oatmeal Cookies
Room Temperature
Store baked cookies in a lidded hard-sided container — a cookie tin or a hard plastic container with a snap lid. Layer the cookies with a sheet of parchment paper between each layer to prevent them from sticking together and compressing each other’s surfaces. At room temperature, these cookies stay chewy and hold their texture for up to 4 days.
Do not store them in a zip-lock bag — the soft pressure of the bag flattens the cookies and traps humidity against the surface, which makes the flaky salt dissolve and the tops go sticky within a day. Do not leave them uncovered on a plate — exposed cookies dry out from the surface inward and lose their chewy center within 24 hours.
The oats in this recipe help retain moisture longer than a plain peanut butter cookie would — oats are hygroscopic, meaning they draw and hold moisture, which is part of why these cookies stay soft at room temperature for several days rather than just one or two.
Refrigerator
These cookies do not need to be refrigerated and I do not recommend it as a first-choice storage method. The fridge pulls moisture out of baked cookies faster than room temperature storage does, and the texture firms up significantly when cold. If you do refrigerate them — for example, in very warm or humid conditions where room temperature storage is not practical — bring them back to room temperature for at least 20 to 30 minutes before eating. Cold cookies feel denser and drier than they actually are, and the peanut butter flavor is noticeably muted when they are straight from the fridge.
Freezer — Baked Cookies
Baked cookies freeze well for up to 2 months. Let them cool completely on the wire rack — at least 1 hour at room temperature — before freezing. Wrap each cookie individually in plastic wrap, then place the wrapped cookies in a zip-lock freezer bag with as much air pressed out as possible before sealing. The individual wrap layer is what prevents freezer burn on the surface.
To thaw, remove the cookies from the freezer and leave them at room temperature, still wrapped, for 30 to 45 minutes. Do not microwave from frozen — it softens the centers unevenly and makes the edges rubbery. Thawed cookies taste nearly identical to fresh-baked on day one.
Freezer — Unbaked Dough
This dough freezes exceptionally well as portioned dough balls. Scoop the dough into 45g portions as you would for baking, place the dough balls on a parchment-lined baking sheet, and freeze uncovered for 1 hour until solid. Transfer the frozen dough balls to a zip-lock freezer bag and store for up to 3 months.
To bake from frozen, place the frozen dough balls directly on a parchment-lined baking sheet — do not thaw. Add the flaky salt on top and bake at 350°F (175°C) for 13 to 14 minutes rather than 10 to 12. The extra 2 to 3 minutes accounts for the cold dough temperature. Check at 13 minutes — the doneness cues are the same: golden set edges, slightly soft centers.
🗒 Luna’s Note: I almost always freeze half the dough balls from every batch. Portioning takes an extra five minutes and gives me cookies on demand for weeks. Tuesday night cookies in 14 minutes from frozen — no mixing, no cleanup.
Serving Suggestion
I serve these slightly warm — about 10 minutes out of the oven or reheated at 300°F (150°C) for 4 minutes straight from room temperature storage. That brief warmth softens the peanut butter chips back to just-melted and makes the flaky salt pop against the sweet, toasted oat flavor in a way that fully cooled cookies do not quite match. A cold glass of whole milk alongside is the version I keep coming back to.
Frequently Asked Questions About Peanut Butter Oatmeal Cookies
Can I make peanut butter oatmeal cookies ahead of time?
Yes — and this recipe is particularly well suited to making ahead. The baked cookies hold their chewy texture in a lidded hard-sided container at room temperature for up to 4 days with no noticeable quality loss. The unbaked dough balls freeze for up to 3 months and bake directly from frozen at 350°F (175°C) for 13 to 14 minutes — no thawing required. If you are baking for an event, I recommend making the dough up to 3 days ahead, portioning it into 45g balls, and freezing them so you can bake a fresh batch the morning of. The cookies taste identical to same-day baked and the texture is indistinguishable.
Can I use quick oats instead of rolled oats in cookies?
Technically yes, but the result will be a noticeably different cookie than what is shown in these photos. Quick oats are cut smaller and pre-cooked further than old-fashioned rolled oats — they absorb moisture immediately in the dough and break down completely during baking, producing a uniform, paste-like texture with no visible oat character and significantly less chew. The craggy, textured surface visible on every cookie in this article comes directly from old-fashioned rolled oats staying intact through the bake. If old-fashioned rolled oats are unavailable, the cookies will still taste like peanut butter oatmeal cookies — they just will not have the same texture or appearance. I tested both versions and kept the old-fashioned rolled oat version for this recipe specifically because of that visible oat texture.
Can I substitute natural peanut butter in cookies?
No — not in this recipe. Natural peanut butter where the oil separates does not have the stable fat content that creamy commercial peanut butter provides. In a dough where peanut butter is the primary fat source rather than dairy butter, that stability is what holds the dough together. Natural peanut butter produces a crumbly, greasy dough that cannot be scooped and bakes into cookies that fall apart at the edges. Creamy commercial peanut butter such as Jif or Skippy is the correct ingredient here — it is not interchangeable. If you specifically want a recipe that works with natural peanut butter, my 3 ingredient peanut butter cookies use a different structure that accommodates it.
What makes peanut butter oatmeal cookies chewy?
Three things working together: the fat ratio from the commercial peanut butter, the moisture retention of old-fashioned rolled oats, and pulling the cookies at the correct moment before carryover cooking finishes the centers. The peanut butter provides stable fat that keeps the crumb tender rather than dry. Old-fashioned rolled oats are hygroscopic — they draw and hold moisture within the cookie structure, which is why oatmeal cookies stay soft longer than plain drop cookies. Pulling the pan when the centers still look slightly underdone allows carryover cooking on the hot pan to set the interior without the oven drying it out. All three of these factors have to be correct together — fixing only one or two of them produces a chewier cookie than before, but not the result shown in these photos.
How do I keep peanut butter oatmeal cookies soft?
Store them in a lidded hard-sided container at room temperature with parchment between the layers — not in a zip-lock bag, which flattens them and traps humidity unevenly. The oats naturally help retain moisture for several days, but the storage method matters too. If the cookies have already dried out slightly, place a slice of plain white bread in the container with them and seal the lid — the bread releases moisture into the container and the cookies will soften within 12 to 24 hours. For longer storage, freeze the baked cookies individually wrapped in plastic wrap and thaw at room temperature when needed — frozen and thawed cookies retain their texture far better than cookies stored at room temperature past 4 days.
Can I double this peanut butter oatmeal cookie recipe?
Yes, with one adjustment — leavening does not scale linearly. This recipe uses ½ tsp (3g) baking soda. When doubling, use ¾ tsp (4.5g) — that is 1.5 times the amount, not double. Doubling the baking soda to 1 full tsp (6g) produces an over-risen cookie that collapses flat during baking and leaves a faintly metallic, soapy aftertaste. All other ingredients double exactly. Bake in two separate batches on individual pans rather than crowding two pans in the oven at once — rotating two pans mid-bake is difficult to time precisely and produces uneven results across the batch.
How does altitude or humidity affect peanut butter oatmeal cookies?
At high altitude above 3,500 feet (1,067m), leavening acts more aggressively because there is less atmospheric pressure holding the gas bubbles back — reduce the baking soda to ¼ tsp (1.5g), increase the oven temperature by 15°F (8°C) to 365°F (185°C), and check the cookies at 9 minutes rather than 10. In high humidity environments, the flour and oats absorb moisture from the air before baking even begins, which makes the dough stickier than expected and can cause the finished cookies to spread slightly more than shown in the photos. If your dough feels unusually soft or sticky, refrigerate it for 15 minutes before scooping — this firms the fat back up and restores the dough’s ability to hold its shape during baking.
More Cookie Recipes You’ll Love
- Oatmeal Raisin Cookies — chewy old-fashioned rolled oat cookies with warm cinnamon and plump raisins, built on the same one-bowl method as this recipe.
- No Bake Chocolate Oatmeal Cookies — a stovetop cookie that uses old-fashioned rolled oats and peanut butter with zero oven time — ready to set in 30 minutes.

Peanut Butter Oatmeal Cookies
Ingredients
Equipment
Method
- Position the oven rack in the middle slot and heat the oven to 350°F (175°C), then line a light-colored aluminum baking sheet with parchment paper and set aside.
- Add the creamy commercial peanut butter, softened unsalted butter, and plain white granulated cane sugar to a large mixing bowl and stir with a silicone spatula using firm strokes from the bottom of the bowl upward for approximately 40 to 50 strokes until the mixture looks smooth, thick, and uniform with no visible butter streaks remaining.
- Add the room-temperature large egg to the bowl and stir with wide circular strokes for approximately 25 to 30 strokes until the mixture looks glossy and fully uniform with no egg streaks visible.
- Add the all-purpose flour, baking soda, and fine sea salt to the bowl and fold with slow deliberate strokes from the bottom of the bowl upward for approximately 15 to 20 strokes until no dry flour is visible — do not overmix.
- Add the old-fashioned rolled oats and peanut butter chips to the bowl and fold for approximately 15 to 20 strokes until the oats and chips are evenly distributed throughout the dough.
- Scoop 2 tablespoons (45g) of dough per cookie and place as tall mounds on the prepared baking sheet, spacing each mound at least 2 inches (5cm) apart — do not press the dough flat.
- Bake on the middle rack at 350°F (175°C) for 10 to 12 minutes until the edges look golden and set and the centers still look slightly soft and underdone — do not wait for the centers to look fully set.
- Immediately after pulling the pan from the oven, sprinkle flaky sea salt over the top of each cookie, then leave the cookies on the hot pan for exactly 5 minutes before transferring to a wire cooling rack to cool completely.