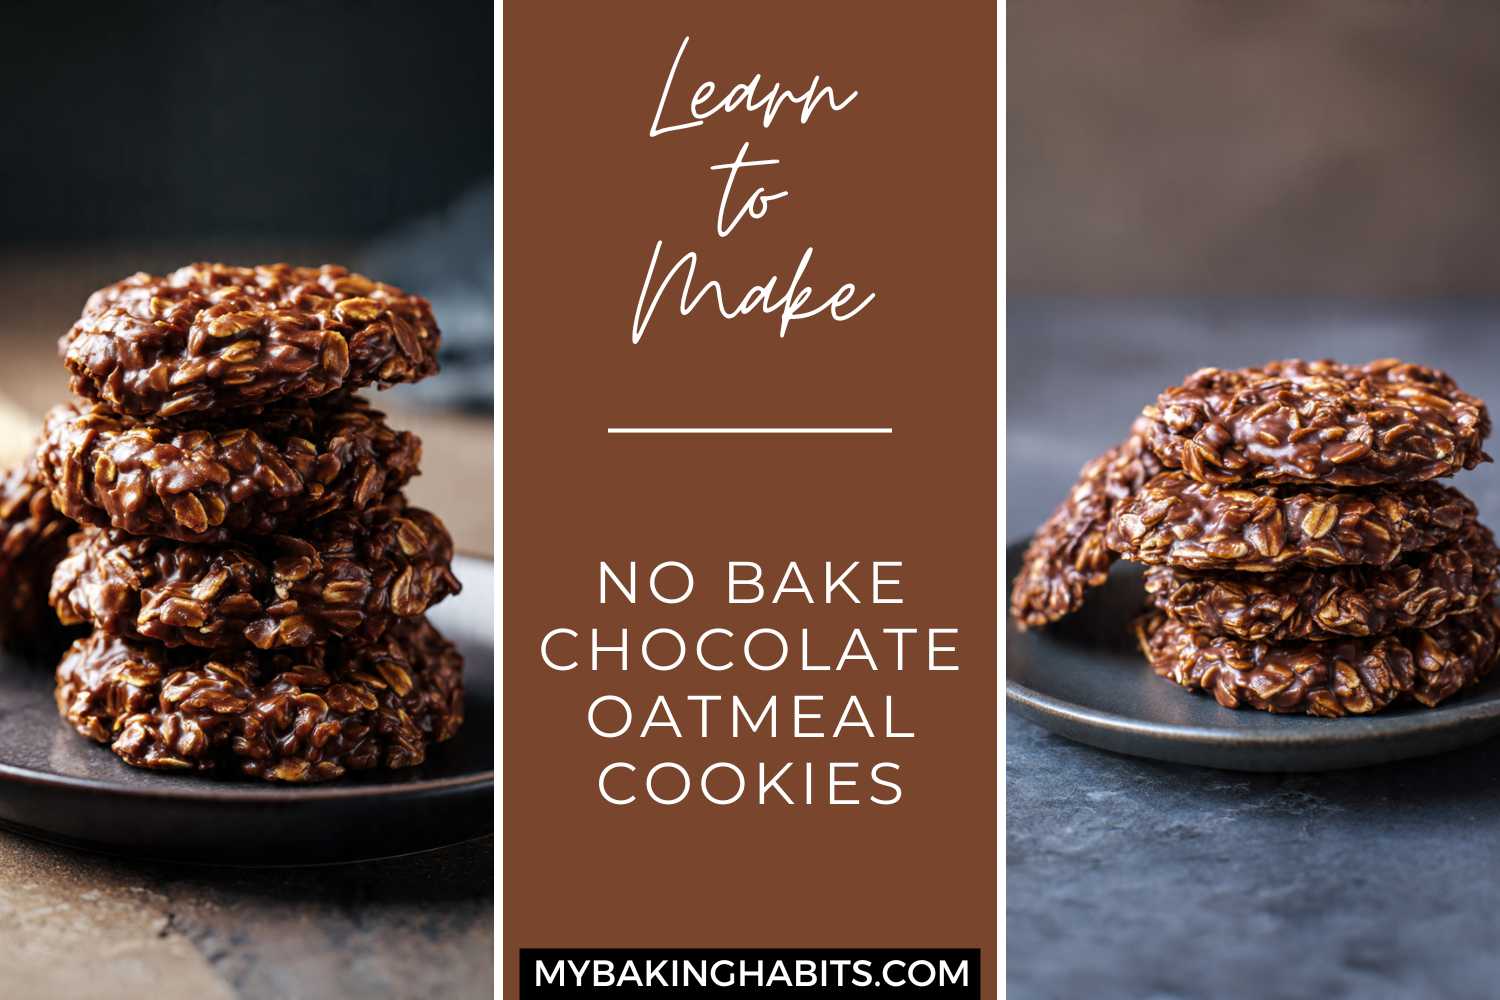
No-Bake Chocolate Oatmeal Cookies
These cookies have ended more “I’ll just have one” promises than anything else I make. The moment the chocolate syrup hits the peanut butter and oats and you drop those dark, glossy mounds onto the parchment — you already know. There is no oven, no chilling, no mixer, and no waiting longer than 30 minutes from start to finished no bake chocolate oatmeal cookie. I have made this recipe across more than thirty test batches and fixed every way it can fail.
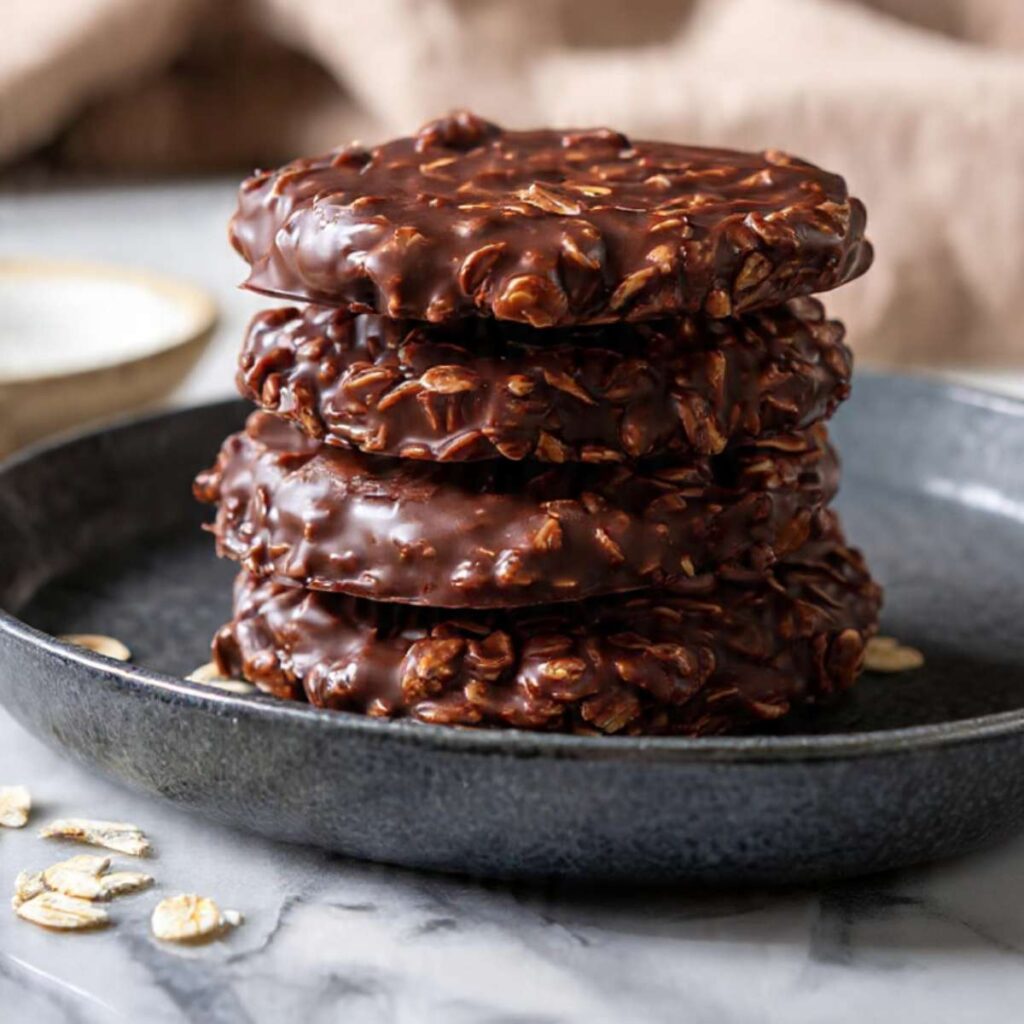
What you get is a cookie that is genuinely chewy from the old-fashioned rolled oats, rich and deeply chocolatey from a cooked cocoa-butter syrup, and held together by peanut butter without a single gram of flour or egg. The texture is fudgy at the center, slightly firmer at the edge, and packed with oat chew in every bite — exactly what you see in the stacked photos above.
🗒 Luna’s Note: The one variable I obsess over with these is the boil time. I tested batches at exactly 60 seconds, 75 seconds, and 90 seconds of rolling boil. The 60-second batch never fully set — still sticky at the center two hours later. The 90-second batch set hard and dry, almost sandy. Seventy-five seconds of a full rolling boil is the number that produced the glossy, fudgy, properly set cookie every single time.
I also tested this recipe with natural peanut butter against commercial peanut butter (Jif). The natural peanut butter batch — made with a well-stirred, fresh jar — produced cookies that looked assembled but never set cleanly at the base. The oil in natural peanut butter separated from the solid during cooling and pooled beneath each cookie, leaving a greasy underside and a soft, unstable interior. The Jif batch set firmly, cleanly, and with a consistent texture throughout. Commercial stabilized peanut butter is the version I kept — it is non-negotiable for this recipe.
I have tested this recipe more times than I want to admit, specifically because “no bake cookies that won’t set” is one of the most searched baking failures on the internet — and I wanted to understand exactly why it happens. The answer is the sugar syrup. If it does not reach soft-ball stage (235–240°F / 113–115°C), the cookies will be sticky and soft indefinitely. If it goes past that window, they will be dry and crumbly by the time they cool. The boil time and temperature are the only two things standing between you and a perfect cookie.
A few things to know before you start: this recipe uses old-fashioned rolled oats, not quick oats — the difference in texture is significant and I cover it in the FAQ. It uses creamy commercial peanut butter (Jif or Skippy), not natural peanut butter — the oil separation in natural peanut butter disrupts the set. No chilling required. No special equipment beyond a heavy-bottomed saucepan and a candy thermometer. The cookies set at room temperature in 20 to 30 minutes.
| Calories | Fat | Carbs | Sugar | Protein |
|---|---|---|---|---|
| ~178 kcal | ~7g | ~27g | ~20g | ~3g |
Macros are approximate and will vary based on ingredient brands and serving size.
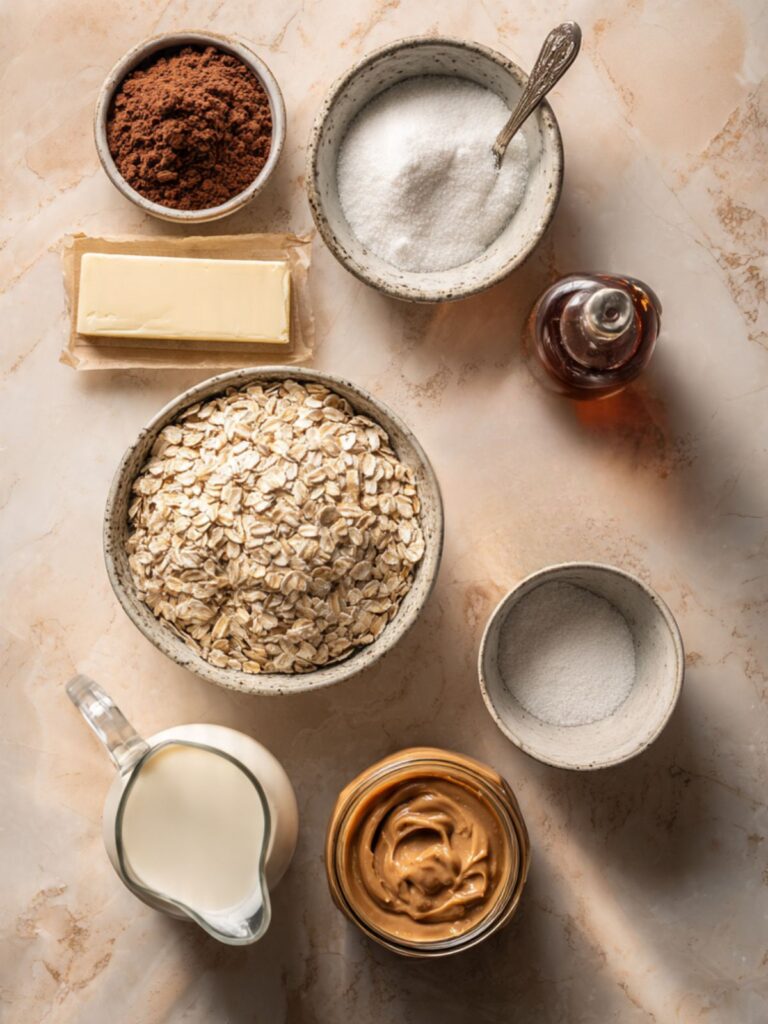
Ingredients & Tools
For the cookies
- 2 cups (400g) plain white granulated sugar
- ½ cup (113g) unsalted butter, cut into tablespoon pieces
- ½ cup (120ml) whole milk
- ¼ cup (25g) unsweetened natural cocoa powder, sifted
- ½ tsp (3g) fine sea salt
- ½ cup (129g) creamy commercial peanut butter (Jif or Skippy — not natural)
- 1 tsp (5ml) pure vanilla extract
- 3 cups (270g) old-fashioned rolled oats (not quick oats, not instant)
Necessary Tools
- Large heavy-bottomed saucepan (3-quart / 2.8-liter minimum)
- Candy thermometer or instant-read thermometer
- Kitchen scale
- Silicone spatula
- Medium mixing bowl (for oats and peanut butter)
- Two baking sheets lined with parchment paper
- Cookie scoop or two tablespoons (for portioning)
- Timer
Before You Start
Gram weights take priority over volume in this recipe. The sugar syrup is sensitive to ratio — too much sugar and the cookies set dry and crumbly, too little and they never fully firm up. Weigh your ingredients if at all possible. A kitchen scale costs less than a wasted batch.
Mixing method: This recipe requires no mixer of any kind — a silicone spatula and a large mixing bowl are all you need for the folding step. A stand mixer or hand mixer will over-work the mixture and accelerate cooling in the bowl, narrowing the drop window. Use a spatula only.
No leavening: This recipe contains no baking soda or baking powder — no freshness check is needed. Structure comes entirely from the sugar crystal network, not from a chemical reaction.
No oven required: No oven rack position is needed for this recipe. The cookies set at room temperature on parchment-lined baking sheets — no heat source beyond the stovetop.
A few ingredient notes before you gather everything:
- Oats: Old-fashioned rolled oats only. Quick oats absorb the syrup faster and produce a pasty, compressed texture instead of the chewy, oat-forward bite visible in the photos. Instant oats will turn to mush. Do not substitute.
- Peanut butter: Creamy commercial peanut butter — Jif or Skippy are the two I have tested. Natural peanut butter has a separated oil layer that disrupts the syrup emulsification and produces cookies that never set cleanly. If you need a nut-free version, see the FAQ.
- Cocoa powder: Unsweetened natural cocoa powder. Dutch-process cocoa will work here but produces a darker, more muted chocolate flavor. The two are interchangeable in this recipe since there is no leavening to disrupt — but the flavor profile shifts noticeably. I use natural.
- Milk: Whole milk. The fat content in whole milk contributes to a smoother, more cohesive syrup. Lower-fat milk will produce a slightly thinner syrup that is more prone to setting issues at lower boil times.
- Butter: Unsalted butter, measured by weight. The salt in the recipe is controlled separately — salted butter throws off the balance.
- Vanilla: Pure vanilla extract, not imitation. Add it off the heat — heat destroys the volatile aromatic compounds that make vanilla taste like vanilla.
How to Make No Bake Chocolate Oatmeal Cookies
Step 1: Preparing Your Workspace and Measuring Everything Before the Syrup Starts
In your medium mixing bowl, combine your 3 cups (270g) old-fashioned rolled oats and your ½ cup (129g) creamy commercial peanut butter. Do not stir them together yet — you want them measured and waiting in the same bowl so the moment the syrup is ready, you can pour and fold without delay. Line two baking sheets with parchment paper and set them on a flat, heat-safe surface within arm’s reach of the stove. Measure your 1 tsp (5ml) pure vanilla extract into a small dish and set it beside the stove.
The reason for this setup step is speed. Once the syrup hits the right temperature, you have approximately 60 to 90 seconds to pour, fold, and drop before the mixture begins to set in the bowl. Ingredients that are not pre-measured at this stage will cost you that window.
The bowl should have oats and peanut butter ready, parchment sheets flat, and vanilla measured — nothing should still need to be opened, measured, or located once the burner turns on.
Do not skip this step thinking you can measure while the syrup cooks. You cannot. The syrup moves faster than it looks like it will. Set a timer for this step if it helps.
Your workspace is ready — now move directly to the stove without pausing.
Step 2: Building the Chocolate Syrup in a Heavy-Bottomed Saucepan
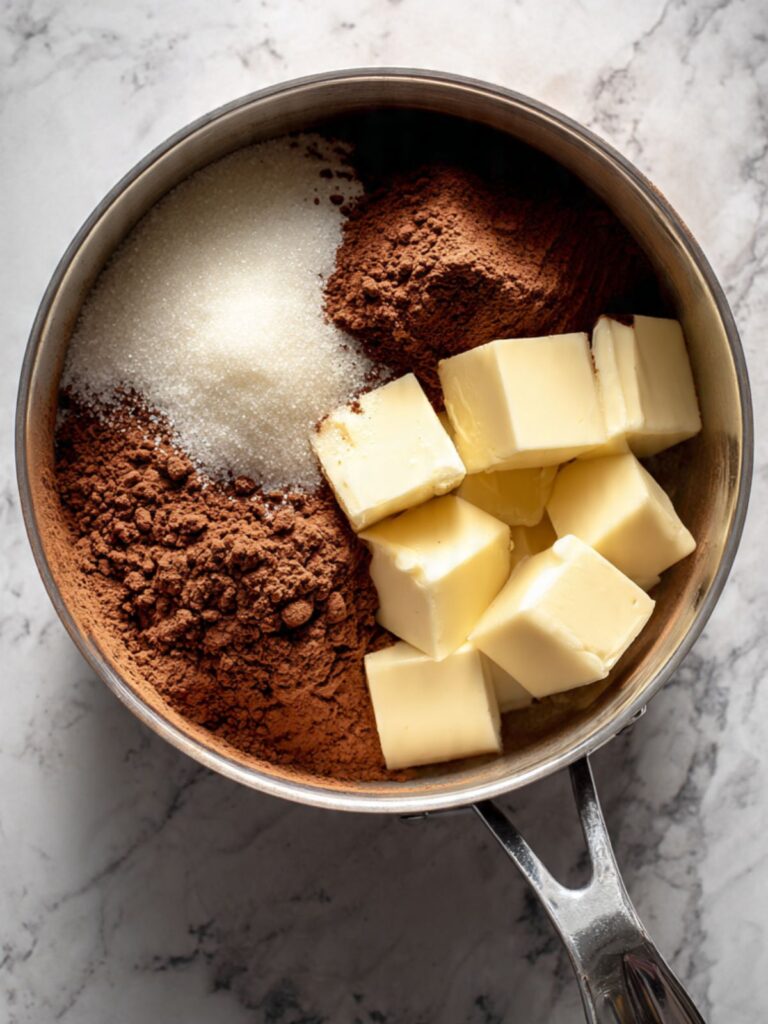
In your large heavy-bottomed saucepan set over medium heat, combine your 2 cups (400g) plain white granulated sugar, ½ cup (113g) unsalted butter cut into tablespoon pieces, ½ cup (120ml) whole milk, ¼ cup (25g) unsweetened natural cocoa powder sifted, and ½ tsp (3g) fine sea salt. Clip your candy thermometer to the side of the pan with the bulb submerged in the mixture but not touching the pan bottom — contact with the pan bottom reads 20 to 30°F higher than the actual syrup temperature and will cause you to pull too early.
The granulated white sugar is what controls the set of these cookies. It needs to cook to soft-ball stage — 235 to 240°F (113 to 115°C) — to crystallize correctly as the cookies cool. Below this range the syrup stays tacky and the cookies will not firm up. Above this range the sugar crystallizes too aggressively and the cookies set dry and crumbly with a sandy texture.
Stir constantly with your silicone spatula as the mixture heats, scraping the bottom and sides of the pan in wide, slow strokes. Keep the heat at medium — do not rush this with high heat. The butter will melt first, then the sugar will dissolve into the milk, and the mixture will begin to look uniform and glossy before it reaches a boil.
The mixture should look smooth, deeply chocolate-colored, and completely uniform before you see the first bubbles — no visible sugar granules, no streaks of unmixed cocoa, no separated butter pooling at the edges.
If you see butter pooling at the edges rather than incorporating, your heat is too high. Reduce to medium-low and stir more frequently until it comes back together.
This is the step that determines everything — move directly to Step 3 the moment you see a full rolling boil begin.
Step 3: Cooking the Syrup to Soft-Ball Stage Without Going Past It
Once the mixture reaches a full rolling boil — large bubbles breaking across the entire surface, not just at the edges — start your timer for exactly 75 seconds and maintain medium heat. Do not stir during the boil. Do not reduce the heat. Do not walk away.
Watch your thermometer. You are targeting 235 to 240°F (113 to 115°C). The 75-second boil time and this temperature range should align — if your thermometer reads below 230°F (110°C) at the 75-second mark, give it another 10 to 15 seconds and check again. If it reads above 242°F (117°C), pull immediately regardless of time elapsed.
🗒 Luna’s Note: I trust the thermometer over the timer every time. The timer is a safety net — the thermometer is the truth. In my Los Angeles kitchen the syrup hits 238°F right at the 75-second mark consistently. In a more humid environment it may take slightly longer. Let the temperature tell you when to pull.
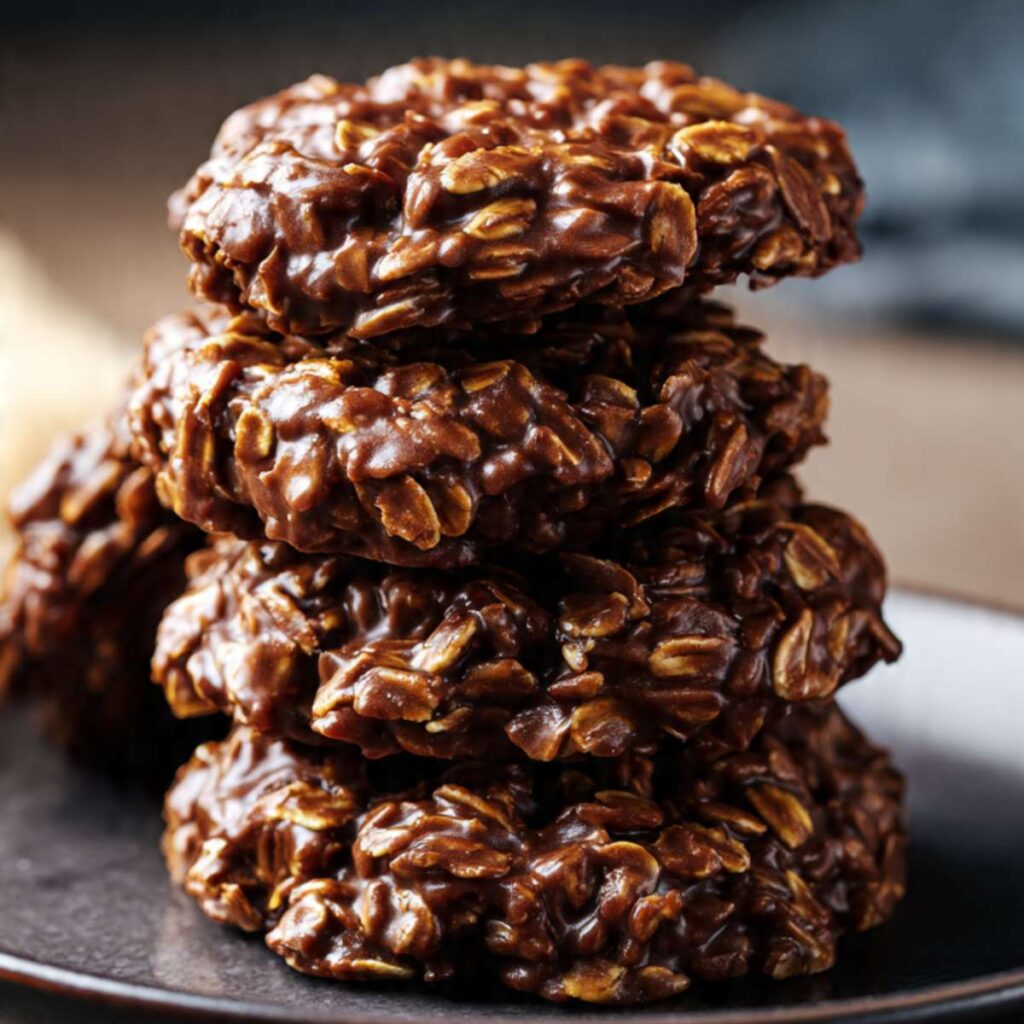
As you can see in the stacked cookie photos above, the finished cookies have a glossy, fudgy surface — not matte, not sandy. That gloss is the visual confirmation that the syrup was pulled at the right moment. A matte, dull surface on a cooled cookie is the first sign the syrup either went too far or was not stirred sufficiently before dropping.
The syrup should be visibly thicker than when it started boiling, deeply chocolate-colored, and smell intensely of cocoa and caramel — this is the Maillard reaction working on the sugar and cocoa solids simultaneously.

Pull the pan from the heat immediately at the correct temperature and move without pausing to Step 4.
Step 4: Folding the Oats and Peanut Butter Into the Hot Syrup Without Losing the Set Window
Remove the pan from heat and immediately pour the hot syrup over the oat and peanut butter mixture in your mixing bowl. Add your 1 tsp (5ml) pure vanilla extract now — adding it off the heat preserves the aromatic compounds that high heat would destroy.
Using your silicone spatula, fold everything together with slow, deliberate strokes from the bottom of the bowl upward — not stirring in circles, which cools the mixture unevenly. Count approximately 20 to 25 full strokes from the moment the syrup hits the bowl. You are looking for complete coating — every oat should be chocolate-covered, no dry oat clusters, no unmixed peanut butter streaks.
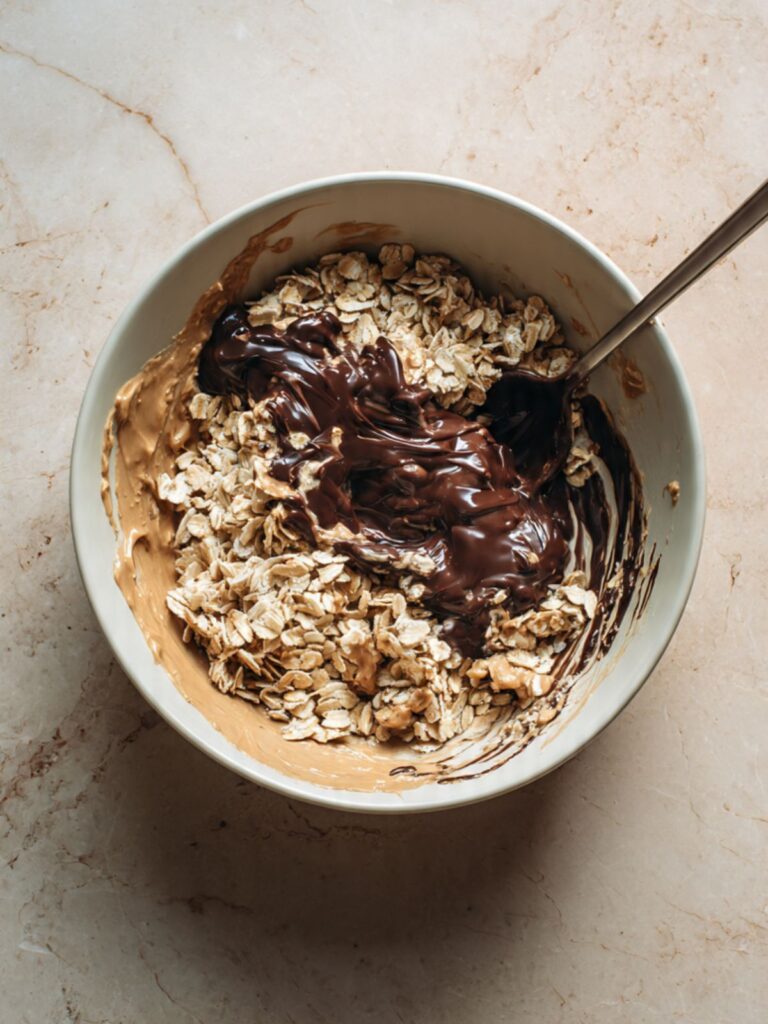
The peanut butter acts as both a binder and a fat source here — it emulsifies into the hot syrup and creates the cohesive matrix that holds each cookie together as it cools. This is why commercial peanut butter is non-negotiable: the stabilized fat content incorporates smoothly. Natural peanut butter’s separated oils do not emulsify the same way.
Do not overmix past full incorporation — continued folding after everything is coated begins to cool the mixture in the bowl rather than on the parchment, and cookies dropped from a partially-set mixture will have a rough, broken surface instead of the smooth, mounded shape visible in the photos.
The folded mixture should look uniformly dark brown, glossy, and thick enough to mound slightly when you lift the spatula — if it looks thin and runs off the spatula in a ribbon, the syrup did not reach temperature. The cookies can still be dropped but will need an extra 15 to 20 minutes to set.
Move directly to portioning — do not pause.
Step 5: Portioning the Cookies Onto Parchment Before the Mixture Sets

Using your cookie scoop or two tablespoons, drop heaped tablespoon portions — approximately 45g each — onto your parchment-lined baking sheets. Work quickly and steadily. Space the cookies at least 1.5 inches (4cm) apart — these cookies do not spread during setting, so spacing is about airflow and handling, not spread prevention.
Weigh the first cookie on your kitchen scale to confirm 45g — use that as your calibration reference for the remaining 29. At this scoop size the batch yields exactly 30 cookies.
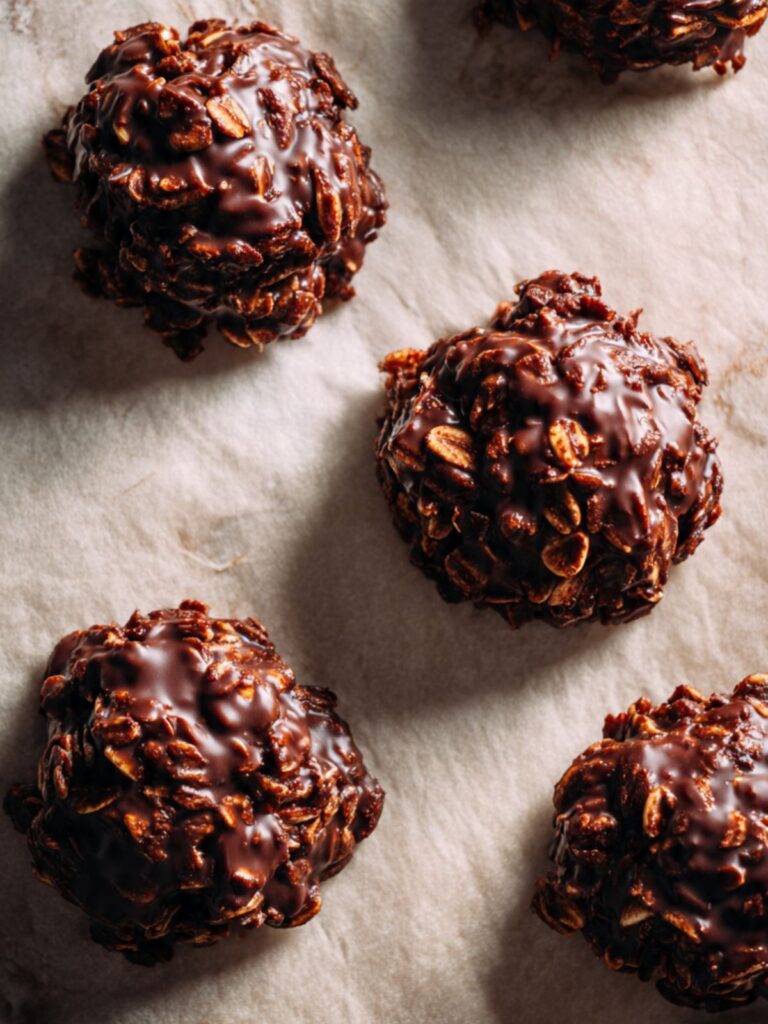
Do not press or flatten the dropped mounds. The mixture will self-level slightly as it cools. Pressing disrupts the structure before the sugar has begun to crystallize and produces flat, dense cookies rather than the naturally mounded shape visible in the stacked photos.
As you can see in the overhead and stacked images, the cookies have a rough, craggy surface with visible oat texture throughout — this is what correctly portioned, unpressed cookies look like straight off the spoon. Pressed cookies lose this texture entirely.
Each dropped mound should hold its shape immediately without spreading — if the mixture is running flat on the parchment, the syrup did not reach temperature and the cookies will need longer to set, but the texture will be softer than shown in the photos.
Baker's warning: Do not attempt to move, stack, or touch the cookies for a minimum of 20 minutes — the surface may look set within 10 minutes but the interior is still warm and the sugar is still crystallizing. Picking them up too early will leave fingerprints and crack the surface structure.
All cookies are portioned — now leave them completely undisturbed to set.
Step 6: Setting at Room Temperature Until Fully Firm
Leave the portioned cookies on the parchment-lined baking sheets at room temperature for 20 to 30 minutes. Do not refrigerate to speed up setting — rapid chilling causes uneven crystallization that produces a grainy, sandy texture rather than the smooth, fudgy set visible in the photos. Room temperature setting is the correct method.
The cookies are fully set when they lift cleanly from the parchment without any sticking or bending at the base. Test one cookie at the 20-minute mark by sliding a thin spatula underneath — if it releases cleanly and holds its shape when lifted, the batch is ready. If it sticks or bends, give the full 30 minutes before testing again.
A fully set cookie will be firm to the touch at the surface, lift cleanly from parchment, hold its mounded shape without cracking, and have a slight sheen across the chocolate surface — exactly what you see in the stacked cookie photos.
Baker's warning: A warm kitchen above 78°F (25.5°C) will extend setting time to 35 to 40 minutes. In my Los Angeles kitchen in summer I move the baking sheets near an air conditioning vent — not directly under it, which causes uneven cooling — to keep the ambient temperature consistent during setting.
The cookies are ready when they pass the lift test — move them to a wire rack or storage container at that point.
The Science Behind No Bake Chocolate Oatmeal Cookies
Why the Sugar Syrup Temperature Is the Only Variable That Actually Matters
No bake chocolate oatmeal cookies fail for one reason more than any other: the sugar syrup did not reach soft-ball stage. Understanding why this temperature matters — and what happens at the molecular level when it does — is the difference between cookies that set every time and cookies that stay sticky on the counter for hours.
When sugar dissolves in liquid and is heated, water evaporates and the sugar concentration increases. At soft-ball stage — 235 to 240°F (113 to 115°C) — the sugar solution has concentrated to the point where, when it cools, the sugar molecules arrange themselves into a fine, flexible crystal network. This network is what holds the cookie together. It is firm enough to give the cookie structure but fine-grained enough to stay fudgy rather than hard. Below this temperature the concentration is too low — the syrup stays pliable and sticky indefinitely because the crystal network never fully forms. Above this temperature the crystals form too densely — the cookie sets hard, dry, and sandy because the sugar has over-concentrated and the crystal structure becomes rigid rather than flexible.
The 75-second full rolling boil at medium heat is a reliable proxy for reaching this temperature in a standard home kitchen. The thermometer is the confirmation. Use both.
🗒 Luna’s Note: I keep the thermometer clipped to the pan from the moment the burner turns on — not added mid-cook when I think it’s getting close. A thermometer dropped into a near-boiling syrup reads incorrectly for the first 15 to 20 seconds while it adjusts. Clipping it cold means the reading is accurate the moment the syrup starts moving.
Why Old-Fashioned Rolled Oats Produce a Completely Different Cookie Than Quick Oats
Old-fashioned rolled oats and quick oats are the same grain processed differently — and that difference determines the entire texture of this cookie. Old-fashioned oats are steamed and rolled into flat, intact flakes approximately 4mm across. Quick oats are rolled thinner and cut into smaller pieces to reduce cooking time. Instant oats are processed further still — pre-cooked, dried, and rolled paper thin.
In a no-bake cookie, the oat’s job is to absorb the hot syrup while maintaining structural integrity — providing chew and body without turning to paste. Old-fashioned oats absorb the syrup slowly and hold their shape through the folding and setting process, producing the rough, craggy, oat-forward texture visible in the stacked cookie photos. Quick oats absorb the same syrup faster and more completely — by the time the cookie sets, the oats have softened into a dense, compressed mass with no distinct chew. Instant oats absorb so aggressively that the mixture turns gluey before it even reaches the parchment.
If you enjoy a chewier, more textured cookie — which is the result shown in these photos — old-fashioned rolled oats are not a preference, they are a requirement. For a reference on how rolled oats perform differently across baking applications, my oatmeal chocolate chip cookies article covers the same oat-type distinction in a baked context.
Why Commercial Peanut Butter Sets These Cookies and Natural Peanut Butter Does Not
The difference between commercial peanut butter (Jif, Skippy) and natural peanut butter in this recipe comes down to emulsification stability. Commercial peanut butter contains added stabilizers — typically fully hydrogenated vegetable oils — that keep the peanut fat homogeneously distributed throughout the product. When commercial peanut butter hits the hot chocolate syrup, it melts smoothly into the mixture and creates a uniform, cohesive emulsion that sets evenly as it cools.
Natural peanut butter separates into peanut solids and liquid oil because it contains no stabilizers. When that separated oil hits the hot syrup, it does not emulsify — it pools. The result is a cookie that looks assembled but has pockets of liquid fat that never bind with the sugar crystal network. The cookie sets with a greasy, uneven texture and often does not firm up properly at the base.
If you need a peanut-free version, sunflower seed butter (commercial, stabilized) is the most reliable substitute. Almond butter works but produces a slightly softer set — expect 5 to 10 more minutes of setting time. Cashew butter works similarly to almond butter. Whatever you use, it must be a commercial stabilized product, not a natural separated one.
How Brown Sugar and White Sugar Work Together to Control Texture
This recipe uses white granulated sugar only — no brown sugar — and that is a deliberate choice that determines the texture you see in the photos. White granulated sugar, when cooked to soft-ball stage, produces a fine, smooth crystal network that sets the cookie with a slight sheen and a fudgy interior. It is the sugar that creates the gloss on the surface of a properly made no-bake cookie.
Brown sugar, if substituted for all or part of the white sugar, introduces molasses — which is hygroscopic, meaning it actively attracts and retains moisture from the air. A cookie made with brown sugar will set softer, stay stickier, and lose structural integrity faster in a warm or humid environment. It will also have a more pronounced caramel flavor that competes with the cocoa. This recipe is built around white sugar specifically to produce the clean chocolate flavor and glossy firm set visible in the photos. If you want a slightly chewier, moister cookie with more caramel depth, replacing ¼ cup (50g) of the white sugar with packed brown sugar is the adjustment to make — but understand that it will soften the set.
No Bake Chocolate Oatmeal Cookies Troubleshooting & Pro-Tips
Why Your No Bake Cookies Feel Greasy and Won’t Set Cleanly
Symptom: The set cookies have an oily or greasy surface, the base feels slick rather than firm, and the cookies are soft or unstable when lifted — they may leave an oil residue on the parchment beneath them.
Cause: Natural peanut butter was used instead of commercial stabilized peanut butter. Natural peanut butter contains no stabilizers — the peanut solids and liquid oil separate during storage, and when that separated oil hits the hot chocolate syrup it does not emulsify. Instead it pools out of the mixture as the cookies cool, creating a greasy underside and an interior that never firms up correctly.
Fix: Nothing reverses oil separation once it has occurred. The cookies are edible but the texture will be uneven throughout. Pat the surface with a paper towel to remove visible pooled oil before serving.
Prevention: Use only creamy commercial peanut butter — Jif or Skippy are the two I have tested reliably. Even with commercial brands, stir the jar thoroughly before measuring. If any oil has pooled at the surface of the jar, stir it fully back in before scooping your ½ cup (129g).
Why Your Cookies Stick to the Pan or Set in an Unusable Sheet
Symptom: The dropped cookie mounds fuse together into a single slab, stick firmly to the surface beneath them and cannot be removed without breaking, or have a rough, torn underside where they were pulled off the pan.
Cause: The cookies were dropped onto an unlined baking sheet, onto greased foil, onto wax paper, or onto a silicone mat rather than unbleached parchment paper. Wax paper is not heat-resistant and transfers a waxy coating to the base of the cookie as the hot syrup sets against it. Greased foil causes the base to set with an oily film. Silicone mats hold heat differently than parchment and cause the base of the cookie to stay soft longer — in a warm kitchen this means the cookie never firms at the base even when the surface appears set. An unlined pan means the cookies adhere directly to the metal as the sugar crystallizes.
Fix: If the cookies have already set onto the wrong surface, refrigerate the entire sheet for 20 minutes — the cold contracts the sugar slightly and makes removal easier. Slide a thin metal offset spatula underneath at a low angle and apply steady, even pressure rather than prying upward. Expect some breakage.
Prevention: Line both baking sheets with unbleached parchment paper before the burner turns on — not wax paper, not foil, not a silicone mat. The parchment must be flat with no curl that would prevent even contact. A sheet with heavy curl: flip it upside down and press it flat against the pan before laying it down.
Why Your No Bake Cookies Won’t Harden
Symptom: The cookies are still soft, sticky, or tacky at the center 30 minutes after dropping — they hold a fingerprint when pressed and do not lift cleanly from the parchment.
Cause: The sugar syrup did not reach soft-ball stage (235 to 240°F / 113 to 115°C) before being pulled from the heat. The syrup looks ready — it is bubbling, it smells right, it looks thick — but if the temperature has not reached the soft-ball window, the sugar concentration is too low to form the crystal network that sets the cookie. A warm kitchen above 78°F (25.5°C) compounds this — the mixture cools more slowly and the crystal network forms less efficiently, extending set time regardless of syrup temperature.
Fix: If the cookies have been on the parchment for 30 minutes and are still soft, they cannot be re-melted and re-dropped — the oats have absorbed too much syrup by this point. Eat them as a soft, spoonable treat or press them into a parchment-lined 8×8 inch (20x20cm) pan, refrigerate for 2 hours, and cut into bars. The texture will be dense and fudgy rather than the mounded cookie shown in the photos, but the flavor will be identical.
Prevention: Use a candy thermometer every time. Do not rely on boil time alone. Confirm the syrup reads 235 to 240°F (113 to 115°C) before pulling — if it is not there at 75 seconds, give it 10 more seconds and check again.
Why Your No Bake Cookies Are Dry, Crumbly, or Sandy
Symptom: The cookies set firmly but feel dry and grainy rather than fudgy. They crumble when bitten and the surface looks matte and dull rather than glossy.
Cause: The sugar syrup cooked past soft-ball stage into firm-ball or hard-ball territory (above 245°F / 118°C). At this temperature the sugar over-concentrates and the crystal network that forms during cooling is too dense and rigid. The cocoa solids and oats cannot hold enough moisture against that crystal pressure, so the cookie sets dry. A second cause is over-boiling beyond the 75-second window without a thermometer to catch the overshoot.
Fix: There is no recovery once the syrup has overcooked. The batch will be dry regardless of set time. Use the crumbled cookies as an ice cream topping or mix them into a no-churn ice cream base — the flavor is completely intact even when the texture has failed.
Prevention: Clip the thermometer before the burner turns on — do not add it mid-cook. Pull the pan the moment the thermometer reads 238°F (114°C) — do not wait for 240°F because carryover heat in the pan will carry it the remaining 2 degrees off the burner.
Why Your No Bake Cookies Look Dull Instead of Glossy
Symptom: The set cookies have a matte, flat surface with no sheen — they look chalky or dull rather than the glossy chocolate surface visible in the stacked photos.
Cause: Three possible causes. First, the syrup was stirred during the boil — stirring reintroduces sugar crystals into the solution and triggers premature, uneven crystallization that produces a matte finish. Second, the cocoa powder was not sifted and clumped into the syrup, creating uneven cocoa distribution across the surface. Third, the cookies were refrigerated during setting — rapid chilling produces large, coarse sugar crystals rather than the fine network that creates gloss.
Fix: A dull surface does not affect flavor or texture — only appearance. If gloss matters, the only solution is a fresh batch with the corrections below applied.
Prevention: Do not stir once a full rolling boil is established. Sift the cocoa powder before adding it to the pan. Set at room temperature only — never refrigerate to speed setting.
Why Your No Bake Cookies Spread Flat on the Parchment
Symptom: The dropped mounds do not hold their shape — they spread outward into thin, flat discs rather than the mounded, thick cookies shown in the photos.
Cause: The syrup did not reach temperature, or the mixture was over-folded in the bowl and began cooling before portioning. A mixture that has started to cool in the bowl loses viscosity unevenly — the outside cools faster than the center — and when dropped it spreads before the sugar network can crystallize in place.
Fix: Work faster from the moment the syrup hits the oat bowl. Twenty to 25 fold strokes maximum, then drop immediately. If the mixture has already spread flat on the parchment, press the sheet pan gently to level everything and let it set as a slab — cut into bars after 2 hours in the refrigerator.
Prevention: Have the parchment sheets positioned and ready before the burner turns on. Fold only to full incorporation — not beyond. Drop cookies within 90 seconds of the last fold stroke.
Humidity, Altitude, and Environment Notes
High humidity (above 60% relative humidity) extends setting time and can prevent cookies from setting fully at room temperature — the hygroscopic sugar in the syrup absorbs ambient moisture during the cooling process. In humid environments, set the cookies in an air-conditioned room and store immediately in an airtight container once set.
High altitude (above 3,500 feet / 1,067m) causes liquids to boil at lower temperatures — the soft-ball stage temperature drops slightly. At 5,000 feet (1,524m), reduce the target temperature by approximately 2°F (1°C) per 1,000 feet of elevation above sea level. Use your thermometer and adjust accordingly — do not rely solely on boil time at altitude.
Expert Pro-Tips
Use a spring-loaded cookie scoop for portioning — it drops consistently sized mounds faster than two spoons and reduces the time the mixture sits in the bowl between drops. Speed matters more in this recipe than in almost any other cookie recipe on this site.
If your kitchen runs warm, chill your parchment-lined baking sheets in the refrigerator for 10 minutes before you start — a cold surface accelerates initial crystallization at the base of each cookie and helps them hold their mounded shape without spreading.
Sift the cocoa powder directly into the cold saucepan before the burner turns on — not tapped in from a spoon once the butter starts melting. Cocoa sifted into a dry pan dissolves into the syrup evenly from the start. Cocoa added to a hot liquid clumps on contact and those clumps do not fully dissolve during the short boil time, leaving bitter dark pockets in the finished cookie.
How to Store No Bake Chocolate Oatmeal Cookies
Room Temperature Storage
Store fully set no bake chocolate oatmeal cookies in an airtight container — a hard-sided container with a snap or locking lid, not a zip-lock bag. Zip-lock bags allow micro-compression that flattens the mounded shape and causes the cookies to stick together at the surface. Layer the cookies between sheets of parchment paper if stacking — direct contact between set cookies causes surface adhesion, especially in a warm kitchen.
At room temperature (68 to 72°F / 20 to 22°C), the cookies keep well for 4 to 5 days. Day 1 and 2: glossy surface, fudgy center, full oat chew. Day 3 and 4: surface sheen dulls slightly, texture firms a little more — still excellent. Day 5: noticeably firmer and slightly drier at the edges — still good but past their peak. Do not store near a heat source, on top of the refrigerator, or in direct sunlight — ambient heat above 75°F (24°C) softens the sugar crystal network and the cookies lose structural integrity.
Do not store in the refrigerator for everyday keeping. Refrigeration does not extend shelf life meaningfully for these cookies, and the cold causes the sugar crystals to contract and the oats to absorb residual moisture — the texture shifts from fudgy and chewy to dense and slightly gummy within 24 hours.
Freezer Storage
No bake chocolate oatmeal cookies freeze well for up to 2 months. Freeze them in a single layer on a parchment-lined baking sheet for 1 hour until fully solid — do not skip this step. Stacking unfrozen cookies before the surface has hardened in the freezer causes them to fuse together and break apart when separated.
Once individually frozen solid, transfer to a freezer-safe zip-lock bag or airtight freezer container with parchment between layers. Press out as much air as possible before sealing — freezer burn on these cookies dries out the oats and produces an off-flavor in the chocolate base within 3 to 4 weeks.
To thaw: remove the number of cookies needed and set them on a parchment-lined surface at room temperature for 20 to 30 minutes. Do not microwave — the sugar crystal network remelts unevenly in a microwave and the cookie loses its set structure. Do not thaw in the refrigerator — condensation forms on the surface as the cookie warms, which disrupts the gloss and softens the base.
Freezing the Unset Mixture
The cookie mixture cannot be frozen before dropping — once the syrup has been folded into the oats, the sugar begins crystallizing immediately and the mixture will set solid in the bowl within 3 to 4 minutes regardless of temperature. There is no hold point between folding and portioning. Freeze only fully set, cooled cookies as described above.
Make-Ahead Notes
The cookie mixture cannot be made ahead and held before dropping — once the syrup is folded into the oats, the mixture sets in the bowl within 3 to 4 minutes. There is no pause point between folding and portioning.
What can be done ahead: measure and pre-stage all ingredients the night before. The syrup takes less than 10 minutes from cold pan to correct temperature — the only time pressure in this recipe is the 60 to 90 second window after folding. Having everything staged means the actual active time is under 15 minutes.
For gifting or events, make the full batch up to 4 days ahead and store at room temperature in a single airtight container. They hold texture well through day 3 and remain presentable through day 4.
Serving Suggestion
🗒 Luna’s Note: I always serve these at room temperature — never straight from a cold storage spot. The sugar crystal network in a cold no-bake cookie is contracted and the texture reads dense and waxy rather than fudgy. Even 10 minutes at room temperature makes a noticeable difference in how the center feels when you bite through it.
Serve at room temperature with a cold glass of whole milk or a strong black coffee — the bitterness of the coffee cuts through the sweetness of the cocoa syrup in a way that makes the chocolate flavor read deeper and more complex than it does on its own. These are the cookie I reach for on a weeknight when a full baking project feels like too much — 35 minutes from an empty counter to a finished batch, no oven required, nothing to clean beyond a saucepan and a spatula. That is the occasion. Tuesday evening, a quiet kitchen, and a reason to eat something genuinely good without committing to an afternoon of baking.
Frequently Asked Questions About No Bake Chocolate Oatmeal Cookies
Why won’t my no bake cookies harden?
No bake cookies that won’t harden almost always mean the sugar syrup did not reach soft-ball stage — 235 to 240°F (113 to 115°C) — before being pulled from the heat. At this temperature the sugar has concentrated enough to form the crystal network that sets the cookie firm as it cools. Below this range the concentration is too low and the syrup stays pliable indefinitely regardless of how long the cookies sit on the counter. Use a candy thermometer every time and confirm the temperature before pulling — do not rely on boil time alone. A warm kitchen above 78°F (25.5°C) can also extend setting time to 35 to 40 minutes even with a correctly cooked syrup.
How long does it take for no bake cookies to set?
No bake chocolate oatmeal cookies set at room temperature in 20 to 30 minutes when the syrup reached the correct temperature during cooking. Test at the 20-minute mark by sliding a thin spatula under one cookie — if it releases cleanly and holds its shape when lifted, the batch is ready. If it sticks or bends, give the full 30 minutes before testing again. Do not refrigerate to speed setting — rapid chilling produces a grainy, sandy texture rather than the smooth, fudgy set that forms at room temperature. In a kitchen warmer than 78°F (25.5°C), allow up to 40 minutes.
Can I use quick oats instead of old-fashioned oats in no bake cookies?
You can use quick oats but the texture will change significantly. Quick oats are thinner and more finely cut than old-fashioned rolled oats — they absorb the hot syrup faster and more completely, producing a denser, more compressed cookie with less distinct oat chew. The cookie will still set and taste similar but will lack the rough, craggy texture and oat-forward bite visible in the photos. Instant oats are not a workable substitute — they absorb so aggressively the mixture becomes gluey before it reaches the parchment. For the texture shown in this recipe, old-fashioned rolled oats are the correct choice. If quick oats are all you have, reduce the quantity by 2 tablespoons (12g) to compensate for their faster absorption rate. For more on how oat type affects texture across recipes, my oatmeal chocolate chip cookies article covers this in a baked context.
Can I make no bake cookies without peanut butter?
Yes, with the right substitute. Sunflower seed butter — commercial stabilized, not natural — is the most reliable swap at a 1:1 ratio (½ cup / 129g). It produces a nearly identical set and a slightly more neutral flavor that lets the chocolate come through more prominently. Almond butter works at the same ratio but produces a softer set — expect 5 to 10 extra minutes of setting time. Cashew butter behaves similarly to almond butter. Whatever you use must be a commercial stabilized product — natural nut butters with separated oil will not emulsify into the syrup and the cookies will not set cleanly. For a fully nut-free version, use the same quantity of sunflower seed butter and confirm the brand is processed in a nut-free facility if allergens are a concern. If you enjoy the peanut butter and oat combination in other forms, my peanut butter oatmeal cookies article gives a baked version of that pairing worth bookmarking.
Can I make no bake cookies ahead of time?
Yes — no bake chocolate oatmeal cookies are an excellent make-ahead cookie. Make the full batch up to 4 days ahead and store at room temperature in a hard-sided airtight container with parchment between layers. The texture on day 1 and day 2 is peak — glossy, fudgy, full oat chew. By day 4 they are slightly firmer but still excellent. What cannot be done ahead is holding the unset mixture — once the syrup is folded into the oats, the mixture begins setting within 3 to 4 minutes and must be dropped immediately. Stage all ingredients the night before if you want to minimize active time on the day.
Can I double this no bake cookie recipe?
Yes, with one important adjustment: cook the syrup in two separate saucepan batches rather than doubling everything into one pan. A doubled syrup volume in a single pan heats unevenly — the edges reach soft-ball stage before the center does, and you cannot stir during the boil to correct this. Two separate batches of syrup, each cooked correctly to 235 to 240°F (113 to 115°C), will produce consistent results across the full double batch. This recipe contains no leavening, so there are no non-linear scaling concerns beyond the syrup cooking constraint. Double the oats and peanut butter together in one large bowl and work both syrup batches in quickly — fold and drop the full quantity before either batch cools.
Do altitude and humidity affect no bake cookies?
Yes — both have a direct effect on the syrup and the set. At high altitude (above 3,500 feet / 1,067m), water boils at a lower temperature, which means the syrup reaches a rolling boil earlier but may not have concentrated sufficiently at that point. Reduce the target temperature by approximately 2°F (1°C) per 1,000 feet above sea level and use your thermometer rather than boil time as the primary signal. In high humidity (above 60% relative humidity), the hygroscopic sugar in the set cookie absorbs moisture from the air during cooling, which extends setting time and can produce a stickier surface even with a correctly cooked syrup. In humid conditions, set the cookies in an air-conditioned room and transfer them to an airtight container as soon as they pass the lift test.
More Cookies You’ll Love
If these no bake chocolate oatmeal cookies hit the right note, these three are worth making next:
- Iced Oatmeal Cookies — crisp edges, chewy centers, and a crackled white glaze that sets firm. A baked oatmeal cookie that delivers the same oat-forward chew in a completely different format.
- Banana Oatmeal Cookies — naturally sweetened, soft throughout, and packed with oat texture. A one-bowl recipe with no chilling required and a completely different flavor profile that works when you want something less rich.
No-Bake Chocolate Oatmeal Cookies
Ingredients
Equipment
Method
- Line two baking sheets with parchment paper and set them on a flat, heat-safe surface near the stove — then measure 3 cups (270g) old-fashioned rolled oats and ½ cup (129g) creamy commercial peanut butter into a large mixing bowl without stirring, and measure 1 tsp (5ml) pure vanilla extract into a small dish beside the stove.
- In a large heavy-bottomed saucepan over medium heat, combine 2 cups (400g) plain white granulated sugar, ½ cup (113g) unsalted butter cut into tablespoon pieces, ½ cup (120ml) whole milk, ¼ cup (25g) unsweetened natural cocoa powder sifted, and ½ tsp (3g) fine sea salt, then clip a candy thermometer to the side of the pan with the bulb submerged in the mixture but not touching the pan bottom.
- Stir constantly with a silicone spatula using slow wide strokes, scraping the bottom and sides of the pan, until the butter melts and the sugar fully dissolves into a smooth, uniform, deeply chocolate-colored mixture with no visible sugar granules or cocoa streaks.
- Once a full rolling boil with large bubbles breaking across the entire surface is reached, stop stirring, start a timer for exactly 75 seconds, and maintain medium heat while watching the thermometer — target 235 to 240°F (113 to 115°C) — then pull the pan from the heat immediately when the thermometer reads 238°F (114°C).
- Immediately pour the hot syrup over the oat and peanut butter mixture in the mixing bowl, add the 1 tsp (5ml) pure vanilla extract, and fold everything together with a silicone spatula using slow strokes from the bottom of the bowl upward — approximately 20 to 25 strokes — until every oat is chocolate-coated and no peanut butter streaks remain.
- Working quickly, drop heaped tablespoon portions — approximately 45g each — onto the parchment-lined baking sheets spaced 1.5 inches (4cm) apart, weighing the first cookie to confirm 45g and using it as the reference for the remaining 29, without pressing or flattening the mounds.
- Leave the cookies completely undisturbed at room temperature for 20 to 30 minutes until fully set — test at 20 minutes by sliding a thin spatula under one cookie, and if it releases cleanly and holds its shape the batch is ready.