Easy Chocolate Chip Cookies Recipe
These easy chocolate chip cookies are the ones I make when I need something that works on the first try, every time, with whatever I have on the counter. No mixer. No chilling. One bowl, melted butter, and twenty minutes in the oven. I have made this exact recipe more than thirty times across eight months of testing, and I know every way it can go wrong. The version here does not go wrong.
No mixer required. No chilling — this dough goes straight from the bowl to the oven. No waiting, no equipment you do not already own. The first four batches used creamed butter. The texture was fine — but “fine” is not what I was after. Batch five switched to melted butter and a higher ratio of brown sugar. The centers came out denser, chewier, and more deeply flavored. That was the direction. I never went back to creamed butter for this recipe.
I tested rolled oats versus quick oats in four back-to-back batches. Quick oats dissolved almost completely into the dough and produced a texture that read as a slightly grainy chocolate chip cookie — not bad, but not what these images show. Old-fashioned rolled oats kept their structure through the bake, giving each cookie a distinct chew and a visible oat texture on the surface. Old-fashioned oats are the recipe. Quick oats are not a substitute here.
I tested chilling the dough for one hour versus baking straight from the bowl. The chilled version spread slightly less. The texture difference was minimal — a few millimeters of thickness and a barely perceptible change in chew. Not worth the wait for a recipe called easy. These go straight from the bowl to the oven.
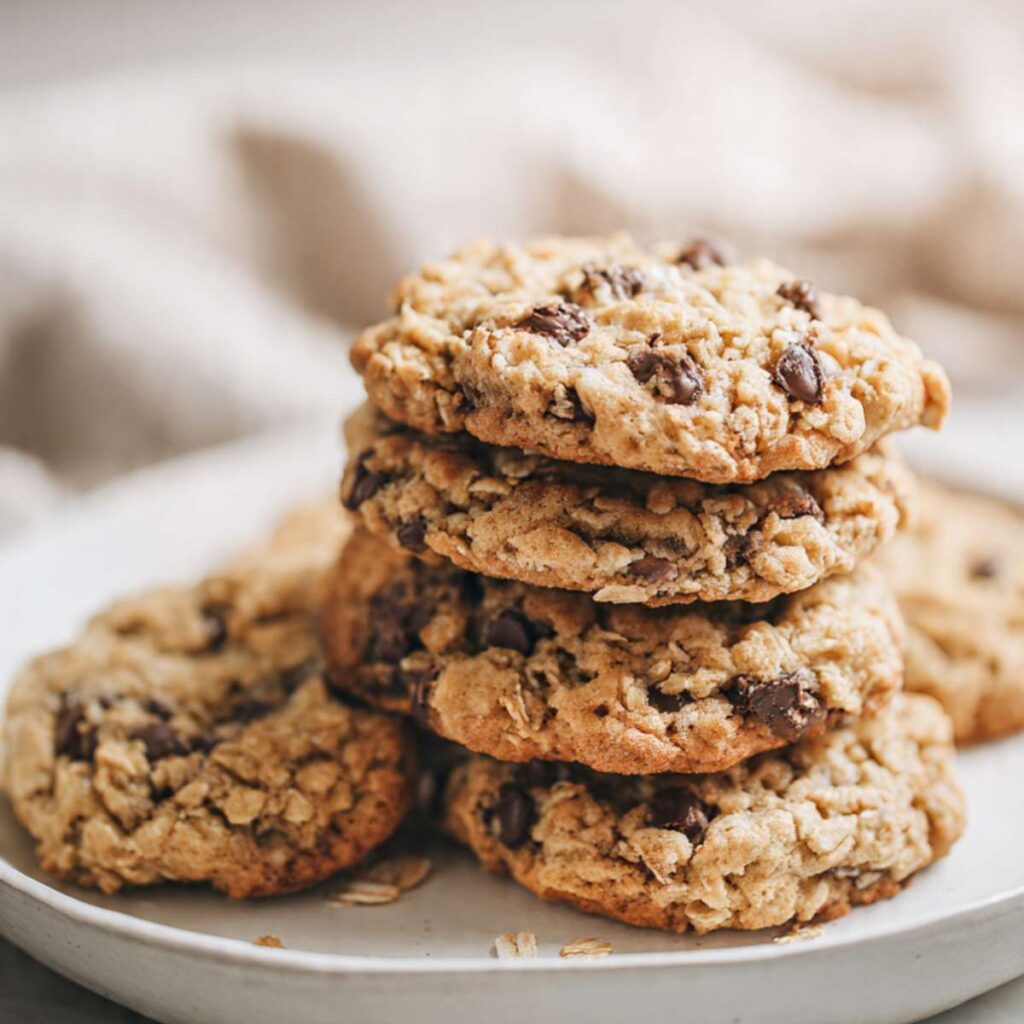
What you get: edges that are set and lightly golden with a faint crackle across the surface, and centers that look slightly underdone when you pull the pan — because they are, intentionally. The carryover heat from the pan finishes them. By the time they are cool enough to eat, the centers are dense, fudgy, and exactly right. The oats add a chew that a standard chocolate chip cookie does not have. The brown sugar keeps them soft for days.
No mixer required. No chilling. One bowl and a silicone spatula. This is the recipe I reach for on a Tuesday night when I want something real.
🗒 Luna’s Note: I keep a kitchen scale on my counter at all times. Melted butter recipes are especially sensitive to flour ratio — one extra tablespoon of packed flour turns these from fudgy to dry. Weighing the flour at 190g is the single habit that made my results consistent batch after batch.
| Prep Time | Cook Time | Total Time | Yield | Difficulty |
|---|---|---|---|---|
| 15 min | 11 min | 26 min | 22 cookies | Easy |
| Calories | Fat | Carbs | Sugar | Protein |
|---|---|---|---|---|
| ~195 kcal | ~9g | ~27g | ~16g | ~3g |
Macros are approximate and will vary based on ingredient brands and serving size.
Ingredients & Tools for Chocolate Chip Cookies Recipe
For the Cookies
- 1½ cups (190g) all-purpose flour, spooned into the measuring cup and leveled — or weighed at 190g
- 1½ cups (135g) old-fashioned rolled oats — not quick oats, not instant oats
- 1 tsp (6g) baking soda, checked for freshness
- ¾ tsp (4.5g) fine sea salt
- ¾ cup (170g / 1½ sticks) unsalted butter, melted and cooled to room temperature
- ¾ cup (165g) packed brown sugar — light or dark both work, dark produces a deeper molasses flavor
- ¼ cup (50g) plain white granulated cane sugar
- 2 large eggs (approximately 50g each without shell), room temperature
- 1½ tsp (6ml) pure vanilla extract
- 1½ cups (255g) semi-sweet chocolate chips (45–55% cacao), such as Nestle Toll House or Ghirardelli
For the Dark Chocolate Chunk Variation
- Replace the semi-sweet chips with 1½ cups (255g) roughly chopped dark chocolate (70%+ cacao), such as Lindt 70% or Valrhona — irregular chunk sizes create pools of melted chocolate rather than uniform chips
- 1 tsp (3g) flaked sea salt, such as Maldon — for finishing immediately after baking
Before You Start
This recipe uses melted butter and requires no electric mixer. A large mixing bowl and a silicone spatula are the only tools you need. Do not attempt to use cold or softened butter — the recipe is built around melted butter and the ratio will not work correctly with any other fat state.
Weigh your flour. Spooning flour directly from the bag packs 20–30% more than the recipe intends. One extra tablespoon per cup turns these from fudgy and chewy to dry and crumbly. If you do not have a kitchen scale, spoon the flour gently into your measuring cup with a separate spoon and level the top with a straight edge — never scoop directly.
Melt and cool the butter before starting. Melt it in a small saucepan over low heat or in the microwave in 20-second bursts. Pour it into your mixing bowl and let it sit for 10–15 minutes until it reaches room temperature — warm to the touch but not hot. Butter that is too hot when the eggs go in will begin to cook them. The test: rest your wrist against the bowl. If it feels hot, wait longer.
Bring your eggs to room temperature. Cold eggs do not emulsify smoothly into melted butter and can cause the batter to look greasy and broken. Pull them from the fridge 30 minutes before starting, or place them in a bowl of warm (not hot) water for 10 minutes.
Check your baking soda. Drop ½ tsp (3g) into a small bowl with hot water and a splash of white vinegar. It should bubble aggressively within 2 seconds. If it fizzes weakly or not at all, replace the box — flat baking soda produces flat, dense cookies with no surface crackle.
Check your brown sugar. Packed brown sugar that has hardened cannot be measured accurately. If yours has gone hard, place a damp paper towel over the surface, cover loosely, and microwave in 20-second increments until it is pliable enough to pack.
Position your oven rack in the middle of the oven before preheating. Top rack burns the tops. Bottom rack burns the bottoms. Middle rack is the only correct position for drop cookies.
No chilling required. This dough goes straight from the bowl to the oven — no refrigeration, no resting time. If your dough ends up in the fridge for any reason before baking, let it sit at room temperature for 15 minutes before portioning or the dough will be too stiff to scoop cleanly and the cookies will spread less than shown in the photos.
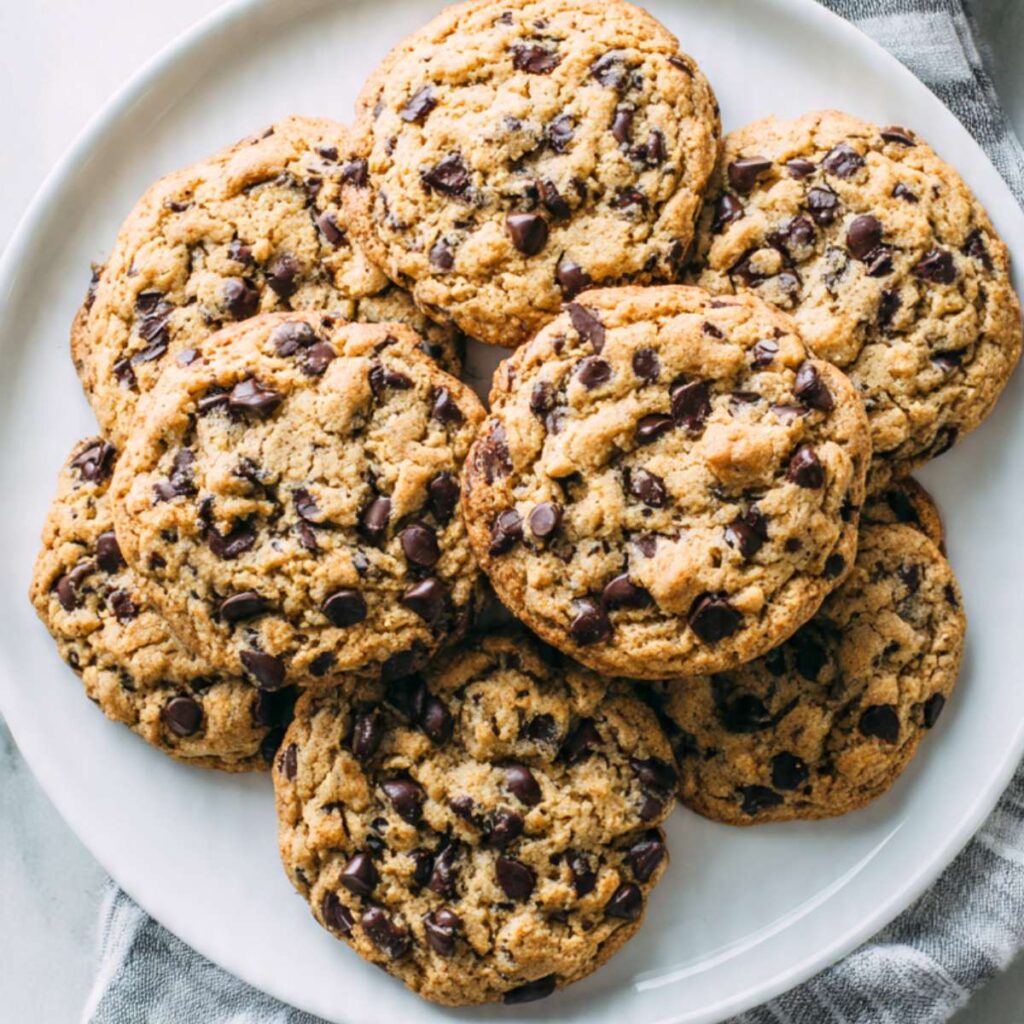
Check your chocolate chips. If the chips have a white or grey coating on the surface — called bloom — they are still safe to use and will still taste correct. Bloomed chips may not melt as smoothly as fresh chips, so the chocolate pockets in the finished cookie will be slightly firmer. Replace the bag if you want the glossy melted result shown in the photos.
Use old-fashioned rolled oats only. Quick oats and instant oats are processed to a finer texture and dissolve into the dough during baking. They will not produce the visible oat structure and distinct chew shown in the photos. This is a non-negotiable ingredient difference, not a preference.
Necessary Tools
Required:
- Kitchen scale (strongly recommended — gram weights are more accurate than volume, especially for flour and butter)
- Large mixing bowl
- Silicone spatula
- Whisk
- Light-colored aluminum half-sheet baking pan — not dark non-stick, not glass, not ceramic
- Parchment paper (unbleached preferred)
- Wire cooling rack
Optional but recommended:
- Medium cookie scoop (2 tablespoon / 45g capacity) — ensures uniform dough balls and consistent bake time across the batch
- Oven thermometer — most home ovens run 15–25°F (8–14°C) off the dial reading; confirming actual temperature before the pan goes in is the single most reliable way to eliminate inconsistent results
How to Make Easy Chocolate Chip Cookies
Step 1: Your Oven and Pan Are Ready Before the Dough Is
Preheat your oven to 350°F (175°C) and position the rack in the middle of the oven. Line a light-colored aluminum half-sheet pan with parchment paper — do not grease it, do not use foil, and do not use a dark non-stick pan. Dark pans absorb significantly more heat and will overbrown the bottoms before the centers have set, giving you burnt bases with raw middles. Foil conducts heat unevenly and causes the same problem on the bottom edge. Parchment on a light pan is the correct setup for this recipe.
Most home ovens run 15–25°F (8–14°C) hotter or cooler than the dial reads. If you have an oven thermometer, place it on the middle rack now and confirm the actual temperature before the pan goes in. A 25°F variance is enough to change the spread and bake time of these cookies significantly.
The oven should be fully preheated — not still climbing — when the pan goes in. A cookie that goes into an under-temperature oven spreads too fast before the structure sets.
Set your oven and begin the dough. By the time the dough is portioned and ready, the oven will be at temperature.
Step 2: Butter and Sugars Combined Until Smooth and Glossy
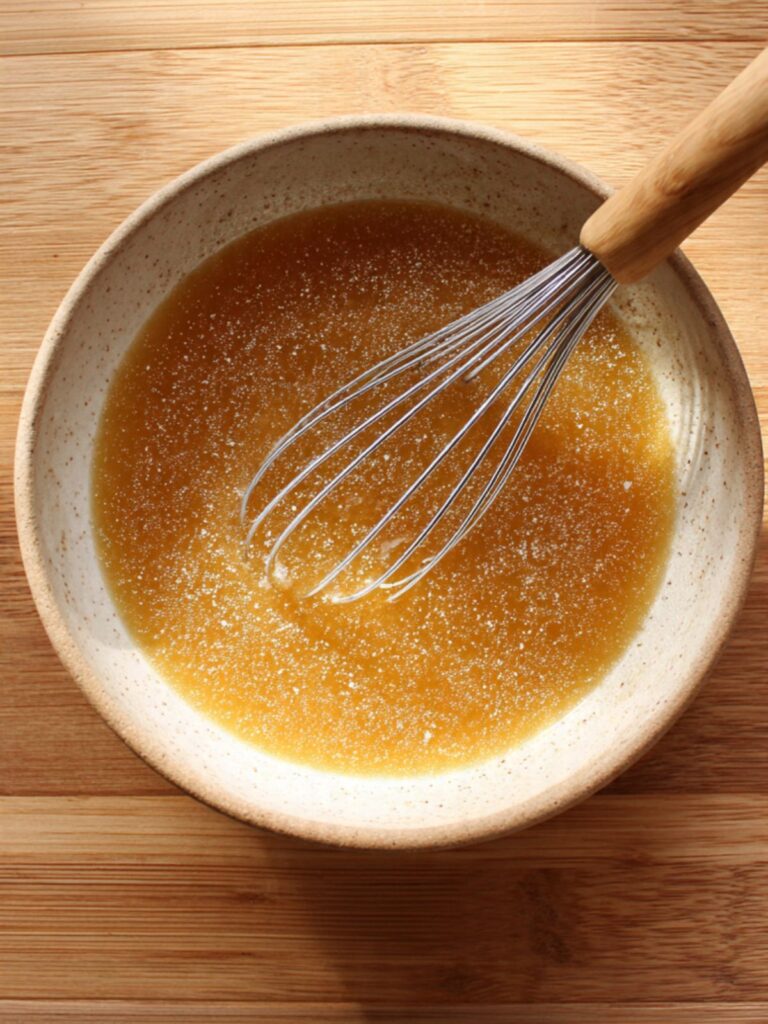
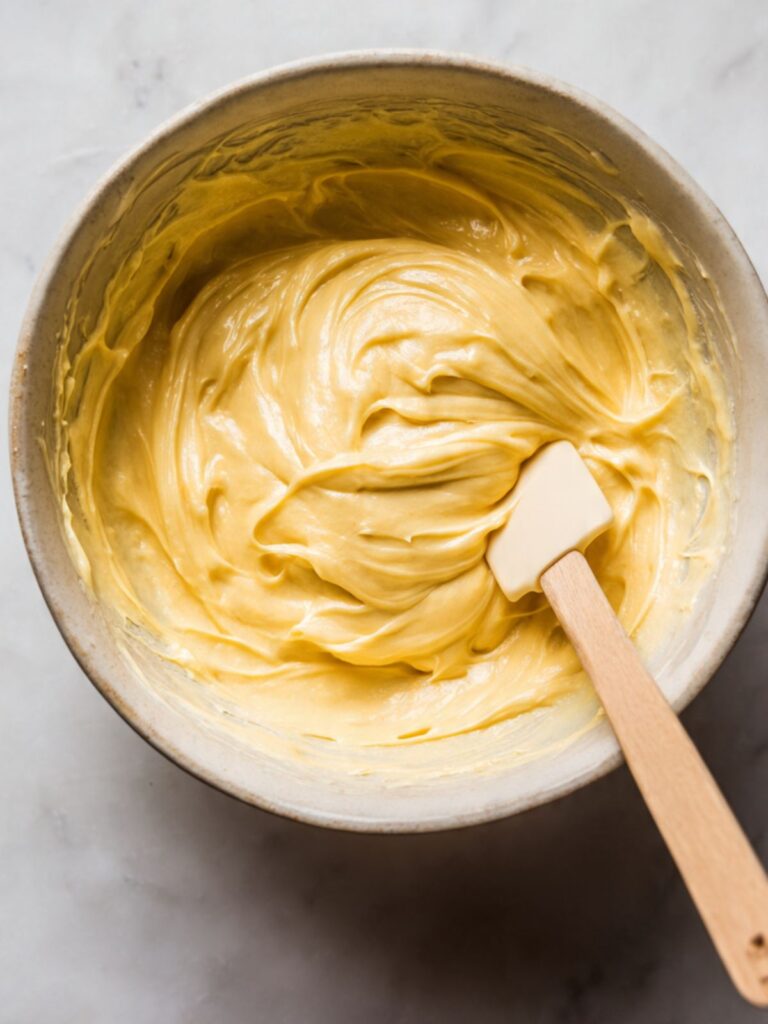
Pour the cooled melted unsalted butter (170g) into your large mixing bowl. Add the packed brown sugar (165g) and the plain white granulated cane sugar (50g) directly on top. Whisk vigorously by hand for 60–90 seconds until the mixture looks smooth, unified, and slightly glossy at the edges — the sugars should be fully incorporated with no dry pockets of brown sugar visible at the bottom of the bowl.
Do not rush this step. The sugar needs to begin dissolving into the butter here — this dissolution is what creates the slight crackle on the surface of the finished cookie. If you can still see separate layers of butter and sugar after whisking, keep going for another 30 seconds.
The mixture should look thick, smooth, and a shade lighter than the melted butter alone — if it still looks oily and separated, whisk for another 30 seconds. A greasy, broken-looking mixture at this stage means the butter was still too warm when the sugars went in.
🗒 Luna’s Note: I always use dark brown sugar in this recipe. The molasses content is higher than light brown sugar and it deepens the flavor in a way that is immediately noticeable in the finished cookie — richer, slightly caramel-forward, less one-dimensional. Light brown sugar works. Dark is better.
This bowl is your only bowl for the entire recipe — add the eggs directly here next.
Step 3: Eggs and Vanilla Bring the Dough Together
Add both room-temperature large eggs (approximately 50g each without shell) to the butter-sugar mixture one at a time, whisking fully after each addition before the next goes in. Add the pure vanilla extract (1½ tsp / 6ml) with the second egg.
Whisk for another 30–45 seconds after both eggs are in. The mixture will change visibly — it will look smoother, slightly thickened, and more cohesive than the butter-sugar stage. This is emulsification happening: the egg yolks are binding the fat and water-based ingredients into a unified batter.
⚠️ Do not add cold eggs to warm butter — the fat will seize around the cold egg and the mixture will look broken and greasy rather than smooth. If this happens, let the bowl sit at room temperature for 5 minutes and whisk again — it will usually come back together. If it does not, the butter was too warm at the start.
The batter should look smooth, slightly thick, and uniformly golden — no streaks of egg white visible, no separation at the bowl edges. This is the correct emulsified base the rest of the recipe builds on.
Switch from the whisk to your silicone spatula — the dough gets thicker from here and the spatula gives you better control.
Step 4: Dry Ingredients Folded In Without Overworking the Dough
Add the all-purpose flour (190g / 1½ cups, spooned and leveled), the old-fashioned rolled oats (135g / 1½ cups), the baking soda (1 tsp / 6g), and the fine sea salt (¾ tsp / 4.5g) directly to the bowl. Do not pre-whisk the dry ingredients in a separate bowl — for a one-bowl recipe at this hydration level, adding them directly and folding immediately produces the same result with one less step.
Fold with your silicone spatula using wide, slow strokes — scrape the bottom of the bowl up and over the top, rotate the bowl a quarter turn, repeat. Count your strokes if it helps: you are aiming for the point where no dry flour streaks are visible and the oats are evenly distributed throughout the dough. This typically takes 15–20 folds.
⚠️ Do not overmix after the flour goes in — the edges of the finished cookie will look fine but the center will bake up tough and dense instead of the soft, fudgy result shown in the photos. Stop the moment the flour disappears.
The dough should look thick, slightly rough from the oats, and hold its shape when pressed with the spatula — not wet and sticky, not dry and crumbly. If it looks dry and crumbly, your flour was packed too heavily. If it looks wet and cannot hold shape, your butter was measured by volume rather than weight.
The chocolate chips go in next — keep the spatula in the bowl.
Step 5: Chocolate Chips Folded In and Dough Portioned
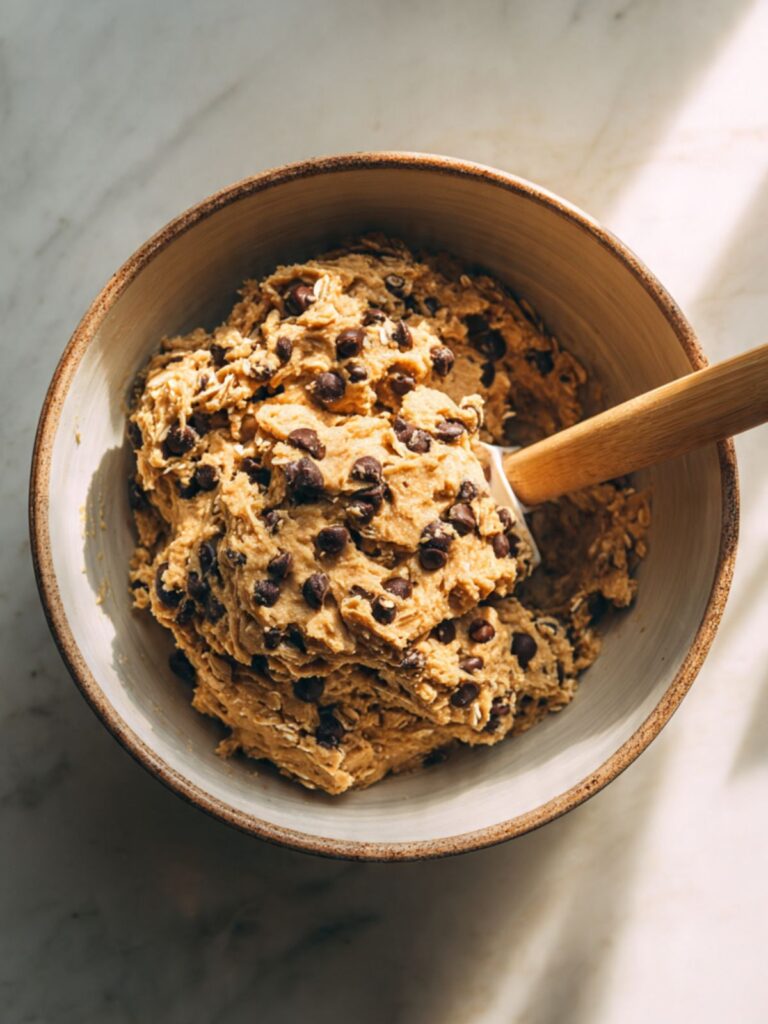
Add the semi-sweet chocolate chips (255g / 1½ cups, 45–55% cacao) to the dough and fold with the spatula until they are evenly distributed — approximately 8–10 folds. You want chips throughout, not clustered in one section of the bowl.
For the dark chocolate chunk variation: Replace the semi-sweet chips with 255g of roughly chopped dark chocolate (70%+ cacao). Chop the chocolate into irregular pieces ranging from small shards to chunks the size of a thumbnail — the variation in size is intentional. Larger chunks create pools of melted chocolate that are visible in the finished cookie. Uniform chip-sized pieces will not give you the same result.
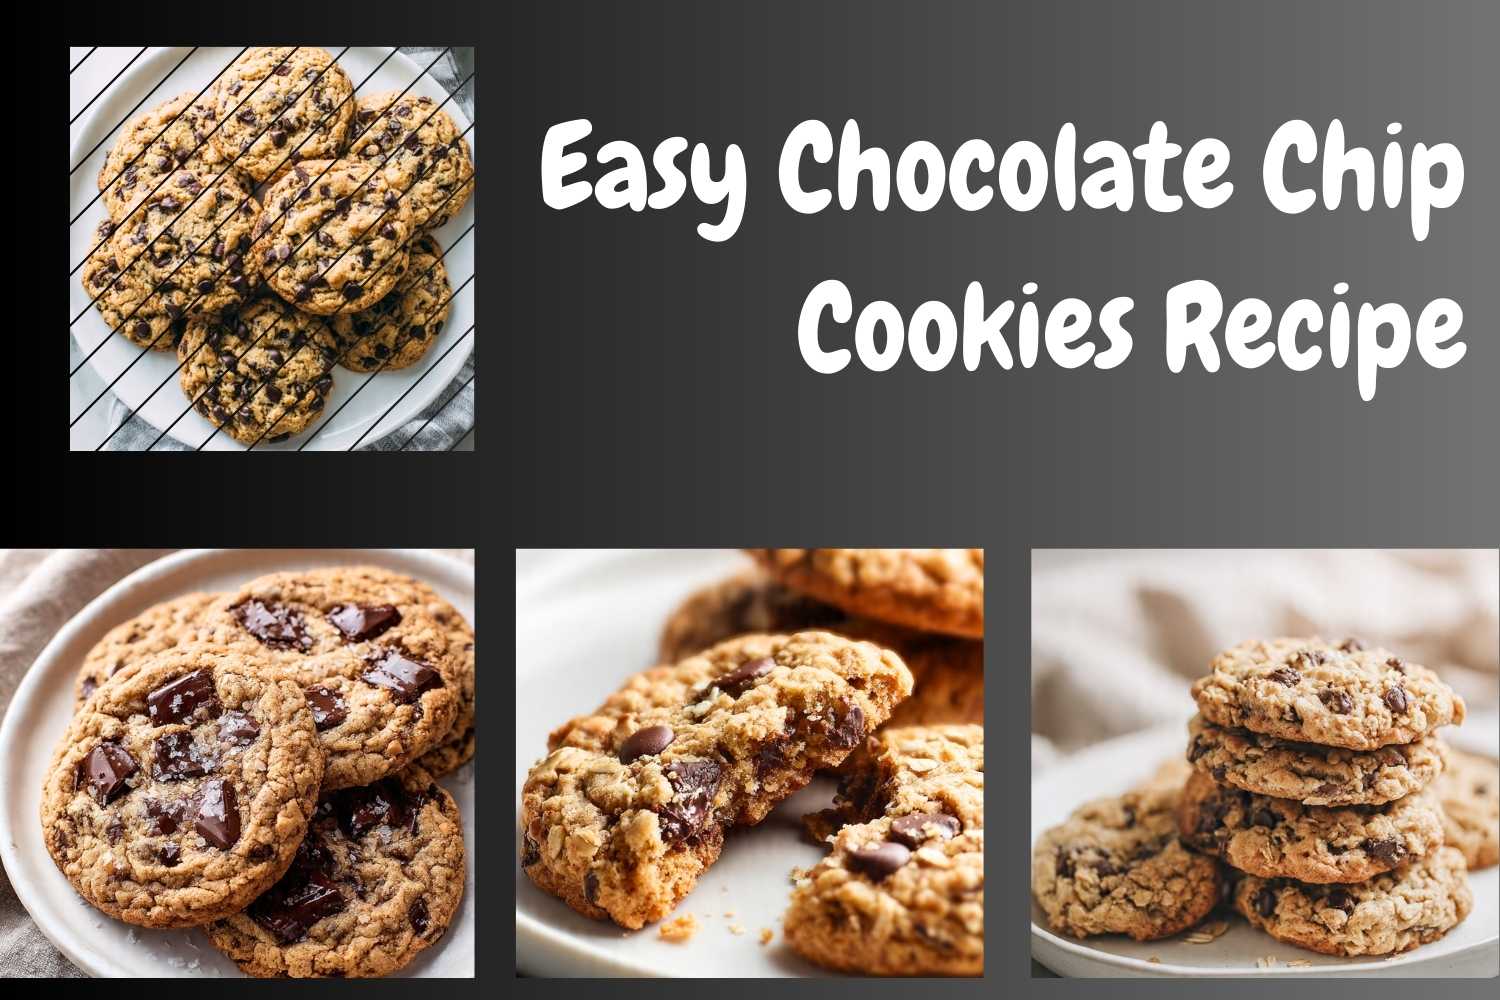
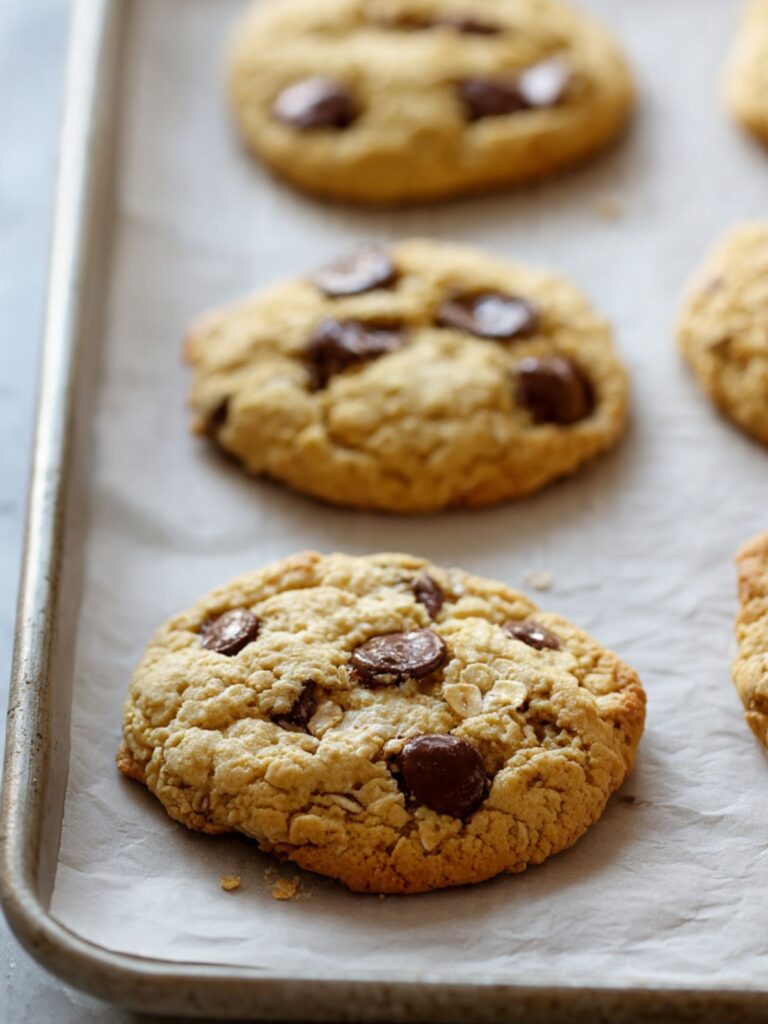
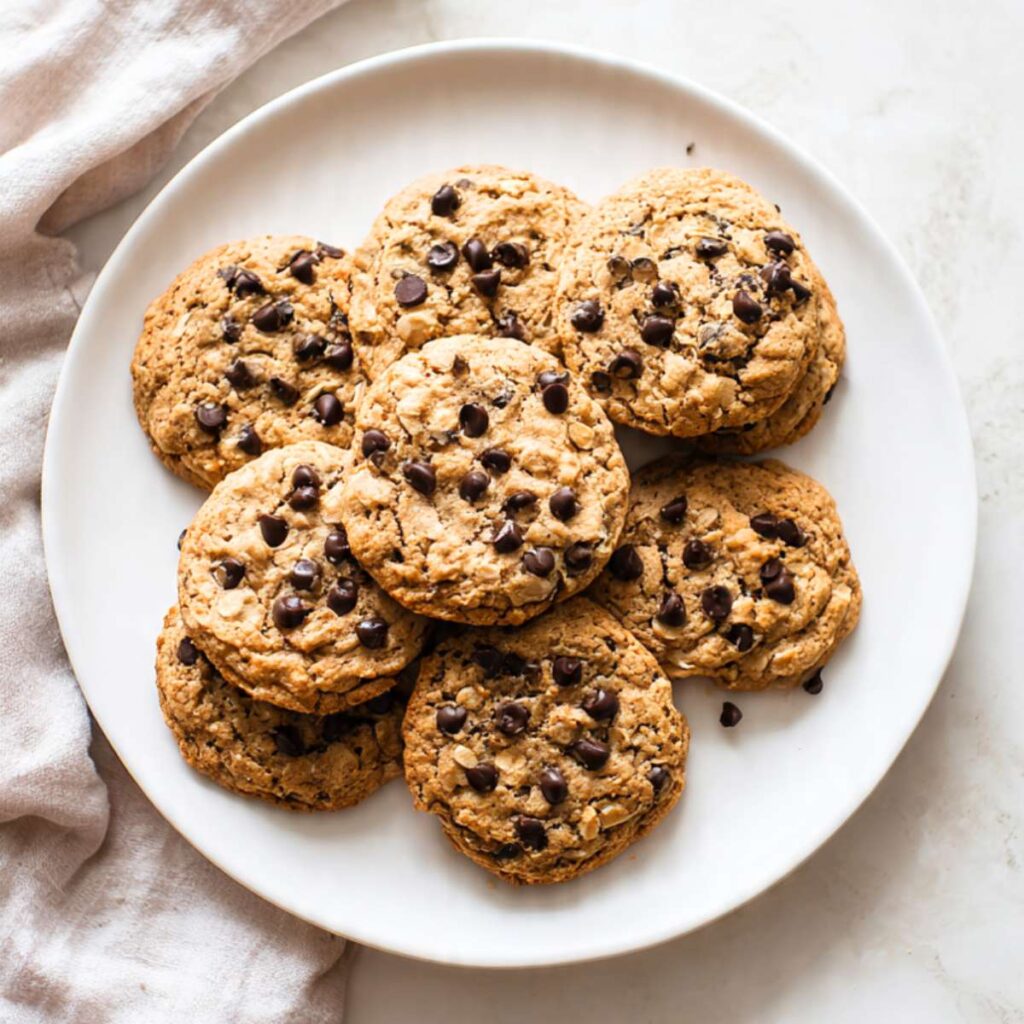
Using your medium cookie scoop (2 tablespoon / 45g capacity), portion the dough onto the parchment-lined pan. Weigh the first dough ball on your kitchen scale — it should land at 45g. Use that as your calibration and portion the remaining dough to match. Space the dough balls at least 2 inches (5cm) apart in every direction — as you can see in the overhead shot, this spacing is what allows each cookie to spread into a full round without merging with its neighbor.
This batch yields exactly 22 cookies at this scoop size. If your yield is significantly lower, your dough balls are too large. If significantly higher, too small — and the bake time will need to adjust accordingly.
🗒 Luna’s Note: I always press 4–5 extra chocolate chips onto the top of each dough ball immediately before the pan goes into the oven. Chips folded inside the dough get partially buried as the cookie spreads. This guarantees visible glossy chocolate on the surface of every finished cookie — exactly what you see in the photos.
The dough balls should look slightly rough and textured on the surface from the oats, hold their shape without spreading on the cold pan, and sit proud rather than flat. If they are already spreading before the pan goes in, the butter was too warm.
The pan is ready for the oven — bake one pan at a time.
Step 6: Baked Until the Edges Are Set and the Centers Still Look Underdone
Place the pan on the middle rack of your fully preheated 350°F (175°C) oven. Bake for 10–12 minutes — begin checking at the 10-minute mark. Do not open the oven door before 10 minutes.
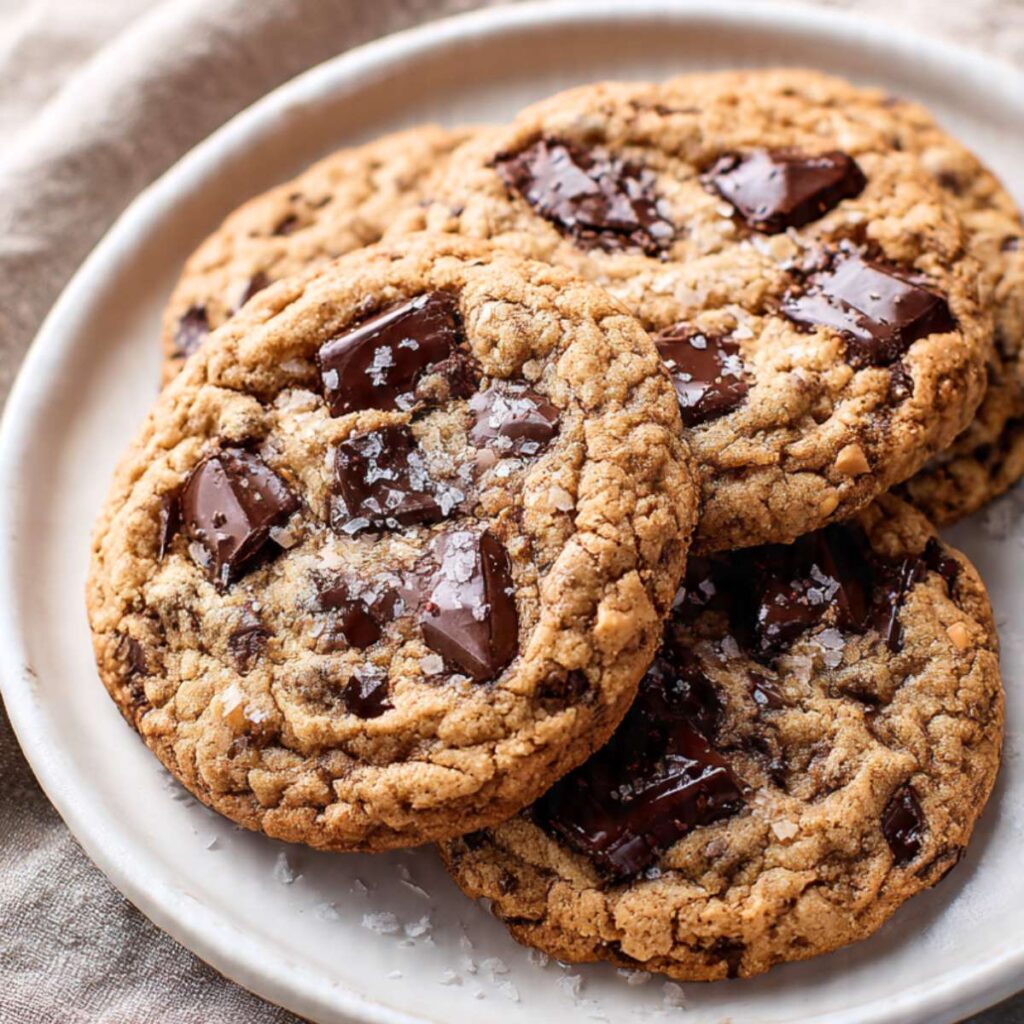
Pull the pan the moment the edges look set and lightly golden with a faint crackle beginning to form across the surface, and the centers still look slightly underdone and puffy. This is the exact moment shown in the stacked cookie photo — edges with color, centers that have not fully flattened. Do not wait for the centers to look done. They are not done in the oven — they finish on the pan.
⚠️ The edges will look set and the centers will look underdone when you pull the pan. This is correct, not a mistake. Waiting until the centers look fully baked produces a dry, overbaked cookie with no fudgy interior — nothing like what is shown in the photos.
The surface should show a faint crackle beginning to form, the edges should be lightly golden and visibly set, and the centers should still look puffy and soft. If the entire surface looks matte and fully set, the cookies have gone one to two minutes too long.
Leave the pan on the counter — do not move the cookies yet.
Step 7: Rested on the Pan, Then Moved to the Rack
Leave the cookies on the hot pan for exactly 5 minutes after pulling from the oven. Do not move them. Set a timer. The pan continues to conduct heat into the cookie base during this time — this carryover heat is finishing the centers without the oven drying them out. Moving the cookies before 5 minutes breaks the structural base before it has set. Waiting longer than 8 minutes begins to over-dry the bottoms.
For the dark chocolate chunk variation: Immediately after pulling the pan from the oven — before the 5-minute rest begins — scatter flaked sea salt (1 tsp / 3g) evenly over the surface of the cookies while the chocolate is still molten. The salt needs to land on liquid chocolate to adhere. If you wait until after resting, the chocolate will have set and the salt will not stick.
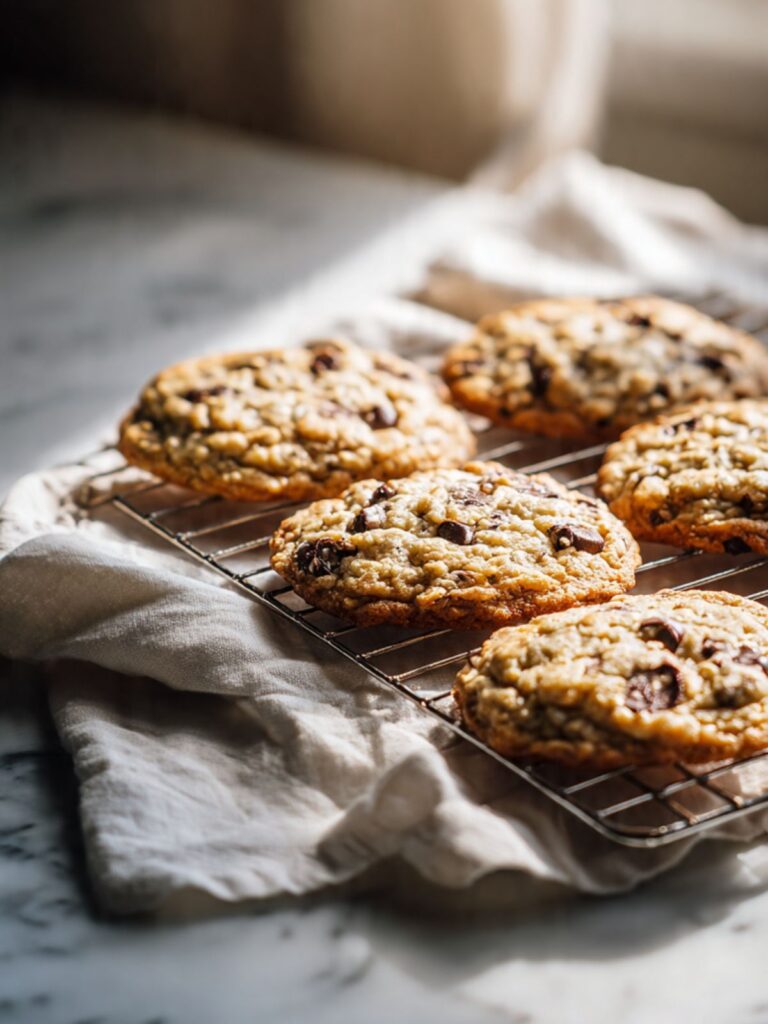
After 5 minutes, use a thin spatula to transfer the cookies to a wire cooling rack. They will feel soft and fragile at this point — that is correct. They firm up as they cool.
The cookies should feel set at the edges and still slightly soft in the center when you lift them — if they feel completely firm all the way through, they were overbaked. If they collapse when you try to lift them, they needed one more minute on the pan.
Cool on the rack for at least 10 minutes before eating. The centers continue to set as they cool — a cookie eaten at 3 minutes off the rack will taste underdone. At 10 minutes, it is exactly right.
The Science Behind Chewy Chocolate Chip Cookies
Why Melted Butter and Brown Sugar Control Everything About the Texture
Most chocolate chip cookie recipes cream softened butter with sugar to trap air and create lift. This recipe does the opposite on purpose. Melted butter contains no trapped air — which means the cookie spreads more during baking and produces a denser, chewier result rather than a cakey, domed one. The fat in melted butter also coats the flour proteins more completely than softened butter does, which limits gluten development and keeps the crumb tender rather than tough.
Brown sugar does the second half of this work. Brown sugar contains molasses — an acidic, hygroscopic ingredient that does two things simultaneously. First, it reacts with the baking soda to produce carbon dioxide bubbles that create the faint surface crackle visible in the finished cookie. Second, it draws moisture from the surrounding air and holds it inside the cookie structure after baking. This is why these cookies stay soft on Day 2 and Day 3 in a way that cookies made with predominantly white sugar do not. The white granulated sugar in this recipe is present specifically for the surface crackle — the Maillard reaction between sugar and heat at the cookie’s edge produces the lightly golden color and the faint crispness at the rim. Remove the white sugar entirely and the surface stays matte and pale. The balance between the two sugars is not interchangeable.
For a deeper look at how oats interact with cookie structure, see my oatmeal chocolate chip cookies — the comparison between old-fashioned and quick oats is covered in detail there.
🗒 Luna’s Note: The first time I understood that brown sugar is hygroscopic — that it physically pulls moisture from the air — was the moment I stopped being confused about why some cookies go stale in a day and others stay soft for a week. It is not luck. It is the sugar ratio.
What Old-Fashioned Rolled Oats Actually Do Inside the Cookie
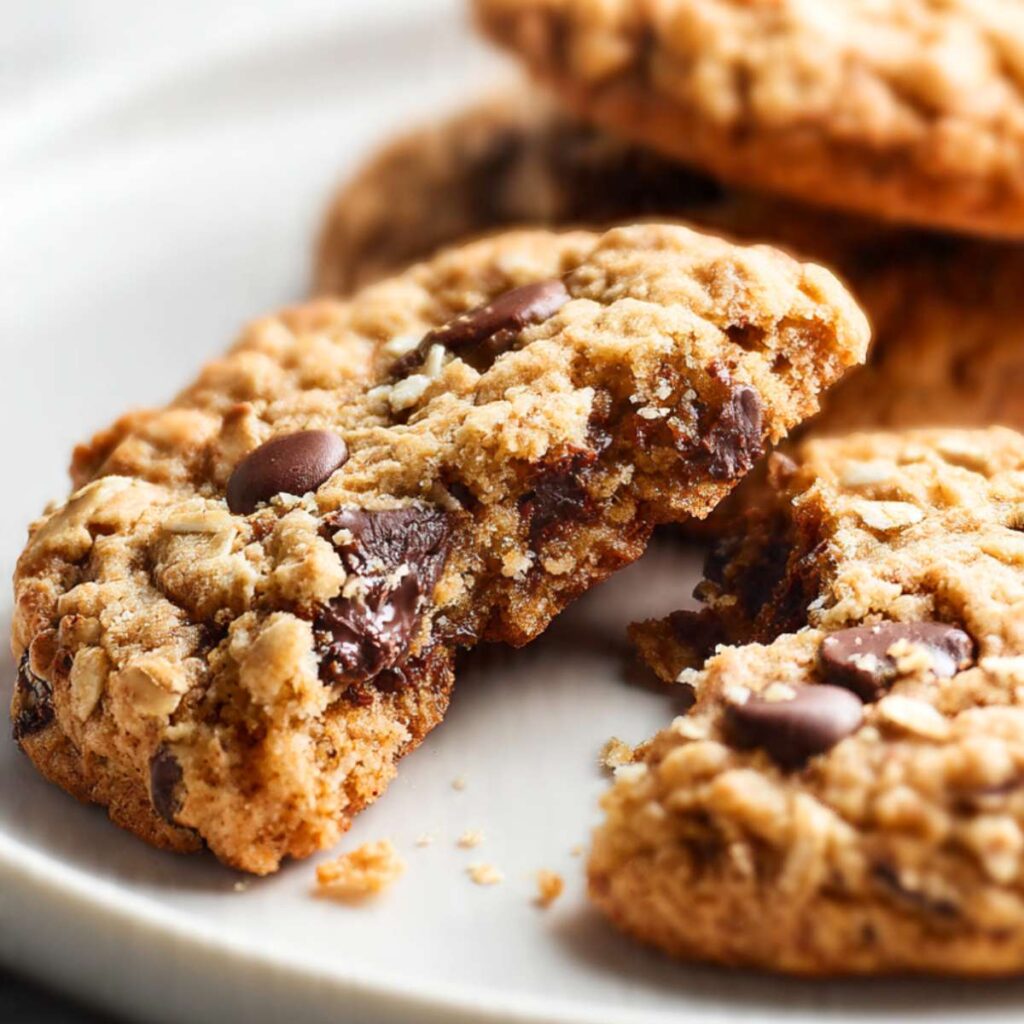
Old-fashioned rolled oats are whole oat groats that have been steamed and rolled flat. They retain their structure through the baking process — they do not dissolve, they do not disappear, and they do not fully hydrate the way quick oats do. Inside this cookie, each oat flake absorbs just enough moisture from the surrounding dough to soften slightly while keeping its shape. The result is a cookie with two distinct textural layers: the dense, fudgy chocolate chip cookie crumb and the slightly chewy, separate bite of each oat.
This texture is visible in the cross-section image — the interior shows a moist, cohesive crumb interrupted by distinct oat pieces and pockets of melted chocolate. Quick oats, processed to a much finer texture, absorb moisture faster and more completely. They hydrate fully during baking and become indistinguishable from the surrounding dough — producing a cookie that reads as slightly grainy without the structural contrast that makes this recipe work. The oat type is not a preference. It is a structural ingredient decision.
Starch gelatinization plays a role here too. As the oat starches heat up in the oven, they absorb water and swell — contributing to the body and chew of the finished cookie in a way that flour alone does not produce. The combination of gelatinized oat starch and hydrated oat structure is what gives these cookies their characteristic density without heaviness.
Why the Bake Window Is So Narrow — and What Carryover Heat Actually Does
I pulled my first three batches of this recipe at what looked like done — surface fully matte, centers no longer puffy, edges a solid golden. Every one of them was overbaked. The centers were dry and tight, nothing like the fudgy interior visible in the cross-section photo. What I did not understand yet was that the oven is not the only thing baking these cookies. The pan is.
The aluminum pan retains significant heat at the moment it leaves the oven. That stored heat continues conducting into the cookie base for the full 5 minutes of the pan rest — the center temperature keeps rising, the egg proteins finish coagulating, and the starch structure sets completely. The cookie that looks underdone when you pull the pan is, in physical terms, still baking. This is carryover cooking — the same principle that makes a steak continue cooking after it leaves the grill.
The bake window for this recipe is narrow specifically because melted butter cookies set faster than creamed butter cookies. Creamed butter traps air pockets that insulate the interior slightly and slow the rate of internal heat transfer. Melted butter contains no such pockets — heat moves through the dough more directly. The difference between perfectly set and overbaked is smaller than it is for creamed butter cookies, which is exactly why the instruction says to start checking at 10 minutes and pull at the first sign of edge color. Wait for the center to look done in the oven and the carryover heat will push it past done on the pan — producing a dry, tight crumb instead of the result shown in the photos.
Easy Chocolate Chip Cookies Troubleshooting & Pro-Tips
Common Mistakes
My cookies spread completely flat and look greasy
This is almost always a butter temperature problem. Melted butter that is still warm — above 80°F (27°C) — when the sugars and eggs go in has already begun to liquefy the sugar crystals prematurely. The dough has no structural resistance when it hits the oven heat and spreads immediately before the flour and egg proteins have time to set the shape. The finished cookie is thin, greasy at the edges, and lacks the slight dome visible in the photos.
The fix if it has already happened: nothing — a flat batch cannot be rescued mid-bake. The prevention: after melting the butter, pour it into the mixing bowl and wait 10–15 minutes. Rest your wrist against the bowl — it should feel warm, not hot. If it still feels hot, wait longer. The butter is ready when it feels the same temperature as a warm room, not a warm stove.
A second cause: measuring butter by volume rather than weight. One and a half sticks is 170g — but sticks vary slightly by brand. Weigh the butter every time.
My cookies did not spread enough and baked up thick and cakey
The most common cause is too much flour. Scooping flour directly from the bag rather than spooning and leveling adds 20–30% more flour than the recipe intends — the equivalent of an extra 2–3 tablespoons per cup. That additional flour absorbs the fat in the dough and prevents the spread that produces the result shown in the photos. The cookies bake up thick, pale, and dry rather than chewy and golden.
The fix: weigh the flour at 190g every time. If you do not have a scale, spoon the flour gently into the measuring cup with a separate spoon, then level the top with a straight edge. Never scoop directly from the bag.
A secondary cause: dough that was refrigerated before baking. Cold dough spreads less. If your dough sat in the fridge for any reason, let it come back to room temperature for 15–20 minutes before portioning.
My cookies are tough and dense in the center, not chewy and fudgy
Overmixing after the flour goes in is the primary cause. Once flour and liquid combine, gluten networks begin forming immediately. Every additional fold tightens those networks further. A dough that has been mixed past the point of no visible dry flour will bake up with a tight, bread-like crumb rather than the soft, fudgy center shown in the cross-section image. The edges look fine — the center gives it away.
The prevention: stop folding the moment the last streak of flour disappears. Count your folds if it helps — 15 to 20 folds from the point of adding the dry ingredients is the target. If you lose count, stop earlier rather than later.
A secondary cause: overbaking. Pulling the cookies two minutes past the correct window produces a dry, tight crumb that cannot be recovered. Trust the visual cue — edges set and golden, centers still puffy and slightly underdone — and pull at that exact moment.
My cookies have no surface crackle and baked up pale and matte
Two causes, both fixable. First: the oven was not fully preheated when the pan went in. Surface crackle on these cookies forms when the outer edge of the dough hits immediate, consistent heat — the sugar at the surface caramelizes rapidly and sets into a thin crackled shell. A slowly heating oven allows the cookie to spread and dry gradually without that rapid surface set. Always wait for the oven to reach full temperature before the pan goes in.
Second: the white granulated sugar was omitted or substituted. The crackle mechanism requires granulated sugar — coconut sugar, raw sugar, and liquid sweeteners behave differently and do not produce the same surface reaction. If you substituted and lost the crackle, that is the reason.
My cookie bottoms are burnt but the centers are underdone
This is a dark pan problem. Dark non-stick pans absorb significantly more radiant heat than light-colored aluminum — the bottom of the cookie reaches a much higher temperature than the center before the interior has had time to set. The result is a burnt base with a raw middle. Switch to a light-colored aluminum pan lined with parchment. If a light pan is not available, reduce the oven temperature by 25°F (15°C) and add 2 minutes to the bake time when using a dark pan.
A secondary cause: bottom rack position. Always bake on the middle rack. The bottom rack sits closer to the oven’s heat element and produces the same uneven result as a dark pan.
My baking soda is fresh but the cookies still did not rise or crackle
Check whether the brown sugar has been replaced with a non-acidic sweetener. Baking soda requires an acid to activate — in this recipe, the acid comes from the molasses in the brown sugar. White granulated sugar contains no acid. If the brown sugar was omitted entirely or replaced with all white sugar, the baking soda has nothing to react with and produces no lift, no crackle, and no surface texture. The cookies will bake flat and pale.
Freshness test reminder: drop ½ tsp (3g) of baking soda into hot water with a splash of white vinegar. Aggressive bubbling within 2 seconds confirms it is active. Weak or absent bubbling means the box needs replacing regardless of the printed date.
My cookies spread more than usual and the texture feels off — humidity and altitude
In high humidity environments (above 70% relative humidity), the hygroscopic sugars in this dough absorb moisture from the air during mixing and portioning — more than they would in a dry climate. The dough becomes slightly wetter than intended and spreads more in the oven. The fix: refrigerate the portioned dough balls for 15–20 minutes before baking. Do not refrigerate the whole bowl — portion first, then chill the pan.
At high altitude (above 3,500 feet / 1,067 meters), leavening gases expand faster and moisture evaporates more quickly. For this recipe at altitude: reduce the baking soda by ¼ tsp, increase the flour by 1–2 tablespoons (8–16g), reduce the brown sugar by 1 tablespoon (14g), and increase the oven temperature to 360°F (182°C). Bake time may decrease by 1–2 minutes — start checking at 9 minutes.
Expert Pro-Tips
Use a cookie scoop and weigh the first ball. Uniform dough balls produce uniform cookies — same spread, same bake time, same texture across the entire batch. A 2-tablespoon scoop gets you close, but weighing the first ball at 45g and using it as your calibration eliminates the variation that produces one overdone cookie and three underdone ones on the same pan.
Press extra chips on top of each dough ball before baking. Chips folded into the dough get partially buried as the cookie spreads. Pressing 4–5 chips directly onto the top surface of each portioned ball guarantees visible, glossy chocolate on every finished cookie — exactly the result shown in the overhead photos. It takes 20 seconds per pan and makes every batch look intentional.
Bake one pan at a time on the middle rack. Two pans in the oven simultaneously block airflow and create hot spots. The bottom pan always overbrowns. Bake sequentially — the second pan goes in the moment the first comes out.
For the dark chocolate chunk variation, chop the chocolate yourself. Pre-bagged dark chocolate chunks are cut to uniform size — they melt predictably but produce a less dramatic visual result. Hand-chopping a 70%+ cacao bar into irregular pieces creates shards, chunks, and fine chocolate dust that melt at different rates during baking. The large chunks pool visibly. The fine shards disperse through the crumb. The result is the layered chocolate experience shown in Image 2 — not achievable with uniform chips.
Pull one minute earlier than you think you need to. Every oven is different. The first time you make this recipe in your oven, pull the pan at exactly 10 minutes regardless of what the surface looks like. Assess the result after the 5-minute pan rest. If the centers are underdone after cooling, add 1 minute next time. If they are dry, you already had it right at 10 minutes. One test batch calibrates your oven for every batch after.
How to Store Easy Chocolate Chip Cookies
Room Temperature
Store baked cookies in a lidded hard-sided container — a ceramic cookie jar, a plastic container with a snap lid, or a metal tin with a fitted lid. Layer the cookies between sheets of unbleached parchment paper to prevent them from sticking together and to protect the surface texture. Do not use zip-lock bags — the pressure flattens the cookies and compresses the centers, which changes the texture from the slightly domed, chewy result shown in the photos to something flatter and denser than what you baked.
At room temperature these cookies stay soft for up to 4 days. Day 1 the edges have a faint crispness and the centers are fudgy. Day 2 the cookies have fully equalized — the edge crispness softens and the entire cookie is uniformly chewy. This is the best day. Day 3 and Day 4 the texture holds well but the flavor begins to mellow. Day 5 they are still edible but noticeably past their peak.
Place one slice of plain white sandwich bread in the container alongside the cookies. The bread sacrifices its own moisture to the surrounding air, keeping the cookies soft longer without affecting their flavor. Replace the bread slice on Day 3 if you are storing for the full 4 days.
Do not store the dark chocolate chunk variation at room temperature for more than 2 days — the exposed chocolate chunks oxidize faster than chips folded into the dough and the flavor sharpens unpleasantly by Day 3.
Refrigerator
Refrigerating baked cookies is not recommended for this recipe. The cold draws moisture out of the cookie crumb and firms the chocolate chips into a hard, waxy texture that does not return to its original state at room temperature. If you must refrigerate — if your kitchen runs very warm — place the cookies in a lidded hard-sided container with parchment between layers and bring them to room temperature for 20–30 minutes before eating. Cold cookies from this recipe taste significantly flatter than room-temperature ones.
Freezer — Baked
Wrap each baked cookie individually in a single layer of plastic wrap, then place the wrapped cookies in a zip-lock freezer bag with the air pressed out, or in a hard-sided freezer-safe container. Individually wrapped cookies can be pulled one at a time without thawing the whole batch. Freeze for up to 2 months.
To thaw: unwrap and place on the counter for 20–30 minutes at room temperature. The texture returns very close to fresh — the centers soften back to fudgy and the oat structure holds. Do not microwave to thaw — 10 seconds too long in the microwave turns the center gummy and the edges rubbery. If you want a warm cookie, place the thawed cookie on a parchment-lined pan and heat at 300°F (150°C) for 4–5 minutes. Pull it when the chocolate just begins to look glossy again.
Freezer — Unbaked Dough
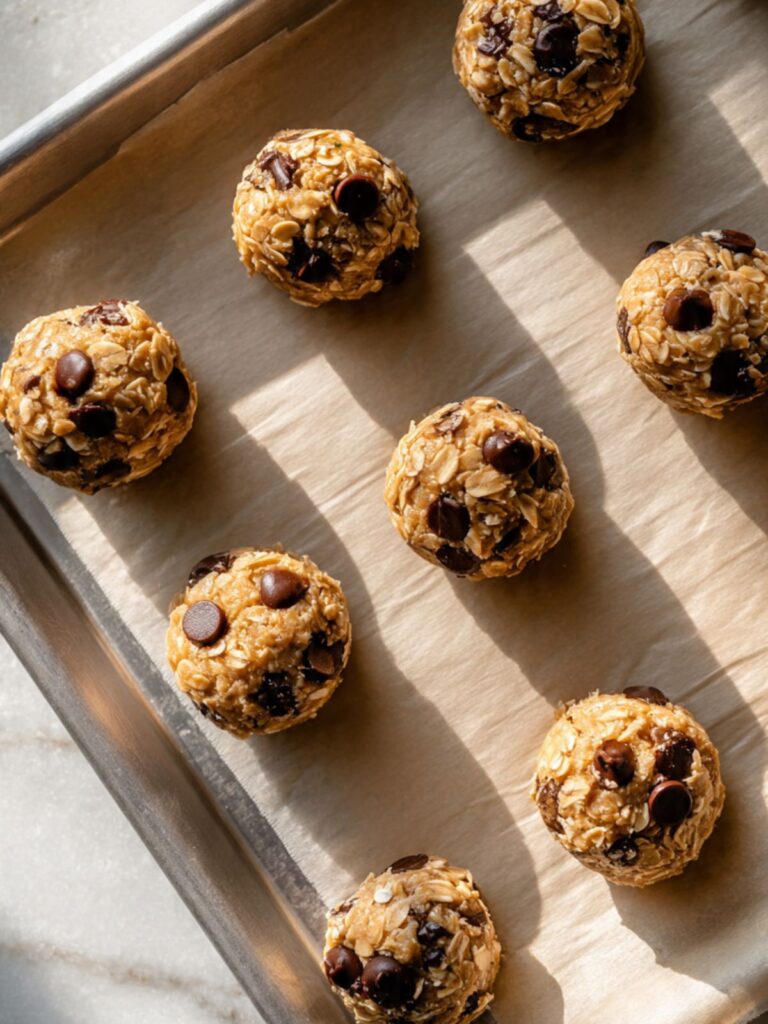
This dough freezes exceptionally well in portioned form. Scoop the dough into 45g balls using your cookie scoop, place them on a parchment-lined pan, and freeze uncovered for 1 hour until the balls are firm. Transfer the frozen dough balls to a zip-lock freezer bag, press out the air, and freeze for up to 3 months. Label the bag with the date and the bake temperature and time.
To bake from frozen: place frozen dough balls directly on a parchment-lined pan — do not thaw. Bake at 350°F (175°C) for 13–14 minutes, checking at 13 minutes. The extra 2–3 minutes accounts for the frozen core. The visual cue is identical to fresh dough — edges set and lightly golden, centers still slightly puffy. The result is indistinguishable from a freshly made batch.
🗒 Luna’s Note: I almost always have a bag of frozen dough balls in my freezer. Portioning a full batch and freezing half of it takes no extra time — the dough is already made. Baked-from-frozen cookies are one of the more useful things I do in my kitchen.
Serving Suggestion
Serve these at room temperature or slightly warm — if you want a warm cookie, 4–5 minutes at 300°F (150°C) is enough to soften the centers back without drying the edges. I eat mine at room temperature on Day 2, which is when the texture has fully equalized and the molasses flavor in the brown sugar has had time to deepen. Day 1 is excellent. Day 2 is better.
I make these with a strong black coffee — no milk, no sugar. The bitterness cuts directly through the sweetness of the brown sugar and the chocolate in a way that a glass of milk does not. Milk rounds everything out. Black coffee sharpens it. Both are correct, but I do not reach for milk.
These are the cookies I make for a Tuesday night when I want something that took less than thirty minutes and does not require an explanation. Not a celebration recipe. Not a recipe you make to impress anyone. The recipe you make because you wanted a cookie and now you have twenty-two of them and that is exactly right.
One honest limitation: these do not travel particularly well over long distances. The oat structure, which is the best thing about them, also makes them slightly more fragile than a standard chocolate chip cookie. Stack them in a hard-sided container for transport — never a zip-lock bag — and do not stack more than three layers deep. For a cookie that ships or travels better, a standard chocolate chip cookie without oats holds up more reliably.
Frequently Asked Questions About Chocolate Chip Cookies
Can I make easy chocolate chip cookies ahead of time?
Yes — and the dough method is better than baking ahead. Portion the dough into 45g balls, freeze them on a parchment-lined pan for 1 hour, then transfer to a zip-lock freezer bag for up to 3 months. Bake directly from frozen at 350°F (175°C) for 13–14 minutes — no thawing needed. If you prefer to bake ahead, these cookies are at their best on Day 2 when the texture has fully equalized and the molasses flavor has deepened — baking the day before serving is a genuinely good strategy, not a compromise.
Can I substitute quick oats for old-fashioned rolled oats?
No — not for the result shown in the photos. Quick oats are processed to a finer texture than old-fashioned rolled oats and hydrate fully during baking, dissolving into the surrounding dough rather than maintaining their structure. The finished cookie loses the distinct oat chew and visible oat texture that defines this recipe. If quick oats are all you have, the cookies will still taste good — but they will read as a slightly grainy standard chocolate chip cookie rather than an oatmeal chocolate chip cookie. The texture difference is significant enough that it changes what the recipe is. Use old-fashioned rolled oats.
Why did my cookies spread too flat?
Butter temperature is the most common cause — melted butter that is still warm when the eggs go in has already begun breaking down the sugar structure, and the dough spreads immediately when it hits oven heat before the flour and eggs can set the shape. Let the melted butter cool for 10–15 minutes until it feels warm to the touch but not hot. The second most common cause is too little flour — if you scooped directly from the bag rather than spooning and leveling, you may have under-measured by 2–3 tablespoons per cup. Spoon and level, or weigh at 190g, every time.
What makes these cookies chewy instead of crispy?
Three variables working together control the chew in this recipe. Melted butter, rather than creamed butter, limits the air incorporated into the dough and produces a denser, chewier crumb rather than a cakey one. The high ratio of packed brown sugar — which is hygroscopic and draws moisture from the surrounding air — keeps the cookie soft long after baking. The old-fashioned rolled oats add a structural chew that flour alone cannot produce. Remove any one of these three and the texture shifts. Increase the white sugar and reduce the brown sugar and the cookie becomes crispier and thinner. Switch to creamed butter and it becomes cakey. The balance is deliberate. For a deeper look at what controls chew versus crispness in chocolate chip cookies, see my chewy chocolate chip cookies.
Can I double this chocolate chip cookies recipe?
Yes — with one adjustment. Multiply all ingredients by 2 except the baking soda. Use 1½ tsp of baking soda for a doubled batch rather than 2 tsp — leavening does not scale linearly, and a full double of baking soda produces a soapy, metallic aftertaste in the finished cookie. Bake in sequential batches on separate pans rather than crowding two pans in the oven simultaneously — two pans block airflow and the bottom pan always overbrowns. The dough can be made in one large bowl and portioned across multiple baking sessions, or frozen in bulk using the method in the storage section.
How does humidity or altitude affect these cookies?
In high humidity (above 70% relative humidity), the brown sugar and oats in this dough absorb ambient moisture during mixing and portioning, making the dough wetter than intended. The cookies spread more and take slightly longer to set. Refrigerate the portioned dough balls for 15–20 minutes before baking to counteract this — do not refrigerate the whole bowl of dough, portion it first. At high altitude (above 3,500 feet / 1,067 meters), reduce the baking soda by ¼ tsp, increase the flour by 1–2 tablespoons (8–16g), reduce the brown sugar by 1 tablespoon (14g), and raise the oven temperature to 360°F (182°C). Start checking at 9 minutes — bake time decreases slightly at altitude due to faster moisture evaporation.
Can I use salted butter instead of unsalted?
Partially — it works but requires an adjustment. Salted butter contains approximately ¼ tsp of salt per stick, which varies by brand. If you use salted butter in this recipe, reduce the fine sea salt from ¾ tsp to ¼ tsp and taste the dough before adding any additional salt. The risk of not adjusting is a noticeably over-salted cookie — the salt level in this recipe is calibrated for unsalted butter specifically. The dark chocolate chunk variation is more sensitive to this than the standard chip version because the flaked sea salt finishing layer adds another salt dimension — if using salted butter for that variation, skip the fine sea salt in the dough entirely and rely only on the flaked salt finish.
More Cookies You’ll Love
- Brown Butter Chocolate Chip Cookies — same chewy center, deeper toffee-forward flavor from the browned butter, with a more complex finish than the melted butter version
- Small Batch Chocolate Chip Cookies — scaled to yield 6 large cookies, perfect for when you want a fresh batch without committing to a full recipe
- Chocolate Chip Cookie Bars — the same flavor profile pressed into a parchment-lined pan and cut into bars, no scooping required

Easy Chocolate Chip Cookies Recipe
Ingredients
Equipment
Method
- Step 1 — Preheat and Prepare: Preheat oven to 350°F (175°C) and position rack in the middle. Line a light-colored aluminum half-sheet pan with parchment paper. Do not use dark non-stick pans or foil — dark pans overbrown the bottoms before the centers set.
- Step 2 — Combine Butter and Sugars: Pour cooled melted butter (170g) into a large mixing bowl. Add packed brown sugar (165g) and granulated sugar (50g). Whisk vigorously for 60–90 seconds until smooth, unified, and slightly glossy — no dry pockets of brown sugar remaining at the bowl bottom.
- Step 3 — Add Eggs and Vanilla: Add both room-temperature eggs one at a time, whisking fully after each. Add vanilla extract (1½ tsp) with the second egg. Whisk 30–45 seconds until smooth, slightly thickened, and no egg white streaks remain. Switch to a silicone spatula.
- Step 4 — Add Dry Ingredients: Add flour (190g), old-fashioned rolled oats (135g), baking soda (1 tsp), and fine sea salt (¾ tsp) directly to the bowl. Fold with the spatula using wide slow strokes — 15 to 20 folds — until no dry flour streaks remain and oats are evenly distributed. Do not overmix — overmixing after the flour goes in produces a tough, dense center instead of the soft fudgy result shown in the photos.
- Step 5 — Fold In Chips and Portion: Add semi-sweet chocolate chips (255g) and fold until evenly distributed — approximately 8 to 10 folds. For the dark chocolate chunk variation, replace chips with 255g roughly chopped dark chocolate (70%+ cacao). Scoop dough into 45g balls using a medium cookie scoop. Space 2 inches (5cm) apart on the prepared pan. Press 4–5 extra chips onto the top of each ball before baking.
- Step 6 — Bake: Bake at 350°F (175°C) for 10–12 minutes. Begin checking at 10 minutes. Pull the pan when edges are set and lightly golden with a faint surface crackle and centers still look slightly underdone and puffy. Do not wait for centers to look fully set — they finish on the pan.
- Step 7 — Rest and Cool: Leave cookies on the hot pan for exactly 5 minutes — do not move them. For the dark chocolate chunk variation, scatter flaked sea salt (1 tsp) over cookies immediately after pulling from the oven, before the 5-minute rest. After 5 minutes, transfer to a wire cooling rack. Cool for at least 10 minutes before eating — centers continue to set as they cool.