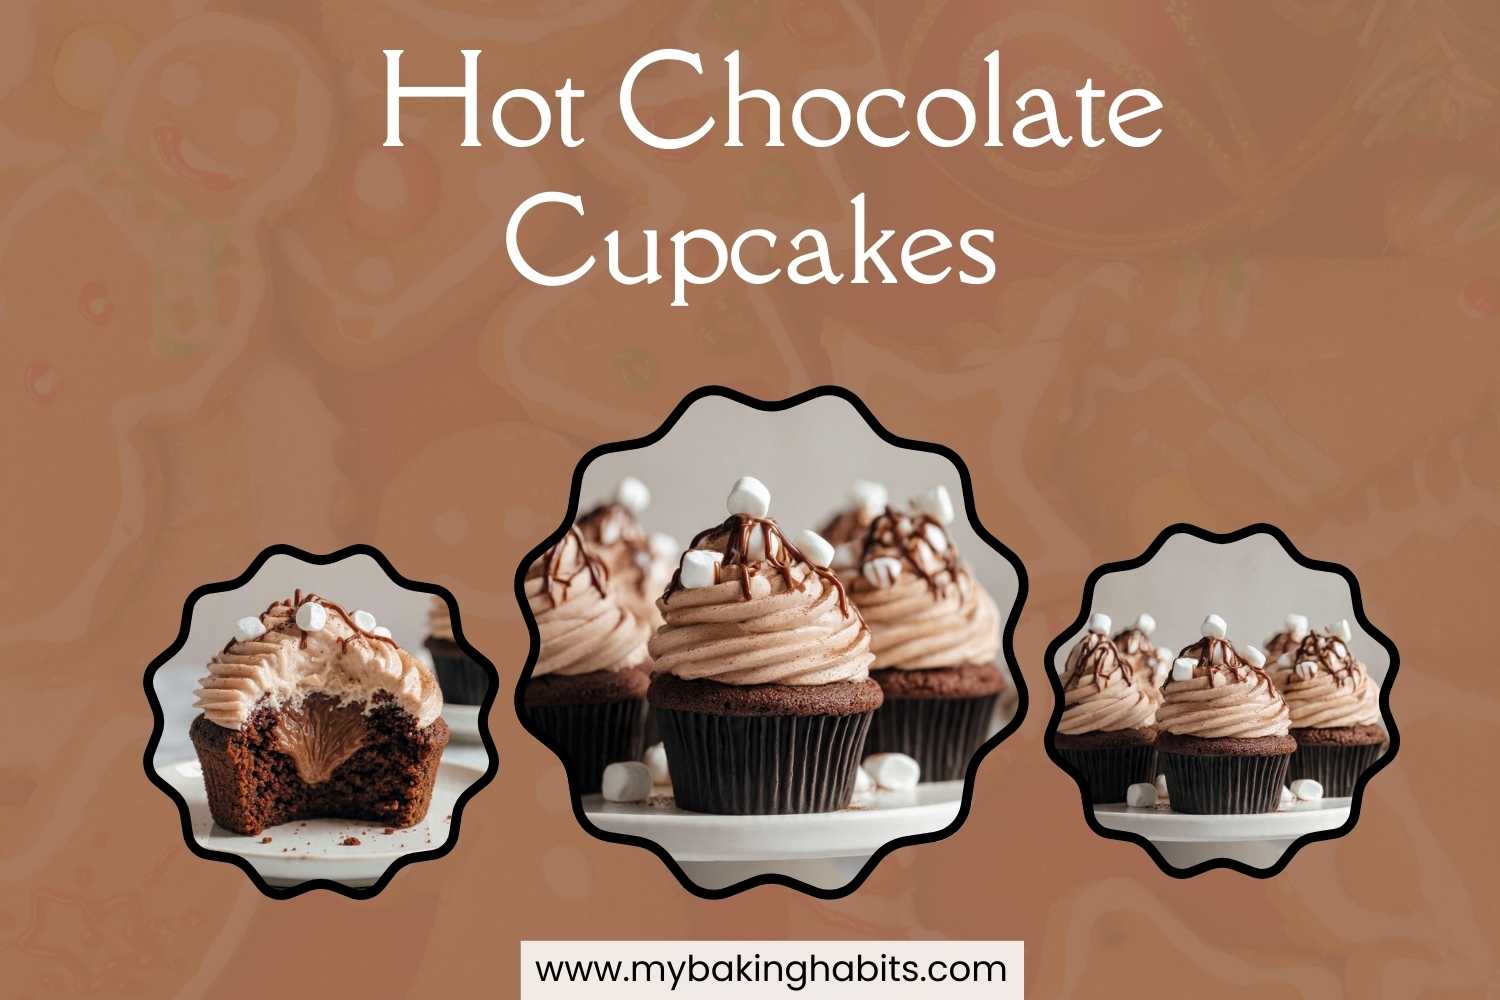
Hot Chocolate Cupcakes (Marshmallow Cream Filling)
There is a mug of hot chocolate sitting on your counter right now, or there should be. This recipe takes everything that makes that drink worth making — the deep cocoa, the marshmallows floating on top, the sweetness that sits just below rich — and bakes it into a cupcake that delivers all of it in one bite.
The base is a very dark chocolate sponge. Not just brown — nearly black, the way a proper hot cocoa gets when you use the right cocoa powder. I tested this batter with both natural cocoa and Dutch-process cocoa across six batches. The natural cocoa version baked up noticeably lighter in color and sharper in flavor — closer to a standard chocolate cupcake than a hot chocolate one.
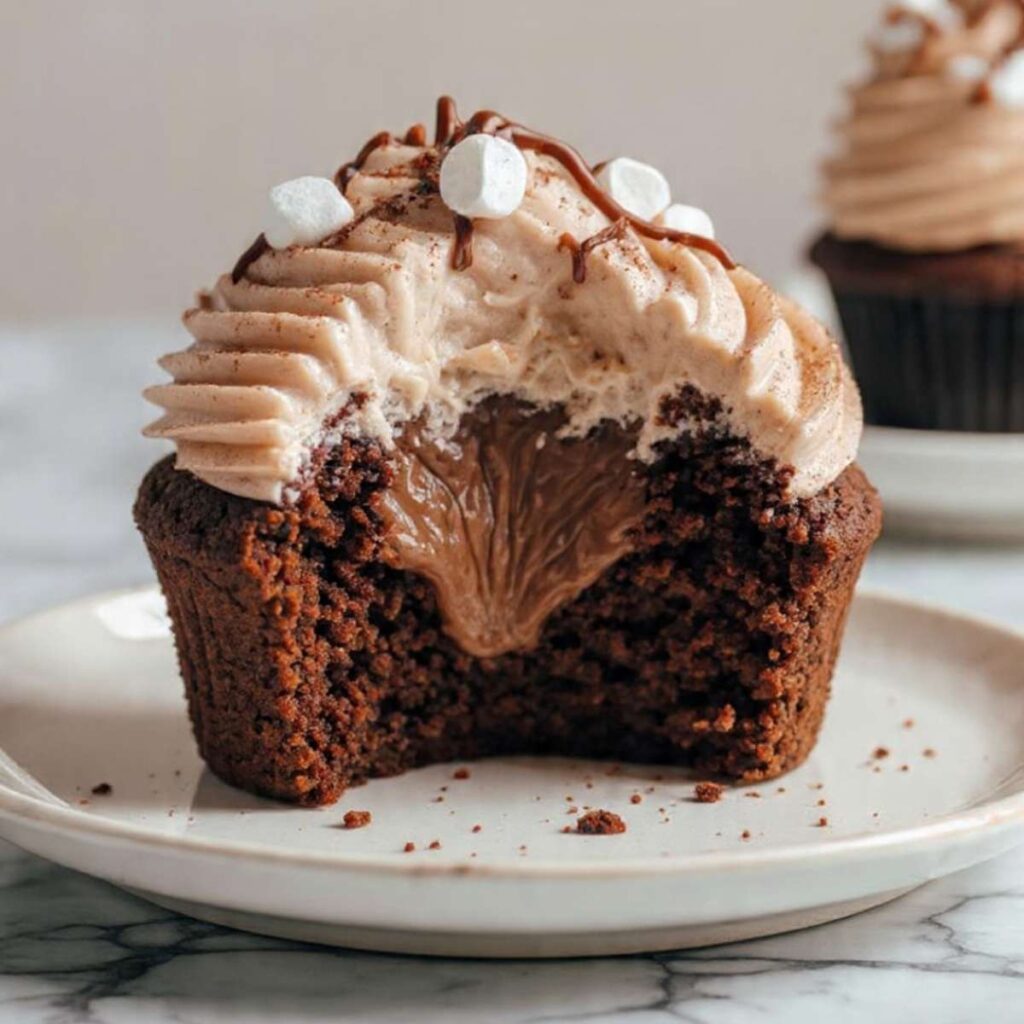
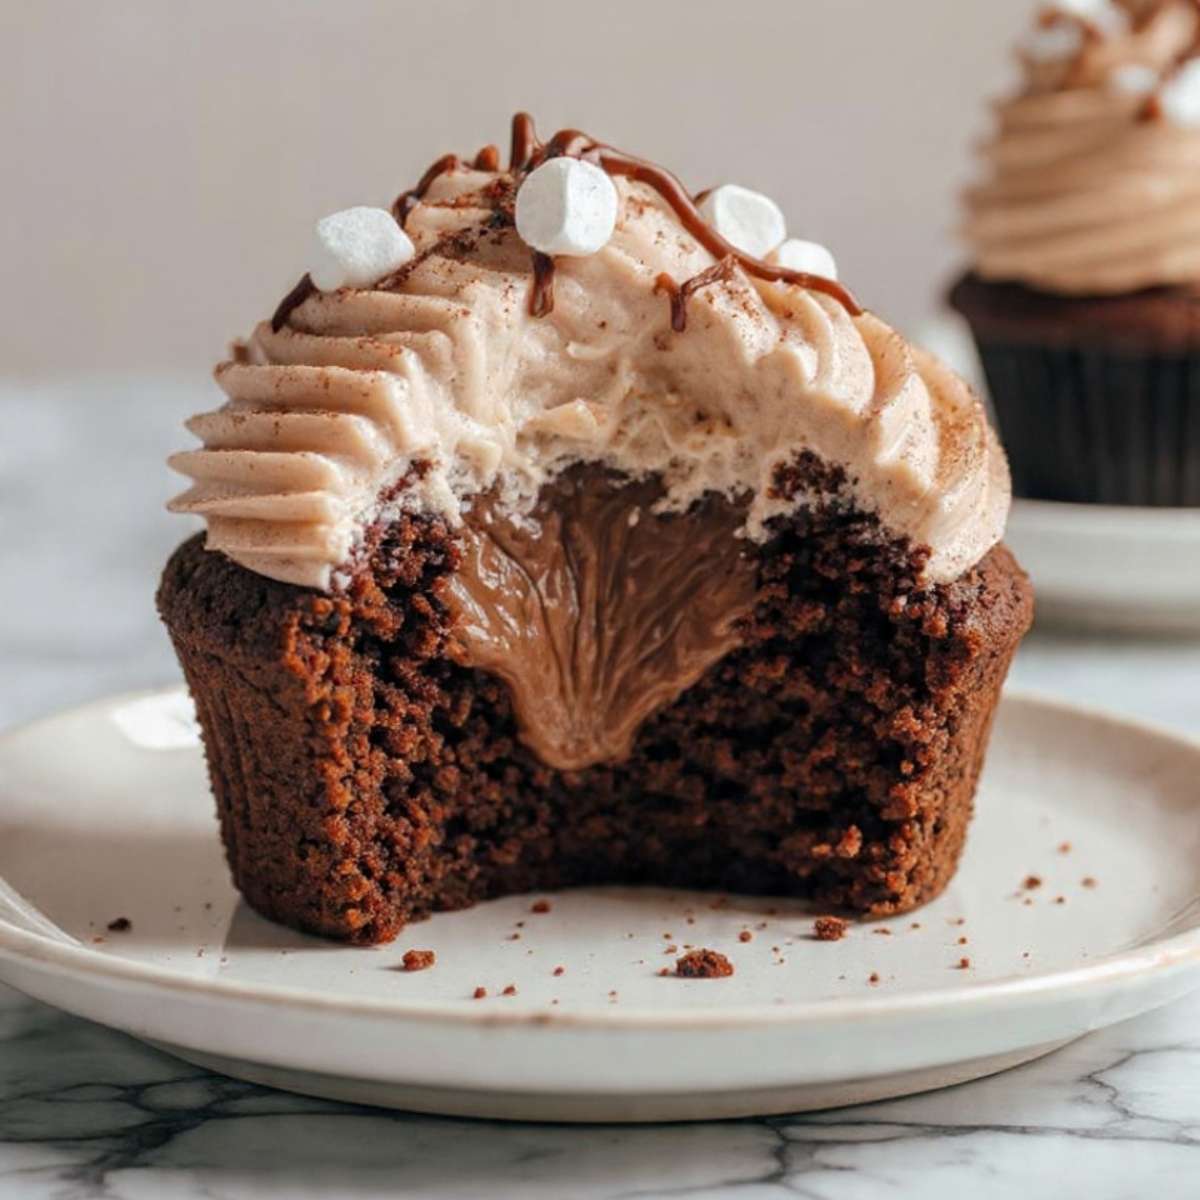
The Dutch-process version produced the near-black crumb visible in the cross-section photo every single time. Dutch-process is the version I kept. The crumb is dense and moist with a tight structure that holds the marshmallow cream filling without collapsing. The filling itself is a vanilla marshmallow crème that you pipe directly into the center of each cooled cupcake — and when you break one open, it fans outward the way a lava cake does, except set, not molten. You can see exactly what I mean in the cross-section photo.
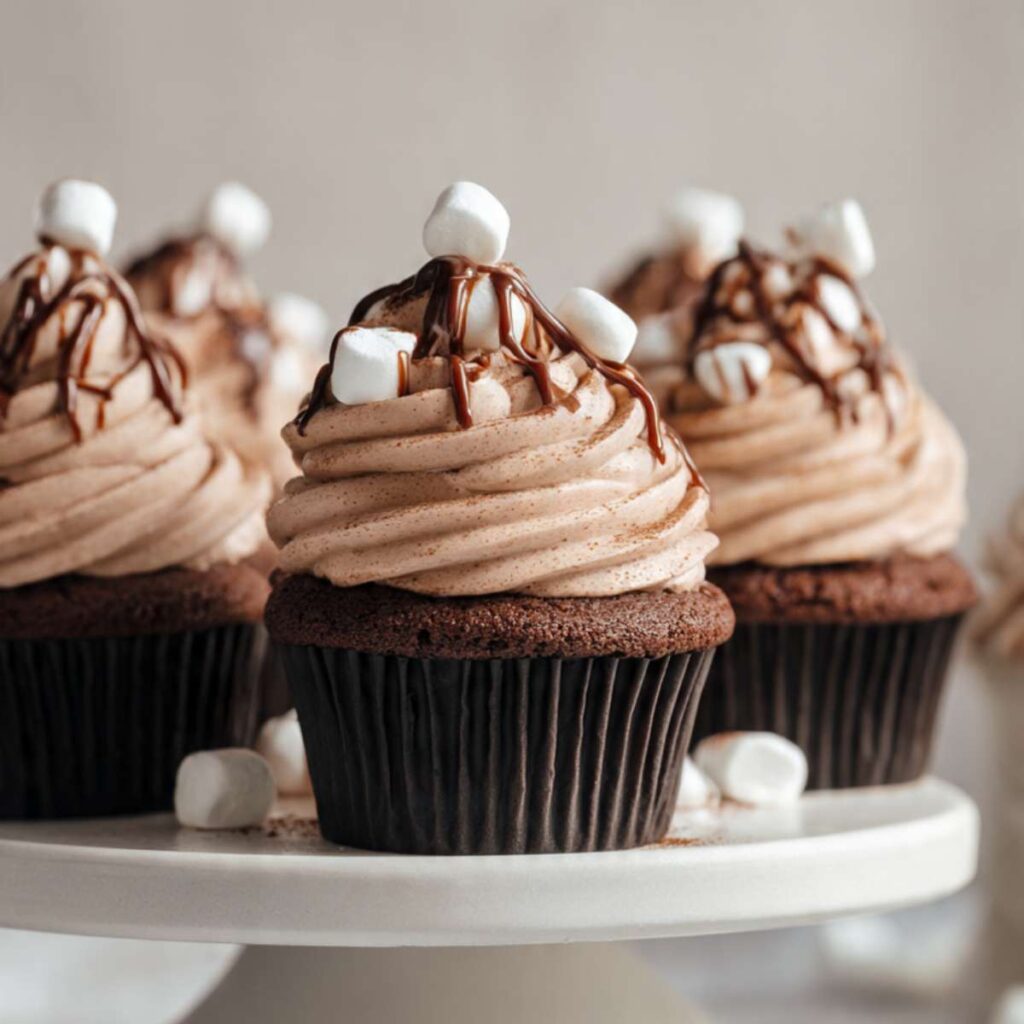
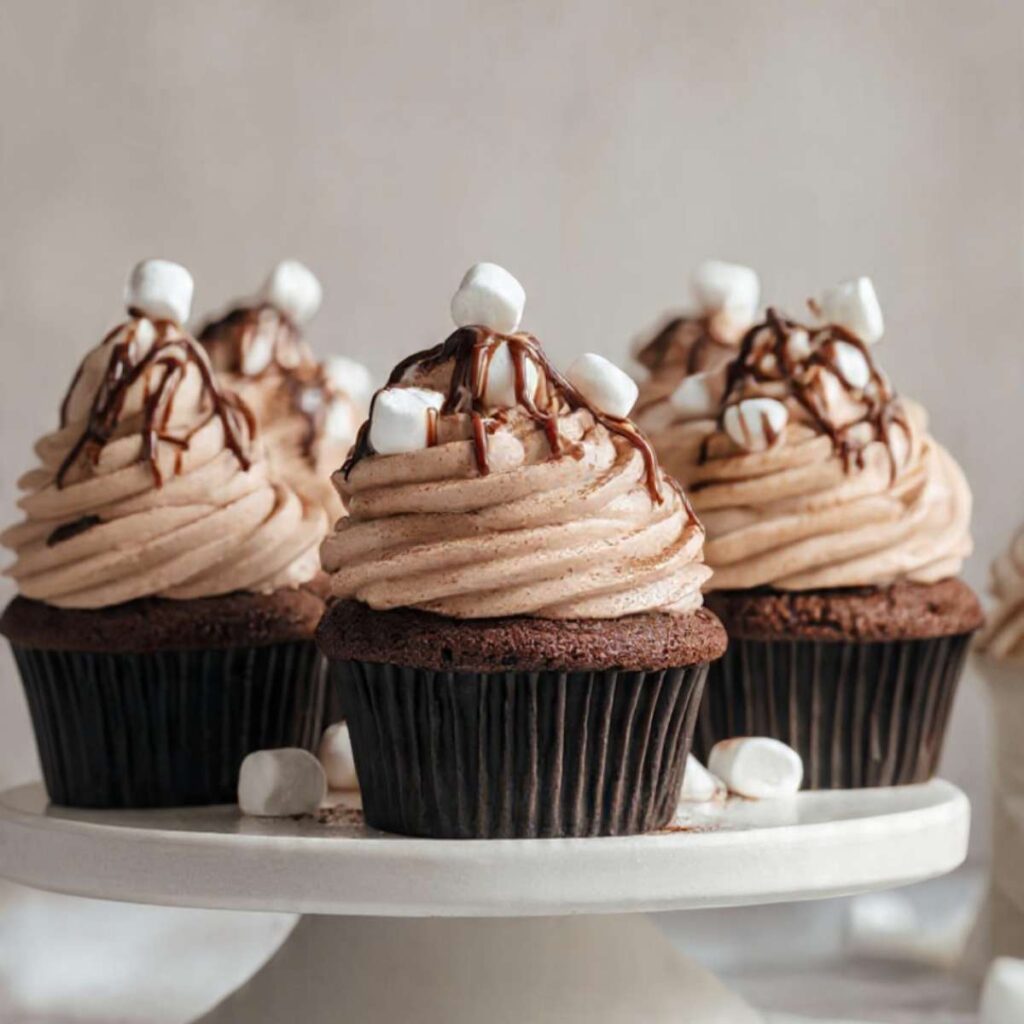
The frosting is not a standard buttercream. It is a cocoa whipped cream — cold, light, and airy — piped high with a Wilton 1M tip. I tested it with two stabilization approaches: plain whipped cream with just powdered sugar, and cocoa whipped cream with both powdered sugar and sifted Dutch-process cocoa. The plain version held its shape for about 45 minutes at room temperature before the swirls began to soften at the base.
The cocoa version held its defined peak shape for over three hours under the same conditions — the cocoa butter in the powder bonds with the fat globules and adds rigidity the plain version cannot match. The cocoa version is the one in the photos. It does not taste like a stick of butter with sugar. It tastes like the foam on top of a good hot chocolate.
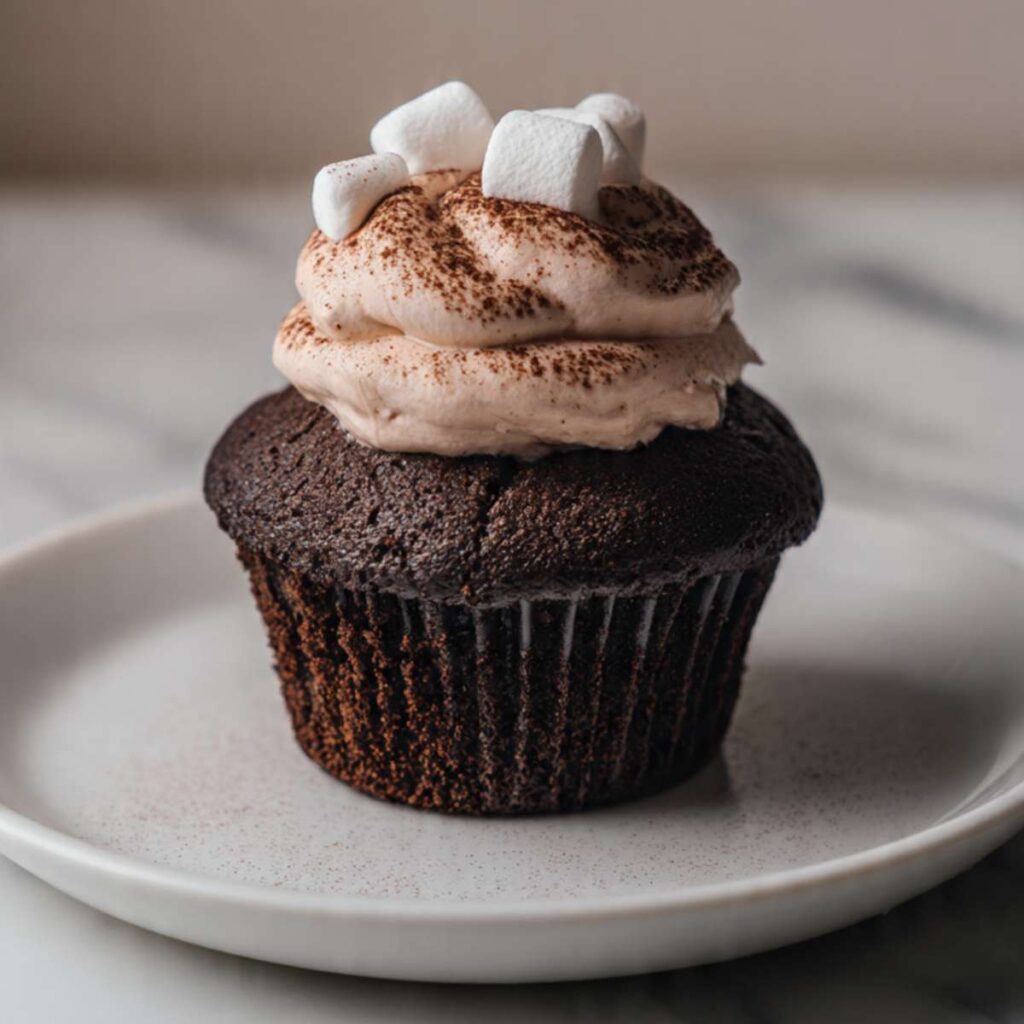
The finishing layer goes on in three stages: a dusting of Dutch-process cocoa powder directly over the frosting, a thin zigzag of dark chocolate drizzle, then three to four mini marshmallows pressed into the peak.
🗒 Luna’s Note: I bloom the cocoa in hot water before it goes into the batter. The difference in color and depth of flavor is significant enough that I have never skipped it since the first time I tested it. The batter turns nearly black, which is exactly what you want.
No chilling required for the batter. The marshmallow cream filling takes five minutes to make. The whipped cream frosting comes together in under three minutes if your cream is cold. The full recipe from first bowl to piped cupcake is about an hour and fifteen minutes, and twelve cupcakes come out of a single batch.
One important note before you start: these cupcakes are filled, which means you need a piping bag for both the filling and the frosting. A zip-lock bag with a corner snipped off works for the filling. For the frosting, a proper piping bag with a 1M tip is what produces the tall swirl shown in the photos.
| Prep Time | Cook Time | Total Time | Yield | Difficulty |
|---|---|---|---|---|
| 30 min | 18 min | 1 hr 38 min | 12 cupcakes | Intermediate |
| Calories | Fat | Carbs | Sugar | Protein | Sodium |
|---|---|---|---|---|---|
| ~420 kcal | ~24g | ~51g | ~36g | ~5g | ~180mg |
Macros are approximate and will vary based on ingredient brands and serving size.
Ingredients & Tools
For the Chocolate Cupcakes
- 1¼ cups (150g) all-purpose flour (spooned and leveled, not scooped — or weighed at 150g for guaranteed accuracy)
- ¾ cup (150g) plain white granulated cane sugar
- ¼ cup (50g) packed light brown sugar
- ⅓ cup (35g) Dutch-process cocoa powder, checked for freshness — should smell deeply chocolatey when opened, not faint or dusty
- 1 tsp (6g) baking soda, checked for freshness
- ½ tsp (3g) fine sea salt
- 2 large eggs (approximately 50g each without shell), room temperature
- ½ cup (120ml) full-fat buttermilk, room temperature
- ½ cup (120ml) neutral-flavored oil such as vegetable oil or canola oil
- ½ cup (120ml) hot water (just off the boil — approximately 200°F / 93°C)
- 1 tsp (5ml) pure vanilla extract
For the Marshmallow Cream Filling
- ½ cup (120g) marshmallow crème (such as Jet-Puffed Marshmallow Creme — not melted marshmallows, which have a different texture and will not pipe correctly)
- 2 tbsp (28g) unsalted butter, softened to room temperature
- ¼ cup (30g) powdered sugar (also called confectioners sugar or icing sugar), sifted
- ½ tsp (2.5ml) pure vanilla extract
- Pinch of fine sea salt
For the Cocoa Whipped Cream Frosting
- 1½ cups (360ml) heavy whipping cream (36% fat minimum), very cold — straight from the refrigerator
- ¼ cup (30g) powdered sugar (also called confectioners sugar or icing sugar), sifted
- 2 tbsp (12g) Dutch-process cocoa powder, sifted
- ½ tsp (2.5ml) pure vanilla extract
For Garnish
- ¼ cup (40g) mini marshmallows — 3 to 4 per cupcake
- 2 oz (55g) bittersweet chocolate (60–70% cacao), finely chopped, for drizzling — or 3 tbsp semi-sweet chocolate chips (45–55% cacao), such as Ghirardelli
- 1 tbsp (6g) Dutch-process cocoa powder, for dusting
Before You Start
Read this section completely before you begin. These are the steps that determine whether your cupcakes match the photos.
Temperature prep: Pull your eggs and buttermilk from the refrigerator at least 30 minutes before you begin mixing. Cold eggs do not emulsify smoothly into an oil-based batter and can cause the mixture to look broken or separated. Cold buttermilk can shock the batter and prevent even mixing. The butter for the marshmallow filling needs to be fully softened — 60 to 90 minutes at room temperature — press your finger into it and it should indent cleanly without resistance. For the frosting, the opposite is true: your heavy whipping cream must stay in the refrigerator until the exact moment you are ready to whip it. Warm cream will not whip.
Cocoa powder type — this is not optional: This recipe requires Dutch-process cocoa powder, not natural cocoa powder. Dutch-process cocoa has been alkalized, which neutralizes its acidity. It produces a deeper, darker color and a smoother, less bitter flavor — which is what gives these cupcakes their near-black crumb visible in the photos. Natural cocoa powder is acidic and reacts with baking soda differently; substituting it here will produce a lighter-colored, more bitter cupcake that tastes different from the hot chocolate profile this recipe is built around. If your cocoa powder does not say “Dutch-process” or “alkalized” on the label, it is natural cocoa — do not substitute.
Leavening freshness check: Drop ½ tsp (3g) of your baking soda into a small bowl with a splash of hot water and a few drops of white vinegar. It should bubble aggressively within 2 seconds. If it fizzes weakly or not at all, replace the box — expired baking soda produces flat, dense cupcakes with no dome.
Hot water — use it hot: The hot water in this recipe is not a mistake. It blooms the cocoa powder, deepening the color and intensifying the chocolate flavor before the batter even goes into the oven. Use water that is just off the boil — approximately 200°F / 93°C. Water that has cooled below 160°F / 71°C will not bloom the cocoa effectively.
Marshmallow crème — use the jarred product: Jet-Puffed Marshmallow Creme or an equivalent jarred marshmallow crème is required for the filling. Do not substitute melted regular marshmallows — the texture is different, the mixture will be stringy rather than smooth, and it will not pipe cleanly into the cupcake centers.
Flour measuring method: Spoon the flour into your measuring cup using a separate spoon and level it off with a straight edge. Do not scoop the cup directly into the flour bag — scooping packs in 20–30% more flour and will produce dry, dense cupcakes. For guaranteed accuracy, weigh the flour at 150g on a kitchen scale. Gram weight always takes priority over volume in this recipe.
Pan prep: This recipe requires a standard 12-cup muffin tin lined with black paper cupcake liners — the black liners are visible in the photos and are part of the recipe’s visual identity. Standard brown or white liners will produce the same cupcake but will not match the finished look. Fill each liner to exactly two-thirds full — overfilling causes the batter to spill over the edges and under-filling produces flat, sunken tops.
Pan material matters significantly here: a light-colored aluminum muffin tin bakes the most evenly and produces the uniformly domed tops shown in the photos. A dark non-stick muffin tin absorbs more heat and will overbrown the cupcake bottoms and sides before the centers are fully set — if your tin is dark non-stick, reduce the oven temperature by 25°F (15°C) to 325°F (163°C) and begin checking for doneness at 15 minutes rather than 17. A silicone muffin tin produces softer edges and a slightly longer bake time — add 3 to 4 minutes and confirm doneness with the toothpick test.
Oven position: Position your oven rack in the middle of the oven before preheating. Top rack burns the tops of cupcakes before the centers are set. Bottom rack burns the bottoms.
Gram weight priority: For the most consistent results, use a kitchen scale set to grams. The gram weights in this recipe are what I tested with — they are the most reliable way to match my result.
Mixing method: The cupcake batter comes together with a large mixing bowl, a whisk, and a silicone spatula — no electric mixer needed for the batter. The frosting is a different story. Whipping 1½ cups of heavy cream to stiff peaks by hand is genuinely difficult and takes considerably longer than it should — a hand mixer or stand mixer fitted with a whisk attachment is required for the frosting. If you only have a hand mixer, it works perfectly well. If you plan to mix by hand with a whisk, budget an additional 8 to 10 minutes of vigorous whisking and accept that the result may not reach the same peak stiffness as a mixer-whipped frosting.
Necessary Tools
Required:
- Kitchen scale (strongly recommended — gram weights are more accurate than volume)
- Large mixing bowl
- Medium mixing bowl
- Whisk
- Silicone spatula
- Standard 12-cup muffin tin
- Black paper cupcake liners
- Wire cooling rack
- Piping bag fitted with a Wilton 1M open star tip (for frosting)
- Piping bag fitted with a round tip (Wilton #12) or a zip-lock bag with a corner snipped off (for marshmallow filling)
- Apple corer, cupcake corer, or a small sharp paring knife (for coring the cupcake centers)
- Fine mesh sieve or small sifter (for cocoa dusting)
- Small heatproof bowl (for melting chocolate drizzle)
- Instant-read thermometer (optional but recommended for checking cupcake doneness)
Optional:
- Oven thermometer (recommended — most ovens run 15–25°F off)
- Hand mixer or stand mixer with whisk attachment — strongly recommended for the frosting, not truly optional. Whipping 1½ cups of heavy cream to stiff peaks by hand requires 8 to 10 minutes of vigorous continuous whisking and the result rarely reaches the same peak stiffness as a mixer-whipped frosting. If you do not have either, the frosting can be made by hand — but be prepared for a significant physical effort and a slightly softer swirl than shown in the photos.
How to Make Hot Chocolate Cupcakes
Step 1: Preheating the Oven and Preparing the Pan
This recipe uses a one-bowl wet-into-dry method for the batter — no creaming, no electric mixer, no alternating additions. The wet ingredients combine first, the dry ingredients go in second, and the bloomed cocoa liquid goes in last. The sequence matters because this batter is thinner than a creamed-butter cupcake batter and comes together quickly — having the pan ready before you begin mixing is not optional.
Position your oven rack in the middle of the oven. Heat your oven to 350°F (175°C) — if you have an oven thermometer, confirm the actual temperature before the pan goes in. My oven runs 15°F hot, which means I set mine to 335°F. A 15°F difference at this stage is the difference between a domed cupcake and a peaked, cracked one. Line your standard 12-cup muffin tin with black paper cupcake liners — press each liner down firmly so it sits flat against the cup walls with no air pocket underneath. The black paper liner is visible in every cupcake photo — it is the exact liner used in testing and it is what produces the sharp contrast between the near-black sponge and the serving surface.
⚠️ Do not line the tin with foil or grease the cups directly — foil creates uneven heat transfer and greased cups without liners make the cupcakes difficult to remove cleanly. The paper liner is the correct preparation for this recipe.
The tin should be fully lined and sitting on your counter before you begin mixing — once this batter comes together it goes straight into the pan.
With the oven heating, gather all your measured ingredients before you start Step 2.
Step 2: Blooming the Cocoa Powder in Hot Water
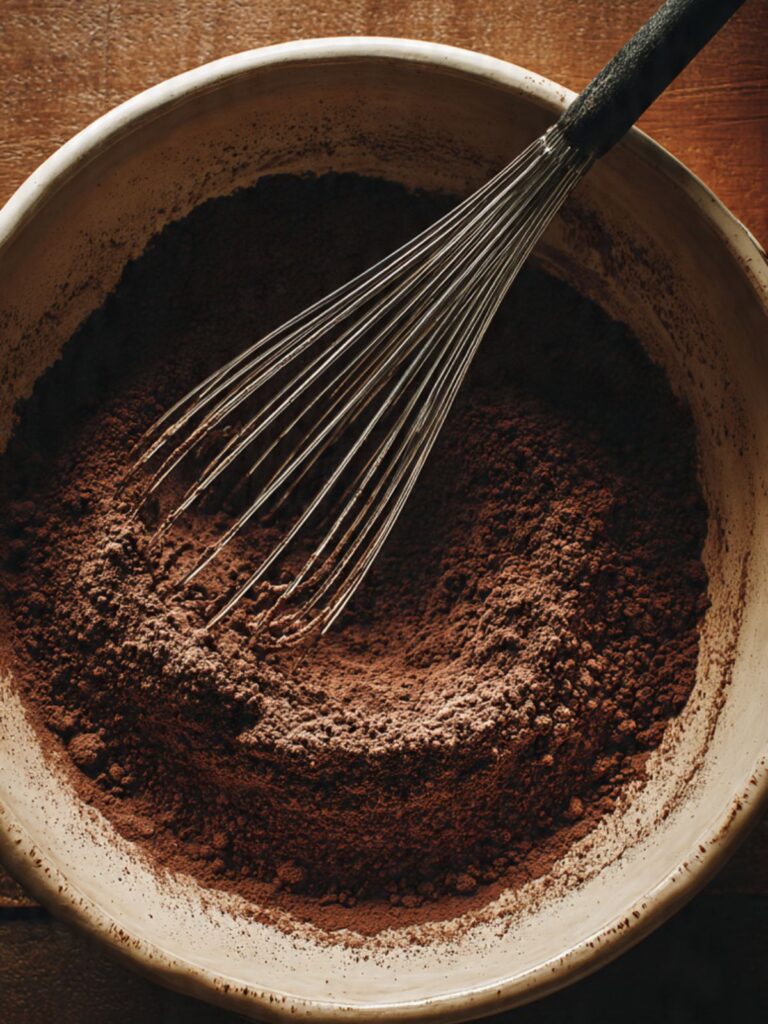
In a small heatproof bowl or liquid measuring cup, combine your ⅓ cup (35g) Dutch-process cocoa powder with your ½ cup (120ml) hot water (just off the boil — approximately 200°F / 93°C). Whisk immediately and vigorously until the cocoa is completely dissolved and the mixture looks like a smooth, very dark liquid with no dry streaks or lumps remaining. The mixture will be thin — this is correct.

Set it aside and let it cool for 5 minutes while you prepare the rest of the batter. Do not skip this step or combine the hot cocoa mixture with the eggs before it has cooled slightly — adding near-boiling liquid directly to eggs scrambles them.
The bloomed cocoa mixture should look like a deep, near-black liquid — almost like very dark espresso. If it still looks brown rather than nearly black, your cocoa powder may be past its freshness. The darker this mixture, the darker and more intensely flavored your finished cupcake.
🗒 Luna’s Note: I use a liquid measuring cup for the bloom so I can pour it directly into the batter without transferring to another bowl. One less thing to wash, and the pour is controlled.
The bloomed cocoa is resting — move directly to the dry ingredients while it cools.
Step 3: Combining the Dry Ingredients
In your large mixing bowl, add your 1¼ cups (150g) all-purpose flour (spooned and leveled), ¾ cup (150g) plain white granulated cane sugar, ¼ cup (50g) packed light brown sugar, 1 tsp (6g) baking soda, checked for freshness, and ½ tsp (3g) fine sea salt. Whisk everything together for 20 full seconds until the mixture looks uniform with no visible streaks of any single ingredient.
The baking soda in this recipe reacts with the acidity in the buttermilk to create lift — it is what produces the domed, evenly risen top visible on every cupcake in the photos. Even distribution in this step ensures that lift is consistent across all twelve cupcakes.
The dry mixture should look uniformly dark brown and feel light and powdery when you run the whisk through it. Any visible lumps of brown sugar should be broken up — press them against the side of the bowl with your fingers before moving on.
⚠️ Do not substitute natural cocoa powder for the Dutch-process cocoa in this batter — natural cocoa is acidic and will react unpredictably with the baking soda, producing a different rise and a noticeably more bitter flavor than the hot chocolate profile shown in the photos.
The dry mixture is ready — pour the wet ingredients in next and begin the fold.
Step 4: Mixing the Wet Ingredients Into a Smooth Batter
In your medium mixing bowl, add your 2 large eggs (approximately 50g each without shell), room temperature, ½ cup (120ml) full-fat buttermilk, room temperature, ½ cup (120ml) neutral-flavored oil such as vegetable or canola oil, and 1 tsp (5ml) pure vanilla extract. Whisk together for 15 to 20 seconds until the mixture looks smooth, glossy, and fully combined — the oil and buttermilk should be emulsified into one cohesive liquid with no separation visible.
The oil in this recipe is intentional — unlike butter, oil stays liquid at room temperature and keeps the cupcake crumb moist for days rather than firming up as it cools. This is what gives the cross-section in the photo its dense, fudgy appearance rather than the drier crumb you get from an all-butter cake. The buttermilk contributes additional moisture and a slight tang that balances the sweetness of the marshmallow filling — full-fat buttermilk adds richness that low-fat versions cannot replicate.
Now pour the wet ingredient mixture into the large bowl of dry ingredients. Using your silicone spatula, fold slowly from the bottom of the bowl upward — wide, deliberate strokes — until the batter is mostly combined. Then pour in your bloomed cocoa mixture, which should now be slightly cooled. Fold again, continuing the same slow strokes from the bottom up, until the batter is completely smooth and no dry flour streaks remain. Count approximately 20 strokes from the moment the cocoa liquid goes in — stop at this point even if a few tiny streaks remain. They will incorporate as the batter rests.
The finished batter should look very dark — nearly black — and flow smoothly off the spatula in a thick, continuous ribbon. It will be thinner than a standard cupcake batter. This is correct. The hot water bloom produces a looser batter that bakes into an exceptionally moist crumb. The near-black color here is exactly what you will see in the finished cupcake cross-section in the photo.
⚠️ Do not overmix after the flour goes in — the crumb will develop tunnels running through the center of each cupcake and the tops will peak sharply rather than dome gently, exactly as shown in the hero photo.
The batter is complete — move to the pan immediately and portion before the leavening begins to activate.
Step 5: Filling the Pan and Baking to a Moist, Domed Finish
Using a medium cookie scoop or a ¼-cup (60ml) measuring cup, portion the batter evenly into the twelve lined cups. For the most consistent result, weigh the first portioned cup on your kitchen scale — it should read approximately 70 to 75g of batter. Use that as your calibration for the remaining eleven cups. This batch yields exactly 12 cupcakes at this portion size — if your total batter weight divided by 12 gives you a number significantly outside this range, check your ingredient measurements before the pan goes into the oven. Each cup should be filled to exactly two-thirds full — this produces the gently domed top visible in the photos. Use a spoon to level any cups that look overfilled. Do not fill beyond two-thirds — the batter will rise and spill over the liner edges, creating uneven cupcakes that stick to the pan.
Place the tin on the middle rack of your preheated 350°F (175°C) oven. Bake for 17 to 19 minutes. Begin checking at 17 minutes.
Doneness cues: the tops should spring back immediately when you press them very lightly with one fingertip — if the indentation stays, they need another minute. A toothpick inserted in the center should come out with a few moist dark crumbs clinging to it — not wet batter, not completely clean. The edges of each cupcake will have pulled very slightly away from the liner walls.
The finished cupcakes should look exactly like the group shot — uniformly domed with a set, slightly matte surface and a very dark, near-black color. The tops will not be shiny. If your tops look peaked and cracked rather than smoothly domed, your oven was too hot or the cups were overfilled.
⚠️ Do not open the oven door before 15 minutes — the sudden temperature drop will cause the centers to sink before the structure has set. A sunken center cannot be fixed after baking.
Remove the tin from the oven and place it on a wire cooling rack. Leave the cupcakes in the tin for exactly 5 minutes — during this time, carryover heat from the pan is finishing the bake and the structure is setting. After 5 minutes, lift each cupcake out of the tin by its liner and transfer directly to the wire rack. Cool completely to room temperature before filling or frosting — approximately 45 minutes to 1 hour. Frosting a warm cupcake will melt the whipped cream immediately.
The cupcakes are cooling on the rack now — use this window to begin measuring the marshmallow filling ingredients.
Step 6: Making the Marshmallow Cream Filling
While the cupcakes cool, make the marshmallow filling. In your medium mixing bowl, combine your 2 tbsp (28g) unsalted butter, softened to room temperature and ½ cup (120g) marshmallow crème. Using a hand mixer on medium speed or a sturdy silicone spatula, beat or stir together until the mixture looks smooth and evenly combined — approximately 1 minute with a mixer, 2 to 3 minutes by hand.
Add your ¼ cup (30g) powdered sugar (sifted), ½ tsp (2.5ml) pure vanilla extract, and a pinch of fine sea salt. Mix on low speed or fold by hand until the powdered sugar is fully incorporated and no white streaks remain. The salt is not decoration — it cuts the sweetness of the marshmallow crème and makes the filling taste like the real thing rather than just sugar.
The finished filling should look pale cream-white, glossy, and hold a soft peak for 3 to 4 seconds when you lift the spatula — not liquid, not stiff. If it looks too soft to pipe, refrigerate for 10 minutes to firm slightly.
⚠️ Do not use warm or melted butter in the filling — the mixture will look glossy and smooth in the bowl but will be too soft to hold its shape in the cupcake cavity. The filling will pool at the bottom of the cored hole rather than staying centered, and you will see it oozing out around the plug when you try to press it down.
Transfer the filling to a piping bag fitted with a round tip (Wilton #12) or a zip-lock bag with one corner snipped to approximately ½ inch (1.2cm).
🗒 Luna’s Note: I make the filling first so it has time to firm up in the piping bag while the cupcakes finish cooling. By the time I am ready to fill, the consistency is exactly right — it pipes cleanly without oozing.
The filling is ready in the piping bag — the cupcakes need to be fully cool before you core them, so press your palm to the bottom of a liner and confirm no warmth remains before moving to Step 7.
Step 7: Coring and Filling Each Cupcake
Once the cupcakes are completely cool to the touch, core the center of each one. Use an apple corer, a cupcake corer, or a small sharp paring knife to remove a cylinder of cake approximately ¾ inch (2cm) wide and 1 inch (2.5cm) deep from the center of each cupcake. Do not go all the way to the bottom — leave at least ½ inch (1.2cm) of cake at the base so the filling has a floor to sit on. Set the removed cake cylinders aside — you will use the tops as plugs.
Insert the piping tip into each cored cavity and squeeze gently, filling the cavity until the filling is level with the top of the cupcake surface. Do not overfill — the filling should be flush with the cupcake top, not mounding above it. Press the top of each removed cake cylinder back over the filling to seal it. Press gently — the plug does not need to be perfect because the frosting will cover it completely. Run your fingertip across each plug to confirm it sits flush with the cupcake surface — any plug that sits proud will create a bump under the frosting that throws the piped swirl off-center.
When you look at the top of the cupcake after plugging, you should see a faint circular seam where the plug meets the cake — this is correct and expected. The filling is fully enclosed beneath. The cross-section in the bite photo shows exactly what the filled interior looks like when the cupcake is broken open — the cream fans outward from the center cavity in a pale, smooth layer against the dark crumb.
⚠️ Do not fill warm cupcakes — the filling will melt and pool at the bottom of the cavity rather than holding its shape. If the cupcakes feel even slightly warm when you press your palm to the bottom of the liner, wait another 15 minutes before coring.
Every cupcake is filled and plugged — make the frosting now while the filling firms under the plugs.
Step 8: Making the Cocoa Whipped Cream Frosting
Remove your 1½ cups (360ml) heavy whipping cream (36% fat minimum) from the refrigerator immediately before this step. Cold cream is non-negotiable — cream that has warmed even slightly above refrigerator temperature will not whip to stiff peaks and the frosting will collapse within minutes of piping.
In the bowl of your stand mixer fitted with the whisk attachment, or in a large mixing bowl using a hand mixer, combine the cold heavy whipping cream, ¼ cup (30g) powdered sugar (sifted), 2 tbsp (12g) Dutch-process cocoa powder (sifted), and ½ tsp (2.5ml) pure vanilla extract. Begin on low speed for 30 seconds to prevent the cocoa and powdered sugar from puffing out of the bowl, then increase to medium-high speed (speed 8 on a KitchenAid).
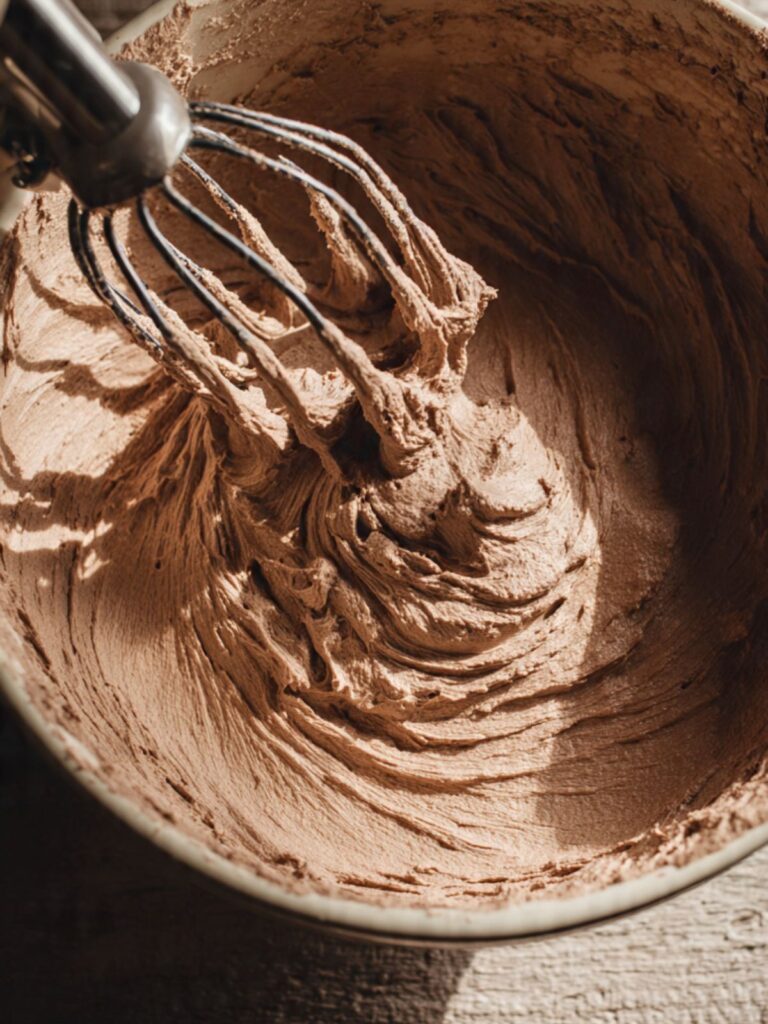
Whip for 2 to 3 minutes, watching closely. The cream will progress through three visible stages: thin and liquid, then soft and billowy with visible ridges, then thick and holding stiff peaks. Stop the moment the frosting holds a firm, defined peak when you lift the whisk — the peak should stand straight up with just the very tip curling over. This is the piping consistency. Do not go past this point — overwhipped cream looks grainy and curdled and cannot be piped smoothly.
The aeration created during whipping is what gives this frosting its light, almost cloud-like quality visible in the tall swirled peaks in the photos. The powdered sugar stabilizes the whipped cream so it holds its structure for several hours without weeping or deflating.
The finished frosting should look a warm mocha-tan color — like milky hot chocolate — and hold a stiff, defined peak for 5 full seconds when you lift the whisk. The warm mocha-tan color of the frosting at this stage is exactly what is visible in the hero photos — if your frosting looks pale beige rather than mocha-toned, the cocoa was not fully incorporated. Stop the mixer, sift in an additional 1 tsp of Dutch-process cocoa, and whip for 15 more seconds.
⚠️ If the frosting looks curdled or grainy with visible lumps of fat separating from liquid, you have overwhipped past stiff peaks into butter. This cannot be fixed. Discard and start with fresh cold cream pulled straight from the refrigerator.
Transfer the frosting immediately to a large piping bag fitted with a Wilton 1M open star tip.
The frosting is in the piping bag — pipe all twelve cupcakes before touching the garnish.
Step 9: Piping the Frosting and Adding the Three-Layer Garnish
Hold the piping bag perpendicular to the cupcake top, tip approximately ½ inch (1.2cm) above the surface and centered over the filled plug. Apply steady, even pressure and pipe in a tight spiral from the outside edge inward and upward, finishing with a pull-up at the center to create the tall peak visible in the photos. Each cupcake takes approximately 3 to 4 seconds of continuous piping pressure. Pipe all twelve cupcakes before moving to the garnish — getting the piping consistent across the full batch is easier when you do it in one continuous pass.
Once all twelve cupcakes are frosted, apply the garnish in three stages — the order is not aesthetic, it is structural:
Stage 1 — Cocoa dusting: Place your 1 tbsp (6g) Dutch-process cocoa powder in a fine mesh sieve. Hold the sieve approximately 6 inches (15cm) above the frosted cupcakes and tap gently to dust a light, even layer over the frosting surface. The cocoa settles into the ridges of the swirl, creating the streaked two-tone effect visible on the frosting in the photos. Apply the cocoa dusting before the drizzle — cocoa applied after the drizzle sits on top of the drizzle lines and looks patchy. Applied first, the drizzle then sits on top of the cocoa layer, creating the clean contrast visible in every photo.
Stage 2 — Chocolate drizzle: Melt your 2 oz (55g) finely chopped bittersweet chocolate (60–70% cacao) in a small heatproof bowl set over a pan of barely simmering water, stirring until smooth. Alternatively, microwave in 20-second bursts, stirring between each, until just melted. Let the melted chocolate cool for 2 minutes until slightly thickened — it should flow in a thin, controlled stream rather than running freely. Using a spoon or a small piping bag, drizzle in a thin zigzag pattern across the top of each cupcake from edge to edge. The drizzle lines should be fine and irregular — not thick, not uniform.
Stage 3 — Mini marshmallows: Immediately press 3 to 4 mini marshmallows into the peak of each cupcake while the chocolate drizzle is still slightly tacky. The marshmallows should sit nestled at the very top of the frosting peak, partially resting against each other.
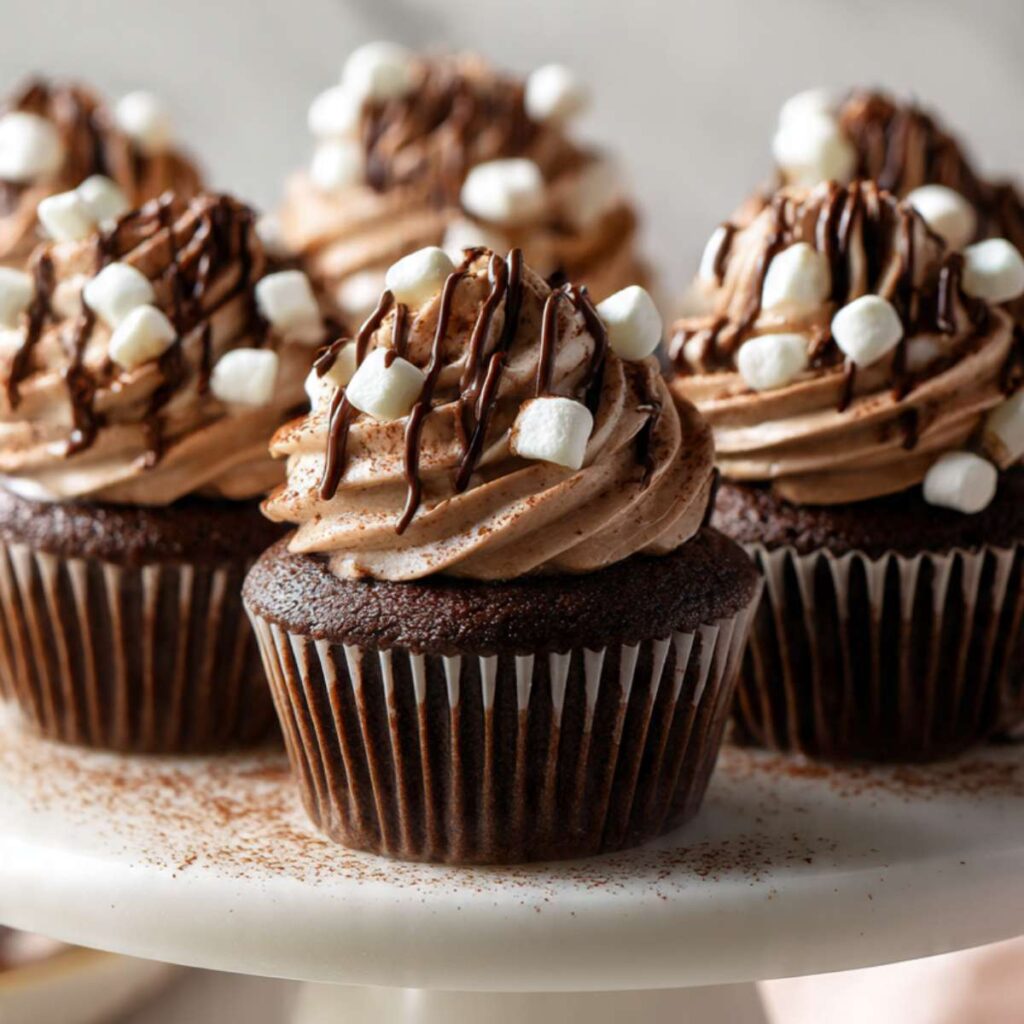
The finished cupcakes should look exactly like the hero photo — a tall mocha-tan frosting swirl with fine cocoa-streaked ridges, a thin dark chocolate zigzag drizzle, and a cluster of white mini marshmallows at the peak. Any loose mini marshmallows can be scattered on the serving surface around the cupcakes for styling, exactly as shown in the photos.
⚠️ Do not apply the marshmallows before the drizzle — they will roll off the dry cocoa-dusted frosting and not adhere to the peak. The slightly tacky chocolate drizzle is what holds them in place. If the drizzle has already set fully before you get the marshmallows on, add a tiny drop of additional melted chocolate to the peak as an adhesive before pressing them in.
🗒 Luna’s Note: I pipe all twelve cupcakes first before touching the garnish. Getting the piping consistent across the full batch is easier when you do it in one continuous pass — stopping to garnish between cupcakes breaks the rhythm and the later ones look different from the earlier ones.
Every cupcake is garnished — let the chocolate drizzle set for 5 minutes before moving them to the serving stand.
The Science Behind Hot Chocolate Cupcakes
Why Blooming the Cocoa in Hot Water Produces a Darker, More Intense Cupcake
The single step that separates a dark, intensely flavored chocolate cupcake from a merely brown one is the hot water bloom. When Dutch-process cocoa powder is combined with near-boiling water before it enters the batter, two things happen simultaneously.
First, the cocoa solids fully dissolve and hydrate — dry cocoa particles that would otherwise remain partially suspended in the batter are broken down into a fully liquid state, which means more surface area in contact with your taste receptors when you eat the finished cupcake.
Second, the heat triggers a mild version of the Maillard reaction in the cocoa solids themselves, deepening both the color and the flavor before baking even begins. This is why the bloomed mixture looks nearly black in the bowl — and why the finished crumb in these cupcakes is so much darker than standard chocolate cupcakes made with cocoa stirred directly into dry ingredients.
The effect is visible in every photo: that near-black crumb is not black cocoa or food coloring. It is what Dutch-process cocoa looks like when it is properly bloomed.
🗒 Luna’s Note: The first time I skipped the bloom to save a step, the cupcakes came out noticeably lighter in color and flatter in flavor. I have not skipped it since. Two minutes of extra work produces a genuinely different result.
Why Oil Instead of Butter Keeps These Cupcakes Moist for Days
Most cupcake recipes use creamed butter as the primary fat. This recipe uses neutral oil instead, and the difference in texture is not subtle. Butter is approximately 80% fat and 20% water — when a butter-based cupcake cools, the fat solidifies and the crumb firms noticeably. Oil is 100% fat and stays liquid at room temperature, which means an oil-based cupcake crumb stays soft and moist from the moment it comes out of the oven through day two and day three without any change in texture.
This is the mechanism behind the dense, fudgy cross-section visible in Image 3 — that interior did not get that way from underbaking. It is what an oil-based chocolate crumb looks like when it is made correctly. The buttermilk in this recipe contributes an additional layer of moisture and a slight tang that balances the sweetness of the marshmallow filling — full-fat buttermilk adds richness that low-fat versions cannot replicate.
If you want to understand why your favorite bakery chocolate cupcake stays moist in the box for two days, this is the answer: they are almost certainly using oil, not butter. For a similar approach applied to a spiced cupcake, the same oil-based method appears in my carrot cake cupcakes.
Why Whipped Cream Frosting Holds Its Peaks Without Collapsing
Whipped cream is aerated fat — specifically, fat globules in heavy cream that cluster around air bubbles when mechanical agitation breaks the membrane surrounding each globule. As whipping continues, the fat globules form a stable network around the trapped air, which is what gives whipped cream its structure. The problem with standard whipped cream is that this network is fragile — warm temperatures, vibration, or time causes the fat globules to release the air and the cream to deflate back into liquid. Two additions in this recipe stabilize the network significantly.
First, the powdered sugar — confectioners sugar contains a small percentage of cornstarch, which absorbs excess moisture from the cream and reinforces the fat network.
Second, the sifted Dutch-process cocoa powder — cocoa butter in the cocoa particles bonds with the fat globules and adds rigidity to the network, which is why a cocoa whipped cream holds its peaks longer than plain whipped cream at the same temperature.
This is the science behind the tall, defined swirl visible in the hero photos — that frosting held its shape through the full photo session and continued to hold for several hours at room temperature. The key variable is cream temperature: fat globules that are too warm are too soft to form a stable network, which is why the cream must stay refrigerator-cold until the exact moment of whipping.
Hot Chocolate Cupcakes Troubleshooting & Pro-Tips
The Cupcakes Baked Up Brown Instead of Near-Black and the Flavor Is Sharper Than Expected
Symptom: The finished cupcakes look noticeably brown rather than near-black, the flavor is sharper and more bitter than a hot chocolate profile, and the crumb may look slightly different in texture from the photos.
Cause: Natural cocoa powder was used instead of Dutch-process cocoa powder. Natural cocoa is acidic — it reacts with baking soda differently than Dutch-process does, producing a lighter color, a more aggressive bitter edge, and a slightly altered rise. The two cocoas are not interchangeable in this recipe without adjusting the leavening, and even with adjustment, the color and flavor profile will not match what is shown in the photos.
Fix: If you have already baked with natural cocoa, the cupcakes are still edible — the flavor will be different but not wrong. The frosting and marshmallow filling will compensate for some of the bitterness. For future batches, source Dutch-process cocoa powder specifically — Valrhona, Cacao Barry, or King Arthur’s Double-Dutch Dark Cocoa are reliable options available at most grocery stores or online.
Prevention: Check the cocoa powder label before you begin. Dutch-process cocoa will say “Dutch-process,” “alkalized,” or “Dutched” on the label. If it says nothing, assume it is natural cocoa. When in doubt, buy a new container.
The Batter Overflowed the Liner During Baking or the Cupcakes Baked Up Flat and Dense
Symptom: Cupcakes overflow the liner during baking, producing mushroom-shaped tops that hang over the edges — or the opposite: cupcakes bake up flat and dense with no dome and a compressed, heavy crumb.
Cause: A non-standard muffin tin was used — either a jumbo tin, a mini tin, or a tin with shallower cups than standard — or the liners were filled past two-thirds capacity. Jumbo cups underbake at the stated time because the batter mass is too large for the heat to penetrate evenly. Mini cups overbake and dry out within 12 minutes. Overfilled standard cups produce batter that rises and spills over the liner, creating uneven cupcakes that stick to the pan walls. A dark non-stick tin used without reducing the oven temperature will overbrown the sides and bottom before the center sets, producing a dense, compressed crumb rather than the open, moist texture shown in the cross-section photo.
Fix: If the cupcakes have already overflowed, trim the overflow with a sharp knife once cooled — the frosting will cover the evidence. For underbaked jumbo cupcakes, return the tin to the oven for 5-minute increments, checking doneness with a toothpick after each. For overbrowning from a dark tin, reduce the oven temperature by 25°F (15°C) on the next batch and begin checking at 15 minutes.
Prevention: Use a standard 12-cup muffin tin with cups that measure approximately 2¾ inches (7cm) across the top. Fill each liner to exactly two-thirds full — use a medium cookie scoop for consistent portioning and weigh the first cup at 70 to 75g as your calibration. If your tin is dark non-stick, reduce oven temperature to 325°F (163°C) before the pan goes in.
The Tops Sank in the Center After Coming Out of the Oven
Symptom: The tops of the cupcakes sink in the center after coming out of the oven, producing a crater where the dome should be.
Cause: The oven door was opened before 15 minutes, the baking soda was expired or used in insufficient quantity, or the cupcakes were underbaked and removed before the center structure had set. An oven running significantly below 350°F / 175°C produces the same result — the batter sets too slowly and the structure collapses before it can hold.
Fix: A sunken top can be concealed with the marshmallow filling and a generous frosting swirl — the tall frosting peak in this recipe covers a significant amount of surface irregularity. Fill the sunken center with extra marshmallow cream before plugging.
Prevention: Run the baking soda freshness test in Before You Start. Do not open the oven door before the 15-minute mark. Confirm oven temperature with an oven thermometer — if your oven runs more than 15°F low, increase the set temperature accordingly.
The Crumb Has Large Air Tunnels Running Through the Center
Symptom: When you core the cupcake or break one open, you see large irregular air channels running vertically through the crumb rather than a dense, even texture like the cross-section in the bite photo.
Cause: The batter was overmixed after the flour was added. Overmixing develops gluten strands in the flour that trap large air pockets during baking — these expand into tunnels as the cupcake rises. The hot water bloom batter is thinner than standard cupcake batter, which makes overmixing easier to do accidentally because it feels like the batter needs more stirring to come together.
Fix: Tunneled cupcakes are fully baked and edible — the texture is chewier and less fudgy than intended but not unpleasant. Fill and frost as normal.
Prevention: Count your strokes after the bloomed cocoa liquid goes into the batter — stop at 20 strokes even if tiny dry streaks remain. They will hydrate as the batter rests. Switch from a whisk to a silicone spatula for the final folds so you have more control over mixing intensity.
The Frosting Swirls Drooped and Flattened Within Minutes of Piping
Symptom: The frosting looks soft and billowy when freshly whipped but the piped swirls droop and flatten within minutes, losing the tall defined shape shown in the photos.
Cause: The heavy whipping cream was not cold enough when whipping began. Fat globules that are warmer than refrigerator temperature are too soft to form a stable network around the trapped air, which means the structure collapses as soon as piping pressure stops. A bowl or whisk that retained heat from previous use can warm the cream enough to cause this problem.
Fix: If the frosting has already been piped and is drooping, refrigerate the cupcakes immediately for 20 minutes — cold temperature will partially re-firm the fat network and the swirls will recover some structure. The result will not be as defined as freshly piped but it will hold for serving.
Prevention: Chill your mixing bowl and whisk attachment in the freezer for 10 minutes before whipping. Pull the cream from the refrigerator at the exact moment you are ready to whip — not earlier. Whip on medium-high speed and watch the cream closely — stop the moment stiff peaks form.
The Marshmallow Filling Oozed Out Around the Plug After Filling
Symptom: After filling and plugging the cupcakes, the marshmallow cream seeps out from around the plug or pushes the plug upward, creating an uneven surface before frosting.
Cause: The filling was too soft when piped — either the butter was too warm when making the filling, the powdered sugar was not fully incorporated, or the filling was used immediately without any chilling time. The cavity was also overfilled — the filling should be level with the cupcake surface, not mounding above it.
Fix: If the filling has oozed, press the plug back down firmly and refrigerate the cupcakes for 15 minutes before frosting. The filling will firm up enough to stay in place under the frosting.
Prevention: Refrigerate the filling in the piping bag for 10 minutes before use if it feels very soft. Fill each cavity until level with the cupcake surface only — stop before the filling begins to mound above the edge.
The Cupcakes Baked Up Completely Flat With No Dome and No Spring
Symptom: The cupcakes bake up completely flat with a dense, heavy crumb and no spring when pressed — the toothpick comes out wet even after the full bake time.
Cause: The baking soda was expired or the freshness test was skipped. Baking soda loses potency within 3 to 6 months of opening. In this recipe, the baking soda reacts with the acidity in the full-fat buttermilk to create the lift that produces the domed top. Expired baking soda produces no reaction and no dome.
Fix: There is no fix for flat cupcakes once baked — the structure is set. Replace the baking soda and bake a fresh batch.
Prevention: Run the freshness test in Before You Start every time. Drop ½ tsp (3g) baking soda into a small bowl with a splash of hot water and a few drops of white vinegar — it should bubble aggressively within 2 seconds. If it does not, replace the box.
Humidity and Altitude Adjustments
High humidity (above 70% relative humidity): The cocoa whipped cream frosting is especially sensitive to humidity — moisture in the air accelerates weeping and deflation. In humid conditions, add 1 tsp (3g) of cornstarch to the frosting when you add the powdered sugar. Pipe and serve the cupcakes as close together in time as possible — do not pipe them hours ahead if your kitchen is humid. Refrigerate frosted cupcakes until 20 minutes before serving.
High altitude (above 3,500 feet / 1,067 meters): Reduce the baking soda by ¼ tsp (1.5g), increase the flour by 2 tbsp (15g), and increase the oven temperature to 365°F (185°C). Start checking doneness at 15 minutes rather than 17. The whipped cream frosting will whip faster at altitude — watch it more closely and stop as soon as stiff peaks form.
Expert Pro-Tips
Press the marshmallow plug flush before frosting. After filling and plugging each cupcake, run your fingertip across the plug to confirm it sits perfectly level with the cupcake surface. Any plug that sits proud of the surface will create a bump under the frosting that throws the piped swirl off-center. Ten seconds of checking per cupcake saves the entire batch.
Chill the piping bag between cupcakes if your kitchen is warm. Cocoa whipped cream frosting is stable but not immune to heat. If you are piping in a kitchen above 75°F / 24°C, pipe six cupcakes, return the bag to the refrigerator for 5 minutes, then pipe the remaining six. The difference in swirl definition between the first and last cupcake in a warm kitchen is significant.
Dust the cocoa before the drizzle — the order is not aesthetic, it is structural. Cocoa powder applied after the chocolate drizzle sits on top of the drizzle lines and looks patchy. Applied first, it settles into the frosting ridges and the drizzle then sits on top of the cocoa layer, creating the clean two-tone contrast visible in the hero photos. The marshmallows go last so they are not coated in cocoa dust.
How to Store Hot Chocolate Cupcakes
Room Temperature
Once frosted and garnished, these cupcakes can sit at room temperature for up to 2 hours before serving. Beyond 2 hours, the cocoa whipped cream frosting begins to weep slightly at the base and the mini marshmallows start to soften and lose their shape. Do not store frosted cupcakes in a zip-lock bag — the bag walls press against the frosting swirls and flatten them. Do not store them uncovered — the frosting surface will dry and form a skin.
For short-term holding before serving, place the cupcakes on a flat tray with enough space between them that the frosting swirls do not touch, tent loosely with plastic wrap without letting the wrap contact the frosting, and keep in the coolest part of your kitchen away from direct sunlight or heat sources.
Refrigerator
Frosted cupcakes store best in the refrigerator. Place them in a single layer in a hard-sided lidded container large enough that the frosting peaks do not contact the lid — a tall cake carrier or a deep food storage container works well. Do not use a flat-lidded container that forces you to press the lid down onto the swirls. Refrigerate for up to 3 days.
Day one: the frosting swirl holds its full shape, the ridges from piping are defined, and the marshmallow filling is perfectly set inside the crumb — this is the best day to serve them.
Day two: the frosting is still good but the swirl ridges soften slightly at the edges and the peak loses some of its definition — still presentable, still delicious, but noticeably less sharp than day one.
Day three: the frosting has lost most of its piped ridge detail and the peak has flattened — the cupcake is still worth eating but it will not look like the photos. Serve by day two for the best visual result.
The whipped cream frosting will firm slightly in the refrigerator, which is normal — it softens back to its original texture within 15 to 20 minutes at room temperature. The marshmallow filling inside the cupcake holds perfectly under refrigeration through all three days and does not change texture. The chocolate drizzle will set firm in the cold but softens again at room temperature.
Unfrosted cupcakes — if you want to bake ahead — store significantly better than frosted ones. Place cooled, filled, and plugged cupcakes in a lidded hard-sided container lined with a paper towel to absorb any excess moisture. Store at room temperature for up to 2 days or refrigerate for up to 4 days. Frost immediately before serving for the best visual result.
🗒 Luna’s Note: I almost always bake and fill the cupcakes the day before I need them, then make the frosting and pipe them the morning of. The cupcake base is actually slightly more moist on day two — the marshmallow filling has had time to settle into the crumb around the cavity. The frosting is always best freshly piped.
Freezer — Baked
Freeze unfrosted, unfilled cupcakes only — the whipped cream frosting does not freeze well and will separate and weep on thawing. The marshmallow filling freezes acceptably but the texture changes slightly on thawing, becoming marginally more dense.
To freeze the cupcake bases: cool completely to room temperature, wrap each cupcake individually in a layer of plastic wrap, then place in a zip-lock freezer bag or a hard-sided freezer-safe container. Freeze for up to 2 months.
To thaw, remove from the freezer and leave at room temperature, still wrapped, for 1 to 2 hours. Do not microwave to thaw — the crumb will become gummy at the center and the texture will not recover.
Once thawed, if the cupcake base feels slightly firm or dense from the freeze-thaw cycle, place it on a parchment-lined baking sheet and warm at 300°F (150°C) for 6 to 8 minutes — this refreshes the crumb and restores the moist, fudgy texture visible in the cross-section photo. Let it cool completely again before filling and frosting — approximately 30 minutes. Do not microwave to reheat — the crumb turns gummy at the center within seconds and the texture will not recover.
Once the bases are thawed and refreshed, make the marshmallow filling and frosting fresh, fill, plug, and pipe as directed.
Freezer — Unbaked
This batter does not freeze well unbaked — the leavening activates on contact with the wet ingredients and loses potency during freezing. Do not freeze the batter. Freeze baked cupcake bases only, as directed above.
Serving Suggestion
Serve these at room temperature — pull them from the refrigerator 15 to 20 minutes before serving so the frosting softens back to its airy, cloud-like texture and the marshmallow filling loosens slightly from the cold. I serve these on a white pedestal cake stand exactly as shown in the photos, with a small scatter of extra mini marshmallows on the stand surface and a light additional dusting of cocoa powder around the base. The occasion I reach for this recipe is a cold-weather dinner party dessert — something that looks impressive enough to warrant a dedicated serving moment but does not require the assembly complexity of a layer cake. A mug of actual hot chocolate alongside each cupcake is not a bad idea either.
Frequently Asked Questions About Hot Chocolate Cupcakes
Can I make hot chocolate cupcakes ahead of time?
Yes — the cupcake bases bake and fill up to 2 days ahead. Bake, cool, core, fill with the marshmallow cream, plug, and store unfrosted in a hard-sided lidded container at room temperature for up to 2 days or refrigerated for up to 4 days. Make the cocoa whipped cream frosting fresh on the day you plan to serve — it does not hold well when piped ahead and refrigerated, as it weeps and loses its peak structure within a few hours. Pipe and garnish immediately before serving.
Can I use natural cocoa powder instead of Dutch-process?
Natural cocoa powder is not a reliable substitute here — the result will look and taste noticeably different. Dutch-process cocoa is alkalized, which produces the near-black color and smooth hot chocolate flavor visible in the photos. Natural cocoa is acidic, which means it reacts with baking soda differently and produces a lighter brown, sharper-tasting cupcake. If Dutch-process is genuinely unavailable, combine ¼ cup (25g) natural cocoa with an extra ½ tsp (2g) baking powder added to the dry ingredients — this partially compensates but the color and flavor will not fully match. For a recipe built around natural cocoa’s flavor profile, my peppermint mocha cupcakes use that approach specifically.
How do I get domed cupcake tops?
Domed cupcake tops come from three variables working together: the correct fill level, a fully preheated oven, and fresh leavening. Fill each liner to exactly two-thirds full — underfilling produces flat tops because there is not enough batter mass to dome upward, and overfilling causes the batter to spill over the liner edge before it can dome. A fully preheated oven at 350°F / 175°C sets the edges of the cupcake quickly, which forces the center to rise upward rather than spreading outward. Expired baking soda produces no dome regardless of fill level or oven temperature — run the freshness test every time. The middle oven rack position is also non-negotiable for this recipe: top rack heat browns the surface before the interior rises, and bottom rack heat sets the base too quickly.
Why did my whipped cream frosting turn grainy and lumpy?
Grainy, lumpy whipped cream frosting means the cream was overwhipped past stiff peaks into the early stages of butter. Once the fat globules have fully coalesced and begun to separate from the liquid, the emulsification that gives whipped cream its smooth structure has broken — and this cannot be reversed. The transition from perfect stiff peaks to overwhipped happens in under 30 seconds at medium-high speed, which is why watching the cream closely in the final stage is more reliable than setting a timer. If your frosting has turned grainy, discard it and start fresh with cold cream straight from the refrigerator. To prevent it: stop the mixer the moment the frosting holds a firm, defined peak that stands straight up with just the very tip curling over — this is the exact piping consistency you need for the swirl shown in the photos.
Can I substitute the marshmallow crème filling with something else?
Yes — a ganache center works beautifully and is less sweet than the marshmallow version. Heat ¼ cup (60ml) heavy whipping cream (36% fat minimum) until just simmering, pour over 2 oz (55g) finely chopped bittersweet chocolate (60–70% cacao), let sit 2 minutes, then stir smooth. Cool at room temperature until pipeable — approximately 30 minutes — before filling. The ganache center is richer and less sweet than the marshmallow crème and pairs well with the cocoa whipped cream frosting. For the full filled cupcake technique with a ganache center, my raspberry chocolate lava cupcakes covers that method in detail.
Can I double hot chocolate cupcakes recipe?
Yes — this recipe doubles reliably with one important adjustment. Multiply all ingredients by 2 except the baking soda — use only 1½ tsp (9g) rather than the full double amount of 2 tsp (12g), or the cupcakes will taste faintly soapy and the dome will overcorrect and collapse. Bake in two separate standard 12-cup muffin tins and keep them on the same middle rack if they fit side by side — do not stack tins on different racks. Make the whipped cream frosting in two separate batches rather than one doubled batch, as doubling the cream volume exceeds most stand mixer bowl capacities.
How do high altitude and humidity affect these cupcakes?
At high altitude (above 3,500 feet / 1,067 meters), reduce the baking soda by ¼ tsp (1.5g), increase the flour by 2 tbsp (15g), and raise the oven temperature to 365°F (185°C) — begin checking doneness at 15 minutes. The whipped cream frosting whips faster at altitude due to lower atmospheric pressure, so watch it closely and stop the moment stiff peaks form. In high humidity (above 70% relative humidity), add 1 tsp (3g) of cornstarch to the frosting along with the powdered sugar for stability, and refrigerate frosted cupcakes until 20 minutes before serving — the cocoa whipped cream is the most humidity-sensitive component in this recipe.
More Cupcakes You’ll Love
- Snickerdoodle Cupcakes — a cinnamon-spiced cupcake with a soft, pillowy crumb and cinnamon buttercream frosting that tastes exactly like the cookie it is named after
- Cookie Dough Cupcakes — vanilla cupcakes filled with edible chocolate chip cookie dough and topped with a generous swirl of brown butter frosting
Hot Chocolate Cupcakes
Ingredients
Equipment
Method
- Position oven rack in the middle of the oven and preheat to 350°F (175°C), then line a standard 12-cup muffin tin with black paper cupcake liners and set aside.
- In a small heatproof bowl, whisk together the ⅓ cup (35g) Dutch-process cocoa powder and ½ cup (120ml) hot water until fully dissolved and smooth, then set aside to cool for 5 minutes.
- In a large mixing bowl, whisk together the flour, granulated sugar, brown sugar, baking soda, and fine sea salt for 20 full seconds until uniformly combined with no dry streaks.
- In a medium mixing bowl, whisk together the eggs, buttermilk, oil, and vanilla extract for 15 to 20 seconds until smooth, glossy, and fully emulsified with no separation visible.
- Pour the wet ingredients into the dry ingredients and fold with a silicone spatula using slow strokes from the bottom of the bowl upward until mostly combined, then pour in the cooled bloomed cocoa mixture and fold again for approximately 20 strokes until the batter is smooth and nearly black with no dry flour streaks remaining.
- Using a medium cookie scoop or ¼-cup measuring cup, portion the batter evenly into the twelve lined cups to exactly two-thirds full, then bake for 17 to 19 minutes until the tops spring back when lightly pressed and a toothpick inserted in the center comes out with a few moist dark crumbs.
- Leave the cupcakes in the tin on a wire rack for exactly 5 minutes, then lift each cupcake out by its liner and transfer to the wire rack to cool completely to room temperature — approximately 45 minutes to 1 hour — before filling or frosting.
- Make the marshmallow filling: beat the softened butter and marshmallow crème together until smooth, then add the sifted powdered sugar, vanilla extract, and pinch of salt and mix until fully combined and the filling holds a soft peak — refrigerate in the piping bag for 10 minutes if it feels too soft to pipe.
- Core the center of each cooled cupcake to approximately ¾ inch (2cm) wide and 1 inch (2.5cm) deep using an apple corer or small paring knife, then pipe the marshmallow filling into each cavity until level with the cupcake surface and press the top of the removed cake plug back over the filling to seal.
- Make the cocoa whipped cream frosting: combine the cold heavy whipping cream, sifted powdered sugar, sifted Dutch-process cocoa powder, and vanilla extract in a chilled mixing bowl and whip on medium-high speed for 2 to 3 minutes until stiff peaks form — stop immediately when the frosting holds a firm defined peak with just the very tip curling over.
- Transfer the frosting to a large piping bag fitted with a Wilton 1M open star tip and pipe a tall spiral swirl onto each cupcake, starting from the outer edge and working inward and upward, finishing with a pull-up at the center peak.
- Dust the frosted cupcakes with Dutch-process cocoa powder through a fine mesh sieve, drizzle with thin zigzag lines of melted bittersweet chocolate, then immediately press 3 to 4 mini marshmallows into the peak of each cupcake while the drizzle is still slightly tacky.