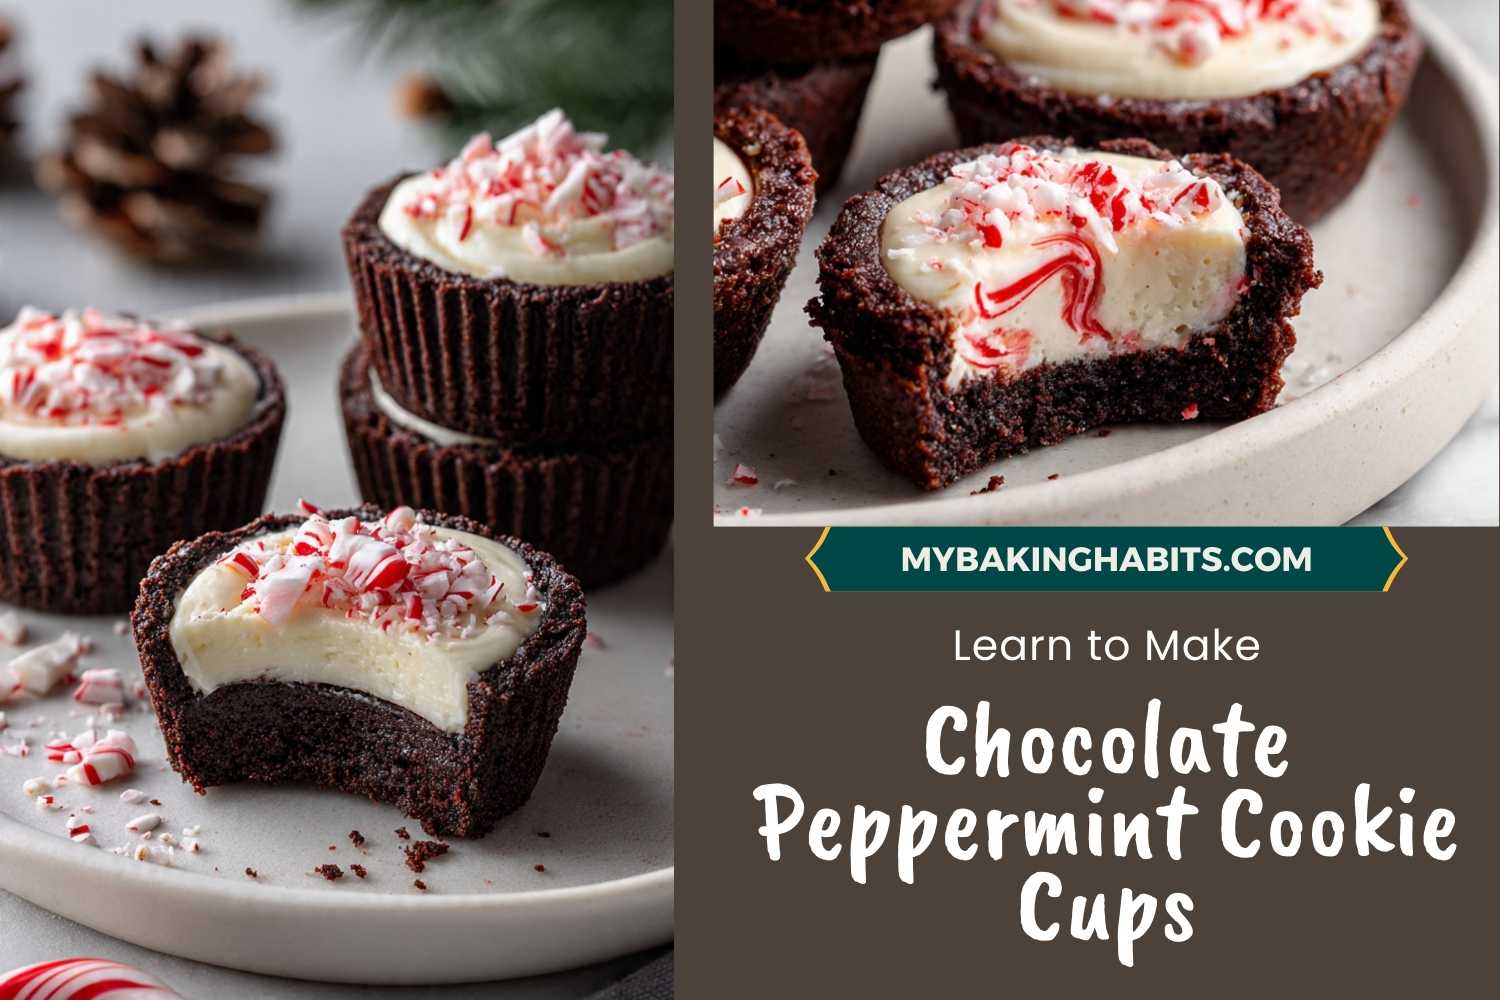
Chocolate Peppermint Cookie Cups
The version that worked came from the batch I almost threw away.
I had been making these with a standard brownie batter poured into muffin cups and baked fully — domed, firm, and impossible to fill without carving into them with a spoon, which is exactly as messy as it sounds. The fourth batch I pressed the centers down while they were still hot, before I had a plan for it. The cup that formed was perfect. I had been solving the wrong problem for three batches.
I have made these chocolate peppermint cookie cups fifteen times across two holiday seasons. I tested two cocoa types back to back — natural cocoa and Dutch-process — across six batches. The color difference alone is enough to justify sourcing the right one: natural cocoa produced a brown cup; Dutch-process produced the near-black wall you see in the photos. The flavor difference was equally significant. Dutch-process is in the recipe. I also tested peppermint extract quantities across four fillings — ¼ teaspoon, ½ teaspoon, ¾ teaspoon, and 1 teaspoon. Half a teaspoon is the amount that reads as peppermint without reading as toothpaste. That is the amount in this recipe.
🗒 Luna’s Note: I started making these because I wanted something holiday-specific that was not a rolled cookie. The muffin tin does all the shaping work for you — no cutters, no piping bags, no chilling and re-rolling. That was the point. I keep this recipe in rotation every December.
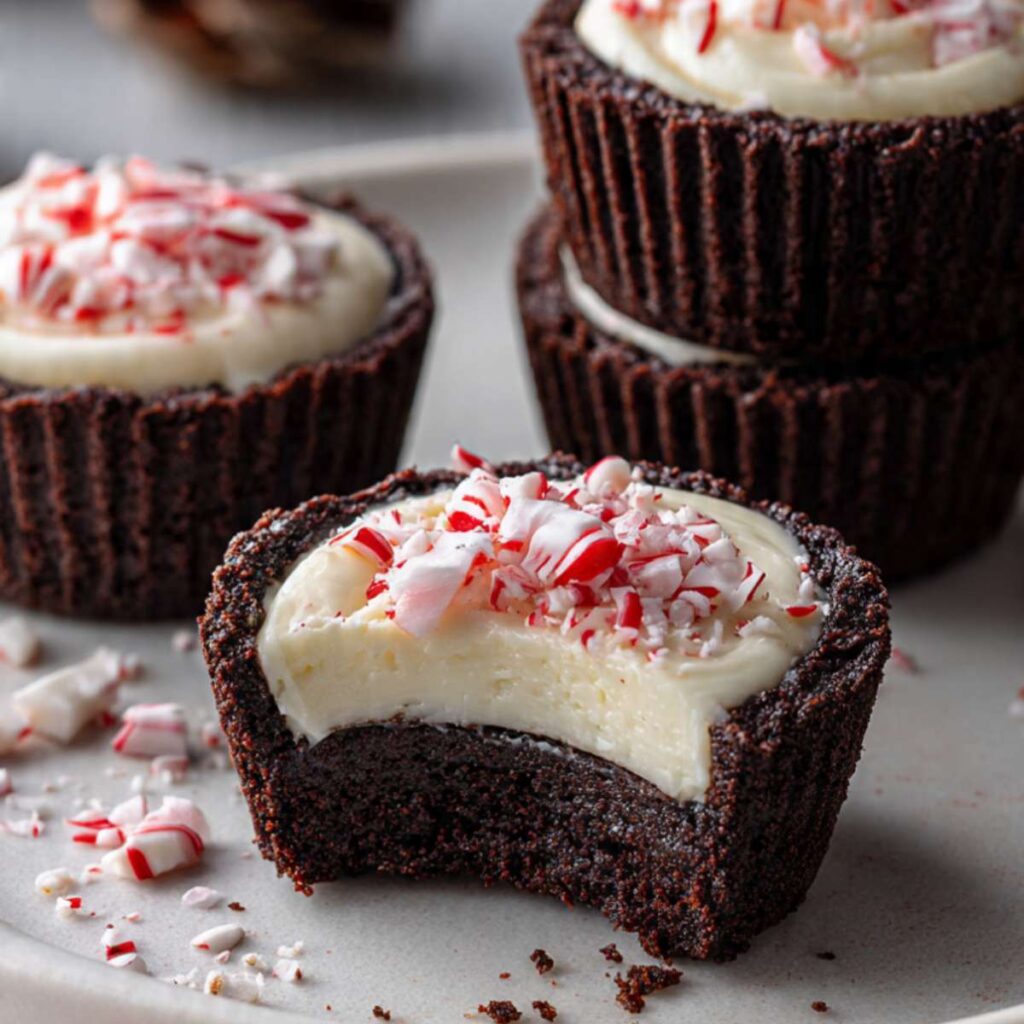
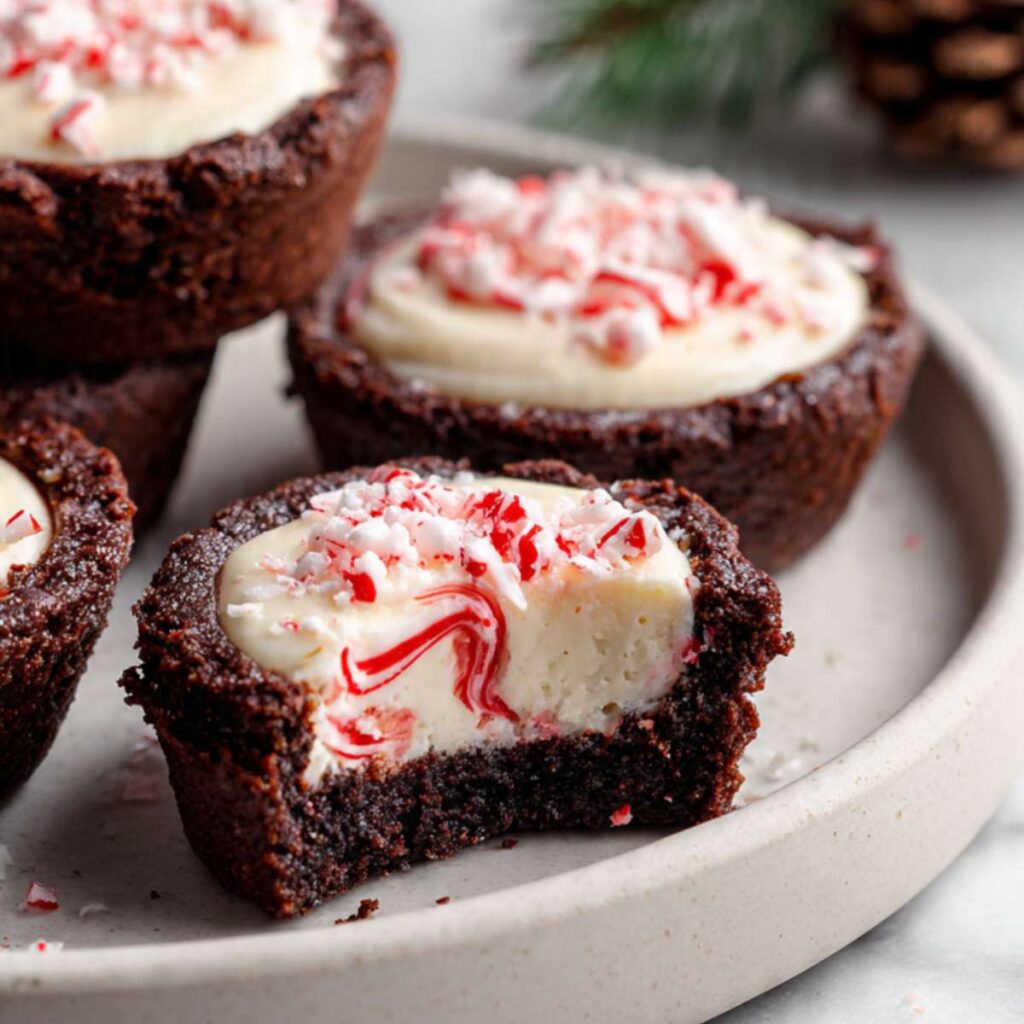
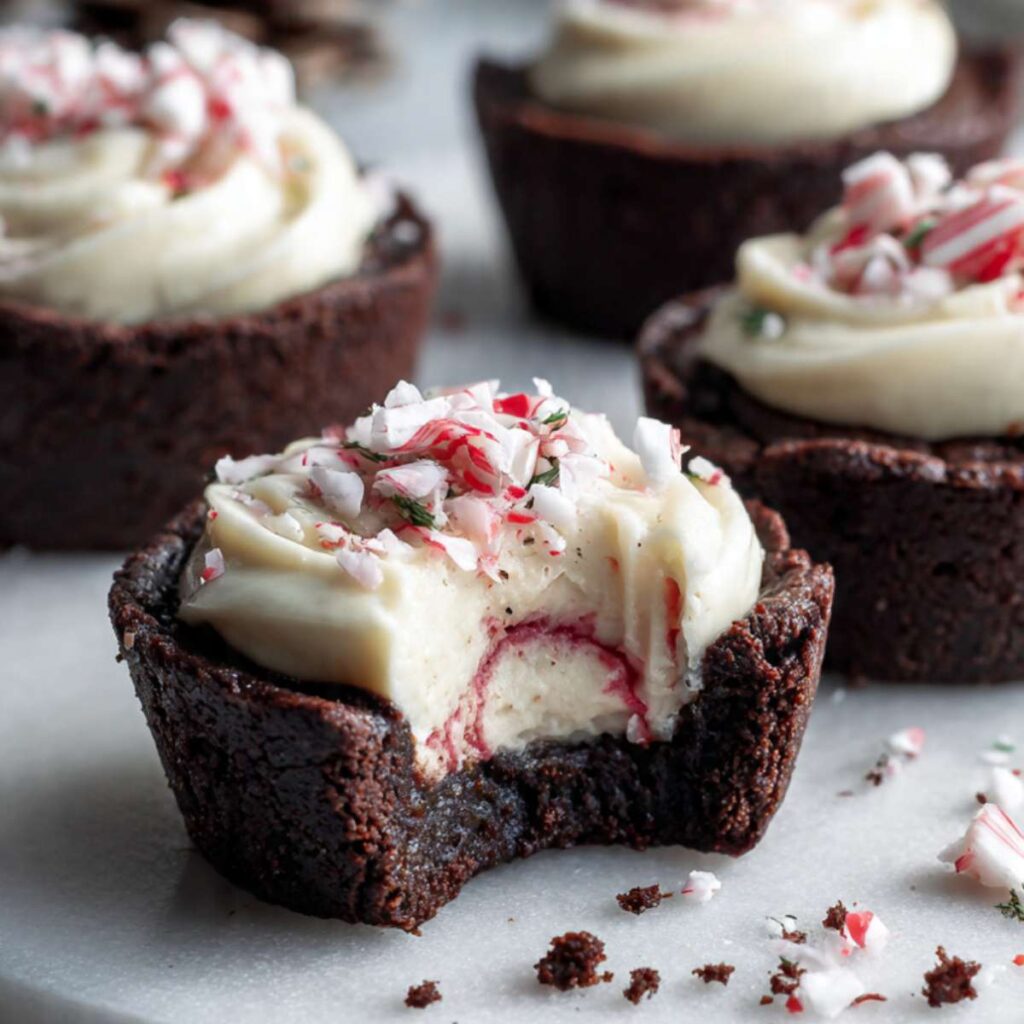
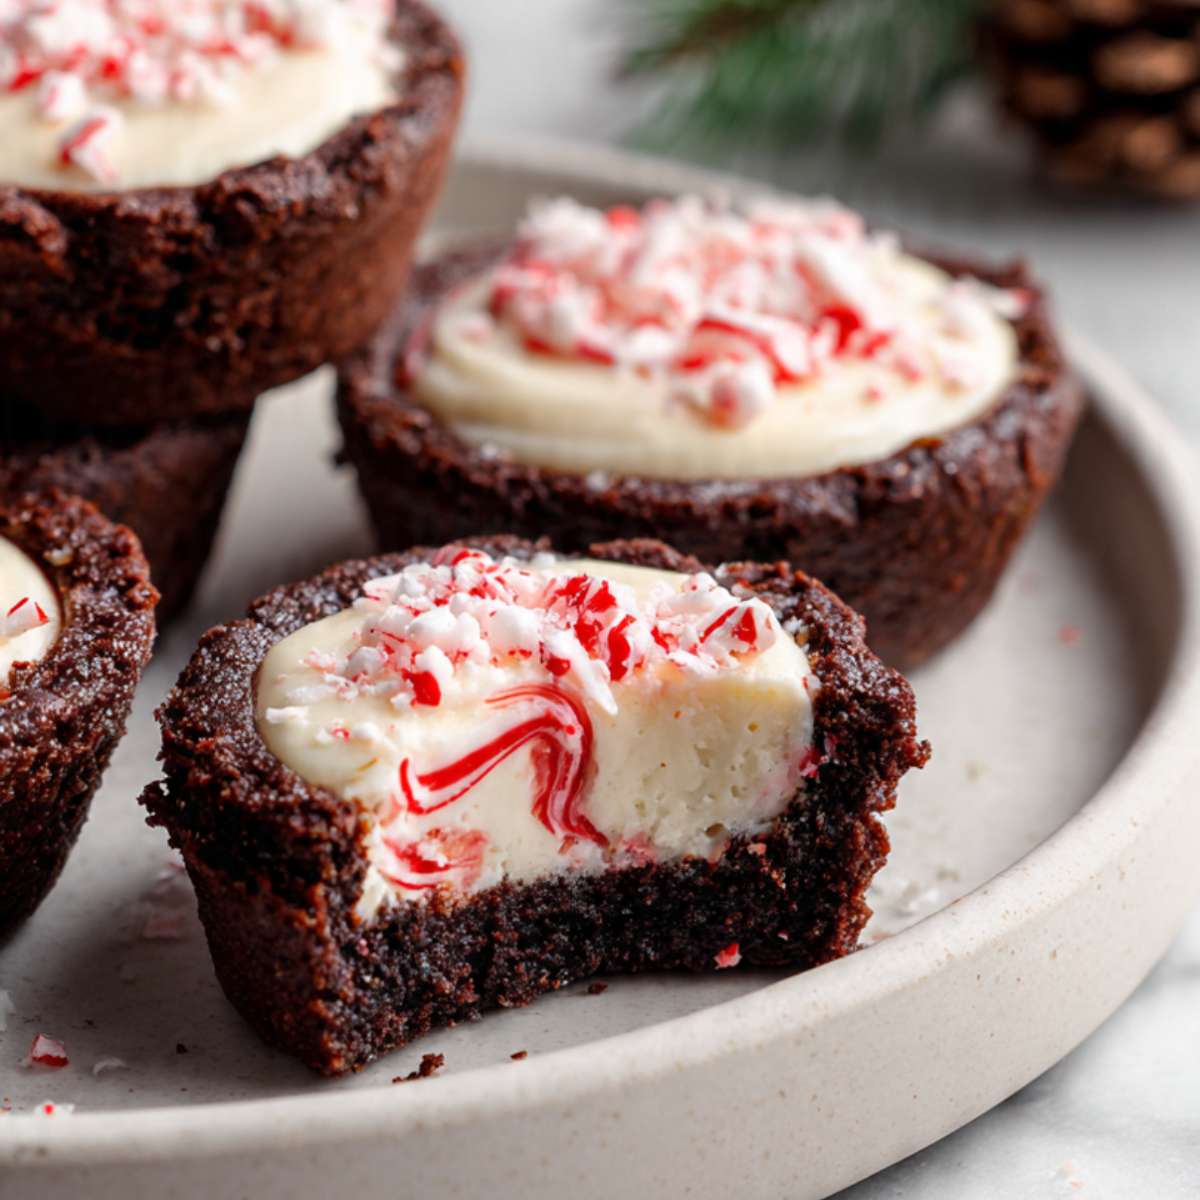
What you get: a dense, fudgy brownie wall with a slightly rough exterior, a cool, thick peppermint cream cheese filling, and a generous layer of crushed candy cane on top. The peppermint is present — not subtle, not overwhelming. The chocolate and mint work the way they always do when neither one is fighting to be the only thing you taste.
This is the recipe I make when I want the dessert table to look like I spent the afternoon on it, and I did not. The muffin tin does more work than people realize.
No chilling required for the brownie base — it goes straight from the bowl into the pan. The filling needs exactly 2 hours in the refrigerator to set to the firm, clean texture visible in the photos. Plan for that before you start.
| Yield | 12 cookie cups |
| Prep Time | 20 minutes |
| Bake Time | 18–20 minutes |
| Chill Time | 2 hours |
| Total Time | 2 hours 40 minutes |
| Difficulty | Intermediate |
| Method | Melt-and-mix (brownie base) + beaten cream cheese (filling) |
| Equipment | Standard 12-cup muffin tin, large mixing bowl, hand mixer or stand mixer |
| Serving Size | 1 cookie cup |
| Nutrient | Amount |
|---|---|
| Calories | ~310 |
| Carbohydrates | ~36g |
| Fat | ~17g |
| Protein | ~4g |
| Sugar | ~28g |
| Sodium | ~130mg |
Ingredients & Tools
For the Brownie Cups
- ½ cup (113g) unsalted butter, melted and cooled to below 90°F (32°C)
- ¾ cup (150g) plain white granulated cane sugar
- 2 large eggs, room temperature (30 minutes out of the fridge)
- 1 teaspoon (5ml) pure vanilla extract
- ⅓ cup (30g) Dutch-process cocoa powder, sifted — not natural cocoa, not hot cocoa mix
- ½ cup (60g) all-purpose flour (spooned into the measuring cup and leveled — not scooped)
- ¼ teaspoon (1.5g) fine sea salt
- ¼ teaspoon (1g) baking powder — check freshness before using (drop ½ teaspoon into hot water; it should bubble vigorously)
For the Peppermint Cheesecake Filling
- 8 oz (226g) full-fat block cream cheese, softened to room temperature (60–90 minutes out of the fridge) — not whipped cream cheese, not reduced-fat, not cream cheese spread
- ¾ cup (90g) powdered sugar, sifted to remove lumps
- 2 tablespoons (30ml) heavy whipping cream — not half-and-half, not milk
- ½ teaspoon (2.5ml) pure peppermint extract — not peppermint oil, not mint extract
- ¼ teaspoon (1.25ml) pure vanilla extract
For the Topping
- 3–4 full-size candy canes (approximately 40g), crushed to a mix of fine crumble and 2–5mm chunks — not pre-ground peppermint dust
Before You Start
Set your oven rack to the middle position before preheating. The middle rack is the only position that gives the brownie cups even top and bottom heat. A lower rack position overbrowns the bases before the walls are set. An upper rack position dries the tops before the centers are done.
Gram weight priority. For the most accurate results, use a kitchen scale set to grams. Volume measurements like cups and tablespoons can vary by 20–30% depending on how the ingredient is scooped or packed. The gram weights in this recipe are the numbers I tested with — they are the most reliable way to get the same result I got.
Butter temperature matters. Melt the butter and let it cool before it touches the eggs. If the butter is above 90°F (32°C) when you add the eggs, it will scramble them. This is the most common first-step mistake in melt-and-mix brownie recipes. I give it 10–15 minutes on the counter after melting — no shortcut here.
Cream cheese must be fully at room temperature. Pull it from the fridge 60–90 minutes before you begin. Cold cream cheese will not beat smooth — it will leave lumps in the filling that no amount of mixing will fully remove. Do not microwave it. Time is the only method that works here. To check readiness: press your thumb firmly into the center of the block. It should leave a clean indent with no resistance and no cold feeling at depth. If the center still feels firm or cold, it needs more time — 20 additional minutes minimum.
Dutch-process cocoa is not interchangeable. This recipe uses Dutch-process cocoa, which has been alkalized to reduce acidity. Natural cocoa reacts differently with the leavening in this recipe and will produce a lighter, more acidic-tasting brownie. The near-black color visible in the photos comes from Dutch-process cocoa specifically — natural cocoa will not produce that result.
Check your baking powder before you start. Baking powder loses its potency within 6–12 months of opening, often before the expiration date printed on the can. Drop ½ teaspoon into a small cup of hot water — it should bubble actively within 5 seconds. If the reaction is slow or absent, the baking powder is spent and will not give the brownie walls enough lift to hold their structure during the pressing step. Replace it before proceeding.
Peppermint extract, not mint extract. These are different products. Mint extract typically contains spearmint, which produces a toothpaste-adjacent flavor in baked goods. Pure peppermint extract is what gives candy canes their specific flavor profile. Check the label before you use it.
This recipe requires paper liners in the muffin tin. Without them, the brownie cups will not release from the pan cleanly regardless of how well you grease it — the fudgy base sticks to unlined aluminum and the cups will tear when you try to remove them, taking the wall structure with them. Standard paper cupcake liners work. Do not use foil liners — the rigid structure of foil makes it difficult to peel the liner back cleanly without breaking the cup wall.
No chilling required for the brownie base. The batter goes straight from the bowl into the lined muffin cups. The filling requires a minimum of 2 hours of refrigeration after the cups are assembled — plan for this before you start.
Mixing equipment: The brownie base comes together with a large mixing bowl and a silicone spatula — no electric mixer needed. The peppermint cheesecake filling requires a hand mixer or stand mixer fitted with the paddle attachment. Mixing the cream cheese filling by hand will not get it smooth enough.
Necessary Tools
- Kitchen scale (strongly recommended)
- Standard 12-cup muffin tin — light-colored aluminum, not dark non-stick
- 12 standard paper cupcake liners
- Large mixing bowl (for the brownie base)
- Medium mixing bowl (for the filling)
- Silicone spatula
- Hand mixer or stand mixer with paddle attachment
- Small saucepan or microwave-safe bowl (for melting butter)
- Instant-read thermometer (for checking butter temperature)
- 1-tablespoon cookie scoop or two spoons (for portioning brownie batter)
- Small spoon or offset spatula (for pressing the cups and filling them)
- Wire cooling rack
- Zip-lock bag and rolling pin or meat mallet (for crushing candy canes)
How to Make Chocolate Peppermint Cookie Cups
Step 1: Preparing the Muffin Tin and Preheating the Oven
Set your oven rack to the middle position and preheat to 325°F (165°C). Line a standard 12-cup light-colored aluminum muffin tin with 12 paper cupcake liners. Do not grease the liners — the brownie batter has enough fat to release cleanly from paper without additional grease, and greasing causes the liner to slide during filling. The brownie base is a melt-and-mix method — one large mixing bowl and a silicone spatula are all you need. No electric mixer is required for any part of the brownie base.
Dark non-stick muffin tins absorb significantly more heat than light-colored aluminum — the brownie walls will overbrown and the bases will set hard before the centers are done. If a dark tin is all you have, reduce the oven temperature to 300°F (150°C) and start checking at 15 minutes.
Most home ovens run 15–25°F (8–14°C) off from the dial setting. If you have an oven thermometer, confirm the actual temperature before the pan goes in. A 25°F variance in either direction changes the bake time by 3–4 minutes and changes the texture of the finished cups.
The oven must be fully preheated before the pan goes in — not just showing the preheat signal. Give it an additional 5 minutes after the signal. An underheated oven causes the batter to spread before it sets, which produces flat cups with no wall structure.
Your oven is ready and your tin is lined — melt the butter now so it has time to cool before the batter comes together.
Step 2: Melting the Butter and Building the Brownie Base
In a medium saucepan over low heat — or in a microwave-safe bowl in 30-second intervals — melt your ½ cup (113g) unsalted butter completely. Butter is the primary fat in the brownie base — it provides the richness and density that makes the cup walls fudgy rather than dry, and it contributes to the Maillard browning on the exterior of each cup during baking.
Pour it into your large mixing bowl and let it cool until it reads below 90°F (32°C) on an instant-read thermometer. This takes approximately 10–15 minutes at room temperature. Do not rush this step with the refrigerator — uneven cooling causes the fat to separate and the batter to look broken before the eggs go in.
Once the butter is cool, add your ¾ cup (150g) plain white granulated cane sugar and stir with your silicone spatula using slow, wide circular strokes from the bottom of the bowl upward — approximately 30 strokes — until the sugar is fully incorporated and the mixture looks pale tan and slightly grainy. The granulated sugar is what controls the fudgy density of the finished cups — substituting brown sugar or coconut sugar will change the texture and produce a softer, more collapsed cup wall.
Add your 2 large room-temperature eggs one at a time, stirring vigorously after each addition for approximately 20 strokes before adding the next. Adding both eggs at once prevents full emulsification and produces a greasy, uneven batter. Add your 1 teaspoon (5ml) pure vanilla extract and stir to combine.
The mixture should look smooth, glossy, and slightly thickened at this point — not grainy, not separated, and no visible butter pooling at the edges of the bowl. If it looks broken or greasy, the butter was still too warm when the eggs went in. Unfortunately this batch cannot be fully recovered — the texture will be off. Cool more carefully next time and use the thermometer.
Your wet base is ready — add the dry ingredients now before the mixture cools further.
Step 3: Adding the Dry Ingredients Without Overmixing
Directly into your wet mixture, sift your ⅓ cup (30g) Dutch-process cocoa powder over the top — do not dump it unsifted. Cocoa powder clumps on contact with fat and wet ingredients, and unsifted cocoa produces dark streaks in the finished cups that never fully incorporate no matter how long you mix. Add your ½ cup (60g) all-purpose flour (spooned and leveled), ¼ teaspoon (1.5g) fine sea salt, and ¼ teaspoon (1g) baking powder.
Fold from the bottom of the bowl upward using your silicone spatula — slow, deliberate strokes, not stirring in circles. Count 20 strokes from the moment the dry ingredients touch the wet. Stop at 20 strokes even if you still see a faint streak of flour — the streaks will hydrate and disappear as you portion the batter into the cups. Overmixing past this point develops gluten in the flour, and the brownie walls will bake up tight and tough rather than fudgy and dense.
Do not add any extra flour if the batter looks thin — it is supposed to look thin at this stage. This is a melt-and-mix brownie batter, not a stiff dough.
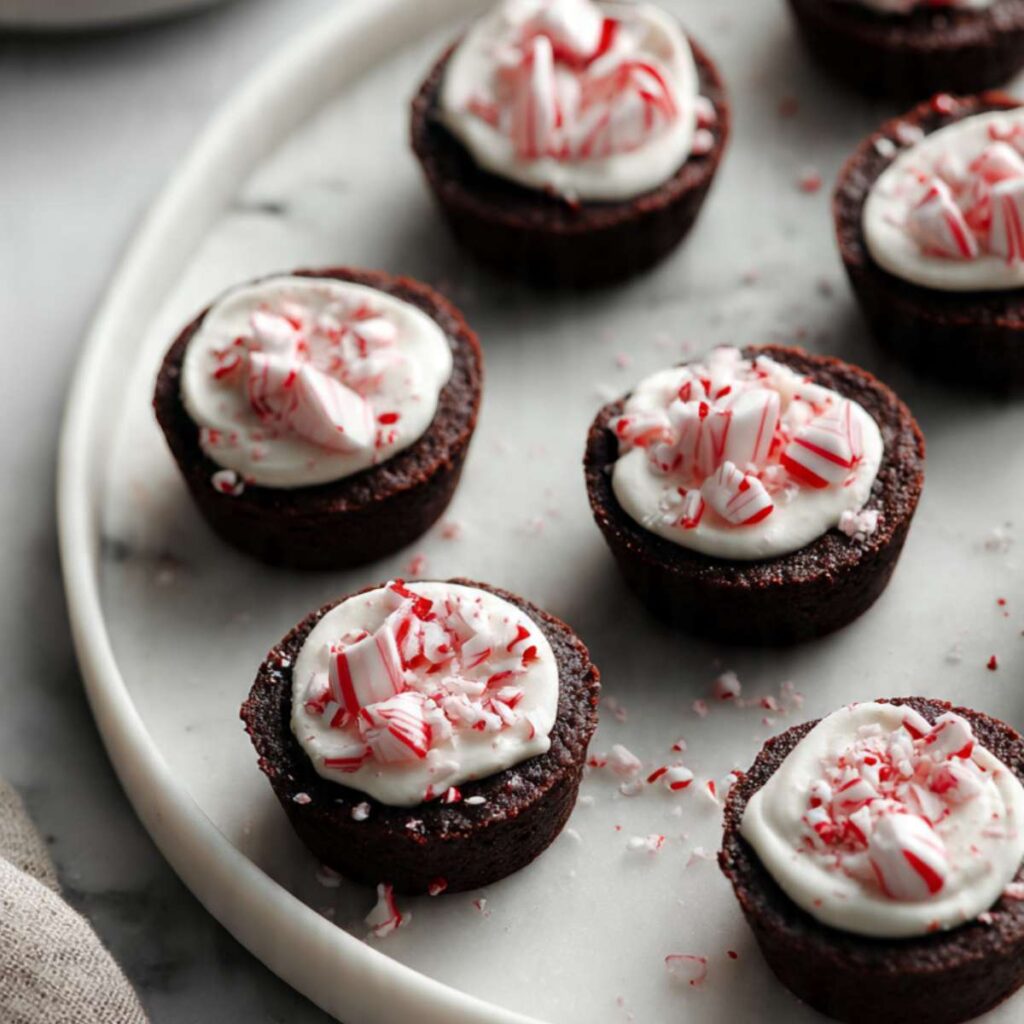
The finished batter should look dark, glossy, and pourable — similar to the deep chocolate color visible on the exterior walls of the cups in the overhead plate photo. That color comes from the Dutch-process cocoa doing its job. If the batter looks brown rather than near-black, your cocoa powder may be natural rather than Dutch-process.
The batter is ready to portion — move quickly, as it begins to thicken as it sits.
Step 4: Portioning the Batter Into the Muffin Cups
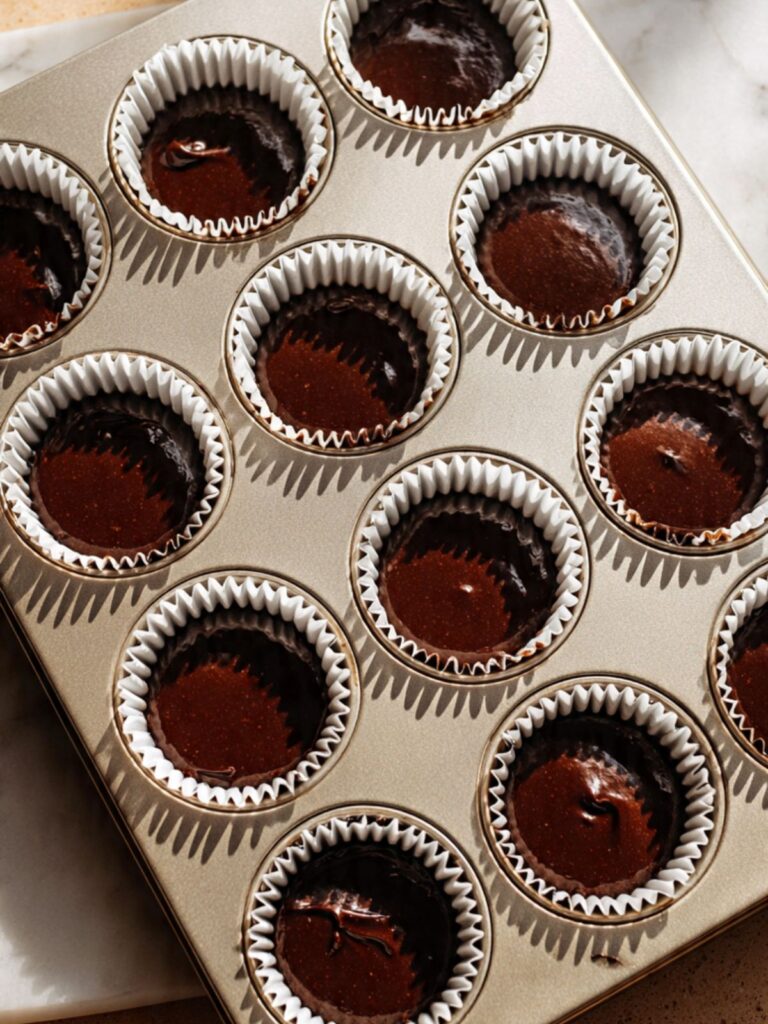
Using a 1-tablespoon cookie scoop or two spoons, portion the batter evenly across your 12 lined muffin cups — approximately 2 tablespoons (about 35–38g) of batter per cup. Weigh the first cup on your kitchen scale and use that as your calibration reference for the remaining 11. Cups that are overfilled will dome aggressively and leave no room for the cheesecake filling. Cups that are underfilled will produce thin, fragile walls that collapse when the paper liner is peeled back.
Fill each cup to approximately one-third full — no more. The batter will rise during baking and then be pressed down to form the cup shape, so what looks like too little batter at this stage is exactly right.
Do not smooth the tops or tap the pan — both actions affect how the batter sets at the edges. The irregular surface you see before baking becomes the rough-textured exterior visible in the photos after the cups are fully baked.
Each cup should be filled to roughly the same depth — about ½ inch (1.25cm) of batter in each cavity. If one cup looks significantly deeper or shallower than the others, adjust before the pan goes in.
Your pan is ready — place it on the middle rack now.
Step 5: Baking the Brownie Cups
Bake at 325°F (165°C) for 18 to 20 minutes. Start checking at 18 minutes. The cups are done when the edges look fully set and matte, the tops are no longer shiny, and a toothpick inserted into the center of one cup comes out with moist crumbs — not wet batter, not completely clean. A completely clean toothpick means the cups are overbaked and the walls will be dry rather than fudgy.
Do not open the oven door before 16 minutes. The sudden temperature drop during the early bake deflates the structure before the eggs have set, and the cups will not hold their wall shape when pressed.
🗒 Luna’s Note: I pull these at exactly 18 minutes in my oven. The centers always look slightly underdone at that point. They are not — the pressing step that comes next finishes the center through carryover heat. Every time I have waited the full 20 minutes before pulling, the walls have been drier than I want them.
The tops should look matte and set at the edges, with the center of each cup looking just barely done — this is correct. The deep, near-black color visible in the photos develops fully during baking and will be uniform across all 12 cups if the oven was fully preheated.
Leave the pan on the oven rack for exactly 2 minutes after pulling — do not move it to a wire rack yet. The pan is still at approximately 325°F (165°C) at the moment it comes out of the oven, and it continues to conduct that heat directly into the base of each cup. This is carryover cooking — the baking process does not stop when the oven door opens. Those 2 minutes are finishing the base from the bottom while the tops cool from above. Moving the pan to a cool wire rack immediately stops this process before the base has fully set. Set a timer for 2 minutes. Then move the pan to the rack and press immediately.
Step 6: Pressing the Cups While Hot — The Critical Step
This is the step that makes these cookie cups. Working quickly while the pan is still hot, use the back of a rounded teaspoon or a small jar with a flat bottom to press firmly down into the center of each brownie cup. The goal is to create a deep well — pressing approximately two-thirds of the way down into the cup, leaving walls on all sides and a base at the bottom.
The cups will look wrong immediately after pressing. The center will look flat and compressed and the walls will look slightly irregular. This is exactly correct. Do not try to reshape or smooth the walls — the rustic, irregular look is what you see in the photos and it is what gives these cups their character.
Press all 12 cups before moving the pan to the wire rack. If you let even one cup cool before pressing, the brownie wall will have set enough to crack rather than compress cleanly.
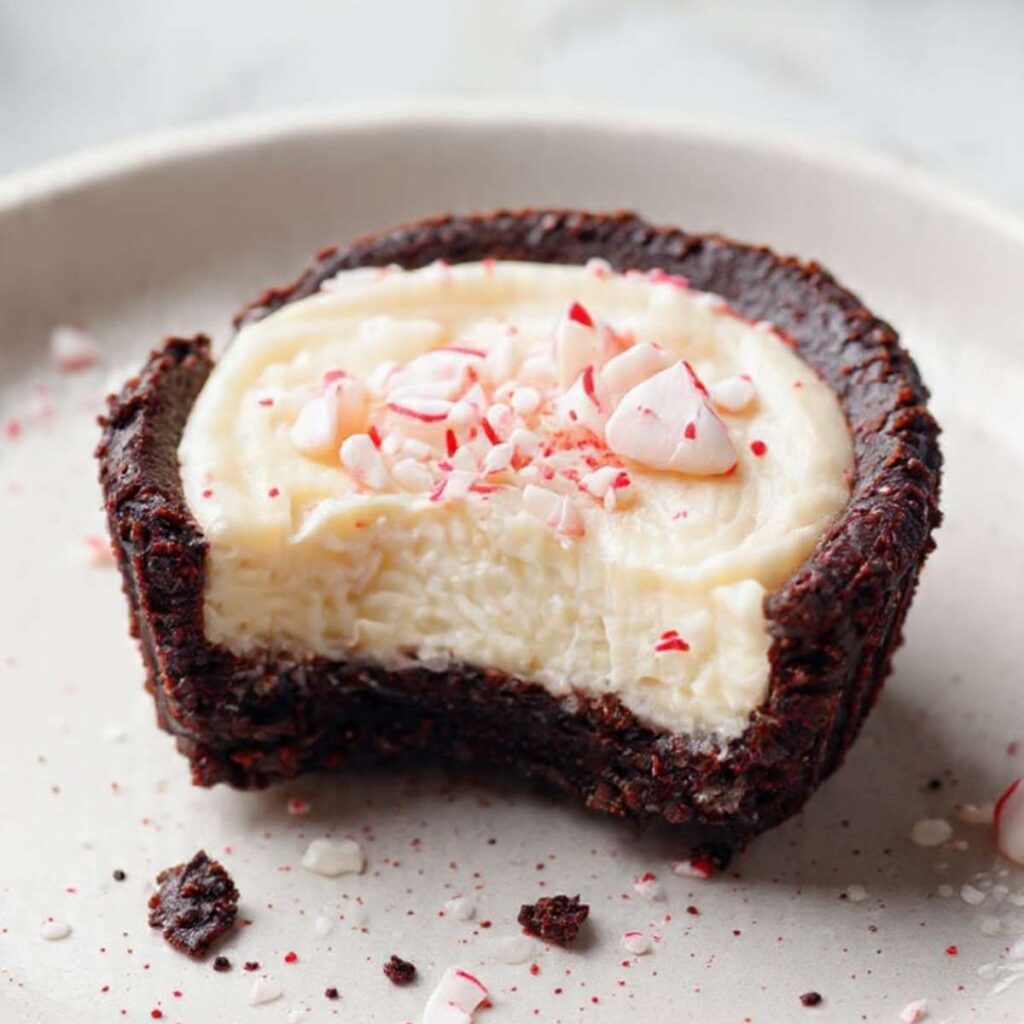
As you can see in the close-up photo showing a single cup with a bite taken out, the brownie wall is solid all the way around with a distinct compressed base — that clean cup shape is created entirely by this pressing step while the batter is still hot and pliable. A cup that was not pressed while hot will have a domed center with no room for the filling.
Do not overfill the well when you press — stop before the bottom of the cup. The base needs to stay intact to support the cheesecake filling.
Transfer the pan to a wire cooling rack. Cool the brownie cups completely in the pan before adding the filling — approximately 45 minutes to 1 hour at room temperature. Adding filling to warm cups melts the cream cheese and the filling will not set properly in the refrigerator.
Step 7: Making the Peppermint Cheesecake Filling
Once the brownie cups are fully cooled, make the filling. In your medium mixing bowl, beat your 8 oz (226g) full-fat block cream cheese alone on medium speed using your hand mixer or stand mixer with the paddle attachment for exactly 2 minutes — set a timer. The cream cheese must be beaten alone first until it is completely smooth and no lumps remain before any other ingredient is added. Scrape the sides and bottom of the bowl with your silicone spatula after the first minute and beat for the remaining minute. Cold cream cheese, or cream cheese beaten with sugar added too early, produces a lumpy filling that cannot be smoothed out no matter how long you continue to mix.
Add your ¾ cup (90g) sifted powdered sugar in two additions — add half, beat on low for 30 seconds until just incorporated, scrape the bowl, add the remaining half, and beat on low for another 30 seconds. Do not dump all the powdered sugar in at once — it will cloud the mixer and produce uneven sweetness distribution.

Add your 2 tablespoons (30ml) heavy whipping cream, ½ teaspoon (2.5ml) pure peppermint extract, and ¼ teaspoon (1.25ml) pure vanilla extract. Beat on medium speed for 1 minute until the filling is smooth, slightly lightened, and holds its shape when you lift the beater. The peppermint extract goes a long way — do not add more than the stated amount before tasting. The flavor intensifies as the filling chills.
Do not overmix after the cream goes in — overbeaten cream cheese filling becomes grainy as the fat separates from the liquid. The sign to watch for: the filling starts to look slightly curdled at the edges, with a texture closer to cottage cheese than cream. If you see this beginning to happen, stop the mixer immediately. The filling cannot be fully recovered at this point — spoon it in anyway, chill it, and add extra crushed candy cane to compensate for the texture.
The finished filling should look thick, smooth, and cream-white — not yellow, not grainy, and not runny. It should hold a soft peak when you lift the beater, similar to the thick, spoonable consistency visible in the cross-section photos where the filling sits cleanly inside the brownie cup wall without spreading.
The filling is ready to spoon into the cups immediately — do not refrigerate it before filling or it will stiffen and become difficult to spread.
Step 8: Filling the Cups and Adding the Candy Cane Topping
Using a small spoon or offset spatula, divide the peppermint cheesecake filling evenly among the 12 pressed brownie cups — approximately 1½ to 2 tablespoons (25–30g) of filling per cup. Spoon the filling into the center of each well and use the back of the spoon to spread it gently to the edges of the cup. The filling should sit flush with or just slightly above the rim of the brownie wall — do not mound it higher than the walls or it will slide when the cups are stacked or stored.
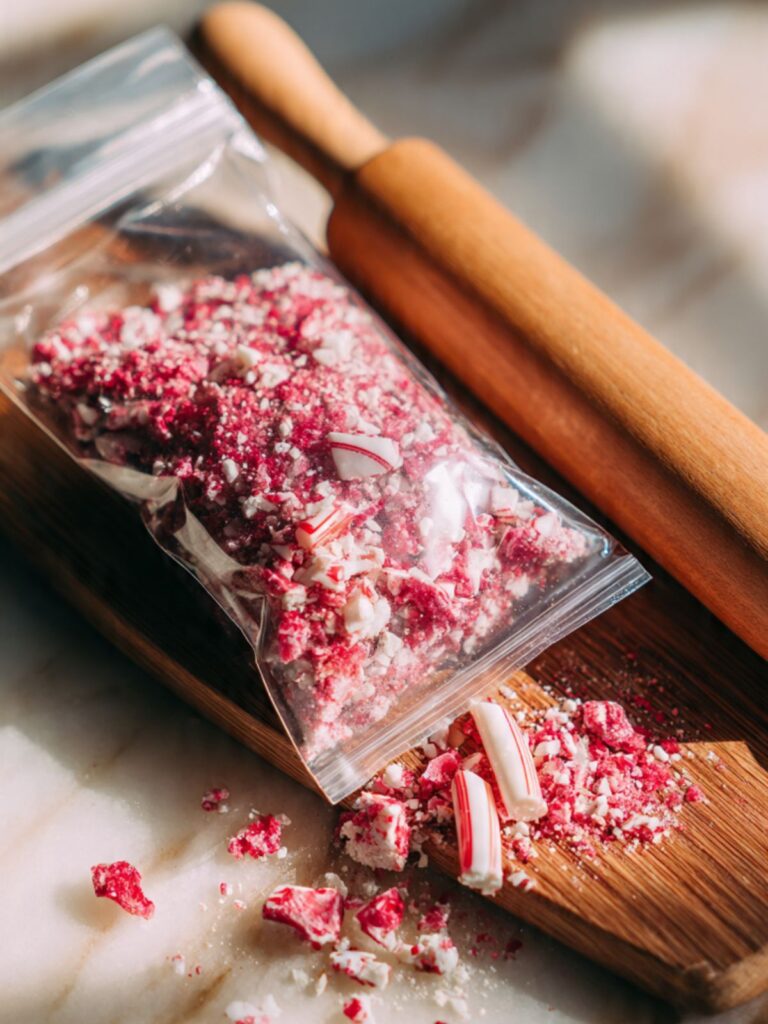
Place your 3–4 full-size candy canes in a zip-lock bag, seal out the air, and crush with a rolling pin or meat mallet using firm, even strikes. You want a mix of coarse chunks (2–5mm) and fine crumble — not a uniform fine powder. The variety of sizes is what gives the topping the visual texture visible in the overhead plate photo showing all 12 finished cups. A fine-only powder looks flat and loses the candy cane identity.
Immediately after filling each cup, scatter a generous pinch of crushed candy cane over the top. Press very lightly with your fingertip so the largest pieces have contact with the filling surface — this prevents them from rolling off when the cups are moved to the refrigerator.
The filling surface should be smooth and level with candy cane pieces scattered generously across the top, with both fine crumble and visible chunks — exactly as shown in the overhead photo of all twelve finished cups on the white marble plate, where the topping coverage is full and consistent across every cup.
Transfer the filled, topped cups — still in the muffin tin — directly to the refrigerator. Chill for a minimum of 2 hours before serving. The filling needs this time to firm from a soft, spoonable texture to the clean, sliceable consistency shown in the cross-section photos. Skipping or shortening the chill time produces a filling that is too soft to hold its shape when the paper liner is peeled back.
The Science Behind Chocolate Peppermint Cookie Cups
Why You Press the Cup While It’s Still Hot — and Why It Looks Wrong Before It Looks Right
I did not understand why the pressing step worked for the first three times I did it. I just knew that pressing cold brownie produced cracks and pressing hot brownie produced a clean cup. What I eventually understood is that this is a protein coagulation and starch gelatinization problem — two processes that are still active in the first two minutes after the pan comes out of the oven.
When brownie batter bakes, the egg proteins set and the starch granules in the flour absorb water and swell — this is what gives the brownie its structure. But at the moment the pan comes out of the oven, both processes are still in progress. The internal temperature of the cups is still rising due to carryover heat from the hot pan. The proteins have not fully coagulated and the starch network is still flexible. This is the window — typically 3 to 4 minutes — where the brownie can be reshaped without fracturing. Press within this window and the cup compresses cleanly. Wait until it cools and the protein network has locked in, and pressing forces cracks through a structure that is no longer pliable.
This is why the cups look wrong immediately after pressing. The compressed center and irregular walls are not a failure — they are the correct result of reshaping a partially-set structure. The cup firms into its final shape as it cools on the wire rack, which is exactly the form you see in the finished photos.
What Dutch-Process Cocoa Does to Color and Flavor
Dutch-process cocoa has been treated with an alkalizing agent — typically potassium carbonate — that neutralizes its natural acidity and raises its pH from around 5 to between 7 and 8. This changes two things that matter in this recipe: color and leavening behavior.
The near-black color of the brownie cups in the photos is not achieved with extra cocoa — it is achieved with Dutch-process cocoa specifically. The alkalization process causes the cocoa’s pigment molecules to shift from reddish-brown (the color of natural cocoa) to deep brown, closer to black. Natural cocoa in the same quantity will produce a noticeably lighter, redder-toned brownie. The visual difference is significant enough that readers frequently write to me assuming they used the wrong amount.
The second consequence is leavening. Dutch-process cocoa is neutral in pH, so it does not react with baking soda the way natural cocoa does. This recipe uses baking powder — not baking soda — as its leavening agent specifically because of the Dutch-process cocoa. Substituting natural cocoa without switching to baking soda will produce a flat cup with poor wall structure, because the acid-base reaction that creates lift never happens. These are not interchangeable in this recipe. If Dutch-process cocoa is unavailable, use a high-fat natural cocoa and substitute the baking powder with ¼ teaspoon baking soda — but expect a lighter color and slightly more acidic flavor. For a recipe about peppermint and chocolate, I recommend finding the right cocoa before making substitutions. You can also find this technique used in my hot chocolate cupcakes recipe, which relies on the same Dutch-process mechanism for its deep color.
Why Cream Cheese Temperature Is Not Optional
Cream cheese is an emulsified product — fat droplets suspended in a water-protein matrix. At refrigerator temperature (38°F / 3°C), the fat is partially crystallized and the protein matrix is stiff. When you beat cold cream cheese with sugar or liquid, the mixer breaks through the protein matrix unevenly — some areas smooth out while others remain as lumps of incompletely softened fat. These lumps do not dissolve with continued mixing. They set permanently in the filling and produce a grainy, uneven texture in the finished cup.
At room temperature (65–68°F / 18–20°C), the fat is soft and the protein matrix is pliable. The mixer works through the entire mass evenly from the first stroke. The result is a filling that goes from solid block to smooth, aerated cream in the two minutes the recipe calls for — no lumps, no grainy patches, no overbeating required to compensate for cold cream cheese.
The practical consequence: pull the cream cheese from the fridge 60–90 minutes before you plan to make the filling. There is no reliable shortcut. Microwaving melts the fat unevenly and produces a filling that is liquid in spots and still firm in others. Time is the mechanism that works.
Chocolate Peppermint Cookie Cups Troubleshooting & Pro-Tips
Common Mistakes
The brownie batter used natural cocoa instead of Dutch-process cocoa
Symptom: The baked cups are noticeably lighter in color — brownish rather than near-black — and the walls taste more acidic and sharp than the deep, rounded chocolate flavor the recipe is designed to produce. The cup structure may also be flatter than expected if the leavening was not adjusted.
Cause: Natural cocoa and Dutch-process cocoa are not interchangeable in this recipe. Natural cocoa is acidic (pH ~5) and reacts with baking soda to create lift. This recipe uses baking powder, which is calibrated for neutral Dutch-process cocoa. Using natural cocoa without switching the leavening leaves the acid-base reaction incomplete.
Fix: If already baked — the cups are still edible. The flavor will be sharper and the color lighter, but the structure will hold. Fill and serve as normal. For the next batch, source Dutch-process cocoa (Droste, Rodelle, or King Arthur are reliable brands) or substitute ¼ teaspoon baking soda for the baking powder if using natural cocoa.
Prevention: Check the cocoa label before you start. “Dutch-process,” “alkalized,” or “European-style” are the terms to look for. If the label says only “unsweetened cocoa powder” with no other descriptor, it is most likely natural cocoa.
The muffin tin was dark non-stick and the brownie walls overbrownedon the outside
Symptom: The exterior walls of the cups are very dark — nearly burnt — while the centers are still correctly fudgy. The bases are hard rather than dense and fudgy.
Cause: Dark non-stick pans absorb significantly more radiant heat than light-colored aluminum. The outer surface of the brownie reaches the Maillard browning threshold faster than the interior can set, which means the outside is overbaked before the inside is done.
Fix: If already baked — peel away the outermost layer of the cup wall with a small knife before serving. The interior of the wall is likely still correctly textured. The filling will cover the top and the presentation will be largely unaffected.
Prevention: Use a light-colored aluminum muffin tin. If only a dark tin is available, reduce the oven temperature to 300°F (150°C) and begin checking at 15 minutes.
The cups were not pressed while hot and the center domed over — no room for filling
Symptom: The brownie cups have a domed, rounded top with no well in the center. The cheesecake filling has nowhere to sit and pools over the sides when spooned in.
Cause: The pressing step must happen within the first 3–4 minutes after the pan comes out of the oven, while the brownie is still hot enough that the protein and starch structure is pliable. Once the cups cool, the structure locks in and pressing causes cracks rather than compression.
Fix: Use a small sharp knife or melon baller to carve a shallow well into the center of each cooled cup. Work carefully — the walls are fudgy and will crack if you apply lateral pressure. Spoon the filling into the carved well. The result will be shallower than the pressed version but still presentable. Press next time while the pan is still hot.
Prevention: Have your pressing tool ready before the pan goes into the oven. The window for pressing is short — do not walk away from the oven in the last 5 minutes of the bake.
The cheesecake filling is lumpy and will not smooth out
Symptom: The filling has visible white lumps that remain even after several minutes of beating. The texture looks curdled rather than smooth.
Cause: The cream cheese was cold when it went into the mixer. Cold cream cheese does not beat evenly — the fat is partially crystallized and the protein matrix is stiff, so the mixer breaks through some areas while leaving others as lumps. These lumps do not dissolve with continued mixing.
Fix: Scoop the lumpy filling into a microwave-safe bowl and heat in 10-second intervals, stirring between each, until it softens slightly — do not let it become liquid. Return to the mixer and beat again on medium speed for 1 minute. This will not fully rescue very cold cream cheese but will significantly improve a filling that was only slightly underdone on tempering. For future batches, pull the cream cheese from the fridge 60–90 minutes before you need it.
Prevention: Check the cream cheese with your finger before beating — it should feel soft all the way through with no firm cold center. If you press your thumb into the block and feel resistance, it is not ready.
The filling is too soft and will not hold its shape after chilling
Symptom: After 2 hours in the refrigerator, the filling is still loose and slides when the cup is tilted. It does not have the firm, clean texture visible in the cross-section photos.
Cause: One of three issues — the heavy cream was substituted with a lower-fat liquid (milk or half-and-half), the filling was overbeaten and the fat began to separate, or the refrigerator temperature is too warm (above 40°F / 4°C).
Fix: Return the cups to the refrigerator for an additional hour. If the filling is still not setting, the fat content of the dairy used was likely too low. Serve as soft cups — the flavor is correct even if the texture is not. Top with extra crushed candy cane immediately before serving to add visual structure.
Prevention: Use full-fat heavy whipping cream only — minimum 36% fat. Do not substitute. Check that your refrigerator is running at or below 40°F (4°C).
The candy cane topping dissolved into the filling overnight
Symptom: The crushed candy cane pieces that were visible and distinct when the cups were first assembled have partially or fully dissolved into the filling surface, leaving a pinkish-red stain and no visible texture.
Cause: Candy canes are primarily sugar, and sugar is hygroscopic — it draws moisture from surrounding surfaces. The cream cheese filling contains enough moisture to begin dissolving the candy cane within a few hours of contact, especially if the cups are stored in a covered container where moisture cannot escape.
Fix: The flavor is unaffected and the cups are still entirely correct to serve. The visual is the only casualty. Add a fresh scattering of crushed candy cane immediately before serving to restore the appearance.
Prevention: Add the crushed candy cane topping no more than 2 hours before serving. If making the cups ahead, store them without the topping and add it at the last moment.
The brownie cups did not rise enough and the walls are flat and dense with no structure
Symptom: The baked cups are very flat with walls that barely rise above the base — no cup shape forms even after pressing, and the walls collapse inward rather than holding their form.
Cause: Spent baking powder that has lost its potency. Baking powder loses its ability to produce CO2 within 6–12 months of opening, sometimes earlier. Flat brownie walls with no lift are the clearest sign. A secondary cause is an oven that was not fully preheated — leavening needs the sudden burst of heat to activate properly.
Fix: Already baked flat cups cannot be re-leavened. Press what structure exists, fill as normal, and serve. The flavor will be correct. The walls will be thinner and denser than the photos show — acknowledge the difference and move on.
Prevention: Test baking powder before every bake: drop ½ teaspoon into a small cup of hot water. Active baking powder bubbles vigorously within 5 seconds. Slow or absent reaction means it needs to be replaced. A new can of baking powder is the cheapest insurance in this recipe.
The brownie walls baked up tough and rubbery rather than fudgy and dense
Symptom: The cup walls have a tight, chewy, almost rubbery texture when bitten through — not the soft, fudgy density visible in the cross-section photos. The walls feel like they are working against the bite rather than giving cleanly.
Cause: The dry ingredients were mixed past the 20-stroke limit. Every stroke past 20 develops gluten in the all-purpose flour — the same network that makes bread chewy makes brownie walls tough when overdeveloped. Melt-and-mix batters are particularly susceptible because the liquid fat coats the flour proteins less effectively than creamed butter does, leaving more free protein available for gluten development.
Fix: Already baked — the texture cannot be changed. The cups are still edible; the filling and candy cane topping compensate. Serve as normal. For the next batch, count strokes aloud and stop at 20, even if the batter still shows faint flour streaks.
Prevention: Use a wide silicone spatula rather than a whisk or spoon — the larger surface area folds more batter per stroke and reaches the 20-stroke limit with fewer passes. Count out loud. Stop at 20.
Humidity and altitude adjustments
High humidity: Crushed candy cane absorbs moisture from the air rapidly in humid environments — add the topping immediately before serving rather than during assembly. The brownie batter itself is not significantly affected by humidity.
High altitude (above 3,500 feet / 1,067m): Reduce the baking powder to ⅛ teaspoon. Leavening agents produce more lift at altitude due to lower atmospheric pressure, and the extra lift causes the brownie walls to dome and then collapse rather than hold their cup shape. Reduce the oven temperature by 15°F (8°C) and increase bake time by 2–3 minutes to compensate.
Expert Pro-Tips
Press with a shot glass for a perfectly shaped well. A small shot glass or a spice jar with a flat, round bottom creates a more uniform cup shape than a spoon. Lightly spray the bottom of the glass with non-stick spray before pressing so it releases cleanly without pulling the brownie surface with it. The rounder, more defined well makes filling easier and produces a more even layer of cheesecake in every cup.
Crush the candy canes while still in the wrapper for cleaner shards. Before unwrapping, place 3–4 candy canes on a cutting board while still in their cellophane wrappers and strike firmly with a rolling pin. The wrapper contains the shards and gives you more control over the size of the pieces. Unwrap over the zip-lock bag after crushing and transfer directly. This method produces far fewer fine candy dust particles than crushing unwrapped canes.
Chill the filled cups in the muffin tin, not on a plate. The muffin tin holds the cups upright and prevents the soft filling from shifting before it sets. Transferring the filled cups to a plate before chilling — even carefully — risks tilting the filling to one side, which produces an uneven set. Leave them in the tin for the full 2-hour chill and transfer only when the filling is firm.
Make the brownie cups up to 24 hours ahead and fill the day of serving. The pressed, unfilled brownie cups can be stored at room temperature in the muffin tin covered with plastic wrap for up to 24 hours. Making the cups one day and the filling the next splits the work and means the candy cane topping goes on fresh. The cups actually firm up slightly overnight, which makes the walls even more defined when the filling is added.
How to Store Chocolate Peppermint Cookie Cups
Room Temperature
These cups should not be stored at room temperature once the cheesecake filling is added. The cream cheese filling requires refrigeration — leaving filled cups at room temperature for more than 2 hours puts the filling outside the safe temperature range for dairy. Unfilled brownie cups (pressed and cooled, no filling yet) can be stored at room temperature in the muffin tin covered tightly with plastic wrap for up to 24 hours before filling.
Refrigerator
Store filled cups in the muffin tin covered loosely with plastic wrap, or transfer to a single-layer lidded hard-sided container with no stacking — for up to 4 days. Do not use a zip-lock bag. The bag applies lateral pressure to the cups and crushes the walls, which are fudgy enough to deform under pressure. Do not cover tightly with foil — foil traps condensation and the moisture drips directly onto the candy cane topping, accelerating the dissolving process described in Troubleshooting.
Add the crushed candy cane topping no more than 2 hours before serving if storing beyond Day 1. For cups already topped, expect the candy cane texture to soften and partially dissolve by Day 2 — the flavor remains correct but the visual changes. A fresh pinch of crushed candy cane immediately before serving restores the appearance entirely.
The filling firms further in the refrigerator overnight. Day 2 cups have a slightly denser, more set filling than Day 1 — some people prefer this texture. The brownie walls also firm slightly, which makes them easier to handle and eat cleanly without the liner.
Freezer — Filled and Assembled
Filled cups freeze well for up to 6 weeks. Freeze them in the muffin tin uncovered for 1 hour until the filling is solid — this flash-freeze step prevents the filling from deforming during wrapping. Once solid, wrap each cup individually in plastic wrap, then place all 12 in a zip-lock freezer bag with the air pressed out. Label with the date.
Thaw overnight in the refrigerator — do not thaw at room temperature. Room temperature thawing causes condensation to form on the filling surface, which dissolves the candy cane topping and makes the filling surface wet and uneven. After refrigerator thawing, add fresh crushed candy cane immediately before serving. The texture after freezing and thawing is very close to fresh — the brownie wall holds its structure well and the cream cheese filling does not separate.
Do not freeze cups that have already had the candy cane topping applied — the sugar dissolves during freezing and thawing and leaves a colored stain on the filling surface. Freeze without topping, thaw, then top fresh.
Freezer — Unbaked Brownie Base
The brownie batter does not freeze well in its unbaked state — the eggs do not hold their emulsification after freezing and the baked result is greasy and uneven. Bake the cups first, press while hot, cool completely, then freeze the unfilled cups if needed. Unfilled, pressed brownie cups freeze for up to 8 weeks wrapped individually in plastic wrap. Thaw at room temperature for 30 minutes before filling with freshly made cheesecake filling.
Serving Suggestion
Serve these cold, straight from the refrigerator. The cheesecake filling is at its best texture — firm, clean, and sliceable — when it is fully chilled. Pulling them out early to come to room temperature softens the filling to the point where it loses the distinct edge visible in the cross-section photos, and the contrast between the dense brownie wall and the cool, set filling is the whole point of these cups.
🗒 Luna’s Note: I serve these on a flat white plate with the paper liners still on — the liner makes them easy to pick up without the filling shifting, and it keeps the chocolate crumbs contained. I peel my own liner back at the table. It is a small thing but it makes a difference when you are serving these at a gathering.
I eat these with a strong black coffee — unsweetened, no milk. The bitterness cuts through the peppermint and the cream cheese fat in a way that makes the chocolate flavor land harder than it does on its own. Peppermint tea also works if you want to stay in the same flavor lane.
These are a December recipe. Not because they cannot be made in March, but because the candy cane is a seasonal ingredient and the combination of chocolate and peppermint reads as holiday in a way that is difficult to separate from that context. I make these when I want something that looks intentional on a holiday dessert table without spending the time that a layer cake requires. They look like they took significantly longer than they did.
Day 1 versus Day 2: Day 1, straight from the initial chill, the filling is slightly softer and the peppermint flavor is brightest. Day 2, the filling has firmed and the peppermint has mellowed slightly into the cream cheese — the flavors have integrated in a way they have not had time to on Day 1. Both are correct. I slightly prefer Day 2 for eating, Day 1 for presentation.
These do not work as a make-ahead party dessert if you plan to top them with candy cane more than 2 hours before serving — the topping dissolves and the visual that makes them worth making disappears. Top them at the last moment or accept that Day 2 cups will need fresh topping. That is the one honest limitation of this recipe.
Frequently Asked Questions About Chocolate Peppermint Cookie Cups
Can I use a brownie box mix instead of making the brownie base from scratch?
Yes, with one important adjustment. Prepare the box mix batter according to package directions, then portion and bake in the lined muffin tin as directed in this recipe. The pressing step works the same way — press while the cups are still hot from the oven. The main variable is bake time: box mix brownies often contain more leavening than scratch recipes and may dome more aggressively, so check at 15 minutes rather than 18. The flavor of the finished cups will be different — box mix cocoa is typically natural cocoa rather than Dutch-process, so the walls will be lighter in color and the chocolate flavor less deep. The structure and technique remain identical.
Can I make chocolate peppermint cookie cups without a muffin tin?
A standard 12-cup muffin tin is required for this recipe as written. The muffin cavity is what creates the wall structure — without it, the batter spreads flat and there is nothing to press into a cup shape. A silicone muffin mold works as a substitute, though the exterior of the cups will be softer and the walls less defined than those baked in aluminum. If using silicone, place it on a flat baking sheet before filling so it is stable going in and out of the oven, and extend the bake time by 2–3 minutes. Mini muffin tins also work — reduce the batter to 1 tablespoon per cup and check at 12 minutes. The yield increases to approximately 24 mini cups.
Can I substitute the peppermint extract with something else?
Peppermint extract can be omitted entirely for a plain chocolate cheesecake cup — the structure and texture of the recipe are unaffected. For a different flavor profile, pure vanilla extract (increase to 1 teaspoon total), almond extract (¼ teaspoon maximum — almond extract is significantly stronger than peppermint), or orange extract (½ teaspoon) all work within the same quantity range. Do not substitute peppermint oil for peppermint extract — peppermint oil is highly concentrated and ½ teaspoon will make the filling inedibly sharp. If using peppermint oil, reduce to 1–2 drops maximum and taste before adding more.
Why did my cheesecake filling crack on top after chilling?
Cracking in a chilled cream cheese filling is almost always caused by overbeating after the heavy cream was added. When cream cheese filling is beaten past the point of smooth incorporation, the fat begins to separate from the liquid — the mixture looks fine in the bowl but the fat contracts as it chills, pulling the surface into cracks. The fix for a cracked filling is purely visual: smooth the surface with the back of a warm spoon dipped in hot water, then add the crushed candy cane topping immediately. The topping covers the cracks entirely. For future batches, stop beating the moment the filling looks smooth and holds a soft peak — approximately 1 minute after the cream and extracts are added. You can find similar cream cheese filling technique in the peppermint mocha cupcakes recipe, which uses the same base with a different application.
Can I make chocolate peppermint cookie cups ahead for a holiday party?
Yes — and the make-ahead method is worth planning around. Bake and press the brownie cups up to 24 hours ahead and store them unfilled at room temperature in the muffin tin covered with plastic wrap. Make the cheesecake filling and fill the cups up to 24 hours before serving, then refrigerate covered. Add the crushed candy cane topping no more than 2 hours before serving — this is the non-negotiable part of the make-ahead plan. Candy cane in contact with cream cheese filling for longer than 2 hours will partially dissolve and lose both texture and visual impact. If you are serving these at a party and cannot add topping at the last moment, skip the candy cane and use a dusting of finely crushed chocolate wafer cookies instead — it holds significantly better overnight.
How do I scale chocolate peppermint cookie cups recipe to make 24 cups?
Double every ingredient exactly, including the leavening — baking powder scales linearly in this recipe because the quantity is small enough that doubling does not over-leaven. You will need two standard 12-cup muffin tins. Bake one tin at a time on the middle rack — baking both tins simultaneously forces one to the lower rack where it will overbrown on the bottom before the tops are set. The bake time for the second tin may be 1–2 minutes shorter if the oven has been running for the duration of the first bake and is running slightly hotter than the dial setting. Start checking the second tin at 16 minutes.
Can I make chocolate peppermint cookie cups gluten-free?
A 1:1 gluten-free all-purpose flour blend (such as Bob’s Red Mill 1-to-1 or King Arthur Measure for Measure) substitutes directly for the all-purpose flour in the brownie base at the same weight — 60g. The texture of the brownie wall will be slightly more crumbly and less fudgy than the wheat version, and the walls may be more prone to cracking during the pressing step. Press more gently and accept a slightly shallower well. The cheesecake filling is naturally gluten-free — no adjustment needed. Confirm that your Dutch-process cocoa and candy canes are certified gluten-free if serving to someone with celiac disease, as cross-contamination during processing is a risk with both ingredients.
More Recipes You’ll Love
If you made these chocolate peppermint cookie cups and want to keep going in the same direction, these are the recipes I would make next.
Hot Chocolate Cupcakes — Dutch-process cocoa at its most concentrated, with a marshmallow frosting that pulls from the same deep chocolate base used in these cookie cups. If the brownie wall in this recipe is what got you, this is the next recipe.
Chocolate Chip Cookie Dough Cups — the same muffin tin cup format with a cookie dough base and edible cookie dough filling. If the cup format is what interests you more than the peppermint specifically, start here.
Chocolate Peppermint Cookie Cups
Ingredients
Equipment
Method
- Preheat oven to 325°F (165°C) and set the rack to the middle position. Line a standard 12-cup light-colored aluminum muffin tin with paper cupcake liners — do not grease the liners.
- Melt the unsalted butter in a saucepan over low heat or in a microwave-safe bowl in 30-second intervals. Pour into a large mixing bowl and cool to below 90°F (32°C) — approximately 10–15 minutes.
- Add the granulated sugar to the cooled butter and stir with a silicone spatula in wide circular strokes for approximately 30 strokes until fully incorporated and pale tan.
- Add the eggs one at a time, stirring vigorously for 20 strokes after each addition before adding the next. Add the vanilla extract and stir to combine.
- Sift the Dutch-process cocoa powder directly over the wet mixture. Add the flour, fine sea salt, and baking powder. Fold with the spatula from the bottom of the bowl upward — exactly 20 strokes. Stop at 20 strokes even if faint flour streaks remain.
- Using a 1-tablespoon scoop, portion approximately 2 tablespoons (35–38g) of batter per cup — filling each to one-third full across all 12 lined cavities.
- Bake at 325°F (165°C) for 18 to 20 minutes — start checking at 18 minutes. The cups are done when the edges are set and matte and a toothpick inserted into the center comes out with moist crumbs, not wet batter.
- Immediately after pulling the pan from the oven, use the back of a rounded teaspoon or the flat bottom of a small shot glass to press firmly down into the center of each cup — creating a deep well with walls on all sides. Press all 12 cups before the pan cools. Transfer to a wire rack and cool completely — approximately 45 minutes to 1 hour.
- Once the brownie cups are fully cooled, beat the room-temperature full-fat block cream cheese alone in a medium bowl using a hand mixer or stand mixer with the paddle attachment on medium speed for exactly 2 minutes until completely smooth. Scrape the bowl after 1 minute.
- Add the sifted powdered sugar in two additions — beat on low for 30 seconds after each addition, scraping the bowl between additions.
- Add the heavy whipping cream, peppermint extract, and vanilla extract. Beat on medium speed for 1 minute until smooth, slightly lightened, and holding a soft peak.
- Divide the filling evenly among the 12 cooled brownie cups — approximately 1½ to 2 tablespoons (25–30g) per cup. Spread gently to the edges with the back of a spoon or a small offset spatula.
- Place candy canes in a zip-lock bag and crush with a rolling pin to a mix of coarse chunks and fine crumble. Scatter generously over each filled cup and press lightly so the largest pieces contact the filling surface.
- Transfer the filled cups — still in the muffin tin — to the refrigerator. Chill for a minimum of 2 hours before serving.