Funfetti Sheet Cake Recipe
Funfetti sheet cake should be the easiest thing I make. It is not. The first three batches I made came out of the pan looking exactly right — pale golden edges, flat level top, a satisfying pull from the pan walls — and still tasted wrong. Dense. Slightly greasy. The kind of cake that is fine but not memorable.
The problem was whole eggs. I had been treating this like a standard yellow cake and adding the full egg. But funfetti cake is, at its core, a white cake — and white cake is built on egg whites alone. The yolk adds richness and color to a yellow cake. In a white cake, it muddies the brightness. Once I switched to whites-only, the crumb went from pale ivory to genuinely bright white, and the sprinkles stopped disappearing into a yellowed background and started looking like what they are supposed to look like: actual confetti.
This is the recipe I make when someone needs a birthday cake and I want zero drama. One pan, no layers to stack, no cake board required, no crumb coat. Just a clean rectangular slab that looks like a party. It travels in the pan it was baked in. That is my actual selling point for this cake.
🗒 Luna’s Note: I started making funfetti cake because a reader asked why hers always came out greasy and dense, even when she followed the recipe. That question made me test six versions in one week. The answer was almost always the same thing: whole eggs in a recipe that needed whites.
Recipe Overview & Nutrition Table
| Method | Creaming |
| Difficulty | Intermediate |
| Prep Time | 30 minutes |
| Bake Time | 28–32 minutes |
| Cooling + Frosting Time | 90 minutes |
| Total Time | ~2.5 hours |
| Yield | 12 large squares |
| Pan Size | 9×13 inch (23×33cm) quarter sheet pan |
| Calories | Carbs | Fat | Protein | Sodium |
|---|---|---|---|---|
| ~420 kcal | 58g | 20g | 4g | 210mg |
Ingredients & Tools for Funfetti Sheet Cake Recipe
For the Cake
- 2¾ cups (325g) cake flour — not all-purpose flour; cake flour’s lower protein content is what produces the tight, tender, bright-white crumb visible in the cross-section
- 1 tablespoon (12g) baking powder, checked for freshness — drop a teaspoon into hot water; it should bubble immediately
- ½ teaspoon (3g) fine sea salt
- 1 cup (225g) unsalted butter, softened to 65–68°F (18–20°C) — should hold a fingerprint indent without feeling warm or greasy
- 1½ cups (300g) plain white granulated sugar
- 5 large egg whites, at room temperature — not whole eggs; yolks will yellow the crumb and muddy the sprinkle colors
- 2 teaspoons (10ml) pure vanilla extract
- 1 teaspoon (5ml) pure almond extract — optional but rounds out the birthday-cake flavor
- 1 cup (240ml) whole milk, at room temperature — not low-fat; fat content affects the richness and crumb structure
- ½ cup (75g) rainbow sprinkle mix (jimmies and nonpareils combined) — fold in at the end; see notes below
For the American Buttercream
- 1½ cups (340g) unsalted butter, softened to exactly 65–68°F (18–20°C) — not warmer — the butter should hold a fingerprint cleanly but still feel cool to the touch; too warm and the frosting will be soupy and will not hold its swoops
- 5 cups (600g) powdered sugar (also called confectioners sugar or icing sugar), sifted — always sift; unsifted powdered sugar lumps produce a streaky, gritty frosting
- 3–4 tablespoons (45–60ml) heavy cream, at room temperature
- 1 tablespoon (15ml) pure vanilla extract
- Pinch of fine sea salt — balances the sweetness
- Additional rainbow sprinkle mix for topping — add after frosting, before serving
Necessary Tools
- Stand mixer with paddle attachment (or hand mixer)
- 9×13 inch (23×33cm) light-colored aluminum baking pan
- Parchment paper
- Kitchen scale (strongly recommended)
- Offset spatula (for frosting)
- Whisk
- Silicone spatula
- Instant-read thermometer (optional — for butter temperature and cake doneness confirmation)
- Oven thermometer (optional — strongly recommended for a first bake)
Before You Start
This recipe requires a stand mixer fitted with the paddle attachment, or a hand mixer with a large bowl. You cannot cream butter and sugar to the correct consistency by hand — the aeration step is what gives this cake its light, open crumb. Do not skip the mixer.
Use a kitchen scale set to grams — strongly recommended. Volume measurements like cups can vary by 20–30% depending on how you scoop. The gram weights in this recipe are the numbers I tested with. If you do not have a scale, use the spoon-and-level method for flour: spoon flour into the measuring cup with a separate spoon, then level the top with a straight edge. Never scoop the cup directly into the flour bag — that packs in 20–30% extra and produces a stiff, dense batter.
Room temperature ingredients are non-negotiable for this recipe. The creaming method depends on emulsification — butter, egg whites, and milk must all be at the same temperature or the batter will look curdled and the crumb will be dense. Take butter out 60–90 minutes before you start. Egg whites and milk need 30 minutes on the counter.
Sprinkle Note: Not all sprinkles behave the same in batter. Nonpareils (the tiny round balls) will bleed color into the batter if they are left sitting in wet batter for more than a few minutes. Jimmies (the longer rod-shaped ones) hold their color far better. For the vivid, confetti-like interior shown in the photos, fold the sprinkles in at the very last step and get the batter into the pan quickly — do not let it sit.
Avoid naturally-dyed or seasonal specialty sprinkles for this recipe. Standard Wilton or store-brand rainbow sprinkles have the correct dye stability for this method.
Before you start, test your baking powder for freshness: drop 1 teaspoon into ½ cup of hot water — it should bubble vigorously and immediately. If it bubbles slowly or not at all, replace it before baking. Dead baking powder produces a flat, dense cake with no lift.
Position your oven rack in the center before preheating. Most home ovens run 15–25°F (8–14°C) hotter or cooler than their display shows. If you have an oven thermometer, confirm the actual temperature before the pan goes in — this is worth doing on a first bake.
This cake uses no chilling. Batter goes straight from the bowl to the pan to the oven.
How to Make Funfetti Sheet Cake
Step 1: Preparing the Pan and Preheating the Oven
Position your oven rack in the center and heat to 350°F (175°C). While the oven heats, line your 9×13 inch (23×33cm) light-colored aluminum baking pan with parchment paper, pressing it flat against the bottom and up the short sides — leave enough overhang on the two short ends to use as handles when lifting the finished cake out. Run a thin layer of butter or non-stick spray over the exposed long-side walls that the parchment does not reach.
Do not use a dark non-stick pan for this recipe. Dark pans absorb more heat and will overbrown the bottom and edges of the cake before the center has time to set — the pale golden edge color visible in the finished photos depends on a light-colored pan.
The pan should be fully lined and ready before you start mixing — this batter moves quickly and should go straight into the pan once it is complete.
Step 2: Whisking the Dry Ingredients
In a large bowl, whisk together your 2¾ cups (325g) cake flour, 1 tablespoon (12g) baking powder, and ½ teaspoon (3g) fine sea salt. Whisk for a full 30 seconds — you are not just combining, you are distributing the baking powder evenly through the flour so no single bite gets a concentrated hit of leavener.
Cake flour has a lower protein content than all-purpose flour — around 7–8% versus 11–12%. That lower protein means less gluten development and a finer, more tender crumb. It is the reason the cross-section looks bright white and tightly springy rather than chewy or bready. Do not substitute all-purpose flour directly — if you must, use 2½ cups (295g) all-purpose flour plus ¼ cup (30g) cornstarch in its place, which approximates the lower protein behavior.
The flour mixture should look uniform and pale — no visible pockets of baking powder remaining.
Step 3: Creaming the Butter and Sugar Until Pale and Aerated
In your stand mixer fitted with the paddle attachment, add your 1 cup (225g) softened unsalted butter. Beat on medium speed (speed 4 on a KitchenAid) for 2 minutes alone, until the butter is smooth and slightly lighter in color. Then add your 1½ cups (300g) granulated sugar all at once and beat on medium-high speed (speed 6) for a full 5 minutes. Set a timer. Do not estimate.
The sugar crystals are cutting tiny air pockets into the butter as it beats. Those air pockets are what give this cake its lift and open crumb — the baking powder expands them during baking, but they have to exist first. At 5 minutes, the mixture should have roughly doubled in volume and turned from yellow to nearly white.
The creamed butter and sugar should look pale ivory, nearly white, and fluffy — not dense yellow or grainy. If it still looks yellow and heavy at 5 minutes, beat for another 60 seconds and reassess. Undermixed butter-sugar is the most common reason this cake comes out dense.
🗒 Luna’s Note: I use the full 5 minutes every time. The first few batches I made, I stopped at 3 minutes because it “looked fine.” It was not fine. The crumb was noticeably heavier. Five minutes is not a suggestion.
Step 4: Adding the Egg Whites and Extracts Without Breaking the Emulsion
With the mixer on medium-low (speed 3), add your 5 large egg whites one at a time, waiting until each is fully incorporated before adding the next — approximately 20 seconds between additions. After all whites are in, add your 2 teaspoons (10ml) pure vanilla extract and 1 teaspoon (5ml) pure almond extract, and beat for 30 more seconds.
The egg whites must be at room temperature. Cold whites hit warm creamed butter and the emulsion breaks — the batter will look curdled and granular, and no amount of additional mixing will fully recover it. If your batter looks broken at this stage, it means either the whites were too cold or they were added too fast. The crumb will still bake but will be denser and less even than the result shown in the photos.
The batter should look smooth, pale, and glossy after the whites are fully incorporated — not streaky, not grainy, and no visible separation between the butter and liquid. That smooth glossy surface is the emulsion holding correctly.
Step 5: Alternating Dry Ingredients and Milk for a Stable Batter
With the mixer on low (speed 2), alternate adding the flour mixture and the 1 cup (240ml) whole milk in five additions: flour → milk → flour → milk → flour. Start and end with flour. Add each addition slowly and wait until it is just barely incorporated before adding the next.
Do not rush this step and do not increase the mixer speed. Each alternating addition keeps the batter’s emulsion stable — dumping the dry and liquid in together at once overwhelms the emulsion and produces a batter that looks broken and bakes up with an uneven, gummy crumb. Ending with flour also coats the gluten strands last, which limits their development and keeps the crumb tender.
Stop the mixer when you can still see a few faint streaks of flour — they will incorporate when you fold in the sprinkles.
The finished batter should be thick, smooth, and ribbon-like — it should fall from a spatula in a wide, slow ribbon rather than plopping off in chunks. If it looks overly stiff, add 1 tablespoon of milk and fold gently.
Step 6: Folding in the Sprinkles
Remove the bowl from the mixer. Using a large silicone spatula, fold in your ½ cup (75g) rainbow sprinkle mix by hand. Use slow, wide strokes from the bottom of the bowl upward — count 10 to 12 strokes maximum from the moment the sprinkles touch the batter.
Do not use the mixer for this step. Paddle speed crushes the jimmies and accelerates color bleed from the nonpareils — the batter will turn muddy and the confetti effect disappears. Hand folding also prevents gluten overdevelopment at the end of the mixing process.
Work quickly. The longer the nonpareils sit in wet batter, the more dye bleeds out. Get the batter into the pan within 2 minutes of adding the sprinkles.
The batter should show bright, distinct sprinkle colors suspended throughout — not bleeding trails or a tinted batter. That is the batter you want in the pan.
Step 7: Baking Until the Edges Pull and the Center Springs Back
Pour the batter into your prepared pan and use your offset spatula to spread it into an even layer that reaches all four corners. The batter is thick — it will not self-level the way a thinner oil-based batter does. Take an extra 20 seconds to push it into the corners.
Bake on the center rack for 28–32 minutes. Do not open the oven door before 25 minutes — the sudden temperature drop during the aeration phase deflates the structure and the center will sink into a depression that the frosting cannot hide.
At 28 minutes, check for doneness: the edges should be pale golden and just beginning to pull away from the sides of the pan, and the center should spring back immediately when you press it lightly with one fingertip. If the center leaves an indent that fills back in slowly, give it 2 more minutes and check again.
Do not wait for a deep golden-brown color on the surface. This is a white cake — the top will never go deeply golden. Pulling it at pale golden is correct. Waiting for more color produces a dry, crumbly result.
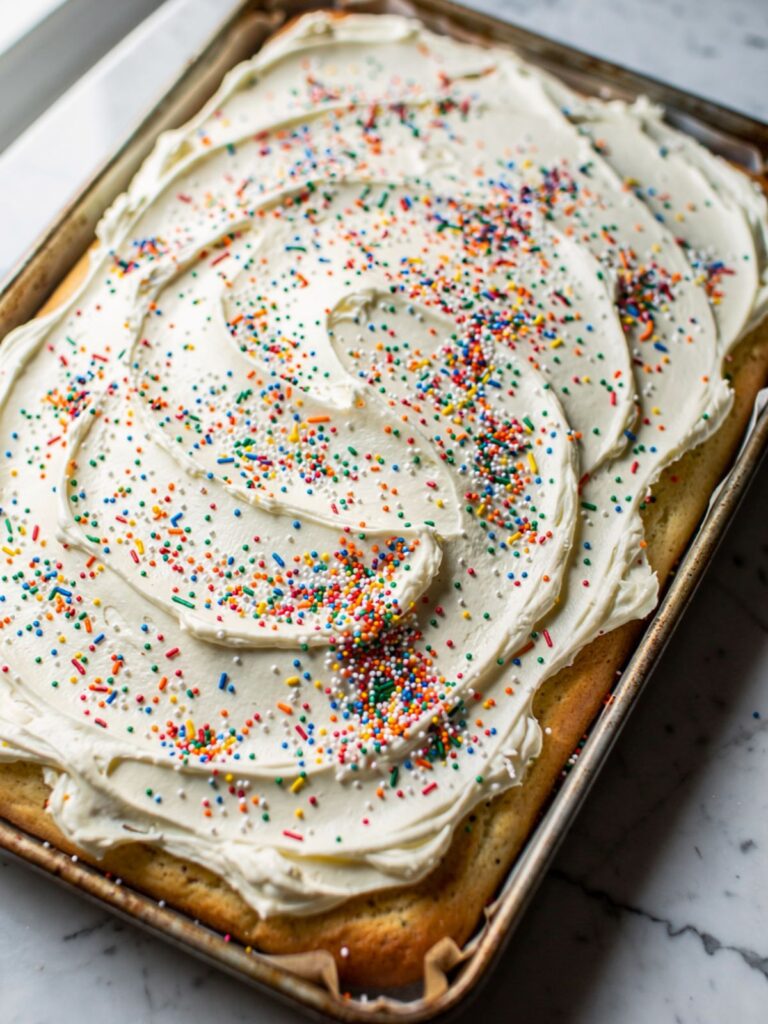
The finished cake in the pan shows edges that have pulled cleanly from all four sides, a level surface with no sink in the center, and a pale golden perimeter — this is exactly the doneness state you want.
🗒 Luna’s Note: I use a digital thermometer to confirm internal doneness when I’m not certain — the center of this cake should read 205–210°F (96–99°C). The springback test is reliable, but the thermometer removes all doubt on a first bake.
Step 8: Cooling Completely Before Frosting
Remove the pan from the oven and place it on a wire rack. Do not cut the heat immediately and walk away — the pan itself continues conducting heat into the cake base for several minutes after it leaves the oven. This carryover heat is finishing the bottom of the cake while it cools: it is why the center feels slightly soft right out of the oven but firms correctly as it cools. Cool in the pan for 30 minutes — not more, not less. After 30 minutes, lift the cake out using the parchment overhang and transfer to the wire rack to cool for a further 60 minutes before frosting.
Do not frost a warm cake. The butter in the American buttercream will melt on contact, the frosting will slide off, and the sprinkles will sink into the surface rather than sitting on top. The cake must be completely cool — not just “not hot.” Pressing your palm flat on the center should feel room temperature, not even slightly warm.
The fully cooled cake should feel room temperature throughout — cool under your palm, firm and set, no soft spots in the center.
Step 9: Making the American Buttercream
In your clean stand mixer bowl fitted with the paddle attachment, beat your 1½ cups (340g) unsalted butter, softened to exactly 65–68°F on medium speed for 3 full minutes until it is pale, fluffy, and has nearly doubled in volume. This step is not optional — butter that is beaten alone first produces a noticeably lighter, creamier frosting than butter that goes straight to powdered sugar.
With the mixer on low, add your 5 cups (600g) sifted powdered sugar in three additions — roughly 2 cups at a time — waiting after each addition until the sugar is fully incorporated before adding more. Adding it all at once creates a powdered-sugar cloud and produces uneven mixing. Add your 1 tablespoon (15ml) pure vanilla extract and a pinch of fine sea salt with the second addition of sugar.
Once all the sugar is in, add 3 tablespoons (45ml) heavy cream and increase to medium-high speed (speed 6) for 2 minutes. The frosting will lighten in color and become noticeably fluffier. If it looks too stiff, add the fourth tablespoon of cream and beat for 30 more seconds. If it looks too thin, refrigerate for 10 minutes and re-beat.
The finished buttercream should be off-white, smooth, and hold a soft peak when you pull the paddle away — not soupy, not stiff enough to tear. Run a spatula through it: it should leave a clean channel that holds its shape.
Step 10: Frosting and Finishing
Spoon the buttercream onto the center of the cooled cake and use your offset spatula to spread it in large, confident circular sweeps from the center outward, building swirls and swoops as you work toward the edges. The frosting should be about ½ inch thick across the surface — thick enough to see the swoops holding their texture.
Immediately scatter your additional rainbow sprinkles across the frosted surface. Do not wait — the frosting sets a light crust within 15 minutes at room temperature, and sprinkles added to set frosting do not adhere as cleanly.
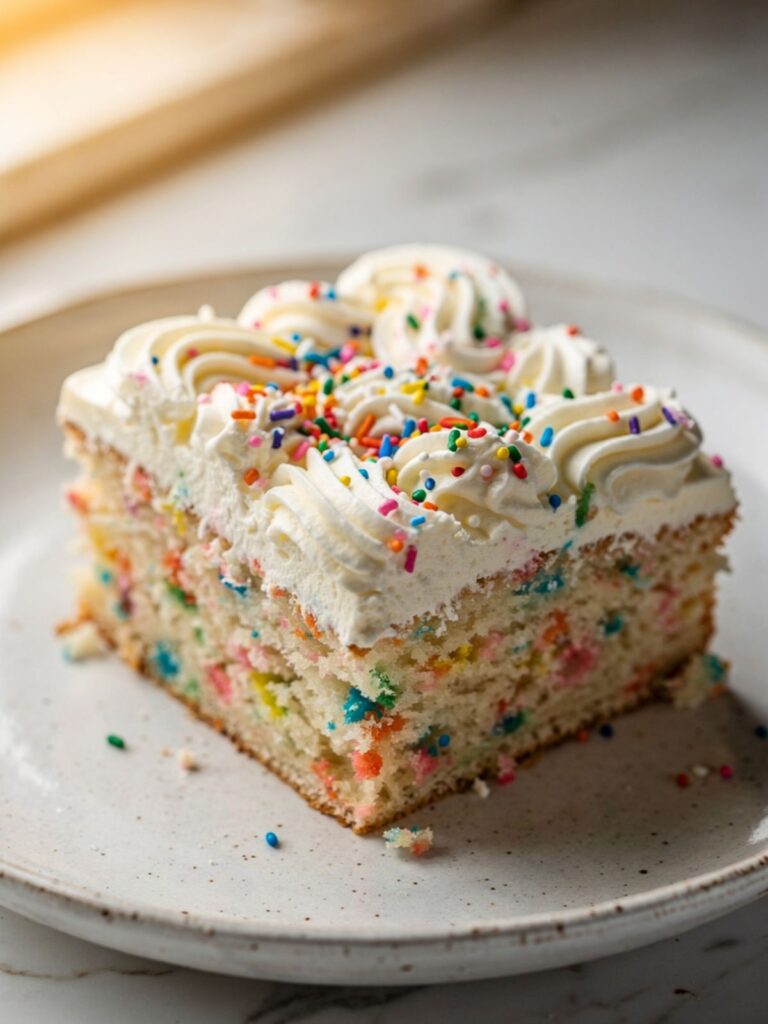
For the piped version shown in the plated slice: fit a large piping bag with a Wilton 1M or 2D star tip and pipe rosette swirls across the surface instead of using the offset spatula. The rosette version is bakery-style and looks more decorative for a birthday presentation; the swoop version is faster and equally good for a casual celebration.
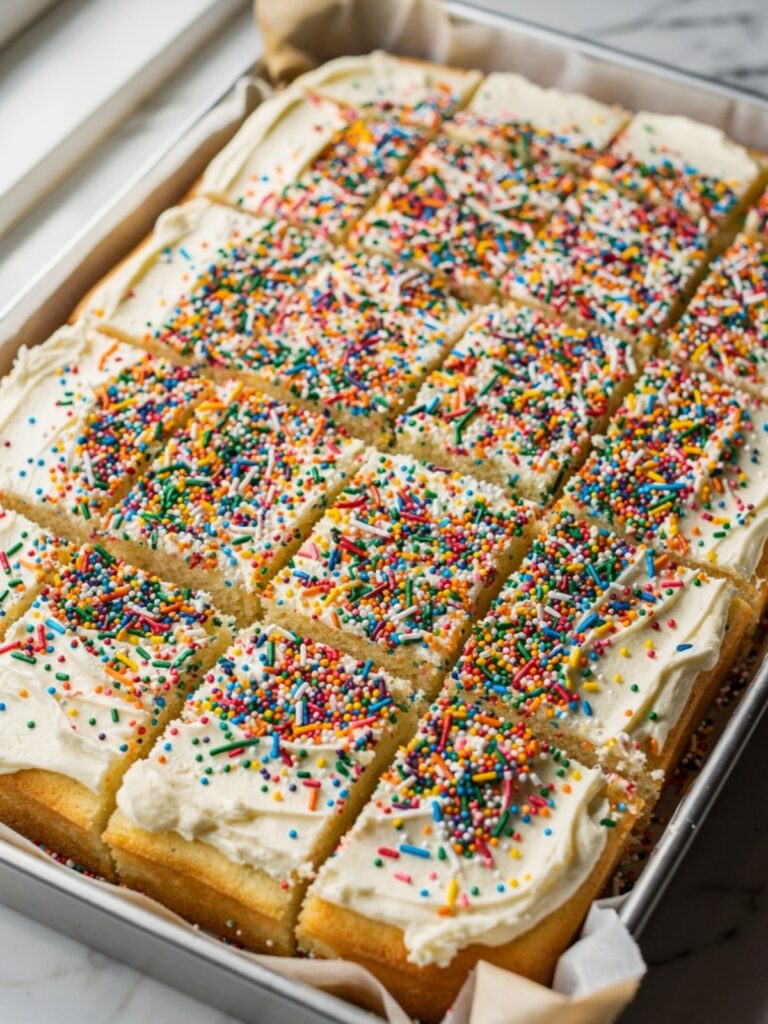
To portion: cut 4 columns and 3 rows — a 4×3 grid — using a long sharp knife. Each square is approximately 3×3 inches and weighs approximately 120–130g before frosting, or 170–185g with frosting. Wipe the knife clean between cuts for the sharpest frosting edges.
The finished frosted cake should show distinct swoop marks from the offset spatula holding their shape — the frosting is thick enough to hold texture but soft enough that the spatula moves through it without dragging. Add sprinkles while the swoops are still soft.
🗒 Luna’s Note: I scatter the sprinkles from about 10 inches above the cake rather than pinching and dropping them close. The height gives a more random, even distribution — you avoid the clumps that happen when you release them too close to the surface.
The Science Behind Funfetti Sheet Cake
Egg Whites Only — Why the Crumb Is Bright White
I made this cake with whole eggs for three batches before I understood what I was actually looking at in the photos. The crumb was fine — pale, tender, baked correctly. But it had a faint yellow cast, and the sprinkle colors read differently against that background. A red jimmy in a yellow crumb looks orange. Against a white crumb, it reads red. The funfetti effect is only as good as the background it sits against.
The chemistry is straightforward: egg yolks contain fat, carotenoid pigments, and emulsifying lecithin. The pigments are what yellow the crumb. Egg whites contain only protein — primarily ovalbumin — which coagulates during baking into a structure that is genuinely white and optically neutral. Removing the yolks also changes the fat balance of the recipe, which is why the butter quantity in this recipe is higher than in a standard whole-egg cake: the fat from the yolks has to come from somewhere, and it comes from creamed butter instead.
The result you see in the cross-section — that vivid confetti against a snow-white background — is not a styling choice. It is a direct consequence of the egg white decision. If you substitute whole eggs here, every color in the sprinkle mix will read differently in the finished cake.
The Creaming Method — How Air Becomes Texture
When butter and sugar are beaten together for five minutes on medium-high speed, the sharp edges of the sugar crystals cut microscopic air pockets into the fat matrix. This is the creaming method, and the aeration that happens in this step is the primary leavening mechanism in this cake — more significant, in terms of final texture, than the baking powder.
The baking powder does not create air from nothing. It expands air that already exists. The bubbles formed during creaming become the scaffold that the baking powder inflates during baking. A cake creamed for two minutes instead of five has fewer, larger, less evenly distributed air pockets going into the oven — and it bakes up visibly denser, with a tighter crumb and less lift. The pale ivory color that develops during extended creaming is a direct visual signal that aeration is happening: the butter is going from yellow and dense to white and fluffy because it is becoming mostly air.
This is also why butter temperature matters so precisely. Butter that is too warm — above 70°F (21°C) — is too soft to hold the air pockets the sugar is cutting into it. The fat flows around the sugar crystals instead of trapping air between them, and the creaming step produces volume without real aeration. Too cold — below 60°F (16°C) — and the butter is too stiff for the sugar to cut into it at all. The 65–68°F window is the range where the fat is pliable enough to be aerated but firm enough to hold what is cut into it.
🗒 Luna’s Note: I keep an instant-read thermometer next to my stand mixer specifically for butter temperature. Not because I am obsessive — because I ruined three batches before I started checking. The difference between 65°F and 72°F butter is a noticeably denser cake. It is worth 10 seconds to check.
Sprinkle Color Stability — Why Nonpareils Bleed and Jimmies Don’t
The two sprinkle types in this recipe behave very differently in wet batter, and understanding why changes how you use them. Jimmies — the elongated rod-shaped sprinkles — are made from sugar, corn syrup, and confectioner’s glaze (a shellac-based coating). That outer coating is hydrophobic: it resists moisture and keeps the dye inside the sprinkle rather than releasing it into the surrounding batter. Jimmies can sit in batter for several minutes without meaningful color loss.
Nonpareils — the tiny round balls — have no protective coating. They are compressed sugar with dye on the surface, and they begin releasing color the moment they contact moisture. At one minute of contact with wet batter, the bleeding is minimal. At five minutes, the batter around each nonpareil turns a soft pastel version of that sprinkle’s color. At ten minutes, the entire batter takes on a grey-pink-orange tint and the individual confetti effect is gone.
This is why the method step instructs you to fold sprinkles in last and get the batter into the pan immediately. For bakeries that make funfetti cake in large quantities and cannot bake immediately, the common workaround is to use jimmies only and omit nonpareils entirely — or to use a jimmies-only mix labeled “bake-stable.” For a home baker making one pan and baking right away, the mixed sprinkle approach works perfectly if the timing is respected. If you prefer a fully jimmies-only approach, reduce the quantity to ⅓ cup (50g) — jimmies are larger and lower density, so the same weight gives more visual coverage than a mixed blend.
For similar funfetti-style bakes, my chocolate chip cookie cake uses a comparable sprinkle fold technique worth comparing.
Funfetti Sheet Cake Troubleshooting & Pro-Tips
Common Mistakes
1. The cake used the wrong flour — and the crumb is chewy, gummy, or dense
Symptom: The crumb feels heavy and slightly rubbery when you bite into it. The texture is springy in the wrong direction — not airy and tender, but elastic and compressed. The slices look pale and tight rather than the open, light interior visible in the cross-section.
Cause: All-purpose flour substituted directly for cake flour without the cornstarch adjustment. All-purpose flour has 11–12% protein content versus cake flour’s 7–8%. That extra protein forms more gluten when mixed, which tightens the crumb structure and produces a noticeably denser, chewier result. Self-rising flour is an equally common wrong substitution — it contains baking powder already and the additional leavening in the recipe produces an over-risen cake that collapses.
Fix: No fix once baked. The crumb structure is set. Serve with generous buttercream and chilled — cold temperature firms the crumb and reduces the perception of density. Note the substitution for next time.
Prevention: Use only cake flour as specified. If you must substitute, use 2½ cups (295g) all-purpose flour plus ¼ cup (30g) cornstarch — sift them together twice before using. This approximates cake flour’s lower protein behavior.
2. The cake stuck to the pan and the edges broke when lifting
Symptom: The cake pulls away from the parchment unevenly, or the long sides without parchment coverage tear when you try to lift the cake out, leaving chunks behind in the pan.
Cause: The parchment overhang was too short to grip properly, the exposed long-side pan walls were not greased, or the cake was lifted out before it had cooled enough in the pan — warm cake is structurally weaker and tears more easily at the edges.
Fix: If the damage is at the edges only, press the broken pieces back against the cake while it is still slightly warm — they will re-adhere as it cools and the frosting will cover the seam completely. If the center tore, let it cool fully, frost generously, and serve directly from the pan without attempting to transfer it.
Prevention: Line the pan with parchment paper long enough to extend 2 inches past both short ends. Grease the exposed long sides before adding batter. Cool in the pan for the full 30 minutes before lifting.
3. The baking powder did not work — the cake barely rose
Symptom: The baked cake sits noticeably lower in the pan than expected — less than 1 inch of height rather than the 1.5-inch slab visible in the sliced photos. The crumb is dense and slightly compressed throughout, with almost no air pockets visible in the cross-section.
Cause: Expired or dead baking powder. Baking powder loses its leavening activity within 6–12 months of opening, regardless of the expiration date on the container. Humidity exposure accelerates this — a container stored near the stove or in a humid cabinet degrades faster than one stored in a cool, dry place.
Fix: No fix once baked. The structure is set. Use the flat cake as a trifle base — cut into cubes, layer with buttercream and fresh fruit in a large glass bowl. The flavor is correct; only the rise is missing.
Prevention: Test baking powder freshness before every use: drop 1 teaspoon into ½ cup of hot water. It should bubble vigorously immediately. Flat or slow bubbling means it is too weak — replace the container before baking.
4. The cake is dense and tight — not light and fluffy
Symptom: The crumb looks compressed rather than open. The slices feel heavy when you lift them and the texture is more like a dense pound cake than the airy, springy result shown in the cross-section photo.
Cause: Almost always the creaming step. Either the butter was the wrong temperature (too warm or too cold), the creaming time was cut short, or egg whites were under-measured. A secondary cause is cake flour weighed incorrectly — too much flour stiffens the batter and prevents full aeration.
Fix: There is no fix for an already-baked dense cake — the structure is set. Serve it with extra frosting or slice it thin and layer it with whipped cream as a shortcake-style dessert. The flavor is correct; only the texture is off.
Prevention: Check butter temperature before creaming — 65–68°F, confirmed with a thermometer. Beat for the full 5 minutes. Weigh egg whites to 150g total. Weigh cake flour rather than scooping by volume.
5. The sprinkle colors bled into the batter and the crumb looks muted or grey-pink
Symptom: Instead of vivid distinct confetti dots, the crumb has a soft pastel tint throughout and the individual sprinkle colors are hard to distinguish. The cake does not look like the sliced cross-section in the photos.
Cause: The sprinkles — particularly the nonpareils — sat in the wet batter too long before baking. Color bleed from nonpareils begins within 2–3 minutes of contact with moisture. Overmixing the sprinkles into the batter with the electric mixer rather than folding by hand also accelerates bleed by crushing the nonpareil coating.
Fix: No visual fix once baked — the color has already transferred into the crumb matrix. The flavor is completely unaffected.
Prevention: Fold sprinkles in by hand with a spatula, maximum 12 strokes. Get the batter into the pan and into the oven within 2 minutes of adding the sprinkles. If you need to pause between mixing and baking, add the sprinkles as the very last step rather than folding them in and then waiting.
6. The frosting is soupy and will not hold the swoop texture
Symptom: The buttercream spreads flat immediately after the offset spatula passes through it. The swoop marks disappear within seconds rather than holding their shape. The frosting looks glossy and slightly greasy rather than matte and fluffy.
Cause: Butter that was too warm when beaten — above 70°F (21°C) — produces buttercream that looks correctly smooth during mixing but cannot hold structure at room temperature. Adding too much heavy cream also causes this. A warm cake surface will melt even correctly-made buttercream if it makes contact with residual heat.
Fix: Refrigerate the made buttercream for 15 minutes, then re-beat on medium speed for 60 seconds. Do not add more powdered sugar — it will make the frosting gritty rather than fixing the structure. If the cake itself is still warm, wait — there is no fix for frosting applied to a warm surface except scraping it off and starting again once the cake is fully cold.
Prevention: Confirm butter temperature before starting — 65–68°F. Ensure the cake is fully cooled before frosting. Add heavy cream one tablespoon at a time and assess consistency before adding more.
7. The cake has a sunken center
Symptom: The center of the cake is visibly lower than the edges. The frosting layer is thicker in the middle to compensate, or the center dips enough to be visible even under frosting.
Cause: Oven door opened before 25 minutes, underbaking, or too much baking powder causing a rapid rise followed by a structural collapse as the cake cools.
Fix: If the sink is shallow — less than ¼ inch — thick frosting will cover it completely without visible depression from the outside. If the sink is deeper, fill it with extra buttercream before the final frosting layer and smooth over the top. The texture of the sunken area may be slightly denser than the edges, but the flavor is unaffected.
Prevention: Do not open the oven before 25 minutes. Test doneness at 28 minutes with the springback method. Measure baking powder by weight, not volume.
Expert Pro-Tips
1. The room-temperature test for butter that actually works. Press your thumb firmly into the center of the butter stick. It should leave a clean indent without the butter feeling warm, greasy, or yielding too easily. If the indent leaves a shiny, slightly melted surface — the butter is too warm. If your thumb meets resistance and the butter cracks rather than denting — it is too cold. The fingerprint indent at zero resistance is the correct state for both the cake butter and the frosting butter, though both are used at the same temperature for different reasons.
2. Weigh the egg whites, not just the count. Five large egg whites should weigh approximately 150g (30g per white). Eggs vary in size more than the carton label suggests, and this recipe is calibrated to a specific total white weight. If your whites come in under 140g, add a sixth white. If they come in over 165g, use only four and add one tablespoon of the extra white to reach the target weight. Too much egg white protein produces a slightly rubbery, over-set crumb.
3. Run the offset spatula under hot water before frosting. A warm offset spatula glides through buttercream rather than dragging through it. Dip it in hot water, dry it quickly, and use it immediately — it stays warm for about 90 seconds of spreading. For a smooth, bakery-finish surface, re-warm the spatula every two passes. For the swoop finish, one warm spatula pass per swoop gives cleaner, sharper texture marks.
4. Add the sprinkle garnish in two stages. Scatter half the garnish sprinkles immediately after frosting — they sink slightly into the soft surface and adhere well. Wait 10 minutes, then add the second half on top of the first layer. The second layer sits higher and catches light differently from the sunken layer, which gives the finished cake the layered, abundant sprinkle density visible in the whole-pan photo rather than a flat single-layer scatter.
How to Store Funfetti Sheet Cake
Room Temperature
Store the frosted cake covered loosely with plastic wrap or a cake dome — do not press the wrap directly onto the frosting surface or you will flatten the swoop texture and pull sprinkles off when you remove it. A tent of plastic wrap with a few toothpicks to hold it off the frosting surface works well if you do not have a cake dome large enough for a quarter sheet pan.
The frosted cake keeps at room temperature for up to 2 days. After 2 days the buttercream begins to develop a harder outer crust and the cake crumb starts to dry at the cut edges. Day 1 and Day 2 are both excellent — Day 1 has the softest frosting texture, Day 2 has a slightly firmer frosting that some people prefer for clean slicing.
Do not store in a zip-lock bag — the plastic presses directly onto the frosting and ruins the surface texture. Do not store in a sealed lidded container unless the container is deep enough that the lid clears the frosted surface entirely.
If your kitchen runs above 75°F (24°C), refrigerate after 24 hours — American buttercream made with real butter can go greasy and begin to separate in a hot kitchen.
Refrigerator
The frosted cake can be refrigerated for up to 5 days. Cover it loosely with plastic wrap tented over toothpicks — not pressed directly onto the surface — or slide the pan into a large zip-lock bag with enough air inside to keep the bag off the frosting.
Cold buttercream firms significantly in the fridge — the cake will feel noticeably stiffer when you pull it out. Pull the cake from the refrigerator 45 minutes before serving and let it come back toward room temperature before slicing. Cold buttercream has a waxy, dense texture that is less pleasant than the soft, creamy version at room temperature. The cake crumb also reads as drier when cold — it has not actually dried out, but cold fat feels less moist than warm fat in the mouth.
🗒 Luna’s Note: I refrigerate this cake after the first day not because it needs it — the butter in the frosting is shelf-stable at normal room temperature — but because I prefer the way the frosting sets overnight in the fridge. It slices cleaner the next day from cold.
Freezer — Baked and Frosted
The frosted cake freezes well for up to 2 months. To freeze: place the cut cake squares individually on a parchment-lined sheet pan and freeze uncovered for 1 hour until the frosting is fully solid. Then wrap each square in plastic wrap, followed by a layer of aluminum foil. Store wrapped squares in a freezer-safe zip-lock bag or lidded container.
The double-wrap method is essential — single-layer plastic wrap allows freezer burn to reach the frosting surface and the sprinkle colors will dull. The flash-freeze step before wrapping prevents the frosting from smearing inside the wrap.
Thaw individual squares at room temperature for 45–60 minutes, or overnight in the refrigerator. The buttercream will return to a soft, creamy texture as it warms. The cake crumb holds up exceptionally well from frozen — better than most layer cakes because the quarter-sheet format means no structural layers to separate or slide.
Freezer — Unbaked
The baked and cooled cake layers can be frozen unfrosted for up to 3 months. Wrap the cooled cake tightly in two layers of plastic wrap directly against the cake surface (no air space), then in a layer of foil. Thaw overnight in the refrigerator, still wrapped, then bring to room temperature for 1 hour before frosting.
The buttercream should always be made fresh — do not freeze and thaw it alongside the cake. Thawed buttercream has a slightly grainy texture that does not fully resolve with re-beating. Fresh frosting takes 15 minutes to make and is worth the effort on the day of serving.
Do not freeze raw batter. The sprinkles will bleed extensively during the freeze-thaw cycle and the leavening will partially activate and then deflate, producing a flat, dense bake.
Serving Suggestion
Serve this cake at room temperature — not cold from the fridge, and not the same day it comes out of the oven if you can help it. The buttercream needs at least two hours to set after application before it slices cleanly. If you frost it and cut it immediately, the frosting smears across the cut face rather than holding a clean layer edge.
I serve this one straight from the pan. No cake board, no transfer, no plating drama — the parchment comes out with the cake, I slide it onto a cutting board, and I cut it into 12 squares at the table. When I want something alongside it, I make a strong black coffee — no sugar. The sweetness of the buttercream and the bitterness of the coffee together is the correct combination. Nothing else I have tried works as well.
For the birthday context specifically: this is the cake I bring when someone wants a birthday cake but not the full production of a layer cake. It feeds 12 people cleanly, it travels in its pan, and it looks deliberately festive rather than accidentally festive. The sprinkles do the visual work so you do not have to.
Day 2 is genuinely good. The crumb tightens very slightly overnight but the moisture redistributes evenly, and the frosting develops a thin crust on the outer surface that gives each bite a faint snap before the soft interior. Some people — including me — prefer it on Day 2 over Day 1.
This does not travel well sliced and stacked. If you need to transport it, keep it whole in the pan with the parchment tent and slice at the destination. Frosted squares stacked in a container collapse the frosting and shift the sprinkle layer.
Frequently Asked Questions About Funfetti Sheet Cake
Can I make funfetti sheet cake ahead of time?
Yes — and it is actually better made partially ahead. Bake and cool the cake up to 2 days before serving, wrap it tightly in plastic wrap, and store at room temperature or in the refrigerator. Make the buttercream and frost on the day of serving, or frost the night before and refrigerate loosely covered. The crumb stays moist for 48 hours unfrosted because the sealed wrap traps moisture against the surface and prevents the cut edges from drying out. If you frost ahead, pull the cake from the refrigerator 45 minutes before serving so the buttercream returns to its soft, creamy texture.
Can I use whole eggs instead of egg whites in funfetti cake?
You can, but the result will be noticeably different from what is shown in the photos. Whole eggs introduce yolk fat and carotenoid pigments that turn the crumb pale yellow — the sprinkle colors will read differently against that background, and the vivid confetti effect depends entirely on the white crumb as a backdrop. Whole eggs also add richness that shifts the texture from light and springy toward denser and more custardy. If you use whole eggs, reduce to 3 large whole eggs in place of the 5 whites, and expect a yellow-crumbed, slightly richer cake. It will taste good — it just will not be funfetti in the visual sense of the word.
Why did my funfetti cake come out dense?
Dense funfetti cake is almost always a creaming problem. The 5-minute butter-and-sugar step is where primary aeration happens — cutting it short leaves fewer air pockets for baking powder to expand during baking. Butter above 70°F (21°C) is too soft to trap air between sugar crystals. Check butter temperature, set a timer, and do not estimate the creaming time.
Can I make this funfetti cake into cupcakes?
Yes. This batter produces approximately 24 standard cupcakes. Line two standard 12-cup muffin tins with paper liners, fill each cup two-thirds full, and bake at 350°F (175°C) for 18–22 minutes — until the tops spring back when pressed and a toothpick inserted in the center comes out with moist crumbs but no wet batter. The cupcake format bakes faster than the sheet pan because the smaller volume sets more quickly — do not use the sheet cake timing or they will overbake and dry out. The buttercream quantity in this recipe is sufficient to frost 24 cupcakes generously with a piped swirl using a star tip. For more funfetti-style bakes in cupcake format, my snickerdoodle cupcakes use a similar white cake base worth comparing.
How does altitude or humidity affect this funfetti sheet cake?
At high altitude — above 3,500 feet (1,065m) — leavening gases expand more aggressively in the reduced air pressure, which causes the cake to rise rapidly and then collapse before the structure sets. Reduce the baking powder to 2 teaspoons (8g) and increase the whole milk by 2 tablespoons (30ml) to compensate for the faster moisture loss. In high humidity — above 70% relative humidity — the powdered sugar in the buttercream absorbs ambient moisture and the frosting can become looser and stickier than intended. Make the buttercream in a cool kitchen, use it immediately after beating, and add 1 extra cup (120g) of sifted powdered sugar to the frosting if the consistency is too soft to hold swoops.
Can I double this funfetti sheet cake recipe?
Yes, for a half sheet pan (13×18 inches / 33×46cm). Double all ingredients except baking powder — increase it to only 1 tablespoon plus 1½ teaspoons (18g) rather than the full double. Leavening does not scale linearly; too much causes rapid over-rise and collapse. Bake time increases to 32–38 minutes — begin checking at 30 using the springback test.
What sprinkles work best in funfetti cake — and can I use any kind?
Standard rainbow jimmies and nonpareils from grocery store brands (Wilton, Betty Crocker, store label) work best for this recipe. Avoid naturally-dyed sprinkles — the dyes used in natural sprinkles are water-soluble and bleed far more aggressively into batter than standard synthetic dyes, producing a grey or muddy crumb regardless of how quickly you bake. Avoid jumbo or chunky sprinkle shapes — they sink to the bottom of the batter during baking because their weight-to-surface-area ratio is too high for this batter density to suspend them. Sequin sprinkles and sugar pearls have a similar sinking problem. The standard mixed jimmies-and-nonpareils blend gives the confetti effect because the two sizes and shapes catch light differently — the variation is what makes the crumb look active rather than flat.
More Cakes You’ll Love
- Texas Sheet Cake — a deeply fudgy chocolate sheet cake with poured ganache frosting, same single-pan format with zero layer-stacking required
- Oreo Poke Cake — a vanilla sheet cake soaked with cookies-and-cream filling and topped with Oreo buttercream, similar base method with a dramatic visual payoff

Funfetti Sheet Cake Recipe
Ingredients
Equipment
Method
- Position oven rack in the center and heat to 350°F (175°C), then line a 9×13 inch (23×33cm) light-colored aluminum baking pan with parchment paper leaving overhang on both short ends, and grease the exposed long-side walls.
- In a large bowl, whisk together 2¾ cups (325g) cake flour, 1 tablespoon (12g) baking powder, and ½ teaspoon (3g) fine sea salt for 30 seconds until evenly combined and set aside.
- In a stand mixer fitted with the paddle attachment, beat 1 cup (225g) softened unsalted butter on medium speed for 2 minutes, then add 1½ cups (300g) granulated sugar and beat on medium-high for a full 5 minutes until pale ivory, nearly white, and fluffy.
- With the mixer on medium-low, add 5 large room-temperature egg whites one at a time waiting 20 seconds between each addition, then add 2 teaspoons (10ml) vanilla extract and 1 teaspoon (5ml) almond extract and beat for 30 more seconds until the batter is smooth and glossy.
- With the mixer on low, alternate adding the flour mixture and 1 cup (240ml) whole milk in five additions starting and ending with flour, mixing until just incorporated after each addition and stopping when a few faint flour streaks remain.
- Remove the bowl from the mixer and fold in ½ cup (75g) rainbow sprinkle mix by hand using a silicone spatula with 10 to 12 wide strokes, then immediately transfer the batter to the prepared pan and spread into an even layer reaching all four corners.
- Bake on the center rack for 28–32 minutes until the edges are pale golden and just pulling from the sides of the pan and the center springs back immediately when pressed lightly — do not open the oven before 25 minutes.
- Cool in the pan on a wire rack for 30 minutes, then lift out using the parchment overhang and cool on the rack for a further 60 minutes until completely room temperature before frosting.
- In the clean stand mixer bowl with the paddle attachment, beat 1½ cups (340g) softened unsalted butter on medium speed for 3 full minutes until pale and fluffy, then add 5 cups (600g) sifted powdered sugar in three additions on low speed followed by 1 tablespoon (15ml) vanilla extract and a pinch of salt, then add 3–4 tablespoons (45–60ml) heavy cream and beat on medium-high for 2 minutes until light and smooth.
- Spoon buttercream onto the cooled cake and spread with an offset spatula in large circular sweeps to create swoop texture approximately ½ inch thick, then immediately scatter rainbow sprinkles across the frosted surface in two stages 10 minutes apart for layered coverage, and slice into a 4×3 grid for 12 squares.