
No-Bake Strawberry Cheesecake Crunch Bites
These are the dessert bites I make when I want something that looks like it came from a specialty dessert shop but takes no oven, no thermometer, and no piping bag. There is no dairy butter and no eggs in this recipe — the structure comes entirely from full-fat block cream cheese, cold temperature, and time in the freezer.
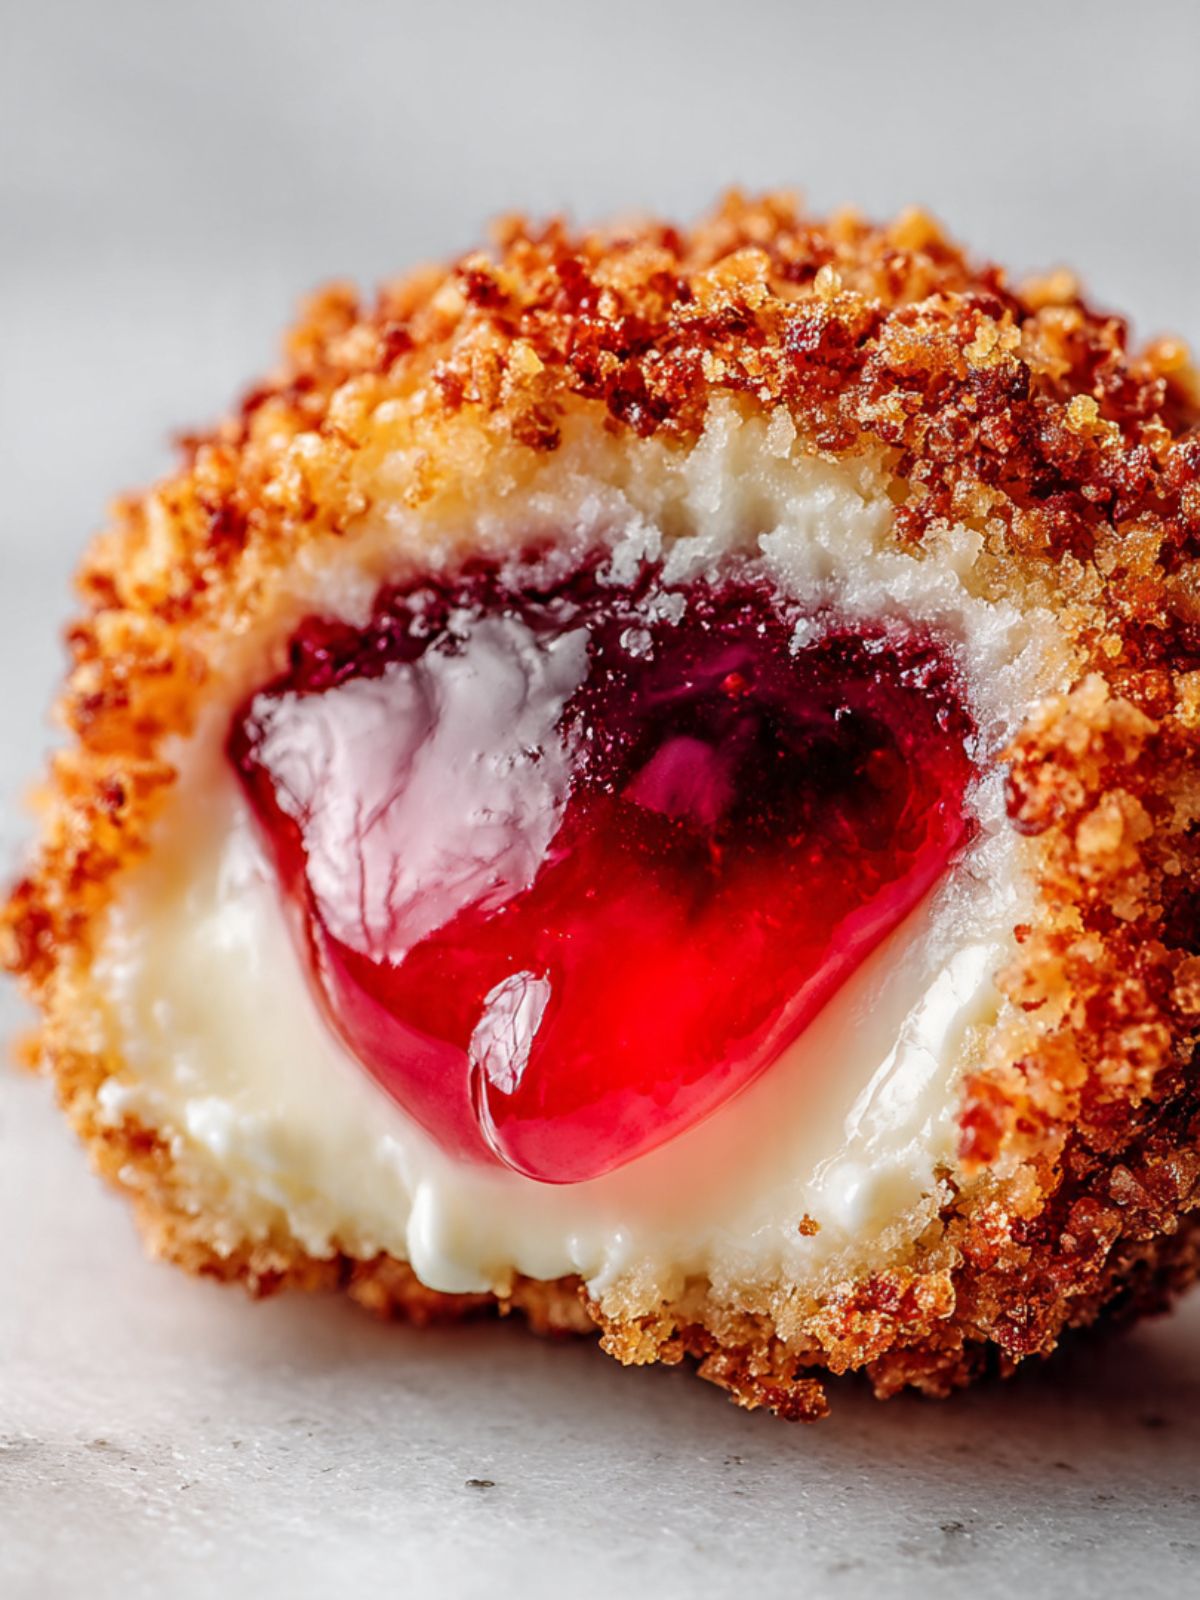
I tested the jam-freezing time across four batches — 30 minutes, 1 hour, 2 hours, and overnight. The 30-minute and 1-hour cores looked firm but compressed and smeared through the cream cheese wall the moment I applied any hand pressure during rolling. The 2-hour cores held their shape through assembly but were borderline — the center was solid but the edges were still slightly pliable. The overnight cores were the only version where every single ball came out with the clean, defined ruby center shown in the cross-section photos above. I kept the 2-hour minimum in the recipe because it works, but I personally always freeze overnight. The difference in result is visible.
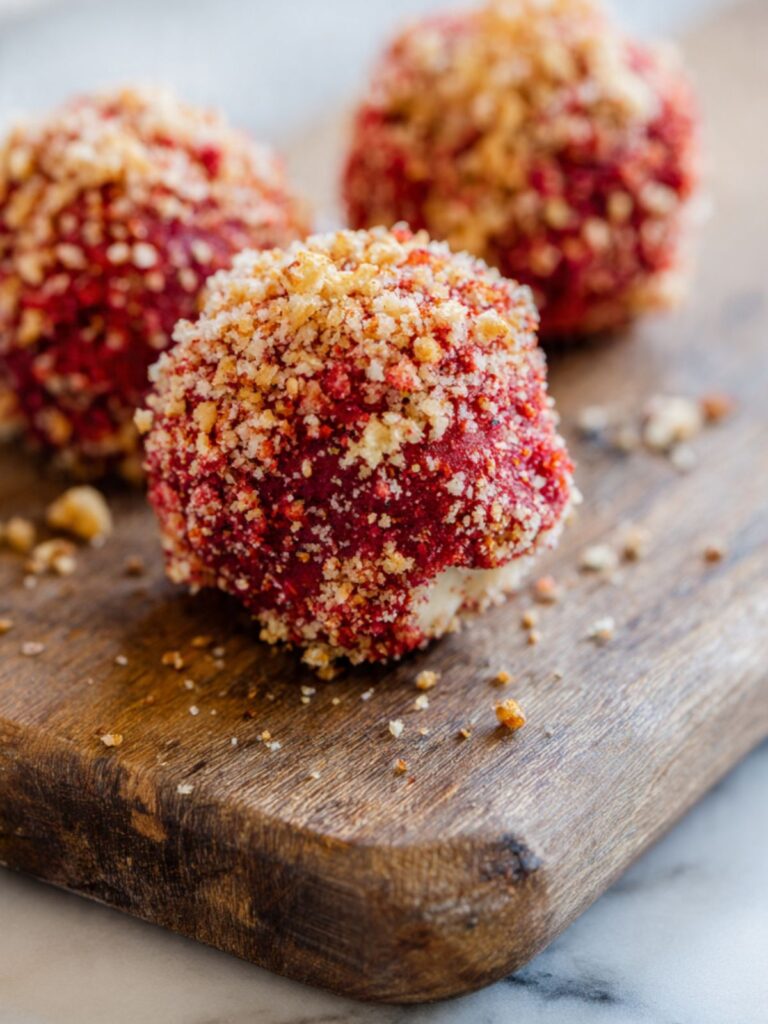
I also tested the coating with three different strawberry additions: strawberry gelatin powder, dried strawberries, and freeze-dried strawberries. The gelatin powder produced a vivid pink coating but tasted artificial and turned sticky within 20 minutes of leaving the refrigerator. The dried strawberries were too moist — the coating softened within an hour and the red color bled into the golden crumbs. The freeze-dried version was the only one that produced the dry, crisp, vivid crimson-specked coating you can see in the scatter shot above, and the flavor was sharp and genuinely strawberry rather than sweet and jammy. Freeze-dried only. I would not use any other form.
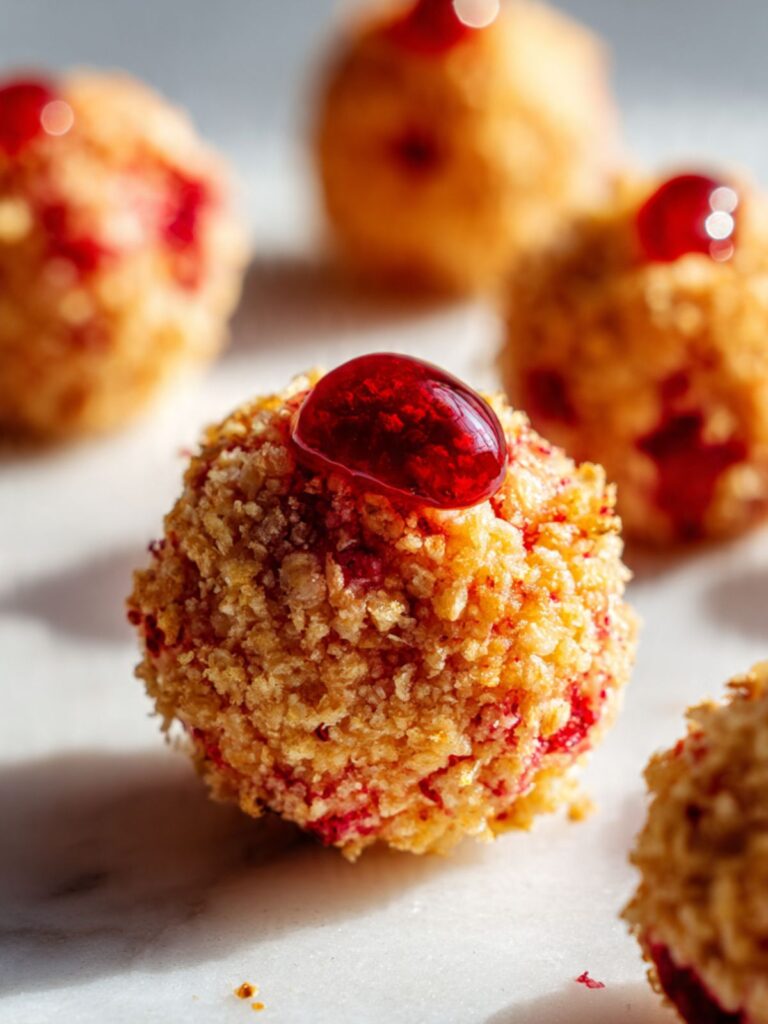
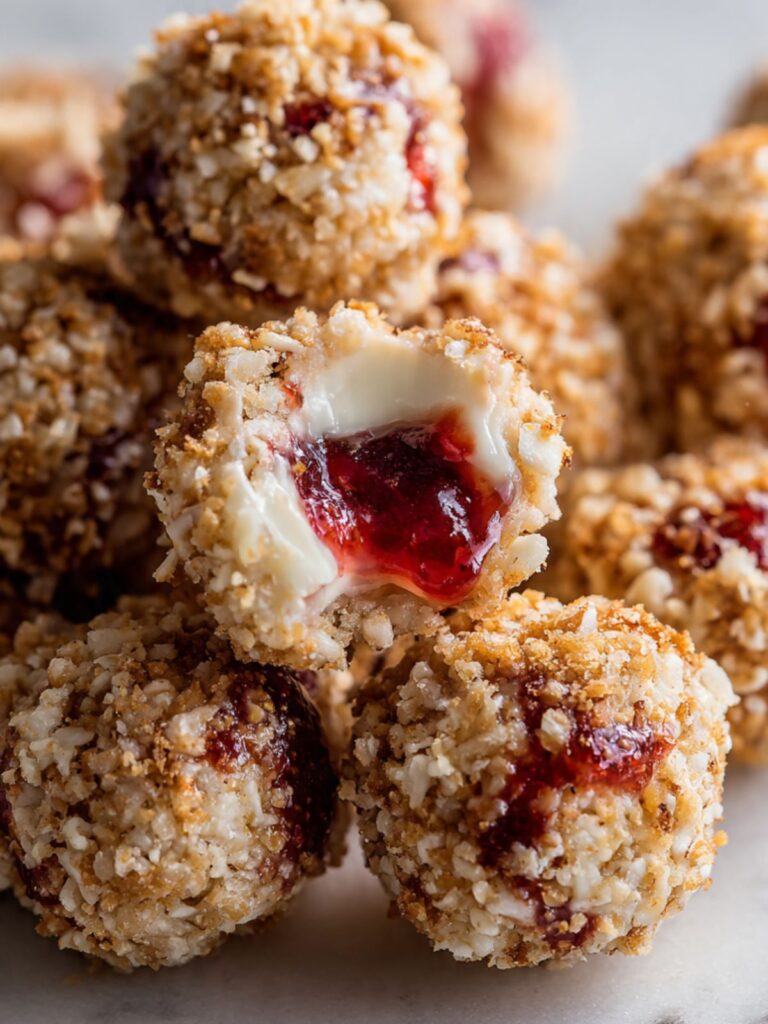
What you get: a dense, smooth cream cheese exterior — not cakey, not mousse-like, just cold and slightly firm the way set cream cheese is — with a strawberry jam center that loosens to a liquid-glossy pool the moment you bite through. The coating is bimodal: crushed Golden Oreos give the golden, coarse, buttery crumb base, and crushed freeze-dried strawberries give those vivid crimson-red specks and a sharp strawberry punch that cuts through the richness of the cream cheese. Together they produce the signature strawberry crunch texture you can see coating every ball in the overhead scatter shot above.
No mixer required. A bowl, a spatula, and a freezer are everything you need.
What you are working with, ingredient by ingredient:
This is a three-component recipe. I want to name every ingredient upfront because the wrong version of any one of these will change the result significantly.
The cream cheese layer is built from full-fat block cream cheese (not the spreadable kind in a tub, not low-fat, not whipped — block only), powdered sugar (also called confectioners sugar or icing sugar), and pure vanilla extract. The cream cheese is the entire structure of this recipe. Low-fat cream cheese contains more water and will not hold a firm, rollable consistency even after freezing. Whipped cream cheese has a different fat ratio and produces a loose, sticky filling that will not shape into a ball.
The jam center uses strawberry preserves or strawberry jam — not strawberry jelly. Preserves and jam contain fruit solids that freeze firmer and hold better than jelly, which is mostly sugar and pectin and stays tacky even when cold. The center in the cross-section shots above is thawed strawberry preserves that loosened as the ball came to temperature — that liquid-glossy pool is the goal.
The coating is a mix of crushed Golden Oreos and crushed freeze-dried strawberries. Golden Oreos produce the golden, buttery, coarse crumb base you see in Images 1, 2, and 5. Crushed freeze-dried strawberries — not strawberry powder, not fresh strawberries, not dried strawberries — produce the vivid red specks throughout the coating and the sharp strawberry flavor. Fresh or dried strawberries have too much moisture and will make the coating soggy within an hour. Freeze-dried only.
🗒 Luna’s Note: I buy freeze-dried strawberries in the snack aisle, not the baking aisle. The baking aisle version is often pre-ground into powder, which works but loses the visual texture of the distinct red specks. The snack aisle bags are whole or sliced — crush them yourself in a zip-lock bag with a rolling pin for the coarser texture you can see in the photos.
Chilling and freezing is not optional. This recipe has two separate freezing stages: one for the jam cores before assembly, and one for the assembled balls before coating. Skipping or shortening either stage produces balls that are too soft to coat cleanly and fall apart when handled. Plan for a minimum of 4 hours total — 2 for the jam cores, 1 for the assembled balls, and 1 hour of refrigeration before serving. Overnight prep is easier and produces a cleaner result.

Recipe Overview & Nutrition Table
| Yield | 12–14 balls |
| Prep Time | 25 minutes |
| Freeze Time (Jam Cores) | 2 hours minimum |
| Freeze Time (Assembled Balls) | 1 hour minimum |
| Chill Time (Before Serving) | 1 hour |
| Total Active Time | 25 minutes |
| Total Passive Time | 4 hours minimum |
| Difficulty | Easy — no baking, no mixer, no special equipment |
| Nutrient | Per Ball |
|---|---|
| Calories | ~145 |
| Carbohydrates | ~16g |
| Fat | ~8g |
| Protein | ~2g |
| Sugar | ~11g |
| Sodium | ~105mg |
Ingredients & Tools for Strawberry Cheesecake Crunch Bites Recipe
For the Cream Cheese Filling
- 8 oz (226g) full-fat block cream cheese (not spreadable tub cream cheese, not low-fat, not whipped — Philadelphia block is the most reliable), softened to room temperature (65–68°F / 18–20°C)
- ½ cup (60g) powdered sugar (also called confectioners sugar or icing sugar), sifted — do not substitute granulated sugar. Granulated sugar will not dissolve into cold cream cheese and the filling will taste gritty and sandy no matter how long you mix it.
- 1 tsp (5ml) pure vanilla extract (not imitation vanilla)
- Pinch of fine sea salt
For the Jam Core
- 4 tablespoons (80g) strawberry preserves or strawberry jam (not jelly — preserves or jam only, with visible fruit solids)
For the Strawberry Crunch Coating
- 16 Golden Oreo cookies (168g), crushed to a coarse crumb — not powder
- ½ cup (13g) freeze-dried strawberries, crushed to a mix of fine powder and small pieces (not dried strawberries, not fresh strawberries, not strawberry powder — freeze-dried only)
- 2 tablespoons (28g) unsalted butter, melted and cooled (helps bind the coating so it adheres to the balls without sliding off)
Optional Garnish
- 1 tablespoon (20g) strawberry preserves, warmed slightly (for the glossy jam dollop visible on top of one ball in the close-up shot above — styling only, not required for the recipe to work)
Before You Start
Read this entire block before you begin. These are not suggestions — each one prevents a specific failure this recipe is prone to.
Soften the cream cheese correctly. Pull your block cream cheese from the refrigerator 1 to 2 hours before you begin. Cream cheese softened to 65–68°F (18–20°C) blends into a completely smooth, lump-free filling. Cold cream cheese will not mix smoothly no matter how long you stir — the lumps are cold fat pockets that do not break down without heat, and heat is the one thing you cannot use here because it will change the structure. Do not microwave it. Do not use the tub version. Time only.
If the cream cheese is microwaved even briefly, the heat melts the fat unevenly — some pockets liquefy while others remain cold. The resulting filling will feel smooth but will not hold a firm ball shape even after freezing, and the balls will soften and lose structure faster at serving temperature. Time is the only safe method.
Visual check for correct softness: press your finger into the block. It should leave a clean, deep indent and feel soft all the way through — not slick, not greasy, not warm. If it looks shiny or your finger slides through it, it has gone too warm. Refrigerate for 15 minutes and check again.
Use block cream cheese only. Spreadable cream cheese in a tub contains stabilizers and more water than block cream cheese. Low-fat versions have a significantly higher water content. Whipped cream cheese has incorporated air that collapses during mixing. Any of these substitutes will produce a filling that is too loose to roll into balls, even after freezing.
Use sifted powdered sugar only. Granulated sugar does not dissolve into cold or room-temperature cream cheese — it stays as individual crystals that produce a gritty, sandy texture in the finished filling. Powdered sugar dissolves almost immediately because its particles are so fine. Sift it before adding to remove any lumps that would otherwise stay visible in the filling.
Freeze the jam first — this is the most critical step in the recipe. Line a small plate or baking sheet with parchment paper. Drop ½ teaspoon (approximately 3g) portions of strawberry preserves onto the parchment, spacing them apart. Freeze for a minimum of 2 hours, or overnight. The jam must be completely solid before assembly begins. If the jam is soft, it will smear through the cream cheese wall during rolling instead of staying in the center.
Use freeze-dried strawberries, not any other form. Fresh strawberries release moisture immediately and will turn the coating soggy within 30 minutes. Dried (dehydrated) strawberries are chewy and too moist for a crumb coating. Strawberry gelatin powder produces a very different flavor. Freeze-dried strawberries are the only form that crushes into a dry, shelf-stable powder-and-piece mixture that holds in a crumb coating without softening it. Find them in the snack aisle, not always the baking aisle — look for bags labeled “freeze-dried” not “dried.”
Use a kitchen scale. Volume measurements for powdered sugar and freeze-dried strawberries in particular can vary significantly depending on how the ingredient is scooped or packed. The gram weights in this recipe are what I tested with — they are the most reliable path to the same result.
Work quickly with cold hands. Cream cheese warms rapidly from body heat. If your kitchen is warm (above 72°F / 22°C) or if the balls start to feel sticky and difficult to handle during assembly, place the bowl of filling in the refrigerator for 10 minutes before continuing. The colder the filling stays during assembly, the cleaner the shape and coating.
Necessary Tools
- Large mixing bowl
- Silicone spatula or sturdy wooden spoon
- Small plate or quarter sheet pan (for freezing jam cores)
- Parchment paper
- Small cookie scoop or tablespoon measure (for portioning filling)
- Shallow bowl or plate (for the crumb coating)
- Kitchen scale (strongly recommended over volume measurements)
- Zip-lock bag and rolling pin (for crushing Golden Oreos and freeze-dried strawberries)
- Refrigerator and freezer access
No electric mixer required. This recipe comes together entirely with a bowl and spatula.
How to Make Strawberry Cheesecake Crunch Bites
This is a no-heat recipe — no oven, no stovetop, no mixer at any stage. Everything comes together with a large mixing bowl, a silicone spatula, and a freezer. Read all six steps before you begin, because the timing between freeze stages determines the result.
Step 1: Freeze the Jam Cores — Do This First, Hours Before Assembly
Before you touch the cream cheese, line a small plate or quarter sheet pan with a piece of parchment paper. Using a ½ teaspoon measure or a small spoon, drop 4 tablespoons (80g) of strawberry preserves into individual small mounds — approximately 12 to 14 mounds total, one per ball you plan to make. Space them at least 1 inch apart so they do not freeze together into one mass.
The preserves will spread slightly on the parchment — this is fine. You are not looking for a perfect shape at this stage. What matters is that each portion is small enough to sit in the center of a 1.5-inch ball without touching the outer wall.
Slide the plate into the freezer. Freeze for a minimum of 2 hours. Overnight is better. The jam must be completely solid — not just firm, not just cold — before you begin Step 2. Press one with your fingertip to check: it should feel hard all the way through, like a small frozen candy. If it gives at all under pressure, return it to the freezer for another 30 minutes.
Do not rush this step. A jam core that is not fully frozen will smear and bleed through the cream cheese wall the moment pressure is applied during rolling — the center will not stay in the center. The cross-section showing that clean, defined ruby pool surrounded by the unbroken white cream cheese wall is only possible when the jam core goes in frozen solid.
The filling and coating take less than 20 minutes to prepare. The freezer does the real work here — give it the time it needs.
Step 2: Making the Strawberry Crunch Coating Before the Filling
Make the coating before you make the filling so it is ready the moment the assembled balls come out of the freezer — cold balls coat cleanly, and you do not want them sitting at room temperature waiting while you prepare the crumb mixture.
Place 16 Golden Oreo cookies (168g) into a zip-lock bag. Seal it, pressing out as much air as possible. Use a rolling pin to crush the cookies into a coarse, uneven crumb — you want a mix of fine crumbs and slightly larger pieces, approximately 3–5mm. Do not crush to a fine powder. The coarse texture is what produces the pebbled, craggy coating visible on the surface of each ball. Over-crushing produces a dense, uniform crust that looks flat and does not cling to the curves of the ball the same way.
Place ½ cup (13g) freeze-dried strawberries into a separate zip-lock bag and crush in the same way — rolling pin, firm pressure. You want a mixture of fine red powder and small recognizable pieces. The powder coats the crumbs and turns the mixture a vivid pinkish-red throughout, while the pieces produce the distinct crimson flecks you can see throughout the coating in the scatter shot above.
Transfer both to a shallow bowl. Add 2 tablespoons (28g) melted and cooled unsalted butter and toss with a fork until the butter is evenly distributed and the mixture clumps slightly when pressed together. The butter is what binds the coating to the surface of the ball — without it, the crumbs slide off clean cream cheese and will not adhere evenly.
The finished coating mixture should look like damp sand — golden-beige streaked with vivid crimson-red, slightly clumped but not wet or greasy. If it looks too dry and dusty, add ½ teaspoon more melted butter. Set aside at room temperature until needed.
🗒 Luna’s Note: I always make slightly more coating than I think I need — about 20% extra. The first few balls use significantly more crumbs than the later ones as the bowl builds up with loose crumbs, and running out halfway through means some balls get a thinner coat than others. Extra coating keeps in a sealed container at room temperature for 3 days.
Step 3: Mixing the Cream Cheese Filling Until Completely Smooth
In your large mixing bowl, add your 8 oz (226g) full-fat block cream cheese, softened to room temperature. Using your silicone spatula, press and fold the cream cheese against the sides of the bowl for 30 to 45 seconds until it looks completely smooth and uniform — no lumps, no cold spots, no visible grainy texture. Do this before adding any other ingredient. Cold lumps in the cream cheese at this stage will not smooth out once the sugar is added.
Add your ½ cup (60g) sifted powdered sugar, your 1 tsp (5ml) pure vanilla extract, and your pinch of fine sea salt. The powdered sugar dissolves almost immediately into softened cream cheese because it is so finely milled — this is why it works in a no-bake filling where granulated sugar would stay gritty. The vanilla adds background warmth that balances the tanginess of the cream cheese. The salt sharpens both.
Fold everything together using slow, deliberate strokes from the bottom of the bowl upward — approximately 30 to 40 strokes — until the mixture is completely uniform, smooth, and slightly glossy. Do not beat aggressively. You are not trying to incorporate air. Overworking the filling makes it stiff and difficult to mold around the jam cores.
The finished filling should look thick, smooth, and slightly sticky — pale ivory in color, glossy at the edges of the bowl, and hold its shape when scooped. It should not look grainy, wet, or loose. If it looks at all soft or difficult to handle, cover the bowl and refrigerate for 20 minutes before continuing.
Do not add more powdered sugar to compensate for a filling that seems too soft — excess sugar makes the filling sticky rather than firm and changes the flavor balance significantly.
Step 4: Assembling the Balls Around the Frozen Jam Cores
Remove your frozen jam cores from the freezer. Work quickly from this point — the cores begin to thaw within 3 to 4 minutes at room temperature, and a partially thawed core is too soft to handle cleanly.
Using your small cookie scoop or a tablespoon measure, Scoop approximately 1 tablespoon plus 1 teaspoon (approximately 22–25g) of cream cheese filling per ball — this is a generous tablespoon, not a heaping one. Weigh the first portion on your kitchen scale to calibrate: 22g at the low end produces 13–14 balls, 25g at the high end produces 12 balls. Use your first weighed portion as the reference for every ball that follows. The total filling weight is approximately 292g — at 22–25g per ball, this batch yields exactly 12 to 14 balls. If you scoop heavier than 25g, you will run short on filling before completing the batch.

Flatten the scooped filling into a disc in your palm — approximately 2 inches across and ½ inch thick. Place one frozen jam core in the center of the disc. Close the cream cheese filling up around the jam core by cupping your palm and pressing gently from the edges inward, sealing the filling completely over the top. Roll gently between both palms in a circular motion for 5 to 8 seconds until the ball is smooth and spherical.
Move quickly. If the ball starts to feel tacky or the jam core begins to show through the cream cheese wall, the filling is warming too fast. Set that ball on a parchment-lined plate and return everything to the freezer for 10 minutes before continuing.
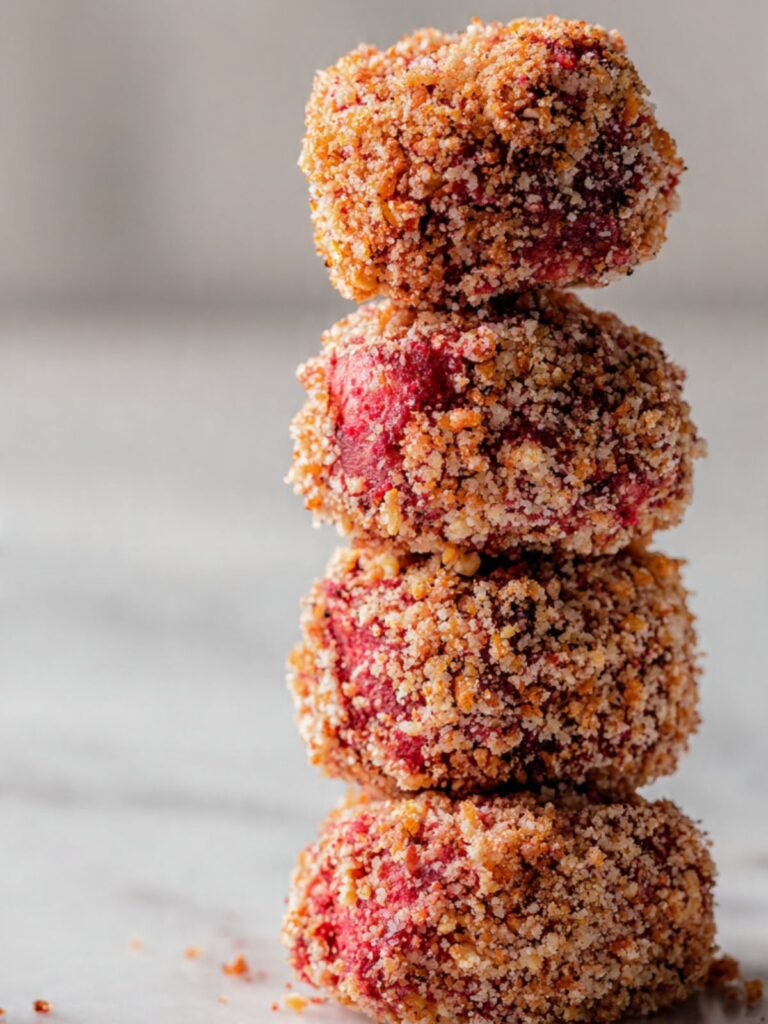
Place each finished ball on the parchment-lined plate as you go. Each ball should look like a smooth, pale ivory sphere with no visible jam showing through the surface — similar to what you see in the stacked tower shot above before the coating is applied. Any gap or thin spot in the cream cheese wall will leak during the coating stage.
Once all balls are assembled, slide the plate into the freezer. Freeze for a minimum of 1 hour. The balls must be completely firm and cold before coating — a soft ball will deform under the pressure of rolling in the crumb mixture and lose its shape.
Step 5: Coating the Frozen Balls in the Strawberry Crunch Mixture
Remove the frozen balls from the freezer one or two at a time — do not take all of them out at once. Cold balls coat perfectly. Balls that have been sitting at room temperature for more than 2 to 3 minutes will be too tacky and the coating will clump unevenly.
Drop one ball into the shallow bowl of strawberry crunch coating. Using your fingers or a spoon, press and roll the ball firmly through the crumb mixture, pressing lightly so the crumbs adhere to the surface. Rotate the ball to ensure every part of the surface is covered — pay attention to the bottom, which tends to go flat and bare if not deliberately rolled. Apply light pressure as you roll — enough to press the crumbs into the cream cheese surface so they grip, but not so much that you deform the ball.
Roll each coated ball briefly between your palms one final time to press any loose crumbs into the surface. Place on a clean parchment-lined plate.
The finished coated ball should look like the balls in the overhead scatter shot — fully covered in the bimodal golden-and-crimson crumb mixture with no pale cream cheese showing through, slightly irregular and textured across the entire surface. If bare patches remain, press additional coating directly onto those spots with your fingertip.
Once all balls are coated, do not serve immediately. Transfer the plate to the refrigerator and chill for a minimum of 1 hour before serving. This final chill allows the coating to set against the cream cheese surface and the jam cores to thaw just enough to reach that liquid-glossy pool state visible in the cross-section shots — still cold, but no longer frozen solid.
Do not skip this final refrigeration step — a ball served immediately after coating will have a jam core that is still frozen solid and will not produce the liquid center effect.
Step 6: The Optional Jam Garnish and Final Presentation
If you want the glossy jam dollop visible on top of one ball in the close-up hero shot, warm 1 tablespoon (20g) of strawberry preserves in a small bowl for 10 seconds in the microwave until it loosens to a pourable consistency. Using a small spoon, place a single small drop — approximately ¼ teaspoon — directly on top of each ball immediately before serving.
This garnish is purely visual. It does not change the flavor or structure of the finished ball. If you are serving these at a party or plating for photos, it adds a professional finish and signals the strawberry flavor before anyone bites in. For everyday serving, skip it entirely.
Arrange the finished balls on a marble surface, a plate, or a small wooden board as shown in the photos above — scattered loosely for a casual presentation, or stacked in a small tower for a more deliberate one. Serve cold, directly from the refrigerator.
The balls are at their best within 30 minutes of coming out of the refrigerator. After that, the jam cores continue to thaw and the cream cheese wall softens slightly — still delicious, but the clean cross-section effect diminishes.
The Science Behind Strawberry Cheesecake Crunch Bites
Why the Jam Core Has to Be Frozen Solid — Not Just Cold
I did not fully understand this until my second failed batch. The first time I froze the jam for only 45 minutes — it felt firm enough when I pressed it, and I thought that was sufficient. The moment I started pressing the cream cheese around it, the jam core compressed slightly under my palm and broke through the wall. I ended up with pink-streaked filling and no defined center in any of the balls. I thought I had done something wrong during assembly. I had not. The jam was simply not solid enough to resist the pressure of shaping.
Here is what is actually happening: strawberry preserves contain a high concentration of sugar, and sugar significantly lowers the freezing point of a liquid — a phenomenon called freezing point depression. This is the same reason ice cream stays scoopable at freezer temperatures instead of turning into a solid brick. It means jam freezes at a lower temperature than water and takes considerably longer to reach a fully solid state. What feels firm on the surface after 45 minutes still has a semi-liquid interior. Two hours at standard freezer temperature (0°F / -18°C) is the minimum for a portion this small to freeze all the way through. Overnight is more reliable.
The practical result you can observe: a fully frozen jam core holds its position in the center of the ball during assembly and produces the clean, defined ruby pool visible in the cross-section shot. A partially frozen core migrates, compresses, and bleeds. The freezing point depression of sugar is the entire reason this step cannot be shortened — and why the recipe specifies preserves over jelly. Jelly has an even higher sugar concentration and freezes less firmly than preserves with fruit solids.
Why Full-Fat Block Cream Cheese Sets Without Gelatin or Heat
Most no-bake fillings that need to hold a shape use gelatin, white chocolate, or a significant quantity of powdered sugar as a setting agent. This recipe uses none of those. The cream cheese wall sets firm enough to roll, coat, and serve without any additional stabilizer — and the reason is fat crystallization.
Full-fat block cream cheese contains approximately 33% fat. At refrigerator and freezer temperatures, the fat in cream cheese crystallizes into a semi-solid network — the same mechanism that makes cold butter firm and room-temperature butter soft. When the assembled balls go into the freezer for their second chill, the fat in the cream cheese crystallizes around the frozen jam core and locks the entire structure in place. When you bring the ball to refrigerator temperature for the final hour before serving, the fat partially re-melts to give that soft, dense, creamy texture — but retains enough structure to hold the ball shape.
This is exactly why low-fat and whipped cream cheese fail in this recipe. Low-fat cream cheese has a higher water content and lower fat content — the fat network that forms during chilling is less dense, and the ball softens and loses its shape faster at room temperature. Whipped cream cheese has incorporated air that collapses as the fat crystallizes, producing an uneven, porous wall that cannot hold the jam core cleanly. Full-fat block cream cheese, softened correctly and chilled correctly, is doing structural work that no other form of cream cheese can replicate.
This same fat crystallization principle is what gives the cream cheese frosting in my Strawberry Crunch Cupcakes its structure at room temperature — a different application of the same mechanism, worth reading if you want to understand why cream cheese behaves differently from butter-based frostings.
Why Freeze-Dried Strawberries Work and Every Other Form Fails
The coating on these balls has to do something technically difficult: it has to adhere to a cold, slightly tacky cream cheese surface, hold its texture without softening, and deliver intense strawberry flavor without adding any moisture to the system. Freeze-dried strawberries are the only strawberry product that meets all three requirements simultaneously — and understanding why clarifies exactly what goes wrong with every substitute.
Freeze-drying removes approximately 98% of a strawberry’s moisture content by freezing the fruit solid and then reducing the surrounding air pressure until the ice converts directly to vapor without passing through liquid — a process called sublimation. What remains is a rigid, completely dry cellular structure that contains all of the original flavor compounds and natural sugars in a concentrated form, with essentially zero free water. When crushed, freeze-dried strawberries produce a dry, intensely flavored powder-and-piece mixture that absorbs into the buttered crumb coating without releasing moisture back into it.
Fresh strawberries contain approximately 91% water by weight. The moment they contact the cold cream cheese surface, they begin releasing that water, which softens the coating and creates a soggy layer between the crumb and the ball within minutes. Dried strawberries are dehydrated rather than freeze-dried — they retain 15–20% moisture and are chewy, not brittle, which means they cannot be crushed into a dry crumb and release moisture slowly into the coating over time. The result you can see in the scatter shot above — vivid, dry, crimson-red specks distributed throughout a crisp golden crumb coating — is only achievable with freeze-dried.
🗒 Luna’s Note: The flavor difference between freeze-dried and dried strawberries in this coating is not subtle. Freeze-dried strawberries taste like concentrated fresh strawberry — sharp, bright, almost acidic. Dried strawberries taste sweet and jammy. Both are good on their own. In this recipe, the sharp acidity of the freeze-dried version is what cuts through the richness of the cream cheese and makes the coating feel like it belongs to the filling rather than just sitting on top of it.
Strawberry Cheesecake Crunch Bites Troubleshooting & Pro-Tips
Common Mistakes
The coating turned soggy immediately — within minutes of assembly
The cause is always the strawberry ingredient used. Dried strawberries, fresh strawberries, and strawberry gelatin powder all contain free moisture that immediately migrates into the cookie crumb coating and softens it. Only freeze-dried strawberries are moisture-free enough to stay dry in a crumb coating.
If you used anything other than freeze-dried and the coating is already soggy: the coating cannot be rescued once wet. Remove it by rolling the balls gently on a dry paper towel to pull off as much as possible, then re-roll in a fresh batch of freeze-dried strawberry coating made correctly. The flavor of the original coating will have partially transferred — the second coat will be thinner but functional.
Next time: freeze-dried strawberries only, from a bag labeled “freeze-dried” not “dried.”
The balls stuck to the parchment during freezing and the coating tore when lifted
Cause: the parchment was skipped, or a foil or plastic wrap surface was used instead. Cream cheese bonds to foil and plastic wrap at freezer temperatures and tears when pulled. Standard parchment paper does not bond with cream cheese even when frozen — the silicone coating on parchment prevents adhesion.
Fix: if balls are already stuck, let the plate sit at room temperature for 60 seconds — just enough for the surface layer of cream cheese to release without the whole ball warming. Slide a thin offset spatula or butter knife under each ball at an angle rather than lifting from above.
Next time: parchment only, on a flat rigid surface (plate or sheet pan — not a flexible cutting board, which bows in the freezer and creates uneven contact points).
The jam center is not in the center — it migrated to one side or broke through the wall
The cause is always one of two things: the jam core was not fully frozen before assembly, or the cream cheese filling was too warm during rolling. A jam core that has any give under finger pressure is not ready. A filling that feels tacky or slick on your palms is too warm.
Fix for this batch: if you notice the core breaking through during assembly, stop immediately, place everything on a parchment-lined plate, and return it to the freezer for 15 minutes before continuing. The balls where the core has already migrated will still taste correct — the cross-section effect will be uneven but the flavor is not affected.
Next time: freeze the cores overnight and keep the filling refrigerated between batches of 3 to 4 balls.
The cream cheese filling is lumpy and will not smooth out
Cause: the cream cheese was too cold when mixing began. Cold fat pockets in cream cheese do not break down with stirring alone — they require warmth to soften. Do not add liquid to try to smooth them. Do not microwave the filled bowl.
Fix: transfer the lumpy filling to a clean bowl, press it against the sides with your spatula repeatedly for 60 to 90 seconds using firm pressure. If lumps remain after this, the cream cheese was significantly under-softened. Scrape the filling onto a plate and leave at room temperature for 20 more minutes, then re-mix.
Next time: pull the cream cheese from the fridge 2 full hours before you begin, not 1.
The coating will not adhere — it slides off the ball and falls into the bowl
Cause: wrong cream cheese type, or the balls were not cold enough during coating. Whipped and low-fat cream cheese produces a surface that is too smooth and slightly wet for crumbs to grip. Balls that have been sitting at room temperature for more than 3 minutes lose the tacky surface that acts as a natural adhesive for the crumb mixture.
Fix for this batch: press the coating directly onto the surface of each ball with your fingertips using firm, deliberate pressure rather than rolling. Return the balls to the freezer for 10 minutes and press again — the cold surface grips better.
Next time: use full-fat block cream cheese only, and coat the balls immediately after removing from the freezer, two at a time.
The filling is too sweet or too dense
Cause: excess powdered sugar added during mixing, or the cream cheese was a low-fat version with a higher sugar-to-fat ratio than full-fat.
Fix: there is no way to reduce sweetness in a made filling. Serve the finished balls with something acidic alongside — fresh strawberry slices, a small amount of lemon zest on top, or a black coffee pairing — the contrast makes the sweetness feel more balanced.
Next time: measure the powdered sugar by weight (60g), not by volume, and use full-fat block cream cheese.
The jam center is still frozen solid when served — no liquid pool effect
Cause: the final refrigeration hour was skipped and the balls went straight from freezer to table. A frozen jam core requires approximately 1 hour at refrigerator temperature to thaw to the liquid-glossy state visible in the cross-section photos.
Fix: return the balls to the refrigerator for 45 to 60 minutes before serving. They will not look any different on the outside — the thawing is internal.
Next time: plan the refrigeration hour into your timeline. The balls can stay refrigerated for up to 24 hours before serving with no quality loss.
The Coating Looks Flat and Powdery Instead of Craggy and Textured
The Golden Oreos were crushed too finely. When reduced to a uniform fine powder, the coating packs against the ball surface in a smooth, flat layer — it looks like the ball was dipped in sand rather than rolled in the coarse, irregular crumb texture visible in the photos. There is no fix once applied — a flat, powdery coating cannot be re-textured. Serve as is; the flavor is unaffected.
Salvage option: press a small amount of coarsely broken cookie pieces (3–5mm) directly onto the surface with your fingertips before the coating sets — the contrast of sizes is visible and adds back some of the texture.
Next time: crush the Golden Oreos in a zip-lock bag with a rolling pin using moderate pressure, stopping frequently to check. The mixture should have visible pieces and crumbs of varying sizes — not a uniform powder. If it looks like fine breadcrumbs, it has gone too far.
Humidity and altitude note
In high humidity environments, freeze-dried strawberries absorb ambient moisture faster than usual — crush them immediately before making the coating rather than in advance, and keep the coated balls refrigerated until the moment of serving.
At high altitude (above 3,500 feet / 1,067m), freezer temperatures and standard refrigerator performance are not affected for this recipe — no adjustments needed. This is a no-bake recipe with no leavening chemistry, so altitude has no impact on the result.
Expert Pro-Tips
Freeze the jam in a silicone mini ice cube tray instead of on parchment. Quarter-teaspoon sized cavities produce perfectly uniform jam cores that are easier to center in the cream cheese filling than freeform parchment drops. The uniform shape means every ball has the same wall thickness all the way around, which is what produces the clean, symmetric cross-section visible in the sliced ball photo above. A standard silicone ice cube tray with small cavities works — fill each cavity ¾ full and freeze as directed.
Use a zip-lock bag to shape the balls instead of your palms for the first stage. After flattening the filling disc and placing the jam core in the center, drop the whole thing into a small zip-lock bag and press the bag closed around it from the outside. Roll the bag between your palms rather than touching the filling directly. This keeps your body heat from warming the filling and gives you 30 to 40 seconds more working time per ball before the surface becomes too tacky to handle cleanly.
Press extra crumb coating onto each ball with the heel of your hand rather than just rolling. Rolling distributes crumbs but does not press them into the surface firmly enough for long-term adhesion — particularly on the curved top and bottom of the ball. After rolling, press the heel of your hand flat against the top of each ball and apply 2 seconds of firm, even pressure. Rotate the ball 90 degrees and repeat on the other side. This is what produces the dense, fully embedded crumb coverage visible in the close-up shot rather than a loose, patchy exterior.
Make the filling the day before and refrigerate it overnight. Overnight refrigeration firms the cream cheese filling significantly — it becomes easier to portion cleanly and holds its shape longer during assembly, which means less rushing and cleaner balls. Scoop and assemble directly from the refrigerator, working in small batches. The filling keeps covered in the refrigerator for up to 48 hours before assembly.
How to Store Strawberry Cheesecake Crunch Bites
Room Temperature
These balls cannot be stored at room temperature. The cream cheese filling is a perishable dairy product and must stay refrigerated at all times. At room temperature above 70°F (21°C), the cream cheese wall softens within 20 to 30 minutes, the ball loses its shape, and the jam core thaws completely and begins to bleed through the filling. Beyond the texture issue, cream cheese left at room temperature for more than 2 hours enters the food safety danger zone. Do not leave these out on a table for grazing — plate them cold and return any uneaten balls to the refrigerator within 30 minutes.
Refrigerator
Store finished balls in a single layer in a lidded hard-sided container — not a zip-lock bag, which compresses the balls against each other and damages the coating. Line the bottom of the container with a sheet of parchment paper to prevent the crumb coating from sticking to the surface. Do not stack the balls directly on top of each other — the weight of the top layer compresses the coating on the bottom layer and flattens the balls slightly. If you need to store more than one layer, place a sheet of parchment between layers and keep the second layer minimal.
Refrigerate for up to 3 days. The coating stays crisp for the first 24 hours. Between Day 1 and Day 3, the freeze-dried strawberry component in the coating gradually absorbs ambient moisture from the refrigerator and softens slightly — the flavor does not change, but the texture of the exterior becomes less pebbled and more matte. The filling and jam center are unaffected.
Do not store alongside strongly flavored foods — cream cheese absorbs surrounding odors readily in a shared refrigerator space. A lidded container is non-negotiable for this reason.
Day 1 versus Day 2 note: Day 1, straight from the refrigerator after the final chill hour, is the best version of this recipe. The coating is at peak crispness, the jam center is at the ideal liquid-glossy state, and the cream cheese wall has maximum structure. Day 2 is still very good — the flavors have melded and the filling tastes slightly more developed. The coating texture is the only thing that diminishes noticeably. Day 3 is acceptable but the coating has lost most of its crunch. Make these the day before you plan to serve them at the latest.
Freezer — Made and Assembled
Fully coated and finished balls can be frozen for up to 6 weeks. Place them in a single layer on a parchment-lined plate and freeze uncovered for 1 hour until the coating is completely firm — this prevents the crumbs from being displaced when the balls touch each other in storage. Once individually firm, transfer to a zip-lock freezer bag or a lidded freezer-safe container, layered with parchment between layers.
To thaw: transfer the number of balls you need to a parchment-lined plate and refrigerate for 1 to 2 hours. Do not thaw at room temperature — the cream cheese softens faster than the jam core thaws, which produces an uneven result. Do not microwave. After refrigerator thawing, the coating will be slightly less crisp than freshly made but the filling and jam center will be identical to the fresh version.
Texture comparison to fresh: the filling is indistinguishable from fresh. The coating loses approximately 20 to 30% of its surface crispness after freezing and thawing — it is softer and more matte, but still fully adhered and flavorful. If coating crispness is important for your serving context, make a small batch of fresh coating crumbs and roll the thawed balls through it again immediately before serving.
Freezer — Unassembled Components
Each component can be made and frozen separately, which makes this an excellent make-ahead recipe for events.
Jam cores: freeze in their parchment-lined portions as directed in Step 1. Once solid, transfer to a small zip-lock bag. Keep frozen for up to 3 months. Use directly from frozen — do not thaw before assembly.
Cream cheese filling: prepare as directed in Step 3, transfer to a zip-lock bag, and freeze for up to 1 month. Thaw overnight in the refrigerator. Stir briefly with a spatula before using — the texture returns to its original consistency after refrigerator thawing. Do not thaw at room temperature.
Crumb coating mixture: store in a sealed zip-lock bag or lidded container at room temperature for up to 3 days, or freeze for up to 1 month. The freeze-dried strawberry component stays stable frozen. Thaw at room temperature for 30 minutes before using — the mixture should feel dry and crumbly, not damp. If it has absorbed any moisture during storage, spread it on a parchment-lined plate and leave at room temperature for 15 minutes to dry before using.
Serving Suggestion
Serve these cold — pulled directly from the refrigerator and plated immediately. I do not let them sit out before serving the way I might with a cookie or a slice of cake. The cold temperature is not just a food safety requirement here; it is part of the eating experience. The contrast between the cold, firm cream cheese wall and the liquid-glossy jam center only exists when the ball is cold. A warm ball is just a soft, sweet cream cheese bite — the structural drama disappears.
I serve these with strong black coffee or an unsweetened sparkling water. The richness of the cream cheese and the sweetness of the coating need something with no competing sweetness alongside them — milk makes everything taste heavier, and a sweet drink tips the balance past the point I like. The coffee bitterness does exactly what the fine sea salt does inside the filling: it sharpens the strawberry flavor and makes the cream cheese taste less dense.
This is the recipe I bring when I want to bring something that looks technically impressive but took me less than 30 minutes of active time. The cross-section reveal — that ruby center pooling against the white wall — does the work for me. I have never served these without someone asking for the recipe before they finish the first one.
These are not a make-ahead party recipe if coating crispness matters to you. The crumb exterior is at its best within 24 hours of assembly. If you are serving at an event, assemble the balls and freeze them uncoated up to a week in advance, then coat them the morning of the event and refrigerate until serving.
🗒 Luna’s Note: I always arrange these on a flat marble surface rather than a plate with a rim — the rim makes it harder to pick them up cleanly without touching the coating on adjacent balls. A flat board or a sheet of parchment on the counter lets guests lift each ball without disturbing the others.
Frequently Asked Questions About Strawberry Cheesecake Crunch Bites
Can I use a different flavor of jam or preserves for the center?
Yes — any thick jam or preserves with visible fruit solids will work structurally, as long as it freezes solid within 2 hours. Raspberry, blueberry, and blackberry preserves all freeze reliably and produce the same liquid-center effect as strawberry. Avoid jellies regardless of flavor — their high sugar concentration and pectin-only structure means they freeze less firmly than preserves and are more prone to migrating during assembly. If you change the jam flavor, adjust the coating to match: swap the freeze-dried strawberries for freeze-dried raspberries or blueberries to keep the flavor cohesive. Mixed berry preserves with a freeze-dried mixed berry coating is a version I have made several times and it works well.
Can I use low-fat or whipped cream cheese to make these lighter?
No — not if you want the result shown in the photos. Low-fat cream cheese contains significantly more water and less fat than full-fat block cream cheese. The fat network that forms during freezing and chilling is what gives the cream cheese wall its structure — low-fat versions produce a softer, looser wall that does not hold the ball shape cleanly, especially as the ball warms toward serving temperature. Whipped cream cheese has incorporated air that collapses during assembly, producing an uneven, porous filling. The calorie difference between full-fat and low-fat cream cheese in this recipe works out to approximately 15 calories per ball — not a meaningful reduction for a meaningful texture loss. Use full-fat block cream cheese. It is the one ingredient in this recipe that cannot be substituted without changing the result.
Can I make strawberry cheesecake crunch bites ahead of time?
Yes — this is one of the better make-ahead no-bake desserts for that reason. The jam cores can be frozen up to 3 months in advance. The cream cheese filling can be made and refrigerated up to 48 hours before assembly, or frozen for up to 1 month. The assembled, uncoated balls can be frozen for up to 6 weeks — coat them the morning of serving and refrigerate until needed. The one thing you cannot do in advance is apply the coating more than 24 hours before serving, because the freeze-dried strawberry component begins absorbing moisture and the crunch diminishes. For maximum efficiency: freeze the jam cores and the uncoated assembled balls well in advance, then do the coating the day before or morning of serving.
Why are my cheesecake bites not holding their round shape?
Shape loss almost always comes from one of three causes: the cream cheese filling was too warm during assembly, the assembled balls did not freeze long enough before coating, or the balls were handled too long during the coating stage. Cream cheese warms quickly from body heat — if your kitchen is above 72°F (22°C) or if you work slowly, the filling softens before the ball is fully shaped. The fix is to work in small batches of 3 to 4 balls at a time, returning the filling to the refrigerator between batches. The assembled balls also need a full hour in the freezer before coating — a ball that is only partially firm will deform under the pressure of rolling through the crumb mixture. If shape loss is happening at the coating stage, the balls were not cold enough when they came out of the freezer. Coat immediately after removing, two at a time, and return any waiting balls to the freezer.
Can I substitute the Golden Oreos with a different cookie for the coating?
Yes, with some adjustments. Golden Oreos produce a buttery, lightly sweet crumb with a neutral flavor that lets the freeze-dried strawberry and cream cheese flavors lead. Vanilla wafers (such as Nilla Wafers) are the closest substitute and produce nearly identical results — slightly less sweet, slightly finer crumb. Graham crackers work but produce a coarser, drier crumb that does not adhere as evenly — add an extra teaspoon of melted butter to compensate. Shortbread cookies produce a richer, more buttery coating. Regular Oreos (chocolate) work structurally but the chocolate flavor competes with the strawberry — use them only if you want a chocolate-strawberry flavor profile intentionally. Whatever cookie you use, crush to a coarse crumb rather than a fine powder — the coarse texture is what produces the pebbled, craggy surface visible on the finished balls.
Can I double this recipe?
Yes — this recipe scales well. Double every ingredient exactly, including the melted butter in the coating. The one thing that does not scale linearly is your working time — a double batch means twice as many balls to assemble individually, and the cream cheese filling continues to warm while you work. For a double batch, divide the filling into two bowls and keep one refrigerated while you work through the first. Freezer capacity is the other practical consideration — make sure you have space for two plates of jam cores and two plates of assembled balls simultaneously. Baking chemistry is not a factor in this recipe, so leavening non-linearity does not apply.
How do I keep the coating from getting soggy if I’m serving these at a party?
Three things control coating integrity at a party: temperature, timing, and the strawberry form you used. Keep the balls refrigerated until 5 minutes before serving — not on a room-temperature table for an hour. Serve in batches rather than all at once, replenishing from the refrigerator every 20 to 30 minutes. If you used freeze-dried strawberries in the coating as specified, the coating will stay crisp for 30 to 45 minutes at room temperature before softening noticeably. If the coating has already softened before serving, roll the balls through a fresh batch of dry crumb mixture immediately before plating — the fresh dry crumbs adhere to the slightly tacky surface of the softened coating and restore most of the visual texture, even if not the full crunch.
Are these suitable for people with dietary restrictions?
These balls contain dairy (cream cheese, butter) and gluten (Golden Oreos). They are not suitable as written for dairy-free or gluten-free diets without substitutions. For a gluten-free version: substitute the Golden Oreos with a certified gluten-free vanilla sandwich cookie — the structure and coating method are identical. For a dairy-free version: a full-fat dairy-free cream cheese block (such as Violife or Kite Hill block-style) can work structurally, though the flavor profile will be less tangy than the dairy version and the fat network behaves differently — allow extra freezing time at each stage. The butter in the coating can be replaced with coconut oil, melted and cooled. I have not tested the dairy-free version personally, so I cannot confirm the result will match the photos exactly. Always check the allergen labeling on all packaged ingredients, including the freeze-dried strawberries, for cross-contamination warnings.
More Recipes You’ll Love
If you liked these strawberry cheesecake crunch bites, these recipes from the same no-bake and cheesecake-adjacent corner of the site are worth your time:
Biscoff Icebox Cake — a no-bake layered dessert that uses the same refrigerator-set method as these bites. No oven, no mixer, fully assembled in advance. A good next recipe if you liked the make-ahead structure of this one.
Chocolate Chip Cookie Dough Cups — no-bake edible cookie dough in a chocolate shell. Another no-heat, refrigerator-set dessert in the same category as these bites, with a similar assembly logic of a filling inside a coating.
No-Bake Strawberry Cheesecake Crunch Bites Recipe
Ingredients
Equipment
Method
- Line a small plate or quarter sheet pan with parchment paper. Drop ½ teaspoon portions of strawberry preserves onto the parchment to make 12–14 small mounds. Freeze for a minimum of 2 hours or overnight until completely solid — press one with your fingertip to confirm it is hard all the way through before proceeding.
- Place 16 Golden Oreo cookies in a zip-lock bag and crush with a rolling pin to a coarse, uneven crumb — not a fine powder. Place ½ cup freeze-dried strawberries in a separate bag and crush to a mix of fine powder and small pieces. Combine both in a shallow bowl, add 2 tablespoons melted and cooled unsalted butter, and toss with a fork until the mixture resembles damp sand streaked with vivid red. Set aside.
- In a large mixing bowl, press and fold 8 oz softened full-fat block cream cheese against the sides of the bowl with a silicone spatula until completely smooth with no lumps — about 30 to 45 seconds. Add ½ cup sifted powdered sugar, 1 tsp pure vanilla extract, and a pinch of fine sea salt. Fold together with slow, deliberate strokes — approximately 30 to 40 strokes — until the filling is smooth, uniform, and slightly glossy. Refrigerate if it feels too soft to handle.
- Remove the frozen jam cores from the freezer and work quickly. Scoop approximately 1.5 tablespoons (30g) of cream cheese filling per ball. Flatten into a disc in your palm, place one frozen jam core in the center, and close the filling up and around it, sealing completely. Roll gently between both palms until smooth and spherical. Place on a parchment-lined plate. Repeat with remaining filling and cores. Freeze assembled balls for a minimum of 1 hour until completely firm.
- Remove frozen balls from the freezer two at a time. Drop each ball into the crumb coating bowl and roll firmly, pressing lightly so the crumbs adhere to the entire surface including the bottom. Press the heel of your hand against the top of each coated ball for 2 seconds to embed the crumbs. Place on a clean parchment-lined plate. Repeat with remaining balls, keeping uncoated balls in the freezer until their turn.
- Transfer all coated balls to the refrigerator and chill for a minimum of 1 hour before serving. This final chill thaws the jam core to its liquid-glossy state. Serve cold directly from the refrigerator. If adding the optional jam garnish, warm 1 tablespoon of strawberry preserves for 10 seconds in the microwave and drop a small amount on top of each ball immediately before serving.