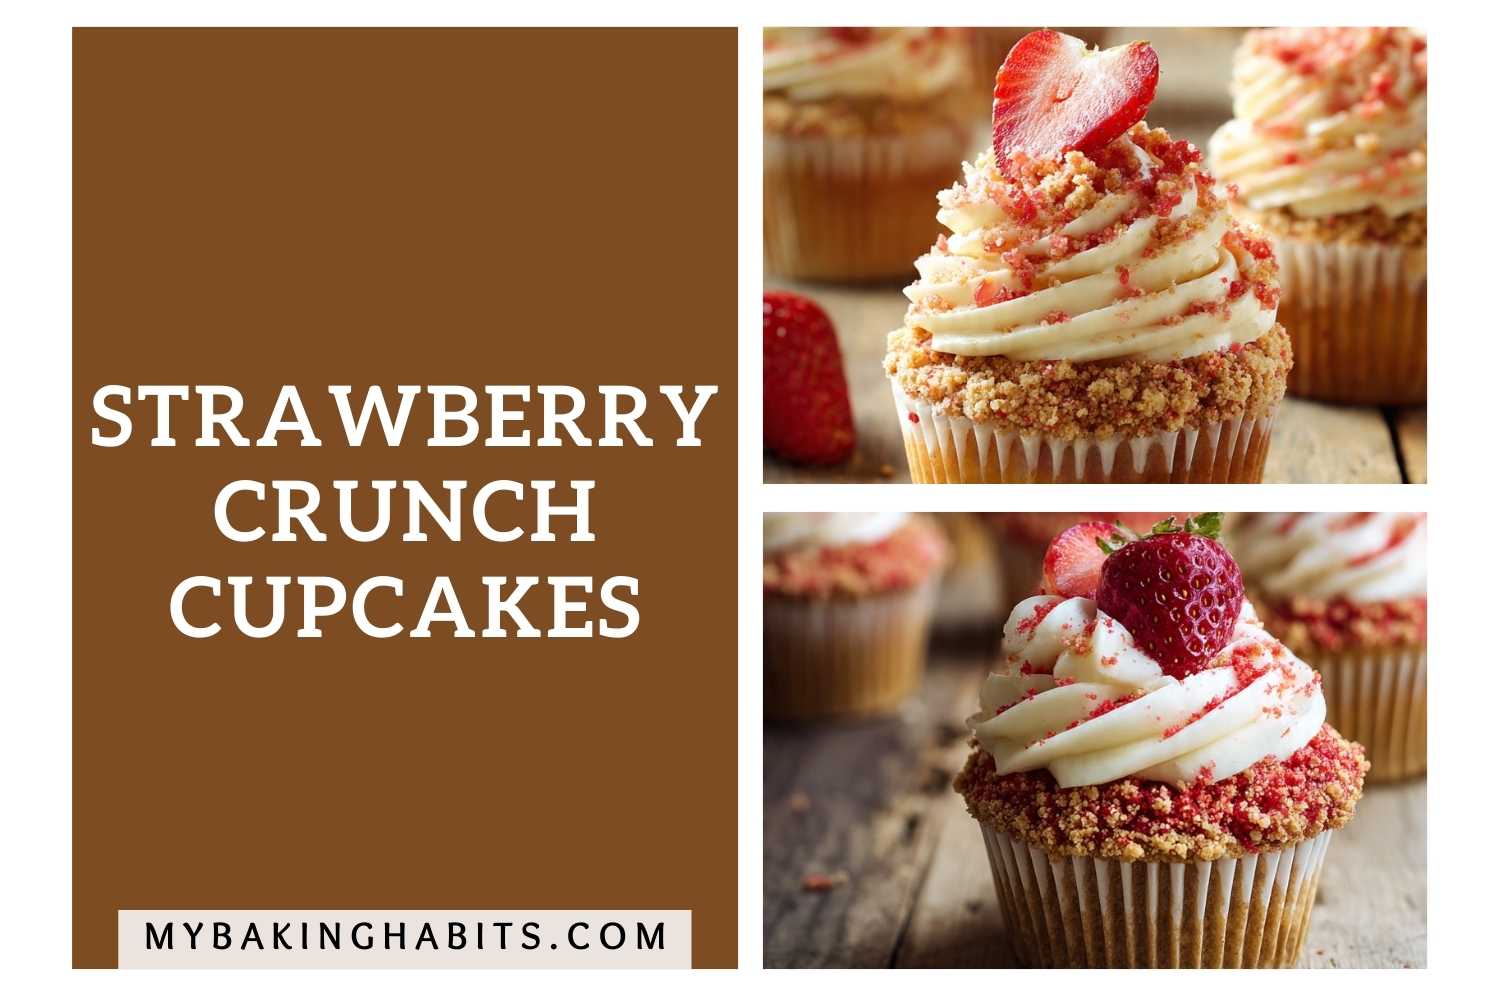
Strawberry Crunch Cupcakes
I have made these strawberry crunch cupcakes more times than I can count across two full months of testing, and the version I landed on solves the two problems I kept running into: frosting that slides off a warm cupcake and crunch topping that goes soft within an hour of decorating. Both are fixed here, and I will show you exactly how. This recipe requires a hand mixer or stand mixer — no chilling required before baking.
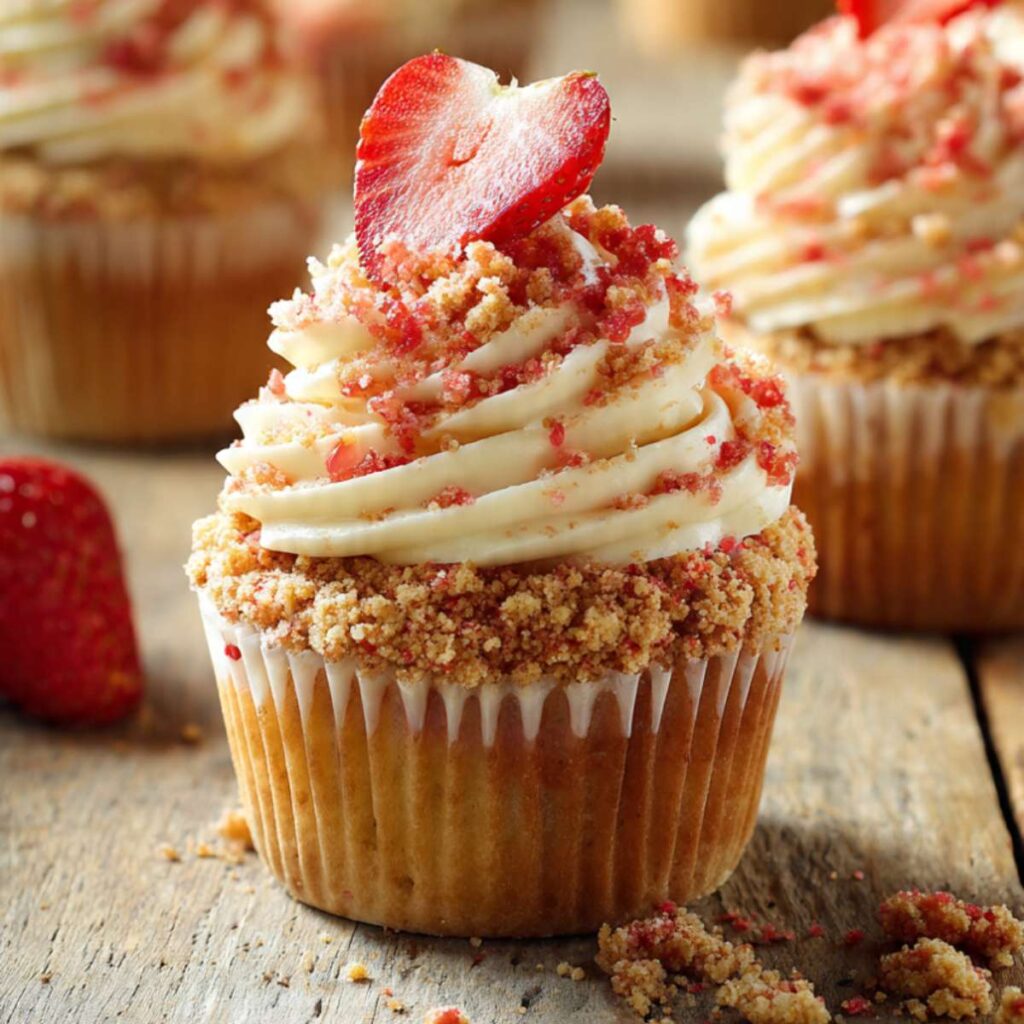
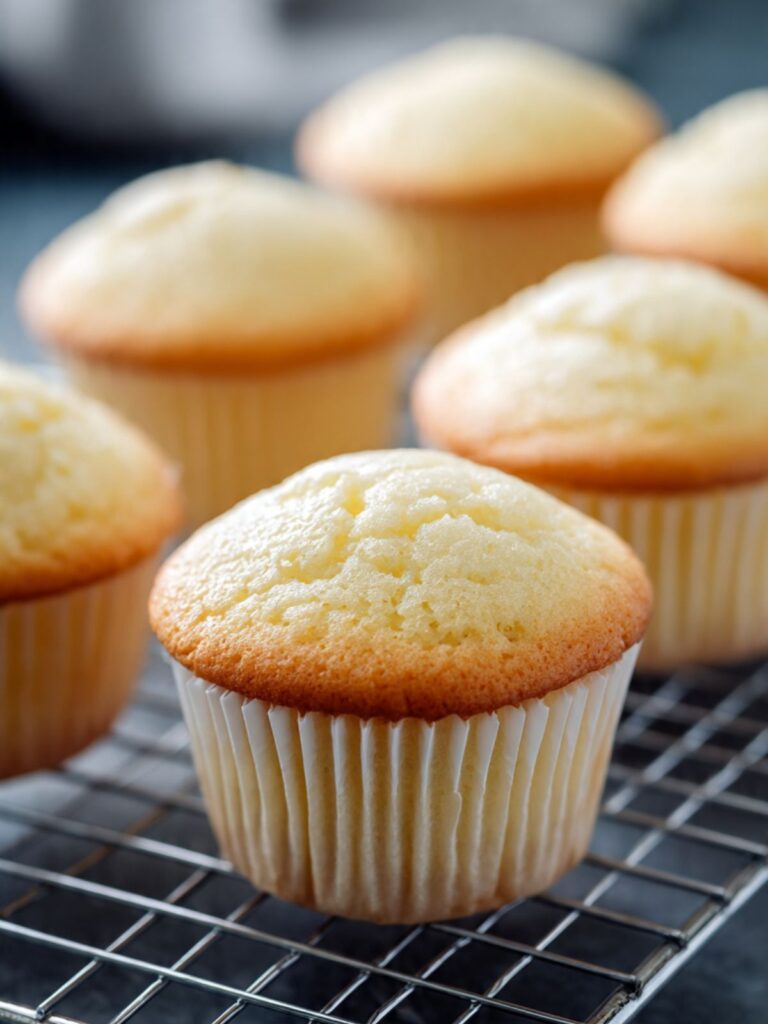
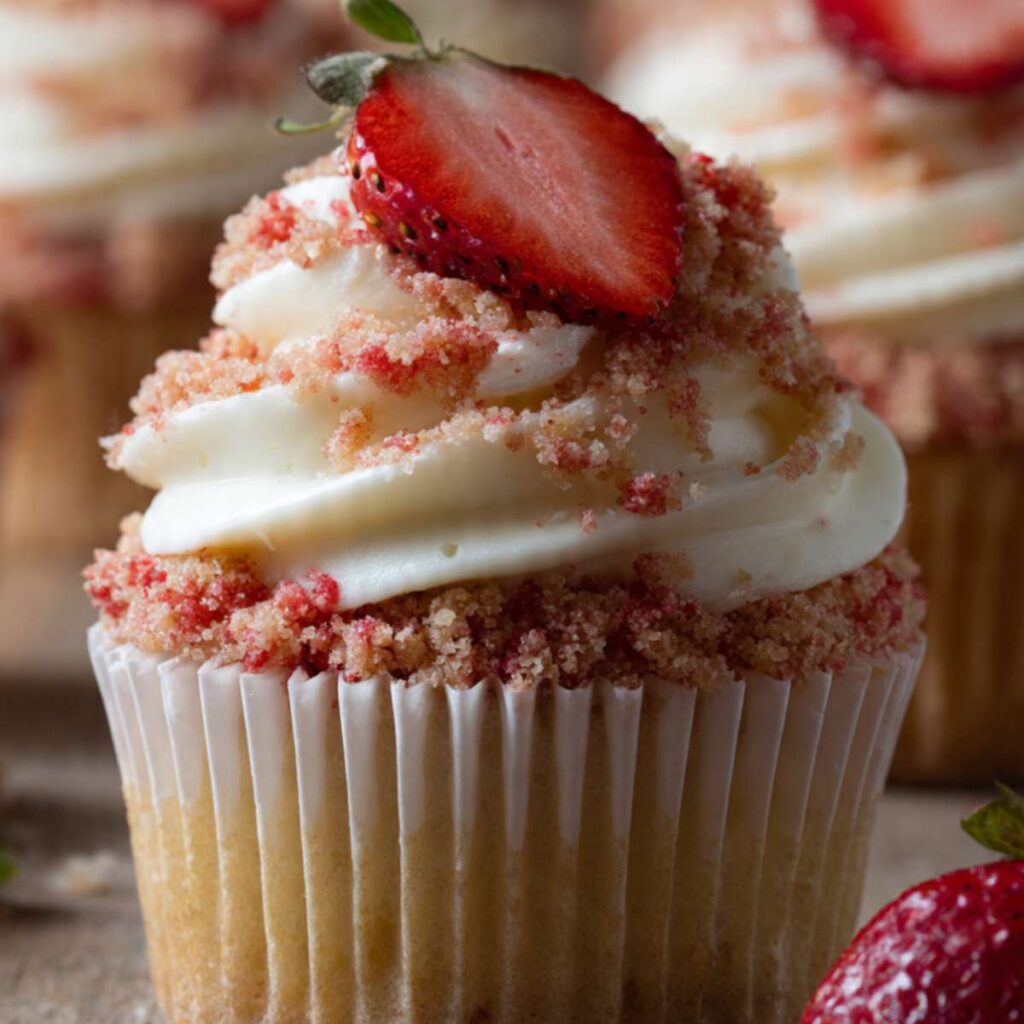
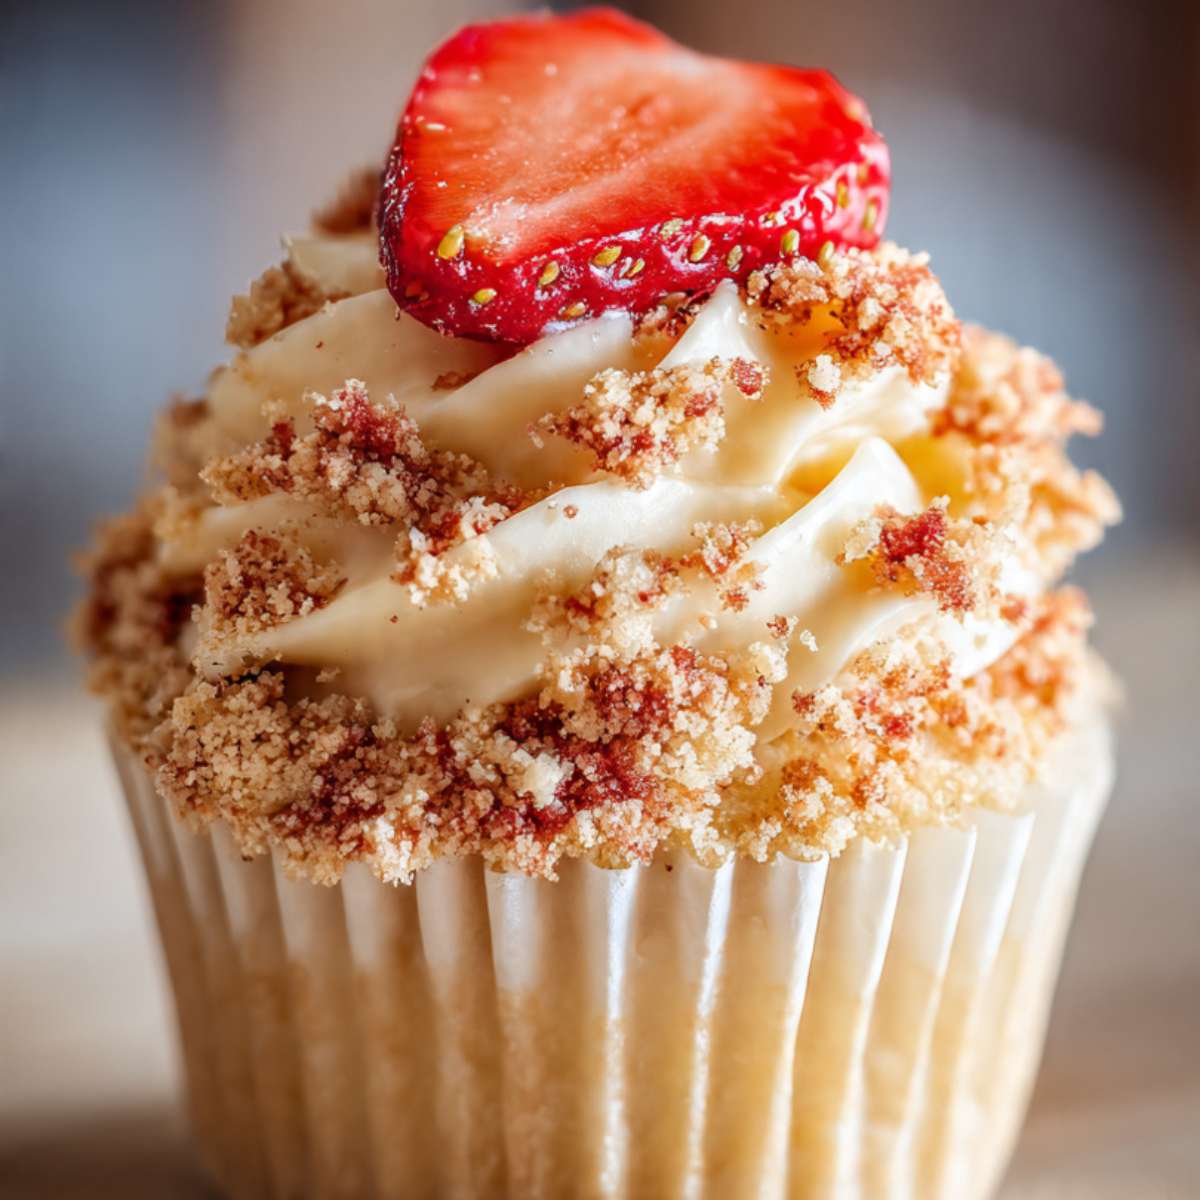
The cupcake base bakes up with a pale golden dome — soft all the way through, with a fine, tender crumb that holds the weight of a tall frosting swirl without collapsing. The frosting is thick, cool, and steady — it holds its peaked shape for hours. The crunch topping is a mix of golden cookie crumbs and vivid red strawberry crumbs pressed into the frosting right after piping, which is the exact window when the frosting is tacky enough to hold them in place. Every bite has that contrast of smooth frosting and sandy, sweet crunch.
🗒 Luna’s Note: I add the crunch topping within 60 seconds of piping the frosting — not after all 12 cupcakes are frosted, but one at a time. The moment the frosting starts to skin over, the crumbs will not press in cleanly.
I tested whole milk versus 2% milk in the batter. Whole milk produced a noticeably more tender, moist crumb. The 2% version baked up slightly drier with a tighter crumb that did not spring back as well when pressed. Whole milk is the version I kept — it is not negotiable here.
I tested the frosting consistency at three different powdered sugar ratios. Too little powdered sugar produced a frosting that looked beautiful for 10 minutes, then slumped. Too much produced a stiff, gritty pipe that cracked at the ridges. The ratio in this recipe holds a clean swirl at room temperature for up to 3 hours without slipping, which is what you need when you are decorating 12 cupcakes and serving them at a gathering.
The crunch topping comes together in under 2 minutes and needs no baking.
| Prep Time | Cook Time | Cooling + Decorating | Total Time | Yield | Difficulty |
|---|---|---|---|---|---|
| 25 minutes | 18 minutes | 45 minutes | 1 hr 28 min | 12 cupcakes | Beginner-friendly |
| Calories | Fat | Carbs | Sugar | Protein |
|---|---|---|---|---|
| ~355 kcal | ~19g | ~44g | ~32g | ~4g |
Calculated based on full-fat ingredients at stated quantities. Values are estimates — use a nutrition calculator with your exact brands for precise figures.
Ingredients & Tools for Strawberry Crunch Cupcakes
For the Cupcake Batter
- 1½ cups (190g) all-purpose flour (spooned into the measuring cup and leveled) — or weighed at 190g
- 1½ teaspoons (6g) baking powder, checked for freshness
- ¼ teaspoon (1.5g) fine sea salt
- ½ cup (113g) unsalted butter, softened to room temperature (65–68°F / 18–20°C)
- ¾ cup (150g) plain white granulated cane sugar
- 2 large eggs (approximately 50g each without shell), room temperature
- 2 teaspoons (10ml) pure vanilla extract
- ½ cup (120ml) whole milk (3.5% fat), room temperature
For the Vanilla Buttercream Frosting
- 1 cup (226g) unsalted butter, softened to 65–68°F (18–20°C) — slightly cooler than baking butter, never greasy or shiny
- 3½ cups (420g) powdered sugar, sifted
- 2–3 tablespoons (30–45ml) whole milk (3.5% fat), added one tablespoon at a time
- 1½ teaspoons (7.5ml) pure vanilla extract
- ⅛ teaspoon (0.75g) fine sea salt
For the Strawberry Crunch Topping
- ¾ cup (75g) golden cookie crumbs — made from Golden Oreos or vanilla wafers, crushed to a coarse sand texture
- ¼ cup (25g) freeze-dried strawberry crumbs — crushed freeze-dried strawberries, not dehydrated, not strawberry powder
- 12 fresh strawberries for garnish — rinsed and completely dried before use, halved lengthwise or left whole with hull
Before You Start
Bring your cold ingredients to room temperature before you begin. This step is not optional — cold butter will not cream properly, and cold eggs will not emulsify into the batter smoothly.
- Unsalted butter (batter): Pull from the fridge 60–90 minutes before mixing. At the correct temperature, you should be able to press your finger into the butter and leave a clean indent without the butter feeling greasy or slick. If the surface looks shiny or your finger slides through, it is too warm — put it back in the fridge for 10 minutes.
- Unsalted butter (frosting): Pull from the fridge 45–60 minutes before making the frosting. Frosting butter must stay on the cooler side of room temperature — 65–68°F (18–20°C). Too warm and the frosting will not hold its swirl shape.
- Eggs: Pull from the fridge 30 minutes before mixing. In an emergency, place them in a bowl of warm (not hot) water for 10 minutes.
- Whole milk: Pull from the fridge 20 minutes before mixing.
No chilling required for this recipe. The batter goes straight from the bowl into the lined pan — no resting, no refrigerating. The frosting also requires no chilling before piping, provided the butter was at the correct 65–68°F (18–20°C) when beaten. If you are working in a warm kitchen above 72°F (22°C), place the finished frosting in the fridge for 10 minutes before piping to firm it slightly.
Check your baking powder for freshness. Drop 1 teaspoon (4g) into ½ cup (120ml) of hot water. It should bubble immediately and vigorously. If it fizzes weakly or not at all, replace it before baking — expired baking powder produces flat, dense cupcakes with no dome.
Measure your flour correctly. Spoon the flour into the measuring cup using a separate spoon, then level off the top with a straight edge. Never scoop directly from the bag — scooping packs up to 30% more flour than spooning and leveling, which produces a dry, dense cupcake. Gram weight is always more accurate: use a kitchen scale set to grams and weigh at 190g.
For the most accurate results across this entire recipe, use a kitchen scale set to grams. The gram weights listed are the numbers I tested with — they are the most reliable way to get the same result I got.
This recipe uses the creamed butter method. You will need a hand mixer or stand mixer for both the cupcake batter and the frosting. Mixing the batter or frosting by hand will not incorporate enough air, and the texture of both will be wrong.
Prepare your muffin tin before you start mixing. Line a standard 12-cup light-colored aluminum muffin tin with paper cupcake liners. Do not grease the liners — greasing causes the paper to pull away from the cupcake sides as it bakes, which tears the cupcake edge and creates a visible gap between the liner and the cake in the finished result. If you use a dark non-stick muffin tin, reduce the oven temperature by 25°F (15°C) to prevent overbrowning on the bottoms.
Position your oven rack in the middle of the oven and preheat to 350°F (175°C) before you start mixing the batter. Most home ovens run 15–25°F (8–14°C) off. If you have an oven thermometer, confirm the actual temperature before the pan goes in. Top rack burns tops. Bottom rack burns bottoms.
Prepare your fresh strawberry garnishes before you start decorating. Rinse the strawberries under cold water and dry them completely with paper towels or a clean kitchen towel — pat each one individually, including the hull end. A wet strawberry releases water onto the frosting surface on contact and causes the frosting to soften and separate at that point within 30 minutes. Dry strawberries sit stable on the frosting for hours.
If you are baking at high altitude (above 3,500 feet / 1,065m), see the FAQ section for specific adjustment guidelines before mixing the batter.
Necessary Tools
Required:
- Standard 12-cup light-colored aluminum muffin tin
- Standard paper cupcake liners
- Hand mixer or stand mixer with paddle attachment
- Two large mixing bowls
- Medium mixing bowl (for dry ingredients)
- Silicone spatula
- Kitchen scale (strongly recommended)
- Measuring cups and spoons
- Wire cooling rack
- Large piping bag fitted with a Wilton 1M open star tip — this tip produces the ridged star swirl pattern visible in the hero image. If you do not have a star tip, a large zip-top bag with one corner cut to approximately ½ inch (1.25cm) works as a substitute, but will produce a smooth round swirl rather than the ridged starred pattern. The crunch topping and garnish apply the same way regardless of which method you use.
Optional but useful:
- Oven thermometer — most home ovens run 15–25°F (8–14°C) off the dial; an oven thermometer eliminates this variable entirely
- Cookie scoop or ice cream scoop (3-tablespoon / 55g size) — for even batter portioning across all 12 cups
- Small offset spatula
- Rolling pin — for crushing Golden Oreos or vanilla wafers to the correct crumb size
How to Make Strawberry Crunch Cupcakes
This recipe uses the creamed butter method — fat and sugar are beaten together first to build aeration before any other ingredient goes in. Follow the steps in order. Skipping ahead or combining steps will change the texture of the finished cupcake.
Step 1: Preheat the Oven and Prepare the Pan
Goal: Get the oven to the correct temperature and the pan ready before the batter is mixed — batter left sitting while the oven preheats loses leavening power.
Using your standard 12-cup light-colored aluminum muffin tin, line each cup with a paper cupcake liner. Do not grease the liners — greased liners cause the paper to pull away from the cupcake sides as it bakes, which tears the cupcake edge and creates a visible gap between the liner and the cake. The liner should sit flush against the cupcake all the way up. Position the oven rack in the middle position and set the oven to 350°F (175°C). If you have an oven thermometer, confirm the actual internal temperature before the batter goes in — most home ovens read 15–25°F (8–14°C) hotter or cooler than the dial shows.
The pan should be fully lined and sitting on the counter before you touch the mixing bowl. The oven should be fully preheated — not still climbing — when the pan goes in. Do not open the oven door to check the temperature once the cupcakes are inside — opening the door in the first 10 minutes causes the centers to sink before they have set.
Do not use a dark non-stick muffin tin without reducing the oven temperature by 25°F (15°C) — dark pans absorb more heat and overbrown the cupcake bottoms before the centers are fully baked.
Your pan is lined, your oven is climbing to temperature, and you are ready to start the batter.
Step 2: Combine the Dry Ingredients
Goal: Distribute the baking powder and salt evenly through the flour before it meets the wet ingredients — uneven distribution causes pockets of dense or over-leavened crumb.
In a medium mixing bowl, add 1½ cups (190g) all-purpose flour (spooned and leveled), 1½ teaspoons (6g) baking powder checked for freshness, and ¼ teaspoon (1.5g) fine sea salt. Whisk together for 20 full seconds using a balloon whisk or fork — not a quick stir. Work in slow circles from the center outward until the mixture looks completely uniform with no visible white streaks of salt or clumps of baking powder.
The dry mixture should look like a single, uniform pale powder with no visible salt crystals or concentrated white spots. If you see any white spots, whisk for another 10 seconds and check again.
Do not add the baking powder directly to the wet ingredients without whisking it through the flour first — concentrated baking powder hitting the butter-sugar mixture produces uneven rise and a bitter aftertaste in the finished cupcake.
Set this bowl aside. Your dry ingredients are ready.
Step 3: Cream the Butter and Sugar Until Pale and Fluffy
Goal: Beat air into the butter and sugar to create the structure that lifts the cupcake — this step is where the texture is built, not in the oven.
In a large mixing bowl, add ½ cup (113g) unsalted butter softened to 65–68°F (18–20°C) and ¾ cup (150g) plain white granulated cane sugar. Using your hand mixer or stand mixer fitted with the paddle attachment, beat on medium speed (speed 4 on a KitchenAid, medium on a hand mixer) for 3 full minutes. Set a timer — do not estimate. After 3 minutes, stop the mixer and scrape down the sides and bottom of the bowl completely with a silicone spatula, then beat for 1 more minute.
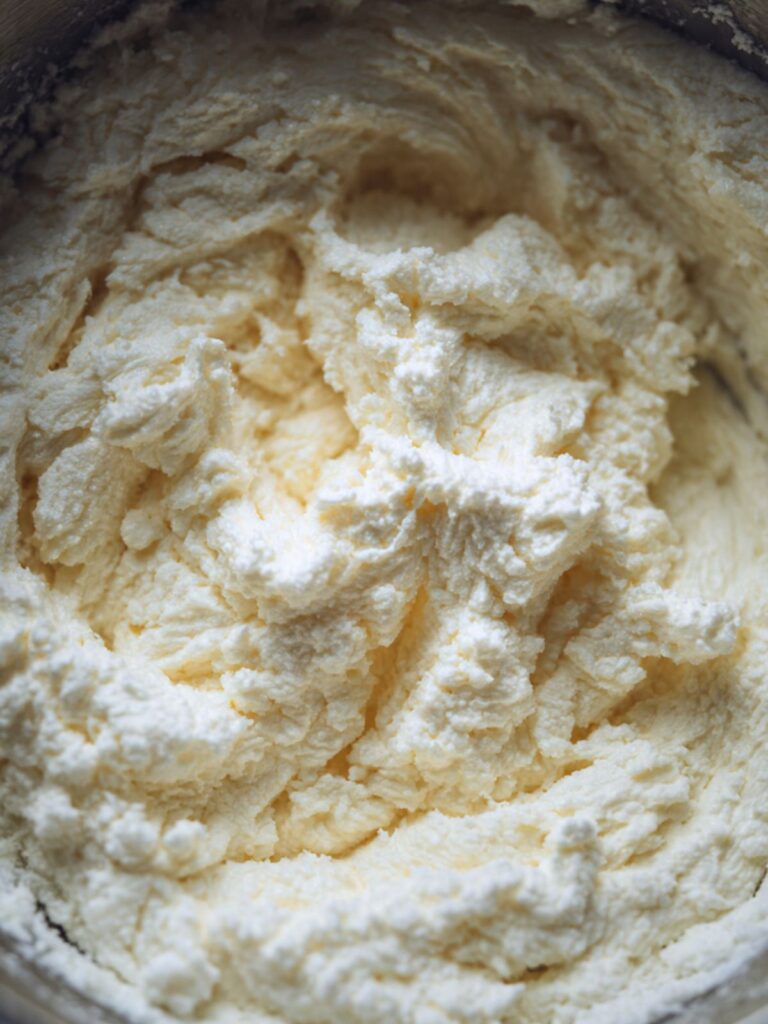
The mixture should look pale — nearly white, not yellow — and noticeably fluffy. It should have increased in volume and the texture should look light and airy, not dense and compact. If it still looks yellow and dense after 4 minutes total, your butter was too cold — beat for 2 more minutes before continuing.
Do not rush this step to under 3 minutes — under-creamed butter and sugar produces a flat, dense cupcake with no dome. The aeration built here is what pushes the batter up in the oven.
Your butter-sugar mixture is pale, fluffy, and ready for the eggs.
Step 4: Add the Eggs and Vanilla
Goal: Emulsify the eggs into the creamed butter one at a time — adding both eggs at once breaks the emulsion and produces a curdled, separated batter that bakes up greasy and uneven.
With the mixer on low speed, add 1 large egg (approximately 50g without shell), room temperature. Increase to medium speed and beat for 30 seconds until fully incorporated. Stop the mixer, scrape down the bowl completely, then add the second large egg the same way — low to start, medium for 30 seconds, then scrape. Add 2 teaspoons (10ml) pure vanilla extract and beat on low for 10 seconds to combine.
The batter should look smooth, creamy, and cohesive — not broken, not grainy, and not showing any separation between the fat and liquid. If it looks curdled or separated, your eggs were too cold. Continue beating on medium for 60 more seconds — a slightly broken emulsion usually comes back together with more mixing.
Do not add both eggs at once — each egg needs to be fully incorporated before the next one goes in. The egg yolk is the emulsifier that holds the fat and liquid together. Adding too fast overwhelms the emulsification process and the batter separates.
Your batter is smooth, creamy, and pale — ready for the dry ingredients and milk.
Step 5: Alternate the Dry Ingredients and Milk in 5 Additions
Goal: Add the flour and milk in alternating additions to keep the batter stable — adding all the flour at once seizes the gluten and produces a tough cupcake; adding all the liquid at once breaks the emulsion.
With the mixer on low speed, add the dry ingredients and milk in 5 alternating additions — starting and ending with flour. The sequence is: one-third of the dry ingredient mixture → half of the ½ cup (120ml) whole milk (3.5% fat) → one-third dry → remaining milk → final one-third dry. Mix on low for 10 seconds between each addition — no more. After the last addition of flour, mix on low for exactly 15 seconds, then stop the mixer completely. Switch to the silicone spatula and fold 4–5 times by hand from the bottom of the bowl upward to catch any unmixed flour at the base.
The batter should look smooth and thick — not runny, not stiff, and with no visible streaks of dry flour anywhere in the bowl. It should fall off the spatula in a slow, thick ribbon. This is the correct consistency before it goes into the pan — if it looks lumpy or streaky, fold 2–3 more times by hand only, not with the mixer.
Do not mix past the point where the flour disappears — overmixing after the flour is added develops gluten and produces a tough, tunnel-filled cupcake instead of the soft, tender crumb visible in the images. Stop the mixer the moment the batter looks uniform and finish with the spatula only.
Your batter is ready to portion into the prepared pan.
Step 6: Portion the Batter and Bake
Goal: Fill each liner to the correct level so every cupcake domes evenly — too little batter produces a flat cupcake that cannot hold a tall frosting swirl; too much overflows and produces a mushroom-shaped top that is impossible to frost cleanly.
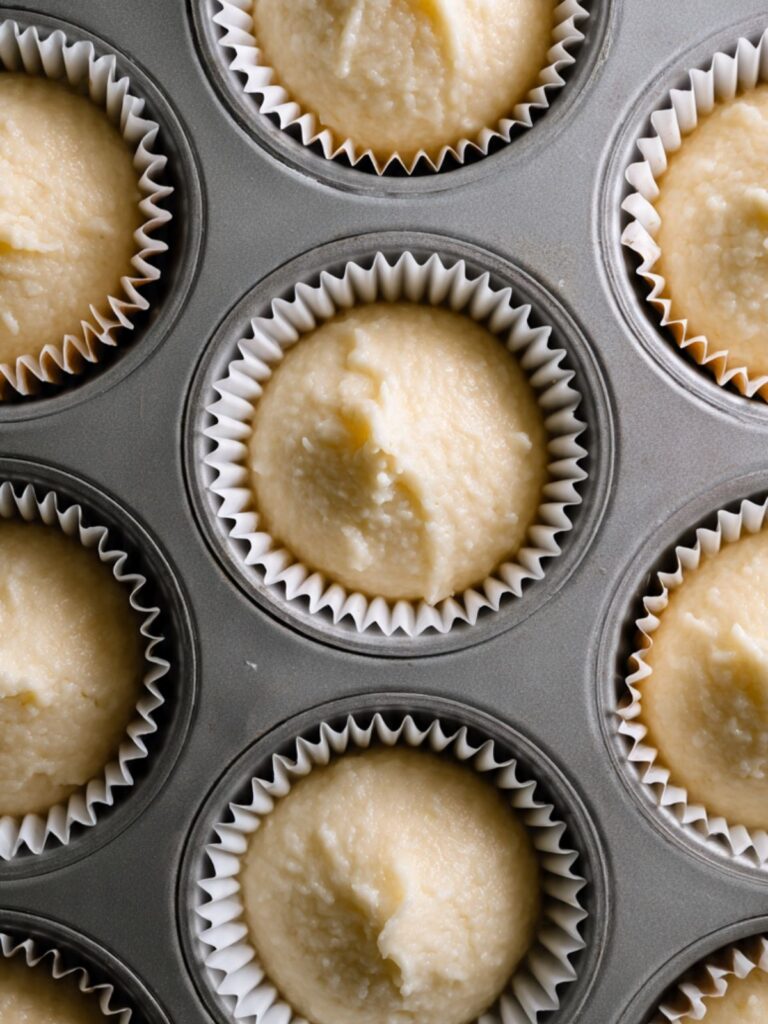
Using a cookie scoop or ice cream scoop, portion the batter evenly between the 12 lined cups — approximately 3 tablespoons (55g) of batter per cup. Each liner should be filled to two-thirds full — no more. If you do not have a scoop, use a spoon and weigh the first cup on your kitchen scale at 55g, then use that as your reference for the remaining 11. Place the filled pan on the middle rack of the fully preheated 350°F (175°C) oven.
Bake for 16–20 minutes. Start checking at 16 minutes. The cupcakes are done when the tops look set, pale golden, and spring back immediately when you press the center lightly with one finger. Insert a toothpick into the center of one cupcake — it should come out with moist crumbs but no wet batter. Do not wait for the toothpick to come out completely clean — a clean toothpick at this stage means the cupcakes are overbaked.
The finished cupcakes should look exactly like the pale golden domes visible in the images — lightly colored, not dark brown, with a gently rounded top that sits just above the liner rim. If the tops look flat or sunken, the oven was not fully preheated when the pan went in.
Do not open the oven door before 16 minutes — opening early causes the centers to sink before the batter has set enough to hold its structure. Once you open the door to check, work quickly and close it immediately.
Remove the pan from the oven and set it on a wire rack.
Step 7: Cool the Cupcakes Completely
Goal: Allow carryover heat to finish the cupcake structure off the heat — and cool the cupcakes fully before frosting, because warm cupcakes melt buttercream on contact.
Leave the cupcakes in the muffin tin for exactly 5 minutes after pulling from the oven. Do not move them. The pan continues to conduct heat into the cupcake base during this time — this carryover heat finishes setting the interior without the oven drying them out. After 5 minutes, transfer the cupcakes individually to a wire cooling rack. Cool at room temperature for a minimum of 45 minutes to 1 hour before frosting.
The cupcakes must feel completely cool to the touch — not warm, not slightly warm — before the frosting goes on. Press the flat of your hand against the bottom of one cupcake. If you feel any warmth at all, wait another 15 minutes. A cupcake that feels cool on the outside can still be warm in the center.
Do not frost warm or even slightly warm cupcakes — buttercream begins to melt at approximately 75°F (24°C). A melting frosting will not hold the crunch topping, and the tall swirl visible in the images will collapse within minutes of piping.
Your cupcakes are fully cooled, domed, and ready for frosting.
Step 8: Make the Strawberry Crunch Topping
Goal: Prepare the crunch topping before making the frosting so it is ready to apply within 60 seconds of piping — the window between freshly piped tacky frosting and skinned-over frosting is short.
To crush the Golden Oreos or vanilla wafers, place them in a zip-top bag, seal it, and roll firmly with a rolling pin — 8–10 passes gives the coarse sand texture you need. Do not use a food processor — it grinds the cookies too fine and removes the visible crumb texture shown in the images. You want irregular sandy pieces, not a powder. Measure out ¾ cup (75g) and place in a medium mixing bowl.
For the freeze-dried strawberries, place them in a separate zip-top bag and crush with your hands — a firm squeeze and a few pinches breaks them into the irregular vivid red pieces visible in the hero image. Do not use a rolling pin on the freeze-dried strawberries — they are brittle and will powder instantly. You want visible red crumb pieces, not dust. Measure out ¼ cup (25g) and add to the bowl with the golden crumbs.
Stir together with a fork until the red and golden crumbs are evenly distributed throughout — approximately 10 strokes.
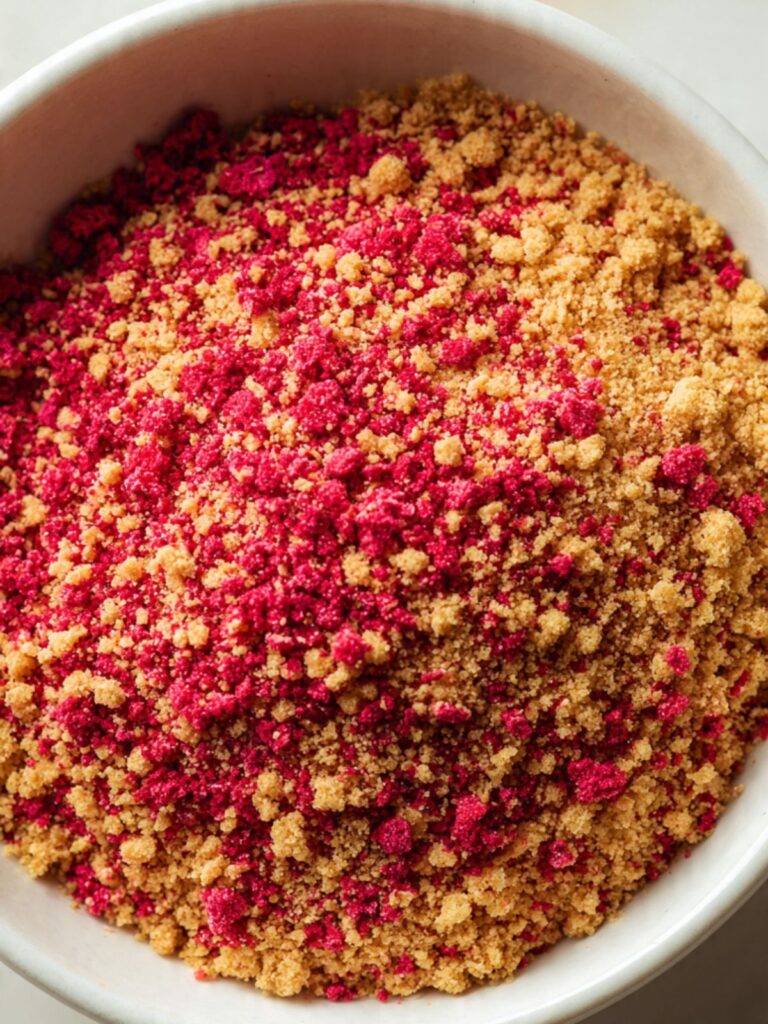
The finished crunch mixture should look like a coarse, two-tone sandy blend of golden and vivid red crumbs — exactly like the textured band visible around the base of the frosting in the hero image. If your mixture looks uniformly pale pink throughout, the freeze-dried strawberries were ground too fine — the red pieces should be clearly distinct from the golden crumbs, not blended into them.
Do not use strawberry gelatin powder, strawberry-flavored sugar, or dehydrated strawberries as a substitute for freeze-dried strawberry crumbs — none of these provide the coarse texture or the deep vivid red color visible in the images. Freeze-dried strawberries are the only ingredient that produces this specific look and crunch.
Set the crunch mixture aside in the bowl uncovered. It must stay completely dry until it goes on the frosting.
Step 9: Make the Vanilla Buttercream Frosting
Goal: Build a frosting thick enough to hold a tall piped swirl and tacky enough to grip the crunch topping — this is American buttercream, which relies entirely on butter temperature and powdered sugar ratio for its consistency.
In a large clean mixing bowl, add 1 cup (226g) unsalted butter softened to 65–68°F (18–20°C). Beat with the hand mixer or stand mixer fitted with the paddle attachment on medium speed for 3 full minutes until the butter looks pale, fluffy, and has nearly doubled in volume. Stop and scrape down the bowl completely.
With the mixer on low speed, add the 3½ cups (420g) sifted powdered sugar in three additions — never all at once, which creates a sugar cloud and causes uneven mixing. After each addition, mix on low for 20 seconds before adding the next. Once all the powdered sugar is in, add 1½ teaspoons (7.5ml) pure vanilla extract and ⅛ teaspoon (0.75g) fine sea salt. Increase to medium-high speed and beat for 2 full minutes.
Add whole milk (3.5% fat) one tablespoon (15ml) at a time, beating on medium for 20 seconds between each addition, until the frosting reaches a thick, smooth consistency that holds a stiff peak when you lift the beater — the peak should stand upright for at least 5 seconds without drooping.
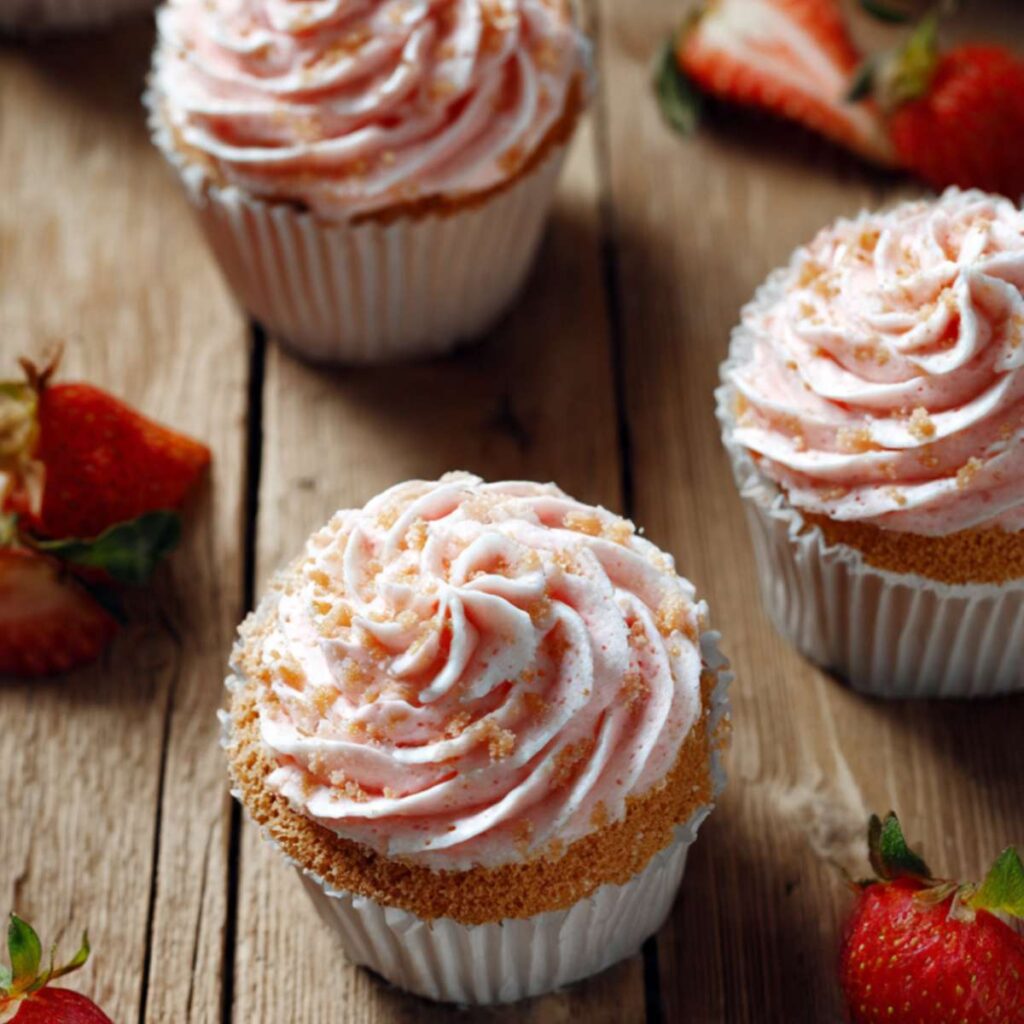
For a pale pink frosting as shown in the overhead image, add 1–2 drops of pink gel food coloring — never liquid food coloring, which thins the frosting and changes the consistency — after the final beat. Mix on low for 10 seconds only. The frosting should turn a soft blush pink evenly throughout. If the color looks streaky, fold once or twice with the silicone spatula to even it out without deflating the frosting.
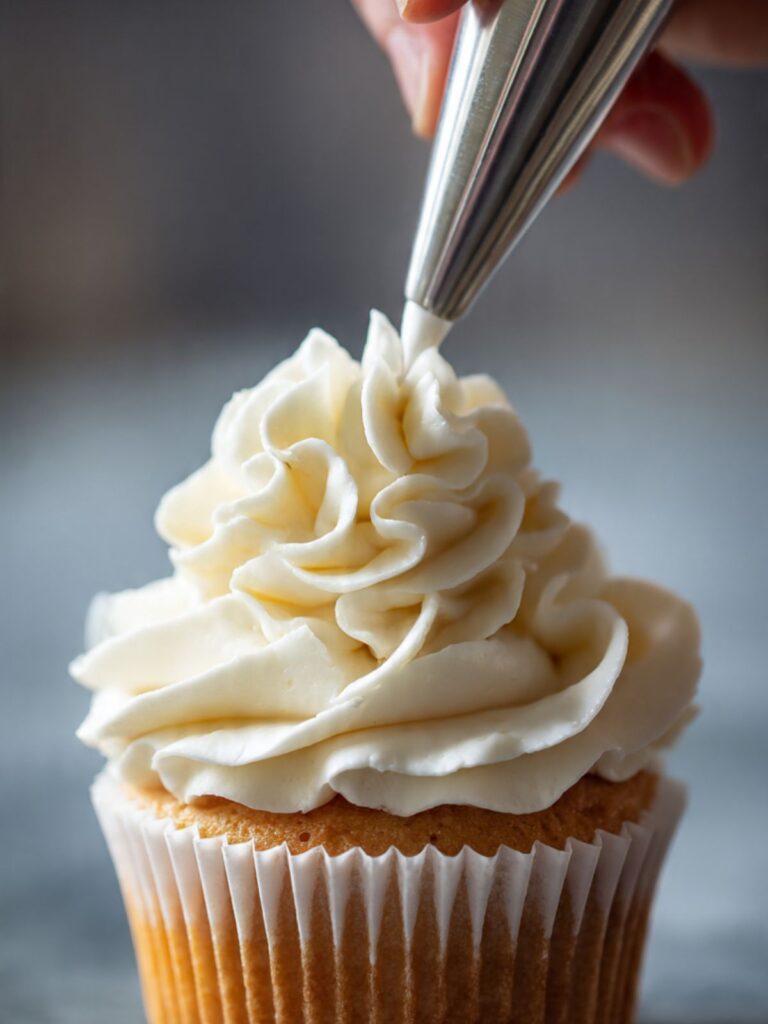
The finished frosting should look bright white or pale pink depending on your choice, smooth, and hold a clean stiff peak — exactly like the tall cream swirl visible in images 1 and 4. If it looks glossy and soft and the peak droops immediately, the butter was too warm — refrigerate the bowl for 10 minutes, then re-beat. If it looks stiff and cracked at the edges, add one more tablespoon of milk and beat for 30 seconds.
Do not sift the powdered sugar directly into the bowl while the mixer is running — the fine powder disperses into the air and settles on every surface in the room. Add it with the mixer off, then turn to low before increasing speed.
Your frosting is thick, smooth, and ready to pipe.
Step 10: Frost, Crunch, and Garnish
Goal: Pipe, crunch, and garnish one cupcake at a time — the crunch topping must go on within 60 seconds of piping while the frosting surface is still tacky enough to grip the crumbs.
Fit a large piping bag with a Wilton 1M open star tip. Fill the bag no more than two-thirds full with frosting — fold the top of the bag down over your hand like a cuff before spooning in the frosting, then twist the top closed and unfold the cuff. This keeps the outside of the bag clean and prevents frosting from creeping toward the twisted end, which causes inconsistent pressure mid-pipe.
Hold the bag straight up and down, perpendicular to the cupcake surface, with the tip approximately ½ inch (1.25cm) above the center of the cupcake. Apply steady, even pressure from the top of the bag — not the middle — and pipe outward from the center in a slow spiral, building upward into a tall swirl. Release pressure completely before lifting the tip to avoid a ragged peak.
Immediately after frosting each cupcake — within 60 seconds — hold it over the bowl of crunch topping and use your other hand to press the crumbs firmly into the lower ring of frosting, then scatter a pinch of crumbs across the top of the swirl and press gently. Finish with a fresh completely dried strawberry half placed cut-side down at the crown of the swirl, pressing it enough to anchor it in the frosting at a very slight forward angle — approximately 10 degrees toward you — which counteracts the natural tendency of the strawberry to lean backward under its own weight. This is exactly how every garnish in these photos sits.
If you prefer a cleaner, more minimal look, leave the strawberry garnish off entirely and finish with the crunch topping only — the cupcakes in that style photograph beautifully from directly above.
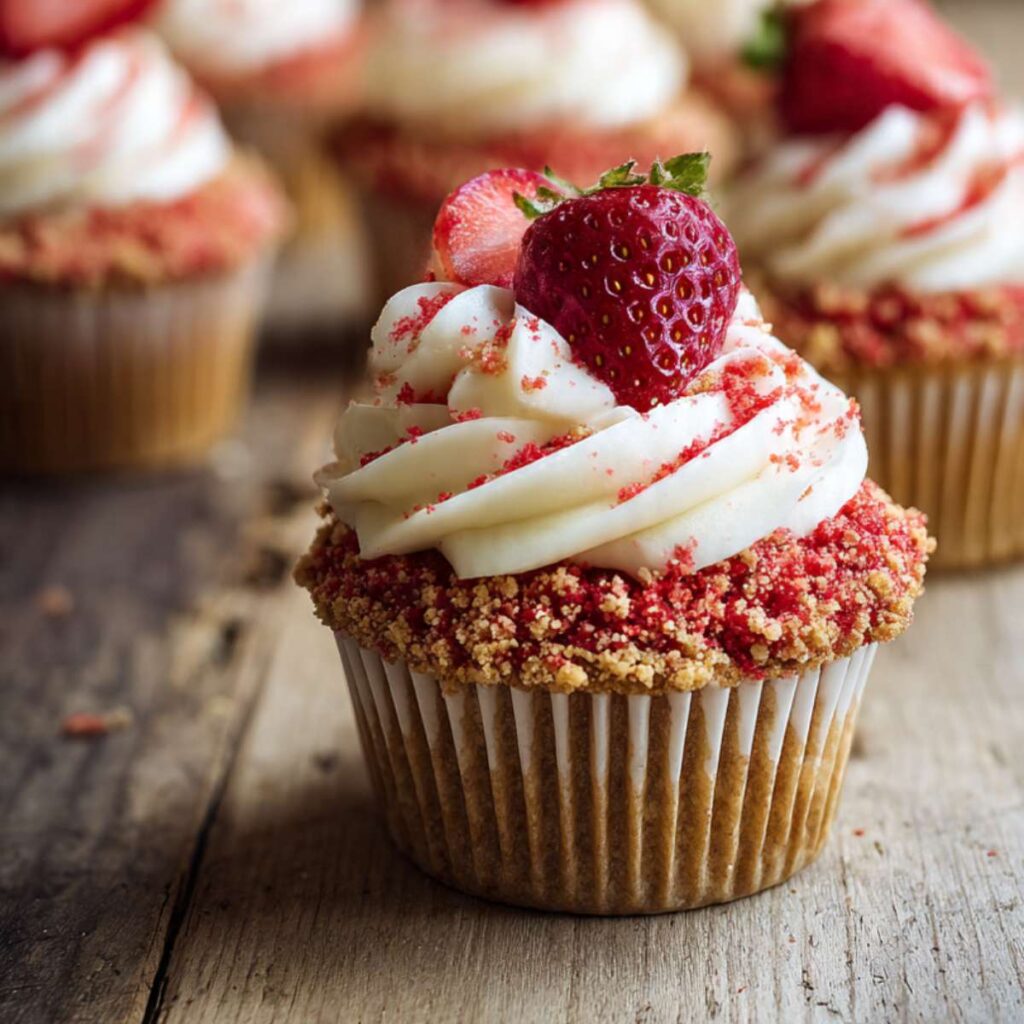
The finished cupcake should look exactly like the images — a tall cream swirl densely coated at the base and scattered across the top with the two-tone golden and red crumb mixture, crowned with a bright red strawberry half. The crumbs should be visibly pressed into the frosting surface, not sitting loosely on top.
🗒 Luna’s Note: I frost and crunch one cupcake at a time — not all 12 frosted first, then crumbed. Frosting that has had even 5 minutes to sit develops a dry skin that the crumbs will not press into. One at a time is the only method that gives the dense crumb coverage visible in these photos.
Do not press the strawberry garnish too deeply into the frosting — it should sit at the crown, visible from above, not buried in the swirl. Place it with light pressure and it will hold without sinking.
All 12 cupcakes are frosted, crunched, and garnished. They are ready to serve or store.
The Science Behind Strawberry Crunch Cupcakes
Why the Creaming Method Gives You a Domed, Tender Cupcake
The creaming method works by forcing air bubbles into the fat before any other ingredient is added. When butter and sugar are beaten together at medium speed for 3–4 minutes, the sharp edges of the sugar crystals physically cut into the soft fat and create thousands of tiny air pockets. Those air pockets expand in the heat of the oven — that expansion is what pushes the batter upward into the pale golden dome visible in every image here.
This is why butter temperature matters so much at this stage. Butter that is too warm is too soft for the sugar crystals to cut into — the fat smears around the bowl instead of trapping air. Butter that is too cold is too firm for the sugar to penetrate. The 65–68°F (18–20°C) window is the exact range where the fat is plastic enough to hold air but firm enough to trap it.
The alternating addition of flour and milk in Step 5 protects that aeration. Adding all the flour at once tightens the gluten network before the air pockets have time to set, which collapses the structure. Five small alternating additions keep the batter relaxed, the gluten development gentle, and the trapped air intact all the way to the oven.
🗒 Luna’s Note: I always set a 4-minute timer for the creaming step. Every time I have tried to eyeball it and stopped early, the cupcakes came out flatter than the ones in these photos. The timer is the most important tool in this recipe.
Why Freeze-Dried Strawberries — Not Fresh, Not Dehydrated — Give You That Texture and Color
The crunch topping in these cupcakes depends entirely on moisture content. Fresh strawberries contain approximately 90% water by weight. Dehydrated strawberries still contain 15–20% residual moisture. Freeze-dried strawberries have had nearly all their moisture removed through a low-temperature vacuum process that leaves the cell structure intact — the result is a berry that is rigid, intensely flavored, and completely dry.
That dryness is what makes the topping work. When freeze-dried strawberry crumbs contact the buttercream frosting, they pull a tiny amount of surface moisture from the frosting — enough to bond without dissolving. Fresh or dehydrated fruit crumbs absorb moisture too aggressively and turn the entire topping into a soggy paste within 30 minutes of decorating.
The golden cookie crumbs in the mixture serve a structural role — they add bulk, a neutral sweetness, and a coarser texture that prevents the freeze-dried crumbs from clumping. The two-tone color contrast visible in the images — vivid red against golden tan — only happens when both components stay at their correct grind size. Grind either too fine and the visual distinction disappears entirely.
If you love strawberry-forward baking, my Mango Strawberry Sunset Cupcakes recipe uses a similar fruit-forward decorating technique with a two-tone frosting swirl that is worth adding to your rotation.
Why Carryover Cooking Matters More for Cupcakes Than Almost Any Other Bake
Cupcakes are small. Small baked goods have a high surface-area-to-volume ratio, which means they lose heat faster than a full-sized cake — but they also absorb residual heat from the pan more aggressively during the first few minutes off the heat. The 5-minute rest in the muffin tin after pulling from the oven is not a suggestion — it is a continuation of the baking process.
During that 5-minute window, the metal of the muffin tin is still holding significant heat — typically 200–230°F (93–110°C) at the surface. That heat continues to conduct into the base and lower sides of each cupcake, finishing the protein coagulation process that sets the crumb structure. Cupcakes moved off the pan before this window closes often have a slightly gummy, undercooked ring at the base even when the toothpick came out clean.
The same principle applies in reverse to the frosting. Buttercream is an emulsion of fat and sugar held stable at room temperature. Above approximately 75°F (24°C), the fat begins to soften faster than the sugar can hold the structure together, and the frosting begins to flow rather than hold. A cupcake that is even slightly warm when frosted is conducting heat upward into the frosting base continuously — which is why the tall swirl in the images is only achievable on a cupcake that has cooled fully for a minimum of 45 minutes.
Strawberry Crunch Cupcakes Troubleshooting & Pro-Tips
Common Mistakes
My Cupcakes Came Out Dense and Dry Instead of Soft and Tender
The most common cause is too much flour from incorrect measuring. If you scooped directly from the bag instead of spooning and leveling, you added up to 30% more flour than the recipe calls for — that extra flour absorbs moisture from the batter and produces a dry, tight crumb that no amount of frosting can rescue. The fix for next time is to spoon the flour into the measuring cup with a separate spoon and level off the top with a straight edge, or weigh it at exactly 190g on a kitchen scale. If the cupcakes are already baked and dry, a simple syrup soak helps — brush each cupcake top with 1 tablespoon of warm simple syrup (equal parts sugar and water, dissolved together over low heat) before frosting to restore surface moisture.
My Cupcakes Sank in the Middle
Sinking centers are almost always caused by one of three things: the oven was not fully preheated when the pan went in, the oven door was opened before 16 minutes, or the cupcakes were underbaked and removed too early. When the batter hits an oven that is still climbing to temperature, the leavening activates too slowly — the batter rises, then collapses before the protein structure sets. The fix is to always wait for the oven to reach full temperature before the pan goes in, and to use an oven thermometer to confirm the actual internal temperature rather than trusting the dial. Sunken cupcakes cannot be fixed after baking — cover with extra frosting and extra crunch topping to disguise the dip, and adjust the oven process next time.
My Frosting Is Melting and Sliding Off the Cupcake
This is a butter temperature problem, not a recipe problem. Either the butter for the frosting was too warm when beaten — producing a frosting that looked correct in the bowl but had no structural integrity — or the cupcakes were not fully cooled before frosting. Buttercream begins to soften at approximately 75°F (24°C). If the frosting is already sliding, transfer the frosted cupcakes to the refrigerator for 20 minutes — the cold will re-firm the fat and stabilize the swirl. For next time, make sure the frosting butter is at exactly 65–68°F (18–20°C) before beating, and confirm the cupcakes are completely cool to the touch — bottom included — before piping.
My Crunch Topping Went Soft and Soggy

Soft topping happens for two reasons: the wrong type of strawberry product was used, or the topping was applied too long after frosting. Dehydrated strawberries, strawberry powder, and fresh strawberry pieces all contain too much residual moisture — they absorb buttercream instead of bonding lightly to its surface, and the topping turns paste-like within 30 minutes. Use only freeze-dried strawberries with no exceptions. The second cause is timing — frosting that has had more than 60–90 seconds to start skinning over will not hold the crumbs firmly, and they sit loose on the surface where they absorb moisture from the air. Apply the crunch topping immediately after piping each individual cupcake, one at a time, not all 12 frosted first then crumbed.
My Baking Powder Did Not Work — The Cupcakes Are Completely Flat
Flat cupcakes with no dome and a dense, gummy crumb are the signature of expired or inactive baking powder. Baking powder loses its potency after 6–12 months once opened — and in humid climates, it can lose potency even faster. The freshness test is fast: drop 1 teaspoon (4g) into ½ cup (120ml) of hot water. It should bubble immediately and vigorously. If it fizzes weakly or not at all, the baking powder is spent and must be replaced before baking. Unlike baking soda, baking powder contains its own acid and does not require an acidic ingredient in the recipe to activate — but it does require heat and moisture, which is why expired powder fails silently until the cupcakes come out of the oven flat.
My Cupcakes Have Tunnels Through the Crumb
Tunnels — long vertical air channels running through the interior of the cupcake — are caused by overmixing after the flour was added. When flour meets liquid and is stirred aggressively, gluten develops rapidly and forms an elastic network that traps CO2 from the baking powder into long channels rather than small, even bubbles. The result is a cupcake with a tough, uneven crumb full of tunnels rather than the fine, soft crumb visible when these cupcakes are broken open. The fix is to stop the mixer the moment the flour disappears into the batter, then finish with 4–5 gentle folds by hand using a silicone spatula. The batter should be mixed to uniformity — not to smoothness.
My Piped Frosting Swirl Looks Uneven and Ragged
Uneven piping is almost always a pressure control issue. If you squeeze the bag from the middle instead of the top, the pressure is inconsistent — you get thick sections and thin sections in the same swirl. Hold the bag vertically with your dominant hand gripping the twisted top of the bag, and apply pressure only from there. Move the tip in a slow, steady spiral from the center outward and upward without stopping mid-swirl. Release pressure completely before lifting the tip — lifting with pressure still applied creates a ragged, torn peak. Practice the pressure-and-release motion on a plate or piece of parchment before piping the actual cupcakes — one practice swirl is enough to calibrate your hand pressure before the real batch.
Humidity and Altitude Adjustments
In high humidity, the freeze-dried strawberry crumbs will begin absorbing moisture from the air within 30–60 minutes of application — serve these cupcakes within 2 hours of decorating in humid conditions for the best crunch texture. For the batter, high humidity can add moisture to the flour before it even reaches the bowl — if your kitchen is very humid, reduce the milk by 1 tablespoon (15ml) and assess the batter consistency before adding more.
At high altitude (above 3,500 feet / 1,065m), reduce the baking powder to 1 teaspoon (4g), increase the flour by 2 tablespoons (16g), and increase the oven temperature to 375°F (190°C). Leavening acts more aggressively at altitude because lower air pressure allows CO2 bubbles to expand faster — reducing the baking powder prevents over-rising and collapsing.
Expert Pro-Tips
Press the crunch topping into the frosting — do not sprinkle it. Hold the cupcake over the bowl of crunch mixture and use your palm to press a generous pinch of crumbs firmly into the lower ring of frosting with slight inward pressure. The crumbs should be embedded in the frosting surface, not sitting on top of it. This is the difference between the dense, textured band visible in images 1 and 2 and a sparse, uneven coating that falls off when the cupcake is picked up.
Sift the powdered sugar even if the bag looks lump-free. Powdered sugar compacts in the bag during storage and develops micro-clumps that do not fully dissolve during beating. Unsifted powdered sugar produces a frosting with a slightly gritty texture that is noticeable on the tongue even when the frosting looks smooth in the bowl. Sift it directly into a separate bowl before the mixing starts — this one step takes 90 seconds and eliminates grittiness entirely.
Use a cookie scoop for the batter to guarantee even baking. Uneven batter portions produce cupcakes that finish at different times — some overbaked, some underbaked, all on the same pan. A standard cookie scoop (approximately 3 tablespoons / 55g) portions every cup identically, which means every cupcake domes at the same rate and finishes at the same time. Weigh the first scoop on your kitchen scale to confirm it hits 55g, then use that scoop for the remaining 11 without re-weighing.
Fill the piping bag correctly to maintain consistent pressure throughout. Fold the top of the piping bag down over your non-dominant hand like a cuff before spooning in the frosting — this keeps the outside of the bag completely clean and prevents frosting from migrating toward the twisted end during piping. A clean twist at the top means you can apply pressure from exactly one point throughout the entire swirl. Fill to no more than two-thirds full, twist the top closed tightly, then unfold the cuff. A bag filled more than two-thirds becomes difficult to grip and control, and the pressure becomes uneven as the bag empties.
Angle the strawberry garnish forward for a stable, upright finish. To keep the halved strawberry garnish upright rather than sliding off the frosting swirl, press the flat cut side down into the highest point of the swirl at a very slight forward angle — approximately 10 degrees toward you. The angle counteracts the natural tendency of the strawberry to lean backward under its own weight as it sits on the curved frosting surface. This is exactly how every garnish in these photos sits — upright, centered, and stable without any additional support.
How to Store Strawberry Crunch Cupcakes
Room Temperature
Frosted and decorated strawberry crunch cupcakes keep at room temperature for up to 24 hours. Store them in a hard-sided lidded container — not a zip-lock bag, which compresses the frosting swirl and causes the crunch topping to transfer onto the lid. The container must be tall enough to fit the full height of the frosting swirl without the lid touching the top of any cupcake. Do not wrap individual frosted cupcakes in plastic wrap — the wrap pulls the crunch topping off the frosting surface when removed.
The crunch topping is at its best texture on day one, within the first 4–6 hours of decorating. After 24 hours at room temperature, the freeze-dried strawberry crumbs will have absorbed enough ambient moisture to soften noticeably — the cupcakes will still taste good, but the textural contrast that defines this recipe begins to fade.
Do not store these cupcakes near a heat source, in direct sunlight, or in a warm kitchen above 72°F (22°C). Buttercream softens at approximately 75°F (24°C) — a warm room will cause the frosting swirl to slowly slump even in a covered container.
Refrigerator
Refrigerate frosted cupcakes if you need to keep them beyond 24 hours, or if your kitchen runs warm. Place them in a hard-sided lidded container tall enough to clear the frosting, and refrigerate for up to 3 days. Do not cover the container opening with plastic wrap before putting the lid on — the wrap traps condensation against the frosting surface and causes the crunch topping to go wet.
Before serving refrigerated cupcakes, remove them from the fridge and let them sit at room temperature for 20–30 minutes. Cold buttercream is firm and dense — it needs time to soften back to its intended creamy texture. Do not microwave to speed this up — even 5 seconds in the microwave begins to melt the outer frosting layer unevenly while the interior stays cold.
Note that refrigeration accelerates the softening of the crunch topping — the cold, moist environment of the fridge pulls moisture into the freeze-dried crumbs faster than room temperature air does. By day 2 in the fridge, the crunch will be noticeably softer than day one. The flavor remains good, but the texture changes. If crunch texture is important to your serving occasion, decorate on the day you plan to serve.
Freezer — Frosted and Decorated
Fully decorated cupcakes do not freeze well. The freeze-dried strawberry crumbs absorb moisture aggressively during the thawing process and turn the topping completely soft. The fresh strawberry garnish also deteriorates in the freezer — it becomes waterlogged and loses its color and structure on thawing. Do not freeze decorated cupcakes under any circumstances — the result after thawing will not resemble what is shown in the images.
Freezer — Unfrosted Cupcake Bases
The unfrosted cupcake bases freeze beautifully for up to 2 months. Once the baked cupcakes have cooled completely — minimum 1 hour at room temperature — wrap each one individually in a layer of plastic wrap, then place the wrapped cupcakes in a zip-lock freezer bag with as much air pressed out as possible. Label with the date and the recipe name.
To thaw, remove from the freezer and unwrap immediately — do not thaw in the plastic wrap, which traps condensation against the cupcake surface and makes the top tacky and sticky. Thaw at room temperature for 45–60 minutes, then frost and decorate as normal. The texture of the thawed base is nearly identical to fresh — the tight crumb structure of the creamed butter method holds up well through a freeze-thaw cycle.
🗒 Luna’s Note: I almost always freeze half a batch of unfrosted bases the day I bake them. When I need cupcakes quickly, I pull them from the freezer in the morning and they are ready to frost by early afternoon. The crunch topping always goes on fresh — never from frozen bases that have not fully thawed and returned to room temperature first.
Freezer — Unbaked
Cupcake batter does not freeze well once mixed — the leavening begins activating the moment it contacts the wet ingredients, and freezing an already-mixed batter causes the leavening to lose most of its potency before the batter ever reaches the oven. Do not freeze unbaked batter. Bake first, cool completely, then freeze the bases as described above.
Serving Suggestion
🗒 Luna’s Note: I serve these most often at weekend afternoon gatherings and birthday tables — the height of the frosting swirl and the color of the crunch topping make them look deliberately composed even when the whole batch came together in under 2 hours. I set them out on a flat wooden board rather than a tiered stand — the board keeps them stable and shows the crunch topping and strawberry garnish from a straight-on angle, which is exactly how they look best. I pair them with a pot of plain black coffee or unsweetened iced tea. The frosting is sweet and rich, and a bitter drink next to it makes every bite taste more intentional.
I sometimes skip the strawberry garnish on half the batch and finish those cupcakes with the crunch topping only — it gives a cleaner, more minimal look that photographs well from directly above. Both versions taste identical. Serve within 2 hours of decorating for the best crunch texture regardless of which garnish style you choose.
Frequently Asked Questions About Strawberry Crunch Cupcakes
Can I make strawberry crunch cupcakes ahead of time?
Yes, with one important distinction. The cupcake bases can be baked up to 2 days ahead and stored at room temperature wrapped tightly in plastic wrap, or frozen for up to 2 months. The frosting can be made up to 3 days ahead and refrigerated in a lidded container — bring it back to room temperature for 30 minutes, then re-beat on medium speed for 60 seconds before piping. What cannot be done ahead is the final decorated assembly — the crunch topping begins softening within a few hours of application, and the fresh strawberry garnish deteriorates quickly once placed on frosting. Decorate on the day you plan to serve them, using pre-baked bases and pre-made frosting, and the whole assembly takes under 20 minutes for a full batch of 12.
What is strawberry crunch topping made of?
The topping is a two-component mixture: golden cookie crumbs and freeze-dried strawberry crumbs. The golden cookie crumbs come from Golden Oreos or vanilla wafers crushed to a coarse sand texture — they provide the tan-colored base and a neutral sweetness. The freeze-dried strawberry crumbs come from crushed freeze-dried strawberries — not dehydrated, not fresh, not strawberry powder — and provide the vivid red color, the intense strawberry flavor, and the dry, crunchy texture that does not dissolve into the frosting. The ratio in this recipe is three parts golden crumbs to one part strawberry crumbs, which gives the two-tone color contrast visible in the images without the topping tasting overwhelmingly sweet.
How do I get domed cupcake tops?
Three things control whether a cupcake domes or bakes flat. First, the oven must be fully preheated to 350°F (175°C) before the pan goes in — a climbing oven activates the leavening too slowly and the batter spreads before it sets. Second, each liner should be filled to exactly two-thirds full at approximately 55g of batter — under-filled cups produce flat tops that do not rise above the liner rim. Third, the baking powder must be fresh and active — expired baking powder produces no lift regardless of oven temperature or fill level. Run the freshness test described in the Before You Start section before every batch. All three conditions must be met simultaneously for the dome visible in these images to form reliably.
Can I use strawberry cake mix instead of making the batter from scratch?
You can, but the result will be different in two specific ways. Boxed strawberry cake mix contains artificial strawberry flavoring that produces a noticeably synthetic flavor next to the real freeze-dried strawberry crunch topping — the contrast between artificial and real is more obvious here than it would be in a standalone cake. The texture also differs — mix-based cupcakes tend to have a spongier, more open crumb than the fine, tight crumb produced by the creamed butter method in this recipe, which means the base is less sturdy under a heavy frosting swirl. If you use a mix, follow the box instructions for cupcakes exactly, cool completely, and apply the frosting and crunch topping as described in Steps 9 and 10. The decoration technique works the same way regardless of what base you use.
Why did my frosting turn out gritty?
Gritty buttercream is almost always caused by unsifted powdered sugar. Powdered sugar compacts during storage and develops micro-clumps that feel smooth in the bag but do not fully dissolve during beating — they remain as tiny sugar crystals suspended in the fat, which registers as grittiness on the tongue. Sift the powdered sugar through a fine mesh sieve into a separate bowl before it goes into the mixer, every time, without exception. If your frosting is already made and gritty, beat it on high speed for an additional 2 minutes — extended beating breaks down some of the clumps. If it is still gritty after that, the only complete fix is to make a fresh batch with properly sifted sugar. For more cupcake frosting techniques using this same American buttercream base, my Snickerdoodle Cupcakes recipe covers a cinnamon variation that uses identical ratios with a different flavor profile.
Can I double strawberry crunch cupcakes recipe?
Yes, this recipe doubles reliably with one important adjustment. When doubling, do not double the baking powder to 3 teaspoons — use only 2¼ teaspoons (9g) instead. Baking powder does not scale linearly — doubling it produces too much lift too fast, which causes the cupcakes to dome dramatically and then collapse in the center as the structure cannot support the over-expanded rise. Everything else in the recipe doubles directly: flour, butter, sugar, eggs, milk, vanilla, salt, and all frosting and topping ingredients. Bake in two separate pans on the same rack if your oven is wide enough, or bake one pan at a time on the middle rack — rotating two pans partway through produces uneven results because opening the door mid-bake drops the oven temperature abruptly.
How do I store strawberry crunch cupcakes in hot or humid weather?
In hot or humid conditions, these cupcakes need refrigeration from the moment they are decorated. Buttercream softens at approximately 75°F (24°C), and high humidity accelerates moisture absorption into the freeze-dried strawberry crumbs — both work against this recipe simultaneously in warm weather. Store decorated cupcakes in a hard-sided lidded container in the refrigerator, and remove them 20–30 minutes before serving to allow the frosting to soften back to its creamy texture. In very high humidity, the crunch topping will soften within 1–2 hours even under refrigeration — for outdoor summer events, decorate as close to serving time as possible and keep the cupcakes in a cool, shaded spot until they are served.
Can I make this as a strawberry crunch cake instead of cupcakes?
Yes, this batter converts reliably to a single-layer cake. Pour the full batch of batter into a greased and floured 9-inch (23cm) round cake pan or an 8×8 inch (20x20cm) square pan — both work with the same quantity of batter. Bake at 350°F (175°C) for 28–35 minutes, starting to check at 28 minutes with a toothpick inserted in the center. The toothpick should come out with moist crumbs but no wet batter.
The full batch of frosting is enough to cover the top and sides of a single-layer cake generously. Apply the crunch topping to the sides immediately after frosting — press it in firmly using your palm the same way you would on a cupcake, working quickly around the perimeter within 60 seconds of frosting.
The fresh strawberry garnish can be arranged across the top of the cake in a loose cluster at the center or scattered evenly across the surface. Note that a cake format will not have the same crunch-to-frosting ratio per bite as the cupcakes — the cupcake format gives a higher proportion of topping relative to cake in every single bite, which is what makes this recipe work so well as individual portions.
More Cupcake Recipes You’ll Love
- Cookie Dough Cupcakes — a fudgy chocolate cupcake base filled with edible eggless cookie dough and topped with a thick brown sugar buttercream swirl
Strawberry Crunch Cupcakes
Ingredients
Equipment
Method
- Position the oven rack in the middle of the oven and preheat to 350°F (175°C), then line a standard 12-cup light-colored aluminum muffin tin with paper cupcake liners — do not grease the liners, as greasing causes the paper to pull away from the cupcake sides during baking.
- In a medium mixing bowl, whisk together 1½ cups (190g) all-purpose flour spooned and leveled, 1½ teaspoons (6g) baking powder checked for freshness, and ¼ teaspoon (1.5g) fine sea salt for 20 full seconds in slow circles until completely uniform with no visible white streaks or clumps.
- In a large mixing bowl, beat ½ cup (113g) unsalted butter softened to 65–68°F (18–20°C) and ¾ cup (150g) plain white granulated cane sugar on medium speed for 4 full minutes until pale, nearly white, fluffy, and noticeably increased in volume — scrape the bowl completely halfway through with a silicone spatula.
- With the mixer on low, add 1 large room temperature egg, increase to medium and beat for 30 seconds until fully incorporated, scrape the bowl completely, then repeat with the second large room temperature egg, then add 2 teaspoons (10ml) pure vanilla extract and beat on low for 10 seconds to combine — batter should look smooth and cohesive with no separation.
- With the mixer on low, add the dry ingredients and ½ cup (120ml) whole milk (3.5% fat) room temperature in 5 alternating additions starting and ending with flour — one-third flour, half the milk, one-third flour, remaining milk, final one-third flour — mixing on low for 10 seconds between each addition, then stop the mixer and finish with 4–5 folds by hand from the bottom of the bowl upward using a silicone spatula until the batter looks smooth, thick, and streak-free.
- Using a cookie scoop, portion approximately 3 tablespoons (55g) of batter into each lined cup filling each to two-thirds full — weigh the first scoop on a kitchen scale at 55g and use that as your reference for the remaining 11 — then place the filled pan on the middle rack of the fully preheated 350°F (175°C) oven.
- Bake for 16–20 minutes starting to check at 16 minutes — the cupcakes are done when the tops look set and pale golden and spring back immediately when pressed lightly in the center with one finger, and a toothpick inserted into the center comes out with moist crumbs but no wet batter — do not wait for the toothpick to come out completely clean as that indicates overbaking.
- Leave the cupcakes in the muffin tin for exactly 5 minutes after pulling from the oven to allow carryover heat to finish setting the crumb structure, then transfer individually to a wire cooling rack and cool completely for a minimum of 45 minutes to 1 hour before frosting — the bottom of each cupcake must feel completely cool to the touch before frosting begins.
- Place ¾ cup (75g) Golden Oreo or vanilla wafer crumbs crushed to a coarse sand texture with a rolling pin into a medium bowl, add ¼ cup (25g) freeze-dried strawberry crumbs crushed by hand into irregular vivid red pieces, and stir together with a fork for approximately 10 strokes until evenly distributed — set aside uncovered and completely dry.
- In a large clean mixing bowl, beat 1 cup (226g) unsalted butter softened to 65–68°F (18–20°C) on medium speed for 3 full minutes until pale and fluffy, then add 3½ cups (420g) sifted powdered sugar in three additions on low speed mixing 20 seconds between each, then add 1½ teaspoons (7.5ml) pure vanilla extract and ⅛ teaspoon (0.75g) fine sea salt, increase to medium-high and beat for 2 full minutes, then add whole milk one tablespoon (15ml) at a time beating 20 seconds between additions until the frosting holds a stiff peak for at least 5 seconds when the beater is lifted — for pale pink frosting add 1–2 drops of pink gel food coloring on low speed for 10 seconds only.
- Fold the top of a large piping bag fitted with a Wilton 1M open star tip down over your hand like a cuff, fill no more than two-thirds full with frosting, twist the top closed tightly, then hold the bag perpendicular to the cupcake surface with the tip ½ inch (1.25cm) above the center and pipe outward from the center in a slow upward spiral applying steady pressure from the top of the bag only — release pressure completely before lifting the tip to avoid a ragged peak.
- Immediately after frosting each cupcake within 60 seconds, press a generous pinch of the crunch topping firmly into the lower ring of frosting using your palm, scatter a pinch across the top of the swirl and press gently, then finish with a completely dried fresh strawberry half pressed cut-side down at the crown of the swirl at a slight 10-degree forward angle to keep it upright and stable — repeat for each cupcake one at a time, frosting and crunching each before moving to the next.