
No-Bake Biscoff Cheesecake Bars Recipe
Biscoff cheesecake bars are one of those recipes where the technique gap between a mediocre result and a genuinely impressive one is smaller than people expect — and almost entirely located in two decisions: the crust ratio and the chill time. Most versions I tried before developing this recipe had crusts that crumbled the moment a knife touched them and fillings that were fluffy and mousse-like rather than the dense, thick, sliceable result I was after. It took eleven batches to get both right at the same time. This is batch eleven.
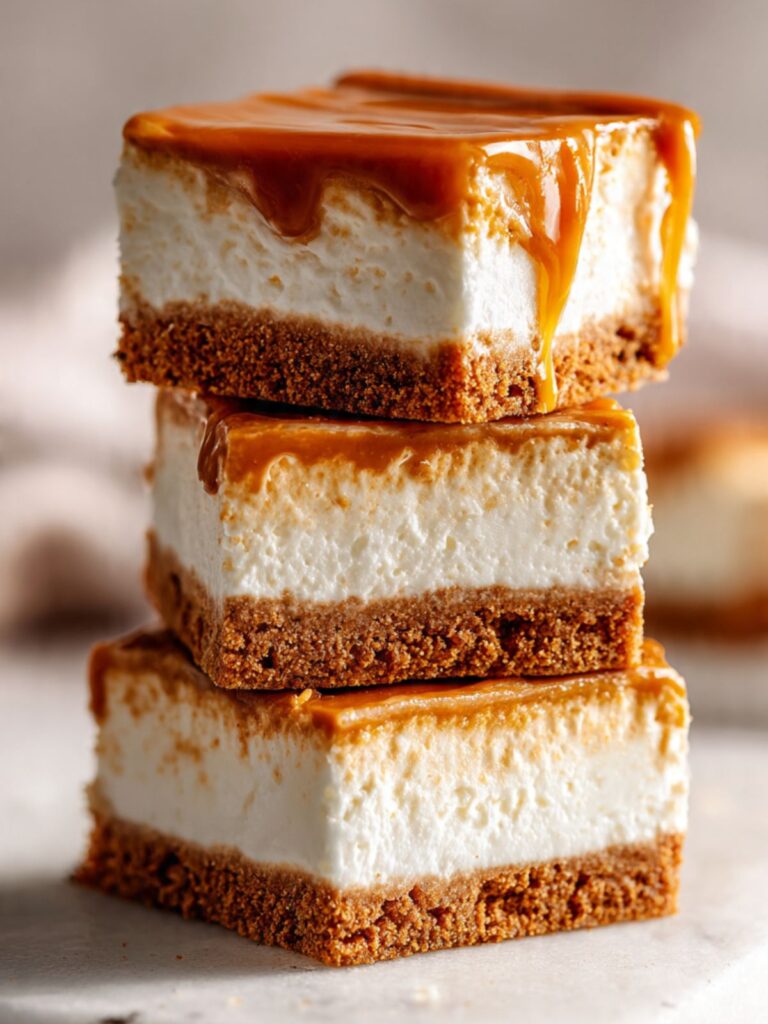
The filling in these bars is made with full-fat block cream cheese and heavy whipping cream — no gelatin, no condensed milk, no shortcuts. The texture you see in the stacked cross-section photo is what you get: clean square edges, a dense ivory filling that holds its shape the moment it comes out of the pan, and a thick, granular Biscoff crust that stays together when you lift a bar off the plate. The caramel is made from scratch on the stovetop — a simple salted version that sets to a soft, glossy layer on top.
No oven required for the filling. The crust gets a brief freeze to set before the filling goes in. A hand mixer is required — mixing by hand will not whip the cream cheese smooth enough or incorporate enough air into the cream.
🗒 Luna’s Note: The very first test batch I made had the right flavor but a filling so soft it collapsed when I tried to slice it cold. I had the cream cheese ratio wrong — too much whipped cream, not enough cream cheese to hold the structure. The bars in the photos are the result of flipping that ratio. Cream cheese is the anchor. Whipped cream is the texture.
I tested this with and without the caramel layer set directly on the filling. Pouring warm caramel onto a cold set filling sounds right — and it is, if the filling is cold enough. Twice during testing, I poured caramel that was too warm onto a filling that had only chilled for two hours, and the top half of the filling softened and moved. The caramel must be cooled to room temperature before it goes onto the bars. The filling must be fully set — minimum six hours in the refrigerator, preferably overnight. I keep these conditions in the recipe. I would not change either of them.
I tested the crust with both Biscoff cookie crumbs alone and with an addition of granulated sugar. The Biscoff cookie already carries a significant amount of sugar from the speculoos base — adding more produced a crust that was gritty and too sweet against the caramel topping. Plain Biscoff crumbs with melted butter is the correct ratio. No added sugar.
These bars are no-bake from the filling up. The only heat involved is melting butter for the crust and making the caramel on the stovetop. The chilling time is six hours minimum — I strongly recommend overnight. Everything else comes together in about 25 minutes of active work.
| Prep Time | Chill Time | Total Time | Yield | Difficulty |
|---|---|---|---|---|
| 25 min | 6–8 hours (overnight preferred) | 6 hours 25 min | 9 bars (3×3 cut from a 9×9 inch pan) | Intermediate |
| Calories | Fat | Carbs | Sugar | Protein | Sodium |
|---|---|---|---|---|---|
| ~420 kcal | ~28g | ~38g | ~27g | ~5g | ~210mg |
Ingredients & Tools for No-Bake Biscoff Cheesecake Bars Recipe
For the Biscoff Crust
- 2¾ cups (300g) Lotus Biscoff cookie crumbs — crush whole Lotus Biscoff sandwich cookies in a food processor until fine and sandy, with no large pieces remaining. Do not substitute with graham crackers or digestive biscuits — the speculoos spice profile of Biscoff is what flavors the entire crust and cannot be replicated with a plain cracker base.
- 6 tablespoons (85g) unsalted butter, melted and slightly cooled — unsalted only; salted butter adds an unpredictable amount of sodium that competes with the measured salt in the caramel. Melt fully and allow to cool for 3–4 minutes before mixing into the crumbs — butter that is too hot will partially cook the crumb mixture and produce a greasy crust.
For the No-Bake Cheesecake Filling
- 24 oz (680g) full-fat block cream cheese, at room temperature — block-style only, such as Philadelphia Original in the silver foil packaging. Do not use cream cheese spread, whipped cream cheese, or low-fat cream cheese — these contain more water and stabilizers than block cream cheese and will produce a filling that does not set firm enough to hold a clean square edge. Remove from the refrigerator 90–120 minutes before mixing. The cream cheese must feel completely soft when pressed — if it still feels cool or resistant in the center, it is not ready. Cold cream cheese causes lumps that cannot be beaten out once the sugar is added.
- ⅔ cup (80g) powdered sugar, sifted — sift through a fine mesh sieve before measuring to remove any lumps. Unsifted powdered sugar leaves gritty streaks in the filling that no amount of beating will fully dissolve.
- 1 teaspoon pure vanilla extract — pure only, not imitation. Imitation vanilla extract uses synthetic vanillin and leaves a faintly chemical aftertaste in no-bake fillings where the flavor is not cooked off.
- ½ cup (120ml) heavy whipping cream, cold straight from the refrigerator — heavy whipping cream only, minimum 36% fat content. Do not use light cream, half-and-half, or whipping cream below 36% fat — lower-fat creams will not whip to stiff peaks and the filling will not hold its shape. The cream must be cold when it goes into the mixer — warm cream will not whip. Keep it in the refrigerator until the exact moment it is needed.
For the Salted Caramel Topping
- ¾ cup (150g) plain white granulated cane sugar — plain white granulated only. Do not substitute with coconut sugar, raw sugar, brown sugar, or cane sugar crystals — these contain varying amounts of molasses that cause the caramel to burn at a lower temperature and produce a bitter, overcooked flavor before it reaches the correct amber color.
- 5 tablespoons (75g) unsalted butter, cut into 1-tablespoon pieces and at room temperature — unsalted only. To confirm room temperature: press one piece between two fingers — it should flatten without resistance and feel neither cool nor slick. Cold butter straight from the refrigerator will cause violent spattering when it hits the hot caramel and will not incorporate smoothly. Butter that is too warm and greasy will make the caramel loose and overly soft at room temperature. Set it out 45–60 minutes before making the caramel.
- ⅓ cup (80ml) heavy whipping cream, at room temperature — room temperature cream spatters significantly less than cold cream when added to hot caramel. Cold cream added to hot sugar causes a violent boil-up that can overflow the saucepan. Set the cream on the counter for 20 minutes before starting the caramel.
- ½ teaspoon fine sea salt — fine sea salt dissolves evenly into the caramel. Do not use kosher salt or coarse flaked sea salt at this stage — larger crystals do not fully dissolve and create uneven salty pockets in the finished topping.
For the Garnish
- 9 whole Lotus Biscoff cookies — one per bar, placed on the whipped cream rosette immediately before serving. These are the full round sandwich cookies with the distinctive ridged geometric pattern on the surface, not crumbled Biscoff or Biscoff spread.
- ½ cup (120ml) heavy whipping cream, cold — for the whipped cream rosettes. Same fat-content requirement as the filling cream. Whip separately just before serving — pre-whipped cream weeps and loses structure within 30 minutes at room temperature.
- 1 tablespoon (8g) powdered sugar — to lightly sweeten the whipped cream for the rosettes. Optional but recommended — unsweetened whipped cream against the sweet caramel and Biscoff base reads as flat.
Before You Start
Temperature preparation — read this before touching anything:
The two ingredients that will ruin this recipe if they are the wrong temperature are the block cream cheese (must be fully room temperature — 90 to 120 minutes out of the refrigerator) and the heavy whipping cream for the filling (must be cold — kept in the refrigerator until the moment it is used). These two conditions work against each other in timing and must both be managed deliberately.
Pull the cream cheese from the refrigerator first, 90–120 minutes before you plan to mix. Confirm it is ready by pressing two fingers firmly into the block — it should indent completely without resistance and feel the same temperature throughout, not cool in the center. If it resists at all, give it another 15–20 minutes. At 68°F (20°C) room temperature, 90 minutes is usually sufficient. In a cooler kitchen, allow 120 minutes.
Keep the heavy whipping cream for the filling in the refrigerator the entire time the cream cheese is warming. Pull it only when you are ready to whip it — this is the last step before assembly.
The heavy whipping cream for the caramel topping needs 20 minutes at room temperature before the caramel is made. Set it out when you begin crushing the Biscoff cookies.
Crust freeze — do not skip: The 20-minute freeze is not optional. A crust that goes into the pan warm and unfrozen has butter that is still liquid — the filling poured on top will partially absorb into the crust and the two layers will merge rather than staying distinct. The clean visual separation between crust and filling visible in every cross-section photo requires a fully frozen crust before any filling touches it.
How many Lotus Biscoff cookies to buy: You need approximately 38–42 whole Lotus Biscoff cookies for the crust (yielding 300g of crumbs) plus 9 whole cookies for the garnish — approximately 50 cookies total. One standard 8.8 oz (250g) package of Lotus Biscoff cookies contains approximately 32 cookies. Buy 2 packages minimum. If your packages contain more, use the extras for snacking — the recipe uses exactly what it uses and does not need more.
Crushing the Biscoff cookies: Use a food processor to crush the Lotus Biscoff cookies to a fine, sandy crumb with no visible large pieces. If you do not have a food processor, place the cookies in a zip-lock bag and crush with a rolling pin — this takes approximately 2–3 minutes of firm rolling and produces a slightly coarser crumb than the food processor method, which is acceptable. The crumb should feel like damp sand when the butter is mixed in — not powdery, not chunky.
Gram weight priority: For the most accurate results, use a kitchen scale set to grams. The gram weights in this recipe are the numbers tested — they are the most reliable way to get the same result. Volume measurements for the cream cheese and Biscoff crumbs in particular can vary significantly depending on how tightly the crumbs are packed or how the cream cheese block is weighed.
Mixing method: This recipe requires a hand mixer or stand mixer fitted with the whisk attachment for the filling. Mixing by hand will not incorporate enough air into the heavy whipping cream and will not beat the cream cheese smooth enough to eliminate lumps before the cream goes in. A stand mixer fitted with the paddle attachment is used first (for the cream cheese base), then switched to the whisk attachment (for whipping the cream). If using a hand mixer, the same sequence applies — beat the cream cheese base with the beaters, then whip the cream separately and fold in.
Pan preparation: Line a 9×9 inch (23×23cm) baking pan with parchment paper, leaving a 2-inch (5cm) overhang on all four sides. The overhang is not optional — it is the only way to lift the entire slab of bars out of the pan cleanly before slicing. Without the overhang, the bars must be cut and served directly from the pan, and the first two bars in each corner cannot be removed without breaking. Use two sheets of parchment laid perpendicular to each other to cover all four sides. Press the parchment firmly into the corners. No greasing required.
If you use a larger pan — 9×13 inch (23×33cm) — the bars will be thinner and the chill time decreases to 4–5 hours. The yield increases to approximately 12–15 bars. The caramel quantity remains the same.
Oven: No oven required for this recipe. The only heat sources are the stovetop (for the caramel) and the microwave or stovetop (for melting the butter for the crust).
Freshness checks:
- Vanilla extract: open the bottle and smell it. Pure vanilla extract smells deep, sweet, and slightly alcoholic. If it smells flat or faintly chemical, it is old or imitation — replace it.
- Heavy whipping cream: check the expiration date and smell before using. Cream that is even slightly sour will curdle when whipped and the filling will be unusable.
- Powdered sugar: check for hard lumps — a sign of moisture exposure. Sift regardless.
Necessary Tools
Required:
- Food processor — for crushing Lotus Biscoff cookies to fine crumbs. Alternatively: a zip-lock bag and a rolling pin.
- 9×9 inch (23×23cm) light-colored metal baking pan — light-colored metal preferred. Dark pans are not a concern here since there is no oven baking, but light metal conducts cold more evenly during the freezing step and produces a more uniformly set crust.
- Parchment paper — two sheets, for the full overhang on all four sides. Essential for lifting the bars out cleanly.
- Stand mixer with paddle attachment and whisk attachment (or hand mixer with standard beaters) — paddle for beating the cream cheese base smooth; whisk for whipping the heavy cream to stiff peaks.
- Large mixing bowl — for folding the whipped cream into the cream cheese base. Must be large enough to fold without deflating the cream.
- Silicone spatula — for folding the whipped cream into the cream cheese base and scraping the bowl sides and bottom during mixing. The spatula reaches into corners that the mixer beaters miss — every unscraped section of cream cheese becomes a lump in the finished filling.
- Small heavy-bottomed saucepan — for the salted caramel. Light-colored interior strongly preferred — it allows you to see the exact color of the caramel as it cooks. A dark-interior pan hides the color change and leads to burnt caramel.
- Silicone pastry brush or damp pastry brush — for brushing down the sides of the saucepan if sugar crystals form during caramel cooking.
- Instant-read thermometer — optional but strongly recommended for the caramel. The caramel is done when it reaches 350°F (175°C) and turns deep amber. Without a thermometer, the color is the only guide — amber, not pale gold, not dark brown.
- Offset spatula — for spreading the cheesecake filling evenly into the pan and smoothing the caramel layer on top. A regular butter knife works but produces a less even surface.
- Piping bag fitted with a star tip (Wilton 1M or equivalent) — for the whipped cream rosettes on each bar. If no piping bag is available, use a zip-lock bag with a small corner cut off — the rosettes will be less defined but functional.
- Sharp chef’s knife — for slicing the bars. Wipe the blade clean between every cut. A single pass of cream cheese residue on the blade smears the next cut and produces uneven, dragged edges. For the cleanest cuts: warm the blade briefly under hot water, wipe dry, then slice.
- Kitchen scale — strongly recommended for weighing the Biscoff crumbs, cream cheese, and caramel ingredients. Volume measurements for these ingredients are the least reliable in this recipe.
Optional:
- Oven thermometer — not applicable to this recipe.
- Bench scraper — useful for smoothing the top of the filling layer before chilling, as an alternative to the offset spatula.
How to Make Biscoff Cheesecake Bars
This recipe uses the no-bake press-in crust method followed by the whipped cream-stabilized cream cheese filling method. No oven is required for the filling. The sequence is: make the crust → freeze to set → make the filling → pour and smooth → refrigerate overnight → make the caramel → top and garnish.
Step 1: Crushing the Biscoff Cookies and Building the Crust
In your food processor, add the whole Lotus Biscoff cookies in two batches — approximately 20–22 cookies per batch depending on the size of your food processor bowl. Pulse 8–10 times in short bursts, then run continuously for 20–25 seconds until the crumbs are uniformly fine and sandy with no visible large pieces remaining. Pour all the crumbs into a large mixing bowl. You need exactly 2¾ cups (300g) Lotus Biscoff cookie crumbs — weigh them on your kitchen scale before adding the butter. If you are short, crush a few additional cookies and add to the bowl.
Pour your 6 tablespoons (85g) unsalted butter, melted and cooled for 3–4 minutes, over the crumbs. The butter acts as the binding agent — it coats each crumb particle and, when pressed and chilled, holds them together as a cohesive slab. Without enough butter, the crust crumbles on the knife. With too much, it becomes greasy and dense. This ratio was tested specifically for a 9×9 inch pan.
Using your silicone spatula, stir from the bottom of the bowl upward in slow, even strokes — approximately 15 strokes — until every crumb is evenly coated and the mixture looks uniformly damp throughout. The crumb mixture should look like wet sand and clump together when you squeeze a small amount in your fist — if it falls apart when squeezed, the butter has not distributed evenly. Stir for another 8–10 strokes and test again.
Do not add more butter if the mixture looks dry at first — the butter needs time to coat each crumb fully. Stirring more is always the first correction.
Pour the crumb mixture into your parchment-lined 9×9 inch (23×23cm) pan. Use the flat bottom of a measuring cup or drinking glass to press the crumbs firmly and evenly across the base — press hard, working from the center outward, then press the edges firmly against the parchment. The crust should be compact, even in thickness, and approximately ¾ inch (2cm) deep across the entire surface. If you can see the parchment through the crust in any spot, that area is too thin — add a pinch of extra crumb and press again.
Place the pan in the freezer for exactly 20 minutes. This brief freeze sets the butter in the crust before the filling goes in — it prevents the crust from lifting or mixing into the filling during spreading. Do not skip this step and do not leave the crust in the freezer longer than 30 minutes — an over-frozen crust becomes brittle and cracks when sliced.
Your crust is set and ready — pull it from the freezer only when the filling is completely mixed and ready to pour.
Step 2: Beating the Cream Cheese Base Until Completely Smooth
Before anything goes into the mixer, confirm your 24 oz (680g) full-fat block cream cheese has been at room temperature for 90–120 minutes and passes the press test — two fingers pressed firmly into the block should indent completely without any resistance or cool spots in the center. This is the most important confirmation in the entire recipe. Lumpy cream cheese cannot be fixed after the sugar and cream are added — the lumps become permanent.
In your stand mixer fitted with the paddle attachment, add all the room-temperature cream cheese. Beat on medium speed — speed 4 on a KitchenAid — for exactly 3 minutes. Set a timer. Do not estimate. During this time the cream cheese transforms from a dense, slightly sticky block into a smooth, slightly aerated mass that pulls cleanly from the sides of the bowl.
Stop the mixer after 3 minutes and scrape down the sides and bottom of the bowl completely using your silicone spatula — the paddle misses the bottom corners of the bowl on every rotation, and any unscraped cream cheese sitting on the bowl bottom becomes a lump in the finished filling. This scrape is not optional.
Add your ⅔ cup (80g) powdered sugar, sifted, and your 1 teaspoon pure vanilla extract. The powdered sugar sweetens the filling and, because it contains a small percentage of cornstarch, contributes a slight additional structure to the set. Beat on low speed — speed 2 — for 30 seconds to incorporate, then increase to medium speed — speed 4 — for 1 full minute. Stop and scrape the bowl sides and bottom again.
The cream cheese base should now look smooth, glossy, and uniform — no streaks, no lumps, no visible sugar granules. Run a clean finger through the mixture and feel for any gritty texture. If you feel grittiness, the powdered sugar was not fully sifted — beat for an additional 60 seconds on medium and check again. This is the base the whipped cream folds into — it must be perfect before you continue.
Do not overmix at this stage — the cream cheese base should look smooth and slightly thick, not airy or mousse-like. Overbeaten cream cheese incorporates too much air and produces a filling that looks inflated in the pan but deflates slightly during chilling, creating an uneven surface. Your cream cheese base is ready — move immediately to Step 3.
Step 3: Whipping the Heavy Cream to Stiff Peaks and Folding Into the Base
Remove your ½ cup (120ml) heavy whipping cream from the refrigerator now — not before, not after. Cold cream is essential. Pour it into a clean, cold mixing bowl — if your kitchen is warm (above 75°F / 24°C), chill the mixing bowl in the freezer for 5 minutes before whipping. Fat in cream whips by trapping air in a network of partially crystallized fat globules — warm fat cannot hold that structure and the cream will stay liquid no matter how long you beat it.
Using your stand mixer fitted with the whisk attachment (or your hand mixer with the beaters), whip the heavy cream starting on medium-low speed — speed 3 — for 30 seconds, then increase to medium-high speed — speed 7 on a KitchenAid — and whip for 60–90 seconds, watching closely. The cream will progress through three visible stages: liquid → soft billowy mounds → stiff peaks that hold their shape when the whisk is lifted. Stop at stiff peaks.
The whipped cream is ready when it holds a firm, defined peak that points straight up without curling over when you lift the whisk — it should look dense and cloud-like, not glossy or wet. If the peak droops at the tip, whip for another 15 seconds and check again. Stop the moment stiff peaks form — overwhipped cream becomes grainy and begins to separate into butter and liquid, which cannot be rescued.
Transfer approximately one-third of the whipped cream into the cream cheese base bowl. Using your silicone spatula, fold with slow, deliberate strokes from the bottom of the bowl upward and over — not stirring in circles. This first addition is a lightening agent: it loosens the dense cream cheese base so the remaining cream folds in without deflating. Count 10 strokes for this first addition — a few streaks remaining is fine at this stage.
Add the remaining two-thirds of the whipped cream in one addition. Fold with the same slow bottom-to-top strokes — wide, unhurried, deliberate. Count your strokes: 15 to 20 maximum from the moment the cream touches the base. Stop folding the moment no white streaks of cream remain.
The finished filling should look thick, smooth, and hold its shape when spooned — it should not be pourable or runny. If you lift a spoonful and drop it back into the bowl, it should fall in a slow, heavy ribbon, not a liquid stream. A filling that pours rather than drops means the cream was underwhipped or the cream cheese was still too cold — the bars will not hold a clean edge when sliced.
Do not overfold — every extra stroke deflates the structure the whipped cream built. The fold is done. Move immediately to Step 4.
🗒 Luna’s Note: I always whip the cream in a separate bowl and fold it in by hand rather than beating it directly into the cream cheese base in the stand mixer. The mixer is too aggressive at this stage — it deflates the cream and produces a denser filling than the one shown in the photos. The fold is what creates the texture.
Step 4: Filling the Pan and Smoothing the Surface
Pull the crust from the freezer. It should feel firm and cold to the touch — the butter will have solidified and the crust will hold its shape when you press it gently with a finger. If it still feels soft or tacky, return it to the freezer for another 5 minutes.
Pour all of the cheesecake filling onto the center of the frozen crust in one motion. Using your offset spatula, spread the filling from the center outward toward the edges in slow, even strokes — do not press down hard or you will disturb the crust underneath. Work the filling into the corners first, then smooth the surface from edge to edge. The goal is an even, flat surface with no peaks or valleys.
As you can see in the overhead photo showing the full batch of cut bars on the marble surface, the filling layer is visibly thick and even across every bar with no variation in height — this is the result of an unhurried spreading step and a completely flat pan surface. If your pan is even slightly tilted, the filling will set unevenly and one side will be thicker. Place the pan on a confirmed flat surface before spreading.
The surface should look smooth and level — run the flat edge of your offset spatula across the top in one long stroke from one side to the other to confirm. If you see any ridges or peaks, they will set permanently during chilling. Fix them now. Once you are satisfied with the surface, do not touch it again.
Do not add the caramel at this stage — the filling must set completely before any topping goes on. Cover the pan loosely with plastic wrap — do not press the plastic wrap onto the surface of the filling, as it will leave an imprint. Drape it over the edges of the pan so it hovers just above the surface.
Transfer the pan to the refrigerator and chill for a minimum of 6 hours. Overnight — 8 to 12 hours — is strongly preferred. Do not move the pan during the first 2 hours of chilling — the filling is still liquid beneath the surface and any movement creates an uneven set. Do not place anything on top of the plastic wrap during chilling.
Do not cut into the bars before the full chill time is complete — the filling directly below the set surface is still liquid at 3–4 hours and will run and collapse the moment a knife opens it, leaving a sunken, wet pocket where the bar should have been. Every cut is permanent. The bars are ready when the entire surface feels completely firm and does not move at all when you tilt the pan gently.
The bars are set when the entire surface feels firm and does not move when you tilt the pan gently. If any part of the surface jiggles, return the pan to the refrigerator for another 2 hours.
Step 5: Making the Salted Caramel Topping
Make the caramel only after the cheesecake filling has fully set — never before. The caramel must cool to room temperature before it goes onto the bars, which takes approximately 20–25 minutes after cooking. Factor this into your timing.
This is the dry caramel method — no water is added to the sugar. Place your ¾ cup (150g) plain white granulated cane sugar into your small heavy-bottomed saucepan with a light-colored interior. Spread it in an even layer across the bottom of the pan. Place over medium heat.
Do not stir. Do not touch the sugar with a spoon or spatula from this point until the caramel is fully formed. Stirring causes the dissolved sugar molecules to recrystallize around the undissolved granules, turning the entire batch grainy and white — a process called crystallization that cannot be reversed. The only motion permitted is a gentle swirl of the pan by the handle if the edges are browning faster than the center.
Watch the pan closely. After 3–4 minutes, the edges of the sugar will begin to melt and turn pale gold. Swirl the pan gently to encourage even melting. The center will follow within 1–2 minutes. The sugar will progress from pale gold → golden amber → deep amber in approximately 6–8 minutes total from the first moment of melting.
Pull the pan off the heat the moment the caramel reaches a deep amber color — the color of dark honey, not pale straw and not dark brown. At this exact moment, the caramel smells deeply nutty and slightly smoky. If it smells at all burnt or acrid, it has gone past the window. If you have an instant-read thermometer, the target temperature is 350°F (175°C).
Working quickly and carefully — the caramel is approximately 350°F (175°C) and will cause serious burns — add your 5 tablespoons (75g) unsalted butter, cut into 1-tablespoon pieces, to the hot caramel off the heat. The mixture will bubble violently. This is normal and expected — do not pull back. Whisk constantly until every piece of butter is fully melted and incorporated, approximately 30–45 seconds.
Slowly pour your ⅓ cup (80ml) heavy whipping cream, at room temperature, into the caramel in a thin, steady stream while whisking constantly. Again, the mixture will bubble aggressively — keep whisking and keep the stream slow and steady. Once all the cream is in, return the pan to medium-low heat and cook for exactly 1 minute, whisking constantly, until the caramel is smooth, glossy, and slightly thickened.
Remove from heat. Add your ½ teaspoon fine sea salt and whisk to incorporate. Taste carefully — the caramel is still very hot. It should taste deeply sweet, slightly bitter at the edges, and unmistakably salty. If it needs more salt, add a pinch at a time.
Pour the caramel into a heatproof bowl or glass measuring cup and allow it to cool at room temperature for 20–25 minutes, stirring occasionally, until it has thickened to the consistency of a pourable but not runny sauce — it should coat the back of a spoon and hold a line when you drag your finger through it. Do not pour warm caramel onto the set cheesecake filling — warm caramel softens the top layer of the filling and causes it to move and separate from the crust. The caramel must be at room temperature — touch the bottom of the bowl. It should feel warm, not hot.
Step 6: Topping the Bars With Caramel and Chilling to Set
Remove the set cheesecake from the refrigerator. Peel back the plastic wrap carefully from one corner — if the plastic has touched the surface and left a slight imprint, smooth it with the flat edge of your offset spatula before the caramel goes on.
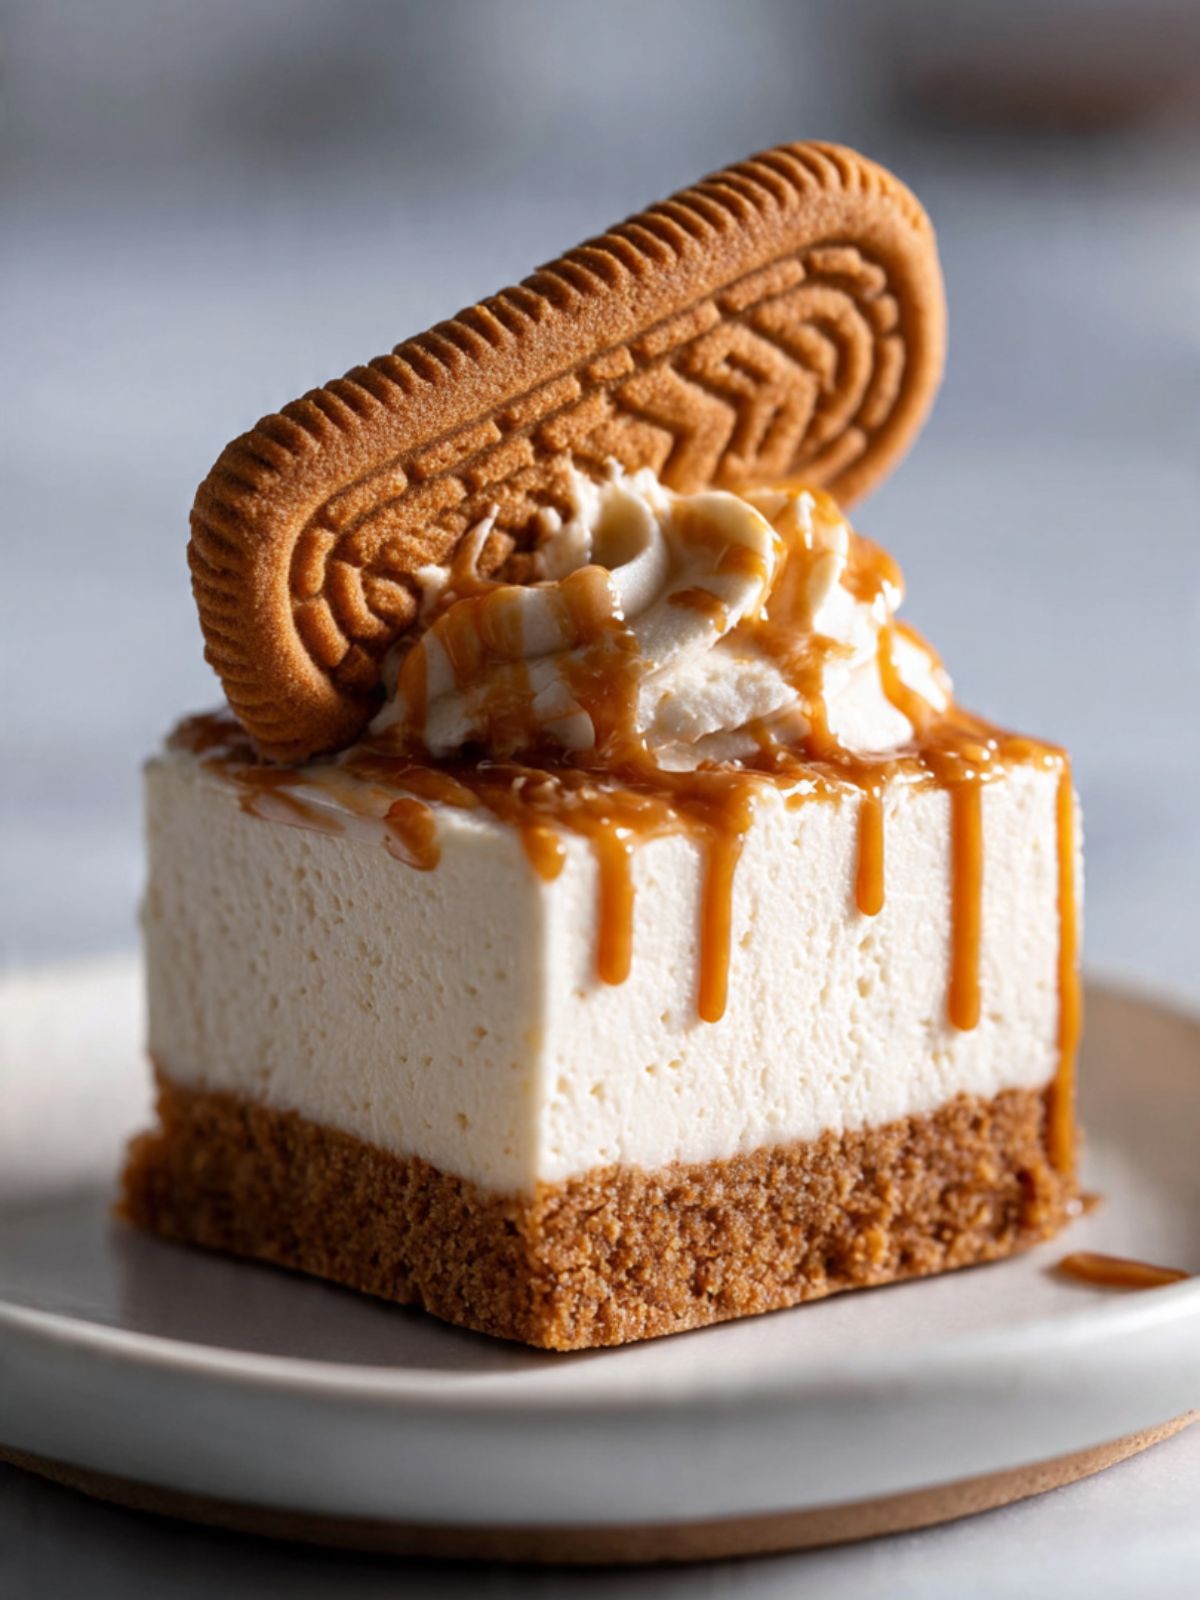
Pour the cooled caramel onto the center of the set filling in one slow pour. Using your offset spatula, spread the caramel from the center outward to the edges in steady strokes, working quickly — caramel begins to set as it cools and becomes harder to spread with every passing minute. Cover the entire surface evenly. As you can see in the close-up photo of the single bar on a white plate, the caramel layer sits directly on top of the dense ivory filling as a thin, glossy, even cap — not a thick poured layer and not a thin drizzle, but a uniform coating that reaches every edge.
The caramel should reach all four edges and sit level across the entire surface. If it begins to firm up before you reach the edges, warm your offset spatula briefly under hot water, wipe it dry, and use the warm blade to coax the caramel to the corners. Work within 2–3 minutes of pouring — after that, the caramel has set too much to spread cleanly.
Return the pan to the refrigerator, uncovered, for a minimum of 1 hour to allow the caramel layer to fully set. After 1 hour, the caramel should feel firm to a light touch and hold a fingerprint without running. If it is still tacky, return it for another 30 minutes.
Your fully assembled bars are ready — move to Step 7 to slice.
Step 7: Slicing the Bars Cleanly and Garnishing
Remove the pan from the refrigerator. Grip the parchment overhang on two opposite sides and lift the entire slab straight up and out of the pan in one motion — do not tilt or angle, which cracks the caramel layer. Place the slab on a flat cutting surface.
Run your sharp chef’s knife under hot water for 10 seconds. Wipe the blade completely dry with a clean kitchen towel. Press the blade straight down through the slab in one firm, continuous motion — do not saw back and forth. Sawing drags the caramel layer and smears the cream cheese filling, producing ragged edges instead of the clean, defined layers visible in the stacked bar photo. After each cut, wipe the blade clean with a damp cloth, reheat under hot water, wipe dry, and make the next cut.
Cut the slab into a 3×3 grid — 3 cuts in one direction, 3 cuts in the other — yielding 9 equal square bars, each approximately 3×3 inches (7.5×7.5cm).
Each bar should show three clean, distinct horizontal layers when viewed from the side: the deep amber-brown Biscoff crust at the base, the thick ivory cheesecake filling in the middle, and the glossy amber caramel cap on top. If any layer has smeared into another, the knife was not wiped between cuts or the bars were not fully chilled. The definition between layers is the visual signal that everything was done correctly.
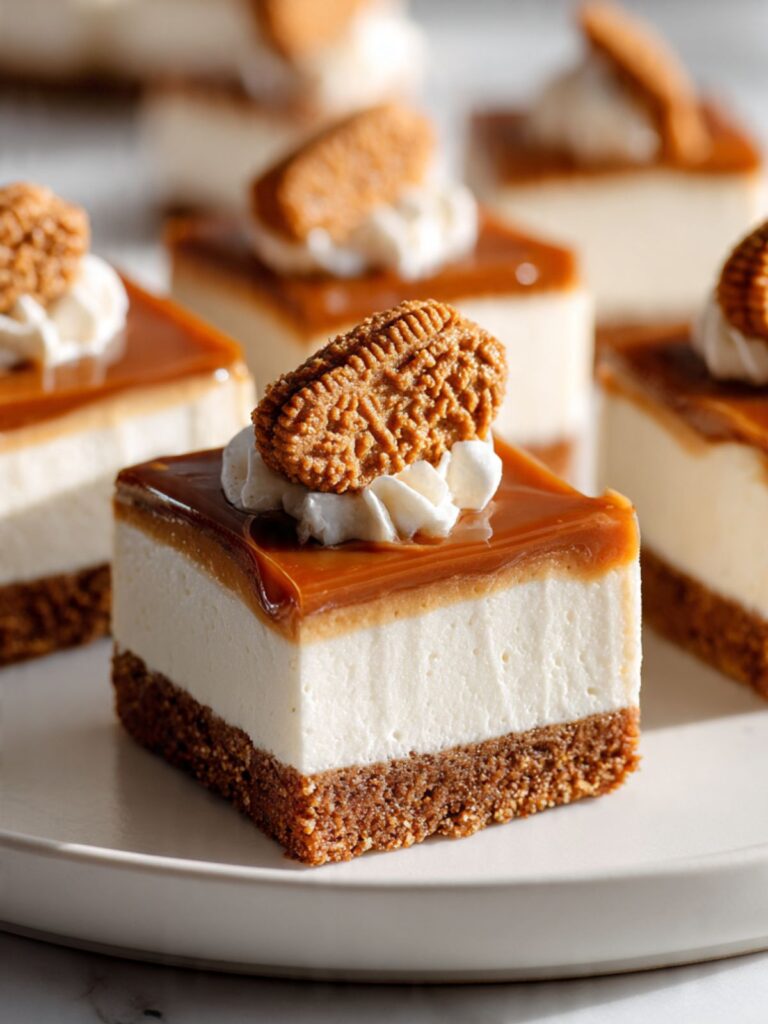
To garnish: whip your ½ cup (120ml) cold heavy whipping cream with 1 tablespoon (8g) powdered sugar to stiff peaks using your hand mixer or stand mixer whisk attachment — same method as Step 3. Transfer to your piping bag fitted with a Wilton 1M star tip. Pipe one rosette onto the center of each bar’s caramel surface. Press one whole Lotus Biscoff cookie into each rosette at a slight angle, as shown in the close-up single-bar photo — the cookie should lean back slightly so the distinctive ridged pattern on its surface faces the camera.

Serve immediately after garnishing, or return the bars to the refrigerator for up to 2 hours before serving. Do not garnish bars you do not plan to serve within 2 hours — whipped cream rosettes weep and the Biscoff cookies soften against the caramel within that window.
🗒 Luna’s Note: I wipe the knife with a damp cloth between every single cut, not every two or three. One pass of caramel residue on the blade is enough to drag the next cut. The extra 10 seconds per cut is what produces the edges in the photos.
The Science Behind Biscoff Cheesecake Bars
Why Full-Fat Block Cream Cheese Is the Only Cream Cheese That Works Here
I noticed this before I understood why. My first two test batches used whatever cream cheese was in the refrigerator — one was a tub of whipped cream cheese spread, one was a reduced-fat block. Both fillings looked identical going into the pan. After six hours of chilling, the whipped spread version had barely set — it was soft, almost mousse-like, and collapsed the moment I lifted a bar. The reduced-fat version set slightly firmer but had a watery sheen on the surface and a filling that tasted thin and slightly sour rather than rich and dense. Batch three used full-fat block cream cheese. The difference was immediate and not subtle.
The reason comes down to fat content and water activity. Full-fat block cream cheese contains approximately 33% fat and significantly less free water than either whipped or reduced-fat versions. When cream cheese is whipped into a filling, the fat molecules form a semi-solid network that holds the structure as the filling chills. Reduced-fat cream cheese replaces some of that fat with water and stabilizers — the water does not contribute to structure, and the stabilizers produce a slightly gummy texture rather than the clean, dense bite visible in the cross-section photos. Whipped cream cheese has been aerated during manufacturing, which means it contains more air and less actual cream cheese per cup than the block — the filling deflates as it chills and produces a soft, spongy result instead of a sliceable slab.
Full-fat block cream cheese, beaten to room temperature before mixing, gives the filling enough fat structure to hold a clean square edge after six hours in the refrigerator — exactly the edge visible in the stacked bar photo. No gelatin required. No additional stabilizers. The fat does the work if the cream cheese is the right type and the right temperature.
If you enjoy the Biscoff flavor profile, my biscoff icebox cake uses a similar cream cheese base in a layered no-bake format — a useful comparison for understanding how cream cheese behaves differently depending on how it is set.
How Whipped Cream Stabilizes a No-Bake Filling Without Gelatin
Most no-bake cheesecake recipes use gelatin as the primary setting agent. I tested a gelatin version of these bars early in development and ultimately rejected it — the texture was too firm and slightly bouncy, which read as artificial against the natural density of the Biscoff crust. The whipped cream-stabilized version produces a softer, more natural texture that still holds a clean edge when cold.
The mechanism is fat crystallization. Heavy whipping cream at 36% fat or above contains enough fat globules that, when agitated by the whisk, partially rupture and release their fat content. That released fat coats the air bubbles trapped during whipping and, as the cream chills, the fat crystallizes around each bubble — locking the foam structure permanently. When folded into the cream cheese base, those crystallized fat networks distribute throughout the filling and create a semi-solid matrix that sets firm in the refrigerator without any gelatin.
The critical variables are fat content and temperature. Cream below 36% fat does not contain enough fat globules to build a stable foam — it whips to soft peaks at best and collapses within minutes. Warm cream cannot crystallize — the fat stays liquid and the foam structure never forms. This is why the cream must come straight from the refrigerator and why the kitchen temperature matters: above 75°F (24°C), the cream warms faster than it can be whipped and the window for stable foam closes before stiff peaks form. The result is exactly what the filling looks like in every photo — dense, smooth, and holding a defined edge at refrigerator temperature without any wobble or collapse.
Why Caramel Burns Before It Looks Ready — and How to Read the Color Correctly
Sugar caramelization is the science concept in this recipe where reader instinct diverges most reliably from correct technique. The instinct is to pull the caramel when it looks golden — pale, bright, amber-adjacent. The correct moment to pull is later than that instinct suggests, and pulling too early is actually the more common failure in home kitchens, not burning.
Here is the chemistry: sucrose molecules begin breaking down at approximately 320°F (160°C), releasing water and forming hundreds of new flavor compounds — fruity, nutty, slightly bitter — that do not exist in plain sugar. The color progresses from colorless → pale gold → golden amber → deep amber → dark brown → burnt. The flavor complexity increases at every stage. Pale gold caramel tastes primarily sweet with faint caramel notes. Deep amber caramel — the target for this recipe — has developed the full range of flavor compounds and carries a slight bitterness that balances the sweetness of the cream cheese filling and the Biscoff crust. Burnt caramel, one stage past deep amber, is acrid and cannot be rescued.
The practical problem is that a light-colored saucepan shows color accurately but a dark pan hides the progression entirely. The second practical problem is that the caramel continues cooking from residual heat in the pan for several seconds after you pull it from the burner — which means you must pull it slightly before it looks done, not at the moment it looks right. I pull these bars’ caramel the moment it reaches true deep amber and smells nutty with a faint edge of smoke. By the time the butter is whisked in, the color deepens another shade from carryover heat. If I waited until the color looked perfect in the pan, the butter addition would tip it past the window every time.
🗒 Luna’s Note: The light-colored saucepan is not optional for me with caramel. I learned the hard way that my dark non-stick pan was hiding the color progression on every batch. I switched to a stainless steel saucepan and immediately stopped burning caramel. The pan is the tool that makes this step readable.
Biscoff Cheesecake Bars Troubleshooting & Pro-Tips
Common Mistakes
1. Wrong Cream Cheese Type or Substitution
Symptom: The filling looks normal going into the pan but does not set firm after chilling — it is soft, spongy, or collapses when lifted. The edges do not hold a clean square when sliced and the layers smear into each other.
Cause: The wrong cream cheese was used. Whipped cream cheese spread contains more air and less actual cream cheese per volume than block cream cheese — the filling deflates during chilling. Reduced-fat or low-fat block cream cheese contains more free water and fewer fat molecules — the filling sets to a softer, wetter texture that cannot hold a defined edge. Cream cheese that was still cold when beaten produces lumps that prevent even distribution of fat throughout the filling, weakening the structure.
Fix: If the bars are already chilled and the filling is too soft to slice cleanly, return the entire pan to the freezer for 45–60 minutes before attempting to cut. The filling will firm enough for one clean pass of the knife. Serve immediately — once the bars return to refrigerator temperature, the texture will soften again. This is a salvage only, not a correction.
Prevention: Use only full-fat block cream cheese — Philadelphia Original in the silver foil block packaging is the most consistent brand for this recipe. Confirm the cream cheese has been at room temperature for 90–120 minutes before beating and passes the two-finger press test before any mixing begins.
2. Wrong Pan Size or Skipping the Parchment Overhang
Symptom: The bars are too thin and fragile, or they cannot be lifted from the pan without the crust crumbling and the filling separating. The first two corner bars break apart when removed.
Cause: A pan larger than 9×9 inch (23×23cm) was used — the filling spreads thinner and sets faster but produces shorter, more fragile bars that crack when lifted. Alternatively, the parchment overhang was skipped or only one sheet of parchment was used, covering only two sides — the bars on the uncovered sides cannot be lifted out and must be cut and served in the pan, which makes clean slicing impossible.
Fix: If the bars are already set in a larger pan without parchment overhang, run a thin offset spatula or butter knife around the entire perimeter between the crust and the pan wall before attempting to cut. Slide the spatula under each bar individually and lift straight up rather than dragging. Expect some crust loss on the first and last bars.
Prevention: Always use a 9×9 inch (23×23cm) pan — confirm the measurement before lining. Use two sheets of parchment paper laid perpendicular to each other, each with a minimum 2-inch (5cm) overhang on both sides. Press the parchment firmly into the corners so the crust fills into the parchment corners rather than leaving gaps.
3. Caramel Poured Onto the Filling While Still Warm
Symptom: The top layer of the cheesecake filling has softened, separated from the rest of the filling, or moved toward one side of the pan. The caramel layer is uneven — thicker on one side, thin or absent on another. The filling surface shows ripples or a visible separation line between the caramel and the cream cheese layer.
Cause: The caramel was poured onto the bars before it cooled to room temperature. Warm caramel — anything above 85–90°F (29–32°C) — transfers heat directly into the surface of the set filling, softening the top ½ inch (1.3cm) of cream cheese and causing it to flow slightly before the caramel sets on top. Once this happens, the caramel and the softened filling move together as one layer during spreading, producing an uneven surface that sets permanently in that position.
Fix: If the caramel has already been poured and the filling has moved, do not attempt to re-spread it. Return the pan to the refrigerator immediately without touching the surface. After 2 hours, the caramel will have set over whatever position the filling settled into. The bars will still taste correct — the visual result will be uneven layers. Slice and serve as planned; the flavor is unaffected.
Prevention: After pouring the caramel into its cooling bowl, stir it every 5 minutes and test the temperature by touching the bottom of the bowl. The bowl should feel warm to the touch — not hot, not neutral. At room temperature, this takes 20–25 minutes. For an accurate read, use an instant-read thermometer and confirm the caramel is below 85°F (29°C) before pouring.
4. Caramel Crystallized During Cooking
Symptom: The melted sugar turns grainy, white, and opaque during cooking — it looks sandy rather than glossy and liquid. The entire batch seizes at once and cannot be stirred smooth.
Cause: The sugar was stirred during cooking. Stirring introduces undissolved sugar crystals from the spoon or spatula into the molten sugar, which act as seed crystals — each one triggers the surrounding liquid sugar to recrystallize around it. Once crystallization starts, it propagates through the entire batch within seconds. Wet sugar crystals on the sides of the saucepan that are not washed down also cause crystallization when they fall back into the cooking sugar.
Fix: A crystallized caramel batch cannot be rescued by stirring or adding liquid. Discard the batch, wash the saucepan completely, and start again with fresh sugar. This is a hard reset — there is no salvage once crystallization has set in.
Prevention: Never stir the sugar after it goes into the pan. Swirl the pan by the handle only. Keep a pastry brush dipped in clean water nearby — if you see sugar crystals forming on the sides of the pan above the liquid line, brush them down with the wet pastry brush immediately before they can fall back in. Use a light-colored stainless steel saucepan with straight sides rather than a wide shallow pan — the deeper sides reduce the surface area where crystals can form.
5. Filling Is Lumpy After Mixing
Symptom: The finished filling has visible white lumps throughout — some as small as pea-sized, some larger. The lumps do not disappear during folding and set permanently in the chilled bars, creating an uneven texture when the bars are cut.
Cause: The cream cheese was too cold when beaten. Cold cream cheese does not beat smooth — the fat is too firm to fully disperse and small clumps of unbeaten cream cheese remain suspended in the mixture. Once sugar and whipped cream are added, the lumps become coated and cannot be beaten out without deflating the whipped cream structure.
Fix: If the filling is already mixed and contains lumps, press it through a fine mesh sieve using a silicone spatula before pouring it into the pan. This is time-consuming and deflates some air from the filling, but produces a lump-free result. The texture will be slightly denser than intended — still acceptable, not ideal.
Prevention: Confirm the cream cheese is fully at room temperature before beating — 90 to 120 minutes at 68°F (20°C). The two-finger press test is mandatory: both fingers pressed into the block should indent completely with zero resistance and zero cool spots. Beat the cream cheese alone for a full 3 minutes before adding any other ingredient, stopping to scrape the bowl sides and bottom at least once during those 3 minutes.
6. Crust Crumbles When Sliced or Lifted
Symptom: The Biscoff crust falls apart when a knife goes through it — it crumbles away from the filling, leaving a bare bottom on the bar and a pile of crumbs on the cutting board. The bars look intact from above but collapse at the crust when lifted.
Cause: Either not enough butter was used to bind the crumbs, the crust was not pressed firmly enough before freezing, or the crust was not frozen long enough before the filling went in. A crust that was not pressed hard enough has air gaps between the crumb particles — the butter cannot bridge those gaps and the crust stays loose. A crust that was not frozen long enough has butter that is still soft and has not locked the crumb structure in place.
Fix: If the crust has already crumbled on some bars, press the loose crumbs back against the filling side of each bar firmly with your fingers and serve the bars on individual plates so the crumbs stay with the bar. Alternatively, press the crumbled bars into individual ramekins or glasses, add a scoop of vanilla ice cream on top, and serve as a deconstructed Biscoff cheesecake — the crumbled crust becomes a topping rather than a structural failure.
Prevention: Weigh the butter at exactly 85g — do not estimate by tablespoon alone. Mix the crumbs and butter until the mixture passes the squeeze test: a small handful squeezed in your fist holds together and does not crumble when released. Press the crust with the flat bottom of a measuring cup using firm, deliberate pressure across every square inch of the surface, paying extra attention to the corners. Freeze for the full 20 minutes — set a timer.
7. Bars Will Not Slice Cleanly — Caramel Drags and Tears
Symptom: The knife drags the caramel layer across the top of the bars when cutting — it stretches, tears, and pulls away from the filling rather than cutting through cleanly. The cut edges show ragged caramel instead of the defined clean cap visible in the photos.
Cause: The knife was not warmed between cuts, or the caramel layer had not fully set before slicing. Cold caramel is firm but brittle — it fractures rather than cutting cleanly. Caramel that has not set fully is still soft enough to stretch and tear under the blade rather than separating cleanly.
Fix: If the caramel is already torn on some bars, use a warm offset spatula to press the torn caramel edge back down against the filling surface while it is still pliable from the warmth of the knife. Work quickly — it re-sets within seconds at refrigerator temperature.
Prevention: Run the blade of the chef’s knife under hot water for 10 seconds before every single cut. Wipe completely dry. The warm blade melts through the caramel layer cleanly rather than dragging it. Confirm the caramel has set for the full 1 hour in the refrigerator after pouring before attempting any cuts — it should feel firm, not tacky, when lightly touched.
8. Humidity and Altitude
In high humidity environments above 70% relative humidity, the caramel topping will remain tacky at the surface even after full chilling — sugar is hygroscopic and absorbs ambient moisture from the air. Store the bars in the refrigerator with a loose sheet of parchment paper laid directly on the caramel surface rather than plastic wrap, which traps condensation against the caramel and accelerates surface stickiness.
At high altitude above 3,500 feet (1,067m), the caramel will reach its target color slightly faster than at sea level due to lower atmospheric pressure — start checking color at 5 minutes rather than 6 and be prepared to pull earlier. The cheesecake filling and crust are unaffected by altitude.
Expert Pro-Tips
Pro-Tip 1 — Freeze the bars for 20 minutes before slicing for the cleanest possible edges. Even after overnight refrigeration, the filling at the very center of each bar is slightly softer than the edges. A 20-minute freeze before slicing firms the entire slab uniformly — the knife passes through crust, filling, and caramel in one motion without any layer resisting differently than the others. Return the cut bars to the refrigerator immediately after slicing — do not serve directly from the freezer, as the filling texture at freezer temperature is too dense.
Pro-Tip 2 — Score the caramel layer with a warm knife before cutting all the way through. Make a single shallow score line along each cut line first — just enough to break through the caramel cap without going into the filling. Then make the full cut along the same line. This two-pass method eliminates caramel drag entirely and produces the defined clean cap visible in the stacked bar cross-section photo.
Pro-Tip 3 — Make the caramel the day before and refrigerate it overnight. Cold caramel from the refrigerator is thick, spreadable, and at exactly the right temperature to go directly onto the set filling without any waiting. Warm it gently in a small saucepan over low heat for 2–3 minutes, stirring constantly, until it returns to a pourable consistency — then let it cool for just 5 minutes before pouring. This eliminates the 20–25 minute cooling wait on the day of assembly and gives you more control over the caramel temperature.
Pro-Tip 4 — Press the Biscoff cookie garnish in at a slight backward angle, not straight up. A cookie pressed straight upright into the whipped cream rosette tends to fall forward as the whipped cream softens slightly at room temperature. Pressing the cookie in at a 20–30 degree backward angle — leaning away from you — keeps it stable for the full serving window and ensures the ridged geometric pattern on the cookie face is clearly visible, exactly as shown in the close-up single-bar photo.
How to Store Biscoff Cheesecake Bars
Room Temperature
Biscoff cheesecake bars cannot be stored at room temperature. The cream cheese filling is a dairy product that requires refrigeration — leaving the bars at room temperature for more than 2 hours puts them in the bacterial growth zone (40–140°F / 4–60°C) and the filling will begin to soften and lose its structural integrity within that window. The caramel topping also softens significantly at room temperature above 70°F (21°C) and becomes tacky on the surface.
The only acceptable room temperature window is the 30–45 minutes before serving — pull the bars from the refrigerator, garnish with whipped cream and Biscoff cookies, and serve within that window. Beyond 45 minutes, the whipped cream rosettes begin to weep and the Biscoff cookie garnish softens against the caramel.
Do not leave garnished bars sitting out at a party or gathering beyond 45 minutes. If you are serving over an extended period, keep the bars refrigerated and garnish in small batches as needed.
Refrigerator
Store the bars in a single layer in a hard-sided lidded container — not a zip-lock bag, which compresses the whipped cream rosettes and smears the caramel surface, and not plastic wrap pressed directly onto the caramel, which leaves a permanent imprint and traps condensation against the surface.
If you are storing the bars before garnishing — which is the recommended approach — lay a single sheet of parchment paper loosely over the caramel surface before placing the lid. The parchment sits between the caramel and the container lid without touching the surface and prevents any condensation from the lid dripping onto the caramel.
If the bars are already garnished, store them uncovered on a flat plate or tray in the refrigerator and do not stack anything on top of or near them.
Duration: Up to 4 days refrigerated, ungarnished. Day 1 is excellent — the caramel is glossy and the filling is at its densest and cleanest. Day 2 the filling firms slightly further and the Biscoff flavor in the crust deepens as the butter and crumb continue to meld — this is actually the best day for the crust texture. Day 3 and Day 4 remain very good but the caramel surface may develop slight condensation spots from refrigerator humidity. Pat the surface gently with a paper towel before serving if needed. Do not store garnished bars beyond Day 2 — the whipped cream rosettes break down and the Biscoff cookie garnish becomes completely soft by Day 3.
Luna’s Note: I always add the caramel layer the morning of serving, not the night before. The caramel that has been on the filling for 8+ hours overnight seeps very slightly into the top of the cream cheese layer and loses the crisp visual separation between the two that you can see in the batch photo. Morning-of caramel, chilled for 1 hour, holds the clean edge all day.
Freezer — Made and Set
These bars freeze well in their ungarnished state — before the whipped cream and Biscoff cookie garnish are added. Do not freeze garnished bars — whipped cream does not survive freezing and the Biscoff cookie garnish becomes soggy on thawing.
To freeze individual bars: After slicing, place the bars on a parchment-lined baking sheet or flat plate in a single layer, spaced so they are not touching. Freeze uncovered for 1 hour — this flash-freeze step prevents the caramel surfaces from sticking together in the container. Once the surfaces are firm, wrap each bar individually in a single layer of plastic wrap, pressing the wrap firmly against all six sides. Place the wrapped bars into a zip-lock freezer bag, press out as much air as possible, and seal. Label with the date.
Duration: Up to 2 months in the freezer. Beyond 2 months, the crust begins to absorb freezer odors and the cream cheese filling develops a slightly grainy texture on thawing.
To thaw: Transfer the wrapped bars from the freezer to the refrigerator the night before serving — allow 8–10 hours for a complete thaw at refrigerator temperature. Do not thaw at room temperature — the filling softens unevenly, with the outer edges warming faster than the center, and the caramel surface develops condensation that does not evaporate cleanly. Do not microwave to thaw — the filling will melt before the center is thawed.
Texture after freezing: The cream cheese filling firms very slightly after freezing and thawing — it is still smooth and dense but loses a small amount of the airy quality from the whipped cream fold. The crust holds up well. The caramel becomes slightly more firm and opaque after freezing — still delicious, slightly less glossy. Garnish after thawing, not before freezing.
Freezer — Unbaked / Unset
The assembled but unset filling — before the caramel is added — can be frozen directly in the pan if needed. Cover the pan tightly with two layers of plastic wrap and one layer of aluminum foil. Freeze for up to 1 month. To thaw, transfer the covered pan to the refrigerator overnight — 10–12 hours. Once thawed and confirmed set, make the caramel fresh on the stovetop and add it to the surface following Step 6. Do not add caramel before freezing — caramel becomes grainy and loses its glossy finish after a freeze-thaw cycle.
Serving Suggestion

Serve these bars cold — pulled from the refrigerator no more than 20 minutes before they go on the plate. The filling is at its best texture between 38–45°F (3–7°C): dense enough to hold a clean edge but soft enough that the first bite gives without resistance. Beyond 20 minutes at room temperature the filling begins to soften perceptibly at the edges, and the caramel transitions from a firm glossy cap to a soft, sticky layer that clings to the fork. The contrast between the cold dense filling and the yielding caramel is what makes these bars work — do not let them warm past that window before serving.
I serve these with a strong black coffee or a double espresso — no milk, no sugar. The bitterness of the espresso cuts directly through the sweetness of the caramel and the speculoos spice of the Biscoff crust in a way that a milky coffee does not. A cup of black tea with no additions works equally well for the same reason. These bars are sweet enough on their own that they do not need a sweet drink alongside them.
This is the recipe I make when someone asks me to bring something and I want them to remember what I brought. The three visible layers in the cross-section — the amber crust, the ivory filling, the glossy caramel cap — do the work before anyone takes a bite. They look like significantly more effort than they are, which I appreciate in a recipe.
Day 2 is the best day for these bars. The Biscoff crust firms and deepens in flavor overnight as the butter fully sets into the crumb. The cream cheese filling becomes slightly more dense and the flavors — vanilla, cream cheese, speculoos spice — have had time to meld rather than sitting as separate notes. The caramel on Day 2 is slightly less glossy but no less flavorful. If you can make these the day before and resist cutting into them until the next morning, do it.
These bars do not travel well ungarnished. The caramel surface is smooth and glossy but picks up every fingerprint, every lid impression, and every jostle from the car. If you are transporting them to another location, transport the slab uncut in the pan with the parchment overhang intact, slice on arrival, and garnish on-site. Cutting and garnishing at the destination takes 10 minutes and produces a result that looks as clean as the photos. Transporting pre-cut garnished bars produces something that looks like it survived a car journey.
Frequently Asked Questions About Biscoff Cheesecake Bars
Can I make Biscoff cheesecake bars without a mixer?
No — a hand mixer or stand mixer is required for this recipe. The cream cheese must be beaten alone for a full 3 minutes to reach a completely smooth, lump-free consistency, and the heavy whipping cream must be whipped to stiff peaks before folding into the base. Neither task is achievable by hand with a whisk or spatula — hand-beating cream cheese produces a lumpy filling that sets unevenly, and hand-whipping 36% fat heavy cream to stiff peaks requires sustained high-speed agitation that a whisk cannot generate consistently enough. If you do not have a stand mixer, a hand mixer with standard beaters works for the cream cheese base and the cream whipping — the process and timing are identical.
Can I use Biscoff spread instead of Biscoff cookies for the crust?
No — Biscoff spread cannot replace crushed Biscoff cookies in the crust. Biscoff spread is a smooth nut-butter-style paste with a high oil content and no structural dry matter — it does not combine with melted butter to form a pressable, cohesive crumb. A crust made with Biscoff spread and butter produces a greasy, soft layer that never sets firm enough to hold the filling and collapses completely when sliced. Crushed Lotus Biscoff cookies provide the dry crumb matrix that the melted butter binds — the crumb particles lock together under pressure and cold temperature to create the firm, sliceable crust visible in the photos. If you want a stronger Biscoff flavor in the filling itself, fold 2 tablespoons (30g) of Biscoff spread into the cream cheese base after beating it smooth — this adds flavor without compromising the crust structure.
Why did my no-bake cheesecake filling not set firm?
Three causes: wrong cream cheese type, underwhipped cream, or insufficient chill time. Full-fat block cream cheese provides the fat structure the filling needs to hold a square edge — reduced-fat and whipped spread versions contain too much water and will not set firm regardless of chill time. Heavy cream must reach stiff peaks before folding, and the bars need a minimum of 6 hours refrigeration — the filling looks set on the surface after 3 hours but the center is still liquid. If your bars did not set after a full 6-hour chill with correct ingredients, freeze for 45–60 minutes before slicing and serve immediately.
Can I make Biscoff cheesecake bars ahead of time?
Yes — these bars are better made ahead. Make the crust and filling on Day 1, chill overnight. Add the caramel on Day 2 morning, return to the refrigerator for 1 hour to set. Slice and garnish no earlier than 2 hours before serving — whipped cream rosettes weep and the Biscoff cookie garnish softens against the caramel within that window. The caramel keeps separately in a sealed glass jar in the refrigerator for up to 3 days — reheat gently over low heat, cool to room temperature before applying.
Can I substitute the salted caramel topping with store-bought caramel sauce?
Yes, with a caveat. Store-bought caramel sauce contains corn syrup and stabilizers that keep it pourable at refrigerator temperature — it will not set to the firm glossy cap shown in the cross-section photos. The bars will need to be served on a plate rather than lifted by hand. For the set caramel layer in this recipe, the homemade version is required. If using store-bought, choose a thick premium sauce and apply approximately 1 tablespoon per bar.
How do I scale this recipe up for a larger batch?
Double the recipe for a 9×13 inch (23×33cm) pan, yielding approximately 15 bars. All filling and crust ingredients scale proportionally. Do not make the caramel in one double batch — a larger volume of sugar does not heat evenly in a standard home saucepan and the edges will burn before the center melts. Make two separate caramel batches. The bars in a 9×13 pan are thinner and the layering effect is less dramatic in cross-section.
Why did my caramel turn grainy and white during cooking?
Your caramel crystallized — stirring during cooking introduced seed crystals that triggered a chain reaction through the entire batch. Crystallized caramel cannot be rescued. Discard the batch, wash the saucepan completely, and start fresh. For your next attempt: swirl the pan by the handle only, never stir, and keep a damp pastry brush ready to wash down any crystals forming on the pan sides. You may also find the salted caramel chocolate chip cookie bars useful — it covers the same method with additional color-reading detail.
More Bars and No-Bake Desserts You’ll Love
If these Biscoff cheesecake bars landed well in your kitchen, these recipes from the same collection are worth making next:
- Chocolate Chip Cookie Bars — a one-bowl, no-mixer bar that comes together in under 15 minutes of active work. The texture is thick and fudgy with crisp edges — a reliable weeknight recipe when a full cheesecake project is not what the evening calls for.
- Nestle Toll House Cookie Bars — the classic bar recipe made from the original Toll House formula, tested for consistent results across different pan materials and oven types.
No-Bake Biscoff Cheesecake Bars Recipe
Ingredients
Equipment
Method
- Step 1 — Make the crust: Crush 2¾ cups (300g) Lotus Biscoff cookies in a food processor until fine and sandy with no large pieces remaining, then pour into a large mixing bowl, add 6 tablespoons (85g) melted unsalted butter cooled for 3–4 minutes, stir with a silicone spatula in slow bottom-to-top strokes for approximately 15 strokes until every crumb is evenly coated and the mixture clumps when squeezed in your fist, then press firmly and evenly into a parchment-lined 9×9 inch (23×23cm) pan using the flat bottom of a measuring cup until the crust is approximately ¾ inch (2cm) deep across the entire surface with no thin spots, and freeze for exactly 20 minutes.
- Step 2 — Beat the cream cheese base: Confirm the 24 oz (680g) full-fat block cream cheese has been at room temperature for 90–120 minutes and passes the two-finger press test with zero resistance, then beat in a stand mixer fitted with the paddle attachment on medium speed (speed 4 on a KitchenAid) for exactly 3 minutes, stop and scrape the bowl sides and bottom completely with a silicone spatula, add ⅔ cup (80g) sifted powdered sugar and 1 teaspoon pure vanilla extract, beat on low speed for 30 seconds then increase to medium speed for 1 full minute, and scrape the bowl again — the base should look smooth, glossy, and completely lump-free with no gritty texture when tested with a clean finger.
- Step 3 — Whip the cream and fold into the base: Pour ½ cup (120ml) cold heavy whipping cream (36% fat minimum) into a clean cold mixing bowl, whip using the stand mixer whisk attachment starting at medium-low speed for 30 seconds then increasing to medium-high speed for 60–90 seconds until stiff peaks form that point straight up without curling when the whisk is lifted, then transfer approximately one-third of the whipped cream into the cream cheese base and fold with a silicone spatula in slow bottom-to-top strokes for 10 strokes to lighten the base, add the remaining two-thirds of the whipped cream and fold for 15–20 strokes maximum until no white streaks remain — the finished filling should be thick, smooth, and fall in a slow heavy ribbon when spooned, not pour like a liquid.
- Step 4 — Fill the pan and chill: Pull the frozen crust from the freezer and confirm it feels firm and cold to the touch, pour all the cheesecake filling onto the center of the crust in one motion, spread from the center outward using an offset spatula in slow even strokes until the filling is level and even to all four edges with no peaks or valleys, run the flat edge of the offset spatula across the top in one long stroke to confirm a flat surface, drape plastic wrap loosely over the pan edges without touching the filling surface, and refrigerate for a minimum of 6 hours or overnight — do not move the pan during the first 2 hours of chilling.
- Step 5 — Make the salted caramel: Confirm the ⅓ cup (80ml) heavy whipping cream for the caramel has been at room temperature for 20 minutes, then spread ¾ cup (150g) plain white granulated cane sugar in an even layer in a small heavy-bottomed light-colored saucepan over medium heat without stirring — swirl the pan by the handle only if edges brown faster than the center — and cook for 6–8 minutes until the caramel reaches a deep amber color (the color of dark honey) and smells deeply nutty with a faint edge of smoke or reaches 350°F (175°C) on an instant-read thermometer, then immediately remove from heat and add 5 tablespoons (75g) unsalted butter cut into 1-tablespoon pieces whisking constantly until fully melted and incorporated, slowly pour ⅓ cup (80ml) room-temperature heavy whipping cream in a thin steady stream while whisking constantly, return to medium-low heat and cook for exactly 1 minute whisking constantly, remove from heat, add ½ teaspoon fine sea salt, whisk to incorporate, pour into a heatproof bowl and cool at room temperature for 20–25 minutes stirring occasionally until the caramel coats the back of a spoon and the bowl bottom feels warm not hot.
- Step 6 — Top with caramel and set: Remove the fully set cheesecake from the refrigerator and peel back the plastic wrap carefully, pour the cooled room-temperature caramel onto the center of the filling in one slow pour and spread immediately using an offset spatula from the center outward to all four edges in steady strokes to create a thin even glossy cap across the entire surface, then return the pan uncovered to the refrigerator for a minimum of 1 hour until the caramel feels firm to a light touch and holds a fingerprint without running.
- Step 7 — Slice and garnish: Grip the parchment overhang on two opposite sides and lift the entire slab straight up and out of the pan in one motion onto a flat cutting surface, run a sharp chef's knife under hot water for 10 seconds and wipe completely dry, press the blade straight down through the slab in one firm continuous motion without sawing to cut into a 3×3 grid yielding 9 equal square bars and wipe the blade clean under hot water between every single cut, then whip ½ cup (120ml) cold heavy whipping cream with 1 tablespoon (8g) powdered sugar to stiff peaks using a hand mixer or stand mixer whisk attachment, transfer to a piping bag fitted with a Wilton 1M star tip, pipe one rosette onto the center of each bar's caramel surface, and press one whole Lotus Biscoff cookie into each rosette at a slight 20–30 degree backward angle so the ridged pattern faces forward — serve within 45 minutes of garnishing.