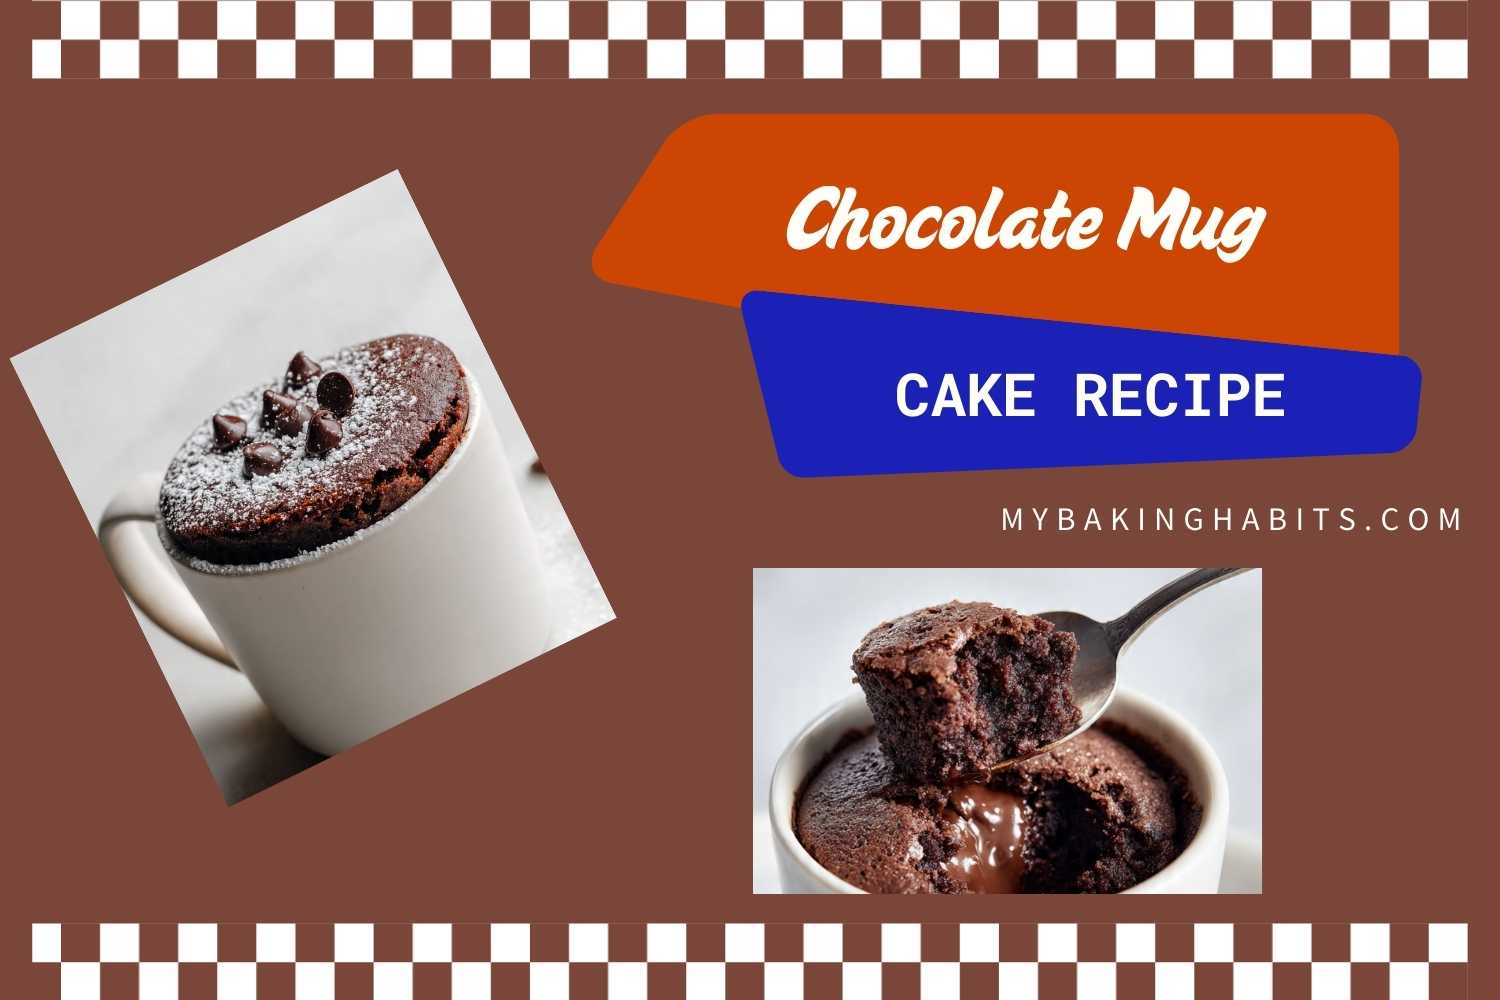
Chocolate Mug Cake
I’ve made this chocolate mug cake at least a dozen times to get the ratio right — testing cook times, oil amounts, and chip placement until the result was consistently fudgy with a genuine molten center rather than just a soft bite. This is the recipe I come back to when I want something warm and chocolatey without turning on the oven, usually late at night or on slow Sunday afternoons.
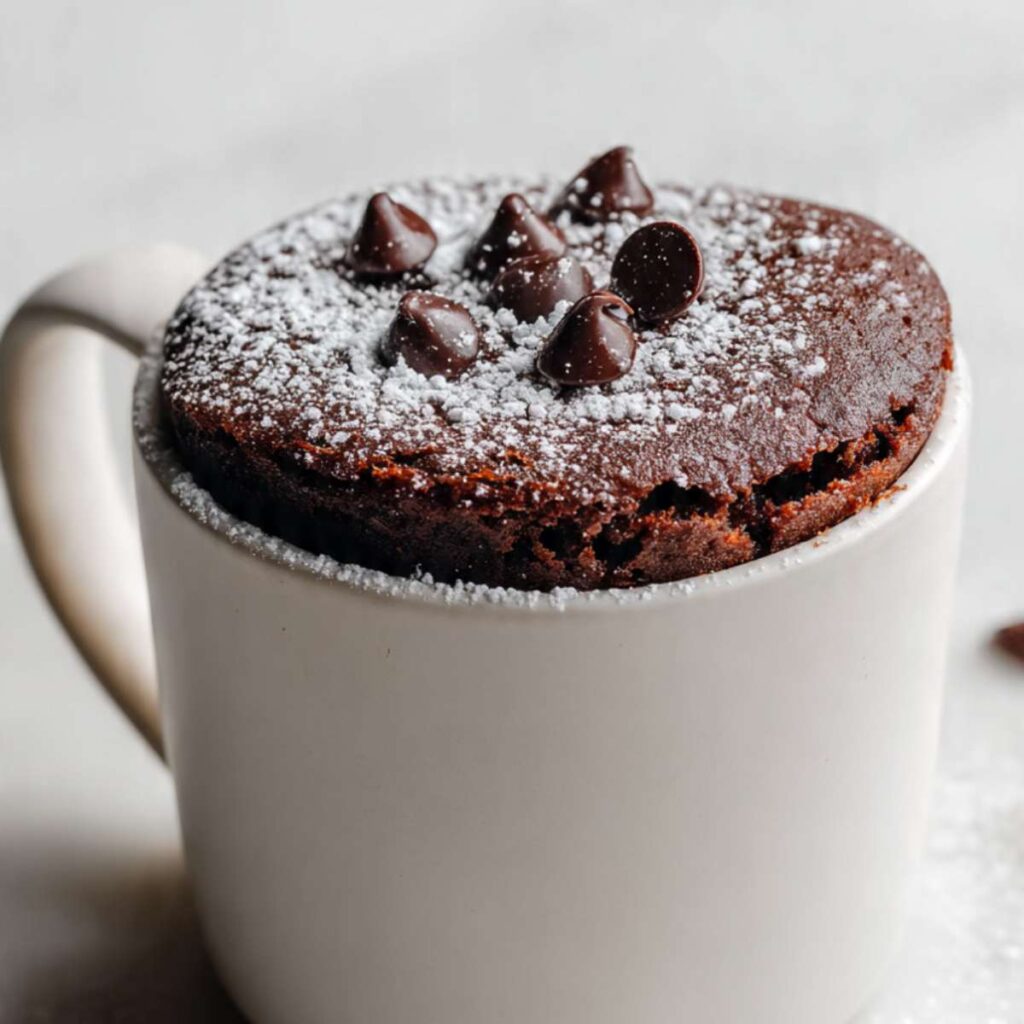
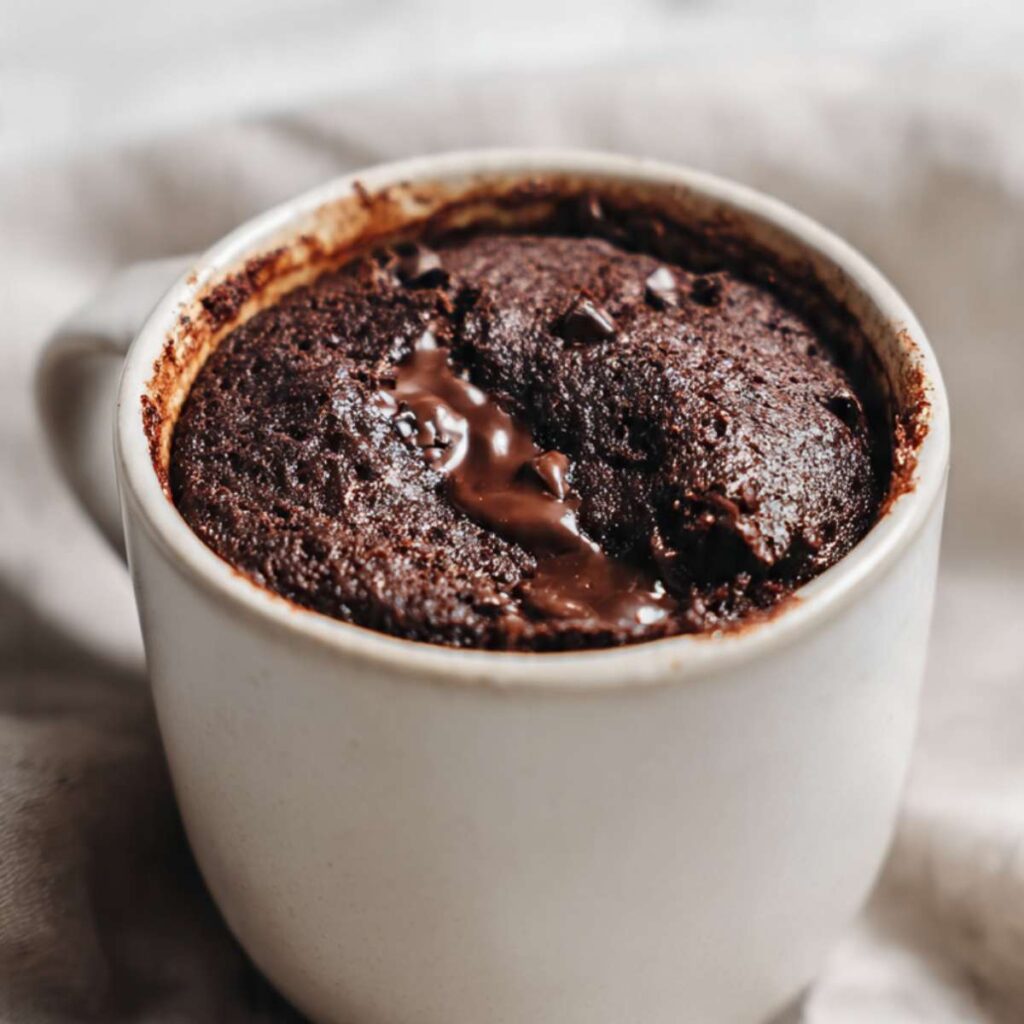
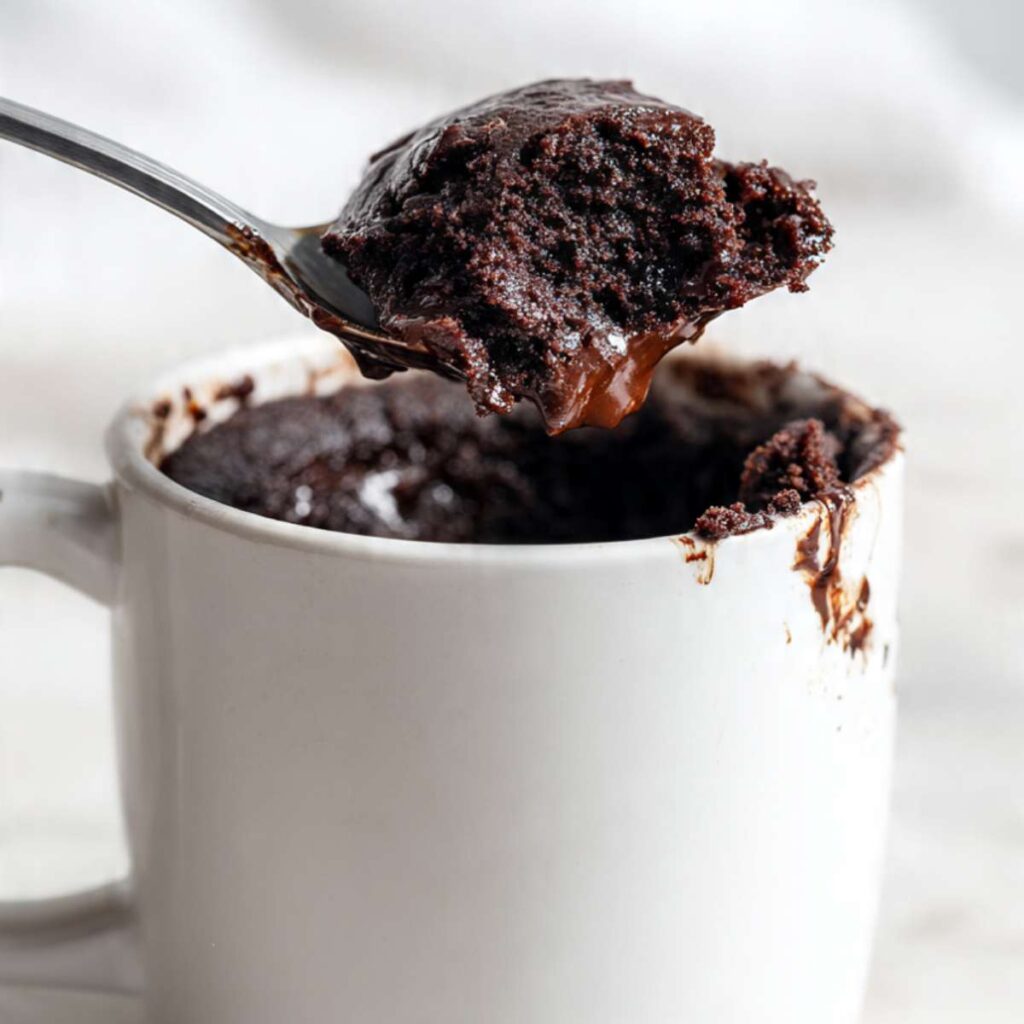
The edges set firm and pull slightly away from the mug walls. The center stays soft, almost wet, and when you press chocolate chips into the middle before microwaving, they melt into a genuine gooey pocket — not just a slightly soft bite, but real pooling chocolate. The top domes up above the rim, which tells you the batter hydration is right and the mug is the correct size.
I tested this with 1 tablespoon of oil versus 2 teaspoons. One full tablespoon made the crumb greasy and heavy. Two teaspoons kept it moist without that slick coating on your tongue. That’s the version I kept.
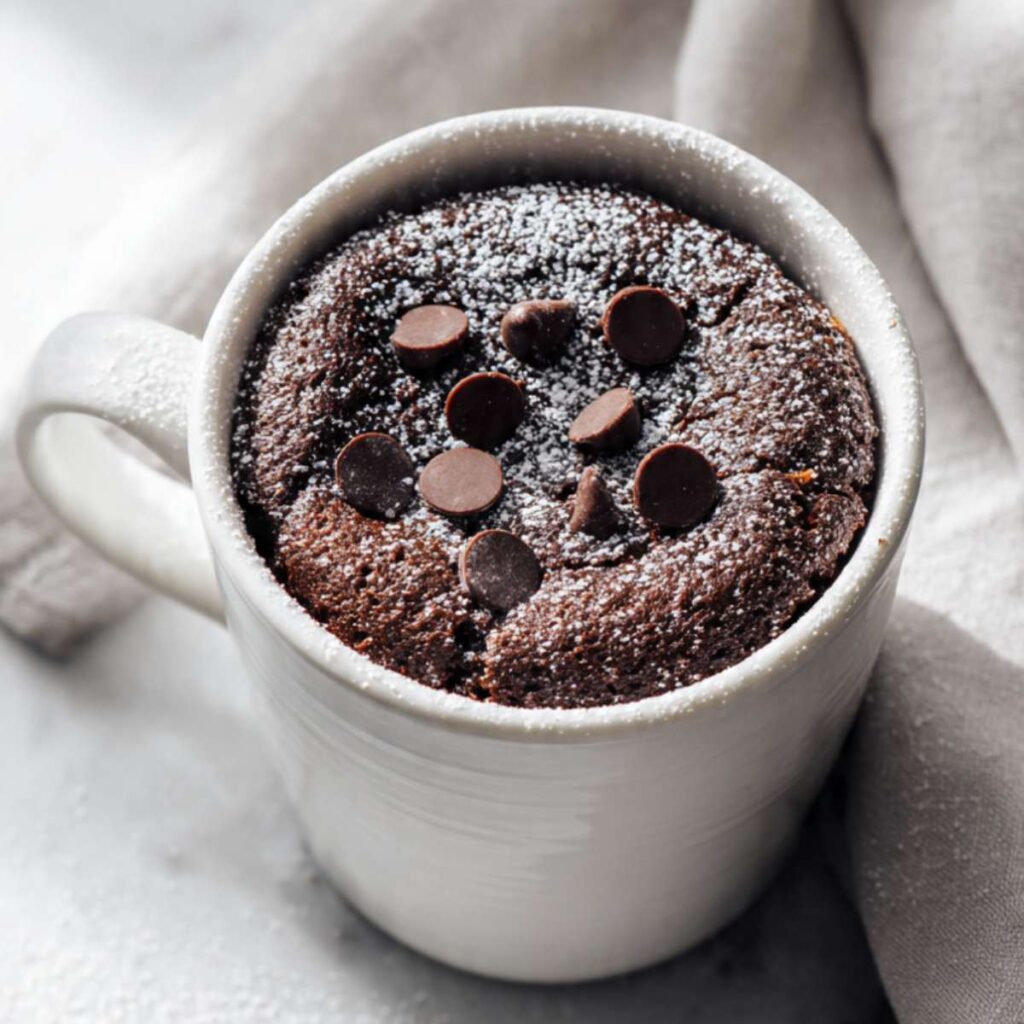
I also tested stirring the chocolate chips into the batter versus pressing them into the center. Stirring them in distributed the chocolate but gave no defined gooey moment. Pressing them into the middle before cooking created that molten pocket you can see in the photos — the one where chocolate pools out the second you break the surface. That method wins every time.
One more test: 60 seconds versus 70 seconds in a 1000-watt microwave. At 70 seconds, the center was fully set and the crumb dried out around the edges. At 60 seconds, the top looked just set while the center stayed fudgy. Pull it at 60 seconds and let carryover cooking do the rest during the 30-second rest.
Luna’s Habit Note: I keep a pre-measured dry mix jar in my pantry at all times. Late nights are when I make this most — knowing the dry ingredients are already measured means I’m eating warm chocolate cake in under 3 minutes.
| Prep Time | Cook Time | Total Time | Yield | Difficulty |
|---|---|---|---|---|
| 5 min | 1 min | 6 min | 1 mug cake | Easy |
| Calories | Fat | Carbs | Sugar | Protein |
|---|---|---|---|---|
| 443 kcal | 17g | 69g | 38g | 7g |
Macros are approximate and will vary based on ingredient brands, milk fat percentage, and chocolate chip quantity used.
Ingredients & Tools
For the Cake
- 4 tablespoons (30g) all-purpose flour, spooned and leveled
- 2 tablespoons (25g) granulated sugar
- 2 tablespoons (11g) unsweetened cocoa powder, natural or Dutch-process, measured level
- 3 tablespoons (45ml) whole milk, room temperature
- 2 teaspoons (9g) neutral oil (vegetable or canola)
Add-Ins & Toppings
- 1½ tablespoons (21g) semi-sweet chocolate chips (45–55% cacao), plus extra for topping
- Powdered sugar for dusting (optional)
Before You Start
Use a kitchen scale if you have one. Measuring by weight is always more accurate than measuring by volume for a recipe this small. When the total batter is only a few tablespoons, even a slightly heaped scoop of flour or cocoa can throw off the texture noticeably. A scale removes that variable entirely. If you don’t have one, use the spoon-and-level method — spoon each dry ingredient into the measuring spoon and sweep off the excess with a straight edge. Never scoop directly from the container.
Pull your milk out of the fridge 5 minutes before mixing. Cold milk doesn’t absorb into cocoa powder and flour as smoothly as milk at room temperature. It’s ready when it no longer feels cold against the inside of your wrist — that’s the visual and tactile check that tells you the temperature is right. Room temperature milk blends into the dry ingredients in one smooth motion without streaks or resistance.
This is a one-bowl, stir-by-hand recipe. No mixer, no whisk, no special equipment. Everything goes directly into the mug and gets stirred with a spoon. Unlike cake batters that rely on aeration — whipping air into butter or eggs to create a light, open crumb — this batter is intentionally dense and minimally mixed. You’re looking for a smooth, combined batter, not volume. Stir only until the dry streaks are gone and stop immediately.
Check your mug size before you start. You need at least a 12-ounce (350ml) mug — larger is always safer. The batter rises significantly during microwaving and will spill over a small mug. A wide, tall mug gives the cake room to dome up properly above the rim, exactly as shown in the photos.
Luna’s Habit Note: I keep my pre-measured dry mix jar right next to the mugs in my cabinet. When I want a mug cake, I don’t measure anything — I just grab the jar, add the wet ingredients, and go. It takes maybe 90 seconds of active effort.
Necessary Tools
Required:
- Kitchen scale (strongly recommended — weight measurements give more accurate results than volume for a recipe this small)
- 12-ounce (350ml) or larger microwave-safe mug
- Spoon for mixing
- Measuring spoons (if not using a scale)
Optional:
- Small fine-mesh sieve for dusting powdered sugar evenly
How to Make Chocolate Mug Cake
Step 1: Mix the Dry Ingredients for an Even, Lump-Free Base
Place your 12-ounce (350ml) or larger microwave-safe mug on a flat surface. Add 4 tablespoons (30g) all-purpose flour, 2 tablespoons (25g) granulated sugar, and 2 tablespoons (11g) unsweetened cocoa powder directly into the mug.
The flour is here to give the batter structure — without it, the egg-free batter has nothing to hold the crumb together and would cook into a wet, fudgy paste rather than a cake with any body. Two tablespoons (11g) of cocoa powder is a high ratio for this small a batter, which is exactly what gives the finished cake its deep, almost brownie-like chocolate intensity.
Stir with a spoon for about 20 seconds, scraping the bottom and sides as you go. You’re looking for a single, even dark brown color with no visible dry pockets or light flour streaks at the bottom corners of the mug. Any unmixed cocoa or flour left at the bottom will show up as a bitter or dry spot in the finished cake.
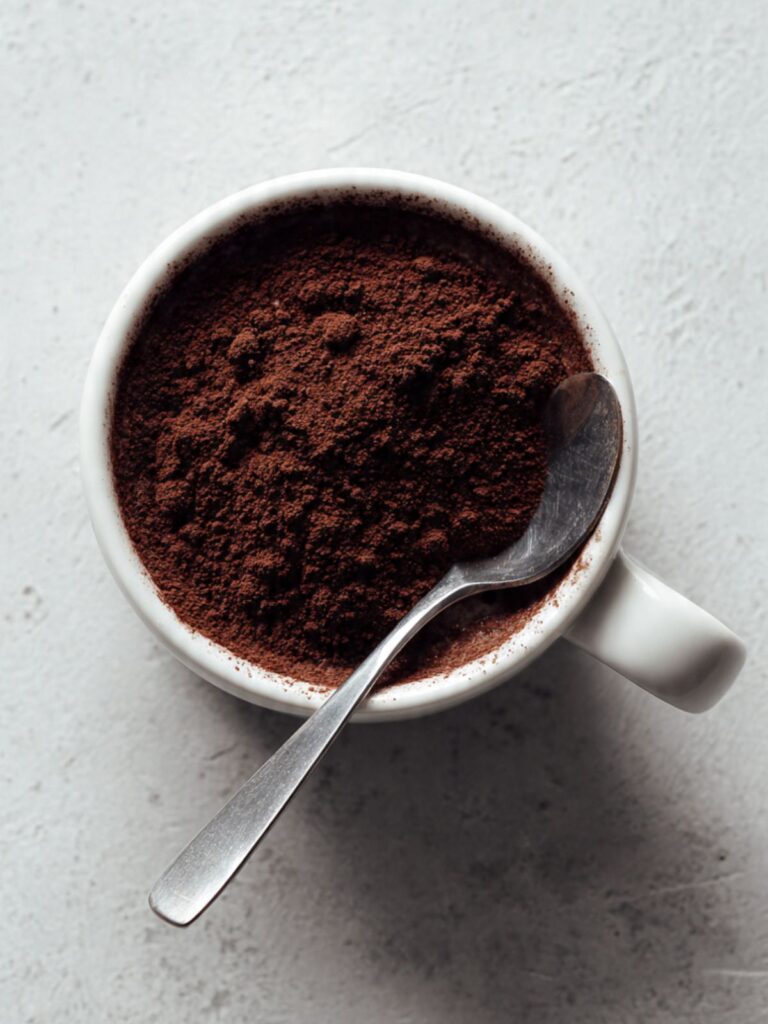
As you can see in the process shot above, the correctly mixed dry ingredients look uniformly dark with no light patches — that even color before the wet ingredients go in is your first success check.
Baker’s Warning: Do not tap or shake the mug to mix — the powder just settles back unevenly. Always stir with a spoon and scrape the bottom corners of the mug where a spoon doesn’t always reach naturally.
Your dry mixture should look like dark, evenly colored cocoa with no streaks of white flour visible anywhere in the mug.
Step 2: Add the Wet Ingredients and Build the Batter
Pour 3 tablespoons (45ml) whole milk and 2 teaspoons (9g) neutral oil into the mug directly over the dry mixture.
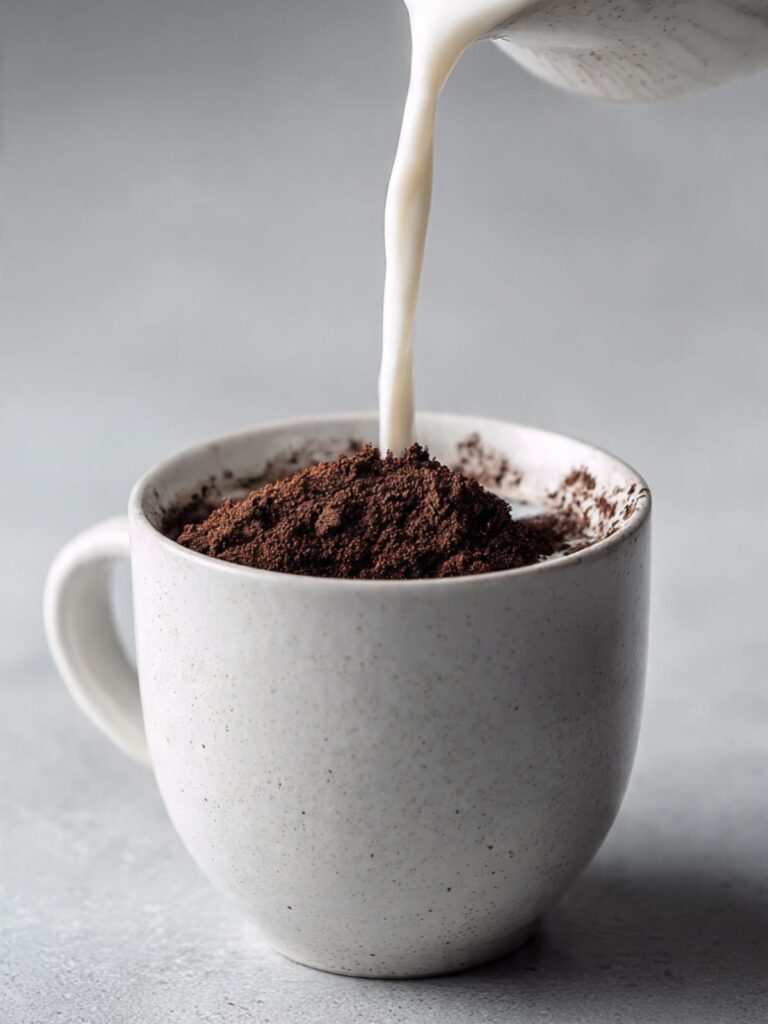
The oil is doing the moisture work here — it’s 100% fat with zero water content, so it coats the crumb structure during cooking and keeps it tender even after a full minute of microwave heat. The milk adds body and a small amount of protein that helps the batter hold together. Together they create the emulsification that gives you a smooth, cohesive batter rather than a greasy or grainy one.
Stir slowly and steadily, working from the bottom of the mug upward. Keep stirring until the batter looks thick, dark, and glossy with no dry streaks remaining and the mixture pulls away from the spoon in a slow, heavy ribbon. If it feels too stiff to stir smoothly, add just a tiny splash of milk — no more than half a teaspoon — and stir again.
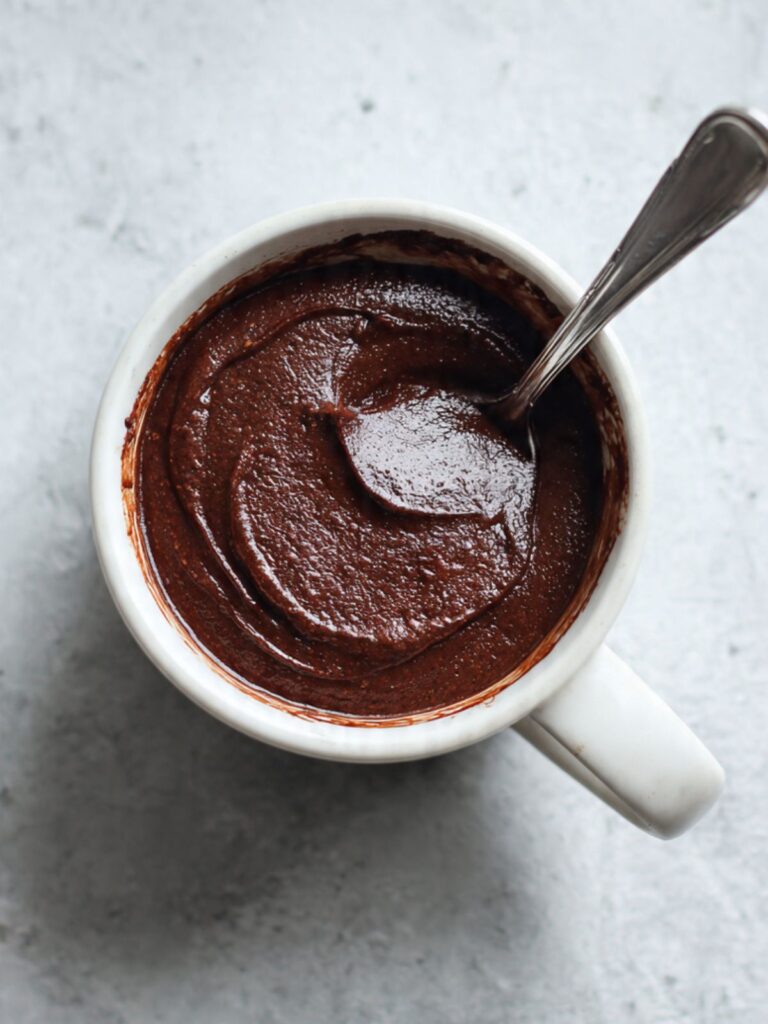
As you can see in the process shot above, the correctly mixed batter is uniformly dark and glossy — if you still see lighter streaks or patches, keep stirring for another 10 seconds and scrape the bottom again.
Baker’s Warning: Stop stirring the moment everything is combined. Overmixing develops gluten in the flour, which tightens the crumb structure and gives you a tough, rubbery cake instead of a tender, fudgy one.
Your batter should now look thick, dark, and glossy — heavier and denser than standard cake batter. That’s correct for this recipe.
Step 3: Press the Chocolate Chips Into the Center for a Molten Pocket
Use your fingertips to press 1½ tablespoons (21g) semi-sweet chocolate chips directly into the center of the batter. Don’t stir them in — push them down so they sit just below the surface, clustered together in the middle rather than spread toward the edges.
The chips need to be submerged, not resting on top. During microwaving, the outer batter cooks and sets first while those center chips stay surrounded by heat and melt into a single concentrated molten pocket. Chips sitting on the surface will simply firm up as the cake cools rather than melting into the crumb.
The batter surface should look smooth and unbroken with a slight depression in the center where the chips are sitting just below — you can see a faint outline of the chips through the batter but they shouldn’t be visible or poking above the surface.
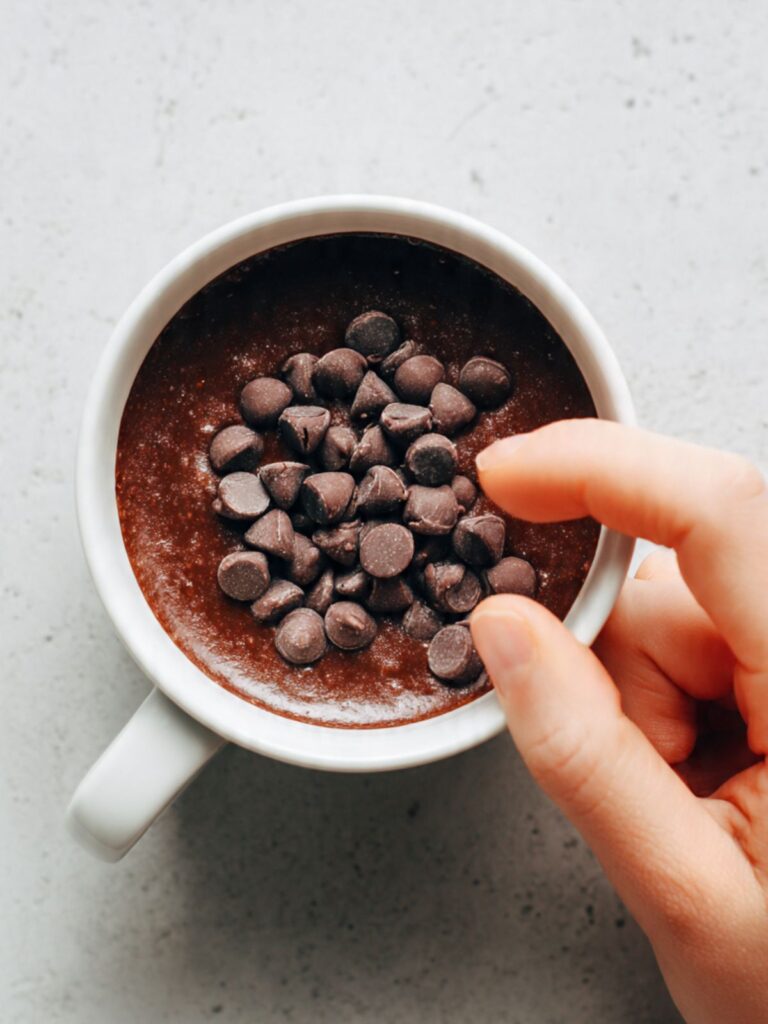
As you can see in the process shot above, the chips are clustered in the middle and pressed just below the surface — that positioning is exactly what creates the flowing chocolate pocket visible in the finished cake photos.
Baker’s Warning: Don’t press the chips all the way to the bottom of the mug. You want them sitting in the center of the batter depth — too deep and they don’t melt cleanly, too shallow and they firm up on top instead of creating a molten center.
Your mug should now show a smooth batter surface with a faint central depression where the chips are waiting just below — that’s the right setup before it goes into the microwave.
Step 4: Microwave at the Right Time for a Fudgy, Not Dry, Result
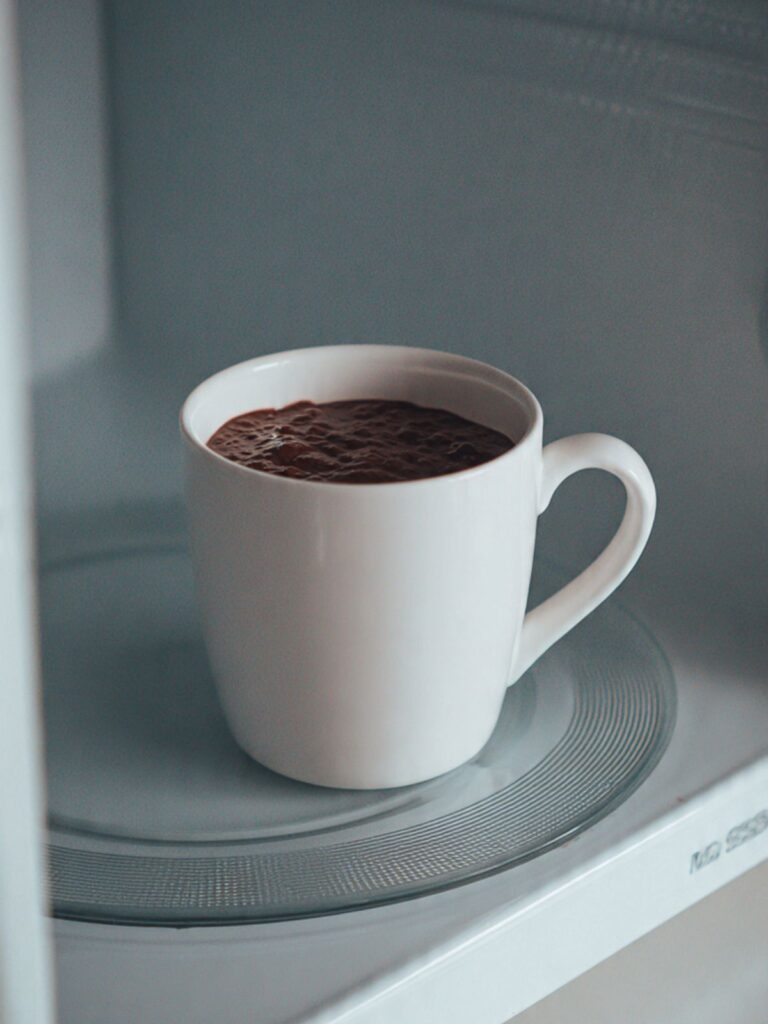
Place the mug in the center of your microwave turntable. Cook on full power for 60 seconds in a 1000-watt microwave.
When the microwave stops, the top should look set and slightly domed above the rim of the mug, while the very center of the surface still appears soft and slightly underdone. That is exactly what you want. The center will finish cooking during the 30-second rest from carryover heat.
Microwave wattage varies between models. If yours runs lower than 1000 watts, add 10 seconds. If it runs higher, check at 50 seconds first. The domed top with a soft center is your visual cue — not the timer. That moment, right when the top has just set, is what you can see in the photo above — the cake has risen above the rim and the surface looks matte and just-done rather than wet or shiny.
Baker’s Warning: Do not add extra time trying to fully set the center while it’s still in the microwave. Even 15 extra seconds can turn a fudgy cake completely dry and rubbery all the way through. Pull it when the top looks just done and trust the rest period to finish the job.
Your cake should now be sitting domed above the mug rim with a set top and a center that still has a faint soft spot — that’s the correct result before resting.
Step 5: Rest, Finish, and Serve While the Center Is Still Molten
Leave the mug on the counter untouched for 30 seconds. This rest period lets carryover heat gently finish the center and brings the surface temperature down just enough to eat without burning your mouth.
Once rested, hold a small fine-mesh sieve over the mug and dust the top generously with powdered sugar. Then immediately place a few whole chocolate chips on top of the sugar while the surface is still warm — as you can see in the finished photos, the chips sit on the dusted surface and give the cake a clean, finished look without any extra effort.
The finished top should look matte and evenly dusted with powdered sugar, chips sitting upright and intact, the cake still visibly domed above the rim — that’s the result you’re going for before you dig in.
Baker’s Warning: Don’t cover the mug at any point after cooking. Trapped steam softens the top surface and makes it wet and gummy within minutes. Leave it completely open and serve immediately.
Your cake is ready when the top is dusted, the chips are placed, and the center still feels warm when you press the back of a spoon gently against the surface — eat it now, straight from the mug.
The Science Behind This Chocolate Mug Cake
Why Cocoa Powder Gives You Stronger Chocolate Flavor Than Melted Chocolate
Cocoa powder is pure defatted chocolate solids with almost all the cocoa butter removed. That means the chocolate flavor is concentrated and intense — far more so than melted chocolate, which is diluted with cocoa butter, sugar, and sometimes milk solids.
In a mug cake, you only have a few tablespoons of batter to work with. Every ingredient has to pull maximum weight. Two tablespoons (11g) of cocoa powder in that small volume delivers a deep, rich chocolate flavor that melted chocolate simply cannot match at this scale.
This is also why measuring cocoa carefully matters. One extra teaspoon tips it from rich to bitter very quickly. Use the spoon-and-level method — spoon cocoa into the measuring spoon and sweep off the excess with a straight edge. The deep, dark color on the surface of the finished cake isn’t just cocoa — it’s the Maillard reaction at work, the same browning process that creates flavor complexity in roasted coffee and seared meat. Even in a microwave, enough surface heat builds during cooking to trigger it at the edges and top of the cake.
Why Oil Keeps the Crumb Moist and Why Pressing Chips Creates the Molten Center
Butter is about 80% fat and 20% water. When microwaved, that water content turns to steam and drives moisture out of the crumb fast. Oil is 100% fat with zero water content, which means it stays in the batter and coats the crumb structure during cooking — that’s emulsification working in your favor.
The result is a mug cake that stays moist and tender even after a full minute of microwave heat. Butter-based mug cakes tend to dry out around the edges before the center is done. Two teaspoons (9g) is the right amount — more than that and the crumb starts to feel greasy rather than moist.
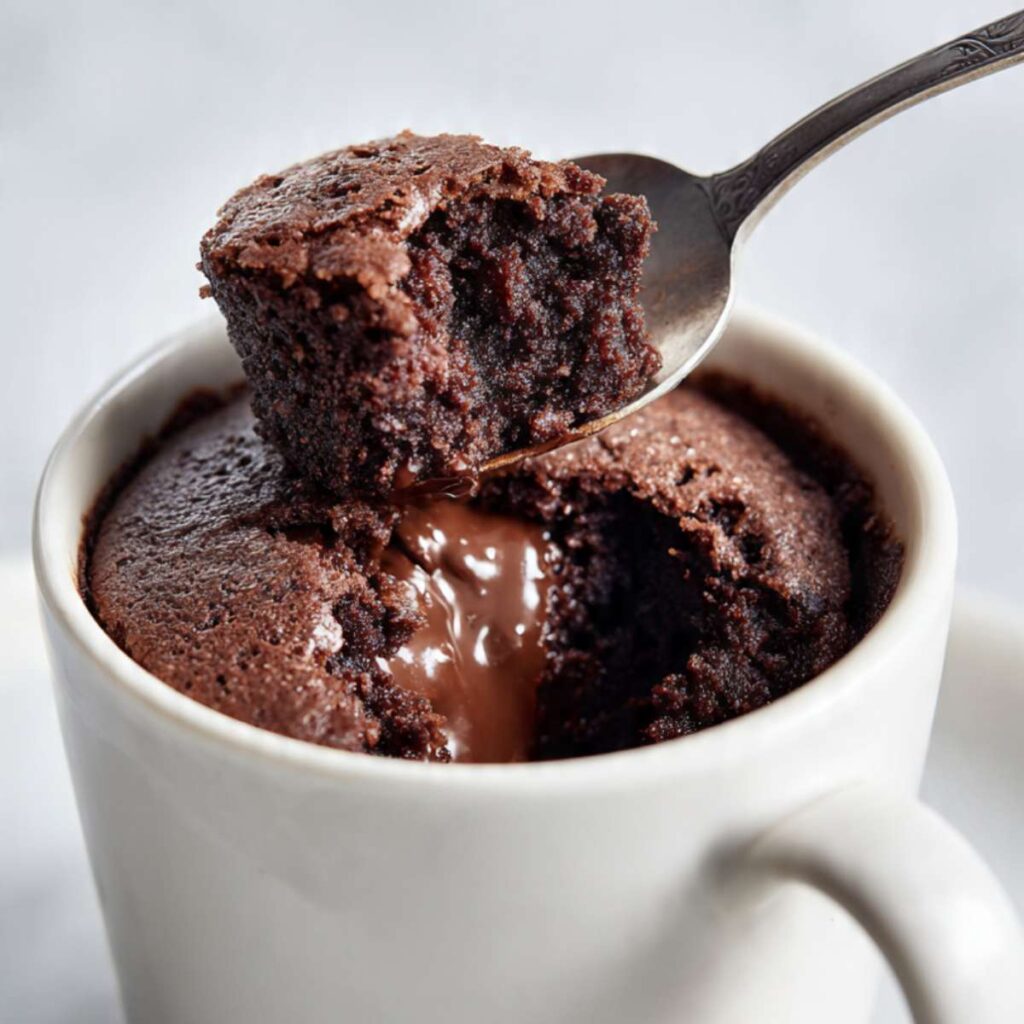
The chip placement works by the same logic. When you press chips into the center as a cluster, they melt together into a single concentrated mass. The surrounding batter sets and holds that melted chocolate in place. When you break the surface with a spoon, the whole pocket releases at once — that’s the flowing chocolate moment you can see when the cake is opened in the photos. Stirring chips in disperses them too thin and you lose that defined gooey moment entirely.
If you enjoy making single-serve chocolate desserts, my raspberry chocolate lava cupcakes use this same pull-early principle in a traditional oven — worth a read if you want to understand the technique more deeply.
Why You Pull It Early and Let Carryover Cooking Finish the Job
Microwaves heat water molecules directly, which means they drive heat into food fast and aggressively. The moment you stop the microwave, the food doesn’t stop cooking — the residual heat trapped in the outer crumb continues moving inward for another 20 to 30 seconds.
Pulling the cake at 60 seconds when the center looks underdone is not a mistake. It’s the technique. Those 30 seconds of resting time finish the center gently without overcooking the edges.
If you wait until the center looks fully set inside the microwave, carryover heat will push it past done and you’ll end up with a dry, rubbery result. The visual cue that ends the cook time is a set, slightly domed top with a center that still has a faint soft spot — not a fully firm surface.
Troubleshooting & Pro-Tips
Common Mistakes
The cake came out dry and rubbery. Symptom: The crumb is tough all the way through and the center has no softness or moisture left. Cause: Overcooking. Even 10 to 15 extra seconds in a high-wattage microwave is enough to push the crumb past fudgy and into tough territory. Fix: Pull the cake when the top looks just set but the center still appears soft. Trust the 30-second rest period to finish it. Prevention: Start at 50 seconds if your microwave runs hot. Check the visual cue — domed top, soft center — before adding any extra time. Add in 5-second increments only.
The batter overflowed the mug. Symptom: Batter spilled over the rim during microwaving and made a mess on the turntable. Cause: The mug was too small. The batter rises significantly during cooking and needs room to dome up without spilling. Fix: Transfer the remaining batter to a larger mug immediately and continue — it won’t hurt the result. Prevention: Always use a mug that holds at least 12 ounces (350ml). Never fill any mug more than halfway with raw batter before microwaving.
The cake tasted bitter. Symptom: Strong, harsh chocolate flavor that sits unpleasantly at the back of the throat rather than tasting rich and deep. Cause: Too much cocoa powder. This recipe uses exactly 2 tablespoons (11g) measured level — a heaped tablespoon can add 30 to 40% more cocoa than intended. Fix: Nothing saves an already-bitter cake. Add a dusting of extra powdered sugar on top to balance it as much as possible. Prevention: Use the spoon-and-level method every time. Spoon cocoa into the measuring spoon and sweep off the excess with a straight edge. Never scoop directly from the container.
There were dry flour clumps in the finished cake. Symptom: Gritty or powdery pockets in the crumb that taste raw and floury. Cause: The dry ingredients weren’t mixed thoroughly before the wet ingredients went in. Flour and cocoa both clump at the bottom corners of the mug where a spoon doesn’t always reach. Fix: Nothing restores a clumpy finished cake — the raw flour pockets are baked in at that point. Prevention: Stir the dry ingredients for a full 20 seconds before adding any liquid. Scrape the bottom corners of the mug deliberately with every stroke — that’s where clumps hide.
The center was completely set with no gooey pocket. Symptom: The cake is uniformly cooked all the way through with no molten center when broken open. Cause: Either the chips weren’t pressed deep enough into the center, or the cake was cooked too long and the chips set along with the surrounding batter. Fix: Nothing restores a set center once it’s cooked. Eat it as a fully cooked mug cake — it’s still good, just not gooey. Prevention: Press chips at least halfway into the batter depth, clustered in the middle. Pull the cake at 60 seconds maximum and let the rest period do the work.
The batter was too thick to stir. Symptom: The dry and wet ingredients won’t combine smoothly — the mixture feels stiff and paste-like rather than flowing into a glossy batter. Cause: Cold milk straight from the fridge doesn’t absorb into cocoa powder and flour as readily as room temperature milk. Fix: Add a half teaspoon (2.5ml) of milk and stir again. Repeat once more if needed — but no more than 1 teaspoon (5ml) total extra liquid or the batter will thin out too much. Prevention: Pull milk from the fridge 5 minutes before mixing. It’s ready when it no longer feels cold against the inside of your wrist.
The cake is dense and gummy at high altitude. Symptom: The crumb collapses slightly after cooking and the texture is heavier and stickier than expected, even with correct timing. Cause: At high altitude — above 3,500 feet (1,065m) — water evaporates faster and the batter structure sets more quickly, which can cause the cake to rise and collapse before the crumb has time to stabilize. Dry air at altitude also pulls moisture from the crumb faster during and after cooking. Fix: Reduce microwave time by 5 seconds and add an extra half teaspoon (2.5ml) of milk to the batter before cooking. Prevention: If you live above 3,500 feet (1,065m), treat the altitude adjustment as a standard part of the recipe rather than a one-time fix. Very humid climates have the opposite effect — sift the cocoa powder before measuring if your kitchen runs humid, as clumping in the dry mix is common in high-humidity environments.
Expert Pro-Tips
Use Dutch-process cocoa for a deeper, smoother chocolate flavor. Natural cocoa powder is slightly acidic and can taste sharp at high concentrations. Dutch-process cocoa has been alkalized, which mellows the bitterness and gives you a darker, more rounded chocolate flavor. Either works in this recipe, but Dutch-process is what I reach for when I want the richest result.
Add a tiny pinch of espresso powder to the dry ingredients. You won’t taste coffee — the amount is too small for that. What it does is amplify the cocoa flavor and make the chocolate taste deeper and more complex. About ⅛ teaspoon is enough for one mug cake. Add it with the cocoa powder and stir it in with the other dry ingredients.
Use good quality semi-sweet chips for the center. Cheap chocolate chips are formulated with stabilizers that prevent them from melting smoothly. They’ll soften but won’t give you a clean, flowing molten pocket. Guittard or Ghirardelli semi-sweet chips at 45–55% cacao melt into a genuinely glossy, liquid center. The quality difference is visible the moment you break the surface.
For a richer crumb, swap the whole milk for heavy cream. The higher fat content of cream adds body to the batter and makes the crumb noticeably more dense and indulgent. The cook time stays the same — swap the milk 1:1 with heavy cream and proceed exactly as written.
Let the mug sit on a folded kitchen towel after cooking. The mug gets very hot at the base and sides after a full minute in the microwave. A folded towel protects your hands and your counter, and also slows heat loss slightly — which gives carryover cooking a little more time to work on the center during the 30-second rest.
How to Store Chocolate Mug Cake
Room Temperature
This cake is a make-and-eat recipe. It doesn’t store well at room temperature — the crumb tightens and dries out within an hour of cooking, and the molten center sets completely as it cools.
If you do need to hold it for a short time, leave it uncovered in the mug on the counter. Do not cover it with plastic wrap or a plate — trapped steam makes the top surface wet and gummy within minutes. Even uncovered, expect the texture to decline noticeably after 30 minutes. By the one-hour mark the crumb is noticeably drier and the gooey center is gone entirely.
There is no way to restore that fudgy texture once it’s set. Make it fresh every time — the whole process takes 6 minutes.
Refrigerator
I don’t recommend refrigerating this cake. Cold air accelerates moisture loss in a crumb this small, and reheating can’t fully reverse it.
If you have no choice, cover the mug loosely with plastic wrap and refrigerate for no longer than 24 hours. Reheat on full microwave power for 20 to 25 seconds before eating. The crumb will soften slightly but won’t return to its original fudgy texture. The molten center will be completely set. It’s edible, but it’s a noticeably different result than fresh.
Freezer — Baked
The cooked cake does not freeze well. The crumb becomes dense and gummy after freezing and reheating — the texture turns unpleasant and the moisture distribution is uneven when thawed. I don’t freeze the baked cake for this reason.
If you accidentally froze a portion, thaw it fully at room temperature for 20 to 30 minutes before reheating on 50% microwave power in 15-second increments. It won’t be the same as fresh, but it’s edible if you’ve already committed.
Freezer — Unbaked
This is the smarter make-ahead option. Pre-measure the dry ingredients — 4 tablespoons (30g) all-purpose flour, 2 tablespoons (25g) granulated sugar, and 2 tablespoons (11g) unsweetened cocoa powder — into a small jar or zip-lock bag. Store in the pantry for up to 3 months.
When you want a mug cake, the dry mix is already done. Add the wet ingredients directly into your mug, stir, add chips, and microwave. It cuts active prep time down to about 2 minutes. Label the jar with the wet ingredient amounts so you don’t have to remember them.
Serving Suggestion
I eat this straight from the mug with a spoon the moment it comes out of the microwave — that’s when the center is at its most molten and the crumb is at its softest. I don’t plate it. Part of the appeal is eating it exactly as it is, warm and messy, straight from the vessel it cooked in.
When I want to make it feel more indulgent, I add a scoop of vanilla ice cream the moment the cake comes out. The contrast between the hot fudgy cake and cold ice cream is genuinely good — the ice cream melts slightly into the chocolate and creates its own sauce without any extra effort.
If you’re finishing it with the powdered sugar and chocolate chip topping shown in the photos, dust the sugar first using a small sieve, then place the chips immediately after — before the sugar absorbs any steam and clumps on the surface.
Luna’s Habit Note: Late nights are when I make this most. I keep a pre-measured dry mix jar in my pantry so I can have a warm chocolate cake in under 3 minutes without measuring anything.
Frequently Asked Questions
Can I make chocolate mug cake without cocoa powder?
Not with the same result. Cocoa powder is doing two jobs here — it’s the primary chocolate flavor source and it’s contributing to the dry ingredient structure of the batter. Swapping it out for melted chocolate changes the fat ratio and the batter consistency entirely. If you want to use melted chocolate instead, you’d need to rebuild the recipe from scratch with adjusted flour and liquid ratios. Pick up unsweetened cocoa powder and make it properly — the flavor difference is significant at this small scale.
Can I use water instead of milk in mug cake?
You can, but the crumb will taste noticeably thinner and less rich. Whole milk adds fat and a small amount of protein, both of which contribute to the moist, tender crumb structure of the finished cake. Water produces a result that’s more rubbery and one-dimensional in flavor. If dairy is a concern, unsweetened oat milk or almond milk both work reasonably well as substitutes — oat milk in particular gives a crumb very close to whole milk because of its higher carbohydrate content, which mimics some of the body that dairy fat provides.
How long do you cook a mug cake in the microwave?
Sixty seconds at full power in a 1000-watt microwave. If your microwave runs lower than 1000 watts, start at 75 seconds and check. If it runs higher, check at 50 seconds. The visual cue that ends the cook time is a set, slightly domed top with the very center still appearing soft — not a fully firm surface. Never rely on the timer alone. Microwave wattage varies enough between models that the visual check matters more than the number. Add time in 5 to 10-second increments only if needed.
Can I make mug cake ahead of time?
This is one recipe I don’t make ahead — and I mean that literally, not as a cliché. The crumb dries out within 30 minutes of cooking and the molten center sets completely as it cools. There is no storage method that preserves the fresh texture. What you can do instead is pre-measure the dry ingredients into a small jar and store them in the pantry for up to 3 months. When you want a mug cake, the dry mix is ready to go and the whole process takes about 2 minutes. That’s the only make-ahead step worth doing here.
Why did my mug cake come out dry and rubbery?
Almost always overcooking. Even 10 to 15 extra seconds in a high-wattage microwave is enough to push the crumb past fudgy and into tough territory. Microwave ovens vary significantly in actual output, so a recipe written for 1000 watts will overcook in a 1200-watt model at the same time setting. Start checking at 50 seconds if your microwave runs hot. The center should still look soft and underdone when you pull it out — carryover cooking during the 30-second rest will finish it. Overmixing the batter is the second most common cause: stir just until smooth and stop immediately.
Does altitude affect how a mug cake turns out?
Yes, though less dramatically than with traditional oven-baked cakes. At high altitude — above 3,500 feet (1,065m) — water evaporates faster and leavening acts more aggressively, which can cause the cake to rise and collapse quickly, leaving a dense, slightly gummy center. If you’re baking above 3,500 feet, reduce the microwave time by 5 seconds and check early. You may also find that adding an extra half teaspoon (2.5ml) of milk helps maintain moisture at altitude where the air is drier. Humidity on the other end — very humid climates — can cause the cocoa powder to clump in the dry mix, so sift it before measuring if your kitchen runs humid.
Can I make this chocolate mug cake gluten free?
Yes. Swap the all-purpose flour 1:1 with a gluten free 1-to-1 baking flour blend — the kind that already contains xanthan gum. Bob’s Red Mill 1-to-1 and King Arthur Measure for Measure both work well here. The texture will be very slightly more dense than the original, but the chocolate flavor and gooey center stay intact. Do not use almond flour or coconut flour — the ratios are completely different and the batter won’t hold together. If you enjoy gluten free chocolate baking, my gluten free chocolate chip cookies use a similar substitution approach and are worth bookmarking.

Chocolate Mug Cake
Ingredients
Equipment
Method
- Add the 4 tablespoons (30g) flour, 2 tablespoons (25g) sugar, and 2 tablespoons (11g) cocoa powder to a 12-ounce (350ml) or larger microwave-safe mug and stir with a spoon for 20 seconds, scraping the bottom and sides, until the color is completely even with no dry pockets or flour streaks remaining.
- Pour in the 3 tablespoons (45ml) whole milk and 2 teaspoons (9g) neutral oil and stir slowly from the bottom upward until the batter is thick, dark, glossy, and completely smooth with no dry streaks — if the batter feels too stiff, add a half teaspoon of milk and stir again.
- Use your fingertips to press the 1½ tablespoons (21g) chocolate chips into the center of the batter, pushing them just below the surface in a cluster rather than spreading them toward the edges or stirring them in.
- Place the mug in the center of the microwave turntable and cook on full power for 60 seconds in a 1000-watt microwave, checking that the top looks set and slightly domed while the center still appears soft — add 10 seconds if your microwave runs below 1000 watts, check at 50 seconds if it runs higher.
- Leave the mug on the counter untouched for 30 seconds to let carryover heat finish the center gently without overcooking the edges.
- Dust the top with powdered sugar using a small sieve and place a few whole chocolate chips on top immediately, then serve straight from the mug while still warm.
Notes
here. Dutch-process gives a darker, smoother, more
rounded chocolate flavor. Natural cocoa is slightly
sharper and more acidic. Measure level — never heaped. – Chocolate chips: Use 45–55% cacao semi-sweet chips
for the best melt. Cheap stabilized chips soften but
won’t give a clean molten center. Guittard or
Ghirardelli recommended. – Milk substitution: Swap whole milk 1:1 with
unsweetened oat milk or almond milk for dairy-free.
Oat milk gives the closest result to whole milk. – Gluten free: Replace all-purpose flour 1:1 with a
gluten free 1-to-1 baking blend containing xanthan
gum. Do not use almond flour or coconut flour. – Storage: Make and eat fresh. The crumb dries out
within 30 minutes and the molten center sets
completely as it cools. Do not cover with plastic
wrap — trapped steam makes the top gummy. – Freeze unbaked: Pre-measure dry ingredients into a
small jar or zip-lock bag and store in the pantry
for up to 3 months. Add wet ingredients and
microwave when ready. – Make ahead: Not recommended for the baked cake.
The dry mix jar is the only make-ahead step
worth doing. – Altitude: Above 3,500 feet (1,065m), reduce
microwave time by 5 seconds and add an extra
half teaspoon (2.5ml) of milk to compensate
for faster moisture loss. – Scaling: This recipe is designed for one serving
in one mug. Do not double the batter in a single
mug — microwave two separate mugs one after the
other for two servings. – Allergens: Contains gluten (flour), dairy (milk,
chocolate chips). May contain traces of nuts
depending on chocolate chip brand. Check packaging
for allergen declarations. – Pro tip: Press chips into the center rather than
stirring them in — this is the technique that
creates the flowing molten chocolate pocket when
the cake is broken open.