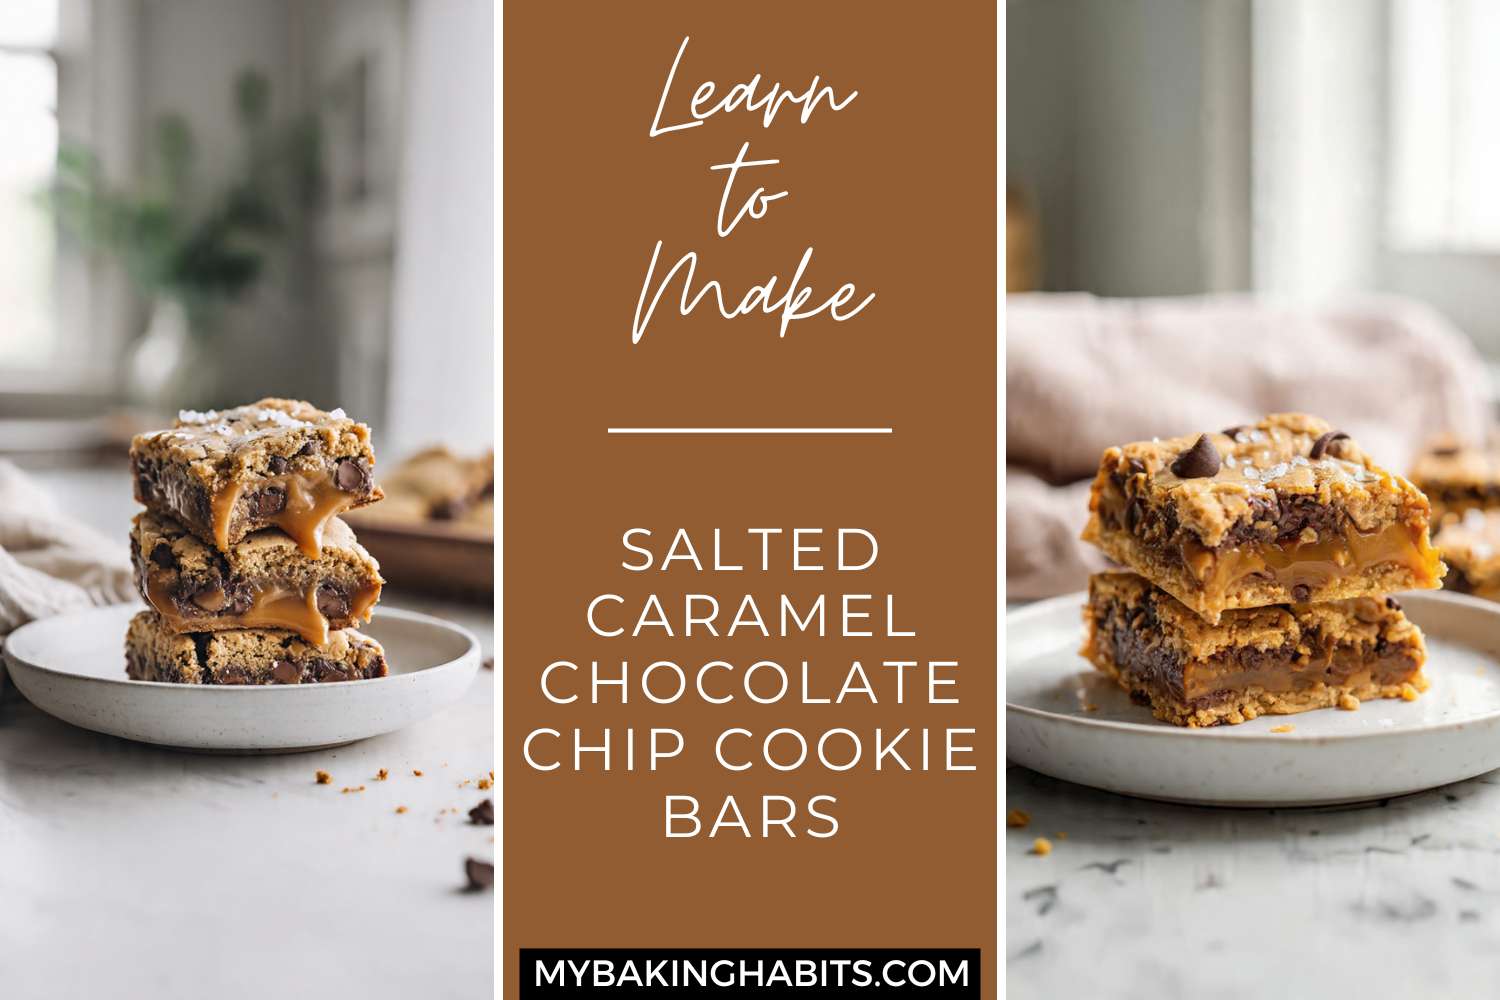
Salted Caramel Chocolate Chip Cookie Bars
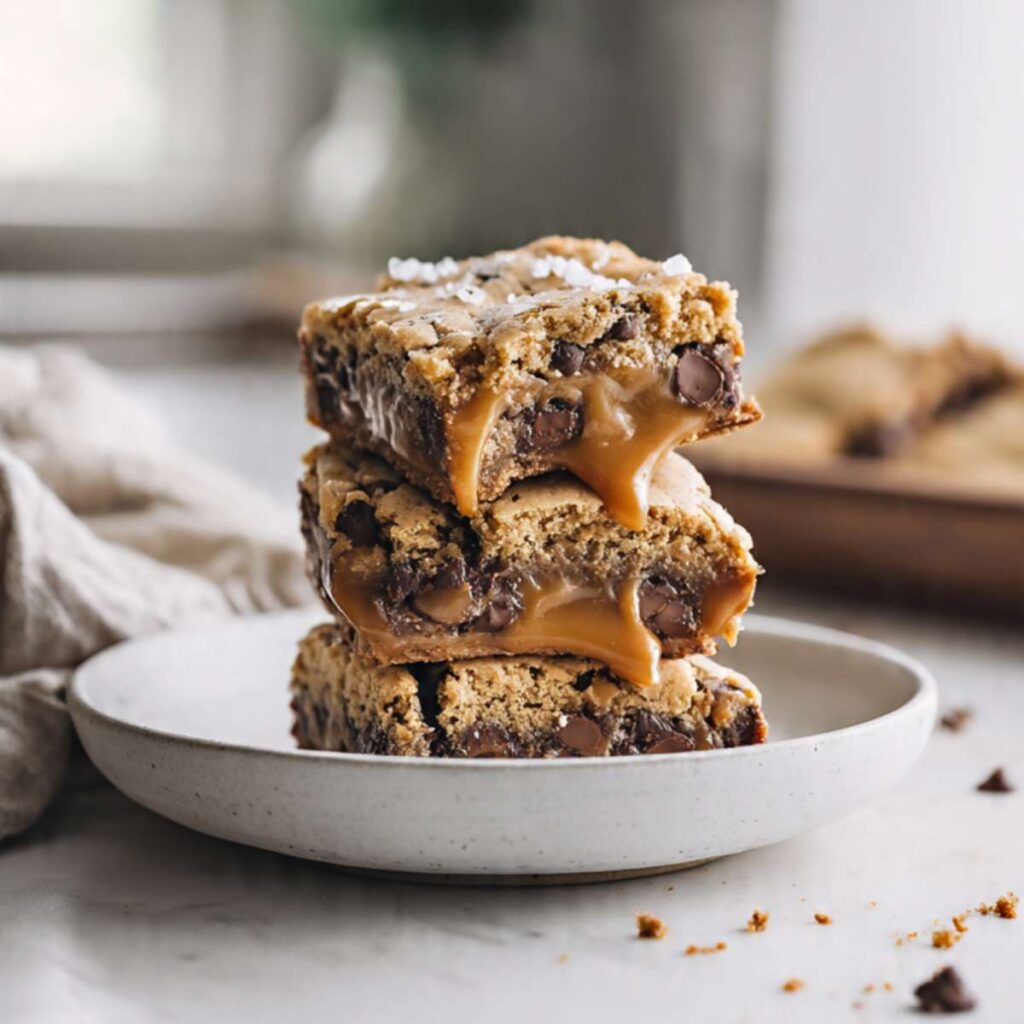
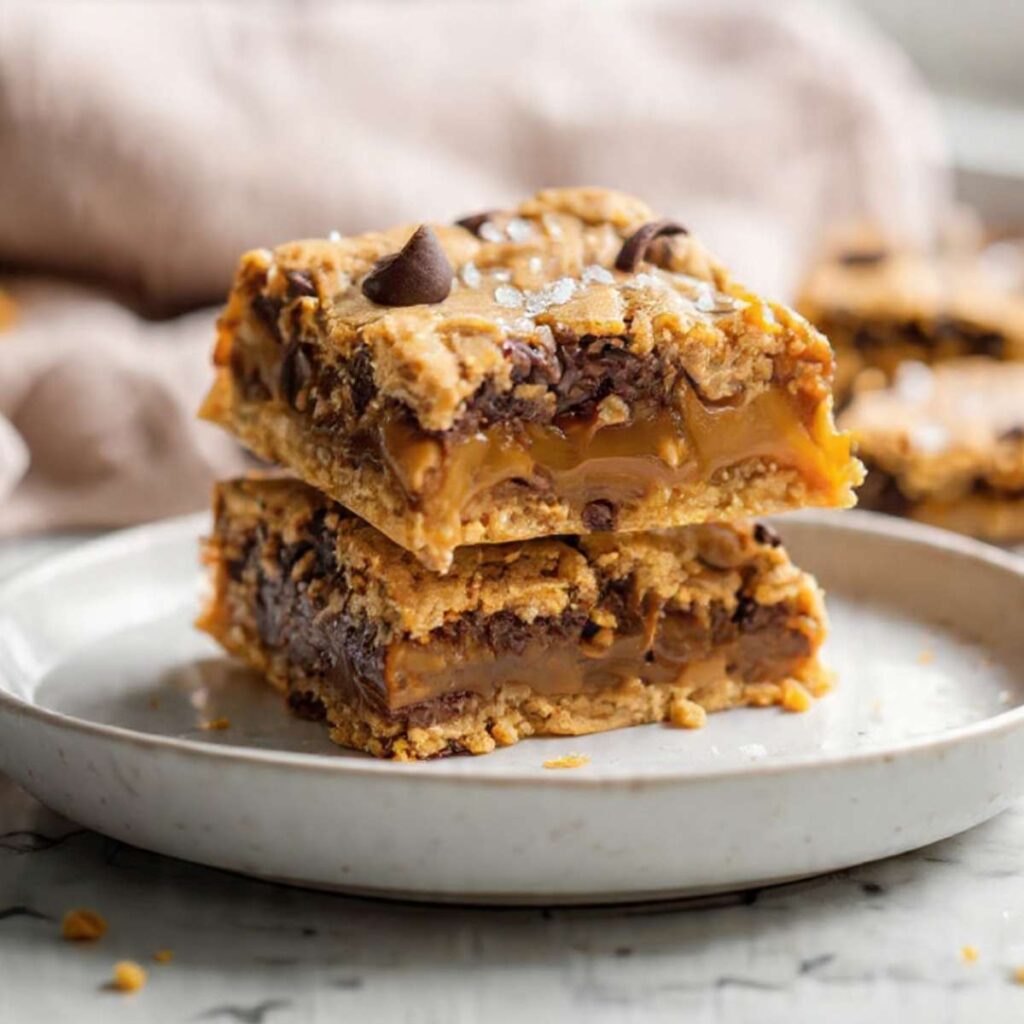
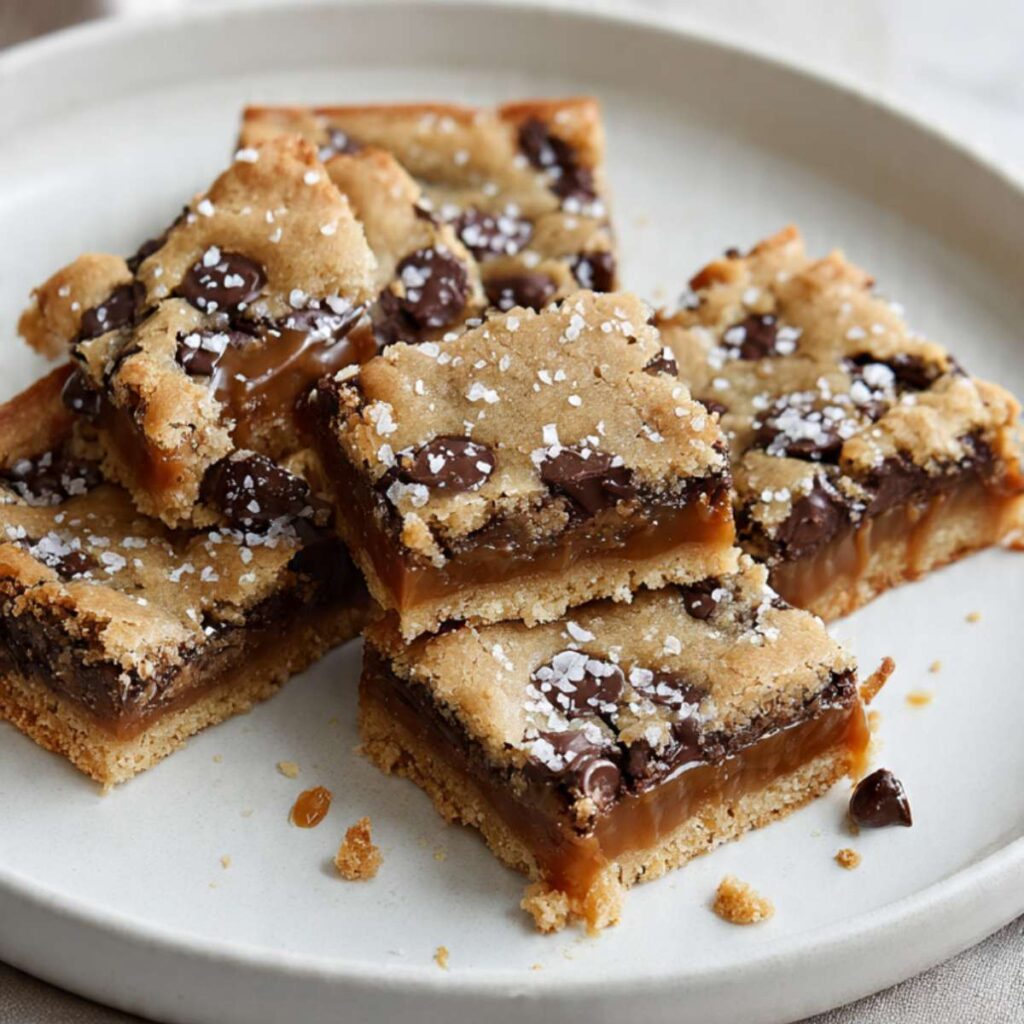
I have made these salted caramel chocolate chip cookie bars more times than any other bar on this blog — eight batches to get the caramel layer thick enough to hold its own band between the two cookie layers without sinking into the dough or running out the sides. That specific layered cross-section, the one you can see in the stacked bar photos with the clean amber stripe between two fudgy cookie layers, took four batches to nail. The other four were about locking in the right texture in the cookie layers themselves.
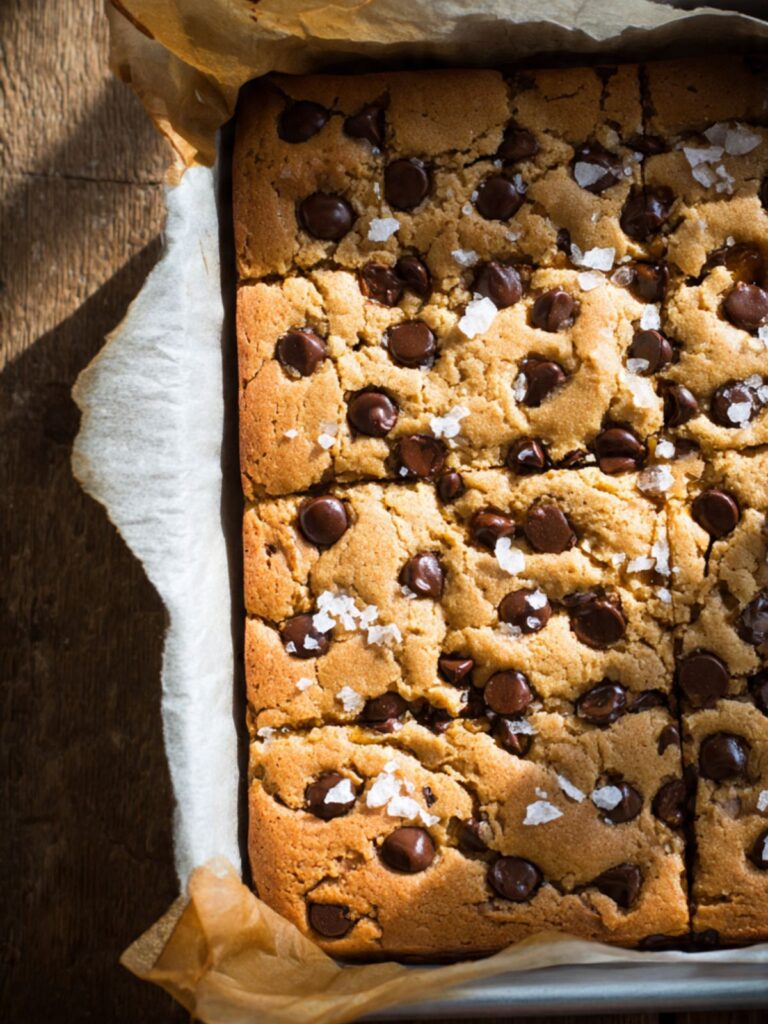
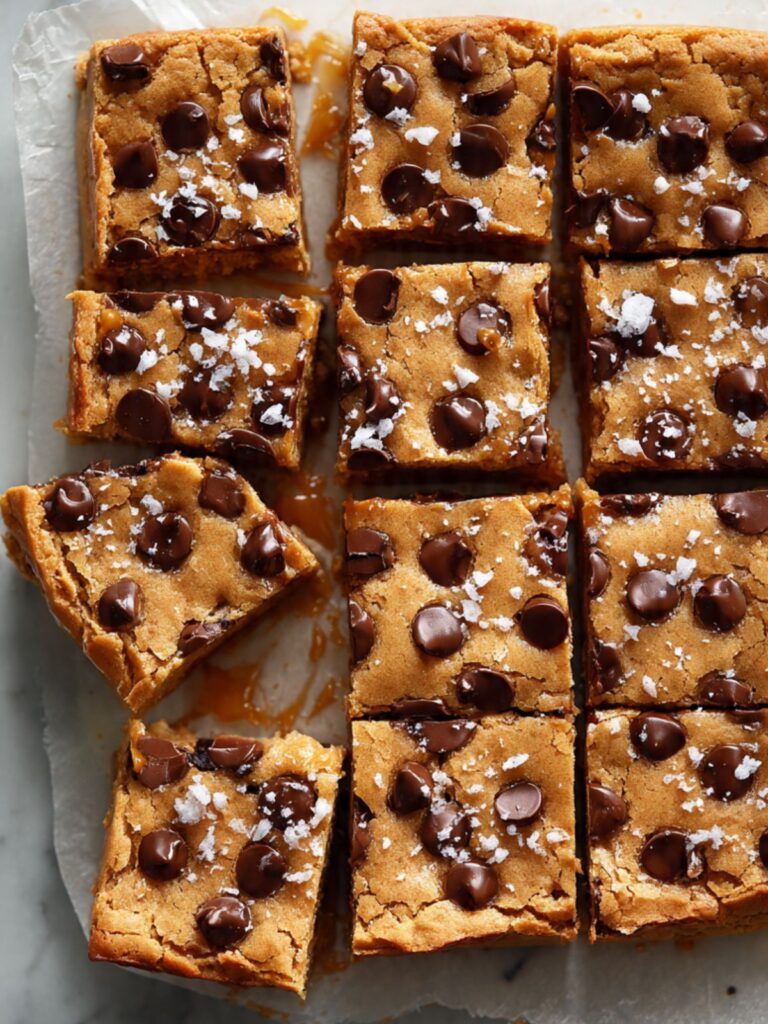
The texture here is specific and intentional. The cookie layers are dense and chewy — not cakey, not crumbly — with pockets of melted semi-sweet chocolate in every bite. The caramel middle stays fluid enough to ooze slightly when the bars are cut, then firms up just enough at room temperature to hold the stack without collapsing. The flaked sea salt on top is not decoration. It cuts through the sweetness and makes the chocolate and caramel flavors sharper.
I tested the caramel layer twice — once with homemade brown butter caramel and once with melted soft caramel candies. The homemade version tasted marginally better but the texture was inconsistent across batches. The melted candy version gave a perfectly even layer every time with almost no extra effort. I kept the candy version for reliability and added a tablespoon of heavy cream to keep it from seizing.
I also tested splitting the dough evenly versus using more dough on the bottom than the top. An even split left the top layer too thin and it dried out in the oven before the caramel had time to set. Using 60% of the dough on the bottom and 40% on top gave the structural balance you can see in the stacked cross-section photos — a solid base that holds the caramel without the top cracking or pulling away at the edges.
No mixer needed for this recipe. Everything comes together in one bowl with a silicone spatula. The bars do need to cool for at least two hours before cutting — the caramel layer needs that time to firm up enough to hold a clean slice. Cut early and the center will be molten and will not hold its shape.
🗒 Luna’s Note: I always press extra chocolate chips directly onto the top layer of dough right before the pan goes in — it takes ten seconds and makes every bar look like it came out of a bakery case rather than a home oven.
| Prep Time | Cook Time | Total Time | Yield | Difficulty |
|---|---|---|---|---|
| 20 min | 25 min | 2 hr 55 min (includes cooling) | 9 bars | Easy |
| Calories | Fat | Carbs | Sugar | Protein | Sodium |
|---|---|---|---|---|---|
| ~545 kcal | ~23g | ~80g | ~62g | ~4g | ~220mg |
Macros are approximate and will vary based on ingredient brands and serving size.
Ingredients & Tools
For the Cookie Dough
- 1¼ cups (150g) all-purpose flour, spooned into the measuring cup and leveled — or weighed for accuracy
- ½ cup (113g) unsalted butter, melted and cooled to room temperature — not hot
- ¾ cup (165g) packed light brown sugar — dark brown sugar will make the bars denser and more molasses-forward
- ¼ cup (50g) plain white granulated cane sugar
- 1 large egg (approximately 50g without the shell) + 1 egg yolk, room temperature — the extra yolk adds richness and keeps the centers fudgy
- 1½ tsp pure vanilla extract — not imitation
- ½ tsp baking soda, checked for freshness
- ¼ tsp fine sea salt
- 1¼ cups (213g) semi-sweet chocolate chips (45–55% cacao), such as Nestlé Toll House or Ghirardelli — standard size, not chunks or mini chips
For the Caramel Layer
- 11 oz (312g) soft caramel candies, unwrapped — Kraft or Werther’s Soft Caramels work reliably; do not use caramel sauce or caramel syrup
- 3 tablespoons (45g) full-fat heavy cream (36% fat or higher)
For the Finish
- 1 teaspoon flaked sea salt — Maldon is the standard; do not substitute fine salt or kosher salt
Necessary Tools
- 9×9 inch (23×23cm) light-colored aluminum baking pan — dark non-stick pans run hotter and will overbrown the bottom layer before the top sets
- Parchment paper with overhang on all four sides for clean removal
- Large mixing bowl
- Small saucepan or microwave-safe bowl for the caramel layer
- Sturdy silicone spatula
- Kitchen scale (strongly recommended — gram weights give consistent results batch to batch)
- Offset spatula or the back of a spoon for pressing the top dough layer
Before You Start
No mixer needed: This entire recipe comes together with a large mixing bowl and a sturdy silicone spatula — no electric mixer required at any stage.
Temperature prep: Pull your egg and egg yolk out of the refrigerator 30 minutes before you begin. A cold egg added to warm melted butter will cause the butter to seize and the mixture to look broken and greasy. At room temperature, the egg emulsifies smoothly into the butter and sugar. Press the egg gently against your wrist — it should feel neither cold nor warm against your skin.
Melt your butter and set it aside to cool for at least 10 minutes before mixing. You want it liquid but no longer hot. If it is too hot when the egg goes in, the egg will begin to cook and the dough will bake up tough and dry.
Pan prep: Line your 9×9 inch (23×23cm) pan with parchment paper, leaving at least 2 inches (5cm) of overhang on all four sides. This overhang is your handle — you will use it to lift the entire slab out of the pan cleanly before cutting. Parchment is mandatory. Greasing without parchment will not give you a clean release with the caramel layer present.
If you are using a glass or ceramic pan instead of aluminum, reduce the oven temperature by 25°F (14°C) to 300°F (149°C) — glass and ceramic retain heat longer and will overbrown the base layer before the top sets.
Baking soda freshness check: Drop ¼ teaspoon of baking soda into a small bowl and pour 1 teaspoon of hot water over it. It should fizz immediately and vigorously. If it does not fizz, your baking soda is spent — replace it before baking. Flat baking soda produces bars with no lift and a dense, gummy texture throughout.
Brown sugar check: If your brown sugar has hardened, place a damp paper towel over it and microwave in 20-second increments until it is soft and pliable enough to pack. Hard brown sugar cannot be packed accurately and will measure short, producing bars that are less moist and chewier than intended.
Gram weight priority: This recipe was developed and tested by weight. Volume measurements for flour in particular can vary by up to 20% depending on how the flour was stored and scooped. If you have a kitchen scale, use it. If you are measuring by volume, spoon the flour into the measuring cup and level it with a straight edge — never scoop directly from the bag.
Caramel prep note: Unwrap all caramel candies before you begin. It takes longer than you expect and the caramel layer needs to be poured while the first cookie layer is still warm from the oven. Having everything ready before the pan goes in means no scrambling.
How to Make Salted Caramel Chocolate Chip Cookie Bars
Step 1: Setting Up the Oven and Pan for an Even Bake
Position your oven rack in the middle of the oven and heat to 325°F (163°C). Most home ovens run 15–25°F (8–14°C) hotter or cooler than the dial reads — if you have an oven thermometer, confirm the actual temperature before the pan goes in. A light-colored aluminum 9×9 inch (23×23cm) pan lined with parchment is already waiting on your counter from prep.
The 325°F (163°C) temperature is intentional. These bars have two cookie layers sandwiching a caramel center — a higher temperature would set and brown the outside layers before the caramel has time to melt evenly and the interior layers have time to bake through. Low and slow gives you an even bake across all three layers.
The pan should look fully lined with parchment, overhang on all four sides, sitting flat and ready. Set it next to the stove so you can move quickly when the caramel is ready.
Your oven is preheating — move directly to the dough.
Step 2: Combining the Butter and Both Sugars Into a Glossy Base
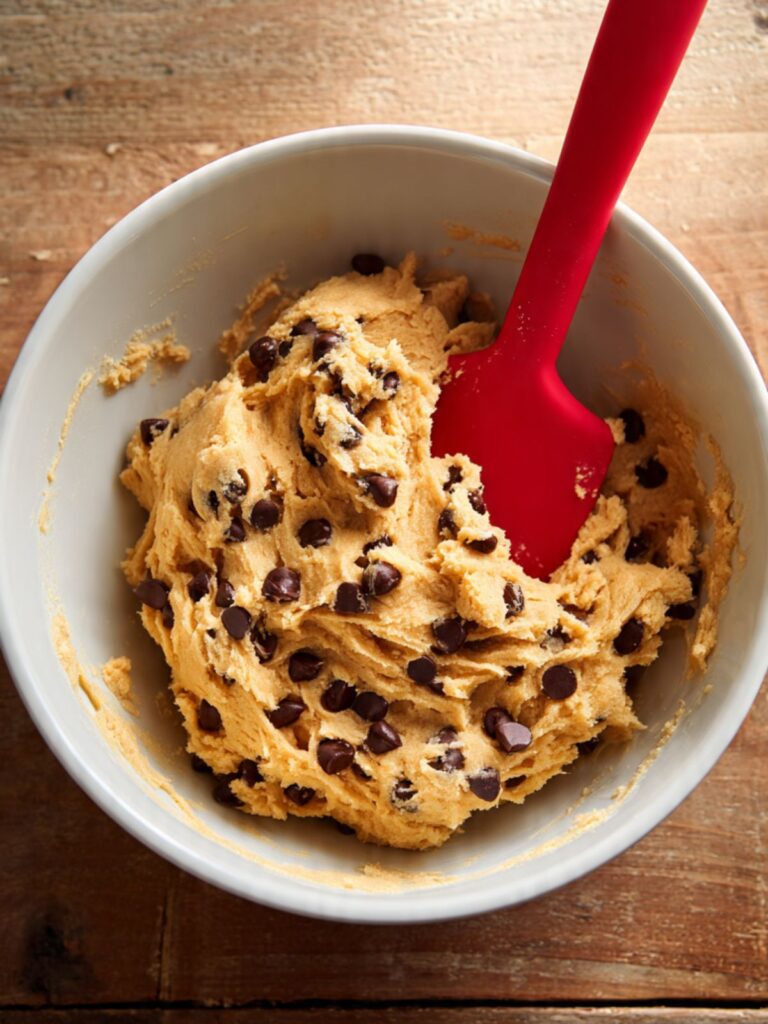
In your large mixing bowl, add your ½ cup (113g) melted, cooled unsalted butter, your ¾ cup (165g) packed light brown sugar, and your ¼ cup (50g) plain white granulated sugar. Using your sturdy silicone spatula, stir from the bottom of the bowl upward in wide circular strokes — approximately 30 strokes — until the mixture looks uniform, glossy, and pulls away from the sides of the bowl in one mass.
The light brown sugar is doing two things here: it provides moisture through its molasses content, which is what keeps these bars fudgy rather than dry, and it gives the cookie layers their deep caramel-adjacent flavor that works with the filling instead of competing with it. The white granulated sugar adds structure and a very slight crispness to the edges.
Do not rush this step — undissolved sugar streaks left in the butter at this stage will create uneven pockets of texture in the finished bars.
The mixture should look thick, smooth, and glossy — a deep amber color with no visible dry sugar streaks remaining. If you see streaks, stir for 10 more strokes and check again.
This base is the foundation — add the eggs directly into this bowl next.
Step 3: Adding the Eggs and Vanilla Without Scrambling
Add your 1 large room-temperature egg, 1 room-temperature egg yolk, and 1½ tsp pure vanilla extract directly into the butter-sugar mixture. Stir immediately and continuously with your silicone spatula using the same bottom-to-top circular motion — approximately 20 strokes — until the mixture is fully combined and no egg streaks remain.
The extra egg yolk is not optional. The yolk adds fat and lecithin — a natural emulsifier — which is what creates the fudgy, dense interior texture visible in the cross-section photos. A whole egg alone produces a slightly cakey, more open crumb. The yolk keeps the crumb tight and rich.
Adding cold eggs to this mixture will cause the melted butter to re-solidify around the cold egg proteins — the mixture will look broken, greasy, and separated. If this happens, place the bowl over a pot of warm (not hot) water for 30 seconds and stir — it will come back together. Room temperature eggs prevent this entirely.
The mixture should look smooth, slightly thickened, and a uniform deep amber — no egg streaks, no greasy separation, no visible yolk color remaining. It will look almost like a thick caramel sauce at this stage.
The dry ingredients go in next — add them directly to this bowl.
Step 4: Adding the Dry Ingredients Without Developing Gluten
Add your 1¼ cups (150g) all-purpose flour, spooned and leveled, your ½ tsp baking soda, freshness-checked, and your ¼ tsp fine sea salt directly into the wet mixture. Fold with slow, deliberate strokes from the bottom of the bowl upward — not stirring in circles. Count 15 to 18 strokes from the moment the flour touches the batter. Stop the moment no dry flour streaks remain.
The baking soda reacts with the slight acidity in the brown sugar to create a gentle lift — this is what gives the bars enough structure to hold the caramel layer without collapsing, while keeping the interior fudgy rather than bready. Overmixing at this stage develops gluten in the flour, and overdeveloped gluten has an observable consequence: the finished bars will bake up with a tough, dense interior that resists pulling apart — not fudgy and tender, but rubbery and compressed. The texture will feel wrong from the first bite. Fifteen to eighteen strokes is the ceiling. Stop there even if the dough looks like it could use one or two more.
The dough should look thick and cohesive — it will be stiffer than a brownie batter but softer than a drop cookie dough. No dry flour patches, no streaks. It should hold its shape when pressed with the spatula.
Add the chocolate chips before pressing into the pan.
Step 5: Folding In the Chocolate Chips and Pressing the First Layer
Add 1 cup (170g) of your semi-sweet chocolate chips — reserve the remaining ¼ cup (43g) for the top. Fold them in with 8 to 10 strokes using the same bottom-to-top motion until evenly distributed throughout the dough.
Scoop approximately 60% of the dough — roughly 340g if you are weighing — into your prepared pan. Using your offset spatula or the flat bottom of a measuring cup, press the dough into an even layer across the entire base of the pan, all the way into the corners. The layer should be approximately ½ inch (1.3cm) thick and completely even — thin spots will overbake before the center is done.
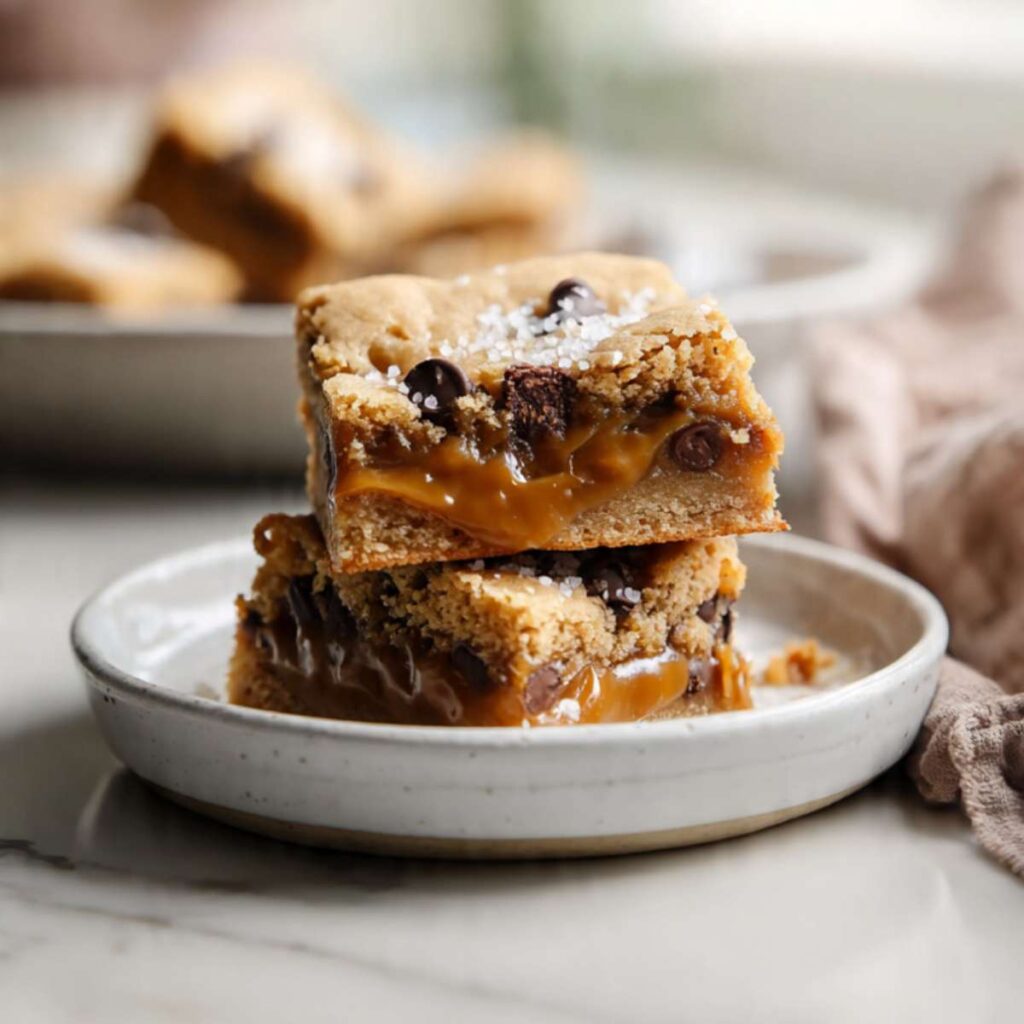
As you can see in the overhead shot of the finished bars, the chocolate chips are distributed throughout both layers — not just sitting on the surface. That even distribution starts here, at the pressing stage.
The base layer should look flat, even, and fully covering the parchment with no gaps at the corners or edges. Press firmly — a loose base layer will shift when the caramel is poured.

Slide the pan into the preheated oven and bake the base layer for exactly 10 minutes while you prepare the caramel.
Step 6: Melting the Caramel Layer to the Right Consistency
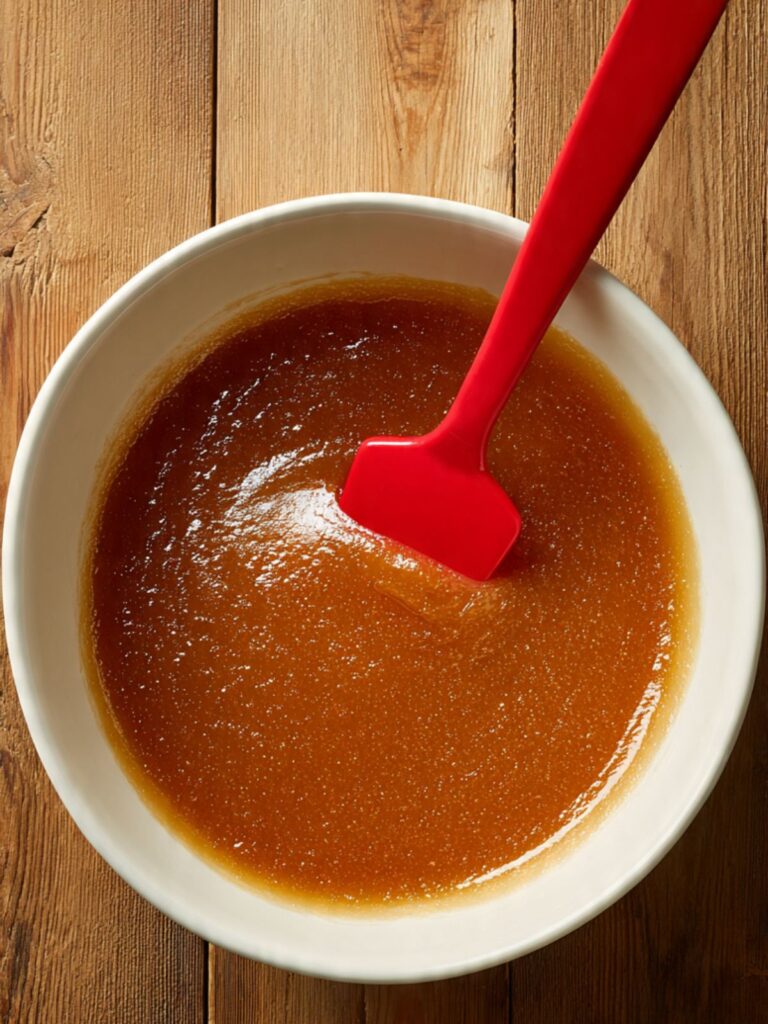
While the base layer bakes, combine your 11 oz (312g) unwrapped soft caramel candies and 3 tablespoons (45g) full-fat heavy cream in a small saucepan over medium-low heat. Stir constantly with a silicone spatula, scraping the bottom of the pan with every stroke, until the candies are completely melted and the mixture is smooth and pourable — approximately 5 to 7 minutes.
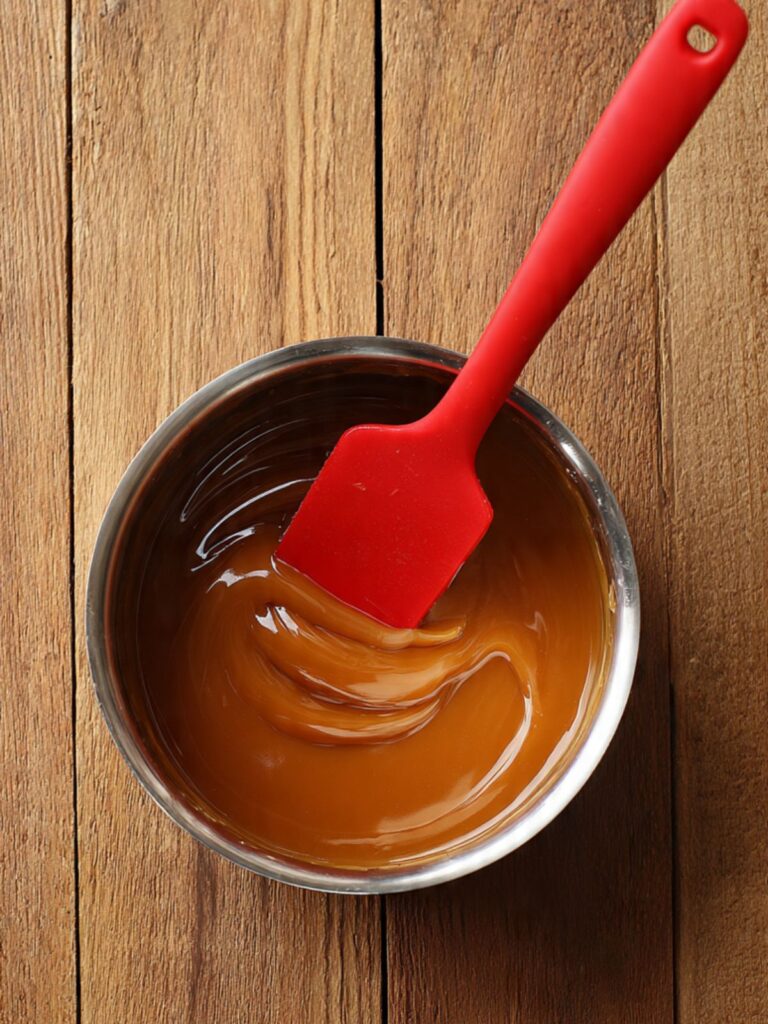
Do not walk away from this pan. Caramel scorches quickly on the bottom when left unstirred, and scorched caramel turns bitter and grainy. Keep the heat at medium-low — high heat causes the sugar to seize and harden rather than melt smoothly.
The heavy cream thins the caramel just enough to pour evenly without making it so fluid that it runs under the top dough layer before setting. Do not substitute milk or half-and-half — lower fat content will make the caramel layer grainy as it cools.
The caramel should look smooth, glossy, and flow easily off the spatula in a thick ribbon — not stiff or lumpy, not watery or thin. If it looks grainy, the heat was too high — reduce to low and stir for another 2 minutes.
Pull the base layer from the oven at the 10-minute mark and pour the caramel immediately.
Step 7: Pouring the Caramel and Adding the Top Cookie Layer
Pull the pan from the oven at exactly 10 minutes — the base layer will look pale gold and just set at the edges, with the center still looking slightly underdone. This is correct. Do not wait for the base to look fully baked — it will continue to bake with the top layer.
Pour the melted caramel evenly over the hot base layer, working quickly from the center outward. Use your offset spatula to spread it gently to within ¼ inch (6mm) of the edges — leaving a small border prevents the caramel from bubbling up the sides of the pan and burning against the parchment. The caramel visible in the stacked bar photos shows an even, unbroken layer between the two cookie layers — that clean separation starts with an even pour.
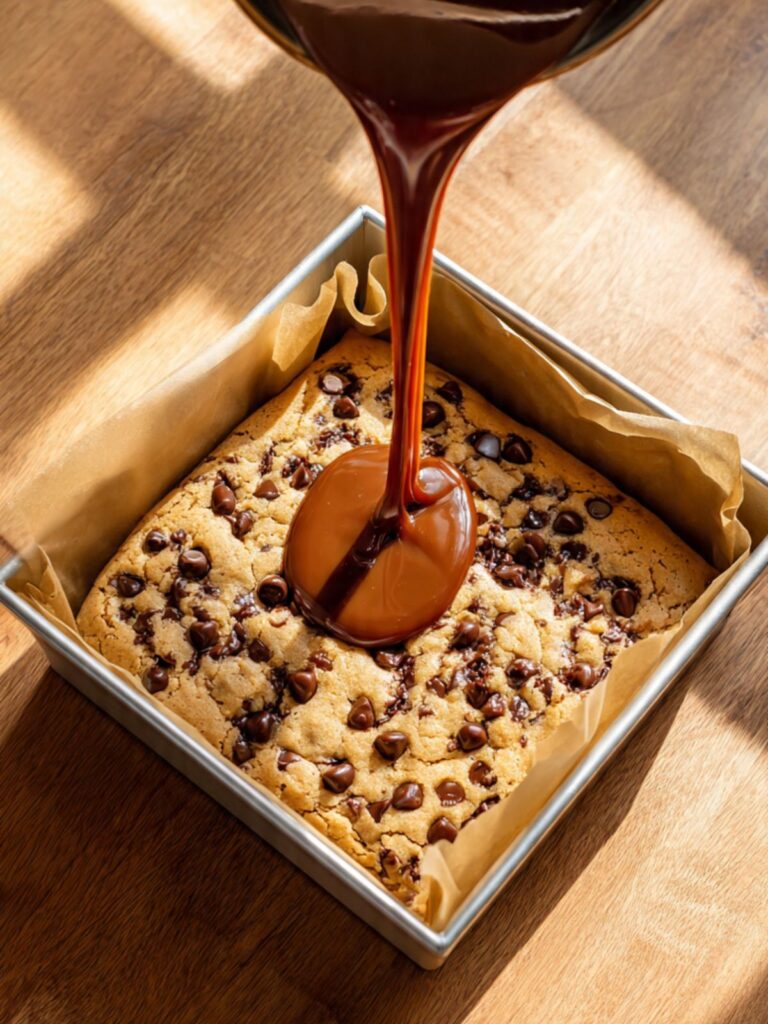
Do not overspread or press the caramel into the cookie base — it should sit on top of the base layer as a distinct layer, not mix into it.
Drop the remaining dough over the caramel in small pieces — roughly 1 tablespoon per piece — distributing them evenly across the surface. Gently flatten each piece with your fingertips until the pieces just barely touch each other. The top layer does not need to be perfectly solid — small gaps are fine and will close during baking.
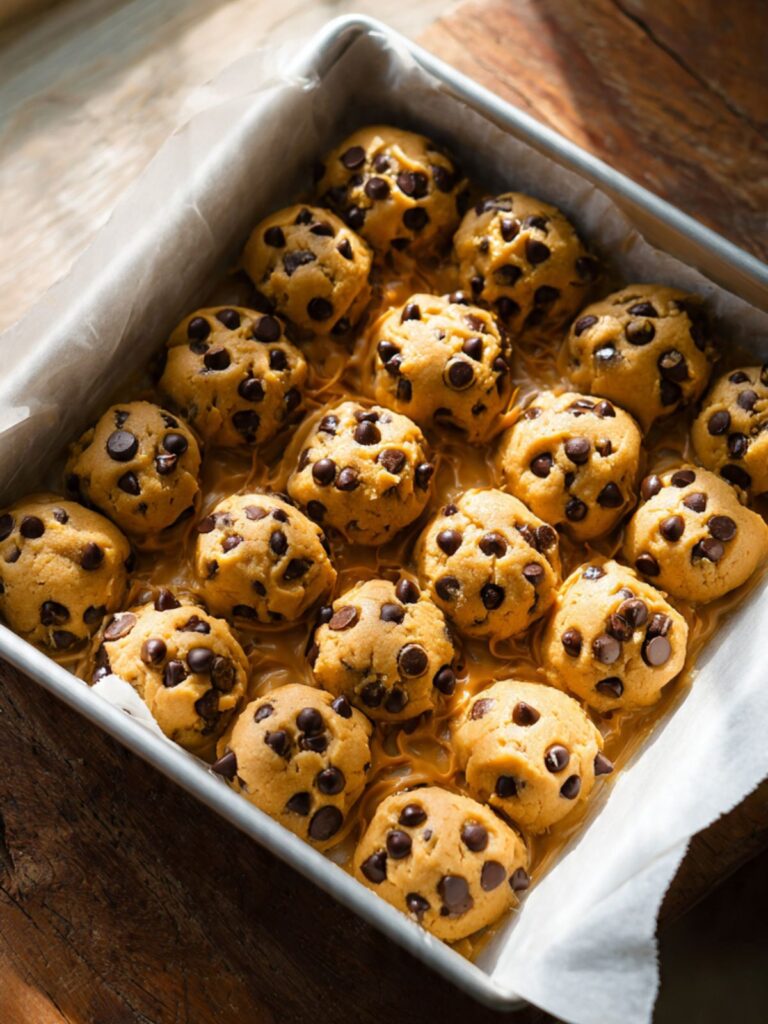
🗒 Luna’s Note: I drop the top layer pieces cold from the bowl — if the dough has warmed up from handling, I chill it for 5 minutes before adding it. Warm dough sinks into the caramel rather than sitting on top of it, and the layer separation disappears.
Scatter the reserved ¼ cup (43g) chocolate chips over the top surface and press them in lightly.
The assembled pan should look like a patchwork of cookie dough pieces just covering the caramel, with the amber layer barely visible at the edges. Do not press down hard — you will push the caramel through the top layer.
Return the pan to the oven immediately.
Step 8: Baking the Assembled Bars to the Right Doneness
Return the pan to the middle rack and bake at 325°F (163°C) for 22 to 25 minutes. Start checking at 22 minutes.
The bars are done when the top layer looks matte golden-brown across the entire surface, the edges have pulled away slightly from the parchment, and the center no longer looks wet or shiny. The top surface will look set but the bars will still feel soft when the pan is gently shaken — this is correct. The caramel layer underneath means the bars will feel softer than a standard cookie bar at pull time.
Do not wait for the center to feel firm in the oven. Bars pulled at the correct visual moment will set fully during cooling. Bars left in until the center feels firm will be overbaked and dry by the time they cool.
The top layer should look like the bars in the close-up photos — matte golden, chocolate chips visible across the surface, edges clearly set with slight pull from the parchment sides.
Do not cut. Do not lift the parchment. Move directly to cooling.
Step 9: Cooling Completely Before Cutting
Remove the pan from the oven and place it on a wire rack. Scatter your 1 teaspoon of flaked sea salt evenly across the top surface immediately — the residual heat helps the flakes adhere without melting them. Apply within 2 minutes of pulling from the oven.
Leave the bars undisturbed in the pan for a minimum of 2 hours at room temperature. The caramel layer needs this time to firm from a molten liquid to a stable, sliceable layer. Do not move to the refrigerator to speed this up — rapid chilling causes the caramel to harden completely and the bars will shatter rather than slice cleanly.
Do not cut the bars before the 2-hour mark. The caramel will still be molten underneath the set cookie surface — a knife going through the bars before that point will collapse the center into a gummy, shapeless mass that cannot be recovered. Set a timer.
After 2 hours, lift the entire slab out of the pan using the parchment overhang. Place on a cutting board. Use a sharp chef’s knife — not a serrated knife — and cut in one clean downward press per cut. Do not saw. Wipe the blade clean between cuts to keep the caramel layer from dragging.
The finished bars should look exactly like the stacked cross-section photos — defined cookie layers, a clean amber caramel band, chocolate chips throughout, and flaked sea salt sitting proud on the top surface.
🗒 Luna’s Note: I run my knife under hot water and wipe it dry between every cut. The warm blade slides through the caramel layer without dragging, and every slice comes out with a clean edge rather than a pulled, smeared one.
The Science Behind Salted Caramel Chocolate Chip Cookie Bars
Why Brown Sugar Makes These Bars Stay Fudgy for Days
Brown sugar is hygroscopic — it actively attracts and holds moisture from the air around it. In these bars, that moisture-retention property is what keeps the cookie layers soft and fudgy at room temperature for several days after baking, rather than drying out the way a white-sugar-dominant bar would. The molasses in brown sugar also binds water molecules within the dough itself, slowing the staling process at the structural level. The result is a bar that tastes just as dense and tender on day three as it did the day it was baked. If you have made my chocolate chip cookie bars and noticed they stay soft longer than most, this is the same mechanism at work.
Why Melted Butter Produces a Denser, Chewier Bar Than Creamed Butter
Creaming butter traps air bubbles in the fat, and those air bubbles expand in the oven to produce a lighter, more open crumb. Melted butter contains no trapped air — the fat coats the flour proteins more completely and produces a tighter, denser crumb structure. In a bar cookie, that density is exactly what you want. The tight crumb is what gives the cookie layers enough structural integrity to hold the caramel without collapsing, while still staying tender enough to pull apart cleanly when bitten. The trade-off is that melted butter bakes faster than creamed butter — which is why the pull temperature and timing in the method are not negotiable.
How the Egg Yolk Changes the Interior Texture
A whole egg contributes both fat (from the yolk) and protein and water (from the white). The egg white proteins set during baking and create structure — but they also drive the crumb toward a more open, cakey texture when present in high quantity relative to the fat. Adding a second yolk without its white shifts the fat-to-protein ratio in the dough. More fat means more tenderness and a denser, richer crumb. Less additional white protein means less structural rigidity. The result is the fudgy, tight interior visible in the cross-section of these bars — not cakey, not crumbly, not gummy. The yolk is doing the work that extra butter or oil would do in other recipes, but with the added emulsifying power of lecithin to keep the dough cohesive.
Why the Salt Layer on Top Makes Everything Taste Better
Flaked sea salt on the surface of a sweet baked good is not just a garnish — it is performing a specific sensory function. Salt suppresses bitterness at the receptor level, which allows the sweetness and chocolate flavor to read as more intense without actually adding more sugar. In a bar this sweet, with a caramel filling and brown-sugar-dominant dough, the salt is the element that stops the flavor from reading as flat or one-dimensional. Flaked salt works better than fine salt here because the large crystals dissolve slowly on the tongue, delivering intermittent bursts of contrast rather than uniform saltiness throughout. Fine salt dissolved into the batter performs a different job — it seasons the dough evenly. The flakes on top create a flavor moment that fine salt cannot replicate.
Why the Caramel Layer Stays Soft Instead of Hardening
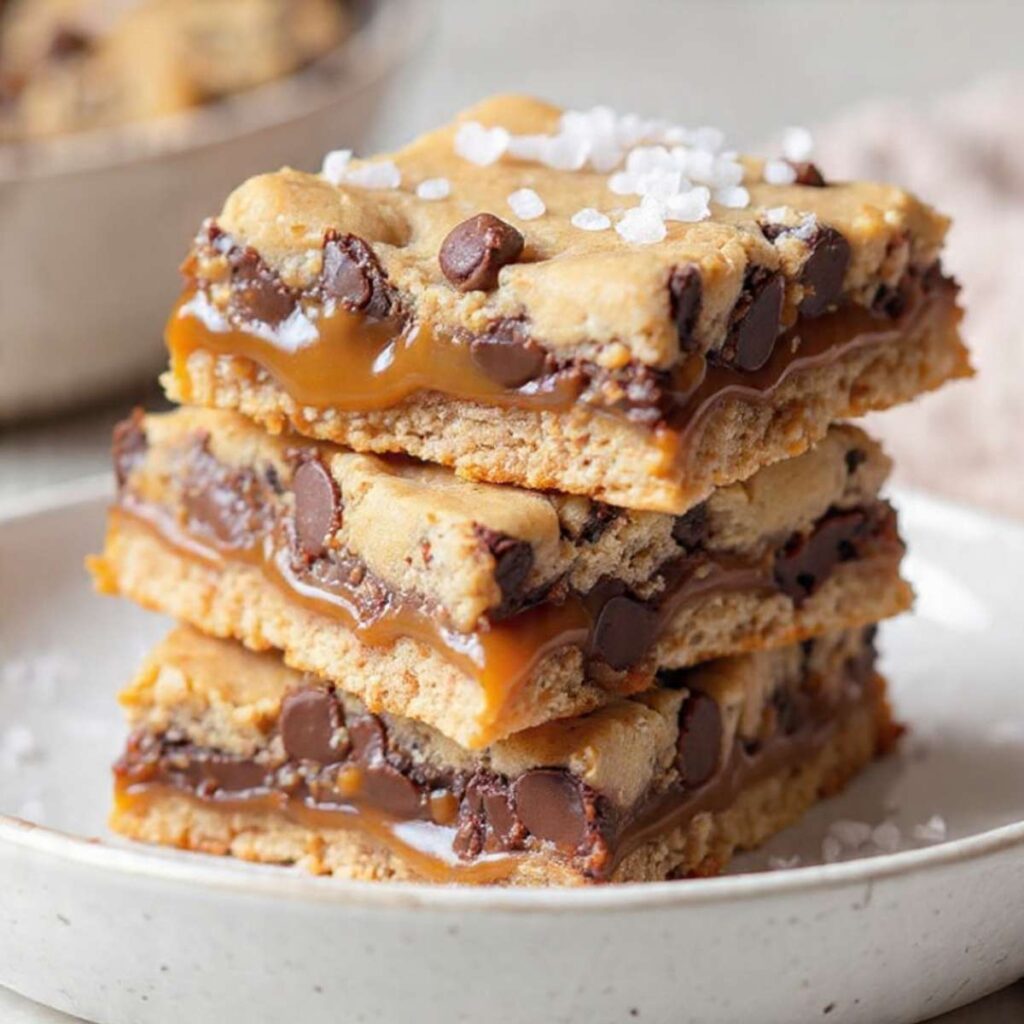
The heavy cream added to the melted caramel candies is what keeps the caramel layer pliable at room temperature rather than setting into a hard, brittle slab. Caramel candies on their own contain enough sugar to crystallize back into a firm structure as they cool. The fat in the heavy cream interrupts that crystallization by coating the sugar molecules and preventing them from bonding tightly to each other. The result is a caramel layer that stays soft and pulls when the bar is bitten through — exactly what is visible in the oozing caramel in the stacked bar photos. Using milk or a lower-fat cream substitute reduces the fat content enough that partial crystallization occurs, which is what produces a grainy, waxy caramel layer rather than a smooth one.
Salted Caramel Chocolate Chip Cookie Bars Troubleshooting & Pro-Tips
The Caramel Layer Is Leaking Out the Sides During Baking
The caramel was spread too close to the edges of the pan, or the base layer had gaps at the corners that allowed the caramel to run underneath it. Caramel liquefies completely in the oven before it begins to set again, so any gap in the base layer or any caramel touching the parchment directly will cause it to migrate toward the pan edges. The fix for the current batch is to leave it — removing the pan mid-bake causes more damage than the leak. For the next batch, press the base layer firmly into the corners with no gaps, and stop spreading the caramel at least ¼ inch (6mm) from all four edges. The top dough layer will cover the border and seal it during baking.
The Top Cookie Layer Is Dry and Cracked Instead of Soft and Matte
The bars were overbaked, or the top dough layer was pressed too thin in spots. A top layer under ¼ inch (6mm) thick will lose its moisture before the caramel below has finished setting, leaving dry, cracked patches across the surface. Check the top layer thickness before the pan goes back into the oven — each piece of dough should be pressed to approximately ¼ to ⅓ inch (6–8mm). If the oven runs hot, reduce to 315°F (157°C) and add 3 minutes to the bake time rather than keeping the higher temperature. Pull the moment the surface looks matte gold — waiting for the center to feel firm guarantees an overbaked top layer.
The Bars Are Too Soft to Slice Even After Two Hours
The cooling time was not long enough, or the kitchen is running warm enough to slow the caramel from setting. Two hours at room temperature is the minimum for a kitchen at or below 72°F (22°C). In a warm kitchen above 78°F (26°C), extend to 2.5 to 3 hours — the caramel sets more slowly when the ambient temperature is close to its softening point. If the bars are still too soft after 3 hours at room temperature, refrigerate for 30 minutes as a targeted intervention to firm the caramel layer, then return to room temperature for 15 minutes before slicing.
Note that this refrigerator step is a rescue move for an unusually warm environment — not a routine shortcut. Moving bars to the refrigerator before the full room temperature cooling window is up causes the caramel to harden unevenly and the cookie layers to firm before the internal heat has fully dissipated, which can cause the layers to separate when cut. Use the refrigerator only if the 3-hour room temperature window has elapsed and the bars are still too soft.
The Caramel Layer Is Grainy or Waxy Instead of Smooth
The caramel was melted over heat that was too high, or a low-fat cream substitute was used instead of full-fat heavy cream. High heat causes the sugar in the caramel candies to recrystallize as it melts, producing a grainy, sandy texture that does not smooth out even with continued stirring. The fix is prevention — medium-low heat and constant stirring from the first moment the candies hit the pan. If the caramel looks grainy while still on the stove, add 1 additional tablespoon of heavy cream and stir vigorously over the lowest heat setting for 2 more minutes. It will often come back to smooth. If it does not, the batch is too far gone — start a fresh caramel layer. The extra five minutes are worth it.
The Bars Are Sticking to the Pan Even With Parchment
The parchment was not left with enough overhang, or the caramel seeped under the parchment at the edges during baking and bonded to the pan. For the current batch, run a thin offset spatula along the outside edge of the parchment between the parchment and the pan wall before attempting to lift. Work slowly around all four sides before pulling upward. For the next batch, leave a full 2 inches (5cm) of overhang on every side and press the parchment firmly into the corners before adding the dough — a parchment sling with full overhang gives you the leverage to lift the entire slab cleanly regardless of any caramel that migrates to the edges.
The Bars Are Flat and Dense With No Lift in the Cookie Layers
The baking soda was expired or the freshness check was skipped. Baking soda loses its potency after 3 to 6 months once the box has been opened — it can look and smell identical to fresh baking soda while having lost most of its leavening power. The result is a bar with no structural lift in the cookie layers: flat, very dense, gummy in texture, and lacking the slight open crumb that separates the layers from the caramel band visually when cut. Run the freshness test before every batch — drop ¼ teaspoon into a small bowl with 1 teaspoon of hot water. Vigorous, immediate fizzing means it is active. Slow or absent fizzing means replace the box. A fresh box of baking soda costs less than the other ingredients combined.
The Layers Are Not Distinct — The Caramel Mixed Into the Cookie Dough
The base layer was not baked for the full 10 minutes before the caramel was poured, or the caramel was pressed into the base rather than poured gently on top of it. An underbaked base layer has not set enough to support the caramel’s weight — the caramel sinks into the soft dough and the two layers merge. The base layer must feel set at the edges and look pale gold before the caramel goes on. If you pulled it at 8 minutes and this happened, add 2 minutes to the base bake time for the next batch. Pour the caramel from the center outward and use a light hand with the offset spatula — the goal is to guide it, not press it.
Pro-Tips
Use a bench scraper instead of a chef’s knife if you have one — a bench scraper cuts straight down in one motion with no rocking, which gives a cleaner edge through the caramel layer. Chill the bars for 15 minutes before the final cut if you want bakery-sharp edges for photos or gifting. Store cut bars with a piece of parchment between each layer to prevent the caramel surfaces from fusing together overnight.
If you are baking at altitude above 3,500 feet (1,067m), reduce the baking soda to ¼ tsp and increase the oven temperature to 335°F (168°C). At high altitude, leavening gases expand faster and the lower air pressure causes the bars to rise and then collapse before the structure sets — less baking soda slows that expansion. In high humidity above 70%, add 1 tablespoon (8g) of additional flour to the dough — excess ambient moisture makes the dough too slack and the base layer will not hold the caramel without spreading.
How to Store Salted Caramel Chocolate Chip Cookie Bars
Room Temperature Storage
Store cut bars in a single layer in an airtight hard-sided container — a glass or plastic container with a snap-fit lid works best. Do not use a zip-lock bag. The caramel layer is soft enough that stack pressure from a bag will compress the bars and cause the layers to fuse together. If you need to stack bars, place a sheet of parchment between each layer.
At room temperature, the bars stay soft and fudgy for up to 4 days. Day one and day two are peak texture — the caramel is fluid, the cookie layers are tender, and the flaked salt is still distinct on the surface. By day three the caramel firms slightly and the salt begins to dissolve into the top layer, but the bars are still excellent. By day four the cookie layers start to dry at the edges — still good, but noticeably drier than earlier in the week.
Do not store near a heat source or in direct sunlight. The caramel layer will soften to a point where the bars lose their shape at temperatures above 78°F (26°C).
Refrigerator Storage
Refrigeration is not required but extends shelf life to 7 days. If you refrigerate, store in the same hard-sided airtight container with parchment between layers. The caramel will firm significantly in the refrigerator — the bars will feel almost solid when cold, which is normal. Pull them out 20 to 25 minutes before serving and allow them to come back to room temperature. Cold bars straight from the refrigerator have a waxy, stiff caramel layer that does not pull or ooze the way the photos show — the texture only returns fully at room temperature.
🗒 Luna’s Note: I refrigerate these overnight after baking and pull them 20 minutes before serving the next day. The cold rest firms the caramel layer just enough that I get cleaner slices than I do at the 2-hour room temperature mark, and the texture is back to perfect by the time they hit the plate.
Freezer Storage
These bars freeze well for up to 2 months. Freeze in a single layer on a parchment-lined baking sheet for 1 hour until the caramel layer is fully solid, then transfer to a zip-lock freezer bag or airtight freezer container with parchment between layers. Freezing without the initial solid freeze causes the caramel layers to stick together permanently and the bars will tear when separated.
To thaw, move bars to the refrigerator overnight, then bring to room temperature for 20 to 25 minutes before serving. Do not microwave to thaw — the caramel layer heats unevenly and will become liquid in spots while the cookie layers are still cold.
Unbaked dough can also be frozen before assembly — portion and freeze the cookie dough flat in a zip-lock bag for up to 1 month. Thaw overnight in the refrigerator before pressing into the pan. The caramel layer must always be made fresh.
Serving Suggestion
Serve these bars at room temperature — between 68°F and 72°F (20–22°C) is the sweet spot where the caramel layer has just enough give to pull when bitten without running completely. A 10-second warm in the microwave brings back the ooze visible in the stacked bar photos if the bars have been refrigerated and you are impatient.
I serve these with a scoop of vanilla bean ice cream alongside when I am bringing them out for a dinner party — the cold ice cream against the room-temperature caramel bar is a better pairing than a warm brownie and ice cream because the bar holds its structure on the plate rather than collapsing. These are also the bars I make when a layer cake feels like too much — a tray of these cut into squares looks generous and intentional without the assembly pressure of a frosted cake.
Frequently Asked Questions About Salted Caramel Chocolate Chip Cookie Bars
Can I use homemade caramel instead of store-bought caramel candies?
Yes, but the consistency must match melted caramel candies — not a thin sauce. Cook homemade caramel to the firm ball stage at 245–250°F (118–121°C), then stir in 3 tablespoons (45g) of heavy cream off the heat before pouring. Caramel cooked to a lower temperature will be too fluid and will sink into the base layer rather than forming a distinct band. For a reliable caramel technique with detailed temperature notes, my peanut butter chocolate chip bars covers the same process.
How do I keep caramel cookie bars from being too gooey?
The two most common causes are underbaking and cutting before the full 2-hour cooling window. Bake until the top layer is matte gold and the edges have pulled from the parchment — 22 to 25 minutes at 325°F (163°C). Then cool at room temperature for a minimum of 2 hours before cutting. In a warm kitchen above 78°F (26°C), extend to 3 hours. If bars are consistently too gooey after the full cooling window, add 2 minutes to the bake time on the next batch.
Can salted caramel chocolate chip cookie bars be frozen?
Yes, for up to 2 months. The key step most people skip is the initial solo freeze — lay cut bars in a single layer on parchment for 1 hour before stacking them in a container. Skipping this causes the caramel surfaces to bond together permanently. Thaw overnight in the refrigerator, then rest at room temperature for 20 to 25 minutes before serving. Microwaving directly from frozen melts the caramel unevenly before the cookie layers have warmed through.
How do you cut caramel bars without them falling apart?
Use a sharp chef’s knife or bench scraper and press straight down in one motion — do not saw. Wipe the blade clean between every cut. For the sharpest edges, refrigerate the fully cooled slab for 15 minutes before cutting — the cold firms the caramel just enough for a cleaner line without making the cookie layers brittle. One decisive downward motion per cut is more important than the tool you use.
Can I make salted caramel chocolate chip cookie bars ahead of time?
Yes — these are one of the better make-ahead bars on the blog because the texture actually improves overnight. Bake and cool fully, then store in an airtight hard-sided container at room temperature for up to 2 days ahead, or refrigerate for up to 5 days ahead. Pull refrigerated bars out 20 to 25 minutes before serving to let the caramel layer return to its proper soft, pulling consistency. The flaked salt will have dissolved into the top surface by day two — add a fresh pinch before serving if you want it back.
Can I make salted caramel chocolate chip cookie bars in a 9×13 pan?
Yes, scaled up by 1.5 times. A single batch spread across a 9×13 inch (23×33cm) pan produces layers too thin to hold their structure — the base overbakes before the top sets and the caramel band disappears when sliced. Scale all dough ingredients by 1.5 and increase caramel to 16 oz (454g) with 4 tablespoons (60g) of heavy cream. Bake time increases to 26 to 30 minutes at the same temperature. Use ¾ tsp baking soda for the scaled batch — leavening does not scale linearly and the full 1.5x amount will make the bars taste soapy.
What is the difference between blondies and cookie bars?
Blondies and cookie bars share the same basic structure — a bar baked in a single pan rather than portioned and dropped — but the distinction is in the ratio and method. Blondies typically use a higher brown sugar ratio and melted butter with no leavening or minimal leavening, producing a very dense, fudge-like interior with a shiny top. Cookie bars use a dough that is closer to a standard drop cookie dough — with leavening, a mix of brown and white sugar, and a slightly more open crumb than a blondie. These salted caramel chocolate chip cookie bars sit closer to the cookie bar end of the spectrum — they have leavening, a defined crumb, and edges that crisp slightly, rather than the completely fudge-dense interior of a true blondie.
How long do salted caramel chocolate chip cookie bars last?
At room temperature in an airtight hard-sided container, up to 4 days — days one and two are peak texture. Refrigerated in an airtight container, up to 7 days — pull them 20 to 25 minutes before serving to soften the caramel back to the right consistency. Frozen, up to 2 months with no meaningful texture loss when thawed correctly overnight in the refrigerator.
More Cookie Bars You’ll Love
If these salted caramel chocolate chip cookie bars hit the right note, these are the next ones to try.
My oatmeal chocolate chip bars use the same one-bowl, no-mixer method but with rolled oats in the dough — the oats add a slightly nutty chew and a heartier texture that works well when you want something less rich than a caramel-filled bar.
My Nestlé Toll House cookie bars are the simplest bar on the blog — one dough, one pan, no filling — and they are the recipe I reach for when I need something fast with ingredients I always have on hand.
My brown butter chocolate chip cookies are not bars, but if the deep caramel-adjacent flavor of these bars is what you are chasing, brown butter is the next logical step — it adds a nuttiness that takes the same chocolate chip base somewhere completely different.

Salted Caramel Chocolate Chip Cookie Bars
Ingredients
Equipment
Method
- Position oven rack in the middle and heat to 325°F (163°C), then line a 9×9 inch (23×23cm) light-colored aluminum pan with parchment paper leaving 2 inches (5cm) of overhang on all four sides.
- In a large mixing bowl, stir together the melted cooled butter, packed light brown sugar, and granulated sugar with a silicone spatula for approximately 30 strokes until smooth, glossy, and no sugar streaks remain.
- Add the room-temperature egg, egg yolk, and vanilla extract to the butter-sugar mixture and stir for approximately 20 strokes until fully combined with no egg streaks visible.
- Add the flour, baking soda, and fine sea salt directly to the wet mixture and fold with slow bottom-to-top strokes — counting 15 to 18 strokes — until no dry flour remains, then fold in 1 cup (170g) of the chocolate chips with 8 to 10 strokes, reserving the remaining ¼ cup (43g) for the top.
- Press approximately 60% of the dough (roughly 340g) into an even ½ inch (1.3cm) layer across the base of the prepared pan, pressing firmly into the corners, then bake for exactly 10 minutes until the edges are just set and pale gold.
- While the base bakes, combine the unwrapped caramel candies and heavy cream in a small saucepan over medium-low heat, stirring constantly until completely melted, smooth, and flowing — approximately 5 to 7 minutes.
- Remove the pan from the oven, pour the melted caramel evenly over the base layer spreading to within ¼ inch (6mm) of the edges, then drop the remaining dough in tablespoon-sized pieces evenly across the caramel surface and gently flatten each piece until they just touch.
- Scatter the reserved ¼ cup (43g) chocolate chips over the top dough layer and press in lightly, then return the pan to the oven and bake at 325°F (163°C) for 22 to 25 minutes until the top looks matte golden-brown and the edges have pulled slightly from the parchment.
- Remove from the oven, immediately scatter the flaked sea salt evenly across the top surface, and cool in the pan on a wire rack for a minimum of 2 hours at room temperature before lifting and cutting.
- Lift the slab from the pan using the parchment overhang, place on a cutting board, and cut into 9 bars using a sharp chef’s knife in one clean downward press per cut, wiping the blade clean between cuts.