
Hot Cocoa Cookies (Peppermint Marshmallow Topping)
The first batch I made spread flat and looked like chocolate frisbees. Then the second. I had melted the butter and chocolate together, added everything else, and skipped chilling because I did not think a dough this dense would need it. Batch three went into the fridge for 45 minutes before scooping. Thick domed centers, that fudgy interior — exactly the result I wanted. I have not skipped chilling since. The cold dough is non-negotiable and every batch after batch three confirmed it.
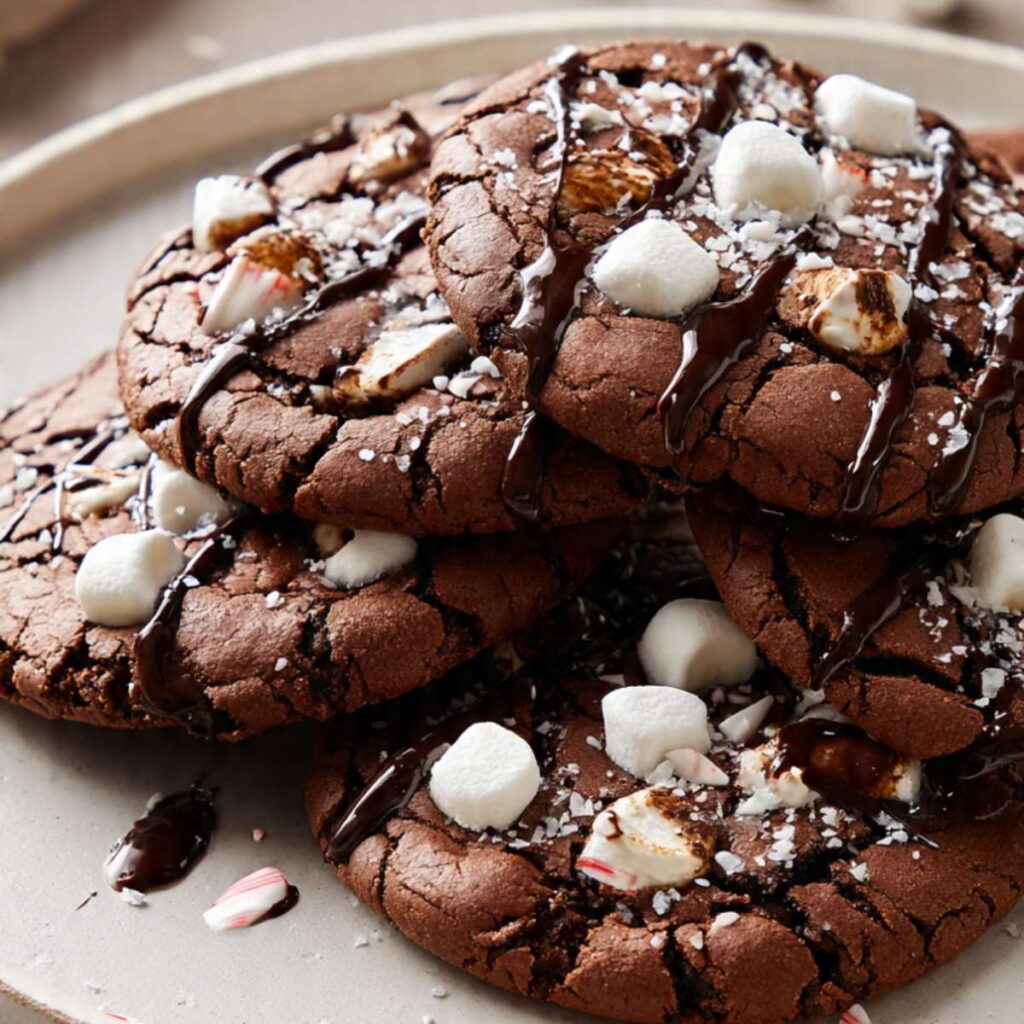
Hot cocoa cookies are exactly what they promise: the flavors of a mug of hot chocolate pressed into a thick, brownie-textured cookie. The base is a melt-and-mix chocolate dough — no mixer, no creaming, no chilling the butter to the right temperature first. You melt the butter and chocolate together, let them cool, add your eggs and sugar, fold in the dry ingredients, and chill. The topping is where the hot cocoa identity comes from: mini marshmallows pressed on while the cookies are still warm from the oven, a quick pass under the broiler to toast them, and a dark chocolate drizzle and crushed candy cane finish.
🗒 Luna’s Note: I tested this with and without the peppermint extract in the dough — three batches each. Without it, the cookies taste like a very good fudgy chocolate cookie. With a small amount in the dough, the peppermint reads as background warmth rather than mint-forward, and it makes the candy cane topping feel cohesive instead of decorative. I kept it in at ¼ teaspoon. Any more than that and it takes over the chocolate.
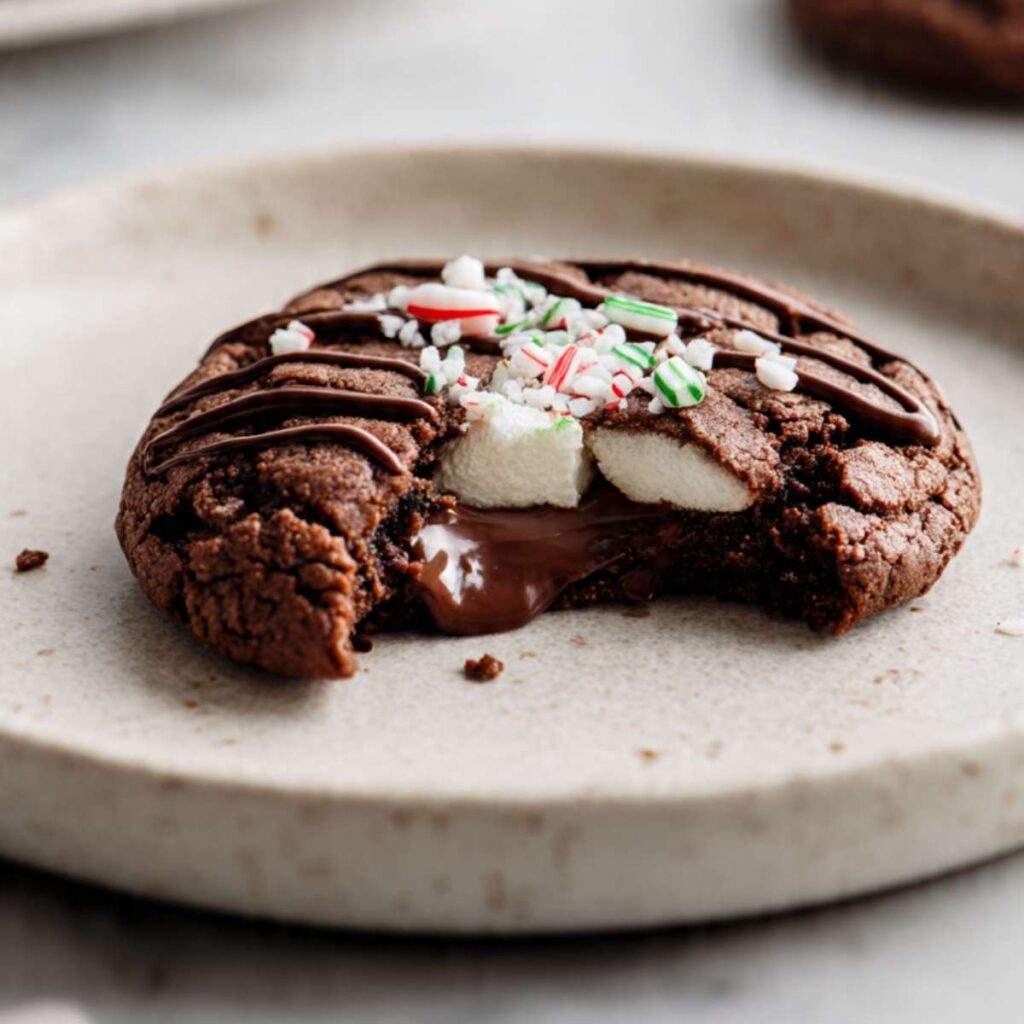
What you get is a cookie with a deep mahogany-brown, crackled matte surface — the same texture as a good brownie top — and a dense, fudgy center that stays soft for days. The edges hold their shape when you pick them up. The centers do not. That is the balance this recipe is built around.
This is not a subtle cookie. It is a celebration cookie — the kind you make in December when you want the kitchen to smell like chocolate and peppermint and you want to put something on a plate that makes people stop and look before they eat it.
Recipe Overview & Nutrition Table
| Yield | 14 cookies |
| Serving Size | 1 cookie |
| Prep Time | 20 minutes |
| Chill Time | 45 minutes |
| Bake Time | 10–12 minutes |
| Total Time | 1 hour 15 minutes |
| Difficulty | Intermediate |
| Nutrient | Amount |
|---|---|
| Calories | 234 kcal |
| Carbohydrates | 33g |
| Fat | 11g |
| Protein | 3g |
| Sugar | 24g |
| Sodium | 95mg |
Ingredients & Tools for Hot Cocoa Cookies Recipe
For the Cookie Dough
- 6 tablespoons (85g) unsalted butter, cut into pieces
- ¾ cup (128g) semi-sweet chocolate chips — use a standard baking chip such as Ghirardelli or Nestlé Toll House; avoid cacao percentages above 65%, which produce a bitter, less cohesive dough
- ½ cup (100g) plain white granulated cane sugar
- ¼ cup (55g) packed light brown sugar
- 2 large eggs, room temperature
- 1 teaspoon (4g) pure vanilla extract — not imitation
- ¼ teaspoon (1g) pure peppermint extract — not peppermint oil, which is significantly stronger and will overpower the chocolate
- 1 cup (120g) all-purpose flour, spooned into the measuring cup and leveled — not scooped directly from the bag
- ¼ cup (25g) Dutch-process cocoa powder — not natural cocoa; Dutch-process has been alkalized and cannot be swapped for natural cocoa without adjusting the leavening
- ½ teaspoon (3g) baking soda — check for freshness before using
- ½ teaspoon (3g) fine sea salt — not table salt, not kosher salt
For the Topping
- ½ cup (50g) Jet-Puffed mini marshmallows — not regular-sized marshmallows, which are too large and do not distribute evenly across the cookie surface
- 2–3 candy canes (28g), crushed into coarse ¼–½ inch fragments — not candy cane dust, not peppermint baking pieces; the visible red-and-white striped fragments are part of the visual identity of this cookie
- ½ cup (85g) semi-sweet chocolate chips + 1 teaspoon (4g) neutral oil such as refined coconut oil or vegetable oil — for the drizzle
Before You Start
Bring your eggs to room temperature. Cold eggs added to warm melted chocolate seize the fat and produce a broken, greasy batter. Set them in a bowl of warm (not hot) water for 10 minutes if you forgot to pull them from the fridge ahead of time.
Use a kitchen scale. The gram weights in this recipe are the numbers I tested with. Volume measurements for flour and cocoa can vary by 20–30% depending on how they are scooped or packed. Weigh both for the most accurate result.
Dutch-process cocoa is not optional. The deep mahogany color and smooth, non-acidic flavor in these cookies comes specifically from Dutch-process cocoa. Natural cocoa — the kind labeled “unsweetened cocoa powder” without specifying the process — is acidic and reacts differently with baking soda. Swapping it will change the rise, the color, and the flavor.
Do not skip chilling. This dough must chill for a minimum of 45 minutes before scooping and baking. Unchilled dough spreads flat in the oven and produces thin, greasy cookies with no dome. The thick, fudgy centers visible in the photos above require the dough to be cold when it hits the pan.
Crush the candy canes by hand. Place them in a zip-lock bag and tap firmly with a rolling pin or the flat side of a meat mallet until you have coarse, irregular fragments. Aim for pieces between ¼ and ½ inch — not fine dust, which dissolves and disappears, and not large shards, which are uncomfortable to eat.
Preheat your broiler before the cookies come out. The marshmallow toasting step happens fast — 30 to 60 seconds under a hot broiler. Have the broiler preheated and ready before the cookies finish baking so the marshmallows go on while the cookies are still warm enough to anchor them.
This recipe requires no electric mixer. The entire dough comes together in one bowl with a silicone spatula — no stand mixer, no hand mixer, no creaming. This is one of the easiest doughs on the site to make and the one-bowl cleanup is part of the point.
Position your oven rack in the middle before preheating. The middle rack ensures even heat circulation around the cookies. The top rack runs hotter and will overbrown the surface before the centers set. The bottom rack transfers too much direct heat to the base. Middle rack only.
Line your baking sheet with parchment — not foil, not a greased pan. Foil conducts heat more aggressively than parchment and will overbrown the cookie bottoms. A greased pan without parchment causes the cookies to spread more and stick at the edges. Parchment is the only liner that produces the even, clean release visible in the finished photos.
Check your brown sugar before starting. Packed brown sugar that has hardened into a brick will not incorporate evenly and leaves dry, sugary pockets in the dough. Break up any lumps with your fingers before measuring, or microwave the sealed bag for 10 seconds to loosen it.
Necessary Tools
- Large mixing bowl (3-quart minimum)
- Small heavy-bottomed saucepan or microwave-safe bowl — for melting butter and chocolate
- Silicone spatula — for folding and scraping
- Kitchen scale — mandatory for flour and cocoa accuracy
- Oven thermometer (optional but recommended — most home ovens run 15–25°F off their displayed temperature; an accurate reading is the single most reliable way to prevent overbaked or underbaked cookies)
- 2-tablespoon cookie scoop or large spoon
- Light-colored aluminum baking sheet — dark pans absorb more heat, overbrown the bottoms before the centers set, and should not be used for this recipe
- Parchment paper — do not substitute with foil or a greased pan; parchment prevents sticking and allows even heat transfer from the bottom
- Wire cooling rack
- Zip-lock bag + rolling pin — for crushing candy canes
- Small microwave-safe bowl — for melting the drizzle chocolate
- Spoon or piping bag — for drizzling
How to Make Hot Cocoa Cookies
This is a melt-and-mix method — one bowl, no electric mixer required from start to finish. The butter and chocolate melt together first and form the fat base of the entire dough.
Step 1: Melting the Butter and Chocolate Together Until Smooth and Glossy
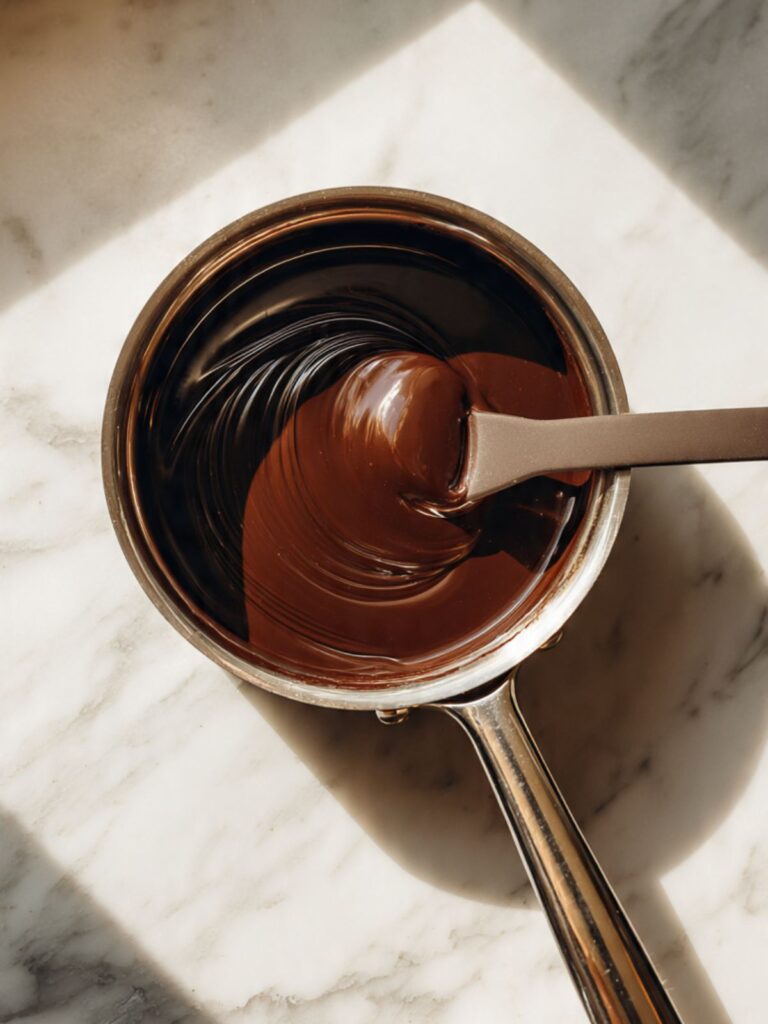
In your small heavy-bottomed saucepan over low heat, combine your 6 tablespoons (85g) unsalted butter, cut into pieces and ¾ cup (128g) semi-sweet chocolate chips. Stir constantly with your silicone spatula using slow circular strokes from the bottom of the pan — do not walk away from this step. The butter melts first and begins to melt the chocolate; keep stirring until both are fully combined and the mixture looks smooth, glossy, and uniformly dark with no visible chip pieces remaining. This takes approximately 3 to 4 minutes over low heat.
Remove the pan from the heat immediately once the last chip has melted. Pour the mixture into your large mixing bowl to stop the cooking.
The melted butter and chocolate together create the fat base of this dough — this is what gives the cookies their brownie-like, fudgy interior rather than a cakey or crispy texture. A higher proportion of fat relative to flour keeps the crumb tight and dense.
Do not rush this step over higher heat — chocolate scorches quickly and seized chocolate cannot be recovered. If you see the mixture turning grainy or separating, the heat was too high.
The finished mixture should look like a smooth, fluid dark ganache — glossy, uniform, and no grainier than melted chocolate from a bar. If it looks streaky or separated, the heat was too high.
Set the bowl aside and allow the mixture to cool for 10 to 12 minutes — it needs to reach approximately 90°F (32°C) before the eggs go in. The bowl should feel warm to the touch, not hot — if it is too hot to hold your palm against the side for 5 seconds, it is not ready. Once cooled to warm, move to the sugar and eggs.
Step 2: Adding the Sugars and Eggs to the Cooled Chocolate Base
Once your chocolate mixture has cooled to warm (not hot), add your ½ cup (100g) plain white granulated cane sugar and ¼ cup (55g) packed light brown sugar directly to the bowl. Using your silicone spatula, stir from the bottom upward in wide, deliberate strokes — approximately 20 strokes — until both sugars are fully incorporated and no dry sugar remains visible at the bottom of the bowl.
The granulated white sugar is doing two things here: it controls spread during baking and drives the crackled surface you can see on the finished cookies. The brown sugar contributes moisture retention, which is part of why these cookies stay soft for days after baking.
Now add your 2 large eggs, room temperature, one at a time. After each egg, stir firmly for 20 to 25 strokes until it is fully absorbed before adding the next. Do not add both eggs at once — each egg needs to emulsify into the fat base individually or the batter will look broken and greasy rather than smooth and cohesive.
Add your 1 teaspoon (4g) pure vanilla extract and ¼ teaspoon (1g) pure peppermint extract and stir for another 10 strokes to distribute evenly. The peppermint extract works as a background flavor signal rather than a dominant mint note at this quantity — ¼ teaspoon in a full batch of dark chocolate dough produces warmth rather than the sharp, candy-like peppermint you would taste in a candy cane on its own. It is what makes the topping feel cohesive rather than decorative.
The batter at this stage should look thick, smooth, and slightly glossy — similar to a fudgy brownie batter. If it looks greasy or separated, the chocolate was still too warm when the eggs went in. Let it cool a further 5 minutes and stir vigorously — it will usually come back together.
Your wet base is ready. Move directly to the dry ingredients.
Step 3: Folding in the Dry Ingredients Without Overdeveloping the Gluten
Before adding anything to the bowl, check your baking soda for freshness: drop ¼ teaspoon into a small cup of hot water. If it fizzes actively, it is good. If nothing happens, replace it — flat baking soda produces cookies with no lift and no surface crackle.
Into your bowl of chocolate batter, add your 1 cup (120g) all-purpose flour, spooned and leveled, ¼ cup (25g) Dutch-process cocoa powder, ½ teaspoon (3g) baking soda, and ½ teaspoon (3g) fine sea salt all at once on top of the wet ingredients. Do not stir yet.
Using your silicone spatula, fold from the bottom of the bowl upward in slow, wide strokes — not circular stirring. Do not overmix after the flour goes in — the finished cookie will bake up tough and rubbery rather than the tender, fudgy result shown in the bite-through photo, and no amount of correct baking time will fix an overmixed dough. The dough is thick and will feel like it needs more mixing. It does not. Stop at 20 to 25 strokes.
Overdeveloping the gluten at this stage is the most common way this cookie goes wrong. The dough is thick and will feel like it needs more mixing. It does not. Stop as soon as it comes together.
The finished dough should look thick, dense, and slightly sticky — darker than a standard brownie batter because of the Dutch-process cocoa. It will not be pourable. If it looks wet and pourable, the flour was not measured accurately — weigh it next time.
Proceed immediately to chilling.
Step 4: Chilling the Dough Until Firm Enough to Scoop
Press a sheet of plastic wrap directly onto the surface of the dough in the bowl — direct contact prevents a skin from forming on the surface. Refrigerate for a minimum of 45 minutes. Do not rush this.
Unchilled dough spreads aggressively in the oven because the fat is still fluid and mobile. The thick, domed center you can see in the cookie photos — the same height that gives each cookie its fudgy interior — only forms when the dough is cold enough that the edges set before the fat has time to run. Chilling is not a textural preference in this recipe. It is a structural requirement.
🗒 Luna’s Note: I have chilled this dough overnight multiple times. The cookies baked from overnight-chilled dough are marginally thicker and the chocolate flavor is slightly more developed — worth it if you are planning ahead. Pull the dough from the fridge and let it sit for 8 to 10 minutes before scooping if it has been in longer than 2 hours — very cold dough is stiff and hard to portion evenly.
The dough can be chilled for up to 48 hours. Beyond that the leavening begins to weaken.
The dough is ready to scoop when it holds its shape when pressed with a finger and does not immediately slump back — it should feel firm and cold throughout, not just on the surface.
While the dough chills, preheat your oven to 350°F (175°C) and line your light-colored aluminum baking sheet with parchment paper.
Step 5: Scooping and Portioning the Dough onto the Prepared Pan
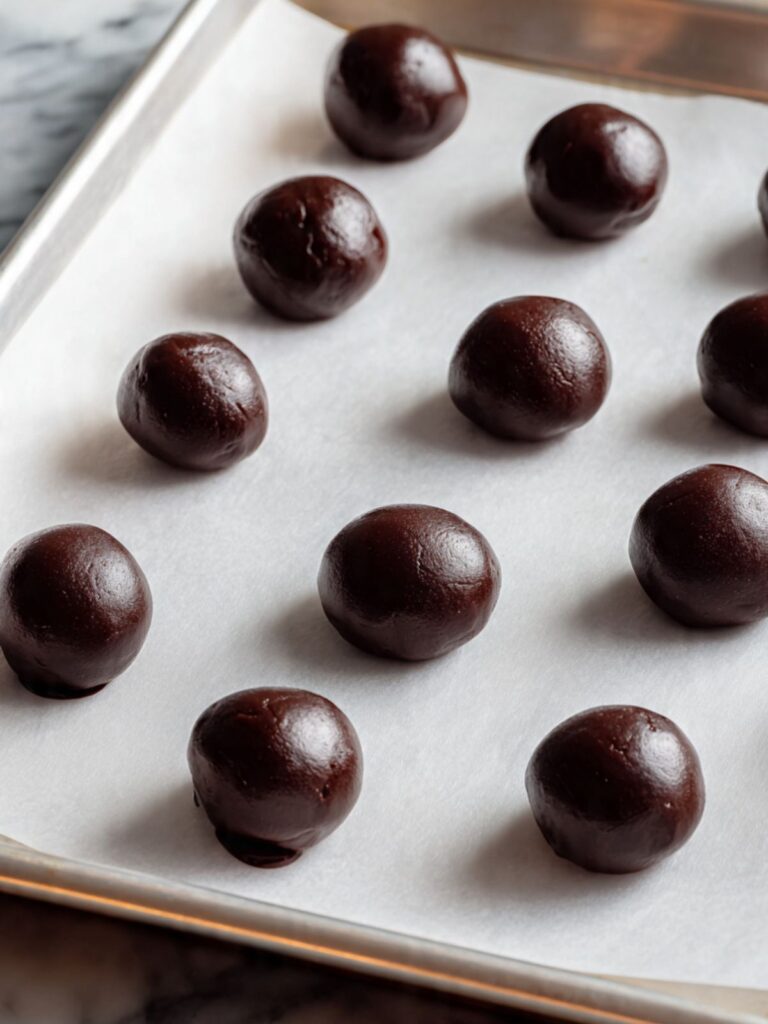
Using your 2-tablespoon cookie scoop, portion the chilled dough into balls of approximately 45g each. Weigh the first ball on your kitchen scale and use it as your reference for the remaining portions — this batch yields exactly 14 cookies at this scoop size. Roll each portion briefly between your palms to smooth the surface into a round ball. Work quickly — the warmth of your hands softens the dough fast.
Place the dough balls on your parchment-lined baking sheet, spaced at least 2 inches (5cm) apart. These cookies spread less than a standard butter cookie because the dough is cold and the fat ratio is controlled, but they still need room to expand slightly at the edges.
Do not flatten the dough balls. The dome shape going into the oven is what produces the thick, domed center in the finished cookie. Pressing them flat before baking eliminates the height that makes the fudgy center possible.
Each dough ball should look smooth, round, and dark — almost black from the Dutch-process cocoa. If they are cracking on the surface before they go in, the dough was too cold. Let the portioned balls rest on the pan for 3 minutes and they will smooth out.
Bake one sheet at a time on the middle rack.
Step 6: Baking Until the Edges Are Set and the Centers Still Look Soft
Slide the pan onto the middle rack of your preheated 350°F (175°C) oven. Most home ovens run 15 to 25°F (8 to 14°C) off from their display — if you have an oven thermometer, confirm the actual temperature before the pan goes in. A cold oven produces cookies that spread before the structure sets.
Bake for 10 to 12 minutes. Start checking at 10 minutes.
This is the step where instinct will mislead you. The cookies will look underdone at the correct pull moment — the centers will still appear puffy, soft, and not fully set. Pull them anyway. The pan continues to conduct heat into the base of each cookie for the full 5 minutes they rest on it after coming out of the oven, and that carryover heat finishes the centers. If you wait until the centers look set inside the oven, they will be overbaked and dry by the time they cool.
The doneness cue for these cookies is the edges — not the centers. The edges should look matte, set, and no longer shiny. The surface should show the beginning of the crackled texture visible in the photos of the finished stack. The centers will still look slightly puffed and soft. That is correct.
Do not open the oven door before the 10-minute mark — the sudden temperature drop can cause the centers to sink.
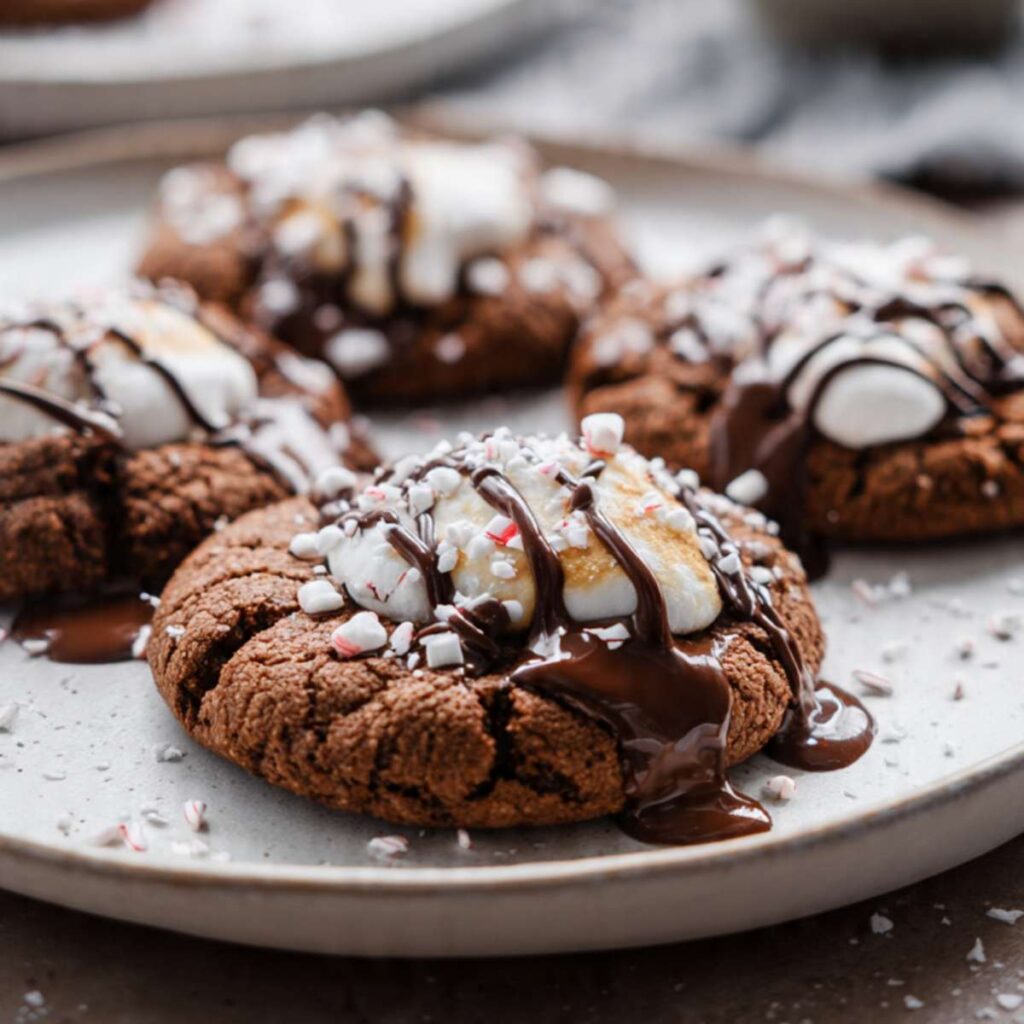
Pull the pan the moment the edges look set and matte and the surface shows visible cracking — even if the centers look underdone. They are not underdone. They are exactly right. The target interior is exactly what you can see in the photo showing the cookie with a bite taken out — dense, dark, and fudgy all the way through with no open crumb. That result only comes from pulling the cookies while the centers still look soft inside the oven.
Leave the cookies on the hot pan for exactly 5 minutes after pulling from the oven. Set a timer. The carryover heat from the pan is finishing the baking process during this window. Moving them before 5 minutes breaks the structural base. Waiting more than 8 minutes starts to dry out the bottoms.
Step 7: Adding the Marshmallow Topping and Toasting Under the Broiler
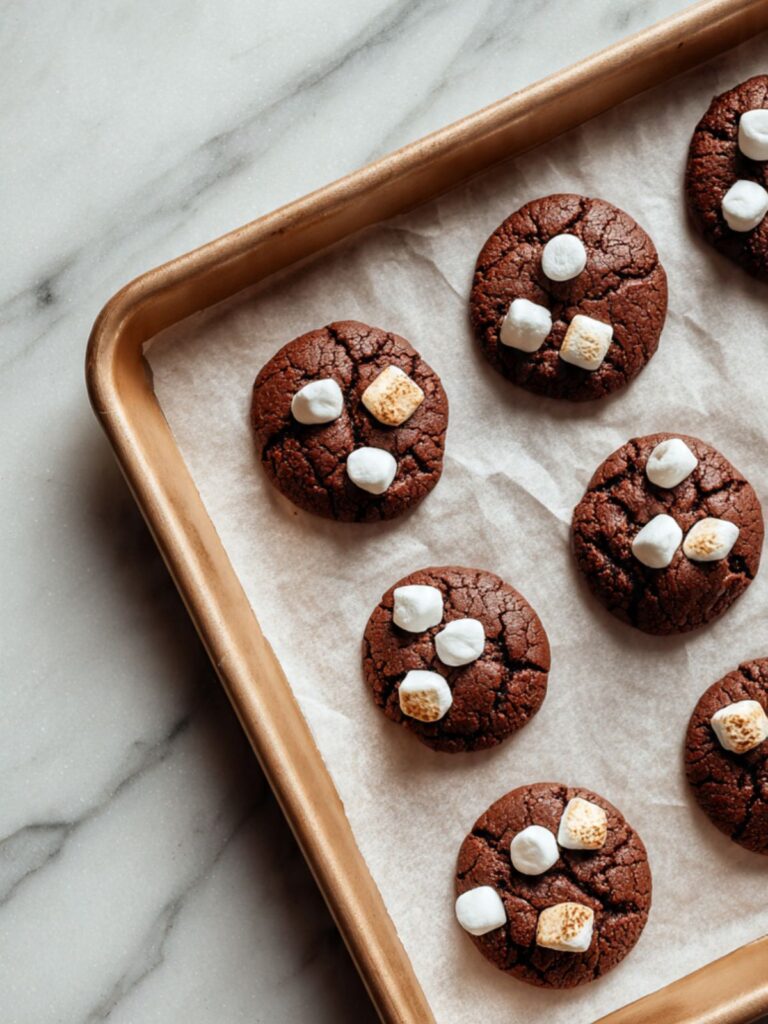
While the cookies are still on the hot pan and warm from the oven — immediately after the 5-minute rest — press 4 to 5 Jet-Puffed mini marshmallows firmly onto the top of each cookie. Press them in gently so they anchor to the warm surface. They will not stick if the cookies have cooled completely, so this step must happen while the cookies are still warm.
Switch your oven to the broiler setting and allow it to preheat for 2 minutes if it was not already on. Slide the pan back under the broiler, positioning it 4 to 5 inches from the heating element. In most standard ovens this is the second rack position from the top — move your rack there before switching to broil.
Broil for 30 to 60 seconds — watch constantly and do not step away. The marshmallows toast fast. You are looking for golden-brown color on the tops and edges of the marshmallows — the same toasted color visible on some of the marshmallows in the finished cookie photos. Some marshmallows will puff slightly and show golden edges; others will stay white if they are more sheltered. Both are correct.
Pull the pan immediately at the first sign of golden color. Broilers vary significantly in intensity — in a strong broiler this can happen in under 30 seconds.
The marshmallows should look puffed, lightly golden on the edges, and anchored to the cookie surface — not fully melted into a puddle, not raw white. If they start to char, pull immediately.
Transfer the cookies to a wire cooling rack and leave them undisturbed for 5 minutes before adding the drizzle.
Step 8: Making the Chocolate Drizzle and Finishing the Cookies
In a small microwave-safe bowl, combine your ½ cup (85g) semi-sweet chocolate chips and 1 teaspoon (4g) neutral oil. Microwave in 20-second intervals, stirring between each interval, until the chocolate is fully melted and the mixture is smooth and fluid — typically 2 to 3 intervals total. The oil thins the melted chocolate just enough to drizzle cleanly; without it, melted chips are too thick to pour in thin lines.
Allow the melted chocolate to cool for 2 minutes until it is still fluid but no longer steaming — hot drizzle will melt the marshmallows further and run off the edges of the cookie rather than setting on the surface.
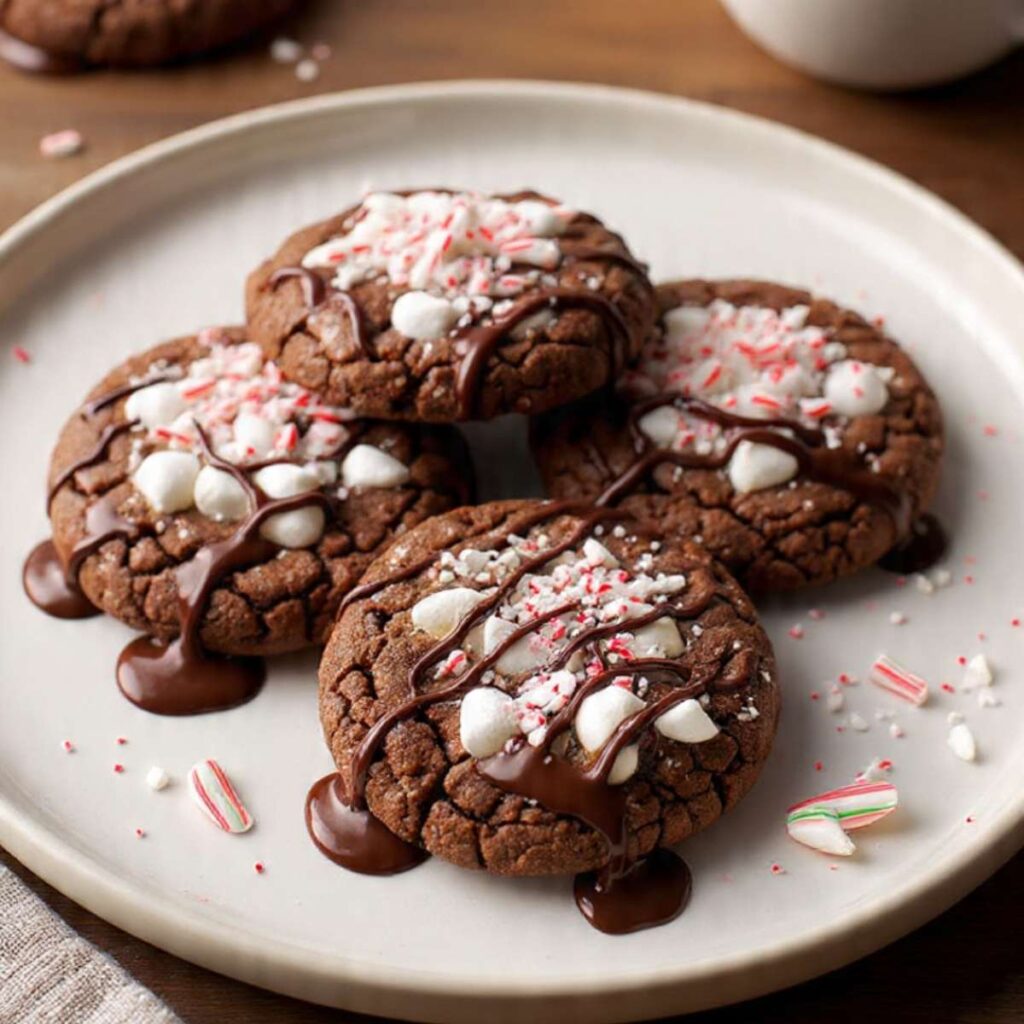
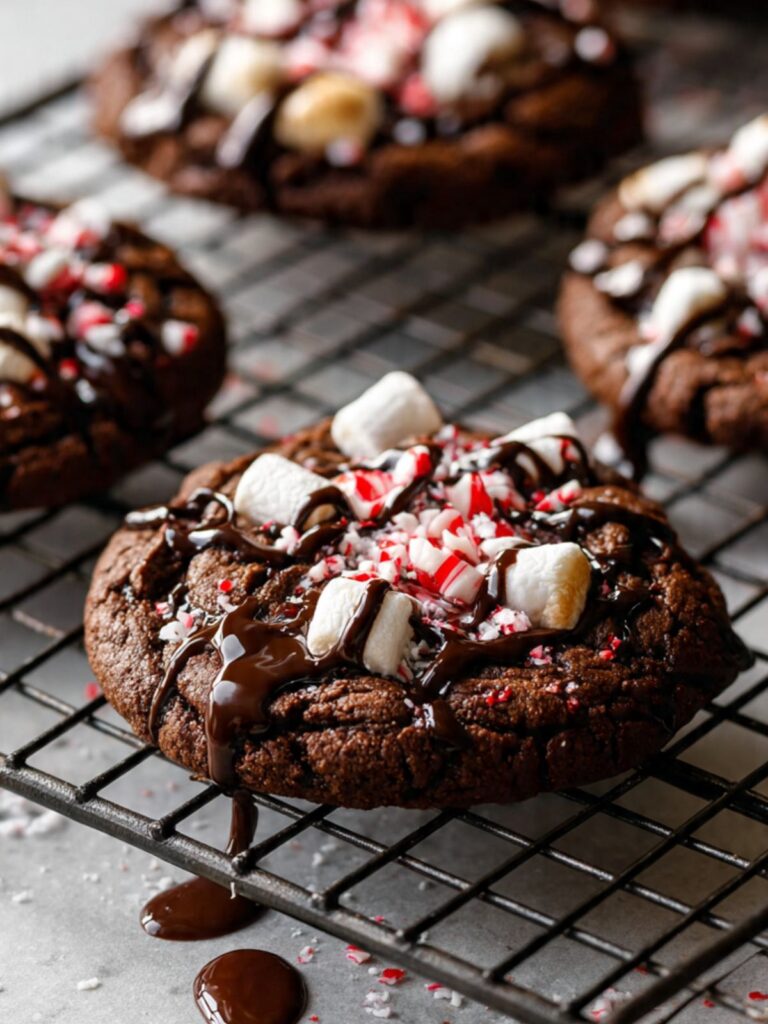
Using a spoon, drizzle the chocolate back and forth over each cookie in overlapping lines — the same pattern visible in the close-up photo showing the thick, overlapping chocolate lines across the marshmallow and candy cane surface. Alternatively, transfer the melted chocolate to a small zip-lock bag, snip a tiny corner, and pipe it for more controlled lines.
Immediately after drizzling — before the chocolate sets — scatter your crushed candy cane fragments over each cookie. The chocolate drizzle acts as the adhesive that holds the candy cane pieces in place. If you add the candy cane after the chocolate has set, the pieces will not adhere and will fall off when the cookies are picked up.
The finished cookies should look like the stacked photo — deep mahogany base, golden-edged marshmallows, overlapping chocolate drizzle lines, and visible red-and-white candy cane fragments distributed across the surface.
Allow the drizzle to set for 10 minutes at room temperature before serving, or place the cookies in the refrigerator for 5 minutes if you need them to set faster. The chocolate drizzle sets firm at room temperature; the cookies are ready to eat once it is no longer tacky to the touch.
🗒 Luna’s Note: I always crush more candy cane than I think I need — one extra candy cane’s worth. The coarse fragments are visually striking on the finished cookie but they scatter when you apply them and some always miss. Having extra means every cookie gets an even, generous coating without rationing.
The Science Behind Hot Cocoa Cookies
Why These Cookies Look Underdone When They Are Correctly Done
I pulled my first three batches too late. The centers looked soft and underset at 11 minutes, so I left them in for another 2 minutes until they looked more stable. Every batch came out dry and tight — nothing like the fudgy, dense interior in the bite-through photo. What I did not understand yet was that the cookies were already done at 11 minutes. The softness I was seeing in the centers was not underbaking. It was the correct result — and the oven was about to ruin it.
This is carryover cooking. When a pan of cookies comes out of a 350°F (175°C) oven, the metal pan itself has absorbed and stored a significant amount of heat. That heat keeps conducting into the base and lower portion of each cookie for the full 5 minutes the cookies rest on the pan after baking. For a standard butter cookie, this carryover effect is modest. For a dense, brownie-style cookie like this one — where the center has much more mass and holds heat longer — the carryover effect is pronounced. The centers are still actively cooking during those 5 minutes off the heat.
The doneness cue for these cookies is the edges, not the centers. Set edges plus a still-soft center equals a correctly baked hot cocoa cookie. Set edges plus a set center inside the oven equals an overbaked one. The difference between the two is less than 2 minutes of bake time — which is why the visual cue matters more than the clock.
What Dutch-Process Cocoa Does That Natural Cocoa Cannot
Dutch-process cocoa has been treated with an alkalizing agent that neutralizes its natural acidity. That single step changes three things at once: color, flavor, and chemical behavior in the dough.
The color difference is the most visible. Natural cocoa produces a reddish-brown baked good — the same color you see in a classic devil’s food cake. Dutch-process cocoa produces the deep, near-black mahogany color visible across the surface of these cookies in every photo. That color is not from food coloring or extra cocoa — it is entirely from the alkalized cocoa reacting with heat.
The flavor difference is equally significant. Natural cocoa is sharper, fruitier, and more acidic. Dutch-process cocoa is smoother, deeper, and more intensely chocolatey without the acidic edge — which is exactly the flavor profile that makes these cookies taste like hot chocolate rather than a standard chocolate cookie.
The chemical behavior difference is the one that causes failures when people substitute without adjusting. Natural cocoa is acidic and reacts with baking soda to create leavening. Dutch-process cocoa is pH-neutral and does not react with baking soda in the same way. If you swap natural cocoa into this recipe without adjusting, the baking soda has less acid to react with, the leavening is reduced, the cookies will not rise properly, and the surface crackle — which depends partly on that leavening reaction — will be minimal or absent. Use Dutch-process. It is not interchangeable here.
Why Melted Butter Produces a Fudgier Cookie Than Creamed Butter
The texture difference between these cookies and a standard drop cookie comes down almost entirely to how the butter enters the dough. In a creamed butter cookie, the butter is beaten with sugar at room temperature until air is incorporated — those air pockets expand in the oven and produce lift, spread, and a softer, more open crumb. In this recipe, the butter is melted and combined with chocolate before anything else is added. No air is incorporated. No fat crystallization occurs.
Melted butter produces a denser, tighter crumb because the fat coats the flour proteins differently — it inhibits gluten development more thoroughly than creamed butter does, and without the trapped air, there is no structure pushing the crumb open during baking. The result is the tight, fudgy interior visible in the bite-through photo: dense all the way through, with no open air pockets, and a texture that sits between a cookie and a brownie. This is also why the recipe requires no mixer — creaming is the step that needs mechanical aeration, and this recipe deliberately skips it.
This is the same mechanism that makes brownies fudgier when made with melted butter rather than oil or creamed butter. If you have made chocolate chip cookie brownies and noticed how the texture differs from a standard bar cookie, you have already seen this principle at work.
Hot Cocoa Cookies Troubleshooting & Pro-Tips
Common Mistakes
Wrong cocoa powder type
Symptom: The cookies bake up reddish-brown instead of deep mahogany, the surface crackle is minimal or absent, and the flavor is sharper and more acidic than expected — closer to a standard chocolate cookie than a hot cocoa flavor profile.
Cause: Natural unsweetened cocoa powder was used instead of Dutch-process. Natural cocoa is acidic and reacts differently with baking soda — the leavening chemistry changes, the color changes, and the flavor profile changes entirely.
Fix: There is no mid-bake fix for this. The cookies are still edible — they will taste like a good chocolate cookie, just not this recipe. For the next batch, source Dutch-process cocoa specifically. Brands widely available in US grocery stores include Droste, Hershey’s Special Dark (labeled Dutch-process), and King Arthur.
Prevention: Read the cocoa label before purchasing. Dutch-process cocoa will say “Dutch-process,” “alkalized,” or “processed with alkali” on the packaging. If the label says only “unsweetened cocoa powder” with no process noted, it is natural cocoa.
Wrong pan type or color
Symptom: The bottoms of the cookies are dark brown to burnt before the centers have finished baking. The edges overbrown while the centers are still raw.
Cause: A dark non-stick baking pan was used. Dark pans absorb significantly more radiant heat than light-colored aluminum pans and transfer it aggressively to the bottom of the cookie before the top and center have time to set.
Fix: If the bottoms are already burnt, the batch cannot be salvaged for presentation — but the tops are fine. Slice the burnt bottom off each cookie with a serrated knife and serve them upside down with the marshmallow topping facing up. Nobody will know.
Prevention: Use a light-colored aluminum baking sheet lined with parchment paper every time. If you only own dark pans, reduce the oven temperature by 25°F (15°C) and check the cookies 2 minutes earlier than the recipe states.
Cookies spread flat instead of doming
Symptom: The cookies spread into thin, flat discs in the oven with no dome and little to no crackle. The interior is greasy and dense rather than fudgy.
Cause: The dough was not chilled long enough, or was allowed to warm back up significantly between scooping and baking. Warm fat is fluid and mobile — it runs before the cookie’s structure has time to set.
Fix: Flat cookies cannot be undone once baked. They will still taste good — crush them and use them as an ice cream topping or a mix-in for vanilla ice cream. For the next batch, chill the dough the full 45 minutes minimum, scoop quickly, and if your kitchen is warm, return the scooped dough balls to the refrigerator for 10 minutes before baking.
Prevention: Chill the dough for the full 45 minutes before scooping. Work quickly when portioning — if the kitchen is above 75°F (24°C), scoop half the batch, return the portioned balls to the fridge while the first half bakes, then scoop the second half.
Cookies baked up dry and tight instead of fudgy
Symptom: The interior of the finished cookie is dry, crumbly, or cakey rather than the dense, fudgy result shown in the photos. The center does not have that soft, almost molten quality when you bite through.
Cause: The cookies were overbaked — left in the oven until the centers looked set rather than being pulled when the edges were set and the centers still looked soft. Alternatively, the flour was packed rather than spooned into the measuring cup, adding 20–30% more flour than the recipe calls for.
Fix: Overbaked cookies cannot be made fudgy again. Serve them with a scoop of peppermint ice cream or vanilla ice cream — the temperature contrast compensates for the drier texture and the pairing still works well. For the next batch, pull the cookies at the 10-to-12-minute mark the moment the edges look matte and set, regardless of how the centers look.
Prevention: Pull at the edges-set / centers-soft cue, not the centers-set cue. Weigh your flour — 120g exactly, not a packed cup.
Marshmallows slide off the finished cookie
Symptom: The mini marshmallows do not adhere to the cookie surface and slide or fall off when the cookie is picked up, especially after the chocolate drizzle sets.
Cause: The marshmallows were pressed on after the cookies had cooled rather than while they were still warm from the oven. A cooled cookie surface has no residual stickiness to anchor the marshmallows. Alternatively, the chocolate drizzle was applied before the marshmallows, eliminating the warm-surface adhesion window.
Fix: If the marshmallows are already sliding, apply a small amount of the chocolate drizzle directly underneath each marshmallow as a glue and press them back down. Allow to set for 5 minutes before handling.
Prevention: Press the marshmallows onto each cookie immediately after the 5-minute pan rest — while the cookie is still warm. The marshmallows go on first, then the broiler, then the drizzle, then the candy cane. Never reorder these steps.
Candy cane pieces fall off or dissolve
Symptom: The candy cane fragments do not stay on the cookie surface — they either fall off immediately or dissolve into a sticky pink smear within an hour of being applied.
Cause: Two possible causes. First, the candy cane pieces were applied after the chocolate drizzle had already fully set, so there was no adhesive surface to hold them. Second, the cookies were stored in a humid environment or covered before the drizzle and candy cane had fully set, causing the candy cane sugar to absorb moisture and dissolve.
Fix: If the pieces have dissolved into a sticky coating, the appearance is affected but the flavor is not. Scatter fresh crushed candy cane over the cookies just before serving.
Prevention: Apply the crushed candy cane immediately after drizzling — while the chocolate is still wet. Store finished cookies uncovered at room temperature for at least 30 minutes before covering or stacking. In humid climates, store in a lidded container with a food-safe silica packet.
The chocolate drizzle seized or turned grainy in the microwave
Symptom: Instead of melting into a smooth, fluid chocolate, the chips clump together into a thick, grainy, dull paste that does not drizzle and cannot be thinned back to a pourable consistency.
Cause: The chocolate was overheated — microwaved in intervals that were too long, or stirred while still too hot. Even a small amount of steam condensation from a warm bowl can cause chocolate to seize. Chips without added cocoa butter (bargain brands or carob chips) are also more prone to seizing than quality semi-sweet chips.
Fix: Seized chocolate cannot be un-seized for drizzling. Start fresh with new chips. Add the neutral oil from the start and microwave in strict 20-second intervals — stir between every single interval even if the chips look unmoved. The oil helps buffer the chocolate against overheating.
Prevention: Use a completely dry, room-temperature bowl. Microwave in 20-second intervals maximum. Stop microwaving the moment approximately 80% of the chips are melted and stir until the residual heat melts the rest — this prevents overheating entirely.
Leavening failure — no crackle and minimal rise
Symptom: The cookie surface bakes up smooth and flat with no crackle. The cookies are denser than expected with very little dome.
Cause: The baking soda has lost its potency. Baking soda weakens over time, especially in humid environments or if the container has been left open.
Fix: Baked cookies cannot be re-leavened. They are still edible — serve as intended. For the next batch, test the baking soda: drop ¼ teaspoon into a cup of hot water. Active fizzing means it is good. No reaction means replace it.
Prevention: Store baking soda in a sealed container away from heat and moisture. Replace it every 6 months, or test it before each use if you bake infrequently.
Altitude and humidity adjustments
High altitude (above 3,500 feet / 1,067m): Reduce baking soda to ¼ teaspoon and increase flour by 2 tablespoons (15g). The lower air pressure at altitude causes leavening to work more aggressively — the cookies will over-puff and collapse if not adjusted. Reduce oven temperature to 340°F (171°C) and check at 9 minutes.
High humidity: The crushed candy cane is the most vulnerable element in humid conditions — it absorbs moisture quickly and can dissolve within hours of application. In high humidity, apply the candy cane immediately before serving rather than when finishing the cookies. Store finished cookies in a lidded container with a dry paper towel on the bottom layer.
Expert Pro-Tips
Chill the scooped dough balls, not just the bowl. After portioning, place the individual dough balls on the parchment-lined pan and return the entire pan to the refrigerator for 10 minutes before baking. This gives the exterior of each ball a colder starting temperature than the interior — the outer layer sets faster in the oven, which creates a more defined dome and a more pronounced crackle across the surface.
Use a fine-mesh sieve to dust the cocoa into the bowl. Dutch-process cocoa clumps easily and dense cocoa clumps in the dough do not fully incorporate — they create bitter, dark pockets in the finished cookie. Sifting the cocoa directly into the bowl over the other dry ingredients takes 10 seconds and eliminates this problem entirely.
Test your broiler distance before committing to the full batch. Broiler intensity varies significantly between ovens. Before you toast all 14 cookies at once, test with 2 or 3 cookies first. Position the rack at 4 to 5 inches from the element and time exactly how long it takes to get golden-brown marshmallow color without charring. Use that time as your benchmark for the full batch.
How to Store Hot Cocoa Cookies
Room Temperature
Store finished hot cocoa cookies in a lidded hard-sided container — not a zip-lock bag, which compresses the marshmallow topping and causes the candy cane pieces to transfer and dissolve against the cookie surface. Place a single layer of parchment paper between stacked layers to prevent the chocolate drizzle from adhering cookies to each other.
Do not stack more than two layers deep. The marshmallow topping adds height and structural fragility to these cookies — three or more layers of weight will compress the marshmallows and dislodge the candy cane pieces on the lower layers.
At room temperature in a cool, dry environment, these cookies keep well for up to 3 days. Day 1 is the showiest — the marshmallows are at their best texture, the candy cane has the most visual definition, and the chocolate drizzle has the cleanest finish. Day 2 the cookie base is actually better — the chocolate flavor deepens overnight and the interior becomes slightly more fudgy as the moisture redistributes. Day 3 is still good but the candy cane pieces will have begun to soften and lose their crunch.
In a warm or humid kitchen, reduce the room temperature storage window to 2 days and keep the container away from direct sunlight or heat sources. Heat softens the chocolate drizzle and causes the marshmallows to weep.
Refrigerator
Refrigerator storage is not recommended as the primary storage method for these cookies. Cold air dries out the cookie base faster than room temperature storage does, and condensation forming on the chocolate drizzle and candy cane when the cookies are brought back to room temperature creates a wet, sticky surface.
If you need to refrigerate — for example, in a hot climate where room temperature storage is not practical — store in a lidded hard-sided container with parchment between layers. Allow refrigerated cookies to come to room temperature for 20 to 30 minutes before serving. Cold cookie bases are firmer and denser than intended; the fudgy center texture the recipe is built around only fully expresses at room temperature.
If refrigerating, consume within 5 days.
Freezer — Baked
These cookies freeze well despite the toppings, with one modification: freeze the cookie base only, without the marshmallow, drizzle, and candy cane topping. The marshmallows become rubbery and weep after freezing and thawing, and the candy cane dissolves entirely. The chocolate drizzle survives freezing but loses its glossy finish.
To freeze the base cookies: allow them to cool completely after baking — before any topping is applied. Wrap each cookie individually in plastic wrap, then place the wrapped cookies in a zip-lock freezer bag with as much air removed as possible. Freeze for up to 2 months.
To serve from frozen: thaw at room temperature for 45 to 60 minutes. Once thawed, warm the cookies in a 300°F (150°C) oven for 4 to 5 minutes to restore the fudgy interior texture, then apply the marshmallow topping, broil, drizzle, and candy cane fresh as directed in the method. The finished result is indistinguishable from a freshly baked batch.
Freezer — Unbaked Dough
The dough freezes exceptionally well and this is the method I recommend for making these cookies ahead. Portion the chilled dough into balls as directed in Step 5, place them on a parchment-lined pan, and freeze uncovered for 1 hour until solid. Transfer the frozen dough balls to a zip-lock freezer bag and freeze for up to 6 weeks.
To bake from frozen: do not thaw. Place the frozen dough balls directly on a parchment-lined pan and bake at 350°F (175°C) for 13 to 15 minutes — 2 to 3 minutes longer than the standard bake time. The doneness cue is the same: edges set and matte, centers still slightly soft. Apply the toppings as directed immediately after baking.
🗒 Luna’s Note: I keep a bag of these dough balls in the freezer from December through January. When someone comes over unexpectedly or I want a single cookie without committing to a full batch, I pull out two or three balls and bake them straight from frozen. Fifteen minutes from freezer to finished cookie. The hardest part is waiting for the drizzle to set.
Serving Suggestion
Serve these at room temperature or very slightly warm — pulled from the oven and finished with the toppings, then rested for the full 10 minutes until the drizzle sets. The fudgy center texture is most pronounced at room temperature; a cold cookie eaten straight from the fridge compresses the interior and mutes the chocolate flavor.
I serve these with a strong black coffee or an actual mug of hot cocoa — unsweetened, made with whole milk. The bitterness cuts through the sweetness of the marshmallow and candy cane in a way that a glass of milk does not. The pairing makes the peppermint read as background warmth rather than the dominant flavor, which is exactly how this cookie is meant to taste.
These are a December cookie. Not in the sense that you cannot make them in March — you can — but they belong to the specific feeling of a cold night, a warm kitchen, and something on the counter that looks like it took more effort than it did. They are the cookie I bring to holiday gatherings when I want people to ask for the recipe without me having to mention I made it. They always ask.
Day 2 these cookies are genuinely better than Day 1 in the base — the chocolate deepens and the interior becomes more uniformly fudgy as the moisture settles. The topping is at its visual best on Day 1, but if you are eating them alone at the kitchen counter the next morning, Day 2 is the better cookie.
One honest limitation: these do not travel well over long distances. The marshmallow topping is fragile, the candy cane pieces dislodge in transit, and the chocolate drizzle softens if the container warms up in a car. Make them where you are serving them, or transport the untopped cookie bases and apply the toppings on arrival.
Frequently Asked Questions About Hot Cocoa Cookies
What makes hot cocoa cookies taste like hot chocolate?
Hot cocoa cookies get their hot chocolate flavor from three layered sources: Dutch-process cocoa in the dough, which produces a deep, smooth chocolate flavor without the sharp acidity of natural cocoa; a small amount of peppermint extract in the dough, which reads as background warmth rather than mint-forward; and the topping combination of toasted marshmallows, chocolate drizzle, and crushed candy cane — the same elements you would find in a dressed mug of hot cocoa. Remove any one of the three layers and the cookies taste like a very good chocolate cookie. All three together is what produces the specific hot cocoa identity.
Can I make hot cocoa cookies without peppermint?
Yes, and they are still excellent. Omit the peppermint extract from the dough entirely and replace the crushed candy cane topping with crushed graham crackers, flaked sea salt, or additional mini chocolate chips. The cookie base — the Dutch-process cocoa dough with toasted marshmallow and chocolate drizzle — stands completely on its own without the peppermint element. The flavor profile shifts from hot cocoa with peppermint to a s’mores-adjacent chocolate cookie, which is a worthwhile recipe in its own right. Do not substitute peppermint oil for peppermint extract — peppermint oil is significantly more concentrated and even a small amount will overpower the chocolate.
How do you keep marshmallows on top of cookies?
Press the mini marshmallows onto each cookie immediately after the 5-minute post-bake pan rest, while the cookie surface is still warm. The residual warmth creates a slight stickiness that anchors the marshmallows before the broiler step. After broiling, the chocolate drizzle applied over the toasted marshmallows acts as a secondary adhesive that locks everything in place once it sets. The order matters: warm cookie surface first, marshmallows pressed on second, broiler third, drizzle fourth, candy cane fifth. Reversing any step in this sequence — particularly adding drizzle before marshmallows, or waiting until cookies are cool to add marshmallows — removes the adhesion mechanism and the toppings will not stay.
Why did my hot cocoa cookies spread too much?
Hot cocoa cookies spread too much when the dough was not chilled long enough before baking, or when the dough warmed up significantly during portioning. The melted butter in this recipe is already in a fluid state — unlike creamed butter, which holds its structure until the oven melts it, melted butter has no structural resistance to spreading at room temperature. Chilling firms the dough so the edges set before the fat has time to run. Refrigerate the dough for the full 45 minutes minimum, scoop quickly, and if your kitchen is warm, return the portioned dough balls to the refrigerator for 10 minutes before baking. A fully preheated oven is equally important — a cold oven gives the fat time to spread before the structure sets.
How do you get the crackle top on hot cocoa cookies?
The crackled surface forms from two mechanisms working together. First, the baking soda in the dough reacts with residual acidity in the brown sugar and chocolate during baking, producing small gas bubbles that push toward the surface and create the cracked texture as the exterior sets around them. Second, the high ratio of sugar to flour means the surface layer sets and firms before the interior does — the interior continues to expand slightly, stretching and cracking the already-set exterior. Both mechanisms require fresh baking soda, the correct cocoa type, and a fully preheated oven. A dull, smooth surface with no crackle almost always means the baking soda was old or the oven was not fully preheated when the pan went in.
For more on the science behind fudgy chocolate bakes, the method breakdown in these peppermint mocha cupcakes covers the same cocoa chemistry in a different format.
Can I make hot cocoa cookies ahead of time?
Yes — two reliable methods. First: make and chill the dough up to 48 hours in advance, keeping it covered in the refrigerator, then scoop and bake when needed. Second: portion the dough into balls, freeze them solid on a parchment-lined pan, transfer to a zip-lock freezer bag, and bake directly from frozen at 350°F (175°C) for 13 to 15 minutes. Both methods produce cookies identical to a fresh-made batch. Apply the marshmallow, drizzle, and candy cane topping fresh after baking — these elements do not hold well if applied to cookies that are then stored or frozen. The topping takes less than 10 minutes to apply and is best done immediately before serving.
Can I double this hot cocoa cookies recipe?
The dough doubles without issue — combine the doubled quantities in a large bowl and proceed as directed. The one component that does not scale linearly is the baking soda: for a doubled batch, use ¾ teaspoon rather than a full teaspoon. Doubling leavening exactly doubles the reaction, which in a dense dough like this one produces cookies that over-puff and then collapse rather than dome cleanly. Bake time stays the same at 10 to 12 minutes regardless of batch size — the individual cookie size has not changed. Bake in sequential batches rather than two pans simultaneously, as most home ovens cannot maintain even heat with two pans at once.
Do hot cocoa cookies work at high altitude?
Yes, with adjustments. At altitudes above 3,500 feet (1,067m), reduce the baking soda from ½ teaspoon to ¼ teaspoon — the lower air pressure causes leavening to work more aggressively, and the full amount will cause the cookies to over-puff and then collapse. Increase the flour by 2 tablespoons (15g) to compensate for the faster moisture evaporation. Reduce the oven temperature to 340°F (171°C) and start checking at 9 minutes. The doneness cue stays the same: edges set and matte, centers still soft.
More Chocolate Cookies You’ll Love
If these hot cocoa cookies hit the right note for you, these are the recipes I would make next:
Hot Chocolate Cupcakes — The same hot cocoa flavor profile in cupcake form, with a marshmallow frosting that toasts under a kitchen torch. If you want the hot cocoa experience in a format that travels better than these cookies, this is the recipe.
Chocolate Mug Cake — When you want deep, fudgy chocolate in five minutes with no chilling, no batch, and no waiting. The same fudgy chocolate interior as these cookies, scaled to a single serving.
Hot Cocoa Cookies
Ingredients
Equipment
Method
- In a small heavy-bottomed saucepan over low heat, combine the 6 tablespoons (85g) unsalted butter and ¾ cup (128g) semi-sweet chocolate chips and stir constantly until fully melted and smooth — approximately 3 to 4 minutes — then pour into a large mixing bowl and cool for 10 to 12 minutes until warm but not hot.
- Add the ½ cup (100g) granulated sugar and ¼ cup (55g) packed brown sugar to the cooled chocolate mixture and stir with a silicone spatula for approximately 20 strokes until fully incorporated, then add the 2 large room-temperature eggs one at a time, stirring for 20 to 25 strokes after each addition until fully absorbed, then add the 1 teaspoon (4g) pure vanilla extract and ¼ teaspoon (1g) pure peppermint extract and stir to combine.
- Add the 1 cup (120g) all-purpose flour, ¼ cup (25g) Dutch-process cocoa powder, ½ teaspoon (3g) baking soda, and ½ teaspoon (3g) fine sea salt on top of the wet ingredients and fold with the silicone spatula in slow, wide strokes from the bottom of the bowl upward — no more than 20 to 25 strokes — until no dry flour streaks remain.
- Press plastic wrap directly onto the surface of the dough and refrigerate for a minimum of 45 minutes until firm and cold throughout.
- Preheat the oven to 350°F (175°C) and line a light-colored aluminum baking sheet with parchment paper.
- Scoop the chilled dough into 45g (2-tablespoon) portions, roll briefly into balls, and place 2 inches (5cm) apart on the prepared baking sheet — this batch yields exactly 14 cookies.
- Bake on the middle rack at 350°F (175°C) for 10 to 12 minutes until the edges are set and matte and the centers still look slightly soft and puffy — do not wait for the centers to look set — then leave the cookies on the hot pan for exactly 5 minutes before moving.
- Preheat the broiler, then immediately press 4 to 5 Jet-Puffed mini marshmallows firmly onto the top of each warm cookie and slide the pan under the broiler 4 to 5 inches from the heating element for 30 to 60 seconds until the marshmallows are puffed and golden — watch constantly and do not step away.
- Transfer the cookies to a wire cooling rack and rest for 5 minutes, then melt the ½ cup (85g) semi-sweet chocolate chips with 1 teaspoon (4g) neutral oil in a microwave-safe bowl in 20-second intervals, stirring between each, until smooth and fluid.
- Drizzle the melted chocolate over each cookie in overlapping lines, then immediately scatter the crushed candy cane fragments over the wet drizzle before it sets — allow the drizzle to set for 10 minutes at room temperature before serving.