
Cookies and Cream Cookies
The first four batches spread completely flat. I thought it was the flour measurement. It was the Oreo-to-dough ratio — I had added so many crushed cookies that the extra fat from the filling was melting into the dough and collapsing the structure before the edges could set. Batch five, with the ratio corrected and the white chocolate chunks swapped in for chips, was the version I kept. That is the cookies and cream cookies recipe in this article.
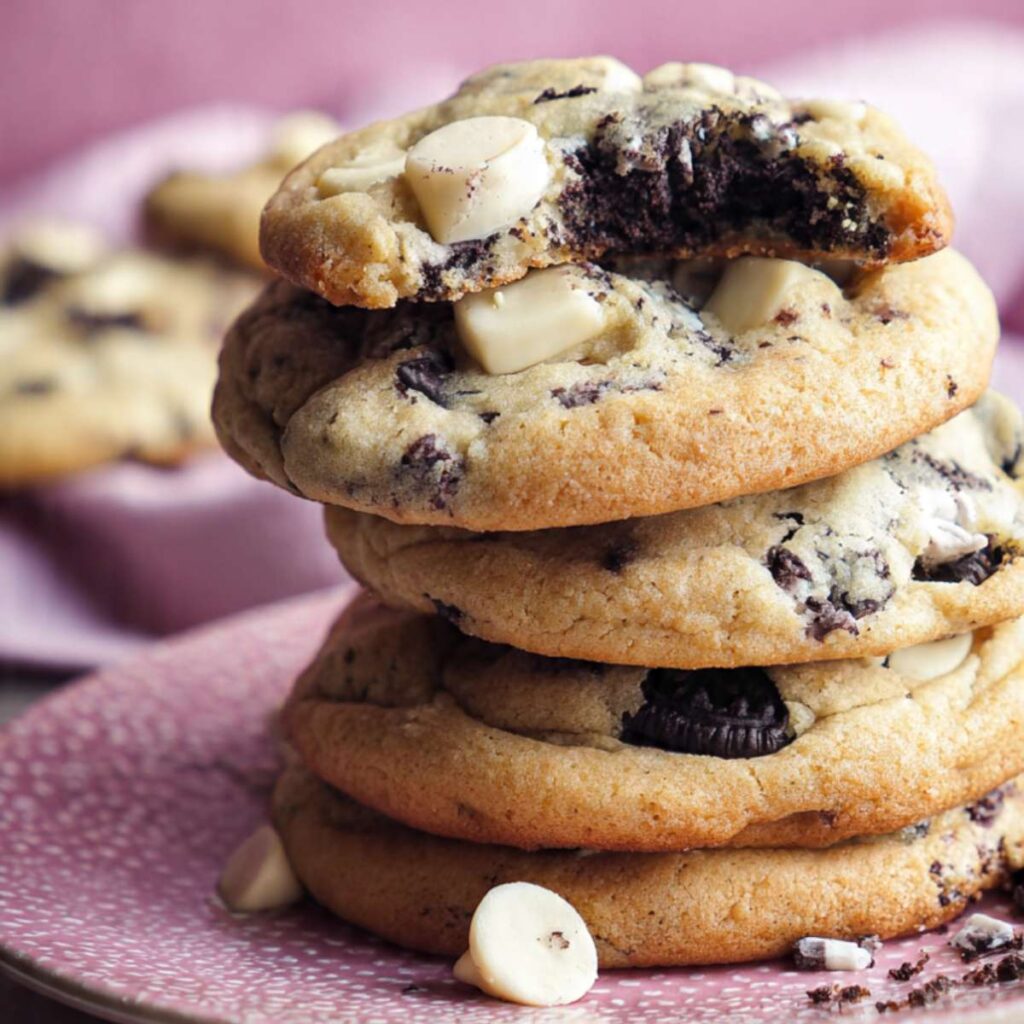
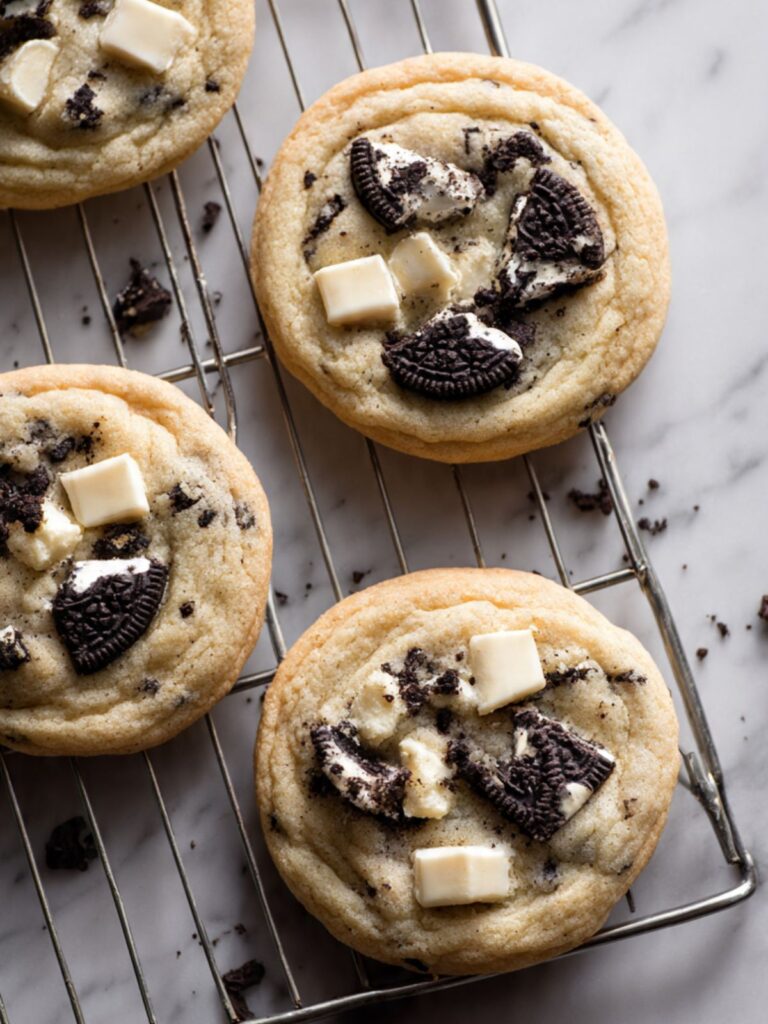
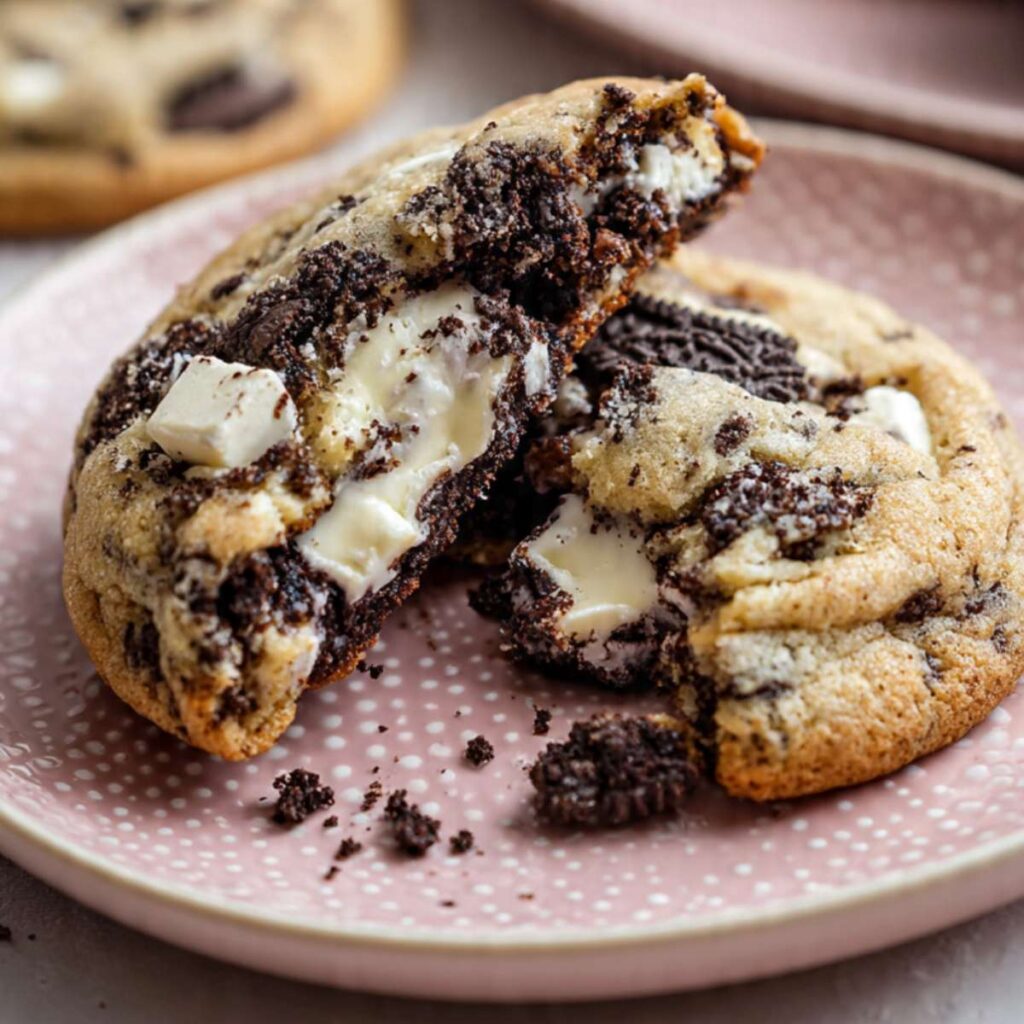
What you get from this recipe: thick, domed cookies with a soft cream-colored interior that is dense without being heavy. The crushed Oreo pieces throughout the dough give you a dark chocolate crumb in every bite. The white chocolate melts into pools when the cookie is still warm, and on Day 2 it firms slightly into a fudgy layer. The whole Oreo halves pressed into the tops before baking give you that crunch contrast that makes these worth making over a simpler Oreo-crumble cookie.
I tested white chocolate chips against white chocolate chunks. White chocolate chips contain a stabilizer that prevents full melting — they hold their shape in the oven and stay firm on cooling. White chocolate chunks (chopped from a bar) melt completely and create those visible white pools you can see in the interior shot above. I kept the chunks. Chips work, but the interior does not behave the same way — no pooling, no melt-through. If you want the result in the photos, use white chocolate chunks.
I tested chilled dough versus room-temperature dough. Chilled dough spread less and produced a taller cookie. Room-temperature dough spread to a thinner profile with crisper edges. These photos show the chilled version — the thick, domed result required 30 minutes of refrigerator time. I have included both bake paths in the method, but the photos match the chilled version.
I tested Oreo quantity at three levels — 12 cookies, 18 cookies, and 24 cookies per batch of dough. Twelve per standard batch was so dense with cookie that the dough barely held together. Eighteen was the right ratio — enough dark crumb and cream filling to flavor the entire cookie without breaking the dough structure.
I also tested regular Oreos against Double Stuf in back-to-back batches. Double Stuf added significantly more fat from the extra filling — the dough was stickier, harder to scoop, and produced a flatter, sweeter cookie than the regular Oreo version. The flavor difference was less than expected. The structural difference was not subtle. I kept regular Oreos. Double Stuf is not worth the dough instability it creates.
This recipe requires a hand mixer or stand mixer for the creaming step. The dough requires 30 minutes of refrigerator chilling before baking. Both of those details matter for the result in the photos.
🗒 Luna’s Note: I press the Oreo halves into the tops of the dough balls right before they go into the refrigerator, not after chilling — they adhere better to slightly soft dough. A cold, firm dough ball does not hold the Oreo piece at the surface and it falls off during baking.
| Prep Time | Cook Time | Total Time | Yield | Difficulty |
|---|---|---|---|---|
| 20 min | 11 min | 1 hr (includes 30 min chill) | 18 cookies | Easy |
| Calories | Fat | Carbs | Sugar | Protein | Sodium |
|---|---|---|---|---|---|
| ~328 kcal | ~16g | ~43g | ~27g | ~1g | ~160mg |
Macros are approximate and will vary based on ingredient brands and serving size.
Ingredients & Tools
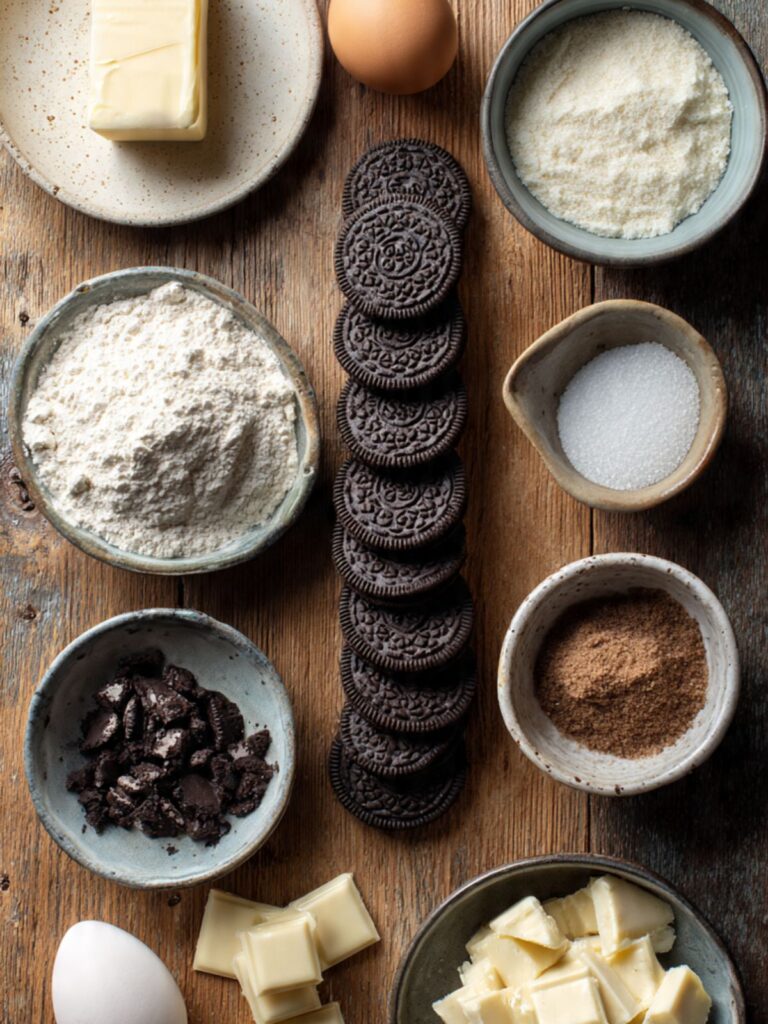
For the Cookies
- 1 cup (226g) unsalted butter, softened to room temperature (65–68°F / 18–20°C)
- ¾ cup (150g) plain white granulated cane sugar
- ¾ cup (165g) packed brown sugar
- 2 large eggs (approximately 50g each without shell), room temperature
- 2 tsp (10ml) pure vanilla extract
- 2¼ cups (281g) all-purpose flour (spooned into the measuring cup and leveled — or weighed at 281g)
- 1 tsp (6g) baking soda — check freshness before using
- ½ tsp (3g) fine sea salt
- 18 regular Oreo cookies, roughly crushed into coarse chunks — not fine crumbs — plus 9 additional Oreos, halved, for pressing into tops
- 1 cup (170g) white chocolate, chopped into irregular chunks from a bar — not white chocolate chips
Before You Start
Temperature prep — this is where most batches go wrong before mixing begins: Pull your butter from the refrigerator 60–90 minutes before you plan to mix. Softened butter at 65–68°F (18–20°C) is the single most important variable in this recipe. When you press your finger into the center of a stick, it should leave a clean indent without the butter feeling greasy or slick. If your finger slides through without resistance, or if the butter looks shiny, it is too warm. Too-warm butter will not aerate properly during creaming and the cookies will spread flat. If that happens, set the butter back in the refrigerator for 10 minutes and test again.
Pull your eggs from the refrigerator at the same time as the butter — they need 30 minutes minimum at room temperature. Cold eggs do not emulsify smoothly into a butter-based dough and can cause the mixture to look broken or curdled. In an emergency, place uncracked eggs in a bowl of warm (not hot) water for 10 minutes.
Flour measuring method: Spoon the flour into your measuring cup using a separate spoon and level it off with a straight edge. Do not scoop the cup directly into the bag — scooping packs in 20–30% more flour than the recipe needs and produces dry, dense cookies. For guaranteed accuracy, weigh the flour at 281g on a kitchen scale. Gram weight takes priority over volume in every step of this recipe.
White chocolate — this is not interchangeable: Use a white chocolate bar, not white chocolate chips. White chocolate chips contain a stabilizer that prevents them from fully melting in the oven — they hold their shape and produce no interior pooling. A chopped white chocolate bar melts completely and creates the visible white pockets shown in the interior shot above. Ghirardelli and Lindt white chocolate bars both work well. Chop them into irregular pieces ranging from ¼ inch to ½ inch — mixed sizes melt at different rates and produce better texture variation.
Oreo prep: Use regular Oreos — not Double Stuf. Double Stuf adds significantly more filling fat to the dough and softens the structure further, producing a flatter, stickier cookie than what is shown in the photos. Crush 18 Oreos into coarse, uneven chunks by placing them in a zip-lock bag and breaking them with a rolling pin or the flat side of a measuring cup. You want pieces ranging from quarter-cookie size down to large crumbs — not a fine powder. The texture contrast between intact cookie pieces and the dough is part of what makes these work. Halve 9 additional Oreos cleanly by twisting apart and keeping both halves intact for pressing into tops.
Leavening freshness check: Drop ½ tsp of baking soda into 2 tablespoons of hot water and add a few drops of white vinegar. If it bubbles aggressively, it is fresh. If it barely reacts or sits flat, it is expired — expired baking soda produces flat, dense cookies regardless of every other variable being correct.
Brown sugar hardened in the bag? Place a damp paper towel over the brown sugar and microwave in 20-second increments until pliable before measuring. Hardened brown sugar cannot be packed accurately and will throw off the moisture content of the dough.
Mixing equipment: This recipe requires a hand mixer or stand mixer fitted with the paddle attachment. Creaming butter and two sugars together by hand does not incorporate enough air and produces flat, dense cookies. If you are using a hand mixer, use a large deep bowl to prevent splashing during the creaming stage.
Chilling — do not skip this: After mixing, the dough requires 30 minutes of refrigerator chilling before baking. Unchilled dough spreads significantly more in the oven and produces thin, flat cookies instead of the thick, domed result shown in the photos. Press the Oreo halves into the dough balls before chilling, not after — the soft dough holds them better than cold, firm dough.
Gram weight priority: For the most consistent results, use a kitchen scale set to grams. The gram weights in this recipe are what I tested with — they are the most reliable way to match my result.
Oven position: Position your oven rack in the middle of the oven before preheating. The top rack burns the tops of cookies before the centers set. The bottom rack burns the bottoms before the edges crisp.
Baking sheet size: Use a standard half-sheet pan (18×13 inches / 46x33cm). A quarter-sheet pan is too small — the cookies will be crowded and the edges will merge. A dark non-stick baking sheet will overbrown the bottoms before the centers set — use light-colored aluminum.
Necessary Tools
Required:
- Kitchen scale (strongly recommended — gram weights are more accurate than volume)
- Hand mixer or stand mixer fitted with the paddle attachment
- Large mixing bowl (if using hand mixer)
- Silicone spatula
- Light-colored aluminum baking sheet — dark pans absorb more heat and overbrown cookie bottoms before the centers set
- Parchment paper
- Medium cookie scoop (approximately 1.5 tablespoons / 45ml capacity) — ensures uniform cookies that bake evenly
- Wire cooling rack
- Zip-lock bag and rolling pin (for crushing Oreos)
Optional:
- Oven thermometer — most home ovens run 15–25°F (8–14°C) off calibration; an oven thermometer confirms your actual temperature before the pan goes in
- Kitchen ruler — for confirming 2-inch spacing between dough balls
How to Make Cookies and Cream Cookies
Step 1: Preheating the Oven and Preparing the Pans for an Even Bake
Position your oven rack in the middle position and preheat to 350°F (175°C). Allow a full 15–20 minutes for the oven to reach temperature — most ovens signal ready before the internal temperature has fully stabilized, and a pan going into an under-temperature oven produces cookies that spread before the edges can set. If you have an oven thermometer, confirm the actual reading before proceeding.
Most home ovens run 15–25°F (8–14°C) off calibration. Line your light-colored aluminum baking sheet with parchment paper and set it aside. Parchment is not optional here — a greased pan conducts heat differently and produces darker, greasier cookie bottoms than the matte, evenly baked result shown in the photos. Do not use foil. Foil reflects heat unevenly and produces hot spots that overbrown edges while the center remains underdone.
The pan should look completely flat, lined edge to edge with parchment, with no wrinkles that would shift the cookie position during baking.
⚠️ If you are using a dark non-stick baking sheet, reduce the oven temperature by 25°F (15°C) to 325°F (165°C) — dark pans absorb significantly more heat and will overbrown the cookie bottoms before the centers set.
Pan is ready. Move to creaming the butter and sugars while the oven preheats.
Step 2: Creaming the Butter and Both Sugars Until Pale and Fully Aerated
In the bowl of your stand mixer fitted with the paddle attachment, or in a large deep mixing bowl using a hand mixer, add your 1 cup (226g) unsalted butter, softened to 65–68°F (18–20°C), ¾ cup (150g) plain white granulated cane sugar, and ¾ cup (165g) packed brown sugar. The granulated sugar drives surface crackle and controls spread — it is the variable that gives the edges their slight firmness while the centers stay soft.
The brown sugar contributes moisture and chewiness through its molasses content, and because it is hygroscopic, it continues to draw moisture from the air after baking, which is why these cookies stay soft on Day 2. Beat on medium speed (speed 4 on a KitchenAid, medium on a hand mixer) for a full 3 minutes. Set a timer. Do not estimate. At 90 seconds the mixture will still look grainy and yellow — this is not done. At 3 minutes it should have visibly lightened in color and increased in volume.
The creamed mixture should look pale yellow — nearly cream-colored — fluffy, and noticeably increased in volume. If you drag a spatula through it, it should hold a soft ribbon for 2 seconds before settling. If it still looks dense and yellow at 3 minutes, beat for another 60 seconds and check again.
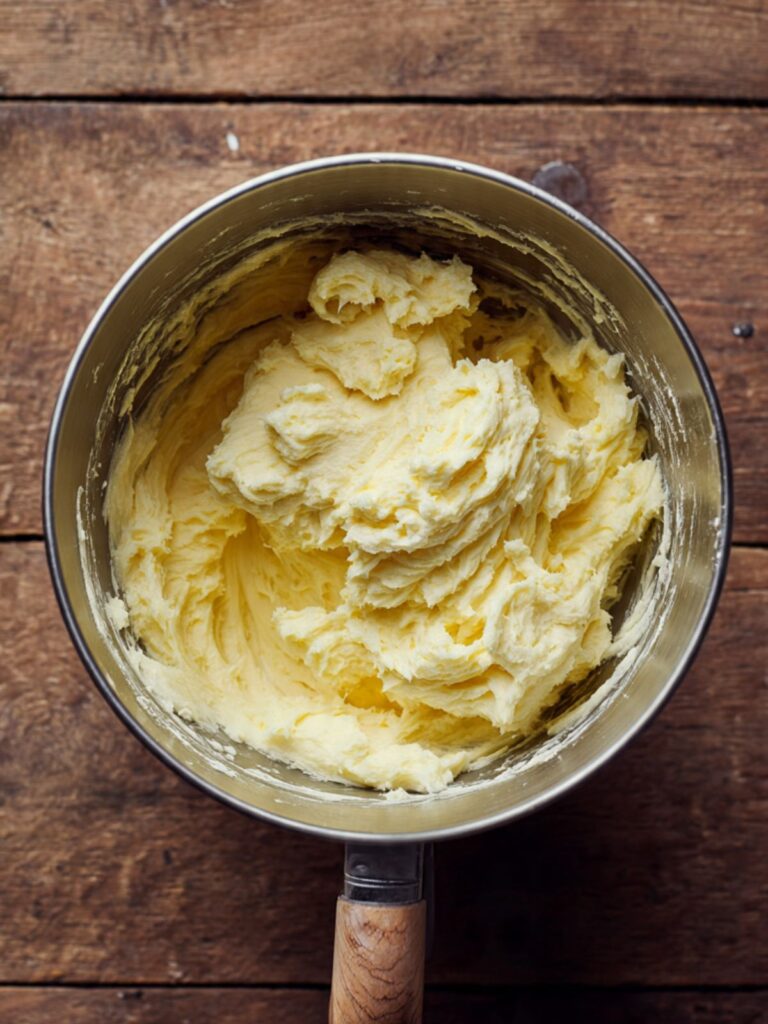
⚠️ Under-creamed butter produces flat, dense cookies — the air incorporated during this step is what gives the cookies their domed profile. Do not rush this step and do not walk away from the mixer. The texture change between 90 seconds and 3 minutes is significant and visible.
Butter and sugars are fully creamed. Move immediately to adding the eggs.
Step 3: Adding the Eggs and Vanilla to Build the Emulsified Dough Base
With the mixer running on low speed, add your 2 large eggs (approximately 50g each without shell), room temperature, one at a time. Add the first egg and mix on low for 20 seconds until fully incorporated before adding the second. Adding both eggs at once can break the emulsification — the fat and water in the dough need time to bind.
After both eggs are incorporated, add your 2 tsp (10ml) pure vanilla extract and increase to medium speed for 30 seconds. The vanilla is not just flavoring here — the alcohol in pure vanilla extract carries aromatic compounds that amplify the chocolate and cream notes from the Oreos throughout the finished cookie.
The dough should look smooth, glossy, and cohesive at this stage — slightly thicker than a cake batter. If it looks broken, curdled, or greasy with visible liquid separation, your eggs were too cold. This is recoverable: set the bowl over a pan of warm water for 30 seconds and mix again on low. The warmth re-emulsifies the fat.
⚠️ Do not add warm eggs to a dough made with correctly softened butter — warm eggs will melt the butter and collapse the aerated structure you built in Step 2. Room temperature is the target for both.
🗒 Luna’s Note: I crack my eggs into a small bowl first before adding them to the mixer — it takes five extra seconds and prevents a shell fragment from landing in a perfectly mixed dough. I have fished shell out of cookie dough exactly once. Once was enough.
Dough base is emulsified and ready. Move to adding the dry ingredients.
Step 4: Adding the Dry Ingredients Without Overworking the Gluten
In a separate medium bowl, whisk together your 2¼ cups (281g) all-purpose flour (spooned and leveled or weighed), 1 tsp (6g) baking soda, and ½ tsp (3g) fine sea salt until evenly combined. Whisking the dry ingredients before adding them distributes the baking soda and salt uniformly through the flour — a pocket of undissolved baking soda produces a soapy, metallic taste in the cookie directly above it. With the mixer on the lowest speed, add the dry ingredient mixture to the butter-egg dough in two additions. Add half, mix on low for 10 seconds, add the remainder, and mix on low just until no flour streaks remain — approximately 15 seconds more.
Stop the mixer the moment the flour disappears. Every additional second of mixing after this point develops gluten and moves the texture from soft and tender toward tough and chewy in the wrong direction.
The dough should look thick, cohesive, and slightly tacky — it will pull away from the bowl sides in one mass. If it looks crumbly and dry, your flour was over-measured. If it looks wet and sticky and does not hold its shape at all, your butter was too warm during creaming.
⚠️ Do not mix the dry ingredients in on medium or high speed — the flour will cloud the bowl and the higher speed develops gluten faster. Low speed only from this point forward.
Dry ingredients are incorporated. Remove the mixer bowl from the stand and switch to a silicone spatula for the mix-ins.
Step 5: Folding in the Oreo Chunks and White Chocolate to Finish the Dough
Add your 18 roughly crushed Oreo cookies (coarse chunks, not fine powder) and 1 cup (170g) white chocolate chunks to the dough. Using your silicone spatula, fold from the bottom of the bowl upward in wide, deliberate strokes — not stirring in circles. Count your strokes. The mix-ins should be fully distributed in 12 to 15 strokes. More than 20 strokes at this stage develops gluten and toughens the finished cookie.
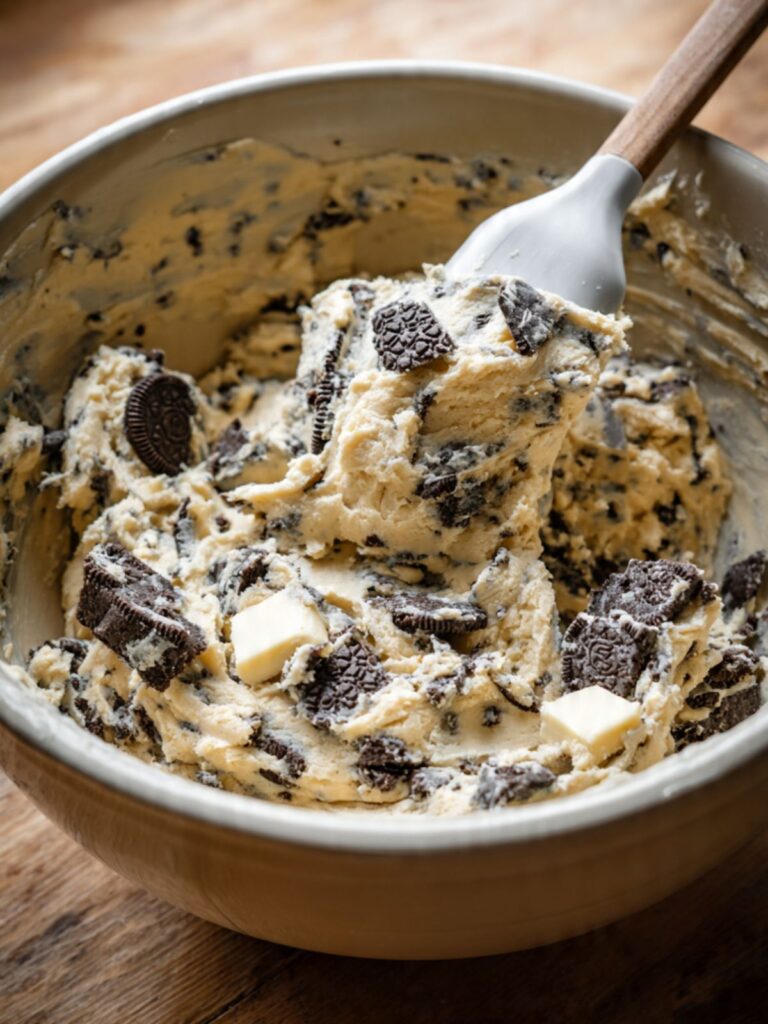
The Oreo pieces will begin to bleed dark crumbs into the dough as you fold — this is correct and is what gives the dough its speckled cream-and-dark appearance visible in the photos. Do not try to keep the chunks perfectly intact. Some breakage during folding is expected and produces the crumb distribution shown in the interior shot.
The finished dough should look thick and heavily studded — you should see dark Oreo pieces and cream-colored white chocolate chunks throughout every section of the dough. If you can see large unfilled areas of plain dough, fold 3 to 4 more strokes and check again.
⚠️ Do not overfold trying to achieve perfect distribution — uneven pockets of Oreo or chocolate are preferable to a tough, overdeveloped dough. The goal is roughly even, not perfectly uniform.
Dough is finished. Move immediately to portioning and pressing before chilling.
Step 6: Portioning the Dough, Pressing the Oreo Halves, and Chilling
Using your medium cookie scoop (approximately 1.5 tablespoons / 45ml), portion the dough into 18 equal balls at approximately 55–60g each — weigh the first ball on your kitchen scale and use it as your reference for the rest. At this scoop size, the full batch yields exactly 18 cookies. And place them on a parchment-lined plate or tray — not the baking sheet yet.
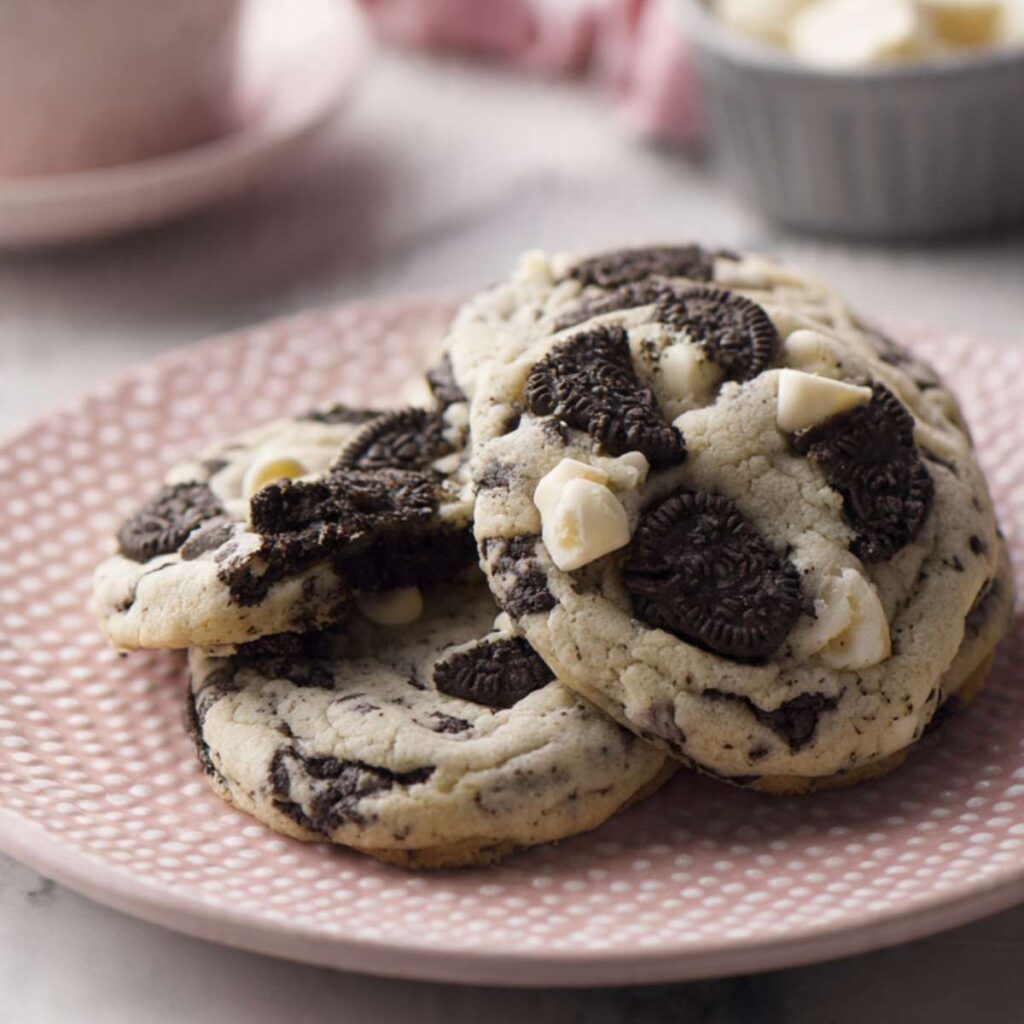
Roll each ball lightly between your palms to smooth any rough edges. Press one halved Oreo firmly into the top of each dough ball, flat side down, pushing it approximately halfway into the dough so it does not fall off during baking. As you can see in the overhead plate shot above showing two finished cookies side by side, the Oreo halves sit flush with the top surface of the baked cookie — they should not be sitting on top like a garnish, they should be embedded.
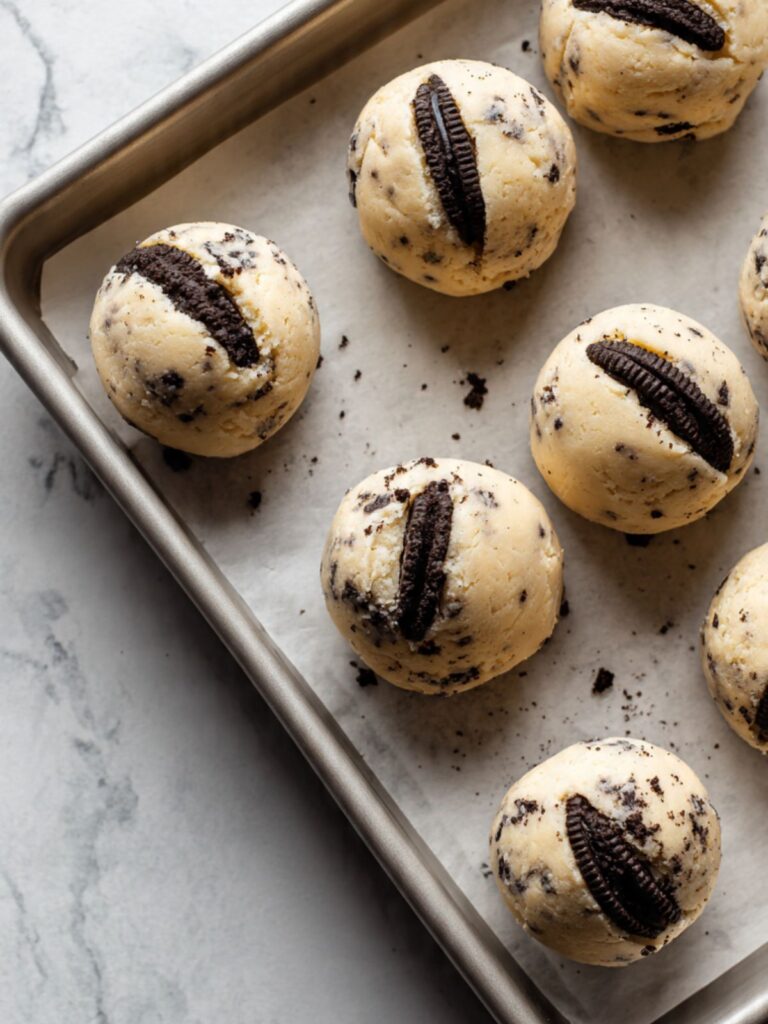
Transfer the tray of dough balls to the refrigerator and chill for exactly 30 minutes uncovered. Do not cover with plastic wrap during this initial chill — condensation on the dough surface changes how the top sets in the oven and produces a slightly matte, less defined surface texture.
The dough balls should feel firm but not rock-hard after 30 minutes — they should hold their shape completely when lifted and placed on the baking sheet without sagging or spreading before they reach the oven.
⚠️ Do not skip the chilling step. Unchilled dough spreads significantly more in the oven and produces flat cookies instead of the thick, domed result shown in the hero image. If you need to bake in batches, keep the remaining dough balls in the refrigerator between bakes — do not let them come back to room temperature on the counter.
🗒 Luna’s Note: I press the Oreo halves in before chilling, not after. Cold dough is firm and the Oreo does not embed properly — it sits on the surface instead of sinking in, and it separates during baking. Soft dough grips the cookie piece the way it should.
Dough balls are portioned, topped, and chilled. Move to baking.
Step 7: Baking the Cookies to a Soft-Set Center and Golden Edge
Place 6 chilled dough balls on your prepared light-colored aluminum baking sheet, spacing them at least 2 inches (5cm) apart in every direction. These are large cookies and they spread during baking — crowding the pan causes the edges to merge and the cookies to bake into each other rather than maintaining their individual shape. Bake on the middle rack at 350°F (175°C) for 10 to 12 minutes. Begin checking at 10 minutes.
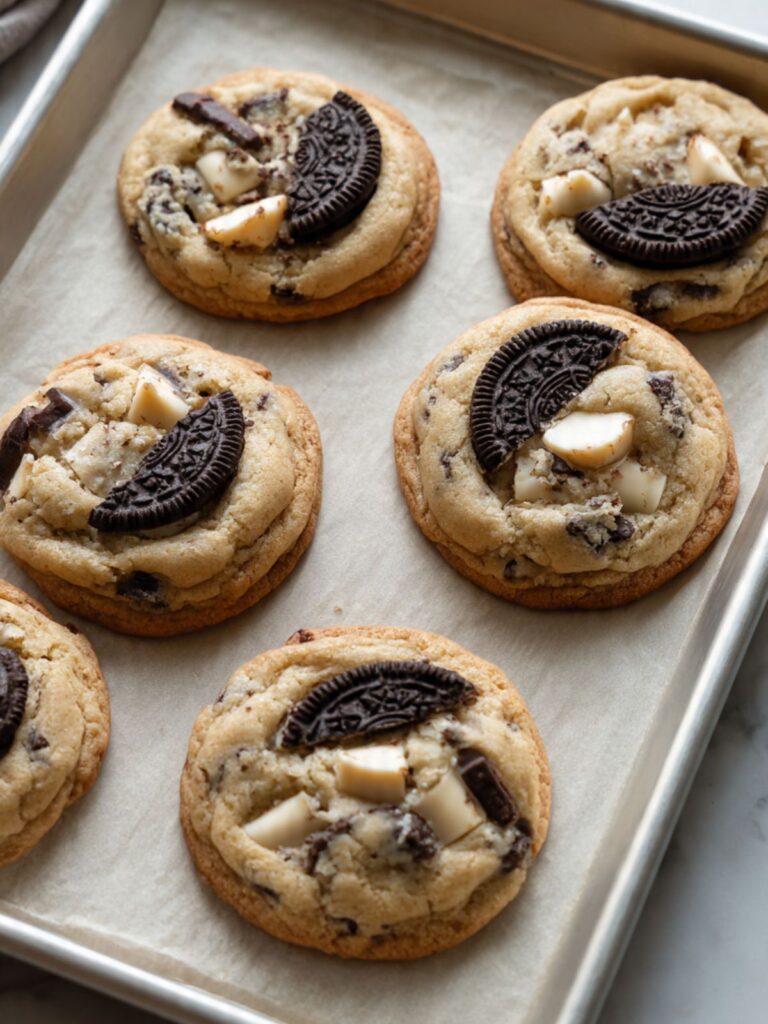
The correct pull point is when the edges look set and lightly golden and the centers still look underdone and slightly glossy — as though they need another 2 minutes. They do not. The residual heat from the pan continues baking the centers for the full 5 minutes they rest on the pan after the oven door opens, which is carryover cooking. Pulling them at the correct visual cue is what produces the soft, dense center visible in the interior shot — waiting until the centers look fully set produces a dry, over-baked cookie.
The edges should look matte and set, with a faint golden color at the very rim. The centers should still look slightly glossy and puffed. The Oreo half pressed into the top should look embedded and slightly darker than it went in — not burnt, just toasted. This is exactly the visual in the hero image.
⚠️ Do not open the oven door before 10 minutes — the temperature drop deflates the structure while the dough is still in its most fragile state and can cause the centers to sink and not recover.
Cookies are baked. Move immediately to the resting step — do not transfer them to the rack yet.
Step 8: Resting on the Pan and Transferring to the Cooling Rack
Leave the baked cookies on the hot baking sheet for exactly 5 minutes before moving them. During this time, carryover heat from the pan is finishing the baking process — the centers are still setting and are not structurally firm enough to be moved without breaking. At exactly 5 minutes, slide the parchment sheet with the cookies directly onto a wire cooling rack.
Do not lift individual cookies with a spatula at this point — slide the entire parchment sheet. The cookies will feel soft and fragile until they have cooled for at least 15 minutes on the rack. After 15 minutes they are stable enough to handle. After 30 minutes at room temperature the white chocolate chunks will have re-firmed and the centers will have reached their final texture. Repeat the baking process with the remaining dough balls, always starting with chilled dough on a room-temperature (not hot) baking sheet.
At 5 minutes on the pan, the edges should look fully set and the centers should look matte rather than glossy — the glossy sheen disappears as the interior sets. If the center still looks wet and shiny at 5 minutes, give it one more minute on the pan before moving.
⚠️ Moving the cookies before 5 minutes breaks the base — the bottom of the cookie is the last part to fully set and will tear away from the parchment if lifted too soon. Waiting longer than 8 minutes on the pan starts to dry out the bottoms as the pan continues to cool and the cookie sticks.
Cookies are cooled and set. Move to the Science section to understand why every variable in this method produces the result shown in the photos.
The Science Behind Cookies and Cream Cookies
Why the Oreo Filling Changes the Dough Structure
I noticed it before I understood it. The batches with the most Oreo pieces were consistently softer, flatter, and harder to handle than the batches with fewer. I assumed I was over-mixing. I wasn’t. The issue was fat content — specifically, the cream filling in each Oreo cookie is approximately 50% vegetable shortening by weight. Every Oreo you fold into the dough contributes additional fat that is not accounted for in the butter measurement. At 18 Oreos per batch, that fat contribution is significant enough to change the dough’s consistency, lower its melting point, and accelerate spread in the oven.
This is why the Oreo quantity is not adjustable without consequences — adding more does not simply make the cookies more Oreo-flavored. It changes the fat ratio of the entire dough and produces a flatter, greasier cookie that cannot hold the domed profile shown in the photos. The 30-minute chill exists specifically to re-solidify the shortening from the filling before the dough hits the oven, giving the edges time to set before the center fat melts and spreads. Skip the chill and you are skipping the mechanism that controls the shape.
How Creaming Creates the Structure That Chilling Preserves
The creaming method — beating softened butter with sugar at medium speed for a full 3 minutes — does one specific thing: it forces air bubbles into the fat. Butter fat at 65–68°F (18–20°C) is soft enough to be malleable but firm enough to trap and hold air pockets when agitated. Those air pockets expand in the heat of the oven and push the cookie upward, which is what produces the domed profile rather than a flat disc. Sugar crystals act as tiny mechanical aerators during this process — they cut into the butter fat and create the pockets. This is why plain white granulated cane sugar cannot be swapped for powdered sugar or liquid sweeteners in this recipe without losing the dome. Powdered sugar dissolves before it can cut. Liquid sweeteners do not cut at all.
If you have made these and gotten flat cookies despite correct butter temperature, under-creaming is almost always the cause — 90 seconds of mixing looks similar to 3 minutes but produces significantly less aeration. The cookies in the hero image above are the result of a full 3 minutes at medium speed, nothing less. If you want to make a similar cookie without the creaming step, my easy chocolate chip cookies recipe uses a melted butter method that produces a flatter, chewier result by design — a genuinely different texture built around a different mechanism.
Why White Chocolate Melts Completely While Chips Hold Their Shape
White chocolate behaves differently from semi-sweet or dark chocolate in a hot dough because of what it contains. True white chocolate is cocoa butter, milk solids, and sugar — no cocoa mass. Cocoa butter has a narrow melting range of 93–98°F (34–37°C), which means it begins to melt at body temperature and is fully liquid well before the oven reaches its set temperature. When a white chocolate chunk sits inside cookie dough at 350°F (175°C), it liquefies completely in the first 4 to 5 minutes of baking and flows into the surrounding dough — this is the pooling visible in the interior shot above.
White chocolate chips are formulated differently. They contain added stabilizers — typically palm kernel oil or hydrogenated vegetable fat — that raise the melting point and allow the chip to hold its shape through a full bake cycle. This is useful when you want defined visible chips in a finished cookie. It is not useful when you want the interior melt-through shown in these photos. Chopped white chocolate bar produces that result. White chocolate chips do not, regardless of brand.
Troubleshooting & Pro-Tips About Cookies and Cream Cookies
Common Mistakes
The cookies spread flat and look thin and greasy
The most likely cause is butter that was too warm when creamed. Butter above 70°F (21°C) cannot trap and hold air during creaming — it is too soft to resist the mechanical action of the mixer and produces a greasy, liquid-fat dough rather than an aerated one. A second cause specific to this recipe is Oreo quantity — if you added more than 18 Oreos to the batch, the additional shortening from the filling contributed excess fat that lowered the dough’s structural integrity before it reached the oven.
If the cookies have already baked flat, they are still edible but the texture will be thin and slightly greasy rather than soft and domed. For the next batch: confirm butter temperature with an instant-read thermometer before creaming, measure Oreos by count not by weight, and do not skip the 30-minute chill. Unchilled dough that carries extra fat from the Oreo filling will spread aggressively the moment it hits oven heat.
The cookies baked into each other and the edges merged on the pan
This is a pan preparation and spacing failure. Six cookies per standard half-sheet pan is the correct number for this dough — these are large cookies and they spread during baking. Fitting more than six per pan forces the edges to meet before they can set individually. If you used a dark non-stick baking sheet without reducing the oven temperature, the bottoms also overbrown before the centers finish, which contributes to uneven spread. For the next batch: use a light-colored aluminum baking sheet, space dough balls at least 2 inches (5cm) apart in every direction, limit to 6 cookies per pan, and reduce the oven temperature by 25°F (15°C) if your pan is dark.
The Oreo halves on top fell off during baking or sank completely into the cookie
Fell off: the Oreo half was pressed into cold, firm dough after chilling rather than into soft dough before chilling. Cold dough does not grip the cookie piece — it holds it at the surface without embedding it, and the piece separates as the dough expands in the oven. Press the Oreo halves into the dough balls before the 30-minute refrigerator chill. Sank completely: the dough was too soft when the Oreo was pressed in, and the piece was pushed too deep. Press the halved Oreo approximately halfway into the dough ball — not flush with the surface, and not buried. The correct depth shows the Oreo pattern clearly on the surface of the baked cookie, which is the result visible in the photos.
The interior is dry and crumbly instead of soft and dense
Over-baking is the cause in almost every case. These cookies must be pulled when the centers still look underdone and slightly glossy — not when they look set. If you waited until the centers looked fully baked before pulling the pan, carryover heat from the pan continued cooking them for another 5 minutes and produced a dry, over-set interior. A secondary cause is over-measured flour — a scoop-packed measuring cup can add 20–30% more flour than the recipe needs, which dries out the dough before baking even begins. For the next batch: pull the pan at 10 to 11 minutes when centers look glossy and underdone, rest on the pan for exactly 5 minutes, and weigh the flour at 281g rather than measuring by volume.
The dough is too sticky to scoop and does not hold its shape
The butter was too warm during creaming or the dough was not chilled before portioning. A correctly made dough at room temperature is tacky but scoopable — it holds a ball shape when compressed in the scoop but releases easily. A dough that collapses immediately or sticks to everything has too much soft fat. Transfer the entire bowl of dough to the refrigerator for 20 minutes and test again. If the dough is still unworkable after chilling, the butter temperature during creaming was the root cause and the batch may need to be started again. This is the consequence of skipping the butter temperature check before mixing.
The cookies taste sweet but flat — no depth, no chocolate complexity
This is an Oreo quality or white chocolate quality issue. Generic sandwich cookies that are not Oreo brand contain different ratios of cocoa in the wafer and different filling fat compositions — the result is a less pronounced dark chocolate flavor and a filling that behaves differently in the dough. Use name-brand Oreos. For the white chocolate, low-quality white chocolate chips or compound white coating (sometimes labelled “white baking chips” rather than “white chocolate”) contain no cocoa butter and produce a waxy, artificially sweet flavor rather than the rich, creamy melt of real white chocolate. Use a white chocolate bar with cocoa butter listed in the ingredients.
The cookies baked flat and dense with no dome and a slightly soapy aftertaste
This is a leavening failure — the baking soda was expired or insufficient. Baking soda loses potency over time, and a batch made with expired leavening produces cookies that never lift in the oven and carry a faint metallic or soapy flavor from the inert sodium bicarbonate. Test before every batch: drop ½ teaspoon of baking soda into 2 tablespoons of hot water with a few drops of white vinegar. Vigorous, immediate bubbling confirms it is active. Flat, slow, or no reaction means replace the box. Baking soda expires approximately 6 months after opening regardless of the best-by date on the packaging — write the opening date on the box.
The cookies spread more than expected and the surface looks tacky even after full cooling
High ambient humidity — above 70% relative humidity — causes cookie dough to absorb moisture from the air during scooping and on the pan before baking, which accelerates spread and delays surface setting. The surface may remain slightly tacky after cooling even when the interior is fully baked — this is surface moisture from the air, not underbaking. Refrigerate scooped dough balls for 45 minutes instead of 30 before baking, and bake one test cookie first to assess spread before committing the full batch. At high altitude above 3,500 feet (1,067 meters), reduce the baking soda to ¾ tsp, add 2 tablespoons (16g) of flour, and increase the oven temperature by 15°F (8°C) — leavening gases expand faster at altitude and can cause the cookies to over-puff and collapse.
Expert Pro-Tips
Bake one test cookie before committing the full batch. Dough composition varies by butter brand, flour brand, and kitchen humidity. Before baking all 18, bake a single cookie and assess the spread, dome, and bake time. Adjust spacing and bake time for the remaining cookies based on what that first cookie shows you.
For extra Oreo flavor on the surface, press a pinch of crushed Oreo crumbs onto the top of each dough ball alongside the Oreo half before chilling. The crumbs toast lightly in the oven and intensify the cookie flavor at the surface without changing the dough structure.
If baking in multiple batches, always use a room-temperature pan for each new batch. Placing chilled dough balls on a hot pan from a previous bake causes the dough to begin spreading before it reaches the oven — the bottom of each cookie softens on contact with the hot metal and loses its shape. Let the pan cool fully between batches or rotate between two pans.
For cleaner Oreo pieces in the finished cookie, freeze the whole Oreos for 15 minutes before crushing. Cold Oreos shatter into larger, cleaner chunks rather than crumbling into fine powder. Fine powder disappears into the dough and contributes flavor but no texture. Cold-crushed pieces hold their edges and produce visible dark chunks in the finished cookie interior.
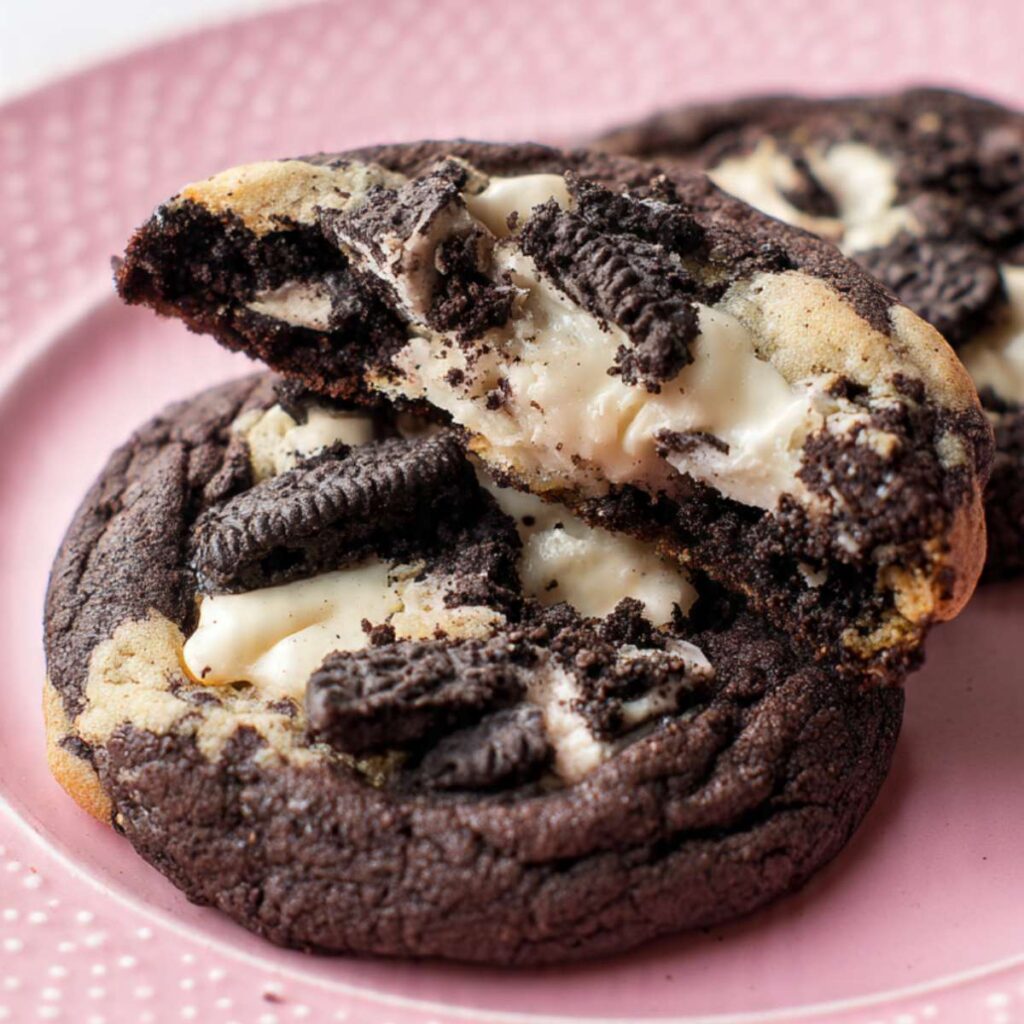
For a chocolate cookies and cream version: Replace ¼ cup (30g) of the all-purpose flour with ¼ cup (22g) of unsweetened Dutch-process cocoa powder and increase the granulated sugar by 2 tablespoons (25g) to compensate for the cocoa’s bitterness. The dough will be darker and slightly stickier — chill for 45 minutes instead of 30. The baked result is the deep dark brown cookie shown in the broken-open close-up above, with the same white chocolate interior melt. This variation is slightly fudgier than the vanilla version and the Oreo flavor is less distinct — the cocoa competes with it.
How to Store Cookies and Cream Cookies
Room Temperature
Store fully cooled cookies in an airtight container with a tight-fitting lid — not a zip-lock bag laid flat, which traps moisture unevenly and softens the bottom of each cookie faster than the top. Layer the cookies in a single layer if possible, or separate layers with a sheet of unbleached parchment paper to prevent the Oreo pieces from sticking to the cookies above and below. Do not use plastic wrap pressed directly against the cookies — it pulls the surface and disturbs the Oreo half embedded in the top.
At room temperature, these cookies stay soft and dense for up to 4 days. Day 1 the white chocolate is still slightly soft and the interior is at its most tender. Day 2 the white chocolate has firmed into a fudgy layer inside the cookie and the overall texture becomes slightly chewier — many people prefer Day 2. By Day 3 the Oreo pieces soften further as they absorb moisture from the surrounding dough, which deepens the cookies-and-cream flavor but reduces the textural contrast between the crunchy cookie pieces and the soft dough. Day 4 is the outer limit — the cookie is still good but the Oreo crunch is largely gone.
Refrigerator
These cookies do not benefit from refrigerator storage. Cold temperatures firm the white chocolate and butter fat simultaneously, producing a dense, hard texture that does not reflect what you made. If you need to store them longer than 4 days, go directly to the freezer rather than the refrigerator. If a cookie has been refrigerated, bring it to room temperature for 20 to 30 minutes before eating — or warm it in a 300°F (150°C) oven for 4 minutes, which softens the white chocolate back toward its fresh-baked state.
Freezer — Baked Cookies
Place fully cooled cookies in a single layer on a parchment-lined tray and freeze for 1 hour until solid. Transfer to a freezer-safe zip-lock bag or airtight freezer container, separating layers with parchment. Baked cookies freeze well for up to 2 months. The Oreo pieces hold their structure well in the freezer — they do not become soggy during the freeze-thaw cycle the way fruit inclusions can. To thaw: place cookies on the counter at room temperature for 45 minutes to 1 hour. For the closest approximation to fresh-baked, warm thawed cookies in a 300°F (150°C) oven for 5 to 6 minutes — the white chocolate softens and the interior returns to a near-fresh texture.
Freezer — Unbaked Dough Balls
This dough freezes exceptionally well before baking, and frozen unbaked dough balls produce a better result than frozen baked cookies. Portion and top the dough balls with Oreo halves as directed in the method, then freeze on a parchment-lined tray for 1 hour until solid. Transfer to a freezer-safe bag and store for up to 3 months. Bake directly from frozen — do not thaw. Add 2 to 3 minutes to the bake time and watch for the same visual cues: edges set and lightly golden, centers still slightly glossy. The frozen dough bakes to a slightly thicker, more domed cookie than fresh dough because the fat is fully solidified going into the oven — some people prefer this result and freeze their dough intentionally for this reason.
Serving Suggestion
Serve these cookies at room temperature or slightly warm — not hot from the oven, and not cold from the refrigerator. At room temperature the white chocolate has firmed just enough to give the interior a fudgy, creamy texture rather than a liquid melt, which is the result visible in the cross-section shots. The Oreo pieces have the most textural contrast at this temperature — still with some resistance before giving way to the soft dough around them.
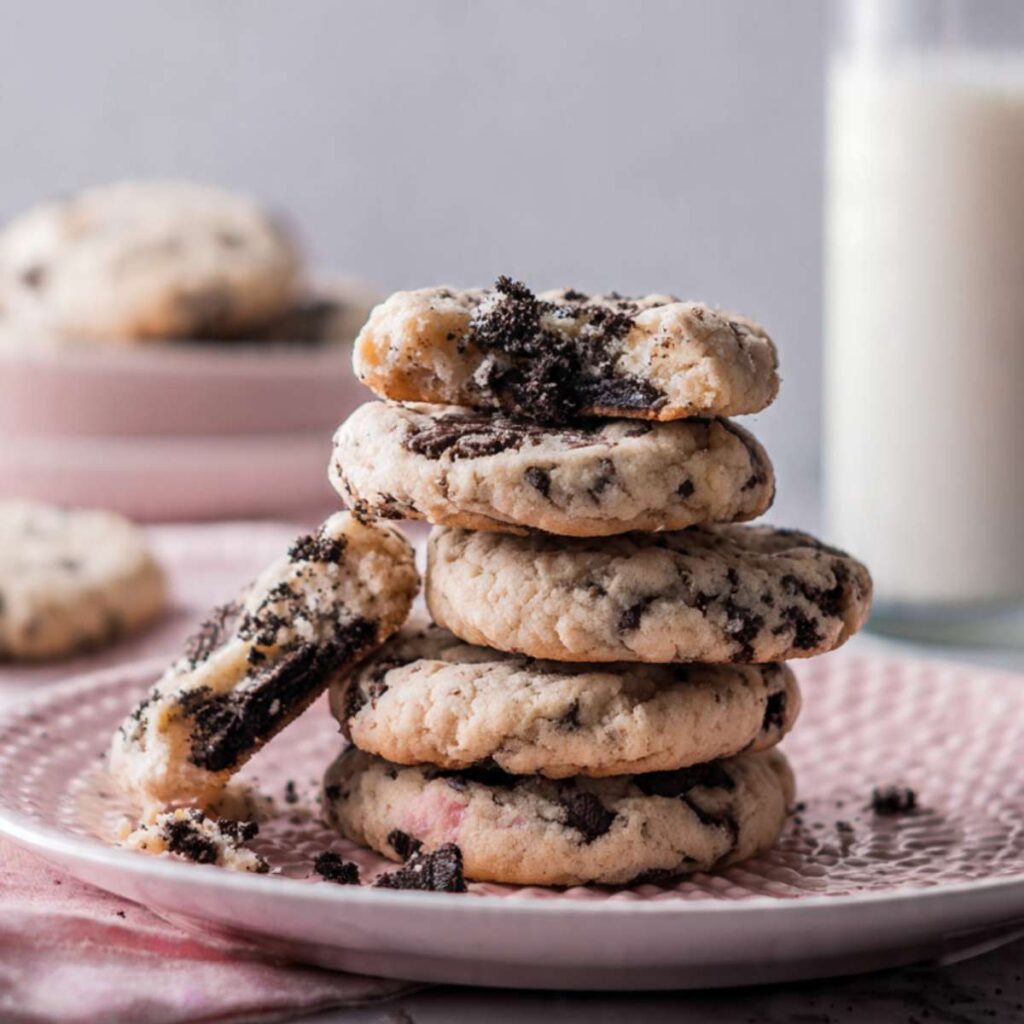
I serve these with cold whole milk — not oat milk, not almond milk. The fat in whole milk cuts the sweetness of the white chocolate and the Oreo filling in a way that lower-fat alternatives do not. It is a specific pairing and it makes a noticeable difference.
These are the cookies I bring when someone asks me to bring something that will be remembered. Not a dinner party, not a birthday cake situation — something more casual, where the bar is lower and the cookies end up being the thing everyone talks about. A school pickup, a friend’s moving day, a Sunday afternoon when nothing is planned and someone just needs cookies on the counter.
Day 2 is genuinely better than Day 1 for these cookies if you can wait. The white chocolate fudges, the Oreo pieces soften slightly into the dough, and the overall cookies-and-cream flavor integrates in a way that the fresh-baked version has not had time to develop yet. I make these the evening before I need them specifically for this reason.
These cookies are not good for stacking in a gift box without padding — the Oreo half on top is a structural vulnerability. It will survive one layer of parchment but not the weight of another cookie placed directly on top of it. Box them in a single layer or wrap individually.
🗒 Luna’s Note: I always make a double batch and freeze half the dough balls before baking. Frozen dough bakes thicker than fresh — slightly more domed, slightly more structured — and I have found that the frozen version is actually the result I prefer. A bag of portioned, Oreo-topped dough balls in the freezer means cookies in 14 minutes any time I want them, with no mixing, no cleanup, no planning.
Frequently Asked Questions
Can I make cookies and cream cookies ahead of time?
Yes — and they are better made the evening before you need them. Bake the cookies and store in an airtight container at room temperature overnight; by the next day the white chocolate fudges and the Oreo pieces integrate into the dough in a way the fresh-baked version has not had time to develop. Alternatively, freeze unbaked dough balls for up to 3 months and bake directly from frozen.
Can I use Double Stuf Oreos instead of regular Oreos?
Double Stuf Oreos work but produce a noticeably different result — softer dough, flatter spread, and a sweeter overall flavor. The extra filling in Double Stuf cookies contains significantly more shortening than a regular Oreo, which adds fat to the dough beyond what the recipe accounts for. That additional fat lowers the dough’s structural integrity and accelerates spread in the oven, producing a thinner, stickier cookie than what is shown in the photos. If you use Double Stuf, chill the dough for 45 minutes instead of 30, reduce the Oreo count to 15 instead of 18, and expect a slightly flatter result. Regular Oreos are what this recipe was tested and calibrated with.
Why did my cookies spread too much and go flat?
Cookies spread too much when the butter was too warm during creaming, the dough was not chilled before baking, or the Oreo count was too high. Butter above 70°F (21°C) cannot trap air during the creaming process and produces a dough with too much liquid fat, which melts and spreads immediately in the oven before the edges can set. In this specific recipe, each Oreo also contributes shortening from its cream filling — more Oreos than the recipe calls for adds fat that is not accounted for in the butter measurement and accelerates spread further. Refrigerate scooped dough balls for the full 30 minutes, confirm butter was at 65–68°F (18–20°C) before creaming, and measure Oreos by count rather than weight.
Can I substitute white chocolate chips for white chocolate chunks?
White chocolate chips can be substituted but the interior result will be different. White chocolate chips contain stabilizers — typically palm kernel oil — that prevent full melting during baking. They hold their shape through the bake cycle and produce visible defined chips in the finished cookie rather than the pooled, melted white chocolate interior shown in the cross-section photos. The flavor is similar but the texture experience is not the same. If the interior melt is what you want — which is the result in these photos — use a chopped white chocolate bar. If you want defined white chocolate pieces that hold their shape and stay firm after cooling, chips are the correct choice for that specific outcome.
How do high altitude and humidity affect these cookies?
In humid climates above 70% relative humidity, the dough absorbs moisture from the air and the cookies spread more and take longer to set on the surface. Refrigerate the scooped dough balls for 45 minutes instead of 30 before baking, and expect the surface to feel slightly tacky even when fully baked — this is surface moisture from the air, not underbaking. At high altitude above 3,500 feet (1,067 meters), leavening gases expand faster and the cookies can over-rise and then collapse. Reduce the baking soda from 1 tsp to ¾ tsp, increase the flour by 2 tablespoons (16g), and increase the oven temperature by 15°F (8°C). For a related no-bake Oreo option that sidesteps altitude baking variables entirely, my no bake chocolate oatmeal cookies require no oven and no leavening adjustment.
Can I double this cookies and cream cookies recipe?
Yes — double all ingredients except the baking soda. For a doubled batch, use 1¾ tsp of baking soda rather than 2 tsp. Leavening does not scale linearly — double the baking soda produces a soapy, metallic aftertaste and causes the cookies to over-rise and collapse. Bake the doubled batch in separate batches on separate pans — do not crowd both batches onto one pan or onto two pans baked simultaneously on different racks. Bake time remains 10 to 12 minutes per batch. Keep the unbaked dough balls in the refrigerator between batches so they do not warm up and lose the structural benefit of chilling.
What makes cookies and cream cookies chewy versus cakey?
The ratio of brown sugar to white sugar and the bake time together control the texture. Brown sugar is hygroscopic — it draws and holds moisture — which produces a chewier, denser crumb. White sugar drives spread and surface crackle. This recipe uses equal parts of both, which produces a balanced result: soft and dense in the center with slightly set edges, which is the texture shown in the photos. Cakey cookies result from too much flour, too many eggs relative to fat, or over-baking to a fully set center. If your cookies came out cakey rather than chewy and dense, check flour measurement first — a scoop-packed cup adds enough extra flour to shift the texture from chewy to cakey without changing any other variable.
More Cookies You’ll Love
- Peanut Butter Chocolate Chip Cookies — dense, fudgy cookies where commercial peanut butter provides all the fat and binding; packed with semi-sweet chips and finished with a slight crinkle on top.
- Hot Cocoa Cookies — soft chocolate cookies with a marshmallow center and a deep cocoa flavor; the cookies-and-cream cousin for anyone who wants something richer and more chocolate-forward.

Cookies and Cream Cookies
Ingredients
Equipment
Method
- Position oven rack in the middle and preheat to 350°F (175°C), allowing 15–20 minutes for full temperature stabilization, then line a light-colored aluminum baking sheet with parchment paper and set aside.
- In the bowl of a stand mixer fitted with the paddle attachment or a large bowl with a hand mixer, beat the 1 cup (226g) softened unsalted butter, ¾ cup (150g) granulated sugar, and ¾ cup (165g) packed brown sugar on medium speed for exactly 3 minutes until pale, fluffy, and noticeably increased in volume.
- With the mixer on low, add the 2 room-temperature large eggs one at a time, mixing for 20 seconds after each addition, then add the 2 tsp (10ml) pure vanilla extract and mix on medium for 30 seconds until smooth and glossy.
- In a separate bowl, whisk together the 2¼ cups (281g) all-purpose flour, 1 tsp (6g) baking soda, and ½ tsp (3g) fine sea salt, then add to the butter mixture in two additions on the lowest speed, mixing only until no flour streaks remain.
- Remove the bowl from the mixer and fold in the 18 crushed Oreo cookies and 1 cup (170g) white chocolate chunks using a silicone spatula in 12 to 15 wide strokes from the bottom of the bowl upward until evenly distributed.
- Using a medium cookie scoop, portion the dough into 18 balls, roll lightly between your palms, press one halved Oreo firmly halfway into the top of each ball, then transfer to a parchment-lined tray and refrigerate uncovered for exactly 30 minutes.
- Place 6 chilled dough balls at least 2 inches (5cm) apart on the prepared baking sheet and bake on the middle rack at 350°F (175°C) for 10 to 12 minutes, pulling the pan when edges look set and lightly golden but centers still appear slightly glossy and underdone.
- Leave baked cookies on the hot pan for exactly 5 minutes, then slide the parchment sheet onto a wire cooling rack and cool for at least 30 minutes before eating; repeat with remaining dough balls, always baking from chilled dough on a room-temperature pan.