
Thick & Soft Snickerdoodle Cookies
I have made these snickerdoodle cookies in my kitchen more than thirty times across four separate rounds of testing, and I have fixed every single way they can fail. Flat cookies, hard cookies, cookies that lose their cinnamon sugar coating in the oven — I have seen all of it, and this recipe solves all of it.
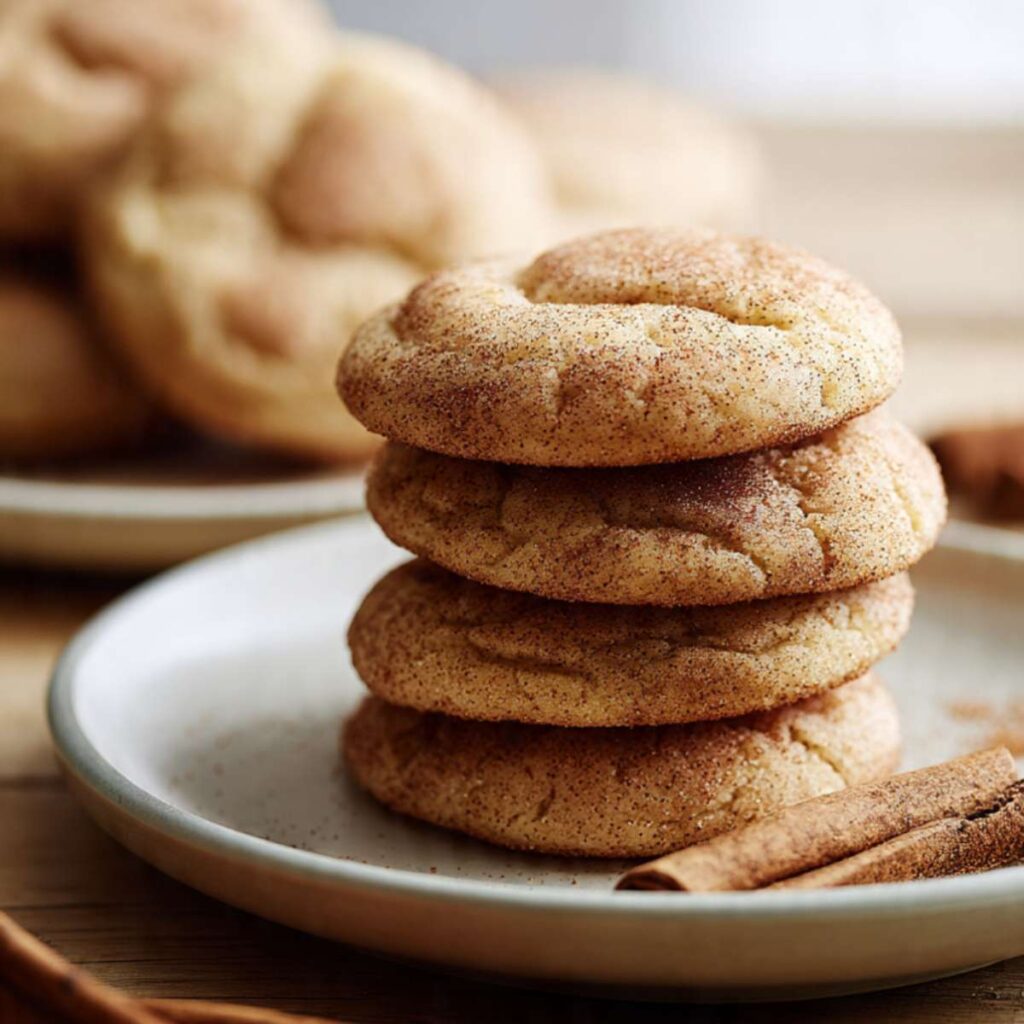
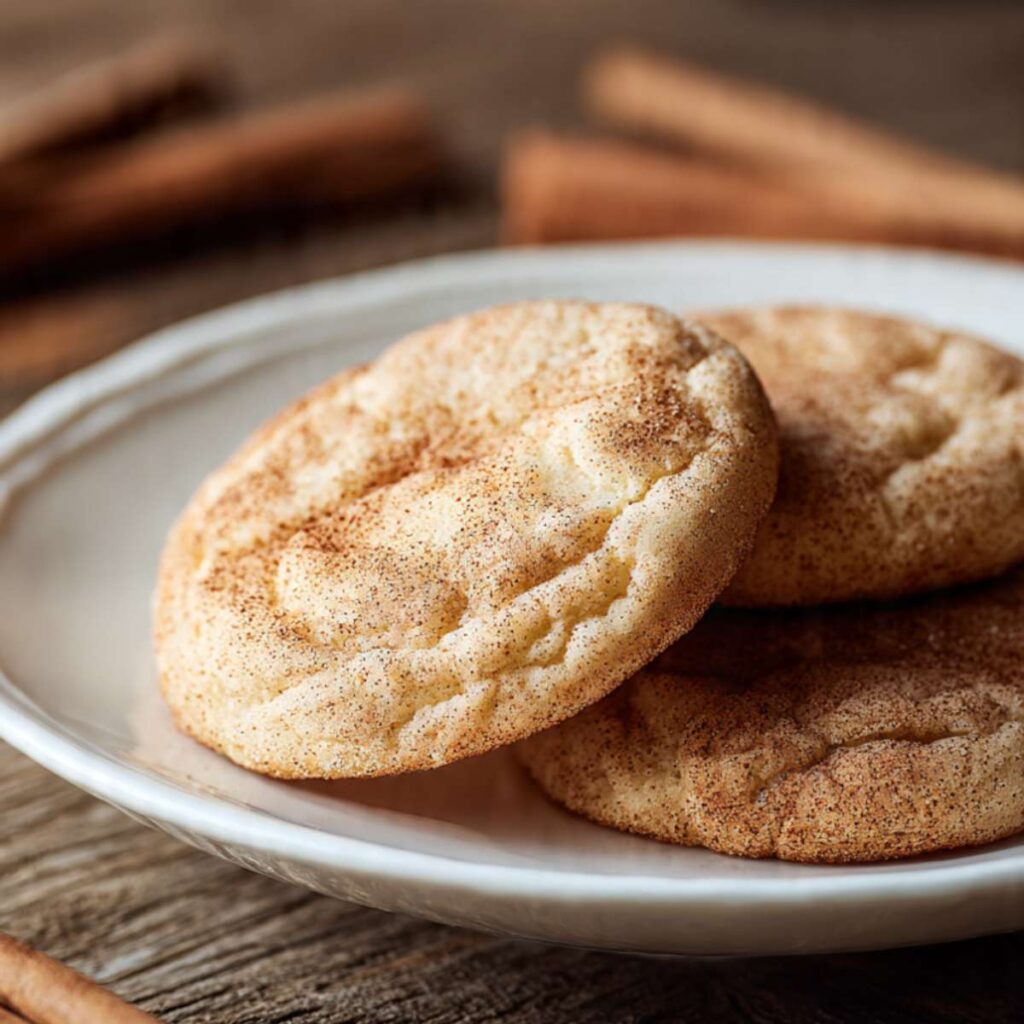
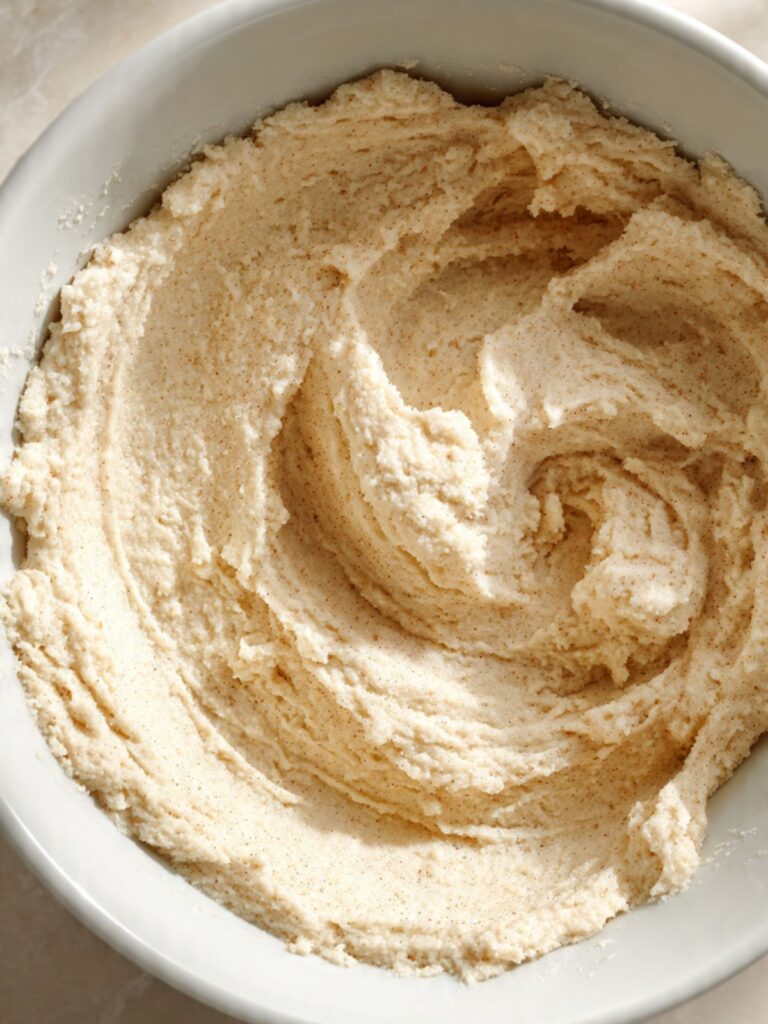
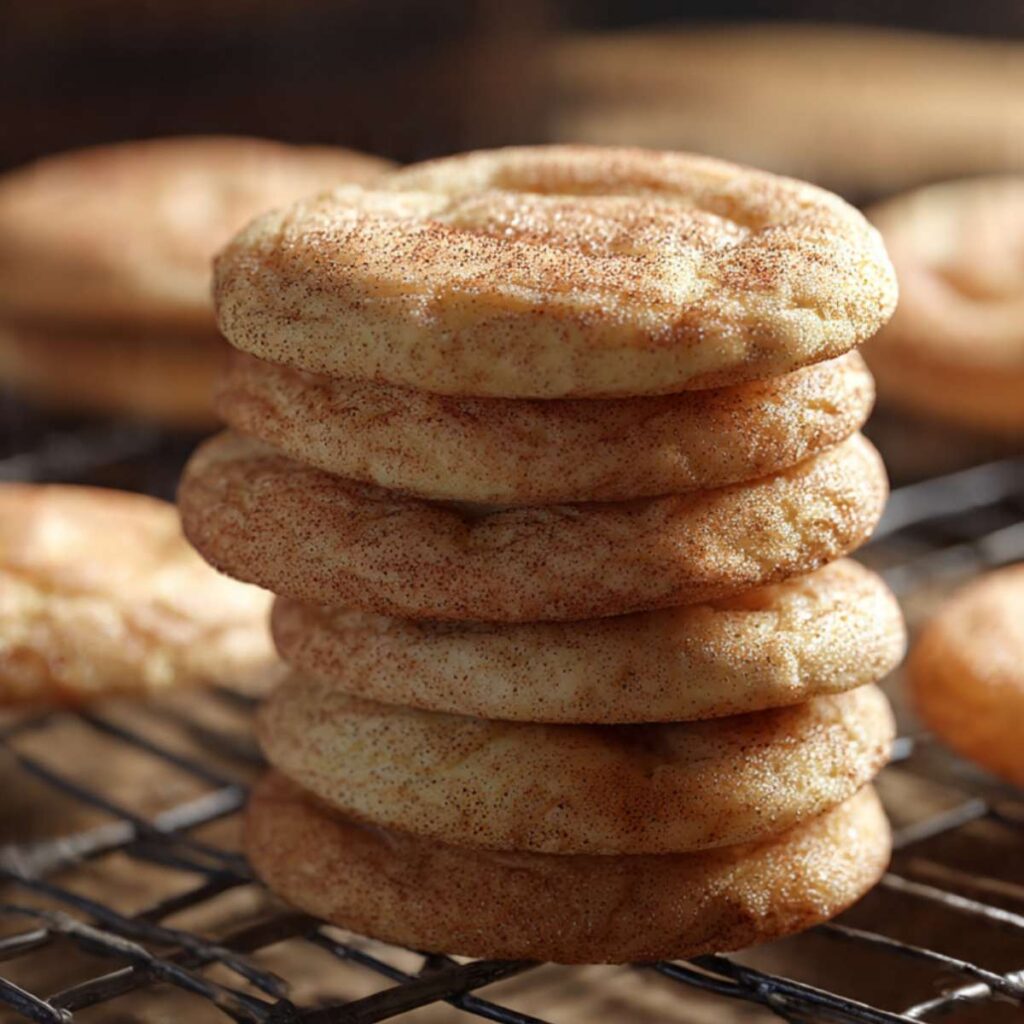
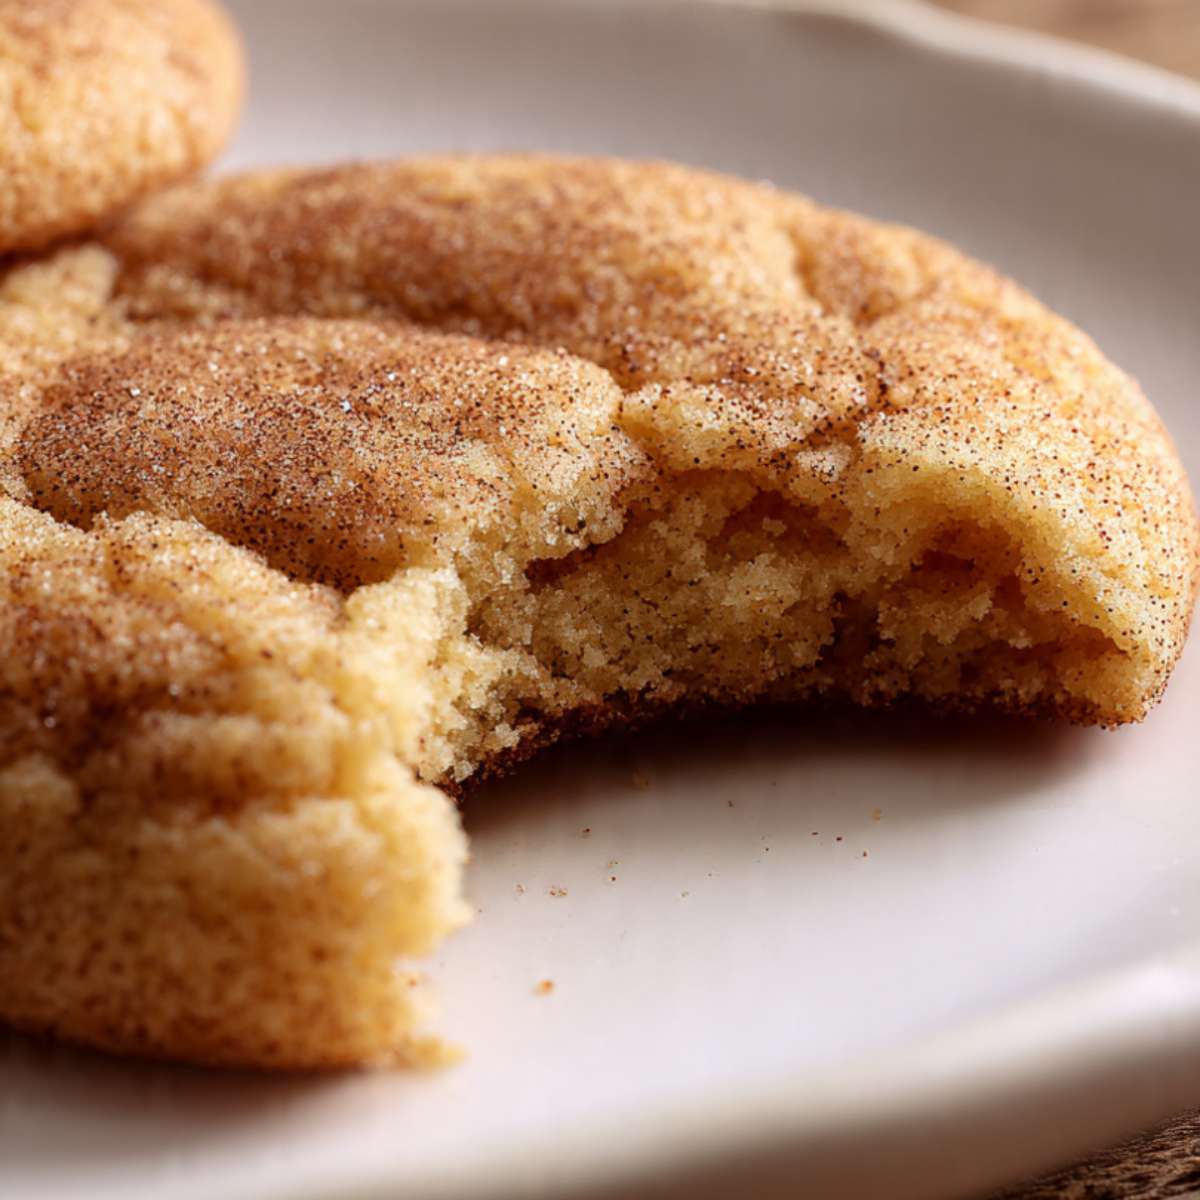
The cookies you are going to make look exactly like the ones in the hero photo at the top of this page. Thick and domed with a rounded top that holds its shape through the full bake. A heavy, even cinnamon sugar crust covers every surface — you can see the individual sugar granules and the warm brown cinnamon dusting that gives each cookie its matte, fragrant finish. The edges are just set. The centers still look slightly underdone when you pull them. That is exactly right. When you break one open — as shown in the close-up photo further down — the interior is a pale cream-colored, dense, tightly structured crumb. No large air pockets, no dry zones. Tender all the way through.
There is no brown butter in this recipe. No chilling required. This dough goes straight from the bowl to the oven, and the entire batch is done in under 35 minutes from the moment you start measuring.
🗒 Luna’s Note: I always make snickerdoodles when I want a cookie that disappears from the counter by the end of the day. There is something about the cinnamon sugar smell that fills the kitchen that makes everyone appear from the other rooms.
I tested this with melted butter versus properly softened butter. Melted butter produced cookies that spread flat and thin — nowhere near the thick domed profile in the stacked photo. The cinnamon sugar coating also slid to the edges instead of staying even across the top. Softened butter creamed with the sugar traps air pockets that give these cookies their height. That is the only version that works for this result.
I tested this with and without cream of tartar. Snickerdoodles without cream of tartar are just cinnamon sugar cookies. The cream of tartar is what gives snickerdoodles their slightly tangy, almost buttery-sour flavor underneath the cinnamon. It also reacts with the baking soda to produce a more tender crumb and that signature soft, fine interior you see in the broken cookie photo. Leaving it out changes the flavor profile and the texture. It stays in.
I tested the cinnamon sugar ratio at 1 teaspoon of cinnamon to 3 tablespoons of sugar, and at 1½ teaspoons of cinnamon to the same sugar amount. The lower ratio produced cookies that looked pale and tasted more like plain sugar cookies. At 1½ teaspoons the coating looks like what you see in the images — deeply fragrant, visibly brown-dusted, and flavorful enough to taste with every bite without overwhelming the buttery interior.
No mixer attachments to swap mid-recipe. One bowl for the dough, one small bowl for the coating. That is the whole setup.
| Prep Time | Cook Time | Total Time | Yield | Difficulty |
|---|---|---|---|---|
| 15 minutes | 10–12 minutes | 30 minutes | 20 cookies | Easy |
| Calories | Fat | Carbs | Sugar | Protein |
|---|---|---|---|---|
| ~178 kcal | ~9g | ~24g | ~14g | ~2g |
Macros are approximate and will vary based on ingredient brands and exact cookie size.
Ingredients & Tools
For the Cookies
- 2¾ cups (330g) all-purpose flour (spooned into the measuring cup and leveled — or weighed at 330g for guaranteed accuracy)
- 2 tsp cream of tartar — this is not optional. It is what makes a snickerdoodle a snickerdoodle. See Before You Start for why.
- 1 tsp baking soda, checked for freshness
- ½ tsp fine sea salt
- 1 cup (227g) unsalted butter, softened to room temperature (65–68°F / 18–20°C) — not melted, not cold. See Before You Start for timing and the visual check.
- 1½ cups (300g) plain white granulated cane sugar — do not substitute coconut sugar, raw sugar, or any liquid sweetener. The crystal structure of plain granulated sugar is what controls spread and creates the surface crinkle on these cookies.
- 2 large eggs (approximately 50g each without shell), room temperature — cold eggs will not emulsify smoothly into the creamed butter and can cause the batter to look broken or curdled.
For the Cinnamon Sugar Coating
- 3 tbsp (38g) plain white granulated cane sugar
- 1½ tsp ground cinnamon, checked for freshness — open the jar and smell it before you start. It should hit you immediately with a strong, warm, spicy scent. If it smells faint or like nothing at all, replace it. Old cinnamon will produce a pale, flavorless coating that looks nothing like the deeply fragrant crust in the photos.
Before You Start
Butter timing and visual check: Pull your butter from the refrigerator 60 to 90 minutes before you begin mixing. In a warm kitchen (above 72°F / 22°C), 45 minutes is enough. The butter is ready when you press your finger into it and it leaves a clean indent without the surface feeling greasy or slick. If your finger slides straight through and the butter looks shiny, it is too warm — the cookies will spread flat and lose their dome. If the indent does not hold a clean shape and the butter feels cold and resistant, it is still too cold — it will not cream properly and the cookies will be dense and under-risen.
If you are short on time, cube the butter into ½-inch (1.5cm) pieces and let them rest on the counter for 20 to 30 minutes. Small pieces come to temperature significantly faster than a full stick. Do not use the microwave to soften butter for this recipe. Microwaved butter softens unevenly — the center melts while the outside still feels firm — and partially melted butter cannot be creamed correctly. Once any portion of the butter has melted, it cannot be brought back. Start with a fresh stick.
This single check — the finger-indent test — is the most important thing you can do before this recipe begins. Every thick, domed cookie in these photos started with butter that passed it.
Egg timing: Pull your eggs from the refrigerator 30 minutes before mixing and set them on the counter. Cold eggs added directly to creamed butter disrupt the emulsification — the fat and water separate instead of binding, and the mixture can look curdled or broken. It recovers in the oven, but the texture of the finished cookie is never quite as smooth or uniform as when the eggs were at room temperature.
If you forgot to pull the eggs ahead of time, place them still in their shells into a bowl of warm water — not hot, not boiling, just comfortably warm to the touch, approximately 90–100°F (32–38°C). Leave them for 10 minutes. This brings them to room temperature quickly without beginning to cook them. Do not use hot water above 120°F (49°C) — water that hot begins to cook the egg white through the shell, which changes its protein structure and the way it behaves in the dough.
After 10 minutes, lift one egg out and hold it in your palm for 5 seconds. It should feel neutral — neither cold nor warm. That is room temperature. If it still feels distinctly cool, return it to the water for another 3 to 4 minutes.
Flour measuring method: Use a separate spoon to scoop flour into your measuring cup, then level it off with a straight edge. Do not scoop the measuring cup directly into the flour bag — direct scooping packs in 20 to 30% more flour than the recipe needs and will produce dry, dense cookies that do not spread to the rounded profile shown in the photos. For guaranteed accuracy, weigh the flour at 330g on a kitchen scale. The gram weight is the number I tested with.
Gram weight priority: For the most consistent results, use a kitchen scale set to grams. The gram weights in this recipe are what I tested with — they are the most reliable way to get the exact cookies you see in these images.
Cream of tartar — why it is here: Cream of tartar is a dry acid derived from winemaking. In this recipe it does two things: it reacts with the baking soda to leaven the dough and produce a tender crumb, and it gives snickerdoodles their signature slightly tangy, buttery-sour flavor that you do not get from plain sugar cookies. Without it, these are cinnamon sugar cookies — not snickerdoodles. It does not expire the way baking soda does, but check that the container is sealed and dry.
Leavening freshness check: Drop ½ tsp (3g) of baking soda into a small bowl with a splash of hot water and a splash of white vinegar. It should bubble aggressively within 2 seconds. If it fizzes weakly or not at all, replace the box before baking.
Cinnamon freshness check: Open the jar and smell it directly. Fresh ground cinnamon should have an immediate, strong, warm scent. If you have to bring the jar close to your nose to detect anything, the cinnamon has lost its potency and will produce a pale, underwhelming coating. This recipe uses a generous amount of cinnamon for a reason — the deeply dusted surface in the photos depends on cinnamon that still has its full strength.
Mixing method: This recipe requires a stand mixer fitted with the paddle attachment, or a hand mixer. Mixing by hand with a spoon will not incorporate enough air into the butter and sugar during the creaming step, and the cookies will not achieve the thick, domed profile shown in the stacked photos.
Oven rack position: Position your oven rack in the middle of the oven before preheating. The top rack scorches the tops before the centers set. The bottom rack overbrowns the bottoms before the edges are done.
No chilling required: This dough goes straight from the bowl to the cinnamon sugar to the pan. No rest time, no refrigeration needed before baking.
Necessary Tools
Required:
- Stand mixer with paddle attachment (or hand mixer)
- Large mixing bowl
- Small mixing bowl (for cinnamon sugar coating)
- Kitchen scale (strongly recommended — gram weights are more accurate than volume)
- Light-colored aluminum half-sheet baking pan (18×13 inch / 46x33cm) — dark non-stick pans absorb more heat and will overbrown the bottoms of these cookies before the centers set
- Parchment paper — do not substitute foil or grease the pan directly. Foil conducts heat too aggressively and produces tough, dark-bottomed cookies. A greased pan without parchment causes uneven spread.
- Cookie scoop, 2-tablespoon size (optional but strongly recommended for consistent sizing and yield)
- Wire cooling rack
- Silicone spatula
Optional:
- Oven thermometer — most home ovens run 15–25°F (8–14°C) off. If your cookies are spreading more than expected or not spreading enough, the oven temperature is the first thing to check.
How to Make Snickerdoodle Cookies
This recipe uses the creamed butter method — butter and sugar are beaten together first to trap air, eggs are added one at a time for smooth emulsification, and dry ingredients are folded in last with minimum mixing to protect the tender crumb. Follow the order exactly. Every step exists for a specific reason and deviating from it changes the result.
Step 1: Setting Up the Oven, the Pan, and the Equipment
Before anything is measured or mixed, set up your oven and pan correctly — these two things directly control whether the cookies dome or spread flat.
Position your oven rack in the middle position before turning the oven on. Top rack scorches the tops before the centers set. Bottom rack overbrowns the bases before the edges are done. Middle rack is the only position that bakes these cookies evenly from all directions.
Set the oven to 350°F (175°C) and allow it to preheat for a full 15 minutes before the first pan goes in. Do not rush this. Most home ovens run 15–25°F (8–14°C) hotter or cooler than the dial reads. If you have an oven thermometer, place it on the middle rack now and confirm the actual temperature before baking. A 25°F variance is enough to change the spread, the crinkle pattern, and the color of the cinnamon sugar coating on the finished cookies.
Line your light-colored aluminum half-sheet baking pan (18×13 inch / 46x33cm) with parchment paper. Press the parchment completely flat against the pan surface — parchment that bubbles at the corners causes cookies at the edges to bake unevenly.
This recipe uses the creamed butter method and requires a stand mixer fitted with the paddle attachment, or a hand mixer. A hand mixer works but may need an additional 60 seconds of creaming time to achieve the same pale, fluffy result as a stand mixer. Mixing by hand with a spoon will not incorporate enough air into the butter and sugar — the cookies will not dome to the thick, rounded profile shown in the hero photo. You will also need a separate regular mixing bowl for the dry ingredients — the stand mixer bowl stays free for the creaming step.
Do not use a dark non-stick pan. Dark pans absorb significantly more radiant heat than light aluminum and will overbrown the bottoms of these cookies before the centers have a chance to set. The pale, even base visible on the underside of the broken cookie in the close-up photo is the direct result of a light-colored pan at the correct temperature.
Do not grease the parchment. These cookies contain enough butter to release cleanly. Added grease increases spread and pushes the cookies flatter than the domed profile in the photos.
The pan should be lined with flat parchment on the middle rack of a fully preheated oven before Step 2 begins. Your stand mixer bowl should be free and clean, and a separate large mixing bowl should be ready for the dry ingredients.
Step 2: Whisking the Dry Ingredients for Even Leavening Distribution
In a large mixing bowl — not the stand mixer bowl, which you need free for Step 3 — combine 2¾ cups (330g) all-purpose flour, spooned and leveled, 2 tsp cream of tartar, 1 tsp baking soda, checked for freshness, and ½ tsp fine sea salt.
Whisk these four dry ingredients together for approximately 30 seconds until the mixture looks uniformly pale and powdery with no visible clumps. The cream of tartar is a fine white powder that clumps slightly in storage — whisking breaks up any clumps so it disperses evenly through the dough. Cream of tartar that pools in one spot rather than distributing evenly means some cookies will taste tangier than others and some will spread differently. The baking soda and cream of tartar need to be distributed evenly through the flour before they contact any wet ingredients — this prevents premature activation and ensures every cookie gets an equal share of the leavening.
The fine sea salt goes in now rather than with the wet ingredients because distributing it through the flour ensures every bite is seasoned consistently — not just the parts of the dough that happened to be near the salt when it was added.
The dry mixture should look uniformly pale and powdery with no visible white clumps of cream of tartar or dark specks of unmixed baking soda remaining. If you see clumps, whisk for another 15 seconds and check again.
Do not add the dry ingredients to the wet ingredients yet. Set this bowl aside within arm’s reach and move to Step 3.
You should now have one bowl of evenly combined dry ingredients set aside, your stand mixer bowl clean and empty, and your oven approaching 350°F (175°C). That is the correct setup before creaming begins.
Step 3: Creaming the Butter and Sugar Until Pale, Fluffy, and Doubled in Volume
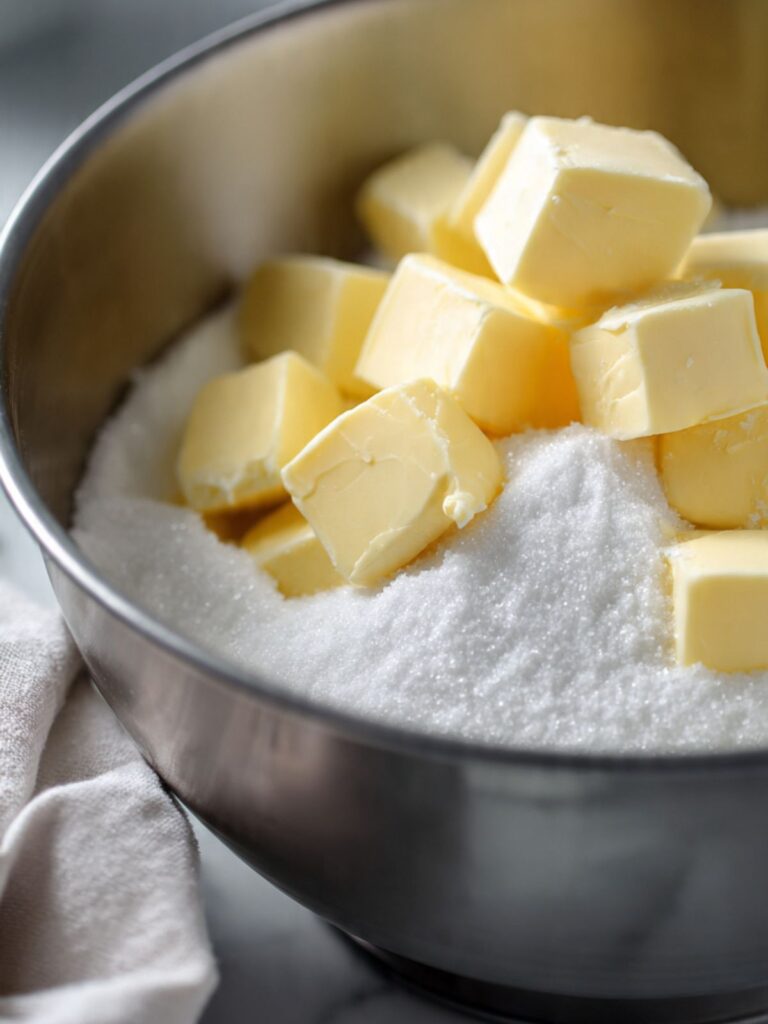
In the bowl of your stand mixer fitted with the paddle attachment, add your 1 cup (227g) unsalted butter, softened to room temperature (65–68°F / 18–20°C) and 1½ cups (300g) plain white granulated cane sugar.
The granulated sugar does two critical things during this step: its sharp crystal edges cut millions of microscopic air pockets into the softened butter fat, and it begins dissolving into the fat to form the emulsion structure that controls how much these cookies spread in the oven. This is precisely why the sugar type is non-negotiable — coconut sugar, raw sugar, and turbinado have different crystal sizes, different moisture contents, and different melting points. Substituting any of them changes the spread, the surface crinkle, and the texture of the finished cookie. Plain white granulated cane sugar only.
Beat on medium speed (speed 4 on a KitchenAid, speed 6 on a hand mixer) for 3 to 4 minutes. Set a timer and do not estimate. The visual trigger — not the timer — is your authority. At the 1-minute mark the mixture will still look yellow and grainy with visible sugar crystals. At the 2-minute mark it will look smoother but still dense and pale yellow. At the 3-minute mark it should look noticeably paler — almost ivory — noticeably increased in volume, and hold a soft ribbon for 2 seconds when you lift the paddle. If it still looks yellow and dense at 3 minutes, beat for another 60 seconds and check again.
Stop the mixer and scrape down the sides and bottom of the bowl thoroughly with your silicone spatula before moving on. Butter that collects under the paddle at the bottom of the bowl is always under-mixed — if it stays there, it shows up as a greasy streak through the finished dough and produces cookies with inconsistent texture across the batch.
🗒 Luna’s Note: I scrape the bowl after creaming every single time, even when it looks fully combined. That pocket of under-mixed butter hiding under the paddle has ruined more than one batch I thought was perfect. Thirty seconds of scraping is not optional.
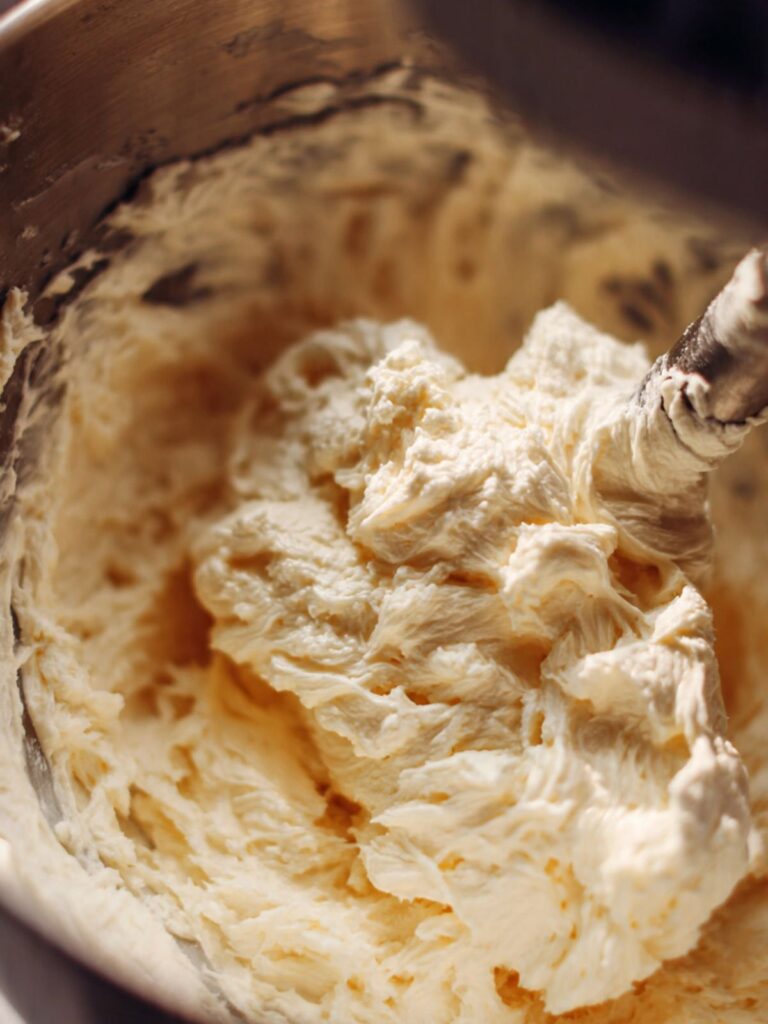
The creamed mixture should look pale ivory — almost white — nearly doubled in volume compared to when you started, and hold a soft ribbon for 2 full seconds when you lift the paddle before it falls back into the bowl. If it still looks yellow, dense, or grainy, keep beating. Yellow butter means under-creamed — the cookies will not dome correctly.
Step 4: Adding the Eggs One at a Time for Smooth Emulsification
With the mixer running on low speed (speed 2 on a KitchenAid), add your first large egg (approximately 50g without shell), room temperature directly into the creamed butter and sugar. Allow it to incorporate fully — approximately 30 seconds — before adding the second.
Add the second large egg the same way. Allow another 30 seconds of mixing on low before stopping the mixer and scraping down the sides and bottom of the bowl thoroughly with your silicone spatula again.
The eggs provide structure, moisture, richness, and binding. Adding them one at a time on low speed gives the fat and water in each egg time to emulsify into the creamed butter without overwhelming it. Adding both eggs at once, or adding them too quickly, breaks the emulsion — you will see small wet clumps surrounded by greasy-looking butter. This does not ruin the cookies but produces a less uniform crumb than the tight, even interior visible in the broken cookie close-up photo.
If the batter looks slightly curdled or broken after the eggs go in — do not panic and do not add more flour. Continue to Step 5. The flour mixture will bring the dough back together.
Classic snickerdoodles do not use vanilla extract. The buttery, tangy flavor profile in this recipe comes entirely from the cream of tartar and the quality of the butter itself. If you are in the habit of adding vanilla to cookie dough at this stage, skip it here deliberately — vanilla shifts the flavor toward plain sugar cookie territory and dulls the cream of tartar tang that makes this recipe taste like a snickerdoodle.
After both eggs are fully incorporated and the bowl is scraped clean, the mixture should look thick, smooth, and slightly glossy — like a very dense cake batter. No visible streaks of egg white, no separation at the edges, no greasy pools. This is correct emulsification. If you see significant separation, scrape the bowl and mix on low for another 15 seconds.
Step 5: Adding the Dry Ingredients Without Developing Gluten
With the mixer on the lowest speed (speed 1 on a KitchenAid), add the flour mixture from Step 2 to the butter mixture in two additions. Add approximately half the flour mixture and allow it to just incorporate — about 10 to 15 seconds. Add the remaining half and mix again until no dry flour streaks are visible — another 10 to 15 seconds.
Stop the mixer the moment the last streak of dry flour disappears. Do not mix beyond this point even if it feels like the dough could use more mixing — it cannot. Gluten forms when the proteins in flour bond with moisture under mechanical pressure. The longer you mix after the flour goes in, the stronger those bonds become. Tight gluten produces a tough, bready, dense cookie — nothing like the soft, tender crumb visible in the broken cookie photo. The crumb in that photo is the result of minimum mixing at this exact stage.
If you see 2 or 3 streaks of dry flour remaining when you stop the mixer, do not turn it back on. Finish those streaks with 2 to 3 deliberate folds of your silicone spatula — fold from the bottom of the bowl upward, rotating the bowl a quarter turn between each fold. This finishes the mixing without developing additional gluten.
Do not overmix after the flour goes in. This is the single most common cause of snickerdoodles that come out tough and dense instead of soft and tender. The dough does not need to look smooth and polished — it needs to look just combined.
The finished dough should look soft, cohesive, and slightly tacky — it will pull away from the sides of the bowl cleanly but will stick lightly to your fingers when touched. It should hold a clean rounded mound when scooped with the cookie scoop. If the dough looks wet or runny, your butter was too warm — refrigerate for 20 minutes before portioning. If it looks dry and crumbly, your flour was over-measured — see the Troubleshooting section.
Step 6: Making the Cinnamon Sugar Coating
In a small mixing bowl, combine 3 tbsp (38g) plain white granulated cane sugar and 1½ tsp ground cinnamon, checked for freshness.
Stir with a spoon for 15 to 20 seconds until the cinnamon is fully and evenly distributed through the sugar with no white patches or dark clumps visible. Hold the bowl up to the light and look across the surface — evenly mixed coating looks uniformly light brown throughout. If you can see streaks of white or dark, stir for another 10 seconds and check again.
The cinnamon-to-sugar ratio in this recipe is deliberate. At 1½ teaspoons of cinnamon to 3 tablespoons of sugar, the coating produces the deeply fragrant, visibly brown-dusted surface you see on every cookie in the stacked plate photos. A lower ratio — 1 teaspoon of cinnamon to the same sugar — produces a pale, lightly flavored coating that reads as sugar cookie, not snickerdoodle. Do not reduce the cinnamon.
The coating mixture should look uniformly light brown throughout — no white sugar patches, no dark cinnamon streaks. This takes under 30 seconds to get right. Do not skip the visual check before rolling.
Step 7: Portioning, Rolling, and Coating the Dough Balls
Using your 2-tablespoon cookie scoop, portion the dough into balls of approximately 2 tablespoons (45g) each. Weigh the first ball on your kitchen scale to confirm 45g — this is your calibration reference. Use it to visually calibrate the remaining portions. This batch yields exactly 20 cookies at this scoop size. If you end up with 18 or 22, your scoop size was inconsistent — the bake time will vary slightly across the batch.
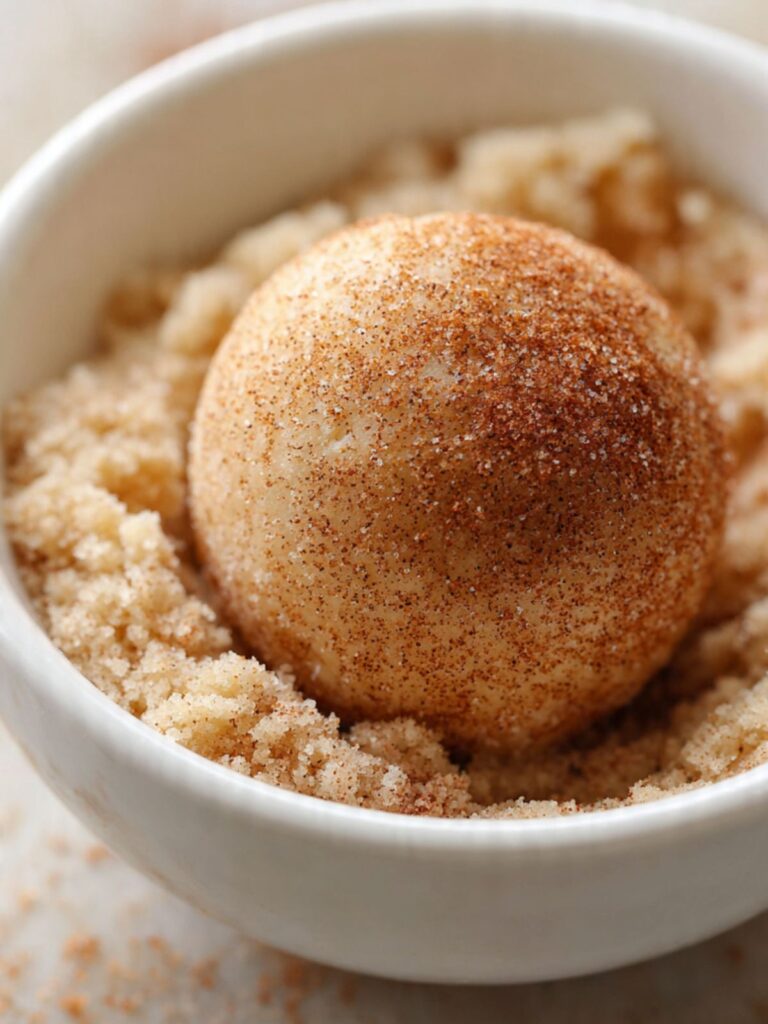
Roll each dough ball between your palms for 3 to 4 seconds until it forms a smooth, round sphere. A smooth surface gives the cinnamon sugar an even base to adhere to. Rough or cracked surfaces will have uneven coating coverage — some spots will look thick and deeply fragrant, others will look pale and bare after baking.
Drop each ball into the cinnamon sugar bowl. Roll it with your fingers until every visible surface is fully coated. Press the coating gently into any pale patches. Roll the ball through the coating a second time. The double-roll is what produces the heavy, sparkle-dusted, fully browned coating visible on every cookie in the stacked plate and cooling rack photos — a single roll is adequate coverage, but the second roll is what gives the deeply fragrant, fully saturated crust.
🗒 Luna’s Note: I portion all 20 balls before any of them go near the cinnamon sugar bowl. It keeps the two steps separate and I can check every ball for consistent size before the coating step starts. Once a dough ball is coated it goes straight to the pan — no going back to re-roll it.
Place each coated dough ball on the prepared parchment-lined pan. Space them at least 2 inches (5cm) apart. These cookies spread to approximately 2.5 to 3 inches (6 to 7.5cm) in diameter — crowded cookies will touch at the edges and will not dome correctly.
Do not flatten the dough balls before baking. The rounded, unflattened dome shape going into the oven is exactly what produces the thick, pillowy profile visible in every stacked photo. As you can see in the overhead pan image, the dough balls sit tall and round on the parchment before the pan goes in — pressing them flat before baking produces thin, crisp cookies with no dome.
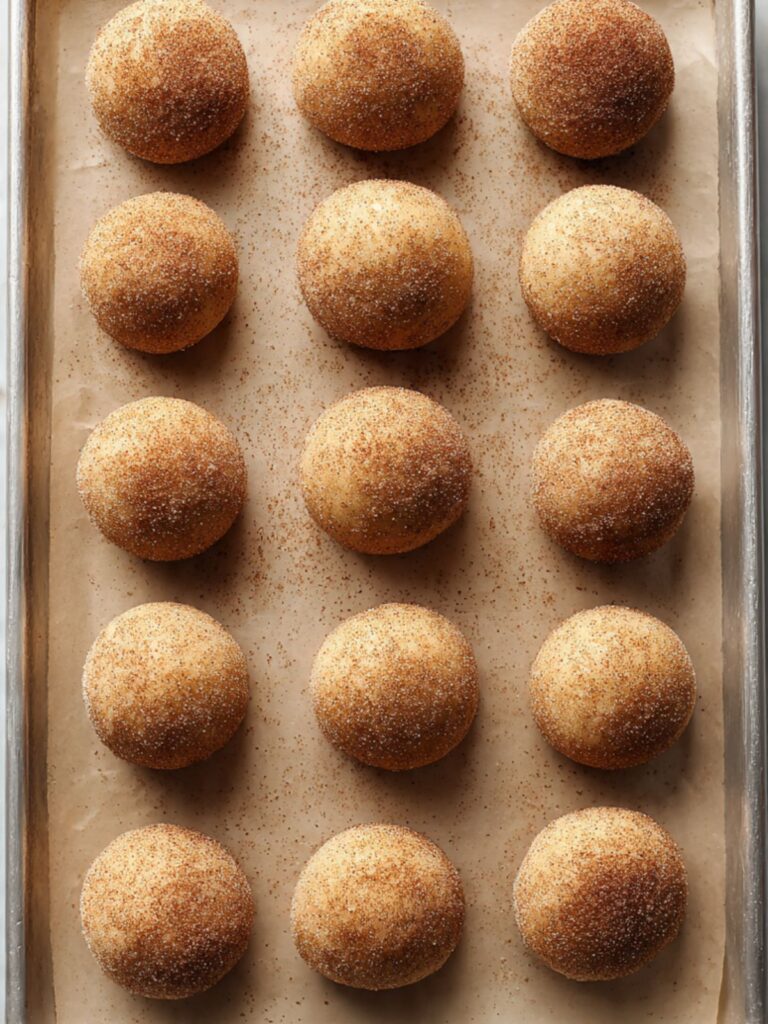
Bake no more than 12 cookies per standard half-sheet pan. If you have more dough balls ready, keep them covered at room temperature while the first batch bakes — do not refrigerate between batches unless your kitchen is above 75°F (24°C).
The pan should go into the oven with evenly sized, fully coated dough balls spaced at least 2 inches (5cm) apart, each one a smooth, round sphere with no pale patches in the cinnamon sugar coating. If any ball has a visible bare spot, roll it through the coating bowl one more time before it goes on the pan.
Step 8: Baking Until the Edges Set and the Centers Stay Underdone
Slide the pan onto the middle rack of your fully preheated 350°F (175°C) oven and close the door immediately.
Bake for 10 to 12 minutes. Set a timer for 10 minutes and begin watching at that mark. Do not open the oven door before 10 minutes — opening early drops the oven temperature by 25–50°F (14–28°C) and interrupts the spread and dome formation mid-bake. Once disrupted, the cookies will not recover their dome.
The correct moment to pull these cookies is very specific and must be read visually — the timer is a starting point, not the finish line. The edges of each cookie should look set and the cinnamon sugar coating at the outer edge should look dry and matte — not wet or shiny. The centers should still look soft, slightly puffed, and underdone. They will look like they need another minute. They do not. Pull the pan at this exact moment.
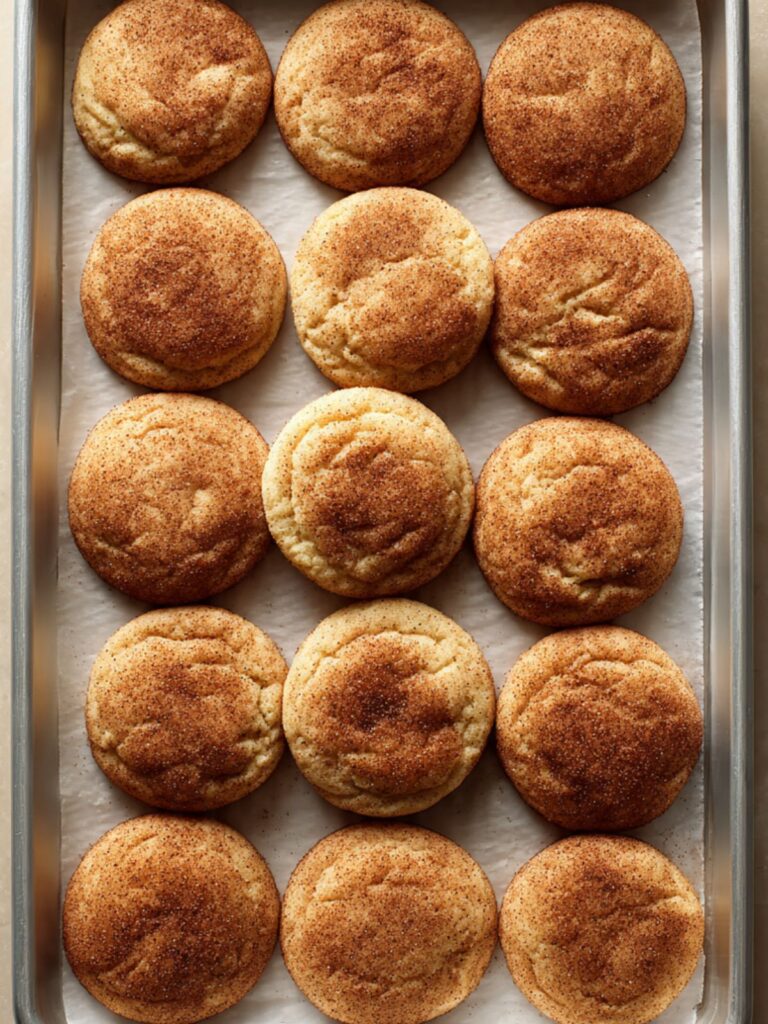
As you can see in the cooling rack photo, the fully baked cookies look thick, domed, and lightly crinkled across the surface with a matte cinnamon sugar crust. They are not flat, not shiny, not aggressively browned at the edges. The cinnamon sugar at the edges looks just set — dry but not darkened. This is the visual target. Match it exactly.
Do not wait for the centers to look fully baked in the oven. Cookies that look completely done in the oven will be hard, dry, and over-structured once they cool. The centers finish setting during the 5-minute rest on the hot pan through carryover cooking — the aluminum pan retains significant heat after the oven door opens and continues cooking the cookie base off the heat.
Baker's warning: If the entire surface of every cookie looks matte, firm, and fully set before the 12-minute mark, your oven is running hot. Pull the pan immediately and reduce the dial by 25°F (15°C) for the next batch. If the cookies have not begun to spread and the edges still look raw and wet at the 10-minute mark, your oven is running cool — extend by 2 minutes and verify with an oven thermometer before the next batch.
The pan coming out of the oven should show cookies that look exactly like the cooling rack photo — thick, domed, lightly crinkled on top, with set edges and centers that still look soft. If the centers look firm and fully matte all the way across, they are overbaked.
Step 9: Resting, Cooling, and Reading the Final Texture
The moment the pan comes out of the oven, place it on a flat, heat-safe surface and set a timer for exactly 5 minutes. Do not move the cookies. Do not transfer them. Do not touch them. Walk away.
During these 5 minutes, the hot aluminum pan is actively conducting residual heat into the base of every cookie and completing the baking process. This is carryover cooking — the same heat that baked these cookies in the oven continues working after the oven door closes, but at a lower, gentler temperature that sets the centers without the dry oven air pulling moisture out of them. The cookies that looked underdone when you pulled the pan are setting right now, on the counter, without losing any of the moisture that makes them tender.
Moving the cookies before 5 minutes breaks the structural base — the cookie will crack across the bottom and the center, which has not yet fully set, will be too soft to hold together. Waiting longer than 8 minutes starts to over-dry the bottoms from the residual pan heat. Five minutes is the window. Set the timer and honor it.
After the 5-minute rest, use a thin spatula to transfer the cookies to a wire cooling rack. They will feel slightly firm at the edges and still yielding at the center when lifted — this is correct. They will continue to firm slightly as they cool to room temperature over the next 10 to 15 minutes.
🗒 Luna’s Note: I slide the second pan into the oven the moment the first one comes out. The 5-minute rest on the counter lines up almost perfectly with the time it takes to load the next pan. Both batches are done within 30 minutes of starting the oven.
Two visual details to expect and not mistake for a problem:
First — the interior crumb of a correctly baked snickerdoodle is pale cream-colored, almost ivory. If you break one open and see the pale, dense, tightly structured crumb shown in the close-up photo, that is exactly correct. A golden or tan interior would indicate overbaking. The pale cream color is the sign of a cookie that was pulled at the right moment and finished setting off the heat.
Second — as the cookies cool on the rack, a shallow dimple will form at the center top of each dome. This is visible in the cooling rack photo — every stacked cookie has it. This is caused by the cream of tartar’s leavening reaction completing as the cookie cools and the center settling slightly inward. It is a characteristic snickerdoodle feature, not a failure. A snickerdoodle without the center dimple was either overbaked or did not have enough cream of tartar.
The fully cooled cookies should look exactly like the stacked plate photos — thick, domed with a slight center dimple, covered in a matte cinnamon sugar crust with visible granules. When pressed gently at the center, they should yield slightly — not feel hard, not feel raw. If the centers feel hard when fully cooled, they were overbaked by 1 to 2 minutes. If they feel wet or paste-like in the middle, they needed 1 more minute in the oven.
The Science Behind Snickerdoodle Cookies
Why Cream of Tartar Is the Ingredient That Makes a Snickerdoodle a Snickerdoodle

Cream of tartar is potassium bitartrate — a dry acid that forms naturally as a byproduct of winemaking. In this recipe it does two separate jobs simultaneously, and neither one can be replicated by leaving it out or swapping in extra baking powder.
Its first job is chemical: it reacts with the baking soda in the dough to produce carbon dioxide bubbles that leaven the cookie and create a more tender crumb structure than baking soda alone. Because cream of tartar is a stronger acid than the brown sugar or buttermilk you might find in other cookie recipes, the reaction is more complete — which means better lift and a finer, softer interior texture. This is exactly what you see in the broken cookie photo: a tight, even, tender crumb with no large air pockets and no dense, compressed zones.
Its second job is flavor: it gives snickerdoodles their signature tangy, slightly sour undertone that sits underneath the cinnamon sugar. This is the flavor that separates a snickerdoodle from a cinnamon sugar cookie. Without it, the cookie tastes sweet and buttery but flat. With it, there is a faint acidity that makes the cinnamon read brighter and the butter taste richer. If you have ever eaten a snickerdoodle and thought it tasted almost like a very good butter cookie with something extra — that something is the cream of tartar. For more on how acids interact with leavening in cookie recipes, my sugar cookies recipe walks through the same chemistry from a different angle.
🗒 Luna’s Note: I spent two full batches testing this recipe without cream of tartar just to be sure I could explain the difference clearly. The cookies without it were good. The cookies with it were snickerdoodles. The difference is real and it is worth the one extra ingredient.
How the Creaming Method Creates the Thick, Domed Profile in the Photos
The thick, rounded dome on every cookie in these photos does not happen by accident. It is the direct result of the creaming step — beating the butter and sugar together for a full 3 minutes before any other ingredient goes in.
When butter at the correct temperature (65–68°F / 18–20°C) is beaten with granulated sugar, the sharp crystal edges of the sugar cut millions of microscopic air pockets into the fat. These air pockets are physically trapped inside the butter and they expand in the heat of the oven — this process is called aeration. The expanded air is what pushes these cookies upward into their domed shape rather than outward into a flat disc.
Butter that is too warm (above 70°F / 21°C) is too soft to hold air pockets — the sugar dissolves into the fat instead of cutting into it, and the cookies spread flat. Butter that is too cold (below 60°F / 15°C) is too stiff to cream — the sugar cannot penetrate it and the cookies come out dense and under-risen. The 65–68°F (18–20°C) window is the precise range where the butter is soft enough to aerate and firm enough to hold the air it traps. This is why the butter temperature check in Before You Start is not a suggestion — it is the mechanism that produces every thick cookie you see stacked in these photos.
Why Pulling the Cookies Early Is the Single Most Important Step in This Recipe
Every snickerdoodle that comes out hard, dry, or tough was pulled from the oven at the wrong moment — specifically, when the centers looked done. Centers that look fully set in the oven are already overbaked by the time they hit the cooling rack.
The reason is carryover cooking. When a hot baking pan comes out of a 350°F (175°C) oven, it does not immediately stop conducting heat. The aluminum retains significant thermal energy and continues transferring it into the base of every cookie sitting on its surface for the full 5 minutes of the rest period. During this time, the centers — which looked soft and slightly underdone in the oven — finish setting off the heat without the oven’s dry air pulling moisture out of them. The result is a cookie with a set structure and a tender, moist interior. A cookie left in the oven until the centers look done has already lost that window — the additional 2 to 3 minutes of oven time drove out the moisture that carryover cooking would have preserved.
This is why the doneness cue in this recipe is so specific: edges set, cinnamon sugar coating dry and just barely golden at the edges, centers still looking soft and slightly puffed. Pull at that exact moment, set the timer for 5 minutes, and do not touch them until it goes off.
Snickerdoodle Cookies Troubleshooting & Pro-Tips
Common Mistakes
Wrong Butter Type or Temperature — The Most Common Failure in This Recipe
Symptom: Cookies spread flat and thin instead of doming, or come out dense and barely spread at all. The cinnamon sugar coating slides to the edges instead of staying even across the top.
Specific cause: Melted butter or butter that is too warm (above 70°F / 21°C) cannot hold the air pockets created during creaming. The fat is too loose to trap anything, so the cookies spread flat the moment they hit the oven heat. Cold butter (below 60°F / 15°C) does not cream at all — the sugar cannot penetrate the stiff fat and no aeration occurs, producing dense, under-risen cookies with a tight, compact crumb.
Immediate fix: If your dough looks greasy or unusually soft before baking, refrigerate it for 20 to 30 minutes before portioning. This firms the butter back up enough to slow the spread in the oven.
Prevention: Pull butter from the refrigerator 60 to 90 minutes before mixing. Press your finger into the butter before you start — it should leave a clean indent without the surface feeling greasy or slick. If it feels greasy, it is too warm. If the indent does not hold a shape, it is too cold. Do not start creaming until the butter passes this check.
Wrong Pan Type — Dark Pans and Overbrowning
Symptom: Cookie bottoms are dark brown or burnt before the centers and tops have finished setting. The cinnamon sugar coating looks correct but the base of the cookie tastes bitter or hard.
Specific cause: Dark non-stick pans absorb significantly more radiant heat than light-colored aluminum pans. At 350°F (175°C), a dark pan can effectively expose the cookie bottom to 375–400°F (190–204°C) of surface heat while the oven air temperature stays at 350°F. The bottom overbakes before the top and center have time to catch up.
Immediate fix: If you only have a dark pan, reduce the oven temperature by 25°F (15°C) — bake at 325°F (163°C) instead — and start checking at 9 minutes.
Prevention: Use a light-colored aluminum half-sheet pan lined with parchment for every batch. This is the pan used for testing and it is the only pan that produces the even, pale-golden base visible in the broken cookie photo.
Cookies Have No Surface Crinkle — Flat, Smooth Top Instead of the Characteristic Wrinkled Crust
Symptom: The baked cookies have a smooth, uniform surface rather than the characteristic shallow crinkled pattern visible across the top of every cookie in the photos. The cinnamon sugar coating looks correct but the surface underneath it is flat and glassy.
Specific cause: Three possible causes — oven not fully preheated when the pan went in, granulated sugar substituted with a different sweetener, or butter was too warm and the dough was too soft before baking. The surface crinkle on a snickerdoodle forms when the outer edge of the cookie sets quickly in a hot oven while the center is still expanding — this differential sets the crinkle pattern. An under-preheated oven heats the cookie too gradually for this differential to form. Sugar substitutes (coconut sugar, raw sugar) have different melting points and do not produce the same crinkle behavior as plain white granulated cane sugar.
Immediate fix: The crinkle cannot be added after baking. For the remaining dough, confirm oven temperature with a thermometer, ensure the oven has preheated for the full 15 minutes, and confirm the sugar used is plain white granulated cane sugar.
Prevention: Always preheat for a full 15 minutes before the first pan goes in. Use only plain white granulated cane sugar — no substitutes. If your oven runs cool (below 340°F / 171°C actual temperature), increase the dial setting by 25°F (15°C) to compensate.
Cookies Spreading Too Flat — No Dome, Thin and Crisp
Symptom: Cookies spread into thin discs instead of the thick domed profile in the photos. The cinnamon sugar coating migrates to the edges and the center looks pale and flat.
Specific cause: Three possible causes in order of likelihood — butter too warm, flour under-measured, or oven not fully preheated. An oven that has not reached full temperature when the pan goes in allows the butter to melt and the cookie to spread before the structure sets.
Immediate fix: Refrigerate the remaining portioned dough balls for 15 minutes before baking the next batch. A brief chill firms the fat enough to slow the spread.
Prevention: Confirm butter temperature before creaming. Weigh the flour at 330g rather than measuring by volume. Allow the oven to preheat for a full 15 minutes before the first pan goes in. If spreading is still excessive, your oven is running hot — verify with an oven thermometer and reduce by 25°F (15°C).
Cookies Coming Out Hard or Tough After Cooling
Symptom: Cookies feel firm and dry when fully cooled instead of the soft, yielding texture shown in the photos. The crumb is tight and compact rather than tender when broken open.
Specific cause: Two possible causes — overbaking, or overmixing the dough after the flour was added. Overbaking drives out the moisture that carryover cooking is supposed to preserve. Overmixing develops excess gluten that tightens the crumb structure and produces a tough, bready texture rather than a tender cookie crumb.
Immediate fix: Nothing reverses an overbaked or overmixed cookie. For the remaining dough, reduce bake time by 1 minute and stop the mixer the moment no dry flour streaks are visible.
Prevention: Pull the cookies the moment the edges look set and the centers still look soft and slightly underdone. Stop mixing immediately when the flour disappears into the dough — finish any remaining dry streaks with 2 to 3 folds of a spatula, not the mixer.
Leavening Failure — Flat Cookies With No Rise or Crinkle
Symptom: Cookies bake completely flat with no dome, no surface crinkle, and a dense, heavy texture. The cinnamon sugar coating looks correct but the cookie itself has no lift.
Specific cause: Expired baking soda. Baking soda loses its potency after 3 to 6 months once opened. An expired box produces little to no carbon dioxide when it hits the cream of tartar in the dough, and the cookies have no leavening to create lift or the characteristic crinkled surface.
Immediate fix: The batch cannot be saved. Replace the baking soda and start again.
Prevention: Run the freshness test from Before You Start every time — drop ½ tsp (3g) baking soda into a small bowl of hot water with a splash of white vinegar. It should bubble aggressively within 2 seconds. If it does not, replace the box before baking.
Cinnamon Sugar Coating Looks Pale or Uneven After Baking
Symptom: The cookies come out of the oven looking lightly dusted rather than the deeply fragrant, evenly browned cinnamon crust visible in the photos. Some spots look pale or the coating has slid unevenly to one side.
Specific cause: Two possible causes — old cinnamon that has lost its color and potency, or dough balls that were not fully coated before baking. Dough balls that were rushed through the coating bowl will have thin spots that bake out to pale patches.
Immediate fix: Nothing restores the coating after baking. For remaining dough balls, roll each one twice through the cinnamon sugar mixture and press the coating gently into any visible pale patches before placing on the pan.
Prevention: Smell the cinnamon before you start — it should hit you immediately with a strong, spicy scent. Replace it if it does not. Roll each dough ball slowly and deliberately in the coating, checking all sides before it goes on the pan.
Humidity and Altitude Adjustments
High humidity (above 70% relative humidity): In humid climates, the cinnamon sugar coating absorbs moisture from the air and can feel tacky or slightly wet on the surface of the baked cookie. The cookies may also spread slightly more than expected. Refrigerate your portioned, coated dough balls for 15 minutes before baking — this firms the fat and slows the spread. Bake and store on the same day for best texture.
High altitude (above 3,500 feet / 1,067 meters): Leavening gases expand faster at altitude and liquids evaporate more quickly. For this recipe, reduce the baking soda by ¼ tsp (from 1 tsp to ¾ tsp), increase the flour by 2 tablespoons (15g), and reduce the granulated sugar in the dough by 2 tablespoons (25g). Increase the oven temperature by 15°F (8°C) to 365°F (185°C) and start checking at 9 minutes. The cookies will still dome — they may just dome slightly less dramatically than at sea level.
Expert Pro-Tips
Roll Each Dough Ball Twice Through the Coating. After the first roll, check every surface of the ball visually. Then roll it through the cinnamon sugar a second time before it goes on the pan. The double coating is what produces the heavy, sparkle-dusted surface visible across every cookie in these images — a single roll gives adequate coverage, but the double roll gives the deeply fragrant, fully browned crust that makes these cookies look exactly like the photos.
Bake One Pan at a Time on the Middle Rack. Resist the temptation to bake two pans simultaneously. Two pans in the oven at once require one on the upper rack and one on the lower rack — neither position is the middle, and both produce uneven results. The pan on the upper rack will have tops that set too fast. The pan on the lower rack will have bottoms that overbrown. Bake one pan at a time, always on the middle rack, for the consistent result shown in the images.
Use a Cookie Scoop for Consistent Yield and Bake Time. Inconsistent dough ball size means inconsistent bake time. A 40g ball and a 50g ball placed on the same pan will not finish baking at the same moment — the smaller one will be overbaked by the time the larger one is ready to pull. A 2-tablespoon cookie scoop portions every ball to the same weight in 2 seconds and eliminates this variable entirely.
How to Store Snickerdoodle Cookies
Room Temperature
Store fully cooled snickerdoodle cookies in a hard-sided container with a tight-fitting lid, with a single layer of parchment paper between each layer of cookies. The hard sides protect the domed shape — zip-lock bags crush the cookies and flatten the cinnamon sugar crust that took careful rolling to build.
Do not store them in a container that is too large for the batch. Extra air space inside the container accelerates moisture loss and the cookies will dry out faster than they should. Pack them in snugly with parchment between layers.
At room temperature these cookies stay soft and tender for up to 4 days. Day 1 and Day 2 are peak texture — the centers are at their softest and the cinnamon sugar crust has the best contrast between the crisp exterior and the tender crumb. By Day 3 the exterior softens slightly as the cinnamon sugar absorbs ambient moisture, but the interior texture holds. By Day 4 the cookies are still good but noticeably softer throughout.
Do not store with a slice of bread to keep them soft — the bread introduces excess moisture that makes the cinnamon sugar coating tacky and wet. The hard-sided container with a good lid is all these cookies need.
Do not refrigerate unless your kitchen runs very warm (above 78°F / 25°C). Refrigeration dries out cookies significantly faster than room temperature storage. A cookie pulled from the refrigerator will feel noticeably drier and firmer than one stored at room temperature in a lidded container. If you must refrigerate, bring them to room temperature for 20 to 30 minutes before eating.
🗒 Luna’s Note: I store mine in a round ceramic container with a cork lid that fits snugly. The seal is tight enough that the cookies on Day 3 still have almost the same texture as Day 1. The container matters more than most people think.
Refrigerator
Refrigeration is not recommended for these cookies unless your kitchen is unusually warm. Cold air pulls moisture out of baked cookies faster than room temperature air does, and snickerdoodles rely on their moisture content for the soft, tender crumb visible in the broken cookie photo.
If you do need to refrigerate — for example, if you are in a warm, humid climate and room temperature storage is causing the cinnamon sugar coating to become sticky — store in the same hard-sided lidded container with parchment between layers. They will keep for up to 7 days in the refrigerator.
Before eating refrigerated cookies, allow them to sit at room temperature for 20 to 30 minutes. Cold cookies feel denser and drier than they actually are — bringing them back to room temperature restores the soft, yielding texture.
Do not microwave refrigerated cookies to warm them quickly. A microwave heats unevenly and will make the edges rubbery while the center is still cold. If you want a warm cookie, place it on a parchment-lined baking sheet in a 300°F (150°C) oven for 4 to 5 minutes. This warms it evenly without drying it out.
Freezer — Baked Cookies
Baked snickerdoodles freeze well for up to 2 months. The cinnamon sugar coating holds up through freezing and thawing better than most cookie coatings — the granulated sugar does not dissolve or become sticky in the freezer.
To freeze baked cookies: Arrange fully cooled cookies in a single layer on a parchment-lined baking sheet and freeze for 1 hour until the cinnamon sugar coating is completely firm. Once firm, transfer to a zip-lock freezer bag or a hard-sided freezer-safe container with parchment between layers. Freezing them flat first prevents the coating on one cookie from pressing into and damaging the surface of the next.
To thaw: Remove from the freezer and place on a wire cooling rack at room temperature for 30 to 45 minutes. Do not thaw in the microwave — it makes the coating wet and uneven. Do not thaw in a sealed container — condensation will form on the surface and make the coating tacky.
Texture after thawing: The interior crumb is nearly identical to fresh-baked. The cinnamon sugar coating will be slightly less crisp than fresh but will firm back up within 10 minutes of reaching room temperature.
Freezer — Unbaked Dough
Snickerdoodle dough freezes exceptionally well and this is the method I use most often. Freezing portioned, coated dough balls means you can bake exactly as many cookies as you want at any given time — straight from frozen — without making a full batch.
To freeze unbaked dough balls: Portion and roll the dough balls as directed in Step 7. Roll each ball in the cinnamon sugar coating before freezing — do not freeze uncoated dough and coat later, as the coating does not adhere as well to frozen dough surfaces. Arrange coated dough balls in a single layer on a parchment-lined baking sheet and freeze for 1 hour until completely firm. Transfer to a zip-lock freezer bag. Label with the date and bake temperature. Frozen dough keeps for up to 3 months.
To bake from frozen: Do not thaw. Place frozen dough balls directly on a parchment-lined light-colored aluminum pan, spaced 2 inches (5cm) apart. Bake at 350°F (175°C) for 13 to 15 minutes — 2 to 3 minutes longer than fresh dough. The doneness cue is identical: edges set, cinnamon sugar coating dry at the edges, centers still looking soft and slightly underdone. The cookies will dome correctly from frozen — do not press them down before baking.
Serving Suggestion
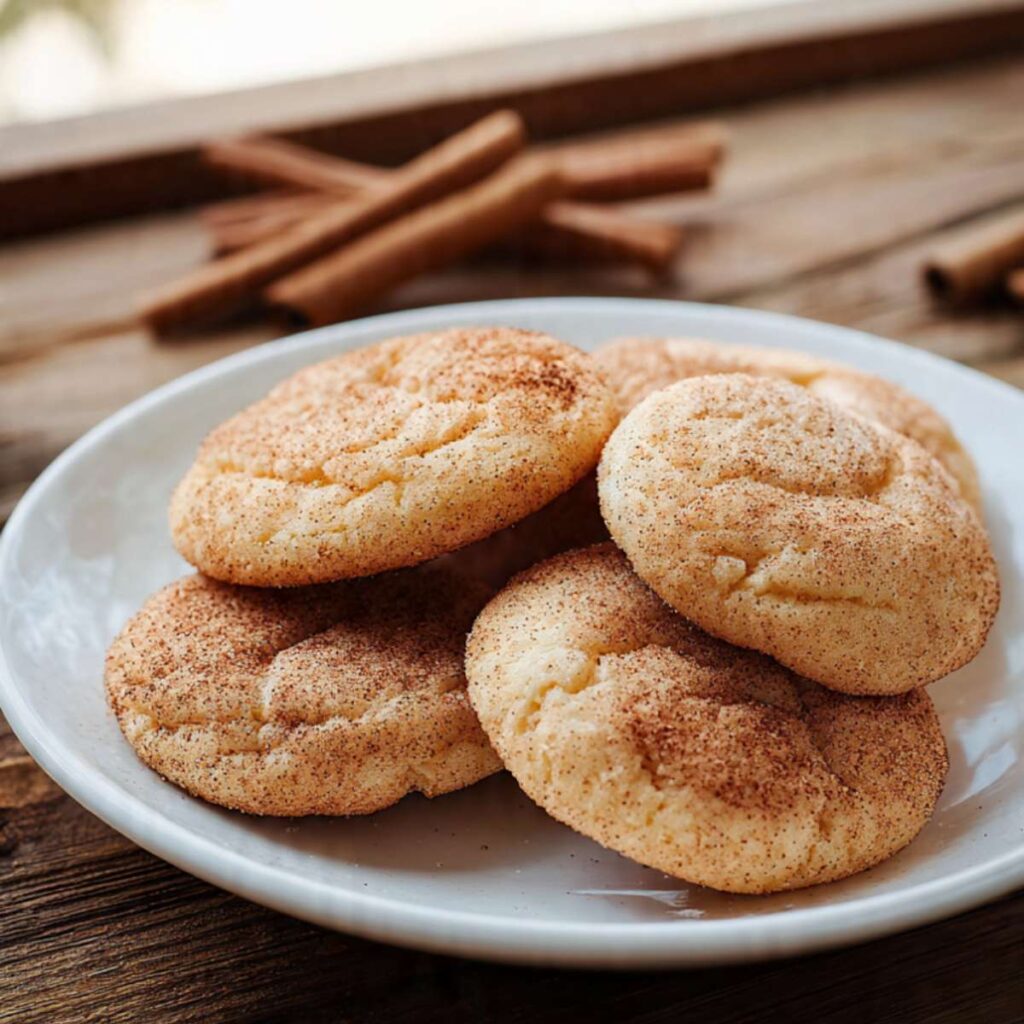
🗒 Luna’s Note: I serve these slightly warm — about 10 minutes off the cooling rack — with a mug of black coffee or spiced chai. The cinnamon in the cookie and the spice in the chai play off each other in a way that makes the whole thing feel intentional. For a crowd I stack them on a plain white plate the way they are shown in the photos — the height of the stack and the cinnamon dusting do all the visual work. No decoration needed.
These cookies are complete on their own. They do not need a dip, a drizzle, or a topping. The cinnamon sugar crust and the tender buttery interior are the whole point. If you want to serve them as a dessert plate, pair with a small scoop of vanilla ice cream and let the warm cookie sit next to it for 2 minutes before serving — the contrast between the crisp cinnamon exterior and the cold cream is one of the better combinations I have found for this cookie.
Frequently Asked Questions About Snickerdoodle Cookies
What makes snickerdoodles different from sugar cookies?
Snickerdoodles and sugar cookies share a similar ingredient base — butter, sugar, flour, and eggs — but two things separate them completely. First, snickerdoodles contain cream of tartar, which gives them a faintly tangy, slightly sour undertone that sugar cookies do not have. Second, every snickerdoodle is rolled in cinnamon sugar before baking, which creates the signature crinkled, fragrant crust that sets on the outside while the interior stays soft and tender. A sugar cookie is sweet and buttery with a smooth or decorated surface and no tang. A snickerdoodle has that distinctive cream-of-tartar bite, the warm cinnamon coating, and the textural contrast between the crisp outer crust and the pale, dense crumb visible in the broken cookie photo. Remove the cream of tartar and the cinnamon sugar and you have a sugar cookie — every element that defines a snickerdoodle is tied to those two things. My sugar cookies recipe covers the same creaming method these cookies rely on, and comparing the two side by side is a good way to understand exactly what the cream of tartar contributes.
Why do snickerdoodle cookies need cream of tartar?
Cream of tartar serves two functions in this recipe that cannot be replicated by leaving it out or swapping in extra baking powder. First, it is the acid that reacts with the baking soda to produce carbon dioxide and leaven the dough — this reaction creates the lift that gives these cookies their thick, domed profile and their fine, tender crumb. Without it, the cookies bake flatter and denser. Second, cream of tartar contributes the slightly tangy, buttery-sour flavor that is the defining characteristic of a snickerdoodle — the flavor that separates them from cinnamon sugar cookies. If you cannot find cream of tartar, you can substitute by replacing both the 1 teaspoon baking soda and 2 teaspoons cream of tartar with 2 teaspoons of baking powder instead — but understand that the flavor will shift noticeably toward plain sugar cookie, the tang will be absent, and the crumb will be slightly different in texture. Baking powder contains its own built-in acid and produces a different leavening reaction than the cream of tartar and baking soda pair.
Why did my snickerdoodles come out flat?
Flat snickerdoodles are caused by one of three things in order of likelihood: butter that was too warm when creamed, flour that was under-measured, or an oven that was not fully preheated. Butter above 70°F (21°C) is too soft to hold the air pockets created during the creaming step — it melts too quickly in the oven heat and the cookie spreads flat before the edges can set. Under-measured flour reduces the structural scaffolding that holds the cookie upright as it bakes. An oven that has not reached full temperature when the pan goes in allows the butter to melt and spread before the structure sets. Run the finger-indent test on your butter before creaming — clean indent, no greasy feeling. Weigh your flour at 330g rather than measuring by volume to eliminate scooping error entirely. Allow the oven to preheat for a full 15 minutes before the first pan goes in. If the problem continues after all three checks, refrigerate your portioned, coated dough balls for 15 minutes before baking — the brief chill firms the fat enough to slow the spread and restore the dome.
Why are my snickerdoodles hard instead of soft?
Hard snickerdoodles come from overbaking, overmixing, or both — and overbaking is by far the more common cause. Cookies that look fully set in the oven are already past their window. The correct pull point is when the edges are set, the cinnamon sugar coating looks dry at the outer edge, but the centers still look soft and slightly underdone. The centers finish setting during the mandatory 5-minute rest on the hot pan through carryover cooking — pulling when the centers look done means the carryover heat will push them past done, and they will be hard once cooled. Overmixing after the flour goes in is the second cause — excess gluten development tightens the crumb structure and produces a dense, bready texture rather than the soft, pale crumb shown in the close-up photo. Stop the mixer the moment the last streak of dry flour disappears, and finish any remaining patches with 2 to 3 folds of a spatula. For a detailed comparison of how mixing time affects cookie texture, my molasses cookies article covers the same gluten development principle from a different angle.
Can I make snickerdoodle dough ahead of time?
Yes — snickerdoodle dough keeps well in the refrigerator for up to 48 hours before baking. Portion and coat the dough balls in cinnamon sugar before refrigerating rather than storing the dough as a bulk mass — this way you can pull exactly as many as you need and bake them without additional prep. Cover the portioned dough balls loosely with plastic wrap directly on the pan so the cinnamon sugar coating does not dry out or crack in the cold. Bake refrigerated dough balls at the same temperature — 350°F (175°C) — for the same 10 to 12 minutes. The slight chill on the dough actually helps the cookies hold their dome shape more reliably than room temperature dough because the fat is slightly firmer going into the oven heat. For longer storage, freeze the coated dough balls as described in the Storage section — they keep for up to 3 months and bake directly from frozen in 13 to 15 minutes with no thawing.
Can I freeze snickerdoodle dough?
Yes, and freezing pre-portioned, pre-coated dough balls is the most practical method for having fresh snickerdoodles available at any time without committing to a full batch. Portion the dough into 45g balls, roll each one through the cinnamon sugar coating twice, and freeze them in a single layer on a parchment-lined pan for 1 hour before transferring to a zip-lock freezer bag. The coating must go on before freezing — it does not adhere properly to cold dough surfaces after the fact, and the coating that does stick tends to be thin and uneven. Frozen dough balls bake directly from frozen at 350°F (175°C) for 13 to 15 minutes with no thawing required. Use the same doneness cue: edges set, coating dry at the outer edge, centers still looking soft. The cookies dome correctly from frozen — do not press them down. Frozen dough keeps for up to 3 months with no detectable change in flavor or texture after baking.
How do I know when snickerdoodles are done baking?
Snickerdoodles are done when the edges of each cookie look set and the cinnamon sugar coating at the outer edge looks dry and matte — but the centers still look soft, slightly puffed, and underdone. This window arrives between 10 and 12 minutes at 350°F (175°C). Do not use the centers as your doneness signal — centers that look fully set in the oven are already overbaked. The centers finish setting during the 5-minute rest on the hot pan after the oven, where carryover heat from the aluminum completes the baking process without the oven’s dry air pulling moisture from the crumb. When in doubt, pull at 10 minutes — a slightly underbaked snickerdoodle can rest on the pan for an extra minute, but an overbaked one cannot recover its soft center. The cookies should match the cooling rack photo when the pan comes out: thick, domed, matte cinnamon sugar surface, set edges, centers that still look yielding.
Can I double or halve this recipe, and how does altitude or humidity affect the bake?
This recipe doubles well with one important adjustment: multiply all ingredients by 2 except the baking soda — use only 1½ teaspoons of baking soda instead of 2 teaspoons, or the cookies will taste metallic and soapy. The cream of tartar doubles normally. Bake in two separate batches on separate pans at the same temperature and time — do not place two pans in the oven simultaneously, as neither position will be the middle rack and both batches will bake unevenly. To halve the recipe, use 1 cup plus 6 tablespoons (165g) flour, ¾ cup (150g) granulated sugar, ½ cup (113g) butter, 1 large egg, 1 teaspoon cream of tartar, and ½ teaspoon baking soda. The half batch yields approximately 10 cookies and bakes at the same temperature for the same 10 to 12 minutes. At high altitude (above 3,500 feet / 1,067 meters), reduce the baking soda to ¾ teaspoon, increase the flour by 2 tablespoons (15g), reduce the dough sugar by 2 tablespoons (25g), raise the oven temperature to 365°F (185°C), and begin checking at 9 minutes. In high humidity (above 70% relative humidity), the cinnamon sugar coating can become tacky on the surface of stored cookies — bake and consume on the same day for the best texture, and refrigerate portioned dough balls for 15 minutes before baking to firm the fat and control spread.
More Cookies You’ll Love
Brown Butter Chocolate Chip Cookies — thick, fudgy-centered cookies with a nutty brown butter depth that makes them the most requested cookie in my kitchen every single year
Authentic Snickerdoodle Cupcakes
Ingredients
Equipment
Method
- Position oven rack in the middle and heat to 350°F (175°C), then line a standard 12-cup muffin tin with 12 white paper cupcake liners and set aside.
- In a medium bowl, whisk together 1 ½ cups (180g) all-purpose flour, 1 ½ tsp (6g) baking powder, ½ tsp (1.5g) cream of tartar, 1 ½ tsp (4g) ground cinnamon, and ¼ tsp (1.5g) fine sea salt for 30 full seconds until evenly combined and no white streaks remain.
- In the bowl of a stand mixer fitted with the paddle attachment, beat ½ cup (113g) softened unsalted butter and ¾ cup (150g) granulated sugar on medium speed for 4 minutes until pale, light, and significantly increased in volume.
- With the mixer on low, add 2 large room-temperature eggs one at a time, waiting until each is fully incorporated before adding the next, then add 1 tsp (5ml) pure vanilla extract and increase to medium speed for 30 seconds until smooth and cohesive.
- With the mixer on low, alternate adding the dry ingredient mixture and ½ cup (120ml) room-temperature whole milk in three additions — dry, milk, dry, milk, dry — mixing only until each addition just disappears, then finish with 4 to 5 folds of a silicone spatula from the bottom of the bowl upward.
- Using a medium cookie scoop or ¼ cup (60ml) measure, fill each liner to exactly two-thirds full — approximately 55–60g of batter per cup — then gently set the pan down without tapping and transfer to the oven.
- Bake at 350°F (175°C) for 18 to 20 minutes, starting to check at 18 minutes, until the tops spring back when lightly pressed and a toothpick inserted in the center comes out with moist crumbs — not wet batter and not completely clean.
- Leave the cupcakes in the pan for exactly 5 minutes, then transfer to a wire cooling rack and cool completely for a minimum of 45 minutes before frosting.
- In the stand mixer bowl fitted with the paddle attachment, beat 8 oz (226g) softened full-fat block cream cheese and ½ cup (113g) softened unsalted butter on medium speed for 2 minutes until completely smooth, scraping down the sides and bottom before proceeding.
- With the mixer on low, add 3 cups (360g) sifted powdered sugar one cup at a time, mixing until just combined after each addition, then add 1 ½ tsp (4g) ground cinnamon and 1 tsp (5ml) pure vanilla extract and beat on medium speed for 2 full minutes until smooth and stiff.
- Check frosting consistency — it should hold a stiff peak for at least 5 seconds; if too stiff, add 1 tbsp (15ml) heavy cream and beat 30 seconds; if too soft, refrigerate the bowl for 15 minutes and beat briefly before piping.
- Fit a piping bag with a Wilton 1M open-star tip, fill with frosting, and pipe a tall spiral swirl onto each cooled cupcake starting at the outer edge and moving inward and upward with steady even pressure.
- Hold a fine-mesh sieve containing 1 tsp (3g) ground cinnamon approximately 6 inches (15cm) above the frosted cupcakes and tap gently to dust evenly over all 12 cupcakes, then serve at room temperature.