
Soft & Spiced Gingerbread Men Cookies

Gingerbread men are not a difficult cookie. They are a misunderstood one. The problems people run into — spread shapes, lost edges, cookies that look nothing like the cutter — almost always trace back to one step, and it is not the step most recipes warn you about.
I have been making gingerbread men every December for six years and tested this specific recipe eleven times across two holiday seasons before I was satisfied. The version I kept going back to had a double chill — once after mixing the dough, and once after the shapes were cut and sitting on the pan. That second chill, which most recipes either skip or call optional, is what produces the clean, defined edges you can see in the photos. I found it by accident the first year when my oven was running behind and the cut shapes sat in the fridge fifteen minutes longer than I planned. That batch was sharper and cleaner than any before it. I tested it deliberately after that. Twelve times. It is not optional.
The molasses is the other variable I spent time on. Three batches with blackstrap, three with unsulfured. The blackstrap version had a sharp, medicinal bitterness that sat underneath the spice notes and competed with them rather than supporting them. Unsulfured molasses — the Grandma’s Original bottle — produced the warm, rounded, deeply spiced flavor that makes these taste like gingerbread men should. That decision is locked in.
🗒 Luna’s Note: The first time I made gingerbread men in America, I did not understand why you would decorate a cookie that was going to get eaten immediately. My mother’s Bengali sweets were never decorated — they were made to taste right, not look right. It took me a few years to understand that the decorating is the point for a lot of people. Now I make these every December and I always leave the icing station messy on purpose so people can decorate their own.
These are the cookies I make when I want something to look like it took more work than it did. A plate of decorated gingerbread men reads as a serious baking project to anyone who was not in the kitchen watching. That is the most useful thing about them.
The dough requires chilling — minimum two hours, overnight is better. Chilling is not negotiable for cut-out cookies that need to hold a shape. The cookies bake up medium-thick with a soft, tender center and a slightly firmer edge — not hard, not crisp, not the kind that crumbles when someone picks it up by the arm.
This dough requires a stand mixer or hand mixer. Mixing by hand will not develop the butter and sugar enough to produce the right texture. Chilling is required — do not skip it.
Recipe Overview & Nutrition Table
| Yield | 24 cookies (approximately 3.5–4 inches / 9–10cm tall) |
| Prep Time | 25 minutes (plus 2 hours minimum chilling) |
| Bake Time | 9–11 minutes per batch |
| Total Time | 2 hours 45 minutes (including chilling) |
| Difficulty | Intermediate |
| Method | Creamed butter / rolled cut-out |
| Equipment | Stand mixer or hand mixer, rolling pin, gingerbread man cookie cutter (3.5–4 inch) |
| Nutrient | Amount |
|---|---|
| Calories | ~145 |
| Carbohydrates | ~22g |
| Fat | ~6g |
| Protein | ~2g |
| Sugar | ~11g |
| Sodium | ~95mg |
Nutrition is estimated per undecorated cookie. Royal icing and candy decorations add approximately 20–30 calories per decorated cookie depending on amount of icing used.
Ingredients & Tools for Gingerbread Men Cookies Recipe
For the Dough
- 3 cups (360g) all-purpose flour, spooned into the measuring cup and leveled — do not scoop directly from the bag
- 1 teaspoon (6g) baking soda — check freshness before starting (½ tsp + 1 tsp white vinegar should bubble vigorously)
- 2 teaspoons (5g) ground ginger
- 1½ teaspoons (4g) ground cinnamon
- ¼ teaspoon (0.5g) ground cloves
- ¼ teaspoon (0.5g) ground nutmeg
- ½ teaspoon (3g) fine sea salt
- ¾ cup (170g) unsalted butter, softened to room temperature (65–68°F / 18–20°C)
- ¾ cup (150g) packed dark brown sugar — press out any hardened lumps before measuring; hardened sugar will not cream evenly into the butter
- 1 large egg, room temperature
- ⅓ cup (110g) unsulfured molasses — not blackstrap
- 1 teaspoon (5ml) pure vanilla extract
For the Royal Icing
- 3 cups (360g) powdered sugar, sifted
- 2 tablespoons (16g) meringue powder
- 5–6 tablespoons (75–90ml) warm water, added 1 tablespoon at a time
- ½ teaspoon (2.5ml) pure vanilla extract
For Decoration
- Red and green round candy-coated chocolate pieces (such as M&M’s Minis), for buttons and nose
- White, red, and green nonpareils, for scattering on the serving plate
Before You Start
Read these notes before you begin. Each one prevents a specific failure.
Butter temperature matters more than it seems. Pull the butter from the fridge at least 60–90 minutes before you begin. At a cool kitchen temperature (65–68°F / 18–20°C), 60 minutes is enough. In a warm kitchen, 45 minutes is sufficient. Press your finger into the center of the stick — it should leave a clean indent without the butter feeling slick, greasy, or shiny. Butter that is too warm will produce a soft, sticky dough that spreads in the oven and loses shape definition. Butter that is too cold will not cream properly and will produce a dense, under-aerated cookie.
Check your brown sugar before you start. Brown sugar that has hardened into a solid block in the bag will not cream properly into the butter — you will end up with hard sugar lumps suspended in the dough that never fully dissolve, which creates uneven sweetness and texture. If your brown sugar has hardened, break it up completely before measuring. The easiest method: microwave the measured amount for 10–15 seconds, stir, and allow to cool to room temperature before using. It should feel soft and press together without crumbling.
Weigh your flour. Volume measurements for flour can vary by 20–30% depending on how tightly the flour was packed in the bag before you opened it. The gram weight in this recipe — 360g for 3 cups — is the number I tested with. If you are using measuring cups, spoon the flour into the cup and level it with a straight edge. Never scoop the measuring cup directly into the flour bag, which compresses the flour and adds up to 30g extra per cup. That extra flour is the most common reason gingerbread men come out dry and crumbly.
Use unsulfured molasses, not blackstrap. Unsulfured molasses is milder, sweeter, and produces the warm golden-brown color you see in the photos. Blackstrap molasses is significantly more bitter and will overpower the spice blend in this recipe. The brand does not matter — the type does. Check the label.
Check your spice freshness. Ground spices lose potency after 12–18 months. If your ground ginger or cinnamon smells faint or dusty rather than sharp and fragrant, they are past their prime and the cookies will taste flat. This is worth checking before you start.
Chill the dough, then chill the cut shapes. This recipe requires two chilling stages. The first chill (the full dough, minimum 2 hours) firms the butter and makes the dough rollable. The second chill (the cut shapes on the pan, 10–15 minutes in the freezer or 20–25 minutes in the fridge before baking) is what preserves the sharp edge definition you see in the photos. Both stages are required.
Set your oven rack to the middle position before preheating. The middle rack provides the most even heat distribution for cut-out cookies. The top rack runs hotter and overbrowns the surface before the centers set. The bottom rack is closest to the heating element and overbrowns the bottoms. Middle rack only for this recipe.
Room temperature egg. A cold egg added to creamed butter can cause the mixture to look curdled or broken. Pull the egg from the fridge 30 minutes before you start, or place it in a bowl of warm water for 10 minutes.
Mixer required. This recipe requires a stand mixer fitted with the paddle attachment, or a hand mixer. Mixing by hand will not develop the butter and sugar enough to produce the right texture.
One small thing I will say without being asked: I own three sets of rolling guides and I use them every time I make cut-out cookies. Eyeballing ¼ inch sounds easy. It is not as easy as it sounds. The guides take five seconds to set up and eliminate the most frustrating variable in rolled cookie baking.
Gram weights are the source of truth. For the most accurate results, use a kitchen scale set to grams. The gram weights in this recipe are the numbers I tested with.
Pan preparation matters for the bottoms. Use a light-colored aluminum half-sheet baking pan lined with parchment paper. A dark non-stick pan absorbs significantly more heat and overbrowns the cookie bottoms before the centers are done — the bottoms will taste burned while the centers still look pale. Foil conducts heat unevenly and produces hard, patchy bottoms. Greasing the parchment is unnecessary and makes the cookies spread slightly more than they should. Parchment only, no grease.
Necessary Tools
Required:
- Stand mixer fitted with the paddle attachment, or a hand mixer with a large bowl
- Medium mixing bowl, for dry ingredients
- Rolling pin
- Gingerbread man cookie cutter, 3.5–4 inches (9–10cm) — the size used in the photos
- Light-colored aluminum half-sheet baking pan (18×13 inch / 46x33cm) — not dark non-stick
- Parchment paper
- Wire cooling rack
- Piping bags or zip-lock bags with a small corner snipped off, for royal icing
- Fine mesh sieve, for sifting powdered sugar
Strongly recommended:
- Kitchen scale
- Oven thermometer
Optional but useful:
- Thin offset spatula, for transferring cut shapes to the pan
- ¼-inch (6mm) rolling guides or wooden dowels, for even dough thickness
- Large mixing bowl (if using a hand mixer)
How to Make Gingerbread Men Cookies
This recipe uses the creamed butter method — butter and sugar are beaten together with a mixer to create aeration before any other ingredients go in. The dry ingredients come together first so the flour mixture is ready to add the moment the wet base is done.
Step 1: Whisking the Dry Ingredients Together
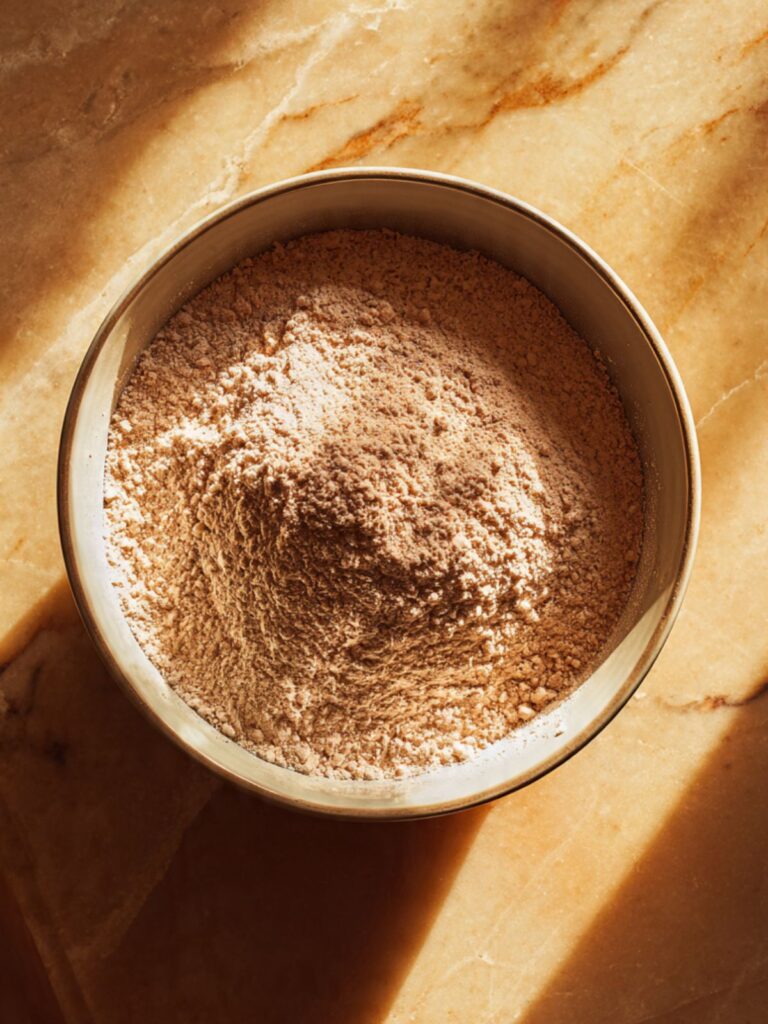
In a medium mixing bowl, whisk together your 3 cups (360g) all-purpose flour, 1 teaspoon (6g) baking soda, 2 teaspoons (5g) ground ginger, 1½ teaspoons (4g) ground cinnamon, ¼ teaspoon (0.5g) ground cloves, ¼ teaspoon (0.5g) ground nutmeg, and ½ teaspoon (3g) fine sea salt. Whisk for a full 30 seconds — not a quick stir, but a deliberate whisk that distributes the leavening and spices evenly through the flour. The baking soda needs to be fully dispersed before the dough comes together or you will get uneven rise and inconsistent surface texture across the batch.
The spices in this recipe are not decorative. Ground ginger provides the sharp, warm heat that makes gingerbread taste like gingerbread. Cinnamon adds sweetness and depth. Cloves and nutmeg are the background notes — present but not dominant. If any of these smells faint or dusty when you open the jar, replace it before continuing.
The dry mixture should look uniformly tan-brown with no visible white pockets of baking soda or flour lumps remaining.
Set the bowl aside. Your mixer and butter go next.
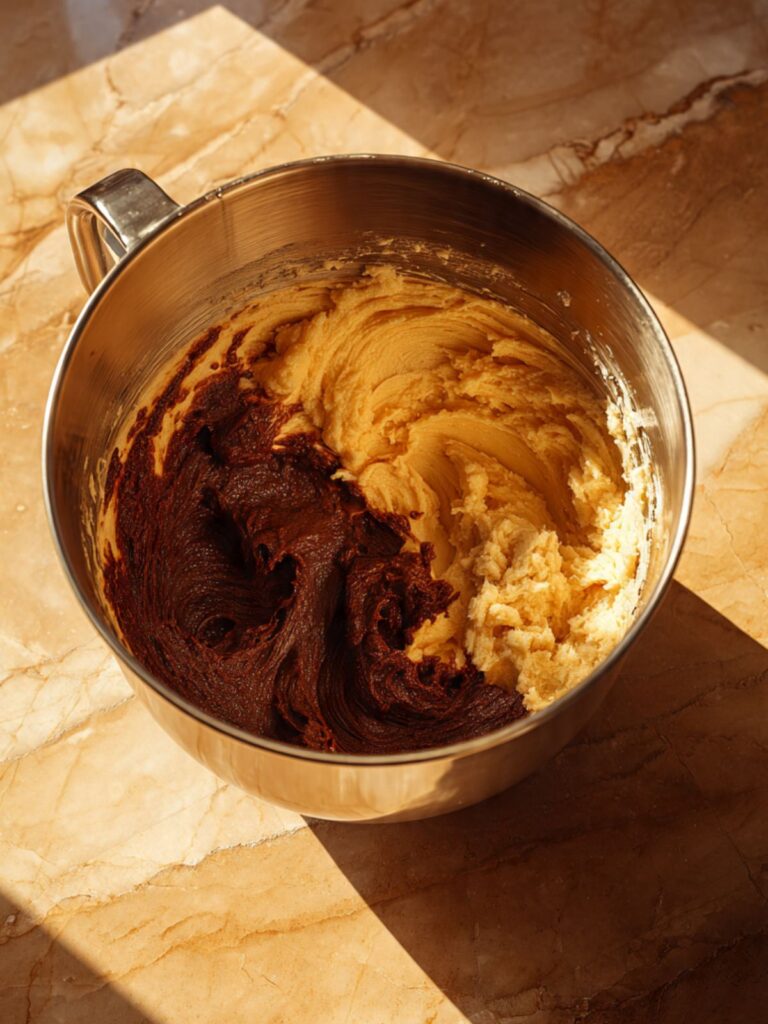
Step 2: Creaming the Butter and Brown Sugar Until Pale and Fluffy
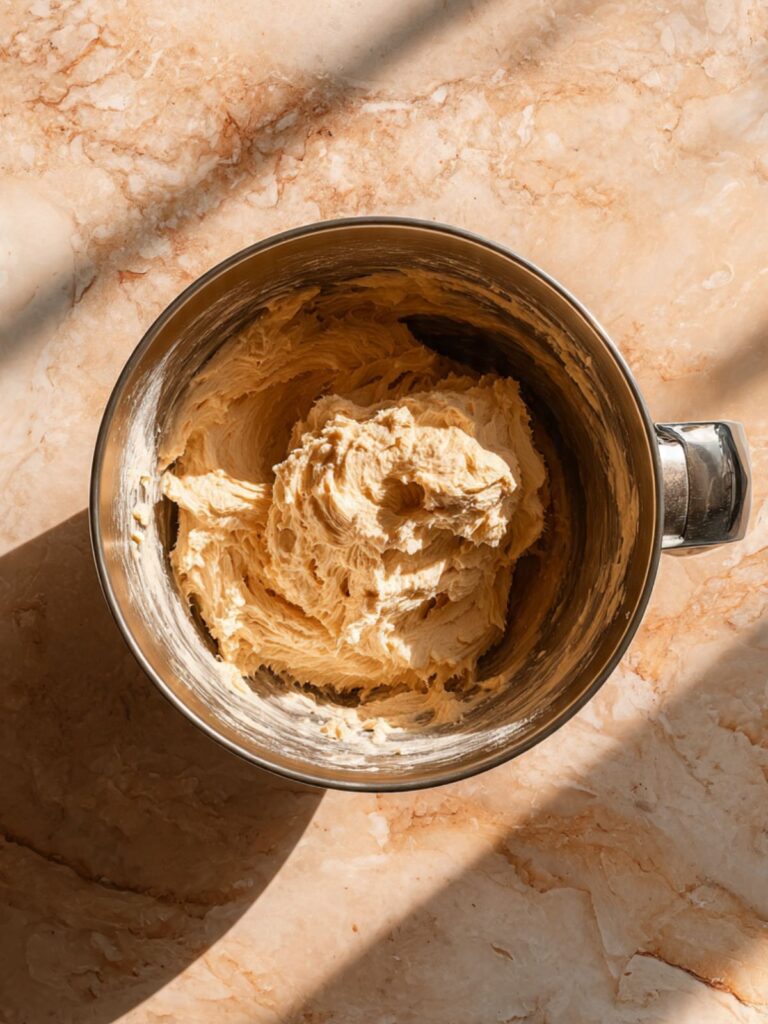
In the bowl of your stand mixer fitted with the paddle attachment — or in a large bowl with your hand mixer — add your ¾ cup (170g) unsalted butter, softened to room temperature (65–68°F / 18–20°C) and ¾ cup (150g) packed dark brown sugar. Beat on medium speed (speed 4 on a KitchenAid, or the equivalent medium setting on a hand mixer) for a full 3 minutes. Set a timer. Do not estimate.
The creaming step is doing two things at once: it is aerating the fat with thousands of tiny air pockets that will expand in the oven and give the cookie lift, and it is dissolving the sugar crystals into the butter so the dough has a smooth, even texture rather than a gritty one. Under-creaming is one of the most common reasons gingerbread men come out flat and dense — 90 seconds is not enough, even if the mixture looks combined.
After 3 minutes, the mixture should look noticeably paler than when you started — a lighter tan rather than deep brown — and it should appear fluffy and increased in volume, pulling away from the sides of the bowl in soft ribbons. If it still looks dense and dark brown, keep beating for another 60 seconds.
Do not skip this step time or the cookies will not have the right texture.
Step 3: Adding the Egg, Molasses, and Vanilla
With the mixer running on low speed, add your 1 large egg (room temperature) and mix until it is fully incorporated — approximately 30 seconds. Scrape down the sides and bottom of the bowl with a silicone spatula.
Add your ⅓ cup (110g) unsulfured molasses and 1 teaspoon (5ml) pure vanilla extract. Increase the speed to medium-low and mix for another 45 seconds until the molasses is fully combined and the mixture looks uniformly dark and glossy.
The molasses is doing more than adding flavor here. It is an acidic ingredient that reacts with the baking soda in the dry mixture — this reaction produces the slight lift and the surface crackle you can see in the close-up shots. Molasses also contains hygroscopic sugars that draw moisture from the air, which is part of why these cookies stay soft for several days after baking rather than drying out the way a plain sugar cookie does.
Do not substitute blackstrap molasses. The close-up texture in the photos — that warm, deep golden-brown — is unsulfured molasses. Blackstrap produces a darker, more bitter cookie that tastes sharp rather than spiced.
The mixture will look almost black and very wet at this stage. This is correct. It will come together once the flour goes in.
Scrape the bowl thoroughly before the next step — molasses settles at the bottom and any unmixed pockets will create uneven flavor across the batch.
Step 4: Adding the Dry Ingredients Without Overworking the Dough
With the mixer on its lowest speed, add the flour mixture in three equal additions — approximately one cup at a time — allowing each addition to mostly incorporate before adding the next. After the final addition, mix only until no visible dry streaks remain. Stop the mixer the moment the dough looks uniform.
Do not overmix after the flour goes in. Every turn of the mixer after the flour is fully incorporated develops more gluten — the protein network in the flour that creates elasticity. In bread, gluten is the goal. In gingerbread cookies, it produces a tough, rubbery cookie that is hard to roll and snaps rather than bends when it comes out of the oven.
The finished dough should look smooth and uniform dark brown, firm enough to hold its shape when pressed with a finger, and not sticky to the touch. It will be stiff — stiffer than a drop cookie dough. This is correct.
🗒 Luna’s Note: I always do a final check with my hands at this stage — I press the dough flat and fold it once to make sure there are no unmixed pockets of butter or flour at the bottom of the bowl. The mixer paddle sometimes misses the very bottom. One or two folds with my hands catches anything the paddle left behind.
Scrape the dough out of the bowl onto a large piece of plastic wrap. Flatten it into a disc approximately 1 inch (2.5cm) thick — a disc chills faster and more evenly than a ball. Wrap tightly in the plastic wrap.
Step 5: Chilling the Dough Until Firm (First Chill — Do Not Skip)
Place the wrapped dough disc in the refrigerator for a minimum of 2 hours. Overnight — up to 48 hours — is better. The dough needs this time for two reasons: the butter needs to firm back up after being warmed by the mixer, and the flour needs to fully hydrate. Dough that has not chilled long enough will be too soft to roll without sticking, and the cut shapes will spread in the oven and lose their definition.
Do not attempt to speed this up in the freezer — freezing the dough makes it too stiff to roll without cracking at the edges. The refrigerator is the only correct tool for this step.
After 2 hours, the dough should feel firm and cold throughout — like chilled clay. It should not feel soft or pliable at room temperature. If it still feels soft in the center, give it another 30 minutes.
If you are chilling overnight, pull the dough from the fridge 10–15 minutes before rolling to allow it to soften slightly — fully cold dough straight from the fridge after 8+ hours can crack at the edges when rolled.
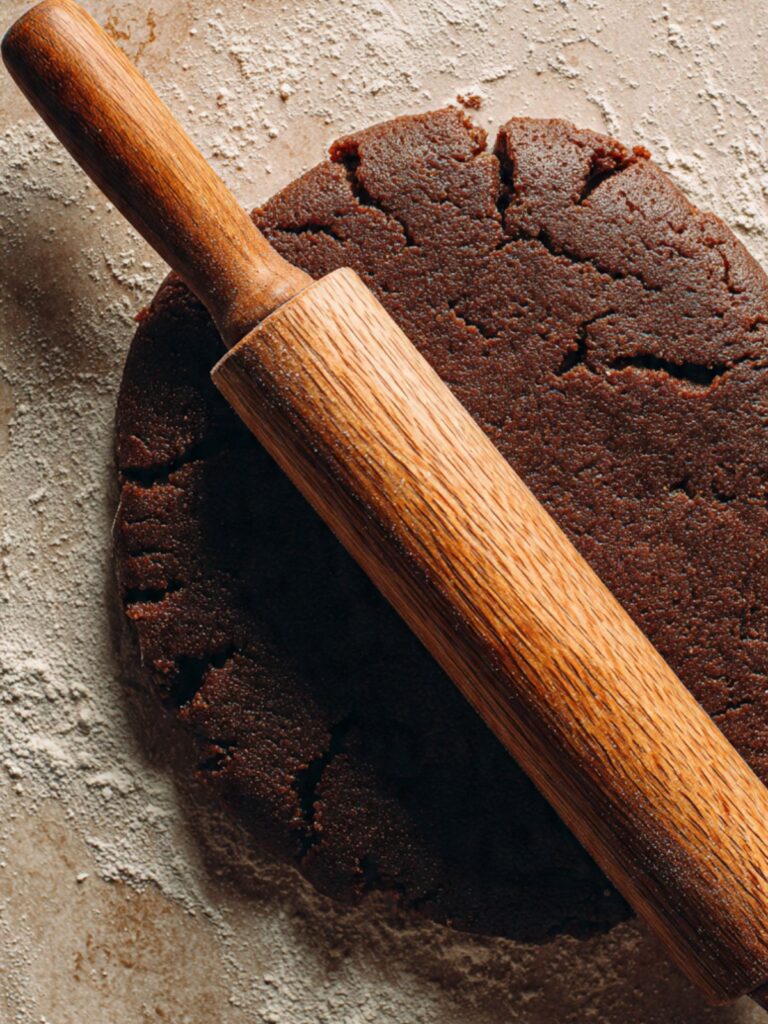
Step 6: Rolling and Cutting the Shapes
Preheat your oven to 350°F (175°C). Most home ovens run 15–25°F (8–14°C) off — if you have an oven thermometer, confirm the actual temperature before the first pan goes in. Position a rack in the middle of the oven.
Line your light-colored aluminum half-sheet baking pan with parchment paper. Do not grease the parchment. Do not use a dark non-stick pan — it absorbs more heat and overbrowns the bottoms of the cookies before the centers are set. Do not use foil — it conducts heat unevenly and produces crisp, hard bottoms.
Lightly flour a clean work surface and your rolling pin. Working with half the dough at a time — keep the other half in the fridge — roll the dough to an even thickness of ¼ inch (6mm). Use a ruler or thickness guides if you have them. Cookies rolled thinner than ¼ inch will bake faster and come out crisper rather than soft. Cookies rolled thicker than ⅓ inch will need an extra minute or two and may look underdone at the standard bake time.
The total dough weight for this recipe is approximately 800–820g after mixing. Divided across 24 cookies at the stated 3.5–4 inch (9–10cm) cutter size and ¼ inch (6mm) thickness, each cookie uses approximately 32–34g of dough. Weigh the first cut shape on your kitchen scale to calibrate — if it reads significantly above 35g, your dough is rolled too thick and the bake time will need to increase by 1–2 minutes. If it reads below 28g, the dough is rolled too thin and the cookies will bake faster and crisper than the soft-centered result shown in the photos.
Cut shapes as close together as possible to minimize re-rolling. Press the cutter straight down with firm, even pressure and lift straight up — do not twist the cutter, which distorts the shape. Use a thin offset spatula to transfer the cut shapes to the prepared pan, spacing them 1.5 inches (4cm) apart.
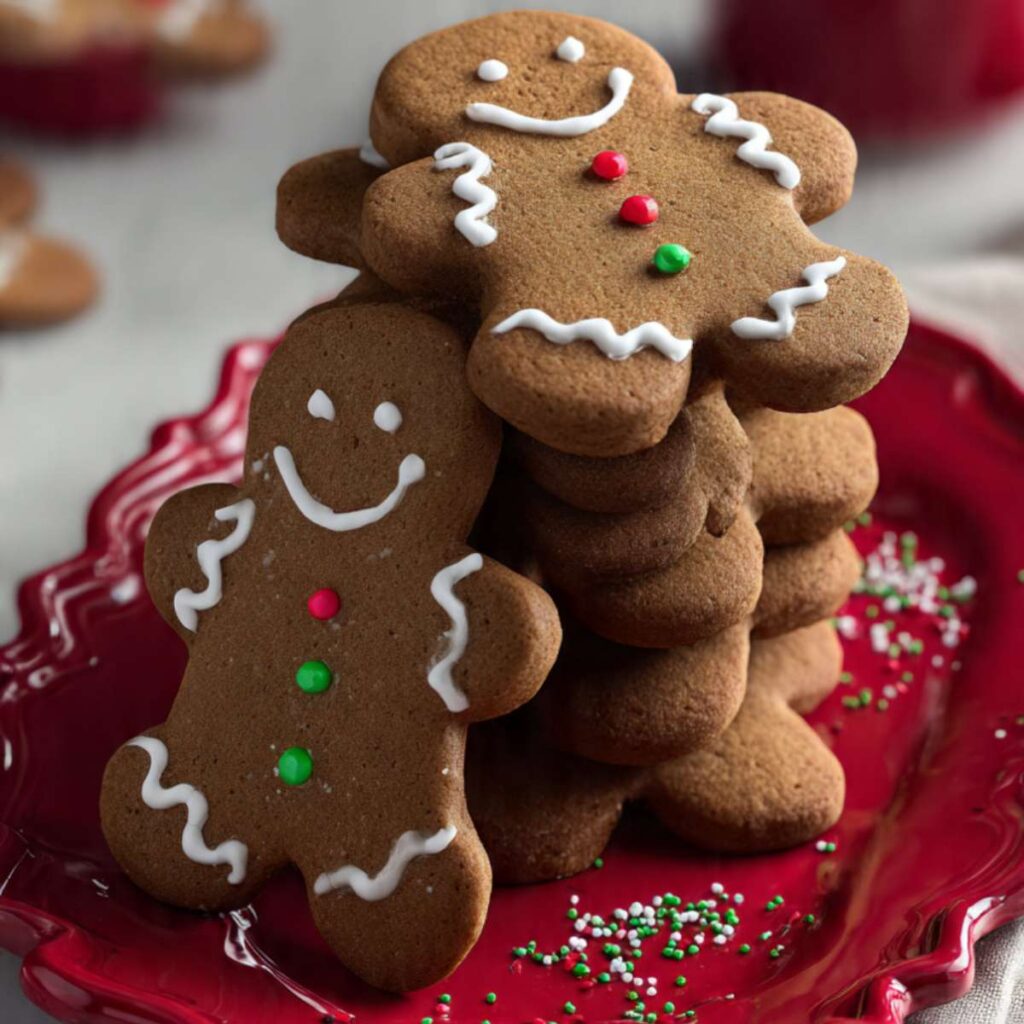
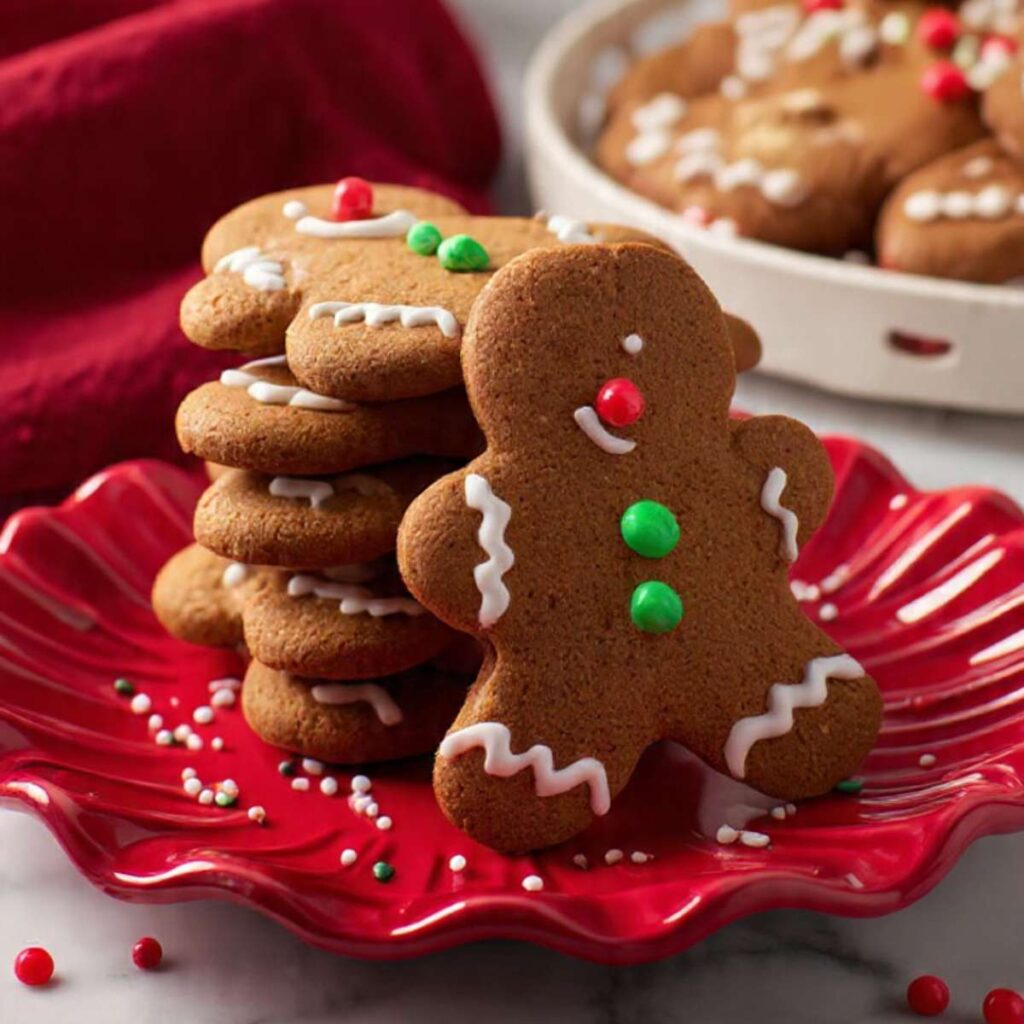
The cut shapes should have clean, defined edges — exactly like the cookies shown on the red plate in the photos. If the edges look ragged or the shapes look slightly blurred, the dough was too warm. Return the cut shapes to the fridge for 10 minutes before continuing.
Gather the scraps, press them together, wrap in plastic, and return to the fridge for 15 minutes before re-rolling. Warm scrap dough produces cookies with less defined edges. Re-roll scraps only once. A second re-roll develops enough additional gluten that the texture becomes noticeably tougher — use any remaining scraps as cookie crumbs rather than baking a third-roll batch.
Step 7: Chilling the Cut Shapes Before Baking (Second Chill — This Is the Step Most Recipes Skip)
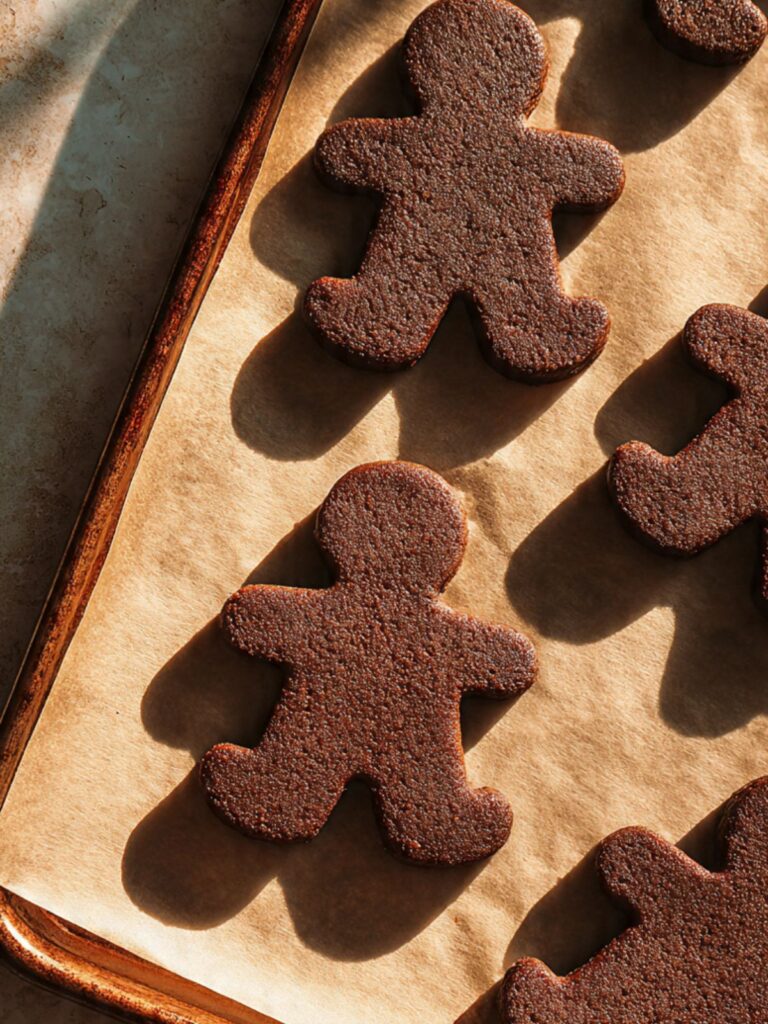
Once the cut shapes are on the lined baking pan, slide the entire pan into the freezer for 10–15 minutes, or into the refrigerator for 20–25 minutes, before baking. Do not skip this step.
This is the step that produces the sharp edge definition visible in the photos. When cold dough goes into a hot oven, the butter in the outer edges of the cookie solidifies and sets before the heat fully penetrates to the center. This means the shape holds its outline as the cookie bakes. When dough goes into the oven at room temperature, the butter softens and begins to spread before the structure sets — the edges blur and the gingerbread man loses definition in his arms, legs, and head.
The shapes should feel cold and firm to the touch before the pan goes into the oven. If any shape feels soft or slightly warm at the edges, give it another 5 minutes.
🗒 Luna’s Note: I discovered this step by accident — my oven was occupied and the cut shapes sat in the fridge longer than I planned. The edges on that batch were sharper and cleaner than anything I had made before. I have not skipped the second chill since.
Step 8: Baking to a Soft, Set Center
Slide the pan onto the middle rack of your preheated 350°F (175°C) oven. Bake for 9 to 11 minutes. Start checking at 9 minutes.
The cookies are done when the edges look set and lightly firm and the centers look just barely dry on the surface — not shiny, not wet, but not deeply golden either. The center will still look slightly underdone compared to the edges. Pull the pan at this moment. Do not wait for the centers to look fully done — by the time the center looks done in the oven, the edges will be overbaked and the cookie will harden to a crisp as it cools.
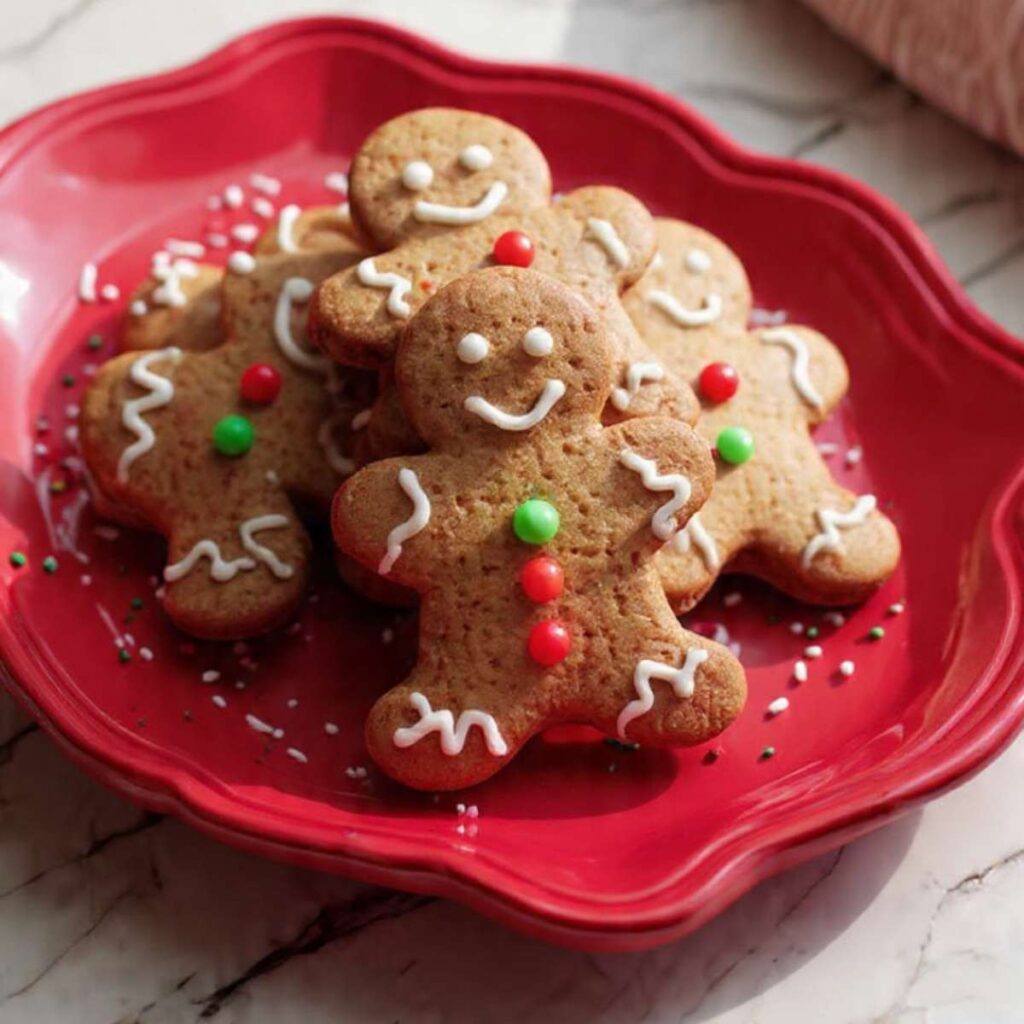
This is the single most important pull moment in this recipe. The warm, deep golden-brown color you see across the full surface of the cookie in the close-up shot — where the surface crackle is clearly visible and the color is even from edge to center — forms during the last 2 minutes of baking and during the carryover resting period on the hot pan. The Maillard reaction — the same process that browns meat and toast — is still happening inside the cookie after the pan leaves the oven. The exterior color you see in the finished photos is the result of both oven time and that carryover period combined.
The edges should look set and slightly firm. The center surface should look just dry — no wet sheen, but no deep golden color yet either. The cookies will look underdone. Pull them at this exact moment.
Do not open the oven door during the first 8 minutes. A sudden drop in temperature during the early bake disrupts the structure before it has set and can cause uneven rise across the batch.
Step 9: Resting on the Pan and Cooling on the Rack

Leave the cookies on the hot pan for exactly 5 minutes after pulling from the oven. Do not move them. The pan continues to conduct heat into the cookie base during this time — this carryover heat finishes setting the centers without the oven drying them out. Moving the cookies before 5 minutes breaks the structural base while it is still soft. Waiting more than 8 minutes starts to over-dry the bottoms. Set a timer.
After 5 minutes, use a thin metal spatula to transfer the cookies to a wire cooling rack. They will feel slightly soft and flexible — this is correct. They firm up as they cool to room temperature.
After 15 minutes on the rack, the cookies should feel firm and set throughout with a slight give when pressed in the center — not hard, not fragile. This is the texture shown in the photos. Do not decorate until the cookies are completely cool — at least 30 minutes at room temperature — or the royal icing will melt and run.
Repeat with the remaining dough, always baking from a cold pan. If your pan is warm from a previous batch, let it cool to room temperature or run it briefly under cold water and dry it before adding the next set of cut shapes.
Step 10: Making the Royal Icing
In a large mixing bowl, combine your 2 tablespoons (16g) meringue powder and 5 tablespoons (75ml) warm water. Whisk vigorously by hand for 30 seconds until the meringue powder is fully dissolved and slightly foamy.
Sift in your 3 cups (360g) powdered sugar in two additions, stirring between each. Unsifted powdered sugar will leave lumps in the icing that clog the piping tip and create uneven lines. Add your ½ teaspoon (2.5ml) pure vanilla extract and stir to combine.
Check the consistency: the icing should fall from the spoon in a thick, slow ribbon and settle flat within 8–10 seconds. This is piping consistency — firm enough to pipe clean lines, fluid enough to hold the ribbon shape. If it is too thick and holds stiff peaks, add warm water ½ teaspoon at a time. If it is too thin and spreads immediately, add sifted powdered sugar 1 tablespoon at a time.
Use meringue powder, not raw egg whites. Meringue powder is pasteurized and food-safe, produces a more stable icing that sets harder, and is not affected by humidity the way fresh egg whites are.
The finished icing should look bright white, smooth, and glossy — the same clean white you see piped as zigzag lines and dot eyes on the cookies in the photos. If it looks dull or grainy, the powdered sugar was not fully sifted or the meringue powder was not fully dissolved.
Transfer the icing to a piping bag or a zip-lock bag with a small corner snipped off — the opening should be no larger than 2mm for clean lines.

Step 11: Decorating the Cookies
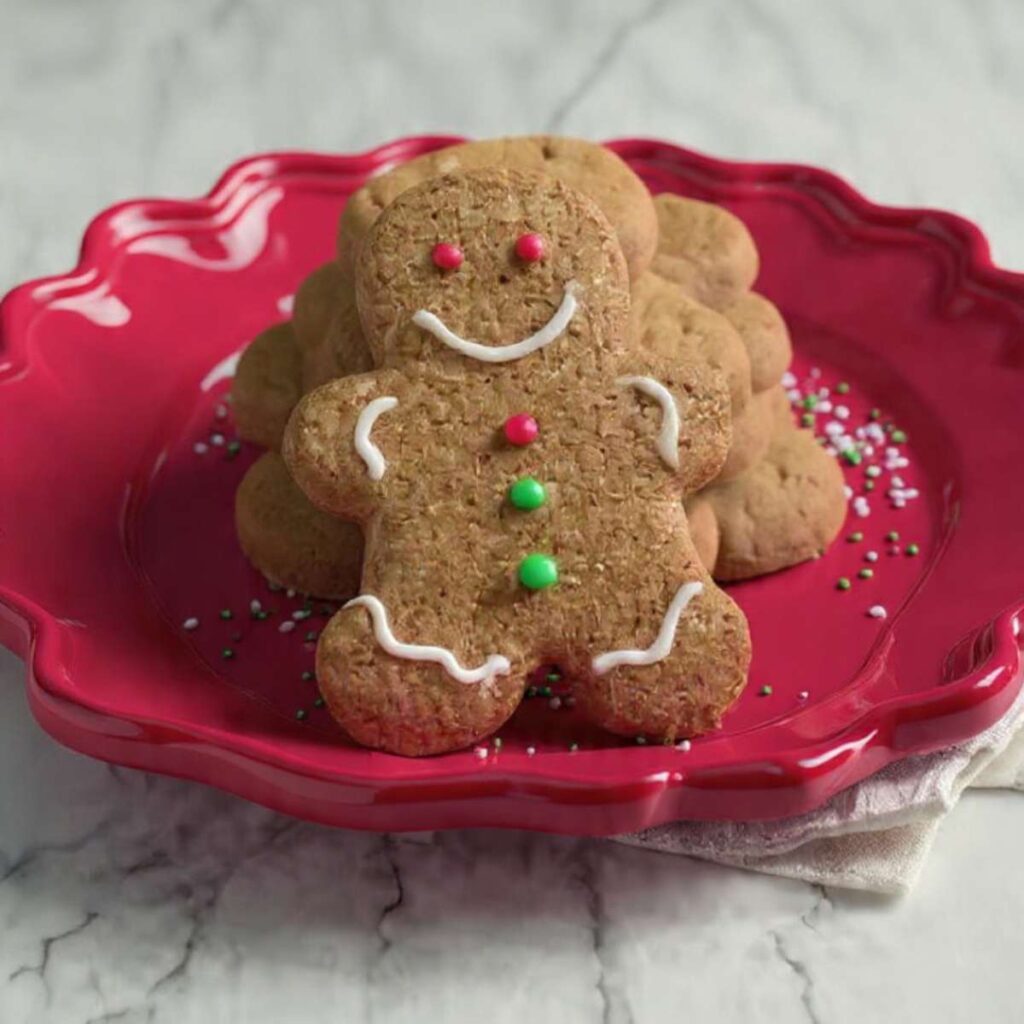
Working on fully cooled cookies, pipe white royal icing zigzag lines along the arms, waist, and legs — following the edge of the cookie shape as shown in the photos. Pipe two small dot eyes at the top of the head. Pipe a small curved smile line below the eyes.
Press one red round candy piece into the icing at the nose position before the icing sets — the icing acts as adhesive. Press two to three green round candy pieces down the center of the torso as buttons, and one additional green piece below for the lowest button. Work quickly — the icing begins to set within 2–3 minutes of piping, and candy pieces pressed into set icing will not adhere.
If the icing floods outside the piped zigzag lines and bleeds into the flat surface of the cookie, the consistency is too thin — the ribbon is not holding its shape long enough before it settles. Stop, add sifted powdered sugar 1 tablespoon at a time, test on a piece of parchment paper, and do not continue piping until the ribbon holds for a full 3–4 seconds before settling flat.
Allow the decorated cookies to dry completely at room temperature for a minimum of 1 hour before stacking or packaging. The royal icing dries to a firm, matte finish. Do not attempt to stack decorated cookies before the icing is fully dry. After 1 hour the icing should feel completely firm and dry to the touch with no give — your decorated cookies are ready to serve, store, or package — the zigzag lines will smear and the candy pieces will shift.
The finished decorated cookies should look like the cookies shown on the red plate in the photos — clean white zigzag outlines, a red candy nose, green candy buttons, and white dot eyes with a curved smile. The icing should feel completely dry and firm to the touch, not tacky.
The Science Behind Gingerbread Men Cookies
Why the Double Chill Produces Sharper Edges Than Any Other Variable
I kept getting blurred edges on my first several batches and I assumed it was the cutter. I tried pressing harder. I tried flouring the cutter. I tried a sharper metal cutter instead of a plastic one. None of it made a meaningful difference. The edges were still soft and slightly rounded by the time the cookies came out of the oven. What I did not understand was that the problem had nothing to do with the cut — it had everything to do with what happened to the butter between the cutting board and the oven.
Butter melts at approximately 90–95°F (32–35°C). A home kitchen in active use sits at 68–75°F (20–24°C). That gap is narrower than it feels when your hands are warm, the mixer has been running, and you have been handling the dough. By the time a cut shape reaches the oven at room temperature, the butter in the outer edges — the thinnest parts of the cookie, where the arms and legs taper — has already softened close to its melting point. The moment it hits the 350°F oven, those thin edges lose structure before the starch in the flour has had time to gelatinize and hold the shape. The result is spread — not dramatic spread like a drop cookie, but the subtle blurring of a defined edge into a rounded one.
The second chill solves this by driving the butter temperature back down to 35–40°F (2–4°C) before the pan goes in. Cold butter takes longer to melt in the oven, which gives the starch gelatinization time to catch up and lock the shape in place before the fat releases. The edges set first, the center sets second, and the shape you cut is the shape you get. This is exactly the mechanism behind the clean, defined gingerbread men you see in the photos — wide flat arms, distinct rounded head, straight legs. That definition comes from cold dough hitting a hot oven, not from the cutter.
How Molasses and Baking Soda Work Together to Create Lift and Soft Texture
Baking soda is an alkaline leavening agent — it produces carbon dioxide gas when it contacts an acid. In most cookie recipes, the acid comes from brown sugar, buttermilk, or natural cocoa. In gingerbread, the primary acid is molasses. Unsulfured molasses is mildly acidic — acidic enough to react with the full teaspoon of baking soda in this recipe and produce a meaningful amount of gas. That gas creates the slight lift that gives these cookies their tender, soft center rather than a dense, compressed one.
The same reaction is also responsible for the surface crackle you can see in the close-up photos. As the gas expands in the oven and pushes upward through the dough, it creates small fractures in the surface crust as the exterior sets faster than the interior. This is not a flaw — it is a direct visual signal that the leavening reaction fired correctly and the cookies have the right interior texture. A completely smooth, uncracked surface on a gingerbread cookie often means the baking soda was old, the molasses was insufficient, or the dough was overbaked past the point where the center has any softness left.
This is also why blackstrap molasses produces a noticeably different result. Blackstrap is more acidic than unsulfured molasses — it triggers a more aggressive leavening reaction that can cause the cookies to rise and then collapse slightly, producing a puffier but less defined shape. The stronger bitterness compounds in blackstrap also overwhelm the warm spice notes that make these cookies taste the way they should. Unsulfured molasses gives you the right acid level for the right leavening reaction and the right flavor balance simultaneously.
For more on how molasses and spice interact in baked cookies, the gingersnap cookies article on this site covers the higher-molasses, crisper version of this same flavor profile in detail.
Why Brown Sugar Keeps These Cookies Soft for Days
Granulated white sugar is hydrophobic — it does not attract water molecules from the surrounding environment once it is baked into a cookie. Brown sugar behaves differently. The molasses content in brown sugar makes it hygroscopic — it actively draws moisture from the air and holds it within the baked cookie. This is the same property that causes brown sugar to clump in the bag when left open, and it is the property that keeps these gingerbread men soft and pliable on Day 2 and Day 3 rather than drying out the way a shortbread or a plain sugar cookie does.
The ratio in this recipe — ¾ cup (150g) of dark brown sugar against a relatively modest butter quantity — is calibrated to produce a cookie that holds its moisture over several days without becoming sticky or tacky on the surface. Dark brown sugar contains more molasses than light brown sugar, which means more hygroscopic activity and a more pronounced effect. If you substitute light brown sugar, the cookies will still be soft on Day 1 but will dry out noticeably faster. If you substitute white granulated sugar entirely, you will get a crisper cookie that is pleasant but structurally different from what is shown in the photos — and it will stale within 24 hours.
🗒 Luna’s Note: I tested this recipe with both light and dark brown sugar across three batches. The dark brown sugar version was still soft and pliable on Day 4. The light brown sugar version was noticeably firmer by Day 3. For a cookie that is being decorated and displayed over several days — which gingerbread men usually are — dark brown sugar is not a preference. It is the correct choice.
Gingerbread Men Cookies Troubleshooting & Pro-Tips
Common Mistakes
Wrong molasses type used — cookies taste bitter or too dark
Blackstrap molasses is the highest-risk substitution in this recipe. It is significantly more bitter, more acidic, and darker than unsulfured molasses — it changes both the flavor and the appearance of the finished cookie in ways that cannot be fixed after baking. The cookies will have a sharp, almost medicinal bitterness underneath the spice notes, and the color will be noticeably darker than the warm golden-brown shown in the photos. If you have already baked with blackstrap: the cookies are edible but the bitterness is present in every bite — heavy royal icing decoration helps mask it. The prevention: check the label before you start. The word “blackstrap” will be on the front of the jar. Unsulfured molasses brands include Grandma’s Original, Brer Rabbit, and Golden Barrel — any will work.
Wrong pan type or pan preparation used — bottoms are overbaked or unevenly baked
A dark non-stick pan absorbs significantly more heat than a light-colored aluminum pan and overbrowns the cookie bottoms before the centers are set — you will pull the pan at the correct time based on the center cue, but the bottoms will have a burned, bitter taste while the centers still look right. Foil instead of parchment conducts heat unevenly and produces hard, patchy bottoms with inconsistent browning. Greasing the parchment causes slight additional spread and produces edges that are less defined than the ungreased result. If the bottoms are already overbaked: trim a thin layer from the bottom of each cookie with a serrated knife before decorating — the interior texture and flavor are unaffected. The prevention: light-colored aluminum pan, parchment paper, no grease, every time.
The cookies spread and lose their shape in the oven
This almost always traces to one cause: the dough or cut shapes were not cold enough when the pan went into the oven. Warm butter in the thin arms and legs melts before the starch structure sets, and the shape blurs outward. If it has already happened: the cookies are still edible but the shape definition is gone — serve them as rustic gingerbread cookies or use them as a base for heavy icing that disguises the edges. The prevention: always complete both chilling stages — minimum 2 hours for the dough disc, and 10–15 minutes in the freezer (or 20–25 minutes in the fridge) for the cut shapes on the pan before baking. The second chill is the one most recipes skip. Do not skip it.
The dough is too sticky to roll and keeps tearing
Two causes: either the dough did not chill long enough, or the kitchen is warm enough that the dough warmed up during rolling. Do not add more flour — adding flour at this stage changes the ratio and produces dry cookies. Return the dough to the fridge for 20–30 minutes and try again. Work with one half of the dough at a time and keep the other half refrigerated. In a warm kitchen above 75°F (24°C), work quickly and return the dough to the fridge between every two or three cut shapes if needed.
The cookies came out hard and dry rather than soft
Three possible causes in order of likelihood: overbaking, too much flour, or rolling too thin. Overbaking is the most common — if the centers looked fully golden and set in the oven, they were left in too long. Pull them when the center still looks slightly underdone. Too much flour: if you scooped the measuring cup directly into the flour bag, you likely added 15–30g too much per cup — switch to weighing. Rolling too thin: anything under ¼ inch (6mm) bakes faster and produces a crisper result. If the cookies are already hard and dry: crumble them over vanilla ice cream, layer them into a trifle, or crush them as a cheesecake crust base. They are not wasted.
The dough cracks at the edges when rolling
This happens when the dough has been refrigerated for 8+ hours and is too cold and stiff to roll without fracturing. Let the dough disc sit at room temperature for 10–15 minutes before rolling. Do not force-roll cold, stiff dough — the cracks travel inward and compromise the cut shapes. If cracks appear at the edges while rolling, stop, rest the dough 5 minutes, then continue.
The baking soda is not producing lift — cookies are flat and dense
Test it before you start: ½ teaspoon of baking soda into a small bowl with 1 teaspoon of white vinegar should bubble vigorously immediately. If it fizzes weakly or not at all, replace it. Flat, dense gingerbread men cannot be fixed after baking — they are still edible but will lack the soft center and surface crackle the recipe produces when the leavening is active.
The royal icing is bleeding or spreading outside the piped lines
Two causes: icing too thin, or cookies not fully cooled before decorating. If the icing is too thin — add sifted powdered sugar 1 tablespoon at a time and test the ribbon on a piece of parchment before continuing. The ribbon should hold its shape for 3–4 seconds before settling flat. If the cookies were still warm — the heat softens the icing immediately. Test the consistency before you fill the piping bag: pipe a short line on parchment and watch it for 5 seconds. If it spreads and loses its shape, add more powdered sugar before touching the cookies. Wait a full 30 minutes after the cookies come off the cooling rack before piping.
Altitude and humidity adjustments
At high altitude (above 3,500 feet / 1,065m): reduce baking soda by ¼ teaspoon and increase oven temperature by 15°F (8°C). In high humidity environments: the dough may feel stickier than usual. Chill the dough for an additional 30–60 minutes and work in shorter rolling sessions to prevent the dough from absorbing more moisture during handling.
How to Store Gingerbread Men Cookies
Room Temperature
Store fully decorated and fully dried gingerbread men in a lidded hard-sided container — not a zip-lock bag, which puts pressure on the royal icing decorations and causes the candy pieces to dislodge and the zigzag lines to crack and flake. Layer the cookies with a sheet of parchment paper between each layer to prevent the icing on the top surface of one cookie from pressing against the base of the cookie above it. Do not stack more than two layers deep.
At room temperature in a cool, dry kitchen (65–70°F / 18–21°C), the cookies will stay soft and the icing will stay intact for up to 5 days. In a warm or humid kitchen, 3 days is the more realistic window — the hygroscopic sugars in the molasses and brown sugar will draw excess ambient moisture and the cookies will begin to feel slightly tacky on the surface. If your kitchen runs warm, store the container in the coolest spot available and keep the lid on between servings.
Undecorated cookies store the same way and last the same duration. If you are baking ahead for a decorating session, store the undecorated baked cookies in the lidded container at room temperature and decorate within 5 days.
Refrigerator
Refrigerating decorated gingerbread men is not recommended as a routine storage method. The fridge introduces two problems: condensation forms on the royal icing surface as the cookies move from cold to room temperature, which softens the icing and causes colors to bleed if you have used tinted icing; and the dry air of most refrigerators gradually pulls moisture from the cookie itself, producing a drier texture by Day 2.
If your kitchen is genuinely warm — above 75°F (24°C) for extended periods — the fridge is the better option despite these trade-offs. Store in a lidded hard-sided container with parchment between layers and bring the cookies to room temperature for 20–30 minutes before serving to allow the icing to firm back up after any condensation evaporates.
Freezer — Baked and Decorated
Decorated cookies can be frozen, but the royal icing changes texture slightly after thawing — it becomes slightly softer and less crisp than freshly dried icing. For cookies that will be displayed and the appearance matters, freeze undecorated and decorate after thawing.
To freeze baked undecorated cookies: allow them to cool completely, then wrap each cookie individually in plastic wrap. Place the wrapped cookies in a single layer in a zip-lock freezer bag or a lidded freezer-safe container, pressing out as much air as possible. Freeze for up to 2 months.
To thaw: remove from the freezer and let the cookies come to room temperature on the counter, still wrapped, for 1–2 hours. Do not unwrap while still cold — the condensation that forms will settle on the wrapping rather than the cookie surface. Once fully thawed and at room temperature, unwrap and decorate as normal. The texture after thawing is nearly identical to freshly baked — the brown sugar and molasses help the cookies retain their softness through the freeze-thaw cycle better than a plain sugar cookie would.
Freezer — Unbaked Dough
The dough freezes exceptionally well. Prepare the dough through the first chill, flatten into a disc, wrap tightly in plastic wrap, then wrap again in a layer of aluminum foil. Freeze for up to 3 months.
To thaw: transfer the wrapped dough disc to the refrigerator the night before you plan to bake — overnight thawing in the fridge brings it back to the correct temperature and texture for rolling without making it too soft. Do not thaw at room temperature — the outside of the disc will warm and soften before the center thaws, making it impossible to roll evenly.
Once thawed, proceed from Step 6 — roll, cut, second chill, and bake exactly as written. No adjustments to bake time are needed for dough that has been frozen and properly thawed.
Serving Suggestion
Serve these at room temperature — not warm from the oven. The royal icing needs time to set fully, and the cookie texture is actually better after it has cooled and rested than it is straight from the pan. The centers firm slightly as they cool and develop a soft, yielding chew that the warm cookie does not have yet.
I serve these every year in the first week of December with a strong black tea — Assam, unsweetened, steeped for four minutes. The slight bitterness of the tea cuts through the sweetness of the royal icing in a way that coffee does not quite manage. It is a pairing I stumbled into the first year I made these in Los Angeles and have not changed since.
These are the cookies I make when I want something to look like it took more effort than it did. A plate of decorated gingerbread men reads as a serious baking project to anyone who did not watch you make them. They are the right thing to bring to a cookie exchange, to leave on a neighbor’s porch in December, or to set out at a party where you want people to linger at the dessert table.
On Day 2, these cookies are better than Day 1. The spice notes — particularly the ginger and clove — deepen and round overnight as the molasses continues to work through the crumb. Day 1 they taste freshly spiced. Day 2 they taste developed. Day 3 they are still good. Day 4 and 5 the texture firms slightly at the edges while the center stays soft.
🗒 Luna’s Note: I eat the Day 4 and 5 cookies cold, straight from the container with a cup of strong Assam tea. The centers have firmed up enough that they hold together differently than the fresh batch — not worse, just a different experience. I actually prefer them at this stage when I am eating alone and not worrying about presentation.
These do not travel well undecorated — plain baked gingerbread men without icing look unfinished and fragile in transit. Decorate before packaging for gifting, and pack them in a rigid box with tissue between layers rather than a bag. A bag will break the icing lines within the first ten minutes of handling.
Frequently Asked Questions About Gingerbread Men Cookies
Why do my gingerbread men spread in the oven?
Gingerbread men spread when the dough or cut shapes are too warm when the pan goes into the oven. The butter in the thin edges of the arms and legs melts before the starch structure sets, causing the shape to blur outward. The fix is a two-stage chill: minimum 2 hours for the dough disc in the refrigerator, then 10–15 minutes in the freezer (or 20–25 minutes in the fridge) for the cut shapes on the pan before baking. Both stages are required — the second chill is the one most recipes skip, and it is the one that makes the difference between defined edges and blurred ones.
What kind of molasses is best for gingerbread cookies?
Unsulfured molasses is the correct choice for gingerbread men cookies. It is mild enough to deepen the spice notes without overpowering them and produces the warm golden-brown color visible in the photos. Blackstrap molasses is significantly more bitter and more acidic — it triggers a stronger leavening reaction, produces a darker cookie, and introduces a sharp, medicinal bitterness that competes with the ginger and cinnamon rather than supporting them. Check the label before you start. Grandma’s Original, Brer Rabbit, and Golden Barrel are all reliable unsulfured options.
Can you make gingerbread cookie dough ahead of time?
Yes — gingerbread cookie dough is one of the best make-ahead doughs in baking. The dough keeps in the refrigerator for up to 48 hours, and the flavor improves as the spices bloom into the fat and the molasses hydrates the flour more fully. For longer storage, the dough freezes well for up to 3 months — wrap the chilled disc in plastic wrap then foil, and thaw overnight in the refrigerator before rolling. Do not thaw at room temperature.
How do you keep gingerbread men soft?
Two things keep gingerbread men soft: dark brown sugar and unsulfured molasses. Both contain hygroscopic compounds that draw moisture from the surrounding air and hold it within the cookie, slowing the staling process that makes cookies dry and hard. To maximize softness, do not overbake — pull the cookies when the center still looks slightly underdone and allow carryover heat to finish them on the hot pan. Store in a lidded hard-sided container at room temperature with parchment between layers. Adding a slice of white bread to the container is a traditional trick — the bread releases moisture into the enclosed space and the cookies absorb it, but with this recipe and these ingredients, it is not necessary if stored correctly from the start.
For the same soft, chewy spiced cookie in a drop format that requires no rolling or chilling, the cut out sugar cookies recipe on this site uses a similar creamed butter base with a different spice profile worth comparing.
What makes gingerbread cookies hard instead of soft?
Gingerbread cookies turn hard for three reasons, in order of likelihood: overbaking, too much flour, or rolling too thin. Overbaking is the most common — waiting until the centers look fully done in the oven means the residual heat during the resting period overbakes them further. Pull the cookies when the center still looks slightly underdone. Too much flour changes the fat-to-flour ratio and produces a dry, dense cookie — weigh the flour rather than measuring by volume to eliminate this variable. Rolling thinner than ¼ inch (6mm) produces a crisper result because less mass means faster heat penetration and less moisture retained. If crispness is the goal, rolling to ⅛ inch (3mm) intentionally will produce a snap-style gingerbread cookie.
Can you freeze gingerbread cookie dough or baked cookies?
Both freeze well. Gingerbread cookie dough: chill the disc first, wrap in plastic wrap then foil, freeze up to 3 months, thaw overnight in the refrigerator. Baked undecorated cookies: wrap each individually in plastic wrap, freeze up to 2 months, thaw at room temperature still wrapped. Decorate after thawing. Decorated cookies can be frozen but the royal icing softens slightly after thawing — freeze undecorated when appearance matters.
How long do gingerbread cookies last?
Stored in a lidded hard-sided container at room temperature with parchment between layers, gingerbread men cookies stay soft and intact for up to 5 days in a cool, dry kitchen. In a warm or humid kitchen, 3 days is the more realistic window before the surface begins to feel slightly tacky. The flavor actually improves between Day 1 and Day 2 as the spice notes deepen. Undecorated baked cookies last the same duration. Frozen baked cookies last up to 2 months with no meaningful change in texture after thawing.
More Cookies You’ll Love
If you enjoyed these gingerbread men cookies, these recipes from the same spiced and holiday cookie family are worth making next.
Molasses Cookies — same deep molasses flavor in a thick, soft drop cookie format that requires no rolling, no chilling, and no cutter. The spice profile overlaps closely with gingerbread and the cookies stay soft for days longer than most.
Shortbread Cookies Recipe — a rolled cut-out cookie with a completely different flavor profile and method. No leavening, no eggs, pure butter flavor. Worth making back-to-back with gingerbread men to understand how the creamed butter cut-out method produces different results depending on what surrounds the fat.

Gingerbread Men Cookies
Ingredients
Equipment
Method
- Step 1: In a medium mixing bowl, whisk together 3 cups (360g) all-purpose flour, 1 tsp baking soda, 2 tsp ground ginger, 1½ tsp ground cinnamon, ¼ tsp ground cloves, ¼ tsp ground nutmeg, and ½ tsp fine sea salt for 30 seconds until fully combined and no white pockets remain. Set aside.
- Step 2: In the bowl of a stand mixer fitted with the paddle attachment, beat ¾ cup (170g) unsalted butter softened to room temperature and ¾ cup (150g) packed dark brown sugar on medium speed for 3 full minutes until the mixture is noticeably paler, fluffy, and increased in volume.
- Step 3: With the mixer on low, add 1 large room temperature egg and mix for 30 seconds until incorporated. Scrape the bowl. Add ⅓ cup (110g) unsulfured molasses and 1 tsp pure vanilla extract, increase to medium-low, and mix for 45 seconds until fully combined and glossy.
- Step 4: With the mixer on its lowest speed, add the flour mixture in three equal additions, mixing only until no dry streaks remain after the final addition. Stop the mixer immediately. Do not overmix.
- Step 5: Scrape the dough onto plastic wrap, flatten into a 1-inch (2.5cm) disc, wrap tightly, and refrigerate for a minimum of 2 hours or overnight.
- Step 6: Preheat the oven to 350°F (175°C) and position a rack in the middle. Line a light-colored aluminum half-sheet baking pan with parchment paper. On a lightly floured surface, roll half the dough to ¼ inch (6mm) thickness. Cut shapes with a 3.5–4 inch gingerbread man cutter, transfer to the prepared pan spacing 1.5 inches (4cm) apart, and keep the remaining dough refrigerated.
- Step 7: Slide the pan of cut shapes into the freezer for 10–15 minutes or the refrigerator for 20–25 minutes before baking. Do not skip this step — this second chill is what preserves the sharp edge definition during baking.
- Step 8: Bake at 350°F (175°C) on the middle rack for 9–11 minutes, until the edges look set and the center surface just looks dry with no wet sheen. The centers will look slightly underdone — pull the pan at this moment and do not wait for them to look fully done.
- Step 9: Leave the cookies on the hot pan for exactly 5 minutes, then transfer to a wire cooling rack and cool completely — at least 30 minutes — before decorating.
- Step 10: For the royal icing, whisk 2 tbsp (16g) meringue powder and 5 tbsp (75ml) warm water for 30 seconds until dissolved and slightly foamy. Sift in 3 cups (360g) powdered sugar in two additions, stirring between each. Add ½ tsp pure vanilla extract and stir to combine. Adjust consistency with additional water ½ tsp at a time or additional sifted powdered sugar 1 tbsp at a time until the icing falls in a slow, thick ribbon and settles flat within 8–10 seconds.
- Step 11: Transfer icing to a piping bag with a 2mm opening. Pipe zigzag lines along arms, waist, and legs, dot eyes, and a curved smile. Immediately press red candy pieces at the nose position and green candy pieces as buttons before the icing begins to set. Allow decorated cookies to dry at room temperature for a minimum of 1 hour before stacking.