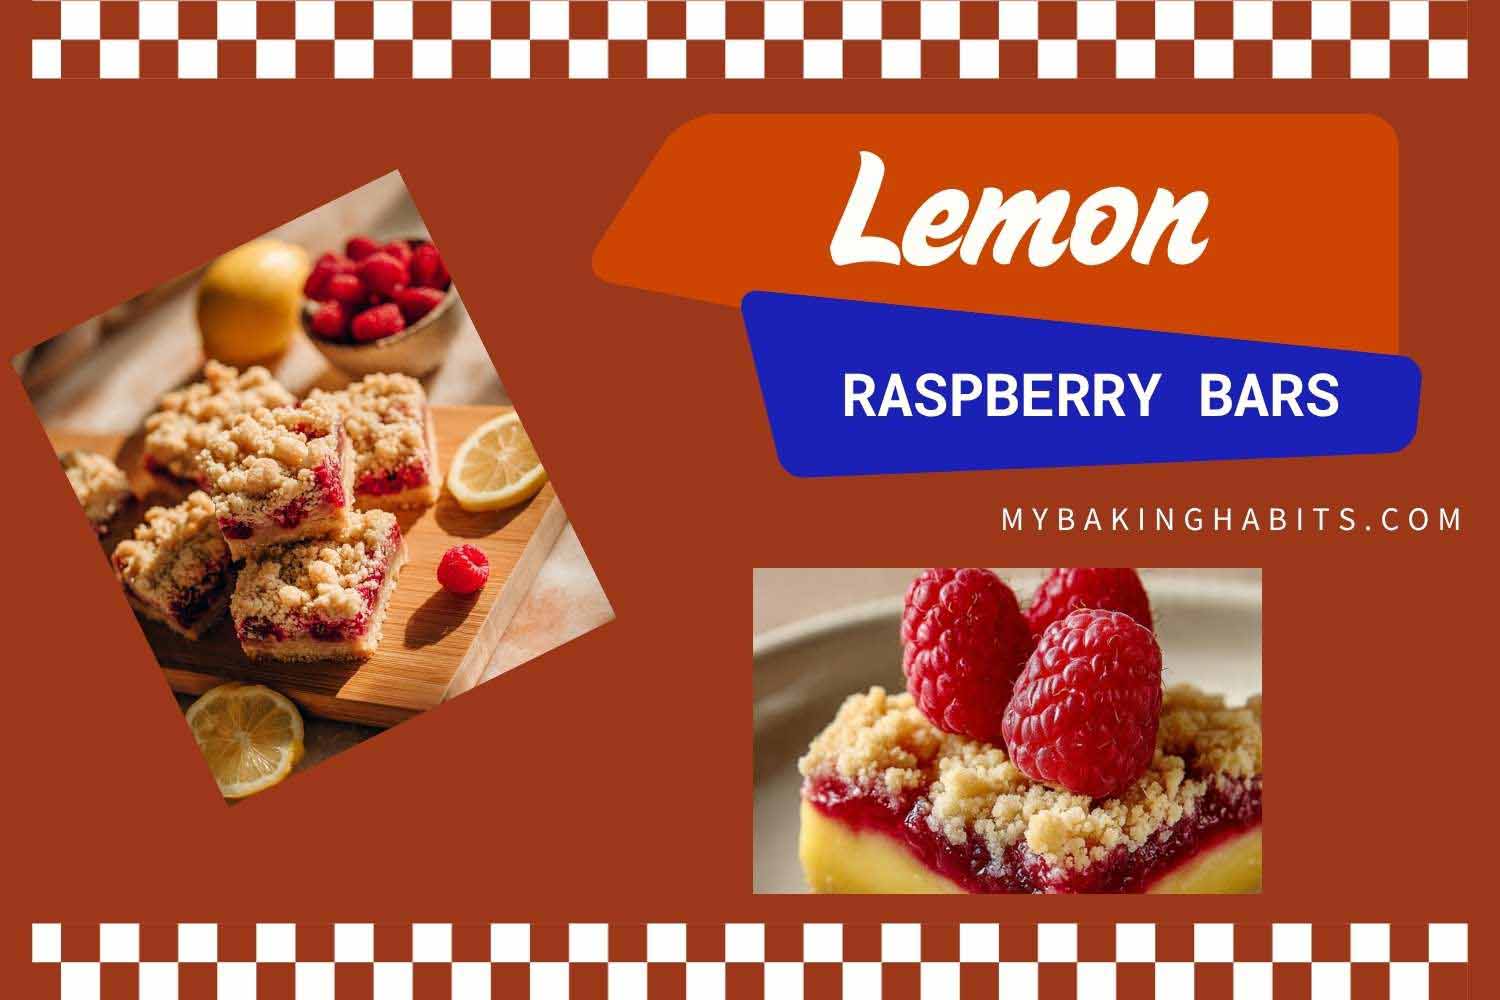
Lemon Raspberry Bars Recipe

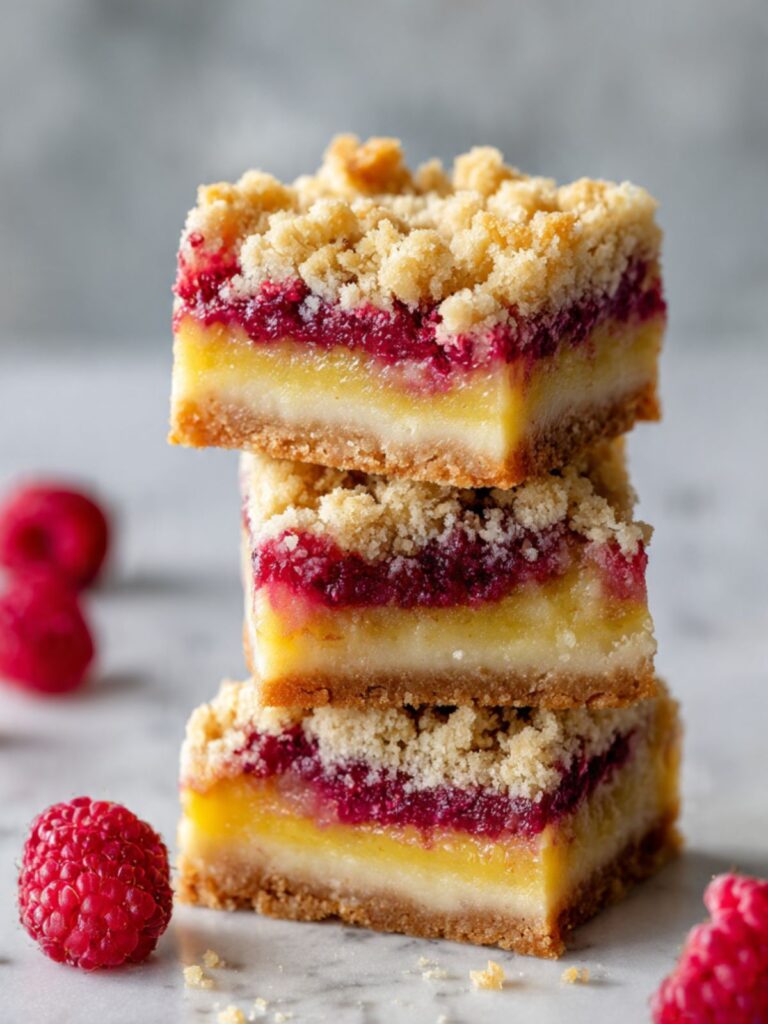
Lemon raspberry bars have a reputation for being straightforward. They are not. There are three separate components that each need to behave correctly before they ever meet each other in the pan — and the order of assembly, the temperature of each layer when the next one goes on, and the chilling time after baking all determine whether you end up with the four clean, distinct horizontal layers shown in the photos above or a blurry, collapsed mess that tastes fine but falls apart the moment you cut it.
I have made this recipe across more than fifteen test batches over two baking sessions. The first session produced bars with a lemon curd layer that wept into the crust — I poured it onto a crust that was still steaming hot from the oven, and the residual moisture from the hot crust cooked the bottom of the curd unevenly before it had a chance to set. The fix was obvious once I understood the cause: the crust needs to cool for at least ten minutes before the lemon filling goes in. That one change produced the clean, razor-edged cross-section you see in the stacked bar photo above.
🗒 Luna’s Note: I also tested this recipe with bottled lemon juice in batch three. I would not do it again. The curd turned dull and flat — none of the brightness you get from fresh lemons. Fresh lemon juice is not a suggestion here. It is what makes the lemon layer taste like lemon.
I tested the lemon curd ratio across five variations — two whole eggs plus one yolk ended up being the correct ratio for a curd that sets clean and holds its shape without turning rubbery. More eggs produced a curd with a cooked, slightly eggy flavor in the center. Fewer eggs produced a curd that never fully set and turned liquid when sliced.
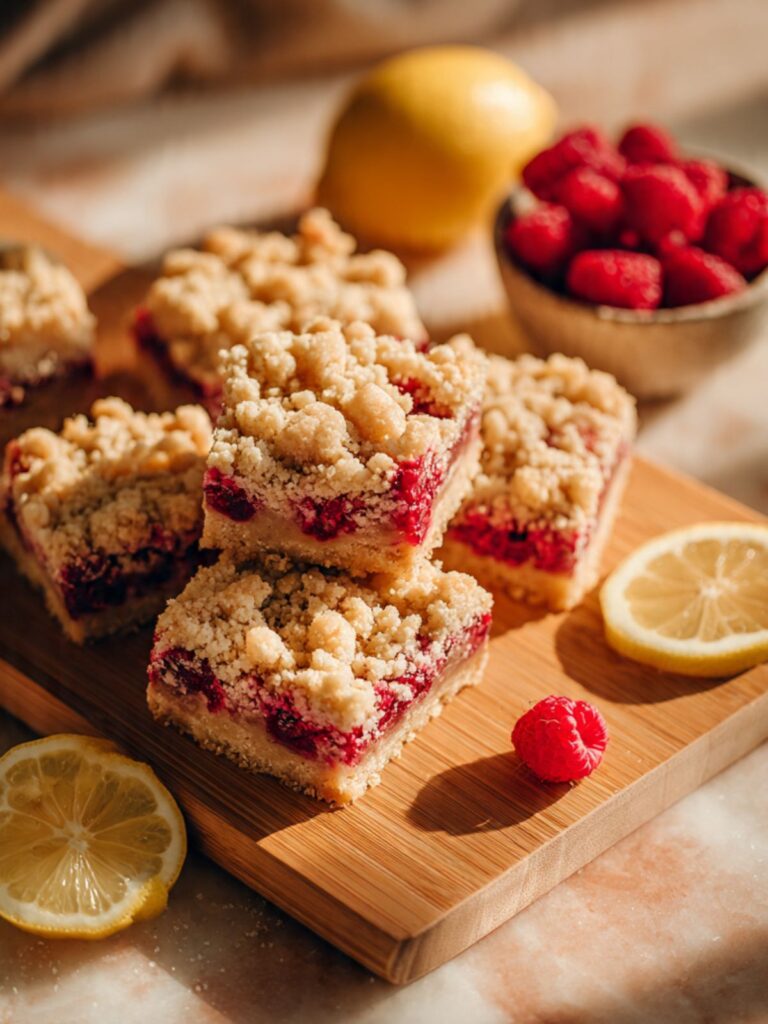
I tested fresh raspberries versus frozen for the fruit layer. Frozen raspberries (thawed and drained) produced a thicker, jammier layer because the freezing process breaks down the cell walls and releases more pectin. Fresh raspberries produced a brighter, slightly looser layer. Both work. The photos in this article use fresh raspberries with a small amount of cornstarch to ensure the layer holds its shape when sliced. If you use frozen, drain them thoroughly and reduce the cornstarch by half — the thawed berries release enough natural thickening on their own.
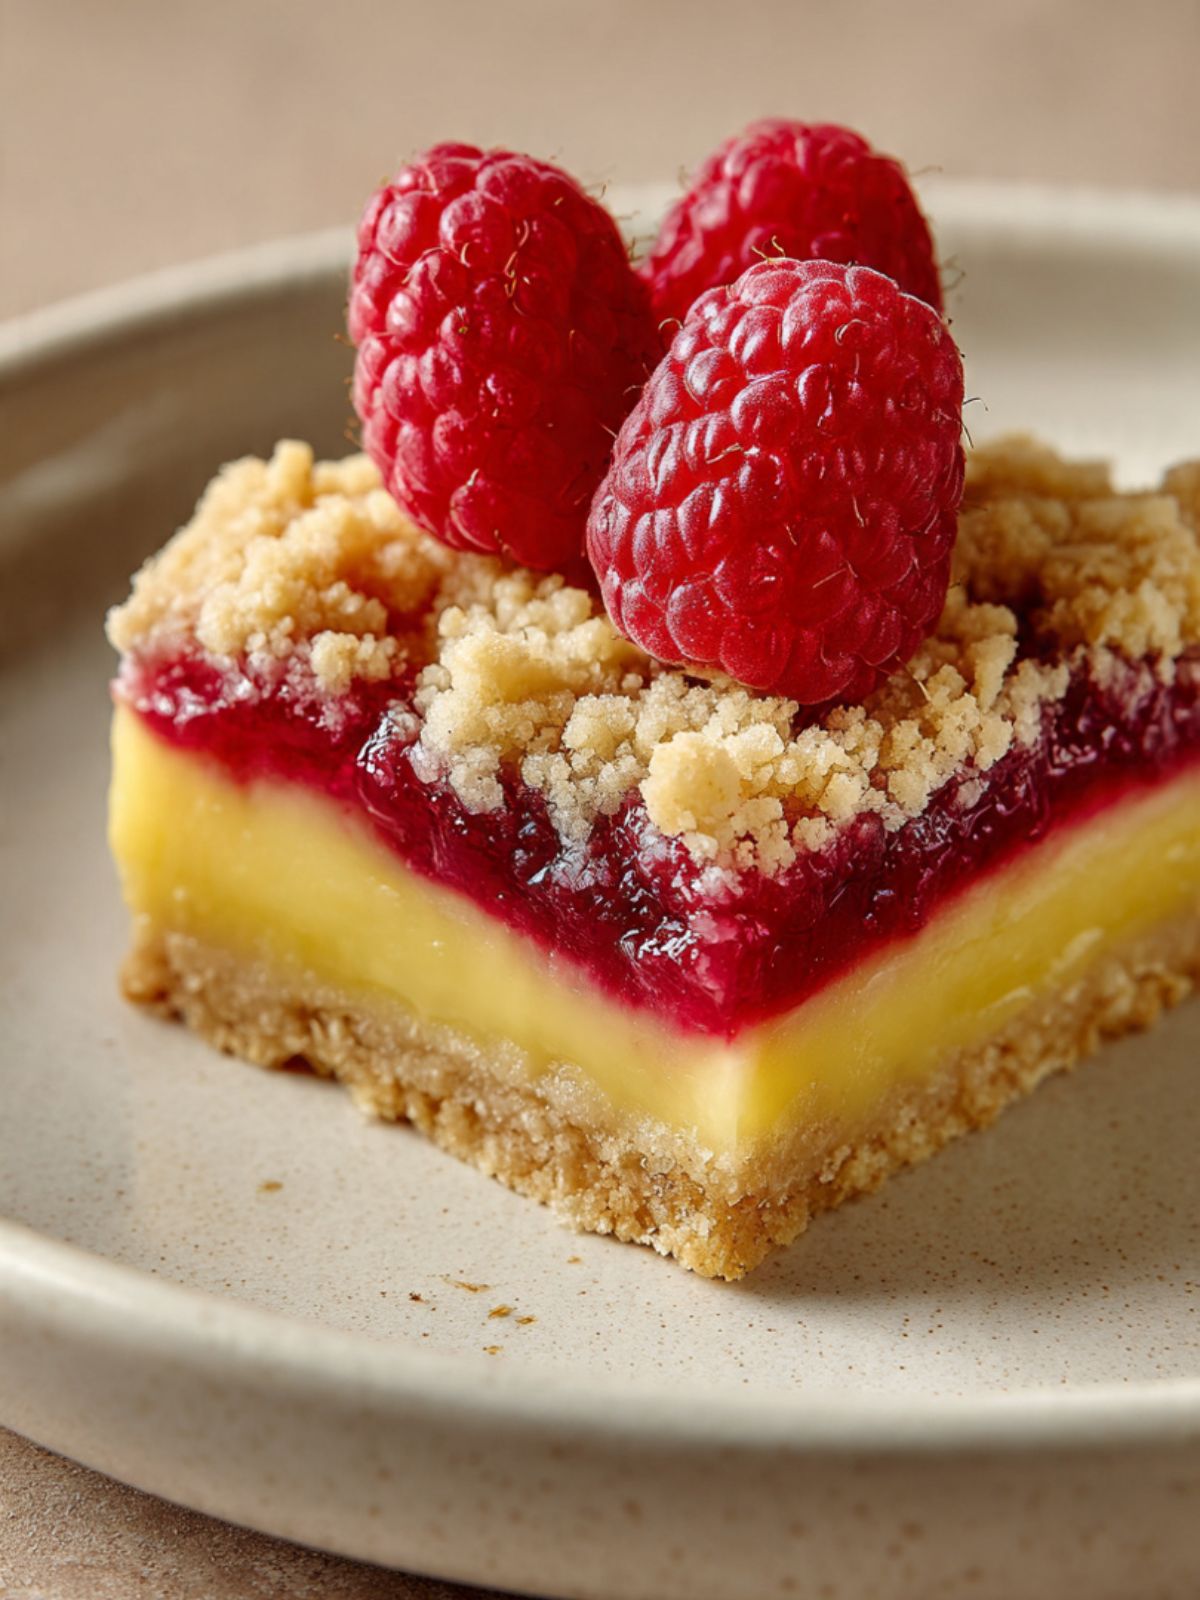
The result, when every step is done correctly, is a bar with four genuinely distinct layers: a buttery, crumbly shortbread base, a smooth, bright lemon curd, a jammy seeded raspberry layer with real fruit presence, and a pale golden streusel crumble on top. These need to be refrigerated overnight before slicing. I know that is a long wait. The razor-clean edges in the photos above are the reason.
The first time I got the layers right — all four of them, clean, distinct, the lemon a true yellow and the raspberry holding its edge — I stood at the cutting board for a moment before I did anything else. That is the bar this recipe produces when the chill time is honored.
No mixer required for any component. The crust, filling, and streusel all come together with a bowl and a pastry blender or your fingertips. Chilling is required — and the consequence of skipping it is bars that collapse and smear the moment a knife goes through them.
| Prep Time | Cook Time | Total Time | Yield | Difficulty |
|---|---|---|---|---|
| 30 min | 45 min | 1 hr 15 min + overnight chill | 9 bars (from an 8×8 pan) | Intermediate |
| Calories | Fat | Carbs | Sugar | Protein | Sodium |
|---|---|---|---|---|---|
| ~310 kcal | ~14g | ~44g | ~26g | ~4g | ~95mg |
Macros are approximate and will vary based on ingredient brands and exact serving size.
Ingredients & Tools for Lemon Raspberry Bars Recipe
For the Shortbread Crust and Streusel Topping
(This is one dough — two-thirds is pressed into the pan for the crust, one-third is crumbled over the top for the streusel.)
- 1½ cups (190g) all-purpose flour, spooned into the measuring cup and leveled — do not scoop directly from the bag
- ½ cup (100g) plain white granulated sugar — not powdered sugar, not coconut sugar
- ¼ tsp (1.5g) fine sea salt — not table salt, not kosher salt
- ¾ cup (170g) unsalted butter, cold and cubed into ½-inch pieces — straight from the refrigerator, not softened
For the Lemon Curd Layer
- 2 large eggs + 1 large egg yolk, room temperature — not cold from the refrigerator
- ½ cup (100g) plain white granulated sugar
- ⅓ cup (80ml) fresh lemon juice — squeezed from approximately 2–3 medium lemons, never bottled
- 1 tsp finely grated lemon zest — from the same lemons, before juicing
- 2 tablespoons (28g) unsalted butter, cold and cubed
For the Raspberry Layer
- 1½ cups (180g) 180g fresh raspberries — this is the version used in the recipe and the test. Frozen raspberries work as a substitute; see Before You Start for the full adjustment.
- 3 tablespoons (36g) plain white granulated sugar
- 1½ tablespoons (12g) cornstarch — not arrowroot, not tapioca starch
Optional Finish
- Powdered sugar for dusting — optional, added immediately before serving only
Before You Start
Butter temperature — this is the most important prep step in this recipe. The crust and streusel require cold butter straight from the refrigerator, cut into ½-inch cubes. Do not soften it, do not let it sit on the counter, and do not melt it. Cold butter stays in distinct pieces when worked into the flour — those pieces create the sandy, crumbly texture of a proper shortbread crust. Warm or softened butter blends fully into the flour and produces a dense, paste-like base with no crumble structure. If your kitchen is warm (above 75°F / 24°C), cube the butter and return it to the refrigerator for 10 minutes before using.
Eggs — room temperature only for the lemon curd. Pull the eggs for the lemon curd from the refrigerator 30 minutes before you begin. Cold eggs added to the lemon mixture will lower the temperature of the curd as it cooks and cause it to seize unevenly on the surface while remaining undercooked in the center. To bring eggs to temperature quickly, place them in a bowl of warm (not hot) water for 10 minutes.
Fresh lemon juice is non-negotiable. Bottled lemon juice contains preservatives that dull and flatten the flavor of the curd. The brightness in the lemon layer visible in these bars is the direct result of fresh-squeezed juice. Zest the lemons before juicing — you cannot zest a juiced lemon cleanly. Measure the juice after squeezing.
Raspberries — fresh versus frozen. Fresh raspberries produce a bright, slightly looser layer with intact berry pieces and visible seeds — exactly the layer shown in the close-up cross-section photo. Frozen raspberries (fully thawed in the refrigerator overnight and drained of all released liquid in a fine mesh sieve) also work and produce a jammier, more concentrated layer. If using frozen, reduce the cornstarch from 1½ tablespoons (12g) to 1 tablespoon (8g) — thawed berries release enough natural pectin during cooking to compensate for the reduction. Do not use frozen raspberries straight from the freezer without thawing — the ice crystals release all at once during cooking and produce a watery filling that will not set.
Gram weight takes priority over volume. The gram weights in this recipe are what I tested with. Volume measurements like cups and tablespoons can vary by 20–30% depending on how an ingredient is scooped or packed — especially flour, which is the most variable. Use a kitchen scale for the most reliable result.
Mixing equipment. No electric mixer is needed for any component in this recipe. The crust and streusel come together with a pastry blender or your fingertips. The lemon curd is whisked by hand over heat. The raspberry layer is stirred in a saucepan.
Pan preparation. Use an 8×8-inch (20x20cm) light-colored aluminum baking pan. Dark non-stick pans absorb more heat and will overbrown the bottom crust before the filling layers are set. Line the pan with parchment paper with at least 1 inch of overhang on all four sides — this overhang is what allows you to lift the fully chilled bars cleanly out of the pan for slicing. If you skip the parchment overhang, the bars cannot be removed without breaking. Lightly butter the parchment after lining.
Oven position. Place your oven rack in the middle position before preheating. The top rack will overbrown the streusel before the filling sets. The bottom rack will overbrown the crust.
Cooling sequence — read before you start baking. This recipe has three distinct cooling moments: (1) the par-baked crust must cool for 10 minutes before the lemon curd goes in; (2) the fully baked bars must cool to room temperature on a wire rack before going into the refrigerator; (3) the bars must refrigerate for a minimum of 2 hours, and overnight is strongly preferred before slicing. Plan your baking timeline accordingly — these bars cannot be rushed at the cutting stage.
Necessary Tools
Required:
- Kitchen scale (strongly recommended — gram weights are more reliable than volume for every component in this recipe)
- 8×8-inch (20x20cm) light-colored aluminum baking pan
- Parchment paper with overhang on all sides
- Pastry blender or fork (for cutting cold butter into the crust/streusel dough)
- Two medium mixing bowls
- Small heavy-bottomed saucepan (for the lemon curd)
- Second small saucepan (for the raspberry layer)
- Whisk
- Silicone spatula
- Fine mesh sieve (for straining the lemon curd — optional but recommended for the smoothest layer)
- Wire cooling rack
- Sharp chef’s knife (for slicing the chilled bars)
Optional:
- Oven thermometer — most home ovens run 15–25°F (8–14°C) off. If you have one, confirm your oven temperature before the pan goes in.
- Fine mesh sieve (for draining frozen raspberries if using frozen)
- Offset spatula (for spreading the lemon curd layer evenly)
- Instant-read thermometer (optional — useful for confirming lemon curd has reached 160°F / 71°C before removing from heat)
How to Make Lemon Raspberry Bars
Step 1: Making the Shortbread Crust and Streusel Dough
In a large mixing bowl, combine your 1½ cups (190g) all-purpose flour, ½ cup (100g) plain white granulated sugar, and ¼ tsp (1.5g) fine sea salt. Whisk them together briefly until the salt and sugar are evenly distributed through the flour — about 10 seconds. This crust uses the cold fat cut-in method — the same technique that produces flaky pie crust and crumbly scones. The defining rule of this method is that the butter must stay cold throughout mixing. Everything else follows from that.
Add your ¾ cup (170g) cold unsalted butter, cubed into ½-inch pieces directly from the refrigerator. The flour coats the fat, which is the mechanism behind the crumbly shortbread texture — when cold butter is worked into the flour, it stays in small, distinct pieces that melt during baking and create a sandy, layered structure rather than a smooth, dense base.
Using a pastry blender or your fingertips, work the butter into the flour mixture using a pressing and cutting motion — not rubbing in circles, which warms the butter too quickly. Press each butter cube down and through the flour, rotating the bowl as you go. If using your fingertips, work quickly and use only the tips, not the palms — body heat from the palms softens the butter faster than the recipe allows. Continue until the mixture resembles coarse, damp sand with some pea-sized butter pieces still visible — approximately 2 to 3 minutes of active work.
Do not overwork this dough. The mixture should look like clumped, uneven crumbs that hold together when you press a small amount between your fingers but fall apart when you release it — not a smooth, cohesive ball. If the mixture feels greasy or looks shiny, the butter has warmed too much. Refrigerate the bowl for 10 minutes and continue.
Set aside approximately one-third of this mixture (roughly 1 heaping cup / about 200g) in a small bowl — this becomes the streusel topping. Keep both portions refrigerated while you prepare the fillings.
The crust dough and streusel are ready — both go into the refrigerator now while you make the two fillings.
Step 2: Par-Baking the Shortbread Crust Until Just Set
Position your oven rack in the middle of the oven and preheat to 350°F (175°C). Most home ovens run 15–25°F (8–14°C) off — if you have an oven thermometer, confirm the actual temperature before proceeding. While the oven preheats, remove the larger portion of crust dough from the refrigerator and press it firmly and evenly into the bottom of your parchment-lined 8×8-inch (20x20cm) light-colored aluminum pan.
Press the dough from the center outward using the flat bottom of a measuring cup or a straight-sided glass, working it into an even layer that reaches all four corners. The layer should be approximately ¼ inch (6mm) thick throughout — uneven pressing creates thin spots that overbake and thick spots that remain underdone. Press the dough firmly enough that it holds together as a slab, not loosely packed crumbs — this is what produces the clean, structural base visible in the sliced bar photos.
The correctly pressed crust should look flat, even, and matte across the full surface — similar to the pale, sandy base visible at the bottom of every bar in the stacked cross-section photo showing three bars on white marble. That base is what you are building here. Do not use a dark non-stick pan for this step. Dark pans absorb more heat at the base and will overbrown the bottom crust before the center of the crust sets. The crust in these bars is pale golden — not deep brown — which requires the reflective surface of a light-colored aluminum pan.
Bake the crust at 350°F (175°C) for 15 to 18 minutes, until the edges are just beginning to turn pale golden and the surface looks dry and set — not shiny or raw-looking. The crust should look matte and lightly colored at the edges, with the center still appearing slightly pale. It will bake again with the fillings on top — pulling it fully golden now will result in an overbaked, hard crust in the finished bar. Remove from the oven and place on a wire rack. Allow the crust to cool for exactly 10 minutes before adding the lemon curd layer — pouring warm filling onto a hot crust creates steam that disrupts the lemon curd as it sets. Set a timer.
Step 3: Cooking the Lemon Curd Until Smooth and Pourable
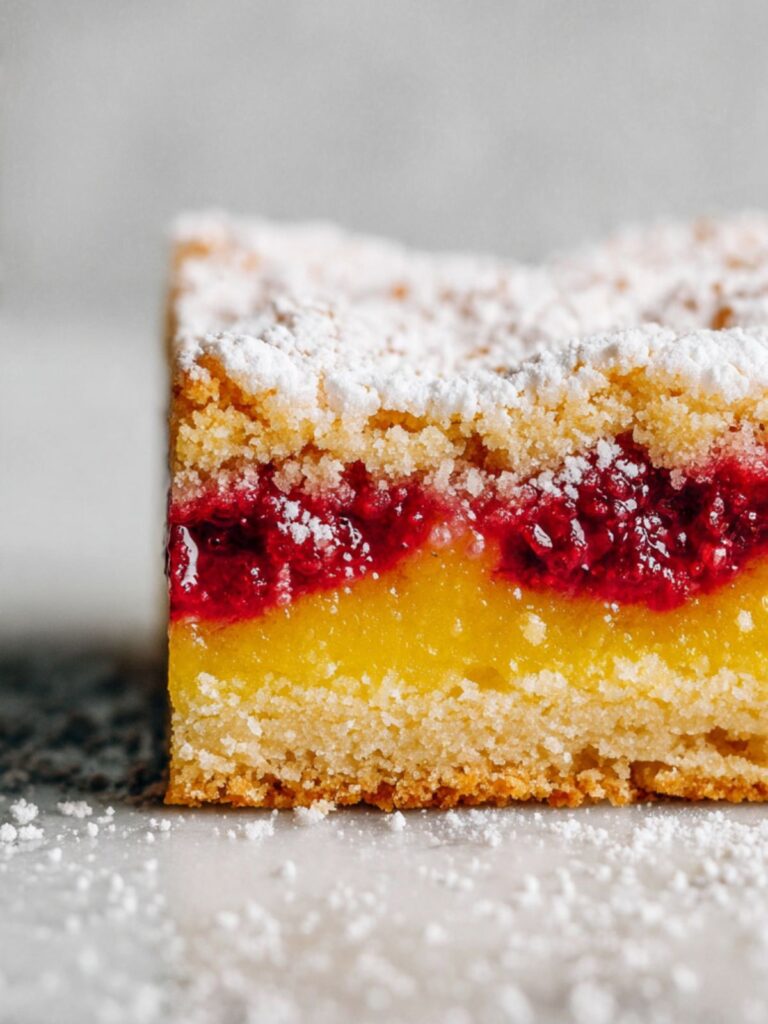
While the crust par-bakes and cools, make the lemon curd. In a small heavy-bottomed saucepan, whisk together your 2 large eggs, 1 large egg yolk (all at room temperature), ½ cup (100g) granulated sugar, ⅓ cup (80ml) fresh lemon juice, and 1 tsp finely grated lemon zest. The egg yolk is what separates a curd from a simple lemon bar filling — the extra yolk adds richness and produces the opaque, deeply yellow color visible in the bar cross-section. Whole eggs alone produce a curd that bakes up paler and slightly more rubbery in texture.
🗒 Luna’s Note: I whisk the eggs, sugar, and lemon juice together in the pan before turning on any heat. This gives everything a head start on combining and prevents the eggs from sitting on a hot surface before they are diluted by the sugar and juice — which is exactly how you end up with scrambled egg bits in the bottom of the pan.
Place the saucepan over medium-low heat. Cook, whisking constantly, until the mixture thickens enough to coat the back of a spoon and hold a line when you drag your finger through it — approximately 8 to 10 minutes. Do not increase the heat to speed up the process — if the curd is cooking too hot, you will see white, curdled specks forming on the bottom of the pan and the mixture will look grainy and broken rather than smooth and glossy.
The moment you see any white specks forming, pull the pan off the heat immediately, whisk vigorously for 30 seconds, and strain through a fine mesh sieve before continuing. The egg proteins in the curd coagulate at around 160°F (71°C) — cooking too quickly over high heat causes them to seize unevenly and produces a grainy, lumpy curd rather than the smooth, glossy layer visible in the photos. Keep the heat moderate and keep whisking.
Remove from heat and immediately whisk in your 2 tablespoons (28g) cold unsalted butter, cubed. The cold butter stops the carry-over cooking and emulsifies into the curd, giving it a glossy, smooth finish. Whisk until the butter is fully melted and incorporated — about 30 seconds. For the smoothest possible layer, pour the curd through a fine mesh sieve into a bowl, pressing gently with a spatula to push it through. This step is optional but removes any small egg bits that may have caught on the bottom of the pan.
The finished curd should look glossy, pourable, and deeply yellow — similar to the smooth lemon layer visible in the stacked bar cross-section photo. If it looks grainy or has visible lumps, it was cooked too hot or too fast. You can still use it — the flavor will be correct — but strain it first.
Set aside and allow to cool slightly — approximately 5 minutes — while you make the raspberry layer. Do not refrigerate it yet; it needs to remain pourable.
Step 4: Cooking the Raspberry Layer Until Jammy and Thickened
In a second small saucepan, combine your 1½ cups (180g) fresh raspberries, 3 tablespoons (36g) granulated sugar, and 1½ tablespoons (12g) cornstarch. Stir to combine. The cornstarch is the structural binding agent for this layer — without it, the raspberry filling releases too much liquid during baking and the layer either weeps into the lemon curd below or remains too loose to hold a clean edge when sliced. Do not substitute arrowroot or tapioca starch — both have different activation temperatures and will not produce the same set.
Place over medium heat and cook, stirring constantly, until the raspberries begin to break down and release their juice and the mixture thickens into a jammy, cohesive mass — approximately 5 to 7 minutes. Use the back of a spoon or spatula to gently press the berries as they soften, but do not mash completely — the visible seeds and partial berry pieces in the cross-section photos confirm the filling retains some fruit texture rather than cooking down to a smooth purée.
The mixture should look thick, deeply ruby-red, and glossy when it is ready — similar to the dark, jewel-toned layer visible in the extreme close-up photo showing the bar’s cross-section. It should hold its shape briefly when you drag the spatula through it before the sides flow back together. If it still looks watery and runs immediately when you drag through, cook for another 2 minutes and check again.
Remove from heat and set aside. The raspberry layer will continue to thicken slightly as it cools. Do not refrigerate — it needs to remain spreadable for assembly.
Step 5: Assembling the Layers in the Correct Order
This is the step that determines whether the four layers stay distinct or bleed together. Temperature and sequence both matter here.
The par-baked crust should now have cooled for the full 10 minutes. Pour the lemon curd directly onto the crust surface and spread it evenly to the edges using an offset spatula or the back of a spoon — work gently to avoid disturbing the crust beneath. The lemon layer should be approximately ¼ to ⅓ inch (6–8mm) thick across the full surface. The lemon layer at this stage will look bright yellow and smooth — this is exactly the glossy, even surface it needs to be before the raspberry layer goes on.
Immediately spoon the raspberry mixture over the lemon curd in small spoonfuls, then gently spread it from the center outward in one direction using the back of a spoon. Do not stir or swirl the two layers together — the goal is two distinct horizontal bands. The raspberry layer should be slightly thinner than the lemon layer. Work quickly but carefully — the warm raspberry mixture will begin to sink slightly into the lemon curd if left in one place too long. If the raspberry mixture is poured on while still boiling hot, it will sink through the lemon curd rather than sitting on top of it — you will see the two layers merge at the boundary into a blurry orange-pink band rather than two clean distinct colors. Let both fillings rest for the full 5 minutes off the heat before assembly.
Remove the reserved streusel portion from the refrigerator. Using your fingers, break it into irregular crumbles ranging from pea-sized to small almond-sized pieces — uneven sizing creates the rustic, textured topping visible in the photos. Scatter the crumbles evenly over the raspberry layer, covering the surface without pressing down. Do not pack the streusel — loose crumbles bake up with the coarse, open texture shown in the photos. Pressed streusel bakes into a solid, flat cap rather than a crumbly topping.
The assembled pan should show four visible layers from the side — crust, yellow, red, crumble — before it goes back into the oven. This is the moment to check that the raspberry layer is fully covering the lemon layer and the streusel is evenly distributed with no large bare patches.
Step 6: Baking the Assembled Bars Until the Streusel Is Golden and the Fillings Are Set
Return the assembled pan to the oven at 350°F (175°C) and bake for 25 to 30 minutes. Start checking at 25 minutes. The bars are done when the streusel topping is pale golden brown across the surface — not deep brown, not still pale and floury — and the center no longer wobbles when you gently shake the pan. The raspberry and lemon layers beneath the streusel will be fully set at this point through a combination of the direct oven heat and the egg proteins in the lemon curd reaching full coagulation temperature.
Do not overbake to get the streusel deeply golden. This is the counterintuitive moment in this recipe: the streusel on the outside will look ready before the curd underneath has fully set, and the temptation is to keep baking until the topping looks properly golden and toasted. Overbaking past 30 minutes dries out the lemon curd and turns it from the smooth, bright-yellow layer visible in the photos into a rubbery, slightly greenish-tinged slab. Pull the bars when the streusel is pale golden and the center is just barely set — the refrigerator chill that follows will finish the job.
As you can see in the stacked bar cross-section photo, the streusel topping is a pale, sandy golden — not deeply caramelized. That color is the correct pull moment. The edges of the streusel should look set and lightly golden, and the center should no longer jiggle as a liquid mass when you move the pan — it should move as one unit, like a very firm gelatin. Pull it at this exact moment.
Remove from the oven and place on a wire rack. Do not attempt to cut, lift, or move the bars out of the pan at this stage.
Step 7: Cooling and Chilling Until the Layers Are Fully Set for Slicing
Cool the bars in the pan on a wire rack at room temperature for a minimum of 1 hour. During this time, carryover heat from the pan continues to set the lemon curd layer from the bottom up — moving the bars to the refrigerator while the pan is still hot traps steam under the curd and can cause the surface to weep or wrinkle. Wait the full hour.
After room temperature cooling, transfer the pan to the refrigerator and chill for a minimum of 2 hours. Overnight refrigeration — 8 hours or longer — is strongly preferred and produces the clean, razor-edged slices visible in the photos. The lemon curd continues to firm and the raspberry layer continues to set throughout the chilling period. At the 2-hour mark the bars are technically sliceable, but the layers will still be slightly soft and will smear at the cut edge. At the overnight mark, the layers are fully firm and a sharp knife moves through them cleanly.
🗒 Luna’s Note: I always make these the day before I need them. Not because I am organized, but because I have cut them at the 2-hour mark twice and regretted it both times. The overnight bars are a completely different experience — the layers are distinct, the edges are sharp, and the lemon flavor deepens noticeably after a full night in the fridge.
To slice: lift the fully chilled bars out of the pan using the parchment overhang and place on a cutting board. Use a sharp chef’s knife wiped clean with a damp cloth between each cut. Cut into a 3×3 grid for 9 bars — each bar at this size weighs approximately 115–125g and measures 2.5 x 2.5 inches (6.5 x 6.5cm). Weigh the first bar if you want to confirm your yield is on track before cutting the rest.
Do not use a serrated knife — it drags through the lemon curd layer and tears the streusel topping rather than cutting cleanly through both. For the sharpest possible edges, run the knife under hot water, dry it, and make each cut in one firm downward motion without sawing.
The finished bars should look exactly like the single bar shown on the ceramic plate — four clean horizontal bands, a crumbly streusel top, and sides that hold their shape without the lemon or raspberry layers bleeding into the crust. If the layers smear when you cut, the bars needed more time in the refrigerator. Return the remaining bars to the fridge and wait another hour before slicing the rest.
The Science Behind Lemon Raspberry Bars
Why the Lemon Curd Sets Firm Enough to Slice
I noticed something during my second batch of testing that I did not understand at the time. The curd I made for batch two looked identical to the curd in batch one when it went into the pan — same color, same consistency, same pour. But batch two sliced cleanly and batch one smeared. The only difference was that batch two went into the refrigerator for eight hours and batch one came out after two. The curd was the same. The time was different. What I was watching, without knowing it, was protein coagulation finishing its work in the cold.
This is also the science behind the most counterintuitive instruction in this recipe: pull the bars when the streusel is only pale golden, not when it looks deeply toasted. The streusel browning is a surface event happening at the top of the pan. The curd setting is a structural event happening throughout the middle layer. By the time the streusel looks deeply golden and toasted, the curd beneath has been at high heat long enough for the egg protein network to over-tighten, expel moisture, and turn rubbery. The pale golden streusel you see in the photos is not an undercooked streusel. It is the correct pull point.
Here is the mechanism: egg proteins begin to coagulate — link together into a firm, stable network — at around 160°F (71°C). During baking, the lemon curd reaches this temperature and begins to set. But the network is not fully cross-linked when the bars come out of the oven. The refrigerator chill is not just about making the bars cold — it is completing the structural process that the oven started. As the curd cools slowly in the refrigerator, the egg protein network tightens and the curd firms from a soft gel into a sliceable solid. Rushing this step by cutting at the 2-hour mark means cutting through a curd that is structurally incomplete — the layers separate and smear rather than holding their edge.
This is why overnight refrigeration produces the four clean horizontal bands visible in the stacked bar photo. The oven sets the structure. The refrigerator finishes it.
Why Cold Butter Produces a Crumbly Shortbread Crust — and Warm Butter Ruins It
Shortbread texture is almost entirely controlled by butter temperature. This is the concept that separates a sandy, crumbly shortbread base — the kind visible at the bottom of these bars — from a dense, bread-like slab that holds together but has no delicacy to it.
When cold butter is worked into flour, it stays in discrete pieces rather than fully blending in. During baking, those butter pieces melt and release steam, and the pockets left behind are what create the open, crumbly structure of a proper shortbread. Fat crystallization is the technical term — cold butter retains its solid crystal structure as it is cut into the flour, and those crystals are what produce the texture. When butter is softened or at room temperature, it blends fully into the flour during mixing, coats every flour particle evenly, and produces a cookie-like base that bakes up dense and tight rather than crumbly and sandy.
The same principle applies to the streusel topping — cold butter worked quickly into the flour produces the coarse, irregular crumbles visible in the photos. Warm butter produces a paste that bakes into a solid, flat cap. This is why the recipe calls for butter straight from the refrigerator and instructs you to work quickly with only your fingertips. If the butter softens during mixing, return the bowl to the refrigerator for ten minutes before continuing.
For a deeper look at how cold fat technique works across different baked recipes, the same principle drives the texture in a shortbread cookies recipe — where the ratio of cold fat to flour determines everything about the final texture.
How Cornstarch Keeps the Raspberry Layer Intact When Sliced
The raspberry layer in these bars needs to do something structurally difficult: hold its shape as a distinct horizontal band through the full refrigerator chill and then slice cleanly without squeezing out or compressing when the knife goes through. Fresh raspberries alone cannot do this. They contain natural pectin, but not enough to set a firm, sliceable layer without help.
Cornstarch solves this through starch gelatinization. When cornstarch is heated in the presence of liquid — in this case, the juice released by the raspberries as they cook — the starch granules absorb that liquid and swell, forming a thick gel network that surrounds the berry pieces and holds them in place. The gel sets as the layer cools and then firms further during refrigeration, which is why the raspberry layer in the bars slices cleanly rather than squeezing out sideways when cut. The cornstarch gel also prevents the raspberry liquid from weeping down into the lemon curd layer during the final bake — a failure that produces a pink-stained, mottled lemon layer rather than the clean yellow visible in the photos.
This is also why the cornstarch quantity changes when you use frozen raspberries. Frozen raspberries have already had their cell walls broken down by the freezing process, so they release significantly more liquid when thawed. That extra liquid would over-thin the cornstarch gel and produce a looser raspberry layer. Reducing the cornstarch to 1 tablespoon when using frozen berries compensates for the higher water content and keeps the layer firm.
Lemon Raspberry Bars Troubleshooting & Pro-Tips
Common Mistakes
The wrong butter state was used for the crust or streusel
Softened or melted butter in the crust produces a dense, paste-like base that bakes up solid and bread-like rather than the crumbly, sandy shortbread shown in the photos. The streusel made with warm butter bakes into a flat, solid cap rather than coarse, open crumbles.
There is no fix once the dough is mixed with warm butter — the texture cannot be corrected after the fact. If the dough looks greasy, shiny, or feels like a smooth paste rather than crumbly clumps, the butter was too warm. Discard and start again with butter straight from the refrigerator.
Prevention: cube the butter and keep it refrigerated until the moment it goes into the flour.
The bars stuck to the pan or could not be lifted out cleanly
The parchment overhang was either skipped, too short, or the pan was not lined at all. Without a parchment sling with at least 1 inch of overhang on all four sides, there is no way to lift the chilled bar slab out of the pan intact — the lemon curd layer is too delicate to pry out in pieces without breaking. If this has already happened, use a thin offset spatula to run around the edges and lift individual bars from the pan one at a time — they will not look as clean but will still be fully edible.
A dark non-stick pan is the second pan failure in this recipe: it overbrowns the crust bottom before the center sets, producing a pale, underbaked crust interior with a burnt base.
Prevention: always line with parchment leaving generous overhang on all four sides, use a light-colored aluminum pan only, and lightly butter the parchment surface before pressing the crust in.
The lemon curd layer turned grainy or lumpy
This is an egg temperature problem. Granules or lumps in the curd mean the egg proteins seized before they were fully diluted and distributed through the sugar and juice — either the heat was too high, the eggs were added to a pan that was already hot, or cold eggs were used straight from the refrigerator.
The fix if it has already happened: strain the curd immediately through a fine mesh sieve while it is still warm and pourable, pressing firmly with a spatula to push it through. The strained curd will be smooth enough to use and will bake up correctly.
Prevention: always start with room-temperature eggs, combine everything in the cold pan before turning on any heat, and keep the burner at medium-low throughout.
The bars crumbled or smeared when sliced
The bars were cut before the lemon curd layer was fully set. A curd that looks firm on the surface can still be structurally incomplete in the center, and cutting through it at this stage collapses the layer and causes smearing at the knife edge. If this has already happened, press the cut edges gently back into shape, return all bars to the refrigerator for another 2 hours, and re-slice any bars that need it using a knife rinsed under hot water between cuts.
Salvage note: bars that have crumbled can be pressed into the bottom of a glass or ramekin, topped with a spoonful of whipped cream and a few fresh raspberries, and served as a deconstructed lemon raspberry parfait.
Prevention: always refrigerate overnight before slicing, and wipe the knife clean between each cut.
The raspberry layer bled into or stained the lemon curd layer
Either the cornstarch was omitted or substituted with a thickener that did not activate correctly, or the raspberry layer was poured onto the lemon curd while the curd was still liquid rather than slightly cooled and beginning to set. Runny raspberry filling sinks through an unset lemon curd and produces a mottled, marbled layer rather than two distinct bands. The flavor will be correct but the visual cross-section will be compromised.
Prevention: cook the raspberry mixture until it is genuinely thick and jammy before spreading it — it should hold its shape briefly when you drag a spatula through it. Use only cornstarch, not arrowroot or tapioca starch, both of which have different activation temperatures and may not produce the same set in a baked filling.
The streusel topping is pale, floury, or underdone
The oven temperature was too low, the bake time was insufficient, or the streusel was packed down rather than scattered loosely. Packed streusel insulates itself and the center does not bake through. If the streusel looks pale and floury after the full bake time, tent the pan with foil to protect the filling layers and return to the oven for an additional 5 minutes at 350°F (175°C). Check every 2 minutes after that — the line between pale golden and overbaked moves quickly once the streusel starts to color.
Prevention: scatter the streusel loosely without pressing, confirm oven temperature with a thermometer before baking, and check at the 25-minute mark rather than waiting for the full 30.
The crust is soggy or did not hold its structure
The crust was either underbaked during the par-bake step or the lemon curd was poured onto the crust while it was still hot, creating steam that softened the baked crust from below. A correctly par-baked crust should look dry and matte on the surface with pale golden edges before the fillings go on. If the finished bars have a crust that feels soft and compresses under light pressure, the par-bake needed 3 to 5 more minutes.
Prevention: bake the crust until the edges are just beginning to turn golden, cool for the full 10 minutes before adding any filling, and use a light-colored aluminum pan — dark pans cause the bottom to steam rather than bake dry.
The layers did not stay distinct — everything looks merged
The assembly sequence was incorrect or the filling temperatures were mismatched. Pouring a hot raspberry layer directly onto a liquid lemon curd causes the two to mix at the boundary. Both filling layers need to be warm and pourable but not boiling hot when assembled — approximately 5 minutes off the heat for each. If the finished bars show a merged, undefined middle section rather than clean bands, the recipe still tastes correct. Slice, serve, and adjust the cooling time in the next batch.
Prevention: allow both fillings to rest off the heat for 5 minutes before assembly and spread the raspberry layer gently from the center outward rather than pouring it all at once.
The lemon curd layer turned rubbery, dense, or has a greenish tinge
The bars were overbaked past the point where the egg protein network could stay smooth. Egg proteins in lemon curd tighten and expel moisture when held at high heat too long — above approximately 185°F (85°C) — which turns the curd from a silky, sliceable layer into a rubbery, compressed one. The greenish tinge is a specific reaction between the sulfur compounds in egg yolks and the acid in the lemon juice at sustained high temperatures — the same reaction that turns hard-boiled egg yolks grey-green. The flavor is unaffected.
Salvage note: slice the bars thinner than normal — approximately ¾-inch slices rather than the standard 2.5-inch squares — and serve cold alongside a spoonful of fresh whipped cream, which softens the textural contrast.
Prevention: pull the bars the moment the streusel is pale golden and the center no longer jiggles as a liquid. The curd does not need to look or feel fully set when it comes out of the oven — the refrigerator chill finishes it.
High altitude and humidity note
In high humidity environments (above 70% relative humidity), the streusel topping may feel tacky on the surface even when fully baked — this is surface moisture from the air, not underbaking. Refrigerating the bars immediately after they reach room temperature resolves this.
At high altitude (above 3,500 feet / 1,067 meters), the lemon curd may set slightly faster due to lower boiling points — watch the curd carefully and pull it from the heat as soon as it coats the back of a spoon. The crust and streusel are not significantly affected by altitude.
Expert Pro-Tips
Chill the assembled pan for 10 minutes before the final bake. After assembling all four layers, place the pan in the refrigerator for 10 minutes before it goes back into the oven. This re-firms the cold butter in the streusel so the crumbles hold their shape during the first minutes of baking rather than slumping into the raspberry layer. The result is a more defined, textured streusel surface — exactly the coarse, irregular crumble visible across the top of the bars in the photos.
Strain the lemon curd even if it looks smooth. Running the finished curd through a fine mesh sieve takes 60 seconds and guarantees a silky, flawless lemon layer. Even a curd that looks smooth in the pan often contains small egg fragments that are not visible until the bars are sliced and the cross-section is exposed. Straining removes them before they become visible in the finished bar.
Use a ruler and score the top before cutting. After lifting the chilled bars from the pan on the parchment, use a ruler and the tip of your knife to lightly score the top of the streusel into a 3×3 grid before making the full cuts. This gives you a guide for perfectly even bars and prevents the knife from sliding on the loose streusel surface during the first cut. Each bar should be approximately 2.5 x 2.5 inches (6.5 x 6.5cm).
For the cleanest cross-section, cut with a hot knife. Run your chef’s knife under hot water, dry it completely, and make each cut in one firm downward motion without sawing. Wipe the blade clean with a damp cloth and repeat for every cut. The hot blade moves through the cold lemon curd layer cleanly rather than dragging through it — this is the single technique that produces the razor-sharp edges visible in the stacked bar photo.
How to Store Lemon Raspberry Bars
Room Temperature
These bars should not be stored at room temperature for longer than 2 hours after slicing. The lemon curd layer contains eggs and butter, and the raspberry layer contains fresh fruit — both require refrigeration for food safety and structural reasons. At room temperature, the curd softens within an hour and the layers begin to lose the definition that makes these bars worth the effort. If you are serving them at a gathering, pull them from the refrigerator no more than 30 minutes before serving — they are best eaten cold or at the cool side of room temperature, when the lemon curd is still firm and the shortbread crust has a slight snap to it.
Refrigerator
Store the bars in a single layer in a hard-sided lidded container — not a zip-lock bag, which compresses the streusel topping and causes the bars to stick together at the sides. If you need to stack them, place a sheet of parchment paper between each layer. Refrigerate for up to 4 days. The bars are at their structural best on Day 1 and Day 2 after baking. By Day 3, the streusel topping begins to soften slightly from the moisture in the refrigerator — it is still good, but the textural contrast between the crisp streusel and the firm curd is less pronounced.
Do not store the bars uncut in the pan covered with plastic wrap pressed directly onto the streusel — this compresses the topping and pulls it away from the raspberry layer when the wrap is removed. Use the parchment overhang to lift the uncut slab out of the pan, transfer to a cutting board, and slice before storing. Or store the full uncut slab on a flat plate loosely tented with foil — this protects the streusel without compressing it.
🗒 Luna’s Note: The lemon flavor in these bars genuinely deepens between Day 1 and Day 2. Day 1 bars are bright and fresh. Day 2 bars have a more rounded, settled lemon flavor — the zest and juice have had time to permeate the curd fully. If you can wait, Day 2 is the better bar.
Freezer — Baked
These bars freeze well when properly wrapped. Slice the fully chilled bars first, then wrap each bar individually in a double layer of plastic wrap — one tight inner wrap, then a second outer wrap to protect against freezer burn. Place the wrapped bars in a single layer in a zip-lock freezer bag or hard-sided freezer container, pressing out as much air as possible before sealing. Freeze for up to 2 months.
To thaw: transfer the individually wrapped bars to the refrigerator and thaw overnight — approximately 8 hours. Do not thaw at room temperature; the temperature differential causes condensation to form on the lemon curd surface, which makes it weep. Do not microwave to thaw — the lemon curd heats unevenly and will liquefy in spots while other areas are still frozen. After overnight refrigerator thawing, the bars are structurally very close to fresh — the streusel will be slightly less crisp, but the lemon and raspberry layers are unaffected by freezing.
Freezer — Unbaked
The assembled unbaked bars can be frozen before the final bake, but the par-baked crust step must still be completed first. Par-bake and cool the crust, add both filling layers and the streusel topping, then wrap the entire pan tightly in two layers of plastic wrap followed by a layer of foil. Freeze for up to 1 month. To bake from frozen: remove the wrapping, place the frozen pan directly into a 350°F (175°C) oven, and add 10 to 15 minutes to the bake time. Check at the 35-minute mark — the streusel should be pale golden and the center should no longer wobble. Cool and refrigerate as normal before slicing.
Serving Suggestion
Serve these bars cold — pulled directly from the refrigerator and plated immediately. The lemon curd layer is at its firmest and most distinct when cold, and the shortbread crust has a light, clean snap that softens within 20 minutes at room temperature. I do not let these sit out before serving. The contrast between the cold, dense curd and the crumbly streusel is exactly what makes them worth the overnight wait.
I serve these with a pot of strong Earl Grey tea, no milk. The bergamot in the tea echoes the citrus in the curd in a way that feels intentional even though I arrived at it by accident the first time I made this recipe. A glass of cold sparkling water also works — the carbonation cuts through the richness of the shortbread in the same way the lemon cuts through the butter.
These are the bars I make when I want to bring something that does not look homemade in the way most homemade things look. The four-layer cross-section, when the bars are sliced correctly, looks like it came from a patisserie. That is the moment — a dinner party, a weekend gathering, any occasion where you want the thing you bring to be the thing people ask about. They are not a weeknight recipe. The overnight chill alone puts them in a different category.
Day 2 is the better bar, as I mentioned in the storage note — the lemon flavor rounds out and deepens after a full night in the refrigerator. Day 1 bars are bright and slightly sharp. Day 2 bars are settled and complex. Day 3 is still good. Day 4 is the last day I would serve them to anyone other than myself.
One honest limitation: these do not travel well once sliced. The layers are stable in the refrigerator but the streusel topping loosens in transit and the bars shift against each other in a container. If you are transporting them, keep them unsliced in the pan with the parchment overhang intact, slice at the destination, and bring your chef’s knife with you. Sliced bars in a container will arrive looking like they were handled — because they were.
Frequently Asked Questions About Lemon Raspberry Bars
Can I make lemon raspberry bars ahead of time?
Yes — and these bars are specifically better when made ahead. The lemon curd layer requires a minimum of 2 hours of refrigeration to set fully, and overnight refrigeration produces the cleanest slices and the most developed lemon flavor. I make these the day before serving every time without exception. Bake and assemble the bars, cool to room temperature, then refrigerate the uncut slab overnight in the pan. Slice the following day using a hot, clean knife. The bars hold well in the refrigerator for up to 4 days, so a 24-hour head start is well within their storage window.
Can I use bottled lemon juice instead of fresh?
Bottled lemon juice will produce a curd that sets correctly, but the flavor will be noticeably flatter and less bright than the curd made with fresh juice. Bottled juice contains preservatives — typically sodium benzoate or sulfur dioxide — that mute the volatile aromatic compounds responsible for the sharp, clean lemon flavor in a properly made curd. The difference is detectable even to people who do not bake regularly. Fresh lemon juice is the one ingredient in this recipe where a substitution produces a meaningfully worse result. Use fresh. Two to three medium lemons yield the ⅓ cup (80ml) needed.
Can I substitute frozen raspberries for fresh?
Yes, with one adjustment. Frozen raspberries work well in the filling layer, but they must be fully thawed in the refrigerator overnight and drained thoroughly in a fine mesh sieve before use — the freezing process breaks down the cell walls and releases significantly more liquid than fresh berries, and that extra liquid will over-thin the cornstarch gel if not drained. Reduce the cornstarch from 1½ tablespoons (12g) to 1 tablespoon (8g) when using frozen — thawed berries release enough natural pectin during cooking to compensate for the reduction. Do not use frozen raspberries straight from the freezer without thawing — the ice crystals release all at once during cooking and produce a watery filling that will not set.
For an equally delicious variation using a different berry, the same technique works well in these chocolate chip cookie bars — where fruit and crumb layers interact in a similar way.
Why did my lemon layer turn rubbery or greenish after baking?
The bars were overbaked. The egg proteins in lemon curd continue to tighten and contract beyond their ideal set point if exposed to heat for too long — past approximately 185°F (85°C), egg proteins begin to expel moisture and the curd becomes rubbery rather than smooth and sliceable. The greenish tinge comes from a reaction between the sulfur in the egg yolks and the acid in the lemon juice at high temperatures — the same reaction that turns hard-boiled egg yolks grey-green when overcooked. The fix if it has already happened: the flavor is unaffected and the bars are still edible. Serve them cold and sliced thin — the texture is less noticeable at a thinner cut. Prevention: pull the bars the moment the streusel is pale golden and the center no longer wobbles as a liquid when the pan is shaken. The curd does not need to look or feel fully set when it comes out of the oven — the refrigerator chill finishes the set.
Can I double this recipe?
Yes. Multiply all ingredients by 2 and bake in a 9×13-inch (23x33cm) pan lined with parchment. The bake time increases slightly — par-bake the doubled crust for 18 to 20 minutes rather than 15 to 18, and bake the assembled bars for 30 to 35 minutes rather than 25 to 30. Check at the 30-minute mark and pull when the streusel is pale golden and the center is just set. The lemon curd and raspberry layer quantities scale linearly without adjustment — unlike leavening agents in cookie or cake recipes, there is no non-linear scaling concern with curd or fruit filling ingredients. Yield from a 9×13 pan: 15 bars at the same 2.5-inch portion size, or up to 20 smaller bars.
How do I adjust this recipe for high altitude or high humidity?
At high altitude (above 3,500 feet / 1,067 meters), water boils at a lower temperature, which means the lemon curd will thicken slightly faster on the stovetop — watch it carefully and pull it from the heat as soon as it coats the back of a spoon rather than cooking to the full 8 to 10 minutes. The crust and streusel are not significantly affected by altitude since they contain no leavening agents.
In high humidity environments (above 70% relative humidity), the streusel topping may feel tacky or soft on the surface even after a correct bake — this is atmospheric moisture being absorbed by the sugar in the streusel, not underbaking. Refrigerating the bars immediately after they reach room temperature prevents further moisture absorption and restores the contrast between the crumbly topping and the firm filling layers.
Can I use a different fruit in place of raspberries?
Yes, with adjustments depending on the fruit. Blackberries are the most direct swap — same water content, same seed structure, same cooking time, same cornstarch quantity. Blueberries work well but release less liquid during cooking, so increase the cornstarch to 2 tablespoons (16g) to ensure the layer sets firmly. Strawberries have a significantly higher water content and must be diced small and cooked longer — approximately 10 minutes — before spreading; increase cornstarch to 2 tablespoons (16g). Stone fruits like diced peaches or cherries work but require the skin removed and a longer cook time to break down.
Do not use citrus segments directly — the acid level is too high and the layer will not set correctly with cornstarch alone. Whatever fruit you use, the layer must be thick and jammy — holding its shape briefly when dragged with a spatula — before it goes onto the lemon curd. A loose filling will sink through the curd and the layers will merge.
More Bars You’ll Love
- Salted Caramel Chocolate Chip Cookie Bars — buttery shortbread base layered with homemade salted caramel and melted chocolate chips, finished with flaked sea salt.
- Peanut Butter Chocolate Chip Bars — dense, chewy peanut butter bars packed with semi-sweet chocolate chips, no chilling required.
Lemon Raspberry Bars Recipe
Ingredients
Equipment
Method
- Position oven rack in the middle and preheat to 350°F (175°C). Line an 8×8-inch (20x20cm) light-colored aluminum pan with parchment paper, leaving at least 1 inch of overhang on all sides. Lightly butter the parchment.
- In a large bowl, whisk together 1½ cups (190g) all-purpose flour, ½ cup (100g) granulated sugar, and ¼ tsp fine sea salt. Add ¾ cup (170g) cold cubed unsalted butter and work it into the flour using a pastry blender or fingertips until the mixture resembles coarse, damp sand with pea-sized butter pieces still visible — approximately 2 to 3 minutes. Do not overwork.
- Set aside approximately one-third of the mixture (about 1 heaping cup / 200g) in a small bowl for the streusel topping. Keep both portions refrigerated while preparing the fillings.
- Press the larger crust portion firmly and evenly into the bottom of the prepared pan using the flat bottom of a measuring cup, working it into all four corners to an even ¼-inch (6mm) thickness.
- Bake the crust at 350°F (175°C) for 15 to 18 minutes until the edges are just beginning to turn pale golden and the surface looks dry and matte. Remove from the oven and cool on a wire rack for exactly 10 minutes before adding any filling.
- While the crust bakes and cools, make the lemon curd: whisk together 2 large eggs, 1 egg yolk, ½ cup (100g) granulated sugar, ⅓ cup (80ml) fresh lemon juice, and 1 tsp lemon zest in a small heavy-bottomed saucepan. Cook over medium-low heat, whisking constantly, until the mixture thickens enough to coat the back of a spoon and hold a line — approximately 8 to 10 minutes. Remove from heat and whisk in 2 tablespoons (28g) cold cubed butter until fully melted and smooth. Strain through a fine mesh sieve if desired. Set aside to cool for 5 minutes.
- Make the raspberry layer: combine 1½ cups (180g) fresh raspberries, 3 tablespoons (36g) granulated sugar, and 1½ tablespoons (12g) cornstarch in a small saucepan over medium heat. Cook, stirring constantly and gently pressing the berries, until the mixture is thick, jammy, and holds its shape briefly when dragged with a spatula — approximately 5 to 7 minutes. Remove from heat and set aside for 5 minutes.
- Pour the lemon curd over the cooled crust and spread evenly to the edges. Gently spoon the raspberry mixture over the lemon curd in small spoonfuls and spread carefully from the center outward — do not swirl or mix the two layers. Remove the reserved streusel from the refrigerator and scatter it in loose, irregular crumbles over the raspberry layer without pressing down.
- Refrigerate the assembled pan for 10 minutes, then bake at 350°F (175°C) for 25 to 30 minutes, until the streusel is pale golden and the center no longer wobbles as a liquid when the pan is gently shaken. Do not overbake.
- Remove from the oven and cool on a wire rack for 1 hour at room temperature, then transfer to the refrigerator and chill for a minimum of 2 hours — overnight is strongly preferred. Do not slice before the full chill time.
- Lift the chilled bars from the pan using the parchment overhang. Using a sharp chef’s knife rinsed under hot water and wiped clean between each cut, slice into a 3×3 grid for 9 bars. Dust with powdered sugar immediately before serving if desired.