Creamy Lemon Squares Recipe
I did not think lemon squares needed to be creamy. I thought the whole point was the sharp, bright curd — the kind that makes you squint a little on the first bite. I made that version for years. Then I tested this one.
The difference is the filling. Sweetened condensed milk and cream cheese together produce something the classic curd version cannot: a pale, smooth, set layer that is rich without being heavy, bright without being sharp, and sliceable without a single crack. The edges hold. The surface stays glossy. You do not need to dust them with powdered sugar to hide anything because there is nothing to hide.
It took me four batches to get the ratio right. The first two had too much lemon juice — the filling curdled slightly at the edges and the center slumped when I cut them. The third batch was too mild. The fourth one I have made fourteen times since.
🗒 Luna’s Note: I started testing this recipe because a reader kept asking me why her lemon bars always cracked on top. The answer was that she was making a baked curd, not this. These do not crack. The chemistry is completely different — and that difference is worth understanding before you start.
These are the lemon squares I make now when someone asks me to bring a dessert and I want them to remember what I brought. Not because they are showy — they are not. Because they are exactly what they look like, and they hold up for two days without becoming soggy or gummy. That is a harder thing to achieve than it looks.
The graham cracker crust matters as much as the filling. It needs to be pre-baked. It needs to be completely cool before the filling goes on. And it needs real butter — not oil, not a substitute — because the crust you see in the photos, that dark, firm, slightly sandy layer, only happens when the butter binds the crumbs at the right temperature and bakes into a structure that can support a liquid filling without going soft.
| Prep Time | Cook Time | Chill Time | Total Time | Yield | Difficulty |
|---|---|---|---|---|---|
| 20 min | 35 min | 4 hours | 4 hrs 55 min | 16 squares | Beginner-friendly |
| Calories | Fat | Carbs | Sugar | Protein | Sodium |
|---|---|---|---|---|---|
| 195 kcal | 10g | 24g | 18g | 4g | 135mg |
Macros are approximate and will vary based on ingredient brands and exact serving size. Garnishes not included.
Ingredients & Tools for Creamy Lemon Squares Recipe
For the Graham Cracker Crust
- 1½ cups (150g) graham cracker crumbs — from approximately 10 full graham cracker sheets, crushed fine. Do not use pre-made crumbs from a can — they are often stale and produce a crust that does not hold together cleanly after slicing.
- 3 tablespoons (36g) granulated white sugar
- ¼ teaspoon fine sea salt — not kosher salt, not table salt. Fine sea salt dissolves evenly into the crumb mixture without leaving visible flecks or uneven saltiness in the baked crust.
- 6 tablespoons (85g) unsalted butter, melted and slightly cooled — not hot. Hot butter steams the crumbs and produces a greasy crust. Unsalted only — salted butter will make the crust taste over-seasoned against the sweet filling. If you only have salted butter, omit the ¼ teaspoon salt.
For the Creamy Lemon Filling
- 8 oz (226g) full-fat block cream cheese, at room temperature — not whipped cream cheese, not low-fat, not cream cheese spread from a tub. Block cream cheese only. It must sit at room temperature for a full 60–90 minutes before mixing. Cold cream cheese will not blend smooth no matter how long you beat it, and the filling will have visible lumps that set permanently during baking.
- 1 can (14 oz / 396g) sweetened condensed milk — full-fat only. Do not substitute evaporated milk. Evaporated milk is unsweetened and has a completely different fat content — the filling will not set correctly and will taste flat.
- ½ cup (120ml) fresh lemon juice — from approximately 3–4 medium lemons. Fresh only. Bottled lemon juice has been heat-treated and has a flat, slightly metallic flavor that baking amplifies rather than softens. Measure after straining — seeds and pulp affect the texture of the filling.
- 1 tablespoon (6g) finely grated lemon zest — from approximately 2 medium lemons, zest only, no white pith. The white pith below the colored layer is bitter. Stop grating the moment you see white. Zest the lemons before juicing them — it is nearly impossible to zest a squeezed lemon.
- 2 large eggs, at room temperature — not cold straight from the fridge. Cold eggs added to a cream cheese mixture cause the fat to seize and the batter to look curdled. Warm them in a bowl of lukewarm water for 10 minutes if you forgot to pull them out ahead of time.
- 1 teaspoon (5ml) pure vanilla extract — not imitation vanilla. Imitation vanilla is made from synthetic vanillin and has a slightly harsh aftertaste that is noticeable in a delicate filling like this one.
For Serving (Optional but Shown)
- Lightly sweetened whipped cream, piped into rosettes — pipe just before serving, not hours ahead. Whipped cream weeps and deflates if it sits on the bars for more than 30 minutes.
- Fresh lemon half-wheels or thin lemon slices — for garnish only. Added at the point of serving.
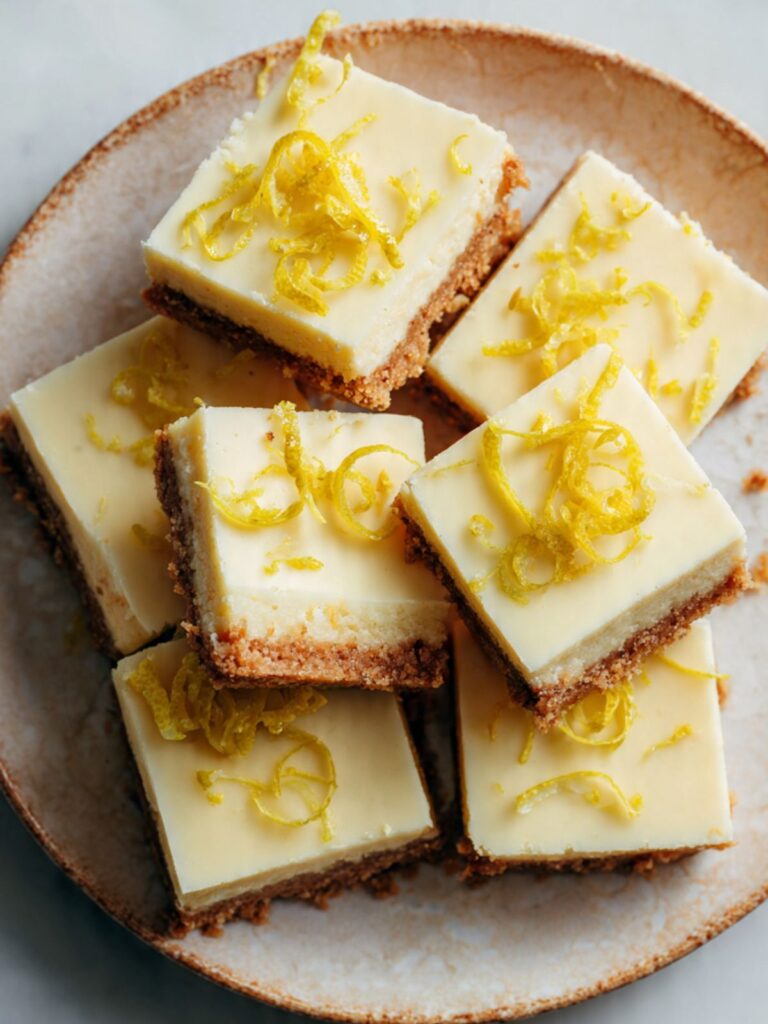
- Finely grated lemon zest curls — use a citrus zester or the fine holes of a box grater pulled along the lemon in one long stroke for curls rather than fine shreds.
Before You Start
Read this entire section before you touch anything.
Scale over cups — every time. The gram weights in this recipe are the numbers I tested with. Volume measurements for graham cracker crumbs in particular vary enormously depending on how finely the crackers were crushed and how tightly the cup was packed. A 20g difference in crumb weight produces a noticeably different crust thickness and texture. Use a kitchen scale.
Room temperature is not a suggestion. Both the cream cheese and the eggs must be genuinely at room temperature before mixing begins — not slightly cool, not just out of the fridge. Cream cheese: 60–90 minutes on the counter at 68°F (20°C). Eggs: 30 minutes on the counter, or 10 minutes in a bowl of lukewarm water. A filling made with cold ingredients will look slightly curdled going into the pan and will bake up with a slightly grainy texture rather than the smooth, glassy result visible in the photos.
The crust must cool before the filling goes on. A warm crust will partially cook the bottom of the filling before the pan goes into the oven, throwing off the bake time and producing uneven set. Pull the crust from the oven and let it cool on a wire rack for a minimum of 15 minutes before pouring the filling.
Zest before you juice. It sounds obvious, but it is easy to juice the lemons first out of habit. A squeezed lemon cannot be zested. Do both measurements before you start — zest into one small bowl, juice strained into another.
The chill time is 4 hours minimum. The bars need the full chill to set completely from edge to center. Cutting before 4 hours produces bars with a soft, underset center that collapses under the knife. I chill mine overnight and cut them cold — the slices shown in the photos were cut straight from the refrigerator with a sharp knife wiped clean between each cut.
Mixing method: This recipe requires a hand mixer or stand mixer fitted with the paddle attachment for the filling. The crust comes together with a fork and a bowl — no mixer needed. Do not try to mix the cream cheese filling by hand — you will not get it smooth enough, and lumps in the batter bake in permanently.
Oven rack position: Position the rack in the middle of the oven before preheating. The top rack concentrates heat on the surface of the filling and can cause the edges to brown before the center sets. The bottom rack over-browns the crust base. Middle rack only.
Necessary Tools
Every tool listed here was used in testing. Substitutions are noted where they exist.
- Kitchen scale — for gram-accurate measurement of crumbs, butter, and cream cheese. Non-negotiable for consistent results.
- 8×8 inch (20×20cm) light-colored aluminum baking pan — light-colored aluminum bakes the crust evenly without over-browning the bottom. Dark non-stick pans absorb more radiant heat and will over-brown the crust before the filling is set. Glass and ceramic pans retain heat longer — if using either, reduce oven temperature by 25°F (15°C) and check the filling 5 minutes earlier.
- Parchment paper — cut two strips to fit the pan with 2-inch (5cm) overhang on all four sides. This overhang is your handle for lifting the entire slab out of the pan before slicing. Without it, you cannot cut clean squares — you will be digging corners out of a pan and breaking edges.
- Medium mixing bowl — for the crust.
- Fork or flat-bottomed measuring cup — for pressing the crust evenly into the pan. A flat-bottomed cup presses more evenly than fingers alone.
- Hand mixer or stand mixer with paddle attachment — for the filling.
- Large mixing bowl — for the filling.
- Fine mesh sieve or citrus juicer with built-in strainer — for straining seeds and pulp from the lemon juice before measuring.
- Microplane or box grater (fine side) — for zesting the lemons.
- Rubber spatula or silicone spatula — for scraping the bowl between additions and smoothing the filling into the pan.
- Wire cooling rack — for cooling the crust before filling goes in.
- Sharp chef’s knife — for slicing the chilled bars. Wipe the blade clean between each cut. A dull knife drags through the filling and produces ragged edges.
- Oven thermometer (optional but strongly recommended) — most home ovens run 15–25°F (8–14°C) off from the dial temperature. A filling baked at an actual 340°F instead of the intended 325°F will overbake at the edges before the center sets. A $10 oven thermometer is the single most useful tool for anyone who bakes regularly.
- Piping bag fitted with a large star tip (Wilton 1M or equivalent) — for whipped cream rosettes, if serving with whipped cream.
How to Make Creamy Lemon Squares
Step 1: Prepare the Pan and Preheat the Oven
Preheat your oven to 325°F (165°C). Most home ovens run 15–25°F (8–14°C) off in either direction — if you have an oven thermometer, confirm the actual temperature before the pan goes in. Position the rack in the middle of the oven.
Line your 8×8 inch (20×20cm) light-colored aluminum baking pan with two strips of parchment paper, criss-crossed so that all four sides have a 2-inch (5cm) overhang. Press the parchment into the corners firmly — loose parchment shifts when you press the crust in and produces uneven edges. You do not need to grease the pan underneath the parchment.
⚠️ Baker’s Warning: Do not skip the parchment overhang. Without it, the fully set bars cannot be lifted cleanly from the pan — you will be forced to dig the first square out with a spoon, and every square after it will have at least one broken edge. The overhang costs thirty seconds and saves the entire batch.
The pan is ready and the oven is heating — move directly to the crust.
Step 2: Make and Press the Graham Cracker Crust
In a medium mixing bowl, combine 1½ cups (150g) graham cracker crumbs, 3 tablespoons (36g) granulated sugar, and ¼ teaspoon fine sea salt. Stir with a fork until the crumbs and sugar are evenly distributed — about 10 strokes. Pour in 6 tablespoons (85g) melted unsalted butter, which should be fluid but not steaming hot. Stir again with the fork until every crumb is coated and the mixture looks like wet sand. Pinch a small amount between your fingers — if it holds together and does not crumble apart immediately, the butter ratio is correct. If it falls apart, add one additional teaspoon of melted butter and test again.
Transfer the crumb mixture into the lined pan and spread it roughly with the fork. Then use the flat bottom of a dry measuring cup to press the crumbs into an even, compact layer across the entire base. Press firmly — this is not a gentle process. The crust needs to be dense enough to hold a liquid filling without absorbing it. Pay particular attention to the corners and the seam where the parchment strips overlap — these areas are easiest to leave thin.
⚠️ Baker’s Warning: A crust that is pressed too lightly will absorb moisture from the filling during baking and turn soft and gummy at the base. The finished bars in the photos show a crust with a distinct, firm bite that holds its structure even after two days refrigerated — that texture comes from firm pressing and proper pre-baking, not from the crumb ratio alone.
Slide the pan into the preheated 325°F (165°C) oven and bake the crust for 12–15 minutes, until the edges are just beginning to deepen in color and the surface looks dry and set. The crust will not brown dramatically — you are looking for a matte, just-set surface rather than a golden color change.
Pull the pan from the oven and set it on a wire cooling rack. As you can see in the process photo showing the pre-baked crust on the rack, the surface should look completely matte and dry with the edges just beginning to deepen in color — not golden-brown, not pale and raw-looking. That is the correct pull point. Do not add the filling yet — the crust must cool for a minimum of 15 minutes.
Step 3: Beat the Cream Cheese Until Completely Smooth
While the crust cools, make the filling. This step is the most important one in the recipe, and it cannot be rushed.
Place 8 oz (226g) of room-temperature full-fat block cream cheese into a large mixing bowl. Beat it alone with a hand mixer on medium speed for 2 full minutes — set a timer. Scrape down the sides and bottom of the bowl with a silicone spatula after the first minute. The cream cheese should be completely smooth, with no lumps visible anywhere, before anything else goes into the bowl. Lift the beaters and look at what clings to them — if you see any white lumps at all, beat for another 30 seconds and check again.
⚠️ Baker’s Warning: Lumps at this stage are permanent. Once the condensed milk and lemon juice go in, you cannot beat hard enough to smooth out cream cheese lumps without also over-beating the eggs later. If your cream cheese was not fully at room temperature, you will see small white pellets that no amount of mixing will remove — they will bake in and the filling will have a slightly grainy texture rather than the smooth, glassy surface visible in the overhead photo of the finished bars. If your cream cheese feels at all cool and firm, stop, let it sit for another 20 minutes, and start again.
The cream cheese is ready when it looks like thick, smooth white frosting with no texture variation. Move to the next step.
Step 4: Add the Condensed Milk, Lemon, and Eggs
With the mixer on low speed, pour the full can (14 oz / 396g) of sweetened condensed milk into the beaten cream cheese in a slow, steady stream. Do not dump it in all at once — adding it slowly allows the two fats to emulsify rather than separate. Once all the condensed milk is in, increase the speed to medium and beat for 30 seconds. Scrape the bowl.
Add 1 tablespoon (6g) of finely grated lemon zest and ½ cup (120ml) of freshly strained lemon juice. The filling will look like it is tightening slightly as the acid hits the dairy — this is correct. The lemon juice reacts with the proteins in the cream cheese and the condensed milk immediately, beginning the process that will eventually set the filling in the oven. Add 1 teaspoon (5ml) of pure vanilla extract and mix on low for 10 seconds.
Now add the 2 room-temperature eggs, one at a time, beating on low speed after each addition just until the yolk disappears — no more than 10 seconds per egg. This is where overmixing becomes a real risk.
⚠️ Baker’s Warning: Do not beat aggressively after the eggs go in. Overbeaten eggs incorporate excess air into the filling — that air expands in the oven and then collapses as the bars cool, producing a sunken, cracked surface instead of the smooth, level top visible in the photos. Low speed, short time, stop the moment the egg is incorporated.
Scrape the bowl one final time and give the filling a slow fold with the spatula to make sure nothing is hiding at the bottom. The finished filling should be pale yellow, smooth, and pourable — the consistency of thick heavy cream. Pour it over the cooled crust immediately.
Step 5: Smooth the Filling and Bake
Pour the filling over the cooled crust in a slow, steady stream, starting from the center and letting it spread toward the edges naturally. Use a silicone spatula to gently guide it into the corners if needed — do not stir or swirl. Tap the pan gently on the counter three times to release any surface bubbles. If bubbles remain on the surface, drag a toothpick across them once to break them — do not stir.
🗒 Luna’s Note: I always strain the filling through a fine mesh sieve directly into the pan as I pour. It catches any remaining cream cheese lumps and produces the smoothest possible surface. Takes five extra seconds and makes a visible difference.
Slide the pan carefully into the preheated 325°F (165°C) oven on the middle rack. Bake for 20–25 minutes. Start checking at 20 minutes.
The filling is done when the edges look set and slightly puffed — you will see a very faint color change at the perimeter, just barely more golden than the center — and the center of the filling has a distinct, slow jiggle when the pan is gently shaken. This is the moment to pull them. The jiggle should look like set gelatin moving as one piece, not like liquid sloshing. If the entire surface ripples like water, give it 3 more minutes and check again.
⚠️ Baker’s Warning: Do not bake until the center looks fully set and still in the oven. By that point the filling has overbaked — the edges will be rubbery and the center will crack as it cools. The bars finish setting during the cooling and chilling process. Pull them at the jiggle. Trust the jiggle.
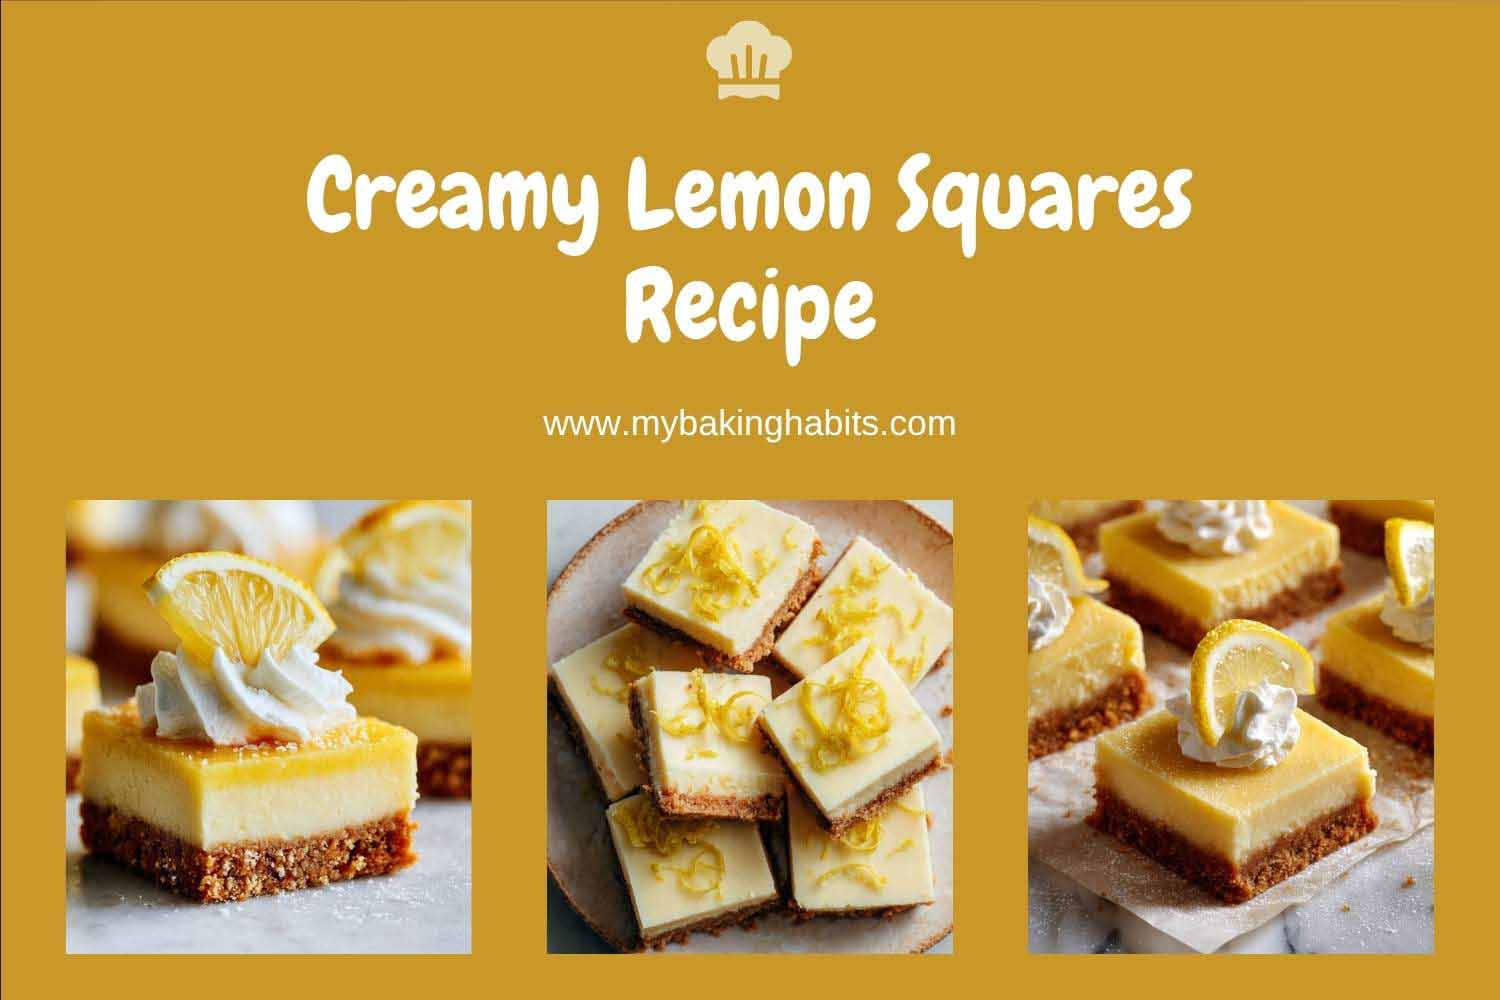
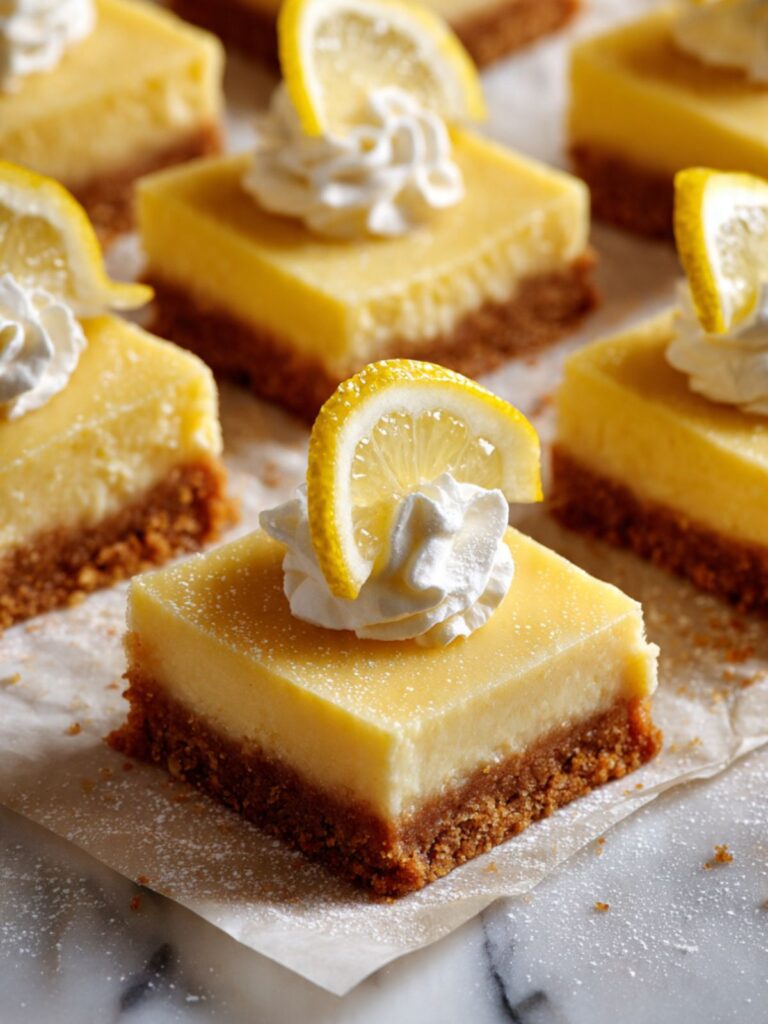
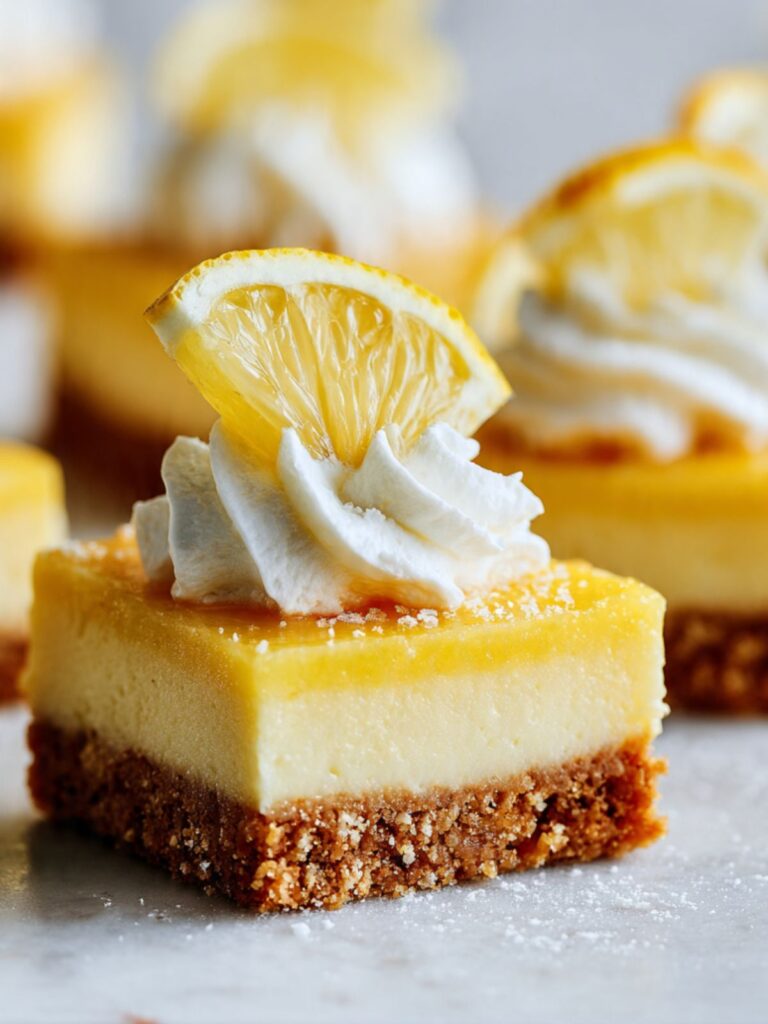
As you can see in the close-up photo of the finished single bar, the surface is completely smooth and matte with no cracking, no browning, and no visible separation from the crust edge — that result comes from pulling at the correct jiggle stage and from not opening the oven door during the first 15 minutes of the filling bake.
Step 6: Cool, Then Chill — In That Order
Remove the pan from the oven and set it on a wire cooling rack. Do not move it to the refrigerator yet. Let it cool at room temperature for a minimum of 1 hour. The filling will continue to set during this time through carryover cooking — the residual heat stored in the pan and the filling itself continues conducting upward and finishing the set from the bottom up, without the oven drying the surface. Moving the pan to the refrigerator while it is still warm traps condensation on the surface and can cause the top of the filling to weep or develop a slightly tacky texture.
After 1 hour at room temperature, transfer the pan to the refrigerator. Chill for a minimum of 4 hours. I chill mine overnight — 8 hours produces a cleaner slice than 4, and the flavor deepens noticeably after a full night in the fridge. The lemon becomes more rounded and less sharp, and the filling firms to exactly the texture you see in the stacked bar photo — dense, smooth, and holdable without bending.
🗒 Luna’s Note: I cover the pan loosely with plastic wrap after the first hour of chilling — once the surface has fully set and is no longer tacky to a light touch. Covering too early traps steam and leaves droplets on the surface. Covering too late risks the filling absorbing refrigerator odors.
The bars are fully chilled and ready to slice — move to the next step.
Step 7: Slice and Serve
Use the parchment overhang to lift the entire slab out of the pan in one clean motion. Set it on a cutting board. If the parchment sticks at the corners, run a thin offset spatula or butter knife along the edge between the parchment and the pan wall to release it.
For the clean, sharp-edged squares visible in the photos, use a sharp chef’s knife wiped completely clean and dry between every single cut. A warm knife helps — run it briefly under hot water, dry it completely, then cut. The heat helps the blade glide through the set filling without dragging. Wipe, warm, cut. Every time.
Measure and score the slab lightly before cutting all the way through — mark 4 equal columns and 4 equal rows for 16 squares. Each square will be approximately 2×2 inches (5×5cm).
🗒 Luna’s Note: I cut these straight from the refrigerator, never at room temperature. Cold bars slice cleaner than room-temperature ones — the filling is firm enough to hold its edge under the knife rather than compressing slightly and producing a rounded corner.
If serving with whipped cream, pipe the rosettes and place the lemon garnish immediately before the bars go to the table. Do not garnish in advance. The bars are plated and ready — serve immediately or return to the refrigerator uncovered for up to 30 minutes before the table.
The Science Behind Creamy Lemon Squares
Why Acid Sets the Filling Before the Oven Does
I noticed something strange the first time I made these. The filling visibly thickened the moment the lemon juice hit the cream cheese and condensed milk — before the pan went anywhere near heat. I thought I had done something wrong. I had not. What I was watching was acid coagulation happening in real time, and it is the single most important reaction in this entire recipe.
Lemon juice has a pH of roughly 2 — highly acidic. When that acid contacts the proteins in cream cheese, it begins to denature them: the protein strands unfold and start to bond with each other, forming a loose network that gives the filling its initial body. The condensed milk contributes additional proteins from the concentrated dairy solids, and those denature under the same acid. The result is a filling that is already partially structured before it ever enters the oven — which is why these bars set at a relatively low temperature of 325°F (165°C) in a shorter time than a standard cheesecake.
This is also why the lemon juice amount is not flexible. Half a cup (120ml) is the minimum required to initiate enough protein coagulation for a clean set. Less juice and the filling relies too heavily on the oven heat to set — producing a rubbery, overbaked edge by the time the center firms. The tight, smooth, sliceable filling you see in the close-up photos of the cut bars is the result of both acid coagulation and heat working together — neither alone is sufficient.
Why Sweetened Condensed Milk Cannot Be Substituted
Sweetened condensed milk does three things in this recipe simultaneously, and no single substitute replicates all three. First, it provides sugar — approximately ½ cup (100g) worth per can, already dissolved into the dairy so it integrates into the filling without any mixing effort. Second, it provides fat — concentrated whole milk fat that contributes to the dense, rich texture visible in the cross-section of the bars. Third, and most critically, it provides milk proteins that have already been partially denatured by the heat used in the condensing process — making them faster to set in the oven than fresh dairy proteins would be.
Evaporated milk contains roughly the same water reduction as condensed milk but none of the sugar and a different protein structure. Substituting it produces a filling that is under-sweetened, sets less firmly, and has a slightly looser texture that does not hold a clean vertical edge when sliced. Heavy cream produces a filling closer to a baked custard — it will set, but it will be softer and will not have the dense, almost fudge-like body that makes these bars holdable at room temperature for the few minutes between plating and eating. If you enjoy bar-style lemon desserts, my chocolate chip cookie bars use a similarly structured filling technique — different flavor, same layered logic.
How the Graham Cracker Crust Stays Crisp Under a Wet Filling
Soggy crust is the most common failure in any bar recipe that uses a pressed crumb base under a liquid filling. The mechanism is straightforward: liquid migrates from high concentration to low concentration, and a wet filling sitting on a dry crust will always try to move moisture into that crust unless something stops it.
Two things stop it here. The first is the pre-bake. Baking the crust alone for 12–15 minutes before the filling goes on does more than set the crumbs — it drives off the residual moisture from the melted butter and begins to toast the graham cracker sugars, creating a slightly hardened surface layer that is less permeable to liquid than unbaked crumbs would be. The second is temperature. Pouring filling onto a cooled crust rather than a warm one prevents the filling from immediately beginning to absorb into the crumb structure before it has a chance to start setting from the acid coagulation described above. Both conditions are required. Pre-bake alone without cooling still produces a slightly soft base. Cooling without pre-baking produces a soft, wet base. The firm, distinct crust layer visible in every cross-section photo — that clean separation between dark crumb and pale filling — is the result of both steps done in sequence.
🗒 Luna’s Note: I have tested this recipe with digestive biscuits in place of graham crackers. The crust is slightly less sweet and slightly more buttery — it works well. The color is a little lighter. If you are outside the US and graham crackers are not available, digestive biscuits are a direct swap at the same weight.
Creamy Lemon Squares Troubleshooting & Pro-Tips
Common Mistakes
The filling has visible white lumps after baking
Symptom: The surface of the baked filling looks smooth from above, but when you slice the bars, the cross-section shows small white specks or pellets scattered through the pale yellow filling.
Cause: The cream cheese was not at room temperature when it was beaten. Cold block cream cheese does not break down fully under the beaters — the fat stays firm and clumps into pellets that are too small to see in the batter but become visible once the filling sets around them. This is the highest-risk substitution and technique failure in this recipe.
Fix: There is no fix once the bars are baked. The lumps are set permanently. The bars are still safe to eat and will taste correct — the texture difference is textural, not flavor-related. Slice them, serve them, and note the issue for next time.
Prevention: Pull the cream cheese from the refrigerator 60–90 minutes before you begin. Press your finger firmly into the block — it should leave an indent without resistance and feel uniformly soft throughout, not just soft on the surface. If the center still feels cool and firm, give it more time. There is no shortcut here. Microwaving melts the outer layer while the center stays cold and produces uneven softening that causes the same lump problem.
The crust is soft, wet, or falling apart when the bars are sliced
Symptom: When you lift a bar from the pan, the crust crumbles away from the filling or feels damp and compressed rather than firm and distinct. The clean separation between crust and filling visible in the photos is absent.
Cause: Either the crust was not pre-baked long enough, the filling was poured onto a warm crust, the pan was not parchment-lined and the butter pooled at the edges, or the crust was pressed too lightly and the crumbs never compacted enough to resist moisture migration from the filling.
Fix: If the bars are already cut and the crust is soft but not completely disintegrated, press each square gently back together and refrigerate for an additional 2 hours. The cold will firm the crust somewhat. The texture will not fully recover, but the bars will be more holdable. Alternatively, crumble the bars into a bowl, layer with whipped cream and lemon curd, and serve as a deconstructed lemon parfait — the flavors are identical and no one will know.
Prevention: Pre-bake the crust for the full 12–15 minutes until the surface looks matte and dry. Cool it on a wire rack for a minimum of 15 minutes before pouring the filling. Press the crumbs firmly with the flat bottom of a measuring cup — you should feel resistance when pressing, not a soft give.
The filling cracked across the top during baking or cooling
Symptom: One or more cracks appear across the surface of the filling — either visible when the pan comes out of the oven or developing as the bars cool on the rack.
Cause: The filling was overbaked — the center was fully set in the oven, leaving no room for the natural contraction that happens during cooling. Alternatively, the eggs were overbeaten after being added, incorporating excess air that expanded in the oven and then collapsed. A third cause: the pan was moved to the refrigerator while the filling was still warm, causing rapid temperature contraction on the surface.
Fix: Cracks do not affect flavor at all. If the crack is shallow, press it gently closed with the back of a spoon while the filling is still warm and slightly pliable — it will close partially. Once chilled, pipe a thin line of whipped cream along the crack before serving. No one will see it.
Prevention: Pull the bars at the jiggle — when the edges are set and the center still moves as one slow, cohesive piece when the pan is shaken. Beat the eggs on low speed for no more than 10 seconds each after adding them to the filling. Cool completely at room temperature for a full hour before moving to the refrigerator.
The filling did not set — it is soft and wobbly even after 4 hours of chilling
Symptom: After the full 4-hour chill, the bars collapse when lifted or the filling slides away from the crust when sliced. The center looks glossy and wet rather than smooth and matte.
Cause: The most common cause is underbaking — the filling was pulled from the oven before the edges were fully set, so the egg proteins and acid-coagulated dairy proteins never reached the temperature needed to form a stable structure. A second cause is incorrect condensed milk — evaporated milk substituted by mistake, or a low-fat condensed milk used instead of full-fat.
Fix: If the bars are still in the pan and completely unset after 4 hours, return the pan to a 325°F (165°C) oven for an additional 10–12 minutes, then cool and re-chill for another 4 hours. This is not ideal — the texture will be slightly more set than the intended result — but the bars will be sliceable. If the filling has already been sliced and is too soft to hold its shape, press it back into the pan, return to the oven for 10 minutes, and re-chill overnight.
Prevention: Bake until the edges show a faint puff and the center has a slow, cohesive jiggle — not a liquid slosh. Use full-fat sweetened condensed milk only. Check the can before opening — it should read sweetened condensed milk, not evaporated milk. They look nearly identical on the shelf.
The surface is mottled, uneven, or has a skin on top after chilling
Symptom: The surface of the chilled bars is not the smooth, uniform pale yellow shown in the overhead photo. Instead it looks slightly wrinkled, has a rubbery skin, or shows an uneven color pattern with slightly darker patches.
Cause: The filling was covered with plastic wrap while still warm, trapping steam on the surface. Alternatively, the pan was stored in the refrigerator uncovered for too long and the exposed surface dried out slightly and formed a skin. A third cause is condensation from a very cold refrigerator dripping back onto the surface.
Fix: A skin that has formed after chilling can be carefully peeled away with a thin offset spatula if it is loose enough — the surface underneath is usually smooth. If the skin is set too firmly, leave it. Once the bars are sliced and garnished with whipped cream and lemon, the surface texture is largely hidden.
Prevention: Cool the bars completely at room temperature — a minimum of 1 hour — before covering. Once the surface is cool and dry to a light touch, cover loosely with plastic wrap and refrigerate. Do not press the plastic wrap directly onto the filling surface as you would with pastry cream — these bars need airflow, not a sealed surface.
The bars are difficult to slice cleanly — the filling compresses or tears
Symptom: The knife drags through the filling instead of cutting cleanly, producing ragged edges or a filling that compresses at the cut rather than holding its edge. The clean, sharp-cornered squares in the photos are not achievable.
Cause: The bars were not chilled long enough, the knife was dull, or the bars were cut at room temperature rather than cold from the refrigerator. A cold, fully set filling slices cleanly. A slightly warm or underset filling compresses under pressure.
Fix: If the bars are already cut and the edges are ragged, the flavor is unaffected. Use an offset spatula to press the sides of each square back to vertical while cold — they will hold that shape once re-chilled for 15 minutes.
Prevention: Chill for the full 4 hours minimum — overnight is better. Cut straight from the refrigerator with a sharp chef’s knife run under hot water and wiped completely dry between every single cut. Score the slab lightly before cutting all the way through so each cut is confident and straight. One decisive downward stroke per cut — do not saw.
Expert Pro-Tips
Wipe the knife between every cut, not every few cuts. Filling residue on the blade drags across the next cut and leaves smear marks on the edge of the square. Hot water, dry wipe, cut. Hot water, dry wipe, cut. The squares in the photos were cut this way — every edge is clean and vertical because the blade was clean for every stroke.
Use a ruler or a scored guide for perfect squares. Eyeballing 16 equal portions from an 8×8 inch slab produces uneven squares. Measure and mark the slab at 2-inch (5cm) intervals along all four sides with a toothpick before cutting. Connect the marks with one clean stroke each. The yield math works out exactly: four rows of four columns at 2 inches each.
Make the filling the day before serving. These bars taste noticeably better after an overnight chill than after the minimum 4-hour chill. The lemon flavor rounds out and the filling firms to its ideal texture. If you are making these for an event, bake the day before and slice on the day — do not slice ahead and store cut, as the exposed edges dry out slightly in the refrigerator overnight.
Zest more than you need and freeze the extra. Lemon zest freezes perfectly in a small zip-lock bag for up to 3 months. The next time a recipe calls for lemon zest, it is already done. Zesting takes more time than any other prep step in this recipe — doing it in bulk once every few months is more efficient than zesting to order every time.
Toast the graham cracker crumbs before making the crust. Spread the crumbs on a rimmed baking sheet and bake at 350°F (175°C) for 5 minutes before mixing in the butter. Toasted crumbs have a deeper, nuttier flavor and produce a crust that holds together more firmly than untoasted crumbs. This is an optional step but a visible upgrade — the crust becomes more complex without adding any additional ingredients.
How to Store Creamy Lemon Squares
Room Temperature
Creamy lemon squares should not be stored at room temperature for longer than 2 hours. The filling contains cream cheese and eggs — both require refrigeration for food safety. At room temperature above 70°F (21°C), the filling begins to soften and the texture moves away from the firm, clean-sliced result shown in the photos. In a Los Angeles kitchen in summer, that window is closer to 1 hour.
If you are serving these at a gathering, pull them from the refrigerator immediately before plating and garnishing. They can sit at room temperature on the table for up to 2 hours safely. Return any uneaten squares to the refrigerator promptly.
Refrigerator
Store cut squares in a single layer in a hard-sided lidded container — not a zip-lock bag, which compresses the edges and leaves pressure marks on the soft filling surface. If you need to stack them, place a sheet of parchment paper between layers and make sure the lid of the container is tall enough to clear the whipped cream garnish, or store the bars un-garnished and pipe the whipped cream at serving time.
Refrigerated creamy lemon squares keep well for up to 4 days. Day 2 is the best day — the flavor is more rounded and the filling has firmed to its ideal texture. By day 4 the crust begins to soften slightly from continued moisture migration, but the flavor remains good. Do not store beyond 4 days.
If storing the uncut slab rather than individual squares, leave it in the pan with the parchment overhang, cover loosely with plastic wrap, and refrigerate for up to 4 days. Slice only when ready to serve — uncut bars stay fresher longer because the interior filling is not exposed to refrigerator air.
Freezer — Baked
Creamy lemon squares freeze better than most cream cheese-based bar recipes, but the texture after thawing is slightly softer than fresh. The filling firms back up adequately after thawing but will never be quite as smooth-surfaced as a freshly chilled bar — minor textural change, no flavor change.
To freeze: cut the bars into individual squares and allow them to chill completely in the refrigerator first — do not freeze warm or room-temperature bars. Wrap each square individually in a layer of plastic wrap, pressing gently to conform to the shape without compressing the filling. Place the wrapped squares in a single layer in a freezer-safe zip-lock bag or rigid container. Freeze for up to 2 months.
To thaw: transfer the individually wrapped squares from the freezer to the refrigerator and thaw overnight — a minimum of 8 hours. Do not thaw at room temperature and do not microwave. Room-temperature thawing produces condensation on the filling surface and softens the crust. Microwave thawing melts the cream cheese filling unevenly and produces a rubbery texture. Unwrap after thawing and serve cold, garnished just before plating.
⚠️ Do not freeze bars that have already been garnished with whipped cream. Whipped cream does not survive freezing — it collapses and weeps on thawing. Freeze plain, garnish after thawing.
Freezer — Unbaked
The crust can be made, pressed into the pan, and frozen unbaked for up to 1 month. Wrap the pan tightly in two layers of plastic wrap. When ready to bake, do not thaw — bake the frozen crust at 325°F (165°C) for 18–20 minutes rather than the standard 12–15 minutes, until the surface looks matte and dry. Cool completely before adding the filling, then proceed as written.
The filling does not freeze well unbaked. The cream cheese and condensed milk mixture separates on thawing and cannot be re-emulsified by mixing. Make the filling fresh on baking day.
Serving Suggestion
These bars are best served cold — pulled straight from the refrigerator, sliced, and plated within 10 minutes. I do not bring them to room temperature before serving. The filling at refrigerator temperature has exactly the density and resistance I want — it holds its edge when you press a fork through it, and the contrast between the cold, firm filling and the slightly crumbly crust is what makes the first bite worth the four hours of waiting.
🗒 Luna’s Note: I serve these with a strong black coffee or an unsweetened iced tea. The lemon filling is rich enough that something bitter alongside it is not optional for me — it is the whole point of the pairing. A very sweet drink makes the bars taste one-dimensional. Something with no sugar at all makes the lemon brightness come forward in a way nothing else does.
I pipe the whipped cream rosettes with a Wilton 1M tip at a 90-degree angle — straight down, steady pressure, lifted cleanly. One rosette per square, centered. A single lemon half-wheel tucked into the cream at a slight angle. That is the presentation you see in the photos, and it takes about 3 minutes for 16 squares once you have the piping bag loaded.
This is the recipe I make when I want something that looks more effortful than it is. The bars are not technically difficult — the chilling time does most of the work. But a tray of 16 perfectly sliced, garnished squares looks like considerably more than a two-step bake and an overnight refrigerator stay. That gap between the effort and the impression is why I keep coming back to this recipe.
For a larger gathering, this recipe doubles cleanly into a 9×13 inch (23×33cm) pan yielding 24 squares. Increase the bake time for the filling to 25–30 minutes and check for the jiggle at 25 minutes. The crust bake time remains the same.
Frequently Asked Questions About Creamy Lemon Squares
Can I make creamy lemon squares ahead of time?
Yes — and you should. These bars are genuinely better after an overnight chill than after the minimum 4-hour rest. The lemon flavor rounds, the filling firms to its ideal density, and the crust fully binds. Bake the day before, chill overnight in the pan, slice on the day.
Can I use bottled lemon juice instead of fresh?
Technically yes, but the flavor difference is significant. Bottled lemon juice is heat-treated during processing, which destroys the volatile aromatic compounds responsible for bright citrus flavor. The acid coagulation mechanism still works, so the filling will set — but the finished bars will taste noticeably flat compared to bars made with fresh juice.
Why did my lemon squares not set firmly enough?
Three causes cover most cases: underbaking before the edges were fully set; using evaporated milk instead of sweetened condensed milk, which lacks the fat and sugar structure needed for a firm set; or insufficient chilling time. Four hours is the minimum — a soft filling at 4 hours often firms fully with 2 more hours of cold. For more bar troubleshooting, see oatmeal chocolate chip bars.
Can I substitute the cream cheese with something else?
Mascarpone is the closest functional substitute — same weight, 8 oz (226g). It produces a filling that sets and slices correctly, though the flavor is richer and less tangy. Increase the lemon juice by 1 tablespoon (15ml) to compensate. Greek yogurt, ricotta, and sour cream contain too much water and will not set firmly enough to slice clean.
How do I get clean edges when cutting lemon squares?
Four conditions must all be true: bars fully chilled at least 4 hours, preferably overnight; knife sharp; blade wiped completely dry between every single cut; knife briefly warmed under hot water before each stroke. One confident downward stroke per cut — sawing compresses the filling and produces smeared edges instead of the sharp vertical face shown in the photos.
How do high altitude or humidity affect creamy lemon squares?
At high altitude — above 3,500 feet (1,067m) — the lower air pressure causes moisture to evaporate from the filling more quickly during baking, which can produce a slightly drier, more set texture at the edges before the center catches up. Reduce the oven temperature by 10–15°F (5–8°C) and check the filling for the jiggle test 5 minutes earlier than the standard time. In high humidity environments — above 70% relative humidity — the graham cracker crust absorbs atmospheric moisture both before and after baking, softening the crumb structure. In humid climates, toast the graham cracker crumbs at 350°F (175°C) for 5 minutes before mixing the crust, and store the finished bars in a fully sealed container rather than loosely covered to slow moisture reabsorption.
Can I add other flavors to the filling?
Yes, within limits. Swap lemon juice for the same volume of fresh lime juice for a lime version — the set is identical. Use half lemon and half passion fruit juice for a more complex citrus filling. Add 1 teaspoon fresh grated ginger along with the zest for a lemon-ginger version. Do not exceed the stated liquid volume or the filling may not set firmly.

Creamy Lemon Squares Recipe
Ingredients
Equipment
Method
- Step 1: Preheat oven to 325°F (165°C) and position rack in the middle of the oven. Line an 8×8 inch (20×20cm) light-colored aluminum baking pan with two criss-crossed strips of parchment paper, each with a 2-inch (5cm) overhang on all sides. Press parchment firmly into the corners.
- Step 2: In a medium bowl, combine graham cracker crumbs, granulated sugar, and fine sea salt. Stir with a fork until evenly distributed. Pour in melted cooled butter and stir until every crumb is coated and the mixture holds together when pinched. Transfer to the lined pan and press firmly into an even compact layer using the flat bottom of a dry measuring cup, pressing firmly into corners and edges.
- Step 3: Bake the crust at 325°F (165°C) for 12–15 minutes until the surface looks matte and dry. Transfer to a wire cooling rack and cool for a minimum of 15 minutes before adding the filling.
- Step 4: Place room-temperature block cream cheese in a large mixing bowl. Beat with a hand mixer or stand mixer fitted with the paddle attachment on medium speed for 2 full minutes, scraping the bowl after 1 minute, until completely smooth with no lumps visible anywhere.
- Step 5: With the mixer on low speed, pour in the sweetened condensed milk in a slow steady stream. Increase to medium speed and beat for 30 seconds. Scrape the bowl. Add lemon zest, fresh lemon juice, and vanilla extract. Mix on low for 10 seconds. Add eggs one at a time, beating on low speed for no more than 10 seconds after each addition, just until the yolk disappears. Scrape the bowl and fold once with a silicone spatula to ensure nothing is hiding at the bottom.
- Step 6: Pour the filling over the cooled crust in a slow steady stream starting from the center. Use a silicone spatula to guide it gently into the corners. Tap the pan on the counter 3 times to release surface bubbles. Bake at 325°F (165°C) for 20–25 minutes until the edges are set and slightly puffed and the center has a slow cohesive jiggle when the pan is gently shaken.
- Step 7: Remove from oven and cool on a wire rack at room temperature for 1 full hour. Do not move to the refrigerator before the hour is complete. After 1 hour, cover loosely with plastic wrap and refrigerate for a minimum of 4 hours, preferably overnight.
- Step 8: Use the parchment overhang to lift the slab from the pan onto a cutting board. Slice into 16 equal squares using a sharp chef's knife warmed briefly under hot water and wiped completely clean and dry between every cut. Score lightly before cutting all the way through. Garnish with piped whipped cream, fresh lemon slices, and lemon zest curls immediately before serving.