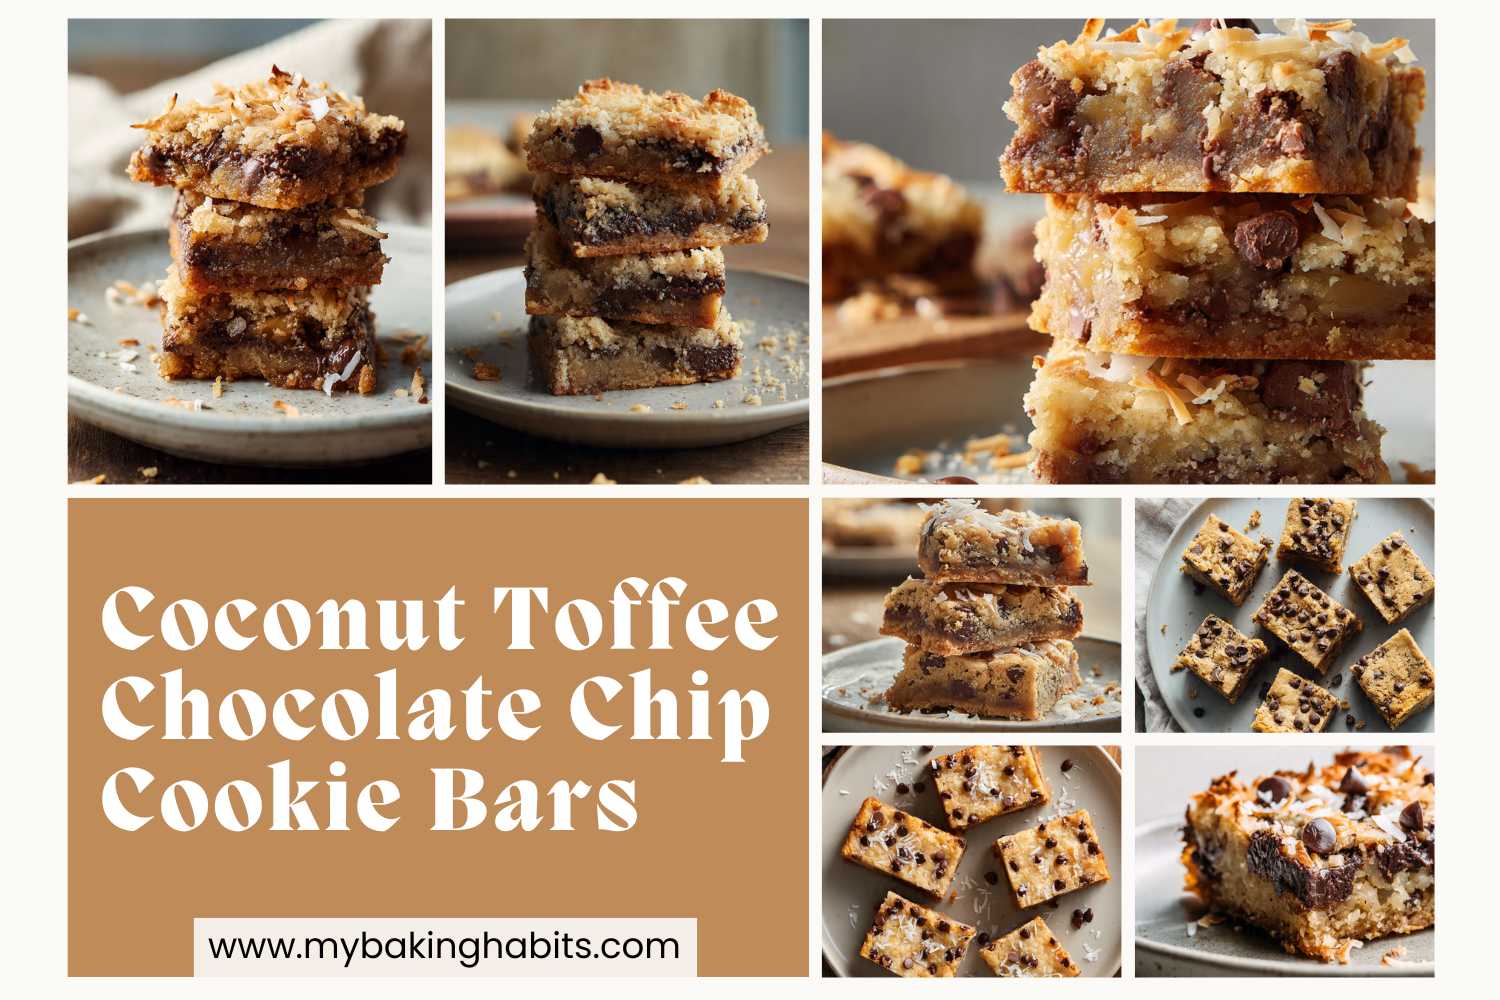
Coconut Toffee Chocolate Chip Cookie Bars
The first batch I pulled out of the oven looked right. The coconut was golden, the edges had that deep amber pull from the pan, and I cut into them ten minutes later. The center collapsed. Liquid toffee pooled across my cutting board. I had gotten the surface right and the interior completely wrong. That batch — and the five that followed it — taught me the one thing this recipe actually requires: patience with the cooling time, not the bake time. Six batches to understand one rule. Here it is.
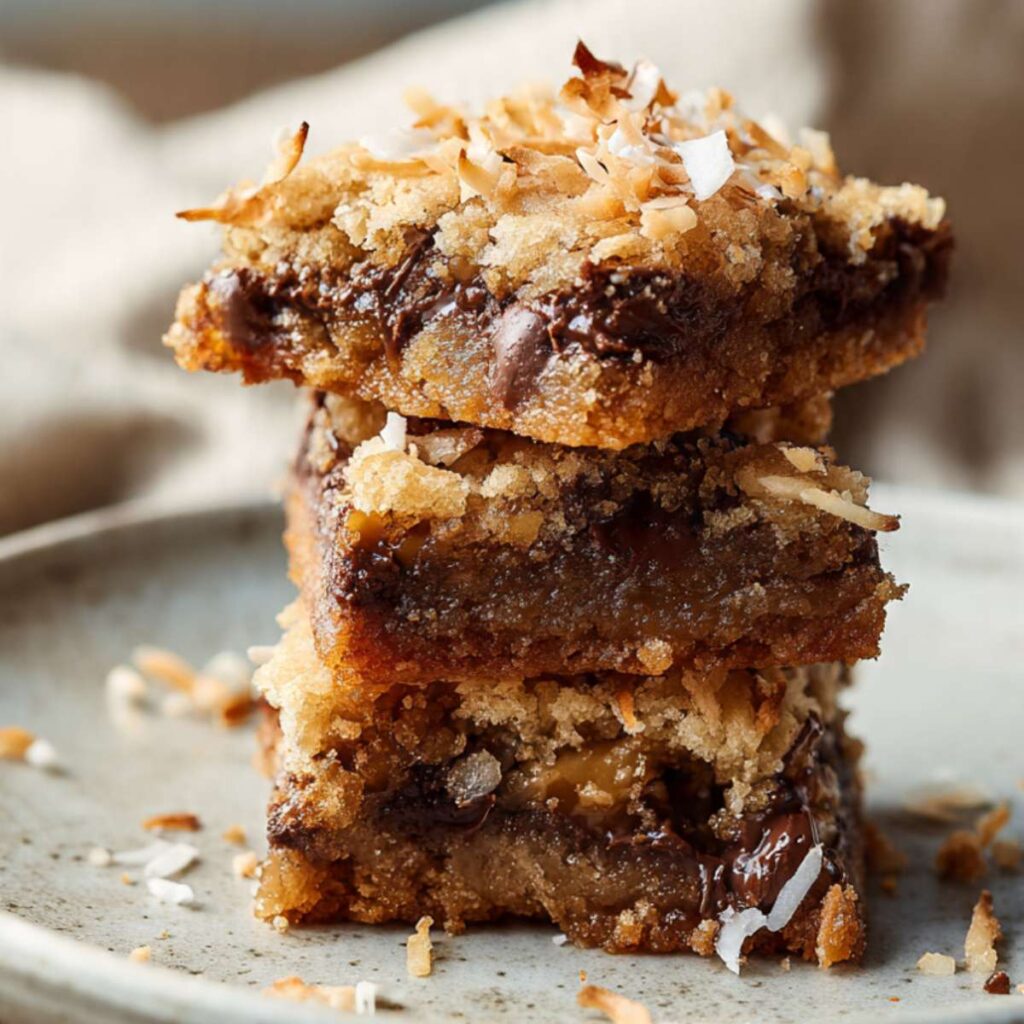
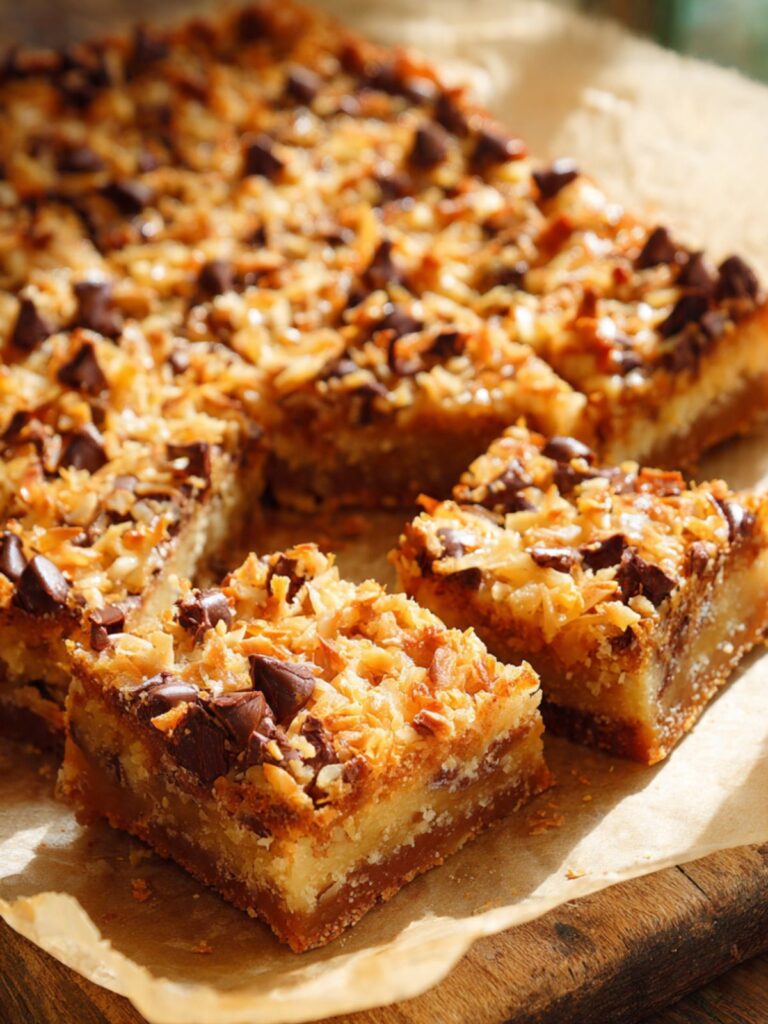
These coconut toffee chocolate chip cookie bars have a fudgy, dense interior with pockets of melted semi-sweet chocolate and pooled toffee running through every bar. The top is crusted with toasted coconut that goes golden-brown in the oven. The edges are deep amber and set firm. The centers stay soft and chewy for days.
I tested sweetened versus unsweetened coconut in the batter. Unsweetened coconut produced a drier, more crumbly bar with less chew — the coconut stayed in distinct shreds rather than integrating into the batter. Sweetened shredded coconut carries extra moisture that softens the interior and helps everything bind. I kept sweetened coconut in the batter and it made a visible difference in the cross-section.
I tested dark brown sugar against light brown sugar across three batches. Light brown sugar produced a paler, slightly cakey interior. Dark brown sugar is what creates the deep amber toffee layer visible when you cut a bar — the higher molasses content caramelizes more aggressively and produces that distinct color and flavor. I would not substitute it.
I tested folding toffee bits in last versus mixing them in with the flour. Early mixing caused the toffee to break up too finely and dissolve almost completely into the batter — no distinct pockets, no amber pooling. Folding them in at the very end keeps them in larger pieces that melt into defined ribbons during baking. The cross-section difference was dramatic.
For chocolate chips I use Ghirardelli semi-sweet chocolate chips. I have used others. Ghirardelli melts cleaner and the flavor holds up against the toffee without getting muddy.
No mixer required for this recipe — everything comes together in one bowl with a silicone spatula. No chilling required either. The batter goes straight into the pan.
These are the bars I bring somewhere when I want people to ask me what I brought. I do not bring them often. When I do, the plate comes back empty.
| Yield | 24 bars |
| Prep Time | 15 minutes |
| Bake Time | 28–32 minutes |
| Cooling Time | 2 hours minimum before cutting |
| Total Time | ~2 hours 50 minutes |
| Difficulty | Easy |
| Calories | Fat | Carbs | Protein | Sugar | Sodium |
|---|---|---|---|---|---|
| ~218 | ~11g | ~29g | ~2g | ~19g | ~95mg |
Calculated based on: 2¼ cups AP flour, 1 cup unsalted butter, 2 cups dark brown sugar, 2 eggs, 1½ cups semi-sweet chocolate chips, 1 cup toffee bits, 1½ cups sweetened shredded coconut, ½ cup flaked coconut topping. Per bar, 24 bars total.
Ingredients & Tools for Coconut Toffee Chocolate Chip Cookie Bars
For the Bars
- 1 cup (227g) unsalted butter, melted and cooled to room temperature
- 2 cups (440g) packed dark brown sugar
- 2 large eggs, room temperature
- 2 teaspoons (10ml) pure vanilla extract
- 2¼ cups (270g) all-purpose flour, spooned into the measuring cup and leveled — never scooped directly from the bag
- 1 teaspoon (6g) fine sea salt
- 1 teaspoon (4g) baking powder, checked for freshness (drop ½ tsp into hot water — active bubbling means fresh)
- 1½ cups (255g) semi-sweet chocolate chips, plus ¼ cup (43g) reserved for pressing on top
- 1 cup (170g) Heath toffee bits (the baking aisle variety — not chocolate-covered, plain toffee pieces only)
- 1½ cups (120g) sweetened shredded coconut, for the batter
For the Topping
- ½ cup (40g) sweetened shredded coconut or flaked coconut, for pressing on top
- ¼ cup (43g) semi-sweet chocolate chips, reserved from above
Before You Start
For the most accurate results, use a kitchen scale set to grams. Volume measurements like cups and tablespoons can vary by 20–30% depending on how the ingredient is scooped or packed. The gram weights in this recipe are the numbers I tested with — they are the most reliable way to get the same result I got.
This entire recipe uses a large mixing bowl and a silicone spatula — no electric mixer needed. A stand mixer or hand mixer will not improve the result and risks overmixing the batter once the flour goes in.
Position your oven rack in the middle of the oven before preheating. Top rack burns the coconut topping before the interior sets. Bottom rack overbrowns the base.
Butter: Melt the butter and set it aside to cool. It should feel barely warm to the touch before it goes into the batter — not hot. Hot butter scrambles the eggs. If you are in a hurry, pour the melted butter into a wide bowl and let it sit for 15 minutes.
Eggs: Pull your eggs from the refrigerator 30 minutes before you start. Cold eggs added to melted butter cause the fat to seize into greasy clumps. Room-temperature eggs incorporate smoothly and produce a cohesive batter.
Baking powder: Check it before you start. Drop ½ teaspoon into a small bowl of hot water. If it bubbles actively, it is fresh. If it sits flat or produces only a faint fizz, replace it — dead baking powder produces bars that are denser and flatter than intended.
Brown sugar: If your dark brown sugar has hardened into a brick, place it in a microwave-safe bowl with a damp paper towel laid on top and microwave in 20-second increments until it loosens. Use it immediately — it will re-harden as it cools.
Chocolate chips: Check for bloom — a white or grey coating on the chips. Bloomed chips are safe to use and will still melt, but they may not melt as smoothly as fresh chips. Ghirardelli semi-sweet chips are what I tested with. Whatever brand you use, make sure they are semi-sweet, not milk chocolate — milk chocolate is too sweet against the toffee and coconut and throws the flavor balance off.
Toffee bits: Use Heath toffee bits from the baking aisle — the plain variety in the bag labeled “bits o’ brickle” or similar. Not the chocolate-covered Heath bar pieces. Not homemade caramel pieces. The plain toffee bits melt into defined amber pools inside the bar. Caramel bits behave differently — they stay softer and do not caramelize in the same way.
Coconut: This recipe uses sweetened shredded coconut in the batter and on top. Sweetened coconut carries extra moisture that integrates into the bar and produces the soft, fudgy interior visible in the cross-section. Unsweetened coconut can be used but the bars will be drier and the coconut strands will stay more distinct rather than integrating. The topping coconut will still toast either way.
Pan: This recipe was tested in a 9×13 inch (23×33cm) light-colored aluminum baking pan. Line it with parchment paper cut to fit the bottom and up both long sides with at least 2 inches of overhang — this is what allows you to lift the entire slab out for clean cutting. If you skip the parchment overhang, you cannot lift the bars out of the pan and the edges will break.
Dark versus light non-stick pans: Dark non-stick pans absorb significantly more heat and will overbrown the bottom and edges before the center is set. Light-colored aluminum is what I tested with. If you only have a dark pan, reduce the oven temperature by 25°F (15°C) and start checking at 25 minutes.
I keep a roll of pre-cut parchment sheets in my baking drawer specifically for 9×13 pans. Cutting parchment to fit every time is the kind of small friction that makes people skip the lining step — and the lining step is not skippable here.
Necessary Tools
- Kitchen scale (preferred) or standard measuring cups and spoons
- 9×13 inch (23×33cm) light-colored aluminum baking pan
- Parchment paper
- Large mixing bowl
- Silicone spatula
- Whisk
- Wire cooling rack
- Sharp chef’s knife for cutting
How to Make Coconut Toffee Chocolate Chip Cookie Bars
Step 1: Preparing the Pan and Preheating the Oven to the Right Temperature
This is a one-bowl, melt-and-mix method — no creaming, no electric mixer, no chilling required. Set up before mixing and the rest of the recipe moves fast.
Position your oven rack in the middle position. Preheat to 350°F (175°C). Most home ovens run 15–25°F (8–14°C) off — if you have an oven thermometer, confirm the actual temperature before the pan goes in. While the oven heats, take your 9×13 inch (23×33cm) light-colored aluminum baking pan and line it with parchment paper. Press the parchment flat against the bottom and up both long sides, leaving at least 2 inches of overhang on each side. Crease the corners firmly so the parchment lies flat with no lifted edges.
Do not use foil. Foil sticks to the caramelized edges and tears when you try to lift the slab out. Do not use only a light spray of oil either — without parchment overhang, there is no way to lift the full slab cleanly for cutting.
The prepared pan should look like a sling — parchment flat on the bottom, two sides lifted with 2 inches of excess above the pan rim. Set it aside.
Your oven needs the full preheat — 20 minutes minimum from the moment you turn it on. A pan going into an under-heated oven spreads the batter before the edges can set, and the bars come out flat and greasy rather than thick and fudgy. Set a timer and do not rush it.
Step 2: Combining the Melted Butter and Dark Brown Sugar Until Glossy
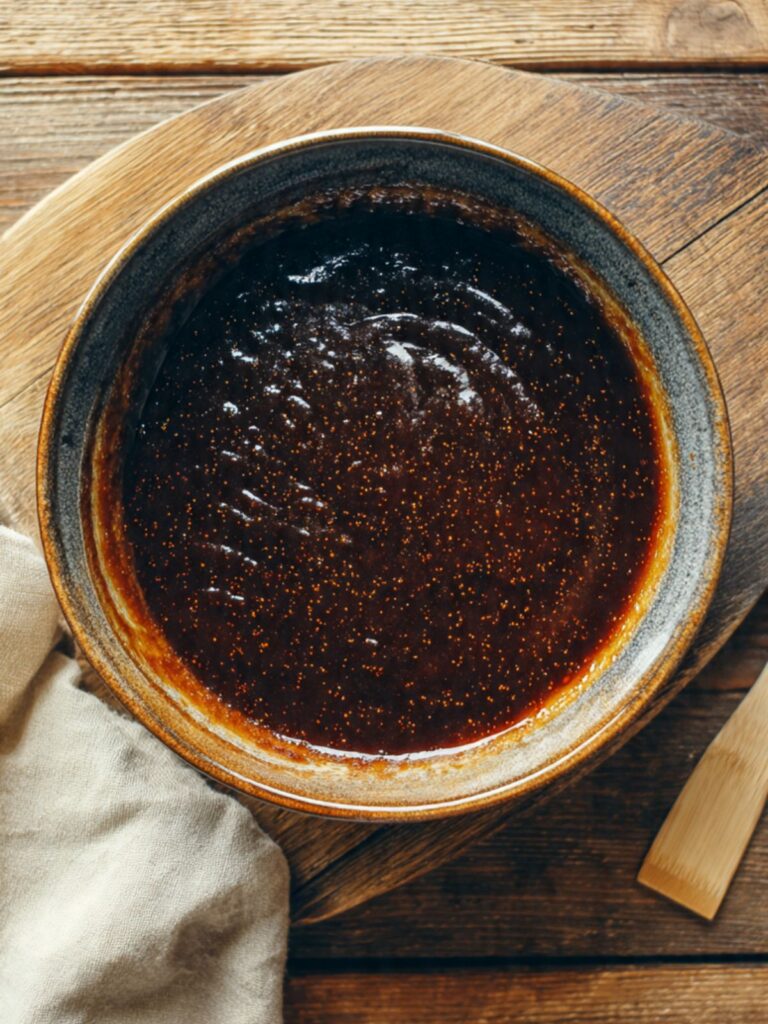
In your large mixing bowl, add your 1 cup (227g) unsalted butter, melted and cooled to barely warm, and your 2 cups (440g) packed dark brown sugar. Check the butter temperature before it goes in — press the back of your hand against the outside of the bowl or cup it was melted in. It should feel no warmer than body temperature. Any hotter and it will scramble the eggs in the next step.
Use your whisk for this step only — it is the only time a whisk is used in this recipe. Stir in wide circular strokes until the sugar is completely absorbed into the butter and no dry streaks remain along the bottom of the bowl — approximately 30 to 40 strokes. Press the whisk flat along the bottom at the end to confirm there is no undissolved sugar sitting there.
Dark brown sugar contains roughly 6.5% molasses by weight — double the molasses of light brown sugar. That molasses is what produces the deep amber interior layer visible in the cut bars. It caramelizes earlier and more aggressively than plain sucrose, creating the distinct toffee-colored ribbon running through the center of each finished bar. Light brown sugar will not replicate this.
The mixture should look like a thick, very dark paste — uniform in color, no dry clumps visible at the bottom, slightly glossy at the edges of the bowl. If it looks grainy or separated, the butter was too warm or the sugar was not fully packed. Keep stirring for another 15 strokes.
Set the whisk aside and pick up your silicone spatula — it does not leave the bowl again until the batter is in the pan.
Step 3: Adding the Eggs One at a Time for a Smooth, Cohesive Batter
Crack your first large room-temperature egg directly into the butter-sugar mixture. Fold with your silicone spatula using slow strokes from the bottom of the bowl upward — not stirring in circles, which breaks the emulsification. Count approximately 15 strokes, until no yellow streaks remain and the egg is fully absorbed. Then add the second large room-temperature egg and repeat — another 15 strokes, fully incorporated before anything else goes in.
Add your 2 teaspoons (10ml) pure vanilla extract. Vanilla rounds the flavor of the molasses and toffee — without it, the sweetness reads flat and one-note. Fold for 8 to 10 strokes until combined.
The eggs must go in one at a time. Each egg needs to emulsify into the fat before the next one is added — they are the only emulsifier in this batter. Adding both eggs at once outpaces what the fat can absorb and the batter breaks into a greasy, separated mess that does not recover fully regardless of how long you keep folding.
The batter should look smooth, cohesive, and slightly glossy — not streaky with fat, not broken, no visible yellow ribbons from the yolks remaining. If it looks curdled or greasy, the butter was still too warm. Continue folding slowly — it will partially come back together. For the next batch, let the butter cool for an additional 5 minutes before starting.
The batter is ready for the dry ingredients — move directly to the next step, do not let it sit.
Step 4: Folding the Dry Ingredients Into the Batter Without Developing Gluten
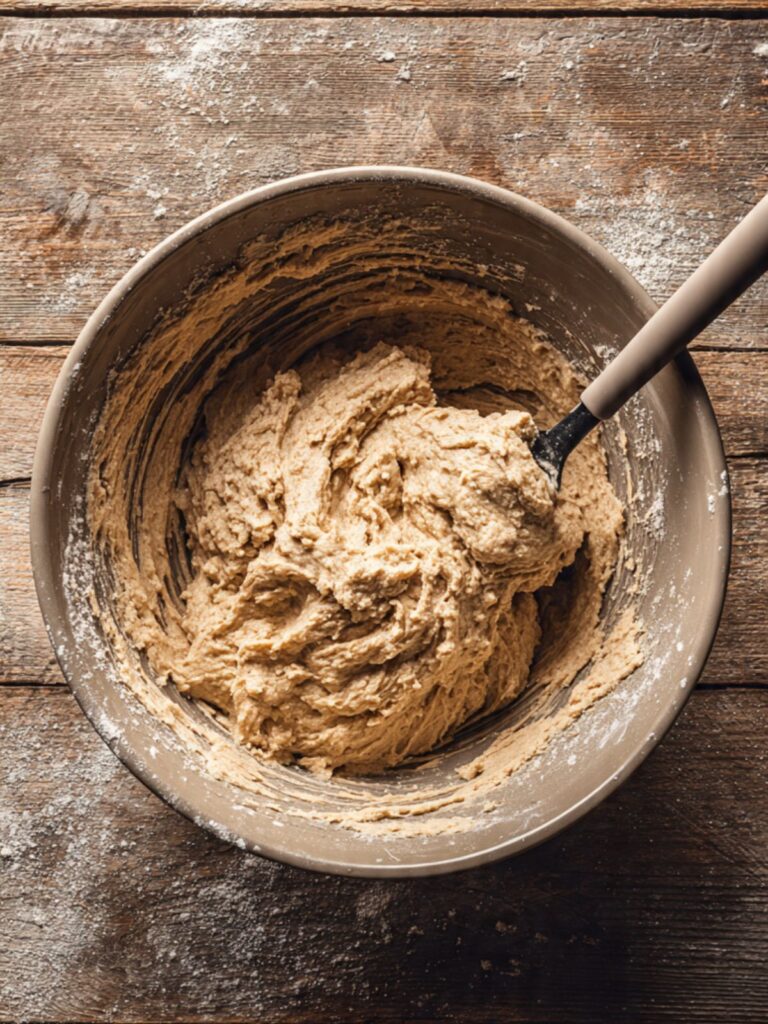
In a separate medium bowl, add your 2¼ cups (270g) all-purpose flour, spooned and leveled, 1 teaspoon (4g) baking powder, checked for freshness, and 1 teaspoon (6g) fine sea salt. Whisk them together until evenly combined — 10 strokes is enough.
Tip the entire dry ingredient mixture into the wet ingredients in one addition. Fold with your silicone spatula using slow strokes from the bottom of the bowl upward — count 20 strokes maximum from the moment the flour touches the batter. Stop folding the instant no dry flour streaks are visible.
Baking powder provides the gentle lift that keeps the interior tender rather than compressed and brick-dense — the quantity is intentionally modest because these bars are not meant to rise dramatically. Salt sharpens the toffee and chocolate flavors; without it, both read sweeter and less complex. Flour at 270g provides enough structure to hold the toffee ribbons intact when the bar is cut — more than this and the batter becomes dry and crumbly.
🗒 Luna’s Note: I weigh the flour every single time, even when I am making these on autopilot. One overpacked cup adds 20–30g more than the recipe calls for. At that amount, the difference in texture is real — the bars come out noticeably tighter and drier, and the toffee layer does not have enough moisture to pool the way it should.
Do not overfold chasing a smooth, uniform batter. The batter will look thick, rough, and slightly shaggy — this is correct. A smooth batter means the gluten has developed and the finished bars will be tough and dense rather than soft and fudgy.
The batter should look thick and stiff — similar to a very dense brownie batter. It will not be pourable. It will not look fully smooth. Both of these things are correct. This is ready for the mix-ins.
Step 5: Folding in the Toffee Bits, Chocolate Chips, and Coconut in the Right Order
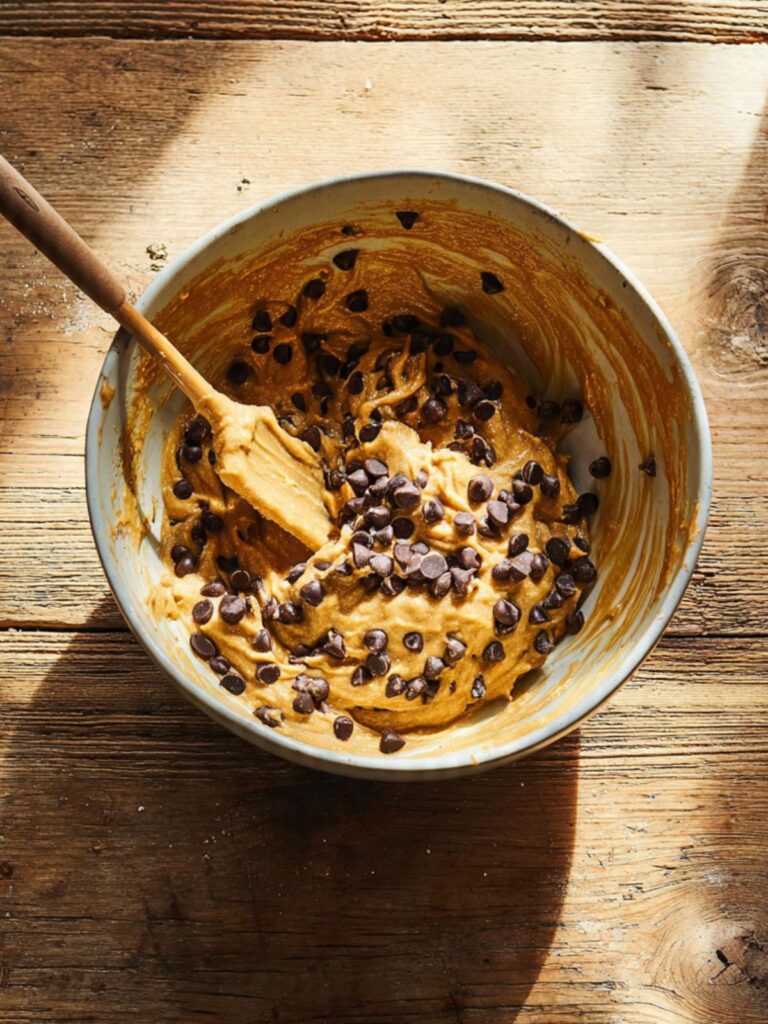
Add your 1½ cups (255g) semi-sweet chocolate chips (approximately 48% cacao), 1 cup (170g) Heath toffee bits, plain variety, and 1½ cups (120g) sweetened shredded coconut to the batter all at once. Fold with your silicone spatula using the same slow bottom-to-top strokes — count 15 to 20 strokes from the moment the mix-ins go in, and stop when they are evenly distributed with no large pockets of plain batter remaining in any corner.
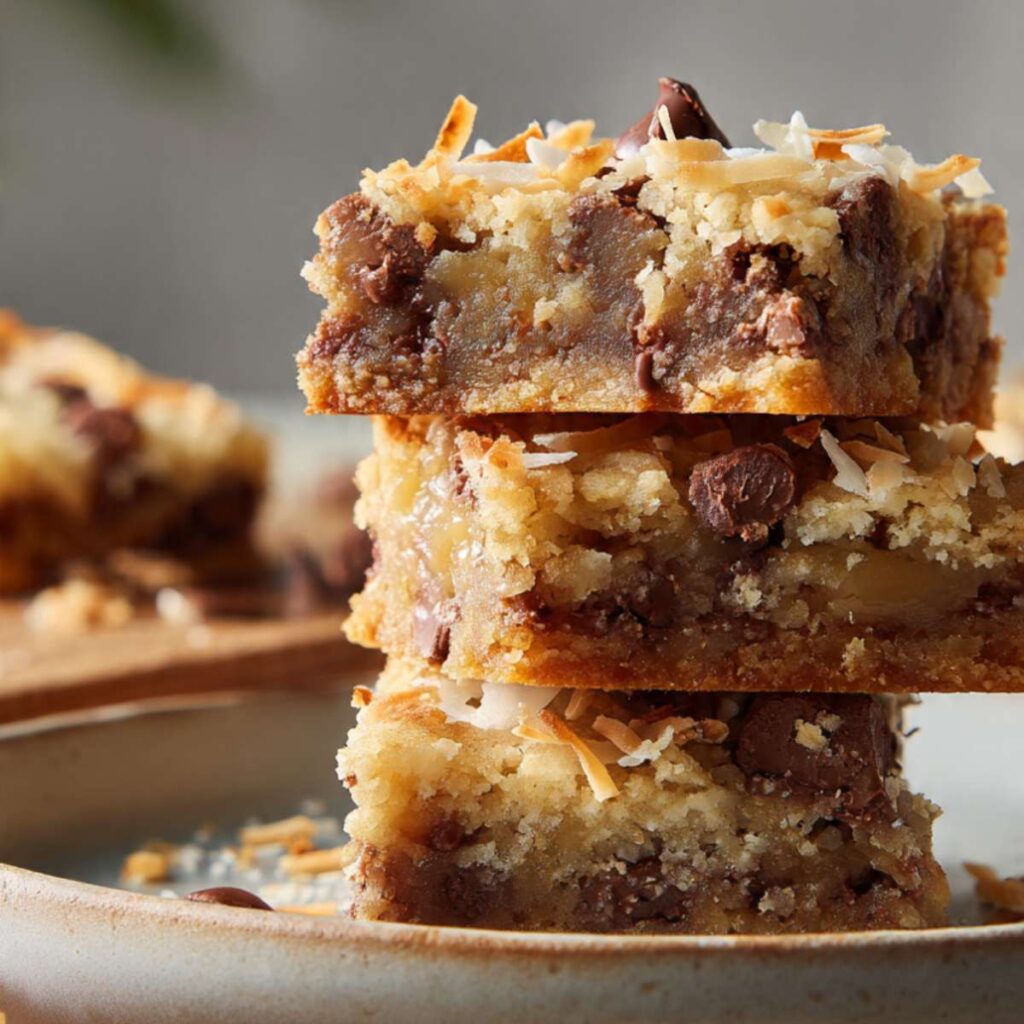
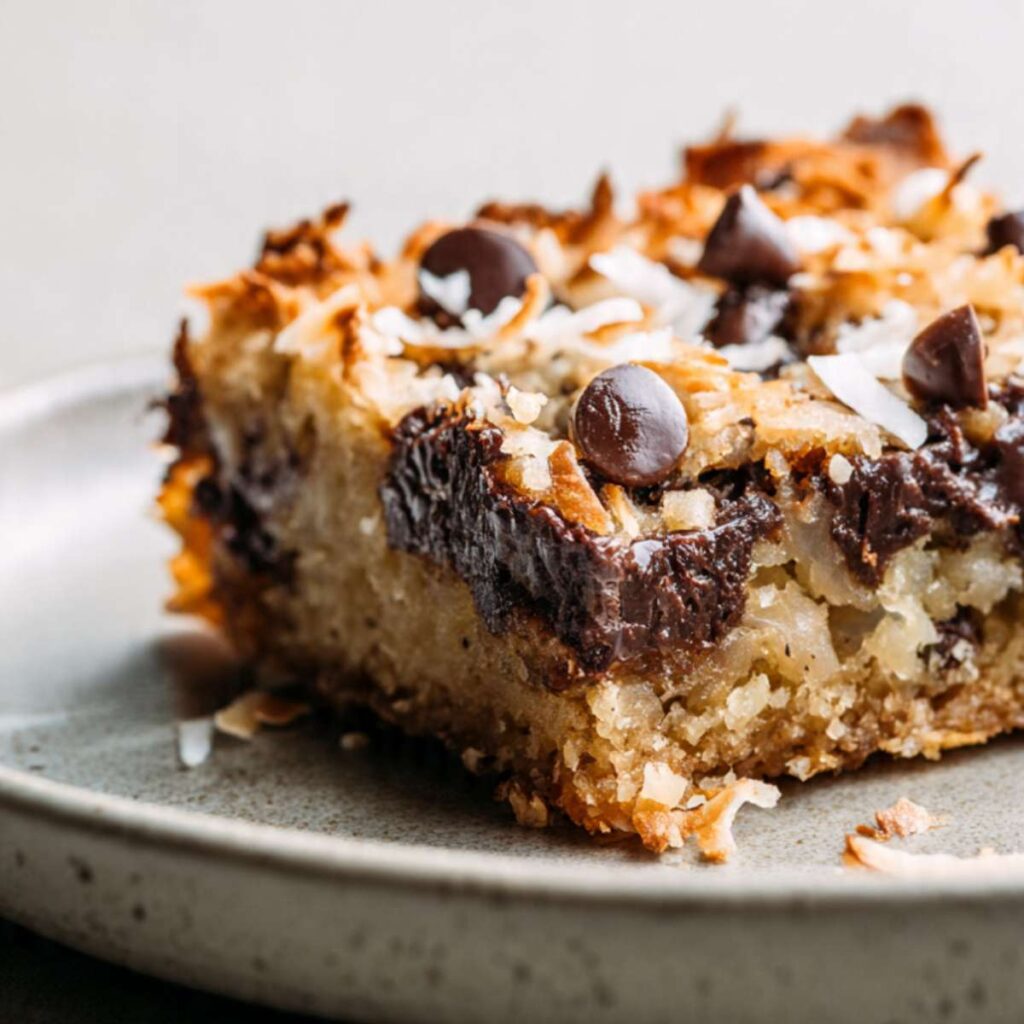
The toffee bits are the most fragile mix-in in this recipe. Heath toffee bits are compressed caramelized sugar — they shatter easily under pressure and dissolve into fine particles if worked too hard. Fine toffee particles disperse into the batter and disappear during baking. Whole or near-whole pieces melt into the defined amber pools visible in the overhead photo showing the bars cut open — those thick, translucent ribbons running through the dense interior are toffee pieces that went in intact and pooled during the bake. The fold order and stroke count are what keep them that way.
Do not break up the coconut shreds before adding — if they have clumped in the bag, separate them with your fingers first, then add. Clumped coconut folds in unevenly and creates pockets of coconut-heavy batter surrounded by bare patches.
The finished batter should look thick and heavily studded throughout — chips, toffee pieces, and coconut shreds visible and roughly evenly distributed from edge to edge of the bowl, no single ingredient dominating one area. If the distribution looks uneven after 20 strokes, resist the urge to fold more — redistribute by rotating the bowl and folding from a different angle for 3 additional strokes only.
The mix-ins are in — press the batter into the pan immediately before it stiffens further.
Step 6: Pressing the Batter Into the Pan and Applying the Topping Evenly
Transfer the batter into your prepared 9×13 inch (23×33cm) parchment-lined pan in large spoonfuls distributed across the pan before spreading — this makes leveling easier than scraping a single mass from one end to the other. Use the flat back of your silicone spatula with firm downward pressure to spread the batter into an even layer, pressing it all the way into the corners and along the short ends where it tends to pull back.
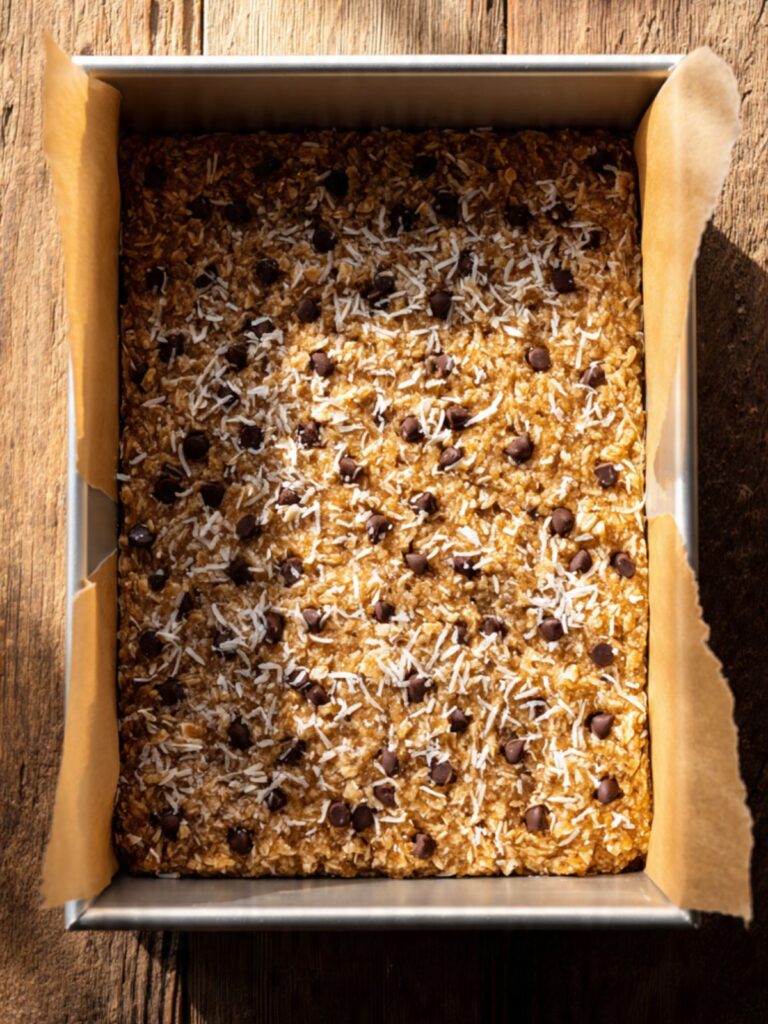
The batter layer should be approximately ¾ to 1 inch thick across the full pan. At this thickness, the yield is exactly 24 bars cut into a 4-column by 6-row grid — each bar approximately 2 inches × 3 inches (5×8cm). If you prefer larger bars, cut a 3×4 grid for 12 bars and add 4 minutes to the bake time; the 2-hour cooling minimum does not change regardless of cut size.
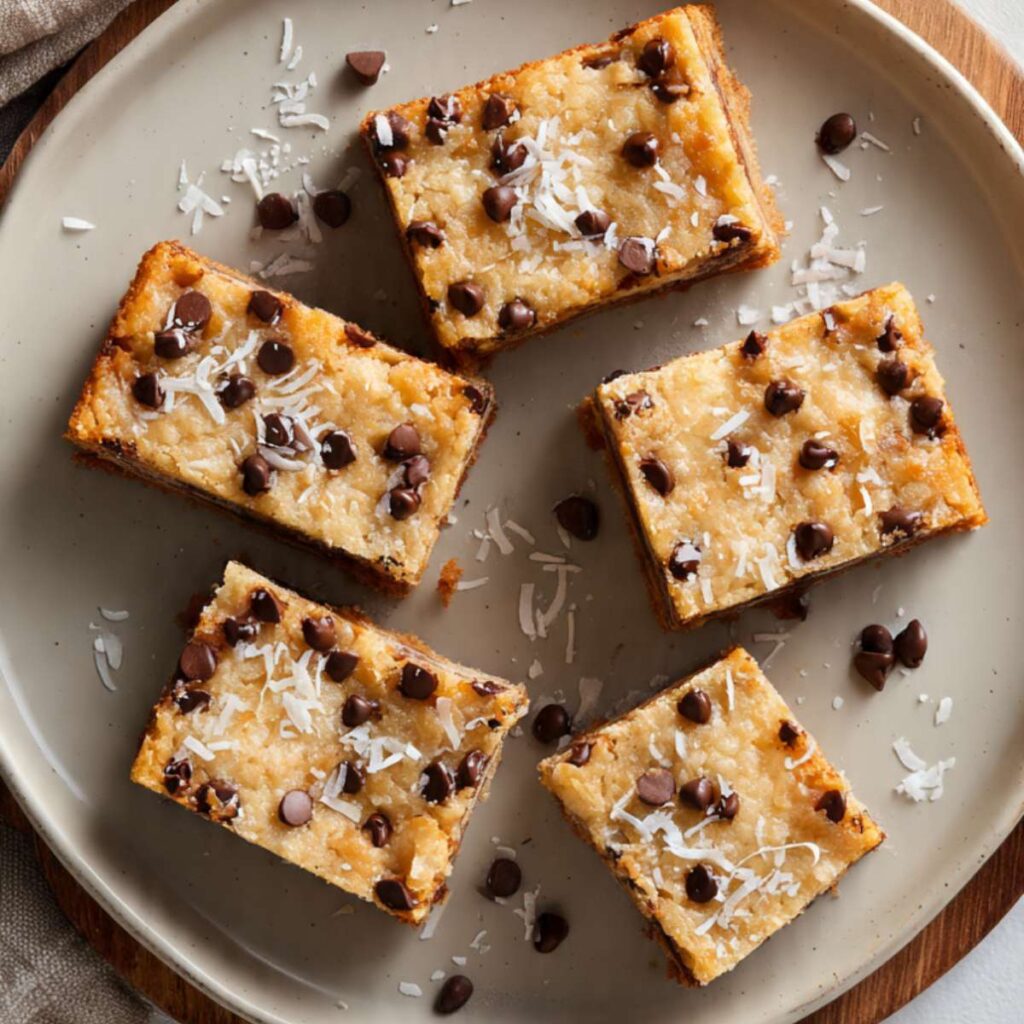
Once the batter is level, scatter your ½ cup (40g) sweetened shredded or flaked coconut evenly across the entire surface from edge to edge. Press it lightly with the palm of your hand — firm enough that every piece makes contact with the batter surface, not so hard that it sinks below. Coconut that is only resting on top without contact with the batter will slide off the finished bars when cut. Then scatter your reserved ¼ cup (43g) semi-sweet chocolate chips across the surface, pressing each chip lightly so it sits half-embedded — you want the chips visible above the coconut surface, exactly as shown in the overhead plate photo where whole chips sit proud above the toasted coconut on each finished bar.
The pan should look fully covered — coconut from edge to edge, chips distributed evenly, no bare batter patches visible anywhere on the surface. The top will look rough and uneven — that is correct and is what produces the textured, craggy toasted surface of the finished bar.
Do not let the pan sit at room temperature more than 5 minutes before it goes into the oven — the butter in the batter will begin to separate slightly if left too long.
Step 7: Baking Until the Edges Are Deep Amber and the Coconut Is Fully Toasted
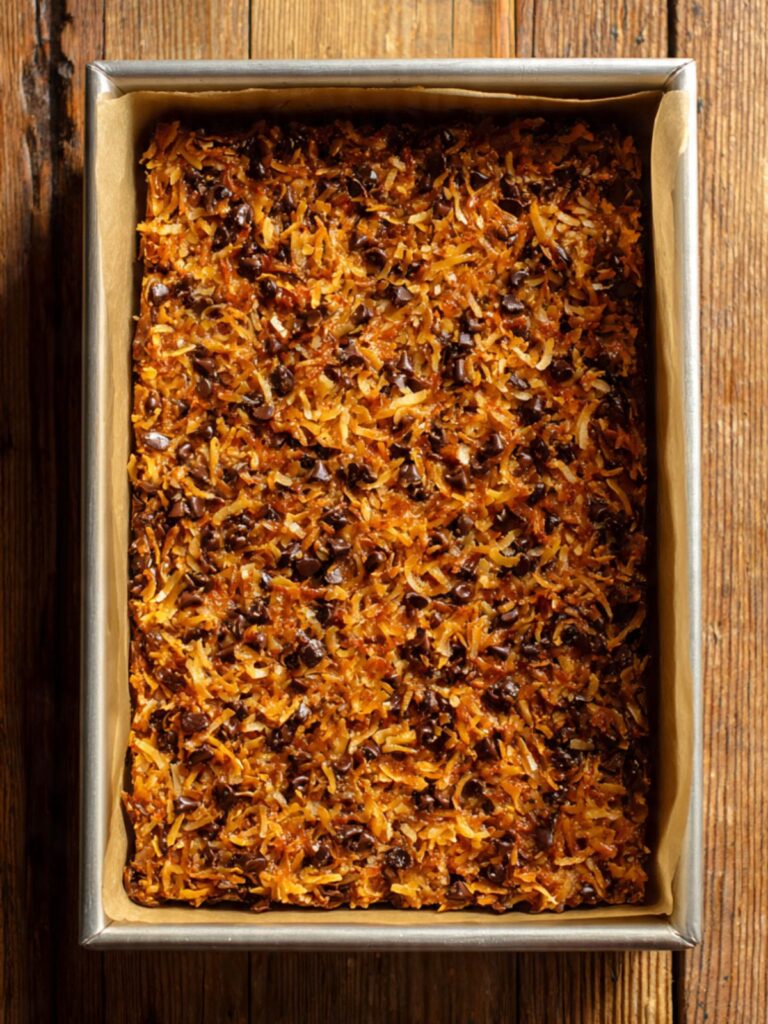
Place the pan on the middle rack of your preheated 350°F (175°C) oven. Set a timer for 28 minutes and do not open the oven door before it goes off. Opening the oven before the structure has set causes a sudden temperature drop that deflates the interior — the bars will sink in the center and stay sunken even as they cool.
Bake for 28 to 32 minutes total. At the 28-minute mark, open the oven and check: the edges should have pulled slightly from the pan sides and turned deep amber-brown — the same dark caramelized color visible along the edges of the bars in the close-up stack photo showing the cut cross-section. The surface coconut should be golden-toasted across the full top, not pale in the center of the pan. The center will still feel soft and look slightly underdone when you press it very gently with a fingertip. This is the correct pull moment.
Do not wait for the center to look set. This is the counterintuitive part of this recipe: the toffee layer inside the bar is still liquid at the 28-minute mark and will remain liquid until the bars cool at room temperature. A center that looks fully done in the oven is a center where the toffee has cooked past chewy into brittle. The edges and the coconut are your doneness signals — not the center.
If the coconut is still pale at 28 minutes but the edges are done, give the pan 2 more minutes and check again. If both edges and coconut are done before 28 minutes, pull immediately — every oven is different, and the doneness cues override the clock.
The edges should be deep amber and visibly contracted from the pan sides. The surface coconut should be golden-brown across the full top. The center should feel soft under a very light fingertip press — not liquid, not firm, somewhere in between. Remove the pan from the oven and place it immediately on your wire cooling rack. Do not move the pan from the rack during the cool.
Step 8: Cooling for the Full 2 Hours Before Cutting for Clean Bars
Leave the pan on the wire cooling rack undisturbed for a minimum of 2 hours. Do not move it. Do not refrigerate it during this window.
Here is what is happening inside the pan during those 2 hours: the residual heat from the pan is continuing to cook the interior — carryover cooking — and the toffee layer is transitioning from liquid to its final chewy set texture. This process cannot be rushed with cold air. A bar moved to the refrigerator immediately after baking will have a toffee layer that seizes hard from the rapid temperature change rather than relaxing into the soft, pull-apart chew visible when you break a finished bar in half. Room temperature, two hours, on the rack.
Cutting before 2 hours produces one specific failure: the knife goes through the set surface crust and hits a molten toffee center that has nowhere to go except sideways. The bar collapses, the pieces crumble, and the toffee pools across the cutting board. It looks like underbaking. It is not. The bars were correctly baked — they were incorrectly cut.
After the 2-hour rest, refrigerate the uncut slab in the pan for 30 minutes. This brief chill firms the toffee layer just enough for the knife to cut through cleanly without the chew dragging the blade. Use your sharp chef’s knife — run it under hot water, dry it completely, and make one firm downward press per cut. Do not saw. Wipe the blade with a damp cloth between every single cut. Re-wet and dry the knife every 3 cuts.
Lift the full slab from the pan using the parchment overhang and place it on your cutting board before cutting — never cut inside the pan. Score the surface lightly into a 4×6 grid first with the tip of the knife to mark your cut lines, then follow the scored lines with full cuts.
🗒 Luna’s Note: The knife temperature matters more than most people expect with these bars. A cold knife through a slightly chilled bar drags through the toffee layer and compresses the coconut topping. A hot-water-warmed, dried knife cuts through both cleanly in one motion. I go through the hot-water-dry-cut routine for every single cut on this recipe and the edge quality is visibly different from when I skip it.
The finished bars should lift cleanly, hold their shape when picked up, and show a distinct interior — firm amber-toasted coconut crust on top, a dense fudgy crumb below, and the amber toffee ribbon running through the center exactly as visible in the close-up cross-section shot of the stacked bars on the grey ceramic plate.
The Science Behind Coconut Toffee Chocolate Chip Cookie Bars
Why Dark Brown Sugar Produces That Amber Toffee Layer
I kept getting a pale, uniform interior in my early batches and could not figure out what was missing. The cross-section looked like a standard blondie — caramel-colored throughout, no distinct layering. I switched from light brown sugar to dark brown sugar on batch four and cut into the cooled bar expecting the same result. The interior had changed completely. There was a visible amber band running through the center — deeper in color than the surrounding crumb, slightly translucent, chewy rather than cakey. I did not understand why the sugar type had produced a structural difference until I looked at the molasses content.
Dark brown sugar contains approximately 6.5% molasses by weight versus light brown sugar’s 3.5%. Molasses is hygroscopic — it actively attracts and retains moisture — and it caramelizes at a lower temperature than plain sucrose. In a dense bar like this, where the interior temperature climbs slowly, the molasses in the dark brown sugar begins caramelizing before the outer crumb sets. The result is a distinct layer of concentrated caramelized sugar that stays softer and more translucent than the surrounding batter — which is exactly the amber ribbon visible when you cut these bars open. Light brown sugar does not have enough molasses to produce this effect at standard baking temperatures.
This is also why these bars stay soft for days after baking. Sugar hygroscopicity means the molasses continues drawing ambient moisture into the bars even after they cool — the same mechanism that keeps brown sugar cookies softer longer than white sugar cookies.
Why the Toffee Bits Must Go in Last
Heath toffee bits are essentially hardened caramelized sugar with a small amount of butter — the same base as a traditional English toffee. At baking temperatures above 300°F (150°C), toffee melts back into liquid and then re-sets as it cools. If the pieces are large enough when they go into the oven, they melt into defined pools that re-solidify into chewy amber ribbons. If they are broken into fragments before baking, they dissolve completely into the batter and the pooling effect disappears.
This is why the fold order matters more in this recipe than in a standard chocolate chip bar. Folding toffee bits in with the flour — or mixing them aggressively at any point — breaks them into fine pieces that behave more like a flavoring than a structural ingredient. Folding them in last, with the minimum number of strokes needed for even distribution, keeps them at a size that melts into the defined ribbons visible in the cut bar interior. The difference between the two approaches is visible in the cross-section. For an internal link to another bar recipe where fold order changes the result, see my chocolate chip cookie bars.
Why the Coconut Toasts on Top but Stays Soft Inside
The coconut on top of these bars toasts to a deep golden-brown during baking while the coconut folded into the batter stays pale and soft. This is not two different types of coconut behaving differently — it is the same coconut in two different moisture environments, and the Maillard reaction explaining the difference.
The Maillard reaction — the browning reaction between proteins and sugars that creates flavor and color — requires surface dryness to proceed. Coconut on the surface of the bars is exposed to direct oven heat with no surrounding moisture trapping it. The surface temperature climbs fast enough and dries out fast enough for Maillard browning to occur, producing the golden-toasted color and nutty flavor visible on the finished bars. The coconut folded into the batter is surrounded by wet batter on all sides throughout the bake — the moisture prevents the surface temperature from climbing high enough or drying out fast enough for browning to happen. It steams rather than toasts, staying pale and soft and integrating into the fudgy interior texture instead.
This is why pressing the topping coconut lightly into the batter surface — rather than leaving it loose — actually helps it toast more evenly. Coconut that has contact with the batter surface stays put as the batter sets around it, while loose coconut can shift and bunch, producing uneven toasting across the pan.
Coconut Toffee Chocolate Chip Cookie Bars Troubleshooting & Pro-Tips
Common Mistakes
Wrong Coconut Type or Toffee Substitution
Symptom: The bars bake up dry and crumbly with no soft chew, or the toffee layer is absent and the interior looks like a plain blondie with no amber pooling.
Cause: Unsweetened coconut was used in the batter instead of sweetened, or caramel bits were substituted for Heath toffee bits.
Fix: If already baked with unsweetened coconut, the bars are still edible — serve them warm with a scoop of vanilla ice cream, which compensates for the dryness. There is no fix for the missing toffee layer in a finished batch.
Prevention: Use sweetened shredded coconut specifically for the batter — the added sugar and moisture are structural, not just flavor. For the toffee, use Heath toffee bits or any plain English toffee baking bits. Caramel bits are softer and do not caramelize in the same way — they stay gummy rather than forming the amber chewy layer. Chocolate-covered toffee pieces change the chocolate-to-toffee ratio in the interior and produce a muddier flavor. Plain toffee bits only.
Wrong Pan Size or Dark Pan
Symptom: The bars are too thin and overbaked at the edges before the center sets, or the bottom is burnt and hard while the top still looks underdone.
Cause: A pan smaller or larger than 9×13 inches was used, or a dark non-stick pan was used at the full recipe temperature.
Fix: Overbaked thin bars from a larger pan will be dry — press them while still warm into ramekins, add a spoonful of warmed chocolate sauce, and serve as a deconstructed dessert. Burnt bottoms cannot be fixed — slice the bars, trim the bottom crust with a sharp knife, and serve them as a thinner bar.
Prevention: Use a 9×13 inch (23×33cm) light-colored aluminum pan exactly. If using a dark non-stick pan, reduce oven temperature to 325°F (165°C) and start checking at 25 minutes. If using an 8×8 pan for a half batch, increase bake time to 34–38 minutes and check edges carefully.
Gummy, Underset Center When Cut
Symptom: The knife goes through and the center collapses — liquid toffee pools onto the cutting board, the bars crumble rather than hold their shape, and the interior looks raw and wet.
Cause: The bars were cut before the 2-hour cooling time was complete. The toffee layer is still liquid and the interior structure has not locked in.
Fix: If this has happened, press the pieces back into the pan as best you can, smooth the surface with a spatula, and refrigerate for 1 hour. They will not look perfect but they will set and be edible. Serve them directly from the pan in scooped portions rather than as clean bars.
Prevention: Wait the full 2 hours at room temperature before cutting. For cleanest results, refrigerate for an additional 30 minutes after the room-temperature rest. The bars look done on the surface long before the interior has set — do not let the appearance of the top mislead you.
Pale, Untoasted Coconut on Top
Symptom: The surface coconut is still white or barely golden when the bars come out, even though the edges look done.
Cause: The coconut was not pressed into contact with the batter surface and shifted during baking, or the oven temperature was too low, or the pan went in before the oven fully preheated.
Fix: If the bars are already out of the oven and the coconut is pale, return the pan to the oven at 375°F (190°C) for 4 to 5 minutes — watch it closely. The coconut will toast quickly at this temperature and can go from pale to burnt in under 2 minutes. Do not walk away.
Prevention: Press the topping coconut firmly enough that it makes full contact with the batter surface before baking. Confirm your oven is fully preheated before the pan goes in. If the edges are done at 28 minutes but the coconut is still pale, the oven temperature is likely running low — use an oven thermometer to verify.
Toffee Bits Dissolved Completely — No Amber Pooling
Symptom: The interior of the cut bar is uniform in color with no distinct amber ribbons — the toffee flavor is there but the visual layer is absent.
Cause: The toffee bits were added too early in the mixing process and broken into fine fragments, or they were folded too aggressively.
Fix: The flavor is still present even if the visual layer is not — the bars are still good. No fix for the current batch.
Prevention: Add the toffee bits in the final fold with the chocolate chips and coconut. Use the minimum strokes needed for even distribution — 15 to 20 maximum from the moment the mix-ins go in. Do not use a whisk or electric mixer at any point after the dry ingredients are added.
Bars Crumble When Cut Into Clean Rectangles
Symptom: The bars break apart along the cut line rather than holding a clean edge — pieces fall away and the corners crumble.
Cause: The bars were cut too warm, the knife was dragged rather than pressed straight down, or the flour was slightly over-measured and the batter was drier than intended.
Fix: Press crumbled pieces into small ramekins, warm them for 20 seconds in the microwave, and serve with ice cream as an individual dessert. The flavor is identical — only the presentation changes.
Prevention: Wait the full cooling time, then refrigerate for 30 minutes before cutting. Use a sharp chef’s knife wiped clean between every cut. Press the knife straight down in one firm motion — do not saw. Weigh the flour rather than measuring by volume to prevent over-measurement.
Flat, Dense Bars with No Rise — Baking Powder Failure
Symptom: The bars bake up noticeably flatter and denser than expected — they look compressed, the interior is very tight, and the texture is more fudge-like than the soft, chewy result shown in the photos.
Cause: Baking powder was expired or inactive. Baking powder loses potency over time, particularly after opening, and will not produce the slight lift that gives these bars their tender interior structure.
Fix: The flavor of the finished bars will still be good — the toffee and chocolate carry the batch. Serve them cut into smaller pieces, warmed briefly in the microwave, topped with a spoonful of vanilla ice cream. The dense texture is actually pleasant as a warm dessert base.
Prevention: Test your baking powder before every batch — drop ½ teaspoon into a small bowl of hot water. Active, immediate bubbling means it is fresh. A flat surface or faint slow fizz means it is dead. Replace it. Baking powder older than 6 months after opening should be replaced regardless of the test result.
Humidity and Altitude Adjustments
High humidity: Sweetened shredded coconut absorbs ambient moisture readily. In high-humidity environments, the topping coconut may take longer to toast and may look golden on the surface while staying slightly soft underneath. Add 2 to 3 minutes to the bake time and check that the topping coconut feels dry and crisp to a very light touch before pulling the pan.
High altitude (above 3,500 feet): Reduce baking powder to ¾ teaspoon (3g). Leavening at altitude produces excessive lift and the bars can rise and then sink in the center as the structure cannot support the expansion. The bake time may decrease by 2 to 3 minutes — start checking at 25 minutes and watch the edges.
Expert Pro-Tips
Toast a portion of the batter coconut before folding it in. Take ½ cup of the 1½ cups of sweetened shredded coconut called for in the batter and toast it in a dry skillet over medium heat for 3 to 4 minutes, stirring constantly, until golden. Let it cool completely then fold it in with the rest of the coconut. This adds a second layer of coconut flavor to the interior — the toasted coconut in the batter produces a nuttier, more complex flavor than untoasted alone, while the untoasted portion keeps the interior moist.
Press extra chips and coconut onto the top immediately after the pan comes out of the oven. While the surface is still hot and the chips are soft, scatter an additional small handful of chips and a pinch of coconut across the surface and press them lightly with the back of a spoon. The residual heat partially melts the fresh chips into a glossy finish and the coconut adheres to the surface — this is what produces the photogenic chip-studded surface visible in the finished bar overhead shots.
Use the refrigerator chill strategically. After the 2-hour room-temperature rest, refrigerate the uncut slab for exactly 30 minutes — not longer. This brief chill firms the toffee layer enough to cut cleanly without making the bars so cold that the chocolate chips shatter rather than cut through. Bars that are too cold when cut have a different crumble pattern than bars at the right temperature — the chips resist the knife and the surrounding crumb tears away from them.
Score the cutting lines before fully pressing down. Use the tip of your chef’s knife to lightly score the surface into a 4×6 grid before making the full cuts. Scoring gives you a visual guide and prevents the knife from drifting on the coconut-crusted surface, which is uneven and can redirect a straight cut.
How to Store Coconut Toffee Chocolate Chip Cookie Bars
Room Temperature
Store cut bars in a lidded hard-sided container — a glass or plastic container with a snap-on lid, not a zip-lock bag. Zip-lock bags compress the bars and flatten the toasted coconut topping. Layer bars with a single sheet of parchment paper between each layer to prevent the coconut topping from sticking to the underside of the bar above it. Store at room temperature for up to 4 days.
Do not store these in a container that is too large for the quantity — excess air in an oversized container dries the bars faster. Pack them snugly in a container that fits the number of bars you have.
If you are not serving the full batch at once, leave the slab uncut and store it whole — cut only the bars you need when you need them. An uncut slab stays fresher for longer because less surface area is exposed to air. The cut edges dry out faster than the interior of a whole slab.
The bars actually improve between Day 1 and Day 2. On Day 1, the toffee layer is still slightly firm from the refrigerator chill used for cutting. By Day 2, it has relaxed back to its natural chewy texture and the molasses flavor from the dark brown sugar has deepened noticeably. Day 3 and Day 4 are still good. Day 5 is edible but the coconut topping has lost its texture and the bars are noticeably drier.
Refrigerator
Refrigeration is not recommended for bars you plan to eat within 4 days — the cold air dries the interior and firms the toffee layer to a harder texture than intended. If you need to refrigerate them — for a warm kitchen above 78°F (26°C) or for make-ahead purposes — store them in a lidded hard-sided container with parchment between layers for up to 7 days. Pull them from the refrigerator 20 to 30 minutes before serving. Cold bars have a different mouthfeel — the toffee layer is noticeably firmer and the chocolate chips are harder than at room temperature. Waiting for them to come up in temperature makes a real difference.
Freezer — Baked Bars
Cut bars freeze well for up to 2 months. Wrap each bar individually in a layer of plastic wrap, pressing the wrap directly against all surfaces to prevent freezer burn on the coconut topping. Place the individually wrapped bars in a zip-lock freezer bag or a lidded hard-sided freezer container. Label with the date.
To thaw: remove the bars from the freezer and unwrap them — do not thaw in the plastic wrap, which traps condensation against the coconut topping and makes it soggy. Place them on a wire rack at room temperature for 45 minutes to 1 hour. The toffee layer takes longer to come back to its correct texture than the surrounding crumb — do not rush the thaw in the microwave unless you intend to serve them warm. Microwaved from frozen produces a very soft, molten-centered bar that is genuinely good but different from the room-temperature version.
The toasted coconut topping softens slightly after freezing and thawing — it will not be as crisp as a freshly baked bar but the flavor is fully intact.
Freezer — Unbaked Batter
The unbaked batter can be pressed into the lined pan, covered tightly with two layers of plastic wrap, and frozen for up to 1 month. Do not add the coconut and chip topping before freezing — add it directly before baking from frozen.
To bake from frozen: add the topping, place the still-frozen pan directly into a preheated 350°F (175°C) oven, and add 10 to 12 minutes to the bake time. Start checking at 38 minutes. The edges will be the doneness signal — wait for the same deep amber pull from the pan sides before removing.
Serving Suggestion
These bars are best served at room temperature — not warm from the oven, not cold from the refrigerator. At room temperature, the toffee layer has the chewy, pull-apart texture that makes these worth making. Warm, it is too soft and the bar does not hold its shape when you pick it up. Cold, the toffee is too firm and the bar eats more like a hard candy bar than a baked good.
I serve these with a strong black coffee — the bitterness cuts through the sweetness of the toffee and coconut in a way that milk or a sweet drink does not. The combination is one of the better things about making a batch on a Sunday afternoon.
These belong to the category of recipe you bring somewhere and people ask for the recipe before they have finished the bar. A potluck, a bake sale, a weeknight where someone needs something real — these travel well, hold their shape at room temperature, and look finished without any additional preparation.
🗒 Luna’s Note: I always cut these the day before I need to bring them somewhere. Day-two bars hold their shape better under transport than freshly cut ones — the toffee layer has had more time to set completely and the edges are cleaner.
Day 2 is genuinely the best version of this bar. The molasses flavor deepens overnight, the toffee layer has settled into a more cohesive chew, and the coconut topping has bonded more fully to the surface. If you can wait, make them the day before you plan to serve them.
The honest limitation: these do not work as a formal plated dessert. They are a hand-held bar and they look like one. If you need something that presents on a plate with visual height and elegance, this is not the recipe for that occasion.
Frequently Asked Questions About Coconut Toffee Chocolate Chip Cookie Bars
Can I use unsweetened coconut instead of sweetened in this recipe?
You can, but the bars will be noticeably different. Sweetened shredded coconut carries extra moisture and sugar that integrate into the batter and contribute to the fudgy, soft interior. Unsweetened coconut is drier and stays in more distinct strands rather than softening into the crumb. The bars will be less chewy and slightly drier overall. If you use unsweetened coconut in the batter, reduce the flour by 2 tablespoons (15g) to compensate for the lower moisture content. The topping coconut can be unsweetened without issue — it toasts the same way either direction.
What are toffee bits and where do I find them?
Toffee bits are small pieces of hardened caramelized butter-sugar candy — the same base as an English toffee bar. The most widely available brand is Heath, sold in the baking aisle as “Heath Bits O’ Brickle Toffee Bits” — a yellow bag with plain toffee pieces, not the chocolate-covered variety. Most major grocery stores carry them near the chocolate chips. If you cannot find them, Skor toffee bits are an identical substitute. Do not substitute with caramel bits — caramel is softer and does not caramelize the same way during baking, so the distinct amber pooling layer will not form.
How do I know when coconut toffee chocolate chip cookie bars are done?
Pull the pan when the edges have turned deep amber-brown and have visibly pulled away from the sides of the pan, and the surface coconut is golden-toasted across the full top. The center will still look and feel slightly underdone — soft to a very light touch — and this is correct. The toffee layer inside is still liquid at this point and sets during the 2-hour cooling period through carryover heat. Waiting for the center to look fully set in the oven means the toffee will harden to a brittle candy texture rather than the chewy layer the recipe produces. Edge color and coconut color are your doneness signals — not the center.
Can I add nuts to coconut toffee chocolate chip cookie bars?
Yes. Chopped toasted pecans or walnuts work well in this recipe — add ½ cup (55g) chopped and toasted alongside the toffee bits and chips in the final fold. Toast them first in a dry skillet for 4 to 5 minutes until fragrant — raw nuts in a bar this dense do not have enough oven exposure to toast properly during baking. Macadamia nuts also work and pair particularly well with the coconut. Do not exceed ½ cup total added nuts or the batter becomes too heavy to hold together cleanly when cut.
Can I make coconut toffee chocolate chip cookie bars ahead of time?
Yes — and these are better made ahead. Bake and cool the bars fully, cut them, and store in a lidded hard-sided container at room temperature for up to 4 days. The bars improve significantly between Day 1 and Day 2 as the molasses flavor deepens and the toffee layer relaxes to its full chewy texture. For further ahead, freeze the cut bars individually wrapped in plastic wrap for up to 2 months and thaw at room temperature for 45 minutes to 1 hour before serving. Alternatively, freeze the unbaked batter in the lined pan for up to 1 month and bake directly from frozen with 10 to 12 additional minutes added to the bake time.
Can I scale this recipe down to an 8×8 pan?
Yes, with adjustments. Halve all ingredients except the leavening — use ½ teaspoon (2g) baking powder rather than a full half-teaspoon scaled from 1 teaspoon, because leavening does not scale linearly and too much in a smaller, thicker bar will cause the center to rise and then sink. The bake time increases to 34 to 38 minutes because the batter is thicker in the smaller pan. Use the same doneness cues — deep amber edges and golden toasted coconut — regardless of pan size. Yield will be approximately 12 bars cut into a 3×4 grid.
How do high altitude and humidity affect these bars?
At high altitude above 3,500 feet, reduce the baking powder to ¾ teaspoon (3g) and start checking the bars at 25 minutes — the lower air pressure causes leavening to work more aggressively and the bars can over-rise and collapse in the center before the structure sets. In high humidity, the sweetened shredded coconut absorbs ambient moisture quickly, which can slow the toasting of the surface coconut. Add 2 to 3 minutes to the bake time in humid conditions and confirm the topping coconut feels dry and crisp before pulling the pan. Store finished bars in a hard-sided container rather than loosely covered — exposed coconut in a humid environment goes soft within hours.
More Cookie Bars You’ll Love
If these coconut toffee bars hit the right note, these are the ones to make next:
Salted Caramel Chocolate Chip Cookie Bars — A caramel layer built differently from the toffee approach here. Richer, more complex, slightly more involved — worth it if you want the caramel to be the star.
Peanut Butter Chocolate Chip Bars — No dairy butter, all peanut butter, dense and chewy with a flavor profile that is completely different from this one. The one I make when I want something that tastes less like a cookie and more like a candy bar.

Coconut Toffee Chocolate Chip Cookie Bars
Ingredients
Equipment
Method
- Position oven rack in the middle position and preheat to 350°F (175°C). Line a 9×13 inch (23×33cm) light-colored aluminum baking pan with parchment paper, pressing it flat against the bottom and up both long sides with at least 2 inches of overhang on each side.
- In a large mixing bowl, whisk together 1 cup (227g) melted cooled unsalted butter and 2 cups (440g) packed dark brown sugar until fully combined and no dry sugar streaks remain — approximately 30 to 40 strokes. The mixture should look thick, glossy, and uniform.
- Add 2 large room-temperature eggs one at a time, folding with a silicone spatula after each addition until fully incorporated before adding the next. Add 2 teaspoons (10ml) pure vanilla extract and fold until combined.
- In a separate bowl, whisk together 2¼ cups (270g) all-purpose flour spooned and leveled, 1 teaspoon (4g) baking powder, and 1 teaspoon (6g) fine sea salt. Add the dry ingredients to the wet ingredients and fold with a silicone spatula using slow bottom-to-top strokes — 20 strokes maximum. Stop the moment no dry flour streaks remain.
- Add 1½ cups (255g) semi-sweet chocolate chips, 1 cup (170g) Heath toffee bits, and 1½ cups (120g) sweetened shredded coconut. Fold with 15 to 20 strokes until evenly distributed. Do not overmix.
- Transfer batter to the prepared pan and spread into an even layer using the back of the spatula, pressing firmly into the corners. Scatter ½ cup (40g) topping coconut evenly across the surface and press lightly with your palm. Scatter ¼ cup (43g) reserved chocolate chips across the top and press each chip lightly to half-embed.
- Bake at 350°F (175°C) on the middle rack for 28 to 32 minutes, until the edges are deep amber-brown and pulled from the pan sides and the surface coconut is golden-toasted. The center will look slightly underdone — this is correct.
- Remove from the oven and place on a wire rack. Cool in the pan for a minimum of 2 hours before cutting. For cleanest cuts, refrigerate for 30 minutes after the room-temperature rest, then lift the slab from the pan using the parchment overhang, place on a cutting board, and cut into 24 bars using a sharp knife wiped clean between each cut.