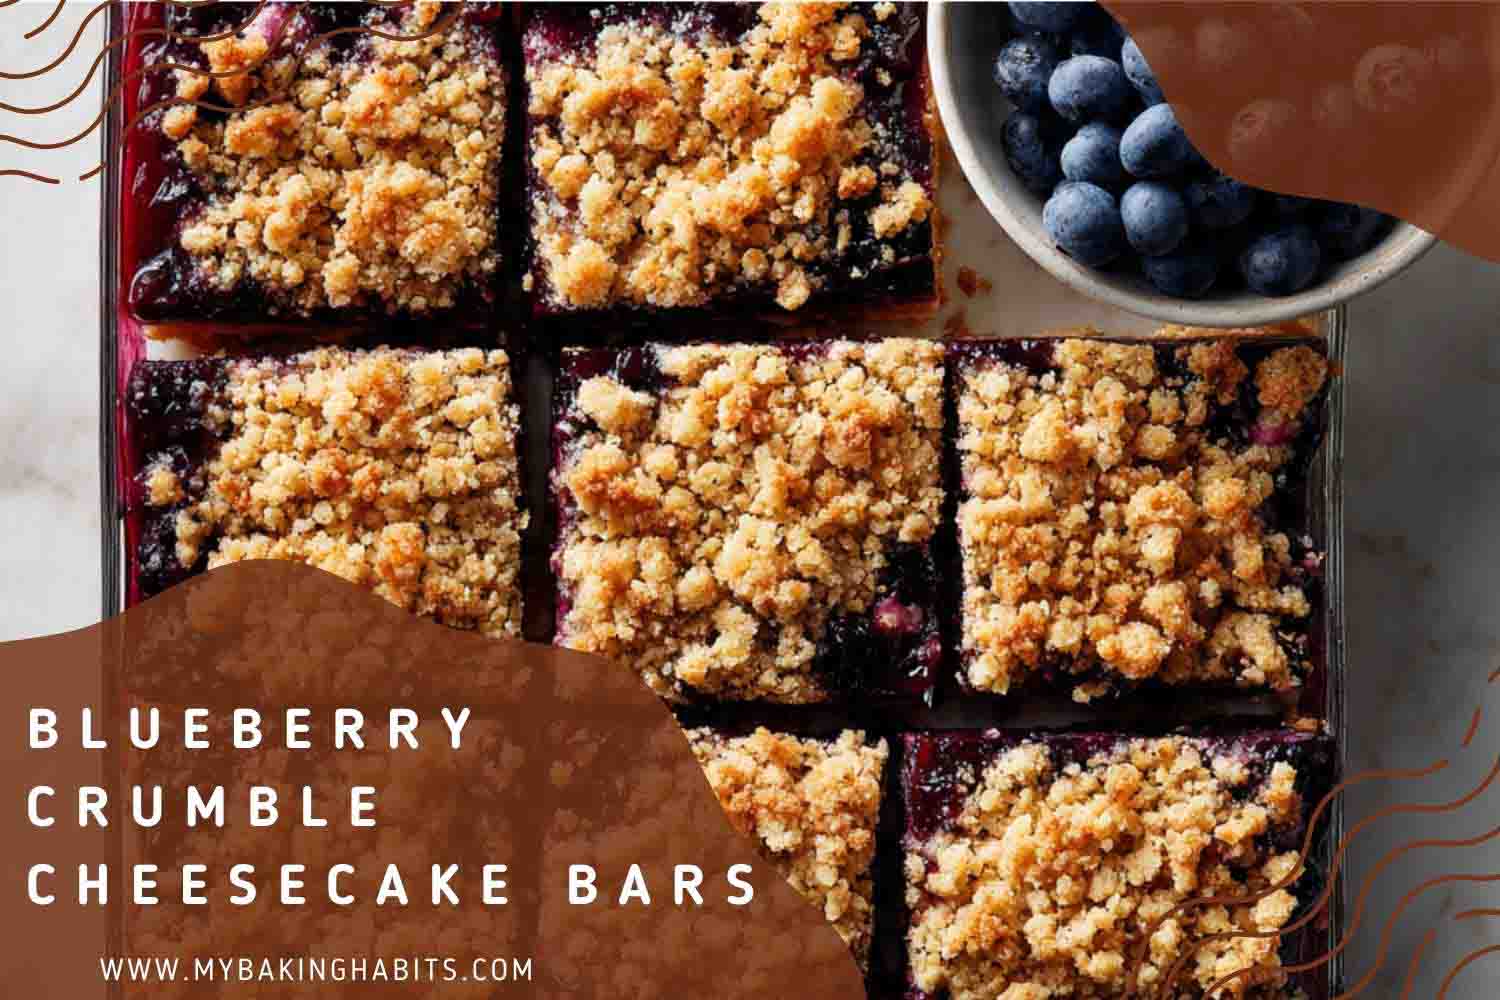
Blueberry Crumble Cheesecake Bars Recipe
The first batch of these blueberry crumble cheesecake bars came out of the oven looking exactly right. Then I cut into them warm.
The cheesecake layer collapsed into a gummy, wet mess the moment the knife went through it. The blueberry filling ran into the crust. The streusel sank. I had a pan of expensive ingredients that looked like a baking disaster, and the only thing that went wrong was that I did not wait. That lesson cost me one full batch — I baked eight more after that — and I have not cut a warm bar since.
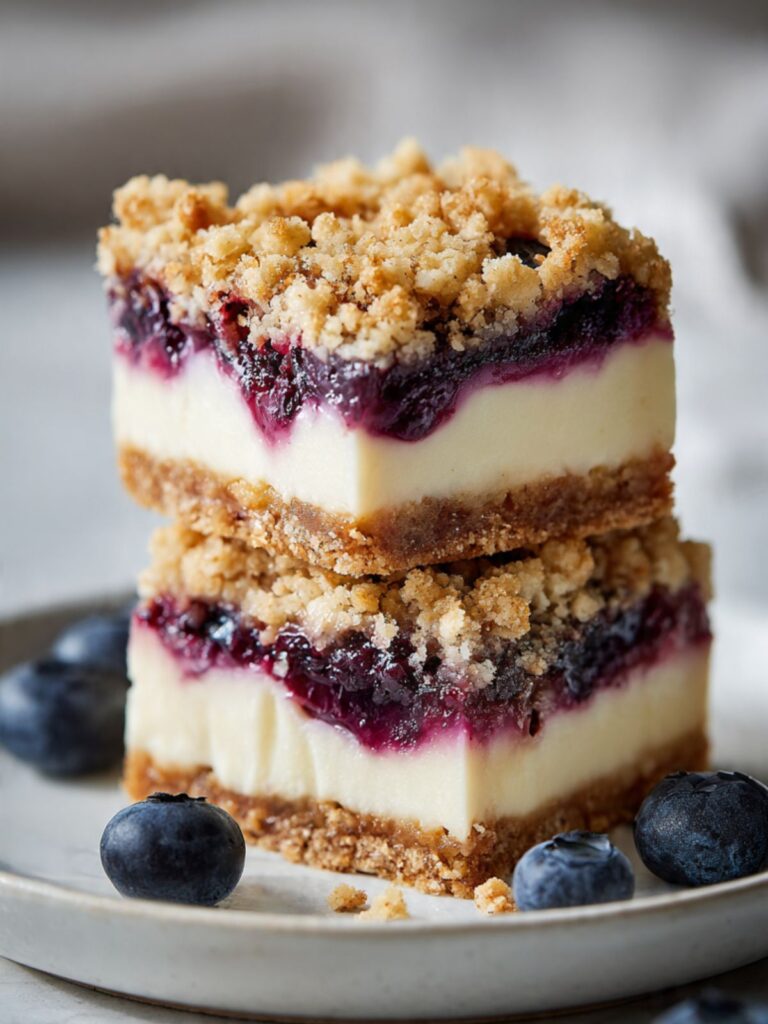
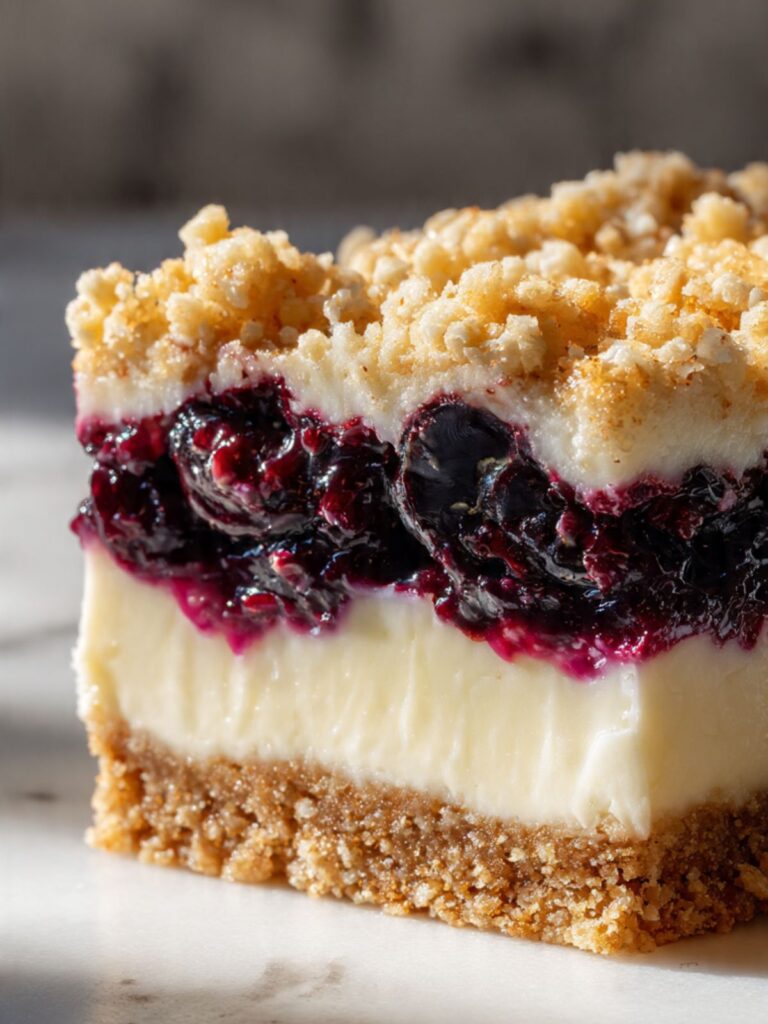
These blueberry crumble cheesecake bars are built from four distinct layers — a buttery graham cracker crust, a dense ivory-white cream cheese filling, a jammy fresh blueberry layer with whole burst berries suspended in a glossy indigo sauce, and a sandy brown sugar streusel topping. Each layer plays a specific structural role. All four are visible when you slice the bars cold, and that cross-section — the clean white line of cheesecake against the dark violet fruit layer — is exactly what you are building toward.
I tested the blueberry layer three different ways. The first version used store-bought blueberry jam spooned directly over the filling. The jam layer was too sweet, too smooth, and the texture was completely flat — you lost every bit of fruit character. The second version used fresh blueberries tossed in sugar only. They released too much water during the bake and the cheesecake layer absorbed it, turning slightly grey at the interface. The third version — fresh blueberries tossed with cornstarch, sugar, and a squeeze of lemon juice before being spooned over the filling — was the one I kept. The cornstarch thickens the released berry juices into a glossy sauce during the bake. The berries burst but keep their shape. The lemon juice brightens the whole layer without competing with the cream cheese.
I tested the streusel topping with and without oats. The oat version produced a heavier, chewier crumble that compressed the cheesecake layer during baking and made the bars harder to slice cleanly. The flour-only version — all-purpose flour, cold butter, and brown sugar — stays light and crisp, breaks into the kind of irregular golden clumps you can see in the overhead pan shot, and does not weigh down the cheesecake underneath. That is the version in this recipe. No oats.
🗒 Luna’s Note: The order of the layers matters more than it looks. The blueberry mixture goes directly on top of the raw cheesecake filling — not folded in, not swirled in. It sits on the surface and bakes in place. When you slice the bars cold, the layers stay separate and the violet-against-white contrast is exactly what makes these look as good as they taste.
This recipe uses full-fat block cream cheese — not the spreadable tub, not low-fat. It uses fresh blueberries, not frozen and not jam. The crust is made from graham cracker crumbs, melted butter, and granulated sugar. The streusel is all-purpose flour, cold butter, and brown sugar. The cheesecake filling is cream cheese, granulated sugar, eggs, sour cream, vanilla extract, and a small amount of lemon zest. Those are the ingredients. Nothing unexpected, nothing hard to find, nothing that requires a specialty store.
No mixer needed for the crust or the streusel. A hand mixer is needed for the cheesecake filling — mixing by hand will not get the cream cheese smooth enough and you will have lumps baked in that no amount of chilling will fix. The bars need at least 4 hours of refrigerating after they come out of the oven — overnight is better. Plan for that time before you start.
| Prep Time | Cook Time | Chill Time | Total Time | Yield | Difficulty |
|---|---|---|---|---|---|
| 25 min | 45 min | 4 hours (min) | 5 hours 10 min | 9 bars (8×8 inch pan) | Intermediate |
| Calories | Fat | Carbs | Sugar | Protein | Sodium |
|---|---|---|---|---|---|
| ~565 kcal | ~34g | ~60g | ~41g | ~8g | ~319mg |
Macros are approximate and will vary based on ingredient brands and exact serving size.
Ingredients & Tools for Blueberry Crumble Cheesecake Bars Recipe
For the Graham Cracker Crust
- 1 ½ cups (150g) graham cracker crumbs — from approximately 10 full graham cracker sheets, crushed fine. Pre-made crumbs from a canister work equally well. Do not use digestive biscuits — they are less sweet and produce a different flavor profile in the crust.
- 6 tablespoons (85g) unsalted butter, melted and slightly cooled — unsalted only. Salted butter adds an unpredictable amount of sodium to the crust and throws off the salt balance in the finished bar. Let the melted butter cool for 5 minutes before mixing — hot butter steams the crumbs and produces a greasy crust.
- 2 tablespoons (25g) granulated sugar — just enough to help the crust set and add faint sweetness without competing with the filling.
For the Cheesecake Filling
- 16 oz (450g) full-fat block cream cheese, softened to room temperature for 2 hours — block cream cheese only, not the spreadable tub and not low-fat. Spreadable tub cream cheese has a higher water content and will produce a filling that does not set properly and slumps when cut. Low-fat cream cheese produces a grainy, chalky texture that does not improve with chilling. Two hours at room temperature is the minimum — the cream cheese must be completely soft before mixing or you will have lumps baked into the filling that no amount of beating will fix after the fact. Do not microwave to soften — it changes the fat structure unevenly and creates hot spots that partially cook the cheese.
- ½ cup (100g) granulated sugar — granulated only. Powdered sugar introduces cornstarch which slightly thickens the batter texture and produces a denser result than tested.
- 2 large eggs, room temperature — room temperature only. Cold eggs added to the cream cheese batter cause the fat to seize and produce a lumpy, curdled filling. Set them in a bowl of warm water for 10 minutes if you forgot to pull them out early.
- ¼ cup (60g) full-fat sour cream, room temperature — full-fat only. The sour cream adds a faint tang that balances the sweetness of the blueberry layer and keeps the cheesecake texture from being too dense. Do not substitute Greek yogurt here — Greek yogurt has a sharper tang and a higher protein content that slightly changes the texture of the set cheesecake.
- 1 teaspoon (5ml) pure vanilla extract — pure, not imitation. Imitation vanilla has a chemical undertone that is noticeable in a filling this simple.
- 1 teaspoon (4g) finely grated lemon zest (from approximately 1 medium lemon) — zest only, no white pith — the zest adds brightness to the filling without making it taste like lemon cheesecake. The white pith below the colored layer is bitter — stop zesting the moment you see white.
For the Blueberry Layer
- 1 ½ cups (225g) fresh blueberries, rinsed and completely dried — fresh only for this recipe. Frozen blueberries release significantly more water during baking, which floods the cheesecake layer and turns it grey at the interface. If you must use frozen, do not thaw — use directly from frozen and increase the cornstarch to 2 tablespoons (16g) to compensate for the extra liquid. The result will be less visually distinct at the layer boundary.
- 3 tablespoons (37g) granulated sugar — adjust up by 1 tablespoon if your blueberries are tart.
- 1 tablespoon (8g) cornstarch (also called cornflour outside the US) — this is what thickens the released berry juice into the glossy sauce visible in the cross-section photos. Do not skip it and do not substitute arrowroot — arrowroot produces a slightly slimy texture when baked at high heat for extended periods.
- 1 tablespoon (15ml) fresh lemon juice — fresh squeezed only. Bottled lemon juice is oxidized and flat and does not provide the same brightness.
For the Brown Sugar Streusel
- ¾ cup (90g) all-purpose flour (spooned and leveled, not scooped) — standard all-purpose. Do not use cake flour — it produces a streusel that turns sandy and fine rather than clumping into the irregular golden pebbles visible in the photos.
- ⅓ cup (65g) packed light brown sugar — light brown sugar only. Dark brown sugar has a stronger molasses flavor that competes with the blueberry layer. Pack it firmly when measuring.
- 4 tablespoons (55g) cold unsalted butter, cut into ½-inch (1.25cm) cubes — cold is non-negotiable. Room temperature butter produces a paste, not a crumble. Cut the butter into cubes and return it to the fridge for 10 minutes after cubing if your kitchen is warm.
- ¼ teaspoon fine sea salt — balances the sweetness of the brown sugar. Fine sea salt dissolves evenly into the streusel. Do not use kosher salt here — the larger crystals do not distribute as evenly in a crumble mixture.
Before You Start
Temperature prep — this step determines whether your filling is smooth or lumpy: Pull the cream cheese, eggs, and sour cream from the refrigerator at least 2 hours before you plan to mix the filling. The cream cheese must be completely soft — Press your finger firmly into the center of the block — it should leave a clean, deep indent with zero resistance and feel uniformly soft from edge to center, not just soft on the outside. The block should feel cool to the touch but not cold. If the center still has any firmness, it is not ready. Full-fat block cream cheese takes 60 to 120 minutes to reach this state at a typical kitchen temperature of 68–72°F (20–22°C). Do not microwave it — microwave softening creates hot spots that partially cook the cheese and produce a grainy filling.
If the cream cheese still feels firm or cool at the center, it is not ready. Do not proceed until it is. For the eggs: if you forgot to pull them, submerge them in a bowl of warm (not hot) water for 10 minutes. That is enough to bring them to room temperature without cooking them.
Flour measuring — spoon and level only: Spoon the all-purpose flour into your measuring cup with a separate spoon and level it off with a straight edge. Do not dip the measuring cup directly into the flour bag — that method packs in 20–30% more flour than this recipe calls for and will produce a streusel that is dry and powdery rather than crumbly and clumped. For guaranteed accuracy, weigh the flour at 90g on a kitchen scale. Gram weight always takes priority over volume in this recipe.
Gram weight priority: Every ingredient in this recipe has a gram weight listed. Use a kitchen scale if you have one. The gram weights are what I tested with — they are the most reliable way to match the result shown in the photos.
Brown sugar check: The streusel uses packed light brown sugar. If your brown sugar has hardened into a solid block, place the amount you need in a microwave-safe bowl with a damp paper towel laid on top — not touching the sugar — and microwave in 20-second increments until it softens enough to pack. Do not over-soften it into a sticky paste. Hard-packed brown sugar that does not break up properly will produce uneven streusel clumps with pockets of undissolved sugar.
Mixing method: The crust and streusel require only a bowl and a fork or your fingertips — no electric mixer. The cheesecake filling requires a hand mixer or stand mixer fitted with the paddle attachment. Mixing the filling by hand will not get the cream cheese smooth enough, and lumps baked into a cheesecake filling do not smooth out in the oven.
Pan prep: Use an 8×8 inch (20×20cm) baking pan. Line it with parchment paper, leaving a 2-inch (5cm) overhang on at least two opposite sides — this is the sling that lifts the entire slab out of the pan cleanly after chilling. If you skip the parchment overhang, you will not be able to remove the bars without breaking the crust and cracking the cheesecake layer. A glass or ceramic pan works for this recipe — if using glass or ceramic, reduce the oven temperature by 25°F (15°C) because these materials retain heat longer and will overbrown the crust before the filling sets.
Oven position: Place your oven rack in the middle position before preheating. Top rack will overbrown the streusel before the cheesecake sets. Bottom rack will overbrown the crust.
No leavening in this recipe: There is no baking soda or baking powder in the cheesecake filling — this is intentional. Leavening in a cheesecake bar causes air expansion during baking that leads to cracking and a porous, uneven texture rather than the dense, smooth cross-section visible in the photos.
High-risk ingredient summary: Block cream cheese at room temperature. Cold butter for the streusel. Fresh blueberries, completely dry. These three points are where this recipe fails most often — every other step is straightforward.
Necessary Tools
Required:
- Kitchen scale (strongly recommended — gram weights are more accurate than volume for every component of this recipe)
- 8×8 inch (20×20cm) baking pan — glass, ceramic, or light-colored aluminum
- Parchment paper with overhang (mandatory for clean removal)
- Large mixing bowl (for crust and streusel)
- Medium mixing bowl (for blueberry layer)
- Hand mixer or stand mixer fitted with paddle attachment (for cheesecake filling only)
- Rubber or silicone spatula
- Fork or pastry cutter (for streusel)
- Measuring cups and spoons (or kitchen scale — scale preferred)
- Wire cooling rack
- Sharp chef’s knife (for slicing — a dull knife drags and breaks the cheesecake layer)
Optional but recommended:
- Oven thermometer — most home ovens run 15–25°F (8–14°C) off the dial. A cheesecake filling that bakes at 350°F instead of 325°F will overbake, crack, and turn slightly yellow before the center sets.
- Flat-bottomed measuring cup (for pressing the crust evenly into the pan)
- Microplane zester (for lemon zest — produces finer zest with less risk of catching the white pith)
How to Make Blueberry Crumble Cheesecake Bars
Step 1: The Oven and Pan Are Ready Before Anything Else
Preheat your oven to 325°F (163°C). Position the rack in the middle of the oven before turning it on — repositioning a hot rack wastes time and heat. Most home ovens run 15–25°F (8–14°C) hotter or cooler than the dial reads. If you have an oven thermometer, clip it to the middle rack and confirm the actual temperature before the pan goes in.
For this recipe, temperature precision matters more than it does for cookies — a cheesecake filling baking at 350°F instead of 325°F will overbake at the edges while the center is still liquid, and the result will crack and turn slightly yellow rather than staying the ivory-white shown in the cross-section photo.
Line your 8×8 inch (20×20cm) baking pan with parchment paper. Leave at least 2 inches (5cm) of overhang on two opposite sides. Press the parchment flat into the corners — creased corners cause the crust to bake unevenly along the edges. If using a glass or ceramic pan, reduce the oven temperature to 300°F (149°C) before you start — glass and ceramic retain heat longer than aluminum and will overbrown the graham crust before the cheesecake layer sets.
If you only have a dark non-stick pan — the type with a black or very dark grey interior coating — reduce the oven temperature by 25°F (15°C) as well. Dark pans absorb more radiant heat than light-colored aluminum and will overbrown the graham cracker crust before the cheesecake filling has time to set. The crust in the photos was baked in a light-colored aluminum pan — that is the standard for this recipe
⚠️ Baker’s Warning: If you skip the parchment overhang, you will not be able to lift the slab out of the pan after chilling. The cheesecake layer will crack when you try to cut bars directly in the pan, and the crust will break away from the filling at the edges. The parchment sling is not optional.
This recipe uses a three-phase baked method: a pre-baked press-in crust, a low-speed custard-style cheesecake filling, and a layered assembly bake. Each phase has a different mixing approach — no mixer for the crust and streusel, hand or stand mixer for the filling only.
The oven is preheating and the pan is lined — move immediately to the crust.
Step 2: The Crust Is Mixed, Pressed, and Pre-Baked
Add the 1½ cups (150g) of graham cracker crumbs and 2 tablespoons (25g) of granulated sugar to a large mixing bowl and stir them together with a fork until evenly combined. Pour in the 6 tablespoons (85g) of melted, slightly cooled unsalted butter and mix until every crumb is coated and the mixture holds together when you press a pinch between your fingers. It should feel like wet sand — not dry and dusty, not wet and sticky. If it feels dry, add melted butter ½ teaspoon at a time. If it feels greasy, your butter was too hot when you added it — the crumbs have absorbed the fat unevenly. Let the mixture sit for 2 minutes and test again before adjusting.
Tip the crumb mixture into the lined pan and spread it roughly with your fingers. Then use the flat bottom of a measuring cup or a smooth glass to press it into a firm, even layer across the entire base. Work from the center outward and press firmly into the corners — uneven crust thickness means some sections will overbake while others stay soft.
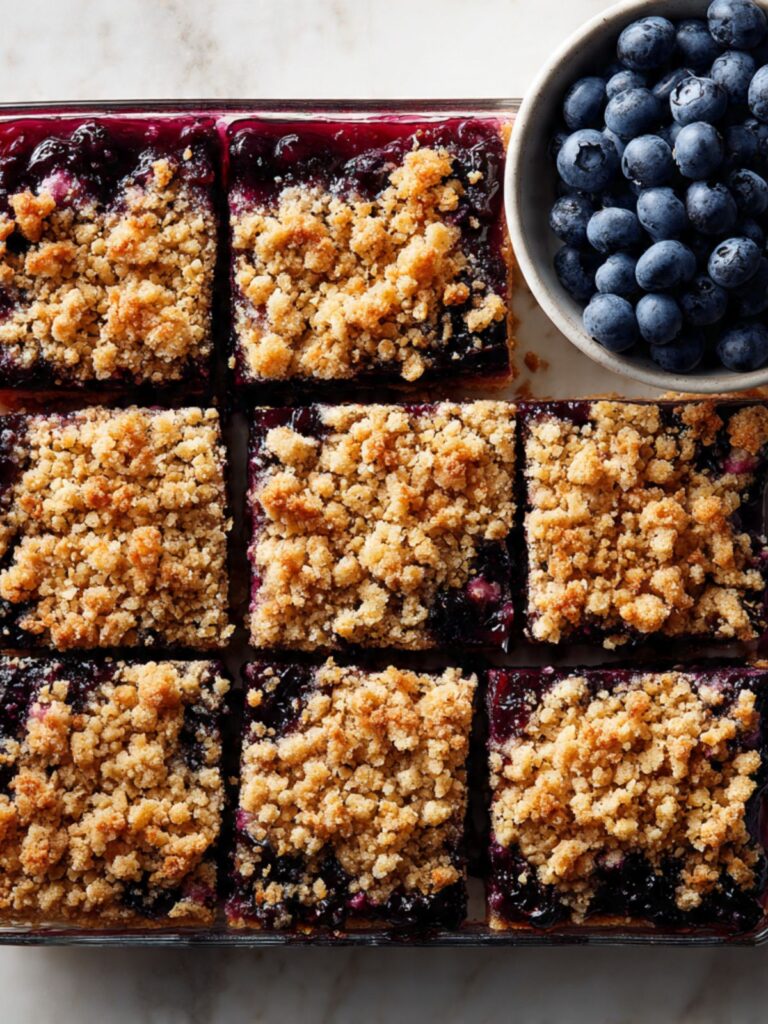
The finished crust should be uniformly compacted with no loose crumbs on the surface — dense and tight, pressed to the same depth across every corner. After baking you can see this base layer clearly at the edges of each bar in the overhead pan photo showing the finished 3×3 grid: a solid, even tan layer with no gaps or thin spots.
⚠️ Baker’s Warning: Do not press the crust up the sides of the pan. This recipe is a flat-base bar — a crust that climbs the sides will bake faster than the base and produce dry, overbrowned edges that crack when you try to slice the bars.
Bake the crust alone at 325°F (163°C) for 10 minutes until it looks set and smells faintly of toasted graham crackers. Pull it from the oven and set it on a wire rack. The crust does not need to cool completely before the filling goes in — 10 minutes on the rack while you mix the filling is enough. A slightly warm crust actually helps the cheesecake filling bond to the base rather than sitting on top of it.
The crust is done — start the cheesecake filling while it rests on the rack.
Step 3: The Cheesecake Filling Is Smooth Before Anything Else Goes In
This is the step where most cheesecake bars fail — not the baking, not the chilling, but the mixing sequence. Follow it exactly.
Place the 16oz (450g) of room-temperature full-fat block cream cheese in the bowl of your stand mixer fitted with the paddle attachment, or in a large bowl if using a hand mixer. Beat the cream cheese alone on medium speed for 2 full minutes until it is completely smooth with no lumps and the texture looks like thick whipped cream. Scrape down the sides and the bottom of the bowl with a silicone spatula — cream cheese hides in the gap between the blade and the bowl and will reappear as a lump in the finished filling if you do not find it now.
Add the ½ cup (100g) of granulated sugar and beat on medium speed for 1 minute until combined. Scrape the bowl again. Add the ¼ cup (60g) of room-temperature full-fat sour cream, 1 teaspoon (5ml) of pure vanilla extract, and 1 teaspoon (4g) of finely grated lemon zest. Beat on low speed for 30 seconds until just combined.
⚠️ Baker’s Warning: From this point forward, every addition goes in on low speed only. Do not increase the speed. Overmixing after the eggs go in incorporates air into the batter — that air expands in the oven and causes the cheesecake to puff, then collapse and crack as it cools. The dense, smooth, crack-free surface visible in the photos is the direct result of low-speed mixing after the eggs are added.
Add the 2 room-temperature large eggs one at a time on the lowest mixer speed. Add the first egg and mix only until the yellow disappears into the batter — approximately 15 seconds. Stop the mixer. Scrape the bowl. Add the second egg and repeat. Stop the mixer the moment the second egg is incorporated. The batter should look smooth, thick, and just slightly glossy — not airy, not foamy, not pale. If it looks foamy, you have overmixed. You can still bake it but expect a small amount of surface puffing and possible light cracking as it cools.
Pour the filling over the pre-baked crust in the pan. Use a spatula to spread it into an even layer that reaches the edges and corners. Tap the pan gently on the counter three times to release any air pockets sitting just under the surface.
The filling is in — move immediately to the blueberry layer before the filling has a chance to form a skin.
Step 4: The Blueberry Layer Goes On Raw, Not Cooked
Add the 1½ cups (225g) of fresh, completely dry blueberries to a medium bowl. Add the 3 tablespoons (37g) of granulated sugar, 1 tablespoon (8g) of cornstarch (also called cornflour outside the US), and 1 tablespoon (15ml) of fresh lemon juice. Toss everything together gently with a spoon until every berry is coated and no dry cornstarch remains visible at the bottom of the bowl. The mixture will look slightly syrupy from the lemon juice — this is correct.
⚠️ Baker’s Warning: Do not cook this mixture on the stovetop before adding it to the pan. Pre-cooking the blueberries produces a smooth, uniform jam layer — you lose the whole burst-berry texture visible in the close-up cross-section photo. The raw cornstarch activates in the oven and thickens the released berry juice into the glossy sauce during baking. The stovetop step is not needed and actively works against the result you are building toward.
Spoon the blueberry mixture evenly over the cheesecake filling in the pan. Do not stir it in. Do not press it down. Lay it on the surface in an even layer using the back of the spoon to distribute the berries so they cover the filling as completely as possible without gaps. Some berries will sit higher than others — that is fine and matches what is visible in the overhead pan photo.
The blueberry layer should cover the surface of the filling almost completely and be approximately ½ inch (1.25cm) deep across the pan — you are not looking for a thin scatter of berries, you are building a substantial fruit layer. In the close-up cross-section photo showing the single bar on the marble surface, the blueberry layer is roughly equal in height to the cheesecake filling below it. That depth requires the full 1½ cups (225g) — do not reduce the blueberry quantity or the layer will be thin and the visual balance of the bars will be off.
As you can see in the overhead pan shot showing the bars cut into a 3×3 grid, the blueberry layer sits directly on top of the cheesecake — not mixed into it. Keeping that separation during this step is what produces the clean layer boundary visible when the bars are sliced cold.
The blueberry layer is on — make the streusel immediately and get it on top before the berry mixture starts to weep liquid into the filling.
Step 5: The Streusel Goes On Cold and Stays That Way
Add the ¾ cup (90g) of all-purpose flour, ⅓ cup (65g) of packed light brown sugar, and ¼ teaspoon of fine sea salt to a medium bowl and stir briefly with a fork to combine. Add the 4 tablespoons (55g) of cold cubed unsalted butter.
Work the butter into the flour mixture using your fingertips — press each cube of butter flat between your thumb and index finger, then rub it into the flour with a quick pinching motion. Work fast. The goal is pea-to-chickpea-sized clumps with some fine sandy bits between them. Stop when the mixture looks like irregular crumbs with visible butter pieces throughout — this is exactly the texture that produces the clumped golden streusel visible in the photos. Do not overwork it into a smooth paste. If the butter starts to feel greasy and warm from your hands, put the bowl in the fridge for 5 minutes before continuing.
⚠️ Baker’s Warning: Room temperature butter in a streusel does not produce clumps — it produces a paste that spreads flat in the oven and bakes into a solid sheet rather than the loose, textured topping shown in the photos. If your streusel looks smooth and doughy before it goes on the bars, your butter was too warm. Scrape it off, refrigerate the mixture for 15 minutes, and work it again with cold hands.
Scatter the streusel evenly over the blueberry layer. Do not press it down — drop it in loose pinches from above so the clumps land naturally and stay intact. Some of the blueberry layer will be visible between the streusel pieces, exactly as shown in the overhead pan photo.
🗒 Luna’s Note: I always make my streusel last and get it onto the bars immediately. The moment the blueberry mixture starts releasing juice into the filling, the surface becomes wet and the streusel sinks rather than sitting on top. Making it in order — crust, filling, berries, streusel — keeps everything in the right place.
The pan is assembled — it goes straight into the oven now.
Step 6: The Bake Is Low, Slow, and Watched Carefully
Place the assembled pan on the middle rack of your preheated 325°F (163°C) oven. Bake for 40 to 45 minutes. Start checking at 40 minutes.
The bars are done when: the streusel is a warm medium golden across the surface — the tops of the clumps are golden and the base of each clump where it meets the blueberry layer has deepened to a slightly darker amber, exactly as visible in the overhead pan photo showing the finished bars, the blueberry layer is visibly bubbling at the edges of the pan, and the cheesecake center has a distinct, uniform jiggle — approximately 2 to 3 inches (5 to 7.5cm) of movement — when you gently shake the pan. The edges of the cheesecake should look fully set and opaque. The center should look slightly underdone and glossy. This is the correct pull moment.
As you can see in the stacked bar photo showing the clean ivory cheesecake layer against the dark blueberry filling, the cheesecake bakes to a warm ivory-white with no browning — that color is only achievable at 325°F (163°C) or lower with a jiggle-pull. Waiting for the center to look fully firm before pulling the pan will produce a cheesecake that is slightly yellowed, slightly rubbery at the edges, and cracked across the surface as it cools.
If you want to remove the guesswork entirely: insert an instant-read thermometer into the center of the cheesecake layer — avoid pushing through to the crust. The correct pull temperature is 150°F (65°C) at the center. Below 145°F (63°C) and the filling is underset. Above 160°F (71°C) and it is overbaked and will be slightly rubbery after chilling.
⚠️ Baker’s Warning: Do not open the oven door before 35 minutes. The sudden temperature drop in the first half of the bake will cause the cheesecake layer to sink in the center before it has developed enough structure to recover. Set a timer and walk away.
Pull the pan at the jiggle moment. The center will continue to set as the bars cool — this is carryover cooking at work. The residual heat stored in the graham cracker crust, the pan walls, and the filling itself continues to cook the cheesecake center for approximately 15 to 20 minutes after the oven is off. If you wait for a firm center in the oven, the carryover heat will push it past done and into the rubbery, overbaked range.
The pan comes out of the oven and goes directly onto the wire rack — do not put it on a cold surface.
Step 7: The Cooling and Chilling Sequence Cannot Be Rushed
This step has three stages. Skipping any one of them produces a different failure.
Stage 1 — Wire rack, oven off, door ajar: 1 hour. The moment the pan comes out of the oven, turn the oven off and prop the door open with a wooden spoon. Let the bars cool on the wire rack at room temperature for 1 full hour. Do not move the pan to a cold surface during this time — a sudden temperature drop causes the cheesecake to contract too quickly and crack across the surface.
Stage 2 — Wire rack, room temperature: 1 additional hour. After the first hour, close the oven door and continue cooling on the wire rack at room temperature for another hour. At the end of Stage 2, the pan should be close to room temperature when you touch the sides.
Stage 3 — Refrigerator, uncovered: minimum 4 hours, preferably overnight. Transfer the pan to the refrigerator uncovered for the first 30 minutes — covering immediately traps condensation on the streusel surface and makes it soggy. After 30 minutes, cover loosely with plastic wrap and refrigerate for a minimum of 4 hours. Overnight refrigeration is significantly better. The cheesecake layer continues to firm and set during refrigeration, and the layer separation between the blueberry filling and the cream cheese becomes more defined the longer the bars chill.
⚠️ Baker’s Warning: Do not cut the bars before the full 4-hour chill. The cheesecake center will still be soft underneath the surface, and the knife will drag the blueberry layer into the cheesecake filling, collapsing the layer separation that makes these bars look exactly as shown. Cut too early and you have a messy, gummy result — cut cold and you get the clean ivory-against-violet cross-section visible in the photos.
When ready to slice: lift the entire slab out of the pan using the parchment overhang. Place it on a cutting board. Use a sharp chef’s knife — wipe the blade clean with a damp cloth between every single cut. A blade with blueberry residue from the previous cut will drag through the cheesecake layer and smear the cross-section. Cut into a 3×3 grid for 9 bars of equal size, approximately 2.5×2.5 inches each.
Each bar weighs approximately 155–165g depending on how evenly the streusel and blueberry layer distributed across the pan during baking. Weigh the first bar after cutting — if it is significantly over 175g, your cuts are uneven and the last bar will be noticeably smaller. Adjust the remaining cuts before completing the grid.
The bars are sliced — they are ready to serve cold, or return them to the refrigerator until needed.
The Science Behind Blueberry Crumble Cheesecake Bars
Why the Cream Cheese Temperature Changes Everything
I noticed this before I fully understood it. My first batch used cream cheese I had pulled from the fridge only 30 minutes before mixing. The batter looked smooth in the bowl — no obvious lumps, nothing alarming. But when the bars came out of the oven and I cut into them cold, there were small dense white specks throughout the cheesecake layer. Not visible on the surface. Not detectable until the knife went through. Those specks were incompletely incorporated cream cheese that had been cold when it hit the mixer, formed a skin against the paddle, and stayed that way through the entire bake.
The science behind it: cream cheese is an emulsion — fat, water, and protein held together in a stable structure by the manufacturing process. When cream cheese is cold, that structure is rigid and the fat molecules are tightly packed. A mixer paddle working against cold cream cheese breaks the surface but cannot penetrate the interior of each piece evenly. The result is a batter that looks homogeneous but contains micro-pockets of incompletely broken-down cheese protein. Those pockets bake at a different rate than the surrounding filling and show up as dense, slightly grainy specks in the finished bar.
At room temperature — after 2 full hours on the counter — the fat in the cream cheese softens and the protein network becomes flexible. The paddle can now work through the entire mass evenly, producing a batter that is genuinely smooth at the molecular level. That smoothness is what you see in the cross-section photo: the ivory cheesecake layer is completely uniform, no specks, no variation in density from edge to center. Two hours of counter time is not a suggestion. It is the difference between those two results.
What Cornstarch Is Actually Doing in the Blueberry Layer
Most people think of cornstarch as a thickener — something you use to tighten a runny sauce. That is true, but it is only half of what is happening in this recipe.
When fresh blueberries are tossed in cornstarch and sugar and placed raw over the cheesecake filling, two things happen simultaneously in the oven. First, the heat draws moisture out of the berries — the same osmotic process that happens when you macerate fruit in sugar. That released liquid dissolves the cornstarch. Second, as the temperature rises past 203°F (95°C), the cornstarch granules absorb the berry liquid, swell, and gelatinize — a process called starch gelatinization. The result is the glossy, thick fruit sauce visible in the cross-section photo: dark indigo, viscous, holding the burst berries in place rather than running into the cheesecake layer below.
The reason this works in a raw application — without pre-cooking on the stovetop — is that the oven provides both the heat and the time for the starch to fully activate. A pre-cooked blueberry layer would have already gelatinized before it went into the pan, producing a uniform smooth jam that bakes into a flat, textureless stripe. The raw application preserves the whole berry structure until the oven bursts the skins, which is why the berries in these bars look burst but intact — not dissolved, not mushy — exactly as shown.
If you enjoy making other bar-style desserts, this same cornstarch principle applies to my chocolate chip cookie bars — understanding how starches behave under heat is one of the most transferable skills in baking.
One small note: I use tapioca starch in fruit pies but cornstarch in cheesecake bar fillings. Tapioca produces a slightly glossier, more elastic gel that works beautifully in a pie where the filling needs to hold a clean slice when the pie is cold. In a cheesecake bar where the starch is working at a thinner ratio distributed across berries rather than a full filling — cornstarch is easier to control and produces a less rubbery texture at the edges where the sauce concentrates. It is a small distinction but it is the one I keep coming back to.
Why Low-Speed Mixing Produces a Crack-Free Surface
Cheesecake cracks. Everyone knows this. Most recipes blame the oven temperature or the cooling speed — and those factors matter — but the crack almost always starts at the mixing stage, long before the pan goes into the oven.
Cream cheese batter is a protein-and-fat emulsion. When you mix it at high speed, you do two things: you incorporate air bubbles into the fat matrix, and you develop the protein structure more aggressively than a cheesecake filling needs. Both of these work against you. The air bubbles expand in the oven heat and cause the filling to puff above the pan rim — you can see this happening through the oven door if you watch. As the bars cool, that puff deflates. The surface contracts faster than the interior can accommodate, and the tension between the deflating surface and the still-warm center produces a crack.
Low-speed mixing after the eggs are added — 15 seconds per egg at the lowest mixer setting — incorporates the eggs without adding meaningful aeration. The batter stays dense. It bakes without puffing. It cools without the surface tension that causes cracking. The flat, uncracked surface visible in the overhead pan photo is the direct result of this mixing discipline. There is no water bath in this bar recipe — unlike a full springform cheesecake, the shallow bar format distributes heat evenly enough that a water bath is not necessary. The low-speed mixing does the work the water bath would otherwise do.
Blueberry Crumble Cheesecake Bars Troubleshooting & Pro-Tips
Common Mistakes
1. Wrong cream cheese type or temperature — the filling is lumpy, grainy, or does not set cleanly
Symptom: The cheesecake layer has visible white specks or a slightly grainy texture when cut cold. Or the filling slumps and spreads when the bars are lifted out of the pan.
Cause: Spreadable tub cream cheese was used instead of full-fat block, or the block cream cheese was not fully at room temperature before mixing. Tub cream cheese has a higher water content and will not set to the dense, sliceable texture shown in the photos. Cold block cream cheese forms micro-pockets of incompletely blended protein that bake into visible dense specks.
Fix: If the bars are already baked and the texture is grainy but the bars are otherwise set — they are still edible and the flavor is unaffected. Serve them cold and the texture difference is less noticeable. If the filling slumped and the bars will not hold their shape — press the pieces into small ramekins, top with whipped cream and fresh blueberries, and serve as a deconstructed cheesecake cup. The flavor is identical.
Prevention: Full-fat block cream cheese only. Two full hours at room temperature minimum. Press your finger into the block before mixing — it should leave a clean indent with zero resistance. If there is any firmness at the center, wait longer.
2. Wrong pan size or missing parchment overhang — bars will not release cleanly
Symptom: The bars crack and break when you try to remove them from the pan, or the crust separates from the cheesecake layer at the edges.
Cause: A larger pan — 9×9 or 9×13 — produces thinner bars that overbake before the cheesecake center sets. A smaller pan produces bars that are too thick and take significantly longer to set in the center. Missing parchment overhang means there is no way to lift the slab cleanly.
Fix: If the bars are already broken in the pan — scoop them into serving glasses, layer with extra blueberries and whipped cream, and serve as a parfait. The cheesecake layer still tastes exactly right. It just will not look like the photos.
Prevention: 8×8 inch (20×20cm) pan only. Parchment with a 2-inch overhang on two opposite sides, pressed flat into the corners. Test the overhang before you add the crust — lift the parchment and confirm it gives you enough grip to pull the slab out cleanly.
3. Cheesecake layer is cracked across the surface
Symptom: A visible crack runs across the top of the cheesecake layer after cooling — either a single line or a spider-web pattern radiating from the center.
Cause: Overmixing after the eggs were added incorporated air into the batter, which puffed during baking and cracked as it deflated during cooling. Less commonly: oven temperature was too high, or the bars were moved to a cold surface immediately after pulling from the oven.
Fix: A crack in the cheesecake layer does not affect flavor at all. The blueberry layer and streusel topping cover the surface completely — once the bars are assembled and chilled, the crack is completely invisible. Serve them as normal.
Prevention: Low speed only after the eggs go in. 15 seconds per egg maximum. Cool on the wire rack at room temperature for 2 full hours before refrigerating — never move a hot pan directly to a cold surface or the refrigerator.
4. Blueberry layer runs into the cheesecake filling and the layers are not distinct
Symptom: When the bars are sliced cold, the blueberry and cheesecake layers are blurred together at the boundary — a grey-violet smear rather than a clean line.
Cause: One of three things happened: the blueberries were frozen and released too much water during baking, the cornstarch was skipped or under-measured, or the bars were cut before the full chill time.
Fix: If the layers are blurred but the bars are otherwise set — the flavor is completely intact. Serve them as-is. The cross-section will not look like the photos but the taste is the same.
Prevention: Fresh blueberries only, completely dry before tossing. Full tablespoon of cornstarch — do not reduce it. Minimum 4-hour chill before cutting, overnight preferred. Wipe the knife blade between every cut.
5. Streusel topping is flat, sandy, or baked into a solid sheet instead of clumps
Symptom: The streusel does not have the irregular, clumped texture visible in the photos — it looks like a smooth, flat layer of browned crumbs instead of distinct golden pebbles.
Cause: The butter was too warm when the streusel was made. Room temperature or warm butter produces a paste that spreads flat in the oven rather than holding its shape as distinct clumps.
Fix: Flat streusel still tastes correct — it is a textural issue only. If it baked into a solid sheet, let the bars chill completely, then use a fork to break the solid streusel sheet into rough irregular pieces before serving — this restores some of the visual variety even if the texture is slightly more uniform than the photos show. Alternatively, crumble the broken streusel pieces over each plated bar individually at the moment of serving and add a small handful of fresh blueberries on top — the result reads as intentional and looks considerably better than a flat solid topping.
Prevention: Cold butter only, cut into cubes and returned to the fridge for 10 minutes after cubing if your kitchen is warm. Work the streusel quickly with cold fingertips. If the mixture feels greasy and warm before it goes on the bars, refrigerate it for 15 minutes and work it again.
6. Crust is soggy or separates from the cheesecake layer
Symptom: The graham cracker crust feels wet and soft when the bars are sliced cold, or it pulls away from the cheesecake filling as a separate crumbling layer.
Cause: The crust was not pre-baked before the filling was added, or the butter was too hot when mixed with the crumbs and produced a greasy base that did not bind properly. Less commonly: the bars were stored covered immediately after baking, trapping steam against the crust.
Fix: A soft crust does not affect the flavor of the bars. Press the sliced bars flat onto a plate and serve them with the crust side up — the texture difference is less noticeable when the crust layer is not the base.
Prevention: Always pre-bake the crust for 10 minutes at 325°F (163°C) before adding any filling. Let the melted butter cool for 5 minutes before mixing with the crumbs. After baking, leave the pan uncovered for the first 30 minutes of refrigeration before covering with plastic wrap.
7. Bars are difficult to cut cleanly — the cheesecake layer drags and smears
Symptom: The knife pulls through the cheesecake filling rather than cutting through it cleanly, smearing the blueberry layer into the white filling and producing ragged edges instead of the clean cross-section visible in the photos.
Cause: The bars were not chilled long enough, or the knife was not wiped clean between cuts, or a serrated knife was used instead of a straight chef’s knife.
Fix: If the bars are already cut and the edges are messy — they taste identical. For presentation, press a clean spatula against each cut edge to smooth it slightly.
Prevention: Minimum 4-hour chill, overnight preferred. Sharp straight-edged chef’s knife only — serrated knives tear rather than slice through the dense cheesecake layer. Wipe the blade with a damp cloth after every single cut, including the first one.
8. Altitude and humidity adjustments
High humidity (above 70% relative humidity): The graham cracker crust may feel tacky on the surface even after the full chill — this is surface moisture from the air absorbing into the crumbs, not underbaking. Store the bars in a lidded container to minimize exposure. The streusel topping will soften faster in humid conditions — serve within 24 hours of baking for the best streusel texture.
High altitude (above 3,500 feet / 1,067 meters): The cheesecake filling may puff more than expected during baking and take slightly longer to reach the jiggle stage. Reduce the oven temperature by 15°F (8°C) and increase the bake time by 5 to 8 minutes. Check the jiggle test rather than relying on the time range — the center 2 to 3 inches should still jiggle uniformly when the pan is gently shaken.
Expert Pro-Tips
Pro-Tip 1 — Use the parchment sling to check the crust before filling. After pressing the crust into the pan, lift the parchment slightly by the overhang to confirm the crust does not stick to the pan base. If it releases cleanly, the butter ratio is correct. If it sticks, the crust needs another 30 seconds of pressing and a light spray of non-stick spray under the parchment before it goes back in.
Pro-Tip 2 — Dry the blueberries thoroughly or the cornstarch will not distribute evenly. After rinsing, spread the blueberries in a single layer on a clean kitchen towel and let them air-dry for at least 10 minutes. Surface water on the berries dilutes the cornstarch before it can coat the fruit evenly, which produces an uneven sauce during baking — thick in some places, watery in others. Dry berries produce the uniform glossy layer visible in the photos.
Pro-Tip 3 — Score the cut lines before lifting the slab out of the pan. While the slab is still in the pan and cold, use a sharp knife to score the cut lines lightly — just enough to mark the surface without cutting all the way through. Then lift the slab out using the parchment overhang and complete the cuts on the board. Scoring in the pan gives you a straight-line guide and prevents the slab from shifting during the full cut.
Pro-Tip 4 — The overnight chill is not just about setting — it improves the flavor. The lemon zest in the cheesecake filling and the lemon juice in the blueberry layer both intensify overnight as the flavors meld together in the cold. A bar eaten 4 hours after baking tastes good. The same bar eaten the next morning tastes noticeably more developed — the citrus brightness sharpens, the blueberry layer deepens, and the cheesecake flavor becomes cleaner and more pronounced. If you can make these the night before serving, do it.
🗒 Luna’s Note: I use a ruler the first time I make any new bar recipe. It sounds overly precise but a 3×3 grid on an 8×8 pan only gives you clean equal bars if your first cut is exactly centered. Off by half an inch on the first cut and the last bar is noticeably smaller than the rest. One measurement, nine equal bars.
How to Store Blueberry Crumble Cheesecake Bars
Room Temperature
These bars cannot be stored at room temperature for any meaningful length of time. The cream cheese filling is a dairy-based custard — it enters the food safety danger zone (above 40°F / 4°C) within 2 hours at room temperature. Pull them from the refrigerator immediately before serving and return any uneaten bars to the fridge within 2 hours. On a warm day or in a warm kitchen, reduce that window to 1 hour.
The streusel topping also softens quickly at room temperature — the crisp, clumped texture visible in the photos begins to lose its structure within an hour of leaving the refrigerator in anything warmer than a cool kitchen. Serve cold and serve promptly.
Refrigerator
Store the bars in a single layer in a hard-sided lidded container — not a zip-lock bag, which compresses the streusel topping and causes it to flatten against the cheesecake layer. Place a sheet of parchment paper between layers if stacking is necessary, though a single layer is strongly preferred to keep the streusel intact.
Do not wrap individual bars directly in plastic wrap while the streusel is still intact — the plastic presses against the topping and pulls the crumble pieces off when unwrapped. If you need to wrap individual bars for portability, let the streusel set firmly in the fridge for at least 6 hours first, then wrap loosely.
Refrigerator duration: up to 5 days. The bars are at their textural peak on Day 1 and Day 2 — the streusel is crispest, the layer separation is most defined, and the cheesecake is at its densest and cleanest. By Day 3 the streusel begins to absorb moisture from the blueberry layer and softens slightly — still very good, but the texture contrast between the crunchy topping and the dense cheesecake is less pronounced. By Day 4 and 5 the streusel is soft throughout and the blueberry layer has bled a deeper violet into the cheesecake interface — the flavor remains intact but the visual cross-section is less defined. Still worth eating. Not worth photographing.
🗒 Luna’s Note: I actually prefer these on Day 2. The lemon zest and blueberry flavors have had an extra night to settle into the cheesecake filling and the whole bar tastes more cohesive. Day 1 is good. Day 2 is the version I would serve to someone I was trying to impress.
Freezer — Baked Bars
These bars freeze well, with one caveat: the streusel topping loses most of its crisp texture during freezing and thawing. The flavor is completely preserved but the topping goes from clumped and slightly crunchy to soft and sandy after a freeze-thaw cycle. If the streusel texture is important to you, freeze the bars without the topping and add fresh streusel after thawing — bake at 350°F (175°C) for 8 to 10 minutes to crisp it up.
To freeze baked bars: Cut the bars into individual portions first. Wrap each bar individually in a layer of plastic wrap — wrap tightly enough to exclude air but not so tightly that you compress the streusel. Place the individually wrapped bars in a single layer in a freezer-safe zip-lock bag or hard-sided freezer container. Freeze for up to 2 months.
To thaw: Transfer the wrapped bars from the freezer to the refrigerator and thaw overnight — minimum 8 hours. Do not thaw at room temperature. The cream cheese filling thaws unevenly at room temperature and the outer edges soften while the center is still frozen, which breaks the texture of the cheesecake layer. Unwrap after thawing completely — unwrapping while still partially frozen tears the cheesecake surface.
Texture after thawing: The cheesecake filling and blueberry layer both thaw well — the density and flavor are very close to fresh. The graham cracker crust may be slightly more crumbly after freezing than it was fresh, but it holds together well enough to eat as a bar. The streusel, as noted above, will be soft. Acceptable for a weeknight dessert, not ideal for serving to guests.
Freezer — Unbaked Components
The assembled unbaked bars do not freeze well — the raw cheesecake filling changes texture when frozen before baking and produces a slightly grainy result after baking from frozen. Do not attempt to freeze the assembled pan before baking.
Individual components can be made ahead separately:
Graham cracker crust: Pre-bake the crust, cool completely, wrap the entire pan tightly in plastic wrap, and freeze for up to 1 month. Thaw at room temperature for 30 minutes before adding the filling — no re-baking needed.
Streusel: Make the streusel and freeze it in a zip-lock bag for up to 1 month. Use directly from frozen — scatter the frozen streusel over the blueberry layer before baking. No thawing needed and the cold temperature actually helps it hold its clumped shape during the bake.
Serving Suggestion
Serve these bars cold — pulled directly from the refrigerator, not brought to room temperature first. The cheesecake layer is at its densest and most sliceable when cold, and the contrast between the firm cream cheese filling, the glossy jammy blueberry layer, and the sandy streusel topping is most defined when everything is still cold and set. Bringing them to room temperature softens the cheesecake layer slightly and the blueberry filling becomes runnier at the boundary — the bars are still good but they lose the clean structural quality that makes them worth making in the first place.
I serve these with a strong black coffee or an unsweetened Earl Grey. The blueberry layer is quite sweet and the lemon brightness in the filling needs something bitter alongside it to balance — milk-based drinks compete with the cream cheese flavor rather than cutting through it.
These are the bars I make when someone asks me to bring a dessert and I want it to look like I spent more time than I did. The cross-section does the work. You cut the bars cold, plate them on their side so the layers are facing up, and they look like something from a bakery case. The actual active time is under 30 minutes — the rest is waiting.
Day 2 note: the bars that sit overnight in the refrigerator are measurably better than the bars served on Day 1. The lemon zest flavor blooms further into the cream cheese filling, the blueberry layer deepens and becomes more jammy, and the streusel has had time to absorb just enough moisture from the fruit layer to soften its base while keeping its surface crunch. If you are making these for an occasion, bake them the night before. Do not bake them the morning of.
The one thing these bars are not good for: transporting long distances or serving outdoors in warm weather. The cream cheese filling softens quickly above 65°F (18°C) and the bars will not hold their shape if left out on a warm table. These belong on a refrigerated platter or served immediately from the kitchen.
Frequently Asked Questions About Blueberry Crumble Cheesecake Bars
Can I use frozen blueberries instead of fresh?
You can, with adjustments. Do not thaw the frozen blueberries before using them — add them directly from frozen. Thawed frozen blueberries are waterlogged and will flood the cheesecake layer with purple-tinted liquid, destroying the layer separation visible in the photos. When using frozen berries straight from the freezer, increase the cornstarch from 1 tablespoon (8g) to 2 tablespoons (16g) to compensate for the additional liquid they release during baking. The layer boundary will be slightly less defined than with fresh berries — the blueberry sauce will bleed a little further into the cheesecake interface — but the flavor is very close. Fresh blueberries produce the cleaner visual result shown in the photos. Frozen is an acceptable substitute when fresh are out of season.
Can I make these blueberry cheesecake bars ahead of time?
Yes — and you should. These bars are genuinely better on Day 2 than Day 1. The lemon zest in the filling and the lemon juice in the blueberry layer both intensify overnight as the flavors meld in the cold. Bake the bars, cool them through the full two-stage room temperature process, then refrigerate overnight before cutting and serving. Do not cut them before chilling — the cheesecake layer needs the full overnight rest to reach its densest, most sliceable texture. Baked and uncut bars keep in the refrigerator for up to 5 days, so you can make them up to 4 days ahead of when you need them and cut them the morning of serving. Store uncut in the pan with the parchment still in place, covered loosely with plastic wrap.
Why did my cheesecake layer crack?
Three possible causes, in order of likelihood. First — overmixing after the eggs were added. High-speed mixing incorporates air into the cream cheese batter, that air expands during baking causing the filling to puff, and as it cools the surface contracts faster than the interior and cracks under the tension. The fix is low speed only after the eggs go in, 15 seconds per egg maximum.
Second — oven temperature too high. At temperatures above 340°F (171°C), the edges of the cheesecake filling set and pull inward before the center has finished cooking, and the tension between the set edges and the still-liquid center produces a crack. Confirm your oven temperature with a thermometer before baking.
Third — cooling too quickly. Moving a hot pan directly to a cold surface or into the refrigerator causes rapid surface contraction. Always cool on a wire rack at room temperature for 2 full hours before refrigerating. A cracked surface does not affect flavor — the blueberry and streusel layers cover it completely once the bars are assembled and chilled.
Can I substitute the graham cracker crust with something else?
Yes. Three reliable alternatives. Digestive biscuits produce a slightly less sweet, more neutral crust that works well if you prefer the blueberry layer to carry more of the flavor. Use the same weight — 150g — processed to fine crumbs with the same butter and sugar quantities. Vanilla wafers produce a sweeter, more delicate crust that complements the lemon zest in the filling — process to fine crumbs and use the same ratios. Golden Oreos with the filling scraped out produce a crispier, more buttery crust — reduce the butter to 5 tablespoons (70g) because the cookies already contain more fat than graham crackers. All three alternatives should be pre-baked for the same 10 minutes at 325°F (163°C).
Do not use a shortbread crust for this recipe — shortbread softens significantly when it absorbs moisture from the cheesecake filling and loses its structural integrity after chilling, which means the bars will not hold their shape when lifted from the pan.
How do I know when the cheesecake bars are done baking?
The jiggle test is the only reliable doneness cue for this recipe — do not rely on color or time alone. At 40 to 45 minutes, open the oven and gently shake the pan. The streusel should be pale-to-medium golden across the surface. The blueberry layer should be visibly bubbling at the edges of the pan. The cheesecake layer should have a distinct, uniform jiggle of approximately 2 to 3 inches (5 to 7.5cm) in the center when the pan moves — the edges should look fully set and opaque, and only the center area should be moving. If the entire surface jiggles like liquid, it needs more time — return it to the oven for 5 more minutes and check again. If there is no jiggle at all and the surface looks fully set and opaque throughout, it is overbaked — pull it immediately and expect a slightly denser, firmer texture after chilling. The internal temperature of a correctly baked cheesecake bar at this stage should read approximately 150°F (65°C) at the center on an instant-read thermometer if you want to remove all guesswork.
Can I double this blueberry crumble cheesecake bars recipe?
You can double all ingredients and bake in two separate 8×8 inch (20×20cm) pans simultaneously, placed side by side on the middle rack. This recipe contains no baking soda or baking powder — there is no leavening to adjust when scaling. Every ingredient in this recipe scales linearly at 2× with no modifications to ratios.
Do not attempt to bake a doubled recipe in a single 9×13 inch pan — the increased depth of the cheesecake layer changes the bake time significantly and produces a filling that is still liquid at the center when the edges are already overbaked. If using two pans, rotate them front to back at the 25-minute mark for even browning across both. The bake time for two pans is identical to one — 40 to 45 minutes.
For larger gatherings, you can also explore my peanut butter chocolate chip bars which scale more easily to a 9×13 format if you need a higher yield from a single pan.
Do these bars work at high altitude or in very humid conditions?
At high altitude above 3,500 feet (1,067 meters): the cheesecake filling may puff more than expected during baking and take longer to reach the jiggle stage because liquids evaporate more quickly and leavening — even the natural CO2 released from the eggs — expands faster at lower atmospheric pressure. Reduce the oven temperature to 310°F (154°C) and increase the bake time by 5 to 8 minutes. Use the jiggle test as your primary doneness cue rather than the time range. The streusel may brown faster at altitude — check it at 35 minutes and tent loosely with foil if it is coloring too quickly before the cheesecake has set.
In high humidity above 70% relative humidity: the graham cracker crust and streusel topping both absorb ambient moisture more quickly than in a dry climate. Serve the bars within 24 hours of baking for the best streusel texture. Store in a hard-sided lidded container rather than loosely covered — exposure to humid air accelerates the softening of both the crust and the crumble topping. The cheesecake filling and blueberry layer are unaffected by humidity.
More Recipes You’ll Love
If these blueberry crumble cheesecake bars hit the right note for you — the combination of a buttery pressed crust, a rich filling, and a fruit and crumble topping — these are the bars I would make next:
- Oatmeal Chocolate Chip Bars — a chewier, heartier bar with rolled oats in the dough and pools of melted chocolate throughout. The oat texture gives these a different bite than a standard cookie bar and they hold up better at room temperature than the cheesecake bars.
- Salted Caramel Chocolate Chip Cookie Bars — the same cookie bar base with a layer of salted caramel baked into the center. The layered construction is the closest in spirit to these blueberry bars — a distinct filling layer sandwiched between dough — and the contrast between the salty caramel and the sweet cookie dough is worth making at least once.
Blueberry Crumble Cheesecake Bars Recipe
Ingredients
Equipment
Method
- Preheat oven to 325°F (163°C) and position the rack in the middle of the oven. Line an 8×8 inch (20×20cm) baking pan with parchment paper leaving a 2-inch overhang on two opposite sides. If using glass or ceramic, reduce oven temperature to 300°F (149°C).
- Mix graham cracker crumbs and granulated sugar together in a large bowl. Pour in the melted cooled butter and mix until every crumb is coated and the mixture holds together when pressed. Press firmly into an even layer in the bottom of the lined pan using the flat bottom of a measuring cup.
- Bake the crust alone at 325°F (163°C) for 10 minutes until set. Remove from oven and place on a wire rack while you prepare the filling. Leave oven on.
- Beat the room-temperature block cream cheese in a stand mixer fitted with the paddle attachment on medium speed for 2 full minutes until completely smooth with no lumps. Scrape the bowl thoroughly.
- Add the granulated sugar and beat on medium speed for 1 minute. Scrape the bowl. Add the sour cream, vanilla extract, and lemon zest and beat on low speed for 30 seconds until just combined.
- Add the eggs one at a time on the lowest mixer speed, mixing only until the yellow disappears after each addition — approximately 15 seconds per egg. Do not overmix. Pour the filling over the warm crust and spread to the edges with a spatula. Tap the pan gently on the counter three times.
- Toss the fresh blueberries with granulated sugar, cornstarch, and fresh lemon juice in a medium bowl until every berry is evenly coated. Spoon the blueberry mixture evenly over the cheesecake filling in an even layer without stirring or pressing it in.
- Combine the flour, brown sugar, and salt for the streusel in a medium bowl. Add the cold cubed butter and work it into the flour mixture with your fingertips until the mixture forms irregular pea-to-chickpea-sized clumps with some sandy bits between them. Scatter the streusel evenly over the blueberry layer without pressing it down.
- Bake at 325°F (163°C) for 40 to 45 minutes until the streusel is pale golden, the blueberry layer is bubbling at the edges, and the cheesecake center has a uniform jiggle of 2 to 3 inches when the pan is gently shaken. Do not open the oven before 35 minutes.
- Remove from oven and cool on a wire rack at room temperature for 2 full hours. Do not move to a cold surface or refrigerate during this time.
- Transfer to the refrigerator uncovered for 30 minutes, then cover loosely with plastic wrap and refrigerate for a minimum of 4 hours, preferably overnight, before cutting.
- Lift the slab from the pan using the parchment overhang and place on a cutting board. Use a sharp chef’s knife, wiping the blade clean with a damp cloth between every cut, and slice into a 3×3 grid for 9 equal bars. Serve cold.