
Lemon Cream Cheese Dump Cake Recipe
The first time I made this, I pulled it out of the oven too early. The center looked done — browned on top, bubbling at the edges. I cut into it after ten minutes and the whole thing collapsed into a warm, soupy mess on the plate. Not in a charming way. In a “this is not the recipe” way.
The second batch I overbaked. The lemon filling absorbed completely into the cake layer and the cream cheese dried out at the edges. The molten center — the entire reason to make this — was gone.
Batch three was the one. Forty-seven minutes, center still wobbling when I pulled it, thirty minutes of cooling before I touched it. That is the recipe.
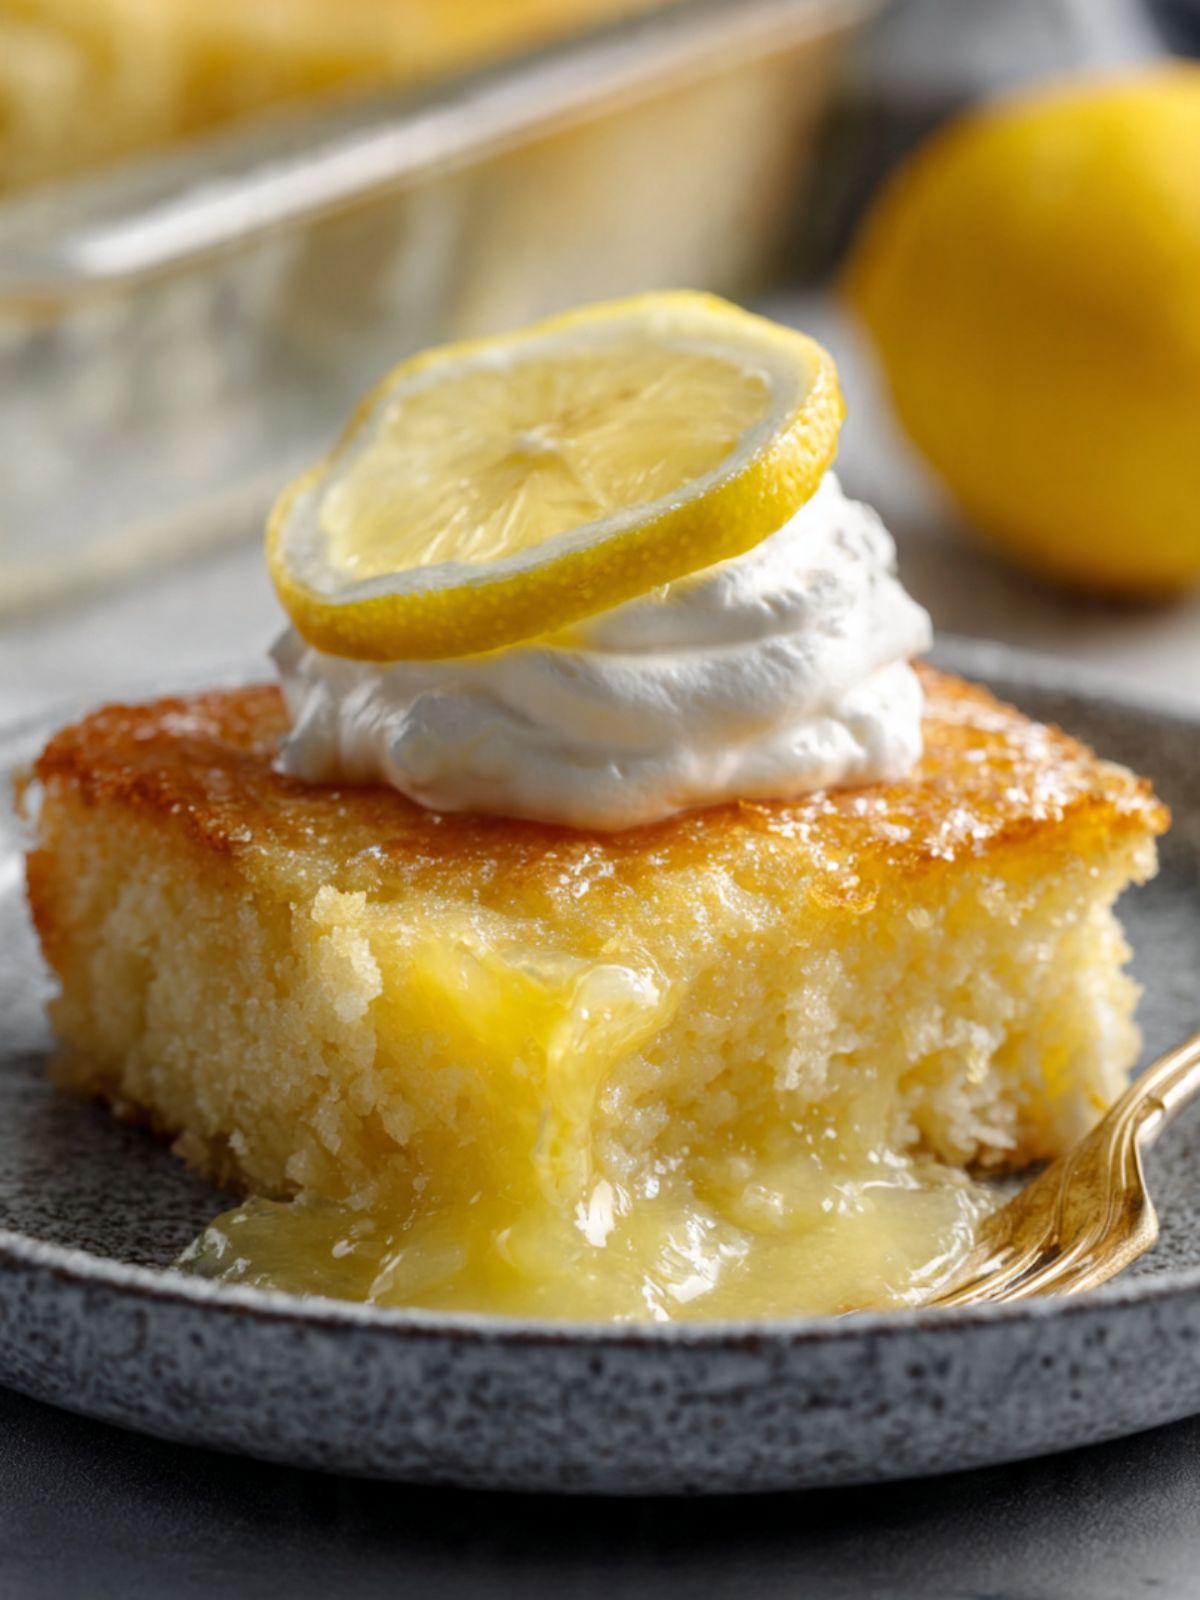
What makes this different from every other dump cake I have made is the interior. Most dump cakes are mostly cake with fruit underneath. This one is mostly cream cheese — baked into a dense, custardy mass that sits between a lemon curd base and a deeply browned top crust. The lemon does not disappear. It pools at the edges and seeps from the cut face of every slice, exactly as you can see in the photos. That ooze is not an accident. It is the point.
There is no mixer required. No creaming, no folding, no technique that requires practice. The difficulty is entirely in the timing — pulling it at the right moment and waiting the full cooling time before serving.
🗒 Luna’s Note: I tested this with both lemon pie filling and lemon curd. The pie filling produces more volume in the lemon layer and a slightly looser ooze. The curd is richer and more intensely flavored but the layer is thinner. I use pie filling in this recipe. If you use curd, expect a more concentrated lemon hit and reduce the amount by 2–3 tablespoons.
This is the recipe I bring when someone asks for something that looks impressive but cannot actually take long to make. It serves twelve, it travels in the dish, and it plates like something that required far more effort than it did. I am not going to pretend that is not part of the appeal.
| Prep Time | Cook Time | Total Time | Yield | Difficulty |
|---|---|---|---|---|
| 10 min | 45–50 min | 1 hr 25 min | 12 servings | Easy |
| Calories | Fat | Carbs | Sugar | Protein | Sodium |
|---|---|---|---|---|---|
| ~370 kcal | ~19g | ~46g | ~30g | ~4g | ~390mg |
Macros are approximate and will vary based on ingredient brands and serving size.
Ingredients & Tools for Lemon Cream Cheese Dump Cake Recipe
For the Lemon Base
- 1 can (21oz / 595g) lemon pie filling — not lemon curd, not lemon pudding mix. The pie filling is thick, opaque, and spoonable straight from the can. This is what creates the molten lemon layer visible in the photos.
For the Cream Cheese Layer
- 8oz (226g) full-fat block cream cheese — not spreadable tub cream cheese, not low-fat, not whipped. Block cream cheese only. Softened to room temperature for 2 hours minimum before using.
- ¼ cup (50g) plain white granulated sugar — not powdered sugar, not brown sugar
- 1 large egg (approximately 50g without shell), room temperature — pulled from the fridge 30 minutes before starting
- 1 teaspoon (5ml) pure vanilla extract — not imitation vanilla. Imitation vanilla has a synthetic sharpness that is noticeable in cream cheese mixtures where vanilla is a primary flavor.
For the Cake Layer
- 1 box (15.25oz / 432g) yellow cake mix — standard box, dry and unmixed. Do not prepare the cake mix according to package directions. Use it dry, straight from the box.
- ½ cup (113g / 1 stick) unsalted butter — sliced into thin pats approximately ¼ inch thick. Cold from the fridge is fine here — unlike most baking, you are not creaming this butter. It melts over the cake mix during baking.
For Garnish (Post-Bake)
- Whipped cream — stabilized preferred for serving. To stabilize: whip 1 cup (240ml) heavy whipping cream (36% fat minimum) with 1 tablespoon (8g) powdered sugar and ¼ teaspoon cream of tartar to stiff peaks. Unstabilized cream weeps within 20 minutes.
- 1–2 fresh lemons, sliced into thin wheels — for plating
- Finely grated lemon zest from 1 medium lemon — zest only, no white pith
Necessary Tools
- 9×13 inch (23×33cm) glass baking dish — glass specifically. Glass heats more slowly and evenly than dark metal, which is what keeps the lemon layer fluid rather than scorched at the base. If you use a dark metal pan, reduce the oven temperature by 25°F (15°C) and start checking at 40 minutes.
- Electric hand mixer or stand mixer fitted with the paddle attachment — needed for the cream cheese layer only. The cream cheese must be beaten smooth before the egg goes in. Mixing by hand will leave lumps that do not bake out.
- Large mixing bowl — for the cream cheese mixture
- Rubber or silicone spatula — for spreading the cream cheese layer evenly
- Offset spatula or the back of a large spoon — for spreading the dry cake mix in an even layer
- Sharp knife — for slicing the butter into pats
- Kitchen scale — for weighing the cream cheese and butter accurately. Volume measurements for cream cheese are inconsistent depending on how softened it is.
- Oven thermometer — most home ovens run 15–25°F (8–14°C) off from the dial setting. This recipe is timing-sensitive enough that an accurate oven temperature matters. If you do not own one, this is worth buying before you bake this.
- Zester or fine microplane — for the lemon zest garnish. A box grater will work but produces coarser zest.
- Serving spoon — this cake scoops rather than slices cleanly from the pan. A large spoon or serving spatula works better than a knife for portioning.
Before You Start
Read this section before you touch a single ingredient.
Oven rack postion. Position your oven rack in the middle of the oven before preheating. Top rack position exposes the surface to the top element and overbrowns the crust before the cream cheese layer sets. Bottom rack burns the base of the glass dish.
Room temperature cream cheese is non-negotiable. Pull the block from the fridge 2 hours before you plan to start. To check readiness: press your finger into the center of the block — it should give without resistance and hold a clean indent. The block should feel soft throughout, not just at the edges. If the center still feels firm, give it another 30 minutes. Do not microwave it. Time is the only fix.
Whipped cream. If serving to a group, stabilize the whipped cream — it holds its shape for 2+ hours rather than weeping onto the plate within 20 minutes.
Room temperature egg — 30 minutes minimum. A cold egg added to softened cream cheese can cause the mixture to seize slightly and look curdled. Set it on the counter when you pull the cream cheese.
Use a kitchen scale. For the most accurate results, use a kitchen scale set to grams. Volume measurements like cups and tablespoons can vary by 20–30% depending on how ingredients are scooped or packed. The gram weights in this recipe are the numbers I tested with — they are the most reliable way to get the same result I got.
The cake mix goes in dry. This is the most common question I get about this recipe. You do not prepare the cake mix. You do not add eggs, oil, or water to it. The dry mix goes directly over the cream cheese layer, and the butter pats on top melt down through it during baking, hydrating it from above while moisture from the layers below works upward. The result is a dense, browned top layer — not a fluffy cake layer.
Do not skip the cooling time. Thirty minutes minimum before you scoop. The cream cheese interior is still setting during this time. Cut into it before the cooling is done and the interior will not hold — it will run onto the plate rather than sit in the slice.
No chilling required before baking. This goes straight from assembly into the preheated oven.
How to Make Lemon Cream Cheese Dump Cake
Step 1: Positioning the Oven and Preparing the Dish
Set your oven rack to the middle position and heat to 350°F (175°C). Most home ovens run 15–25°F (8–14°C) off from the dial — if you have an oven thermometer, confirm the actual temperature now before anything goes in. While the oven heats, lightly grease your 9×13 inch (23×33cm) glass baking dish with a thin layer of butter or non-stick spray. You do not need to line it with parchment — this bake is scooped from the dish rather than lifted out, so parchment overhang is unnecessary. Set the greased dish on the counter where you will be assembling.
The dish should look lightly coated but not pooled with grease. Too much grease at the base will fry the lemon layer rather than letting it heat gently.
⚠️ Baker’s Warning: If you use a dark-colored metal pan instead of glass, the base will heat faster and the lemon filling will scorch before the top is done — you will get a caramelized, jammy bottom and a raw-tasting cake top. Reduce the oven temperature to 325°F (165°C) and begin checking at 38 minutes if you have no choice but to use a dark pan.
Step 2: Spreading the Lemon Base Layer
Open your 1 can (21oz / 595g) lemon pie filling and spoon it directly into the prepared dish. Using your rubber or silicone spatula, spread it into an even layer that reaches all four corners and sits level across the base. The filling is thick — it will not self-level like a liquid. Take thirty seconds to push it into the corners properly. An uneven lemon layer means some portions of the finished cake will have more lemon than others, and the ooze visible in the photos will only appear where the lemon layer is deep enough.
The lemon layer should be fully opaque, pale yellow, and completely covering the base of the dish with no glass visible through it.
⚠️ Baker’s Warning: Do not substitute lemon pudding mix, lemon curd, or lemon jelly for the pie filling. Pudding mix is dry and will absorb into the cake layer rather than staying fluid. Lemon curd is too thin and too rich in fat — it will separate during baking rather than holding its body. Pie filling is the ingredient that produces the molten lemon layer shown in the photos.
Step 3: Making the Cream Cheese Layer Until Completely Smooth
In your large mixing bowl, using your electric hand mixer or stand mixer fitted with the paddle attachment, beat your 8oz (226g) full-fat block cream cheese on medium speed (speed 4 on a KitchenAid) for 90 seconds on its own before adding anything else. This initial beating step is what separates a smooth cream cheese layer from a lumpy one — the cream cheese must be completely lump-free before the other ingredients go in.
Add your ¼ cup (50g) plain white granulated sugar. The sugar does two things here: it sweetens the layer and it draws moisture from the cream cheese during baking, which is part of what keeps the interior dense and custardy rather than dry. Beat on medium for another 30 seconds until fully incorporated.
Add your 1 large room-temperature egg (approximately 50g without shell) and 1 teaspoon (5ml) pure vanilla extract. Beat on low speed just until the egg disappears into the mixture — approximately 15 to 20 seconds. Do not beat on medium or high after the egg goes in.
The cream cheese mixture should look thick, pale, and completely smooth with no visible lumps — if you can see white flecks of unmixed cream cheese, keep beating on medium for another 30 seconds and check again. The mixture should fall from the beater in a slow, heavy ribbon.
⚠️ Baker’s Warning: Do not overmix after the egg goes in — overbeaten cream cheese with egg incorporates too much air and the layer will puff dramatically in the oven and then sink and crack as it cools, leaving a collapsed, rubbery center rather than the dense, creamy interior shown in the photos.
🗒 Luna’s Note: I beat the cream cheese alone first every single time, even when I am in a hurry. The 90 seconds it takes to get it fully smooth before adding anything else is the step that determines whether the interior looks like the photo or like something went wrong. It is not optional.
Step 4: Spreading the Cream Cheese Layer Over the Lemon
Using your rubber or silicone spatula, spoon the cream cheese mixture over the lemon layer in the dish. Work from the center outward, dropping spoonfuls across the surface before spreading — this distributes it more evenly than trying to spread from one end. The cream cheese mixture is thick and will not self-level. Use the spatula to gently push it to the edges, but do not press down hard enough to disturb the lemon layer beneath it.
The cream cheese layer does not need to be perfectly even — small variation in thickness is fine and will not affect the final result. What matters is that the lemon layer beneath it is fully covered with no exposed patches of lemon pie filling visible through the cream cheese.
The cream cheese layer should cover the lemon completely, sitting in a pale, even blanket across the full surface of the dish with no yellow showing through.
⚠️ Baker’s Warning: Do not stir or swirl the cream cheese into the lemon layer — the two layers must stay separate during assembly. Mixing them together removes the distinct cream cheese interior and molten lemon base that define this recipe. Spread gently, do not fold.
Step 5: Adding the Dry Cake Mix Layer
Open your 1 box (15.25oz / 432g) yellow cake mix and pour it directly from the box over the cream cheese layer in an even distribution. Do not dump it all in one spot. Using your offset spatula or the back of a large spoon, spread the dry mix into an even layer that covers the cream cheese completely. The layer will be about ½ inch (1.2cm) deep and will look dusty and dry — this is exactly correct.
Do not press the cake mix down. Do not stir it into the cream cheese beneath. It sits on top as a loose, dry layer. If the cream cheese layer is thin or patchy in places, the lemon filling below will bubble directly up through those thin spots into the dry cake mix above during baking — producing a denser, more absorbed lemon layer in those sections rather than the distinct molten base. Take the extra minute to ensure full coverage.
The cake mix layer should look like a pale yellow, even blanket of dry powder covering the entire surface — no cream cheese showing through, no thick spots, no thin spots.
Step 6: Placing the Butter Pats to Cover the Surface
Take your ½ cup (113g) unsalted butter, sliced into thin pats approximately ¼ inch (6mm) thick — you should have roughly 16 to 18 pats from one stick. Arrange them across the surface of the dry cake mix in a grid pattern, spacing them as evenly as possible. The goal is to cover as much of the dry cake mix surface as you can — gaps between butter pats are where the cake mix will not fully hydrate and will bake up as dry, powdery patches on the finished surface.
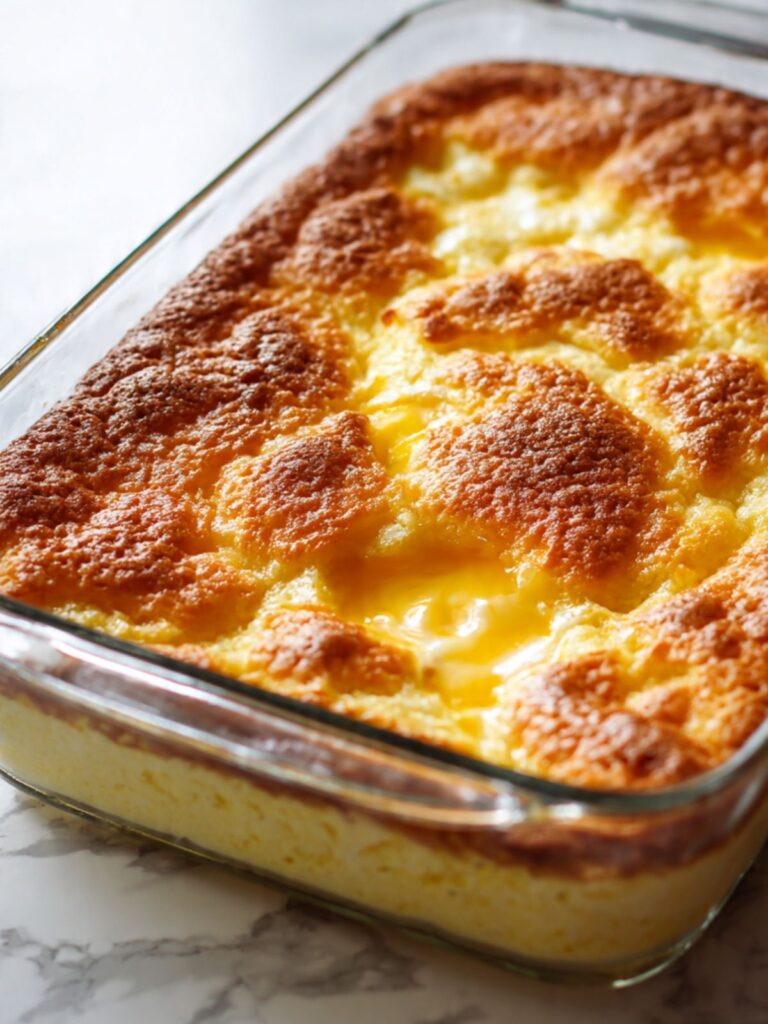
As shown in the overhead photo of the finished pan, the browned surface has open windows where the lemon layer has bubbled through during baking. Those windows form where butter coverage was lighter and the lemon filling below pushed upward. This is the signature look of this recipe and it happens naturally — you do not need to engineer it.
The butter pats should cover approximately 75–80% of the cake mix surface. Some gaps are fine and expected — complete coverage is not possible with one stick and is not the goal.
⚠️ Baker’s Warning: Do not melt the butter and pour it over the top. Melted butter distributes too evenly and the entire surface bakes into a flat, uniform crust without the dramatic mounded browning and lemon windows visible in the photos. Cold or room temperature pats only.
🗒 Luna’s Note: I arrange the butter pats in four rows of four across the dish. It takes about 45 seconds and means I get consistent browning across the whole surface rather than heavy browning in the center and raw patches at the corners.
Step 7: Baking Until Deeply Browned With Lemon Pooling Visible
Place the assembled dish on the middle rack of your preheated 350°F (175°C) oven. Set a timer for 45 minutes and do not open the oven door before that point. The layers need uninterrupted heat to set in the correct order — opening the door before 45 minutes drops the oven temperature and slows the cream cheese layer from setting properly.
At 45 minutes, check through the oven window before opening. You are looking for the browned mounded peaks with open yellow-gold windows between them — exactly as visible in the finished pan photo. If the surface still looks pale and uniform with no browning, close the door and add 3 minutes before checking again.
Bake for 45 to 50 minutes total. The exact time depends on your oven — start checking at 45 and pull when the visual cues are right, not when the timer runs out.
Doneness looks like this: the surface is deeply browned in rounded mounds with lemon-yellow pooling visible in the gaps between them, the edges have pulled slightly from the glass and turned amber-caramel, and the center still carries a slow, heavy wobble when you nudge the dish. This is the moment to pull it.
⚠️ Baker’s Warning: Do not wait for the center to look fully set before pulling. A center that looks completely firm in the oven is an overbaked center — the lemon filling will have absorbed into the cake layer and the cream cheese will have dried out and tightened. The wobble in the center is correct. It will finish setting during the cooling period from carryover heat.
Step 8: Cooling Until the Interior Sets
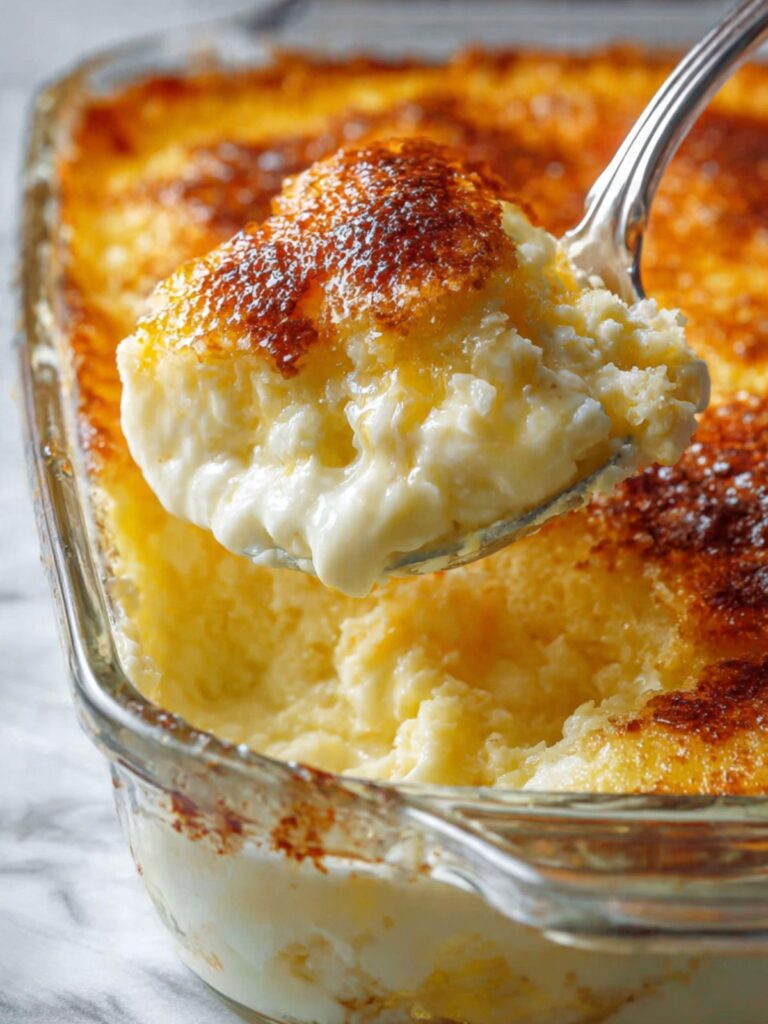
Remove the dish from the oven and place it on a wire cooling rack or a folded kitchen towel on the counter. Do not move it to the fridge. Do not cover it. Leave it completely undisturbed at room temperature for a minimum of 30 minutes.
During this 30 minutes, carryover heat from the glass dish continues conducting into the cream cheese interior, finishing the set that the oven started. This is called carryover cooking — the principle that food continues cooking from residual heat after the heat source is removed. Glass retains and transfers this heat longer than metal, which is why a glass dish is specified for this recipe rather than a metal pan.
The glass retains heat longer than metal — this is actually an advantage here, because it means the interior sets gently and evenly rather than abruptly. Moving the dish to the fridge interrupts this process and produces a cream cheese layer that is set at the edges but still loose at the center.
At 30 minutes, the surface will have settled, the lemon windows will have deepened in color slightly, and the wobble will be gone or almost gone. This is when it is ready to scoop.
At 30 minutes the dish should look fully settled with no movement when nudged — if the center still wobbles, give it another 10 minutes before scooping.
🗒 Luna’s Note: I cool this on the stovetop rather than on a rack — my stovetop is the flattest surface in my kitchen and keeping the dish perfectly level during cooling means the lemon layer redistributes evenly rather than pooling to one corner.
Step 9: Scooping and Garnishing to Serve
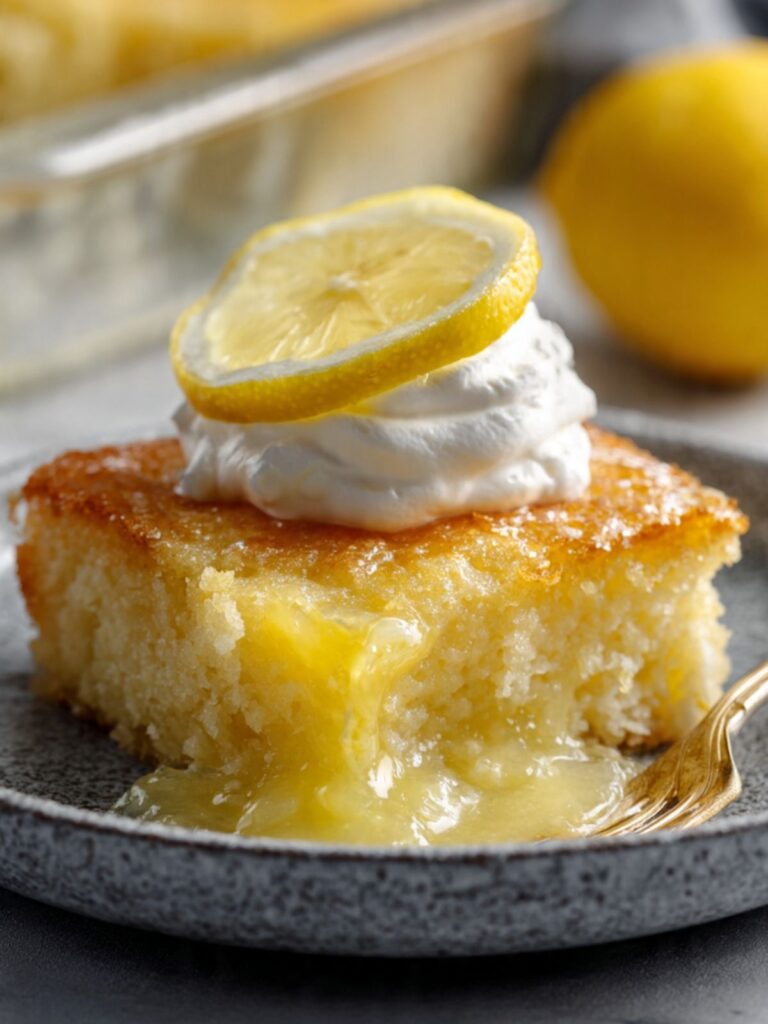
Use your serving spoon or large serving spatula to scoop portions from the dish. This cake does not cut cleanly — the cream cheese interior is soft and the lemon base is fluid. Scoop rather than slice. Each portion will show the browned top, the cream cheese body, and the lemon layer pooling around the base of the scoop, exactly as visible in the plated slice photos.
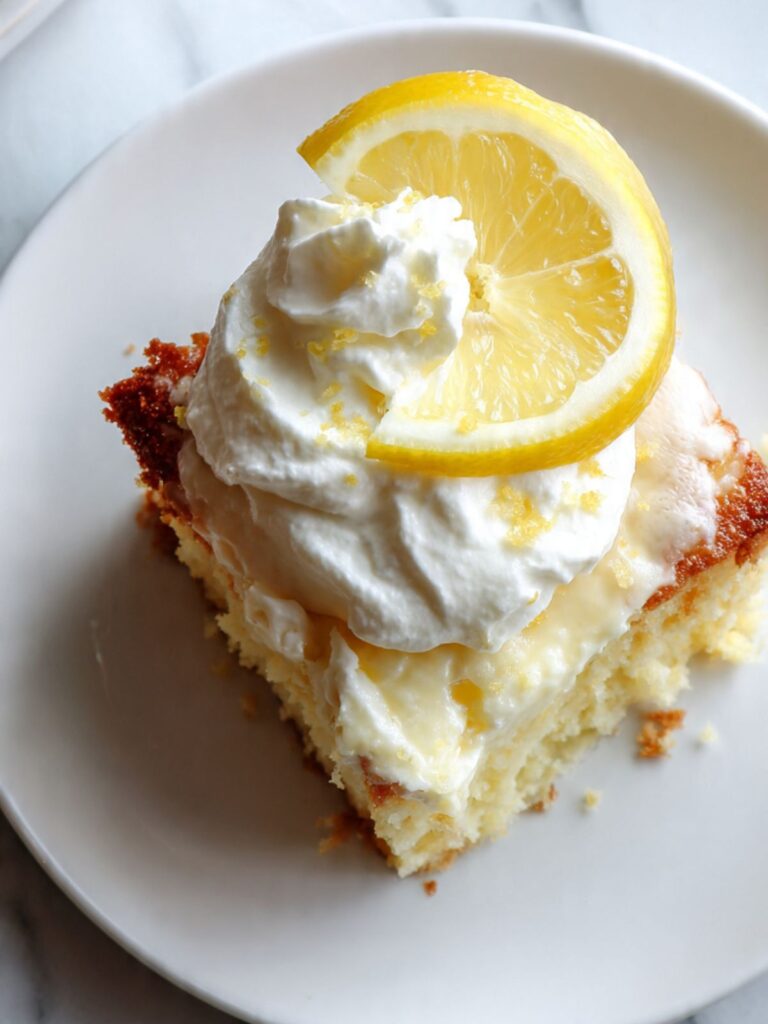
Place each scoop on a plate. Add a generous dollop of whipped cream directly on top of the browned crust. Lay one or two fresh lemon wheel slices against the whipped cream. Finish with a pinch of finely grated lemon zest — zest only, no white pith — scattered across the whipped cream. The zest adds a burst of fresh lemon fragrance that the baked filling alone does not provide.
The finished plated portion should show three visible zones: the browned caramel crust at the top, the pale cream cheese body in the middle, and the translucent lemon yellow pooling at the base and edges of the scoop — topped with white whipped cream and lemon garnish.
The Science Behind Lemon Cream Cheese Dump Cake
Why the Layers Stay Separate During Baking
I did not expect the layers to hold. My instinct before the first test was that the cream cheese would sink into the lemon filling and the cake mix would absorb everything underneath it into one uniform mass. What actually happens is the opposite — and once I understood the physics, it made complete sense.
Each layer has a different density and a different fat content, and those differences are what keep them from merging. The lemon pie filling at the base is the heaviest — it is a starch-thickened gel that holds its structure under heat. The cream cheese mixture sits above it because fat-rich, protein-dense cream cheese is naturally more buoyant than the fruit gel below. The dry cake mix on top is the lightest layer of all. As the butter pats melt during baking, they carry moisture downward through the cake mix while heat from below drives the lemon layer’s steam upward — the two moisture movements meet in the cream cheese zone, which is why that layer bakes into a dense, custardy consistency rather than a dry cake crumb.
The result is the three-zone architecture visible in every cross-section photo: browned crust on top, creamy custard body in the middle, molten lemon at the base. Starch gelatinization in the lemon filling locks the bottom layer in place, and protein coagulation in the cream cheese sets the middle layer — each mechanism happens at a slightly different temperature, which is exactly why the layering survives the oven.
If you want to see a similar layering principle at work in a chocolate version, the chocolate dump cake on this site uses the same physics with a cocoa-based filling.
How the Maillard Reaction Creates That Burnished, Caramelized Top Crust
The browned surface of this cake — the rounded amber mounds visible in the pan photo — is not simple browning. It is the Maillard reaction: a chemical process that occurs when proteins and sugars are heated together above approximately 280°F (138°C), producing hundreds of new flavor compounds that do not exist in the raw ingredients. The yellow cake mix contains both proteins from the egg powder and sugars from the added sugar — when the melted butter carries heat through the dry layer and the surface temperature climbs above 280°F, the Maillard reaction begins.
The result is the deep amber, slightly crisp crust with a toasted, caramelized flavor that contrasts directly with the cool, tangy cream cheese interior beneath it. The reason the browning is uneven — darker at the mounds, lighter at the lemon windows — is that the butter pats melt at slightly different rates depending on their thickness and position, creating local hot spots where the Maillard reaction accelerates faster. Those hot spots are the mounds. The lemon windows are where the butter coverage was lighter and steam from the lemon filling below vented upward through the cake layer, keeping the surface temperature lower and preventing full browning.
🗒 Luna’s Note: The unevenness of the top — the darker mounds and the bright yellow windows — is what makes this cake look the way it does. A perfectly even top would mean either too much butter or the layers were disturbed during assembly. Uneven is correct. Uneven is the recipe working.
Why Pulling It Early Produces a Better Result Than Baking It Through
This is the science point that matters most for this specific recipe, and it is the one most home bakers resist because it goes against the instinct to bake something until it looks done.
The cream cheese layer sets through protein coagulation — the egg proteins in the mixture begin to firm between 145°F and 160°F (63°C and 71°C). Below 145°F, the proteins are still fluid. Above 165°F, they tighten too much and the texture shifts from dense and creamy to rubbery and dry. The window between those two temperatures is narrow — approximately 20°F (11°C) — and in a hot oven, that window passes in minutes. The lemon filling at the base reaches temperature faster than the cream cheese above it because it is directly in contact with the hot glass. By the time the surface looks fully browned and set, the bottom of the cream cheese layer has already passed through the ideal temperature window. The center of the cream cheese layer is still approaching it.
This is precisely why the doneness cue for this recipe is visual and kinetic — the wobble in the center — rather than a toothpick test or a timer. Pulling the dish when the center still wobbles means the cream cheese center is at the ideal temperature to finish setting gently from carryover heat in the glass. Waiting until the wobble is gone means the center has already overshot and the edges are dry. The 30-minute cooling period is not just resting time — it is the final stage of cooking, and it happens off the heat.
Lemon Cream Cheese Dump Cake Troubleshooting & Pro-Tips
Common Mistakes
The Lemon Layer Disappeared Into the Cake
Symptom: The finished cake has no visible lemon pooling at the edges of each scoop. Every bite tastes like cream cheese and cake with no distinct lemon layer. The base of the dish looks dry rather than glossy and fluid.
Cause: Wrong lemon product used, or the bake went too long. Lemon pudding mix, lemon curd, or lemon jelly will not hold their body during baking the way pie filling does. Lemon pudding mix is dry and absorbs directly into the cake layer. Lemon curd is too thin in fat content and separates under sustained heat. Only lemon pie filling — thick, starch-thickened, spoonable straight from the can — holds the distinct bottom layer through the full bake time. Overbaking produces the same result even with the correct filling, because sustained heat eventually drives all the moisture from the lemon layer into the cake mix above it.
Fix: If this has already happened, the cake is still edible — it will taste like a dense lemon cream cheese cake without the molten base. Serve it with extra lemon curd drizzled over each scoop to restore some of the lemon element. For the next batch, verify the product label reads “lemon pie filling” and pull the dish at 45 to 50 minutes when the center still wobbles.
Prevention: Use exactly 21oz (595g) of lemon pie filling — not lemon pudding, not curd. Set a timer for 45 minutes and check the visual cues before the timer runs out rather than waiting for it.
The Top Has Dry, Powdery Patches That Did Not Bake Through
Symptom: The finished surface has areas of pale, dry, floury-tasting cake mix that did not brown or hydrate — visible as white or pale yellow dusty patches alongside the browned mounds.
Cause: Insufficient butter coverage over the dry cake mix layer. Every patch of cake mix that a butter pat did not cover during assembly has no fat source to hydrate it from above. The moisture rising from the lemon and cream cheese layers below can partially hydrate the cake mix, but without butter contact from above, the surface of those patches stays raw and dusty.
Fix: If the dry patches are visible at the 45-minute check, cut a tablespoon of cold butter into small pieces and press them directly onto the dry spots, then return the dish to the oven for 5 more minutes. The butter will melt quickly at that stage and hydrate the remaining dry patches.
Prevention: Slice the full ½ cup (113g) of butter into 16 to 18 thin, even pats before you start assembly. Arrange them in a grid pattern that covers approximately 75–80% of the surface. Small gaps are expected and fine — large uncovered patches are not.
The Cream Cheese Layer Is Rubbery and Tight Instead of Dense and Creamy
Symptom: The interior of the finished cake has a firm, bouncy texture rather than the soft, custardy consistency shown in the scoop photo. It holds its shape too cleanly when portioned and tastes slightly dry.
Cause: Overbaked, overmixed after the egg was added, or cream cheese was not at room temperature before mixing. Overbeating cream cheese with egg incorporates too much air into the mixture, which expands dramatically in the oven and then collapses on cooling — the resulting texture is dense in the wrong way, tight rather than creamy. Cold cream cheese that was not fully softened before beating leaves unmixed fat pockets that bake unevenly. Overbaking drives the interior past the ideal protein coagulation temperature and squeezes out moisture.
Fix: A rubbery cream cheese layer cannot be corrected after baking. Serve the portions with a generous amount of whipped cream and extra lemon curd on the side — the contrast in texture between the firm interior and the soft toppings is more forgiving than it sounds.
Prevention: Pull the cream cheese from the fridge 2 hours before starting. Beat it alone for 90 seconds on medium before adding any other ingredient. Once the egg goes in, beat on low for 15 to 20 seconds only — stop the moment the egg disappears. Pull the dish from the oven when the center still wobbles.
The Surface Browned Too Dark Before the Interior Set
Symptom: The top crust is very dark — approaching burnt at the edges and mounds — but the center is still completely liquid when scooped. The edges taste bitter and the cream cheese interior has not set at all.
Cause: Oven temperature too high, dark metal pan used at full temperature, or dish placed on the top rack. Dark pans absorb more radiant heat and overbrown the surface before the interior has time to set. Top rack position exposes the surface to direct heat from the top element and accelerates surface browning disproportionately to interior cooking.
Fix: If the top is darkening too quickly during the bake, lay a piece of aluminum foil loosely over the dish — do not press it down onto the surface — and continue baking until the center wobble is right. The foil deflects direct heat from the top element while allowing the interior to continue cooking.
Prevention: Use a glass baking dish on the middle rack at exactly 350°F (175°C), verified with an oven thermometer. If using a dark metal pan, reduce to 325°F (165°C) from the start.
The Cake Did Not Set and the Interior Is Still Completely Liquid After Cooling
Symptom: After the full 30-minute cooling period, scooping produces a runny, soup-like result with no structure to the cream cheese layer.
Cause: Pulled from the oven too early, oven temperature was lower than the dial indicated, or cooling time was cut short. The cream cheese layer requires reaching a minimum internal temperature of 145°F (63°C) for the egg proteins to begin coagulating. If the oven is running significantly cold, the interior may never reach this temperature within the bake window.
Fix: Return the dish to the oven at 350°F (175°C) for an additional 10 minutes. Check again for the wobble cue. If the surface is already very dark, tent with foil before returning it. Allow the full 30-minute cooling period again after the second bake.
Prevention: Use an oven thermometer to verify the actual oven temperature before baking. If your oven runs cold, increase the dial setting by 15–25°F (8–14°C) to compensate.
The Layers Mixed Together During Baking
Symptom: The finished cake has no distinct zones — it looks and tastes like a uniform, dense lemon-cream cheese mass rather than three separate layers. No molten lemon base, no distinct cream cheese body.
Cause: The cream cheese layer was stirred into or swirled through the lemon layer during assembly, or the lemon filling was too thin and the cream cheese sank through it. Lemon curd or jelly — being thinner than pie filling — cannot support the cream cheese layer above it and allows it to sink and merge during baking.
Fix: The texture will still be pleasant — dense, tangy, lemon-flavored throughout. It is a different result than intended but not an unpleasant one. Serve it as a lemon cream cheese pudding cake and lean into the garnish — extra whipped cream and lemon zest carry the visual.
Prevention: Spread the cream cheese layer gently over the lemon filling without pressing or swirling. Use lemon pie filling only — its starch-thickened body is what supports the cream cheese layer above it during baking.
Expert Pro-Tips
Warm the lemon pie filling slightly before spreading. Straight from the can, lemon pie filling is stiff and difficult to spread into a perfectly even layer. Microwave it in the opened can or in a bowl for 20 seconds and stir — it becomes significantly more fluid and spreads to the corners of the dish in half the time, producing a more even lemon base.
Serve within 2 hours of baking for the best molten effect. The lemon layer continues to be absorbed by the cake layer as the cake sits at room temperature over time. At 30 minutes of cooling it is at peak ooze. At 2 hours it is still present but thickened. At 4 hours the distinction between the lemon and cake layers begins to blur. This is not a make-ahead-and-serve-tomorrow dessert — it is at its best the day it is made, within the first 2 hours after cooling.
Use a metal spoon rather than a silicone spatula for serving. The firm edge of a metal serving spoon cuts through the browned top crust cleanly and scoops the cream cheese layer without dragging. A silicone spatula is too flexible — it tends to compress the cream cheese rather than lifting it.
Add lemon zest directly to the cream cheese mixture for a more intense lemon flavor throughout. The baked cream cheese layer as written is rich and tangy but mild on lemon flavor — the lemon character comes primarily from the base layer. If you want lemon flavor in every component, fold the finely grated zest of one medium lemon into the cream cheese mixture before spreading. This does not change the texture or the bake time.
How to Store Lemon Cream Cheese Dump Cake
Room Temperature
This cake can sit at room temperature for up to 2 hours after baking — which is also when it is at its best. Beyond 2 hours, the cream cheese layer is in the temperature danger zone for food safety and the lemon layer begins absorbing into the cake layer above it, losing the distinct molten base that defines the recipe. Do not store this cake at room temperature overnight. It contains eggs and cream cheese — both require refrigeration after 2 hours.
Refrigerator
Transfer leftover portions to a lidded hard-sided container — not a zip-lock bag, which compresses the cream cheese layer and causes it to weep moisture. Store individual scoops with a small piece of parchment between portions if stacking. Refrigerate for up to 3 days.
The cold will firm the cream cheese layer significantly — it will be denser and less custardy straight from the fridge than it was fresh from the oven. This is not a flaw. Pull portions from the fridge 20 minutes before serving to allow the cream cheese to soften slightly. The lemon layer, once refrigerated, will have thickened and will no longer ooze — it becomes a firm lemon layer rather than a molten one. Both textures are good. They are just different experiences.
Do not store the cake uncovered in the fridge — the surface will dry out and absorb refrigerator odors within 12 hours.
🗒 Luna’s Note: I actually prefer this cake cold, straight from the fridge the next morning. The cream cheese firms into something closer to a chilled cheesecake texture, the lemon layer is bright and set, and the browned top crust softens overnight into something almost shortbread-like. It is a completely different dessert from the warm version and I think it is the better one. This is my honest opinion and I am keeping it.
Freezer — Baked
This cake freezes adequately but not ideally. The cream cheese layer changes texture after freezing and thawing — it becomes slightly grainy rather than smooth and custardy. The lemon layer holds reasonably well. If you need to freeze it, scoop individual portions onto a parchment-lined tray and freeze uncovered until solid — approximately 2 hours. Then wrap each portion tightly in plastic wrap, place in a zip-lock freezer bag, and freeze for up to 6 weeks.
To thaw: transfer wrapped portions to the fridge overnight. Do not thaw at room temperature — the cream cheese layer will weep moisture unevenly. Serve cold or at room temperature after thawing. Do not reheat frozen portions in the microwave — the lemon layer will bubble and the cream cheese will tighten into a rubbery texture.
Honest assessment: if you are making this ahead, refrigerating for up to 3 days is a significantly better outcome than freezing. The texture loss from freezing is noticeable enough that I would make a fresh batch over serving a thawed one where possible.
Freezer — Unbaked
This recipe does not freeze well unbaked. The layered assembly — particularly the cream cheese mixture with egg — does not hold in the freezer without the layers merging and the egg proteins beginning to break down. Assemble and bake the day you plan to serve it.
Serving Suggestion
Serve this warm — between 30 minutes and 2 hours after pulling it from the oven. That is the window where the cream cheese interior is soft and custardy, the lemon base is still molten enough to pool around the base of each scoop, and the browned top crust has enough structure to hold its shape on the plate.
I use a large metal serving spoon and scoop deliberately — one clean motion straight down through the crust and cream cheese layer, then angled under to lift. Hesitating mid-scoop tears the cream cheese layer rather than lifting it intact.
The whipped cream is not optional here, visually or texturally. The cream cheese interior is rich and dense. The lemon base is sweet and tart. The whipped cream adds lightness that neither of those layers has on its own — it is the element that keeps the whole thing from feeling heavy. I use stabilized whipped cream if I am serving to a group, because unstabilized cream weeps within 20 minutes of being piped.
The specific context this recipe belongs to: any occasion where you need something that reads as effort but cannot actually take effort. A weeknight when someone is coming over and you remembered at 4pm. A potluck where you want to show up with something warm. A family dinner where you want dessert without spending the afternoon on it. This is that recipe. It serves twelve, it bakes in under an hour, and it looks — and tastes — like something that required more planning than it did.
This is not a recipe that travels well once scooped and plated. Make it where you are serving it, scoop it there, garnish it there. If you are transporting it, bring the whole dish covered with foil and scoop on arrival.
Day 1 versus Day 2: Day 1 warm is the molten, custardy version. Day 2 cold is the set, cheesecake-adjacent version. Both are good. Day 3 is still acceptable — the flavors have deepened and the cream cheese is fully firm. Beyond Day 3 the lemon layer has absorbed completely and the cake is drier than it should be.
Frequently Asked Questions About Lemon Cream Cheese Dump Cake
Can I make lemon cream cheese dump cake ahead of time?
Yes — bake up to 24 hours ahead and refrigerate the whole dish covered with foil. The cream cheese layer firms significantly overnight, shifting from a warm custardy texture to something closer to a chilled cheesecake bar. Both are good results, but genuinely different. If you want the molten, custardy version, bake it the day you are serving it.
Can I use lemon curd instead of lemon pie filling?
Yes — bake up to 24 hours ahead and refrigerate the whole dish covered with foil. The cream cheese layer firms significantly overnight, shifting from a warm custardy texture to something closer to a chilled cheesecake bar. Both are good results, but genuinely different. If you want the molten, custardy version, bake it the day you are serving it. The peach dump cake is another dump cake that holds up well when made ahead.
Why did my dump cake come out soggy in the middle?
A soggy center means the cake was pulled too early or the oven ran cold. The cream cheese sets through egg protein coagulation, which requires reaching 145°F (63°C) internally. If your oven runs cold, the interior may never reach this temperature. Return to the oven for 10 more minutes, tent with foil to protect the surface, and allow the full 30-minute cooling period again.
Can I double this lemon cream cheese dump cake recipe?
Double this recipe into two separate 9×13 inch (23×33cm) dishes — never into a single larger pan. The layer depths are calibrated to a 9×13 dish, and a deeper pan will underbake the cream cheese interior regardless of extended bake time. Bake both dishes side by side, rotating front-to-back at 25 minutes. Leavening in the cake mix does not scale linearly — two full boxes across two dishes is correct.
How do I know when lemon cream cheese dump cake is done?
Doneness is visual and kinetic, not time-based. The surface should show deeply browned mounds with lemon-yellow pooling visible between them, edges pulled from the glass, and a slow heavy wobble in the center when you nudge the dish. A toothpick test is not reliable — the cream cheese layer is meant to be soft and will read underdone even when correctly baked. Trust the wobble.
How does altitude or humidity affect this recipe?
At high altitude above 3,500 feet (1,067m), the lemon filling bubbles more aggressively due to lower boiling points, which can disrupt the layering — reduce oven temperature by 15°F (8°C) and start checking at 40 minutes. In high humidity above 70%, open the cake mix box immediately before using and spread it quickly, as dry mix absorbs ambient moisture and hydrates unevenly before the butter pats can do their job.
Can I use a different cake mix flavor?
White or vanilla cake mix works identically — the flavor difference is minimal once the lemon and cream cheese layers dominate. Lemon cake mix doubles the lemon character throughout, which works well if you want lemon in every component. Avoid chocolate, red velvet, or spice mixes — the strong flavors compete with the lemon base. Whatever flavor you use, add it dry and unmixed directly from the box.
More Dump Cakes You’ll Love
- Peanut Butter Cup Dump Cake — rich peanut butter and chocolate layers that set into a dense, scoopable dessert with no mixer required

Lemon Cream Cheese Dump Cake Recipe
Ingredients
Equipment
Method
- Position the oven rack in the middle and heat to 350°F (175°C), then lightly grease a 9×13 inch (23×33cm) glass baking dish with butter or non-stick spray and set aside.
- Spoon the 1 can (21oz / 595g) lemon pie filling into the prepared dish and spread into an even layer reaching all four corners using a silicone spatula — no glass should be visible through the filling.
- In a large mixing bowl using an electric hand mixer or stand mixer with the paddle attachment, beat the 8oz (226g) softened full-fat block cream cheese on medium speed for 90 seconds until completely smooth and lump-free.
- Add the ¼ cup (50g) granulated sugar and beat on medium for 30 seconds until fully incorporated, then add the 1 large room-temperature egg and 1 teaspoon (5ml) pure vanilla extract and beat on low for 15 to 20 seconds only until the egg just disappears — do not overmix.
- Spoon the cream cheese mixture over the lemon layer and spread gently from the center outward using the silicone spatula until the lemon layer is fully covered — do not stir or swirl the two layers together.
- Pour the 1 box (15.25oz / 432g) dry yellow cake mix directly over the cream cheese layer and spread into an even layer using an offset spatula or the back of a large spoon — do not press down or stir.
- Arrange the ½ cup (113g) butter pats in a grid pattern across the surface of the dry cake mix, covering approximately 75–80% of the surface — do not melt the butter before placing.
- Bake on the middle rack at 350°F (175°C) for 45 to 50 minutes until the surface shows deeply browned mounds with lemon-yellow pooling visible in the gaps and the edges have pulled from the glass — the center should still carry a slow heavy wobble when the dish is nudged.
- Remove from the oven and cool on a wire rack or folded kitchen towel at room temperature for a minimum of 30 minutes undisturbed before scooping — do not refrigerate during this cooling period.
- Scoop portions using a large metal serving spoon, plate each scoop, and garnish with a dollop of whipped cream, one or two fresh lemon wheels, and a pinch of finely grated lemon zest.