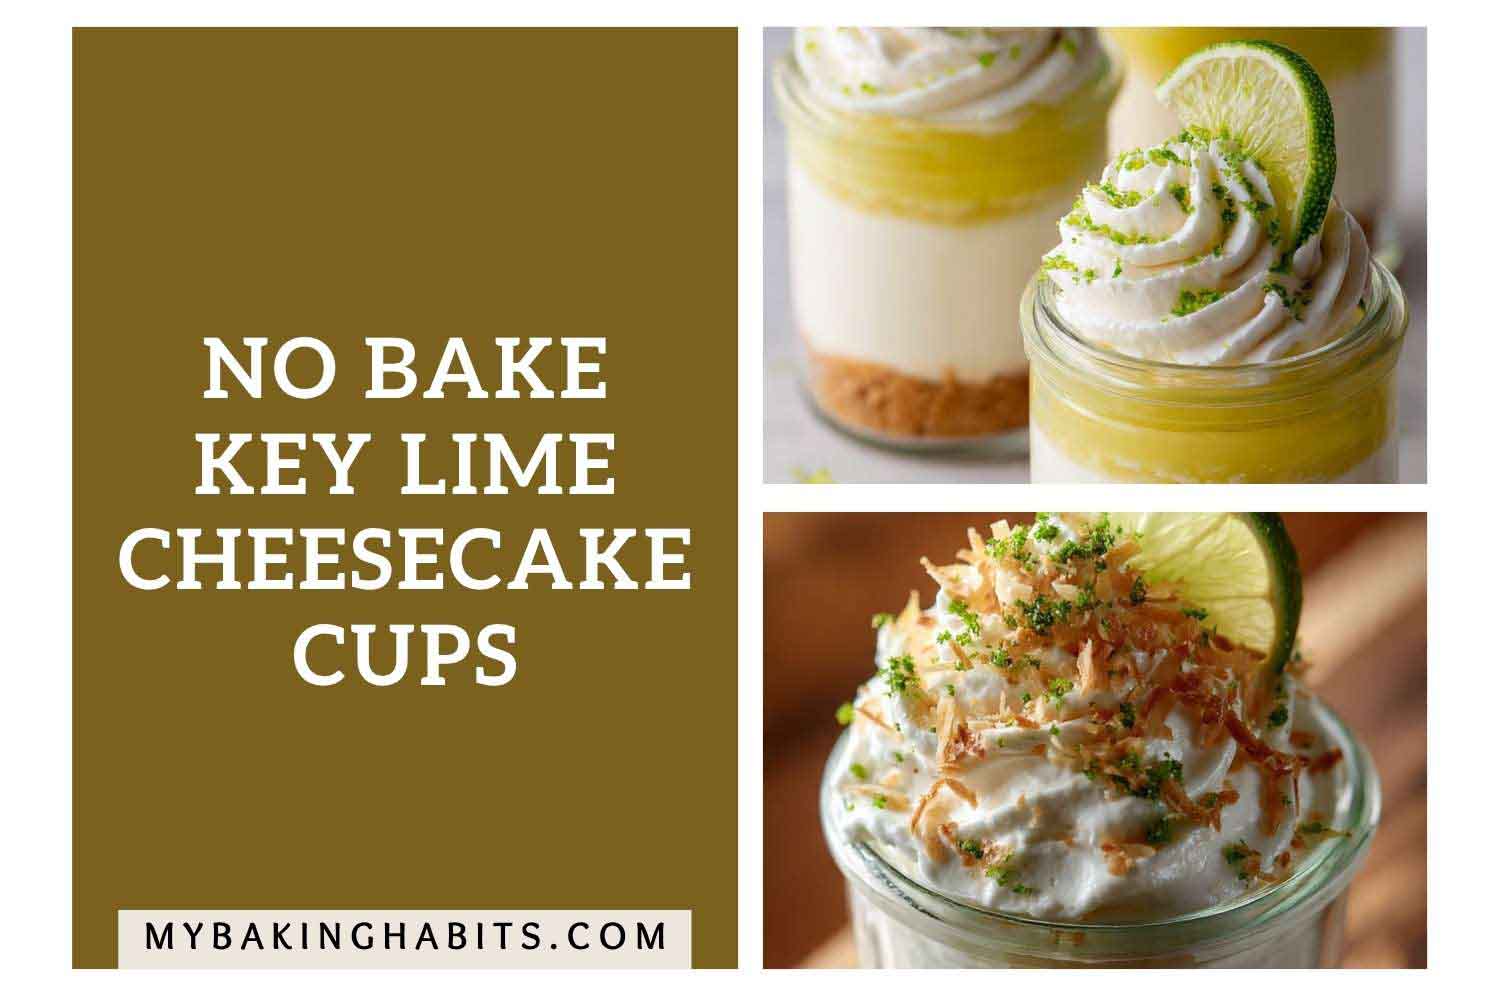
No-Bake Creamy Key Lime Cheesecake Cups Recipe

No bake key lime cheesecake cups are what I reach for when I need something that looks technically impressive and takes almost no actual effort — and I mean that without self-deprecation. I have made these across eleven batches over two months of testing, and there are two variables that took me the longest to get right.
The first was the chilling sequence. I added the lime curd layer too early on the first three batches — the filling surface felt set at the one-hour mark and I assumed that was enough. It was not. Both layers bled at the boundary and set as a murky swirl that bore no resemblance to the clean separation visible in the photos above. The two-hour minimum is not a patience guideline. It is the point at which the filling is structurally firm all the way through — not just at the surface — and the curd can sit cleanly on top without any compression or movement at the boundary.
I tested the filling with and without folded whipped cream — plain beaten cream cheese only versus cream cheese with stiff-peak whipped cream folded in. The plain cream cheese version set firmer but had a heavy, slightly gummy mouthfeel that tasted more like a refrigerated block than a cheesecake filling. The folded version — the one in this recipe — is lighter, more airy, and has the soft, creamy texture visible in the stark white filling layer in the photos. There was no batch of this recipe where I preferred the simpler version.
I also tested fresh key lime juice against bottled key lime juice across six consecutive jars — three of each, same recipe, same chill time. The bottled-juice jars had a flat, faintly cooked citrus note and a softer set — the filling released more liquid against the crust by Day 2. The fresh-juice jars had a sharper, more floral lime flavor and held their texture longer. Fresh juice is not optional here. It is the flavor.
What you are working toward: a cold-set cream cheese and whipped cream filling that is dense enough to hold the weight of a glossy lime curd layer, with a rough-hewn golden graham cracker crust visible at the base through the glass, and a stiff-peak piped rosette on top that holds a fresh lime wedge without drooping. The entire assembly takes under 35 minutes of active work. The refrigerator does the rest.
This recipe requires a hand mixer or stand mixer. There is no workaround — the cream cheese must be beaten completely smooth before any other ingredient is added, and the heavy cream must reach stiff peaks for the filling to set correctly. Minimum refrigeration: 2 hours for the filling before the curd goes on, plus 30 additional minutes after the curd is added.
🗒 Luna’s Note: I always keep an extra lime in my bag of citrus specifically for desserts that need zest. The zest scattered over the whipped cream here is not decorative — the volatile oils in the zest are what make the first bite smell like lime before it tastes like lime. Skip it and the dessert is still good. Use it and the jars smell correct when you open them.
| Yield | 6 individual jars |
| Prep Time | 25 minutes |
| Chill Time | 2 hours minimum (4 hours preferred, overnight best) |
| Cook Time | 10 minutes (lime curd only) |
| Total Time | 2 hours 35 minutes (active: 35 minutes) |
| Serving Size | 1 jar (approximately 200g) |
| Difficulty | Easy |
| Calories | ~592 |
| Carbohydrates | ~48g |
| Fat | ~42g |
| Protein | ~6g |
| Sugar | ~40g |
| Sodium | ~224mg |
Ingredients & Tools No Bake Key Lime Cheesecake Cups Recipe
For the Graham Cracker Crust
- 1½ cups (135g) graham cracker crumbs — from approximately 9 full graham cracker sheets, crushed by hand or pulsed 3–4 times in a food processor. Stop before they become powder — the coarse, sandy texture is what gives the crust its character and the rough-hewn look visible through the glass in the photos.
- 3 tablespoons (38g) plain white granulated cane sugar
- 3 tablespoons (45g) unsalted butter, melted and slightly cooled — use unsalted only. Salted butter throws off the salt balance in a recipe with this little seasoning. Melt it and let it sit for 5 minutes before mixing — too-hot butter steams the crumbs and makes the crust greasy.
For the Cream Cheese Filling
- 12 oz (340g) full-fat block cream cheese, softened to room temperature — this is the most critical ingredient in this recipe. Full-fat block cream cheese only — not whipped cream cheese, not spreadable cream cheese, not low-fat. Whipped and low-fat versions contain more water and less fat, which means the filling will not set firm enough to hold a clean separation line when the curd goes on top. Block cream cheese needs 60–90 minutes at room temperature before mixing. Do not microwave it to speed this up — microwaving changes the fat structure and causes lumps that no amount of mixing will fully smooth out.
- ¾ cup (90g) powdered sugar, sifted — sifted, not scooped straight from the bag. Unsifted powdered sugar contains small lumps that resist dissolving into the cream cheese and leave a gritty texture in the finished filling.
- ½ cup (120ml) heavy whipping cream (36% fat minimum) — cold, straight from the refrigerator. Cold cream whips faster and holds its structure longer than cream at room temperature. Do not substitute half-and-half or light cream — neither has enough fat to whip.
- 3 tablespoons (45ml) fresh key lime juice — freshly squeezed, not bottled. Bottled key lime juice is pasteurized and has a flat, slightly cooked flavor that reads as artificial in a no-bake filling where lime is the primary flavor note. If key limes are unavailable, Persian limes (the standard large limes at most grocery stores) work — the flavor is slightly less floral but still sharp and bright.
- 1 teaspoon (5ml) pure vanilla extract — pure, not imitation. Imitation vanilla has a synthetic sharpness that competes with the lime rather than supporting it.
- Zest of 1 key lime (or 1 small Persian lime) — finely grated with a microplane, colored outer layer only. Stop before the white pith — the pith is bitter and will leave an unpleasant aftertaste in a filling this delicate.
For the Lime Curd Layer
- ⅔ cup (200g) store-bought lime curd — or homemade if you prefer. Store-bought lime curd works perfectly here and removes one stovetop step. Look for a curd made with real egg yolks and butter — it should be thick enough to hold a spoon impression when chilled. Thin, overly sweet curds will bleed into the cheesecake layer instead of sitting cleanly on top. Lemon curd is a direct substitute if lime curd is unavailable — the result will be slightly less sharp.
Note: If making homemade lime curd, you will need: 3 large egg yolks, ½ cup (100g) plain white granulated cane sugar, ¼ cup (60ml) fresh key lime juice, 2 tablespoons (28g) unsalted butter cubed, and 1 teaspoon finely grated lime zest. Cook over a double boiler, stirring constantly, until thick enough to coat the back of a spoon — approximately 8 to 10 minutes. Strain through a fine mesh sieve, press plastic wrap directly onto the surface, and refrigerate until fully chilled before using.
For the Whipped Cream Topping
- ½ cup (120ml) heavy whipping cream (36% fat minimum) — cold, straight from the refrigerator.
- 2 tablespoons (15g) powdered sugar, sifted
- ½ teaspoon (2.5ml) pure vanilla extract
For the Garnish
- 6 thin lime wedges or half-moon slices — cut just before serving so the edges stay bright green and the flesh does not dry out.
- Finely grated lime zest — from 1 lime, microplane-grated. This is the green dust visible scattered over the whipped cream in the photos — it is not optional decoration. The lime oils in the zest are what make the jars smell sharply citrusy when opened.
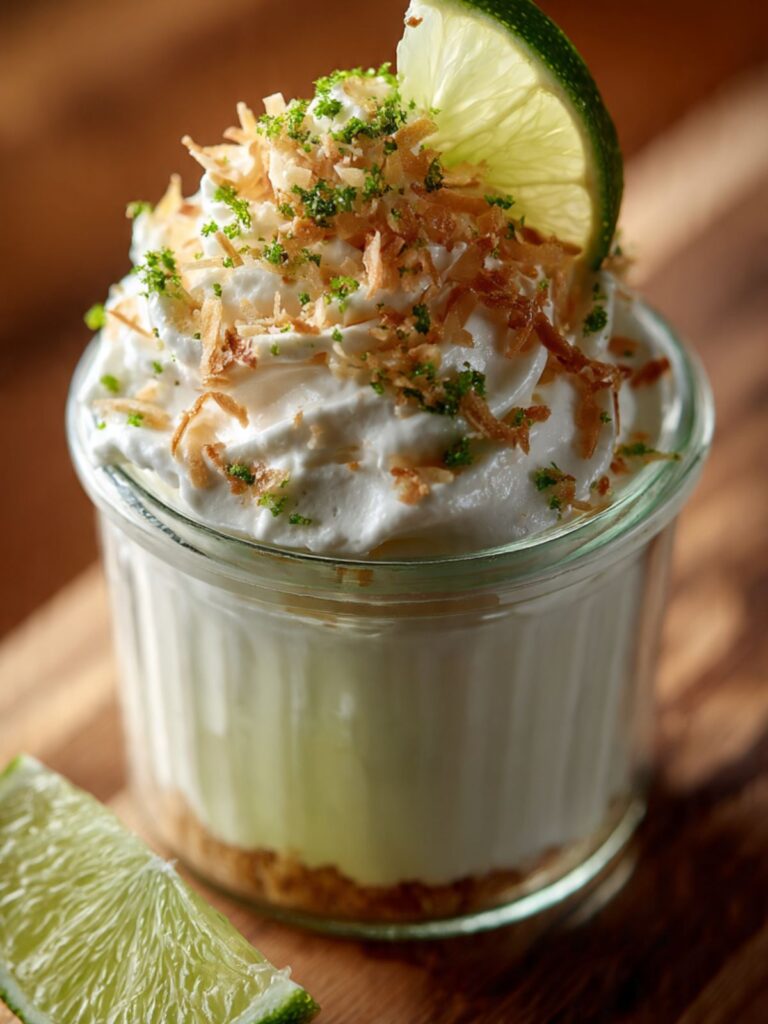
- Optional (coconut variation): ¼ cup (20g) medium-shred sweetened coconut, toasted in a dry skillet over medium heat until golden — approximately 3 to 4 minutes, stirring constantly. Spread on a plate to cool before using.
Before You Start
Read this section fully before you touch anything.
- Cream cheese temperature is non-negotiable. Pull your 12 oz block from the refrigerator 60 to 90 minutes before you start. Press your finger into the block — it should leave a clean, deep indent without the surface feeling greasy or slick. If it springs back, it is still too cold. Cold cream cheese produces a lumpy filling that no amount of mixer time will fully smooth. Do not rush this with the microwave.
- Lime juice yield: One key lime yields approximately 1 tablespoon (15ml) of juice. This recipe needs 3 tablespoons (45ml) for the filling — buy at least 4 key limes to account for variation in juice yield, plus an extra lime for zest and garnish. If using Persian limes, one lime yields approximately 2 to 3 tablespoons (30–45ml) — you need 1 to 2 Persian limes for the filling.
- Heavy cream must be cold. Both the filling cream and the topping cream go into the mixer straight from the refrigerator. Warm cream will not whip to stiff peaks regardless of how long you beat it. If your kitchen is warm (above 75°F / 24°C), chill your mixing bowl and beaters in the freezer for 10 minutes before whipping.
- Use a kitchen scale. The gram weights in this recipe are the numbers I tested with. Volume measurements for powdered sugar and graham cracker crumbs can vary by 20–30% depending on how you scoop. The scale removes that variable entirely and gives you the same filling consistency I got.
- Jar size matters. This recipe is calibrated for standard 4 oz to 6 oz glass jars — mason jars, Weck jars, or similar straight-sided glass containers. Smaller jars will have thicker crust-to-filling ratios and will need less filling per jar. Larger jars will produce fewer servings. The layered look visible through the glass only works in clear straight-sided containers.
- The two-stage chill is structural, not optional. The recipe requires the cheesecake filling to be fully set and firm before the lime curd layer goes on. This takes a minimum of 2 hours in the refrigerator. If you add the curd layer before the filling is firm, both layers will bleed together and the clean visual separation shown in the photos will not form. Plan your time accordingly.
- Equipment required: hand mixer or stand mixer fitted with the whisk attachment. This recipe cannot be made by hand — the cream cheese needs to be beaten completely smooth before any other ingredient is added, and the heavy cream must reach stiff peaks for both the filling and the topping.
Necessary Tools
- Hand mixer or stand mixer fitted with the whisk attachment
- Two large mixing bowls (one for the filling, one for the whipped cream)
- Fine mesh sieve (for straining homemade curd or sifting powdered sugar)
- Microplane grater (for lime zest)
- Citrus juicer or reamer
- Silicone spatula
- Piping bag fitted with a star tip (Wilton 1M or 2D) — for the whipped cream rosette visible in the photos. A zip-lock bag with the corner snipped works as a substitute but will not produce the defined ridged rosette.
- 6 glass jars (4–6 oz capacity, straight-sided, clear)
- Kitchen scale
- Plastic wrap (for covering jars during chilling)
How to Make No Bake Key Lime Cheesecake Cups
Step 1: Crushing the Graham Crackers and Building the Crust Base
This is a cold-set, no-bake assembly method — no oven, no heat except for the optional stovetop lime curd. Every layer sets in the refrigerator. The sequence matters more than the speed.
In a large mixing bowl, combine your 1½ cups (135g) graham cracker crumbs, 3 tablespoons (38g) plain white granulated cane sugar, and 3 tablespoons (45g) unsalted butter, melted and slightly cooled. The granulated sugar in the crust does two things: it adds a faint sweetness that balances the tart lime in the filling above it, and its crystals provide structural friction between the crumb particles — helping the pressed crust hold its shape as a distinct layer rather than compressing into a dense paste. The butter is the only binder in this crust — it coats the crumb particles and, when chilled, the fat solidifies and locks them together into a pressed layer that holds its shape when the filling is spooned on top. This is why the butter must be slightly cooled before mixing — hot butter makes the crumbs greasy and prevents them from pressing into a cohesive layer.
Stir with a silicone spatula until every crumb is evenly coated and the mixture looks like wet sand — it should clump when you press a small amount between your fingers but crumble apart when you release pressure. If it feels dry and falls apart without clumping, add ½ teaspoon of melted butter and stir again.
Do not over-process the crumbs before mixing. The rough, granular texture — the uneven sandy look visible through the glass in the photos — is a texture and visual feature of this crust, not a flaw. A crust pulsed to fine powder compacts into a dense, hard layer that is difficult to eat with a spoon and loses the textural contrast against the smooth filling above it.
Divide the crumb mixture evenly among your 6 glass jars — approximately 3 tablespoons (30g) per jar. Press the crumbs firmly and evenly into the base of each jar using the flat bottom of a small measuring cup or the back of a spoon. Press from the center outward, working the crumbs up against the glass walls slightly to create the defined crust edge visible in the photos. The pressed crust should feel compact and hold its shape when you tilt the jar — loose crumbs that shift when tilted have not been pressed firmly enough.
Place the filled jars on a small tray or baking sheet, cover loosely with plastic wrap, and refrigerate for a minimum of 15 minutes before adding the filling. Do not skip this chill — a warm crust absorbs moisture from the filling and becomes soggy within hours. The 15-minute chill firms the butter enough that the crust layer stays distinct. Now make the filling while the crusts chill.
Step 2: Beating the Cream Cheese Until Completely Smooth
This step determines the texture of every bite. In the bowl of your stand mixer fitted with the whisk attachment — or in a large mixing bowl using a hand mixer — add your 12 oz (340g) full-fat block cream cheese, softened to room temperature. Beat on medium speed (speed 4 on a KitchenAid, medium on a hand mixer) for 2 full minutes before adding anything else. Set a timer. Do not estimate.
Beating the cream cheese alone first breaks down any remaining cold spots and produces a completely smooth base. Every other ingredient added to the bowl will disperse more evenly into a pre-beaten cream cheese than into one that still has cold, resistant chunks in it. This single step is what separates a filling with no lumps from one that has visible white flecks in it no matter how long you continue mixing.
After 2 minutes, the cream cheese should look pale, slightly fluffy, and completely uniform — no streaks, no lumps, no visible white chunks clinging to the bowl sides. Stop and scrape the bottom and sides of the bowl with your silicone spatula before continuing. Any cream cheese that was not scraped from the sides will remain unmixed no matter how long the mixer runs.
Step 3: Adding the Sugar, Lime, and Vanilla to Build the Filling
With the mixer on low speed, add your ¾ cup (90g) powdered sugar, sifted to the beaten cream cheese in two additions — half first, let it incorporate for 20 seconds, then the second half. Adding it all at once creates a fine sugar cloud in your kitchen and causes the mixer to spit unmixed sugar onto the bowl sides. The powdered sugar sweetens the filling and adds body — it dissolves more readily than granulated sugar into a cold fat base, which is why powdered sugar is used here rather than granulated.
Increase speed to medium and beat for 30 seconds until fully incorporated. Scrape the bowl again.
Add your 3 tablespoons (45ml) fresh key lime juice, 1 teaspoon (5ml) pure vanilla extract, and finely grated zest of 1 key lime. The lime juice does two things simultaneously: it adds the primary citrus flavor and its acidity causes the cream cheese proteins to tighten slightly, which helps the filling set firmer in the refrigerator. The zest carries the aromatic lime oils that the juice alone does not — this is what gives the filling its sharp citrus scent on first bite.
Do not add the lime juice to cream cheese that is still cold from the refrigerator — the acid hits the cold fat too quickly and the mixture will look broken and slightly grainy, with small white clumps suspended in a thin liquid. This does not smooth out with more mixing. It is a temperature problem, not a mixing problem. If this happens, stop the mixer and let the bowl sit uncovered at room temperature for 15 minutes, then beat again on medium for 30 seconds — the clumps will usually reincorporate once the fat has warmed slightly.
Beat on medium speed for 45 seconds until the lime juice is fully incorporated and the filling looks smooth and uniform. The filling should smell sharply of lime, look bright white with flecks of green zest distributed evenly throughout, and hold a soft shape when you lift the spatula — not liquid, not stiff, somewhere between a thick yogurt and a soft frosting.
🗒 Luna’s Note: The filling will look slightly looser than you expect at this stage — this is correct. The whipped cream folded in next firms it up considerably, and the refrigerator sets it the rest of the way. A filling that looks too stiff before the cream goes in will be rubbery after chilling.
Step 4: Whipping and Folding in the Heavy Cream for a Light, Set Filling
In a separate clean, cold mixing bowl, add your ½ cup (120ml) heavy whipping cream (36% fat minimum), cold from the refrigerator. Using clean beaters, whip on medium-high speed until the cream reaches soft peaks — approximately 1 to 2 minutes. The cream will look billowy and doubled in volume at soft peaks. Continue beating on medium speed for another 30 to 45 seconds until it reaches stiff peaks — the cream should hold a firm point when you lift the beater straight up, with no curl or droop at the tip.
Do not overwhip. Cream that goes past stiff peaks begins to look grainy and yellow at the edges — the fat is starting to separate into butter. If this happens, the cream cannot be rescued for folding into the filling. Stop beating the moment the peaks hold firm.
Add the whipped cream to the cream cheese mixture in two additions. For the first addition, use your silicone spatula to fold with slow, deliberate strokes from the bottom of the bowl upward and over — not stirring in circles. Count 8 to 10 strokes, then add the second half of the whipped cream and fold again with the same slow motion until no white streaks remain. Fold gently — aggressive stirring deflates the air you just whipped in and produces a dense, heavy filling instead of the light, cloud-like texture visible in the photos.
The finished filling should look thick, smooth, and slightly airy — it holds its shape when scooped with a spoon and has a matte surface rather than the glossy look of the pre-cream mixture. This is the correct consistency to go into the jars.
Step 5: Filling the Jars and Starting the First Chill
Remove your chilled jars from the refrigerator. Divide the cream cheese filling evenly among the 6 jars — approximately 4 to 5 tablespoons (75–80g) of filling per jar. Spoon it over the pressed crust and smooth the top surface level with the back of a small spoon or a small offset spatula. The filling should come up to approximately ½ inch (1.2cm) below the rim of the jar — leave headspace for the curd layer and the whipped cream rosette above it.
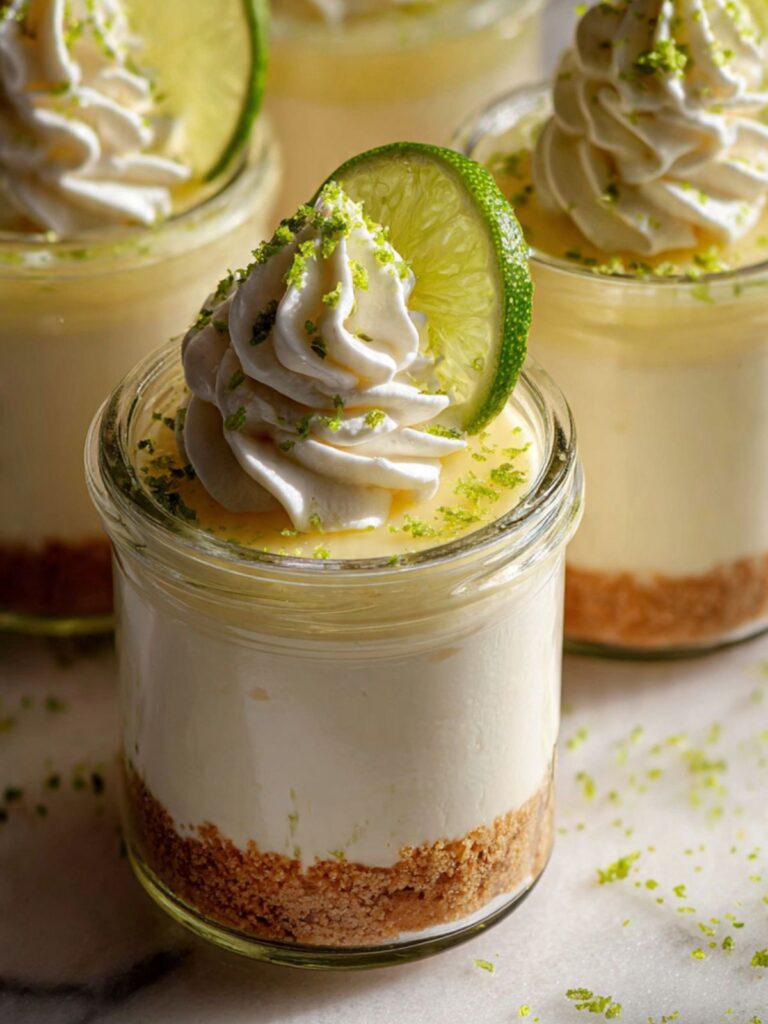
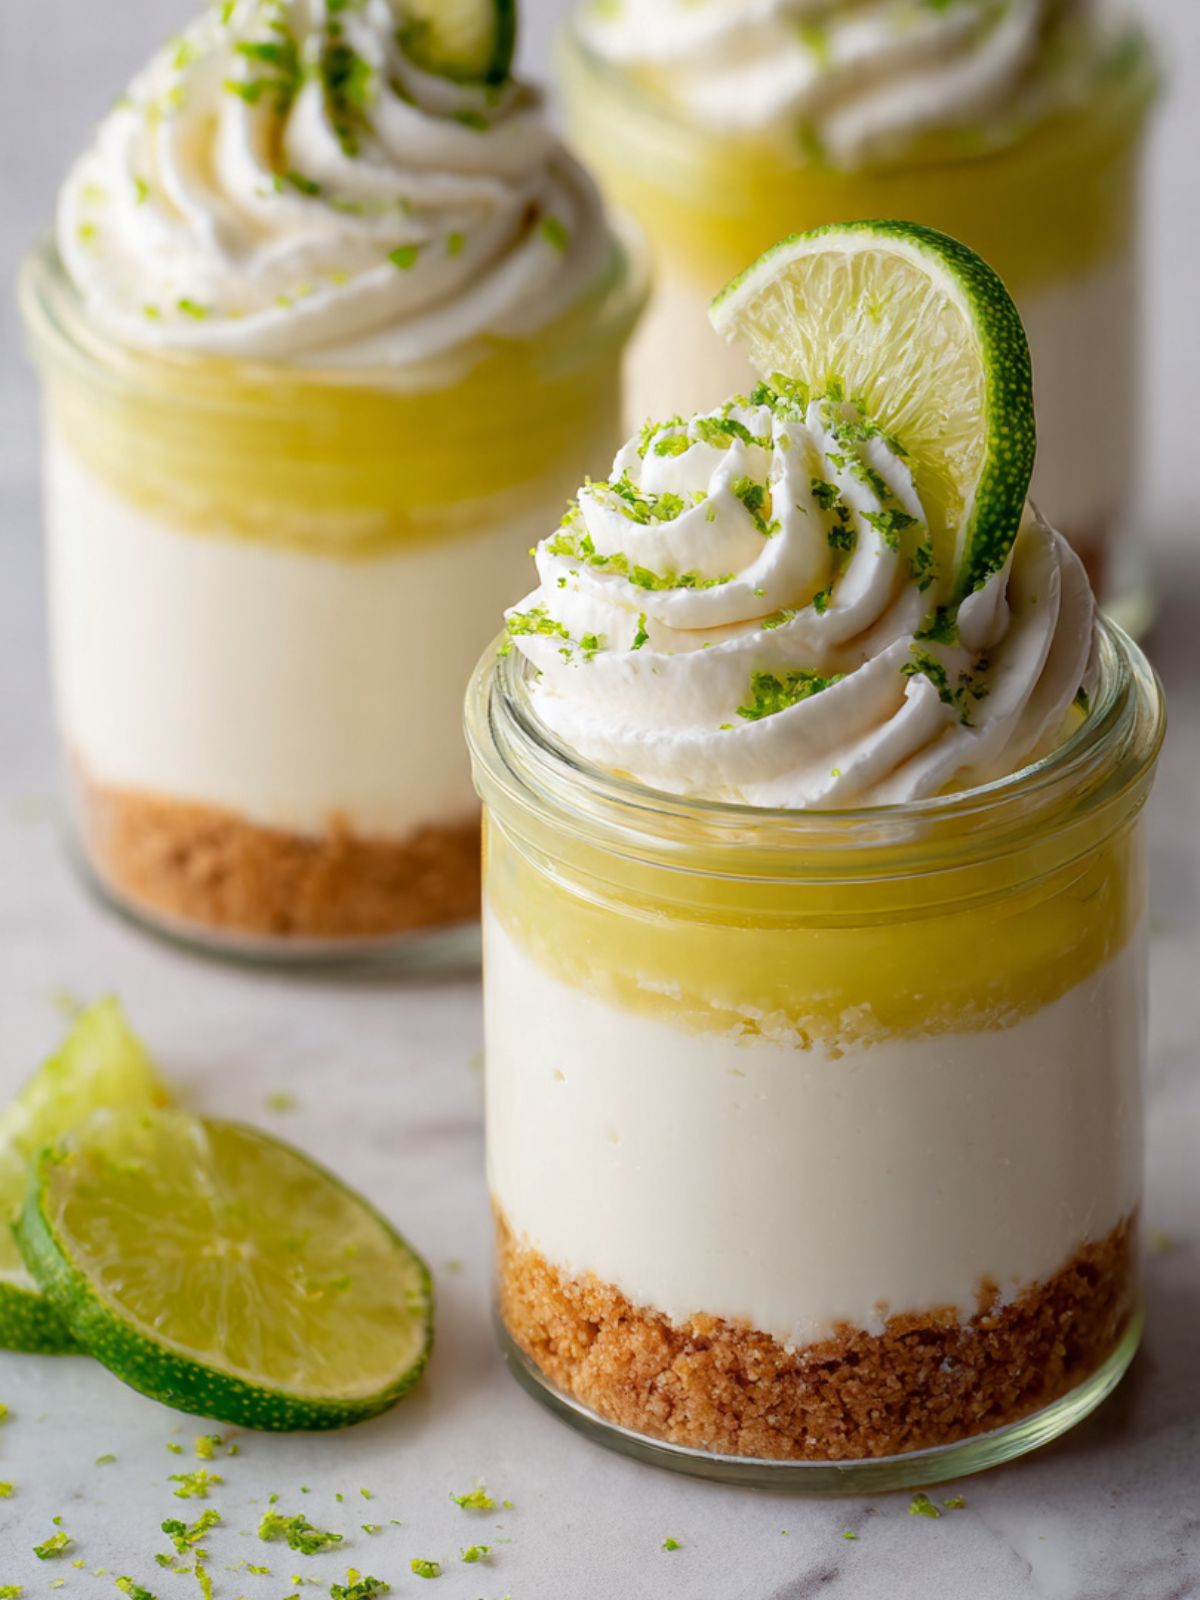
As you can see in the photo showing the jars from the front at eye level, the white filling layer is the deepest and widest layer in the jar — it takes up approximately half the total jar height above the crust. This is the correct proportion. If your filling layer is thinner than this, you may have spread it too thin across more jars than the recipe yields — 6 jars is the correct yield at this filling volume.
Cover each jar loosely with plastic wrap and return the tray to the refrigerator. Refrigerate for a minimum of 2 hours — do not rush this. At 1 hour, the filling surface will feel set to the touch but the interior will still be soft. At 2 hours, the filling is firm all the way through and will hold the weight of the curd layer without the two layers bleeding together. If you add the curd before the 2-hour mark, the curd will sink partially into the soft filling and the clean golden-yellow layer visible in the photos will not form.
For best results and the cleanest visual separation, refrigerate for 4 hours or overnight.
Step 6: Making or Preparing the Lime Curd Layer
While the cheesecake filling chills, prepare your curd layer so it has time to cool to room temperature before it goes on the jars.
If using store-bought lime curd: Spoon ⅔ cup (200g) into a small bowl and let it sit at room temperature for 20 to 30 minutes to loosen slightly — cold curd poured directly from the refrigerator is too thick to spread into an even layer and can drag the set filling surface when spooned on. You want the curd pourable but not liquid.
If making homemade lime curd: In a heatproof bowl set over a saucepan of barely simmering water — the bowl should not touch the water — whisk together 3 large egg yolks (approximately 50g each without shell), ½ cup (100g) plain white granulated cane sugar, and ¼ cup (60ml) fresh key lime juice. Cook over the double boiler, whisking constantly, until the mixture thickens enough to coat the back of a spoon and holds a line when you drag your finger across it — approximately 8 to 10 minutes. Do not let the mixture boil or the egg yolks will scramble. Remove from heat and stir in 2 tablespoons (28g) unsalted butter, cubed, and 1 teaspoon finely grated lime zest until the butter is fully melted. Strain immediately through a fine mesh sieve into a clean bowl. Press plastic wrap directly onto the surface of the curd — this prevents a skin from forming as it cools. Refrigerate until fully chilled before using, minimum 1 hour.
The correct curd consistency for layering: it should fall from a spoon in a thick, slow ribbon — not pour like water, not sit stiff like cold butter. This is the viscosity that produces the translucent, glossy curd layer visible in the photos without disturbing the firm cheesecake layer below it.
Step 7: Adding the Lime Curd Layer and the Final Chill
Remove the jars from the refrigerator and test the filling firmness by pressing lightly on the surface of one jar with your fingertip. The surface should feel completely firm and spring back without leaving an indent — if your finger leaves a dent, the filling needs more time. Return to the refrigerator for another 30 minutes and test again.
Once the filling is fully firm, spoon approximately 1½ to 2 tablespoons (28–35g) of room-temperature lime curd onto the surface of each jar. Tilt the jar gently to let the curd settle level — do not spread it aggressively with a spoon, which disturbs the set surface below. If the curd is at the right consistency, it will self-level with a gentle tilt into an even, glossy layer.
The curd layer should be thin enough to see the white filling below it through the glass — approximately ¼ inch (6mm) deep. The translucent yellow-green color visible in the photos comes from the thin depth of the curd, not from any added coloring.
Cover the jars loosely again and return to the refrigerator for a minimum of 30 minutes to let the curd layer set. At this point, the jars can be refrigerated for up to 24 hours before garnishing and serving. Do not add the whipped cream topping until you are ready to serve — piped cream begins to weep and lose its definition within 2 to 3 hours in the refrigerator.
Step 8: Whipping the Topping Cream and Finishing the Jars
Just before serving, make the whipped cream topping. In a cold mixing bowl, combine your ½ cup (120ml) heavy whipping cream (36% fat minimum), 2 tablespoons (15g) powdered sugar, sifted, and ½ teaspoon (2.5ml) pure vanilla extract. Whip on medium-high speed until the cream reaches stiff peaks — the ridged, defined rosette visible in the photos holding the weight of a fresh lime wedge upright requires stiff peaks, not soft. Soft peaks will collapse under the weight of the garnish within minutes.
Fit your piping bag with a Wilton 1M or 2D star tip. Fill the bag no more than halfway — an overfilled piping bag is difficult to control and produces uneven pressure. Hold the bag directly above the center of the jar, perpendicular to the surface, and pipe in a slow circular motion from the outside edge inward, ending with a slight upward pull at the center. One full rotation produces the rosette visible in the photos. Apply even, steady pressure throughout — inconsistent pressure produces a rosette with one thick side and one thin side.
The piped rosette should have clearly defined ridges from the star tip and hold its shape completely without drooping or spreading at the base — this is the stiff peak confirmation. If the rosette spreads flat after piping, the cream was not whipped to stiff peaks and needs to be re-chilled and re-whipped.
Immediately press one thin lime wedge into the side of the rosette at a slight angle — as shown in the close-up photo where the lime slice leans against the cream — and dust finely grated lime zest generously over the top of each jar.
Serve immediately.
The Science Behind No Bake Key Lime Cheesecake Cups
Why the Two-Stage Chill Is the Most Important Step in This Recipe
I did not understand why the chill sequence mattered until I ruined the third batch by rushing it. The filling looked set at the surface after an hour — firm to the touch, no jiggle when I tilted the jar. I added the curd. Within ten minutes, the yellow-green layer had partially sunk into the white filling and both colors had bled at the boundary into a murky swirl that bore no resemblance to the clean separation in the photos. I put the jar back in the refrigerator thinking the chill would fix it. It did not. The colors set exactly as they were — blurred, merged, wrong.
What I did not understand at the time was that the filling’s surface firmness and its structural firmness are two different things. The surface of a cream cheese and whipped cream filling sets relatively quickly in the refrigerator because the fat at the surface loses heat faster than the interior. But the filling beneath the surface — the full column of cream cheese and cream in the jar — takes significantly longer to reach the temperature where the fat crystals have locked the structure into place throughout. A filling that feels firm at the surface at one hour is still soft and mobile in its interior. When the weight and moisture of the curd goes on top of a soft interior, it does not sit on the surface — it gradually presses down and the boundary between layers softens and mixes.
At two hours, the filling has chilled uniformly through. The fat in the cream cheese and heavy cream has crystallized fully. The structure is rigid enough to support the curd layer without any compression or movement at the boundary. This is why the clean line in the photos is not a styling trick — it is the direct visual result of waiting the correct amount of time before adding the next layer. The chilling sequence is structural engineering, not patience.
What Lime Juice Does to Cream Cheese — and Why It Makes the Filling Set Firmer
The lime juice in this filling is not just flavoring. Lime juice is acidic — a pH of approximately 2.0 to 2.4 — and when it contacts the proteins in full-fat cream cheese, it causes those proteins to tighten and partially denature without heat. This is the same mechanism that makes ceviche “cook” raw fish — acid rearranges protein structure the way heat does, just more gently and without fully firming the texture.
In practical terms: a cream cheese filling made without any acid is softer and more prone to weeping moisture as it sits. A filling made with fresh lime juice sets slightly firmer, holds its shape at the cut edge more cleanly, and releases less liquid over the 3-day refrigerator storage window. The acid does not make the filling taste sour — the powdered sugar balances it — but it changes the physical behavior of the filling in ways that matter for both texture and shelf stability.
This is also why bottled lime juice is a meaningful downgrade in this specific recipe, not just a flavor compromise. Bottled juice is pasteurized and has a pH slightly higher than fresh juice — less acidic, which means the protein-tightening effect is weaker. The filling still sets, but slightly softer, and it weeps more moisture by day two. Fresh juice is worth squeezing here.
🗒 Luna’s Note: I squeeze my limes over a fine mesh sieve set over the measuring cup — it catches seeds and any pith that breaks off without needing a separate straining step. One key lime yields approximately 1 tablespoon (15ml) of juice, so this recipe needs about 3 key limes for the filling alone. Buy five — you will want the extra zest. You can find a similar no-bake approach in my chocolate chip cookie dough cups, where the chilling sequence works the same way for a different filling type.
Why Fat Content Determines Whether the Whipped Cream Holds or Collapses
The stiff-peak whipped cream in this recipe — both folded into the filling and piped on top — only works if the heavy cream contains a minimum of 36% butterfat. This is not a guideline. It is a physical requirement.
Cream whips because the fat globules in the liquid, when agitated rapidly, begin to cluster around air bubbles and form a network of fat and air that traps the bubbles in place. The higher the fat content, the more fat globules are available to form this network, and the more stable the resulting foam. At 36% fat and above, the network is dense enough to hold stiff peaks — sharp points that do not droop or spread — and to maintain that structure under the weight of a lime wedge for the duration of serving.
At lower fat percentages — half-and-half at 10–12% fat, light cream at 18–30% fat — there are not enough fat globules to form a complete network regardless of how long you whip. The liquid will foam slightly and then remain liquid no matter how much time and speed you apply. If you have ever spent ten minutes whipping cream that refused to thicken, the cream was not heavy enough.
The same fat threshold applies to the cream folded into the filling. Under-fat cream that reaches only soft peaks before folding will produce a filling that is denser and heavier than the one in the photos — the airy, light texture of the filling depends entirely on the air network the stiff cream brings into the mixture before folding. Check the label before you buy: heavy whipping cream should read 36% fat or higher. Some regional brands labeled simply whipping cream contain only 30–35% fat and will not perform reliably at stiff peaks in a warm kitchen.
No Bake Key Lime Cheesecake Cups Troubleshooting & Pro-Tips
Common Mistakes
1. Using the Wrong Cream Cheese
Symptom: The filling looks lumpy and granular after mixing, does not smooth out no matter how long you beat it, and the finished cups have visible white flecks or a slightly grainy texture on the tongue.
Cause: Whipped cream cheese, spreadable cream cheese, or low-fat cream cheese was used instead of full-fat block cream cheese. Whipped cream cheese has already had air incorporated and water added to make it spreadable — its fat-to-water ratio is fundamentally different from block cream cheese. Low-fat versions contain even more water. Neither will beat smooth and neither will set to the firm, clean layer shown in the photos.
Fix: If the filling is already made and visibly lumpy, pass it through a fine mesh sieve pressed with the back of a spoon — this removes larger lumps but will not fully rescue the texture. The filling will still set, but the mouthfeel will be less smooth than intended.
Prevention: Always start with full-fat block cream cheese — the kind sold in a foil-wrapped brick, not a tub. Check the label before you buy. Pull it from the refrigerator 60 to 90 minutes before mixing and confirm it passes the finger-press test before the mixer goes on.
2. Wrong Jar Type or Size
Symptom: The layers look uneven, the crust-to-filling ratio is off, or the whipped cream rosette sits above the rim and topples when the jar is moved.
Cause: Jars that are too narrow concentrate the layers vertically and make the crust layer disproportionately thick relative to the filling. Jars that are too wide spread the filling thin and leave insufficient depth for the curd layer to read as a distinct visual band. Jars with tapered sides rather than straight sides make the layers look uneven through the glass.
Fix: If the jars are already filled and the proportions are off, there is no structural fix — serve them as-is and adjust for the next batch. The flavor will be identical regardless of proportion.
Prevention: Use straight-sided, clear glass jars between 4 and 6 oz capacity. Standard wide-mouth mason jars (4 oz Ball jars) and Weck tulip jars both work well. Avoid tapered glasses or stemware — the angled sides distort the layer appearance.
3. The Layers Bled Together and the Curd Sank Into the Filling
Symptom: The lime curd layer is not sitting cleanly on top of the white filling — the boundary between layers is blurred, murky, or the curd has partially sunk into the filling and the two colors have merged.
Cause: The lime curd was added before the cheesecake filling was fully set through to the interior. The surface of the filling firms faster than the interior — a filling that feels firm at the surface at one hour is still soft and mobile underneath. The weight and moisture of the curd pushes down into a soft interior and the layer boundary dissolves.
Fix: Once the layers have bled together, they cannot be separated. The flavor is completely unaffected — serve as a swirled key lime cheesecake cup. The visual is different from the photos but the taste is identical. Dust generously with lime zest and garnish with the lime wedge — the topping draws the eye and the blended layers are not visible from above.
Prevention: Refrigerate the filled jars for a full 2 hours minimum before adding any curd. Press your fingertip lightly onto the filling surface — it must spring back completely without leaving any indent before the curd goes on. When in doubt, wait another 30 minutes.
4. The Whipped Cream Topping Is Weeping or Has Gone Flat
Symptom: The piped rosette has lost its defined ridges, spread flat against the curd layer, or pools of liquid have formed around the base of the cream.
Cause: The cream was not whipped to true stiff peaks before piping, or the cream was whipped correctly but the jars were garnished and refrigerated for more than 2 to 3 hours before serving. Whipped cream is a foam — it is inherently unstable over time, especially in a humid refrigerator environment where condensation accelerates weeping.
Fix: If the cream has gone flat before serving, scrape it off, re-whip a fresh batch, and re-pipe. The curd layer beneath will be undisturbed. A small amount of weeping that has reached the curd layer can be blotted gently with the corner of a paper towel before re-piping.
Prevention: Pipe the whipped cream immediately before serving — not hours ahead. If you need to make the jars ahead, fill and chill through the curd stage, then pipe the cream at the last possible moment. For a more stable topping that can be piped 1 to 2 hours ahead, add 1 teaspoon (3g) of instant vanilla pudding powder to the cream before whipping — it acts as a light stabilizer without changing the flavor noticeably.
5. The Crust Is Soggy or Has Lost Its Texture
Symptom: The graham cracker crust at the base of the jar has become soft, wet, and indistinct — it no longer provides textural contrast against the filling and tastes like wet bread rather than a pressed cracker crust.
Cause: The crust was not pre-chilled before filling was added, the jars were stored for more than 3 days, or excess moisture from the filling migrated downward into the crumb layer over time. Graham cracker crusts in individual jars absorb moisture faster than a crust in a springform pan because the filling is in direct contact with the crumb on all sides.
Fix: A soggy crust cannot be restored. If the texture has already softened, serve immediately — the flavor is still present even without the crunch. For future batches, add a thin barrier layer between the crust and the filling: brush the pressed crust with a very thin coat of melted white chocolate (approximately 1 teaspoon per jar) and let it set for 5 minutes in the refrigerator before adding the filling. The white chocolate creates a moisture barrier that keeps the crust distinct for an additional 24 hours.
Prevention: Always pre-chill the pressed crust for a minimum of 15 minutes before adding the filling. Serve within 3 days of assembly. Store covered but not airtight — a fully sealed jar traps condensation against the filling surface and accelerates moisture migration downward.
6. The Filling Did Not Set and Remains Too Soft After Chilling
Symptom: After 2 or more hours in the refrigerator, the filling still has a soft, pudding-like consistency — it does not hold its shape when a spoon is pressed into it and the curd layer sinks immediately when added.
Cause: Low-fat cream cheese or under-fat heavy cream was used, the cream was not whipped to stiff peaks before folding, or the refrigerator temperature is too warm. Refrigerators should run between 35°F and 38°F (1.5°C to 3°C) — a refrigerator running above 40°F (4.5°C) will not set a cream-based no-bake filling reliably regardless of chill time.
Fix: If the filling is soft after 4 hours of chilling, the ingredients were likely the issue rather than the time. Return the jars to the refrigerator and check again at the 6-hour mark. If still soft, the filling will not set further — serve as a key lime cheesecake mousse by layering the curd on top as a sauce rather than a distinct layer. Crush extra graham crackers and scatter them over the top for texture.
Prevention: Confirm your refrigerator temperature with an appliance thermometer before starting. Use full-fat block cream cheese and heavy whipping cream with a minimum 36% fat content — check labels. Whip the cream to true stiff peaks before folding — test by lifting the beater and confirming the peak holds its shape with no droop.
7. Altitude and Humidity Adjustments
High altitude (above 3,500 ft / 1,065m): No-bake recipes are largely unaffected by altitude since they do not rely on leavening or oven heat. However, cream whips faster at altitude due to lower air pressure — watch closely and stop beating earlier than you think necessary to avoid overwhipping into butter. Begin checking for stiff peaks at the 1-minute mark rather than the standard 1 to 2 minutes.
High humidity (above 70% relative humidity): Humidity accelerates weeping in whipped cream and softens the graham cracker crust faster. In a humid environment, pre-chill the crust for 30 minutes instead of 15. Pipe the whipped cream topping immediately before serving — do not pipe ahead. Consider adding the pudding powder stabilizer to the topping cream as a precaution.
Expert Pro-Tips
Pro-Tip 1: Press Extra Crust Up the Sides of the Jar
After pressing the base layer, use your finger or the handle of a small spoon to press a thin band of crumb mixture approximately ½ inch (1.2cm) up the inside wall of the jar before adding the filling. This creates the defined crust edge visible through the glass in the photos — where the golden crumb layer appears to frame the white filling from below. Without this step, the filling sits directly against the glass at the sides and the crust reads only as a bottom layer rather than a contained base. This takes 30 extra seconds per jar and makes a significant visual difference.
Pro-Tip 2: Use a Cookie Scoop for Even Filling Portions
A standard 3-tablespoon cookie scoop portions the filling into the jars faster, more evenly, and with less mess than spooning. Two level scoops per jar hits the correct fill height reliably across all 6 jars without measuring each one. This also produces a more level filling surface than spooning, which means less smoothing work with the offset spatula and a flatter base for the curd layer to sit on.
Pro-Tip 3: Make the Lime Curd Layer Visible From the Front
The translucent yellow-green curd layer is the visual centerpiece of this dessert when viewed from the front or side — it is the layer that makes the jar look layered and intentional rather than just a white cup with cream on top. To maximize its visibility, position the jars so the curd layer sits at the widest visible band through the glass. If your jars taper slightly toward the base, the crust will be narrower than the filling — place more filling to bring the curd layer up to the widest glass diameter. Check from eye level before refrigerating — what looks correct from above often reads differently from the front.
Pro-Tip 4: Zest the Limes Before Juicing Them
Always zest before juicing. A juiced lime is soft, collapsed, and impossible to zest cleanly — the microplane tears the pith rather than the colored outer layer. Zest all the limes you need first, then juice them. Store any unused zest in a small covered bowl in the refrigerator for up to 24 hours — citrus zest loses its volatile oils quickly at room temperature and should never sit out.
I use a digital kitchen timer for every step in this recipe, not my phone. The difference between 2 hours and 2 hours and 45 minutes in the refrigerator is the difference between correct layers and bled layers — my phone leads to other things and I have missed timers because of it. The timer does not.
How to Store No Bake Key Lime Cheesecake Cups
Room Temperature
These jars are not stable at room temperature. The cream cheese filling begins to soften and the whipped cream topping begins to weep within 30 to 45 minutes at room temperature above 65°F (18°C). Do not leave assembled jars out during serving for longer than 20 minutes — pull them from the refrigerator immediately before plating and return any uneaten jars to the refrigerator promptly.
If you are serving these at an outdoor gathering or in a warm room, set the jars in a shallow tray filled with crushed ice to keep them at a stable temperature during the serving window. This is not optional in warm weather — a cream cheese filling that softens at the table loses both its texture and its clean layer distinction.
Refrigerator
Store assembled jars — without the whipped cream topping and garnish — covered loosely with plastic wrap, in the refrigerator for up to 3 days. Do not use a fully sealed lid for jars that have already been filled — a sealed lid traps condensation against the filling surface and accelerates moisture migration into the crust below.
The whipped cream topping should be piped fresh immediately before serving each time. Do not pipe and refrigerate — piped whipped cream begins to lose its defined ridges and weep liquid within 2 to 3 hours in the refrigerator, and by day two it will have collapsed entirely. Keep the untopped jars refrigerated and whip the topping cream to order.
Day 1 vs. Day 2: The filling on Day 1 is at peak lightness — the whipped cream still carries its airy lift and the lime flavor is bright and sharp. By Day 2, the filling has compressed slightly under its own weight and the texture is denser and creamier rather than airy. The lime flavor deepens and mellows slightly — less sharp on first bite, more integrated. Both are good. Day 1 is the showpiece version. Day 2 is the version you eat standing in front of the open refrigerator.
Day 3: Still safe and still flavorful, but the crust will have softened noticeably and the filling will be denser than intended. Eat by Day 3 — do not push to Day 4.
Freezer — Made
These jars do not freeze well in their assembled state. The cream cheese and whipped cream filling separates on thawing — the water and fat in the filling freeze at different rates and do not reincorporate when thawed, leaving a grainy, weeping texture that is not recoverable. The lime curd layer becomes watery and loses its gloss on thawing. Do not freeze assembled jars.
Freezer — Components Separately
Individual components can be frozen separately if needed:
Graham cracker crust mixture: The unbaked crumb and butter mixture can be frozen in a zip-lock freezer bag for up to 1 month. Thaw overnight in the refrigerator, then press into jars and chill as directed. The texture is identical to fresh.
Lime curd: Homemade lime curd freezes well. Transfer to a freezer-safe container with plastic wrap pressed directly on the surface, then seal with a lid. Freeze up to 2 months. Thaw overnight in the refrigerator, stir gently before using — do not reheat. Store-bought curd: check the label for freeze instructions, as formulations vary.
Cream cheese filling: The filling can be frozen before assembly — transfer to a freezer-safe container and freeze up to 1 month. Thaw overnight in the refrigerator, then beat briefly with a hand mixer on low speed for 30 seconds to restore its consistency before spooning into jars. Expect a very slight texture difference compared to fresh — the filling will be marginally denser after freezing and thawing but will still set correctly in the jars.
Do not freeze the whipped cream topping — frozen whipped cream loses all structural integrity on thawing and cannot be re-whipped.
Serving Suggestion
Serve these jars cold — pulled directly from the refrigerator no more than 5 minutes before the whipped cream goes on. This is not a dessert that benefits from coming to room temperature first. The contrast between the cold, dense filling, the tart glossy curd, and the just-piped stiff cream is what makes the first spoonful work — warm the filling slightly and the contrast collapses into a uniform soft texture that loses its identity.
I serve these with nothing alongside them. The lime is sharp enough and the filling is rich enough that a pairing — coffee, tea, anything — competes rather than complements. The one exception is sparkling water with a lime wedge squeezed in. The carbonation cuts the richness between bites in a way that makes the second and third spoonfuls taste as bright as the first.
This is the dessert I make when someone asks me to bring something and I want them to remember what I brought. It looks technically impressive in a way that suggests difficulty — the clean layers, the piped rosette, the lime wedge — and the actual active work is under 35 minutes. I have never brought these to a gathering where someone did not ask for the recipe before the jars were empty.
Day 2 note: If you are making these for a dinner party, assemble the jars through the curd layer the night before and refrigerate overnight. The overnight chill produces a filling that is denser and more cohesive than the 2-hour version — the layers are more distinct, the curd sits cleaner, and the whole jar is easier to eat with a spoon because the filling does not shift. Pipe the cream and garnish immediately before guests arrive.
One honest limitation: These do not travel. The whipped cream rosette survives approximately 10 minutes of movement before it begins to shift and the lime wedge falls. If you need to transport them, skip the piped topping, cover with a flat lid, and garnish at the destination. The layers survive transport — the garnish does not.
Frequently Asked Questions About No Bake Key Lime Cheesecake Cups
Can I make no bake key lime cheesecake cups ahead of time?
Yes — and they are actually better when made partially ahead. Assemble the jars through the lime curd layer and refrigerate for up to 24 hours before serving. The overnight chill produces a denser, more cohesive filling with cleaner layer separation than the minimum 2-hour version. Do not pipe the whipped cream topping or add the lime wedge and zest garnish until immediately before serving — piped cream begins to weep and lose definition within 2 to 3 hours in the refrigerator and will not look correct by the following day.
What is the difference between key limes and regular limes in this recipe?
Key limes are smaller, more aromatic, and more tart than Persian limes — the standard large limes sold at most grocery stores. The juice from key limes has a slightly floral, more complex acidity that is the defining flavor of a classic key lime dessert. Persian limes produce a sharper, cleaner citrus flavor with less floral complexity. Both work in this recipe — the filling will set correctly either way because the acid content is similar. The flavor difference is noticeable if you have tasted both side by side, but Persian limes are a completely acceptable substitute when key limes are not available or are out of season.
Can I use bottled lime juice instead of fresh?
Technically yes, but the result will be noticeably different in two ways. First, bottled lime juice is pasteurized, which flattens its flavor and gives it a slightly cooked, less bright citrus note — in a no-bake filling where lime is the primary flavor, this difference is more apparent than it would be in a baked recipe where heat changes the flavor anyway. Second, bottled juice has a slightly higher pH than fresh juice, meaning it is less acidic — the protein-tightening effect that helps the filling set firmer is weaker, and the finished cups may be softer and release more moisture over refrigerator storage. Fresh juice is worth the extra two minutes here. You need approximately 3 key limes or 1½ Persian limes for the filling.
Why is my cheesecake filling lumpy and how do I fix it?
A lumpy filling almost always comes from cream cheese that was not at full room temperature before mixing. Cold cream cheese contains fat that has not softened enough to break down under the mixer — the beaters push the cold chunks around the bowl rather than breaking them apart, and those chunks persist no matter how long you mix. The fix for a batch already in progress is to stop the mixer, press plastic wrap directly on the bowl surface, and let the mixture sit at room temperature for 20 minutes before beating again — the ambient warmth will soften the remaining cold spots enough for them to incorporate. For future batches, always pull the cream cheese from the refrigerator 60 to 90 minutes before you begin and confirm it passes the finger-press test before the mixer goes on.
Can I make this recipe without gelatin?
This recipe does not use gelatin — the filling sets entirely from the structure of the cream cheese fat and the air incorporated into the whipped cream. No blooming, no tempering, no gelatin required. The key to a clean set without gelatin is full-fat block cream cheese at room temperature, heavy whipping cream at a minimum 36% fat content whipped to true stiff peaks, and the full 2-hour minimum chill. If you have made no-bake cheesecakes before that required gelatin and found the texture too rubbery or bouncy, this recipe produces a softer, creamier result because the set comes from fat crystallization rather than gelatin cross-linking.
You can find a similar no-bake setting method in my biscoff icebox cake, which uses the same cream cheese and whipped cream structure for a layered slab format.
Does altitude or humidity affect no bake key lime cheesecake cups?
High altitude affects this recipe in one specific way: cream whips faster above 3,500 feet (1,065m) due to lower air pressure, which means the fat network forms more quickly and the risk of overwhipping into grainy, butter-adjacent cream is higher. Begin checking for stiff peaks at the 45-second mark rather than waiting the standard 1 to 2 minutes. High humidity softens the graham cracker crust faster and accelerates weeping in the whipped cream topping — pre-chill the pressed crust for 30 minutes instead of 15, and pipe the cream immediately before serving with no lead time.
Why did my whipped cream not reach stiff peaks?
The two most common causes are cream with insufficient fat content and cream that was not cold enough when whipping began. Cream labeled simply “whipping cream” at some regional brands contains only 30 to 35% butterfat — below the 36% minimum needed to form a stable stiff-peak foam. Check the label before buying and look specifically for “heavy whipping cream” at 36% fat or higher. The second cause is temperature — cream at room temperature does not whip reliably because the fat globules have already softened and cannot form the rigid network needed to trap air at stiff peaks. If your cream is cold and the correct fat percentage and still will not peak, chill the mixing bowl and beaters in the freezer for 10 minutes and try again with fresh cold cream.
Can I make these as one large no bake cheesecake instead of individual cups?

Yes — press the crust mixture into an 8-inch (20cm) springform pan lined with parchment, pour the filling over it, and follow the same chill sequence. The set time increases to a minimum of 4 hours for a full pan — the deeper filling volume takes longer to chill uniformly through than the shallower individual jar portions. Spread the lime curd over the fully set filling and refrigerate for an additional 30 minutes before piping the whipped cream. To serve, run a thin knife around the inside edge of the springform ring before releasing — this prevents the filling from tearing at the sides. The visual layer effect will be less pronounced than in the individual jars because the layers are not viewed through glass from the side, but the flavor and texture are identical.
No Bake Key Lime Cheesecake Cups Recipe
Ingredients
Equipment
Method
- Combine 1½ cups (135g) graham cracker crumbs, 3 tablespoons (38g) granulated sugar, and 3 tablespoons (45g) melted unsalted butter in a large bowl and stir with a silicone spatula until every crumb is evenly coated and the mixture clumps when pressed between your fingers.
- Divide the crumb mixture evenly among 6 glass jars — approximately 3 tablespoons (30g) per jar — and press firmly into the base using the flat bottom of a small measuring cup, working the crumbs slightly up the inner glass walls to form a defined crust edge.
- Place filled jars on a tray, cover loosely with plastic wrap, and refrigerate for a minimum of 15 minutes while you make the filling.
- In the bowl of a stand mixer fitted with the whisk attachment, or using a hand mixer, beat 12 oz (340g) full-fat block cream cheese on medium speed for 2 full minutes until completely smooth, pale, and lump-free — scrape the bowl sides and bottom before continuing.
- With the mixer on low, add ¾ cup (90g) sifted powdered sugar in two additions, then increase to medium and beat for 30 seconds until fully incorporated — scrape the bowl again.
- Add 3 tablespoons (45ml) fresh key lime juice, 1 teaspoon (5ml) pure vanilla extract, and the finely grated zest of 1 key lime and beat on medium speed for 45 seconds until smooth and uniform.
- In a separate cold bowl with clean beaters, whip ½ cup (120ml) cold heavy whipping cream on medium-high speed until it reaches stiff peaks — the cream should hold a firm point with no droop when the beater is lifted.
- Fold the whipped cream into the cream cheese mixture in two additions using a silicone spatula with slow strokes from the bottom of the bowl upward — do not stir in circles — until no white streaks remain.
- Remove the chilled jars from the refrigerator and divide the filling evenly among them — approximately 4 to 5 tablespoons (75–80g) per jar — smoothing the surface level with a small offset spatula, leaving ½ inch (1.2cm) of headspace below the rim.
- Cover loosely with plastic wrap and refrigerate for a minimum of 2 hours — 4 hours preferred, overnight best — until the filling is completely firm and springs back without leaving an indent when pressed lightly with a fingertip.
- Let store-bought lime curd sit at room temperature for 20 to 30 minutes to loosen slightly, then spoon approximately 1½ to 2 tablespoons (28–35g) of curd onto the surface of each fully set jar and tilt gently to self-level — do not spread aggressively.
- Cover and refrigerate for a minimum of 30 minutes to set the curd layer — jars can be held at this stage for up to 24 hours before finishing.
- Just before serving, whip ½ cup (120ml) cold heavy whipping cream with 2 tablespoons (15g) sifted powdered sugar and ½ teaspoon (2.5ml) pure vanilla extract on medium-high speed to stiff peaks.
- Fit a piping bag with a Wilton 1M or 2D star tip, fill the bag halfway, and pipe one rosette per jar by holding the bag perpendicular to the jar surface and piping in a slow circular motion from the outside edge inward with even pressure.
- Press one lime wedge into the side of each rosette at a slight angle, dust generously with finely grated lime zest, and serve immediately.