Peach Crumble Bars Recipe
The first batch of these peach crumble bars had a soggy base. I knew exactly why before I pulled them from the oven — I had skipped the cornstarch toss on the peaches and put the raw fruit directly on the shortbread. The juice ran straight through the base during baking and I had to start over. That single step — tossing the peach slices in cornstarch before they go into the pan — is the difference between bars with a crisp, structured base and bars that dissolve at the bottom.
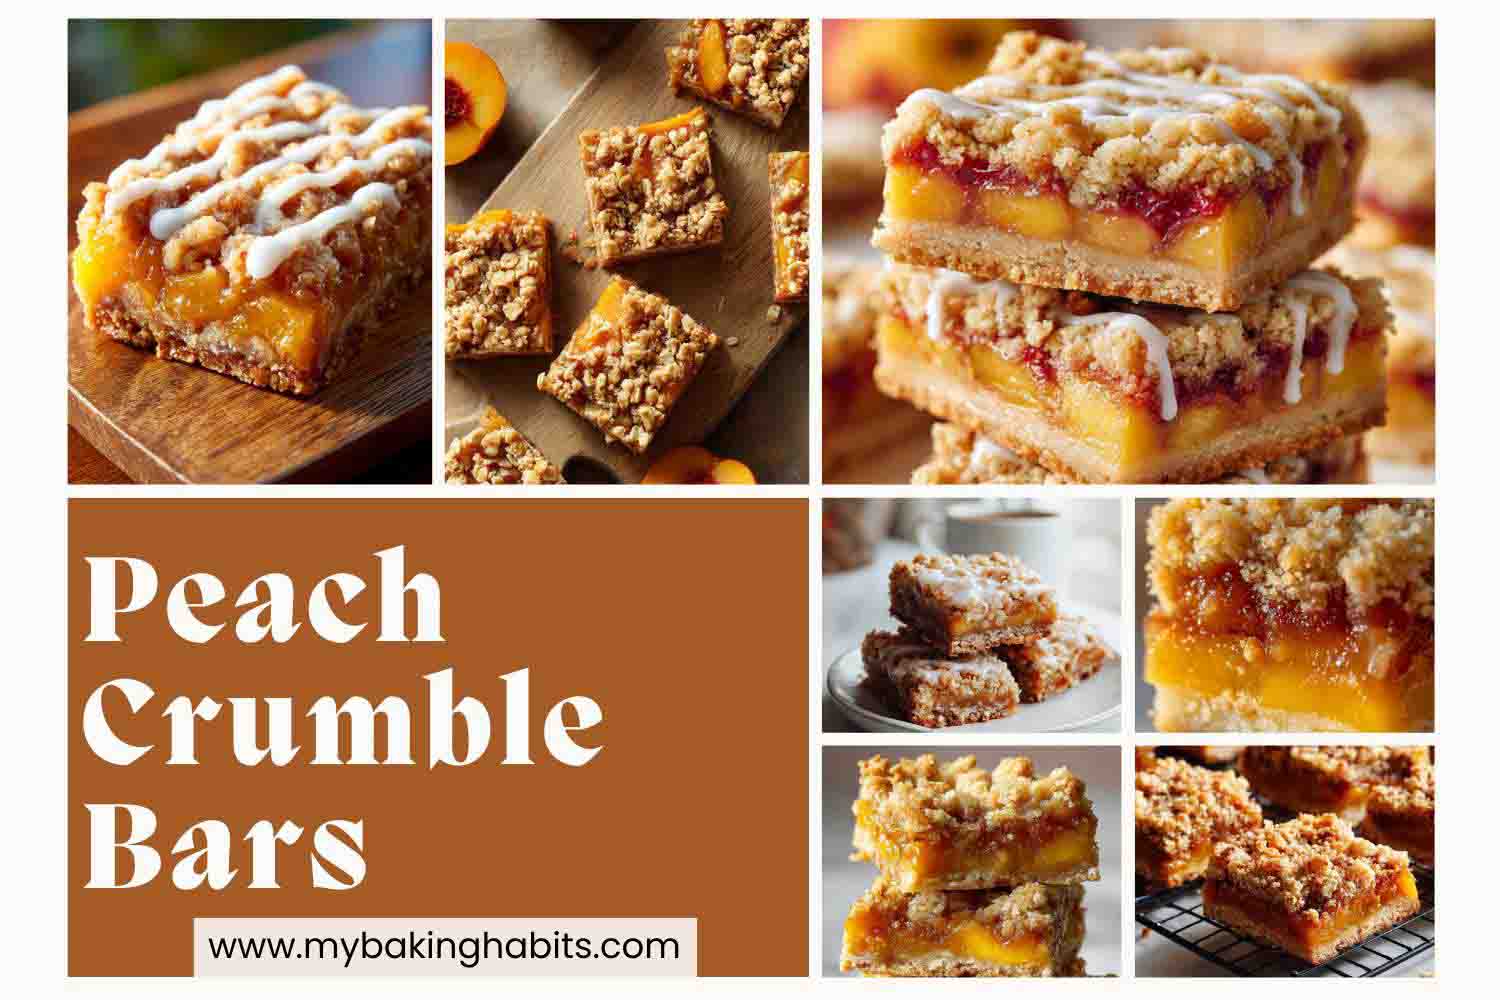
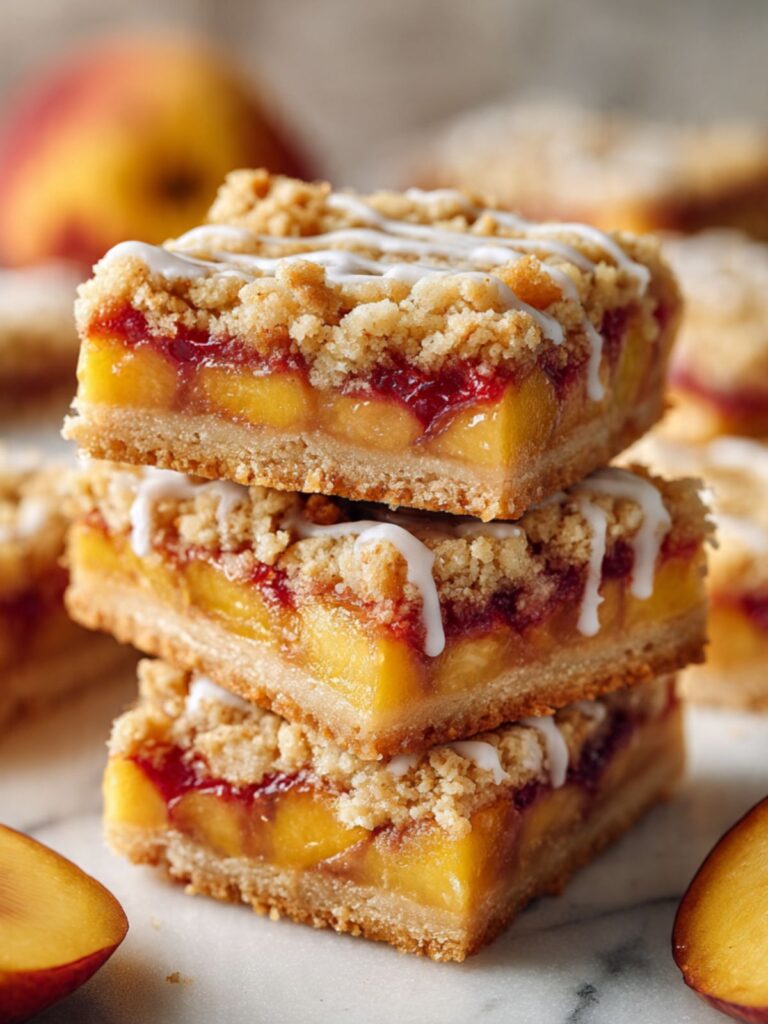
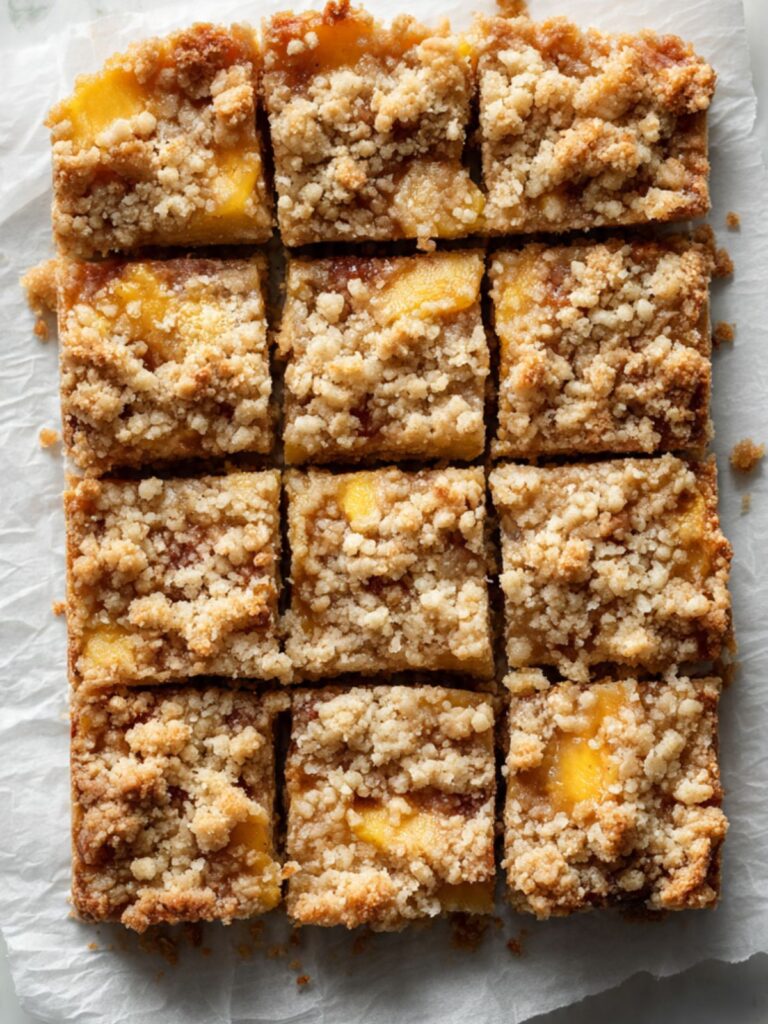
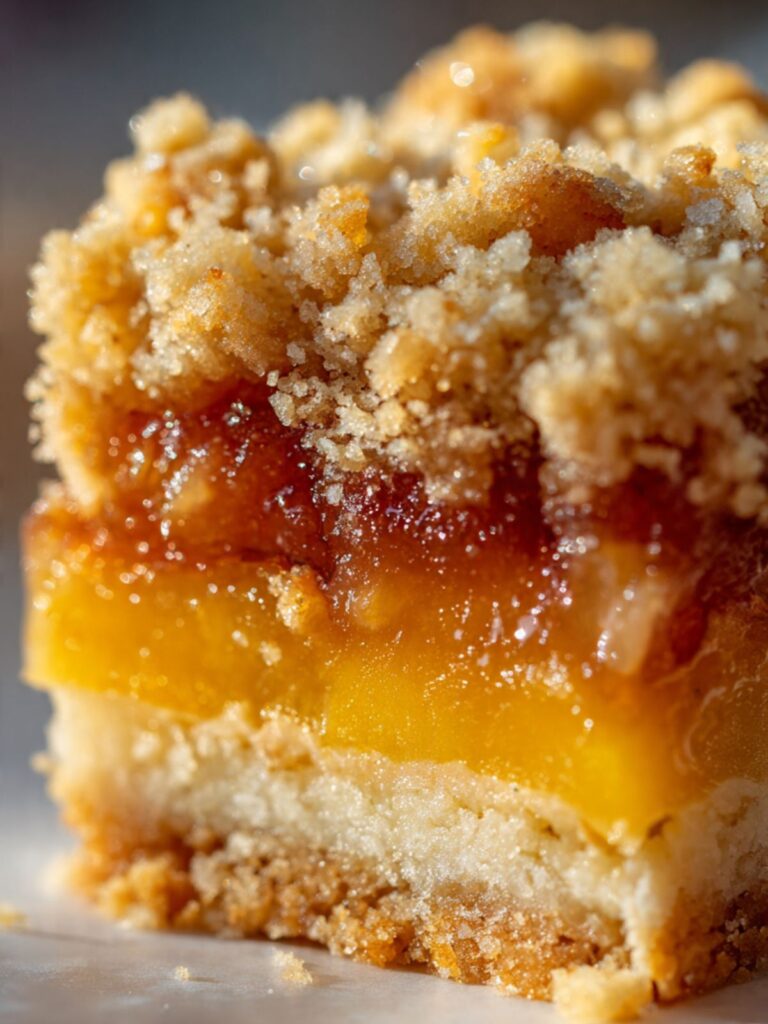
These peach crumble bars are built from three components, and each one matters independently. The base and crumble come from the same shortbread dough — all-purpose flour, cold unsalted butter, granulated sugar, and a little vanilla. Two-thirds of it gets pressed into the pan as the crust. The remaining third gets mixed with rolled oats and crumbled over the top. The filling is fresh yellow peaches tossed with cornstarch, lemon juice, and brown sugar, with a thin layer of raspberry jam dotted over them before the oat crumble goes on. That jam layer is what produces the deep ruby pockets you can see in the cross-section — not a separate step, just three tablespoons of jam spooned over the peaches before the topping goes on.
The result is a bar with a dense, buttery shortbread base that holds its shape completely when sliced. The filling is jammy and syrupy — not soupy, not dry — with large chunks of golden peach suspended in caramelized fruit juices. The crumble topping is clumped and irregular, with toasted oat pieces giving it a coarser, more substantial bite than a flour-only streusel. There is an optional powdered sugar glaze you can drizzle over the top once they cool, which is what you see in the stacked hero photo. It adds about fifteen seconds of effort and significantly improves the presentation.
I tested the crumble with and without rolled oats. The flour-only version baked up sandy and fine — it disappeared into the fruit and gave the bars a more uniform, less visually interesting top. The oat version held its shape as distinct clumps, toasted unevenly at the peaks, and gave each bar a more substantial chew. I kept the oat version. If you do not have oats or prefer a smoother topping, the recipe notes cover the flour-only substitution.
I tested the fruit layer with fresh peaches only versus fresh peaches plus raspberry jam. Fresh peaches alone baked into a lighter, orange-golden filling that tasted good but looked flat in cross-section. Adding three tablespoons of raspberry jam deepened the flavor, produced that two-tone amber-ruby color visible when you cut through the bars, and added a slight tartness that balanced the sweetness of the shortbread. I would not skip the jam. It is not a large amount — it is three tablespoons — but the visual and flavor difference is disproportionate to how little effort it adds.
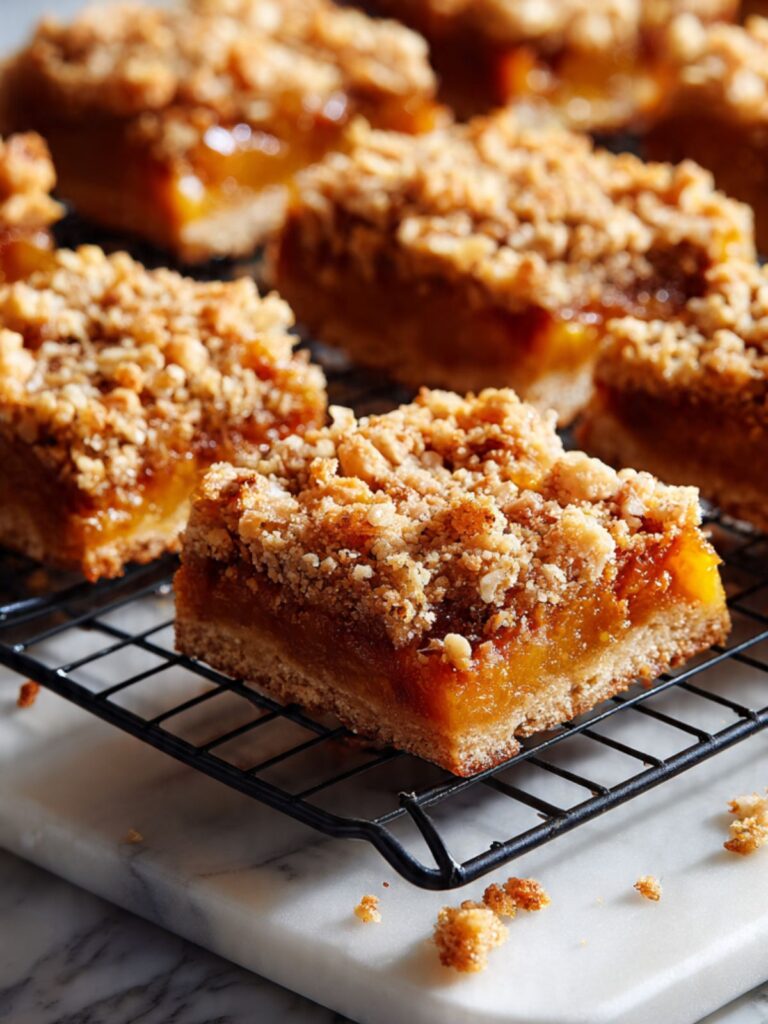
No mixer required for this recipe. The shortbread dough comes together with cold butter cut into the flour by hand or with a pastry blender — this is the same technique used in pie crust, and the cold fat is what creates the crumbly, clumped crumble topping. The bars require chilling after baking before slicing. The cooling rack shot shows them before they go into the fridge — that is not the slicing stage. Chilling for at least two hours produces the clean, vertical cuts visible in the marble stack photo. Slicing warm produces a collapsed, jammy mess.
This is a summer recipe and I treat it like one. I make these when peaches are in season and genuinely ripe — not hard, not mealy, not out-of-season supermarket peaches. Ripe peaches bake down into something jammy and concentrated. Underripe peaches stay firm and bland no matter how long they go in the oven.
🗒 Luna’s Note: I have made these with donut peaches, yellow peaches, and white peaches. Yellow peaches are the version in these photos — they have the most color contrast and the most assertive flavor. White peaches are sweeter and more delicate. Both work. Donut peaches are too small for clean slices and I do not recommend them.
| Prep Time | Cook Time | Total Time | Yield | Difficulty |
|---|---|---|---|---|
| 25 min | 40–45 min | 3 hrs 15 min (includes 2 hr chill) | 12 bars | Intermediate |
| Calories | Fat | Carbs | Sugar | Protein | Sodium |
|---|---|---|---|---|---|
| ~327 kcal | ~12g | ~52g | ~32g | ~3g | ~35mg |
Macros are approximate and will vary based on ingredient brands, peach ripeness, and whether the glaze is included. Calculated with glaze.
Ingredients & Tools for Peach Crumble Bars Recipe
For the Shortbread Base and Crumble Topping
- 2 cups (240g) all-purpose flour, spooned into the measuring cup and leveled — do not scoop directly from the bag
- ¾ cup (150g) plain white granulated sugar
- ¼ tsp (1.5g) fine sea salt
- ¾ cup (170g) cold unsalted butter, cut into ½-inch (1.25cm) cubes — must be cold straight from the refrigerator, not softened
- 1 tsp (5ml) pure vanilla extract
- ½ cup (45g) old-fashioned rolled oats — not quick oats, not instant oats (added to the crumble topping only, not the base)
For the Peach Filling
- 3 cups (480g) fresh yellow peaches, peeled and sliced into ½-inch (1.25cm) pieces — approximately 3 medium ripe peaches (see Before You Start for peeling method)
- 3 tablespoons (36g) plain white granulated sugar
- 1 tablespoon (8g) cornstarch (also called cornflour outside the US)
- 1 teaspoon (5ml) freshly squeezed lemon juice — from approximately half a medium lemon, seeds removed, squeezed gently so no bitter pith oil is pressed in. Bottled lemon juice is not a substitute — it has a flat, preserved flavor that does not brighten the peach filling the same way.
- ¼ teaspoon ground cinnamon, checked for freshness — should smell strong and spicy when the jar is opened
- 3 tablespoons (60g) raspberry jam — seedless preferred, or substitute peach preserves for a milder, all-peach flavor profile
For the Optional Glaze
- 1 cup (120g) powdered sugar (also called confectioners sugar or icing sugar), sifted
- 2–3 tablespoons (30–45ml) heavy whipping cream (36% fat minimum) or whole milk (3.5% fat) — added one tablespoon at a time until the glaze reaches a thick but pourable consistency. Heavy cream produces a slightly richer, more opaque glaze; whole milk produces a thinner, more translucent finish.
Before You Start
Peach preparation — do this first. To peel fresh peaches easily, score an X at the bottom of each peach with a paring knife, lower them into boiling water for 30 to 45 seconds, then transfer immediately to a bowl of ice water. The skin will slip off with your fingers. This is the blanching method — it takes about 3 minutes total and is significantly easier than peeling raw peaches with a knife. Once peeled, slice the peaches into ½-inch (1.25cm) pieces. Avoid thinner slices — they will cook down completely and disappear into the jam layer rather than giving you the distinct golden chunks visible in the cross-section photo.
Butter temperature is non-negotiable. The butter must be cold — straight from the refrigerator, cubed, and used immediately. Cold butter creates distinct clumps in the crumble topping because the fat stays solid long enough to coat the flour and oats before baking, then melts in the oven to produce those irregular, pebbled peaks. Softened or room-temperature butter produces a paste that bakes up flat and sandy. Do not use softened butter here under any circumstances.
Flour measuring. Spoon the flour into your measuring cup using a separate spoon and level it off with a straight edge. Do not scoop the cup directly into the flour bag — scooping packs in 20–30% more flour than the recipe needs. The resulting dough will be too dry to press into the pan and the crumble will be powdery rather than clumped. For guaranteed accuracy, weigh at 240g on a kitchen scale.
🗒 Luna’s Note: I weigh every ingredient in this recipe, but the flour and butter matter most. Too much flour and the crumble is dusty and crumbly. Too little butter and the base will not hold together when sliced. These are the two measurements I never eyeball.
Gram weight priority. For the most consistent results, use a kitchen scale set to grams. The gram weights in this recipe are what I tested with — they are the most reliable way to match the result shown in the photos.
I use a bench scraper for every bar recipe I make — not because it is required, but because lifting a chilled slab with anything else is genuinely awkward. A wide offset spatula works. My hands have also worked, once. The bench scraper is better. It is a $10 tool and it earns its place in the drawer.
Rolled oats — type matters. Old-fashioned rolled oats are the flat, intact oats that create distinct visible pieces in the crumble topping — those are the oat flecks you can see in the wooden board and cooling rack photos. Quick oats are finely cut and will bake into an indistinguishable sandy texture with no visual oat presence. Instant oats absorb liquid too quickly and become mushy. Use old-fashioned rolled oats only.
Cinnamon freshness check. Open your jar of ground cinnamon and smell it before measuring. It should smell strong, warm, and distinctly spicy. If it smells faint, dusty, or like nothing in particular, it is past its useful life. Ground cinnamon loses its potency within 6 months of opening. A bar with stale cinnamon tastes flat and one-dimensional — the spice exists in this recipe to add depth to the peach flavor, not to be identifiable on its own, so even a weakened version matters.
Granulated sugar — do not substitute. The recipe uses plain white granulated cane sugar in both the shortbread dough and the peach filling. Do not substitute coconut sugar, raw sugar, turbinado, or any liquid sweetener. Coconut sugar and raw sugar have larger, harder crystals that do not dissolve or integrate the same way — the shortbread base will have a gritty texture and the filling will be grainy. The granulated sugar in the shortbread also controls how the base bakes — its crystal structure affects spread and set in a way that substitutes cannot replicate.
Raspberry jam. Use a seedless jam with a high fruit content — not a jelly, not a fruit spread with added thickeners. The jam is added in a small amount and dotted over the peaches before the crumble goes on. It is not a thick layer — three tablespoons over a 9×9 inch pan is a very thin distribution. Its job is to deepen the flavor and create those amber-ruby pockets in the filling visible when the bars are sliced. Peach preserves are a valid substitute if you want to keep the filling all-peach in flavor.
Pan preparation. Use a 9×9 inch (23x23cm) light-colored aluminum baking pan. Line it with two sheets of parchment paper — one going each direction, with at least 2 inches (5cm) of overhang on all four sides. This overhang is what lets you lift the entire slab out of the pan after chilling, making clean slicing possible. If you skip the parchment or use a smaller overhang, you will not be able to remove the bars cleanly and the edges will break. Do not use a glass or ceramic pan — they retain heat differently and will overbrown the base before the crumble is done. Do not use a dark non-stick pan — same problem.
No mixer needed. This entire recipe comes together with a large mixing bowl, a pastry blender or your fingertips, and a silicone spatula. No stand mixer, no hand mixer, no food processor required.
Oven rack position. Position your oven rack in the middle of the oven before preheating. Top rack will overbrown the crumble before the base is set. Bottom rack will overbrown the base before the filling bubbles.
Chilling is mandatory — plan for it. After baking, the bars cool on a wire rack for one hour at room temperature, then go into the refrigerator for a minimum of two additional hours before slicing. The total time from the oven to the first slice is at minimum three hours. This is not optional — warm bars fall apart when cut because the filling is still liquid underneath the set surface. The clean, vertical cuts in the stacked marble photo are the result of two hours of refrigerator chilling, not room-temperature cooling alone.
Necessary Tools
Required:
- Kitchen scale (strongly recommended — gram weights are more accurate than volume for both flour and butter)
- Large mixing bowl
- Pastry blender or fingertips (for cutting cold butter into flour)
- 9×9 inch (23x23cm) light-colored aluminum baking pan
- Parchment paper — two sheets, cut with overhang
- Medium mixing bowl (for the peach filling)
- Silicone spatula
- Paring knife and cutting board (for peach prep)
- Wire cooling rack
- Small bowl and fork or small whisk (for the glaze, if using)
Optional but recommended:
- Kitchen scale — for flour and butter accuracy
- Oven thermometer — most home ovens run 15–25°F (8–14°C) off; confirm actual temperature before baking
- Bench scraper — for lifting and portioning the chilled slab cleanly
How to Make Peach Crumble Bars
Step 1: Preheating the Oven and Preparing the Pan for a Clean Release
Position your oven rack in the middle position and preheat to 350°F (175°C). Most home ovens run 15–25°F (8–14°C) off — if you have an oven thermometer, confirm the actual temperature before the pan goes in. While the oven heats, line your 9×9 inch (23x23cm) light-colored aluminum baking pan with two sheets of parchment paper, one running in each direction, with at least 2 inches (5cm) of overhang on all four sides. Press the parchment into the corners firmly. The overhang is your handle — without it, you cannot lift the chilled slab out of the pan without breaking the edges. Do not grease the pan beneath the parchment — it is not necessary and excess grease will make the base oily.
This recipe uses the cold-fat cut-in method — the same technique used for pie crust and scones — which means no mixer at any stage. Everything is done by hand with a pastry blender or your fingertips. Understanding this upfront matters because the success of both the base and the crumble topping depends entirely on keeping the butter cold throughout the process.
The pan should look like a parchment sling — four tabs of paper sticking up above the rim on all sides. Set it aside while you make the dough.
Baker’s Warning: Do not use a glass, ceramic, or dark non-stick pan here. Glass and ceramic retain heat longer and will overbrown the shortbread base before the crumble topping is done. Dark non-stick pans absorb more heat and produce the same problem — a burnt base with an underdone top. Light-colored aluminum is the only pan type this recipe was tested with.
Your oven is heating and your pan is ready — make the shortbread dough next.
Step 2: Making the Shortbread Dough That Becomes Both the Base and the Crumble
This recipe uses a cold-fat cut-in method — the same technique used for pie crust and scones. The cold butter stays in distinct pieces as it gets worked into the flour, and those pieces are what create the crumbled, clumped texture of the topping when baked. Do not rush this step and do not let the butter warm up.
In your large mixing bowl, combine 2 cups (240g) all-purpose flour, spooned and leveled, ¾ cup (150g) plain white granulated sugar, and ¼ tsp (1.5g) fine sea salt. Whisk them together for about 15 seconds until evenly distributed. Add 1 tsp (5ml) pure vanilla extract directly to the dry mixture and toss briefly with a fork — the vanilla will clump the flour slightly, which is fine.
Add your ¾ cup (170g) cold unsalted butter, cut into ½-inch (1.25cm) cubes, all at once. Using a pastry blender or your fingertips, work the butter into the flour mixture using a pressing-and-smearing motion — press each cube flat, then break it apart into the flour. Work quickly. If using your fingers, work in short bursts and stop to press your palms against the outside of the cold bowl to re-chill them if they feel warm. The goal is to break the butter down into pieces roughly the size of small peas, with some larger almond-sized chunks remaining — not a uniform sandy mixture. Those larger chunks are what bake into the distinct crumble peaks visible in the topping.
The mixture should look shaggy and uneven — dry and floury in some spots, clumped in others, with visible butter pieces throughout. It will not look like a smooth dough. This is correct. If the mixture looks uniformly sandy with no visible butter pieces, the butter was too warm and the crumble topping will not clump properly when baked.
Baker’s Warning: Do not overwork this dough. Once the butter reaches the right size — pea to almond — stop. Continuing to work it will melt the butter into the flour from the heat of your hands, producing a paste rather than a crumble. If the mixture starts feeling greasy or cohesive rather than loose and shaggy, refrigerate the bowl for 10 minutes before continuing.
The dough is ready — divide it and press the base next.
Step 3: Pressing the Base Into the Pan and Setting the Foundation Layer
Measure out approximately two-thirds of the shortbread mixture — roughly 310g if you are using a scale, or about two packed cups by volume — and transfer it to your prepared pan. Reserve the remaining one-third in the bowl.
Using the flat bottom of a measuring cup or a straight-sided glass, press the mixture firmly and evenly across the entire base of the pan. Work from the center outward, pressing with firm, overlapping strokes. Pay particular attention to the corners — they tend to be thinner and will overbake before the center is done if left uneven. The pressed base should be approximately ¼ inch (6mm) thick, compact, and completely covering the pan floor with no gaps or thin spots.
The surface should look smooth and uniformly packed — no loose crumbs, no gaps, no visible cracks across the surface. Press any cracks closed before the pan goes in. As you can see in the overhead parchment photo, the base sits flush against all four sides of the parchment lining — that even contact is what produces the straight, clean edges visible when the bars are sliced.
Baker’s Warning: Do not pre-bake the base before adding the filling. This recipe is designed as a single-bake assembly — the base and filling bake together, and the moisture from the peaches during baking actually helps the base cook through evenly without drying out. Pre-baking produces a base that is too hard and separates from the filling when sliced.
Set the pan aside and make the peach filling now — do not let the pressed base sit at room temperature for more than 15 minutes before the filling goes on.
Step 4: Building the Two-Tone Peach Filling That Creates the Jammy Center
In your medium mixing bowl, combine your 3 cups (480g) fresh yellow peaches, peeled and sliced into ½-inch (1.25cm) pieces, 3 tablespoons (36g) plain white granulated sugar, 1 tablespoon (8g) cornstarch (cornflour outside the US), 1 teaspoon (5ml) fresh lemon juice, and ¼ teaspoon ground cinnamon. Toss gently with a silicone spatula until every peach piece is coated — approximately 20 slow folds. Do not stir aggressively — you want the peach slices intact, not broken down into mush before they go into the oven.
The cornstarch is doing two jobs here. First, it absorbs the juice the peaches release as they bake, thickening it into the glossy, syrupy filling visible in the cross-section rather than letting it run straight through the shortbread base. Second, it helps the filling set firm enough to slice cleanly after chilling. Two percent cornstarch by weight of the fruit is the correct ratio for a bar filling — enough to thicken without making the filling gluey or starchy-tasting.
Scatter the coated peach mixture evenly over the pressed shortbread base, distributing the pieces as evenly as possible across the full surface. Then take your 3 tablespoons (60g) raspberry jam and drop small teaspoon-sized dollops across the top of the peach layer — approximately 9 to 12 scattered dots, not one continuous layer. Do not spread the jam — leave it in discrete pockets. As the bars bake, the jam melts and flows between the peach pieces, creating the deep ruby-amber streaks visible in the filling cross-section. Spreading the jam creates a uniform color rather than that two-tone effect.
The filling should look like a densely packed layer of golden peach slices with scattered dark jam dots on top — not a smooth, uniform surface. That uneven, fruit-forward appearance before baking is exactly what produces the jammy, layered interior you see when the bars are cut.
Baker’s Warning: Do not skip the cornstarch or substitute it with flour. Flour can thicken fruit fillings but produces a cloudy, starchy-tasting result in fresh peach bars. Cornstarch thickens clear and glossy — that translucent amber syrup you see surrounding the peach chunks in the overhead photo is cornstarch-thickened fruit juice, not raw liquid. Flour would make it look pasty.
The filling is built — add the crumble topping next.
Step 5: Building the Oat Crumble Topping and Finishing the Assembly
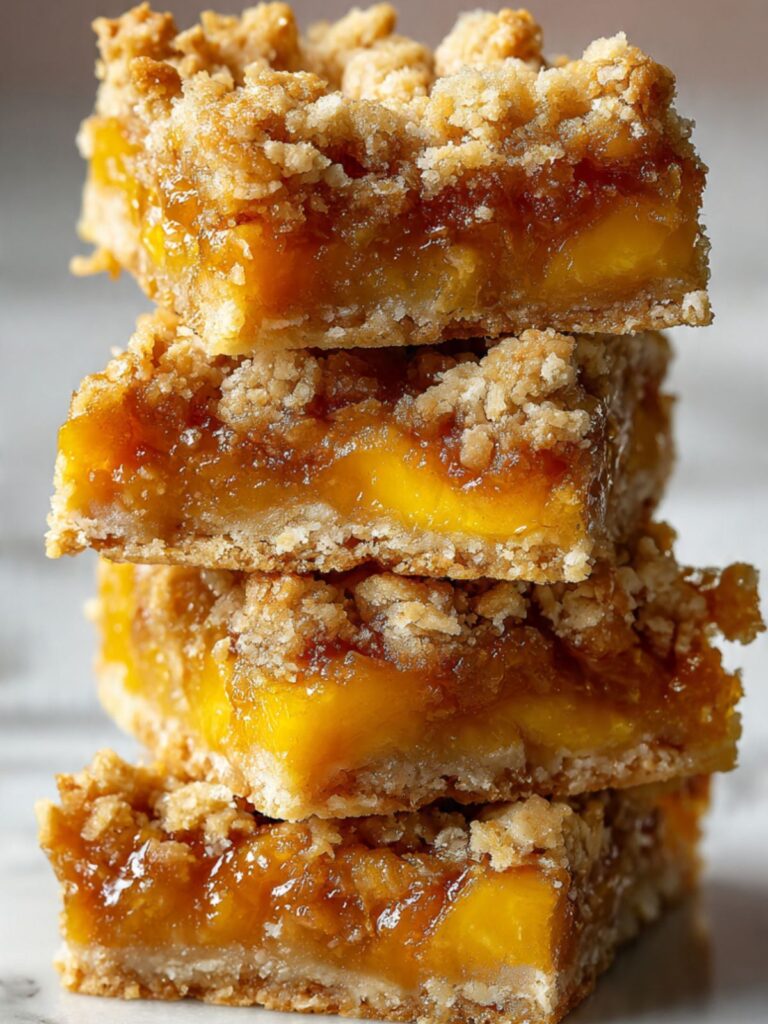
Return to the reserved one-third of the shortbread mixture still in your large mixing bowl. Add ½ cup (45g) old-fashioned rolled oats directly to the reserved dough and toss with a fork until the oats are distributed throughout. Do not mix aggressively — you want the oats folded in while the butter pieces remain intact and the mixture stays loose and clumped. The oats add textural contrast to the topping — the coarser oat pieces toast at a different rate than the flour, creating the irregular, multi-textured crumble peaks visible in the wooden board and cooling rack photos.
Scatter the oat crumble mixture evenly over the peach filling. Use your fingertips to break up any very large clumps into pieces roughly the size of a grape, but leave most of the mixture in its natural clumped state — do not press it flat or pack it down. The irregular, pebbled surface before baking is what produces the toasted, uneven peaks after. Some peach filling will be visible between the crumble clusters — this is correct and intentional. Those gaps allow the fruit to bubble up through the topping during baking, which is what creates the amber pockets visible at the surface.
The assembled pan should look like the bars in the overhead parchment photo — a full layer of golden peach filling barely visible beneath a loose, clumped crumble that does not completely cover the surface. Some fruit color peeking through is the correct assembly state.
Baker’s Warning: Do not press the crumble topping flat against the filling. Pressing compresses the butter pieces and produces a flat, dense topping rather than the irregular clumped texture. The topping goes on loose — gravity and the oven do the rest.
The pan is assembled and ready for the oven.
Step 6: Baking Until the Crumble Is Deep Golden and the Filling Bubbles Through
Place the assembled pan on the middle rack of your preheated 350°F (175°C) oven. Bake for 40 to 45 minutes — start checking at the 38-minute mark. The bars are done when three things are true simultaneously: the crumble peaks are a deep golden brown at their highest points, the fruit filling is visibly bubbling through the gaps in the crumble topping at the edges of the pan, and the base feels firm — not soft or springy — when you press the corner very gently through the parchment.
Do not pull the bars when only the edges are bubbling. The filling must be bubbling at the center of the pan as well — center bubbling confirms the cornstarch has fully activated and the filling will set properly after chilling. Bars pulled before center bubbling produce a filling that stays liquid underneath the set surface and collapses when sliced.
The crumble topping should look exactly like the bars on the wire cooling rack — deep golden brown at the peaks with slightly paler coloring in the valleys between clumps, and amber fruit visible bubbling up through the gaps at the edges. The surface will not look uniformly golden — the irregular color is correct.
Baker’s Warning: Do not open the oven door before the 35-minute mark. Opening too early releases the heat that is building up in the pan base and fruit filling, extending the bake time unpredictably and sometimes causing the filling to re-liquefy after partially setting. Set a timer and do not check until 35 minutes minimum.
Remove the pan from the oven and set it on a wire cooling rack — do not attempt to move the bars out of the pan at this stage. Cool in the pan on the rack for exactly 60 minutes at room temperature before refrigerating.
Step 7: Cooling, Chilling, and Slicing for Clean Edges
After the 60-minute room temperature rest, the bars have finished their carryover cooking — the residual heat from the pan and the hot filling has continued setting the shortbread base and firming the cornstarch gel from the inside out during this window. This is not wasted time.
Now transfer the pan — still with the bars inside — to the refrigerator. Chill for a minimum of 2 hours. Do not slice before this point. The filling is still partially liquid at the 60-minute mark — it has set at the surface but the center is soft. Two hours of refrigerator chilling firms the entire filling layer, including the center, to the point where a sharp knife passes through cleanly without the filling collapsing.
After chilling, grip the parchment overhang on two opposite sides and lift the entire slab straight up and out of the pan onto a flat cutting surface. The slab should release cleanly. If any edges stick, run a thin knife between the parchment and the pan rim before lifting.
To slice: use a sharp chef’s knife — not a serrated knife, which will drag through the crumble and create ragged edges. Wipe the blade clean with a damp cloth between every cut. For 12 bars, cut 3 columns and 4 rows across the slab. Weigh or measure your cuts before making them — the slab is 9×9 inches (23x23cm) and each bar should be approximately 2¼ x 2¼ inches (5.7 x 5.7cm).
Each bar weighs approximately 95–105g depending on how evenly the filling distributed during baking. Weigh the first bar after cutting — if it is significantly over or under this range, adjust your cut lines on the remaining slab before completing all cuts.
The sliced bars should look like the stacked marble photo — clean vertical sides showing three distinct layers: pale shortbread base, golden-amber peach filling, and clumped golden crumble topping. If the filling looks liquid or the layers are indistinct, the bars needed more chilling time. Return the slab to the refrigerator for 30 more minutes and re-slice.
🗒 Luna’s Note: I wipe my knife blade between every single cut. It takes ten extra seconds and makes the difference between clean cross-sections and smeared ones. A smeared cut is not recoverable — you cannot fix a dragged edge after the fact.
Step 8: Making and Applying the Optional Powdered Sugar Glaze
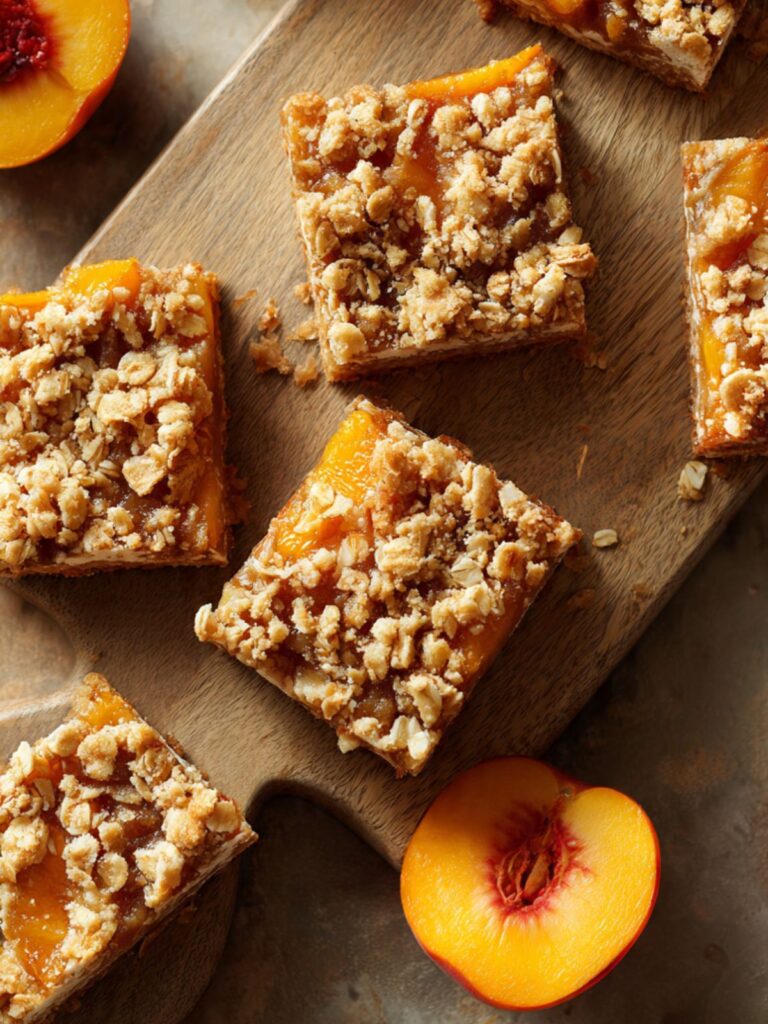
This step is optional — the bars in the overhead parchment photo, the wooden board spread, and the cooling rack shot are all unglazed. The glaze appears in the stacked marble hero photo and the plate photo. It adds sweetness and presentation value. If you prefer the bars without it, skip this step entirely.
In a small bowl, sift your 1 cup (120g) powdered sugar. Add 2 tablespoons (30ml) heavy cream or whole milk and whisk until smooth. The glaze should be thick enough to hold a ribbon for 2 seconds when drizzled from the whisk — if it disappears immediately it is too thin, add more powdered sugar 1 tablespoon at a time. If it holds a stiff peak rather than flowing, add liquid ½ teaspoon at a time.
Using a spoon or a small piping bag, drizzle the glaze in a zig-zag pattern across the sliced bars. Drizzle from a height of about 8 inches (20cm) — this height produces the thin, continuous lines visible in the hero photo rather than thick blobs. Let the glaze set for 10 minutes at room temperature before serving or stacking.
The glaze should look like the bars in the stacked marble photo — thin, opaque white lines running across the crumble surface, with the glaze just barely draping over the edges of a few bars. It should not pool or coat the surface completely.

Your peach crumble bars are ready to serve.
The Science Behind Peach Crumble Bars
Why Cold Butter Is the Only Butter That Works Here
I made this dough with softened butter once — on purpose, to see what would happen. The mixture came together in about ninety seconds into something that looked like a smooth, pale paste. It pressed into the pan easily, which felt like an advantage. It was not. The crumble topping baked flat. The base baked dense and almost cookie-like rather than short and crumbly. The texture was completely wrong in both layers, and I understood immediately why the butter temperature instruction exists.
Cold butter behaves differently from soft butter at a mechanical level. When you cut cold butter into flour, the fat stays in discrete solid pieces — those pea-to-almond-sized chunks you are working toward in Step 2. Each piece of cold butter is coated in flour but remains physically separate from the surrounding flour particles. When the pan goes into the oven, two things happen in sequence: first, the water inside the butter turns to steam and creates small pockets of air between the flour particles — this is what gives the shortbread base its slightly open, crumbly texture rather than a dense, compact one. Second, the fat melts and coats the surrounding flour, creating a barrier that limits gluten development and produces tenderness. The result is a base that is structurally firm enough to support the fruit filling without being hard, and a crumble topping with those irregular peaks and valleys that toast unevenly — darker at the tips, paler in the valleys — exactly as you see on the bars in the cooling rack shot.
Softened butter, by contrast, coats the flour particles immediately and uniformly before baking begins. There are no discrete fat pieces, no steam pockets, no uneven browning — just a uniform paste that bakes into a uniform, flat layer. The crumble does not clump because there are no fat pockets to hold the clusters together. The base does not have that short, crumbly snap because the fat-flour barrier formed too early and too completely. Cold butter is not one option among several here — it is the mechanism the entire recipe depends on.
This is also why the instruction says to work quickly with your hands. Body heat is enough to melt butter. If you feel the mixture becoming greasy or cohesive rather than shaggy, the butter has warmed too much and the refrigerator is the only fix.
How Cornstarch Transforms Raw Peach Juice Into a Set, Sliceable Filling
Fresh peaches contain roughly 85% water by weight. When heat is applied, the cell walls break down and that water releases as juice — this is the amber liquid you see bubbling through the crumble gaps during baking. Without a thickener, that liquid runs directly through the shortbread base, saturating it from below and producing the soggy, collapsed base I described in the Hook. One tablespoon of cornstarch, tossed through the sliced peaches before they go into the pan, prevents this entirely.
Cornstarch works through a process called starch gelatinization. Cornstarch granules are dense, tightly wound starch molecules that absorb very little liquid at room temperature — this is why the coated peaches do not look wet or sticky when you toss them. When the temperature of the fruit juice reaches approximately 203°F (95°C) during baking, the starch granules absorb water rapidly, swell, and burst open, releasing their starch chains into the surrounding liquid. Those chains entangle and create a thick, gel-like network — which is the glossy, translucent amber syrup you see surrounding the peach chunks in the cross-section. That gel is firm enough after chilling to slice cleanly, flexible enough at serving temperature to feel jammy rather than rubbery, and clear enough to let the golden color of the peaches show through rather than clouding the filling.
Flour thickens fruit fillings too, but through a different and less effective mechanism — flour starch is less pure than cornstarch, produces a cloudy, slightly opaque filling, and has a detectable starchy flavor when used in large quantities. Cornstarch is twice as potent as flour by weight, sets clearer, and has no flavor of its own. For fruit bars where the visual clarity of the filling matters — and it does matter here, because that translucent amber color is part of what makes the cross-section photograph the way it does — cornstarch is the correct choice. If you are linking this to another fruit-forward recipe on this site, the same logic applies to the peach dump cake — fruit thickener choice changes the result visually and texturally.
Why the Maillard Reaction Happens Differently Across the Three Layers
The three layers of these bars — shortbread base, peach filling, crumble topping — reach different temperatures during baking, and that temperature difference is what produces the three visually distinct colors you can see in the cross-section: pale cream at the base, amber-gold in the filling, deep golden-brown at the crumble peaks.
The Maillard reaction is the browning process that occurs when proteins and sugars are heated above approximately 280°F (138°C) — it is the same reaction that browns bread, sears meat, and toasts nuts. In these bars, the crumble topping reaches this temperature first because it is directly exposed to the oven’s convective heat with nothing above it. The peaks of the crumble, which are the thinnest and most exposed points, reach Maillard temperatures earliest and produce the deepest browning — the dark golden color at the tips of the clumps you can see in the cooling rack photo. The valleys between clumps, slightly shielded by the surrounding peaks, brown more slowly and stay paler.
The shortbread base, by contrast, is insulated from above by the fruit filling and from below by the pan. The pan absorbs heat but distributes it more slowly than the open oven air. The base reaches baking temperature — enough to cook the flour and set the butter — but stays below the Maillard threshold for most of the bake, which is why it comes out pale cream rather than golden. This is also why a dark pan is dangerous in this recipe: a dark pan absorbs significantly more radiant heat from the oven floor and drives the base past Maillard temperature before the crumble has finished browning — producing a burnt base and an underdone topping simultaneously.
The fruit filling sits between these two extremes. It never reaches Maillard temperatures because its high water content keeps it below 212°F (100°C) for most of the bake — water absorbs heat energy as it evaporates and keeps the surrounding temperature from climbing past boiling. The amber color in the filling is not Maillard browning — it is caramelization of the fruit sugars and the raspberry jam, which occurs at a lower temperature range than the Maillard reaction and produces that warm golden-amber tone rather than a brown one.
🗒 Luna’s Note: Understanding why the three layers brown differently changed how I check for doneness in this recipe. I stopped looking at the base — I cannot see it. I stopped looking at the filling — it is not supposed to brown. I watch the crumble peaks only, and I pull the pan the moment the tallest peaks hit deep golden. That is the signal. Everything else is already done by the time the crumble looks right.
Peach Crumble Bars Troubleshooting & Pro-Tips
Common Mistakes
1. Using the Wrong Type of Butter — Softened Instead of Cold
Symptom: The crumble topping bakes flat and sandy with no distinct clumps. The base bakes dense and hard rather than short and crumbly. The bars feel more like a cookie slab than a layered bar.
Cause: Softened butter coats the flour uniformly before baking begins, eliminating the discrete fat pockets that create both the crumble texture and the shortbread tenderness. Once the butter is at room temperature and worked into the flour, the damage is done — baking will not correct it.
Fix: If you catch it before baking — the mixture feels greasy and paste-like rather than shaggy and clumped — transfer the entire bowl to the refrigerator for 20 to 30 minutes. The butter will re-firm enough to produce some crumble texture, though not as pronounced as dough made with properly cold butter. If the bars are already baked and the topping came out flat, the flavor is unaffected — serve them as-is, or crumble the topping over vanilla ice cream for a deconstructed version that leans into the texture rather than fighting it.
Prevention: Cube the butter straight from the refrigerator and work immediately. If your kitchen is warm — above 75°F (24°C) — freeze the cubed butter for 10 minutes before starting.
2. Using the Wrong Pan — Dark, Glass, or Ceramic Instead of Light Aluminum
Symptom: The shortbread base is dark brown or burnt at the bottom while the crumble topping is still pale and underdone. The bars taste bitter at the base and the two layers feel mismatched in doneness.
Cause: Dark pans absorb significantly more radiant heat from the oven floor and drive the base past the Maillard threshold before the crumble has had time to brown. Glass and ceramic pans retain heat longer and produce a similar overbrowning effect at the base. The crumble requires top heat to brown — the base requires moderate, insulated heat from below. Light aluminum provides both simultaneously.
Fix: If the base is burnt but the crumble is done, slice away the bottom layer of each bar with a sharp knife — the filling and crumble are salvageable. Serve them inverted — crumble side down — as a deconstructed crumble with a scoop of ice cream.
Prevention: Use a 9×9 inch (23x23cm) light-colored aluminum baking pan only. If you only own a dark pan, reduce the oven temperature by 25°F (15°C) and check at 35 minutes.
3. Soggy, Saturated Shortbread Base
Symptom: The base layer is wet, dense, and compressed — it does not have the distinct crumbly texture visible in the cross-section. The filling and base look merged rather than separate. The bars fall apart from the bottom when lifted.
Cause: One of three things: the cornstarch was skipped or under-measured, the peaches were not fully coated before going into the pan, or the bars were sliced before the filling fully set. Without cornstarch, peach juice runs freely through the base during baking. Under-coating the peaches means some pieces are releasing unthickened juice.
Fix: A soggy base cannot be corrected after baking. Press the crumble and filling off the top of each bar, scoop the peach mixture into ramekins, and top with the crumble pieces. Bake at 350°F (175°C) for 10 minutes to re-crisp the crumble and serve as individual peach crumbles. The shortbread base pieces can be crumbled into the ramekins as well — they absorb the fruit in a way that resembles a cobbler base.
Prevention: Use the full 1 tablespoon (8g) of cornstarch. Toss the peaches thoroughly — every slice should be coated before the mixture goes into the pan. Chill for the full 2 hours before slicing.
4. Crumble Topping Does Not Clump — Bakes Sandy and Loose
Symptom: The topping scatters across the bars as fine, sandy crumbs rather than distinct clumped pieces. The visual texture is flat and uniform rather than pebbled and irregular.
Cause: Either the butter was too warm when worked into the flour (see Entry 1), the mixture was overworked past the point where butter pieces remain distinct, or the crumble was pressed flat against the filling before baking.
Fix: Sandy crumble is fully baked and safe to eat — the flavor is unaffected. Serve bars with a scoop of vanilla ice cream and present the sandy crumble as an intentional streusel-style topping. For the next batch, refrigerate the assembled but unbaked pan for 15 minutes before it goes into the oven — this re-firms any butter that softened during assembly.
Prevention: Stop working the butter into the flour the moment pieces reach pea-to-almond size. Scatter the topping loosely over the filling — never press it. If the kitchen is warm, refrigerate the assembled pan for 15 minutes before baking.
5. Bars Crumble and Fall Apart When Sliced
Symptom: The bars collapse at the filling layer when the knife goes through. The crumble topping separates from the filling. The layers do not hold together as a unit.
Cause: Almost always insufficient chilling time. The filling requires a full 2 hours of refrigerator chilling to set firm enough to support clean cuts. Slicing at the 60-minute room-temperature cooling mark — when the surface feels set — produces bars that are still liquid at the center and collapse under the knife. A secondary cause is using a serrated knife, which drags through the crumble and separates the layers.
Fix: If the bars crumbled during slicing, press the pieces back together gently and return the slab to the refrigerator for 1 hour. Re-slice using a sharp chef’s knife wiped clean between cuts. If individual bars are too broken to salvage as slices, layer the pieces in glasses with whipped cream for a deconstructed peach crumble trifle.
Prevention: Chill for a minimum of 2 hours — 3 hours is better. Use a sharp chef’s knife, not serrated. Wipe the blade between every cut.
6. Filling Is Too Runny After Chilling — Does Not Set Firm
Symptom: After 2 hours of chilling, the filling is still liquid or semi-liquid when the bars are sliced. The fruit juice runs out of the bars when cut rather than staying in a set gel.
Cause: The filling did not reach bubbling temperature at the center during baking. Cornstarch gelatinization requires the liquid to reach approximately 203°F (95°C) — if the center of the pan never reached full bubbling, the starch did not fully activate and the filling will not set regardless of how long it chills.
Fix: Return the unsliced slab — still in the pan — to a 350°F (175°C) oven for 10 to 15 additional minutes until the center is visibly bubbling. Cool and re-chill for the full 2 hours before attempting to slice again.
Prevention: Do not pull the bars until the filling is bubbling at the center of the pan — not just at the edges. Center bubbling is the non-negotiable doneness signal for this recipe.
7. The Filling Tastes Bitter or Burnt at the Jam Pockets
Symptom: The peach filling tastes sharp, bitter, or caramelized-past-sweetness specifically at the dark ruby pockets. The crumble topping may also show very dark, near-black tips rather than deep golden brown.
Cause: The bars baked past the correct doneness window. Raspberry jam contains a high concentration of fruit sugars that caramelize quickly once the filling reaches bubbling temperature. Once caramelization crosses into scorching — typically at temperatures above 375°F (190°C) sustained for too long — the jam pockets turn from sweet-tart to bitter. This happens faster in dark pans and in ovens that run hot.
Fix: The bitter flavor in the jam pockets cannot be corrected after baking — it is baked into the filling. Serve the bars with a generous amount of unsweetened whipped cream, which softens the bitter edge significantly. Alternatively, scrape the top crumble layer off individual bars and use it as a topping for vanilla ice cream — the crumble itself is not affected by the overcooked jam beneath it.
Prevention: Pull the bars the moment the crumble peaks reach deep golden brown and the filling is bubbling at the center. Do not wait for the crumble to look uniformly brown across every peak and valley — the valleys will never fully brown before the jam crosses into overbaked territory. Verify your oven temperature with an oven thermometer before baking this recipe — a 25°F (14°C) hot oven is enough to push the jam past the correct window.
8. Altitude and Humidity Adjustments
High humidity (above 70% relative humidity): The shortbread base and crumble topping may feel stickier than expected during assembly — this is surface moisture from the air. Refrigerate the assembled but unbaked pan for 20 minutes before baking to re-firm the butter. Baked bars may feel slightly tacky on the crumble surface even when fully done — this is normal in high-humidity environments and resolves after chilling.
High altitude (above 3,500 feet / 1,067 meters): Liquids evaporate more quickly at altitude, which means the peach filling may bubble and reduce faster than expected. Check the bars at 35 minutes rather than 38. The shortbread base is not leavened, so no flour or sugar adjustments are needed for altitude in this recipe specifically.
Expert Pro-Tips
1. Score the Slab Before Full Chilling for Cleaner Edges
After the 60-minute room-temperature cooling period — before the pan goes into the refrigerator — use a sharp knife to score the surface of the slab lightly along the cut lines. Do not cut all the way through — just score 2–3mm deep into the crumble topping. When you make the full cuts after chilling, the knife follows the scored lines and the crumble does not shift or scatter. This single step produces the razor-clean edges visible in the stacked marble photo.
2. Use the Weight of the Parchment Overhang to Check for Doneness
At the 40-minute mark, grip the parchment overhang on one side and gently lift — just enough to feel whether the base has set. A fully baked base will feel rigid and will not flex when you lift the overhang slightly. An underbaked base will flex or feel soft. This gives you a doneness signal for the base without touching the crumble surface or opening the pan fully. Return the pan to the oven immediately after checking.
3. Freeze the Assembled Unbaked Pan for Make-Ahead Preparation
The assembled, unbaked pan can be covered tightly with plastic wrap and frozen for up to one month. Bake directly from frozen at 350°F (175°C) — add 12 to 15 minutes to the bake time and watch for the center bubbling signal rather than relying on the time alone. This is the most practical make-ahead option for these bars — the baked and chilled version does not freeze as successfully because the peach filling changes texture on thawing.
4. Add the Oats to the Topping Only — Never the Base
The oats go into the reserved one-third of the shortbread mixture only — not into the two-thirds pressed base. Oats in the base create an uneven surface that does not press flat evenly and produces gaps where the peach filling can sink through to the pan. The base needs to be a smooth, continuous barrier — oats only belong in the topping where their irregular texture is an asset rather than a structural problem.
5. Rest the Sliced Bars at Room Temperature for 15 Minutes Before Serving
Bars sliced straight from the refrigerator are very firm — the shortbread base is hard, the filling is cold and slightly rubbery, and the flavor is muted. Fifteen minutes at room temperature softens the base back to its correct crumbly texture, loosens the filling to its jammy, yielding consistency, and allows the peach and raspberry flavors to come forward. The bars in the stacked marble photo were at room temperature for approximately 15 minutes before the shot — that is the texture and sheen you are aiming for.
How to Store Peach Crumble Bars
Room Temperature
Peach crumble bars contain a fresh fruit filling with a high moisture content. They are not stable at room temperature for extended periods — the fruit filling will weep liquid into the shortbread base and the base will soften progressively the longer the bars sit out. Room temperature storage is acceptable for a maximum of 4 hours after slicing — for example, during a gathering or serving window. Beyond 4 hours, the base begins to lose its structural integrity and the filling starts to separate from the crumble topping.
Do not store these bars in a zip-lock bag at room temperature — the bag traps humidity against the crumble surface and turns the topping soft and sticky within a few hours. Do not store them uncovered — the crumble surface dries out and the edges of the bars crack.
For any storage beyond 4 hours, refrigerate.
Refrigerator
Store sliced bars in a single layer in a hard-sided lidded container — not stacked directly on top of each other, as the weight of the top bars compresses the crumble topping of the bars beneath them. If you need to store them in two layers, place a sheet of parchment paper between layers and keep the container no more than two layers deep.
Refrigerated bars keep well for up to 4 days. The shortbread base firms significantly in the refrigerator — this is normal and expected. Pull the bars from the refrigerator 15 minutes before serving to allow the base to soften back to its correct texture and the filling to return to its jammy consistency. Do not microwave cold bars to speed this up — the crumble topping will steam and turn soft.
The uncut slab keeps better than individual sliced bars — the exposed filling edges on sliced bars lose moisture faster than the protected interior of an unsliced slab. If you are making these ahead of a specific serving occasion, chill the slab unsliced and slice 30 minutes before serving.
🗒 Luna’s Note: Day 2 bars from the refrigerator are my preferred eating state for this recipe. The filling has had additional time to set and the flavors have concentrated — the peach tastes more intensely peachy and the raspberry jam layer is more pronounced. The shortbread base is firmer, which I actually prefer to the fresh-baked texture. Pull them out 15 minutes early and they are better than Day 1.
Freezer — Baked
Baked and sliced peach crumble bars can be frozen, but with a significant caveat: the peach filling changes texture on freezing and thawing. Fresh peaches have a high water content, and when that water freezes and then thaws, it releases from the fruit cells and makes the filling slightly wetter and less distinct than it was before freezing. The bars are still good — the flavor is unaffected — but the filling will be softer and the base will absorb more moisture during thawing than it did initially.
To freeze baked bars: wrap each bar individually in plastic wrap, pressing the wrap directly against all surfaces to prevent freezer burn. Place the wrapped bars in a zip-lock freezer bag, press out all air, and freeze for up to 6 weeks. Beyond 6 weeks the crumble topping begins to lose its texture and the fruit flavor flattens.
To thaw: transfer the wrapped bars to the refrigerator the night before serving — approximately 8 hours. Do not thaw at room temperature, which causes uneven thawing and excessive moisture release. Do not microwave from frozen — the crumble topping steams and collapses. After thawing overnight in the refrigerator, rest at room temperature for 15 minutes before serving.
Freezer — Unbaked
This is the recommended make-ahead method for these bars — freezing the assembled but unbaked pan produces significantly better results than freezing baked bars. The raw shortbread dough and raw peach filling freeze well individually, and baking from frozen produces a result that is nearly identical to baking fresh-assembled.
To freeze unbaked: assemble the bars completely through Step 5 — pressed base, peach filling, jam dotted, crumble topping scattered. Do not add the glaze at this stage. Cover the pan tightly with two layers of plastic wrap followed by one layer of aluminum foil. Freeze for up to 1 month.
To bake from frozen: remove all wrapping and place the frozen pan directly into a cold oven. Set the oven to 350°F (175°C) and allow it to preheat with the pan inside — this gradual temperature increase prevents the cold pan from cracking and allows the filling to begin thawing gently before the full bake temperature is reached. Once the oven reaches 350°F (175°C), bake for 55 to 65 minutes — 12 to 20 minutes longer than the fresh-assembled bake time. Check for the same doneness signals: deep golden crumble peaks and filling bubbling at the center of the pan. Cool, chill, and slice exactly as directed in Steps 7 and 8.
Serving Suggestion

I serve these bars at room temperature — pulled from the refrigerator exactly 15 minutes before they go on the table. Cold bars are structurally sound but texturally wrong — the base is hard, the filling is stiff, and the flavor is muted in a way that does not represent what the recipe actually tastes like. Fifteen minutes is enough time to soften the base back to its correct crumbly texture without compromising the structural integrity of the bars enough to make them difficult to handle.
My pairing for these is plain unsweetened whipped cream — not sweetened, not vanilla-flavored, just cream whipped to soft peaks and spooned alongside. The fat in the cream cuts the sweetness of the peach filling and the glaze, and the soft, cool texture is a direct contrast to the crumble topping. I tried vanilla ice cream, which is the obvious pairing, and I think it competes with the peach rather than supporting it. The unsweetened cream disappears into the background and lets the fruit come forward. That is the point.
This is a summer recipe and it belongs in summer specifically — I make it when local peaches are at their peak and I want to do something with them that is not a cobbler and not a pie. The occasion that fits best: something to bring to someone’s house when you want them to remember what you brought. These bars travel well in the pan, unsliced, and you slice them at the destination.
Day 2 is the better eating day for these bars, as noted in the refrigerator storage section. The one honest limitation: these do not work as a formal plated dessert for a dinner party. The crumble topping scatters when cut, the filling is jammy and informal, and the bars are rustic by nature — they are not a precise, elegant dessert. They are a generous, fruit-forward bar that tastes like summer and looks like it was made by someone who knows what they are doing. That is exactly what they are.
Frequently Asked Questions About Peach Crumble Bars
Can I use canned peaches instead of fresh peaches?
Yes, but with adjustments. Drain canned peaches thoroughly in a fine mesh strainer for at least 10 minutes, then spread them on a paper towel-lined plate and pat completely dry — canned peaches contain significantly more liquid than fresh and will make the filling runny if added wet. Reduce the granulated sugar in the filling from 3 tablespoons (36g) to 1 tablespoon (12g), because canned peaches are packed in syrup and are already sweeter than fresh fruit. Keep the cornstarch quantity the same. The mechanism here is straightforward — canned peaches have already been heat-processed, so their cell walls are partially broken down and they release liquid faster than fresh peaches during baking. Thorough drying before assembly compensates for that difference. The flavor will be milder and less complex than fresh, but the structure of the bars will be correct.
Can I make peach crumble bars ahead of time?
Yes — and in two ways. The first option is to assemble the unbaked pan completely, cover it tightly, and refrigerate overnight for up to 24 hours before baking. The cold rest actually improves the crumble texture slightly because the butter re-firms completely before baking, producing more defined clumps. Bake directly from the refrigerator with no adjustments to time or temperature. The second option is freezing the assembled unbaked pan for up to 1 month and baking from frozen — see the Freezer Unbaked section above for the exact method. For a related approach to make-ahead fruit desserts, the same advance-assembly logic applies to the peach dump cake on this site, which can also be prepped and refrigerated before baking. Baked bars keep refrigerated for up to 4 days — slice only when ready to serve for the best texture.
How do I know when peach crumble bars are done baking?
The bars are done when three things are true simultaneously: the crumble peaks are deep golden brown at their highest points, the fruit filling is visibly bubbling through the gaps in the crumble at the center of the pan — not just at the edges — and the base feels rigid rather than soft when you gently lift the parchment overhang. The center bubbling signal is the most important of the three. Cornstarch gelatinization requires the fruit liquid to reach approximately 203°F (95°C) — if the center is not bubbling, the starch has not fully activated and the filling will not set properly after chilling regardless of how long the bars cool. Edge bubbling alone is not sufficient. Start checking at 38 minutes and do not pull the pan until the center bubbles.
Why are my peach crumble bars falling apart when I cut them?
Bars that fall apart when sliced almost always needed more chilling time. The filling requires a full 2 hours of refrigerator chilling after the initial 60-minute room-temperature cool to firm completely — including the center, which takes longer to set than the edges. The reason chilling works is physical: the cornstarch gel that formed during baking becomes progressively stiffer as its temperature drops, and at refrigerator temperature it reaches a firm, sliceable consistency that it cannot achieve at room temperature alone. A secondary cause is using a serrated knife, which drags through the crumble and separates the layers rather than cutting cleanly through them. Use a sharp chef’s knife and wipe it between every cut. If bars crumbled during slicing, press the pieces back together and return to the refrigerator for 1 additional hour before re-slicing.
Can I use frozen peaches instead of fresh?
Yes — do not thaw them first. Add the frozen peach slices directly to the cornstarch, sugar, lemon juice, and cinnamon mixture and toss to coat while still frozen. The coating adheres less evenly to frozen fruit, so toss for an additional 30 seconds compared to fresh. Increase the cornstarch from 1 tablespoon (8g) to 1 tablespoon plus 1 teaspoon (11g) — frozen peaches release more liquid during baking than fresh because freezing ruptures the fruit cell walls, and the additional cornstarch compensates for that extra moisture. Increase the bake time by 5 to 8 minutes and watch for the center bubbling signal rather than relying on the time alone. The flavor of frozen peaches is slightly less bright than peak-season fresh, but the structure and texture of the bars will be correct.
Can I double this recipe?
Yes, with one adjustment. Double all ingredients exactly — the shortbread dough, the peach filling, and the jam — and bake in two separate 9×9 inch (23x23cm) pans rather than one larger pan. Do not attempt to bake the doubled recipe in a 9×13 inch (23x33cm) pan — the filling depth will be greater, the base will be thicker, and the bake time will be unpredictable. Two separate pans bake for the same time as a single pan — 40 to 45 minutes — because the bake time is determined by filling depth and crumble thickness, not total quantity. The glaze does not scale linearly in flavor — if doubling, make the glaze fresh for each pan rather than doubling and dividing, because the consistency changes as the powdered sugar sits. For a related bar recipe that also scales well to two pans, the chocolate chip cookie bars follow the same two-pan doubling logic.
How do I adjust this recipe for high altitude or high humidity?
At high altitude (above 3,500 feet / 1,067 meters), the peach filling will bubble and reduce faster than at sea level because water boils at a lower temperature — check the bars at 35 minutes rather than 38. The shortbread base contains no leavening so no flour or sugar adjustments are needed. At high humidity (above 70% relative humidity), the crumble topping may feel stickier than expected during assembly and the baked surface may feel slightly tacky even when fully done — both are surface moisture effects from the air, not underbaking. Refrigerate the assembled unbaked pan for 20 minutes before baking in high humidity to re-firm the butter, and trust the center bubbling signal over the surface feel when determining doneness. Stored bars in humid climates should be kept in the refrigerator at all times — room temperature storage accelerates softening significantly in high-humidity environments.
More Fruit Bars and Summer Desserts You’ll Love
- Sugar Cookies Recipe — If you want to use the shortbread base dough in a different direction, this sugar cookie recipe uses the same cold-butter cut-in logic but rolls and cuts rather than pressing into a pan.

Peach Crumble Bars Recipe
Ingredients
Equipment
Method
- Position oven rack in the middle and preheat to 350°F (175°C), then line a 9×9 inch (23x23cm) light-colored aluminum baking pan with two sheets of parchment paper running in opposite directions, each with at least 2 inches (5cm) of overhang on all sides.
- In a large mixing bowl, whisk together 2 cups (240g) all-purpose flour, ¾ cup (150g) granulated sugar, and ¼ tsp (1.5g) fine sea salt, then add 1 tsp (5ml) pure vanilla extract and toss briefly with a fork.
- Add ¾ cup (170g) cold unsalted butter cubes all at once and work into the flour mixture using a pastry blender or fingertips, pressing and smearing until the mixture looks shaggy and uneven with butter pieces ranging from pea to almond size — do not overwork.
- Transfer approximately two-thirds of the mixture (roughly 310g) to the prepared pan and press firmly and evenly across the entire base using the flat bottom of a measuring cup, paying attention to the corners, until the base is approximately ¼ inch (6mm) thick with no gaps or thin spots.
- In a medium bowl, combine 3 cups (480g) peeled and sliced fresh yellow peaches, 3 tbsp (36g) granulated sugar, 1 tbsp (8g) cornstarch, 1 tsp (5ml) fresh lemon juice, and ¼ tsp ground cinnamon, then toss gently with a silicone spatula for approximately 20 slow folds until every peach piece is coated.
- Scatter the coated peach mixture evenly over the pressed shortbread base, then drop 3 tbsp (60g) seedless raspberry jam in small teaspoon-sized dollops across the peach layer — approximately 9 to 12 scattered dots — do not spread the jam.
- Add ½ cup (45g) old-fashioned rolled oats to the reserved one-third of the shortbread mixture and toss with a fork until distributed, then scatter the oat crumble loosely over the peach filling without pressing it flat — leave it in natural clumped state.
- Bake at 350°F (175°C) for 40 to 45 minutes, starting to check at 38 minutes, until the crumble peaks are deep golden brown and the fruit filling is visibly bubbling through the gaps in the crumble at the center of the pan — not just at the edges.
- Remove from the oven and cool in the pan on a wire rack for exactly 60 minutes at room temperature, then transfer the pan to the refrigerator and chill for a minimum of 2 hours before slicing.
- After chilling, grip the parchment overhang on two opposite sides and lift the slab straight out of the pan onto a flat cutting surface, then use a sharp chef’s knife wiped clean between every cut to slice into 3 columns and 4 rows for 12 bars approximately 2¼ x 2¼ inches (5.7 x 5.7cm) each.
- If glazing: sift 1 cup (120g) powdered sugar into a small bowl, add 2 tbsp (30ml) heavy cream and whisk until smooth, adjust consistency with additional cream or powdered sugar, then drizzle in a zig-zag pattern over the sliced bars from a height of about 8 inches (20cm) and allow to set for 10 minutes before serving.