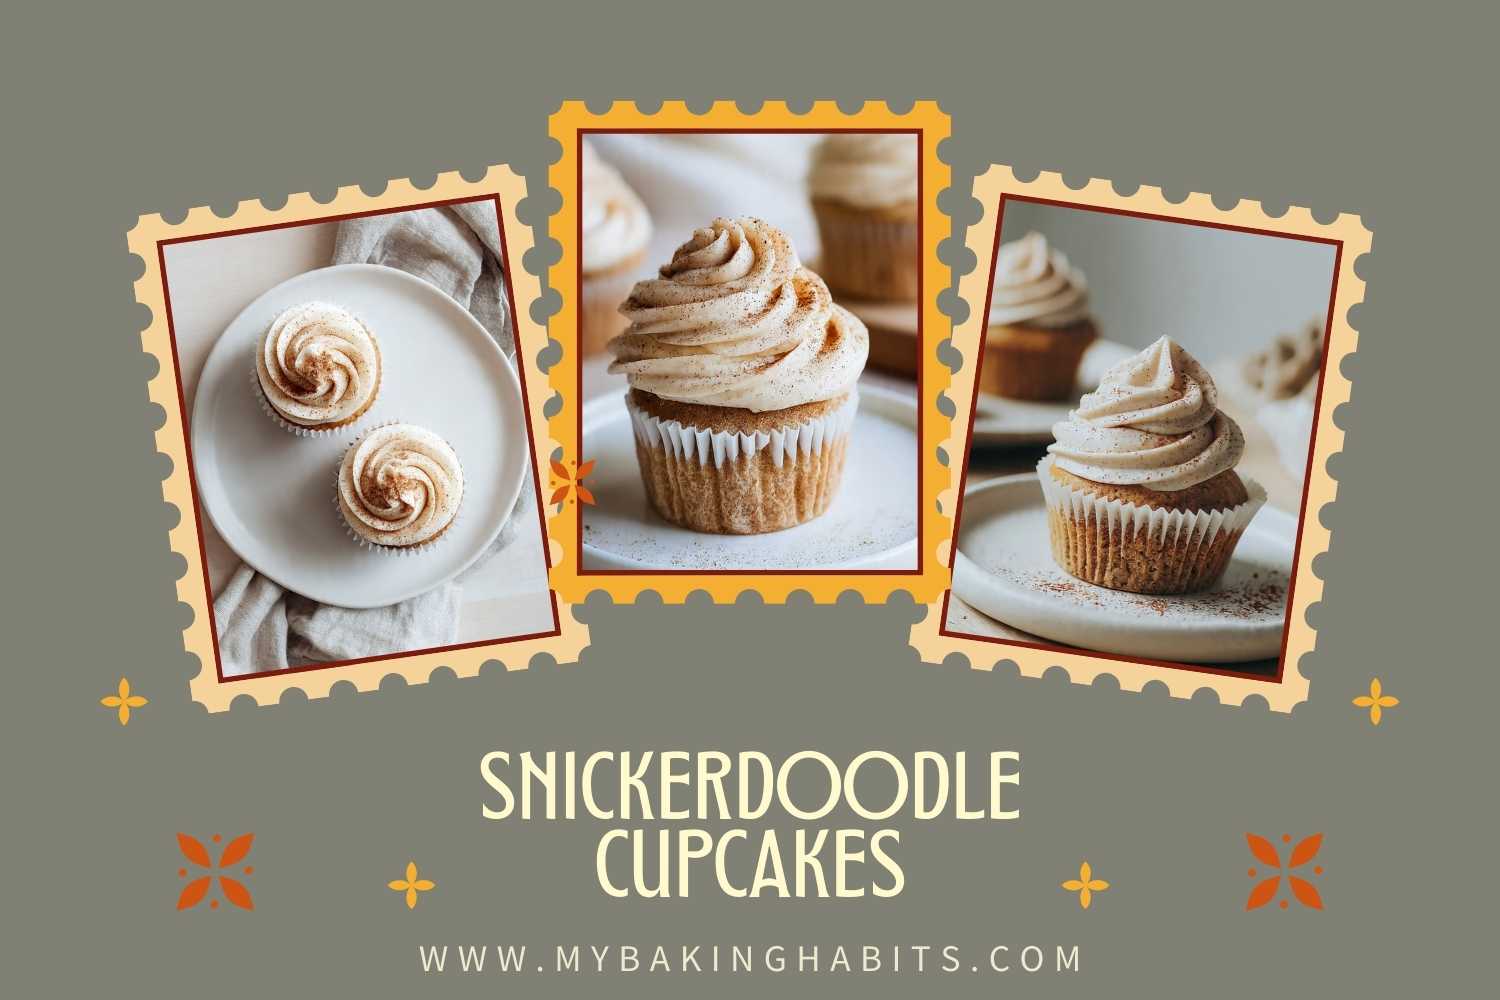
Snickerdoodle Cupcakes
The cupcake that tastes exactly like a snickerdoodle cookie — but with a tall swirl of cinnamon cream cheese frosting on top — is what I kept chasing across six test batches before I got this exactly right. The crumb is soft and tight, the cinnamon warmth runs through every layer, and the frosting has just enough tang from the cream cheese to cut through the sweetness. No chilling required. You need a stand mixer or hand mixer, and this batter is ready to scoop in about 15 minutes.
The main thing I had to solve was getting the snickerdoodle flavor into the actual cupcake — not just the frosting. Most snickerdoodle cupcake recipes taste like vanilla cake with cinnamon frosting. That is not the same thing. A real snickerdoodle has cream of tartar in the dough — that is the ingredient that gives snickerdoodle cookies their signature tang. I put it in the cupcake batter. That single addition changes everything. The cream of tartar works with the baking powder to create a slightly more tender crumb, and it gives the cake a subtle, barely-there tang that makes it taste like a snickerdoodle rather than a regular cinnamon cupcake.
The second problem was the frosting. Cinnamon buttercream on its own is one-dimensional — just sweet and spiced. I use a cinnamon cream cheese frosting instead. The cream cheese adds enough tartness that the frosting does not taste like canned frosting, and it pipes beautifully with a Wilton 1M star tip. The swirl stays tall and does not slump at room temperature, as long as the cream cheese and butter are both properly softened before you start.
🗒 Luna’s Note: The cream of tartar is the one ingredient most people skip — I tested without it and the difference was immediate. The batter with cream of tartar had a slightly more complex flavor and a noticeably more tender bite. Do not leave it out.
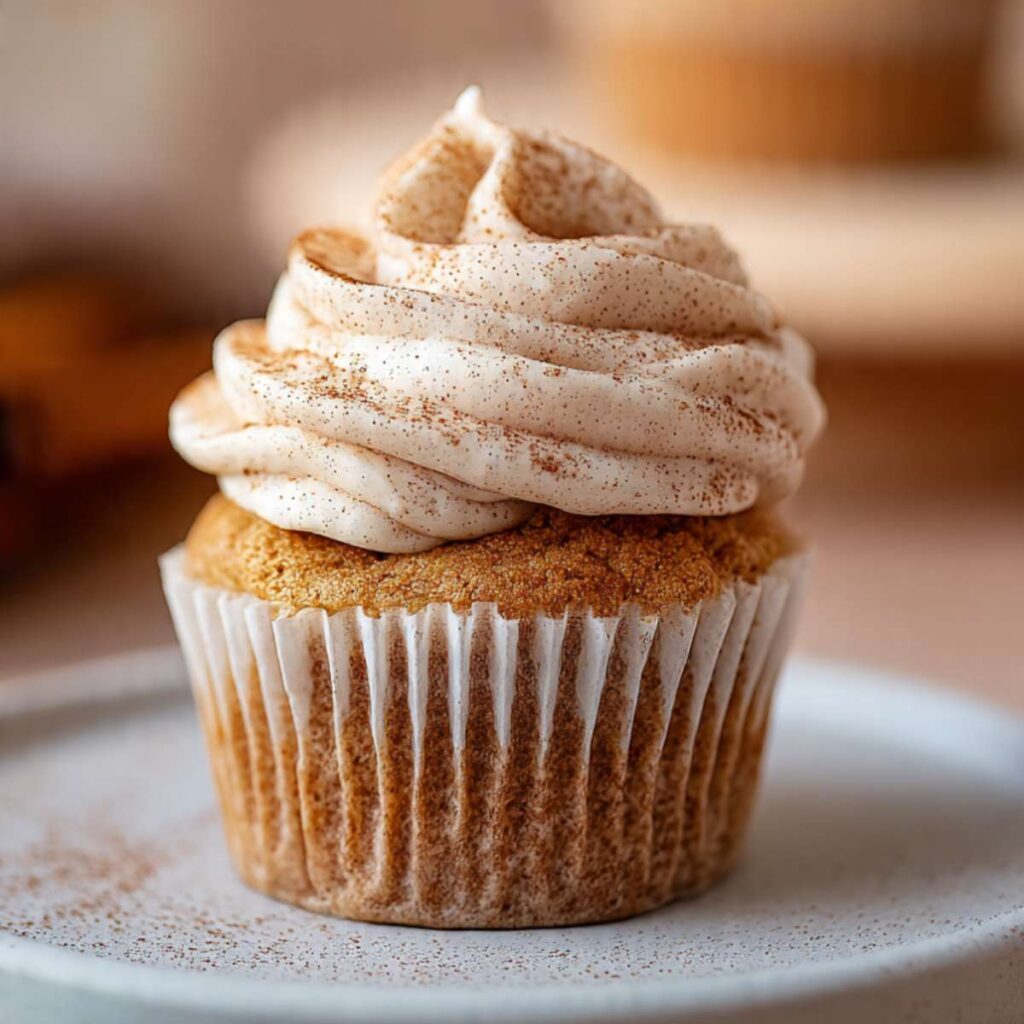
What you get: 12 standard cupcakes with a tall cinnamon cream cheese frosting swirl and a generous dusting of ground cinnamon over the top. The cupcake base is moist, soft, and cinnamon-forward. The frosting is tangy, spiced, and holds its shape for hours.
| Yield | Prep Time | Bake Time | Cooling Time | Total Time | Difficulty |
|---|---|---|---|---|---|
| 12 cupcakes | 20 minutes | 18–20 minutes | 45 minutes | ~1 hr 25 min | Medium |
| Calories | Total Fat | Saturated Fat | Carbohydrates | Sugar | Protein | Sodium |
|---|---|---|---|---|---|---|
| ~444 kcal | 24g | 14g | 55g | 40g | 4g | 195mg |
Calculated with full frosting swirl per cupcake. Values are estimates — your exact result will vary based on how much frosting you pipe per cupcake.
Ingredients & Tools
For the Cupcakes
- 1 ½ cups (180g) all-purpose flour, spooned into the measuring cup and leveled — do not pack
- 1 ½ tsp (6g) baking powder, checked for freshness
- ½ tsp (1.5g) cream of tartar
- 1 ½ tsp (4g) ground cinnamon
- ¼ tsp (1.5g) fine sea salt
- ½ cup (113g) unsalted butter, softened to 65–68°F
- ¾ cup (150g) plain white granulated cane sugar
- 2 large eggs, room temperature
- 1 tsp (5ml) pure vanilla extract
- ½ cup (120ml) whole milk, room temperature
For the Cinnamon Cream Cheese Frosting
- 8 oz (226g) full-fat block cream cheese, softened to room temperature
- ½ cup (113g) unsalted butter, softened to 65–68°F
- 3 cups (360g) powdered sugar, sifted
- 1 ½ tsp (4g) ground cinnamon
- 1 tsp (5ml) pure vanilla extract
- 1–2 tbsp (15–30ml) heavy cream, as needed for consistency
For the Finish
- 1 tsp (3g) ground cinnamon, for dusting over the frosted cupcakes
Before You Start
- Butter temperature matters on both ends. Cupcake butter and frosting butter must both be at 65–68°F — soft enough to leave an indent when pressed but not greasy or shiny. Too warm and the frosting will be loose and will not hold its swirl. Too cold and it will not cream properly and the batter will look curdled. Set both sticks out 30–45 minutes before you begin.
- Cream cheese must be full-fat block-style, not spreadable. Tub-style cream cheese has a higher water content and will make your frosting loose and runny regardless of how much powdered sugar you add. Pull it from the fridge at the same time as the butter.
- Baking powder freshness test. Drop ½ tsp into hot water. If it bubbles vigorously, it is active. If it sits flat, replace it — flat baking powder produces flat cupcakes that do not dome.
- Eggs at room temperature. Cold eggs mixed into creamed butter cause the batter to curdle and look broken. Set them out with the butter. If you forgot, submerge them in warm (not hot) water for 10 minutes.
- Milk at room temperature. Cold milk added to batter tightens the gluten and toughens the crumb. Set it out alongside everything else.
- Sift the powdered sugar. Lumps in powdered sugar become lumps in frosting that no amount of beating will fully eliminate.
- Gram weights are prioritized throughout this recipe. A kitchen scale produces consistent results that volume measurements cannot match — especially for flour, where a packed cup can be 20–30% more than a properly spooned and leveled cup.
Necessary Tools
- Stand mixer with paddle attachment, or hand mixer with large bowl
- Standard 12-cup muffin tin
- 12 white paper cupcake liners
- Medium bowl for dry ingredients
- Whisk
- Silicone spatula
- Kitchen scale (strongly recommended)
- Wire cooling rack
- Piping bag fitted with a Wilton 1M open-star tip (for the frosting swirl — if you do not have a piping bag, a zip-lock bag with one corner snipped works; if you have no tip, use an offset spatula to swirl the frosting)
- Fine-mesh sieve or small strainer (for dusting cinnamon)
- Oven thermometer (recommended — most home ovens run 15–25°F off)
How to Make Snickerdoodle Cupcakes
Step 1: Preparing the Oven and Pan for an Even Bake
Position your oven rack in the middle position and heat to 350°F (175°C). If you have an oven thermometer, confirm the actual temperature before the pan goes in — most home ovens run 15–25°F (8–14°C) off, and a hotter oven will dome the cupcakes too aggressively and crack the tops. Line your standard 12-cup muffin tin with 12 white paper cupcake liners and set it aside. Do not grease the liners — the batter has enough fat to release cleanly.
The oven must be fully preheated before the batter goes in. A cold or partially heated oven means the leavening activates before the structure is set, and the cupcakes will rise unevenly and collapse in the center. Set a timer and give the oven a full 15 minutes at temperature before the pan goes in.
The pan is ready when the liners are seated flat with no gaps and the oven is confirmed at 350°F (175°C) — move directly to the dry ingredients.
Step 2: Whisking the Dry Ingredients to Distribute the Leavening Evenly
In your medium bowl, add your 1 ½ cups (180g) all-purpose flour (spooned and leveled), 1 ½ tsp (6g) baking powder, ½ tsp (1.5g) cream of tartar, 1 ½ tsp (4g) ground cinnamon, and ¼ tsp (1.5g) fine sea salt. Whisk for 30 full seconds — count them. The goal is not just to combine the ingredients but to distribute the baking powder and cream of tartar evenly through every gram of flour. An unevenly mixed dry mixture causes uneven rise — some cupcakes dome, some stay flat.
The cream of tartar is what separates this from a generic cinnamon cupcake. It reacts with the baking powder to create a more tender crumb, and it contributes the subtle tang that makes snickerdoodle cookies taste the way they do. Removing it produces a fine cupcake — just not a snickerdoodle cupcake.
Baker's Warning: Do not substitute baking soda for the baking powder in this recipe. Baking soda requires an acid to activate — the cream of tartar provides some acidity but not enough to balance a full baking soda substitution. The result will be a metallic, soapy aftertaste and an uneven rise.
The dry mixture should look uniformly tan from the cinnamon with no visible white streaks of flour or baking powder — set the bowl aside and move to the stand mixer.
Step 3: Creaming the Butter and Sugar Until Pale and Significantly Increased in Volume

In your stand mixer bowl fitted with the paddle attachment — or in your large mixing bowl if using a hand mixer — add your ½ cup (113g) unsalted butter, softened to 65–68°F and ¾ cup (150g) plain white granulated cane sugar. Beat on medium speed (speed 4 on a KitchenAid) for exactly 4 minutes. Set a timer. Do not estimate.
The granulated sugar does two things here: it aerates the butter by cutting tiny air pockets into the fat during creaming, and it provides the sweetness that balances the tang of the cream of tartar. The air pockets created during this step are what give the cupcakes their lift — the leavening expands those existing pockets in the oven rather than creating structure from scratch.
Baker's Warning: Under-creamed butter and sugar produces flat, dense cupcakes with a tight, compressed crumb. The mixture needs the full 4 minutes. If your butter was too cold going in, the mixture will look crumbly and yellow rather than pale and fluffy — stop the mixer, let it sit at room temperature for 10 more minutes, and cream again.
🗒 Luna’s Note: I always run my mixer on medium rather than high for the creaming step. High speed incorporates too much air too quickly and the structure becomes unstable — the cupcakes look beautiful going into the oven and then sink in the center as they cool.
The butter and sugar mixture should look pale yellow — almost cream-colored — and have visibly increased in volume, appearing light and fluffy rather than dense and grainy. If it still looks yellow and compact after 4 minutes, beat for another 60 seconds and check again.
Step 4: Adding the Eggs and Vanilla Without Breaking the Emulsion
With the mixer running on low speed, add your 2 large eggs, room temperature, one at a time. Add the first egg and wait until it is fully incorporated — about 20 seconds — before adding the second. After both eggs are in, add your 1 tsp (5ml) pure vanilla extract and increase to medium speed for 30 seconds.
Each egg adds fat, protein, and moisture to the emulsion. Adding both at once overwhelms the butter-sugar mixture and the emulsion breaks — the batter looks curdled and wet. Adding them one at a time gives the fat time to absorb each addition.
Baker's Warning: If your eggs were cold and the batter looks broken and curdled after adding them, do not panic and do not add more ingredients. Increase the mixer speed to medium-high for 60 seconds — the friction from the mixing often brings a slightly broken batter back together. If it does not come back, the cupcakes will still bake but will have a slightly denser, less tender crumb.
The batter should look smooth, pale, and cohesive after the egg addition — not broken, not separated, and no visible liquid pooling at the bottom of the bowl. This is the correct base for a light, tender crumb.
Step 5: Alternating the Dry Ingredients and Milk for a Smooth, Lump-Free Batter
With the mixer on low speed, add the dry ingredients and the ½ cup (120ml) whole milk, room temperature in three alternating additions: dry — milk — dry — milk — dry. Start and end with the dry ingredients. Add each portion slowly and wait until it is just incorporated before adding the next.
The alternating method prevents gluten overdevelopment. Flour added to a wet batter all at once requires more mixing to incorporate — more mixing develops more gluten — and more gluten means a tough, rubbery cupcake instead of a tender one. The alternating addition keeps the mixing time minimal and the crumb soft.
Baker's Warning: Do not mix on anything above low speed once the flour goes in. The moment you see the last streak of dry flour disappear, stop the mixer — even if the batter looks slightly uneven. Finish with 4 to 5 slow folds of a silicone spatula from the bottom of the bowl upward to catch any flour pockets at the base.
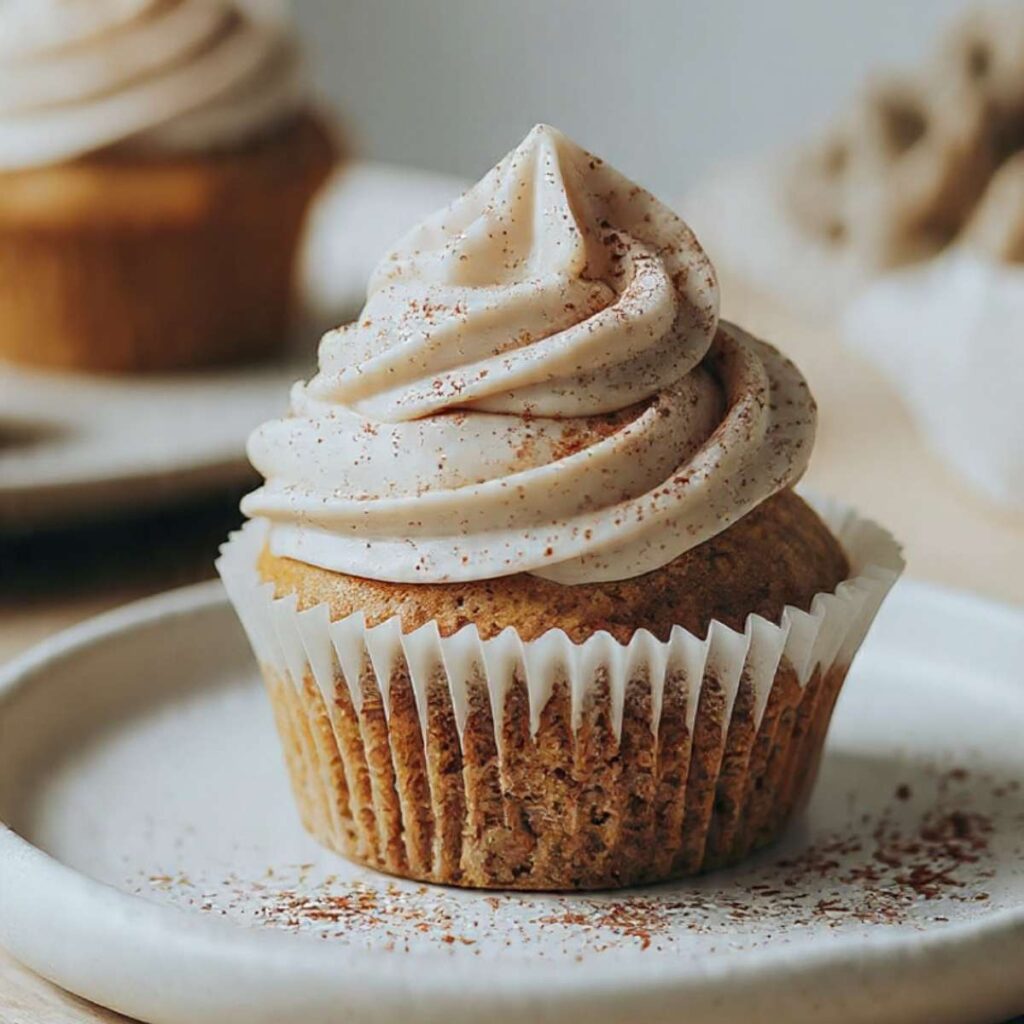
As you can see in the overhead image of the finished cupcakes, the domed tops are rounded and even — that even dome is the result of a properly mixed batter that was not overworked. Overmixed batter produces peaked, cracked tops with a tunnel running through the center.
The finished batter should look smooth and thick — it falls from the spatula in a slow, heavy ribbon, not in chunks and not in a thin stream. If it looks lumpy, fold 3 more times. If it still looks lumpy after that, something went wrong in the butter temperature.
Step 6: Filling the Liners to the Correct Level for a Domed Top
Using a medium cookie scoop or a ¼ cup (60ml) measure, fill each paper liner to exactly two-thirds full — no more, no less. Weigh the first filled liner on your kitchen scale: the target is 55–60g of batter per cup. Use that as your calibration for the remaining 11.
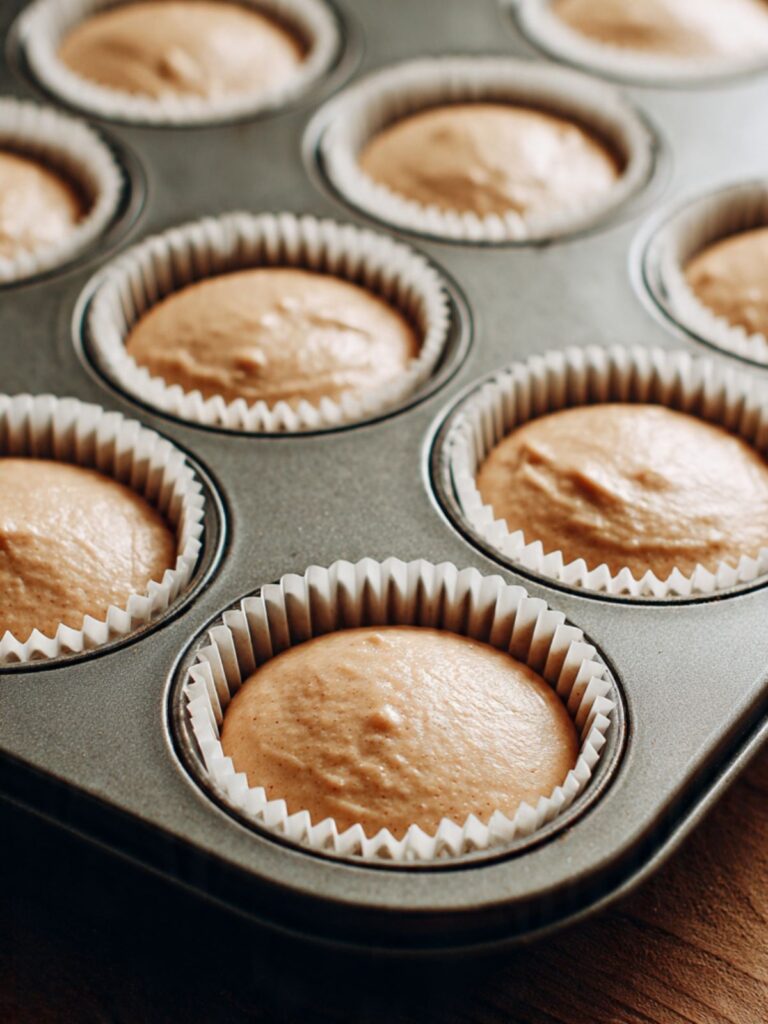
Two-thirds full is the critical fill level for cupcakes. Under-filled liners produce flat cupcakes with no dome — they look deflated and do not hold a tall frosting swirl. Over-filled liners produce cupcakes that overflow, dome unevenly, and fuse to the top of the pan.
Baker's Warning: Do not tap the pan to level the batter. Tapping deflates the air pockets created during creaming — the same air pockets that create the dome. Set the pan down gently and go straight to the oven.
Each liner should sit at exactly two-thirds full with a smooth, slightly domed top of batter visible — the pan is ready to go into the preheated 350°F (175°C) oven.
Step 7: Baking Until the Tops Spring Back and a Toothpick Reads Moist Crumbs
Place the pan on the middle rack of your preheated 350°F (175°C) oven. Bake for 18 to 20 minutes — start checking at 18 minutes. The cupcakes are done when the tops spring back immediately when lightly pressed with one finger, and a toothpick inserted in the center of the tallest cupcake comes out with a few moist crumbs attached — not wet batter, not completely clean.
Baker's Warning: Do not open the oven door before 15 minutes. The sudden temperature drop can cause the centers to sink before the structure has set. Once you open the door to check, close it quickly — do not leave it open while you assess.
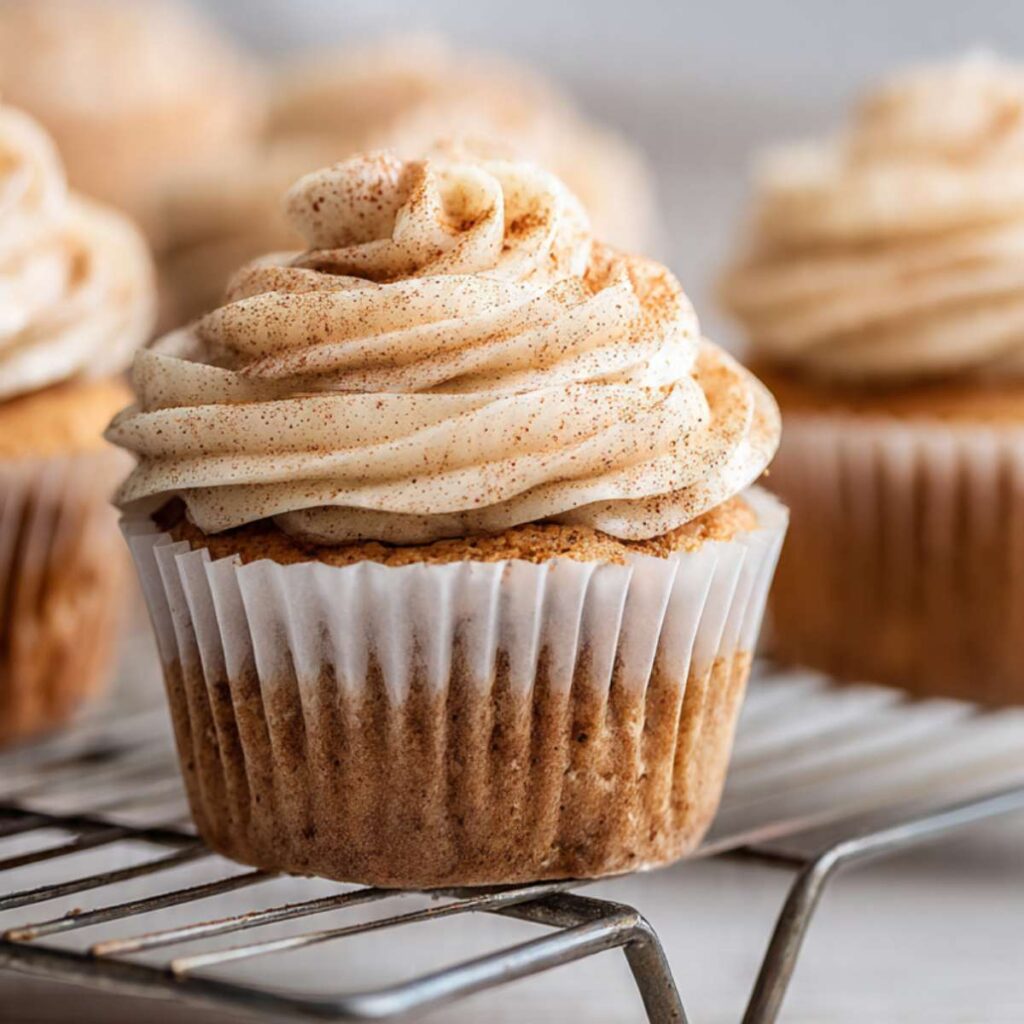
As you can see in the image of the cupcakes on the wire cooling rack, the tops are evenly domed and a warm golden-brown — not pale yellow, not dark amber. That color tells you the batter temperature was correct and the oven was fully preheated. Pale tops mean underbaked. Dark, cracked tops mean the oven ran hot.
The cupcakes are done — remove the pan from the oven and leave it on the counter for exactly 5 minutes before moving the cupcakes to the wire rack.
Step 8: Cooling Completely Before Frosting
Leave the cupcakes in the pan for exactly 5 minutes after pulling from the oven. The pan continues to conduct heat into the base of each cupcake during this time — this carryover heat finishes setting the structure without the oven drying out the crumb. Moving them before 5 minutes risks a collapsed base. Waiting more than 8 minutes starts to steam the liner and can make the base sticky.
After 5 minutes, transfer each cupcake to your wire cooling rack. Leave them at room temperature for a minimum of 45 minutes before frosting. The cupcakes must be completely cool — not warm to the touch, not room temperature at the surface but still warm inside. Press the base gently: if it feels warm at all, wait longer.
Baker's Warning: Frosting applied to a warm cupcake melts on contact. The frosting will slide down the sides, pool around the base, and no amount of refrigeration will restore the swirl. The 45-minute wait is not optional.
The cupcakes are fully cool and ready to frost when they feel room temperature all the way through — move to making the frosting.
Step 9: Making the Cinnamon Cream Cheese Frosting
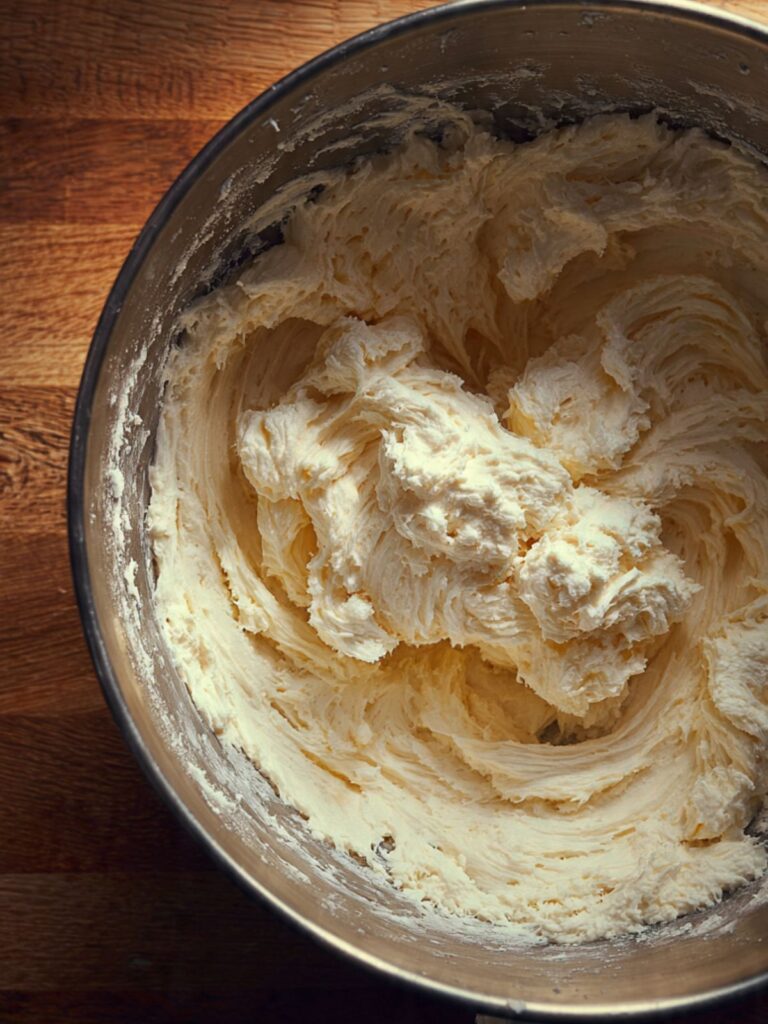
In your stand mixer bowl fitted with the paddle attachment, add your 8 oz (226g) full-fat block cream cheese, softened to room temperature and ½ cup (113g) unsalted butter, softened to 65–68°F. Beat on medium speed for 2 minutes until smooth and completely combined with no visible lumps. Scrape down the sides and bottom of the bowl with your silicone spatula before adding anything else — cream cheese hides in lumps at the paddle and does not incorporate unless you scrape.
With the mixer on low, add your 3 cups (360g) powdered sugar, sifted, one cup at a time. After each addition, mix on low until just combined before adding the next — this prevents a powdered sugar cloud. After all three cups are in, add your 1 ½ tsp (4g) ground cinnamon and 1 tsp (5ml) pure vanilla extract. Increase to medium speed and beat for 2 full minutes.
Check the consistency. The frosting should hold a stiff peak that stays upright for at least 5 seconds when you lift the paddle. If it is too stiff to pipe smoothly, add 1 tbsp (15ml) heavy cream and beat for 30 seconds. Add a second tablespoon only if needed. If it is too soft and will not hold a peak, refrigerate the bowl for 15 minutes and beat again briefly.
Baker's Warning: Do not use softened cream cheese that has become warm or greasy. Cream cheese that is too warm produces a frosting that looks smooth in the bowl but will not hold its piped shape and will slowly slide down the cupcake over the next hour. If your kitchen is warm and the cream cheese felt very soft going in, refrigerate the finished frosting for 20 minutes before piping.
🗒 Luna’s Note: I always taste the frosting for cinnamon balance before I pipe. The cinnamon flavor deepens as the frosting sits, so I err slightly light during mixing — what tastes perfectly spiced when fresh will taste very strong an hour later.
The frosting should look smooth, slightly glossy, and hold a clean stiff peak — pipe a small test swirl onto a plate and check that it holds its shape before filling the piping bag.
Step 10: Piping the Frosting Swirl and Finishing with Cinnamon
Fit your piping bag with a Wilton 1M open-star tip. If you do not have a piping bag, a large zip-lock bag with one corner snipped to about ½ inch (1.25cm) works well. If you have no tip at all, use an offset spatula to swirl the frosting — press the spatula flat on the frosting, rotate the cupcake, and pull up at the center to create a peak.
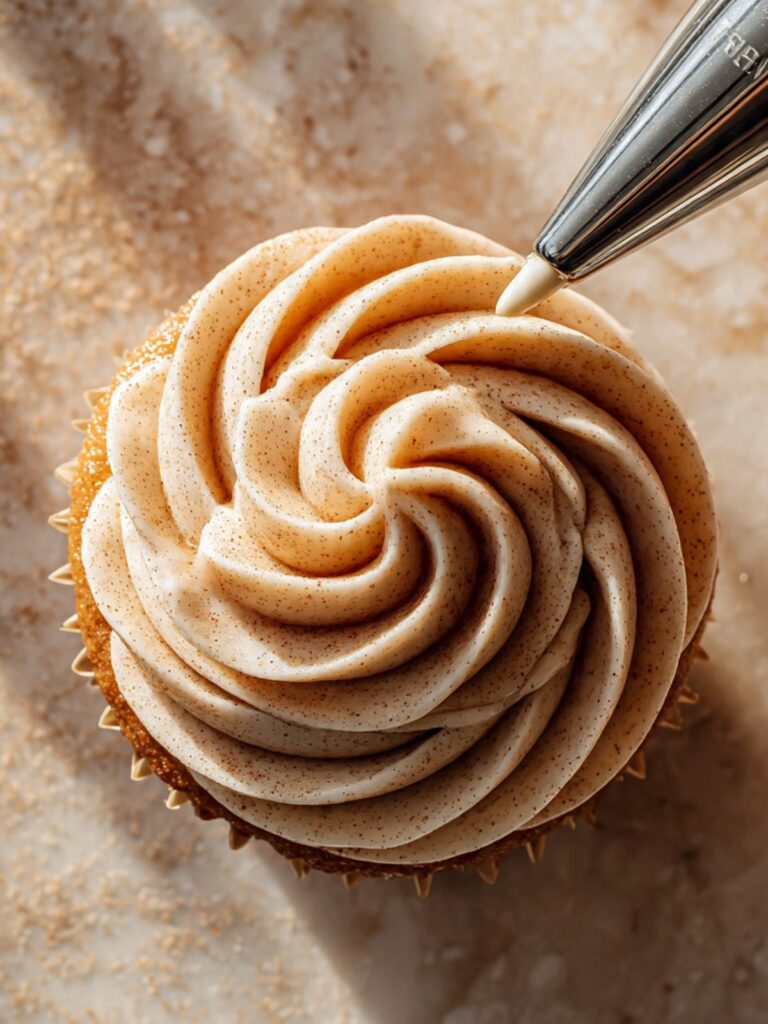
To pipe the swirl: hold the bag perpendicular to the cupcake top, tip about ½ inch (1.25cm) above the surface. Starting at the outer edge, pipe in a tight spiral moving inward and upward toward the center. Apply steady, even pressure throughout — do not squeeze harder as you go up or the swirl will be uneven. Release pressure completely before lifting the tip at the center.
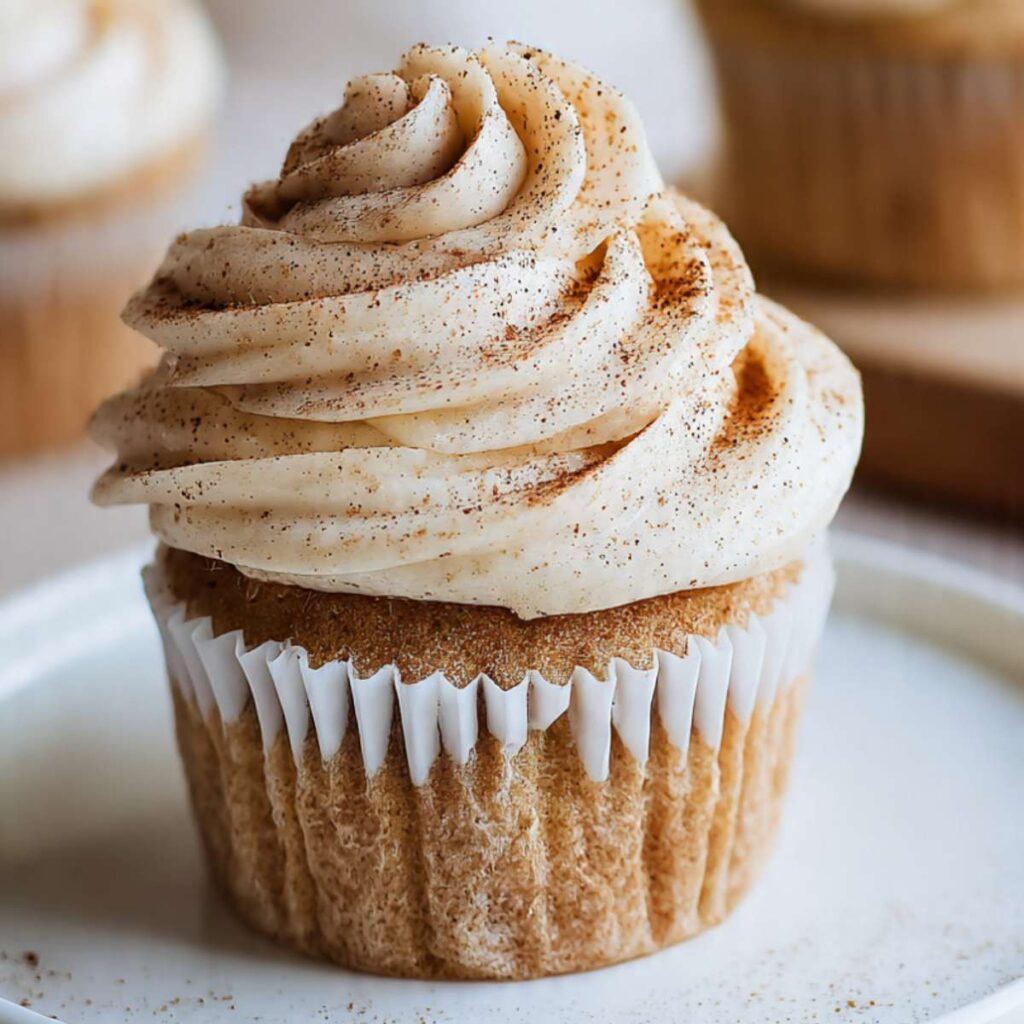
As you can see in the close-up hero images, the frosting swirl is tall and defined with visible ridges from the star tip — that height and definition comes from frosting that is the right consistency and was piped with steady, consistent pressure from start to finish.
Once all 12 cupcakes are frosted, hold your fine-mesh sieve containing the 1 tsp (3g) ground cinnamon about 6 inches (15cm) above the cupcakes and tap gently to dust. The cinnamon should settle into the ridges of the swirl and sit on the peaks — exactly as shown in the hero images.
Baker's Warning: Dust the cinnamon immediately after piping, before the frosting surface dries. Cinnamon applied to a dry frosting surface sits on top and looks uneven. Applied while the frosting is still slightly tacky, it settles naturally into the texture of the swirl.
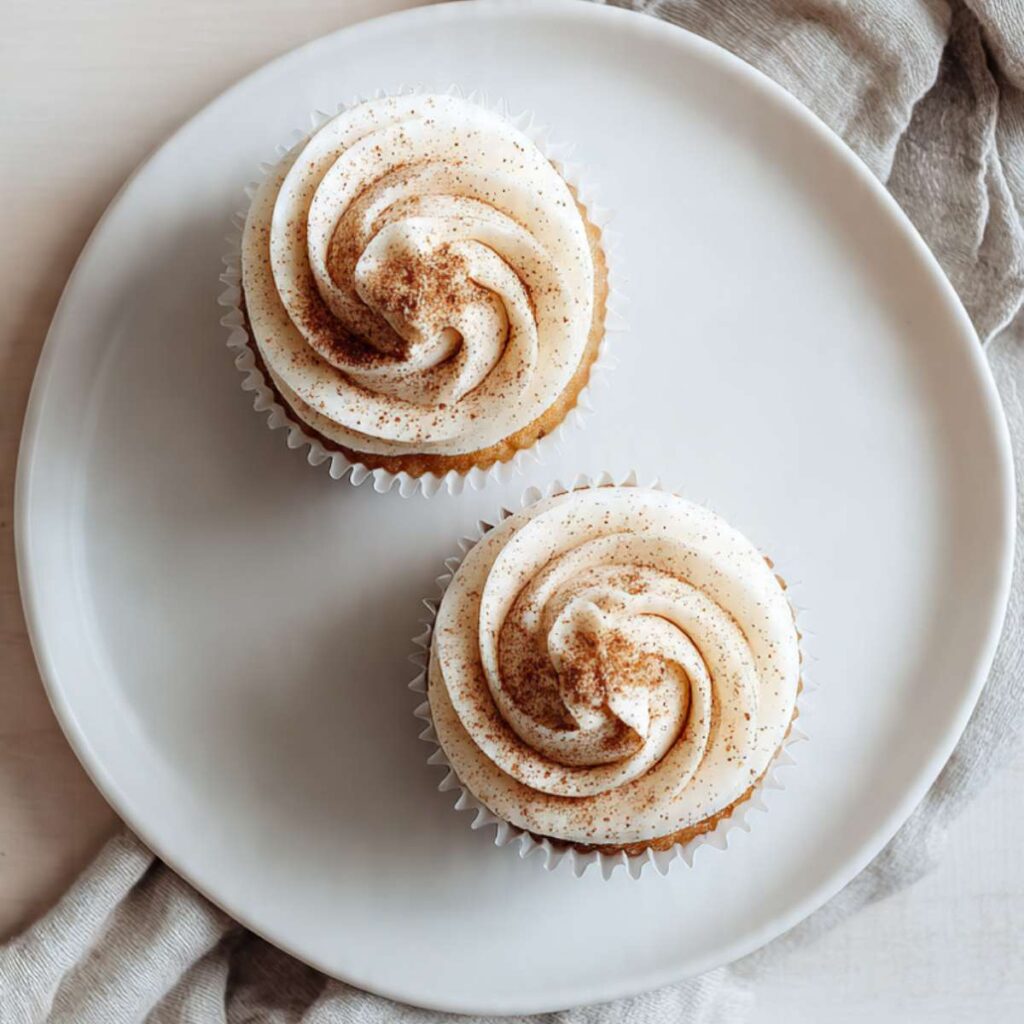
The cupcakes are finished — 12 snickerdoodle cupcakes with tall cinnamon cream cheese frosting swirls and a dusting of ground cinnamon across every surface.
The Science Behind Snickerdoodle Cupcakes
Why Cream of Tartar Is the Ingredient That Makes These Taste Like a Snickerdoodle
Cream of tartar is potassium bitartrate — a naturally acidic byproduct of wine fermentation. In snickerdoodle cookies, it reacts with baking soda to create lift and contributes a mild, distinctive tang that is the defining flavor of a snickerdoodle. In this cupcake batter, it works alongside baking powder and its primary role shifts to flavor rather than leavening. The acidity also tenderizes the gluten network slightly, producing a more delicate crumb than a standard vanilla cupcake. Without cream of tartar, you get a pleasant cinnamon cupcake. With it, you get something that genuinely tastes like the cookie it is named after. For readers who want to compare, the snickerdoodle cookies recipe on this blog uses cream of tartar with baking soda in the classic way — the flavor difference between the two applications is instructive.
Why the Creaming Method Produces the Light, Domed Crumb Visible in These Cupcakes
Creaming butter and sugar together is not just mixing — it is aeration. The sharp edges of granulated sugar crystals cut microscopic air pockets into the fat as the mixer works. Those pockets are trapped in the butter emulsion and remain in the batter when it goes into the oven. When heat hits the batter, the leavening gases expand into those pre-existing air pockets rather than forcing their way through a dense matrix. The result is the light, evenly domed crumb visible in the images — a soft, open structure that springs back when pressed rather than compressing under the weight of the frosting swirl. A melt-and-mix batter skips the aeration step entirely and produces a denser, moister result that works in brownies and bar cookies but not in a cupcake where lift and tenderness are the goal.
🗒 Luna’s Note: I learned this the hard way on my first attempt at cream cheese frosting — I used tub-style because it was what I had on hand. The frosting looked perfect in the bowl and was completely liquid on the cupcakes within 20 minutes. Full-fat block cream cheese only, every time.
Why Full-Fat Block Cream Cheese Is Non-Negotiable in the Frosting
Cream cheese frosting fails for one reason more than any other: the wrong type of cream cheese. Full-fat block cream cheese contains approximately 33% milkfat and has a firm, dense texture when cold. Tub-style cream cheese is whipped with stabilizers and has a higher water content — that is what makes it spreadable straight from the refrigerator. That extra water releases into the frosting during mixing and cannot be beaten back out. The result is a frosting that looks smooth in the bowl, pipes loosely, and slowly slides down the cupcake over the next 30 minutes. The tall, defined swirl visible in every image in this article is only possible with block cream cheese at the correct temperature. The fix is simple: always use the block. The block gives you control over the consistency. The tub does not.
Snickerdoodle Cupcakes Troubleshooting & Pro-Tips
Why Your Cupcakes Sank in the Center
The center sinks when the structure sets before the leavening has finished its work, or when the structure never fully sets because the cupcake was underbaked. The two most common causes are opening the oven door before 15 minutes — the temperature drop deflates the rising structure before it has solidified — and underbaking, where the center looks done from the outside but is still wet and unset inside. A third cause is overmixed batter: excess gluten development creates a tight network that cannot hold the air expanded by the leavening, and the center collapses as the cupcake cools. Check the oven temperature with a thermometer before your next batch. Confirm the toothpick reads moist crumbs — not wet batter — before pulling the pan. Mix only until the last streak of flour disappears.
Why Your Cupcakes Peaked and Cracked on Top
A peaked, cracked top means the oven ran too hot or the liners were overfilled. When the oven temperature is too high, the outer edges of the cupcake set before the center has a chance to rise — the expanding batter forces its way through the set crust and creates a peak or crack. The same thing happens when the liner is filled above two-thirds: there is too much batter relative to the surface area, and the excess has nowhere to go except up and through. Verify your oven temperature with a thermometer. Fill liners to exactly two-thirds — weigh the first one at 55–60g and use it as your calibration.
Why Your Frosting Will Not Hold Its Shape
Frosting that slumps, slides, or will not hold a piped swirl has one of three causes: cream cheese or butter that was too warm going in, cream cheese that was tub-style rather than block, or not enough powdered sugar relative to the fat. Check your cream cheese packaging — it must say block or bar, not spreadable or whipped. If the frosting is correct but your kitchen is warm, refrigerate the filled piping bag for 15 minutes before piping. If the frosting is already on the cupcakes and starting to slide, refrigerate the cupcakes immediately for 20 minutes — the cold will re-firm the fat and stabilize the swirl.
Why Your Cupcakes Taste Like Cinnamon Cake Instead of Snickerdoodle
This is almost always a missing cream of tartar. The cinnamon provides warmth and spice, but the tang from the cream of tartar is what makes the flavor profile read as snickerdoodle rather than generic cinnamon cake. If you skipped it or substituted it, the cupcakes are still good — they are just not snickerdoodle cupcakes. A second cause is under-seasoned frosting: if the frosting tastes flat and sweet without any spice, the cinnamon measurement was short or the powdered sugar overwhelmed it. Add an additional ¼ tsp (0.75g) ground cinnamon to the frosting and beat for 30 seconds.
Why Your Cupcake Liners Peeled Away from the Cake
Liner separation happens when the cupcakes are cooled in a humid environment, when they are stored in an airtight container before they are fully cooled, or when the batter had too much moisture relative to the fat. In a properly balanced batter like this one, liner separation is almost always a storage issue. Let the cupcakes cool completely and uncovered on the wire rack before storing. If your kitchen is very humid, the liners may separate regardless — this is cosmetic only and does not affect flavor or texture.
Why Your Cupcakes Rose Unevenly or Developed a Coarse, Open Crumb at Altitude
At elevations above 3,500 feet (1,067m), lower air pressure causes leavening gases to expand faster and more aggressively than at sea level. The cupcakes rise too quickly before the structure has set, which produces an uneven dome, a coarser crumb, and sometimes a collapsed center. The fix: reduce the baking powder from 1 ½ tsp (6g) to 1 tsp (4g) and increase the whole milk from ½ cup (120ml) to a generous ½ cup plus 2 tbsp (150ml). The reduced leavening slows the expansion rate and the extra liquid compensates for faster moisture evaporation at altitude. In high-humidity environments at sea level, the opposite problem sometimes occurs — the batter absorbs moisture from the air and the cupcakes take 2–3 minutes longer to bake through. Check at 20 minutes rather than 18 if your kitchen is very humid.
Why Your Cupcakes Did Not Rise — Flat, Dense Result
Flat, dense cupcakes that did not dome are almost always caused by inactive baking powder, under-creamed butter and sugar, or batter that sat too long before going into the oven. Baking powder begins reacting the moment it contacts liquid — if the batter sits on the counter for 20 or more minutes while the oven finishes preheating, the leavening has already partially spent itself before the heat activates it. Mix the batter, fill the liners, and get the pan into the preheated oven within 5 minutes of completing the batter. For baking powder: drop ½ tsp into hot water — vigorous bubbles mean it is active. A flat reaction means replace it before baking. For under-creamed butter: the full 4-minute creaming time at medium speed is not optional — this is where the lift comes from.
Pro-Tips
Use a kitchen scale for the flour. Spooning and leveling reduces packing but does not eliminate it entirely. A scale removes the variable completely. 180g of flour is 180g every time.
Pipe a test swirl before doing the cupcakes. Pipe one swirl onto a plate, wait 2 minutes, and check the definition. If the ridges are sharp and the swirl holds, the frosting is ready. If the ridges soften and the swirl spreads, refrigerate the frosting for 15 minutes and test again.
Make the frosting first if your kitchen is warm. Refrigerate the finished frosting while the cupcakes bake and cool. Cold frosting piped onto cool cupcakes holds its shape longer than frosting made at room temperature and used immediately.
The cinnamon dust settles better through a fine-mesh sieve than a spoon. A spoon drops cinnamon in uneven clumps. A sieve held 6 inches (15cm) above the cupcakes and tapped gently produces an even, fine dusting that settles into the frosting ridges exactly as shown in the images.
For clean liner removal, store frosted cupcakes in a single layer. Stacking frosted cupcakes compresses the swirl and causes the liners to peel. A flat storage container with a loose lid keeps the swirls intact and the liners attached.
How to Store Snickerdoodle Cupcakes
Room Temperature
Store frosted snickerdoodle cupcakes in a single layer in a rigid container with a lid — not a zip-lock bag, which compresses the frosting swirls and causes the liners to peel. Leave the lid slightly ajar for the first hour after storing to allow any remaining surface moisture to escape before sealing. At room temperature, the cupcakes are at their best for the first 24 hours. The frosting remains stable and the crumb stays soft. After 24 hours at room temperature, the cream cheese in the frosting begins to weep slightly and the cinnamon flavor in the frosting intensifies past the point of balance. If you are not serving them within 24 hours, refrigerate.
Do not store in a zip-lock bag. The bag traps moisture against the liner, accelerates liner separation, and compresses the frosting swirl. A rigid container only.
Refrigerator
Refrigerate frosted cupcakes in a single layer in a rigid airtight container for up to 4 days. The cold firms the cream cheese frosting significantly — the swirl will look slightly stiffer and less glossy after refrigeration, which is normal. Pull the cupcakes from the refrigerator 20–25 minutes before serving and allow them to come to room temperature. Cold cream cheese frosting tastes dense and muted — at room temperature it opens up and the cinnamon flavor becomes more pronounced. Do not microwave to speed this up — even 10 seconds of microwave heat will melt the frosting swirl.
Day-by-day texture notes: Day 1 — peak texture and flavor. Day 2 — crumb softens slightly, frosting deepens in cinnamon flavor. Day 3 — crumb noticeably more moist, frosting very firmly set from refrigeration. Day 4 — still good but past peak. Discard after day 4.
Freezer
Freeze the cupcake bases unfrosted. Cream cheese frosting does not freeze and thaw cleanly — the water in the cream cheese separates during thawing and the frosting becomes grainy and wet regardless of how slowly it is thawed. Bake the cupcakes, cool completely, and freeze the unfrosted bases in a single layer on a parchment-lined tray for 1 hour until solid. Transfer to a zip-lock freezer bag, press out all air, and freeze for up to 2 months. Thaw at room temperature for 45 minutes to 1 hour before making the frosting fresh and assembling.
If you must freeze frosted cupcakes: freeze uncovered on a tray until the frosting is solid — about 2 hours — then wrap each cupcake individually in plastic wrap and place in a freezer-safe container. Thaw overnight in the refrigerator. Expect some texture loss in the frosting — it will be slightly grainy and less glossy than freshly made. The cupcake base will be unaffected.
Make-Ahead
The cupcake bases can be baked up to 2 days ahead and stored unfrosted at room temperature in an airtight container. The frosting can be made up to 2 days ahead and refrigerated in a covered bowl. Before piping, let the refrigerated frosting sit at room temperature for 20 minutes, then beat briefly with the mixer for 30 seconds to restore its texture. Do not skip the re-beating step — cold frosting piped directly from the refrigerator will be too stiff and will tear rather than glide through the tip.
Serving Suggestion
Serve snickerdoodle cupcakes at room temperature — not cold, not warm. The frosting needs to be at room temperature for the cinnamon flavor to be fully present and for the texture to feel smooth rather than dense. A cupcake pulled straight from the refrigerator and eaten immediately tastes half of what it should. The 20–25 minute rest at room temperature before serving is the step most people skip and most people should not.
These cupcakes pair naturally with a strong cup of black coffee or a chai latte — the bitterness cuts the sweetness of the frosting and the spice in the chai echoes the cinnamon without competing with it. They are the right choice for a fall birthday when a full layer cake feels like too much effort, for a weekend bake that needs to travel to a gathering, or for any occasion where you want something that tastes more intentional than a standard vanilla cupcake without requiring advanced decorating skills.
🗒 Luna’s Note: I always add the cinnamon dust immediately before serving rather than right after frosting — especially if the cupcakes are being refrigerated and pulled out the next day. The cinnamon stays brighter and more visually defined when applied fresh rather than sitting on the frosting overnight.
Frequently Asked Questions About Snickerdoodle Cupcakes
What makes snickerdoodle cupcakes different from regular cinnamon cupcakes?
Snickerdoodle cupcakes contain cream of tartar in the batter — the same ingredient that gives snickerdoodle cookies their signature mild tang and tender texture. Without cream of tartar, a cinnamon cupcake tastes sweet and spiced but flat. The cream of tartar adds a subtle acidity that makes the flavor profile distinctly snickerdoodle rather than generic cinnamon cake. The cinnamon cream cheese frosting reinforces that tang and ties the cupcake back to the cookie it is named after.
Can I make snickerdoodle cupcakes ahead of time?
Yes. The cupcake bases can be baked up to 2 days ahead and stored unfrosted at room temperature in an airtight container. The cinnamon cream cheese frosting can be made up to 2 days ahead and refrigerated in a covered bowl — let it sit at room temperature for 20 minutes and beat briefly for 30 seconds before piping to restore its texture. Fully assembled frosted cupcakes are best within 24 hours at room temperature or within 4 days refrigerated. For the best result, frost on the day you plan to serve them.
What frosting goes on snickerdoodle cupcakes?
Cinnamon cream cheese frosting is the best match for snickerdoodle cupcakes. The cream cheese adds tartness that echoes the tang of the cream of tartar in the batter, and the cinnamon ties the frosting to the cupcake’s flavor profile. A plain cinnamon buttercream works as a substitute — replace the cream cheese with an additional ¼ cup (57g) unsalted butter and increase the heavy cream to 3–4 tbsp (45–60ml) for the right consistency — but the result will be sweeter and less complex than the cream cheese version. Avoid whipped cream frosting: it is too light to hold a piped swirl and will deflate within an hour.
Can I turn this recipe into a snickerdoodle cake instead of cupcakes?
Yes, with adjustments. Pour the batter into two 8-inch (20cm) round cake pans lined with parchment and greased on the sides. Bake at 350°F (175°C) for 22–26 minutes — start checking at 22 minutes. The layers are done when a toothpick inserted in the center comes out with moist crumbs and the edges are pulling slightly from the pan sides. Cool for 10 minutes in the pan, then invert onto a wire rack and cool completely before frosting. Double the frosting recipe for a two-layer cake. Note that leavening does not scale linearly — do not simply double the baking powder if scaling the batter up beyond two layers.
Can I use this recipe to make snickerdoodle cupcakes without a mixer?
The cupcake batter requires a mixer for the creaming step — the 4-minute beating of butter and sugar cannot be replicated effectively by hand. Without a mixer, the butter and sugar will not aerate properly and the cupcakes will be flat and dense. The frosting also requires a mixer to achieve a smooth, pipeable consistency from block cream cheese and butter. If you do not have a stand mixer, a hand mixer works identically for both components. If you have no electric mixer at all, a snickerdoodle cookie recipe — which uses melted butter and requires no mixer — may be a better fit. The snickerdoodle cookies recipe on this blog is a one-bowl, no-mixer recipe.
Can I make snickerdoodle cupcakes at high altitude?
Yes, with two adjustments. Reduce the baking powder from 1 ½ tsp (6g) to 1 tsp (4g) — at elevations above 3,500 feet (1,067m), lower air pressure causes leavening to expand faster, which makes cupcakes rise aggressively and then collapse before the structure sets. Also increase the whole milk from ½ cup (120ml) to ½ cup plus 2 tbsp (150ml) to compensate for faster moisture evaporation at altitude. Bake time stays the same — start checking at 18 minutes. In very humid climates at sea level, the cupcakes may need 2–3 extra minutes — check at 20 minutes and use the toothpick test rather than relying on timing alone.
Can I double this snickerdoodle cupcake recipe?
Yes, with one important note on the leavening. Doubling all ingredients works for flour, sugar, butter, eggs, milk, and vanilla — double each exactly. Do not simply double the baking powder. Leavening does not scale linearly: too much baking powder in a doubled batch causes the cupcakes to rise too fast, dome dramatically, and then sink in the center as they cool. For a doubled batch (24 cupcakes), increase the baking powder to 2 ½ tsp (10g) rather than 3 tsp (12g). The cream of tartar can be doubled exactly — it does not have the same non-linear behavior. Bake in two separate tins on the same rack, rotating once at the 10-minute mark for even heat.
More Cupcakes You’ll Love
If these snickerdoodle cupcakes hit the right note, these recipes from the same collection are worth making next:
- Cookie Dough Cupcakes — vanilla cupcakes filled with edible cookie dough and topped with cookie dough frosting. The same creamed butter method as this recipe with a more indulgent finish.
- Strawberry Crunch Cupcakes — strawberry cupcakes with a cream cheese frosting and a strawberry crunch topping. The crunch topping adds a textural contrast that makes these stand out.
- Carrot Cake Cupcakes — warmly spiced cupcakes with a classic cream cheese frosting. If you like the cinnamon-forward flavor profile of these snickerdoodle cupcakes, the carrot cake version is the natural next bake.
Authentic Snickerdoodle Cupcakes
Ingredients
Equipment
Method
- Position oven rack in the middle and heat to 350°F (175°C), then line a standard 12-cup muffin tin with 12 white paper cupcake liners and set aside.
- In a medium bowl, whisk together 1 ½ cups (180g) all-purpose flour, 1 ½ tsp (6g) baking powder, ½ tsp (1.5g) cream of tartar, 1 ½ tsp (4g) ground cinnamon, and ¼ tsp (1.5g) fine sea salt for 30 full seconds until evenly combined and no white streaks remain.
- In the bowl of a stand mixer fitted with the paddle attachment, beat ½ cup (113g) softened unsalted butter and ¾ cup (150g) granulated sugar on medium speed for 4 minutes until pale, light, and significantly increased in volume.
- With the mixer on low, add 2 large room-temperature eggs one at a time, waiting until each is fully incorporated before adding the next, then add 1 tsp (5ml) pure vanilla extract and increase to medium speed for 30 seconds until smooth and cohesive.
- With the mixer on low, alternate adding the dry ingredient mixture and ½ cup (120ml) room-temperature whole milk in three additions — dry, milk, dry, milk, dry — mixing only until each addition just disappears, then finish with 4 to 5 folds of a silicone spatula from the bottom of the bowl upward.
- Using a medium cookie scoop or ¼ cup (60ml) measure, fill each liner to exactly two-thirds full — approximately 55–60g of batter per cup — then gently set the pan down without tapping and transfer to the oven.
- Bake at 350°F (175°C) for 18 to 20 minutes, starting to check at 18 minutes, until the tops spring back when lightly pressed and a toothpick inserted in the center comes out with moist crumbs — not wet batter and not completely clean.
- Leave the cupcakes in the pan for exactly 5 minutes, then transfer to a wire cooling rack and cool completely for a minimum of 45 minutes before frosting.
- In the stand mixer bowl fitted with the paddle attachment, beat 8 oz (226g) softened full-fat block cream cheese and ½ cup (113g) softened unsalted butter on medium speed for 2 minutes until completely smooth, scraping down the sides and bottom before proceeding.
- With the mixer on low, add 3 cups (360g) sifted powdered sugar one cup at a time, mixing until just combined after each addition, then add 1 ½ tsp (4g) ground cinnamon and 1 tsp (5ml) pure vanilla extract and beat on medium speed for 2 full minutes until smooth and stiff.
- Check frosting consistency — it should hold a stiff peak for at least 5 seconds; if too stiff, add 1 tbsp (15ml) heavy cream and beat 30 seconds; if too soft, refrigerate the bowl for 15 minutes and beat briefly before piping.
- Fit a piping bag with a Wilton 1M open-star tip, fill with frosting, and pipe a tall spiral swirl onto each cooled cupcake starting at the outer edge and moving inward and upward with steady even pressure.
- Hold a fine-mesh sieve containing 1 tsp (3g) ground cinnamon approximately 6 inches (15cm) above the frosted cupcakes and tap gently to dust evenly over all 12 cupcakes, then serve at room temperature.