Pumpkin Chocolate Chip Cookie Bars
The version I make every fall came out of a batch I almost threw away. I had the pumpkin-to-flour ratio wrong in my first three tests — too much pumpkin and the bars never fully set, too little and they baked up dry and crumbly with none of that dense, fudgy pull I was after. Batch four was the ratio that worked. I also tested oil versus melted butter across four batches. The butter version won — more flavor depth, slightly firmer edge, same dense interior. The oil version was not bad. It was just less. That is the recipe I am giving you here.
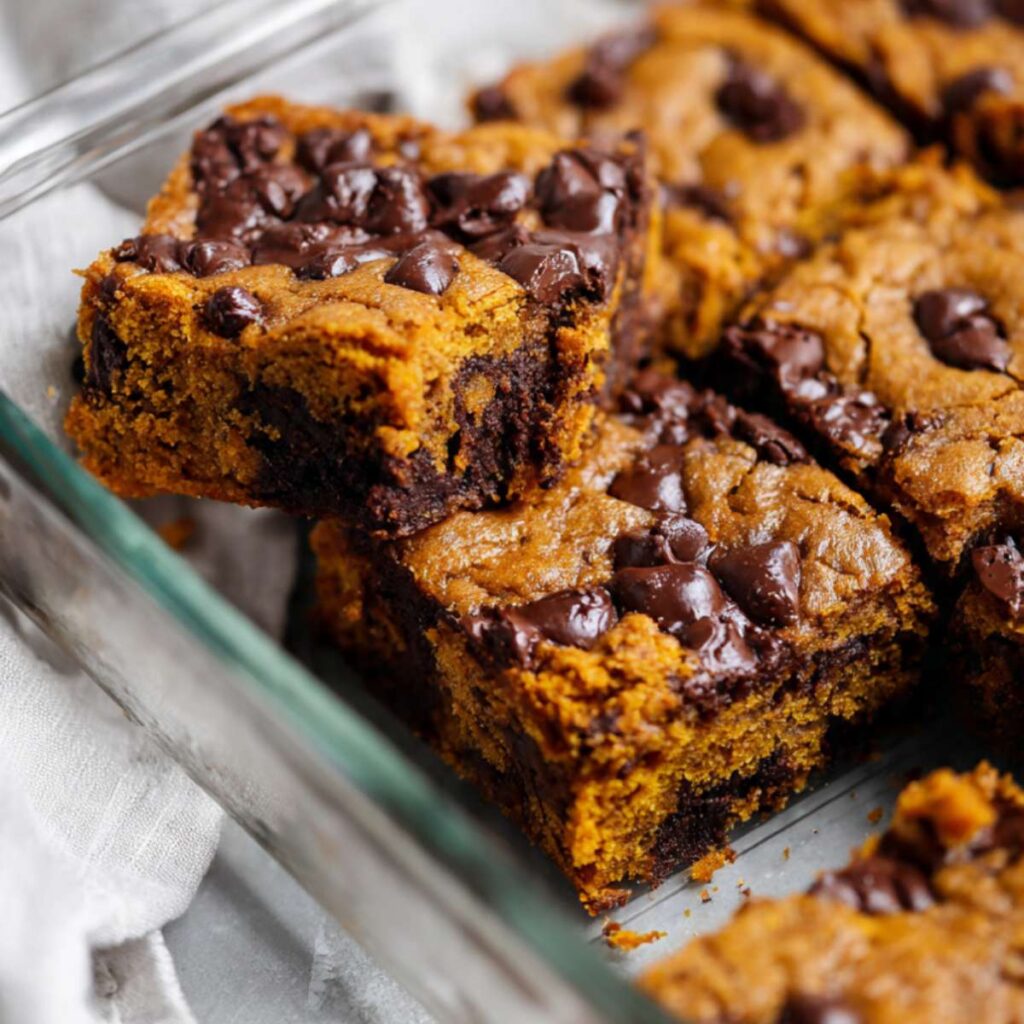
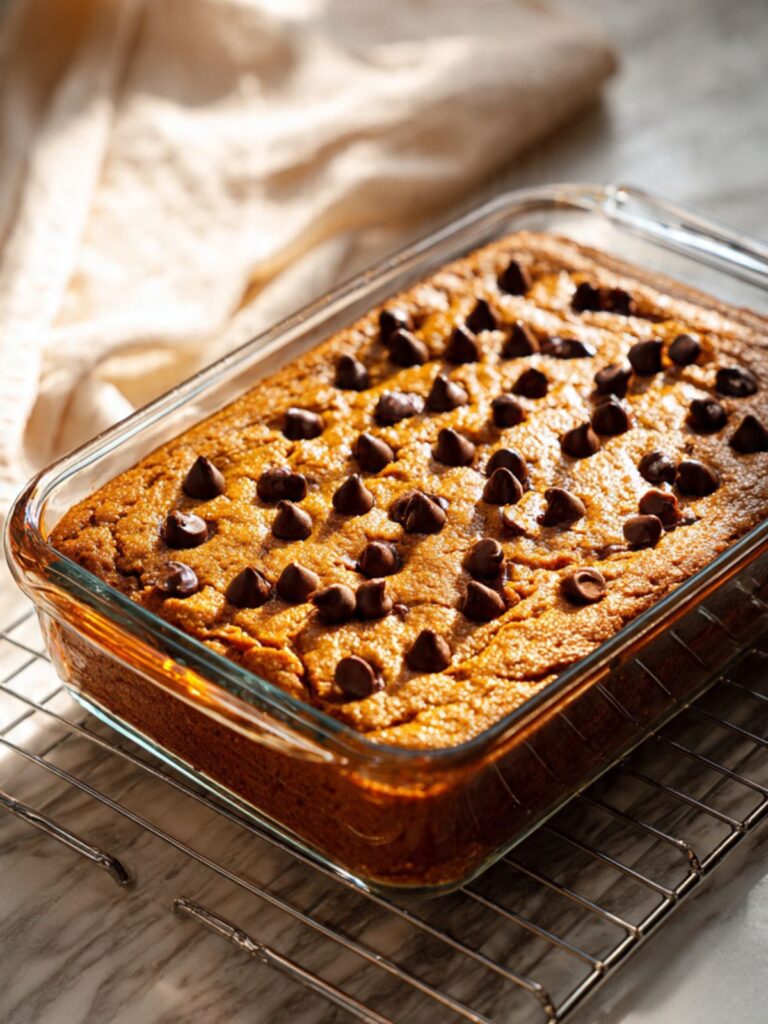
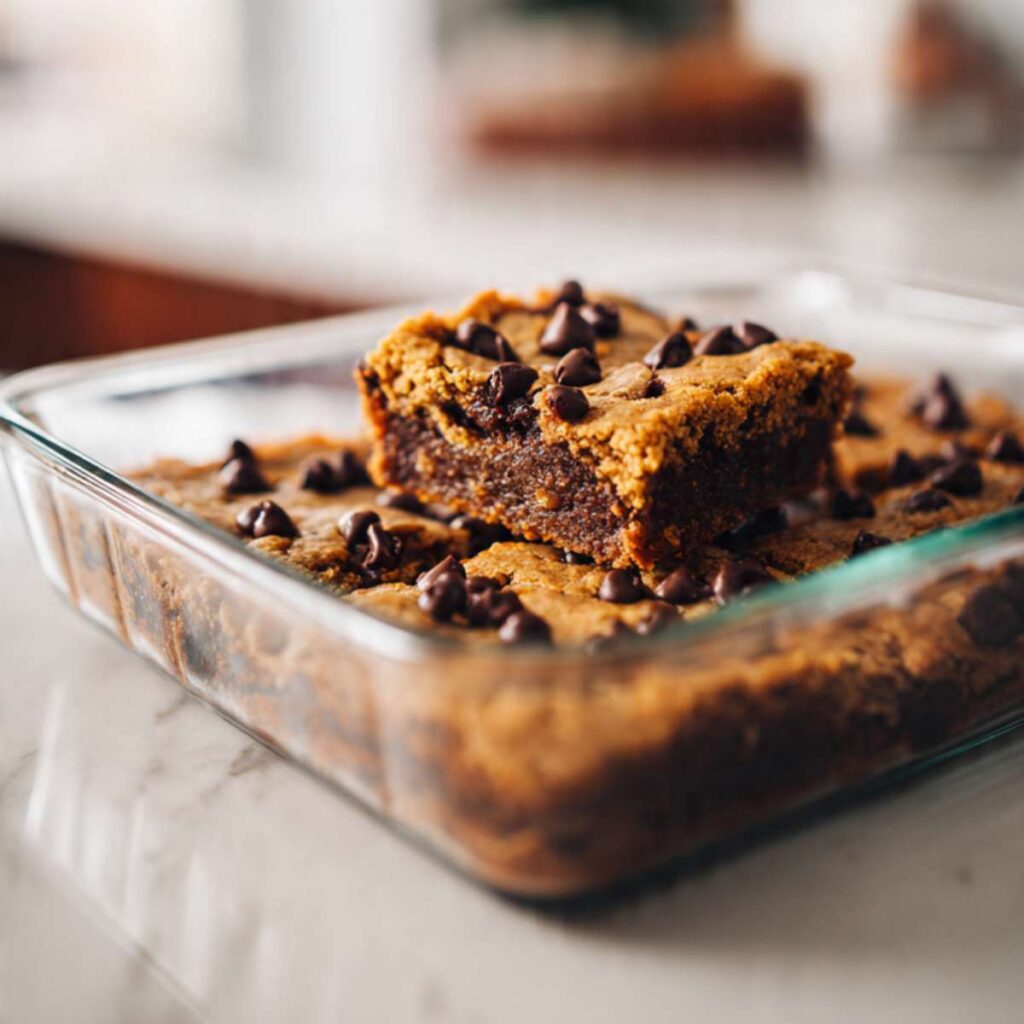
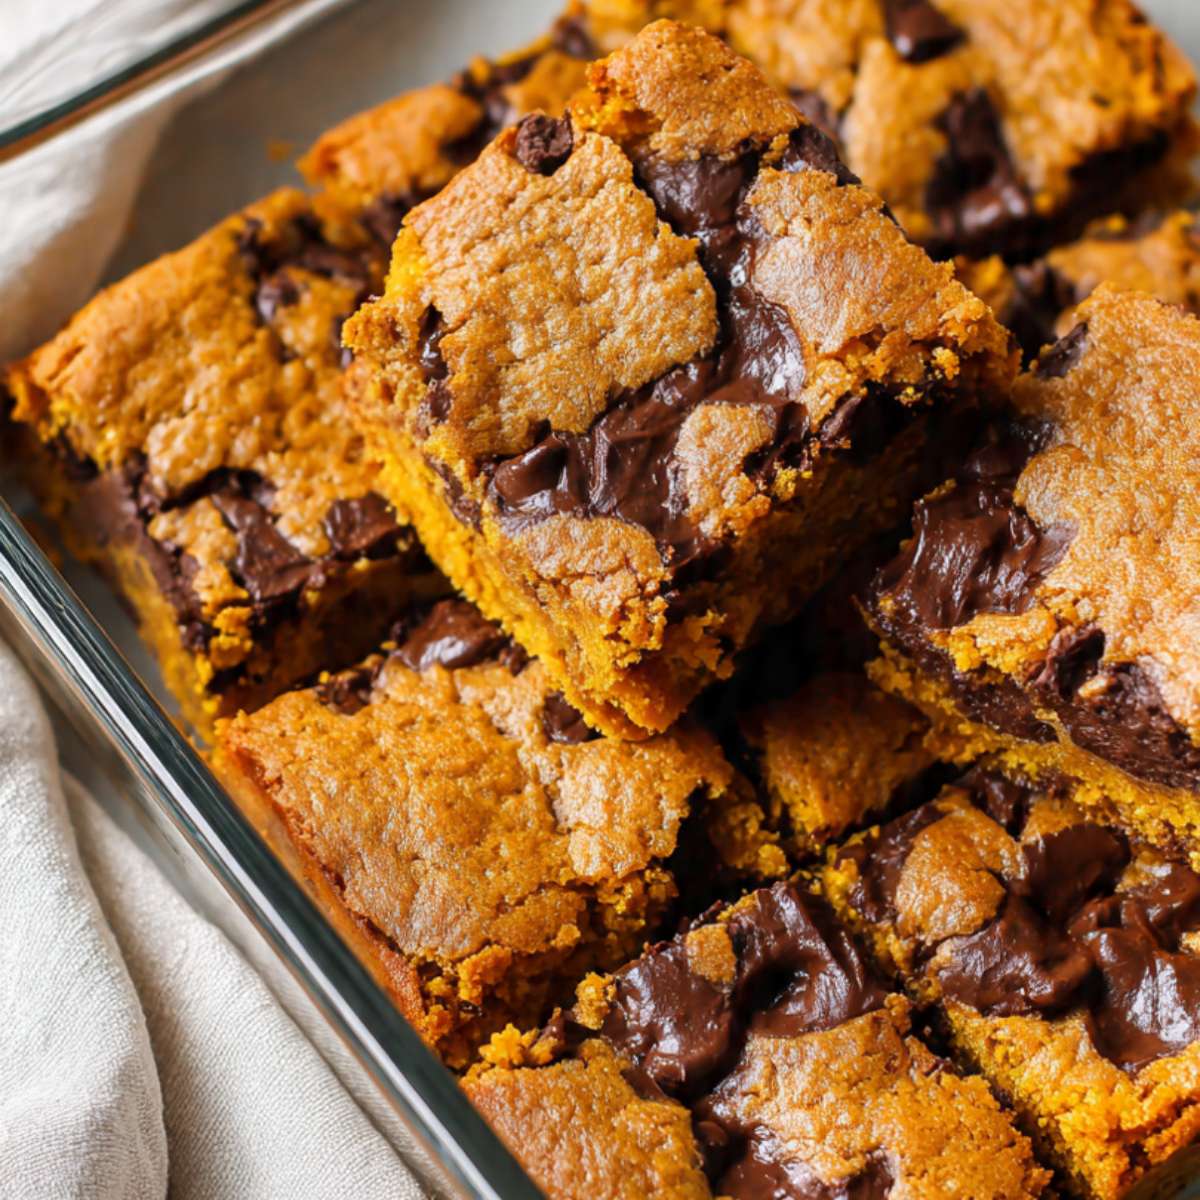
These are not cakey pumpkin bars. They are not pumpkin bread in disguise. The texture is dense and moist all the way through — the interior you can see in the bar propped up in the glass dish in the hero photo, deep amber with visible pockets of melted chocolate running through it — with warm spice in every bite and a clean, defined edge when you cut. The pumpkin flavor is real but not overpowering. It works because of the ratio of pumpkin to fat to flour, not because I added extra spice to compensate for a thin batter.
No chilling required. No mixer. One bowl, one pan, and 30 minutes in the oven.
The two things that most pumpkin bar recipes get wrong: too much pumpkin makes the center permanently wet and the bars collapse when you cut them, and overbaking to compensate dries out the edges before the center sets. I fixed both. The pumpkin quantity in this recipe is calibrated to give you moisture without instability. The pull cue is exact — and it will look earlier than you expect. Pull them anyway.
🗒 Luna’s Note: Pumpkin is the variable that took me the most batches to land. The difference between 1 cup and a full 15-ounce can in this pan size is the difference between bars that hold a clean edge and bars that are wet in the middle no matter how long you bake them. This recipe uses the full can — every gram of it.
| Yield | 16 bars |
| Pan Size | 9×13 inch (23x33cm) glass baking dish |
| Prep Time | 15 minutes |
| Bake Time | 25–30 minutes |
| Cooling Time | 2 hours 30 minutes |
| Total Time | 3 hours 15 minutes |
| Difficulty | Easy |
| Nutrient | Per Bar |
|---|---|
| Calories | ~256 |
| Total Fat | ~12g |
| Carbohydrates | ~37g |
| Protein | ~3g |
| Sugar | ~23g |
| Sodium | ~167mg |
Ingredients & Tools
For the Bars
- 1 can (425g / 15 oz) pure pumpkin purée — not pumpkin pie filling. The can must say 100% pure pumpkin. Pumpkin pie filling is pre-sweetened and pre-spiced and will make these bars too sweet and wrongly spiced.
- ½ cup (113g) unsalted butter, melted and cooled to room temperature — not hot. Pouring hot melted butter into the eggs will scramble them.
- ¾ cup (165g) packed light brown sugar — spoon it into the measuring cup and press it firmly. Loosely measured brown sugar will produce a drier bar.
- ¼ cup (50g) plain white granulated sugar — not raw sugar, not coconut sugar. White granulated sugar drives the slight surface crackle and helps the bars set with a defined edge.
- 2 large eggs, at room temperature — cold eggs can cause the batter to seize when they hit the melted butter. Set them in a bowl of warm water for 10 minutes if you forgot to pull them out ahead of time.
- 1 teaspoon (5ml) pure vanilla extract — not imitation.
- 1¾ cups (210g) all-purpose flour, spooned into the measuring cup and leveled — never scooped directly from the bag. Direct scooping packs up to 30% extra flour into the cup and will produce dry, dense bars.
- 1 teaspoon (4g) baking powder — check freshness before using: drop ½ teaspoon into a cup of hot water. If it bubbles actively, it is fresh. If nothing happens, it is spent and your bars will not rise properly.
- ½ teaspoon (2g) baking soda — check freshness: drop ¼ teaspoon into a small bowl with 1 teaspoon white vinegar. Active fizzing means it is fresh.
- 1½ teaspoons (3g) pumpkin pie spice — store-bought blend is fine. If making your own, use: 1 teaspoon cinnamon, ¼ teaspoon ginger, ⅛ teaspoon nutmeg, ⅛ teaspoon cloves.
- ½ teaspoon (1.5g) ground cinnamon — in addition to the pumpkin pie spice. The extra cinnamon deepens the warm spice note without tipping into gingerbread territory.
- ½ teaspoon (3g) fine sea salt — not kosher salt, not table salt. Fine sea salt dissolves evenly and does not leave sharp salty pockets. If using kosher salt, increase to ¾ teaspoon.
- 1½ cups (255g) semi-sweet chocolate chips (45–55% cacao), divided — 1 cup (170g) folded into the batter, ½ cup (85g) reserved to press onto the top before baking. Standard chip size — not mini, not chunks. I use Ghirardelli 46% cacao semi-sweet chips. Nestle Toll House semi-sweet works reliably as well. Whatever brand you use, check that cacao content is between 45–55% — chips outside this range (very dark or very milk) will change the flavor balance against the pumpkin spice.
Before You Start
Use a kitchen scale. Volume measurements like cups and tablespoons can vary by 20–30% depending on how the ingredient is scooped or packed — especially flour and brown sugar, both of which are high-impact in this recipe. The gram weights here are the numbers I tested with. They are the most reliable way to get the same result I got.
Set your oven rack to the middle position before preheating. The middle rack is the only position that gives these bars even top and bottom heat. Bars baked on the lower rack overbrown on the bottom before the center sets. Bars on the upper rack brown the chips on top before the interior is done.
Melt the butter first and let it cool. It needs to reach room temperature before it goes into the batter — approximately 15–20 minutes on the counter after melting. Test it by touching the bowl: it should feel neutral, not warm. Butter that is still hot when it hits the eggs will scramble them, and butter that is warm when it hits the batter will make it look broken and greasy before you have even added the flour.
Pull the eggs from the fridge 30 minutes before you start, or use the warm water bath method: set the eggs in a bowl of warm — not hot — tap water for 10 minutes. Room temperature eggs incorporate into the batter more smoothly and help the bars bake evenly. Cold eggs added to melted butter can cause the fat to seize and the batter to look curdled.
Test your leavening before you start. Baking powder loses potency within 6 months of opening — drop ½ teaspoon into a cup of hot water. Active bubbling means it is fresh. No reaction means it is spent and your bars will not rise. Baking soda loses potency within 3 months — drop ¼ teaspoon into 1 teaspoon of white vinegar. Vigorous fizzing means it is fresh. Neither will show visible signs of degradation in the jar, so test every time.
Check your spices. Pumpkin pie spice and ground cinnamon lose potency after 6 to 12 months. Open the jar and smell — the aroma should be sharp and immediate. If it smells faint or dusty, the spice is spent and the bars will taste flat and under-flavored no matter how precisely everything else is measured. Replace before baking.
This recipe requires no electric mixer. A large mixing bowl, a whisk for the wet ingredients, and a sturdy silicone spatula for folding in the dry ingredients are all you need. Do not reach for a hand mixer — overbeating this batter develops gluten and produces a tough, bready bar instead of the dense, tender crumb shown in the photos.
Glass pan note. This recipe was tested in a 9×13 inch (23x33cm) glass baking dish — the same dish visible in the photos. Glass retains heat longer than metal and distributes it more evenly, which suits the long, gentle bake these bars need. If you use a light-colored aluminum pan instead, the bake time and result will be very close to the tested version — no temperature adjustment needed. If you use a dark non-stick metal pan, reduce the oven temperature to 325°F (165°C) and start checking at 22 minutes — dark pans absorb significantly more radiant heat and will overbrown the bottom before the center sets.
Line the pan with parchment. Cut a sheet long enough to leave a 2-inch overhang on both long sides. Press the parchment flat against the bottom and sides with no air pockets. This overhang is your handle — it is how the bars come out of the dish in one clean piece after cooling. If you skip the parchment, the bars will not release from the glass without breaking at the edges. No greasing needed on top of the parchment.
Do not cut until fully cooled — minimum 2 hours at room temperature, then 30 minutes in the refrigerator. The bars continue to set as they cool. Cutting earlier gives you a gummy, collapsing center even if the edges look completely done. Build this cooling time into your schedule before you start baking.
Necessary Tools
- 9×13 inch (23x33cm) glass baking dish
- Parchment paper with 2-inch overhang on long sides
- Kitchen scale (strongly recommended)
- Large mixing bowl (at least 4-quart capacity)
- Sturdy silicone spatula
- Whisk
- Measuring cups and spoons (backup if not using scale)
- Wire cooling rack
- Sharp knife for cutting — wiped clean between cuts
- Light-colored aluminum 9×13 inch (23x33cm) baking pan (alternative to glass — see Before You Start for adjustment notes)
- Oven thermometer (optional but recommended — most home ovens run 15–25°F off from the dial)
How to Make Pumpkin Chocolate Chip Cookie Bars
Step 1: Preparing the Pan and Preheating the Oven
Position your oven rack in the middle position and preheat to 350°F (175°C). This is a one-bowl method — no electric mixer required at any point. A large mixing bowl, a whisk, and a silicone spatula are the only tools that touch this batter. If you reach for a hand mixer, put it back — overbeating this batter develops gluten and produces a tough, bready bar instead of the dense, tender crumb shown in the photos.
Most home ovens run 15–25°F (8–14°C) off from their displayed temperature. If you have an oven thermometer, confirm the actual temperature before the pan goes in — an oven that reads 350°F but runs 375°F will overbrown the bottom of these bars before the center sets.
While the oven heats, line your 9×13 inch (23x33cm) glass baking dish with parchment paper. Press the parchment into the corners and let it overhang by at least 2 inches on both long sides. Run your fingers along the edges to press it flat against the glass. No greasing needed — the parchment handles the release.
If you skip the overhang, you will not be able to lift the bars out of the glass dish in one piece. The glass sides are too steep to cut against cleanly, and the bars will break at the edges when you try to lever them out.
The parchment should lie flat against the bottom and sides with no air pockets underneath — this is your clean-release guarantee.
Do not put the pan in the oven yet. Set it aside and move directly to the batter. — The batter comes together in under 10 minutes and the pan goes in as soon as it is filled.
Step 2: Combining the Wet Ingredients Into a Smooth, Unified Base
In your large mixing bowl, add your 1 can (425g) pure pumpkin purée, ½ cup (113g) melted unsalted butter (cooled to room temperature — not warm), ¾ cup (165g) packed light brown sugar, and ¼ cup (50g) plain white granulated sugar.
The brown sugar provides moisture and a deep caramel undertone that carries the pumpkin flavor — this is why it is the dominant sugar in this recipe. The white granulated sugar is not decorative. It is doing structural work: it drives the slight surface crackle and helps the edges set with definition rather than staying soft and formless.
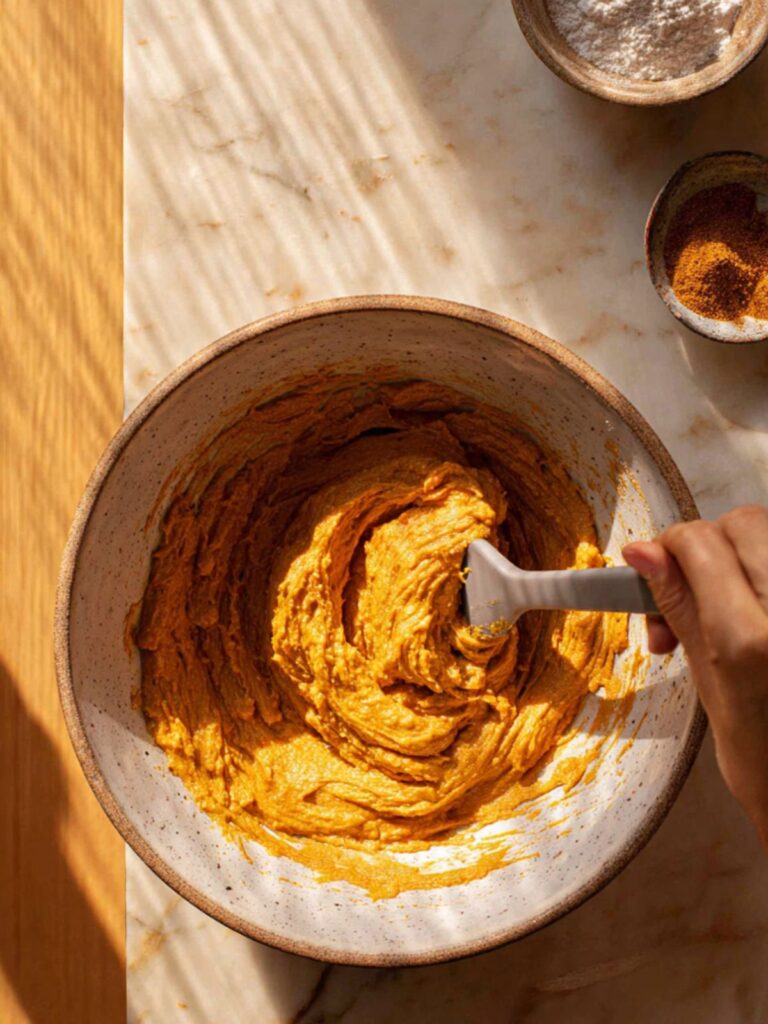
Using your whisk, mix from the center outward in steady circular strokes until the sugars are fully dissolved into the pumpkin and butter and no visible sugar granules remain — approximately 30 to 40 strokes. The mixture will look like a thick, glossy, deep amber paste.

Do not rush this step. Undissolved sugar at this point will leave gritty pockets in the finished bars and can affect how evenly the top surface sets during baking.
The mixture should be thick, uniform in color, and completely smooth — no streaks of butter, no visible sugar crystals, no separation between the pumpkin and fat.
Add your 2 large room-temperature eggs one at a time, whisking each one fully into the batter before adding the next. Then add your 1 teaspoon (5ml) pure vanilla extract and whisk once more until the batter is glossy and cohesive — about 10 additional strokes.
The finished wet base should look like a deep orange, glossy batter that coats the whisk and falls in a slow, thick ribbon — if it looks broken or greasy, the butter was still too warm when it went in. Let it sit 5 minutes and whisk again.
Set the whisk aside. Switch to your silicone spatula. The dry ingredients go in next.
Step 3: Adding the Dry Ingredients Without Overworking the Gluten
In a separate small bowl, whisk together your 1¾ cups (210g) all-purpose flour (spooned and leveled — never scooped), 1 teaspoon (4g) baking powder, ½ teaspoon (2g) baking soda, 1½ teaspoons (3g) pumpkin pie spice, ½ teaspoon (1.5g) ground cinnamon, and ½ teaspoon (3g) fine sea salt. Whisk until the leavening and spices are evenly distributed throughout the flour — about 15 seconds.
The baking powder and baking soda are both doing work here. The baking powder provides the primary lift that gives these bars their dense-but-not-flat crumb. The baking soda reacts with the natural acidity in the pumpkin purée and brown sugar — this is what creates the slight surface crackle and contributes to the matte finish visible across the top of the bars in the photos.
Pour the dry ingredient mixture directly onto the wet batter in the large bowl. Using your silicone spatula, fold with slow, deliberate strokes from the bottom of the bowl upward — not stirring in circles, which develops gluten unevenly. Count your strokes. Stop at 20 strokes or the moment no dry streaks of flour remain — whichever comes first.
Do not stir past the point where the flour disappears. If the batter is overworked, the gluten in the flour forms long elastic chains — the batter will start to feel springy and pull away from the spatula in a stretchy, elastic mass rather than falling off in thick clumps. The finished bars will bake up tough and bready rather than the dense, yielding crumb visible in the cross-section photos. Count your strokes. Twenty is the ceiling.
The batter should look thick, evenly spiced, and slightly rough in texture — not silky smooth. If it looks like a pourable cake batter, the flour was under-measured. If it is stiff and hard to fold, the flour was over-measured.
The chocolate chips go in next — fold them in before the batter goes into the pan.
Step 4: Folding in the Chocolate Chips and Loading the Pan
Reserve ½ cup (85g) of your semi-sweet chocolate chips in a small bowl — set them aside. These go on top, not into the batter.
Add the remaining 1 cup (170g) semi-sweet chocolate chips directly to the batter. Using your silicone spatula, fold them in with 8 to 10 strokes — just enough to distribute them through the batter without overworking the gluten further. Every additional stroke past the point of even distribution toughens the bars.
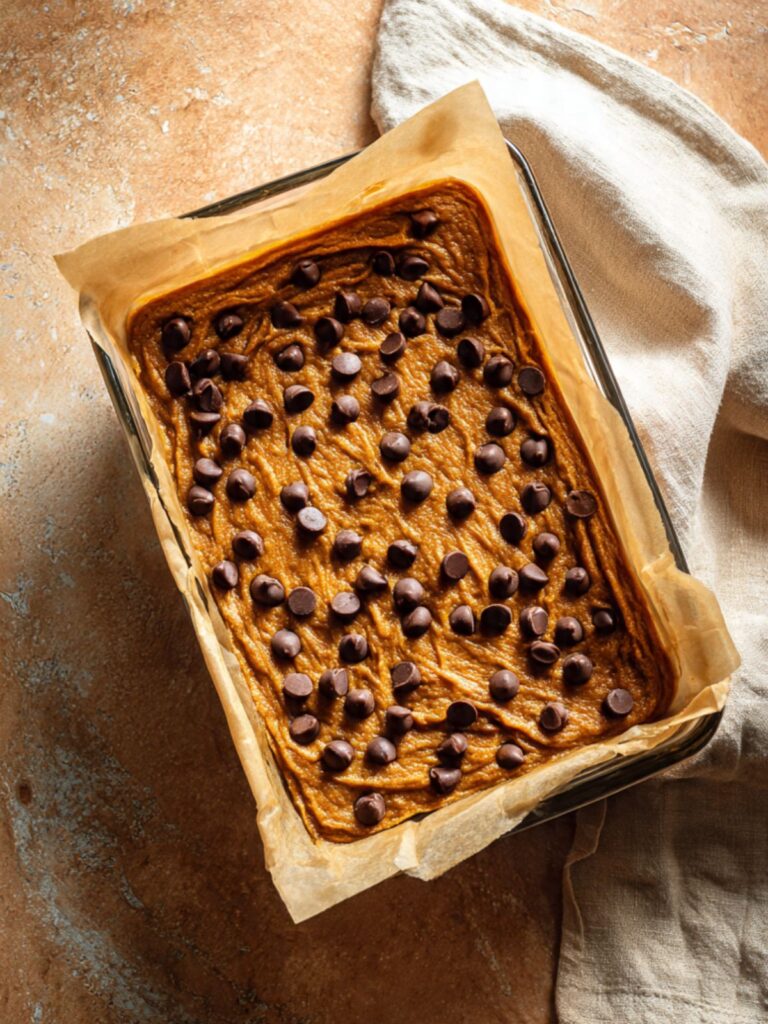
Scrape the batter into your prepared 9×13 inch (23x33cm) parchment-lined glass baking dish. Use the spatula to spread it into an even layer, pushing it all the way into the corners. The batter is thick — it will not self-level the way a cake batter does. Spend 20 to 30 seconds pressing it flat with the back of the spatula until the surface is as even as you can make it.
Now scatter the reserved ½ cup (85g) semi-sweet chocolate chips evenly across the entire top surface of the batter. Press each chip lightly into the surface with your fingertips so they are anchored — chips that sit loose on top will roll off when the batter rises in the oven.
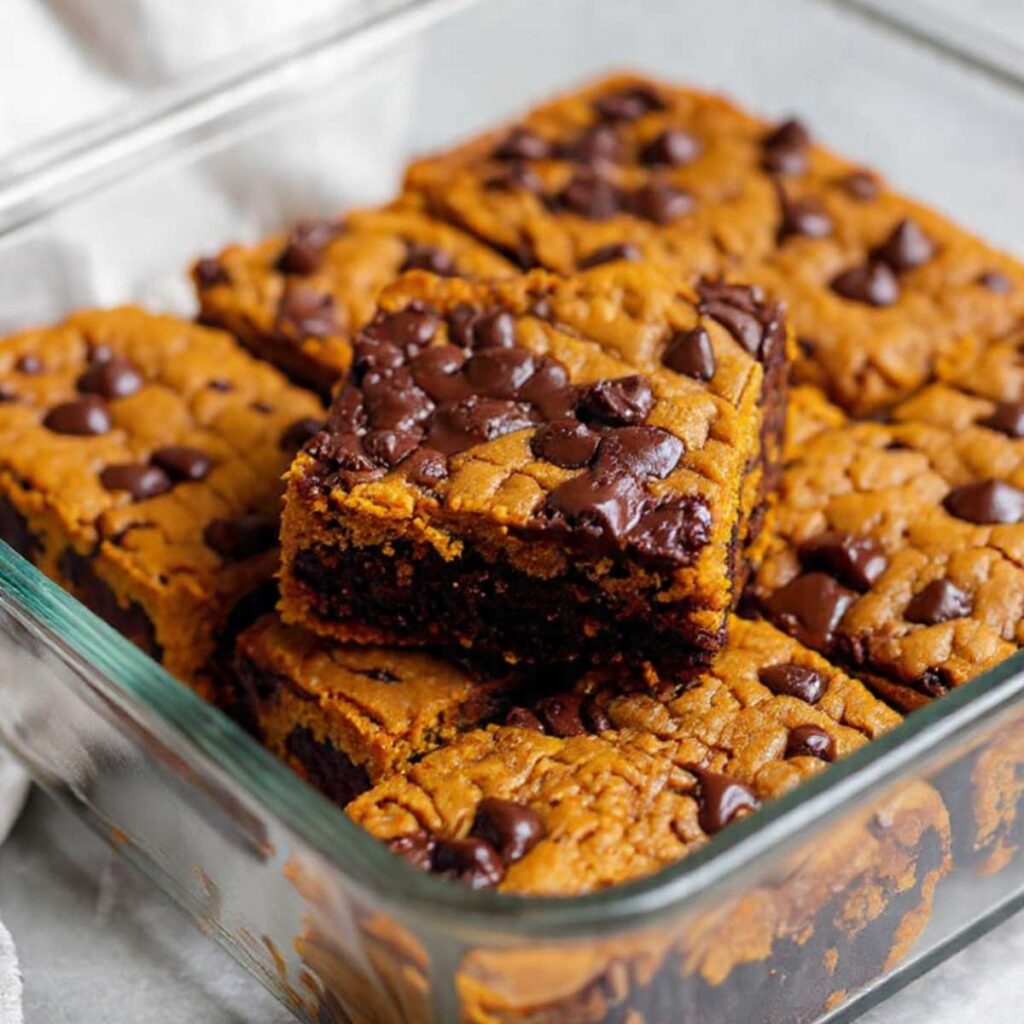
🗒 Luna’s Note: This two-stage chip method — fold some in, press the rest on top — is what produces the chip-dense surface visible in the photos. Chips folded entirely into the batter migrate inward as the bars rise and bake. The pressed-on top layer is what you see. Both layers matter.
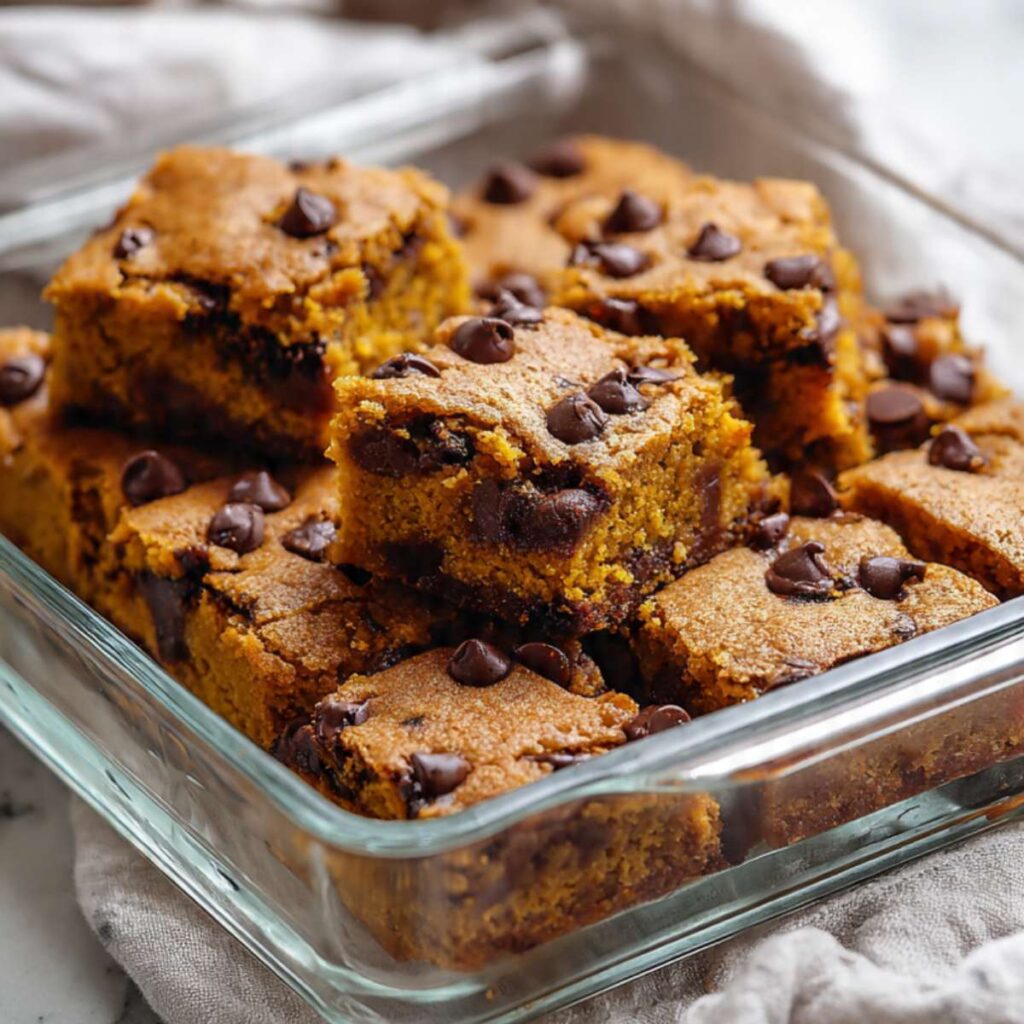
The surface should be flat and even with chips distributed across the entire top — no bare patches, no piled-up center. This is the pre-bake state you are working toward — compare it to the unbaked pan process shot showing chips anchored and evenly distributed across the full amber surface before it goes into the oven.
The pan is loaded and ready — slide it onto the middle rack now and set your timer for 25 minutes without opening the door.
Step 5: Baking Until the Edges Are Set and the Center Still Looks Slightly Soft
Slide the pan onto the middle rack of your preheated 350°F (175°C) oven. Set a timer for 25 minutes.
Do not open the oven door before 25 minutes. Opening the door before the structure has set causes the center to sink — and in a dense bar like this one, a sunken center will not recover.
At 25 minutes, open the oven and perform the doneness check. Look for these specific signals — all three must be present before you pull the pan:
1. The edges — they should look fully set and pulling slightly away from the parchment. The color at the edges should be a deep amber-brown, slightly darker than the center.
2. The top surface — the chocolate chips on top will have melted and settled into the batter. The surface around the chips should look matte and set, not wet or shiny.
3. The center — insert a toothpick 2 inches from the edge (not dead center). It should come out with a few moist crumbs clinging to it. Not wet batter — moist crumbs. This is correct and done.
This is the counterintuitive moment in this recipe. A toothpick that comes out completely clean means the bars are overbaked. The dense, fudgy center visible in the photos — visible in the stacked bar shot showing the interior cross-section — is achieved only by pulling at the moist-crumb stage. Every minute past this point drives moisture out of the pumpkin crumb and produces a drier, tighter texture.
If the center toothpick still shows wet batter at 25 minutes, return the pan to the oven and check every 2 minutes — up to 30 minutes maximum. Do not bake past 30 minutes.
The edges should look dark amber and fully set. The center should look just barely done — soft but not wet. The chips on top will be glossy and partially melted. Pull the pan at this exact moment.
Step 6: Cooling Completely Before Cutting
Remove the pan from the oven and place it on a wire cooling rack. Do not move the bars, do not press the center, do not test the texture yet. The bars are still cooking.
Carryover heat from the glass dish will continue to set the center for 15 to 20 minutes after the pan comes out of the oven. Glass retains heat longer than metal — this is an advantage here, not a problem. It means the bars finish gently and evenly without the oven drying them out further.
Leave the bars on the rack, undisturbed, for a minimum of 2 hours at room temperature.
Do not cut at 1 hour. The center will look set from the top but will still be molten underneath the surface — the knife will go through and the center will collapse into a gummy, wet mass that holds no shape. This is the most common failure point with pumpkin bars. The 2-hour wait is not optional.
After 2 hours, refrigerate the pan (still in the dish, with the parchment) for 30 minutes. The cold firms the bars evenly and makes it possible to cut clean, sharp edges without the centers compressing.
To cut: lift the bars out of the dish using the parchment overhang. Place on a cutting board. The full slab weighs approximately 1,100–1,150g after baking and cooling. For 16 bars, cut into a 4×4 grid — 4 cuts across the long side, 4 cuts across the short side. Each bar weighs approximately 68–72g. Weigh the first cut bar on your kitchen scale and use it as your calibration for the rest. Using a sharp knife, wipe the blade clean with a damp cloth between every cut — chocolate residue on the blade smears the next cut and pulls the bar edge apart.

The finished bars inside the pan should look exactly like the overhead photo showing the full pan of cut squares — deep amber across every bar, chips sitting glossy and slightly pooled on every surface, edges with a defined dark border.
The Science Behind Pumpkin Chocolate Chip Cookie Bars
Why Pumpkin Purée Changes Everything About How These Bars Bake
I kept pulling these bars too early in my first tests because the center never looked done at the time the edges said it was. What I did not understand yet was that pumpkin purée behaves differently from every other wet ingredient I use in bar recipes — and the reason is water content.
Pure pumpkin purée is approximately 90% water by weight. That is significantly higher than butter, eggs, or oil. When you add a full 15-ounce can to this batter, you are introducing a large volume of water that has to evaporate during baking before the structure can fully set. The edges of the pan — which are in direct contact with the hot glass — lose that water faster than the center does. This is why the edges look done while the center still looks soft. They are done. The center is still releasing moisture.
This is also why the toothpick test works differently here than in a standard brownie or blondie. In a brownie, a moist-crumb toothpick means the chocolate is still setting. In these bars, a moist-crumb toothpick means the pumpkin crumb has set correctly and the remaining moisture is exactly what produces the dense, tender texture visible in the interior cross-section. A clean toothpick here means that moisture is gone — and the bar is dry.
The pumpkin also provides structure through its natural fiber content, which acts like a secondary binder alongside the eggs. This is why these bars hold a clean edge when cut, despite having no creamed butter to provide that scaffolding.
🗒 Luna’s Note: The first time I made a version of these that actually worked, I pulled them when I was certain they were underdone. They were perfect. Every batch since, I pull at exactly the same moment — a few moist crumbs, edges pulling away, center still looking soft. I have not overbaked a batch since I stopped trusting how the center looks and started trusting the toothpick.
If you want to see how the same pumpkin flavor profile behaves in a drop cookie format — without the bar structure — these pumpkin chocolate chip cookies use a similar purée-to-flour ratio and show how the water content variable plays out differently when there is no pan holding the shape.
Why Brown Sugar Dominates This Recipe — and What the White Sugar Is Actually Doing
Most pumpkin bar recipes use all brown sugar. I use a 3:1 ratio of brown to white, and the difference is visible in the finished bar.
Brown sugar is granulated sugar with molasses added back in. The molasses is hygroscopic — it actively draws moisture from the surrounding environment, including from inside the baked bar. This is what keeps these bars soft on Day 2 and Day 3 without refrigeration. It is also what gives the interior that dense, moist crumb rather than a dry, crumbly one. Recipes that use only brown sugar in a pumpkin bar produce a very soft, almost sticky texture that never fully firms — because the molasses keeps pulling moisture inward even after baking.
The white granulated sugar counterbalances this. White sugar does not retain moisture. During baking, it dissolves and recrystalizes as the bars cool, contributing to the slight structural firmness at the edges and the faint crackle on the surface. A quarter cup (50g) is enough to tighten the edge texture and give the bars definition without making them dry. This is the same mechanism at work in the edges visible in the overhead photo — the defined, clean-cut border that holds its shape when the bars are stacked.
If you swap all the white sugar for brown, these bars will be noticeably stickier and the edges will not set with the same definition. If you swap all the brown for white, the bars will be drier and the molasses depth will disappear from the flavor. The ratio matters. Use it as written. For a deeper, more caramel-forward flavor, you can use dark brown sugar in place of light — it has a higher molasses content and will deepen the color and flavor of the finished bar without changing the texture significantly. The ratio matters. Use it as written — the same sugar ratio logic applies to any bar recipe built on a brown-sugar-dominant base.
How Melted Butter Produces the Texture These Bars Need
Creamed butter — the method used in most cookies and cakes — works by trapping air bubbles in the fat during mixing. Those bubbles expand in the oven and create lift, lightness, and a cake-like crumb. That is not what these bars want.
Melted butter skips the aeration entirely. There are no air bubbles to expand, which means the crumb stays dense and compact from the first minute in the oven to the last. The fat coats the flour proteins before they can form long gluten chains, which keeps the texture tender rather than chewy or bready. Combined with the pumpkin fiber acting as a secondary binder, melted butter is what produces the dense, fudgy interior visible in the cross-section shots — tight crumb, no open holes, no cakey lightness.
Melted butter also means no mixer required. This matters practically: overmixing is the primary gluten-development risk in this recipe, and a bowl and spatula limits how aggressively you can work the batter. It is a built-in safeguard against the most common failure mode for this type of bar.
One important consequence: melted butter produces a batter that bakes faster than a creamed-butter batter of the same volume, because there is no air insulation in the fat. This is why the visual pull cue — edges set, center with moist crumbs, not wet batter — matters more than the clock in this recipe.
Pumpkin Chocolate Chip Cookie Bars Troubleshooting & Pro-Tips
Common Mistakes
The bars are wet and gummy in the center even after cooling
Symptom: The knife goes through and the center collapses or pulls apart in a wet, dense mass that holds no shape. The edges look and feel done but the middle behaves like underbaked batter.
Cause: Cut too early. This is the most common failure with pumpkin bars specifically. The high water content of pumpkin purée means the center needs the full 2-hour cooling window to finish setting. The center can look and feel firm from the top while still being structurally unstable underneath — the surface sets before the interior does, and cutting through it before the interior has fully firmed releases everything underneath.
Fix: Press the bars back into the pan, cover loosely, and refrigerate for 1 hour. The cold will firm the center enough to cut cleanly. The texture will be denser than bars cooled at room temperature, but they will hold their shape and still taste correct.
Prevention: Wait the full 2 hours at room temperature before refrigerating for 30 minutes. Cut only after the refrigeration step. If you are making these to serve at a specific time, build the cooling time into your schedule — start baking at least 3 hours before you need them on the table.
The bottom is overbrowning before the center is done
Symptom: The underside of the bars is dark brown or scorched when you lift them out of the pan, while the top surface looked underdone when you pulled them from the oven. The bottom edges taste bitter.
Cause: A dark non-stick metal pan was used instead of a glass or light-colored aluminum pan. Dark pans absorb significantly more radiant heat from the oven floor and transfer it directly into the bottom of the batter. Glass and light-colored aluminum reflect more heat and bake more evenly across the full surface. This is a pan material problem, not a temperature or timing problem.
Fix: If you catch it early — before the bottom is fully scorched — slide a second empty baking sheet onto the rack directly below the pan. This creates an air buffer that slows the bottom heat transfer. It will not undo existing browning but will prevent it from getting worse for the remaining bake time.
Prevention: Use a 9×13 inch glass baking dish as shown in the photos, or a light-colored aluminum pan. If you only have a dark non-stick pan, reduce the oven temperature to 325°F (165°C) before the pan goes in and start checking for doneness at 22 minutes.
The bars are dry and crumbly instead of dense and moist
Symptom: The bars feel dry when you bite into them, the crumb is tight and falls apart rather than pulling cleanly, and the interior color looks pale rather than the deep amber shown in the photos.
Cause: There are three possible sources. The first is the wrong pumpkin product — pumpkin pie filling is pre-sweetened and contains added starch that has a lower moisture content than pure pumpkin purée and produces a drier bar. The second is overbaking — every minute past the moist-crumb toothpick stage drives moisture out of the pumpkin crumb, and a clean toothpick in these bars is not a success signal, it is an overbake signal. The third is over-measured flour — if the cup was scooped directly from the bag rather than spooned and leveled, it can contain up to 30% more flour than the recipe calls for, and extra flour absorbs the moisture from the pumpkin and produces a dry, crumbly bar.
Fix: There is no fixing an overbaked bar, but the texture can be salvaged. Slice the bars into rough cubes, layer them in individual bowls with vanilla ice cream or lightly sweetened whipped cream, and serve as a deconstructed pumpkin bar parfait. The cold cream rehydrates the crumb and the texture works well broken down this way. Warm the cubes for 10 seconds in the microwave before adding the ice cream for the best result.
Prevention: Confirm the can label says 100% pure pumpkin — nothing added. Use a kitchen scale to weigh the flour at 210g rather than measuring by cup. Pull the bars at moist crumbs on the toothpick, not a clean toothpick.
The bars did not rise and the texture is flat, heavy, and compressed
Symptom: The bars look flat in the pan, the top surface never developed any lift or crackle, and the texture when cut is compressed and heavy rather than the dense-but-tender crumb shown in the photos.
Cause: Spent leavening is the most likely source. Baking powder and baking soda both lose potency over time — baking powder within 6 months of opening, baking soda within 3 months. Neither will show visible signs of degradation in the jar. A second possible cause is a pan that is too large — if a pan larger than 9×13 inches was used, the batter spreads too thin and the leavening does not have enough batter depth to create lift before the surface sets.
Fix: A flat bar is still edible. Cut into small squares and serve alongside coffee or tea — the flavor is completely unaffected. For a more intentional presentation, dust lightly with powdered sugar and plate as a thin pumpkin chocolate chip slab.
Prevention: Test leavening freshness before every batch — baking soda: ¼ teaspoon into 1 teaspoon white vinegar, active fizz means fresh. Baking powder: ½ teaspoon into ½ cup hot water, active bubbling means fresh. Use the exact 9×13 inch pan size specified.
The bars crumble when cut and the edges collapse
Symptom: The knife goes through and the edges of each bar break apart rather than holding a clean line. The interior looks done but the structure is fragile and the bars fall apart when lifted.
Cause: Two likely sources. The first is cutting before refrigerating — even bars that have cooled for the full 2 hours at room temperature are softer than bars that have gone through the 30-minute refrigerator step. Room-temperature pumpkin bars have enough residual softness that the knife pressure compresses and collapses the edges rather than cutting through cleanly. The second is a dirty blade — chocolate residue on the knife drags through the bar crumb and pulls the edge apart rather than cutting through it.
Fix: Press the crumbled edges back against the bar and refrigerate for 30 minutes. Cold bars hold their shape better and the pressed edges will re-adhere sufficiently for serving. For plating, position the bars cut-side down on the plate so any edge imperfection faces the surface.
Prevention: Always complete the 30-minute refrigerator step after room-temperature cooling before cutting. Use a sharp knife. Wipe the blade clean with a damp cloth between every single cut — not every few cuts, every cut.
The chocolate chips on top sank into the batter during baking
Symptom: The finished bars have chocolate chips inside but the top surface looks bare or chip-sparse compared to the photos. The top is mostly smooth amber with only a few visible chips.
Cause: The reserved top chips were scattered across the batter surface but not pressed in before baking. As the batter rises in the oven, unanchored chips that are simply resting on the surface sink rather than staying proud on top. The batter rises around them and they end up embedded rather than visible.
Fix: Once baked, the chip distribution cannot be changed. The bars taste identical to the correctly-topped version — this is a visual issue only. To recover the appearance for serving, press a small handful of room-temperature chips onto the surface of each bar immediately after slicing. They will not melt in, but they add visible chip coverage and the presentation reads correctly on a serving plate.
Prevention: After scattering the reserved ½ cup (85g) chips across the top of the batter, press each chip lightly into the surface with your fingertip before the pan goes into the oven. They should be partially embedded — sitting in the batter, not lying on top of it.
Altitude and humidity adjustments
High altitude above 3,500 feet (1,067m): Reduce the baking powder to ¾ teaspoon and the baking soda to ⅜ teaspoon. Leavening acts more aggressively at altitude — the reduced air pressure causes gases to expand faster, and too much leavening produces a bar that rises and collapses rather than setting evenly. Start checking for doneness at 22 minutes rather than 25.
High humidity above 70% relative humidity: The pumpkin purée already contributes significant moisture to this batter. In a very humid kitchen, that moisture load is amplified by the surrounding air and the bars may need an additional 3 to 5 minutes of bake time. The full 2-hour cooling window is even more critical in humid conditions — if the bars still feel soft after 2 hours at room temperature, move them to the refrigerator immediately rather than waiting.
Expert Pro-Tips
Press a second layer of chips on immediately after baking. The moment the pan comes out of the oven, scatter an additional small handful of chips — about 2 tablespoons — across the top surface. The residual heat from the pan will melt them slightly within 2 minutes, producing the glossy, pooled chocolate visible on the top surface in the close-up photos. The chips you pressed on before baking will have partially sunk during baking — this second layer is what restores the chip-dense top visible in the photos. This step takes 10 seconds.
Use dark brown sugar for a deeper flavor profile. Light brown sugar produces the baseline recipe as written. Dark brown sugar — which has a higher molasses content — deepens the caramel flavor, darkens the color of the bars slightly, and makes the warm spice notes more pronounced. The texture remains the same. The difference is noticeable. This is the version I make when I want the most autumnal result the recipe can produce.
Score the cutting lines before refrigerating. After the bars have cooled at room temperature for 2 hours, use a sharp knife to lightly score a 4×4 grid across the top surface — just enough to mark the lines without cutting through. Refrigerate for 30 minutes, then cut along the scored lines. The pre-scored guide reduces the lateral pressure on the bar edges during cutting, which is what causes crumbling. Clean edges every time.
How to Store Pumpkin Chocolate Chip Cookie Bars
Room Temperature
Store cut bars in a hard-sided lidded container with a sheet of parchment paper between each layer. Do not use zip-lock bags — the soft pressure of the bag sides compresses the bars and flattens the edges over time. Do not stack more than two layers deep without parchment between them or the chocolate chips on top will press into the underside of the bar above and pull the surface apart when you separate them.
Room temperature storage is fine for up to 3 days. The texture on Day 1 is dense and moist with soft, yielding chocolate pockets. By Day 2, the bars firm slightly — the pumpkin moisture redistributes overnight and the crumb tightens just enough to give each bite a cleaner pull. Day 3 is still good. Day 4 is noticeably drier. Do not push past 3 days at room temperature.
Keep the container away from direct sunlight and away from the stovetop. Pumpkin bars stored near a heat source dry out within hours.
Refrigerator
Refrigeration extends the shelf life to 5 days and is worth doing if you are not planning to finish the batch within 3 days. Store in the same hard-sided lidded container with parchment between layers.
Cold bars straight from the fridge are noticeably firmer than room-temperature bars — the chocolate chips will be fully set and the crumb will feel more compressed. If you prefer the softer, fresher texture, pull the bars from the fridge 20 minutes before serving and let them come back toward room temperature on the counter. The centers soften and the chocolate loosens enough to give you something close to the fresh-baked texture.
Do not store uncovered in the fridge. An uncovered pumpkin bar absorbs refrigerator odors within 24 hours and the surface dries out from the circulating cold air.
Freezer — Baked
These bars freeze well and are one of the better make-ahead options in this category. The pumpkin moisture content that makes them dense also protects them during freezing — the crumb does not dry out the way a lower-moisture bar does.
Wrap each bar individually in a layer of plastic wrap, pressing the wrap directly against all six sides with no air pockets. Then place the individually wrapped bars into a zip-lock freezer bag or hard-sided freezer container. Stored this way, the bars keep for up to 2 months without texture loss.
To thaw: move the wrapped bars from the freezer to the refrigerator and leave them for 4 to 6 hours or overnight. Do not thaw at room temperature — the surface sweats as it warms and the top becomes tacky. Unwrap only after they have fully thawed in the fridge, then let them sit at room temperature for 20 minutes before serving.
The frozen and thawed bar is approximately 90% of the fresh bar in texture. The crumb is slightly more compact and the chocolate chips lose a little of their snap. For serving after freezing, a 10-second microwave warm — still in the plastic wrap, removed immediately after — brings the texture back close to fresh.
Freezer — Unbaked
The assembled unbaked batter can be frozen directly in the parchment-lined pan. Cover the filled pan tightly with two layers of plastic wrap and freeze for up to 1 month.
To bake from frozen: remove the plastic wrap, place the frozen pan into a cold oven — do not preheat first. Glass baking dishes are vulnerable to thermal shock: a frozen glass dish placed into a fully preheated hot oven can crack. Starting both the oven and the pan from cold allows the temperature to rise together safely.
Set the oven to 350°F (175°C) after the pan is inside. Add 12 to 15 minutes to the standard bake time — check for doneness at 37 minutes using the same moist-crumb toothpick test. Do not increase the oven temperature to compensate for the frozen start — higher heat will set the edges before the center has time to thaw and bake through.
Serving Suggestion
Serve these at room temperature or slightly warm — not cold, not hot. Cold bars straight from the fridge are too firm and the spice notes are muted when the fat is fully set. Slightly warm is the best version: 10 seconds in the microwave on a plate, or 5 minutes in a 300°F (150°C) oven. The chocolate softens back to a molten state and the pumpkin spice aroma comes forward in a way it does not at refrigerator temperature.
I eat these with a strong black coffee — no sugar, no milk. The bitterness cuts directly through the sweetness of the chocolate and the brown sugar caramel notes in the bar in a way that makes both taste better. A lightly sweetened chai works for the same reason — the spice in the drink echoes the pumpkin pie spice in the bar without competing with it.
These are the bars I make in the first week of October, specifically for the day the weather shifts and it finally feels like fall in Los Angeles — which, in my experience, is one specific Tuesday in mid-October and then back to 80°F by the weekend. One pan. Eaten over three days. Not shared widely.
Day 2 is the better bar. The spice flavor deepens overnight as the warm spice compounds distribute more evenly through the crumb, the brown sugar molasses note becomes more pronounced, and the texture firms to that clean, dense pull that is harder to achieve on the day of baking. If you can wait until the next morning to cut into them, do.
These do not travel well cut and stacked. The soft crumb compresses under its own weight in a transport container and the edges lose their definition. If you are bringing these somewhere, transport the uncut slab in the pan and cut on arrival.
Frequently Asked Questions About Pumpkin Chocolate Chip Cookie Bars
Can I use pumpkin pie filling instead of pure pumpkin purée?
No. Pumpkin pie filling is pre-sweetened, pre-spiced, and contains added starch that changes the moisture content and structure of the batter. Using it in place of pure pumpkin purée will make these bars too sweet, incorrectly spiced, and drier in texture because the added starch competes with the flour for moisture absorption. The can must say 100% pure pumpkin — nothing added.
Can I make pumpkin chocolate chip cookie bars without eggs?
Yes, with a specific substitution. Replace each large egg with 1 tablespoon (15g) ground flaxseed mixed with 3 tablespoons (45ml) water, rested for 5 minutes until it forms a gel. The flax egg provides binding but not the protein structure that real eggs contribute — the bars will be slightly softer and less defined at the edges, and they will need an extra 3 to 5 minutes of bake time to compensate for the reduced structural proteins. Two flax eggs work in this recipe because the pumpkin purée already provides significant binding through its natural fiber content.
Why are my pumpkin bars still soft in the middle after baking?
The most likely cause is pulling them from the oven too early or cutting them before they have fully cooled. The high water content of pumpkin purée means the center takes longer to set than the edges — this is normal and not a sign of underbaking. The correct doneness signal is a toothpick inserted 2 inches from the edge that comes out with a few moist crumbs, not wet batter. After pulling from the oven, the bars need a minimum of 2 hours at room temperature followed by 30 minutes in the refrigerator before cutting. If the bars are still soft after cutting, press them back into the pan and refrigerate for 1 hour — the cold will firm them enough to hold their shape.
Can I make these pumpkin bars gluten free?
Yes, with a 1:1 gluten-free flour blend — specifically one that contains xanthan gum, which replaces the structural role of gluten. Bob’s Red Mill 1-to-1 Baking Flour and King Arthur Measure for Measure are both reliable in this recipe. Substitute at the same weight: 210g of the GF blend for 210g of all-purpose flour. The texture will be slightly more crumbly and the edges will be less defined than the standard version because gluten-free starches do not bind the same way wheat proteins do. Bake time remains the same — use the moist-crumb toothpick test as your doneness signal rather than the clock. For a related gluten-free option, this [gluten free chocolate chip cookies recipe](gluten free chocolate chip cookies) uses a similar substitution method.
How do I know when pumpkin chocolate chip cookie bars are done?
The correct doneness signal has three components that must all be present simultaneously: the edges are fully set and pulling slightly away from the parchment, the top surface around the chocolate chips looks matte and dry rather than wet or shiny, and a toothpick inserted 2 inches from the edge comes out with a few moist crumbs — not wet batter, not completely clean. A completely clean toothpick means the bars are overbaked and the pumpkin moisture has been driven out. Start checking at 25 minutes and pull the pan the moment all three signals are present — up to 30 minutes maximum.
Can I double pumpkin chocolate chip cookie bars recipe?
You can double the ingredient quantities, but you cannot bake the doubled batch in one pan. A doubled batch requires two separate 9×13 inch pans baked simultaneously on the same rack, or sequentially if your oven cannot fit both. Do not attempt to bake a doubled batch in a single deeper pan — the center will never fully set before the edges overbake. When doubling, note that the leavening does not scale perfectly linearly: use 1¾ teaspoons baking powder and ¾ teaspoon baking soda for the doubled batch rather than exactly doubling both. Bake time remains 25 to 30 minutes per pan — a larger volume of batter in a deeper pan would require significantly longer and produces an uneven result.
Can I make pumpkin chocolate chip cookie bars ahead of time?
Yes — and they are actually better made a day ahead. Bake the bars fully, cool for 2 hours at room temperature, refrigerate for 30 minutes, then cut and store in a hard-sided lidded container with parchment between layers. Refrigerate overnight. The spice flavor deepens and the crumb firms to a cleaner, denser texture by the next day. Bars made ahead and refrigerated overnight are easier to cut cleanly and hold their shape better at room temperature than same-day bars. For make-ahead of the unbaked batter, fill the parchment-lined pan, cover tightly with plastic wrap, and refrigerate for up to 24 hours before baking — add 3 to 5 minutes to the bake time for cold batter.
Do I need to adjust this recipe for high altitude or humid climates?
At high altitude (above 3,500 feet / 1,067m), reduce the baking powder to ¾ teaspoon and the baking soda to ⅜ teaspoon — leavening acts more aggressively at altitude and too much causes the bars to rise and collapse before the structure sets. Start checking for doneness at 22 minutes. In high-humidity climates (above 70% relative humidity), the pumpkin purée’s already-high moisture content is amplified by the surrounding air — extend the cooling time to the full 2 hours minimum and refrigerate immediately if the bars still feel soft. The bake time may need an additional 3 to 5 minutes in very humid conditions.
More Bar Cookies You’ll Love
If these pumpkin chocolate chip cookie bars are your kind of dessert, these are the next ones to make:
- Chocolate Chip Cookie Bars — the classic version, no pumpkin, same dense and fudgy method. If you want to understand how the pumpkin changes the texture of this recipe, bake both back to back.
- Pumpkin Dump Cake — one pan, minimal mixing, maximum pumpkin flavor. If you want something even faster than these bars with no folding or portioning, this is the recipe.
Pumpkin Chocolate Chip Cookie Bars
Ingredients
Equipment
Method
- Position oven rack in the middle position and preheat to 350°F (175°C). Line a 9×13 inch (23x33cm) glass baking dish with parchment paper, leaving a 2-inch overhang on both long sides. Press the parchment flat against the bottom and sides with no air pockets underneath.
- In a large mixing bowl, combine the 425g pure pumpkin purée, 113g melted cooled unsalted butter, 165g packed light brown sugar, and 50g plain white granulated sugar. Whisk from the center outward in steady circular strokes for approximately 30 to 40 strokes until the sugars are fully dissolved and the mixture is thick, smooth, and uniformly deep amber with no visible sugar crystals.
- Add the 2 large room-temperature eggs one at a time, whisking each fully into the batter before adding the next. Add the 5ml pure vanilla extract and whisk for 10 additional strokes until the batter is glossy and cohesive. Switch to a silicone spatula.
- In a separate small bowl, whisk together the 210g all-purpose flour (spooned and leveled), 4g baking powder, 2g baking soda, 3g pumpkin pie spice, 1.5g ground cinnamon, and 3g fine sea salt for 15 seconds until evenly combined. Pour the dry ingredients onto the wet batter and fold with slow strokes from the bottom of the bowl upward — count 20 strokes maximum, stopping the moment no dry flour streaks remain. Do not overmix.
- Reserve ½ cup (85g) of the semi-sweet chocolate chips in a small bowl. Add the remaining 1 cup (170g) chips to the batter and fold in with 8 to 10 strokes until evenly distributed.
- Scrape the batter into the prepared parchment-lined baking dish and spread into an even layer using the back of the spatula, pressing into the corners. Scatter the reserved 85g chocolate chips evenly across the top surface and press each chip lightly into the batter with your fingertip to anchor them.
- Bake on the middle rack at 350°F (175°C) for 25 to 30 minutes. Do not open the oven before 25 minutes. The bars are done when the edges are fully set and pulling slightly from the parchment, the top surface looks matte around the chips, and a toothpick inserted 2 inches from the edge comes out with a few moist crumbs — not wet batter, not completely clean.
- Remove from the oven and place on a wire cooling rack. Do not cut. Cool at room temperature for a minimum of 2 hours, then refrigerate in the pan for 30 minutes. Lift out using the parchment overhang, place on a cutting board, and cut into a 4×4 grid for 16 bars using a sharp knife wiped clean between every cut.