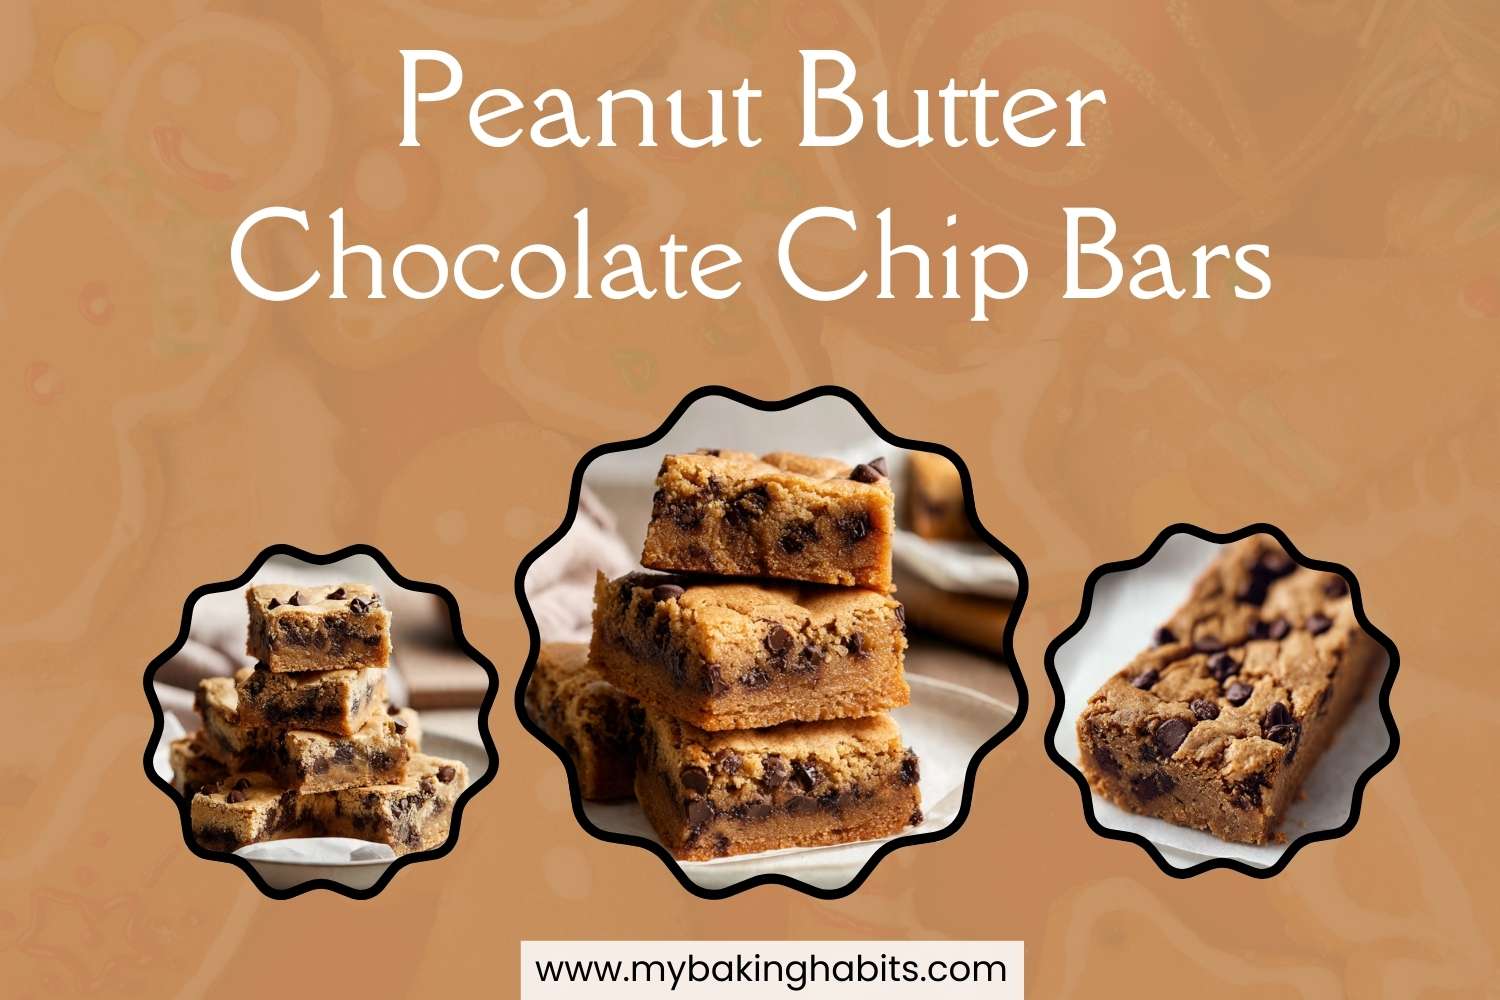
Peanut Butter Chocolate Chip Bars

The first batch I made of these bars had the right flavor and completely wrong texture. I used natural peanut butter — the kind where the oil floats on top and you stir it back in before using. The bars came out greasy and collapsed in the center. The second batch I used commercial creamy peanut butter. That was the recipe. I tested eight batches in total across two rounds of development to confirm every variable — peanut butter type, sugar ratio, flour weight, and bake time. I have not changed the formula since batch five.
These peanut butter chocolate chip bars are one of those recipes that looks simple on paper and actually is simple — but only if you understand the two or three places it can go wrong. I have made them enough times to know exactly where those are, and I have written every one of them into this article.
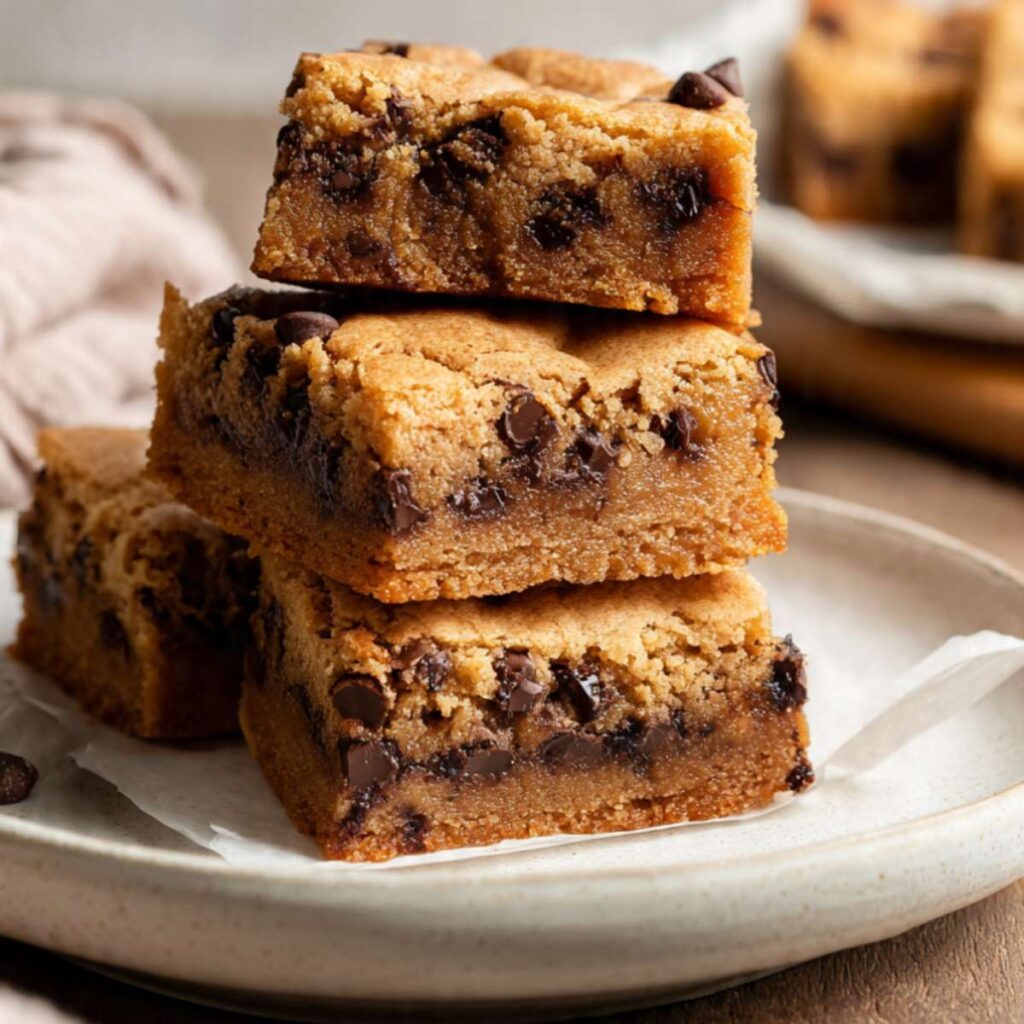
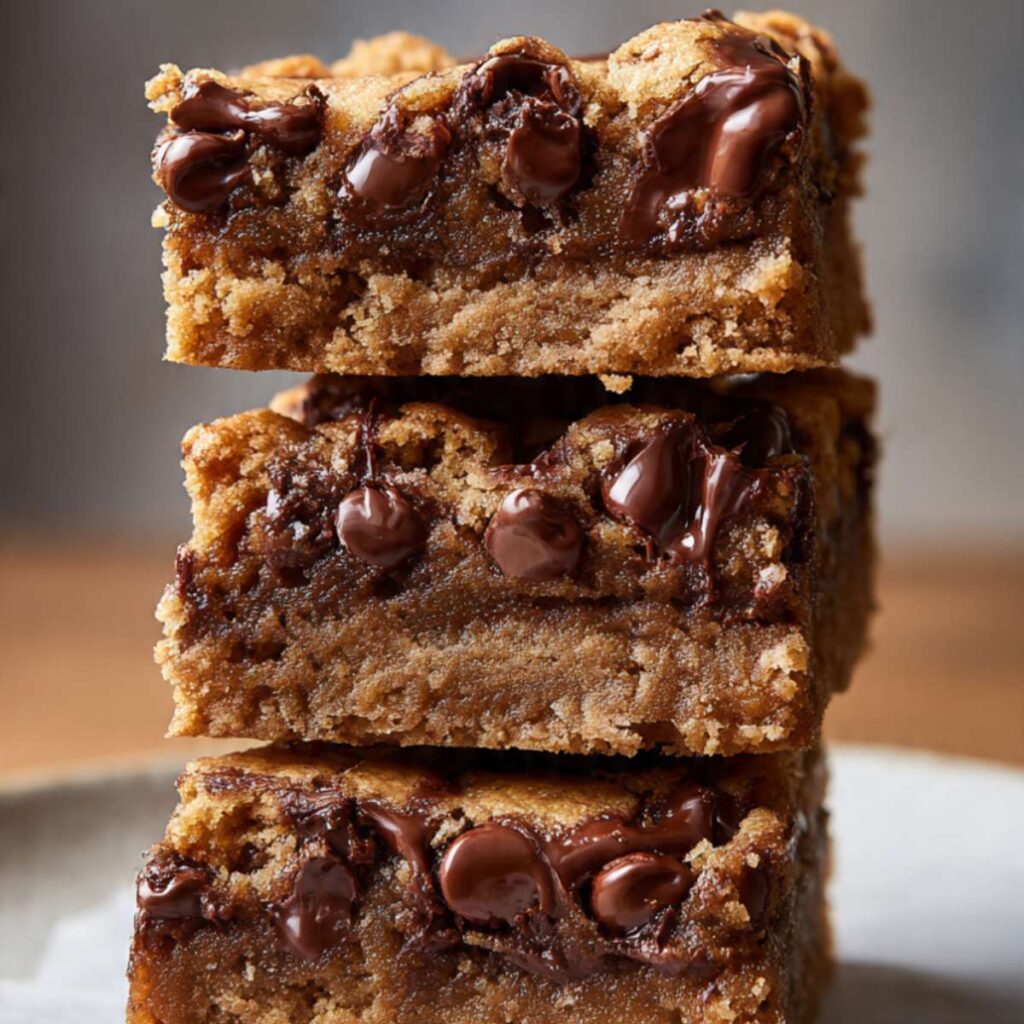
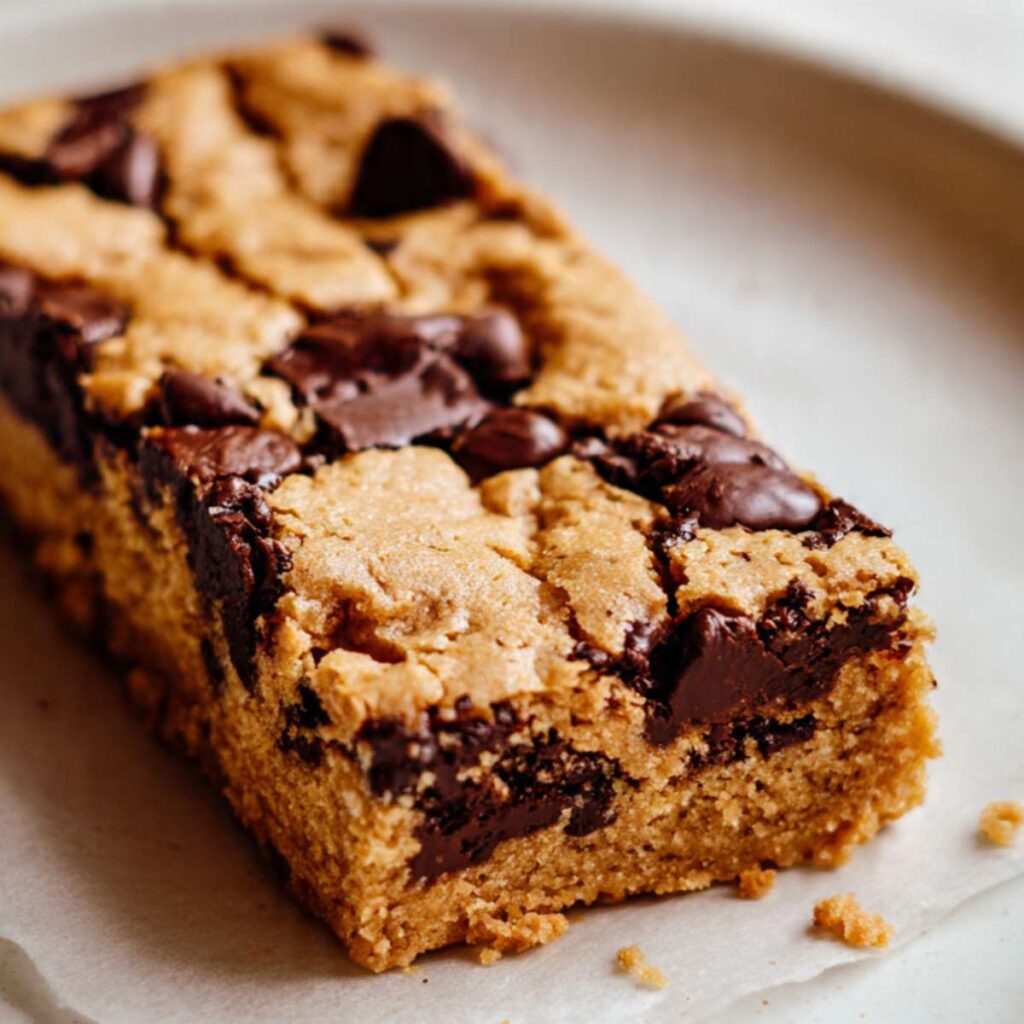
The texture is the thing people ask me about most. These are not cookie bars in the way that some peanut butter bars feel like a slab of cookie dough — dry and crumbly at the edges, doughy in the center. These bars are dense and fudgy all the way through. The interior stays moist and compact. The edges set firm enough to hold a clean cut. Every bite has a heavy peanut butter flavor with pockets of chocolate that melt when the bars are still slightly warm.
I tested this with natural peanut butter versus commercial creamy peanut butter across four batches. Natural peanut butter — even well-stirred — has a higher water content and a more variable oil-to-solid ratio than commercial brands. The bars made with natural peanut butter spread more, released oil into the batter unevenly, and collapsed at the center after cooling. The bars made with Jif or Skippy creamy peanut butter held their shape, baked evenly, and produced the dense, sliceable result shown in the photos. Natural peanut butter is not wrong as an ingredient — it is wrong for this specific recipe. Use commercial creamy.
I tested the brown sugar ratio across three batches — 100% brown sugar versus a split of brown and white. The all-brown-sugar version produced a deeper, more molasses-forward flavor and a softer, moister interior on Day 2. The split-sugar version had a slightly crisper top surface and a lighter color. I kept the all-brown-sugar version. The bars in the photos were made this way — that deep amber color across the full surface is the brown sugar baking at work, not overbaking.
There is no dairy butter in this recipe. The commercial peanut butter provides all the fat and binding the batter needs — which is why the peanut butter type matters as much as it does. No mixer required. No chilling. The batter comes together in one bowl with a silicone spatula and the pan goes straight into the oven.
🗒 Luna’s Note: I have made these bars on days when I needed something reliable and fast. They are not complicated. What they require is the right peanut butter and enough patience to let them cool before cutting — two hours minimum, or the centers collapse when the knife goes through.
| Prep Time | Cook Time | Total Time | Yield | Difficulty |
|---|---|---|---|---|
| 15 min | 28 min | 2 hrs 45 min (includes cooling) | 16 bars | Easy |
| Calories | Fat | Carbs | Sugar | Protein | Sodium |
|---|---|---|---|---|---|
| ~285 kcal | ~14g | ~36g | ~24g | ~7g | ~180mg |
Macros are approximate and will vary based on ingredient brands and serving size.
Ingredients & Tools
For the Bars
- 1 cup (258g) commercial creamy peanut butter (such as Jif or Skippy — not natural, not crunchy, not reduced-fat) — natural peanut butter has an inconsistent oil-to-solid ratio that causes the bars to spread and collapse; reduced-fat versions lack the fat needed for a fudgy texture
- ½ cup (113g) unsalted butter, melted and cooled to room temperature — salted butter changes the salt balance; hot melted butter will scramble the eggs if added too quickly
- 1½ cups (300g) packed light brown sugar — pack the sugar firmly into the measuring cup, or weigh it; brown sugar provides moisture, chew, and the deep amber color visible in the photos
- 2 large eggs, room temperature — cold eggs can cause the batter to seize; pull them from the fridge 30 minutes before starting
- 2 teaspoons pure vanilla extract — not imitation vanilla; imitation has a sharp chemical aftertaste that competes with the peanut butter
- 1½ cups (190g) all-purpose flour, spooned and leveled — King Arthur all-purpose flour is what I tested with; do not scoop directly from the bag
- 1 teaspoon baking soda, checked for freshness — drop ¼ teaspoon into 2 teaspoons of white vinegar; it should bubble immediately and vigorously; flat reaction means expired leavening
- ½ teaspoon fine sea salt — not table salt, not kosher salt by volume; fine sea salt measures consistently and distributes evenly through the batter
- 1½ cups (255g) semi-sweet chocolate chips (such as Ghirardelli or Nestlé Toll House) — not milk chocolate chips (too sweet against the peanut butter) and not dark chocolate chips (too bitter); semi-sweet is the correct balance for this recipe

Before You Start
Pull your eggs from the refrigerator 30 minutes before you begin. Cold eggs mixed into a warm peanut butter-butter mixture will cause the batter to look broken and curdled. Room temperature eggs incorporate smoothly and produce a cohesive batter. A quick check: hold an egg in your palm for 5 seconds — if it feels cool rather than cold, it is ready.
Melt the butter and set it aside to cool before you start. Hot melted butter added directly to the peanut butter and eggs will partially cook the eggs before the pan goes in the oven. The butter should feel warm to the touch but not hot — if you can hold your palm near the bowl without pulling away, it is ready.
Check your brown sugar before measuring. Brown sugar that has hardened into a solid brick will not incorporate evenly into the batter and will leave dense pockets of undissolved sugar in the finished bars. If yours has hardened, place the measured amount in a microwave-safe bowl with a damp paper towel draped on top and microwave in 20-second increments, breaking up the clumps between each round, until it is soft and packable again.
Check your chocolate chips for bloom — a white or grey powdery coating on the surface. Bloomed chips are still safe to use and will not affect flavor, but they may not melt as smoothly as fresh chips and the surface chip pools shown in the photos may look slightly matte rather than glossy. Use fresh chips if you want the melted, glossy surface appearance shown.
This recipe requires no chilling — the batter goes straight from the bowl into the pan and into the oven. No wait time, no refrigerating the dough.
Measure the flour by spooning it into the measuring cup with a separate spoon and leveling the top with a straight edge. Do not scoop the measuring cup directly into the flour bag — scooping compacts the flour and can add 20–30% more than the recipe needs, which produces dry, dense bars. For guaranteed accuracy, weigh the flour at 190g on a kitchen scale.
For the most consistent results, use a kitchen scale set to grams. The gram weights in this recipe are what I tested with — they are the most reliable way to match the result shown in the photos.
This recipe uses a 9×13 inch (23×33cm) baking pan. Line it with parchment paper, leaving a 2-inch overhang on both long sides. Grease the parchment lightly with non-stick spray or butter. The overhang is how you will lift the bars out of the pan cleanly after cooling — skip it and the edges will break when you try to remove them. A light-colored aluminum pan is what I tested with. Dark non-stick pans absorb more heat and will overbrown the bottoms before the centers set. Glass or ceramic pans retain heat differently — reduce the oven temperature by 25°F (15°C) if using either.
Position your oven rack in the middle of the oven before preheating. Top rack burns the surface. Bottom rack burns the bottoms.
Check your baking soda before you start. Drop ¼ teaspoon into 2 teaspoons of white vinegar — it should bubble aggressively within 5 seconds. If the reaction is slow or flat, the baking soda is expired and the bars will not lift properly.
🗒 Luna’s Note: I keep a dedicated baking scale on my counter at all times. Weighing the peanut butter and brown sugar changed these bars more than any other single habit — both pack inconsistently into a measuring cup and a 10–15g difference in either one changes the final texture noticeably.
This entire recipe comes together with a large mixing bowl and a silicone spatula — no electric mixer needed. Mixing by hand keeps the gluten development low, which is exactly what produces the dense, tender crumb visible in the cross-section photos.
I use a light-colored aluminum pan for every bar recipe I make. Not because it is the only pan that works — it is not — but because the bottom browning is predictable and the edges set at the same rate as the center. A dark pan is faster and less forgiving. I always choose predictable over fast.
Necessary Tools
Required:
- Kitchen scale (strongly recommended — gram weights produce the most consistent result)
- Large mixing bowl
- Silicone spatula or wooden spoon
- 9×13 inch (23×33cm) light-colored aluminum baking pan
- Parchment paper with overhang
- Wire cooling rack
Optional:
- Oven thermometer (recommended — most home ovens run 15–25°F off from the dial setting)
- Bench scraper (helpful for clean cutting after cooling)
How to Make Peanut Butter Chocolate Chip Bars
Step 1 — The Oven and Pan Come First
This recipe uses the one-bowl method — no electric mixer at any stage, just a large bowl and a silicone spatula. Preheat your oven to 350°F (175°C). Most home ovens run 15–25°F (8–14°C) off from what the dial reads — if you have an oven thermometer, set it inside now and confirm the actual temperature before the pan goes in. While the oven preheats, line your 9×13 inch (23×33cm) light-colored aluminum baking pan with parchment paper, leaving a 2-inch (5cm) overhang on both long sides. Lightly grease the parchment with non-stick spray or a thin coat of butter. The overhang is not optional — it is how the bars lift out of the pan in one clean piece after cooling. If you skip it, the edges will stick and break when you try to remove them.
The pan should look fully lined with no bare corners exposed and the parchment should sit flat against the sides without bunching. Set the pan aside and move to the batter.
Step 2 — Peanut Butter and Butter Come Together First
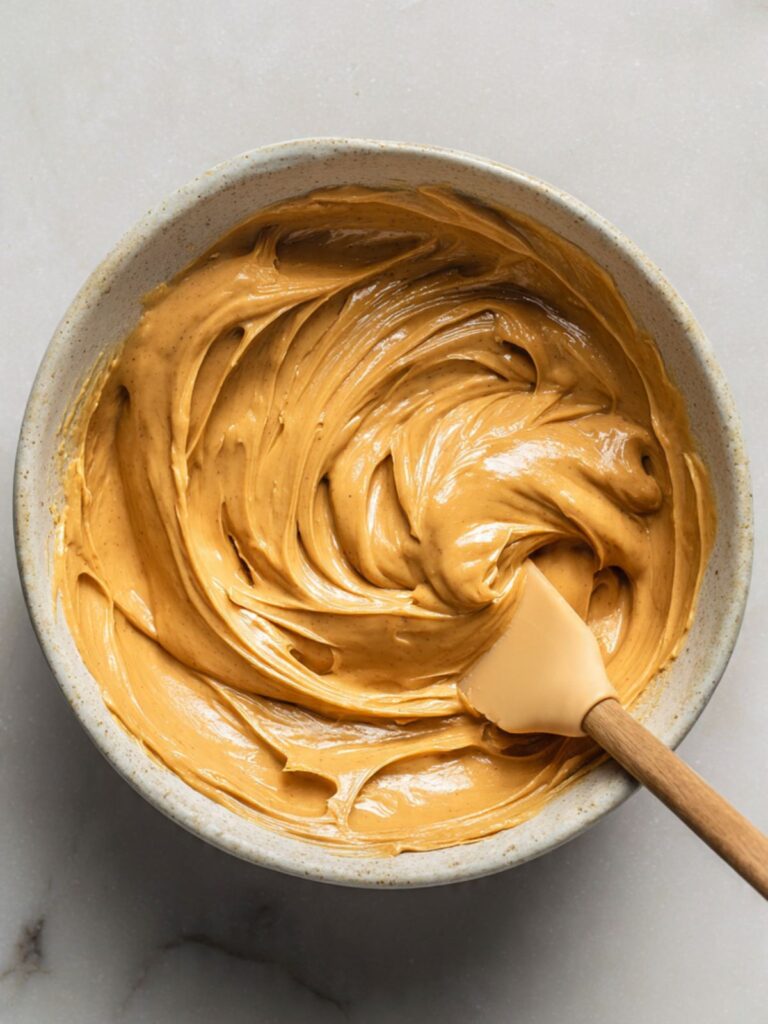
In a large mixing bowl, combine the 1 cup (258g) commercial creamy peanut butter and the ½ cup (113g) melted, cooled unsalted butter. Stir with a silicone spatula until the two fats are fully combined and the mixture looks smooth and uniform — no streaks of butter running through the peanut butter, no separation. This step establishes the fat base of the batter. Because peanut butter is the primary fat in this recipe rather than dairy butter, the two need to be fully homogenous before anything else goes in. If the butter is still warm when it meets the peanut butter, the mixture may look slightly oily — give it 3–4 extra stirs and it will come together.
⚠️ Do not use hot melted butter here — the mixture will look greasy and will not emulsify properly with the eggs in the next step, which produces a broken, oily batter that bakes up dense in the wrong way rather than the fudgy way shown in the photos.
The mixture should look thick, smooth, and a uniform tan color — if you see visible butter pooling at the edges of the bowl, stir for another 30 seconds. Move directly to the sugar.
Step 3 — Brown Sugar Goes In and Gets Worked
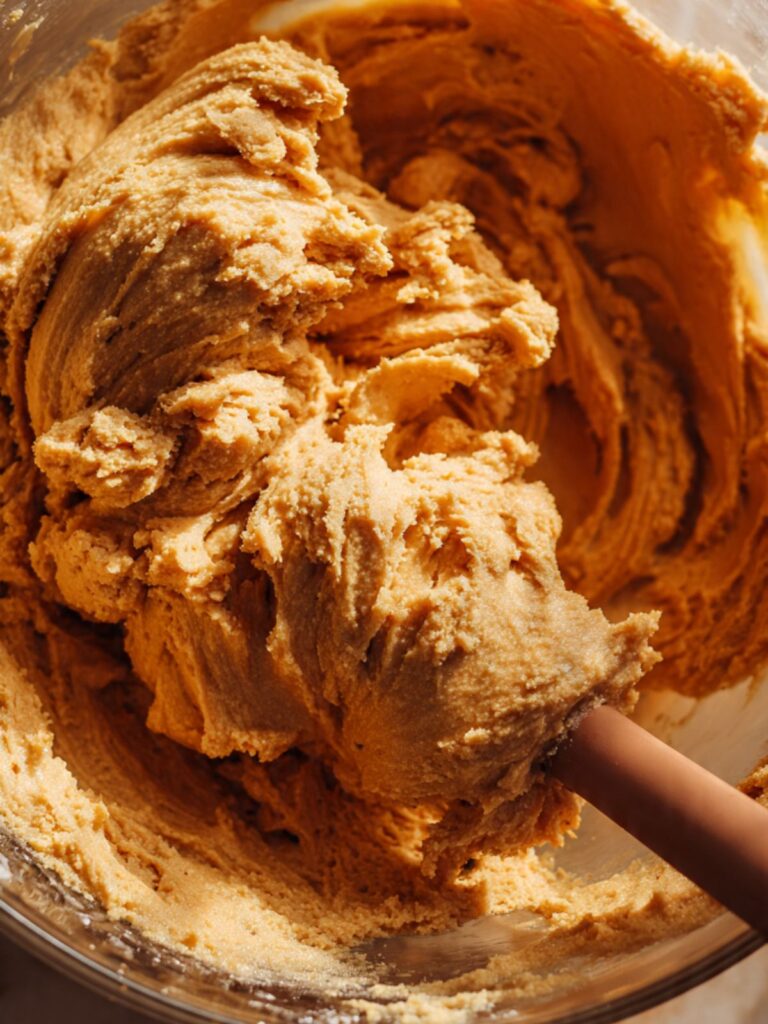
Add the 1½ cups (300g) packed light brown sugar to the peanut butter-butter mixture. Stir with the spatula, pressing the sugar into the fat mixture rather than just folding on top. Continue stirring for a full 60 seconds — this is not creaming, but the friction of stirring the sugar into the fat starts to dissolve the sugar crystals slightly, which contributes to the moist, dense texture of the finished bar. You will feel the mixture thicken and become harder to stir as the sugar incorporates. This is correct.
The mixture should look thick, cohesive, and slightly grainy from the brown sugar — it will not look smooth at this stage, and that is correct. If it looks wet or soupy, the butter was too warm going in. The mixture will smooth out when the eggs are added in the next step.
Step 4 — Eggs and Vanilla Build the Structure
Add the 2 large room-temperature eggs one at a time, stirring fully after each addition before the next egg goes in. Adding both eggs at once risks the batter looking broken — one at a time allows the egg proteins to emulsify into the fat mixture gradually. After the first egg is fully incorporated, add the second. Once both eggs are in, add the 2 teaspoons of pure vanilla extract and stir for another 20 seconds.
⚠️ If the eggs are cold when they go into the warm fat mixture, the fat will seize around them and the batter will look curdled and lumpy — it will not smooth out during baking and the finished bars will have an uneven, greasy texture rather than the uniform fudgy crumb shown in the photos.
The batter should now look smooth, glossy, and cohesive — it should fall from the spatula in a thick, slow ribbon. If it looks broken or oily, the eggs were too cold or the butter was too hot. Add the dry ingredients next.
Step 5 — Dry Ingredients Fold In Gently
Add the 1½ cups (190g) all-purpose flour, 1 teaspoon baking soda, and ½ teaspoon fine sea salt directly to the wet mixture. Fold with the silicone spatula using slow, wide strokes — scrape from the bottom of the bowl up and over, rotating the bowl as you go. Stop folding the moment no dry flour streaks remain visible. Count your strokes if it helps — this should take no more than 15–20 folds. Overmixing activates the gluten in the flour, which tightens the crumb and produces bars that are chewy and tough rather than the soft, dense texture shown in the photos.
The baking soda in this recipe activates against the brown sugar and peanut butter — both are mildly acidic — which produces a small, even lift that keeps the bars from being completely flat without making them cakey.
⚠️ Do not switch to aggressive stirring at this stage — the moment the flour disappears is the moment to stop. Bars that look slightly under-mixed at this stage will bake correctly. Bars that are over-mixed will bake up tough and dry at the edges.
The batter should look thick and slightly sticky, pulling away from the sides of the bowl in one mass — if it looks loose or pourable, the flour was not measured correctly. Fold in the chocolate chips next.
Step 6 — Chocolate Chips Fold In Last
Reserve 3 tablespoons (about 30g) of the chocolate chips and set them aside. Add the remaining 1 cup plus 3 tablespoons (approximately 225g) of semi-sweet chocolate chips to the batter and fold with the spatula until evenly distributed — 6 to 8 folds maximum. The chips should be visible throughout the batter, not concentrated at the bottom of the bowl.
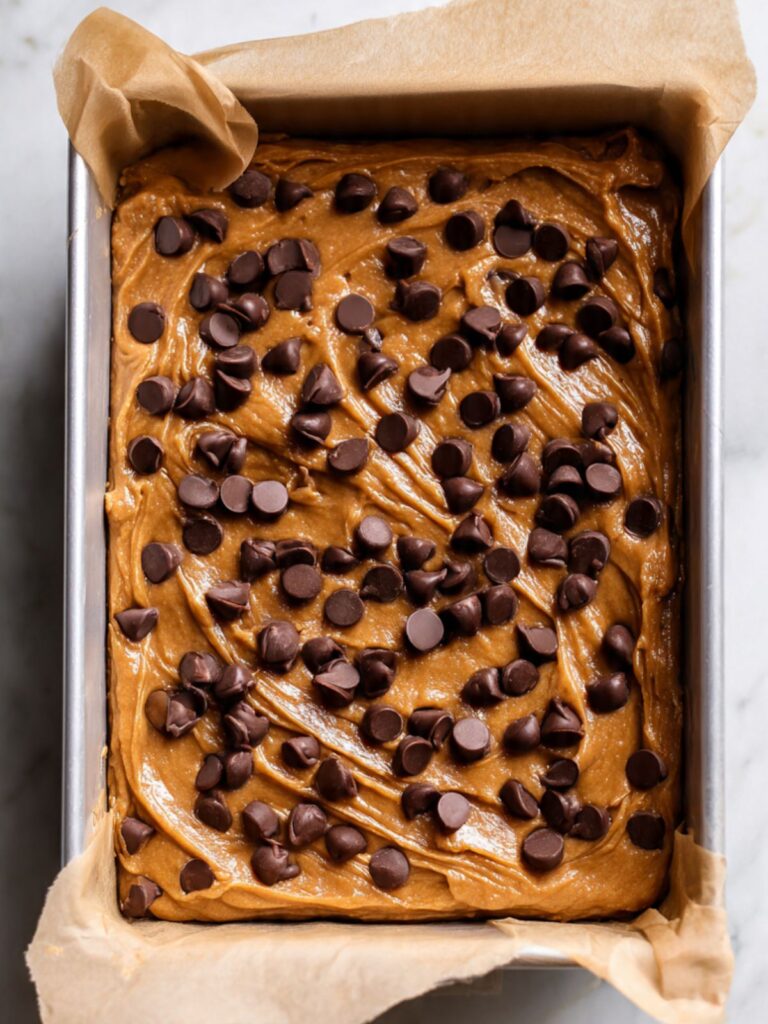
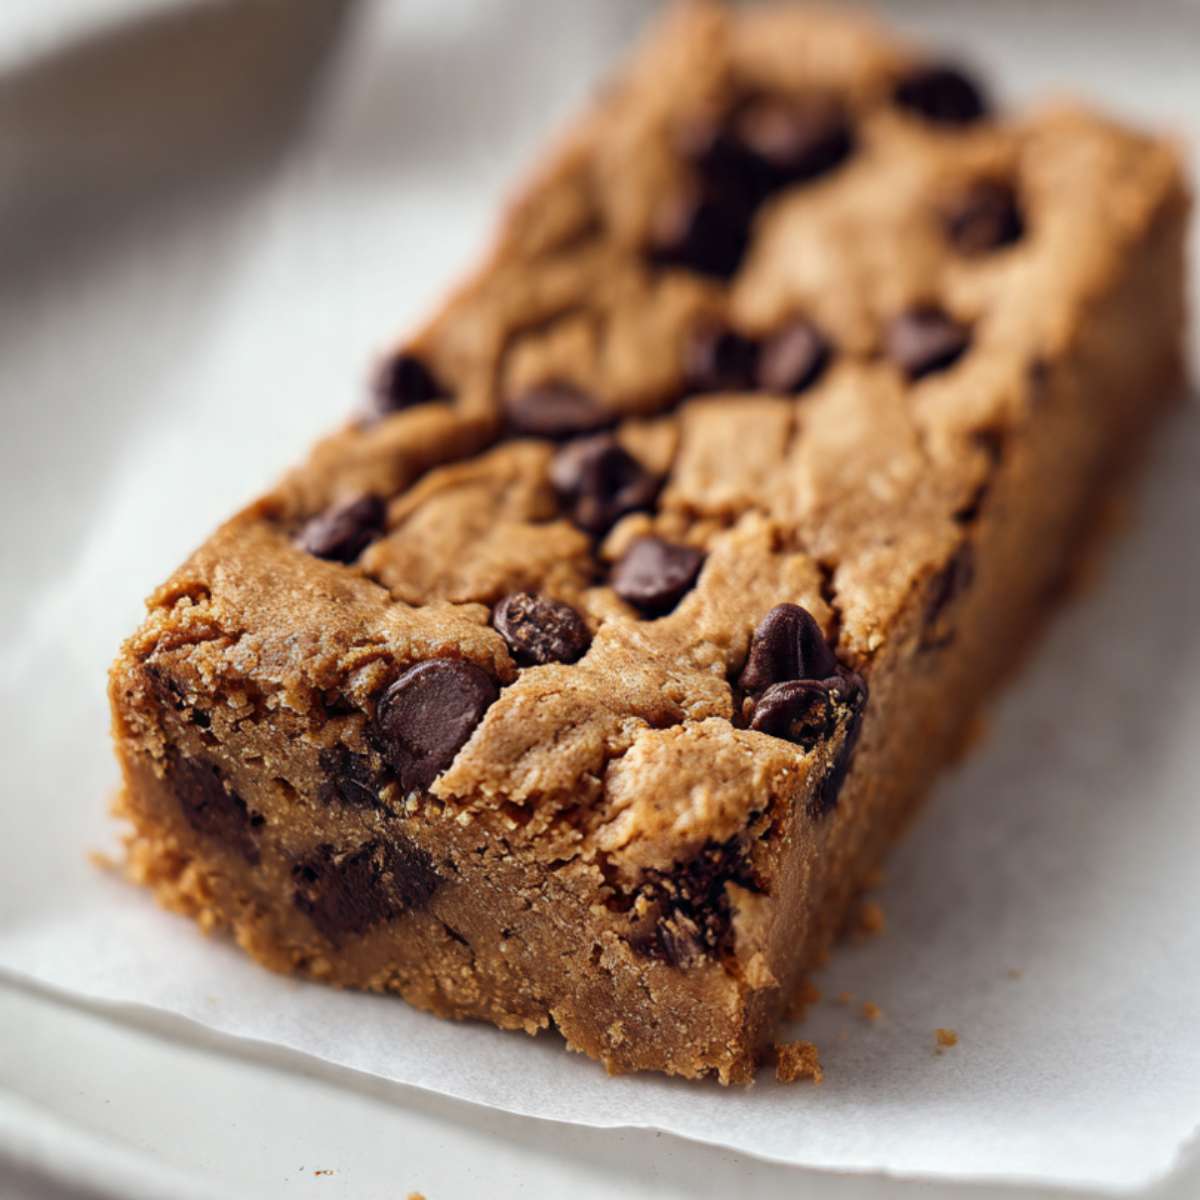
Scrape the batter into the prepared parchment-lined pan and spread it into an even layer using the spatula. The batter is thick — use the back of the spatula or dampened fingertips to press it into the corners and smooth the surface. Scatter the reserved chocolate chips evenly across the top of the batter and press them in lightly with your fingertips.
🗒 Luna’s Note: The reserved chips pressed onto the surface before baking are what produce the visible glossy chocolate pockets across the top of the bars shown in the photos. Chips folded entirely into the batter get buried as the bars bake and spread. These surface chips stay visible and melt into pools rather than disappearing.
The batter in the pan should look thick and even with chips visible throughout and scattered across the surface — if the layer is significantly thicker on one side, redistribute before the pan goes in. The pan is ready for the oven.
Step 7 — The Bake
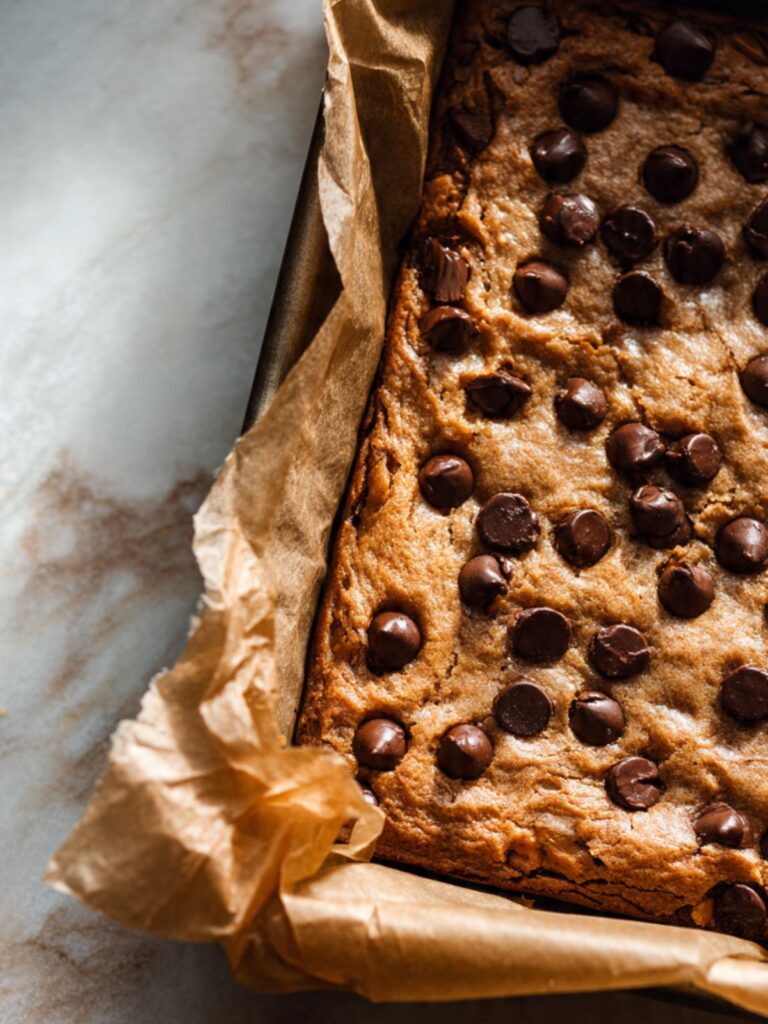
Place the pan on the middle rack of the preheated 350°F (175°C) oven. Bake for 25 to 28 minutes. Start checking at 25 minutes. The bars are done when the edges look set and deep golden brown and have pulled very slightly away from the parchment, and the center looks just barely set — it should not jiggle when you gently shake the pan, but it will still look slightly soft and underdone compared to the edges. This is the correct moment to pull them.
As you can see in the stacked bar photos, the interior of these bars is dense and moist — not cakey, not dry. That texture comes from pulling the pan at exactly this moment and letting carryover heat finish the center off the heat.
⚠️ Do not wait for the center to look fully set and matte in the oven — by the time the center looks done, the edges will be overbaked and dry, and the interior will lose the fudgy density shown in the cross-section photos. Pull them when the center still looks soft.
The edges should look deep golden brown and set, the surface chips should look melted and glossy, and the center should look just barely set when the pan comes out — this is exactly what you want. Set the pan on a wire rack immediately and do not touch it for at least 2 hours.
Step 8 — The Cool Is Not Optional
Leave the bars in the pan on the wire rack for a minimum of 2 hours before cutting. Do not rush this. The center of these bars is still cooking from carryover heat for the first 20 minutes after the pan comes out of the oven — the residual heat from the pan and the bars themselves continues to set the interior long after the oven is off. Cutting before 2 hours produces bars that collapse in the center and crumble at the cut edge rather than holding a clean slice.
For the cleanest possible cuts — edges as sharp as the ones visible in the stacked bar photos — refrigerate the cooled bars in the pan for 30 minutes after the 2-hour room temperature rest. Use a sharp chef’s knife wiped clean with a damp cloth between each cut. Cut into 16 bars: 4 cuts across the long side, 3 cuts across the short side.
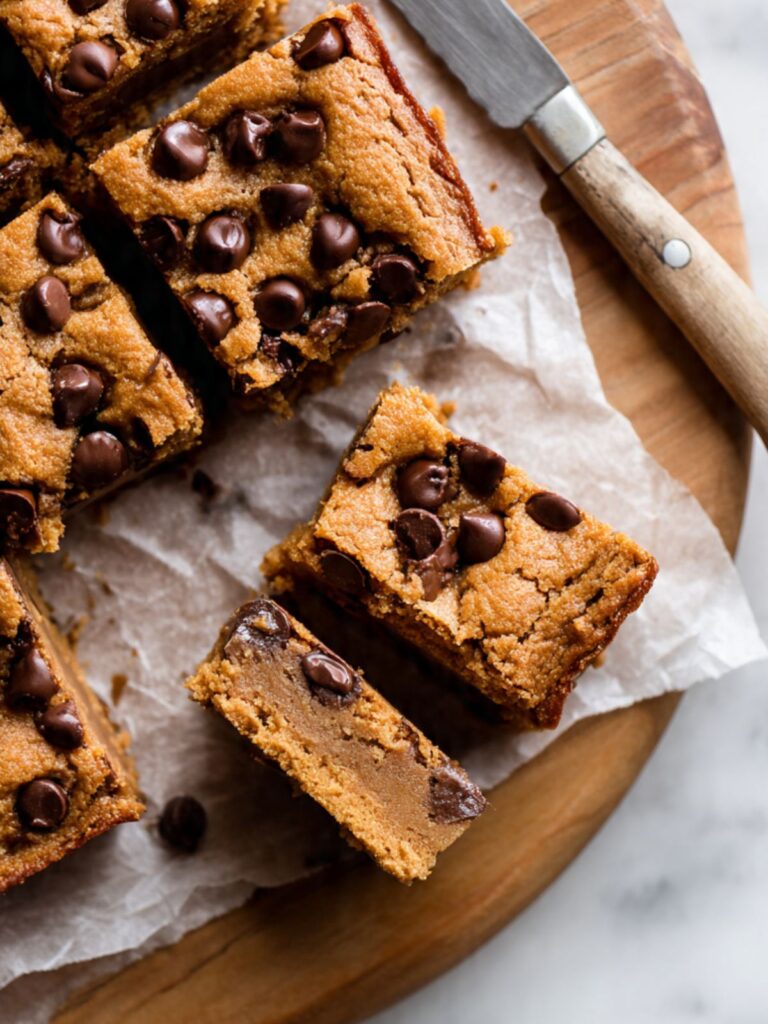
Use the parchment overhang to lift the full slab out of the pan before cutting — place it on a cutting board, peel back the parchment from the sides, and cut from above with the knife held straight and vertical. Cut the slab into 16 bars: 4 cuts along the long side (23cm dimension) and 3 cuts along the short side (33cm dimension) — this yields bars approximately 2.5 inches × 3.75 inches (6.5 × 9.5cm) each. Weigh the first bar after cutting: it should land between 75–85g. If the bars are significantly heavier, the batter was spread thicker on one side — redistribute the cut pieces accordingly. Total slab weight divided by 16 gives you the per-bar average for your specific batch.
The bars should lift cleanly from the pan in one piece, the edges should hold without crumbling, and the cut surface should show the dense, fudgy interior with chocolate chip pockets visible throughout — exactly as shown in the close-up photo above. If the center collapses when the knife goes through, the bars needed more cooling time — press the cut pieces back together and refrigerate for another 30 minutes before continuing.
The Science Behind Peanut Butter Chocolate Chip Bars
Why Commercial Peanut Butter Produces a Fudgy Bar and Natural Peanut Butter Does Not
I noticed this before I understood it. The first batch made with natural peanut butter looked right going into the oven — the batter had the same consistency, the same color, the same chip distribution. It came out greasy at the edges and sunken in the center. I made the same recipe with Jif. The difference was not subtle.
Commercial creamy peanut butter — brands like Jif and Skippy — contains partially hydrogenated oils that are stable at room temperature and remain uniformly distributed throughout the product. The fat-to-solid ratio is consistent from the first spoonful to the last. Natural peanut butter separates because its oils are not hydrogenated — even after stirring, the oil distribution is uneven, and that unevenness carries directly into the batter. The result is pockets of excess oil in some areas and drier, denser pockets in others. The center collapses because the structure is uneven — some areas set while others stay liquid longer.
The practical consequence is exactly what you can see in the cross-section photos: a uniform, dense, cohesive interior from edge to edge. That uniformity is only achievable with a fat source that behaves consistently at baking temperature. Commercial peanut butter is that fat source for this recipe. If you want to bake with natural peanut butter, this is not the recipe for it — the result will be different in ways that cannot be corrected after the fact.
What Brown Sugar Does to These Bars That White Sugar Cannot
Brown sugar is white sugar with molasses added back in — typically 3.5% molasses for light brown sugar and 6.5% for dark. That molasses is hygroscopic, meaning it actively draws moisture from the surrounding environment and holds it. This is the single reason these bars stay soft and moist on Day 2 and Day 3 in a way that a white-sugar bar does not.
The hygroscopic behavior of the molasses in brown sugar works in two directions during baking. First, it slows the rate at which the batter dries out in the oven — which is why the interior stays fudgy even at 350°F (175°C) for nearly 30 minutes. Second, after baking, the molasses continues to draw atmospheric moisture into the bar as it cools, which is why these bars are noticeably better on Day 2 than Day 1. The texture deepens. The peanut butter flavor becomes more pronounced. The chocolate pockets firm up slightly.
The deep amber color visible across the surface and edges of the bars in every photo is the Maillard reaction working on the molasses compounds in the brown sugar — molasses contains amino acids that react with the sugars at lower temperatures than plain white sugar, which is why brown sugar baked goods reach that deep golden color without needing a higher oven temperature or longer bake time. White sugar does not produce that color at the same temperature. If you substituted white sugar here, the bars would bake up paler and taste noticeably flatter.
If you want to explore more brown-sugar-forward bar recipes, my chocolate chip cookie bars uses a similar brown sugar ratio and produces a comparable fudgy texture with a different flavor profile.
Why Gluten Development Must Stay Low in This Recipe
Gluten forms when the proteins in flour — glutenin and gliadin — come into contact with water and are worked through mixing. The more you mix after the flour goes in, the longer and more elastic those protein chains become. In bread, that elasticity is the goal. In these bars, it is the enemy.
These bars use a one-bowl, no-mixer method deliberately. The spatula fold rather than an electric mixer keeps the mixing strokes low and gentle, which limits how much gluten develops before the pan goes into the oven. Low gluten development produces a tender, dense crumb that yields easily when you bite into it — the texture visible in the interior cross-section shots. High gluten development produces a bar that feels chewy and tough, with a crumb that resists rather than gives.
The eggs in this recipe provide the structural protein that holds the bars together as they bake — egg proteins coagulate at around 145°F (63°C), which is well below the oven temperature, so the structure sets early in the bake. The flour’s job is to add body and absorb moisture, not to provide elasticity. Keeping the fold count below 20 strokes after the flour goes in is what preserves that balance. This is also why the batter should never be stirred aggressively — every extra stroke builds gluten the recipe does not need and cannot shed once it is in the oven.
Peanut Butter Chocolate Chip Bars Troubleshooting & Pro-Tips
Common Mistakes
The bars are greasy and collapsed in the center
Cause: Natural peanut butter was used instead of commercial creamy peanut butter. Even well-stirred natural peanut butter has an unstable oil-to-solid ratio that causes oil to separate into the batter unevenly during baking. Some areas of the bar receive excess oil while others receive too little fat, which produces a bar that collapses at the center as it cools.
Fix: There is no fix after baking — a collapsed, greasy bar cannot be salvaged by additional cooling or refrigeration. The structural failure happened in the batter.
Prevention: Use commercial creamy peanut butter only — Jif or Skippy are the most consistent. Check the label before you start: if the ingredients list only peanuts and salt, it is natural peanut butter and it will not work in this recipe.
The bars stuck to the pan and the edges broke when removing
Cause: The parchment overhang was not used, the parchment was not greased, or the bars were removed from the pan before they had fully cooled. A warm bar is structurally fragile — the interior is still soft and the edges have not fully set against the parchment.
Fix: If the bars are already broken, press the pieces back together firmly and refrigerate for 45 minutes — the cold will re-firm the interior enough to hold the pieces. The texture will be unaffected.
Prevention: Line the pan with parchment leaving a full 2-inch (5cm) overhang on both long sides and grease the parchment lightly before adding the batter. Cool the bars for the full 2 hours at room temperature before attempting to lift them. For the cleanest removal, refrigerate for an additional 30 minutes after the room temperature rest before lifting with the overhang.
The bars sank in the center after cooling and the center is gummy when cut
Cause: The bars were underbaked — the center was not yet structurally set when the pan came out of the oven. Unlike the greasy collapse caused by natural peanut butter (which is a fat distribution failure), a sunken gummy center with correctly structured edges means the interior egg proteins and starch had not fully coagulated before the pan was pulled. This can also happen if the oven door was opened during the first 20 minutes of baking, which drops the oven temperature suddenly and stalls the bake in the center.
Fix: Return the pan to the oven immediately if still warm — bake for an additional 5 minutes at 350°F (175°C) and check again using the doneness cues. If the bars have already cooled and sunk, the center cannot be rebaked. Refrigerate the fully cooled bars for 1 hour — the cold will firm the gummy center enough to make them sliceable and edible, though the texture will be denser than intended.
Prevention: Do not open the oven door before the 25-minute mark. Pull the pan only when the edges are set and deep golden and the center does not jiggle when the pan is gently shaken. A toothpick inserted in the center should come out with moist fudgy crumbs — not wet batter.
The bars baked up cakey and dry instead of dense and fudgy
Cause: One or more of four things happened — the flour was over-measured, the batter was overmixed after the flour went in, the bars were overbaked, or reduced-fat peanut butter was used. Any of these individually can shift the texture from fudgy to dry. All four together produce bars that are noticeably wrong.
Fix: Nothing corrects an overbaked or over-floured bar after baking. Serve them with a scoop of vanilla ice cream — the moisture contrast compensates for the dry crumb.
Prevention: Weigh the flour at exactly 190g. Stop folding the moment no dry flour streaks remain — count strokes if necessary, targeting under 20. Pull the pan at 25 minutes and check; the center should still look slightly soft. Use full-fat commercial creamy peanut butter with no exceptions.
The batter looked broken, curdled, or oily after adding the eggs
Cause: Cold eggs were added to a warm fat mixture. The fat seized around the cold egg proteins rather than emulsifying with them, which produces a batter that looks separated and greasy rather than smooth and cohesive.
Fix: If the batter looks broken, place the mixing bowl over a pot of barely warm water for 60 seconds and stir gently — gentle warmth can help the fat and eggs come back together. Do not apply direct heat. If it does not come together after 90 seconds of gentle stirring, the batter is too far gone to fix reliably.
Prevention: Pull the eggs from the refrigerator 30 minutes before starting. Room temperature eggs — around 68°F (20°C) — emulsify smoothly into the fat mixture without shocking the fat into seizing. Add them one at a time, stirring fully after each addition.
The bars have pale, underdone edges and a raw center after the stated bake time
Cause: The oven was not fully preheated, a dark non-stick pan was used (which initially absorbs heat away from the edges and then over-concentrates it later), or the pan was placed on the top or bottom rack rather than the middle.
Fix: Return the pan to the oven for 3–5 minute increments, checking after each. The edges should deepen in color and the center should stop looking wet and shiny.
Prevention: Preheat the oven for a full 20 minutes before the pan goes in — most ovens beep before they reach the set temperature. Use a light-colored aluminum pan on the middle rack. If you have an oven thermometer, confirm the actual temperature reads 350°F (175°C) before the pan goes in.
The bars did not rise and look completely flat
Cause: The baking soda was expired or was not fully incorporated into the batter before baking. Expired baking soda produces no CO2 reaction and the bars bake up flat and very dense — denser than the fudgy result shown in the photos, and without the slight lift at the edges.
Fix: Flat bars that are otherwise correctly baked are still edible — the flavor is unaffected. Cut them into smaller portions; the dense, flat texture reads better in a smaller piece.
Prevention: Test baking soda freshness before every bake: drop ¼ teaspoon into 2 teaspoons of white vinegar. Vigorous immediate bubbling means the leavening is active. Add the baking soda with the flour and fold until no dry streaks remain — do not let it sit on top of the wet batter without incorporating, or it will not distribute evenly.
High altitude and humidity adjustments
At high altitude (above 3,500 feet / 1,067 meters), reduce the baking soda to ¾ teaspoon, increase the flour by 2 tablespoons (16g), and increase the oven temperature to 365°F (185°C). Check the bars at 23 minutes — they will bake faster at altitude.
In high humidity (above 70% relative humidity), the brown sugar will absorb atmospheric moisture before baking and may make the batter feel looser than expected. Refrigerate the assembled batter in the pan for 15 minutes before baking — this firms the batter slightly and prevents excess spread. The finished bars may feel slightly stickier on the surface than the photos show — this is surface moisture from the air, not underbaking.
Expert Pro-Tips
Reserve chips for the surface and press them in before baking. Set aside 3 tablespoons of chips before folding the rest into the batter. Once the batter is spread in the pan, scatter the reserved chips across the entire surface and press them in lightly with your fingertips. Chips folded entirely into the batter get partially buried as the bars bake and expand — the surface chips stay visible and melt into the glossy pools shown across the top of the bars in the photos. This takes 30 seconds and makes a visible difference in the finished result.
Use the refrigerator for clean cuts. After the 2-hour room temperature cooling period, slide the pan — bars still in it — into the refrigerator for 30 minutes before cutting. Cold bars hold a cleaner edge when the knife goes through. Wipe the knife blade with a damp cloth between every cut — chocolate residue on the blade drags through the next cut and produces ragged edges instead of clean ones.
Weigh both the peanut butter and the brown sugar. Both ingredients pack inconsistently into a measuring cup — a tablespoon too much or too little of either changes the final texture in a way that is noticeable. Peanut butter measured by volume can vary by 15–20g depending on how it is scooped. Brown sugar measured by volume can vary even more depending on how firmly it is packed. The gram weights in this recipe are the numbers I tested with. Use them.
How to Store Peanut Butter Chocolate Chip Bars
Room Temperature
Store the bars in a hard-sided lidded container with a sheet of unbleached parchment paper between each layer. Room temperature storage is the correct default for these bars — refrigeration is not necessary and actually works against the texture (more on that below). At room temperature in a sealed container, the bars stay moist and fudgy for up to 4 days. Day 2 is when the texture is at its best — the brown sugar’s hygroscopic properties draw a small amount of atmospheric moisture back into the bar overnight, which deepens the fudgy quality and makes the peanut butter flavor more pronounced. Day 1 bars are good. Day 2 bars are better.
Do not store these in a zip-lock bag. The flexible sides of the bag press against the bars and flatten the surface chips into the top layer. The seal is also less reliable than a hard-sided container, which allows air in and dries the bars faster than they would otherwise. Stack no more than 2 layers with parchment between them — more than 2 layers and the bottom bars compress under the weight of the ones above.
Do not store alongside strongly aromatic foods — brown sugar and peanut butter both absorb surrounding flavors readily, and bars stored near onions, garlic, or heavily spiced foods will taste it by Day 2.
Refrigerator
Refrigeration is not recommended for these bars as a default storage method. Cold temperatures firm the peanut butter fat significantly — refrigerated bars feel noticeably denser and drier than room temperature bars, and the chocolate chips lose their slight softness and become hard. If you prefer a firmer, denser texture, refrigeration is a valid choice — but pull the bars out 20–25 minutes before serving to allow the peanut butter fat to soften back to its natural state. Bars served directly from the refrigerator taste muted and feel waxy rather than fudgy.
If your kitchen runs warmer than 75°F (24°C) — common in summer — refrigeration becomes the better option for storage beyond Day 2. Warm kitchens accelerate the rate at which the fat in the peanut butter softens, which makes the bars increasingly sticky and fragile past the 48-hour mark at room temperature. In that case, store in the refrigerator in a hard-sided container with parchment between layers and pull out 20 minutes before serving.
Freezer — Baked
These bars freeze well. Wrap each bar individually in a layer of plastic wrap, then place the wrapped bars in a zip-lock freezer bag or a hard-sided freezer container. The individual wrapping is what prevents freezer burn — bars placed directly into a container without individual wrapping develop ice crystals on the exposed surfaces within 2 weeks, which damages the texture when thawed. Frozen bars keep well for up to 2 months.
To thaw, transfer the individually wrapped bars from the freezer to the counter and leave them at room temperature for 45 minutes to 1 hour — do not unwrap until fully thawed. Unwrapping before thawing causes condensation to form directly on the surface of the bar, which makes the top sticky and slightly wet. Thawed bars are nearly identical in texture to fresh bars — the brown sugar and peanut butter fat both recover well from freezing.
Do not microwave to thaw — microwave heat melts the chocolate chips unevenly and softens the center faster than the edges, which produces a bar with a hot, collapsing middle and cold, firm edges.
Freezer — Unbaked
The assembled batter can be frozen unbaked. Spread the batter into the prepared parchment-lined pan, scatter the reserved surface chips, then wrap the entire pan tightly in two layers of plastic wrap and freeze for up to 1 month. To bake from frozen, remove the plastic wrap, place the pan directly into a cold oven, and set the temperature to 350°F (175°C). Add 12–15 minutes to the standard bake time — start checking at 37 minutes using the same doneness cues as the standard recipe. The edges should look set and deep golden and the center should look just barely set before pulling.
Serving Suggestion
These bars are best served at room temperature — not warm, not cold. At room temperature the peanut butter fat is soft enough that the bar yields immediately when you bite into it, and the chocolate chip pockets have just enough give to feel melted rather than firm. If the bars were refrigerated, pull them out 20–25 minutes before serving and let them come back to room temperature on the counter still in their container.
I eat these with black coffee. The bitterness cuts the sweetness of the brown sugar and the peanut butter in a way that milk or tea does not — the contrast makes both the coffee and the bar taste more of what they are. A glass of cold whole milk is the other version that works, if coffee is not your preference.
These are the bars I make when someone asks me to bring something and I want it to travel well and hold up at room temperature for several hours without losing anything. They do not need refrigeration, they do not need to be served warm, and they cut cleanly enough to stack in a container and transport without falling apart. That combination is rarer than it sounds.
🗒 Luna’s Note: I always cut these into 16 portions rather than the 12 larger bars some recipes suggest. The peanut butter and brown sugar make these rich — a slightly smaller bar is the right size. Sixteen portions also means the slab disappears more slowly, which is its own advantage.
Day 2 bars are the ones I would serve to someone I wanted to impress. The texture deepens overnight in a way that Day 1 bars do not quite have yet. If you are making these for an event, make them the night before. Not the morning of.
These do not work as a warm dessert. The interior is too soft when warm and the bars lose their structural integrity — they need to be fully cooled and set to hold their shape and deliver the fudgy-but-sliceable texture shown in the photos. Do not attempt to serve them straight from the oven or reheated.
Frequently Asked Questions About Peanut Butter Chocolate Chip Bars Recipe
Can I make peanut butter chocolate chip bars ahead of time?
Yes — and these bars are genuinely better made a day ahead. Bake them fully, cool for the complete 2 hours, cut into bars, and store in a hard-sided lidded container with parchment between layers at room temperature. By the next day the brown sugar’s hygroscopic properties will have drawn moisture back into the bar, deepening the fudgy texture and making the peanut butter flavor more pronounced than it is on Day 1. For an event, make them the night before and store at room temperature overnight — do not refrigerate before serving, as cold temperatures firm the peanut butter fat and mute the flavor.
Can I use natural peanut butter in this recipe?
No — not reliably. Natural peanut butter has an unstable oil-to-solid ratio that causes the bars to spread unevenly, release excess oil into the batter, and collapse at the center after cooling. Even thoroughly stirred natural peanut butter behaves differently from commercial creamy peanut butter at baking temperature because its oils are not hydrogenated and do not remain uniformly distributed through the bake. Use Jif or Skippy creamy — the full-fat, standard version, not the reduced-fat variety. Reduced-fat peanut butter lacks the fat content this recipe relies on for its fudgy texture and will produce dry, cakey bars instead.
Why did my peanut butter bars come out cakey instead of fudgy?
The most common cause is over-measured flour. Scooping the measuring cup directly into the flour bag compacts the flour and can add 20–30% more than the recipe needs — that extra flour absorbs the fat in the batter and produces a drier, cakier crumb. Weigh the flour at exactly 190g for the most reliable result. The second most common cause is overmixing after the flour goes in — gluten development from excess mixing tightens the crumb and produces a bar that is chewy and resistant rather than tender and fudgy. Fold with a spatula, stop the moment no dry streaks remain, and keep the total fold count under 20 strokes. Overbaking is the third cause — pull the pan when the center still looks slightly soft.
Can I double or halve this recipe?
This recipe doubles cleanly with one adjustment: use only 1½ teaspoons of baking soda for the doubled batch, not 2 teaspoons. Leavening does not scale linearly — doubling the baking soda produces bars with a soapy, metallic aftertaste and an uneven rise. Bake the doubled batch in two separate 9×13 inch (23×33cm) pans on the same middle rack if your oven fits both, or bake one pan at a time — do not combine into one larger pan, as the bake time and interior texture will both change. To halve the recipe, use an 8×8 inch (20×20cm) pan lined with parchment and reduce the bake time to 20–23 minutes, checking at 20 minutes using the same doneness cues.
How does humidity or altitude affect these bars?
In high humidity (above 70% relative humidity), the brown sugar absorbs atmospheric moisture before baking and can make the batter feel looser than expected — refrigerate the assembled batter in the pan for 15 minutes before baking to firm it slightly and prevent excess spread. The finished bars may also feel slightly stickier on the surface than the photos show; this is surface moisture from the air, not underbaking. At high altitude (above 3,500 feet / 1,067 meters), reduce the baking soda to ¾ teaspoon, increase the flour by 2 tablespoons (16g), and raise the oven temperature to 365°F (185°C). Start checking the bars at 23 minutes — they will bake faster at altitude than at sea level.
Can I swap the chocolate chips for a different type of chocolate?
Semi-sweet chocolate chips are the correct choice for this recipe — the balance of sweetness against the heavy peanut butter and brown sugar base is calibrated for semi-sweet. Milk chocolate chips are too sweet and flatten the contrast between the peanut butter and the chocolate. Dark chocolate chips (60–70% cacao) work if you prefer a more bitter, less sweet bar — the contrast becomes sharper and the peanut butter flavor reads as more savory. Chopped chocolate bars melt more completely than chips and produce larger, more pooled chocolate pockets rather than distinct chip shapes — a different visual result but a valid one. White chocolate chips are not recommended — the sweetness overwhelms the peanut butter base entirely. For another take on the peanut butter and chocolate combination, my peanut butter chocolate chip cookies uses a similar flavor pairing in a drop cookie format.
How do I know when the bars are done baking?
Pull the pan when the edges look set and deep golden brown and have pulled very slightly away from the parchment, and the center looks just barely set — it should not jiggle when you gently shake the pan, but it will still look slightly soft and underdone compared to the edges. This is the correct moment. Do not wait for the center to look fully matte and set in the oven — by that point the edges are overbaked and the interior will lose the fudgy density shown in the cross-section photos. The bars continue to cook from carryover heat after the pan comes out of the oven, and the center will finish setting during the 2-hour cooling period on the wire rack. A toothpick inserted in the center at the correct pull moment will come out with moist, fudgy crumbs — not wet batter, not clean.
Can I add mix-ins beyond chocolate chips?
Yes, with limits. Chopped roasted salted peanuts (roughly chopped, about ½ cup / 65g) fold in well alongside the chocolate chips and add crunch and a more intense peanut flavor — reduce the chocolate chips to 1 cup (170g) if adding nuts to keep the total mix-in volume balanced. Peanut butter chips work but make the bars very sweet and one-dimensional — use no more than ½ cup (85g) and keep the rest semi-sweet chocolate chips. Fold any additional mix-ins in at the same stage as the chocolate chips and use the same fold count limit. Do not add wet mix-ins — fresh fruit, jam swirls, or caramel sauce added directly to this batter will change the moisture balance and prevent the center from setting correctly.
More Bar Recipes You’ll Love
- Salted Caramel Chocolate Chip Cookie Bars — a gooey caramel layer baked into the center of a chocolate chip cookie bar base, finished with flaked sea salt
- Pumpkin Chocolate Chip Cookie Bars — a fall version of the chocolate chip bar with pumpkin puree folded into the batter, producing an even softer, more moist interior than the standard version
Peanut Butter Chocolate Chip Bars
Ingredients
Equipment
Method
- Step 1 — Preheat oven to 350°F (175°C). Line a 9×13 inch (23×33cm) light-colored aluminum baking pan with parchment paper leaving a 2-inch overhang on both long sides and grease the parchment lightly with non-stick spray or butter.
- Step 2 — In a large mixing bowl, combine the 1 cup (258g) commercial creamy peanut butter and the ½ cup (113g) melted cooled unsalted butter and stir with a silicone spatula until the mixture is fully combined, smooth, and uniform with no visible butter streaks.
- Step 3 — Add the 1½ cups (300g) packed light brown sugar to the peanut butter-butter mixture and stir for a full 60 seconds, pressing the sugar into the fat until the mixture is thick, cohesive, and slightly grainy.
- Step 4 — Add the 2 large room-temperature eggs one at a time, stirring fully after each addition, then add the 2 teaspoons pure vanilla extract and stir for 20 more seconds until the batter is smooth, glossy, and falls from the spatula in a thick ribbon.
- Step 5 — Add the 1½ cups (190g) all-purpose flour, 1 teaspoon baking soda, and ½ teaspoon fine sea salt directly to the wet mixture and fold with the spatula using slow wide strokes, stopping the moment no dry flour streaks remain — target under 20 folds total.
- Step 6 — Reserve 3 tablespoons (30g) of the chocolate chips, fold the remaining chips into the batter with 6 to 8 folds, scrape the batter into the prepared pan, spread into an even layer, scatter the reserved chips across the surface, and press them in lightly.
- Step 7 — Bake on the middle rack at 350°F (175°C) for 25 to 28 minutes until the edges are set and deep golden brown and pulled slightly from the parchment and the center looks just barely set — pull when the center still looks slightly soft.
- Step 8 — Transfer the pan to a wire rack and cool for a minimum of 2 hours before cutting, then use the parchment overhang to lift the slab onto a cutting board and cut into 16 bars with a sharp knife wiped clean between each cut.