
Thick & Soft Iced Oatmeal Cookies
The first batch I made spread into thin, lacy discs. I blamed the oats. It was the butter — it had gone too soft sitting on the counter while I measured everything else, and soft butter in a creamed cookie produces flat cookies every time. The second batch, I kept the butter at exactly 65°F and creamed it properly. Those cookies came out thick, craggy, and exactly the right height. That is the version in this recipe.
Iced oatmeal cookies are one of those recipes where the gap between what they should be and what most people end up with is wider than it looks. The cookie itself has to be thick and substantial — soft through the center, slightly firmer at the craggy oat edges — so that the glaze has something to sit on rather than run straight off. A thin, flat oatmeal cookie under a white glaze is just a sad cracker with icing. I have tested this recipe across fourteen batches over three months, and every variable that matters has been through my oven.
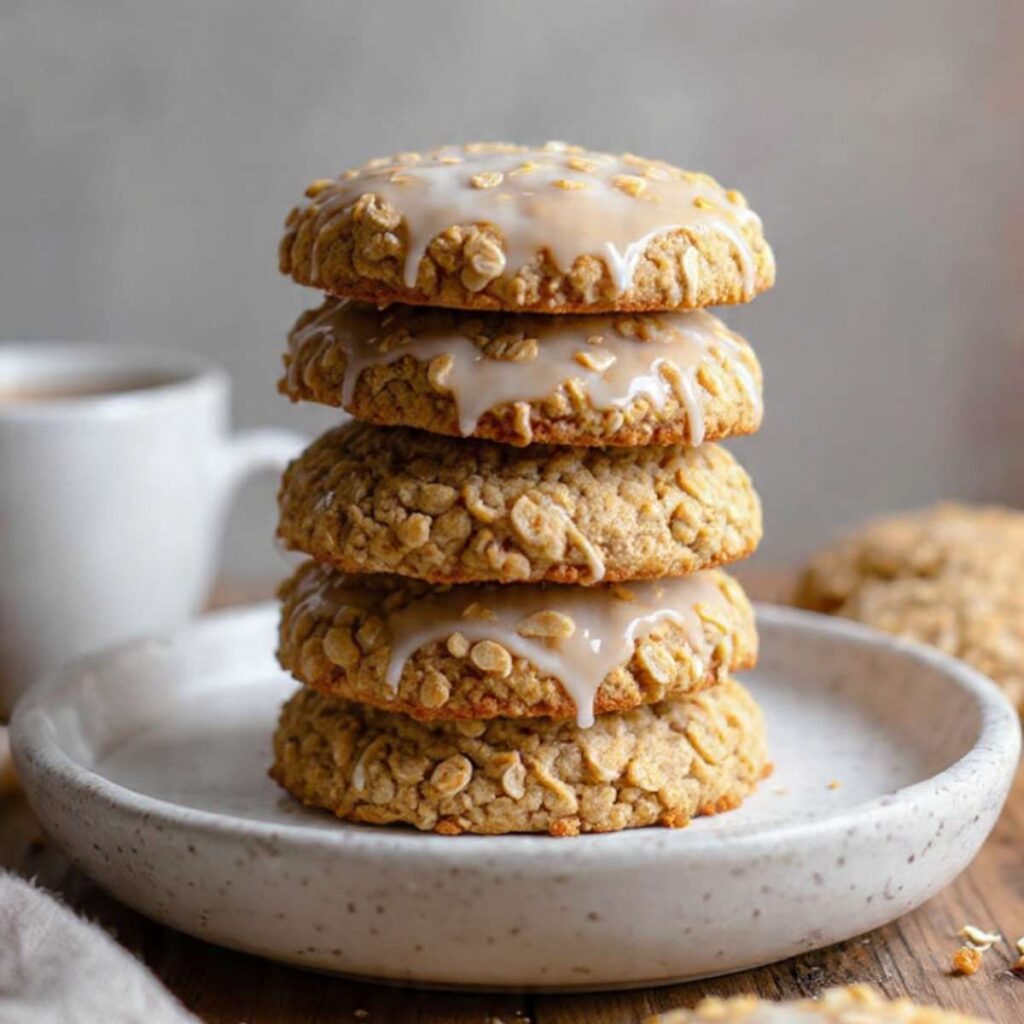
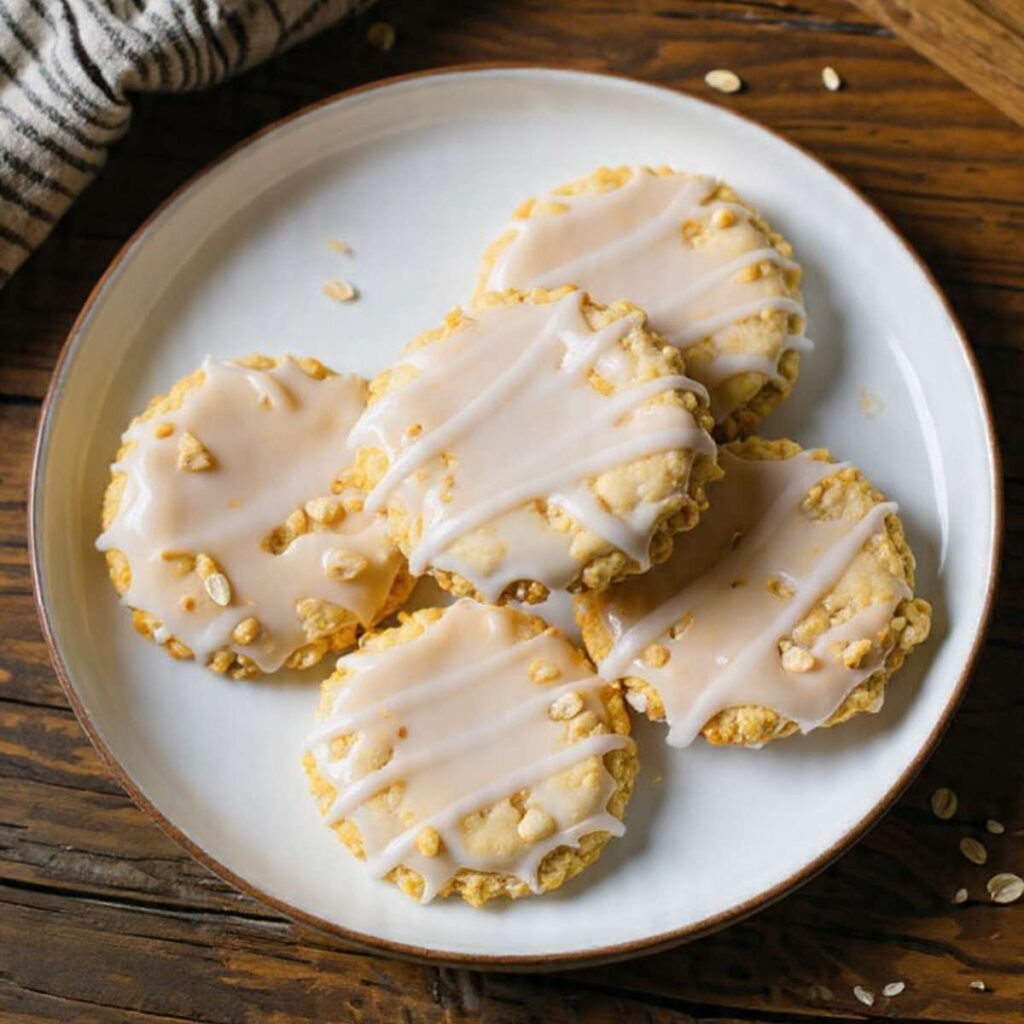
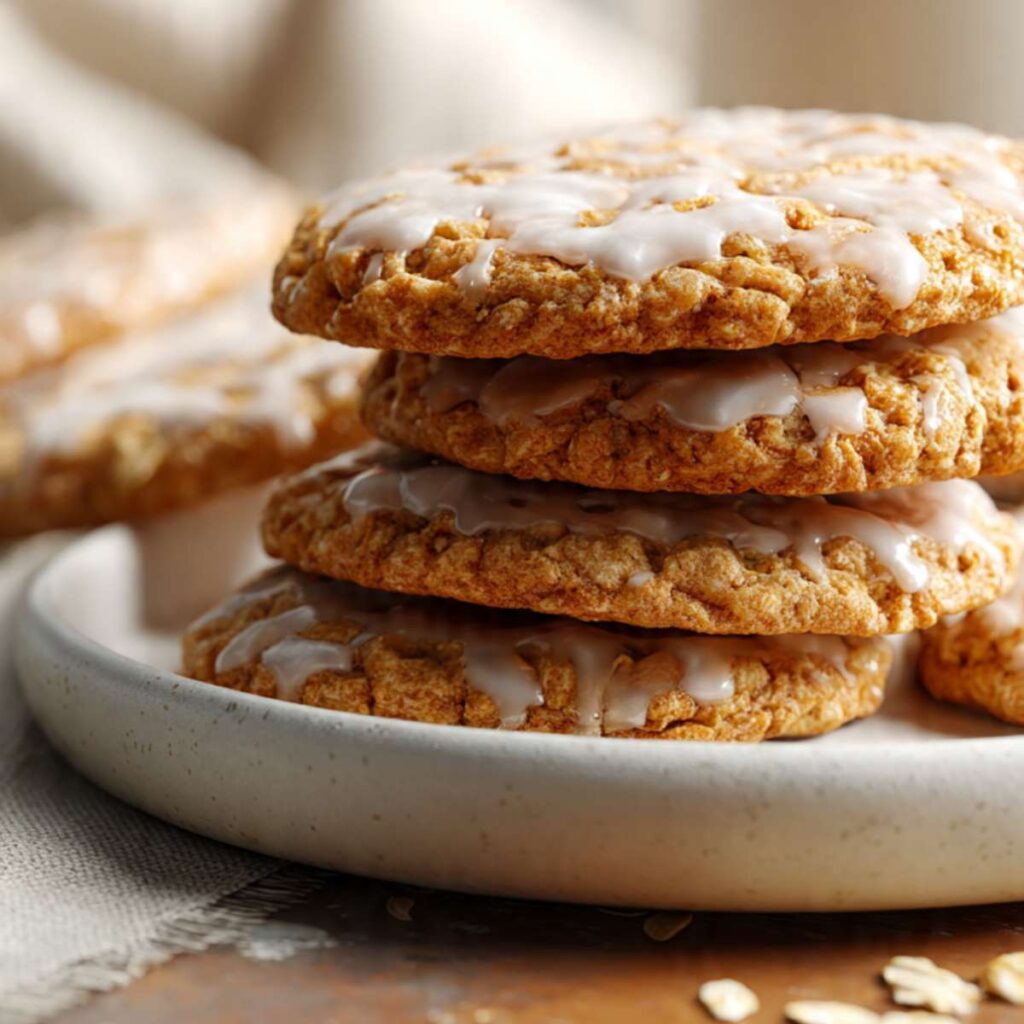
The texture you are looking for: thick, rounded cookies with visible whole oat flakes across the surface, a matte soft center, and a set opaque white glaze that holds its shape on top. The edges have a slight firmness from the oats while the center stays dense and chewy. Warm spice from the cinnamon comes through in every bite. These are not crispy. They are not cakey. They are the soft, chewy, old-fashioned version — the kind that actually tastes like the ones from a tin at a grandparent’s house. That specific memory — the white glaze, the cinnamon smell, the slightly grainy set of the icing — is what I was working toward in every test batch, and this recipe is the one that finally matched it.
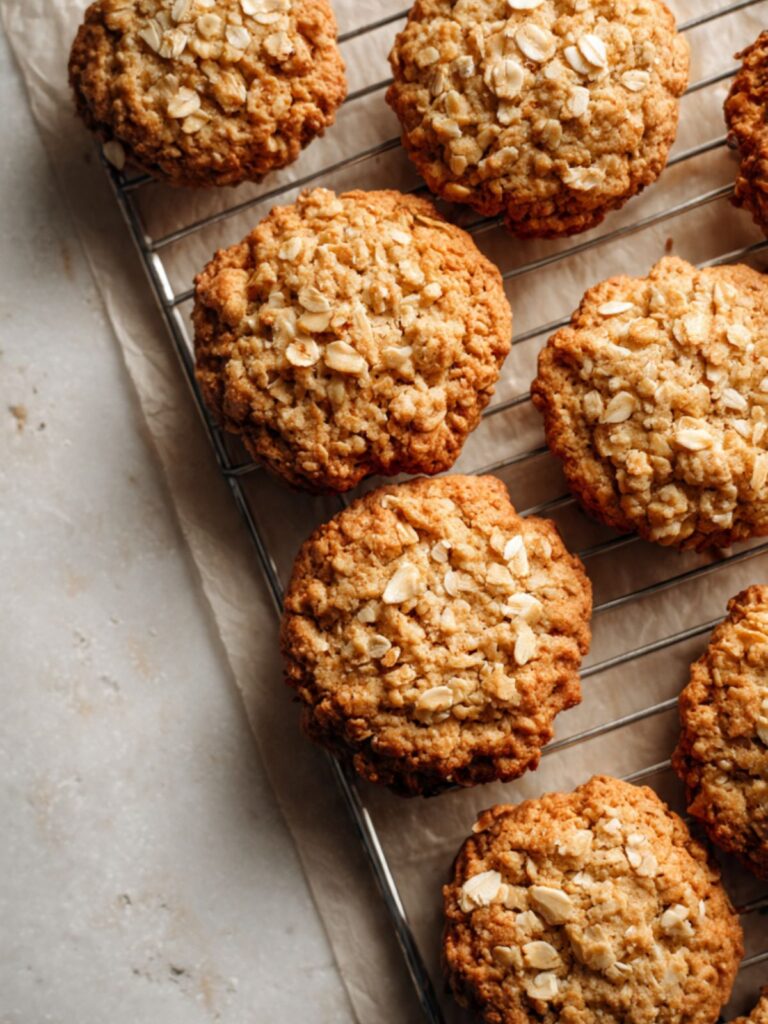
I tested old-fashioned rolled oats against quick oats. Quick oats are finely cut and nearly disappear into the dough — the baked cookie looks smooth on the surface and tastes more like a spiced dough than an oatmeal cookie. Old-fashioned oats stay whole, create the craggy texture visible in every photo here, and give the cookie its characteristic bite. I kept old-fashioned oats without any hesitation. Quick oats are not a workable substitute in this recipe if the visual result matters to you.
I tested the glaze at three consistencies — thick, medium, and thin. A thick glaze, stiff enough to hold peaks, cracked and looked chalky once set. A thin glaze ran straight off the cookie and left only a faint sheen. The medium glaze — just thin enough to pour slowly from a spoon in a steady ribbon — produced the opaque white layer visible in the photos, set firm in about 20 minutes at room temperature. That ratio is in the recipe.
I tested glazing warm cookies against fully cooled cookies. Warm cookies caused the glaze to slide completely off within 30 seconds, leaving nothing on the surface. Fully cooled cookies — and I mean room temperature, not just warm — held the glaze exactly where it was poured. This is the step most recipes undersell. Wait for full cooling. It is not optional.
This is a one-bowl recipe for the cookie dough. No chilling required — the dough goes straight from the bowl to the oven. You will need a hand mixer or stand mixer for the creaming step. The entire batch comes together in about 25 minutes of active time.
Recipe Overview & Nurtition Table
| Prep Time | Cook Time | Total Time | Yield | Difficulty |
|---|---|---|---|---|
| 25 min | 11 min | 36 min | 18 cookies | Easy |
| Calories | Fat | Carbs | Sugar | Protein | Sodium |
|---|---|---|---|---|---|
| ~279 kcal | ~12g | ~41g | ~24g | ~4g | ~147mg |
Macros are approximate and will vary based on ingredient brands and serving size.
Ingredients & Tools for Iced Oatmeal Cookies Recipe
For the Cookies
- 1 cup (226g) unsalted butter, softened to room temperature (65–68°F / 18–20°C)
- 3/4 cup (150g) packed brown sugar
- 1/2 cup (100g) plain white granulated cane sugar
- 2 large eggs (approximately 50g each without shell), room temperature
- 1 tsp pure vanilla extract
- 1½ cups (180g) all-purpose flour (spooned into the measuring cup and leveled — or weighed at 180g)
- 1 tsp baking soda, checked for freshness
- 1 tsp ground cinnamon, checked for freshness — should smell strong and spicy when opened
- 1/2 tsp fine sea salt
- 3 cups (270g) old-fashioned rolled oats — not quick oats, not instant oats
For the Glaze
- 1½ cups (180g) powdered sugar (also called confectioners sugar or icing sugar), sifted
- 3 tbsp (45ml) whole milk (3.5% fat)
- 1/2 tsp pure vanilla extract
Before You Start
Butter temperature. Pull your butter from the fridge 60–90 minutes before you begin. The target is 65–68°F (18–20°C) — press your finger into the block and it should leave a clean indent without the butter feeling greasy or slick. If the butter looks shiny or your finger slides through it, it is too warm and your cookies will spread flat. If it feels cold and resists the indent, it needs more time. Do not rush this step with the microwave — uneven microwave softening produces butter that is too warm in spots and still cold in others, and the creaming step will not work correctly.
Eggs. Pull your eggs from the fridge at the same time as the butter. Room temperature eggs emulsify smoothly into the creamed butter. Cold eggs cause the mixture to look broken and curdled — the cookies will still bake, but the texture will be denser and less even. If you forgot, place the eggs in a bowl of warm (not hot) water for 10 minutes before using.
Oats. Use old-fashioned rolled oats — the large, flat flakes. Do not substitute quick oats or instant oats. Quick oats are cut smaller and absorb more moisture, producing a smoother, softer cookie that loses the craggy oat texture visible in the photos. The oat type is the defining visual and textural difference in this recipe.
Flour measuring. Spoon the flour into your measuring cup using a separate spoon and level it off with a straight edge. Do not scoop the cup directly into the flour bag — scooping packs in 20–30% more flour than the recipe needs and will make the cookies dry and dense. For guaranteed accuracy, weigh the flour at 180g on a kitchen scale. Gram weight always takes priority over volume in this recipe.
Leavening freshness. Test your baking soda before you start: drop ½ tsp (3g) into a small bowl with a splash of hot water and white vinegar. It should bubble aggressively within 2 seconds. If it fizzes weakly or not at all, replace the box — expired baking soda will give you flat, dense cookies with no lift.
Spice freshness. Open your cinnamon and smell it. It should smell strong, warm, and distinctly spicy. If it smells faint or like nothing at all, it is past its useful life and will not contribute flavor to the finished cookie. Replace it.
Brown sugar. Hardened brown sugar cannot be packed accurately and will throw off the moisture balance of the dough. If your brown sugar has hardened into a solid block, place a damp paper towel over it in a microwave-safe bowl and microwave in 20-second increments, checking after each, until it is pliable and can be pressed. Let it cool to room temperature before measuring.
Powdered sugar. Sift the powdered sugar for the glaze before measuring. Unsifted powdered sugar contains lumps that create a streaky, uneven glaze instead of the smooth opaque finish visible in the photos.
Mixing method. This recipe requires a hand mixer or stand mixer fitted with the paddle attachment for the creaming step. Mixing by hand will not incorporate enough air into the butter and sugar, and the cookies will be denser and flatter than the result shown in the photos.
No chilling required. This dough goes straight from the bowl to the oven. You do not need to rest it, refrigerate it, or wait. The only intentional pause in this recipe is the 5-minute carryover rest on the hot pan after baking, and the 30-minute cooling time before glazing.
Gram weight priority. For the most consistent results, use a kitchen scale set to grams. The gram weights in this recipe are what I tested with — they are the most reliable way to match my result.
Oven rack. Position your oven rack in the middle of the oven before preheating. Top rack burns tops. Bottom rack burns bottoms.
Pan prep. Line a light-colored aluminum half-sheet pan (18×13 inches / 46×33cm) with parchment paper. Do not grease the parchment. Dark non-stick pans absorb more heat and overbrown the bottoms — if a dark pan is all you have, reduce the oven temperature by 25°F (15°C) and start checking at 9 minutes.
Necessary Tools
Required:
- Kitchen scale (strongly recommended — gram weights are more accurate than volume)
- Hand mixer or stand mixer fitted with paddle attachment
- Large mixing bowl (if using hand mixer)
- Medium mixing bowl (for glaze)
- Light-colored aluminum half-sheet pan (18×13 inches / 46×33cm)
- Parchment paper
- 3-tablespoon cookie scoop or large spoon
- Wire cooling rack
- Fine mesh sieve or sifter (for powdered sugar)
- Whisk or fork (for glaze)
Optional:
- Oven thermometer (recommended — most ovens run 15–25°F / 8–14°C off from the dial setting)
- Kitchen scale (optional if using volume measurements — but gram weights produce more consistent results)
- Small offset spatula or spoon (for spreading glaze if desired)
How to Make Iced Oatmeal Cookies
Step 1: Preheat the Oven and Prep Your Pan
Position your oven rack in the middle position and heat to 350°F (175°C). Most home ovens run 15–25°F (8–14°C) off from the dial — if you have an oven thermometer, confirm the actual temperature before the first pan goes in. Line your light-colored aluminum half-sheet pan with parchment paper and set it aside. Do not grease the parchment.
⚠️ Do not use a dark non-stick pan without adjusting — dark pans absorb more heat and will overbrown the bottoms of these cookies before the centers have time to set. If a dark pan is your only option, reduce the oven temperature to 325°F (165°C) and begin checking at 9 minutes.
The oven should be fully preheated — not just showing the ready signal — before the first pan goes in. Give it at least 15 minutes after it signals ready. An underheated oven produces cookies that spread wide before the structure sets.
This is a creamed butter method recipe — the mixing sequence matters. Butter and sugar are creamed first to build structure, eggs emulsify into that base, dry ingredients are added last to minimize gluten development. Your pan is ready. Move to the butter and sugar.
Step 2: Butter and Sugars Creamed Until Pale, Fluffy, and Aerated
Add the 1 cup (226g) of softened unsalted butter, 3/4 cup (150g) of packed brown sugar, and 1/2 cup (100g) of plain white granulated cane sugar to the bowl of your stand mixer fitted with the paddle attachment, or to a large mixing bowl if using a hand mixer.
The two sugars play different roles here: the packed brown sugar adds moisture, chew, and depth of flavor; the plain white granulated cane sugar drives spread control and helps the edges set with their characteristic slight firmness. Using all brown sugar would produce a softer, denser cookie with no edge definition. Using all white sugar would produce a crispier, drier result. Beat on medium speed for 3 full minutes. Set a timer — do not estimate.
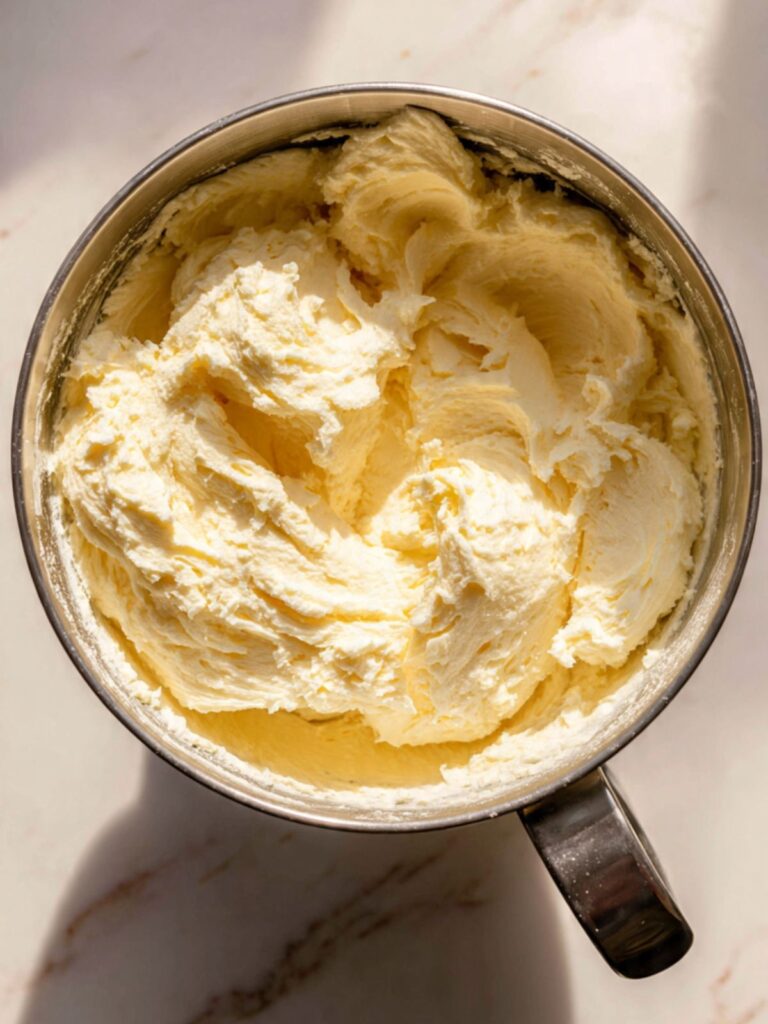
At the 3-minute mark, the mixture should look noticeably paler than when you started, increased slightly in volume, and feel fluffy if you rub a small amount between your fingers. If the mixture still looks yellow and dense after 3 minutes, beat for another 60 seconds and check again. Under-creamed butter and sugar produces flat, dense cookies — the air you are building here is what gives the cookies their height and structure.
🗒 Luna’s Note: I cream for the full 3 minutes even when I am in a hurry. The one time I cut it to 90 seconds to save time, the cookies came out noticeably flatter. The creaming step is not where you save time in this recipe.
⚠️ If your butter was too warm going in — shiny, greasy, or sliding off the paddle — the mixture will look wet and loose rather than fluffy. The cookies will spread too flat. Stop, refrigerate the mixture for 15 minutes, then beat again briefly before continuing.
The mixture should look pale, fluffy, and hold a soft peak when you lift the paddle. That is the correct texture. Move to the eggs.
Step 3: Eggs Incorporated Into a Smooth, Cohesive Batter
With the mixer on low speed, add the 2 large room-temperature eggs one at a time. Add the first egg and mix for 30 seconds until fully incorporated before adding the second. After both eggs are in, add the 1 tsp of pure vanilla extract and mix for another 15 seconds.
The batter will look slightly broken or curdled immediately after each egg goes in — this is normal. It comes back together within 20–30 seconds of mixing. If it still looks broken after 30 seconds of mixing, your eggs were too cold. Keep mixing — it will almost always come together. If it stays broken, the finished cookie will still bake correctly but the texture will be slightly less even.
⚠️ Do not add both eggs at once. Adding two cold eggs simultaneously drops the temperature of the butter mixture too quickly and makes curdling more likely and harder to recover from.
The batter should look smooth, glossy, and cohesive after the vanilla goes in — no visible separation, no greasy sheen at the edges of the bowl. Scrape down the sides and bottom of the bowl with a silicone spatula before moving to the dry ingredients.
Step 4: Dry Ingredients Combined With Minimum Mixing
In a separate small bowl, whisk together the 1½ cups (180g) of all-purpose flour, 1 tsp of baking soda, 1 tsp of ground cinnamon, and 1/2 tsp of fine sea salt until evenly combined. The baking soda reacts with the slight acidity in the brown sugar and butter to produce CO₂ bubbles during baking — this is what gives these cookies their subtle lift and keeps the centers tender rather than compressed and flat. The cinnamon is not background spice here; at 1 tsp for the full batch, it is the dominant flavor note of the finished cookie.
Add the dry ingredient mixture to the butter mixture all at once. Mix on low speed until just combined — approximately 20–25 strokes or 15 seconds on low. Stop the moment you no longer see dry flour streaks.
⚠️ Do not overmix after the flour goes in. Overmixing develops gluten and produces a tough, dense cookie instead of the soft, chewy result shown in the photos. The batter does not need to look perfectly smooth at this stage — a few very faint streaks are fine. The oats will be mixed in next and will distribute the last traces of flour.
The dough should look thick and slightly rough — not smooth like a cake batter, not crumbly like a pie dough. It will be stiff enough to hold its shape when you stop the mixer. Scrape the bowl down before the oats go in.
Step 5: Oats Folded In by Hand to Preserve Whole Flake Texture
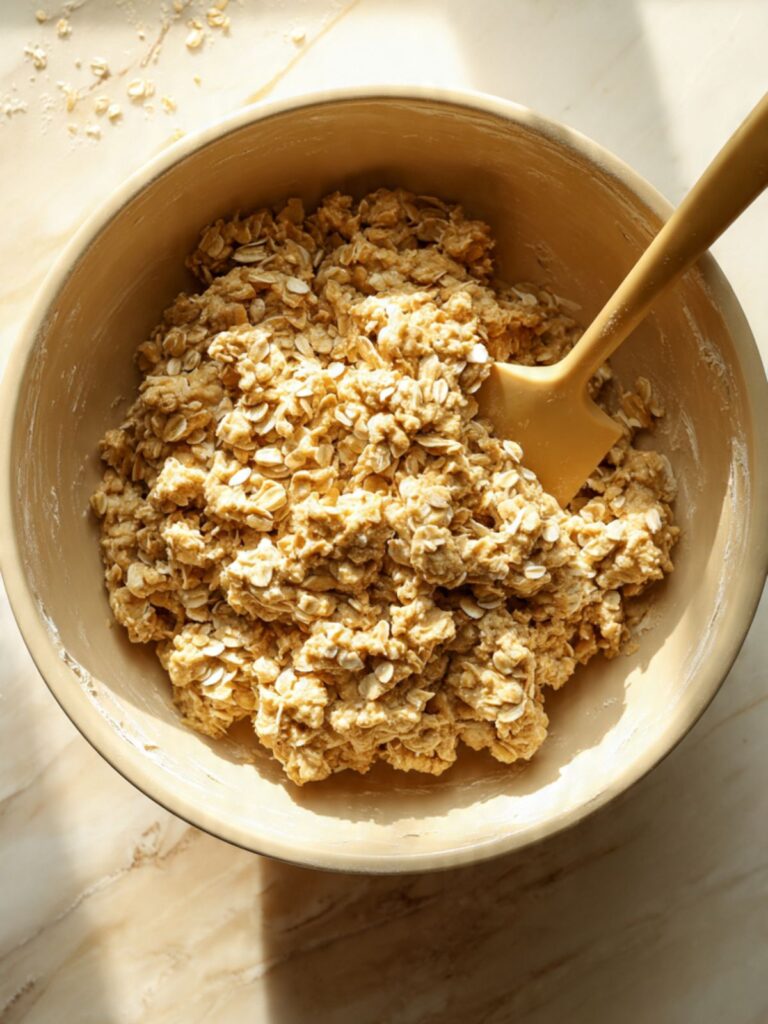
Add the 3 cups (270g) of old-fashioned rolled oats to the dough. Switch from the mixer to a silicone spatula and fold the oats in by hand. Use slow, deliberate strokes from the bottom of the bowl upward — not stirring in circles. The oats are fully incorporated when no dry patches remain and the dough holds together in a cohesive mass.
This will take approximately 15–20 folds. The dough will be stiff and dense — this is correct.
🗒 Luna’s Note: Folding the oats by hand rather than using the mixer is a deliberate choice. The mixer breaks down the oat flakes and produces a smoother dough with less texture. Folding by hand keeps the oats intact, which is what creates the craggy, textured surface visible in the photos.
⚠️ Do not use the mixer for this step. Even 10 seconds on low speed will break the oat flakes down more than you want — the finished cookies will look smoother and less rustic than the photos.
The dough should look thick and oat-studded throughout, with no dry flour patches at the bottom of the bowl. As you can see in the stacked cookie photo, the whole oat flakes are visible on the surface of every finished cookie — that texture starts here, with keeping those flakes whole. The dough is ready to portion.
Step 6: Dough Portioned, Baked Until Edges Set and Centers Still Soft
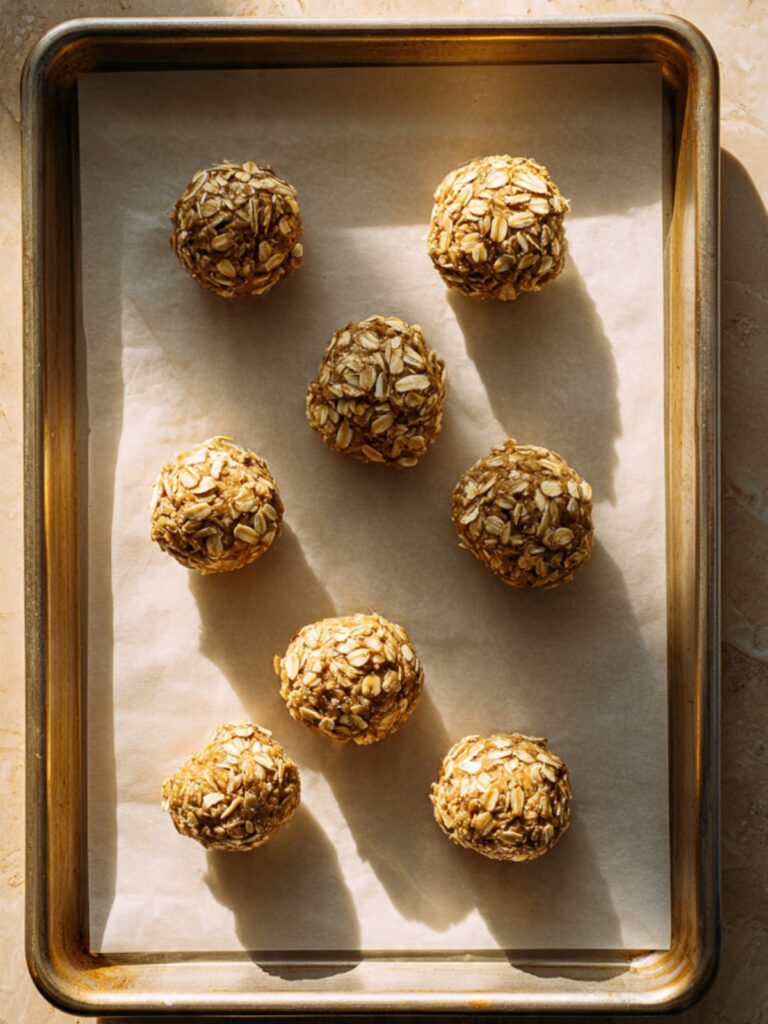
Scoop 3 tablespoons (approximately 69g) of dough per cookie — this is a large scoop, consistent with the size shown in the photos. Weigh the first one on your kitchen scale, use it as your calibration, and portion the remaining cookies to match. Place them on the prepared parchment-lined pan, spaced at least 2 inches (5cm) apart. This batch yields exactly 18 cookies at this scoop size — you will need to bake in two rounds on a standard half-sheet pan.
Do not flatten the dough balls before baking. They will spread naturally in the oven to the size shown in the photos — approximately 3 to 3½ inches (7.5–9cm) in diameter.
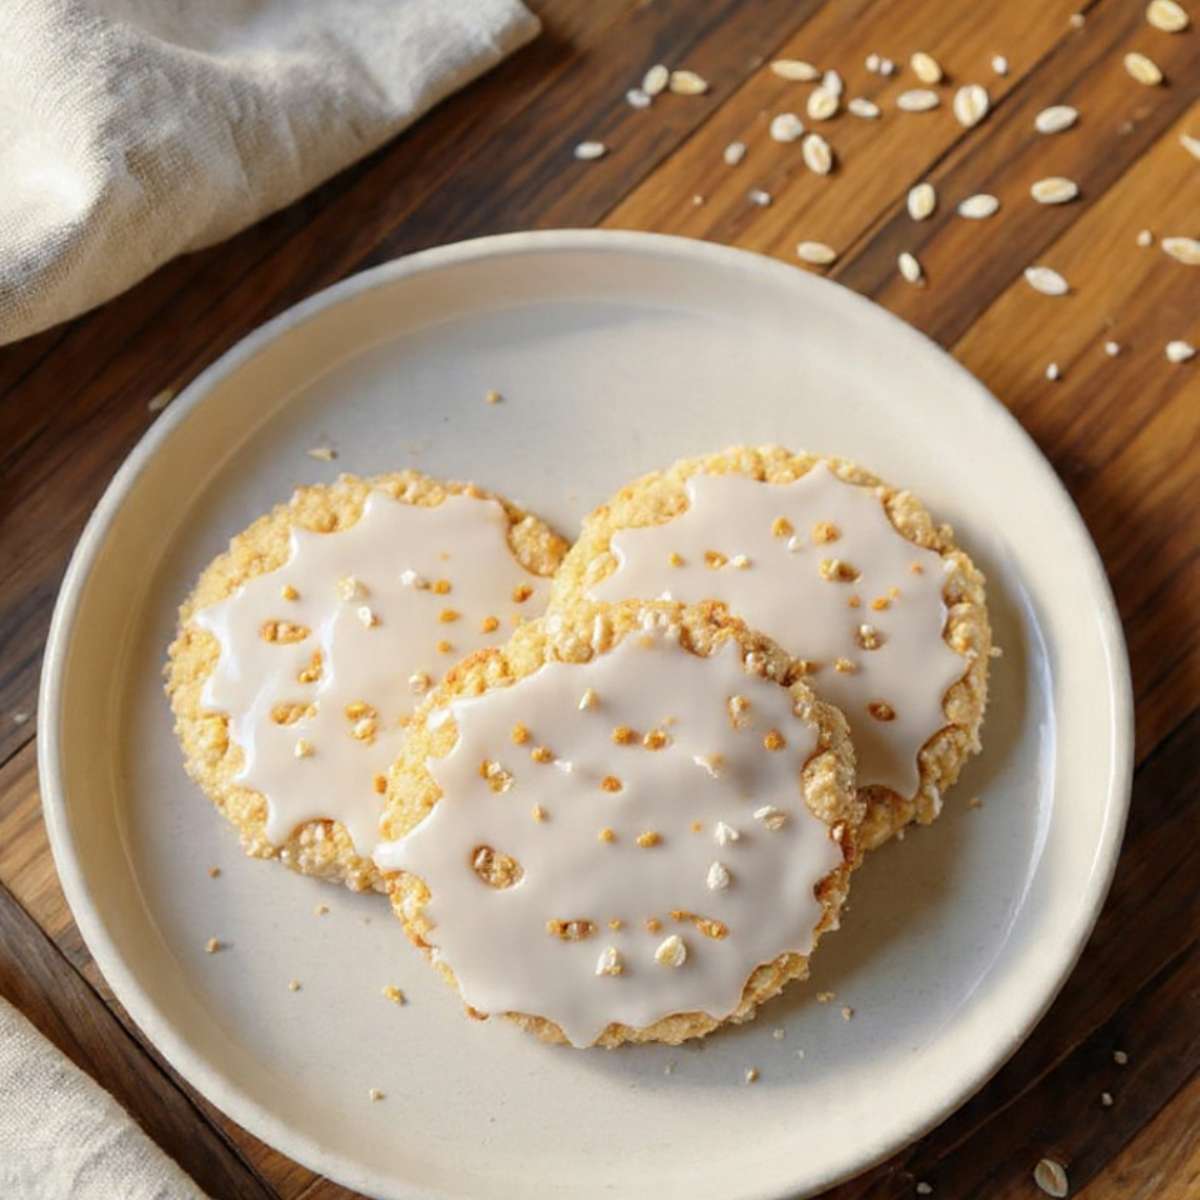
Bake at 350°F (175°C) for 10 to 12 minutes. Start checking at 10 minutes. Pull the pan the moment the edges look set and lightly golden and the centers still look slightly soft and underdone — this is exactly the moment shown in the overhead plate photo, where the cookies have a matte, slightly puffy center and a firmer oat-textured edge. The centers will continue to set on the hot pan after the oven. Do not wait for the centers to look fully done — overbaked oatmeal cookies turn hard and dry within hours.
⚠️ Do not open the oven door before 9 minutes. The structure is still setting during the first part of the bake — cold air rushing in causes the centers to sink.
The edges should look set and lightly golden. The centers should still look soft. Pull the pan at this exact moment and set it on a wire rack. The cookies are not done yet — the pan finishes them.
Step 7: Cookies Rested on the Hot Pan While Centers Finish Setting
Leave the cookies on the hot pan for exactly 5 minutes after pulling from the oven. Do not move them. The pan continues to conduct heat into the cookie base during this time — this carryover heat sets the centers without the oven drying them out. Moving them before 5 minutes breaks the structural base and the cookies will fall apart. Waiting more than 8 minutes starts to over-dry the bottoms. Set a timer.
After 5 minutes, transfer the cookies to a wire cooling rack using a thin spatula. Let them cool completely to room temperature before glazing — approximately 30 minutes. Do not rush this step.
⚠️ Glazing warm cookies causes the icing to slide completely off the surface within 30 seconds, leaving nothing behind. The cookies must be at room temperature — not just warm — before the glaze goes on. If you are unsure, press the bottom of a cookie against your wrist. If it feels warm at all, wait another 10 minutes.
The cookies should feel firm to the touch and completely cool before any glaze is applied. While they cool, make the glaze.
Step 8: Glaze Mixed to Ribbon Consistency and Applied to Fully Cooled Cookies
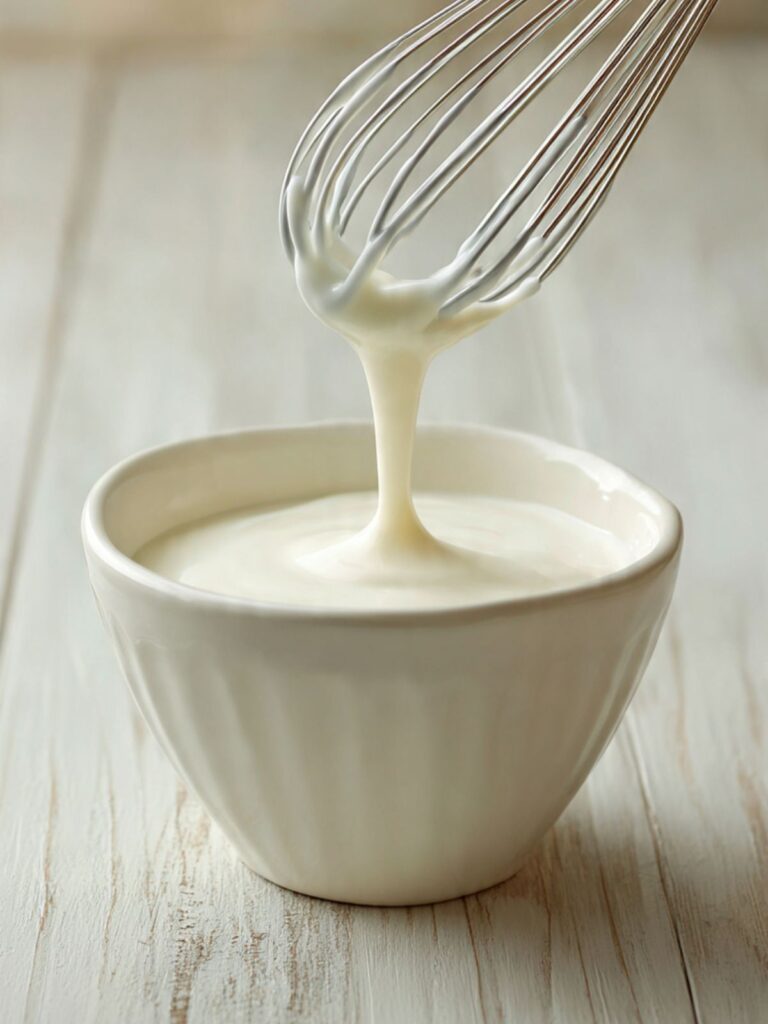
Sift the 1½ cups (180g) of powdered sugar into a medium bowl. Add the 3 tbsp (45ml) of whole milk and 1/2 tsp of pure vanilla extract. Whisk until completely smooth — no lumps, no streaks. The glaze should fall from the whisk in a slow, steady ribbon and settle flat within 5 seconds. If it falls in thick clumps or holds a peak, add whole milk ½ tsp at a time until it reaches the ribbon consistency. If it runs off the whisk with no resistance, add sifted powdered sugar 1 tablespoon at a time until it slows down.
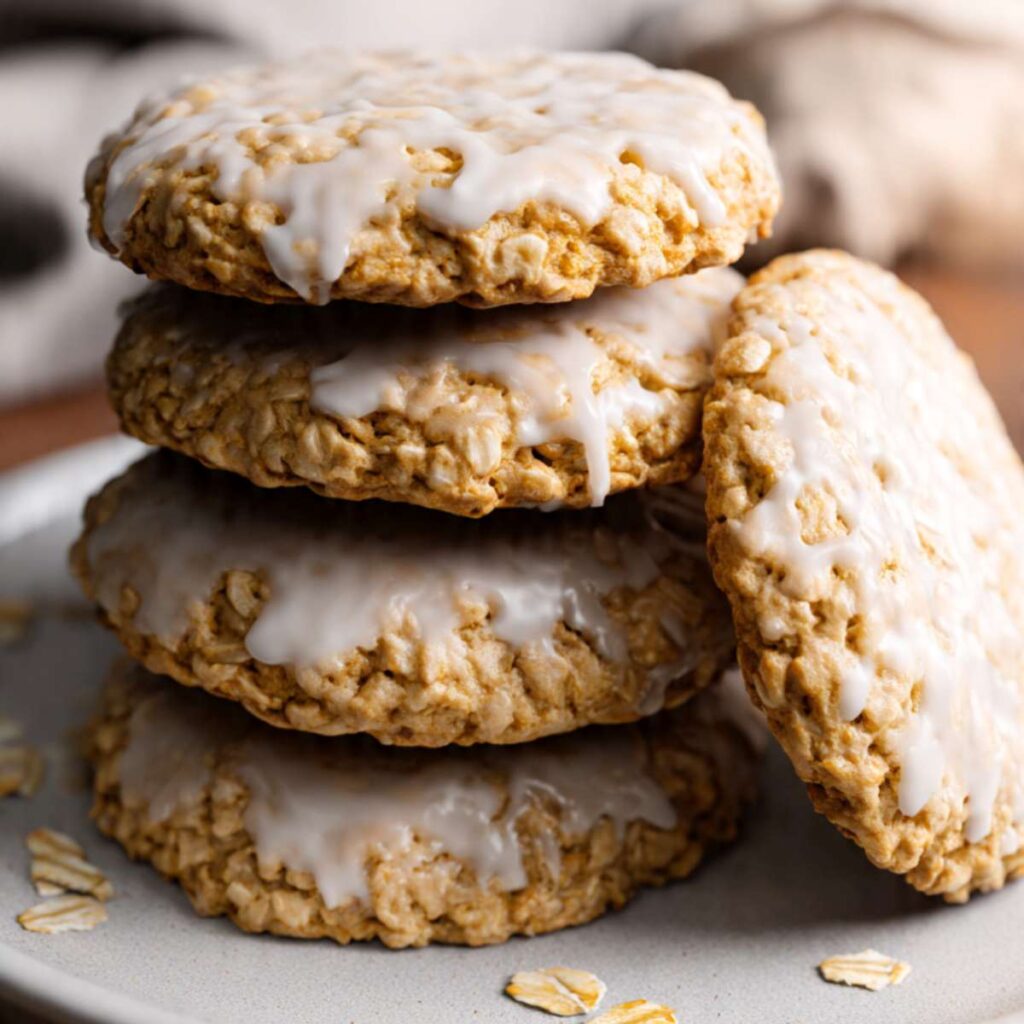
Place the cooled cookies on the wire rack with a sheet of parchment paper underneath to catch drips. Spoon approximately 1½ teaspoons of glaze onto the center of each cookie and let it spread naturally toward the edges — as visible in the close-up stacked photo, the glaze covers most of the top surface and drips slightly over the edges. Do not spread it with a tool unless necessary.
🗒 Luna’s Note: I add a small drop of almond extract — just 1/8 tsp — to the glaze sometimes. It deepens the flavor in a way that is hard to identify but noticeable. Not every batch. But when I want these to taste more like the tin version from memory, that is what I add.
Let the glaze set at room temperature for 20–25 minutes until it is fully opaque and firm to the touch. Do not stack or store the cookies until the glaze has set completely — stacking too early smears the glaze and the cookies will stick together.
The glaze is set when it no longer looks wet and does not move when you gently tilt the rack. Your cookies are done.
The Science Behind Iced Oatmeal Cookies
Why Old-Fashioned Oats Change Everything
I noticed this before I understood why. The first batch I made with quick oats looked fine going into the oven — the dough was the same consistency, the cookies spread to roughly the same size. But the finished cookie had a completely different surface. Smooth. Almost uniform. None of the craggy, jagged oat texture visible in the photos here. I initially thought it was a visual preference — that old-fashioned oats were just prettier. Then I baked both versions side by side and tasted them. The quick oat version was softer, blander, and noticeably more uniform in texture. The old-fashioned version had a slight resistance at the edges from the intact oat flakes, a chewier bite through the center, and a more complex flavor.
The reason is physical structure. Old-fashioned rolled oats are steamed and pressed into flat flakes — they retain their cellular structure and absorb moisture slowly during baking. Quick oats are cut into smaller pieces before rolling, which dramatically increases their surface area. More surface area means faster moisture absorption during the bake. Quick oats hydrate almost completely during mixing and baking, essentially dissolving into the dough matrix. Old-fashioned oats stay partially intact, creating the visible flakes on the cookie surface and the textural variation in every bite.
This is also why the oat-to-flour ratio in this recipe is high — 3 cups of oats to 1½ cups of flour. The oats are not just a flavoring addition. They are doing structural work. They create body, contribute to chew, and produce the surface texture that makes this cookie visually distinct. Reducing the oats makes the cookie taste more like a spiced butter cookie with some oats in it — which is not the same thing.
For a related oat-forward recipe where this same principle applies in a very different context, see my oatmeal cream pies — the texture difference between the two cookies is almost entirely a function of how the oats are handled.
What Creaming Actually Does to Cookie Height
Most recipes say “cream the butter and sugar until light and fluffy” and leave it at that. The instruction sounds simple. What is actually happening is more specific, and understanding it changes how you approach the step.
When butter at 65–68°F (18–20°C) is beaten with sugar, the sharp edges of the sugar crystals cut into the fat and create tiny air pockets. These pockets are not large enough to see, but they are real — properly creamed butter and sugar increases in volume by 15–20% and turns noticeably paler as those air pockets reflect light differently than unworked fat. The air trapped during creaming expands in the heat of the oven, contributing to cookie lift and structure. This is aeration, and it is the mechanism behind why these cookies have a domed, thick profile rather than spreading flat.
The butter temperature is the controlling variable. Butter colder than 60°F (15°C) is too firm for the sugar crystals to cut through efficiently — the mixture stays dense and not enough air is incorporated. Butter warmer than 70°F (21°C) is too soft — the fat smears rather than traps air, the mixture looks wet and greasy, and the cookies spread flat in the oven before the structure has time to set. The 65–68°F (18–20°C) window is not arbitrary. It is the temperature range at which butter fat is soft enough to be worked but firm enough to hold the air pockets it creates.
This is why the 3-minute creaming time in Step 2 is non-negotiable. Under-creaming for 90 seconds produces a mixture that looks combined but has not incorporated sufficient air — the finished cookie sits lower on the pan, spreads wider, and has a denser crumb.
Why the Glaze Sets Opaque Instead of Transparent
A simple powdered sugar glaze with milk looks thin and almost translucent in the bowl. On the finished cookie in the photos, it is bright white and opaque. The mechanism is straightforward but not obvious until you see it happen.
Powdered sugar is granulated sugar that has been ground to a very fine powder and mixed with a small amount of cornstarch — typically 3% by weight — to prevent clumping. When mixed with a small amount of liquid, the sugar partially dissolves and the cornstarch hydrates. As the glaze dries on the surface of the cookie, the water in the milk evaporates. What remains is the sugar matrix and the cornstarch — and as they dry, microscopic air pockets form in the solidifying sugar layer. These air pockets scatter light rather than allowing it to pass through, which is why the dried glaze appears opaque white rather than transparent.
The glaze consistency controls the final opacity. A glaze that is too thin applies in too thin a layer — not enough sugar and cornstarch remain after drying to create a solid opaque coat. A glaze that is too thick applies unevenly, dries with a chalky, cracked texture, and can pull away from the cookie surface. The ribbon consistency in Step 8 — slow enough to fall in a steady stream but thin enough to spread naturally on the cookie — applies the right depth of glaze to produce the bright white finish visible in the photos after a 20-minute set.
Iced Oatmeal Cookies Troubleshooting & Pro-Tips
Common Mistakes
Using quick oats or instant oats instead of old-fashioned rolled oats
Symptom: The cookies look smooth on the surface with no visible oat texture. The bite is softer and more uniform — closer to a spiced butter cookie than an oatmeal cookie. The craggy, textured appearance in the photos is completely absent.
Cause: Quick oats and instant oats are cut smaller before rolling, which increases surface area and causes them to absorb moisture and dissolve into the dough during baking. They do not stay intact the way old-fashioned rolled oats do.
Fix: There is no fix once the cookies are baked. The result is a different cookie — edible and fine, but not the recipe as written.
Prevention: Check the oat package before measuring. The label must say “old-fashioned rolled oats” or “whole rolled oats.” Quick oats and instant oats are not workable substitutes in this recipe if the visual and textural result matters to you.
Using a dark non-stick pan without adjusting temperature
Symptom: The bottoms of the cookies are dark brown or burnt while the centers are still soft and underdone. The tops look correctly baked but the bottoms are overcooked.
Cause: Dark pans absorb more radiant heat from the oven element than light-colored aluminum pans, which means the bottom of the cookie receives more heat than the top and edges. The cookie bottom overcooks before the rest of the cookie catches up.
Fix: If the bottoms are dark but the cookies are still edible, place them glaze-side down on a cutting board and serve them that way — no one sees the bottom. If they are burnt, there is no recovery.
Prevention: Use a light-colored aluminum pan. If dark is your only option, reduce the oven temperature to 325°F (165°C) and start checking at 9 minutes.
Cookies spreading too flat
Symptom: The cookies spread into thin, wide discs instead of the thick, rounded shape in the photos. The edges are thin and lacy rather than craggy and defined.
Cause: Almost always butter temperature. Butter that is too warm — above 70°F (21°C) — melts before the cookie edges can set in the oven, causing the dough to flow outward rather than rise. Under-creaming can also contribute, as insufficient aeration means less structure to hold the cookie up.
Fix: These cookies cannot be undone once baked flat. They are still edible — crumble them over ice cream or layer them with whipped cream in a glass as a quick trifle.
Prevention: Verify butter temperature before creaming. Press your finger into the block — it should leave a clean indent without the butter looking shiny or greasy. Cream for the full 3 minutes at medium speed. If your kitchen is warm, refrigerate the portioned dough balls for 10 minutes before baking.
Cookies coming out hard and dry
Symptom: The cookies feel firm straight out of the oven and harden completely within a few hours of cooling. The texture is crisp rather than chewy, and the centers are dry rather than soft.
Cause: Overbaking. Oatmeal cookies continue to firm up significantly as they cool — a cookie that feels correctly soft in the oven will be the right texture after 5 minutes of carryover cooling on the pan. Pulling them when the centers look fully done means they are already overbaked.
Fix: Hard oatmeal cookies do not soften back up reliably. Place them in a sealed container with a slice of fresh bread overnight — the cookies will absorb moisture from the bread and soften slightly by morning. It is not a perfect fix, but it helps.
Prevention: Pull the pan when the edges are set and lightly golden and the centers still look slightly underdone and soft. Trust the 5-minute carryover cooling step on the hot pan — that is where the centers finish setting.
Glaze running completely off the cookies
Symptom: The glaze slides off the cookie surface within seconds of being applied, leaving only a faint sheen rather than the opaque white coating in the photos.
Cause: Either the cookies were not fully cooled before glazing, or the glaze is too thin. Warm cookies cause even a correctly-made glaze to lose viscosity and slide off. A glaze that is too thin does not have enough body to stay where it is placed.
Fix: If the glaze has run off, let the cookies cool completely and re-glaze. Make a slightly thicker batch of glaze — reduce the milk by ½ tsp — and reapply. The second coat will adhere to the thin dried layer already on the cookie.
Prevention: Confirm cookies are fully at room temperature before glazing — press the bottom of a cookie to your wrist. If it feels warm at all, wait. Mix the glaze to ribbon consistency — slow fall, settles flat in 5 seconds.

Glaze drying chalky or cracked
Symptom: The glaze looks white but has a rough, chalky, or cracked texture once dry rather than the smooth opaque finish in the photos. In some cases the glaze cracks and pulls away from the cookie surface.
Cause: Glaze that is too thick applies in an uneven layer that dries too quickly on the surface while the interior is still wet — the outer layer sets and then cracks as the interior continues to contract during drying. Unsifted powdered sugar also contributes — lumps create an uneven application that dries inconsistently.
Fix: If the glaze has already dried chalky, apply a second thin coat of correctly-made glaze — slightly thinner than ribbon consistency — directly over the first. Let it dry fully. The second coat fills the cracks and dries smoother.
Prevention: Always sift the powdered sugar before mixing the glaze. Mix to ribbon consistency — not stiff, not runny. Allow the full 20–25 minutes of drying time at room temperature before stacking or storing.
Leavening failure — cookies are flat and dense with no lift
Symptom: The cookies come out flat and dense with no domed profile and no lift. The texture is heavy and almost compressed rather than soft and slightly open.
Cause: Expired or inactive baking soda. Baking soda loses potency after 3–6 months once opened and will not produce the CO₂ bubbles needed to create lift and structure in the dough.
Fix: There is no fix once baked — the lift cannot be added retroactively. Crumble the flat cookies and use them as a base layer in a trifle or as a topping over vanilla ice cream.
Prevention: Test baking soda freshness before every batch — drop ½ tsp into hot water with a splash of white vinegar. Aggressive bubbling within 2 seconds means it is active. Weak fizz or nothing means replace the box. Write the opening date on the box so you know when to replace it.
Expert Pro-Tips
Refrigerate the portioned dough balls for 10 minutes if your kitchen is warm. If your kitchen temperature is above 75°F (24°C), the butter in the dough will be softer than ideal by the time you finish portioning the batch. Refrigerating the portioned balls for 10 minutes before baking firms the fat back up and helps the cookies hold their height during the first few minutes in the oven — producing the thick, domed profile in the photos rather than a wider, flatter spread.
Bake one test cookie first. Before committing the full batch, bake a single cookie and evaluate the spread and texture. If it spreads too wide, refrigerate the remaining dough balls for 10 minutes before baking the rest. With this recipe and correctly tempered butter, over-spreading is the more common issue — the dome-too-high scenario is rare but worth knowing. If it domes too high and does not spread enough, press the remaining dough balls slightly flatter before baking — a gentle press with the palm, not flat. One test cookie saves the batch.
Use the parchment drip-catch method for cleaner glaze application. Place the cooled cookies on a wire rack set over a sheet of parchment paper before glazing. The parchment catches every drip cleanly — you can lift it and discard it without cleaning the counter. For the cleanest finish, spoon the glaze onto the center of the cookie and let gravity distribute it naturally. The drips at the edges of the glaze — visible in the stacked cookie photos — happen on their own with correctly-made glaze at the right consistency. Do not try to replicate them manually.
Add ¼ tsp of ground nutmeg to the dough for the classic spiced version. The base recipe uses cinnamon only. A small amount of ground nutmeg — no more than ¼ tsp for the full batch — adds a subtle warmth that deepens the spice profile without taking over. I do not add it every time, but when I want these to taste closer to the old-fashioned tin version, the nutmeg is the difference. Do not increase the amount — nutmeg is very strong and ¼ tsp for 18 cookies is already at the edge of detectable.
Score the glaze lightly with a toothpick for a decorative lined finish. While the glaze is still wet — within the first 2 minutes of application — drag a toothpick lightly across the surface in parallel lines to create a simple lined pattern. This replicates the drizzled line finish visible in several of the photos and gives the cookies a slightly more finished appearance without any additional ingredients or technique. Work quickly — the glaze begins to set within 3–4 minutes and will tear rather than pattern if you wait too long.
How to Store Iced Oatmeal Cookies
Room Temperature
Store fully glazed and set cookies in a lidded hard-sided container — not a zip-lock bag. Zip-lock bags compress the cookies against each other and smear the glaze before it has a chance to fully harden, and the flexible sides allow cookies to shift and break. A hard-sided container with a flat base keeps them stable.
Layer the cookies in single layers with a sheet of unbleached parchment paper between each layer. Do not stack more than two layers deep — the weight of the upper layers will crack the glaze on the lower ones. Keep the container at room temperature away from direct sunlight and heat sources.
Stored this way, the cookies stay soft and the glaze stays intact for up to 4 days. Day 1 and Day 2 are the best — the glaze is at its firmest and the cookie centers are at their softest. By Day 3 the cookies are still good but the centers begin to firm slightly. Day 4 is the outer limit — still edible but noticeably drier than fresh.
Do not store these cookies in the refrigerator unless your kitchen is very warm. The fridge draws moisture from baked goods and makes oatmeal cookies go stale faster than room temperature storage does.
Refrigerator
Refrigerating fully glazed cookies is not recommended for regular storage. Cold air accelerates staling in oat-based baked goods — the starches in the oats retrograde faster at refrigerator temperatures, which means the cookies firm up and dry out more quickly than they would at room temperature. If your kitchen is above 80°F (27°C) or humid enough that baked goods go soft quickly, the fridge is a better option than leaving them out — but expect the texture to be firmer than fresh after 24 hours in the cold.
If you do refrigerate, store in a lidded hard-sided container with parchment between layers and bring the cookies to room temperature for 20–30 minutes before serving. Cold oatmeal cookies straight from the fridge feel dense and dry — 20 minutes at room temperature brings the texture back closer to fresh.
Freezer — Baked
Glazed cookies can be frozen, but the glaze changes texture on thawing — it softens slightly and loses some of its opacity. For the best frozen result, freeze the cookies unglazed and add the glaze after thawing.
To freeze unglazed: Cool the baked cookies completely on a wire rack, then place them in a single layer on a parchment-lined sheet pan and freeze for 1 hour until solid. Once solid, transfer to a zip-lock freezer bag or a lidded freezer-safe container with parchment between layers. Label with the date. They keep well for up to 2 months.
To thaw: Remove from the freezer and let thaw at room temperature on a wire rack for 45–60 minutes. Do not thaw in the microwave — it makes the oats tough and rubbery. Once fully thawed and at room temperature, make the glaze fresh and apply as directed in Step 8. The freshly glazed thawed cookie is nearly indistinguishable from a freshly baked one.
To freeze glazed: If the cookies are already glazed and you need to freeze them, let the glaze set completely — full 25 minutes — before freezing. Freeze in a single layer first, then transfer to a container with parchment between layers. Thaw at room temperature for 60 minutes. The glaze will be slightly softer and less opaque than fresh but still presentable.
Freezer — Unbaked
This dough freezes exceptionally well and the bake-from-frozen result is virtually identical to fresh-baked.
To freeze unbaked dough: Portion the dough into 45g balls as directed in Step 6. Place them on a parchment-lined sheet pan and freeze for 1 hour until solid. Transfer to a zip-lock freezer bag, press out as much air as possible, and label with the date and bake instructions. Unbaked dough keeps for up to 3 months in the freezer.
To bake from frozen: Do not thaw. Place the frozen dough balls directly on a parchment-lined pan, spaced 2 inches (5cm) apart. Bake at 350°F (175°C) for 13 to 15 minutes — 2 to 3 minutes longer than the fresh dough bake time. The doneness cues are identical: set edges, slightly soft-looking center. Cool and glaze as directed.
🗒 Luna’s Note: I almost always have a bag of portioned unbaked dough in my freezer. The glaze takes 5 minutes to make and 25 minutes to set — a batch of iced oatmeal cookies from frozen dough is on the table in under an hour, start to finish. That is the version I make most often.
Serving Suggestion
Serve these at room temperature — not warm from the oven, and not cold from the fridge. The glaze needs time to set and the cookie texture is at its best once it has cooled and firmed slightly. Pulling them off the rack too early means soft glaze and a center that has not finished setting. Thirty minutes after glazing is the earliest I would serve these to anyone.
I eat these with a strong black tea — Assam, nothing added. The malt and tannin in the tea cuts through the sweetness of the glaze in a way that coffee does not quite do. Something about the spice in the cookie and the astringency of the tea works together in a way that feels genuinely right. Milk tea works too, but the straight black version is what I make for myself.
These belong on a plate at the kind of gathering where people stand in the kitchen and talk for longer than they planned to. They are not a showstopper dessert. They are the cookie that disappears first because they are exactly what people actually want — familiar, spiced, not too sweet, with enough texture to feel like something real. I bring these when I want to be the person who brought the cookies everyone remembers.
Day 2 is when these are at their absolute best. The cinnamon flavor deepens overnight, the oats soften slightly into the cookie without losing their chew, and the glaze firms to a cleaner snap. I bake these the evening before whenever I can. Day 1 is excellent. Day 2 is better. I would not serve these past Day 3 to guests — the texture is still acceptable but the freshness edge is gone.
One honest limitation: these do not travel well once glazed. The glaze is firm but not hard — stacking them in a bag or container without proper parchment separation smears and cracks it within minutes. If you are bringing these somewhere, transport them in a single layer in a hard-sided container with parchment beneath each cookie. Freeze the dough and glaze on arrival if you want to be absolutely sure of the result.
Frequently Asked Questions About Iced Oatmeal Cookies
Can I use quick oats instead of old-fashioned oats in iced oatmeal cookies?
Quick oats will produce a workable cookie but not the same cookie. Old-fashioned rolled oats stay intact during baking because they are pressed into large flat flakes with a lower surface area — they absorb moisture slowly and remain visible on the cookie surface, which is what creates the craggy texture in the photos. Quick oats are cut into smaller pieces before rolling, which dramatically increases their surface area and causes them to absorb moisture rapidly and dissolve into the dough matrix.
The finished cookie will have a smooth surface, a softer and more uniform bite, and will look noticeably different from the photos. If old-fashioned oats are genuinely unavailable, quick oats will bake into an edible cookie — but expect a different visual and textural result entirely. The glazed oatmeal cookie texture most people are looking for — craggy, substantial, with a white set glaze on a thick cookie — requires old-fashioned oats.
Can I make iced oatmeal cookies ahead of time?
Yes — and they are actually better made the day before serving. The cinnamon flavor deepens overnight and the oat texture softens slightly without losing its chew, which makes Day 2 cookies noticeably better than Day 1. Bake and cool the cookies fully, then glaze them the same day. Once the glaze has set for the full 25 minutes, store in a lidded hard-sided container with parchment between layers at room temperature. They hold well for up to 4 days, with Days 1 and 2 being peak quality. Alternatively, freeze the unbaked portioned dough balls for up to 3 months and bake from frozen — add 2 to 3 minutes to the bake time and glaze after cooling. This is the most flexible make-ahead option and produces a result virtually identical to fresh-baked.
Why did my iced oatmeal cookies spread too flat?
Flat cookies are almost always a butter temperature problem. Butter above 70°F (21°C) is too soft to hold the air pockets created during creaming — it melts before the cookie edges can set in the oven, causing the dough to flow outward rather than rise upward. The mechanism is fat crystallization: butter at 65–68°F (18–20°C) is soft enough to be worked and trap air during creaming but firm enough to hold those pockets until the oven heat sets the cookie structure. Check that you creamed for the full 3 minutes at medium speed — under-creaming leaves insufficient air in the mixture regardless of butter temperature. If your kitchen is warm, refrigerate the portioned dough balls for 10 minutes before baking to re-firm the fat.
Why did my iced oatmeal cookies come out hard?
Hard cookies are an overbaking issue in almost every case. Oatmeal cookies firm up significantly as they cool — a cookie pulled at the correct moment, when the edges are set and the center still looks slightly underdone, will be soft and chewy after 5 minutes of carryover cooling on the hot pan. Carryover cooking is the mechanism: the residual heat in the pan continues conducting into the cookie base after it leaves the oven, finishing the center without the oven drying it out. If the cookies looked fully done when they came out of the oven, they were already overbaked. Pull earlier than instinct says — the center should look soft and slightly underdone at the moment the pan comes out. If your cookies are already hard, place them in a sealed container with a slice of fresh bread overnight — the cookies absorb moisture from the bread and soften slightly by morning.
How do I get the glaze to set properly on oatmeal cookies?
Two conditions must both be true: the cookies must be fully cooled to room temperature, and the glaze must be at ribbon consistency. Warm cookies cause the glaze to lose viscosity on contact and slide off — the surface temperature of the cookie interferes with the evaporation process that allows the sugar and cornstarch in the powdered sugar to solidify into an opaque layer. Press the bottom of a cookie to your wrist before glazing — if it feels warm at all, wait another 10 minutes. For the glaze itself, ribbon consistency means it falls from a spoon in a slow, steady stream and settles flat within 5 seconds. Too thin and there is not enough sugar depth to dry opaque. Too thick and it dries chalky and cracks. Once applied at the correct consistency to a fully cooled cookie, allow 20–25 minutes of undisturbed drying at room temperature before moving or stacking.
Can I substitute a gluten-free flour in this recipe?
A 1:1 gluten-free all-purpose flour blend works in place of regular all-purpose flour — brands like Bob’s Red Mill 1-to-1 or King Arthur Measure for Measure are the most reliable options I have tested. The texture will be very slightly more crumbly at the edges and the cookies may spread marginally wider, but the result is close enough to the original to be a genuine substitute. Do not use almond flour as a direct swap — almond flour has a much higher fat content and produces cookies that spread flat, feel greasy, and do not hold the oat structure together. Also confirm that your rolled oats are certified gluten-free — standard oats are often processed in facilities that handle wheat and are not safe for celiac disease.
For a related oatmeal recipe that also works well with gluten-free flour substitutions, see my oatmeal raisin cookies.
Can I double this recipe, and does anything change?
Yes, this recipe doubles without any issues with one adjustment: use only 1½ tsp of baking soda for the doubled batch, not 2 tsp. Baking soda does not scale linearly — doubling it produces cookies with a soapy, metallic aftertaste and an overly open, fragile crumb structure. The leavening chemistry is the reason: more baking soda produces more CO₂ than the dough structure can hold, causing the cookies to over-rise and then collapse. All other ingredients double directly. Bake in separate batches on separate pans — do not crowd two batches onto one pan, as the reduced airflow changes the spread and bake time. Bake time stays the same at 10 to 12 minutes per pan.
How does humidity and altitude affect iced oatmeal cookies?
In high humidity — above 70% relative humidity — the cookies may spread slightly more and the glaze will take longer to set, sometimes up to 45 minutes rather than 20. The glaze may also feel slightly tacky even when fully dry, because it is continuously absorbing moisture from the air. Refrigerate the portioned dough balls for 15 minutes before baking to control spread. For the glaze, add 1 additional tablespoon of sifted powdered sugar to the base recipe to thicken it slightly and help it resist humidity. At high altitude — above 3,500 feet (1,067 meters) — reduce the baking soda to ¾ tsp, increase the flour by 2 tablespoons (15g), and reduce each sugar by 1 tablespoon. Bake time may decrease by 1 to 2 minutes — start checking at 9 minutes.
More Cookies You’ll Love
- Oatmeal Chocolate Chip Cookies — thick, chewy oatmeal cookies with pockets of melted semi-sweet chocolate in every bite, made with the same old-fashioned rolled oats base
- Peanut Butter Oatmeal Cookies — three-ingredient cookies that come together in one bowl with no mixer, no chilling, and no flour — the oats provide all the structure
- Banana Oatmeal Cookies — naturally sweetened with ripe banana, soft and dense with a moist crumb, and one of the easiest oatmeal cookies to make from ingredients already in the kitchen
Iced Oatmeal Cookies
Ingredients
Equipment
Method
- Position the oven rack in the middle position and heat to 350°F (175°C), then line a light-colored aluminum half-sheet pan with parchment paper and set aside.
- Add the 1 cup (226g) softened unsalted butter, 3/4 cup (150g) packed brown sugar, and 1/2 cup (100g) granulated cane sugar to the bowl of a stand mixer fitted with the paddle attachment (or a large bowl with a hand mixer) and beat on medium speed for 3 full minutes until pale, fluffy, and increased in volume.
- With the mixer on low, add the 2 room-temperature large eggs one at a time, waiting 30 seconds between each addition until fully incorporated, then add 1 tsp pure vanilla extract and mix for 15 seconds, scraping down the sides and bottom of the bowl with a silicone spatula before continuing.
- In a separate small bowl, whisk together the 1½ cups (180g) all-purpose flour, 1 tsp baking soda, 1 tsp ground cinnamon, and 1/2 tsp fine sea salt until evenly combined, then add the dry mixture to the butter mixture all at once and mix on low speed for 15 seconds until just combined with no visible dry flour streaks remaining.
- Add the 3 cups (270g) old-fashioned rolled oats to the dough, switch to a silicone spatula, and fold by hand using slow strokes from the bottom of the bowl upward for approximately 15–20 folds until no dry patches remain and the dough holds together in a cohesive mass — do not use the mixer for this step.
- Scoop 3 tablespoons (approximately 69g) of dough per cookie, weigh the first one to calibrate, and place the dough balls at least 2 inches (5cm) apart on the prepared pan — do not flatten — then bake at 350°F (175°C) for 10 to 12 minutes until the edges are set and lightly golden and the centers still look slightly soft and underdone.
- Leave the cookies on the hot pan for exactly 5 minutes without moving them, then transfer to a wire cooling rack using a thin spatula and cool completely to room temperature — approximately 30 minutes — before glazing.
- Sift the 1½ cups (180g) powdered sugar into a medium bowl, add the 3 tbsp (45ml) whole milk and 1/2 tsp pure vanilla extract, and whisk until completely smooth and falling from the whisk in a slow steady ribbon that settles flat within 5 seconds — adjust with milk ½ tsp at a time if too thick or powdered sugar 1 tbsp at a time if too thin.
- Place the cooled cookies on a wire rack over parchment paper, spoon approximately 1½ tsp of glaze onto the center of each cookie and let it spread naturally toward the edges, then allow to set at room temperature for 20–25 minutes until fully opaque and firm before stacking or storing.