Thick & Chewy Oatmeal Raisin Cookies
I have tested this oatmeal raisin cookie recipe through more than thirty batches over four months, and I kept going back to the dough until I fixed every single way it can fail — flat cookies, dry interiors, hard raisins, and that chalky flour taste you get when the ratios are slightly off. This recipe does not have any of those problems.
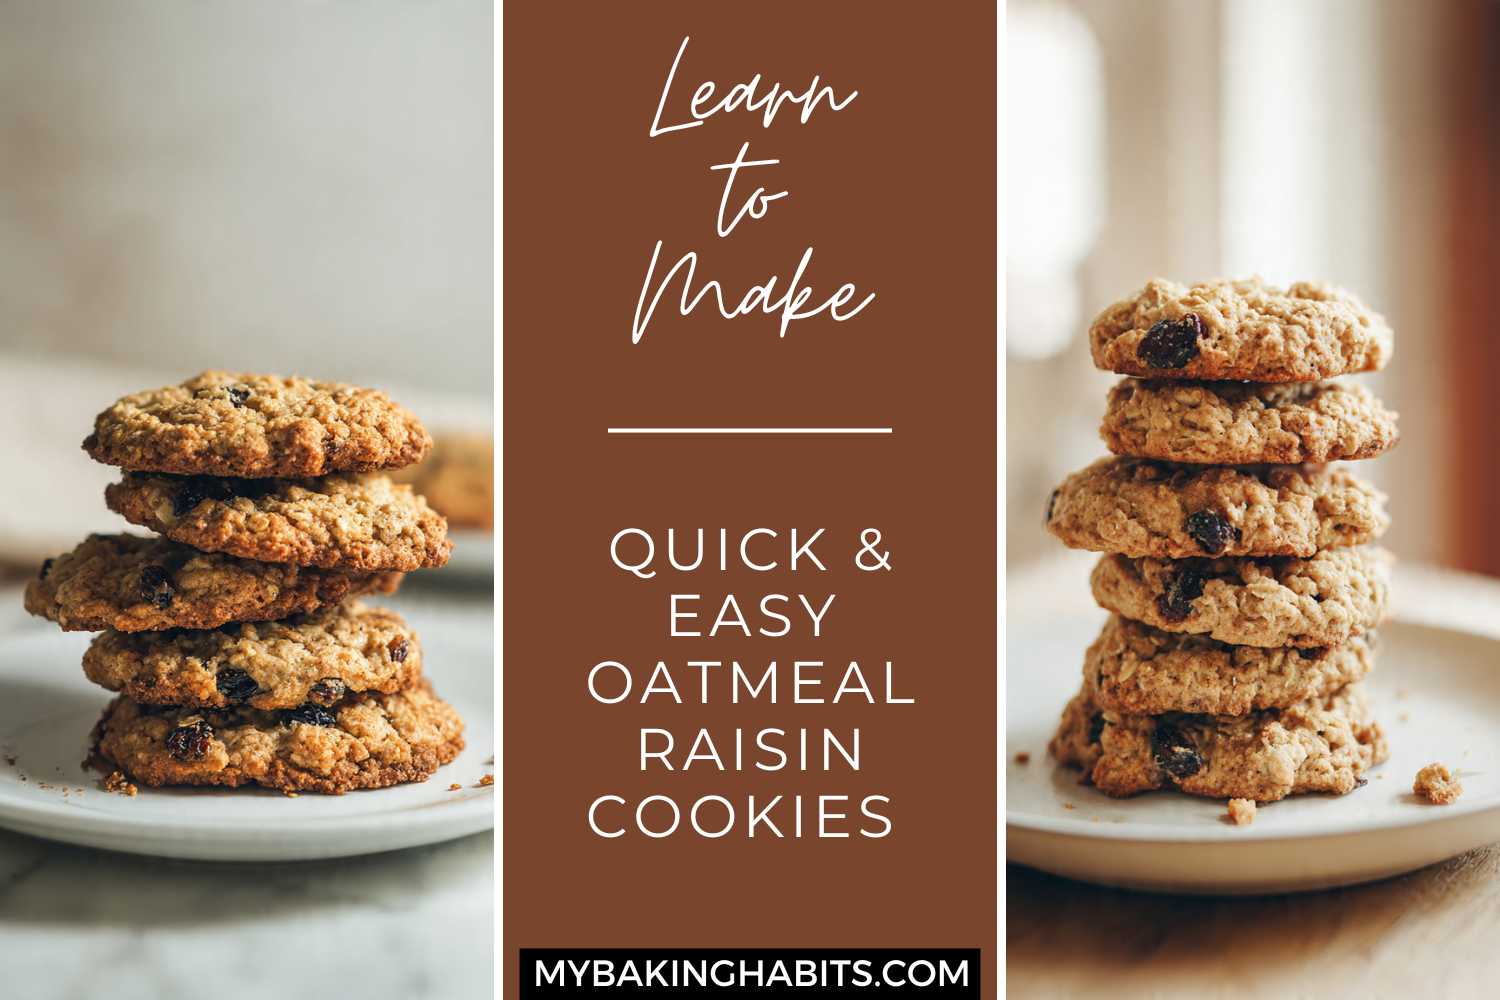
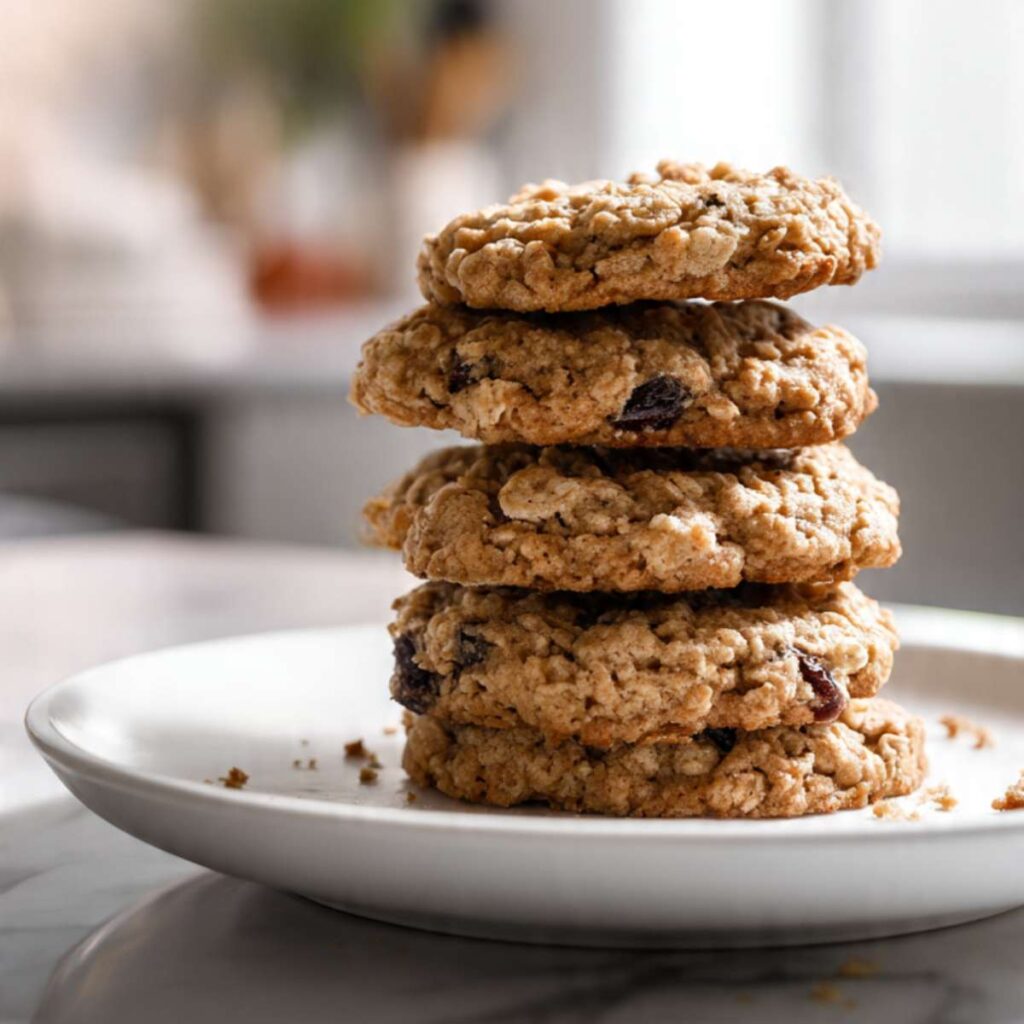
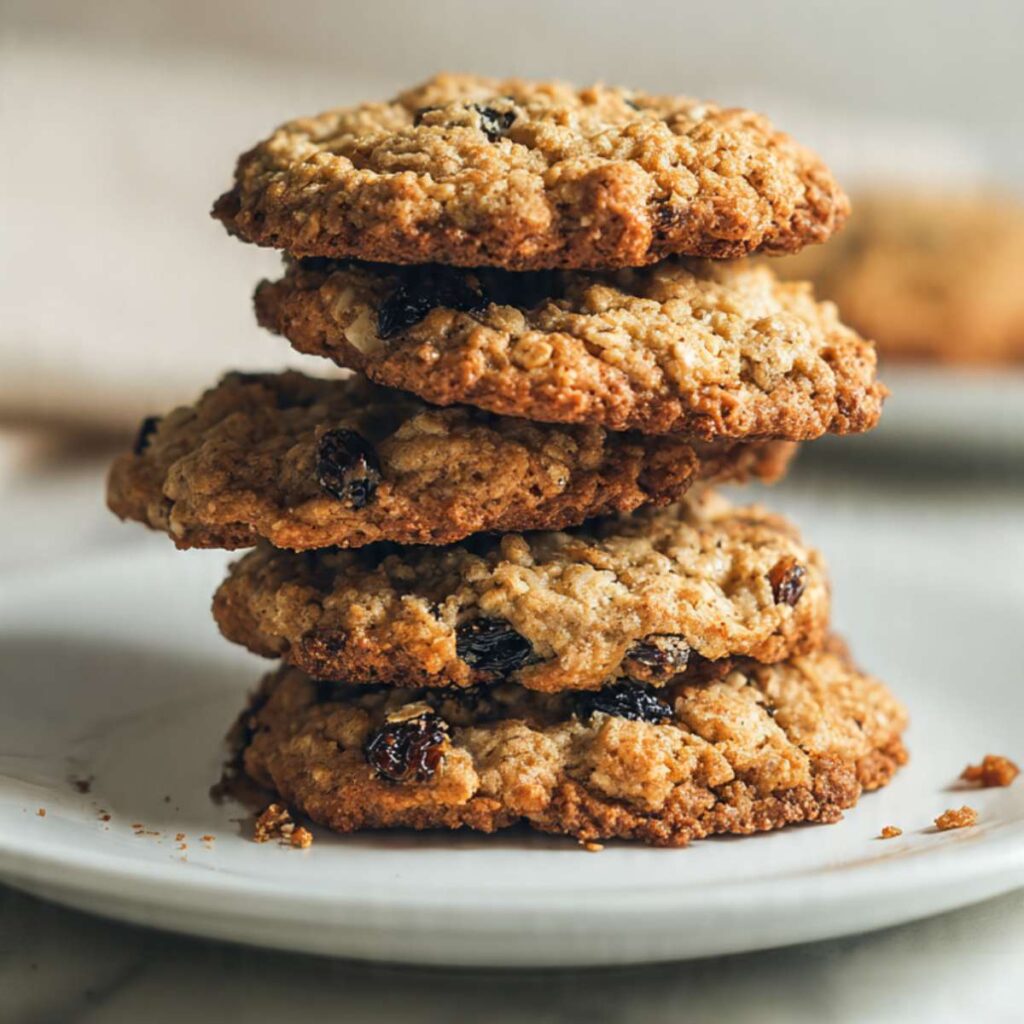
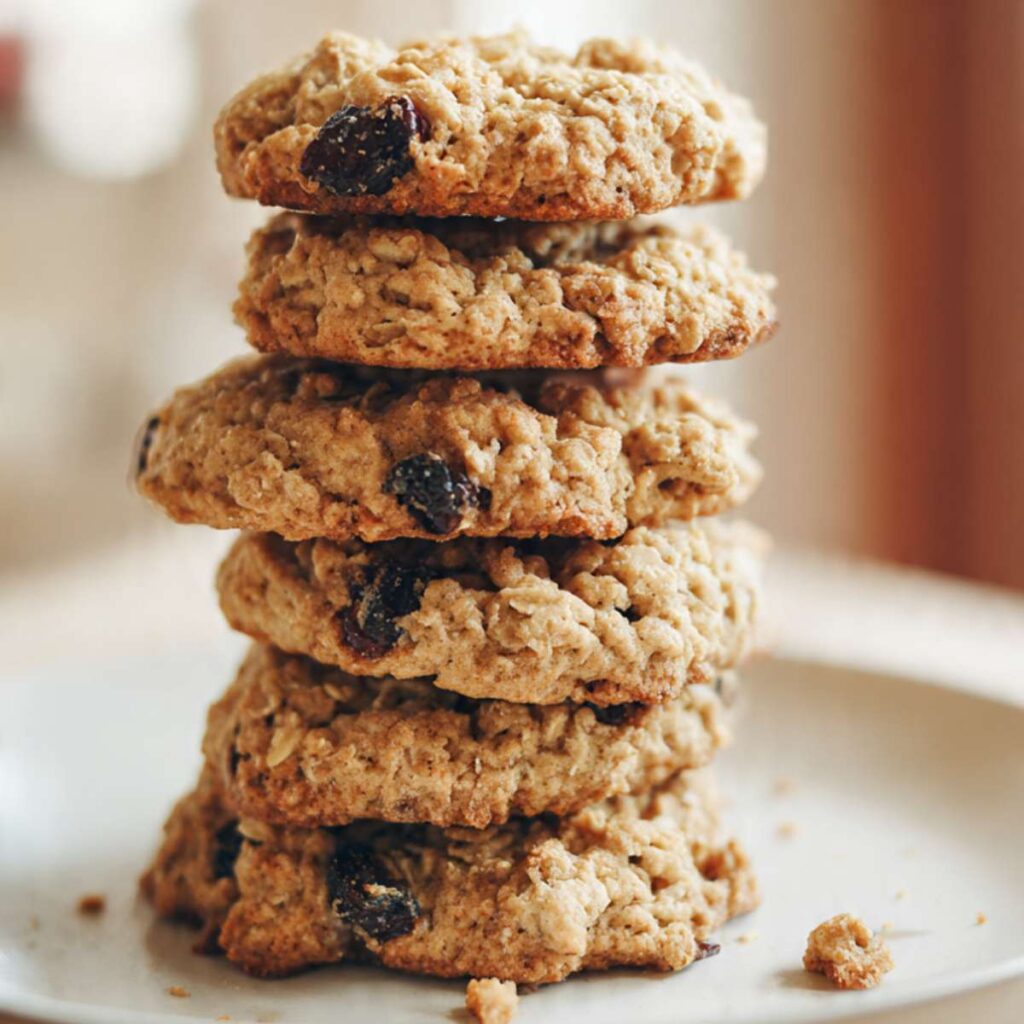
The cookies come out thick with a matte, golden-tan surface and a center that stays genuinely soft — not cakey, not gummy, not dry. Every bite has the chew of old-fashioned oats, pockets of plump raisin, and a warm cinnamon note underneath. The edges have just enough structure to hold the cookie together when you pick it up, and the centers stay dense and tender for days. That texture is exactly what you see in the stacked photos — thick rounds with visible oats and raisins throughout, no crackle, no spread, no flat cookie disaster.
🗒 Luna’s Note: I pull these out of the oven when the centers still look underdone and slightly puffy. By the time the 5-minute pan rest is up, they are exactly right. If they look fully set in the oven, they are already past the window.
I tested this with both old-fashioned rolled oats and quick oats. Quick oats absorbed more moisture and produced a denser, almost gummy interior with no visible oat texture — nothing like what you see in these photos. Old-fashioned rolled oats kept their structure through the bake and gave the cookies their characteristic chew and rough, hearty surface. That is the only oat that works here.
I tested raisins straight from the bag versus raisins plumped in warm water for 10 minutes. Dry raisins pulled moisture from the dough as they baked and came out hard and chewy in a bad way — almost like dried fruit in a protein bar. Plumped raisins stayed soft, swelled slightly, and added little pockets of sweetness without robbing the cookie of moisture. Ten minutes in warm water, drained and patted dry. That step takes less than one minute of active time and makes a significant difference in the finished cookie.
No chilling required. This recipe requires a hand mixer or stand mixer for the creaming step — mixing by hand will not incorporate enough air and the cookies will bake up flatter and denser than what you see in these photos. The whole process takes about 30 minutes from start to finished cookie.
| Prep Time | 15 minutes |
| Cook Time | 12–14 minutes |
| Total Time | 30 minutes |
| Yield | 14 cookies |
| Serving Size | 1 cookie |
| Difficulty | Easy |
| Nutrient | Per Cookie |
|---|---|
| Calories | ~175 kcal |
| Total Fat | ~7g |
| Carbohydrates | ~27g |
| Sugar | ~15g |
| Fiber | ~2g |
| Protein | ~3g |
Nutrition is estimated based on tested gram weights. Actual values will vary slightly depending on ingredient brands and exact scoop size.
Ingredients & Tools for Oatmeal Raisin Cookies
For the Cookies
- 1½ cups (135g) old-fashioned rolled oats (not quick oats or instant — see Before You Start)
- 1 cup (120g) all-purpose flour, spooned into the measuring cup and leveled — or weighed at 120g
- ½ cup (100g) plain white granulated cane sugar — do not substitute coconut sugar, raw sugar, or liquid sweeteners; each has a different crystal structure and moisture content that changes spread and texture
- ½ cup (100g) packed light brown sugar
- ½ cup (113g) unsalted butter, softened to room temperature (65–68°F / 18–20°C)
- 1 large egg (approximately 50g without shell), room temperature
- 1 tsp (5ml) pure vanilla extract
- 1 tsp (3g) baking soda, checked for freshness
- 1 tsp (3g) ground cinnamon, checked for freshness — should smell strong and spicy when the jar is opened
- ½ tsp (3g) fine sea salt
- ¾ cup (120g) seedless raisins, plumped in warm water for 10 minutes and patted completely dry
Before You Start
Oats: Use old-fashioned rolled oats only. Quick oats and instant oats are cut smaller and absorb moisture faster — they dissolve into the dough instead of holding their shape and produce a gummy, textureless cookie with none of the chew visible in these photos. Do not substitute.
Butter: Pull your butter from the fridge 60–90 minutes before you start. At correct softness (65–68°F / 18–20°C), you should be able to press your finger into the block and leave a clean indent without the butter looking shiny or slick. If your finger slides through it or it looks greasy, it is too warm — put it back in the fridge for 10 minutes. Butter that is too warm will produce flat, greasy cookies that spread too much.
Egg: Pull your egg from the fridge 30 minutes before baking, or place it in a bowl of warm (not hot) water for 10 minutes. A cold egg does not emulsify smoothly into the creamed butter and can make the batter look broken or curdled.
Raisins: Place the raisins in a small bowl, cover with warm water, and let them sit for 10 minutes. Drain well and spread on a paper towel — pat until completely dry before folding into the dough. Wet raisins will add excess moisture to the dough. Dry raisins from the bag pull moisture out of the cookie as it bakes and turn hard in the finished cookie.
Brown sugar: Pack the brown sugar firmly into the measuring cup so it holds its shape when tipped out. If your brown sugar has hardened, place a damp paper towel over it and microwave in 20-second increments until pliable, then measure.
Baking soda freshness test: Drop ½ tsp (3g) of baking soda into a small bowl with a splash of hot water and white vinegar. It should bubble aggressively within 2 seconds. If the reaction is weak or slow, replace the box before baking — expired baking soda produces flat, dense cookies with no lift.
Cinnamon freshness: Open the jar and smell it. Ground cinnamon should smell sharp and spicy. If it smells faint or dusty, it has gone flat and will not contribute flavor to the finished cookie. Ground spices lose potency within 6 months of opening.
Gram weight: For the most accurate results, use a kitchen scale set to grams. Volume measurements like cups can vary by 20–30% depending on how the ingredient is scooped or packed. The gram weights in this recipe are the numbers I tested with — they are the most reliable way to get the same result I got.
Flour measuring: If you are not using a scale, spoon the flour into the measuring cup from the bag and level it off with a straight edge. Never scoop directly from the bag — scooping packs 20–30% more flour into the cup and produces dry, dense cookies.
Mixing method: This recipe uses the creamed butter method and requires a hand mixer or stand mixer fitted with the paddle attachment for the creaming step. Mixing by hand will not incorporate enough air into the butter and sugar, and the cookies will bake up denser than what you see in the photos. A stand mixer is ideal, but a hand mixer works perfectly well.
Oven rack: Position the rack in the middle of the oven before preheating. The middle rack position ensures even heat circulation around the cookies from both the top and bottom elements. Bottom rack placement overbrowns the bottoms; top rack placement under-bakes them.
Pan: Use a light-colored aluminum baking sheet lined with parchment paper. Do not grease the pan — a greased surface causes more spread than parchment. Do not use foil — foil conducts heat more aggressively than parchment and produces darker, crispier bottoms. If you only have dark non-stick pans, double-stack two pans to insulate the bottom.
No chilling required: The dough goes straight onto the baking sheet after mixing. You do not need to rest it in the refrigerator first. This is an intentional part of the recipe — the butter temperature and flour ratio are calibrated for room-temperature dough going directly into a preheated oven.
Necessary Tools
Required:
- Hand mixer or stand mixer with paddle attachment
- Large mixing bowl (if using hand mixer)
- Silicone spatula
- Light-colored aluminum baking sheet — dark non-stick pans absorb more heat and overbrown the cookie bottoms before the centers are done
- Parchment paper — do not grease the pan or use foil; parchment creates the right amount of release and even bottom baking
- Cookie scoop (2-tablespoon / 45g capacity) or tablespoon measure
- Wire cooling rack
Strongly recommended:
- Kitchen scale (for gram-weight accuracy)
Optional:
- Oven thermometer — most home ovens run 15–25°F (8–14°C) off from the dial setting; an oven thermometer confirms the actual baking temperature before the pan goes in
How to Make Oatmeal Raisin Cookies
This recipe uses the creamed butter method — fat and sugar are beaten together first to build the aerated base the cookie’s texture depends on. Follow the ingredient addition order exactly. Every step in this method builds on the one before it.
Step 1 — The Oven Is at Temperature and the Pan Is Lined and Ready
Position your oven rack in the middle of the oven. Heat the oven to 350°F (175°C) — if you have an oven thermometer, place it on the middle rack now and confirm the actual temperature before the pan goes in. Most home ovens run 15–25°F (8–14°C) hotter or cooler than the dial reads, and that variance changes both spread and texture in these cookies. Line a light-colored aluminum baking sheet with parchment paper. Do not grease the pan and do not use foil — parchment gives the cookies even heat from the bottom and releases them cleanly without sticking. Dark non-stick pans run hotter and will overbrown the bottoms of these cookies before the centers are done.
The pan should be lined and sitting on the counter before you mix a single ingredient — once the dough is ready, it goes straight onto the pan with no waiting.
Do not preheat and then walk away for 30 minutes — an oven that has been sitting at temperature too long develops uneven hot spots. Preheat while you prep, aiming for the oven to reach temperature at roughly the same time the dough is ready.
Step 2 — The Oven Is at Temperature and the Pan Is Lined and Ready
Place the ½ cup (113g) softened unsalted butter, ½ cup (100g) plain white granulated cane sugar, and ½ cup (100g) packed light brown sugar into the bowl of your stand mixer fitted with the paddle attachment, or into a large mixing bowl if using a hand mixer.
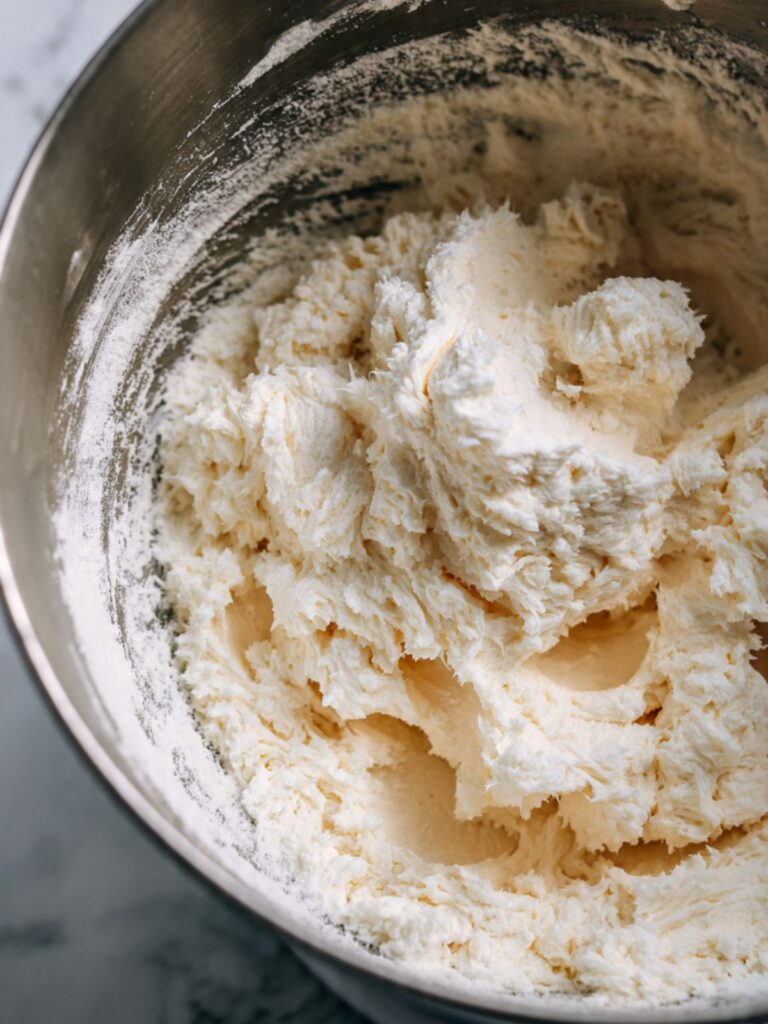
Beat on medium speed (speed 4 on a KitchenAid) for 3 full minutes — set a timer and do not cut this short. As the butter and sugars cream together, the mixture will change from a rough, grainy paste to a pale, fluffy mass that clings to the sides of the bowl. This process traps air into the fat, and that trapped air is what gives these cookies their thickness and lift in the oven.
The creamed mixture should look pale tan, almost ivory, and feel light and fluffy when you stop the mixer and press a small amount between your fingers — no sugar granules remaining, no dense or greasy feeling. If it still looks yellow and dense at the 3-minute mark, beat for another 60 seconds and check again. The pale, fluffy creamed mixture at this stage is the foundation for the thick, tall cookies visible in the stacked hero photo — flat or dense creaming at this step produces a flatter, denser finished cookie.
Do not rush this step by increasing to high speed — high speed at this stage heats the butter from friction and the mixture loses the aeration you just built. Medium speed for the full time is the correct approach.
Step 3 — The Batter Is Smooth, Glossy, and Fully Emulsified
Add the 1 large room-temperature egg to the creamed butter mixture. Beat on medium speed for 45 seconds until fully incorporated — the batter should look slightly thicker, smooth, and glossy with no visible streaks of egg remaining. Add the 1 tsp (5ml) pure vanilla extract and beat for another 10 seconds.
The batter at this stage should look cohesive and smooth — if it looks broken, curdled, or greasy, your egg was too cold. Stop the mixer, let the bowl sit at room temperature for 5 minutes to bring the temperature up slightly, then beat again. In most cases the emulsification will come back together.
Do not add more than one egg at this stage — the recipe uses one large egg, and adding a second changes the moisture content and produces a cakey, puffier cookie rather than the dense, chewy texture in these photos.
Step 4 — The Dough Is Thick, Combined, and Not Overmixed
In a separate bowl, whisk together the 1 cup (120g) all-purpose flour, 1 tsp (3g) baking soda, 1 tsp (3g) ground cinnamon, and ½ tsp (3g) fine sea salt until evenly combined — about 10 seconds of whisking is enough. Adding them pre-mixed means they distribute evenly into the dough in fewer strokes, which reduces the risk of overmixing.
Add the dry ingredient mixture to the mixer bowl all at once. Mix on low speed (speed 2 on a KitchenAid) just until the flour disappears — approximately 20 to 25 seconds. Stop the mixer the moment you no longer see dry flour streaks.
The dough at this point should look thick and slightly rough — not smooth like a cake batter, not crumbly or dry. If it looks too dry and is not coming together, check that your butter was properly softened and that your flour was measured by the spoon-and-level method.
Do not overmix after the flour goes in — overmixing develops gluten and produces a tough, dense cookie instead of the soft, chewy center visible in the stacked photos. Once the flour is gone, stop.
Step 5 — The Dough Is Chunky, Sturdy, and Evenly Loaded
Remove the bowl from the mixer. Add the 1½ cups (135g) old-fashioned rolled oats and the ¾ cup (120g) plumped, patted-dry seedless raisins directly into the dough. Using a silicone spatula, fold them in by hand with slow, wide strokes from the bottom of the bowl upward — approximately 15 to 20 strokes — until the oats and raisins are evenly distributed throughout the dough.

The finished dough should look thick, chunky, and sturdy — you should be able to see distinct oats and dark raisins throughout every section of the dough, exactly like the close-up photo showing the cookie’s surface texture. If the raisins are clumping together in one section, give the dough 4 or 5 more folds.
Do not use the mixer for this step — the paddle will break the raisins apart and mash the oats into the dough instead of keeping them whole and visible.
🗒 Luna’s Note: I fold the oats and raisins in by hand every single time, even when I am tempted to use the mixer to save 30 seconds. The difference in oat texture between hand-folded and paddle-mixed is visible in the finished cookie — you want those oat pieces intact.
Step 6 — Every Cookie Is Portioned and Topped Before the Pan Goes In
Using a 2-tablespoon cookie scoop (45g capacity), portion the dough into rounded mounds and place them on the parchment-lined baking sheet. Space each cookie at least 2 inches (5cm) apart — these cookies spread moderately during baking and need room. Do not flatten the dough balls. These cookies spread to approximately 3 inches (7.5cm) in diameter during baking — that moderate spread is visible in every photo and is correct. They are not bakery-domed cookies and they are not meant to be. The thick, naturally spread shape is the target result. The rounded dome shape going into the oven is what creates the thick, soft center visible in every stacked photo. Pressing them flat produces a thin, spread cookie — not the result shown here.
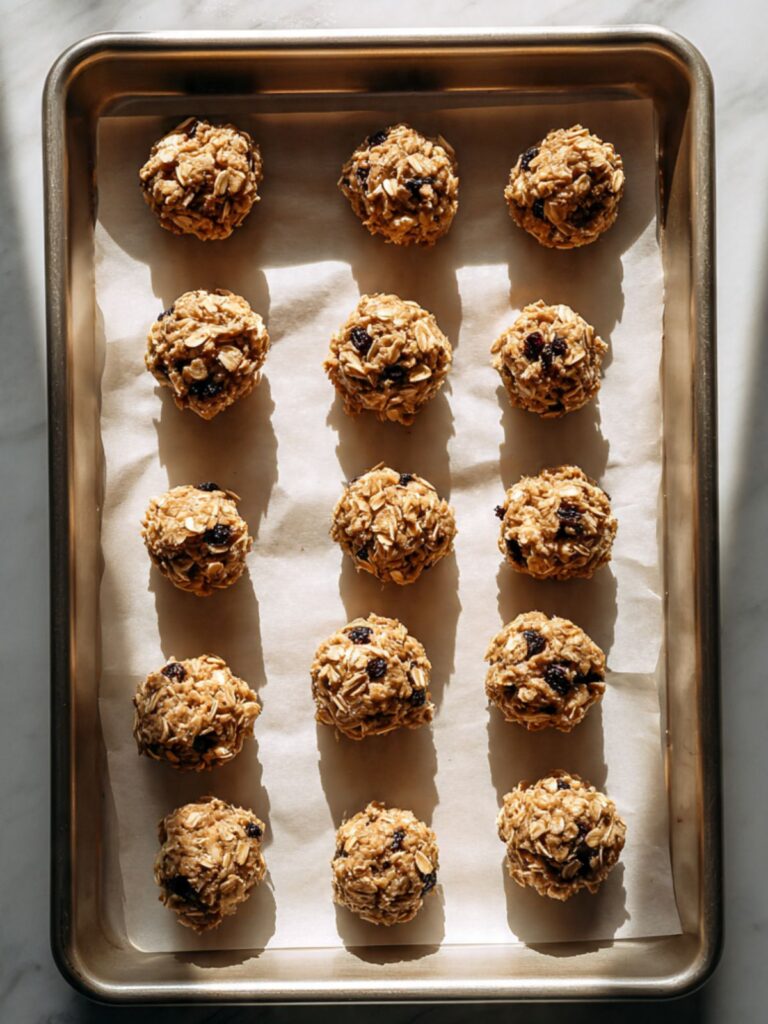
Weigh the first dough ball on your kitchen scale — it should be approximately 40–45g. Use that as your calibration for the rest. This batch yields exactly 14 cookies at this scoop size. If you are getting significantly more or fewer, your scoop size is off and bake time will vary.
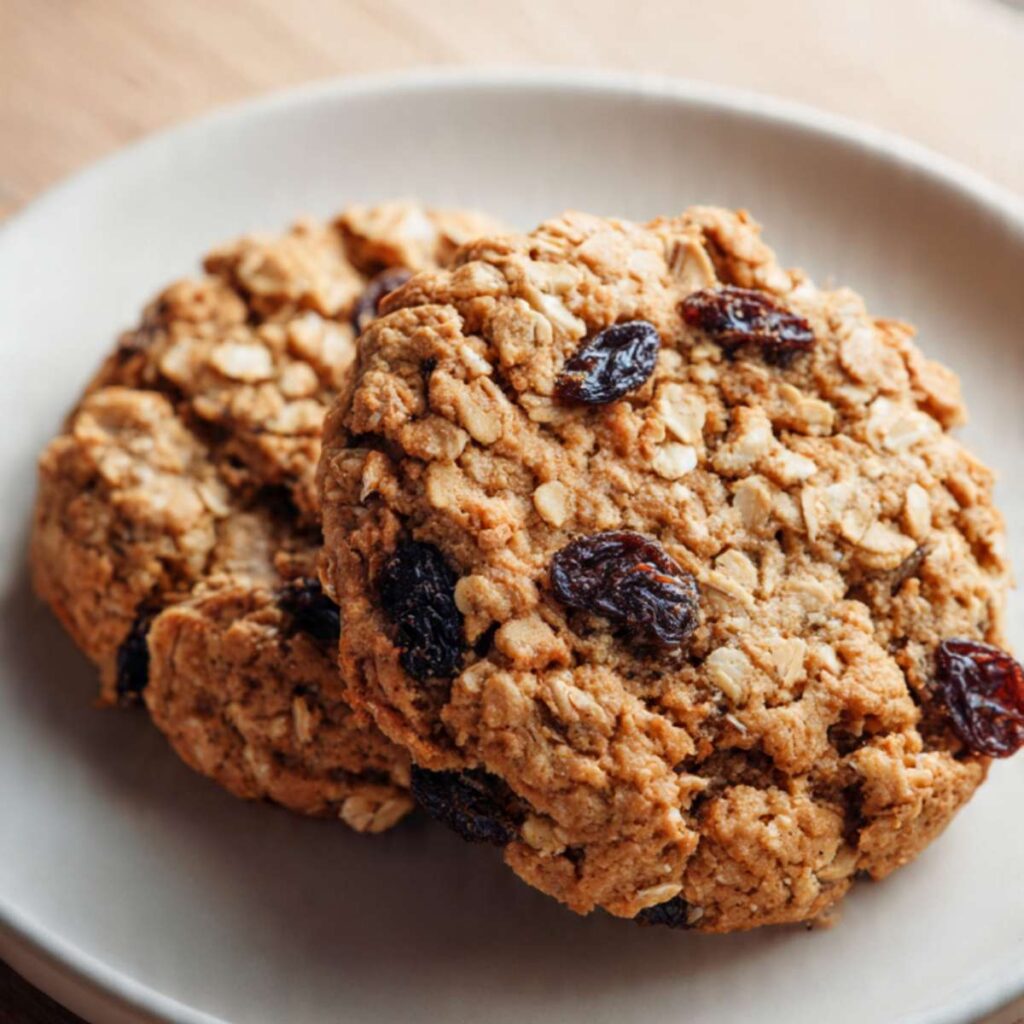
Once all 14 dough balls are on the sheet, press 4 to 5 extra plumped, patted-dry raisins onto the top of each ball. Raisins folded into the dough get partially buried as the cookie spreads — pressing extras onto the surface before baking is what produces the prominent, visible raisins on the top of every finished cookie that you see in the close-up overhead photo. This step takes under one minute for the full batch and is the difference between a finished cookie that looks homemade-rustic and one that looks intentional and photo-ready.
The baking sheet should go into the oven with 14 evenly sized rounded dough balls, each with raisins visibly pressed into the top surface, spaced 2 inches (5cm) apart. If your sheet is not large enough for all 14, bake in two batches and let the sheet cool completely between batches — a hot sheet causes the next batch to spread more than intended.
Step 7 — The Cookies Are Pulled at the Right Moment — Edges Set, Centers Soft
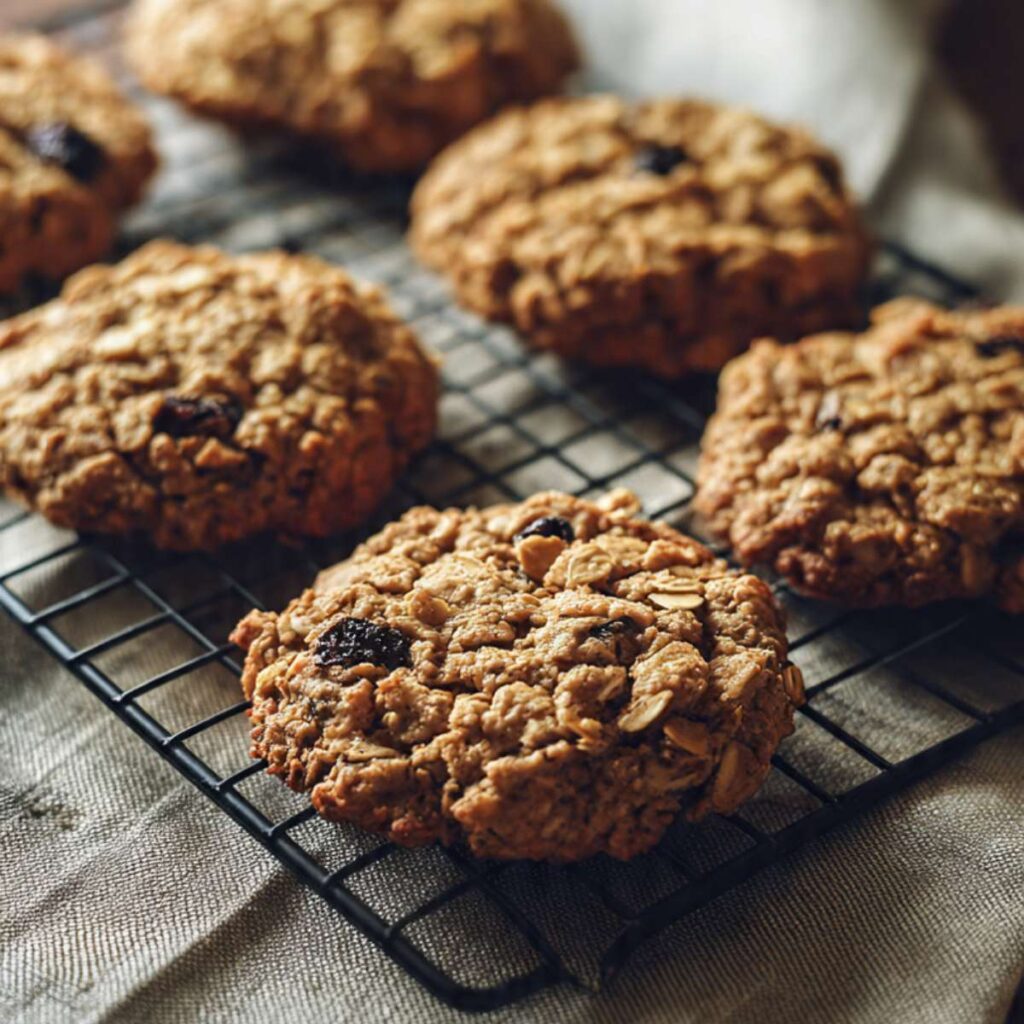
Slide the baking sheet onto the middle rack and bake at 350°F (175°C) for 12 to 14 minutes. Start checking at the 12-minute mark. You are looking for one specific visual cue — the edges of the cookies should look set and lightly golden while the centers still look slightly underdone, puffy, and a shade softer in color than the edges. The centers in these cookies are not pale — they bake to the same warm golden-tan as the rest of the cookie. What you are watching for is a slight visual softness and puffiness in the center compared to the more firmly set edge, not a color difference.
Do not wait for the centers to look fully baked before pulling the pan. The centers will continue cooking on the hot pan after the oven door closes. A cookie that looks done in the center when it comes out of the oven will be dry and slightly hard once it cools — not the soft, chewy texture these photos show.
The correct pull point is edges set and lightly golden, centers still slightly puffy and just a shade softer-looking than the edges — this is exactly the stage shown in the cooling rack photo where the cookies are sitting just out of the oven with that warm, even golden-tan across the whole surface. This is exactly the stage shown in the cooling rack photo where the cookies are sitting just out of the oven. If your oven runs hot, check at 11 minutes.
Do not open the oven door before the 12-minute mark — every time the door opens, the oven temperature drops and the cookies stall in their bake cycle.
Step 8 — The Cookies Are Fully Set and Ready to Move to the Rack
Leave the cookies on the hot baking sheet for exactly 5 minutes after pulling from the oven — do not move them. The residual heat in the pan continues to conduct into the cookie base during this time. This carryover cooking sets the centers without the oven drying them out further. Moving them before 5 minutes risks cracking the base — the cookies are structurally fragile immediately out of the oven. Waiting longer than 8 minutes starts to over-dry the bottoms. Set a timer.
After the 5-minute rest, use a thin spatula to transfer the cookies to a wire cooling rack. Let them cool for at least 10 more minutes before eating — the interior texture finishes setting as the cookie cools. They will feel slightly soft even on the rack, and that is correct.
The cookies should look exactly like the stacked photos at this point — set edges with a matte golden surface, centers that feel soft when you press them gently, and plump raisins visible throughout. If the centers feel completely firm when pressed, they were left in the oven too long.
🗒 Luna’s Note: I always set two timers — one for the oven pull and one for the pan rest. The pan rest timer is the one I used to skip, and it is the one that matters most for the final texture.
The Science Behind Chewy Oatmeal Raisin Cookies
Why Old-Fashioned Rolled Oats Control Everything About the Texture
Old-fashioned rolled oats are whole oat groats that have been steamed and flattened into thick, intact flakes. When they bake inside a cookie, they absorb some of the moisture from the dough but retain their physical structure — which is exactly why you can see distinct oat pieces on the surface of every cookie in these photos. Quick oats are cut into smaller fragments before rolling, which means they have a much larger surface area relative to their size. That larger surface area causes them to absorb moisture faster and more completely during baking, essentially dissolving into the dough and producing a uniform, pasty interior with no chew and no visible oat texture. The choice of oat type is not a preference — it is a structural decision that determines whether the finished cookie looks and eats like what is shown here or like something else entirely.
If you enjoy oatmeal cookies with a hearty, toothsome texture, old-fashioned rolled oats are the only option. For more on how oat type changes cookie texture, see my oatmeal chocolate chip cookies recipe where I tested this same variable across three oat types side by side.
How Brown Sugar Keeps These Cookies Soft for Days
Sugar does more in a cookie than add sweetness — it controls moisture retention after baking. Granulated white sugar is dry and crystalline. Once a cookie cools, white sugar does not hold onto environmental moisture, which is why white-sugar-heavy cookies go crisp within a day. Brown sugar contains molasses, and molasses is hygroscopic — it actively draws moisture from the surrounding air and holds it inside the baked cookie. This is why the ratio of packed light brown sugar to granulated sugar in this recipe is equal rather than granulated-heavy. The brown sugar is doing the long-term moisture work, which keeps these cookies soft on day three the same way they were soft on day one.
This is also why the brown sugar must be packed when measured — unpacked brown sugar can measure 30–40% less by weight than packed, which shifts the ratio and reduces the moisture-retention effect you are counting on for texture.
🗒 Luna’s Note: I store these in a hard-sided container with a slice of plain white bread. The bread gives off moisture slowly and keeps the cookies soft even on day four. The bread dries out — the cookies do not.
Why Plumping the Raisins Changes the Finished Cookie
Raisins are dried fruit — most of their original moisture has been removed during the drying process. When dry raisins bake inside a cookie, they behave like a sponge: they absorb available moisture from the surrounding dough as the cookie heats up. The result is a raisin that comes out of the oven firmer and chewier than it went in, and a cookie interior that is slightly drier than it should be because the raisins took that moisture. Plumping the raisins in warm water for 10 minutes before baking reverses this. The raisins absorb water before they go into the dough, which means they arrive at the bake already saturated — they have no moisture deficit to fill. They stay plump and soft throughout the bake, and the dough keeps the moisture it needs to produce the dense, tender center visible in the close-up photos. The difference between a plumped raisin and a dry raisin in a finished cookie is immediately obvious — one is soft and yields when you bite into it, the other is tough and chewy in an unpleasant way.
Oatmeal Raisin Cookies Troubleshooting & Pro-Tips
Common Mistakes
I used quick oats and the texture is wrong — dense and gummy with no chew
Quick oats cannot be substituted in this recipe. They are cut smaller than old-fashioned rolled oats and absorb moisture much faster during baking, dissolving into the dough instead of holding their shape. The result is a uniform, pasty interior with none of the hearty chew or visible oat texture shown in these photos. If you have already baked a batch with quick oats, the cookies are still edible — crumble them over vanilla ice cream or use them as a base layer for a no-bake bar. For the correct result, rebake with old-fashioned rolled oats only. Instant oats have the same problem — do not substitute those either.
My cookies are pale on top but burnt on the bottom
This is a pan problem. Dark non-stick baking sheets absorb radiant heat from the oven floor more aggressively than light-colored aluminum pans, which causes the bottoms to cook faster than the tops. Switch to a light-colored aluminum baking sheet lined with parchment paper. If you only have dark pans, double-stack two pans together — the air gap between them insulates the bottom and slows the heat transfer significantly. Always bake on the middle rack, never the bottom rack. If your oven has a particularly strong bottom element, raise the rack one position above middle.
My cookies spread too flat and look nothing like the photos
The most common cause is butter that was too warm when it went into the mixer. Butter at the correct temperature (65–68°F / 18–20°C) holds air when creamed and maintains structure in the oven. Butter that is too soft or melted releases that structure immediately in the heat and the cookie spreads before it can set. Press your finger into the butter before you start — it should leave a clean indent without feeling greasy or shiny. If it looks slick, it is too warm — refrigerate for 10 minutes and check again. The second most common cause is a dark non-stick baking sheet, which absorbs more heat and starts melting the butter in the dough before the structure can set. Switch to a light-colored aluminum sheet lined with parchment.
My cookies came out dry, crumbly, and dense instead of soft and chewy
This is almost always a flour measurement issue. Scooping the measuring cup directly into the flour bag packs 20–30% more flour than the recipe requires. Extra flour produces a stiff dough that bakes up dry and crumbly rather than chewy and soft. The fix: spoon the flour into the measuring cup and level it with a straight edge — or weigh it at 120g. A second cause is overbaking. These cookies must come out of the oven when the centers still look underdone and slightly soft. If they looked fully set when you pulled the pan, they were already past the correct window and will be dry once cooled.
My raisins are hard and chewy in the finished cookie
Dry raisins straight from the bag pull moisture out of the surrounding dough as they bake, which makes them firmer in the finished cookie and dries out the interior. The fix: plump the raisins in warm water for 10 minutes before baking, drain them completely, and pat them dry with a paper towel before folding into the dough. Wet raisins that are not patted completely dry will add excess moisture to the dough and cause spreading. The correct state before they go into the dough is plump and fully dry on the surface.
My cookies did not rise and came out flat with no lift
Expired baking soda is the most likely cause. Baking soda loses its potency after 3–6 months once the box is opened. Without active baking soda, there is no leavening reaction and the cookies bake flat and dense. Test before every batch: drop ½ tsp (3g) into a small bowl with hot water and a splash of white vinegar. It should bubble aggressively within 2 seconds. If the reaction is weak or absent, replace the box. The second possible cause is an oven that was not fully preheated when the pan went in — the cookies spread before the leavening had time to activate and create lift.
My cookies look matte and have no crackle on top — is something wrong?
No — a matte surface with no crackle is the correct result for this recipe. The crackled, shiny top you see on some cookies (like sugar cookies or brownie-style cookies) comes from a high ratio of white granulated sugar and whipped eggs, which creates a thin sugar crust that cracks as the cookie expands. These oatmeal raisin cookies use a balanced ratio of brown sugar to white sugar and no whipping step, which produces the intentionally matte, textured surface visible in every photo. If your cookies have a crackled or shiny top, your oven may be running too hot — reduce by 10–15°F (5–8°C) next time.
Humidity and Altitude Adjustments
In high humidity, the oats and brown sugar absorb moisture from the air during mixing, which can make the dough stickier and the cookies spread slightly more. If your kitchen is very humid, refrigerate the portioned dough balls for 15 minutes before baking — this firms the butter back up and reduces spread. At high altitude (above 3,500 feet / 1,070m), reduce the baking soda to ¾ tsp (2.5g), increase the flour by 2 tablespoons (15g), and reduce the baking temperature by 15°F (8°C) to 335°F (168°C). High altitude causes leavening gases to expand faster and cookies to set more slowly — these adjustments compensate for both effects.
Expert Pro-Tips
Plump the raisins in warm spiced tea instead of plain water. A cup of warm black tea or chai adds a faint background depth to the raisins without changing the cookie’s flavor profile noticeably. It takes the same 10 minutes and costs nothing extra. Drain and pat dry exactly as you would with water-plumped raisins.
Use a cookie scoop and do not clean it between portions. A slightly sticky scoop actually helps the dough release more cleanly by the second or third ball. If you wipe it clean between every scoop, the first ball from each clean scoop tends to stick and tear. Scoop the full batch without stopping to clean the scoop mid-batch.
Bake one test cookie before committing the full sheet. Ovens vary more than the dial suggests. Bake a single dough ball first, let it rest the full 5 minutes, then assess the spread, color, and center texture before baking the remaining 13. If the test cookie spread too much, chill the remaining dough balls for 15 minutes. If it came out too pale, add 1 minute to the bake time. This one-cookie test costs 15 minutes and saves an entire batch.
How to Store Oatmeal Raisin Cookies
Room Temperature
Store the cooled cookies in a hard-sided lidded container — not a zip-lock bag. Zip-lock bags compress the cookies under their own weight as the stack settles, which flattens them and makes the edges go soft and slightly stale faster than they would in a rigid container. Place a sheet of parchment paper between each layer of cookies to prevent them from sticking together as the raisins soften further over time.
At room temperature, these cookies stay soft and chewy for up to 4 days. On day one they are at peak texture — set edges with a slight firmness, soft and chewy centers. By day two the edges have softened to match the center and the whole cookie is uniformly soft throughout. By day three the texture deepens further and the cinnamon note becomes slightly more pronounced as the flavors settle. Many people prefer these on day two or three over day one. Do not store near a heat source or in direct sunlight — warmth accelerates staling.
One additional trick: place a single slice of plain white sandwich bread in the container alongside the cookies. The bread releases moisture slowly into the container environment, which the brown sugar in the cookies absorbs and uses to stay soft. The bread will dry out over 24–48 hours — the cookies will not.
Refrigerator
I do not recommend refrigerating these cookies. The refrigerator pulls moisture out of baked goods faster than room temperature storage does, and oatmeal cookies are particularly susceptible — the oats dry out quickly in a cold environment and the raisins firm back up to nearly the same state they were in before plumping. If you need to hold these longer than 4 days, the freezer is a better option than the fridge. If you do refrigerate them for any reason, seal them in a hard-sided container with a piece of bread inside and bring them back to room temperature for 20–30 minutes before eating.
Freezer — Baked Cookies
Baked cookies freeze well for up to 2 months. Let them cool completely — at least 1 hour at room temperature — before freezing. Wrap each cookie individually in plastic wrap, then place the wrapped cookies in a zip-lock freezer bag with as much air pressed out as possible. The individual wrap is the critical step — without it, the cookies absorb freezer odors and the surface dries out during storage.
To thaw, unwrap the cookies and let them sit at room temperature for 30–45 minutes. Do not microwave to thaw — microwaving softens the center but dries the edges unevenly and produces an uneven texture throughout. If you want a warm cookie from frozen, unwrap and place on a parchment-lined baking sheet in a 300°F (150°C) oven for 6–8 minutes. The oven method restores the slightly set edge and warm, soft center that microwaving cannot replicate. The texture after proper thawing or oven warming is very close to fresh-baked — the brown sugar keeps them from drying out significantly during freezing.
Freezer — Unbaked Dough
This dough freezes beautifully as portioned dough balls. Scoop the dough into 40–45g balls, press 4–5 plumped, patted-dry raisins onto the top of each ball, then place them on a parchment-lined baking sheet and freeze uncovered for 1 hour until solid. Once solid, transfer the frozen dough balls into a zip-lock freezer bag and store for up to 3 months. Label the bag with the date and baking instructions.
To bake from frozen, place the frozen dough balls on a parchment-lined baking sheet and add 2–3 minutes to the standard bake time — 14 to 17 minutes total at 350°F (175°C). Do not thaw before baking — thawing causes the dough to spread more than intended and the raisins on top can slide off before the cookie sets.
🗒 Luna’s Note: I almost always freeze half the dough balls from a batch. Having portioned frozen dough in the freezer means I can have freshly baked oatmeal raisin cookies in under 20 minutes on any given evening without making dough from scratch.
Serving Suggestion
I serve these slightly warm — not hot from the oven, but warmed for about 10 seconds in the microwave if they have been sitting at room temperature for a day or two, or for 6–8 minutes in a 300°F (150°C) oven if I want the edges to firm back up slightly. That brief warmth softens the raisins back to peak plumpness and makes the cinnamon more pronounced. A cold glass of milk alongside is the pairing I come back to every time. These also work well as an afternoon snack with black tea — the slight bitterness of the tea cuts the sweetness of the brown sugar and makes the cinnamon note in the cookie more distinct.
Frequently Asked Questions About Oatmeal Raisin Cookies
Can I make oatmeal raisin cookie dough ahead of time?
Yes — this dough holds well in the refrigerator for up to 48 hours before baking. Scoop the dough into portioned balls before refrigerating rather than storing it as a full bowl of dough. Pre-portioned balls go straight from the fridge onto the parchment-lined baking sheet with no additional prep, and the cold dough actually helps the cookies hold their shape slightly better during the first few minutes in the oven. Add 1 minute to the bake time when starting from cold dough — 13 to 15 minutes total at 350°F (175°C). For longer make-ahead storage, freeze the portioned dough balls as described in the storage section — they keep for up to 3 months and bake directly from frozen.
Can I use quick oats instead of rolled oats?
No — quick oats are not a workable substitute in this recipe. Quick oats are cut into smaller fragments before rolling, which gives them a significantly larger surface area relative to their size. That larger surface area means they absorb moisture from the dough much faster and more completely during baking, dissolving into the cookie interior rather than holding their shape. The result is a dense, gummy texture with no visible oat pieces and none of the hearty chew shown in these photos. Old-fashioned rolled oats are the only oat that produces the correct structure here. Instant oats have the same problem as quick oats — do not substitute those either.
Why did my oatmeal raisin cookies turn out flat?
Flat cookies almost always come down to butter temperature or pan type. Butter that is too warm — past 68°F (20°C) — loses its ability to hold the air built up during creaming, and that structure collapses in the oven heat before the cookie can set. Press your finger into the butter before you start — it should leave a clean indent without the surface looking greasy or shiny. The second most common cause is a dark non-stick baking sheet, which runs hotter than light-colored aluminum and starts melting the fat in the dough before the cookie structure has time to set. A light-colored aluminum sheet lined with parchment paper is the correct pan for this recipe. Gluten development from the flour also plays a role — if the dough was mixed too long after the flour went in, the cookie may spread unevenly.
Can I make oatmeal raisin cookies without raisins?
Yes — the base dough works well with other mix-ins in place of raisins. Dried cranberries are the most common swap and work on a 1:1 basis by weight — use ¾ cup (120g) dried cranberries plumped the same way as the raisins. Dried cherries, chopped dried apricots, or semi-sweet chocolate chips all work at the same quantity. If you use chocolate chips, skip the plumping step entirely — chips go in dry. The one substitution that does not work well is fresh fruit — fresh blueberries, diced apple, or similar fresh additions release too much steam during baking and produce a wet, underbaked center. Stick to dried fruit or shelf-stable mix-ins for the best result with this dough.
How do I keep oatmeal raisin cookies soft?
The brown sugar is doing most of the long-term moisture work in these cookies — its hygroscopic molasses content draws ambient moisture and keeps the interior soft after baking. For storage, use a hard-sided lidded container at room temperature with a slice of plain white bread inside. The bread releases moisture slowly into the container, which the cookies absorb and use to stay soft. Do not refrigerate — the fridge pulls moisture out of oatmeal cookies faster than room temperature storage and the oats dry out quickly. Pulling the cookies from the oven while the centers still look underdone is also critical — overbaked cookies lose the residual moisture they need to stay soft as they cool. If you want to explore what the same brown-sugar-forward moisture strategy does in a different cookie format, my peanut butter oatmeal cookies use the same principle with a completely different flavor profile — worth reading for the science comparison alone.
Why are my oatmeal cookies dry and crumbly?
Dry, crumbly oatmeal cookies are almost always caused by too much flour or overbaking — and frequently both at the same time. Too much flour makes the dough stiff before baking and produces a cookie with not enough fat or moisture to hold it together once baked. If you are not using a kitchen scale, switch to the spoon-and-level method — spoon flour into the measuring cup from the bag and level with a straight edge rather than scooping directly. Overbaking removes the residual moisture the cookie needs to stay tender as it cools. These cookies must come out of the oven while the centers still look soft and slightly underdone. Carryover cooking on the hot pan finishes the centers in the 5-minute rest after baking — the oven does not need to finish the job entirely.
Can I double this oatmeal raisin cookies recipe?
Yes — this recipe doubles reliably. Use the gram weights rather than volume measurements when doubling, as volume measurements accumulate more error at larger quantities. One important note: the baking soda does not scale perfectly at double quantity. When doubling, use 1¾ tsp (5.5g) of baking soda rather than a full 2 tsp — too much leavening at double batch produces an over-risen cookie that collapses and spreads flat as it cools. Bake time remains the same at 12 to 14 minutes — do not extend it for a doubled batch. Bake in separate batches on separate sheets rather than crowding one sheet, and let the baking sheet cool completely between batches.
How does altitude or humidity affect these cookies?
At high altitude (above 3,500 feet / 1,070m), leavening gases expand faster and the cookie structure sets more slowly, which causes spreading and collapse before the center can firm up. Reduce the baking soda to ¾ tsp (2.5g), add 2 tablespoons (15g) of flour, and lower the oven temperature to 335°F (168°C) to slow the bake and give the structure time to set. In high humidity, the brown sugar and oats absorb moisture from the air during mixing, making the dough stickier and more prone to spreading. Refrigerate the portioned dough balls for 15 minutes before baking to firm the butter back up before the pan goes into the oven — this counteracts the extra softness from the humid environment without changing the recipe.
More Cookie Recipes You’ll Love
- Iced Oatmeal Cookies — crisp-edged oatmeal cookies with a thin vanilla glaze that sets hard on top, a completely different texture profile from these chewy cookies but built on the same rolled oat foundation.

Oatmeal Raisin Cookies
Ingredients
Equipment
Method
- Position the oven rack in the middle and heat to 350°F (175°C), then line a light-colored aluminum baking sheet with parchment paper and set aside.
- Beat the ½ cup (113g) softened unsalted butter, ½ cup (100g) plain white granulated cane sugar, and ½ cup (100g) packed light brown sugar together in a stand mixer fitted with the paddle attachment on medium speed for 3 full minutes until pale, fluffy, and no sugar granules remain.
- Add the 1 large room-temperature egg and beat on medium speed for 45 seconds until fully incorporated and the batter looks smooth and glossy, then add the 1 tsp (5ml) pure vanilla extract and beat for 10 more seconds.
- In a separate bowl, whisk together the 1 cup (120g) all-purpose flour, 1 tsp (3g) baking soda, 1 tsp (3g) ground cinnamon, and ½ tsp (3g) fine sea salt, then add the dry mixture to the butter mixture and mix on low speed just until the flour disappears — approximately 20 to 25 seconds — stopping the moment no dry streaks remain.
- Remove the bowl from the mixer and fold in the 1½ cups (135g) old-fashioned rolled oats and ¾ cup (120g) plumped, patted-dry seedless raisins by hand using a silicone spatula with slow wide strokes from the bottom of the bowl upward until evenly distributed — approximately 15 to 20 strokes.
- Using a 2-tablespoon cookie scoop, portion the dough into 40–45g rounded mounds and place them on the prepared baking sheet at least 2 inches (5cm) apart — do not flatten — for a yield of 14 cookies.
- Bake at 350°F (175°C) for 12 to 14 minutes until the edges look set and lightly golden while the centers still look slightly underdone and puffy — do not wait for the centers to look fully baked.
- Leave the cookies on the hot baking sheet for exactly 5 minutes after removing from the oven, then transfer to a wire cooling rack and cool for at least 10 more minutes before eating.