Chewy Molasses Cookies Recipe
Molasses cookies are the ones I reach for when I want a straightforward weeknight bake that actually delivers on flavor — not just sweetness, but something deeper. Dark, warm, a little mysterious. The kind of cookie that makes your kitchen smell like it’s been baking all day, even when it hasn’t.
These are the chewy molasses cookies I come back to every fall — not because the recipe is complicated, but because it isn’t.
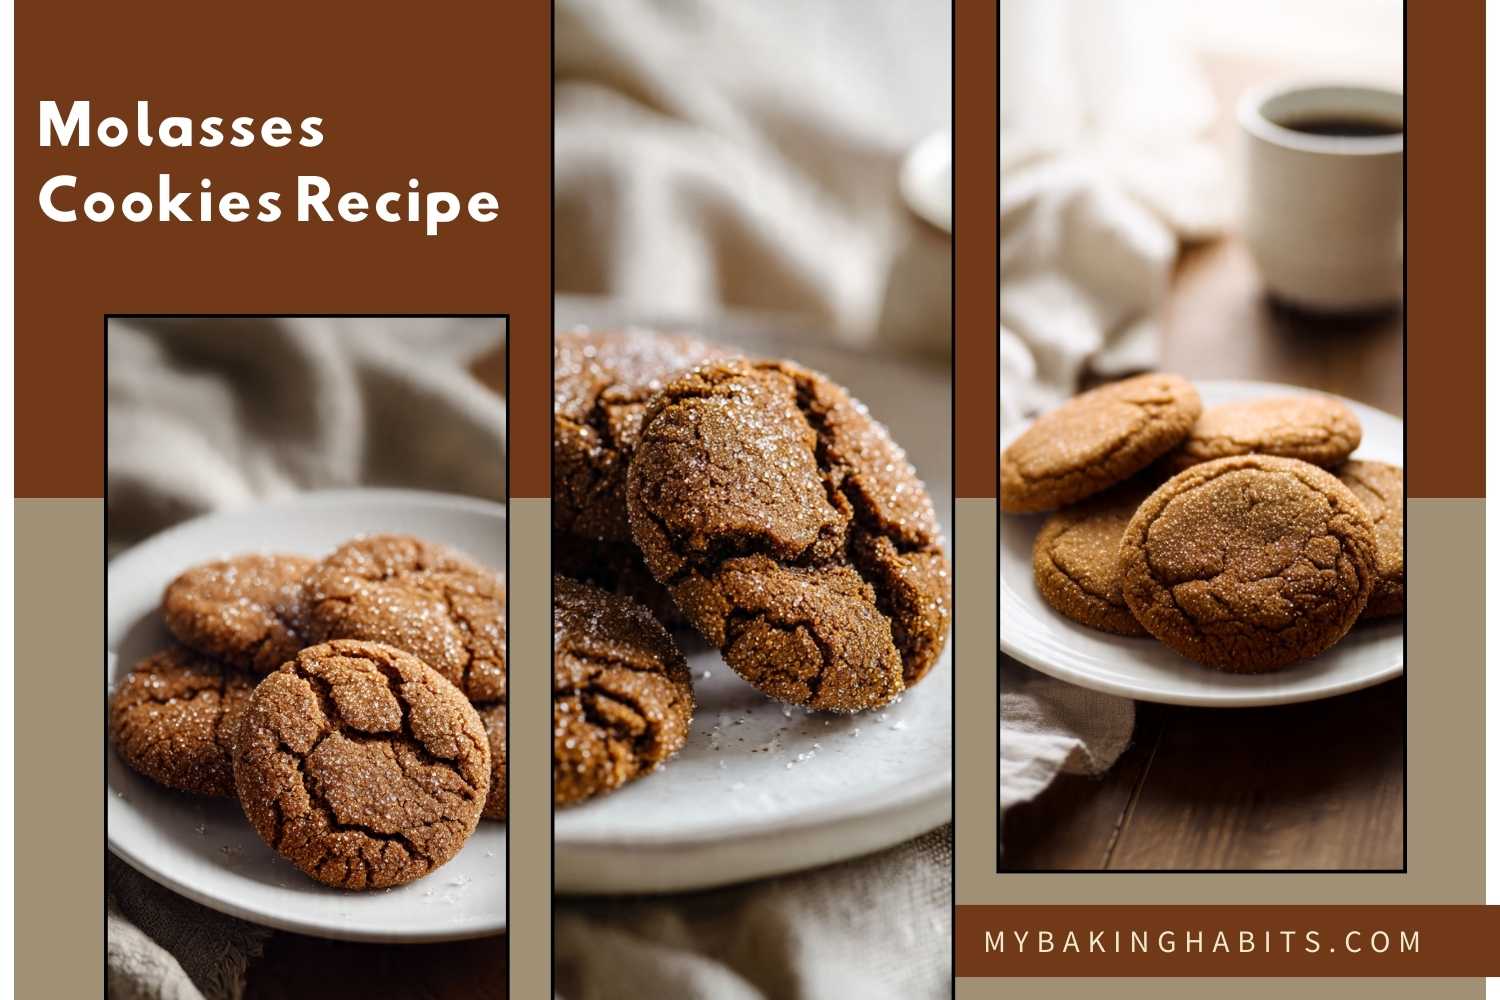
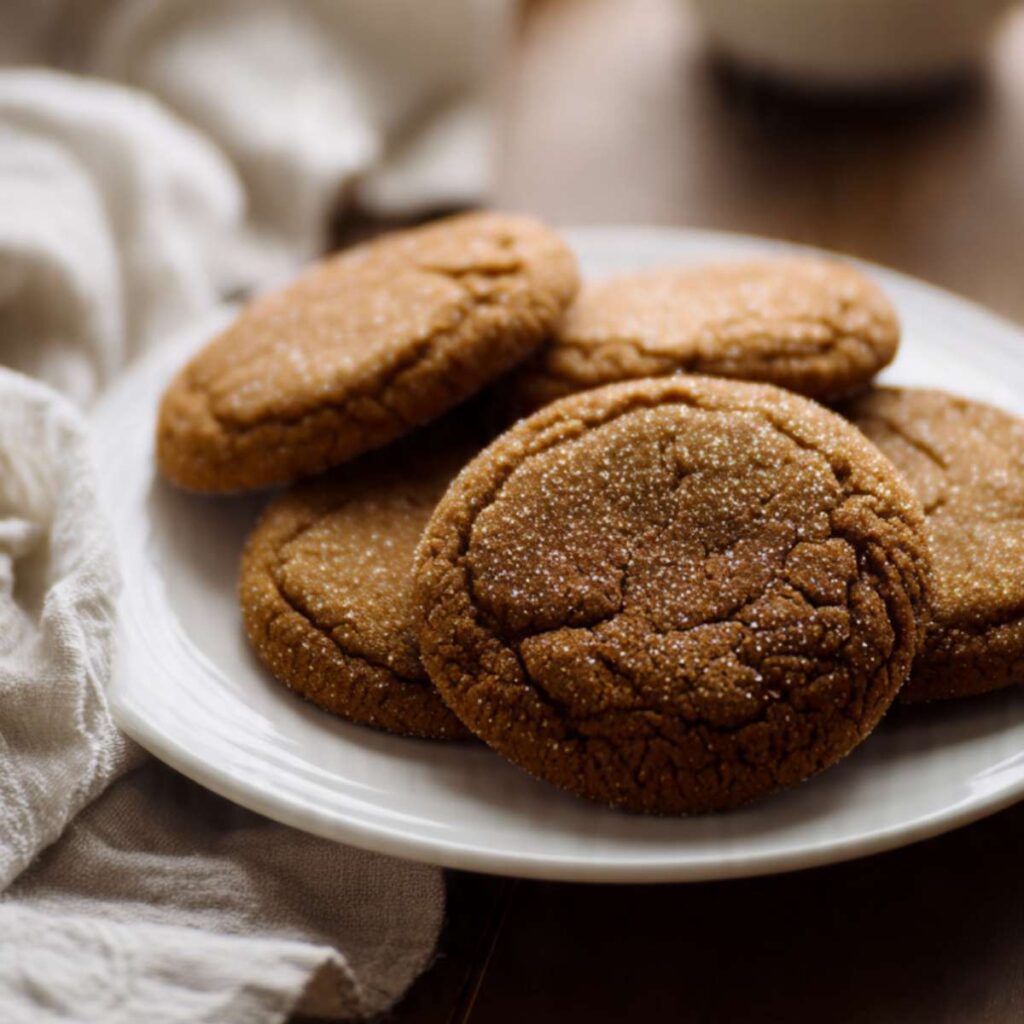
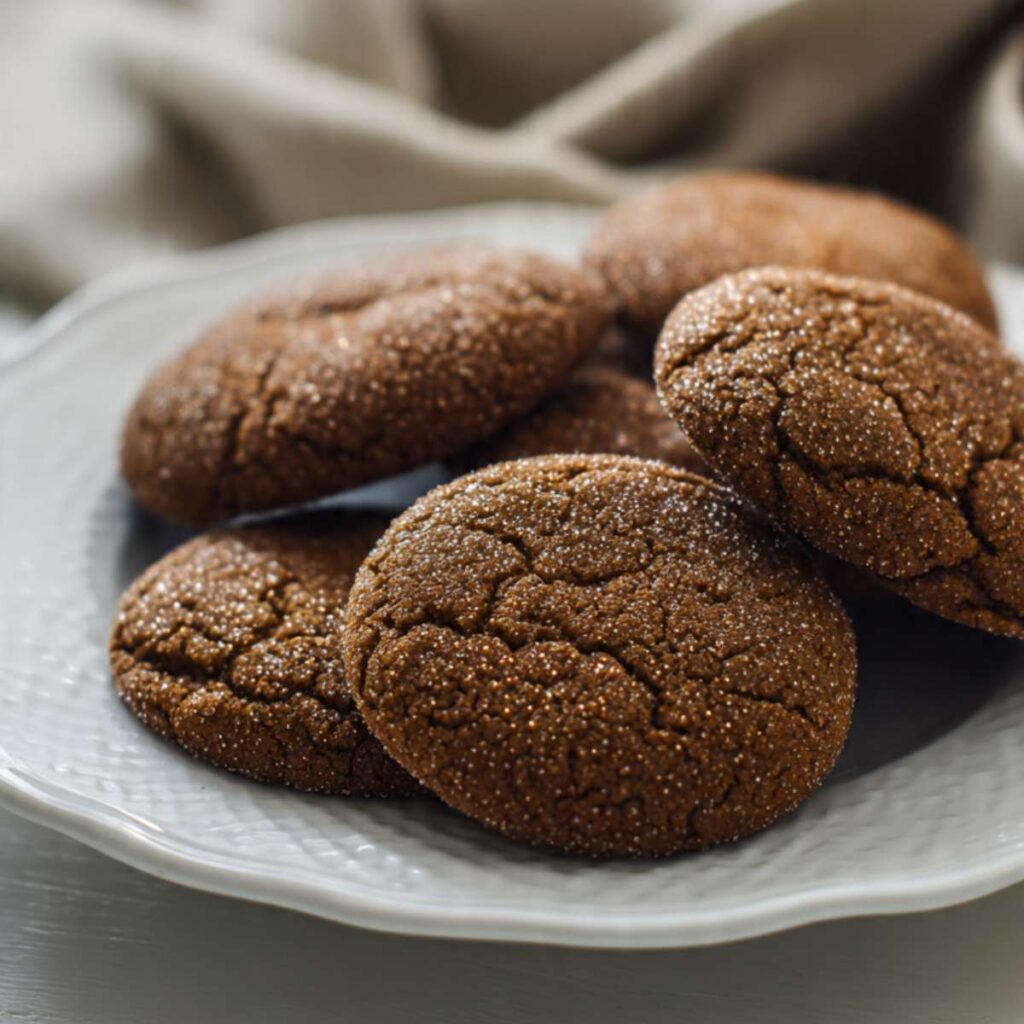
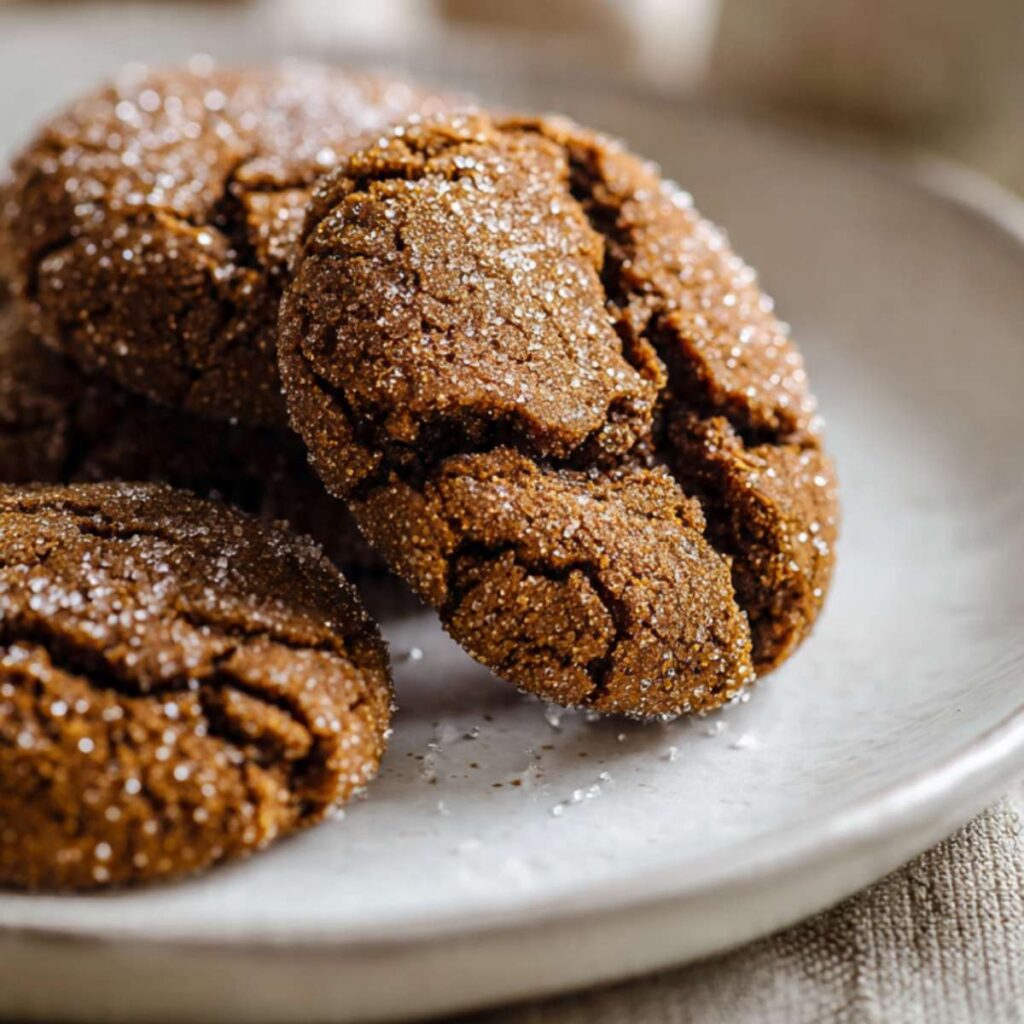
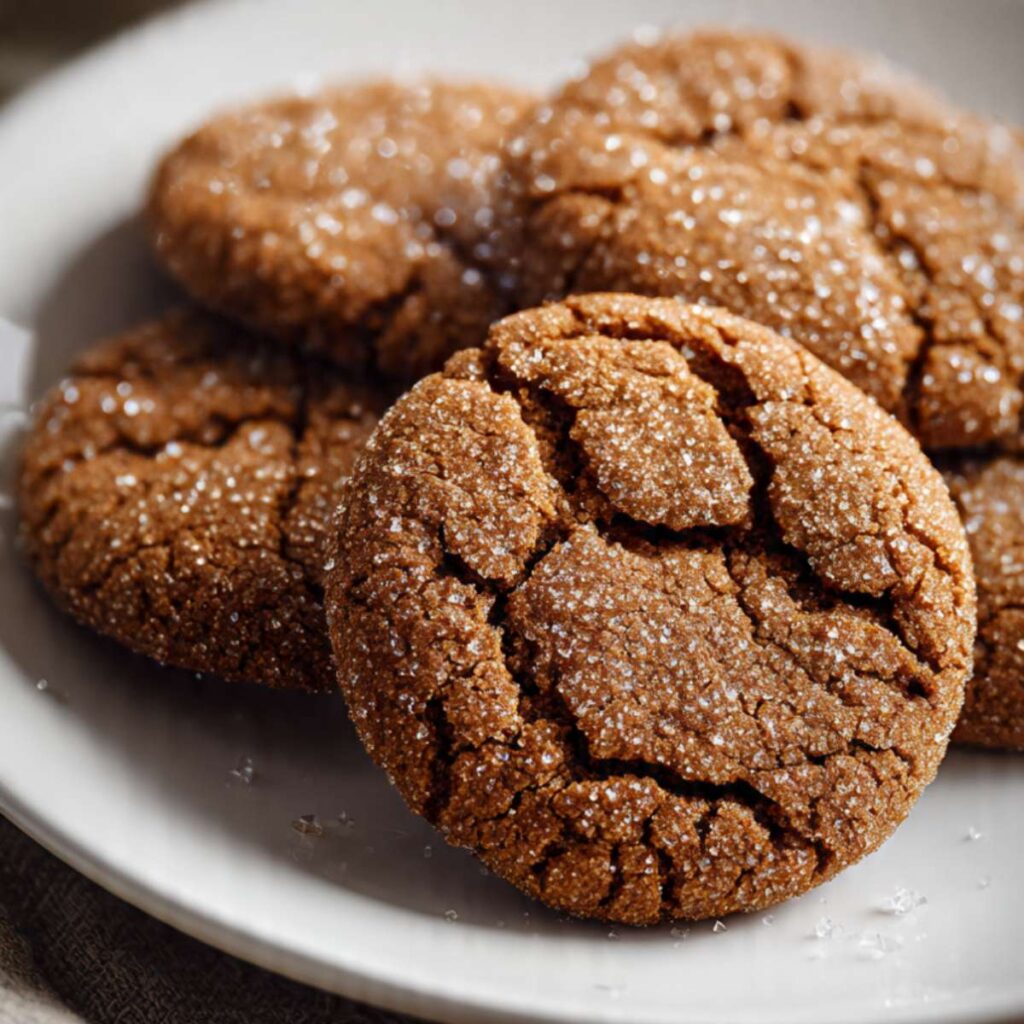
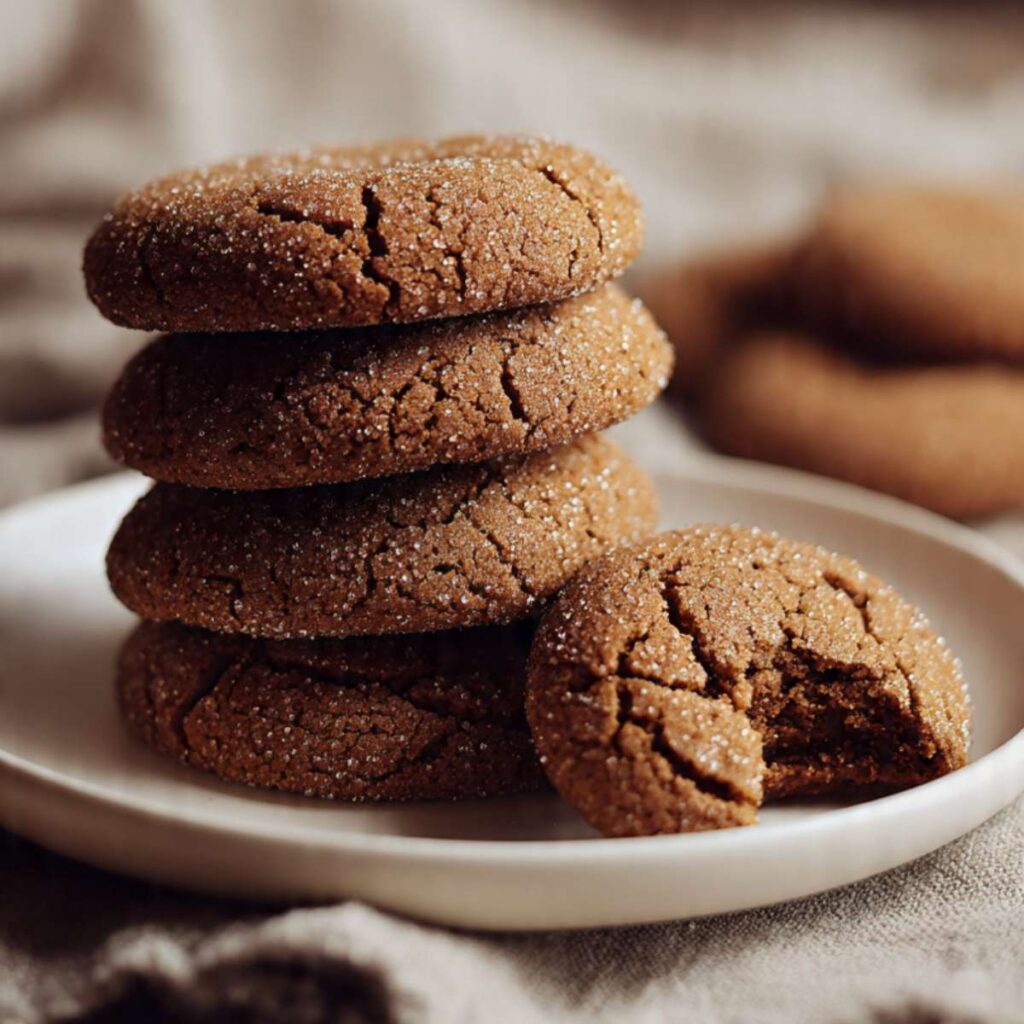
The centers stay dense and soft. The edges set firm with a sugar-crusted crunch from the granulated coating — not a lacy, thin crisp, but a defined edge that holds its shape when you pick the cookie up. And that crinkle top is the result of real technique, not luck.
I’ve tested this recipe through several rounds to lock in the right molasses ratio and bake time. The margin between perfectly chewy and disappointingly dry is narrow, and most recipes don’t tell you that. These do.
I tested ⅓ cup (100g) molasses versus ½ cup (155g). The higher amount gave me cookies with a stronger, almost bitter edge and a texture that stayed too sticky even after cooling. The ⅓ cup version hit the sweet spot — deep flavor without the bitterness, and a crumb that set up chewy and firm by the time the cookies hit room temperature.
I tested bake time at 8 minutes versus 10 minutes at 350°F (175°C). At 8 minutes, the centers were still visibly wet and the cookies never fully set — even after the pan rest. At 10 minutes, the edges were set with the dramatic crackle pattern you can see in the photos, and the centers looked just barely done. That’s the version I kept. Pull them when the center still looks soft. They finish on the pan.
I tested the recipe with and without a dough chill. Room temperature dough spread a little more and gave me flatter cookies with a thinner crackle. Chilled dough (30 minutes in the fridge) produced the taller, rounder profile you see here — with deeper, more defined cracks and a more pronounced dome. I chill the dough now every time.
🗒 Luna’s Note: I always use unsulfured molasses for this recipe — never blackstrap. Blackstrap is too bitter and will overpower everything else. Grandma’s Molasses is the bottle I keep in my pantry.
| Prep Time | Cook Time | Total Time | Yield | Difficulty |
|---|---|---|---|---|
| 15 min + 30 min chill | 10 min | 55 min | ~18 cookies | Easy |
| Calories | Fat | Carbs | Protein |
|---|---|---|---|
| ~203 kcal | ~8g | ~31g | ~2g |
Macros are approximate and will vary based on ingredient brands and cookie size.
Ingredients & Tools for Molasses Cookies Recipe
For the Dough
- 2 ¼ cups (280g) all-purpose flour, spooned and leveled
- 2 teaspoons (10g) baking soda
- ½ teaspoon (3g) fine sea salt
- 2 teaspoons (5g) ground ginger
- ¾ cup (170g) unsalted butter, softened to room temperature
- 1 cup (200g) packed light brown sugar
- 1 large egg, room temperature
- ⅓ cup (100g) unsulfured molasses (not blackstrap)
For Rolling
- ⅓ cup (65g) granulated sugar
Before You Start
Three things to do before you begin:
Pull your butter and egg out 60–90 minutes before baking. Room temperature butter creams properly — cold butter will not incorporate air the same way and your cookies will spread differently. Room temperature egg emulsifies into the butter base without breaking the mixture.
Check your butter before you start creaming. It should hold a finger indent easily without the finger sliding through — waxy and cool to the touch, not shiny or greasy. If it looks glossy or your finger sinks all the way through without resistance, it’s too warm. Give it 15 minutes in the fridge before you begin.
Measure your flour by weight or use the spoon-and-level method. Scooping directly from the bag compresses the flour and can add up to 30g extra per cup. That extra flour makes cookies dry and crumbly instead of chewy.
Use unsulfured molasses — not blackstrap. Check your bottle before you start. Blackstrap molasses is significantly more bitter and will overpower the warm, caramel-like flavor this recipe depends on. Look for “unsulfured” or “original” on the label. Grandma’s Molasses and Brer Rabbit are both reliable options.
Necessary Tools
- Kitchen scale (preferred over measuring cups for accuracy)
- Stand mixer with paddle attachment, or hand mixer
- Two medium mixing bowls — one for dry, one for wet
- Whisk (for dry ingredients)
- Rubber spatula or wooden spoon
- Cookie scoop, 1.5 tablespoon capacity
- Parchment-lined half-sheet baking sheet (18×13 inch)
- Cooling rack
- Plastic wrap (for dough chill)
- Oven thermometer (optional but recommended)
- Measuring cups and spoons (optional if using a scale)
How to Make Molasses Cookies
Step 1: Whisk the Dry Ingredients for Even Leavening
In a medium bowl, whisk together 2 ¼ cups (280g) all-purpose flour, spooned and leveled, 2 teaspoons (10g) baking soda, ½ teaspoon (3g) fine sea salt, and 2 teaspoons (5g) ground ginger. Whisk for a full 30 seconds — not just a quick stir.
The 2 teaspoons of ground ginger is the only spice in this recipe, and that’s intentional. It gives a clean, warm heat without competing with the deep molasses flavor. The 2 teaspoons of baking soda is higher than a typical cookie — it needs to be, because molasses is acidic and the two react together to produce the carbon dioxide that lifts the dough and creates the crinkle top. If you reduce the baking soda, the cookies won’t crack properly.
Don’t skip the whisk step and fold everything in together. Baking soda that isn’t evenly distributed causes uneven rise — some cookies will crack correctly, others will puff unevenly and never develop the dramatic crinkle top you’re after.
Your dry mix should look uniform and pale, with no visible clumps or dark specks from undistributed baking soda. Set this bowl aside.
Step 2: Cream the Butter and Brown Sugar for Structure and Chew
In the bowl of your stand mixer fitted with the paddle attachment — or in a large bowl with a hand mixer — beat ¾ cup (170g) unsalted butter, softened to room temperature and 1 cup (200g) packed light brown sugar together on medium speed.
The packed light brown sugar is doing two jobs here. First, the molasses content in brown sugar is hygroscopic — it holds onto moisture and is the main reason these cookies stay soft for days after baking. Second, packing the sugar tightly when measuring ensures you’re using the full 200g — loosely spooned brown sugar can come in 20–30g short, which changes both the sweetness and the moisture level of the dough.
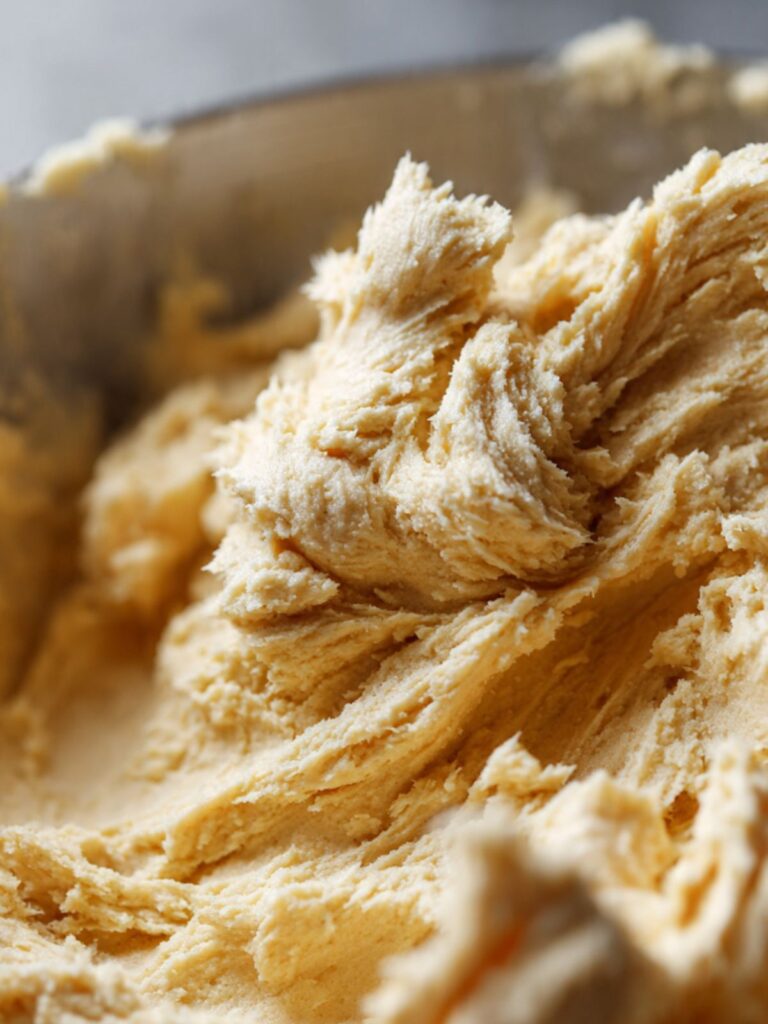
Beat for 3 full minutes. The mixture should go from grainy and stiff to pale, fluffy, and noticeably increased in volume — almost like a thick frosting. That color shift from dark to light tan is your visual cue that enough air has been incorporated through aeration.
Don’t rush this step. Under-creamed butter and sugar means less air in the dough, which means your cookies won’t dome properly and the crinkle top won’t form. Your creamed mixture should hold a soft peak when you lift the paddle and feel light — not dense or greasy. If it still looks grainy after 3 minutes, your butter was too cold. Let it sit 10 more minutes and cream again.
Step 3: Add the Egg and Molasses
With the mixer on low, add 1 large egg, room temperature to the creamed butter mixture. Increase to medium speed and beat for 45 seconds until the egg is fully incorporated and no streaks remain.
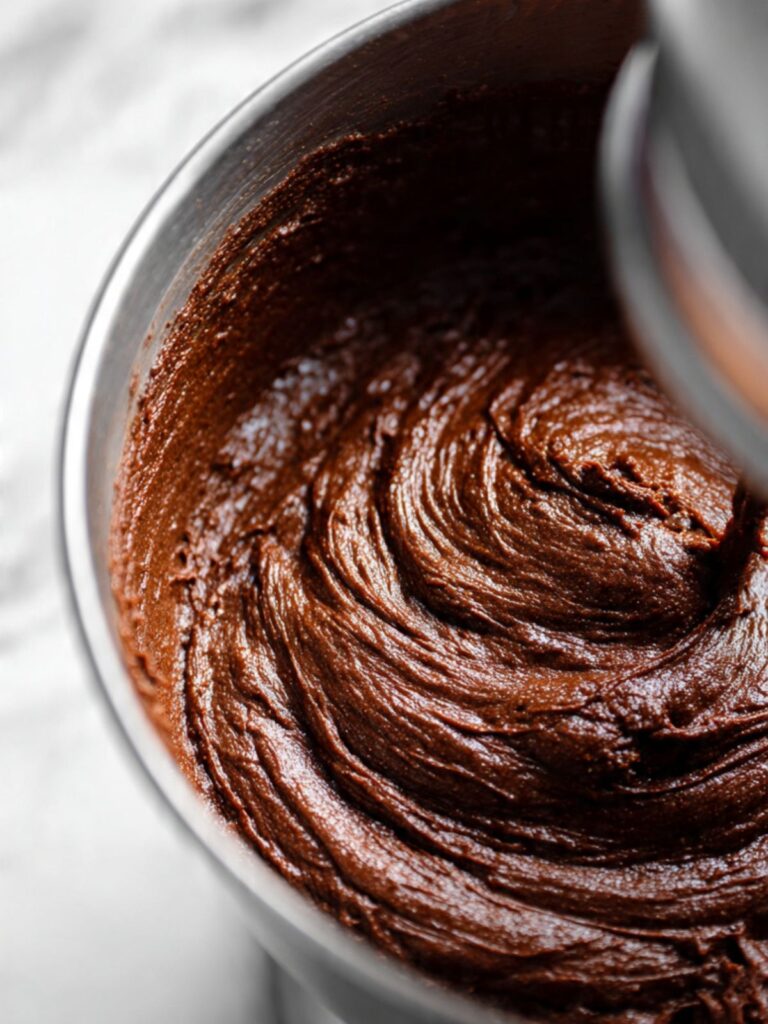
Scrape down the sides of the bowl with your rubber spatula. Then add ⅓ cup (100g) unsulfured molasses (not blackstrap) and beat on low for another 20–30 seconds. The mixture will turn a deep, dark mahogany brown and look thick and glossy — exactly as you see in the finished cookies. That color is your confirmation the molasses is fully combined.
Don’t add the molasses before the egg. Adding molasses first makes it harder for the egg to emulsify into the fat base. Always egg first, then molasses.
🗒 Luna’s Note: I always scrape the bowl twice during this step — once after the egg, once after the molasses. Molasses is heavy and sinks to the bottom. If you don’t scrape it up, the last few cookies in the batch will taste different from the first.
Your wet mixture should look uniform in color, with no lighter streaks of butter visible. If you see pale ribbons, scrape and mix for another 15 seconds.
Step 4: Combine Wet and Dry Ingredients — Stop Early
Add the dry ingredient bowl to the wet mixture all at once. Mix on the lowest speed — or fold by hand with a rubber spatula — until the flour just disappears. This takes about 20–30 seconds on low speed.
The 2 ¼ cups (280g) all-purpose flour, spooned and leveled is measured this way for a reason. Scooping flour directly compresses it — you can end up with 30–40g extra per cup without knowing it. Extra flour in a molasses dough produces cookies that are stiff, dry, and won’t crack properly on top. Weigh it or spoon-and-level every time.
Stop the moment you no longer see dry flour streaks. The dough will look thick, dark, and slightly tacky — like a cross between brownie batter and cookie dough. It should pull away from the sides of the bowl cleanly but still feel soft when pressed.
Do not overmix. Every extra second of mixing after the flour hydrates develops more gluten, making the cookies tougher. Twenty seconds past “just combined” is already too much.
Your finished dough should hold its shape when scooped but not feel stiff. If it seems very loose or sticky, that’s the molasses — move directly to the chill step.
Step 5: Chill the Dough
Cover the bowl tightly with plastic wrap and refrigerate for 30 minutes minimum. Do not skip this step.
Chilling firms the butter back up after all the mixing, which controls how much the cookies spread in the oven. Room temperature dough spreads too fast — the exterior sets before the cookies have time to dome and crack properly. Chilled dough holds its shape longer, giving you the tall, rounded profile and the deep, dramatic crackle pattern you can see across the tops of the cookies in the photos.
Don’t chill for more than 24 hours without scooping first. Dough left in a single mass in the fridge for too long becomes very firm and difficult to portion evenly. If you want to make the dough ahead, scoop and roll it into balls before refrigerating overnight.
Your dough after chilling should feel firm enough to scoop cleanly — not sticky, not rock hard. If it’s too firm to scoop after 30 minutes, let it sit at room temperature for 5 minutes before portioning.
Step 6: Preheat the Oven and Prep the Baking Sheet
Set your oven to 350°F (175°C) and allow it to fully preheat — at least 20 minutes. Line a half-sheet baking sheet (18×13 inch) with parchment paper. Do not use a dark-colored pan; dark metal absorbs more heat and will over-brown the bottoms before the centers are done.
Don’t rely on your oven’s preheat beep. Most residential ovens run 15–25°F off their stated temperature. An oven thermometer tells you the real temperature inside the cavity. If your oven runs hot, your cookies will set too fast on the outside while the center stays raw.
Your parchment should lie flat with no lifting corners. If it won’t stay down, clip the corners or place the pan in the warm oven for 30 seconds to help it relax flat.
Your station should now be fully ready — oven at temperature, pan lined flat, and workspace clear. This is the moment to pull your chilled dough from the fridge and begin portioning.
Step 7: Scoop, Roll, and Place
Remove the chilled dough from the refrigerator. Using a 1.5-tablespoon cookie scoop, portion the dough into balls — each one approximately 30g. Roll each ball between your palms until smooth and round.
Pour ⅓ cup (65g) granulated sugar into a shallow bowl. Roll each dough ball in the sugar until fully coated on all sides. As you can see in the close-up photos, the sugar coating is generous — not a light dusting. Every part of the surface should be covered in glittering granules before the ball goes on the pan.

Place the sugar-coated dough balls on the parchment-lined baking sheet, spacing them at least 2 inches apart. These cookies spread moderately. Crowding them causes the edges to merge and the crinkle tops won’t form properly.

Don’t flatten the dough balls before baking. They will spread and crack on their own in the oven. Pressing them down pre-bake removes the dome that creates the signature crinkle pattern.
Your sheet should look like evenly spaced, sugar-coated spheres — round, uniform, and untouched. That’s exactly right.
Step 8: Bake
Slide the pan into the center rack of your fully preheated oven. Bake for 10–11 minutes.
At the 10-minute mark, look for these three cues together — all three must be present before you pull the pan:
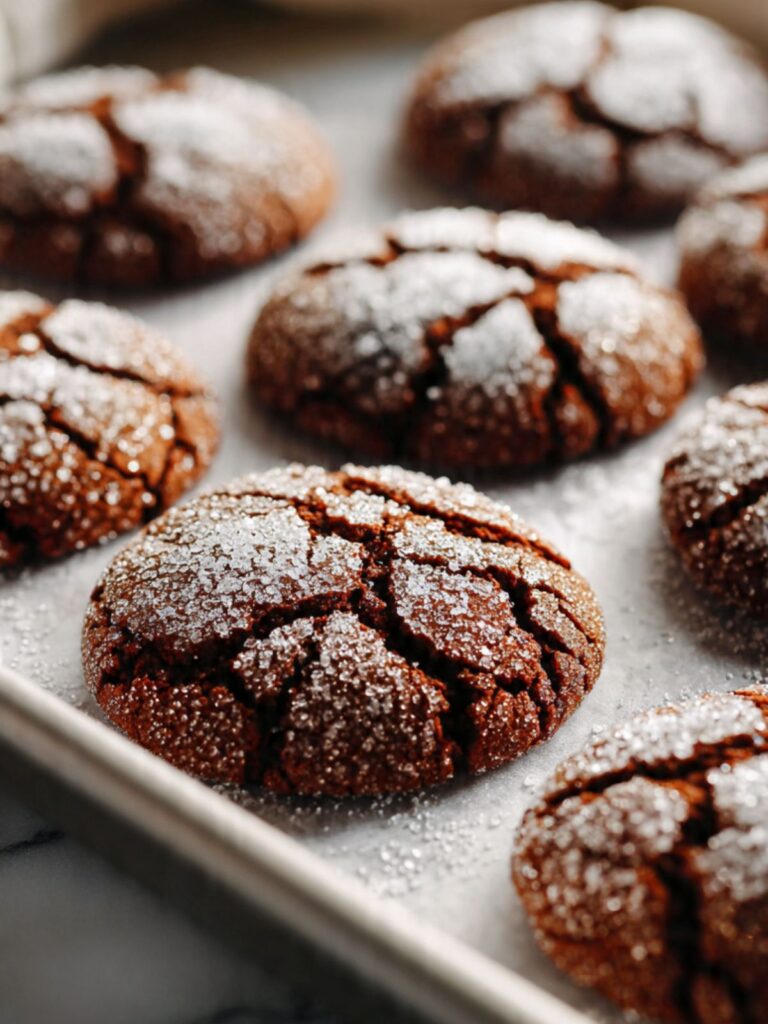
The edges are set and firm with visible crinkle lines radiating outward. The top surface is cracked and fractured — dramatic, multi-directional breaks across the entire cookie, exactly like the cookies in the photos. The center still looks slightly soft and underdone. That last point is the one most people get wrong. If the center looks fully set in the oven, the cookie is already overbaked. Pull at soft center.
Don’t open the oven door before the 10-minute mark. The heat drop from an early peek can cause the cookies to sink instead of crack.
🗒 Luna’s Note: I bake one test cookie first — always. One cookie on a small piece of parchment, same rack, same time. It tells me exactly where my oven sits before I commit the whole batch.
Your cookies fresh out of the oven will look slightly underdone in the center. That is correct. Do not put them back in.
Step 9: Pan Rest and Cool
Leave the cookies on the hot baking sheet for exactly 5 minutes after pulling from the oven. Do not move them. The residual heat from the pan continues cooking the centers — this is carryover cooking, and it’s what takes these from raw-looking to perfectly set without drying them out.
After 5 minutes, transfer the cookies to a wire cooling rack using a thin spatula. They will feel delicate at this stage — work quickly and confidently. Let them cool for at least 10 minutes on the rack before eating.
Don’t transfer straight from oven to rack. Skipping the pan rest means the centers haven’t finished setting from carryover heat. The cookies will be too soft to hold their shape when you lift them, and the crumb structure won’t firm up correctly.
As you can see in the stacked shot, fully cooled cookies hold their shape cleanly — domed top, firm edge, dense and chewy interior with that tight, moist crumb visible in the broken half.
Your finished cookies should feel firm on the outside, slightly soft when pressed gently in the center, and smell deeply of warm molasses and ginger. That’s the one.
The Science Behind the Best Molasses Cookies
Why Molasses Makes These Cookies Stay Soft for Days
Molasses is hygroscopic — it actively attracts and holds onto moisture from the air around it. This is why the recipe specifies unsulfured molasses — it has a higher residual sugar content than blackstrap, which means more hygroscopic activity and a softer, more caramel-flavored cookie. That single property is the reason these chewy molasses cookies stay soft on day three the same way they were on day one, while a standard sugar cookie would be dry and crumbly by then.
Brown sugar works the same way. It contains residual molasses from the refining process, which means you have two hygroscopic ingredients working together in this dough. The combination creates a crumb that resists drying out far longer than a cookie made with white sugar alone.
This is also why the texture feels different at room temperature versus straight from the oven. The moisture redistribution that happens as the cookie cools is part of what locks in that dense, tight, chewy crumb structure you see in the broken cookie in the stacked shot. Give them the full cool time — don’t rush it.
🗒 Luna’s Note: I’ve left these in an airtight container for four days and they were still soft. The molasses does real work here. If your cookies dry out quickly, the most likely culprit is overbaking — not the recipe.
What Creates the Crinkle Top — and Why Sugar Is the Mechanism
The dramatic crackle pattern that makes molasses crinkle cookies instantly recognizable isn’t random. It’s the result of a specific sequence that happens inside the oven during the first few minutes of baking.
When the sugar-coated dough balls hit the hot oven, the exterior crust sets first — the sugar melts and begins to firm into a shell. Meanwhile, the interior is still expanding from the heat and from the carbon dioxide released by the baking soda reacting with the molasses. That expanding interior pushes outward against an already-firming crust, and the crust fractures. Those fractures are your crinkle lines.
The depth and drama of those cracks depends on two things: how cold the dough is when it goes in (chilled dough sets the crust faster, creating more dramatic fractures) and how generously the balls are coated in sugar (more sugar = thicker crust = more defined cracks). Both variables are built into this recipe. For more on how sugar behaves differently in various cookie recipes, the [gingersnap cookies](gingersnap cookies) article covers this in detail in the context of a crisper, snappier bake.
The Role of Baking Soda — and Why the Amount Matters
This recipe uses 2 teaspoons (10g) of baking soda — a relatively high amount for a cookie this size. That’s intentional, and it does two things.
First, baking soda is a base. Molasses is acidic. When the two meet in the dough, a neutralization reaction produces carbon dioxide gas, which leavens the cookie and helps it dome before the crust sets. Without enough baking soda, the cookies won’t rise enough to create the tension that causes cracking.
Second, baking soda accelerates the Maillard reaction — the chemical process responsible for browning. More baking soda raises the pH of the dough, and browning happens faster at higher pH levels. That’s part of why these cookies get so deeply colored even at a moderate 350°F (175°C). The mahogany brown you see in the photos isn’t just from the molasses pigment — the baking soda is actively pushing the color deeper.
Don’t reduce the baking soda to make the cookies “less puffy.” Reducing it flattens the dome, weakens the crinkle formation, and dulls the color all at once.
Troubleshooting & Pro-Tips
Common Mistakes
My cookies went completely flat with no crinkle top.
The most common cause is skipping the dough chill or using butter that was too warm — melted or greasy rather than properly softened. Warm butter means the fat is already liquid going into the oven, so the cookies spread too fast before the crust can set and fracture. The second cause is a low oven temperature. If your oven runs cool, the exterior never firms up fast enough to create the tension that produces crackle lines. Fix: always chill the dough for at least 30 minutes, verify your oven temperature with a thermometer, and make sure your butter is softened but still cool and waxy to the touch — not shiny or greasy.
My cookies came out hard and dry instead of chewy.
This is an overbake problem almost every time. Molasses cookies finish cooking on the pan after you pull them from the oven. If you wait until the centers look fully set in the oven, they will be overbaked by the time they cool. Fix: pull the pan at 10 minutes when the edges are set and cracked but the center still looks soft and underdone. Let them rest on the pan for 5 full minutes before moving them. If they are still coming out dry, reduce bake time by 1 minute and check again.
My cookies taste bitter instead of warm and caramel-like.
This is a molasses problem. Blackstrap molasses is significantly more bitter than unsulfured molasses and will overpower every other flavor in the dough. Fix: check your bottle. It must say “unsulfured” or “original” — not blackstrap. Grandma’s Molasses and Brer Rabbit Original are both reliable. If you have already baked with blackstrap and the cookies are bitter, there is no fix for the baked batch — use unsulfured molasses next time.
3 Expert Pro-Tips
Weigh your molasses directly into the mixing bowl. Molasses is thick, sticky, and clings to everything it touches. Measuring it in a separate measuring cup means you lose a meaningful amount to the walls of the cup — sometimes as much as 10g. Place your mixing bowl on the scale, tare it, and pour the molasses directly in until you hit 100g. Clean, accurate, and no wasted molasses stuck to a cup you now have to scrub.
Roll the dough balls immediately after scooping, before the dough warms up. Chilled dough is much easier to roll into a clean sphere than dough that has been sitting out. Work in small batches — scoop 4 or 5 balls, roll them, coat them in sugar, place them on the pan, then go back for the next group. If the dough starts feeling sticky and soft mid-session, slide the bowl back into the fridge for 10 minutes before continuing.
Use a light-colored, heavy-gauge baking sheet. Dark pans absorb more radiant heat and will over-brown the bottoms of these cookies before the centers are done — especially with the high sugar content in this dough. A light aluminum half-sheet pan with parchment gives you even heat distribution and a bottom that bakes at the same rate as the top. If all you have is a dark pan, add a second pan underneath as an insulating layer and reduce the oven temperature by 10°F (5°C).
A Note on Spice Level
This recipe uses ground ginger only — no cinnamon, no cloves, no black pepper. That is a deliberate choice. A single spice lets the molasses flavor lead without competition, which gives these cookies their clean, warm taste rather than the sharp, layered heat of a gingersnap or gingerbread cookie.
If you want a more complex spice profile, add ½ teaspoon (1g) ground cinnamon and ¼ teaspoon (0.5g) ground cloves to the dry ingredient bowl alongside the ginger. I have tested this version — the texture stays exactly the same, and the flavor shifts toward a softer gingerbread. Keep the ground ginger at 2 teaspoons (5g) regardless of what else you add. Reducing it to compensate flattens the whole spice profile rather than balancing it.
How to Store Molasses Cookies
Room Temperature
Store baked molasses cookies in an airtight container at room temperature for up to 5 days. Layer them with parchment paper between each layer if stacking — the sugar crust is slightly tacky and cookies will stick together without a barrier.
Do not store them in a loosely covered container or on an open plate. Exposure to air is what dries them out. The airtight seal is what keeps the hygroscopic molasses and brown sugar doing their job — holding moisture inside the crumb.
Do not store alongside crispy cookies like gingersnaps or shortbread. Molasses cookies release moisture as they sit, and that moisture will soften anything nearby. Keep them in their own container.
Refrigerator
Refrigerating baked molasses cookies is not recommended. The cold, dry air of the refrigerator pulls moisture out of the crumb faster than room temperature storage does, and the cookies will become firm and dry within 24 hours. Room temperature in an airtight container is always the better option for this recipe.
If your kitchen is very warm — above 75°F (24°C) — and you’re concerned about the cookies, refrigerating is acceptable as a short-term measure. Bring them back to room temperature for 20 minutes before eating to let the crumb soften again.
Freezer — Baked
Baked molasses cookies freeze well for up to 2 months. Let them cool completely first — at least 1 hour at room temperature. Wrap each cookie individually in plastic wrap, then place them in a zip-top freezer bag with as much air pressed out as possible.
To thaw, place them on the counter at room temperature for 30–45 minutes. Do not microwave to thaw — the sugar crust will turn sticky and the crumb will toughen. For a warm cookie straight from frozen, place unwrapped cookies on a parchment-lined baking sheet in a 300°F (150°C) oven for 5–6 minutes. They come out tasting freshly baked.
Freezer — Unbaked
This is the method I use most. Scoop and roll the dough balls, coat them fully in granulated sugar, and place them on a parchment-lined baking sheet in a single layer. Freeze until solid — about 1 hour. Then transfer to a zip-top freezer bag and freeze for up to 3 months.
Bake directly from frozen — no thawing needed. Add 2–3 minutes to the standard bake time, so 12–13 minutes at 350°F (175°C). Watch for the same doneness cues: cracked tops, set edges, soft center. The crinkle pattern still forms beautifully from frozen dough.
🗒 Luna’s Note: I keep a bag of frozen dough balls in my freezer at almost all times during fall and winter. Twelve minutes and I have fresh molasses cookies on a Tuesday night. I coat them in sugar before freezing so there’s genuinely nothing to do but pull them out and put them in the oven.
Serving Suggestion
I serve these slightly warm — about 10 minutes out of the oven when the center is still just barely soft. A cold glass of milk is the obvious pairing and it works every time. In the evenings I’ll have two with a strong cup of black tea, which cuts through the sweetness and brings out the ginger more than you’d expect.
🗒 Luna’s Note: On the rare occasion there are leftovers on day two, I’ll warm one in the microwave for exactly 10 seconds. It brings the center back to that fresh-baked soft, and the sugar crust gets the faintest bit of crunch again. Ten seconds — not more.
Frequently Asked Questions
What makes molasses cookies chewy?
Two ingredients are doing the structural work here: molasses and brown sugar. Both are hygroscopic, meaning they attract and hold onto moisture from the environment. That retained moisture is what keeps the crumb soft and dense instead of dry and crumbly. The creaming method also contributes — beating softened butter with brown sugar incorporates air into the dough, which gives the cookie structure without making it cakey. Pull them from the oven when the center still looks soft, and let carryover cooking on the hot pan finish the job. That combination of hygroscopic ingredients and careful bake time is what produces the chewy crumb structure these cookies are known for.
Can I use blackstrap molasses for molasses cookies?
No — and this is the most important ingredient note in the entire recipe. Blackstrap molasses is the byproduct of the third boiling of sugarcane, which means almost all of the sugar has been extracted. What remains is intensely bitter, mineral-heavy, and far more acidic than unsulfured molasses. Using it in this recipe will make your cookies taste sharp and bitter instead of warm and caramel-like. Use unsulfured molasses — sometimes labeled “original” molasses. Grandma’s Molasses and Brer Rabbit Original are the two brands I keep in my pantry. If your bottle says blackstrap anywhere on the label, set it aside — these soft molasses cookies need the gentler, sweeter flavor that only unsulfured molasses delivers.
Why did my molasses cookies go flat?
Flat cookies with no crinkle top almost always come down to one of three things. First, the dough wasn’t chilled — room temperature dough spreads too fast in the oven before the crust has time to set and fracture. Second, the butter was too warm or partially melted before creaming, which means the fat went into the oven already liquid and spread immediately. Third, the oven temperature was too low — if the exterior doesn’t set quickly enough, there’s no crust tension to produce the crackle. Chill your dough for at least 30 minutes, verify your oven temperature with a thermometer, and make sure your butter is softened but still cool and waxy to the touch — not shiny or greasy.
Can I make molasses cookie dough ahead of time?
Yes — and it’s actually the better way to make this recipe. The dough can be made and refrigerated for up to 48 hours before baking. Scoop and roll the dough balls before refrigerating so the dough doesn’t become too firm to portion cleanly after a long chill. You can also freeze the pre-scooped, sugar-coated dough balls for up to 3 months and bake directly from frozen, adding 2–3 minutes to the bake time. If you enjoy spiced cookies with deeper, more developed flavor, an overnight rest in the fridge allows the ginger and molasses to mellow and integrate — the flavor on day two is noticeably rounder than fresh dough. For more make-ahead cookie strategies, the [snickerdoodle cookies](snickerdoodle cookies) article covers overnight dough rest in detail.
What is the difference between molasses cookies and gingersnaps?
The primary difference is texture and moisture content. Gingersnaps are designed to be crisp and snappy — they use less fat and moisture, and they are baked longer at a higher temperature until the center is fully dry. These soft molasses cookies are the opposite: more butter, more molasses, pulled from the oven while the center is still soft. The spice profile also differs — gingersnaps often combine ginger, cinnamon, cloves, and black pepper for a sharp, layered heat. This recipe uses ground ginger only, which gives a warmer, simpler flavor without the sharp bite. If you prefer a crisper texture, reduce the molasses by 2 tablespoons and bake for an additional 2–3 minutes.
Can I make these molasses cookies gluten free?
A 1:1 gluten free flour blend can be substituted for the all-purpose flour with reasonable results. Look for a blend that contains xanthan gum — this replaces some of the structure that gluten development from wheat protein would normally provide, helping the cookies hold their shape instead of crumbling. Without gluten development, the crumb structure relies more heavily on the egg and butter to hold everything together, which is why room temperature ingredients matter even more in the gluten free version. The texture will be slightly more tender and a little less chewy than the standard version, and the crinkle top may be less dramatic since gluten free doughs spread differently. Weigh your gluten free flour to 280g and chill the dough for the full 30 minutes — gluten free doughs are softer and spread more readily than wheat-based doughs.
More Cookies You’ll Love
- Gingersnap Cookies — if you love the warm spice in these molasses cookies but want a crisp, snappy texture instead of chewy, gingersnaps are the next recipe to try. Same flavor family, completely different bite.
- Snickerdoodle Cookies — another sugar-rolled drop cookie with a crackly top and soft center. If the sugar crust on these molasses cookies is what you love most, snickerdoodles deliver the same satisfaction with a cinnamon-cream of tartar tang.
- Oatmeal Raisin Cookies — chewy, brown sugar-forward, and warm with spice. If you’re drawn to cookies with deep flavor and a dense, moist crumb, oatmeal raisin is the natural next bake.

Chewy Molasses Cookies
Ingredients
Equipment
Method
- In a medium bowl, whisk together the flour, baking soda, salt, and ground ginger for 30 seconds until evenly combined with no visible clumps. Set aside.
- In the bowl of a stand mixer fitted with the paddle attachment, beat the softened butter and packed brown sugar together on medium speed for 3 full minutes until pale, fluffy, and noticeably increased in volume.
- Add the egg and beat on medium for 45 seconds until fully incorporated. Scrape down the bowl, then add the unsulfured molasses and beat on low for 20–30 seconds until the mixture is deep brown and glossy with no pale streaks remaining.
- Add the dry ingredients to the wet ingredients and mix on the lowest speed for 20–30 seconds, just until no flour streaks remain. Do not overmix. The dough will be thick, dark, and slightly tacky.
- Cover the bowl tightly with plastic wrap and refrigerate for 30 minutes minimum.
- Preheat the oven to 350°F (175°C). Line a light-colored half-sheet baking sheet with parchment paper and allow the oven to fully preheat for at least 20 minutes.
- Using a 1.5-tablespoon cookie scoop, portion the chilled dough into 30g balls, roll each between your palms until smooth, then roll fully in granulated sugar until every surface is coated. Place on the parchment-lined baking sheet at least 2 inches apart. Do not flatten.
- Bake on the center rack for 10–11 minutes, until the edges are set and show dramatic crinkle lines across the tops, but the centers still look slightly soft. Do not overbake.
- Let the cookies rest on the hot baking sheet for 5 minutes, then transfer to a wire cooling rack and cool for at least 10 minutes before eating.