
Creamy Lemon Blueberry Bars Recipe

The first three batches of these lemon blueberry bars had a soggy bottom. Not slightly underdone — actively wet, where the lemon filling had soaked straight through the base during baking. I thought the issue was the filling ratio. It was the par-bake. Every time I skipped that step, the base never had a chance to set before the custard layer sat on top of it. Once I started par-baking the shortbread crust for 12 minutes before adding anything, the problem disappeared entirely. That is the most important step in this recipe, and it is the one most recipes leave out.
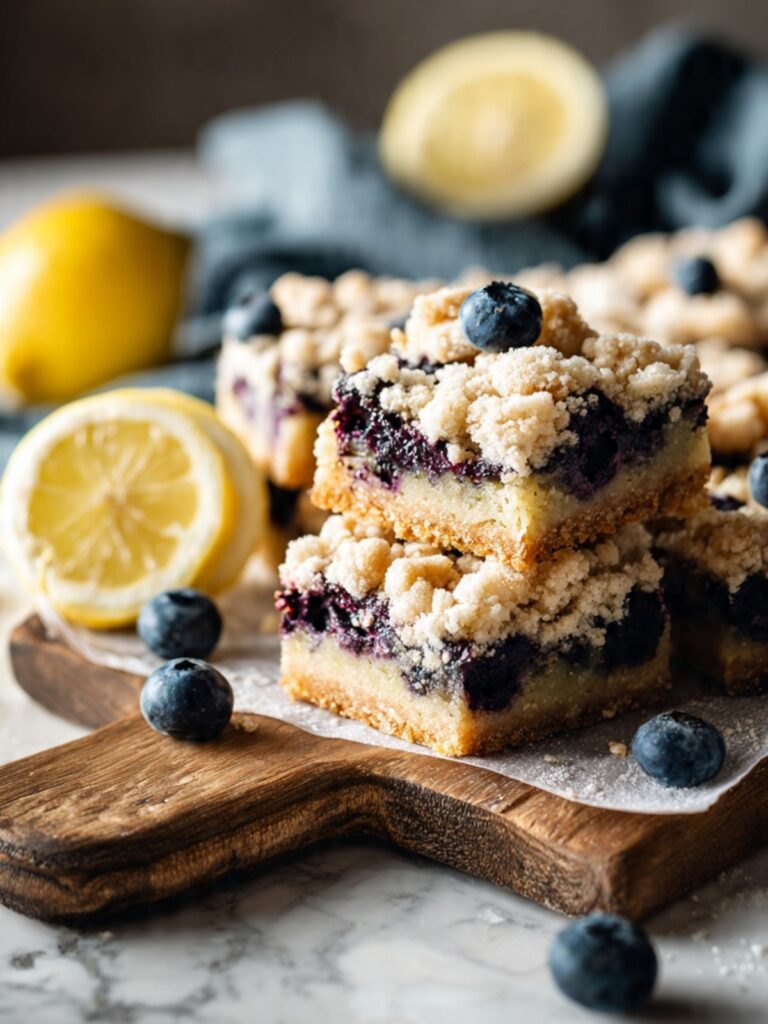
I have tested this recipe nine times across two months. The version you are reading uses cold unsalted butter cut into all-purpose flour, plain white granulated sugar, and fine sea salt — the same four ingredients for both the base and the streusel. The lemon filling is a simple custard: large eggs, plain white granulated sugar, fresh lemon juice, finely grated lemon zest, and a small amount of all-purpose flour to help it set. Whole fresh blueberries go in raw, scattered directly over the lemon layer before the streusel is added, and they burst in the oven into jammy, deeply purple pockets that bleed just slightly into the custard.
I tested the shortbread dough ratio across five batches. The first two used a 1:1 ratio of butter to flour by volume — the result was too rich and the base did not hold a clean edge when cut cold. Batches three and four reduced the butter and the base firmed up correctly but lost the buttery flavor that makes shortbread worth eating. Batch five landed at ¾ cup butter to 2 cups flour — firm enough to cut cleanly, rich enough to taste like shortbread rather than a cracker. That is the ratio in this recipe and I would not change it.
I tested the lemon filling with eggs-only versus eggs plus flour as the setting agent. The eggs-only version produced a soft, trembling curd that tasted beautiful but collapsed the moment the bars were sliced — the filling was too delicate to hold a clean cross-section. Adding 3 tablespoons of all-purpose flour to the filling gave the custard the gel structure it needed to set firmly enough to slice cold while keeping the texture creamy rather than dense. The eggs-only version is not wrong. It just cannot be cut into bars. I kept the flour version. The streusel topping is pale sand at the peaks and deeper golden at the clump bases and edges — both colors are correct and visible in the photos. The contrast is what gives the topping its visual texture.
The result is what you see in the photos: a firm, buttery shortbread base, a bright lemon-cream center threaded with burst blueberries, and a pale sandy streusel on top. These bars hold their shape when cut — clean edges, distinct layers, no collapsing center. That only happens if they cool completely first. I know that waiting is the hardest part. It is still non-negotiable.
No electric mixer needed anywhere in this recipe. The base comes together with cold butter worked into dry ingredients by hand or with a pastry blender. The filling takes one bowl and a whisk. The streusel is the same dough as the base — no separate prep, no extra dishes.
Recipe Overview & Nutrition Table
| Yield | 16 bars (4×4 cut from a 9×9 inch pan) |
| Prep Time | 20 minutes |
| Par-Bake Time | 12 minutes |
| Bake Time | 35–40 minutes |
| Cooling Time | 2 hours minimum (30 minutes additional in refrigerator for clean cuts) |
| Total Time | Approximately 3 hours 15 minutes (including cooling) |
| Difficulty | Intermediate |
| Method | Cold fat / rubbed-in (base + streusel) + direct-bake lemon custard filling |
| Equipment | 9×9 inch (23×23cm) light-colored aluminum pan, parchment paper, pastry blender or food processor, large mixing bowl, whisk, bench scraper |
| Nutrient | Per Bar |
|---|---|
| Calories | ~210 |
| Total Carbohydrates | ~28g |
| Total Fat | ~10g |
| Protein | ~3g |
| Sugar | ~16g |
| Sodium | ~65mg |
Nutrition estimates are calculated from ingredient weights. Individual results will vary based on exact portion size and ingredient brands used.
Ingredients & Tools for Lemon Blueberry Bars Recipe
For the Shortbread Base and Streusel Topping
The same dough builds both the base and the crumble — no separate prep needed. Reserve approximately one-third of the mixture after pressing the base into the pan, and that becomes your streusel.
- 2 cups (240g) all-purpose flour (spooned into the measuring cup and leveled — or weighed at 240g for accuracy)
- ½ cup (100g) plain white granulated cane sugar
- ¼ tsp (1.5g) fine sea salt
- ¾ cup (170g) unsalted butter, cold and cubed into ½-inch pieces — do not soften
For the Lemon Blueberry Filling
- 3 large eggs (approximately 50g each without shell), room temperature
- ¾ cup (150g) plain white granulated cane sugar
- ¼ cup (60ml) fresh lemon juice (from approximately 2 medium lemons — bottled lemon juice will not produce the same bright flavor)
- 2 tbsp (12g) finely grated lemon zest (from approximately 2 medium lemons — zest only, no white pith)
- 3 tbsp (24g) all-purpose flour (spooned and leveled — or weighed)
- ¼ tsp (1.5g) fine sea salt
- 1½ cups (220g) fresh whole blueberries — rinsed and fully dried (frozen blueberries will release excess moisture and make the filling runny; see FAQ for substitution guidance)
For Finishing
- Finely grated lemon zest from 1 additional medium lemon — added immediately after baking, while bars are still warm
Before You Start
Read every point before you begin. These are not reminders — they are the variables that decide whether this recipe works.
Position your oven rack in the middle of the oven before preheating. For these bars the middle rack is not optional — the top rack runs the streusel topping too hot before the filling has time to set, and the bottom rack overbrowns the shortbread base before the custard layer is done. Middle rack only, every time.
Use cold butter for the base. Cold butter is not interchangeable with softened or melted butter here. Cold butter cut into the flour creates pea-sized fat pockets that produce the sandy, crumbly shortbread texture visible in the photos. Softened butter will blend in completely and produce a greasy, dense base with no crumb structure. Cube the butter and return it to the refrigerator for 10 minutes after cutting if your kitchen is warm.
Weigh your flour. Scooping directly from the bag packs up to 30% more flour than spooning and leveling. Extra flour in the base produces a dry, chalky crust that crumbles when cut rather than holding a clean edge. The gram weights in this recipe are the numbers I tested with — use them.
Use fresh lemon juice and zest. Bottled lemon juice is preserved with additives that dull the bright citrus flavor this filling depends on. Freshly squeezed juice and freshly grated zest are non-negotiable here. Roll the lemons firmly against the counter before cutting — it releases more juice.
Dry your blueberries completely. Rinse the blueberries and spread them on a clean kitchen towel for at least 10 minutes before using. Wet blueberries introduce excess moisture into the filling and prevent the custard layer from setting cleanly.
Room temperature eggs. Eggs pulled straight from the refrigerator do not whisk smoothly into the sugar and can produce a lumpy, uneven filling. Pull your eggs 30 minutes before starting, or place them in a bowl of warm (not hot) water for 10 minutes.
Line the pan with parchment overhang. Cut two strips of parchment paper long enough to hang over opposite sides of the 9×9 inch (23×23cm) pan by at least 2 inches on each side. This overhang is the only way to lift the bars out cleanly after cooling. Skip it and the bars will not release without breaking.
Par-baking is mandatory. The base must be partially baked before the filling goes in. This step sets the structure of the crust so it does not absorb the lemon custard during the second bake. Skipping the par-bake is the single most common reason for a soggy, undercooked base in this recipe.
Gram weight is the most reliable measurement. Volume cups and tablespoons vary by 20–30% depending on how the ingredient is scooped or packed. A kitchen scale set to grams gives you the same result every time.
Necessary Tools
- 9×9 inch (23×23cm) light-colored aluminum baking pan — dark non-stick pans absorb more heat and will overbrown the shortbread base before the filling is set
- Parchment paper cut to fit with 2-inch overhang on two sides
- Pastry blender or food processor (for cutting cold butter into the flour)
- Large mixing bowl
- Medium mixing bowl
- Whisk
- Bench scraper or sharp chef’s knife (for cutting the finished bars — a thin knife blade will crack the shortbread base)
- Kitchen scale (strongly recommended over volume measurements)
- Citrus juicer or reamer
- Microplane or fine zester
- Wire cooling rack
- Oven thermometer — recommended. Most home ovens run 15–25°F (8–14°C) off from their dial setting. An oven thermometer costs under $10 and removes the single most common source of unexplained baking failures.
How to Make Lemon Blueberry Bars
This recipe uses the cold fat / rubbed-in method for the shortbread base and streusel, and a bowl-and-whisk method for the lemon custard filling. No electric mixer is needed anywhere in this recipe — a pastry blender or food processor handles the base, and a whisk handles the filling.
Step 1: Preparing the Pan and Preheating the Oven
Set your oven rack to the middle position and preheat to 350°F (175°C). Most home ovens run 15–25°F (8–14°C) off from their dial setting — if you have an oven thermometer, confirm the actual temperature before the pan goes in. An oven that has not fully preheated will produce a pale, underbaked base that softens under the filling.
While the oven preheats, line your 9×9 inch (23×23cm) light-colored aluminum baking pan with two strips of parchment paper. Lay the first strip across the pan lengthwise with at least 2 inches of overhang on each side. Lay the second strip perpendicular to the first, also with 2 inches of overhang. Press the parchment flat into the corners. Do not grease the pan — the cold butter in the dough provides enough fat to prevent sticking, and greasing under parchment causes it to slide during pressing.
If you skip the parchment overhang on these bars, you will not be able to lift them out of the pan cleanly after cooling — the edges will break and the layers will separate. The overhang is the handle. Set a timer and let the oven fully preheat for at least 20 minutes before the pan goes in.
The parchment should lie flat against all four sides with the overhang folded neatly at the corners — this is the configuration that allows clean lifting later.
Step 2: Making the Shortbread Base and Streusel Dough
In your large mixing bowl, combine 2 cups (240g) all-purpose flour (spooned and leveled), ½ cup (100g) plain white granulated cane sugar, and ¼ tsp (1.5g) fine sea salt. Whisk the dry ingredients together for about 15 seconds until evenly combined — this distributes the salt and sugar uniformly through the flour before the butter goes in.
Add your ¾ cup (170g) unsalted butter, cold and cubed. The butter must be cold — if your kitchen is warm and the cubes have started to soften in the time it took to measure, return them to the refrigerator for 10 minutes before continuing. Soft butter will not produce the crumbly, sandy texture this dough needs.
Using a pastry blender, cut the butter into the flour mixture using a rocking, pressing motion — work from the edges of the bowl inward, rotating the bowl as you go. Continue until the mixture resembles coarse, uneven crumbs with some pea-sized butter pieces still visible. This takes approximately 2–3 minutes of active work. Alternatively, pulse the butter and dry ingredients in a food processor in 10 one-second pulses — stop before the mixture becomes uniform. Overworking this dough develops gluten and turns the shortbread tough rather than crumbly.
The dough should look like rough, sandy crumbs that clump when you press a small amount between your fingers but fall apart immediately when released — if it looks smooth and homogenous, the butter was too warm and the shortbread will bake dense and greasy rather than crumbly.
Do not add liquid. This dough is intentionally dry — it holds together only under the pressure of being pressed into the pan.
Measure out approximately ⅔ of the mixture (roughly 280g) and set it aside in the bowl — this becomes the streusel topping later. The remaining ⅓ (roughly 140g) goes into the pan as the base.
Step 3: Pressing the Base and Par-Baking the Crust
Transfer the reserved ⅓ portion of the shortbread dough into the prepared pan. Using clean, dry fingertips or the flat bottom of a dry measuring cup, press the dough firmly and evenly across the entire base of the pan. Work from the center outward, pressing the dough into the corners and all the way to the edges — the base should be a uniform thickness of approximately ¼ inch (6mm) with no thin spots. Thin spots will overbrown during the par-bake before the rest of the crust is set.
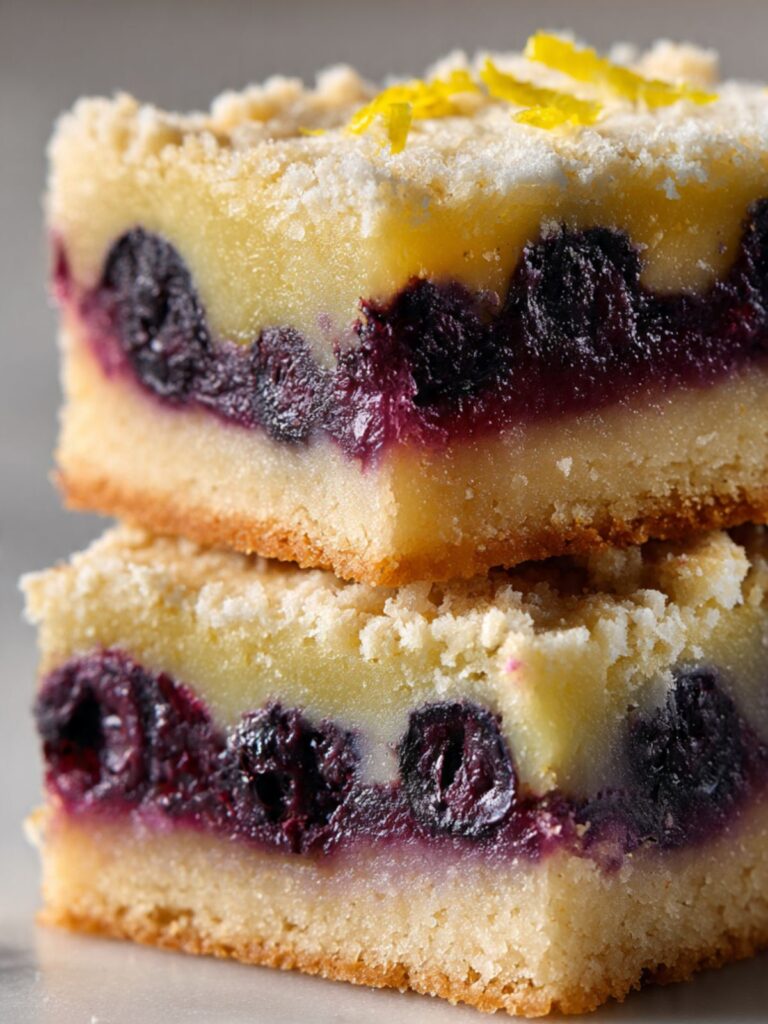
The base visible in the close-up stacked photo — pale golden, fine-crumbed, holding a clean sharp edge — is the result of an evenly pressed, fully par-baked crust. Uneven pressing produces a base that is both underdone in thick areas and overbrown in thin ones.
Place the pan on the middle rack of your preheated 350°F (175°C) oven. Par-bake for 12 to 14 minutes — pull the pan when the edges are just beginning to turn very faintly golden and the center looks dry and set but not browned. The base will look underdone at this point. That is correct. It will bake again with the filling on top.
Do not let the base color deepen past the faintest golden edge during the par-bake — if it goes in with a medium golden color, it will come out with deeply browned, bitter edges and a chalky, over-dry center by the time the filling finishes its 35-minute bake. The base should look almost underdone when you pull it. That is correct. It will finish in the second bake.
The par-baked base should look dry and matte across the surface with the very edges showing the faintest color change — if the center still looks raw and damp after 14 minutes, give it 2 more minutes and check again.
Remove the pan from the oven and place it on a wire rack. Leave the oven on at 350°F (175°C). The filling goes in while the base is still warm — do not let it cool completely.
Step 4: Whisking the Lemon Custard Filling
While the base par-bakes, make the filling. In your medium mixing bowl, combine ¾ cup (150g) plain white granulated cane sugar and 3 tbsp (24g) all-purpose flour (spooned and leveled). Whisk them together briefly to distribute the flour evenly through the sugar — this prevents the flour from clumping when the wet ingredients go in.
Add your 3 large eggs (room temperature), ¼ cup (60ml) fresh lemon juice, and 2 tbsp (12g) finely grated lemon zest (zest only — no white pith). Whisk vigorously for approximately 60 seconds until the mixture is fully combined, smooth, and slightly pale. The sugar should be dissolved into the eggs — you should not feel grit when you rub a small amount between your fingers.
The flour in this filling acts as the thickening agent — it gelatinizes during baking and holds the custard in a soft, sliceable set rather than a liquid pool. Without it, the filling bakes up runny and will not hold a clean edge when cut. The eggs provide structure through protein coagulation — both elements are essential.
The filling should look bright, pale yellow and flow in a smooth, fluid ribbon off the whisk — if it looks lumpy or grainy, the eggs were too cold and the sugar has not fully dissolved. Whisk for another 30 seconds and check again.
Do not add the blueberries to the filling bowl — they go directly onto the crust in the next step.
Step 5: Assembling the Layers Before the Final Bake
With the par-baked base still warm in its pan, pour the lemon custard filling evenly over the crust. Use a spatula to gently spread the filling to all four edges — it should be a thin, even layer covering the entire base with no pooling in the center.
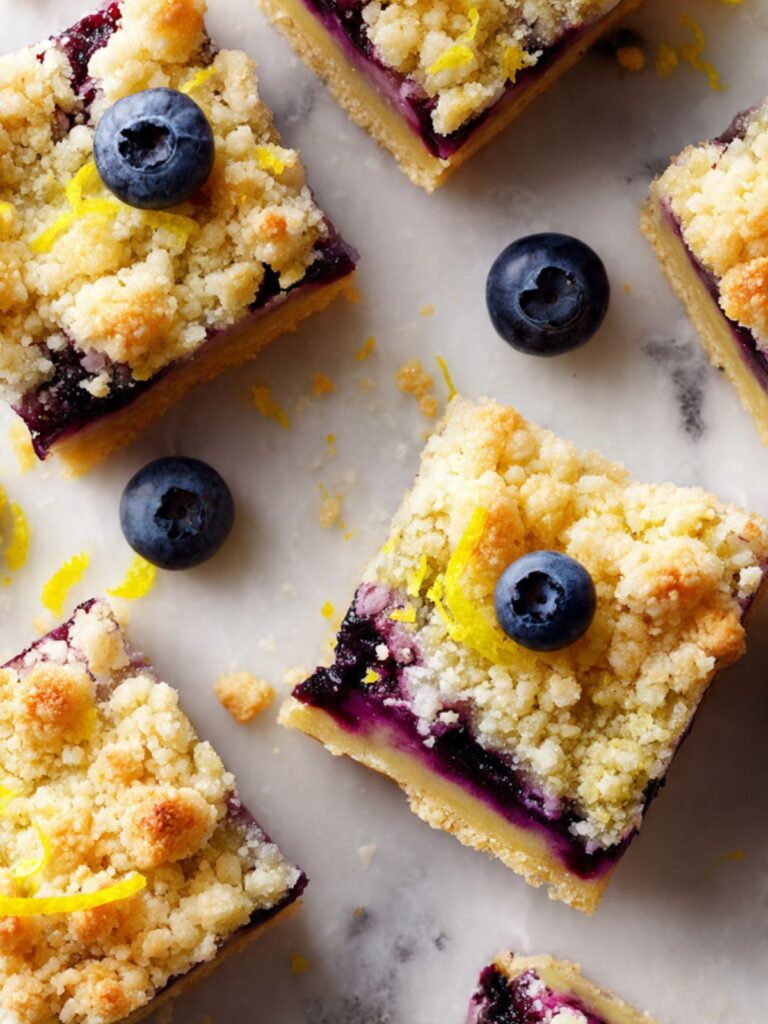
Immediately scatter your 1½ cups (220g) fresh whole blueberries evenly over the surface of the lemon filling. Press them very gently with your fingertips so they sit in — not on top of — the custard layer. Do not stir. Do not press hard enough to break the skins. The blueberries will burst naturally in the oven, releasing their juice into the filling. As you can see in the overhead flat-lay photo, the blueberries are distributed across the full surface of each bar — scatter them intentionally rather than dropping them in the center.
Take the reserved ⅔ portion of shortbread dough from your bowl and crumble it evenly over the blueberries and filling with your fingers. Work across the full surface, breaking larger clumps into pieces roughly the size of a small grape. You want an uneven, textured topping — not a smooth pressed layer. Some blueberries peeking through the streusel is correct and expected. Do not press the streusel down or pack it against the filling — a compressed streusel has no air pockets and steams rather than bakes, producing a pale, dense, chalky layer instead of the loose, granular, golden-tipped crumble visible in the overhead photo of the cut bars.
The assembled pan should show three distinct zones — the pale shortbread base at the edges, the yellow custard with scattered whole blueberries in the middle, and a rough, uneven streusel layer on top with some blueberries still visible through the gaps.
Step 6: Baking to the Correct Doneness Cue
Return the assembled pan to the middle rack of your 350°F (175°C) oven. Bake for 35 to 40 minutes — start checking at 35 minutes.
The doneness cue for these bars is in the filling, not the crust. Bake until the edges of the base are a deep golden brown, the streusel peaks are pale sand in color, and the blueberry juices are actively bubbling up through the crumble in dark purple bursts. This bubbling is the signal that the blueberries have reached temperature and burst — the moment the juices actively bubble through the top is the moment to pull the pan. Waiting longer will cause the lemon custard to over-set and lose its creamy, soft texture.
Do not open the oven door before 30 minutes — the filling is still liquid in the early stages of baking and a temperature drop will cause it to set unevenly, with a cooked edge and a raw center.
If the streusel edges are darkening before the juices begin to bubble, lay a loose sheet of aluminum foil over the top of the pan — do not press it down — and continue baking until the bubbling begins.
🗒 Luna’s Note: I always pull these the moment I see the first active bubbling through the streusel. On my oven it is exactly 37 minutes. Yours may differ by 2 to 3 minutes depending on your oven’s actual calibration — use the bubbling cue, not the clock.
The finished pan should show deep golden edges on the visible shortbread base, pale sandy streusel peaks, and dark purple blueberry juice actively bubbling through the crumble in at least two or three spots across the surface.
Step 7: Cooling Completely Before Cutting
Remove the pan from the oven and place it on a wire rack. Do not touch, cut, or attempt to lift the bars at this stage — the lemon custard filling is still fully liquid beneath the set surface and will collapse the moment a knife goes through it.
Cool the bars in the pan on the wire rack for a minimum of 2 hours at room temperature. During this time the egg proteins in the filling continue to set through carryover heat, and the shortbread base firms up enough to support a clean cut. Cutting before 2 hours produces bars that crumble at the base, collapse in the center, and cannot be lifted cleanly from the pan.
After 2 hours at room temperature, transfer the pan — still uncovered — to the refrigerator for 30 minutes. This final chill firms the filling completely and is the step that produces the clean, distinct layers visible in the stacked photos. The custard should feel firm and barely yielding when you press the center gently through the streusel.
Each bar in a 4×4 cut from a 9×9 inch (23×23cm) pan measures approximately 2.25 × 2.25 inches (5.7 × 5.7cm) and weighs approximately 75–80g per bar. Weigh the first bar after cutting — if it reads significantly outside this range, your pan size or dough distribution was off from what the recipe intended.
To cut: lift the bars out of the pan using the parchment overhang and place them on a flat cutting board. Using a bench scraper or sharp chef’s knife, press straight down in one clean motion — do not saw. Wipe the blade clean between every cut with a damp cloth. A dirty blade drags the filling and smears the layers.
Cut the slab into a 4×4 grid — 4 cuts in each direction — for 16 bars at approximately 2.25 inches square each.
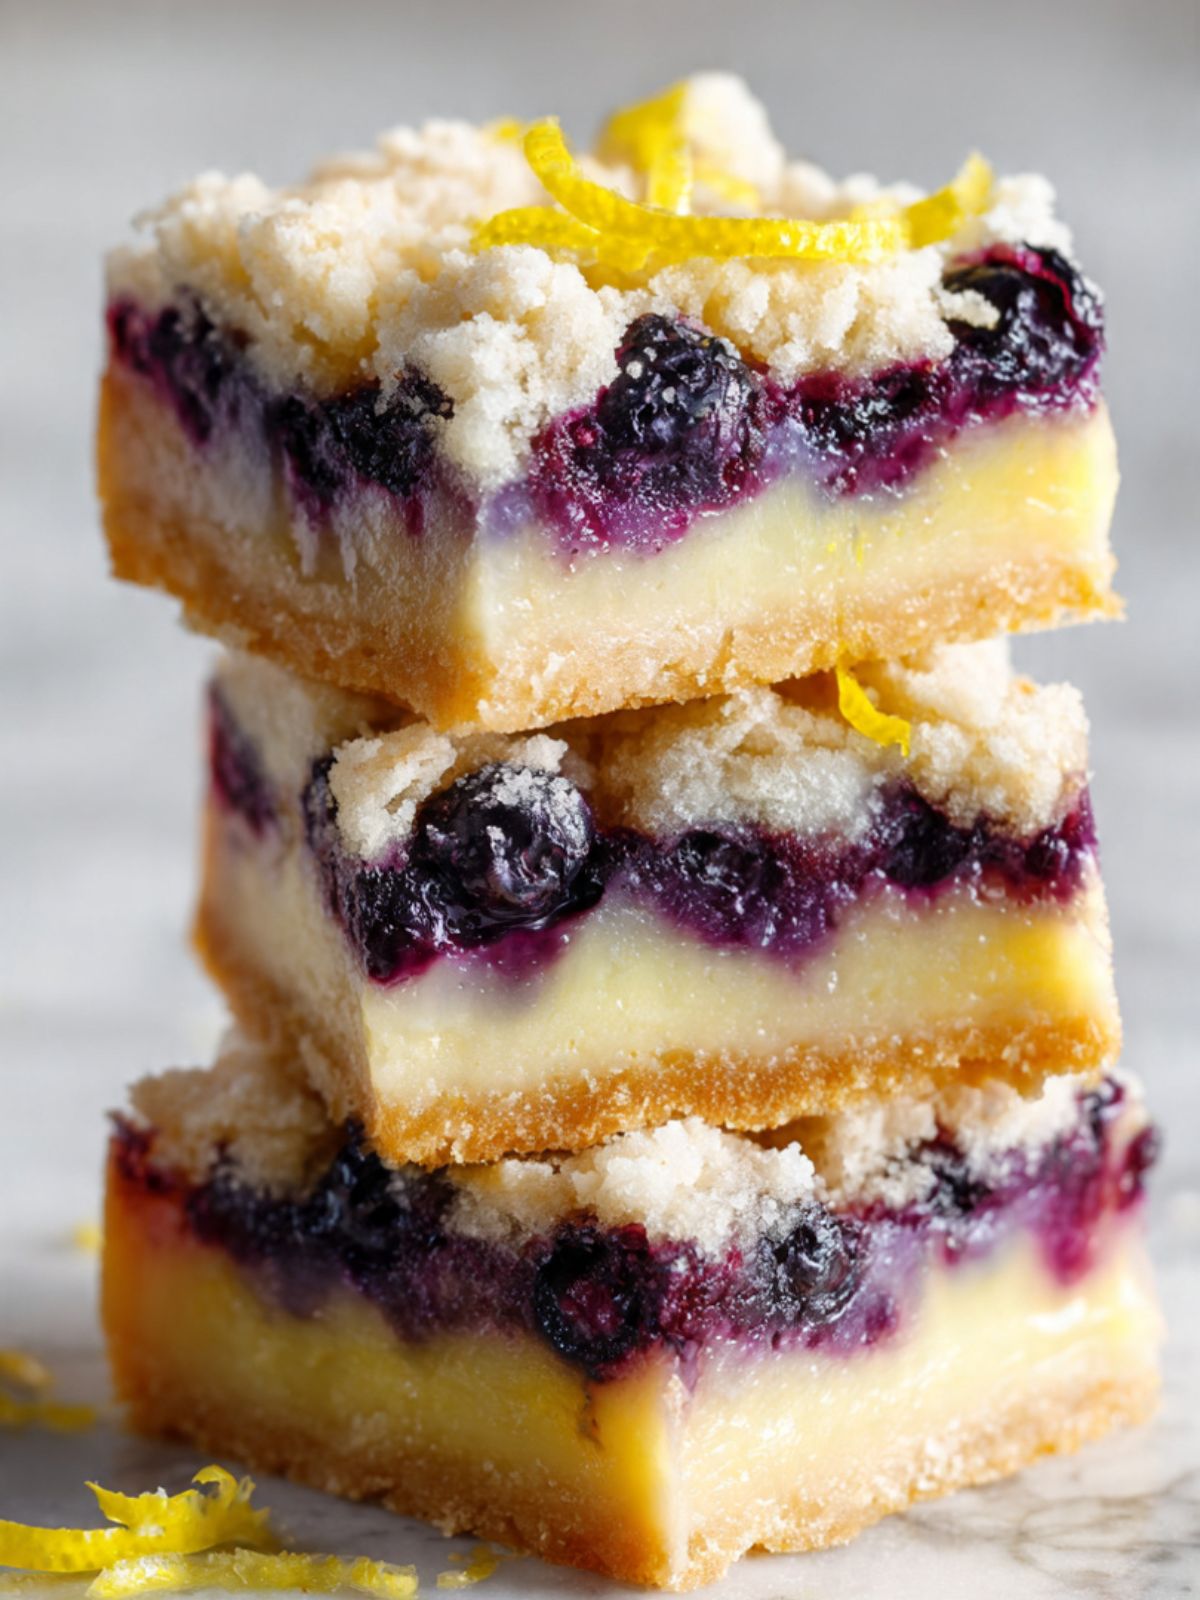
The cut bars should show three clearly distinct layers — a firm golden shortbread base, a pale yellow lemon custard threaded with burst dark blueberries, and a crumbled sandy streusel topping — exactly as shown in the stacked close-up photo.
Scatter the reserved finely grated lemon zest from 1 additional medium lemon over the cut bars immediately. The zest goes on while the bars are still slightly cool — the warmth from the surface releases the lemon oils and the zest adheres to the streusel without sliding off.
The Science Behind Lemon Blueberry Bars
Why the Par-Bake Step Is the Most Important Thing You Will Do
I skipped the par-bake on the first three batches because it felt like an unnecessary step — the base was going back into the oven anyway with the filling on top, and I assumed the total bake time would be enough to cook it through. What I did not understand was that the lemon custard filling acts as a moisture barrier the moment it hits raw dough. The liquid filling soaks into unbaked shortbread before the butter has a chance to set, and no amount of additional oven time reverses that. The base essentially poaches in the filling rather than baking dry.
When shortbread bakes without moisture present, the cold butter melts slowly and the flour and sugar fuse around the fat pockets — this is what produces that firm, sandy crumb with a clean snap at the edge visible in the stacked photo. The fat crystallization that creates shortbread texture requires dry heat. The par-bake gives the dough 12 minutes of dry oven heat to begin that process before the filling is introduced. By the time the custard goes on, the base is already structurally set enough to resist absorption.
This is why par-baking is not optional. It is not a technique preference. It is the mechanism that produces the distinct base layer you see in these bars.
How the Flour in the Filling Sets the Custard Without a Water Bath
Most lemon bar recipes use one of two setting agents: eggs alone (producing a delicate, trembling curd) or cornstarch (producing a firmer, clearer set). This recipe uses a small amount of all-purpose flour alongside the eggs, which produces a middle result — a set that is soft and creamy but firm enough to hold a clean edge when sliced cold.
The mechanism is starch gelatinization. When flour is heated in a liquid environment above approximately 140°F (60°C), the starch granules absorb water, swell, and form a gel network throughout the filling. This gel holds the custard in a sliceable structure once cooled. The eggs contribute protein coagulation — egg proteins denature and bond at around 145°F (63°C), adding a second layer of structural support. The combination of starch gelatinization and protein coagulation is what gives the filling that opaque, creamy appearance rather than the translucent quality of a pure egg curd.
The three tablespoons of flour in this recipe is a precise quantity. Too little and the filling stays soft and sags when cut. Too much and it tastes starchy and dense rather than bright and creamy. If you are tempted to substitute cornstarch — it can work, but use half the volume (1½ tablespoons / 12g) and expect a slightly firmer, clearer set rather than the creamy custard visible in the photos. You can also find my chocolate chip cookie bars as another example of how small ratio changes in a baked layer change the entire texture of the finished bar.
Why Blueberries Burst and What That Does to the Filling
Blueberries have a high water content — approximately 84% by weight — held inside a thin, flexible skin. When whole blueberries are placed raw into a baking environment above 212°F (100°C), the water inside them heats rapidly, converts to steam, and the internal pressure ruptures the skin. This is the burst you see in the cross-section photo — those deep violet, jammy pockets are blueberries that have fully released their juice into the surrounding custard.
That released juice does two things. First, it bleeds into the lemon filling and creates the purple-and-yellow marbling visible in the interior of each bar. Second, it adds a concentrated hit of natural fruit sugar and acid directly into the custard layer — which is why the filling in these bars tastes more complex than a plain lemon custard would on its own. The blueberry juice and lemon juice interact during baking, and the result tastes like both and neither simultaneously.
This is also why dry blueberries matter. Wet blueberries carry surface water in addition to their internal moisture. That extra surface water dilutes the filling before baking even begins, and the custard never sets firmly enough to hold a clean slice. Ten minutes on a kitchen towel after rinsing is the difference between a custard that slices cleanly and one that collapses.
Lemon Blueberry Bars Troubleshooting & Pro-Tips
Common Mistakes
Softened or melted butter was used instead of cold butter in the base
Symptom: The shortbread base bakes up dense, greasy, and flat rather than the sandy, crumbly, firm layer visible in the photos. The base has no snap when cut — it compresses rather than breaking cleanly. The streusel topping, made from the same dough, clumps into a solid layer rather than remaining loose and granular.
Cause: Softened butter blends fully into the flour rather than coating it in discrete fat pockets. Cold butter held in distinct pea-sized pieces is what creates the crumb structure of shortbread — as those pieces melt in the oven, steam is released and the surrounding flour-sugar mixture fuses into a sandy, layered texture. Melted butter produces the opposite effect: it bonds with the flour immediately and the result bakes like a dense, greasy paste rather than a crumbly crust.
Fix: There is no fix once baked — a dense, greasy base cannot be corrected after the fact. If the bars are still edible, serve them as a deconstructed dessert: crumble the base and streusel into glasses, layer with the lemon custard and fresh blueberries, and serve as a trifle. For the next batch, cube the butter and refrigerate it for 10 minutes after cutting if your kitchen is warm before working it into the flour.
Prevention: Cold butter only, always. The test: a cube of properly cold butter should feel firm and resist bending when pressed. If it bends without snapping, it is too warm. Return to refrigerator.
The wrong pan size or pan material was used
Symptom: The base is overbrown and bitter before the filling has set, or the bars are too thin and dry with no distinct custard layer.
Cause: A dark non-stick pan was used instead of a light-colored aluminum pan, or a 9×13 inch pan was used instead of a 9×9 inch pan. Dark pans absorb significantly more radiant heat and overbrown the shortbread base 5 to 8 minutes faster than a light pan. A larger pan produces bars that are too thin for the custard layer to hold its structure.
Fix: If the base has overbrown but the filling is still raw, cover the pan loosely with foil and reduce the oven temperature to 325°F (165°C) for the remaining bake time. The bars will still be edible but the base will have a bitter edge. For the next batch, use a 9×9 inch (23×23cm) light-colored aluminum pan.
Prevention: If you only have a dark non-stick pan, reduce the oven temperature by 25°F (15°C) to 325°F (165°C) and check the par-bake at 10 minutes rather than 12.
The base is soggy and the filling has soaked through
Symptom: The bottom layer is wet, dense, and pasty rather than firm and crumbly. The filling and base have merged into a single layer rather than staying distinct.
Cause: The par-bake step was skipped or cut short. Raw shortbread dough absorbs liquid filling before the fat has a chance to set through dry heat. A par-bake of less than 10 minutes does not give the base enough structural integrity to resist absorption.
Fix: There is no fix once baked — the layers will not separate. Salvage the batch by scooping the bars into ramekins, warming them at 300°F (150°C) for 8 minutes, and serving them as a deconstructed lemon blueberry crumble with a scoop of vanilla ice cream on top. For the next batch, par-bake the base for the full 12 to 14 minutes until the edges show the faintest color change and the surface looks dry and matte before the filling goes in.
Prevention: Set a separate timer for the par-bake. Do not rely on visual judgment alone — 12 minutes at 350°F (175°C) on the middle rack of a correctly calibrated oven is the minimum.
The bars crumble when cut and the layers separate
Symptom: The shortbread base breaks apart rather than holding a clean edge. The filling pulls away from the base when the knife goes through.
Cause: The bars were cut before fully cooling, or a sawing motion was used instead of a straight downward press. The custard filling requires a minimum of 2 hours at room temperature plus 30 minutes in the refrigerator to set completely. Cutting warm bars produces a crumbling base and a filling that has not yet achieved its final firm texture.
Fix: If the bars have already crumbled, press the pieces into a baking dish, top with a layer of whipped cream or crème fraîche, and serve as a deconstructed bar dessert. The flavor is identical. For clean cuts next time, cool fully, refrigerate for 30 minutes, and use a bench scraper pressed straight down in one motion — wiping the blade clean between every cut.
Prevention: Set a 2-hour timer the moment the pan comes out of the oven. Do not cut early regardless of how set the surface appears.
The filling is runny and will not hold its shape when sliced
Symptom: The custard layer spreads and sags the moment the bars are cut, pooling on the cutting board rather than holding a clean cross-section.
Cause: Frozen blueberries were used without adjustment, the bars were undercooked, or the flour measurement in the filling was too low. Frozen blueberries release significantly more moisture than fresh as they thaw during baking, diluting the filling. Underbaking prevents the starch gelatinization and egg protein coagulation that set the custard. Too little flour leaves the filling without enough gel structure.
Fix: Return the uncut bars to the oven at 325°F (165°C) for 10 to 12 minutes if you catch the issue before refrigerating — the custard can still set further with additional heat. If already cut, refrigerate the bars for 1 hour — a partially set filling will firm further with cold. The texture will not be identical to a correctly baked batch but will be sliceable.
Prevention: Use fresh blueberries that have been rinsed and dried completely. If using frozen, do not thaw them first — add them straight from frozen and extend the bake time by 5 to 8 minutes. Weigh the flour rather than measuring by volume.
The streusel topping is pale and powdery rather than golden and clumped
Symptom: The crumble topping looks raw and floury rather than lightly golden with distinct clumps. It tastes dry and chalky rather than buttery and sandy.
Cause: The butter was too warm when the dough was made, producing a smooth, homogenous mixture rather than a crumbly one with distinct fat pockets. Over-mixed dough loses its clump structure entirely. The streusel needs visible butter pieces to brown and crisp in the oven — without them, the topping steams rather than bakes.
Fix: If the topping is pale after the full bake time, remove the foil if you used it and give the bars 3 to 5 additional minutes uncovered — watch closely to avoid burning the edges. The flavor will improve but the texture may remain slightly powdery if the dough was overworked.
Prevention: Keep the butter cold throughout the dough-making process. Work quickly. Stop mixing the moment the dough looks like coarse, uneven crumbs — resist the urge to keep going until it looks uniform.
The lemon flavor is flat and the bars taste more sweet than citrusy
Symptom: The finished bars taste predominantly of sugar with only a faint background lemon note rather than the bright, sharp citrus flavor the recipe is built around.
Cause: Bottled lemon juice was used instead of fresh, or the lemon zest was omitted or reduced. Bottled lemon juice is heat-treated and preserved, which kills the volatile aromatic compounds that make fresh lemon juice taste bright. Lemon zest contains lemon oil — the most concentrated form of citrus flavor — and omitting it removes the aromatic layer that lifts the filling above a basic sugar custard.
Fix: Squeeze additional fresh lemon juice over the cut bars immediately before serving and add a heavy hand of freshly grated zest on top. The flavor will not penetrate the filling at this stage but the surface brightness improves the overall impression significantly.
Prevention: Always use fresh lemon juice. Always include the full 2 tablespoons of zest in the filling and the additional zest on top after baking.
Altitude and humidity adjustment
At high altitude (above 3,500 feet / 1,067m): the lower air pressure causes liquids to evaporate faster during baking. Reduce the bake time by 3 to 5 minutes and check the doneness cue (bubbling blueberry juices) earlier — at 30 minutes rather than 35. The filling may set slightly faster than at sea level. The shortbread base is largely unaffected by altitude.
In high humidity environments: the shortbread dough may feel stickier than expected when pressing into the pan, and the streusel may clump more than usual. Keep the butter cold and work quickly. If the dough feels unmanageably sticky, refrigerate the assembled unbaked pan for 10 minutes before the par-bake. The finished bars may require an additional 5 minutes of refrigerator time to set cleanly.
Expert Pro-Tips
Use the parchment overhang as a tension guide when pressing the base. Hold the overhang on opposite sides taut while pressing the dough into the corners with your other hand. The tension keeps the parchment from shifting and ensures the base thickness is even all the way to the edges — thin corners are the first place a shortbread base overbrowns.
Zest the lemons before juicing them. It is physically impossible to zest a juiced lemon — the skin collapses. Always zest first, then cut and juice. Use a Microplane held at a 45-degree angle and rotate the lemon against it rather than moving the Microplane — you get longer, finer strands and stop naturally at the white pith because you can see the color change clearly.
Chill the bench scraper before cutting. Run the blade under cold water and dry it completely before the first cut. A cold blade drags less through the set custard and produces cleaner edges on the first pass. Wipe and re-chill between rows if the filling starts to drag.
🗒 Luna’s Note: I make this recipe with Meyer lemons when they are in season in January and February in Los Angeles. Meyer lemons are less acidic and slightly sweeter than standard Eureka lemons — the filling becomes noticeably more floral and less sharp. If you use Meyer lemons, reduce the sugar in the filling by 2 tablespoons (25g) to compensate for their lower acidity.
Press a few extra whole fresh blueberries gently into the top of the streusel immediately before the pan goes into the oven for the final bake. The blueberries that are buried under the crumble burst and disappear into the filling. The ones pressed into the top of the streusel burst and leave a visible dark purple pool on the surface — exactly the way the bars look in the overhead photo, with those deep jewel-colored pockets sitting proud on top of the pale sandy crumble.
How to Store Lemon Blueberry Bars
Room Temperature
Lemon blueberry bars can be stored at room temperature for up to 24 hours after baking, provided your kitchen is cool (below 70°F / 21°C) and the bars are kept in a lidded hard-sided container with a single layer of parchment paper between any stacked bars. Do not use zip-lock bags — the pressure of the sealed bag crushes the streusel topping and the bars arrive at the bottom of the bag as crumbs rather than distinct squares.
Beyond 24 hours at room temperature, the lemon custard filling begins to soften and the shortbread base loses its snap. The bars are technically safe to eat for up to 2 days at room temperature but the texture deteriorates noticeably by hour 36. If you are making these for an event the following day, refrigerate them overnight and bring them to room temperature 20 minutes before serving.
Do not store these bars uncovered at room temperature. The streusel topping absorbs ambient moisture quickly and turns from sandy and crisp to soft and damp within a few hours — particularly in humid climates.
Refrigerator
Refrigeration is the recommended storage method for these bars beyond the first day. Store the cut bars in a lidded hard-sided container — glass or BPA-free plastic — with a single layer of parchment paper between layers if stacking. Do not wrap individual bars directly in plastic wrap without a parchment layer underneath — the wrap sticks to the custard surface and pulls the filling when removed.
Refrigerated lemon blueberry bars keep well for up to 4 days. The shortbread base firms further in the refrigerator and the custard filling becomes slightly denser and more sliceable — Day 2 bars are actually easier to cut cleanly than Day 1 bars, which are still slightly soft from the residual warmth of baking. The lemon flavor also intensifies overnight as the zest oils continue to infuse the filling.
Pull refrigerated bars out 15 to 20 minutes before serving. Cold custard straight from the refrigerator has a dense, almost rubbery texture that does not represent the recipe at its best. A brief rest at room temperature allows the filling to soften back to its intended creamy consistency.
Freezer — Baked
These bars freeze well. Cut the fully cooled and chilled bars into individual squares, wrap each one tightly in a layer of plastic wrap followed by a layer of aluminum foil, and place the wrapped bars in a single layer in a zip-lock freezer bag or lidded freezer-safe container. Freeze for up to 2 months.
To thaw: transfer the wrapped bars from the freezer to the refrigerator and thaw overnight — minimum 8 hours. Do not thaw at room temperature. Room temperature thawing causes condensation to form on the custard surface, which makes the streusel topping soggy and the filling surface wet. Refrigerator thawing keeps the condensation controlled and the texture close to fresh.
The texture of a thawed bar is approximately 90% of a freshly baked one. The shortbread base holds up well through freezing. The custard filling is slightly denser after freezing and thawing than it was fresh — still sliceable and clean-edged, but slightly less creamy. The streusel topping softens marginally. For the best post-freeze result, leave the thawed bars uncovered in the refrigerator for the last 30 minutes of their thaw time — the surface air dries the streusel slightly and restores some of its original texture.
Freezer — Unbaked
The assembled unbaked bars can be frozen before the final bake — after the par-baked base, filling, and streusel are assembled but before going back into the oven. Wrap the entire pan tightly in two layers of plastic wrap and freeze for up to 1 month. When ready to bake, transfer the frozen pan directly to a preheated 350°F (175°C) oven — do not thaw first. Add 12 to 15 minutes to the bake time and watch for the blueberry juice bubbling cue rather than relying on the clock.
Note that the par-baked base in a frozen assembled pan has already absorbed some moisture from the filling during freezing. The base in a bake-from-frozen batch will be slightly less crisp than in a freshly assembled batch — still distinct and structural, but with slightly less snap at the edges.
Serving Suggestion
I serve these bars cold — pulled from the refrigerator 15 minutes before they hit the table, not fully room temperature. At that point the filling is still slightly firm and the lemon flavor is at its sharpest. Fully room-temperature bars are softer and the citrus note rounds out. Both are good. I prefer the cold version.
My pairing for these is unsweetened Earl Grey tea — hot, no milk, no sugar. The bergamot in the tea picks up the lemon in the filling and the two flavors extend each other in a way that a sweetened drink does not. A strong black coffee works the same way. What does not work, in my opinion, is anything already sweet alongside these — the bars are rich enough that a sweet drink pushes the whole thing into cloying territory.
This is the recipe I make when I need something that looks more technically impressive than it actually is. The layers photograph beautifully, the lemon and blueberry combination is familiar enough to be universally liked, and the bars hold their shape on a serving board without needing plating. I bring these to gatherings where I want to contribute something that does not require last-minute assembly or refrigeration at the venue — they travel well in a lidded container for up to 2 hours at room temperature.
Day 2 is better than Day 1 for these. The lemon custard firms and the zest flavor deepens overnight in a way the fresh batch does not have yet. Day 1 bars are excellent. Day 2 bars are what I actually want to eat.
One honest limitation: these do not scale up cleanly to a 9×13 inch pan without adjusting the filling ratio. A larger pan produces a thinner custard layer that sets too quickly and dries out before the streusel finishes browning. If you need a larger batch, make two separate 9×9 inch pans rather than attempting to scale into one large one.
Frequently Asked Questions About Lemon Blueberry Bars
Can I use frozen blueberries instead of fresh?
Frozen blueberries can be used but require one important adjustment: do not thaw them before adding to the filling. Add them straight from the freezer directly onto the lemon custard layer before the streusel goes on. Thawed frozen blueberries release a significant amount of excess liquid that dilutes the custard and prevents it from setting firmly. Added frozen, they release their moisture more gradually during baking and the custard has time to set around them. Extend the total bake time by 5 to 8 minutes and watch for the blueberry juice bubbling cue rather than relying on the clock. Expect slightly more purple bleeding into the filling compared to fresh blueberries — the finished bars will taste identical but the custard layer will be more deeply stained.
How do I know when lemon blueberry bars are done baking?
The doneness cue for these bars is the blueberry juice, not the crust color. Bake until the edges of the shortbread base are deep golden brown and the blueberry juices are actively bubbling up through the streusel topping in dark purple bursts — this bubbling confirms the filling has reached the temperature needed to set the custard and burst the berries. The streusel peaks should be pale sand in color, not golden brown. If the streusel is darkening before the juice begins to bubble, lay a loose sheet of aluminum foil over the top and continue baking. Do not pull the pan based on crust color alone — a pale crust with bubbling juice is done; a golden crust with no bubbling juice is not.
Can I make lemon blueberry bars ahead of time?
Yes — these bars are an excellent make-ahead dessert. Bake and cool the bars completely, then refrigerate them uncut in the pan overnight. Cut them the following day after they have chilled for the full cooling period. The lemon custard firms further overnight and the zest flavor deepens, making Day 2 bars actually better than Day 1 in both texture and flavor. Store cut bars in a lidded hard-sided container with parchment between layers. They keep well in the refrigerator for up to 4 days. For events, bake 1 to 2 days ahead and cut the morning of serving — this gives you the cleanest edges and the best flavor.
Why are my lemon blueberry bars crumbling when I cut them?
Bars crumble when cut for two reasons: they were not cooled long enough before cutting, or the cutting method introduced lateral force rather than a clean downward press. The lemon custard needs a minimum of 2 hours at room temperature followed by 30 minutes in the refrigerator to reach a firm, sliceable set — cutting before this window produces a base that fractures and a filling that sags. The cooling time is not a preference, it is a structural requirement. For the cutting method, use a bench scraper or a sharp chef’s knife pressed straight down in one clean motion — never a sawing motion, which drags the filling and pulls the shortbread base apart. Wipe the blade completely clean between every cut.
Can I use a 9×13 inch pan instead of a 9×9 inch pan?
A 9×13 inch pan is not recommended for this recipe without significant adjustments. The larger surface area produces a thinner custard layer — approximately half the depth of what a 9×9 inch pan produces — which sets too quickly in the oven and dries out before the streusel has time to develop its texture. The shortbread base also becomes proportionally thinner and more prone to overbrowning before the filling is done. If you need to make a larger batch, bake two separate 9×9 inch pans rather than scaling into one 9×13 inch pan. If you only have a 9×13 inch pan, increase the filling quantities by 50% and expect a shorter bake time — check for doneness at 28 minutes rather than 35.
How do I store lemon blueberry bars and how long do they last?
Store cut bars in a lidded hard-sided container with a single layer of parchment paper between stacked layers. At room temperature in a cool kitchen they keep for up to 24 hours before the custard begins to soften. Refrigerated, they keep well for up to 4 days — the flavor actually improves by Day 2 as the lemon zest oils continue to infuse the filling overnight. For longer storage, freeze individually wrapped bars for up to 2 months and thaw overnight in the refrigerator. Do not store these bars in zip-lock bags — the pressure crushes the streusel topping and the seal traps moisture against the custard surface.
Can I double this lemon blueberry bar recipe?
You can double this recipe by baking two separate 9×9 inch (23×23cm) pans rather than scaling into one larger pan. A 9×13 inch pan changes the filling depth too significantly — the custard layer becomes too thin to set with the right creamy texture. For two pans, mix a double batch of the shortbread dough and a double batch of the filling, then divide and assemble each pan separately. Bake times remain the same — each pan bakes independently at 350°F (175°C) for 35 to 40 minutes.
Does altitude or humidity affect lemon blueberry bars?
At high altitude above 3,500 feet (1,067m), lower air pressure causes liquids to evaporate faster during baking, so the filling may set slightly faster than at sea level. Start checking for the blueberry juice bubbling cue at 30 minutes rather than 35, and reduce the total bake time by 3 to 5 minutes if the edges are darkening quickly. In high humidity environments, the cold butter in the shortbread dough softens faster during prep — work quickly and refrigerate the assembled unbaked pan for 10 minutes before the par-bake if the dough feels sticky or unmanageable.
More Bar Recipes You’ll Love
If these lemon blueberry bars hit the right note for you, these recipes from the same bar collection are worth making next:
- Oatmeal Chocolate Chip Bars — a chewy, hearty bar with rolled oats and semi-sweet chocolate, cut into thick squares with a texture that sits between a cookie and a brownie.
- Peanut Butter Chocolate Chip Bars — dense, rich, and intensely flavored with commercial peanut butter and a double layer of chocolate chips pressed into the surface before baking.
Creamy Lemon Blueberry Bars Recipe
Ingredients
Equipment
Method
- Set the oven rack to the middle position and preheat to 350°F (175°C). Line a 9×9 inch (23×23cm) light-colored aluminum baking pan with two strips of parchment paper, each with at least 2 inches of overhang on opposite sides, crossing perpendicular to each other and pressed flat into the corners.
- In a large mixing bowl, whisk together 2 cups (240g) all-purpose flour, ½ cup (100g) plain white granulated cane sugar, and ¼ tsp (1.5g) fine sea salt until evenly combined. Add ¾ cup (170g) cold cubed unsalted butter and cut it into the flour mixture using a pastry blender or food processor until the mixture resembles coarse, uneven crumbs with some pea-sized butter pieces still visible — do not overwork.
- Measure out approximately ⅔ of the shortbread mixture (roughly 280g) and set aside in the bowl for the streusel topping. Press the remaining ⅓ (roughly 140g) firmly and evenly into the base of the prepared pan to a uniform thickness of approximately ¼ inch (6mm).
- Par-bake the base on the middle rack at 350°F (175°C) for 12 to 14 minutes until the edges show the faintest color change and the surface looks dry and matte. Remove from the oven and place on a wire rack. Leave the oven on.
- While the base par-bakes, make the filling. In a medium mixing bowl, whisk together ¾ cup (150g) plain white granulated cane sugar and 3 tbsp (24g) all-purpose flour until combined. Add 3 large room-temperature eggs, ¼ cup (60ml) fresh lemon juice, and 2 tbsp (12g) finely grated lemon zest. Whisk vigorously for 60 seconds until smooth, pale, and fully combined with no visible grit.
- Pour the lemon filling evenly over the warm par-baked base and spread gently to all four edges with a spatula. Scatter 1½ cups (220g) fresh whole blueberries evenly over the filling and press them gently so they sit into — not on top of — the custard layer. Crumble the reserved ⅔ shortbread mixture evenly over the blueberries, breaking larger clumps into grape-sized pieces. Do not press the streusel down.
- Return the assembled pan to the middle rack and bake at 350°F (175°C) for 35 to 40 minutes, until the edges of the base are deep golden brown and the blueberry juices are actively bubbling through the streusel topping in dark purple bursts. If the streusel edges darken before bubbling begins, lay a loose sheet of aluminum foil over the top and continue baking.
- Remove the pan from the oven and place on a wire rack. Cool at room temperature for a minimum of 2 hours without cutting. Transfer the pan to the refrigerator for 30 additional minutes. Lift the bars out using the parchment overhang, place on a cutting board, and cut into a 4×4 grid using a bench scraper pressed straight down in one clean motion — wiping the blade between every cut. Scatter finely grated zest from 1 additional lemon over the cut bars immediately.