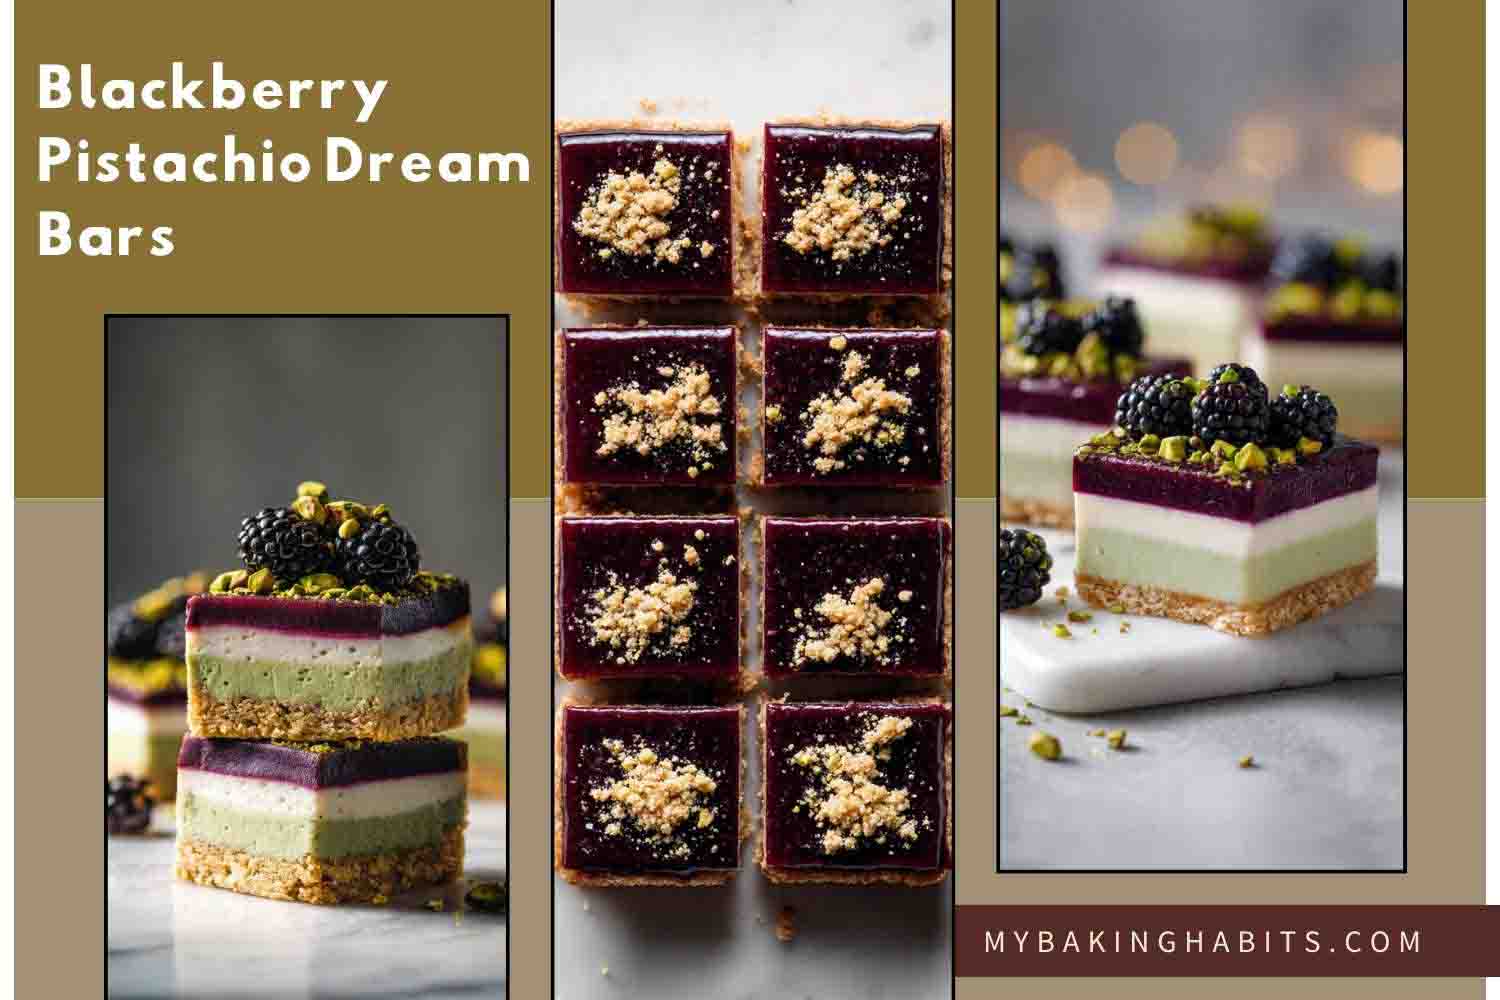
No-Bake Blackberry Pistachio Dream Bars Recipe
The first time I made these, I poured the white cream layer directly onto the pistachio layer while it had barely set — 20 minutes in the refrigerator, edges firm, center still liquid underneath. I lifted the pan to check and the two layers had merged into a single greenish-white swirl. I made them again the next day with 45 minutes between each layer and a finger-press test at the center. That was batch two. I have made these eleven times since, across four months of testing, and the inter-layer chill time is the only step that has never had any room for compromise.
That is the thing you need to know going into these: sequential layering is not a patience preference, it is the mechanism. Everything else is straightforward.
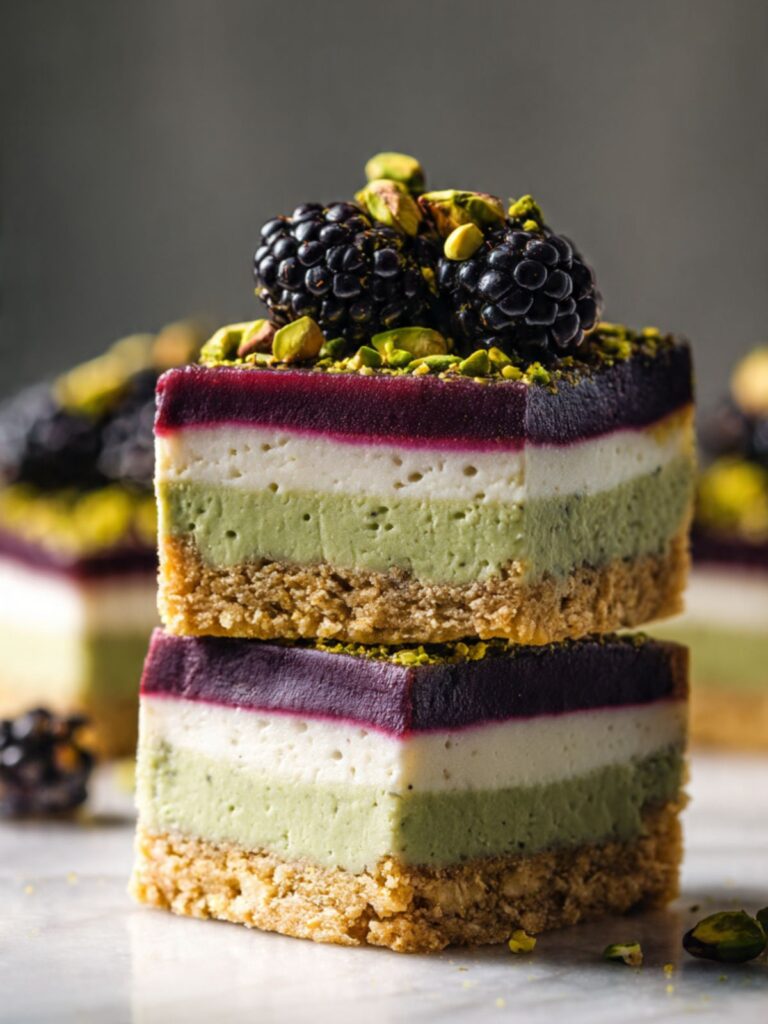
The result is four completely distinct layers — a sandy, golden graham cracker crust that snaps slightly at the edge and yields in the center, a thick pale-green pistachio cream that is dense and smooth with a faint nuttiness that builds as you chew, a thinner stripe of pure white vanilla cream that is lighter in texture, and a deep burgundy blackberry gel top that is firm at the surface and glossy enough to reflect light. Cut cold, the edges are sharp enough that you can see exactly where each layer begins and ends — which is exactly what you see in the stacked bar photo above.
I tested the pistachio layer with both gelatin-set and cream-cheese-only methods. The gelatin version set firmer and cut slightly cleaner but the texture was rubbery and the pistachio flavor was dulled — the gelatin competed with the paste. The cream-cheese-only version was the one that tasted like something. I kept it and adjusted the chill time to compensate. The recipe uses no gelatin in either cream layer.
I tested the blackberry gel top with both cornstarch and gelatin as the setting agent. Gelatin produced a firmer, more bouncy top that held its shape perfectly when cut but looked opaque and slightly dull in the photos — the gel matrix scattered light rather than transmitting it. Cornstarch at the same thickness produced the deep, jewel-like gloss you see in the pan photo above. The cornstarch version is what I kept. If you want a firmer set, the WPRM Notes has the gelatin conversion.
These bars require a hand mixer or stand mixer — both cream layers need the heavy whipping cream whipped to stiff peaks, which hand-mixing cannot reliably achieve. They also require a minimum 4 hours of refrigeration after the final layer is poured — overnight is better. The filling layers are cold-set, not baked. Plan accordingly before you start.
Recipe Overview & Nutrition Table
| Yield | 16 bars (4×4 grid from an 8×8 inch pan) |
| Prep Time | 40 minutes |
| Chill Time | 4 hours minimum (overnight recommended) |
| Bake Time | 10 minutes (crust only) |
| Total Time | 4 hours 50 minutes (minimum) |
| Difficulty | Intermediate |
| Method | Press-in crust + sequential cold-set layering |
| Equipment | 8×8 inch (20×20cm) light-colored aluminum baking pan, hand or stand mixer |
| Serving Size | 1 bar (approximately 2×2 inches / 5×5cm) |
| Nutrient | Per Bar |
|---|---|
| Calories | ~373 |
| Carbohydrates | ~34g |
| Fat | ~26g |
| Protein | ~5g |
| Sugar | ~23g |
| Sodium | ~180mg |
Ingredients & Tools for Blackberry Pistachio Dream Bars Recipe
For the Graham Cracker Crust
- 200g (about 13 full sheets) graham crackers, finely crushed — or 2 cups (200g) pre-made graham cracker crumbs
- 85g (6 tablespoons) unsalted butter, melted and slightly cooled
- 25g (2 tablespoons) plain white granulated cane sugar
- 1 pinch fine sea salt
For the Pistachio Cream Layer
- 340g (12 oz / 1½ blocks) full-fat block cream cheese (not low-fat, not whipped), softened to room temperature
- 65g (¼ cup) pistachio paste — see Before You Start note on sourcing
- 120g (1 cup) powdered sugar, sifted
- 120ml (½ cup) heavy whipping cream (36% fat minimum), cold
- ½ teaspoon (2ml) pure vanilla extract
- 1 pinch fine sea salt
For the Vanilla Cream Layer
- 225g (8 oz / 1 block) full-fat block cream cheese (not low-fat, not whipped), softened to room temperature
- 80g (⅔ cup) powdered sugar, sifted
- 120ml (½ cup) heavy whipping cream (36% fat minimum), cold
- 1 teaspoon (5ml) pure vanilla extract
- 1 pinch fine sea salt
For the Blackberry Gel Top
- 300g (about 2½ cups) fresh blackberries — or frozen blackberries, fully thawed and drained
- 80g (6 tablespoons) plain white granulated cane sugar
- 15ml (1 tablespoon) fresh lemon juice
- 7g (1 tablespoon) cornstarch
- 2 tablespoons (30ml) cold water
For Garnish
- 40g (⅓ cup) shelled pistachios, roughly chopped — bright green, not roasted or salted
- Fresh whole blackberries — 1 to 2 per bar for serving
- Reserved crust crumble — optional, for the scattered-crumble garnish variation shown in the top-down photo
Before You Start
Read this section before you touch anything. These bars have four components and each one has a specific order-of-operations that cannot be reversed.
On cream cheese: Both layers require full-fat block cream cheese — the kind sold in rectangular foil-wrapped blocks, not the spreadable tub kind and not the whipped kind. Low-fat and whipped cream cheese contain more water and stabilizers than block cream cheese; the layers will not set firmly and the bars will be soft and wet at the center when you cut them. Pull both blocks from the refrigerator 90 minutes before you start. The cream cheese is ready when you press a finger into it and it leaves a clean indent without any resistance and without feeling slick or greasy. Cold cream cheese lumps. Lumps do not bake out — this is a cold-set recipe so there is no heat to fix them. Time only.
On pistachio paste: This is not pistachio butter and it is not ground pistachios. Pistachio paste is a smooth, intensely green, sweetened or unsweetened concentrate — similar in consistency to tahini — sold at specialty grocery stores, Middle Eastern markets, and online. If yours is unsweetened, the recipe as written works as-is. If yours is sweetened, reduce the powdered sugar in the pistachio layer by 20g (about 2 tablespoons) and taste before pouring. Do not substitute with pistachio pudding mix or pistachio extract — the color and flavor will not be the same.
On pistachio freshness: Whether you are using shelled pistachios for garnish or making your own pistachio paste, smell the pistachios before using them. Fresh pistachios smell sweet and faintly grassy. Rancid pistachios — which can happen quickly once the bag is opened — smell like old paint or nail polish remover. Rancid garnish will make the entire bar taste off regardless of how well the other components are made. Store shelled pistachios in a sealed bag in the freezer if you are not using them within two weeks.
On the heavy whipping cream: Use it cold, straight from the refrigerator. Cold cream whips to stable peaks. Warm cream whips poorly and produces a loose, unstable filling that will not hold its shape between layers.
On cornstarch for the gel: Cornstarch produces a clear, glossy, firm-set gel — exactly the deep-purple, high-shine top you see in the photos. Do not substitute with flour (cloudy and starchy-tasting) or arrowroot (sets too soft at room temperature). If you want to use gelatin instead, use 1½ teaspoons (4g) of unflavored gelatin bloomed in 2 tablespoons cold water — it produces a firmer set but a slightly more opaque top.
On the sequential layering: Each cream layer must be refrigerated for a minimum of 45 minutes before the next layer is poured. The gel top must be cooled to room temperature — approximately 65–70°F (18–21°C) — before it is poured over the set vanilla layer. Pouring warm gel over a cream cheese layer melts the surface and the layers bleed. This is the step most people rush. Do not rush it.
Oven rack position: Position your oven rack in the middle of the oven before preheating. Top rack burns the crust surface before the base is set. Bottom rack overbrowns the underside.
On gram weights: For the most accurate results, use a kitchen scale set to grams. Volume measurements for cream cheese, powdered sugar, and pistachio paste can vary significantly depending on how they are scooped and packed. The gram weights in this recipe are the numbers I tested with — they are the most reliable way to get the same result.
Chill time: These bars require a minimum of 4 hours of refrigeration after the final layer is poured. Overnight — 8 hours — is better. Do not attempt to cut them before the full chill time. The layers are cold-set; cutting early produces soft, smeared edges and the layers will not hold their shape.
Necessary Tools
- Kitchen scale (strongly recommended) — gram weights for cream cheese, pistachio paste, and powdered sugar are significantly more accurate than volume measurements for these layers
- 8×8 inch (20×20cm) light-colored aluminum baking pan — not glass, not dark non-stick. Glass retains heat longer and makes it harder to judge when the crust is done. Dark non-stick overbrowns the crust base.
- Parchment paper with overhang on two sides — mandatory. Without parchment overhang the bars cannot be lifted cleanly from the pan and the edges will break.
- Food processor or zip-lock bag and rolling pin — for crushing graham crackers
- Hand mixer or stand mixer fitted with the whisk attachment — required for both cream layers. Mixing by hand will not whip the cream to stable peaks and the layers will be dense rather than light.
- Large mixing bowl (×2) — one per cream layer
- Medium saucepan — for the blackberry gel
- Fine mesh sieve — for straining the blackberry gel
- Offset spatula — for spreading each layer evenly
- Instant-read thermometer or cooking thermometer — for confirming the gel has cooled before pouring
- Sharp chef’s knife and cutting board — for slicing; wipe the blade clean between each cut
- Oven thermometer (optional but recommended — most home ovens run 15–25°F / 8–14°C off the stated temperature)
- Wire cooling rack — for cooling the par-baked crust before filling
How to Make Blackberry Pistachio Dream Bars
These blackberry pistachio dream bars use a three-method approach: a press-in crumb crust that is par-baked, two sequential cold-set cream cheese layers that are refrigerator-set without baking, and a stovetop cornstarch-thickened fruit gel that is poured cold over the set layers. No mixer is needed for the crust. A hand or stand mixer is required for both cream layers. The method is straightforward — the discipline is in the timing.
Step 1: Preparing the Pan and Par-Baking the Graham Cracker Crust
Preheat your oven to 350°F (175°C) and position the rack in the middle position. Most home ovens run 15–25°F (8–14°C) off — if you have an oven thermometer, confirm the actual temperature before the pan goes in. While the oven heats, line your 8×8 inch (20×20cm) light-colored aluminum baking pan with parchment paper, leaving at least 2 inches (5cm) of overhang on two opposite sides. Press the parchment into the corners firmly. If you skip the overhang, you will not be able to lift the finished bars cleanly from the pan — the edges will tear and the layers will break.
In your food processor, pulse 200g (about 13 full sheets) of graham crackers until they are a fine, uniform crumb with no large pieces remaining — approximately 15 to 20 one-second pulses. No food processor? Place the crackers in a zip-lock bag, press out the air, and roll firmly with a rolling pin until the crumbs are fine and even.
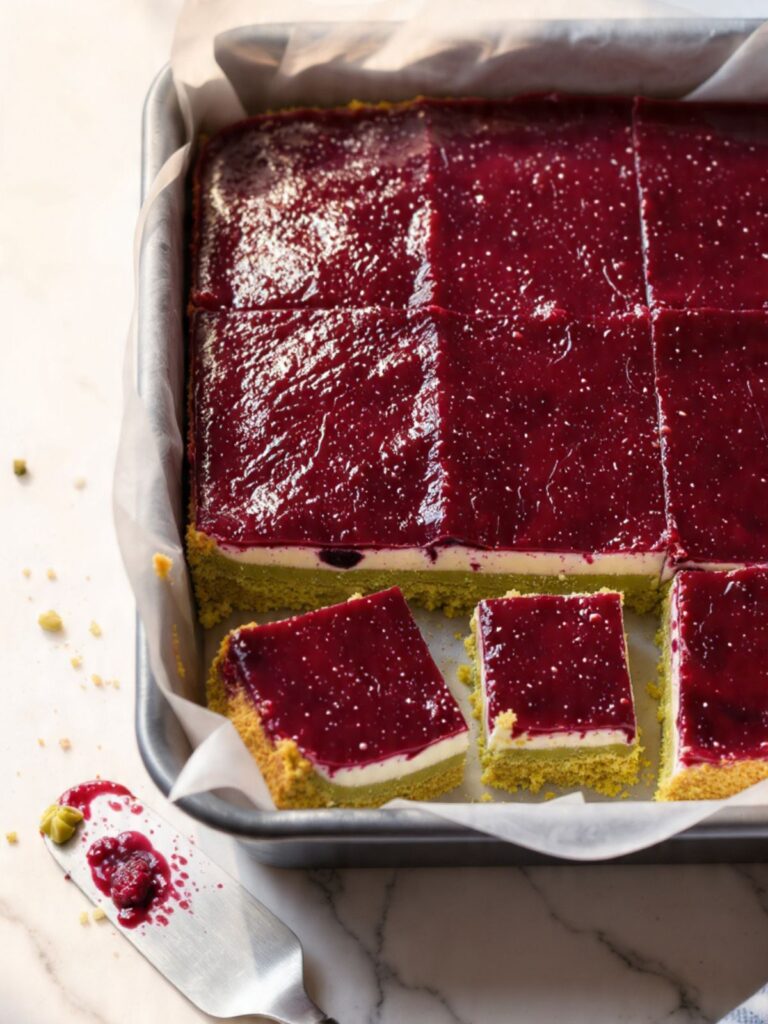
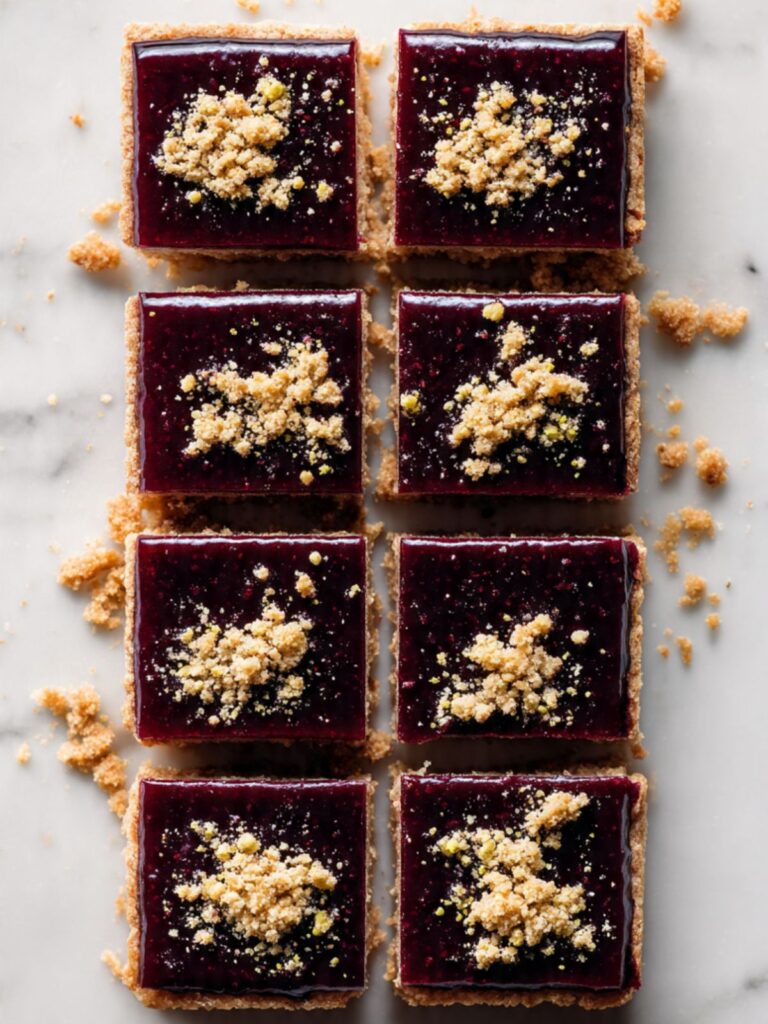
Transfer the crumbs to a large mixing bowl. Pour in your 85g (6 tablespoons) of melted and slightly cooled unsalted butter, 25g (2 tablespoons) of plain white granulated cane sugar, and 1 pinch of fine sea salt. The butter binds the crumbs and the sugar adds just enough sweetness to the base — this is a 2:1 crumb-to-butter ratio, which produces a crust that is firm when cold but sandy when bitten, exactly as shown in the stacked bar photo where the crust layer holds its edge without crumbling away from the filling. Stir with a fork until every crumb is evenly coated and the mixture holds together when you press a small amount between your fingers. Reserve approximately 2 tablespoons of the unbaked crumb mixture in a small bowl before pressing — this becomes the scattered crumble garnish visible in the top-down photo if you want that variation.
Then press the remainder into the pan. If it crumbles apart when pressed, add melted butter one teaspoon at a time. Press the crumb mixture into the prepared pan in an even, compact layer. Use the flat bottom of a measuring cup to press firmly across the entire surface, paying extra attention to the corners and edges — uneven pressure here produces a crust that breaks unevenly when the bars are cut. The surface should look smooth and uniform, with no loose crumbs and no visible high spots.
Bake at 350°F (175°C) for 10 to 12 minutes — start checking at 10 minutes. Pull the pan the moment the edges look set and the surface looks dry and the edges have turned a warm, medium golden brown — the color of a toasted digestive biscuit — and the base feels set and firm when you press the center gently. Do not overbake — a crust that goes too dark will taste bitter against the cream layers.
Transfer the pan to a wire rack. The pan itself continues conducting heat into the crust base for approximately 3 to 4 minutes after leaving the oven — this carryover heat finishes setting the crust without the oven drying it further. Do not move the crust off the wire rack during this window. Cool completely before adding any filling — approximately 45 minutes to 1 hour at room temperature. A warm crust will melt the bottom of the pistachio layer and the layers will not set cleanly. Set a timer and walk away. A warm crust will melt the bottom of the pistachio layer and the layers will not set cleanly. Set a timer and walk away.
The cooled crust should feel firm and dry to the touch, with a faint sandy texture when you press it — not soft, not tacky.
Reserve approximately 2 tablespoons of the unbaked crumb mixture in a small bowl before pressing — this becomes the scattered crumble garnish visible in the top-down photo if you want that variation.
Step 2: Whipping the Pistachio Cream Layer to a Smooth, Dense Filling
Before you begin, confirm your 340g (12 oz / 1½ blocks) of full-fat block cream cheese has been at room temperature for at least 90 minutes. Press a finger into it — it should leave a clean indent with no resistance. If it still feels cool or firm in the center, give it another 20 minutes. Cold cream cheese is the single most common reason layered bars come out lumpy, and no amount of mixing fixes lumps in a cold-set recipe.
In the bowl of your stand mixer fitted with the whisk attachment — or in a large mixing bowl using a hand mixer — beat the 340g of softened full-fat block cream cheese alone on medium speed for 2 full minutes until it is completely smooth and slightly fluffy. Scrape down the sides and bottom of the bowl with a silicone spatula. Any unblended cream cheese at this stage will become a lump in the finished layer. Beat for another 30 seconds and scrape again.
Add your 65g (¼ cup) of pistachio paste and 120g (1 cup) of sifted powdered sugar. The pistachio paste provides the flavor and the pale moss-green color you see in the cross-section — it will look very intensely green at this stage, which is correct; the color lightens when the cream is folded in. The powdered sugar must be sifted — unsifted powdered sugar contains small lumps that do not dissolve fully in a cold mixture and produce a gritty texture in the finished layer. Beat on medium speed for 1 minute until fully combined. Scrape down the bowl. Add ½ teaspoon (2ml) of pure vanilla extract and 1 pinch of fine sea salt and beat for 15 seconds more. The mixture will be thick, slightly sticky, and a soft sage green.
In a separate clean, cold bowl, pour your 120ml (½ cup) of cold heavy whipping cream (36% fat minimum). Using clean beaters, whip on high speed until stiff peaks form — approximately 2 to 3 minutes. The cream must be cold from the refrigerator; warm cream will not whip to stable peaks and the layer will be loose and will not hold its shape between pours. Stiff peaks means the cream holds a firm point when the beater is lifted and does not fall or curl over.
Add the whipped cream to the pistachio cream cheese mixture in two additions. Fold gently with a wide silicone spatula using slow, deliberate strokes from the bottom of the bowl upward — not stirring in circles, which deflates the cream and produces a dense, heavy layer instead of the smooth, slightly airy filling visible in the cross-section. Count approximately 20 strokes per addition. A few small streaks of white are acceptable — overmixing at this stage deflates all the air you just whipped in.
The finished pistachio layer should look smooth, pale sage-green, and thick enough to hold its shape on the spatula without dripping — similar in consistency to a very thick Greek yogurt.
Pour the pistachio cream onto the fully cooled crust and spread into an even layer with your offset spatula, working from the center outward. Tap the pan gently on the counter 3 to 4 times to release any air pockets. Refrigerate for a minimum of 45 minutes — 1 hour is better — before adding the vanilla layer. Do not move the pan during this time. Set a timer.
Step 3: Building the Vanilla Cream Layer Over a Firm Pistachio Base
Before pouring the vanilla layer, gently press the tip of one finger into the edge of the pistachio layer — it should feel firm and set, with no give or jiggle. If it still feels soft in the center, give it another 15 minutes. A layer that has not fully set will collapse under the weight of the next pour and the two layers will merge. This is the moment most people rush and the moment the stacked bar photo — where the green and white layers meet in a perfectly clean horizontal line — depends on entirely.
In a clean large mixing bowl, beat your 225g (8 oz / 1 block) of softened full-fat block cream cheese alone on medium speed for 2 full minutes until completely smooth. Scrape the bowl. Add your 80g (⅔ cup) of sifted powdered sugar, 1 teaspoon (5ml) of pure vanilla extract, and 1 pinch of fine sea salt. Beat on medium speed for 1 minute until fully combined and smooth. Scrape the bowl again.
In a separate clean, cold bowl, whip your 120ml (½ cup) of cold heavy whipping cream (36% fat minimum) on high speed to stiff peaks — approximately 2 to 3 minutes. Fold the whipped cream into the vanilla cream cheese mixture in two additions using the same gentle bottom-upward strokes as the pistachio layer — approximately 20 strokes per addition.
The vanilla layer should look bright white, smooth, and slightly glossy — thicker than pourable but soft enough to spread easily with a spatula.
Spoon the vanilla cream carefully over the set pistachio layer. Do not pour directly from the bowl — spooning and then spreading gently prevents the weight of the pour from pressing into the pistachio layer and disrupting its surface. Spread with your offset spatula in light, even strokes from the center outward. Refrigerate for another 45 minutes to 1 hour before pouring the blackberry gel.
Step 4: Cooking the Blackberry Gel to a Deep, Glossy Set
While the vanilla layer chills, make the blackberry gel. In a medium saucepan over medium heat, combine your 300g (about 2½ cups) of fresh blackberries, 80g (6 tablespoons) of plain white granulated cane sugar, and 15ml (1 tablespoon) of fresh lemon juice. The lemon juice is not just for flavor — its acidity brightens the blackberry color and prevents the gel from tasting flat or one-dimensional. Cook, stirring occasionally, until the blackberries have broken down completely and the mixture is bubbling and deeply colored — approximately 8 to 10 minutes.
Pour the hot blackberry mixture through your fine mesh sieve set over a clean bowl, pressing firmly with the back of a spoon to extract as much liquid and pulp as possible. Discard the seeds and skin left in the sieve. You should have approximately 200–220ml of smooth, deeply colored blackberry liquid.
In a small bowl, whisk together your 7g (1 tablespoon) of cornstarch and 2 tablespoons (30ml) of cold water until completely smooth — no lumps. Pour the cornstarch slurry back into the saucepan and add the strained blackberry liquid. Whisk to combine. Return to medium heat and cook, stirring constantly, until the mixture thickens and comes to a boil — approximately 2 to 3 minutes. Once it boils, cook for exactly 1 minute more, stirring constantly. The cornstarch needs to reach a full boil to activate completely — gel that has not boiled long enough will be loose and will not set to the glossy, firm surface you see in the pan photo. The finished gel should coat the back of a spoon thickly and hold a clean line when you drag your finger through it.
Remove from heat. This is the most critical waiting step in the recipe: the gel must cool to room temperature — approximately 65–70°F (18–21°C) — before it is poured over the vanilla layer. Use your instant-read thermometer to check. Do not estimate. Hot gel poured over a cream cheese layer melts the surface and the white layer bleeds up into the gel, producing a murky, blurred top instead of the deep, opaque burgundy surface shown in the photos. Transfer to a bowl and cool at room temperature for 20 to 30 minutes, stirring occasionally to release heat evenly.
Step 5: Pouring the Gel and Setting the Final Layer
Confirm the vanilla layer has chilled for at least 45 minutes and feels firm at the edges. Confirm the blackberry gel has cooled to room temperature — it should feel neither warm nor cold when you touch the bowl.
Pour the cooled blackberry gel over the set vanilla layer in a slow, steady stream starting from the center of the pan. Tilt the pan gently in all four directions to encourage the gel to flow to the edges, then use your offset spatula to spread it evenly to the corners. Work quickly — the gel will begin to set as it contacts the cold cream layers. The surface should look smooth, deeply colored, and high-gloss — exactly as visible in the pan photo where the gel is set across the entire surface in an even, unbroken layer.
Do not add the garnish at this stage. Chopped pistachios and fresh blackberries are added after slicing, immediately before serving — not before the final chill, which would cause the pistachios to soften and the blackberries to bleed into the gel surface.
Cover the pan loosely with plastic wrap — do not press the wrap directly onto the gel surface or it will leave impressions. Refrigerate for a minimum of 4 hours. Overnight — 8 hours — produces cleaner slices and a more firmly set gel. Do not move the pan for the first 30 minutes after refrigerating.
Step 6: Slicing to Clean Edges and Garnishing for Serving
Use the parchment overhang to lift the fully set bar slab out of the pan onto a cutting board. The slab should release cleanly — if it sticks at the corners, run a thin knife along the unlined edges first.
For the cleanest possible slices, fill a tall glass with hot water and dip your sharp chef’s knife into the water for 10 seconds before each cut. Wipe the blade completely dry between every cut — a wet blade smears the layers. Make 3 evenly spaced cuts in one direction, then rotate and make 3 more cuts in the other direction to produce 16 bars. Do not saw. Press straight down with firm, even pressure in a single motion per cut.
The cut edge should reveal four clean, distinct horizontal layers — golden crust at the base, pale green pistachio cream, a thinner stripe of white vanilla cream, and the deep burgundy gel at the top — with no bleeding or merging between layers, exactly as visible in the close-up bar photo.
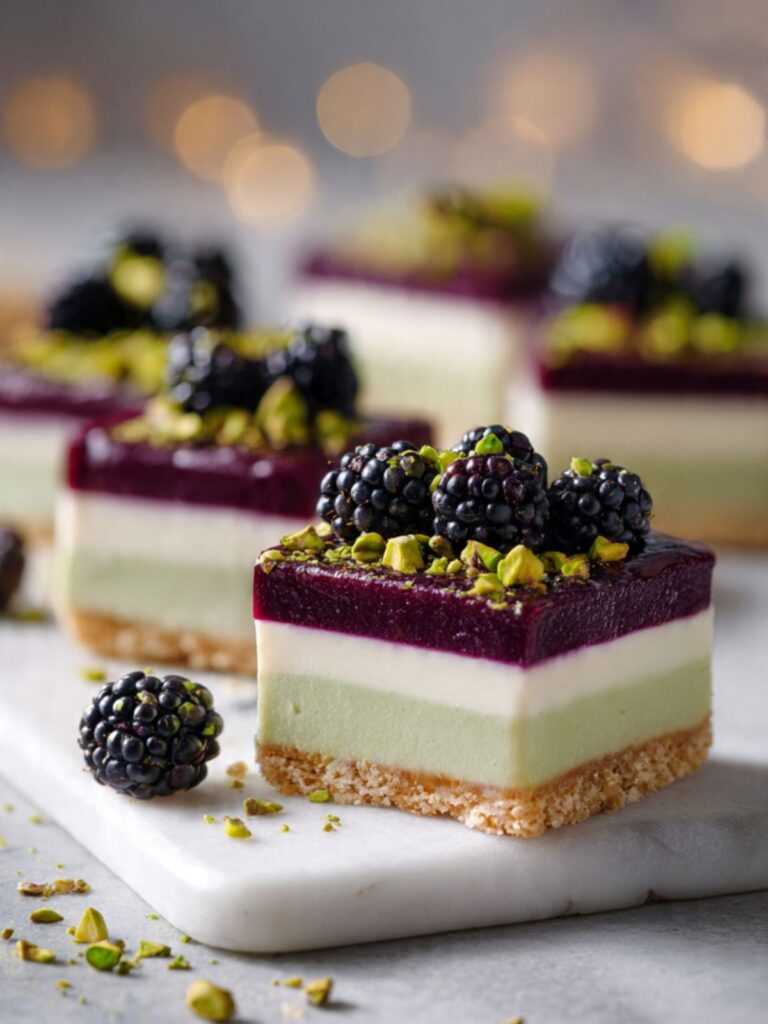
For the pistachio and blackberry garnish (shown in the stacked and close-up photos): scatter 40g (⅓ cup) of roughly chopped bright-green pistachios across the gel surface of each bar, then place 1 to 2 fresh whole blackberries at the center. For the crumble garnish variation (shown in the top-down photo): scatter the reserved unbaked crust crumble across the gel surface in loose clusters instead. Both variations are shown in the photos — choose the one that suits your presentation.
Serve immediately after garnishing, or refrigerate ungarnished for up to 24 hours before the garnish is added.
The Science Behind Blackberry Pistachio Dream Bars
Why the Order You Pour the Layers Is a Chemistry Problem, Not Just a Patience Problem
I ruined the first batch of these not because I did not know the layers needed to chill between pours — I did know that — but because I did not understand what “firm enough” actually meant at the molecular level. I pressed the edge and it felt set. It was not. What I did not understand was that cream cheese fillings set from the outside inward. The edge firms first because it is closest to the cold pan walls. The center is still a semi-liquid emulsion of fat, water, and protein that has not yet had time to organize itself into a stable structure. When I poured the next layer onto a surface that felt firm at the edge but was still fluid at the center, the weight of the new pour pushed through the surface like pushing through a skin stretched over liquid. The layers merged.
What is actually happening during the chill: the fat molecules in the cream cheese and whipped cream are solidifying as temperature drops, locking the protein network in place. Heavy whipping cream at 36% fat has enough lipid content that when it drops below approximately 40°F (4°C) it forms a stable semi-solid structure. But this only happens when the entire layer — center included — reaches that temperature uniformly. The 45-minute minimum between layers is the time it takes for the center of a layer that is roughly ½ inch (1.25cm) thick to reach the same temperature as the edges. Cutting that time short means the center has not set, regardless of what the edges feel like. This is why the visual confirmation — pressing the center gently, not the edge — is the only reliable test.
The clean horizontal lines visible in every cross-section photo are not styling. They are the result of every layer being fully set before the next one was poured. That boundary between green and white is where one cold-set emulsion ended and another began — two distinct fat and protein networks with no molecular mixing between them.
Why Cornstarch Produces That Specific Gloss on the Blackberry Gel
Cornstarch is a starch thickener, which means it works through a process called starch gelatinization — when starch granules are heated in liquid, they absorb water, swell, and burst, releasing long starch chains that form a thick, translucent gel network. The specific quality of that network is what gives the blackberry gel top its deep, jewel-like gloss rather than the matte, opaque look of a flour-thickened sauce.
The reason this matters visually: flour contains proteins in addition to starch, and those proteins scatter light rather than transmit it — producing a cloudy, matte finish. Cornstarch is almost pure starch with no protein, so the gel it forms transmits light rather than scattering it, which is why it looks clear and glossy even when deeply pigmented by blackberry juice. The burgundy-purple surface you see in the photos has that high-shine quality because light is passing through the gel layer and reflecting off the cream surface beneath it, not bouncing off an opaque surface.
This is also why the gel must reach a full boil and cook for exactly one minute after boiling: raw cornstarch granules that have not fully gelatinized produce a starchy, cloudy, loose gel that will not set to the firm, glossy surface shown in the pan photo. The full boil is not optional — it is the mechanism.
What Pistachio Paste Does That Ground Pistachios Cannot
Pistachio paste is made by grinding blanched, skinned pistachios under high pressure until the cell walls rupture and the natural oils are fully released — producing a smooth, intensely flavored concentrate where the fat is already emulsified into the mass. Ground pistachios, by contrast, still have intact cell structure: the oils are bound inside the cells and have not been liberated. This distinction matters in a cold-set filling because emulsification requires free fat.
In the pistachio cream layer, the liberated pistachio oil from the paste acts as an additional emulsifier alongside the fat in the cream cheese and heavy whipping cream. It integrates into the filling smoothly and colors it evenly — which is why the cross-section shows a perfectly uniform pale green with no speckling or green flecks. Ground pistachios stirred into cream cheese would produce a speckled, gritty layer where the nut particles remain suspended but never fully integrate. The color would also be uneven — green where the particles sit, white between them.
For the site’s salted caramel chocolate chip cookie bars, the fat-emulsification principle works differently — melted butter carries the caramel flavor into the dough — but the underlying logic is the same: fully liberated fat integrates into a mixture in a way that intact fat cannot.
Blackberry Pistachio Dream Bars Troubleshooting & Pro-Tips
Common Mistakes
1. Wrong cream cheese type or temperature — the most common reason layers fail
Symptom: The cream layers are lumpy, grainy, or gritty in texture. The filling does not spread smoothly and the finished bars have visible white specks or an uneven surface when cut.
Cause: Low-fat, whipped, or cold cream cheese. Low-fat and whipped versions contain more water and stabilizers than full-fat block cream cheese — the extra water prevents the layers from setting firmly and the bars will be soft and wet at the center when cut. Cold cream cheese — even slightly cool cream cheese — does not beat smooth. The fat in cold cream cheese has not softened enough to release from its crystalline structure, so it remains in discrete clumps no matter how long you mix.
Fix: If the mixture is already lumpy, you cannot un-lump a cold-set filling. Pass the mixture through a fine mesh sieve, pressing firmly with a spatula — this forces the lumps through the mesh and produces a smoother result. It will not be perfect, but it is salvageable. Spread as evenly as possible, chill, and serve — the texture inside will be denser than intended but the flavor will be correct.
Prevention: Pull both blocks of full-fat cream cheese from the refrigerator 90 minutes before you begin. Test readiness by pressing a finger firmly into the center — it should leave a clean indent with no resistance and no slick, greasy feeling.
2. Wrong pan size or pan preparation — leads to broken edges and stuck bars
Symptom: The bars crack or break when lifted from the pan. The edges are ragged and the layers separate at the sides. The crust sticks to the pan bottom and cannot be released cleanly.
Cause: Skipping the parchment overhang, using a pan that is too large, or using a glass or dark non-stick pan. A 9×9 inch pan produces thinner layers that set less firmly and are harder to cut cleanly. A glass pan retains heat longer, making it harder to judge when the crust is done and slowing the cooling time before filling. Dark non-stick pans overbrown the crust base.
Fix: If the bars are stuck, run a thin offset spatula or butter knife along the unlined edges to release them. Work slowly and do not force — rushing tears the crust. If the crust base has crumbled away from the filling at the sides, press the pieces back into place against the filling — the cold layers are sticky enough to hold them. Serve immediately from the board rather than attempting to re-plate.
Prevention: Line the 8×8 inch (20×20cm) light-colored aluminum pan with parchment paper leaving at least 2 inches (5cm) of overhang on two opposite sides before anything goes into the pan.
3. Layers bleeding or merging — the sequential chill was shortened
Symptom: The green and white layers are blurred together at the boundary, producing a single greenish-white swirled layer instead of two clean stripes. The blackberry gel has bled down into the white layer and the top surface shows purple streaks rather than a solid opaque color.
Cause: The previous layer was not fully set before the next pour. The center of a cream cheese layer sets more slowly than the edges — pressing the edge and finding it firm does not mean the center is ready. Hot or warm blackberry gel poured over the vanilla layer melts the cream surface and the two layers mix at the boundary.
Fix: Bleeding between cream layers cannot be reversed once it has happened. The bars are still completely edible — the flavor is identical. Serve them as-is, cut confidently, and scatter the pistachio and blackberry garnish generously on top to draw the eye. The top-down presentation with crumble garnish, shown in the overhead photo, is a good option here because it does not show the cross-section.
Prevention: Chill each cream layer for a minimum of 45 minutes — pressing the center of the layer gently to confirm it feels firm before pouring the next one. Cool the blackberry gel to room temperature (65–70°F / 18–21°C) and verify with a thermometer before pouring.
4. Gel top is loose, cloudy, or does not set
Symptom: The blackberry gel top is thin and pourable after chilling rather than firm and glossy. The surface looks matte and dull rather than deeply colored and high-shine. The gel slides off the bars when they are cut.
Cause: The cornstarch slurry did not reach a full boil, or was not cooked for the full minute after boiling. Cornstarch gelatinization requires a sustained boil — a simmer is not sufficient. Alternatively, the cornstarch was measured by volume without leveling (over- or under-measuring changes the set strength), or the gel was poured before it had cooled and the heat disrupted the cream layer surface, causing mixing.
Fix: If the gel is already on the bars and has not set after 4 hours of chilling, the bars are still edible but the gel will be soft. Serve them cold and plate individually rather than lifting and slicing — the soft gel will flow slightly when cut but will taste correct. Scatter extra chopped pistachios over the surface to provide textural contrast.
Prevention: After adding the cornstarch slurry to the blackberry liquid, stir constantly over medium heat and watch for a full rolling boil — large bubbles breaking the surface, not just small bubbles at the edges. Cook for exactly 1 minute after the boil begins, then remove from heat. Use a thermometer to confirm the gel has cooled to 65–70°F (18–21°C) before pouring.
5. Crust is crumbly and does not hold together when cut
Symptom: The crust layer crumbles away from the filling when the bars are sliced. The base breaks into loose pieces rather than cutting cleanly. The bottom of each bar falls apart when lifted.
Cause: Not enough butter in the crumb mixture, crumbs that were not pressed firmly enough into the pan, or cutting the bars before they were fully chilled. Under-pressing leaves gaps in the crumb structure that have no binding — the butter holds the crumbs together by filling those gaps. Cutting warm bars stresses the crust before the butter has fully solidified again after baking.
Fix: If the crust has already crumbled, press the pieces firmly back against the base of each bar — the cold cream layers are sticky enough to act as a temporary adhesive. Serve on individual plates rather than a board, and eat with a fork. The crumble garnish variation shown in the top-down photo was actually inspired by a batch where the crust crumbled on lift — scatter the fallen pieces over the gel top and lean into it.
Prevention: Press the crumb mixture firmly and evenly using the flat bottom of a measuring cup. The mixture should hold together cleanly when pressed between two fingers before it goes into the pan. Chill the finished bars for the full 4 hours — overnight is better — before slicing.
6. Bars are difficult to slice cleanly — layers smear or compress
Symptom: The knife drags through the layers rather than cutting cleanly. The cream layers compress or smear at the cut edge. The gel top cracks or peels rather than cutting through smoothly.
Cause: The knife is cold and dry, the bars are not fully chilled, or the blade was not wiped between cuts. A cold, dry blade drags through cold cream cheese rather than gliding. Residue from the previous cut smears across the next cut edge.
Fix: The smearing has already happened and the cut face cannot be fully restored. Do not attempt to re-cut — a second pass with the knife makes it worse. Instead, plate each bar individually and press a pinch of roughly chopped pistachios firmly against the smeared cut face — the nuts fill the visual disruption and the layering reads correctly from above. The top-down presentation with crumble garnish (shown in the overhead photo) is the strongest option here because it draws the eye to the surface rather than the cross-section. Alternatively, serve the bars in small dishes or ramekins on their sides — the layer pattern is still visible from above and the smeared edge faces down.
Prevention: Dip the blade in hot water, wipe dry, cut, repeat — every single cut. Do not saw. Press straight down in one firm, even motion.
7. Altitude and humidity adjustments
High altitude (above 3,500 feet / 1,067m): The crust bakes faster at altitude due to lower air pressure — reduce the bake time to 8 to 9 minutes and check at 8. The cream layers are unaffected by altitude. The blackberry gel may take slightly longer to reach a full boil — this is normal, wait for the full rolling boil regardless of time.
High humidity: The graham cracker crust can absorb ambient moisture and soften over time — store the finished bars in a lidded container rather than loosely covered. The gel top may feel slightly tacky on the surface in very humid conditions — this does not affect flavor or structural integrity.
Expert Pro-Tips
Pro-Tip 1: Freeze the pan between layers for 20 minutes instead of refrigerating for 45. If you are short on time, place the pan in the freezer rather than the refrigerator between layers. The cream layers set significantly faster at freezer temperature — approximately 20 minutes in the freezer equals 45 minutes in the refrigerator for the purpose of layer firmness. Do not leave them longer than 25 minutes in the freezer or the layer surface will freeze solid and the next pour will not adhere properly.
Pro-Tip 2: Strain the blackberry gel twice for a cleaner, more intensely colored top. A single pass through the sieve removes the seeds and most of the skin. A second pass through the same sieve — or a finer sieve — removes the remaining fine particles and produces a gel that is noticeably more translucent and more deeply colored. This is the difference between the opaque, matte-tending gel and the jewel-clear, high-gloss surface visible in the pan photo.
Pro-Tip 3: Chill the cutting board and knife in the refrigerator for 10 minutes before slicing. A cold cutting board keeps the bar slab cold during slicing — a warm board softens the bottom of the crust from below and produces a less clean cut. Combined with the hot-water knife technique, a cold board is what produces the sharp, clean edge definition visible in the stacked bar close-up where each layer holds its boundary without any compression or smearing at the sides.
How to Store Blackberry Pistachio Dream Bars
Room Temperature
These bars are not shelf-stable at room temperature. The cream cheese layers begin to soften within 30 minutes at room temperature and the gel top loses its firm set within an hour in a warm kitchen. Do not leave them out for more than 20 minutes before serving — this is enough time to garnish and plate but not enough time to cause structural softening. If you are serving these at a gathering, pull them from the refrigerator in batches rather than all at once.
The one exception: if your kitchen is below 65°F (18°C), the bars will hold their shape for up to 45 minutes. This is not a reliable condition to plan around.
Refrigerator
Store the bars in a single layer in a lidded hard-sided container — not a zip-lock bag, which compresses the gel top and leaves impressions, and not loosely covered with plastic wrap, which in a humid refrigerator will cause condensation to drip onto the gel surface and create soft spots. If you need to stack bars, place a sheet of parchment paper between layers and do not stack more than two layers deep. The gel top is firm but not rigid — pressure from a second layer placed directly on it will leave permanent indentations.
The bars keep well in the refrigerator for up to 4 days. Day 1 and Day 2 are the best — the layers are at their firmest and the gel has the most gloss. By Day 3 the crust begins to absorb moisture from the cream layers and softens slightly, which changes the textural contrast between the sandy crust and the smooth filling. The flavor is still correct on Day 3 and Day 4 but the crust will no longer have the distinct snap of a fresh-cut bar.
Add the pistachio and blackberry garnish only to bars you are serving immediately. Garnished bars stored in the refrigerator will have softened pistachios and blackberries that have bled purple into the gel surface within a few hours.
I store these ungarnished and garnish each bar individually as I plate it. It takes 30 extra seconds and the presentation stays exactly as it should be.
Freezer — Made
These bars freeze better than most cream cheese desserts, largely because the high fat content of the full-fat cream cheese and heavy whipping cream resists ice crystal formation more effectively than lower-fat fillings. Freeze them ungarnished and uncut for the best result — a whole frozen slab is easier to portion cleanly after thawing than pre-cut frozen bars, which lose their edge definition as they thaw.
To freeze the whole slab: lift it from the pan using the parchment overhang before cutting, wrap tightly in two layers of plastic wrap, then place in a zip-lock freezer bag with the air pressed out. Freeze for up to 6 weeks. Beyond 6 weeks the gel top begins to weep liquid as the pectin and starch structure degrades during extended freezing.
To thaw: transfer from the freezer to the refrigerator and thaw overnight — approximately 8 hours. Do not thaw at room temperature; the outside softens before the center thaws and the layers lose their definition. Once thawed, slice with the hot-water knife technique and garnish immediately before serving. The texture after thawing is approximately 90% of fresh — the crust will be slightly softer and the gel slightly less glossy, but the layer definition and flavor are fully preserved.
To freeze individual pre-cut bars: wrap each bar individually in plastic wrap, then place in a single layer in a lidded container. Freeze for up to 4 weeks. Thaw in the refrigerator for 3 to 4 hours before serving.
Freezer — Unbaked Components
The graham cracker crust can be made and par-baked up to 3 days ahead — cool completely, cover the pan tightly with plastic wrap, and refrigerate until ready to fill. Do not freeze the baked crust; it absorbs freezer moisture and becomes soft.
The blackberry gel can be made up to 3 days ahead and stored in a sealed glass jar in the refrigerator. Reheat gently in a small saucepan over low heat, stirring constantly, until it loosens to a pourable consistency — approximately 2 to 3 minutes. Cool back to room temperature before pouring over the set cream layers.
The cream layers cannot be made ahead and stored separately — they begin to weep liquid once set and disturbed. Make them on the day of assembly.
Serving Suggestion
Serve these cold — pulled directly from the refrigerator and plated within 5 minutes. Unlike some cream cheese desserts that benefit from 15 minutes at room temperature to soften slightly, these bars are at their structural best when fully cold. The contrast between the firm, sandy crust and the dense, smooth cream layers is most pronounced when the bars are cold; at room temperature the cream layers soften to a consistency that is pleasant but lacks the clean density visible in the stacked bar photo where each layer holds its shape under its own weight.
I serve these with a small pour of cold heavy cream alongside — not whipped, just poured. The slight bitterness of the blackberry gel and the richness of the pistachio layer both benefit from something plain and cold next to them. A sweetened accompaniment competes; unsweetened cream does not.
These are the bars I make when I need something that looks technically impressive but does not require the skill level that impression suggests. They are genuinely not difficult — they require patience, a thermometer, and a refrigerator, none of which are skills. I make them when I want the result to speak before I do. They are not a casual Tuesday dessert. They are what I bring when the occasion warrants something that will be remembered and I do not want to spend four active hours in the kitchen to get there.
Day 2 is actually the moment I prefer these. The pistachio flavor deepens overnight as the paste has more time to fully infuse into the cream layer, and the gel top firms to a cleaner set than it has at the 4-hour mark. If you can make these the evening before and serve them the following day, do that. Day 3 is still good. Day 4, serve them to yourself with no apology — the flavor is still correct, even if the crust has softened.
One honest limitation: these do not travel well once sliced and garnished. The blackberries bleed, the pistachios soften, and the gel surface becomes tacky within 30 minutes of being out of refrigeration. Make them where you are serving them, or transport the unsliced slab in the pan and slice at the destination.
Frequently Asked Questions About Blackberry Pistachio Dream Bars
Can I use frozen blackberries instead of fresh?
Frozen blackberries work well in the gel — in some cases better than fresh, because frozen berries have already had their cell walls broken down during freezing, which means they release more juice more quickly during cooking and produce a more intensely colored gel. Thaw the berries completely and drain the excess liquid before adding them to the saucepan — excess liquid dilutes the gel and can throw off the cornstarch ratio, producing a looser set. Do not add the drained liquid back in. The flavor and color of the finished gel will be indistinguishable from a fresh-berry version.
Can I make these bars without pistachio paste?
Pistachio paste cannot be directly substituted without changing both the texture and the color of the green layer. The closest workable substitute is 60g of raw, unsalted pistachio butter — processed at home by blending blanched, skinned pistachios in a food processor for 4 to 5 minutes until completely smooth. The color will be slightly more muted and the flavor slightly less intense than commercial pistachio paste, but the fat content is similar enough that the layer will set correctly. Do not substitute with pistachio pudding mix — it contains starch thickeners and artificial flavoring that change the texture of the cream layer entirely and produce a filling that is gummy rather than smooth. Do not substitute with chopped or ground pistachios — the layer will be speckled, gritty, and will not set to a smooth, sliceable consistency.
Why are my layers not setting firm enough to cut cleanly?
Layers that do not set firmly enough to cut cleanly are almost always the result of one of three things: cream cheese that was not fully at room temperature before mixing (producing a filling with an uneven fat structure that does not set uniformly), heavy whipping cream with a fat content below 36% (lower-fat cream produces a less stable whipped structure that weeps liquid during chilling), or insufficient total chill time. The minimum is 4 hours after the final layer is poured — this is not the total time in the refrigerator but the time after the blackberry gel goes on. If the bars were assembled over several hours with chilling between layers, the total refrigerator time may be 7 to 8 hours before the final chill begins. Count from when the gel was poured, not from when the crust went in.
The mechanism in each case is the same: cream cheese is an emulsion of fat, water, and protein, and that emulsion only forms a stable, uniform structure when the fat is soft enough to flow and coat the protein network evenly. Cold fat stays crystalline and clumped — no amount of beating redistributes it. Low-fat cream cheese has excess water that the protein network cannot absorb fully, so the structure is looser and weeps liquid during chilling. Low-fat heavy cream lacks the lipid content to form stable whipped peaks, so the air collapses and the layer becomes dense and wet rather than light and firm.
Can I substitute the graham cracker crust with a different base?
The graham cracker crust can be substituted with any dry, fine-crumbed cookie or biscuit at the same weight — 200g. Digestive biscuits produce a slightly less sweet, more neutral base that lets the pistachio layer flavor come forward more clearly. Shortbread cookies produce a richer, more buttery base with a finer crumb. Oreos — filling removed — produce a dark chocolate base that works well with the blackberry gel but changes the visual contrast of the layers significantly, since the dark crust no longer reads as a distinct fourth layer against the green filling in the cross-section. Whatever base you use, the 2:1 crumb-to-butter ratio stays the same and the par-baking time stays the same. I use digestive biscuits when I can find them — the flavor is cleaner and less sweet, which I prefer against the richness of the cream layers. That is a personal preference, not a recipe requirement.
Can I make these bars ahead of time for a party or event?
These bars are genuinely well-suited to make-ahead preparation — the overnight chill actually improves them. Make the full recipe the evening before your event, complete through the blackberry gel pour, and refrigerate overnight ungarnished. The next day, lift the slab from the pan, slice with the hot-water knife technique, and plate with garnish immediately before serving. The maximum make-ahead window is 48 hours from the time the gel is poured to serving — beyond that the crust begins to absorb significant moisture from the cream layers and loses its textural contrast.
Do not slice and garnish more than 2 hours before serving — pre-garnished bars develop soft pistachios and bled blackberry juice on the gel surface. For larger events, the recipe scales to a 9×13 inch (23×33cm) pan — multiply all ingredients by 1.75 and add 15 minutes to the inter-layer chill times to account for the greater filling depth. Note that leavening does not apply here, but cornstarch for the gel does not scale linearly above double batch — use 1.5× the cornstarch quantity for a 1.75× batch to avoid a gel that is too stiff and rubbery.
How do I get the blackberry gel to be that deep, glossy color?
The color intensity of the gel comes from two things: the concentration of the blackberry liquid after straining, and a full rolling boil of the cornstarch slurry. For the deepest color, cook the blackberries down until they are completely broken apart and the liquid has reduced slightly before straining — approximately 10 minutes rather than 8. Press the strained pulp firmly through the sieve to extract maximum pigment. A second pass through the sieve produces a noticeably more translucent, more intensely colored gel because it removes the fine particles that scatter light and make the gel appear dull. The boil activates the cornstarch fully, which produces a clear gel matrix that transmits light rather than scattering it — this is what gives the surface its gloss rather than a matte finish.
For the oatmeal chocolate chip bars on this site, a similar principle applies to the chocolate drizzle finish — full melt and a brief rest produces gloss; partial melt produces a dull, streaky surface.
Can I use a different fruit for the gel top?
The gel formula works with most berry fruits at the same quantities — raspberry, blueberry, and mixed berry all produce a similarly firm, glossy top. Raspberry produces a brighter, more acidic gel with a slightly looser color than blackberry. Blueberry produces a deeper purple-blue, closer in appearance to the blackberry version, with a milder flavor. Strawberry works but produces a softer, pinker gel that is less visually striking against the cream layers and may require an additional half teaspoon (1.5g) of cornstarch for a firm set, because strawberries have higher water content than blackberries. Stone fruits — peach, apricot, plum — work with the same method but produce a semi-opaque rather than glossy gel because their pectin content is different from berries. Whatever fruit you use, the lemon juice stays in the recipe — it brightens the color and prevents the gel from tasting flat regardless of the fruit.
More Dessert Bars You’ll Love
If these blackberry pistachio dream bars are the kind of dessert you reach for — layered, precise, and worth the patience — these are the next ones to make.
Chocolate Chip Cookie Bars — the one-pan version of the classic cookie, cut into thick squares with crisp edges and a fudgy center. No chilling, no layers, ready in under an hour.
Pumpkin Chocolate Chip Cookie Bars — a spiced, dense bar with a soft cakey crumb and pockets of melted chocolate. A seasonal bar that earns its place on any fall dessert table.

No-Bake Blackberry Pistachio Dream Bars Recipe
Ingredients
Equipment
Method
- Preheat oven to 350°F (175°C) and position rack in the middle position. Line an 8×8 inch (20×20cm) light-colored aluminum baking pan with parchment paper leaving at least 2 inches (5cm) of overhang on two opposite sides.
- Pulse 200g of graham crackers in a food processor until fine, uniform crumbs form — approximately 15 to 20 one-second pulses. Transfer to a large mixing bowl. Add 85g melted butter, 25g granulated sugar, and a pinch of fine sea salt. Stir with a fork until every crumb is evenly coated and the mixture holds together when pressed between fingers. Reserve 2 tablespoons of the unbaked crumb mixture in a small bowl for the optional crumble garnish.
- Press the crumb mixture firmly and evenly into the prepared pan using the flat bottom of a measuring cup, pressing well into the corners. Bake at 350°F (175°C) for 10 to 12 minutes until the edges are set and the surface looks dry and lightly golden. Transfer to a wire rack and cool completely — approximately 45 minutes to 1 hour — before adding any filling.
- Beat 340g of softened full-fat block cream cheese alone on medium speed for 2 full minutes until completely smooth. Scrape the bowl. Add 65g pistachio paste, 120g sifted powdered sugar, ½ teaspoon vanilla extract, and a pinch of fine sea salt. Beat on medium speed for 1 minute until fully combined. Scrape the bowl.
- In a separate clean cold bowl, whip 120ml of cold heavy whipping cream on high speed to stiff peaks — approximately 2 to 3 minutes. Fold the whipped cream into the pistachio cream cheese mixture in two additions using gentle bottom-upward strokes — approximately 20 strokes per addition. Pour onto the cooled crust, spread evenly with an offset spatula, and refrigerate for a minimum of 45 minutes until the center feels firm when gently pressed.
- Beat 225g of softened full-fat block cream cheese alone on medium speed for 2 full minutes until completely smooth. Scrape the bowl. Add 80g sifted powdered sugar, 1 teaspoon vanilla extract, and a pinch of fine sea salt. Beat on medium speed for 1 minute. Scrape the bowl. In a separate clean cold bowl, whip 120ml of cold heavy whipping cream to stiff peaks. Fold into the vanilla cream cheese mixture in two additions. Spoon carefully over the set pistachio layer and spread gently with an offset spatula. Refrigerate for another 45 minutes to 1 hour until firm.
- In a medium saucepan over medium heat, combine 300g blackberries, 80g granulated sugar, and 15ml lemon juice. Cook stirring occasionally until blackberries have broken down completely and the mixture is bubbling — approximately 8 to 10 minutes. Strain through a fine mesh sieve, pressing firmly to extract all liquid and pulp. Discard seeds and skin. Whisk together 7g cornstarch and 30ml cold water until smooth. Add the cornstarch slurry to the strained blackberry liquid in the saucepan. Cook over medium heat stirring constantly until the mixture thickens and reaches a full rolling boil — approximately 2 to 3 minutes. Cook for exactly 1 minute more at a full boil stirring constantly. Remove from heat and cool to room temperature — approximately 65–70°F (18–21°C) — approximately 20 to 30 minutes.
- Confirm the vanilla layer is firm at the center. Pour the cooled blackberry gel over the set vanilla layer in a slow steady stream from the center outward. Tilt the pan to distribute evenly and use an offset spatula to spread to the corners. Cover loosely with plastic wrap without touching the gel surface. Refrigerate for a minimum of 4 hours — overnight is recommended.
- Use the parchment overhang to lift the fully set slab onto a cutting board. Dip a sharp chef’s knife in hot water, wipe completely dry, and press straight down in a single motion — repeat for every cut. Make 3 evenly spaced cuts in one direction, rotate, make 3 more cuts to yield 16 bars. Garnish with chopped pistachios and fresh blackberries immediately before serving, or scatter reserved crust crumble across the gel surface for the crumble garnish variation.