Snickerdoodle Cheesecake Bars Recipe
Cheesecake bars fail in one of two places. The crust gets soggy and separates from the filling. Or the cheesecake layer cracks across the top and the texture turns rubbery instead of staying dense and creamy. Most recipes do not address either one — they assume the reader will figure it out. I did not figure it out. I ran into both problems and worked backward from each one until I understood what caused them.
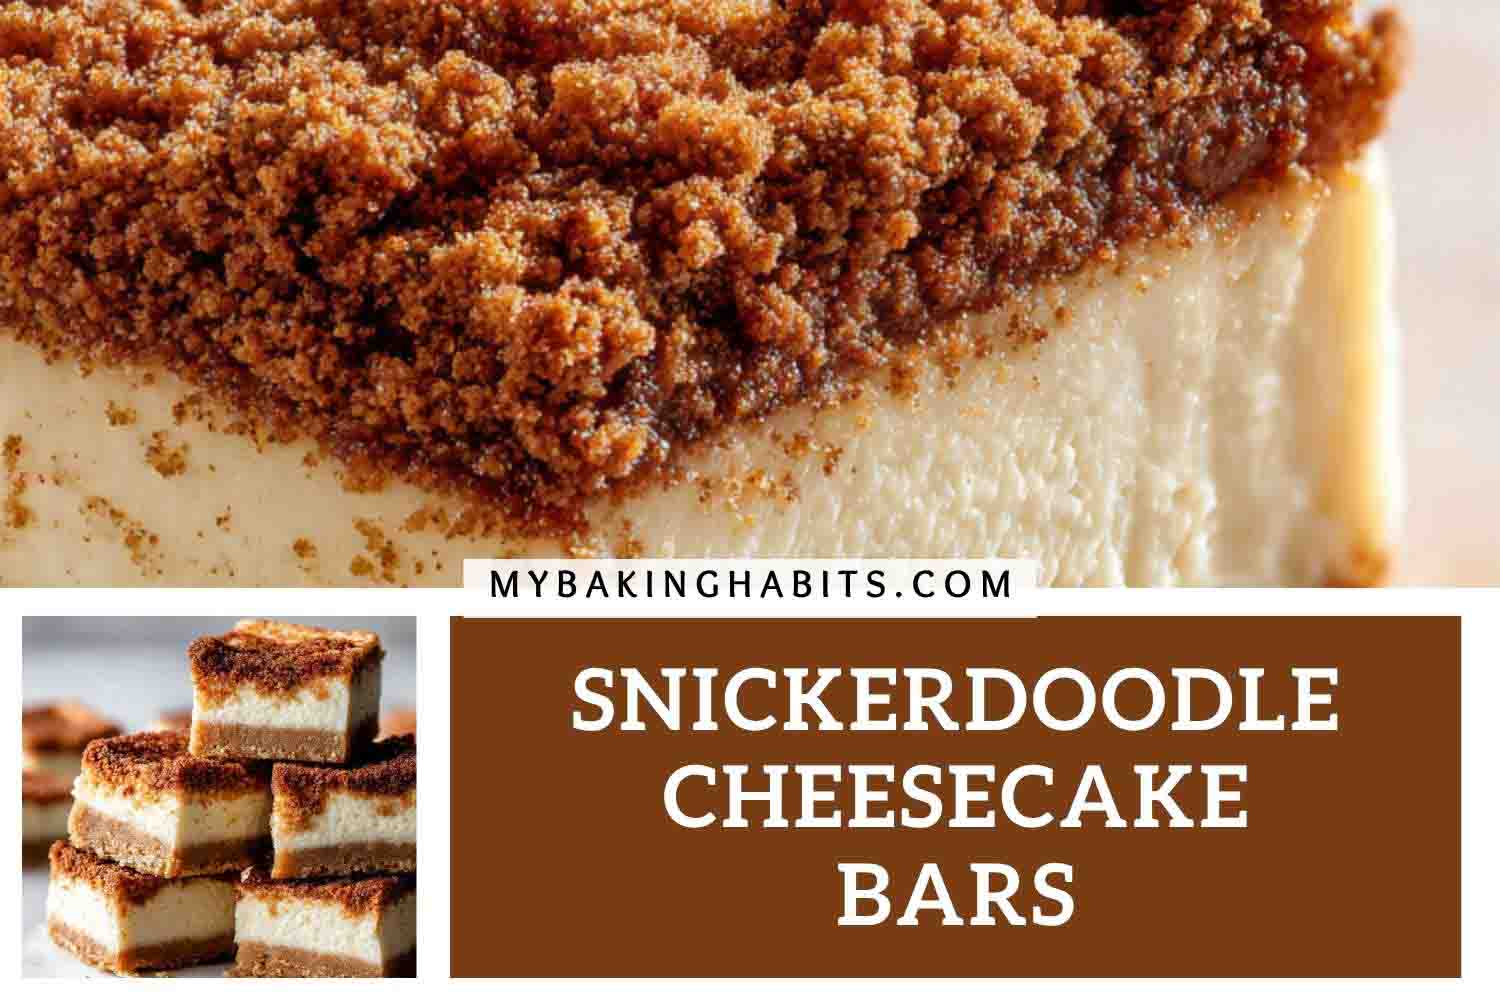
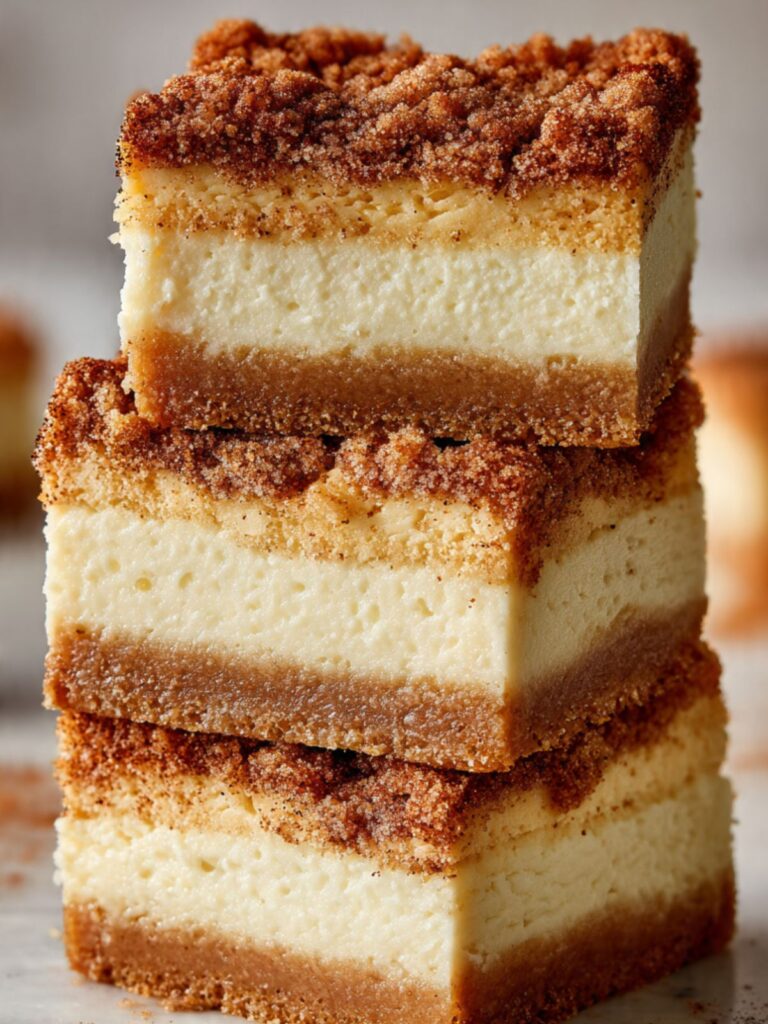
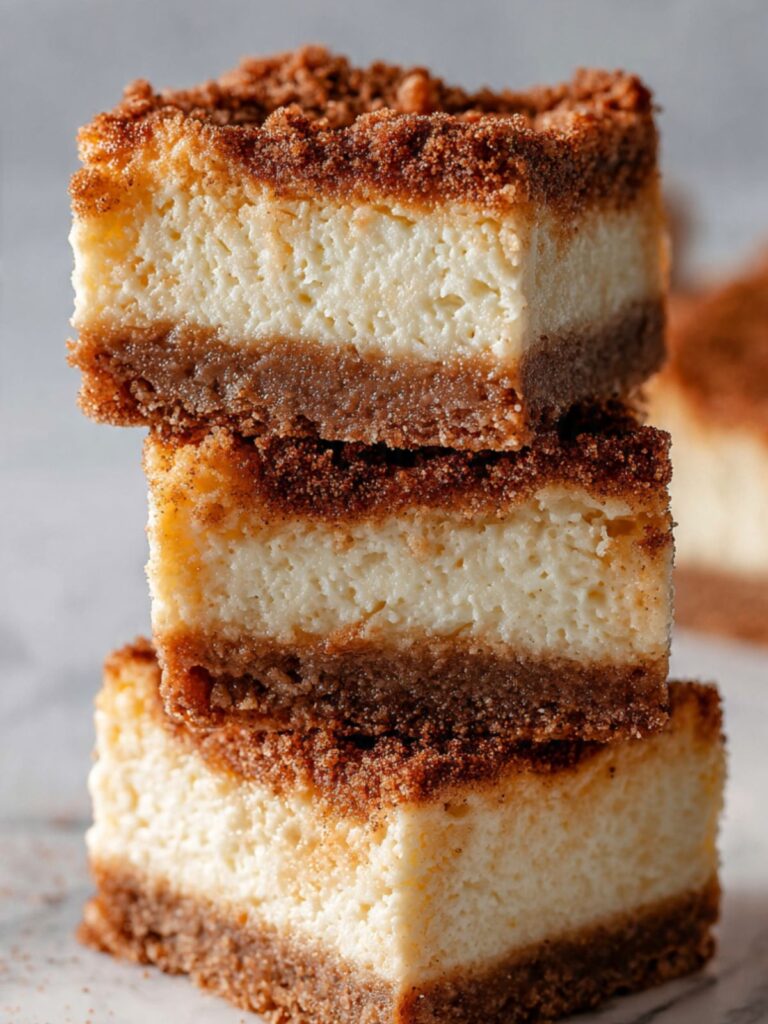
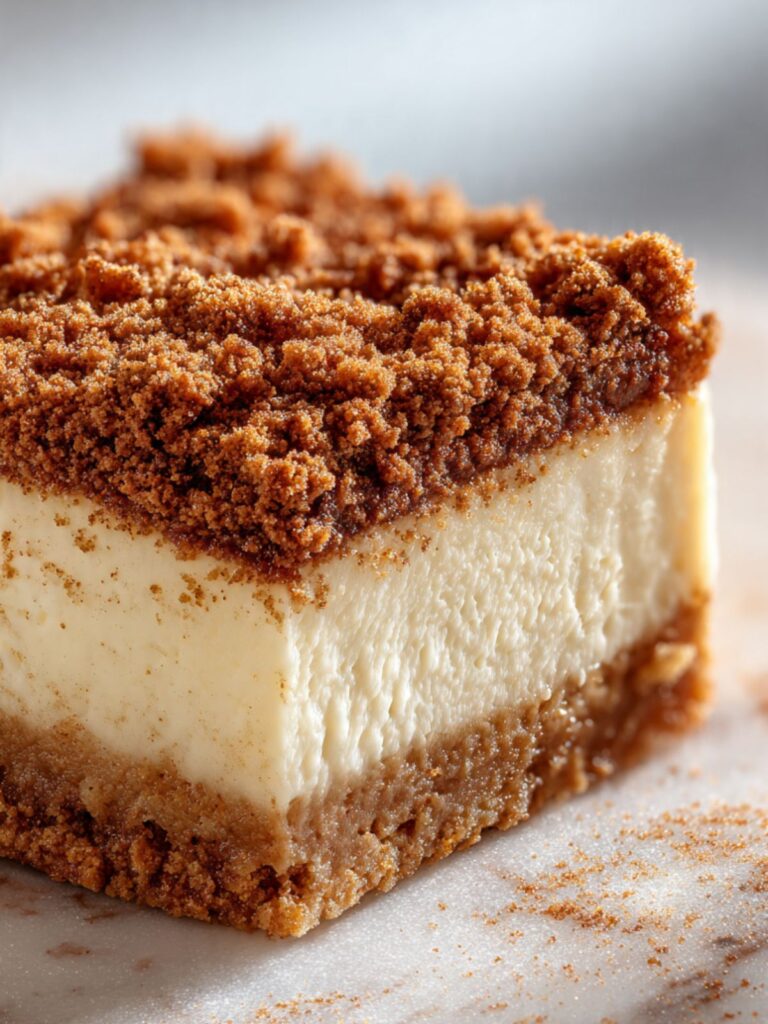
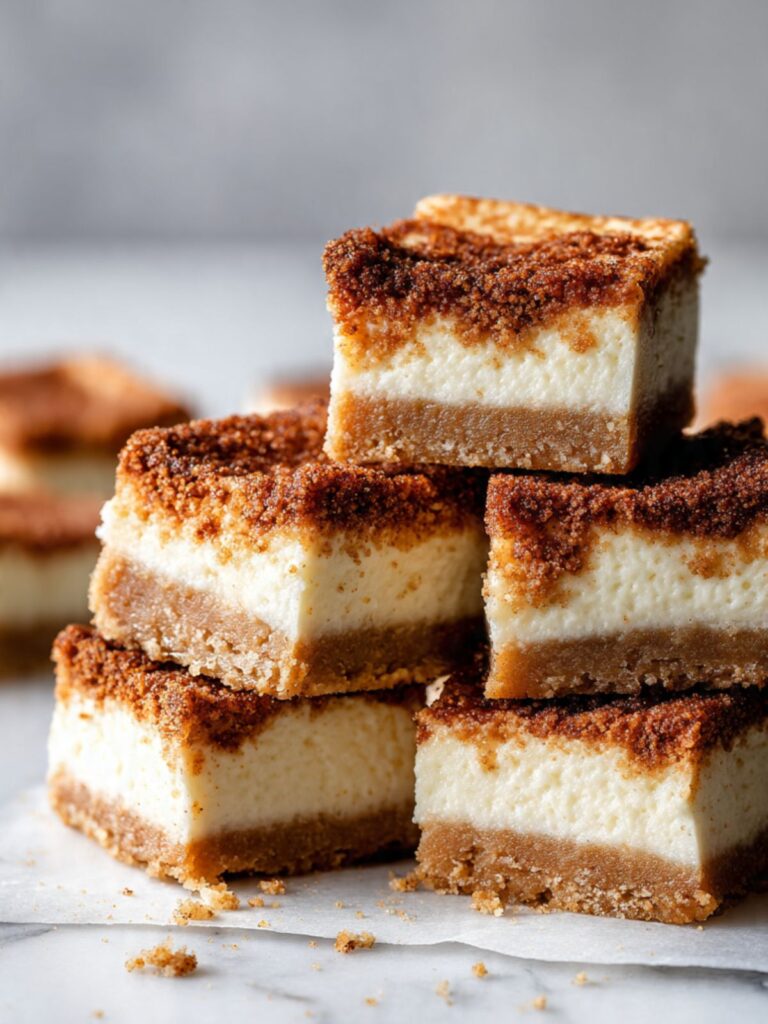
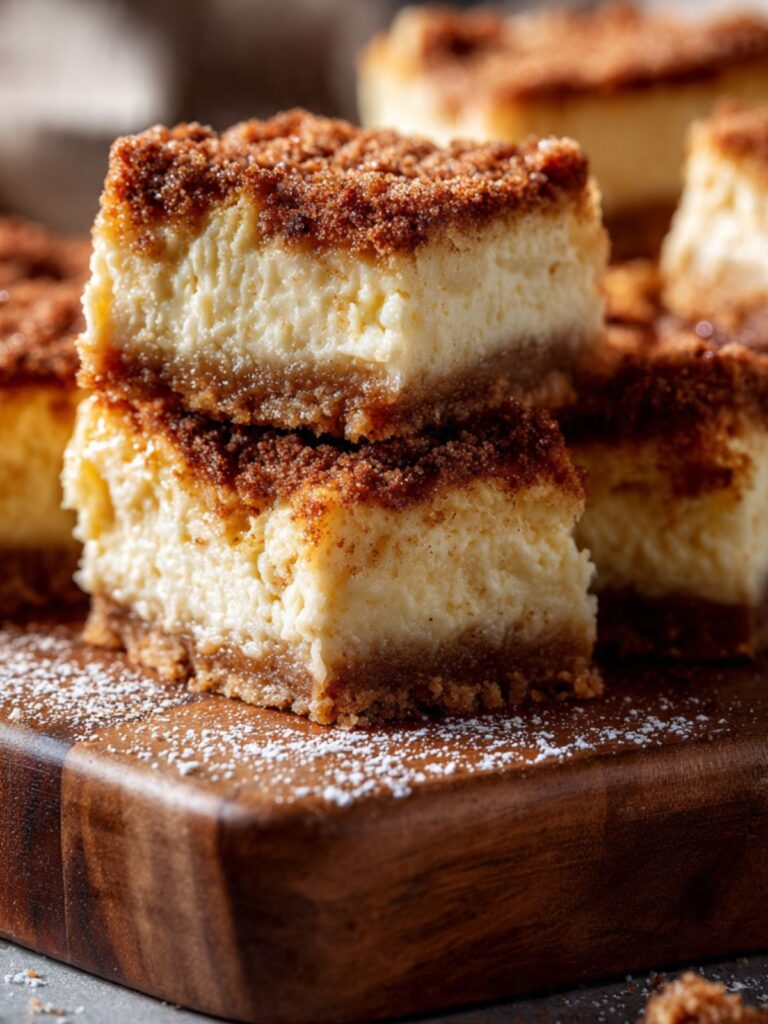
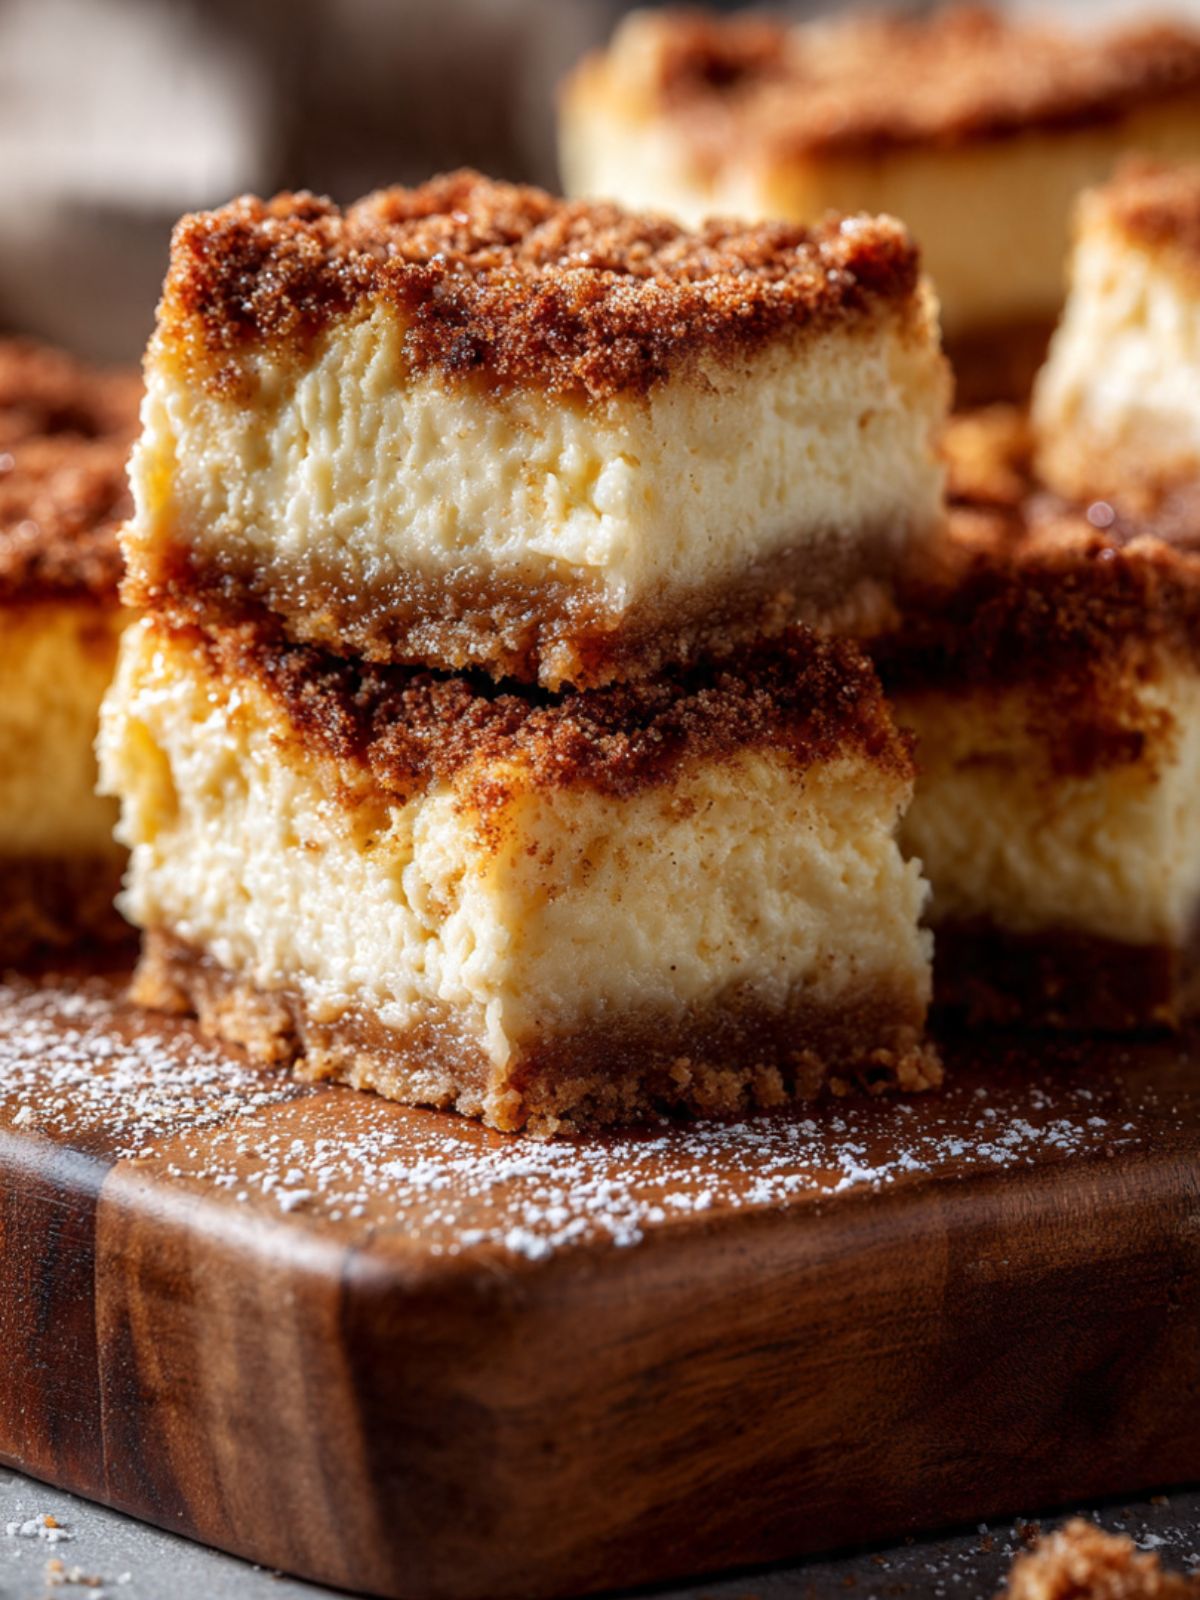
These snickerdoodle cheesecake bars have four distinct layers: a pressed-in snickerdoodle cookie crust, a dense ivory cheesecake filling, a thin cinnamon-sugar interface that bakes into a faintly amber ribbon between the cheesecake and the top, and a heavy cinnamon-brown sugar streusel that caramelizes into deep mahogany clusters in the oven. Every layer is visible in the cross-section when you cut them. That is the visual you are working toward.
I tested the crust twice — once using crushed store-bought cookies and once using a pressed-in snickerdoodle dough. The cookie-crumb version produced a crust that turned soft and separated from the cheesecake after the chill. The dough version — creamed butter, flour, cream of tartar — par-baked into a solid sandy base that held its shape through slicing. The difference in the final bar was immediate and obvious. I kept the dough.
I also tested the mixing speed on the cheesecake filling. Most people mix on medium speed and wonder why the top cracks. The reason is incorporated air — air expands in the oven, lifts the filling slightly, then collapses as it cools, and the surface tears. I switched to low speed throughout and pulled the bars at the moment the edges went matte and the center had just a faint wobble. No cracks. Dense, creamy texture from edge to edge.
This recipe requires a stand mixer or hand mixer for the crust, a hand mixer on low for the cheesecake filling, and a 9×13 inch (23×33cm) pan. No water bath needed — the streusel topping insulates the cheesecake surface during baking and does the job a foil tent would do. You need 6 hours of chilling time after the bake, which means this is a plan-ahead recipe. Make it the night before you want to serve it. The slices are cleaner and the cheesecake layer is firmer and more set on day two.
🗒 Luna’s Note: I always pull the cream cheese out of the fridge before I start anything else in this recipe — two full hours at room temperature, no shortcuts. Cold cream cheese in cheesecake batter is the single most common cause of a lumpy filling, and a lumpy filling does not smooth out during baking. You cannot fix it after the fact.
| Prep Time | Cook Time | Chill Time | Total Time | Yield | Difficulty |
|---|---|---|---|---|---|
| 30 min | 45 min | 6 hours | 7 hrs 15 min | 12 bars | Intermediate |
| Calories | Fat | Carbs | Sugar | Protein | Sodium |
|---|---|---|---|---|---|
| ~385 kcal | ~22g | ~44g | ~28g | ~6g | ~210mg |
Macros are approximate and will vary based on ingredient brands and serving size.
Ingredients & Tools for Snickerdoodle Cheesecake Bars Recipe
For the Snickerdoodle Crust
- 2¼ cups (270g) all-purpose flour (spooned into the measuring cup and leveled — never scooped directly from the bag)
- ½ teaspoon (2g) baking powder, checked for freshness
- ½ teaspoon (2g) cream of tartar — this is what gives snickerdoodle dough its signature tang and slightly chewy texture; do not substitute baking soda
- ¼ teaspoon (1.5g) fine sea salt
- ¾ cup (170g) unsalted butter, softened to room temperature for 60–90 minutes — it should hold a clean fingerprint indent but feel cool to the touch, not greasy or shiny
- ¾ cup (150g) plain white granulated sugar — not raw sugar, not coconut sugar
- 1 large egg, room temperature (30 minutes on the counter)
- 1 teaspoon (5ml) pure vanilla extract — not imitation
Cinnamon-Sugar Crust Coating
- 2 tablespoons (24g) plain white granulated sugar
- 1 teaspoon (3g) ground cinnamon, checked for freshness — it should smell strong and spicy when opened, not dusty or faint
For the Cheesecake Filling
- 16 oz (454g) full-fat block cream cheese (two 8 oz blocks) — not spreadable tub cream cheese, not reduced-fat, not whipped. Block only. Softened to room temperature for a full 2 hours minimum. Do not microwave to soften — microwave heat changes the fat structure and causes a lumpy, uneven filling.
- ½ cup (100g) plain white granulated sugar
- 2 large eggs, room temperature (30 minutes on the counter)
- 1 teaspoon (5ml) pure vanilla extract
- ¼ teaspoon (1g) ground cinnamon, checked for freshness
- 2 tablespoons (30g) full-fat sour cream, room temperature — not low-fat; the fat content keeps the filling creamy rather than grainy after baking
Cinnamon-Sugar Interface Layer
- 2 tablespoons (24g) plain white granulated sugar
- 1½ teaspoons (5g) ground cinnamon, checked for freshness
Crust-to-Cheesecake Interface (between par-baked crust and filling)
- 1 tablespoon (12g) plain white granulated sugar
- ½ teaspoon (2g) ground cinnamon
For the Cinnamon Streusel Topping
- ¾ cup (90g) all-purpose flour
- ½ cup (110g) packed light brown sugar — packed firmly so it holds its shape when tipped from the measuring cup; do not substitute dark brown sugar or the streusel will be too moist and will not crumble properly
- 1½ teaspoons (5g) ground cinnamon, checked for freshness
- ¼ cup (57g) unsalted butter, cold straight from the refrigerator, cut into ½-inch (1.2cm) cubes — cold butter is non-negotiable here; room temperature butter produces a paste instead of a crumble
Necessary Tools
Before you start, confirm you have everything on this list. Missing or swapping a tool mid-recipe causes problems at the worst moments.
- 9×13 inch (23×33cm) light-colored aluminum baking pan — light aluminum bakes most evenly. Dark non-stick pans absorb more heat, overbrown the crust base, and can burn the streusel before the cheesecake sets. Glass or ceramic pans retain heat longer and require reducing oven temperature by 25°F (15°C).
- Parchment paper — cut to fit the base with a 2-inch (5cm) overhang on the two long sides. This overhang is your handle for lifting the entire slab out of the pan cleanly before slicing. If you skip it, you will not be able to remove the bars without breaking the layers.
- Stand mixer with paddle attachment (or hand mixer) — for creaming the crust dough
- Hand mixer — for the cheesecake filling; low speed throughout. A stand mixer tends to run faster than you think on its lowest setting and will incorporate too much air into the filling.
- Two large mixing bowls — one for the crust dough, one for the cheesecake filling
- Medium mixing bowl — for the streusel topping
- Kitchen scale — gram weights are the numbers tested with; volume measurements can vary by 20–30% depending on how flour is scooped or packed
- Rubber spatula or silicone scraper — for folding and scraping bowl sides between mixer additions
- Pastry cutter or two forks — for cutting cold butter into the streusel; fingers work but warm hands soften the butter too quickly
- Offset spatula or the back of a large spoon — for pressing the crust dough evenly into the pan and spreading the cheesecake filling level
- Wire cooling rack — the pan rests on this after baking before going into the refrigerator
- Sharp chef’s knife — for slicing the bars; a serrated knife drags through the cheesecake and tears the layers
- Tall glass of very hot water and a clean kitchen towel — for wiping the knife blade clean and warm between each cut; this is what produces the sharp, professional edges visible in the photos
- Oven thermometer (optional but strongly recommended — most home ovens run 15–25°F / 8–14°C off; confirm actual temperature before the pan goes in)
Before You Start
Four things to read before you touch anything:
1. Room temperature ingredients are not optional in this recipe. Cold cream cheese causes lumps that do not bake out. Cold eggs cause the cream cheese batter to seize and look curdled. Cold butter for the crust dough will not cream properly. Pull the cream cheese out first — it needs 2 full hours. Pull the butter and eggs out 30–60 minutes before you start. Set a timer when you pull them. Do not guess.
2. Use a kitchen scale. For the most accurate results, set it to grams. Volume measurements like cups and tablespoons can vary by 20–30% depending on how the ingredient is scooped or packed. The gram weights in this recipe are the numbers I tested with — they are the most reliable way to get the same result I got. If you measure flour by scooping directly from the bag, you are likely adding 20–30g extra per cup. That extra flour makes the crust dense and dry and the streusel sandy rather than crumbly.
If you are measuring by volume: spoon the flour into your measuring cup using a separate spoon and level it off with a straight edge — do not scoop the cup directly into the flour bag. Scooping packs in 20–30% more flour than the recipe needs and will produce a dry, crumbly crust and a sandy streusel that bakes flat instead of clumping.
3. This recipe requires a mixer for two separate components. The crust dough uses a stand mixer or hand mixer on medium speed. The cheesecake filling uses a hand mixer on low speed — low throughout, no exceptions. If you only have a stand mixer, use it for the crust, then transfer to a large bowl and use a hand whisk at very low effort for the filling, or switch to the lowest speed setting possible.
4. Budget at least 7 hours from start to slice. The bake is 45 minutes. The cooling is 1 hour on the rack. The refrigeration is a minimum of 6 hours — overnight is better. Do not try to shortcut the chill time. Bars cut before the full chill will have a soft, molten center that collapses when the knife goes through, even if the surface looks set. This is a plan-the-night-before recipe.
5. Test your baking powder before you start. Baking powder loses its potency after 6 months of opening. To test: add ½ teaspoon to 3 tablespoons of hot water. It should bubble actively within 5 seconds. No bubbles means the powder is dead and the crust will not have the right texture. Cream of tartar should smell sharply acidic when you open the jar — flat, dusty smell means it has lost potency and the snickerdoodle tang in the crust will be muted.
6. Position your oven rack in the middle of the oven before you start preheating. Top rack concentrates heat on the streusel and burns it before the cheesecake sets. Bottom rack overbrowns the crust base. Middle rack only.
I use a digital kitchen timer for the par-bake and the cooling steps — not my phone. My phone pulls me somewhere else and I come back to a par-bake that has gone five minutes too long. A separate timer stays on the task.
How to Make Snickerdoodle Cheesecake Bars
Step 1: Preparing the Pan and Preheating the Oven
Set your oven rack to the middle position and preheat to 325°F (160°C). Most home ovens run 15–25°F (8–14°C) off — if you have an oven thermometer, confirm the actual temperature before anything goes in. A too-hot oven will crack the cheesecake filling and burn the streusel before the center sets.
Line your 9×13 inch (23×33cm) light-colored aluminum baking pan with parchment paper. Cut the parchment so it covers the base completely with a 2-inch (5cm) overhang on both long sides. Press it flat into the corners. No greasing needed — the butter in the crust will release it cleanly. Do not skip the overhang. Without it, you cannot lift the slab out of the pan in one piece and the layers will break when you try to cut them in the pan.
Do not substitute aluminum foil — foil tears at the fold lines when you try to lift the slab and the bar breaks. Do not grease the pan without parchment — the cheesecake filling will stick directly to the pan walls and the layers will pull apart when you try to remove it.
The pan should be lined and ready before you start mixing anything — once the crust dough is made, it needs to go into the pan immediately.
Step 2: Making the Snickerdoodle Crust Dough
In the bowl of your stand mixer fitted with the paddle attachment, combine your ¾ cup (170g) softened unsalted butter and ¾ cup (150g) plain white granulated sugar. Beat on medium speed (speed 4 on a KitchenAid) for 3 full minutes — set a timer. The butter and sugar need this full time to cream together properly. At the 3-minute mark, the mixture should look pale, fluffy, and noticeably increased in volume. If it still looks yellow and dense, beat for another 60 seconds and check again.
Scrape down the sides and bottom of the bowl with your silicone spatula — the paddle misses the bottom corners and unblenoded butter sitting there will create streaks in the finished dough.
Add your 1 large room-temperature egg and 1 teaspoon (5ml) pure vanilla extract. Beat on low speed for 30 seconds until just combined, then increase to medium for another 30 seconds. The mixture will look glossy and slightly loose — this is correct.
In a separate medium bowl, whisk together your 2¼ cups (270g) all-purpose flour, ½ teaspoon (2g) baking powder, ½ teaspoon (2g) cream of tartar, and ¼ teaspoon (1.5g) fine sea salt. The cream of tartar is what makes this a snickerdoodle base rather than a plain sugar cookie crust — it reacts with the baking powder to create the slight tang and tender crumb that defines a snickerdoodle. Do not substitute.
With the mixer on low, add the flour mixture in two additions, waiting until the first addition is mostly incorporated before adding the second. Mix only until no dry flour streaks remain — approximately 20 seconds per addition. Do not overmix after the flour goes in — the dough will look fine on the surface but the crust will bake up tough and dense instead of sandy and tender.
The finished dough should look slightly crumbly but hold together when pressed between your fingers. It will not be smooth like cookie dough — this is correct. If it looks completely smooth and glossy, the flour was undermeasured or the butter was too warm.
🗒 Luna’s Note: I always mix my dry ingredients in a separate bowl before adding them to the creamed butter — even for a pressed-in crust where it seems unnecessary. The baking powder and cream of tartar need to be evenly distributed through the flour before they hit the butter. Dumping them in separately means uneven leavening and uneven tang across the crust.
The dough is ready — transfer it to the pan now and press it into the base before the butter softens further.
Step 3: Pressing and Par-Baking the Crust
In a small bowl, mix together your 2 tablespoons (24g) granulated sugar and 1 teaspoon (3g) ground cinnamon for the crust coating. Scatter half of this mixture evenly across the base of your lined pan. This layer of cinnamon-sugar sits between the parchment and the crust dough and creates the faintly spiced bottom edge visible in the cross-section photos.
Transfer the crust dough into the pan. Using your offset spatula or the flat base of a large measuring cup, press the dough into an even, compact layer across the entire base. Work from the center outward and pay attention to the corners — thin corners overbake and crumble when you cut. Aim for a layer approximately ½ inch (1.2cm) thick throughout. Scatter the remaining cinnamon-sugar mixture evenly over the surface of the pressed dough.
Bake the crust alone at 325°F (160°C) for 12 to 14 minutes — start checking at 12 minutes. Pull it when the surface looks just set and dry but not yet golden at the edges. It will look underdone and pale. This is correct. The crust will bake a second time with the filling and streusel on top — par-baking only sets the structure so it does not turn soggy under the cheesecake layer.
Do not overbake the par-bake. A crust that is golden at this stage will be overbaked and hard after the second bake. Pale and just-set is exactly right.
Remove from the oven and set on your wire cooling rack. Let the crust cool for 10 full minutes before adding the cheesecake filling. Adding filling to a hot crust begins cooking the eggs in the cheesecake before the pan even goes back into the oven — the filling will be uneven and may curdle at the base.
After the crust has cooled for 10 minutes, scatter an additional 1 tablespoon (12g) granulated sugar mixed with ½ teaspoon (2g) ground cinnamon evenly across the surface of the warm crust before pouring the cheesecake filling over it. This thin layer of cinnamon-sugar sits between the crust and the filling and bakes into the distinct amber band visible between the golden crust and the ivory cheesecake in the cross-section photos. Without it, the crust and cheesecake merge into a single layer at the base with no visual or flavor separation.
The filling is ready — pour it directly over the cooled crust now before it begins to thicken at room temperature.
Step 4: Making the Cheesecake Filling
While the crust is par-baking and cooling, make the cheesecake filling. In a large mixing bowl, add your 16 oz (454g) full-fat block cream cheese. Using your hand mixer on low speed, beat the cream cheese alone for 90 seconds, stopping once to scrape the sides and bottom of the bowl. The cream cheese must be completely smooth with no lumps before anything else goes in. If you see lumps at this stage — the cream cheese was too cold. Stop, cover the bowl, and let it sit at room temperature for another 30 minutes before continuing.
Baker's Warning: No water bath is needed for these bars. The cinnamon streusel topping that goes on in Step 6 acts as an insulating layer over the cheesecake surface — it distributes oven heat before it reaches the filling and prevents the surface browning and cracking that a water bath is normally designed to prevent. Do not wrap the pan in foil and do not place a water pan in the oven — the streusel handles it.
Add your ½ cup (100g) granulated sugar and beat on low speed for 60 seconds. Scrape the bowl thoroughly. The sugar begins to dissolve into the cream cheese at this stage and the mixture will look slightly looser — this is correct.
Add your 2 large room-temperature eggs, one at a time, beating on low speed for 20 seconds after each addition and scraping the bowl between each one. Do not rush the egg additions and do not increase the speed. Eggs added too quickly on too high a speed incorporate air into the filling — that air expands in the oven, lifts the cheesecake, then collapses as it cools and the surface cracks. Low and slow is not optional here.
Add your 1 teaspoon (5ml) pure vanilla extract, ¼ teaspoon (1g) ground cinnamon, and 2 tablespoons (30g) full-fat sour cream. The sour cream adds a small amount of fat and a very faint tang that balances the sweetness of the streusel above it — without it the filling tastes flat against the heavy cinnamon topping. Beat on low for 20 seconds until just combined.
The finished filling should look smooth, thick, and pourable — similar in consistency to a thick pancake batter. It should coat the back of a spoon cleanly. If it looks lumpy or curdled, the cream cheese or eggs were too cold. You cannot smooth this out by mixing more — additional mixing only incorporates more air. The batch should be discarded and started again with fully room-temperature ingredients.
Step 5: Adding the Filling and the Cinnamon Interface Layer
Pour the cheesecake filling over the cooled crust. Use your offset spatula to spread it into an even layer all the way to the edges — work with slow, deliberate strokes rather than scraping back and forth quickly, which can disturb the crust underneath.
In a small bowl, mix together your 2 tablespoons (24g) granulated sugar and 1½ teaspoons (5g) ground cinnamon for the interface layer. Scatter this mixture evenly across the entire surface of the cheesecake filling. Do not press it in — just scatter it. This cinnamon-sugar layer sits on top of the raw filling and bakes into the thin amber ribbon visible between the cheesecake and the streusel in the cross-section. As you can see in the stacked bar photo showing the full cross-section, that amber band is a distinct layer — not a swirl, not a gradient. It comes entirely from this scatter step, which takes about 20 seconds and is the detail that makes the interior of these bars look intentional rather than accidental.
The filling layer should look smooth and level with the cinnamon-sugar evenly distributed across the surface — no bare patches, no heavy concentrations in one area. If the scatter looks uneven, use a spoon to redistribute before the streusel goes on. Once the streusel is down, you cannot adjust it.
Step 6: Making and Adding the Cinnamon Streusel
In your medium mixing bowl, whisk together your ¾ cup (90g) all-purpose flour, ½ cup (110g) packed light brown sugar, and 1½ teaspoons (5g) ground cinnamon until evenly combined.
The packed light brown sugar provides both the caramel sweetness and the moisture that causes the streusel clusters to clump together and caramelize into the mahogany, pebbled texture visible in the overhead photo — granulated white sugar would produce a finer, sandier topping that does not clump the same way.
Add your ¼ cup (57g) cold cubed unsalted butter. Using a pastry cutter or two forks, cut the butter into the flour mixture using a pressing-and-rocking motion — not stirring, not mashing. Work until the mixture resembles coarse, damp sand with irregular clumps ranging from pea-sized to almond-sized. Some fine sandy bits and some larger clusters — both are correct and both are visible in the finished streusel on the bars. If you use your fingers, work quickly — body heat softens the butter within 60 seconds and warm butter produces a paste rather than a crumble.
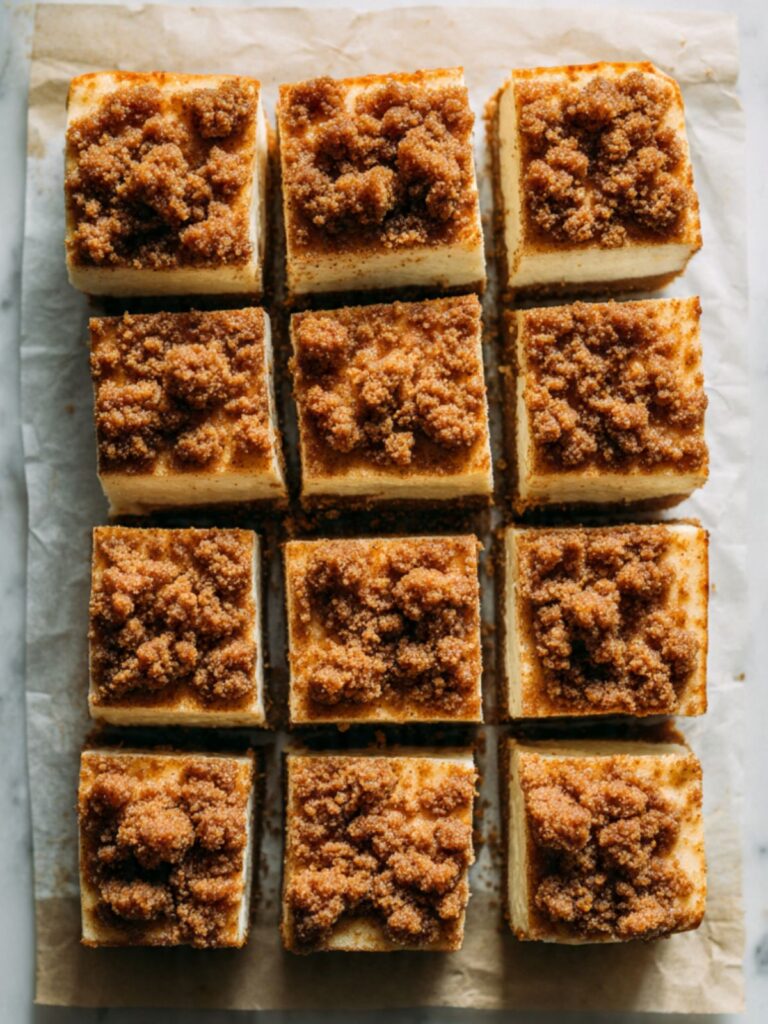
Do not overwork. The moment you have irregular clumps and no visible dry flour at the bottom of the bowl, stop. Overworked streusel bakes into a hard, flat crust rather than the pebbled, clumpy topping visible in the overhead photo showing all 12 bars.
Scatter the streusel evenly over the cheesecake filling. Use your fingers to distribute it — no pressing down, no patting flat. The streusel sits loosely on the surface and bakes into clusters naturally.
The streusel layer should cover the filling completely with no large bare patches of cheesecake visible. The depth of the streusel layer should be approximately ¼ inch (6mm) — enough to cover but not so deep that the cheesecake underneath cannot set properly.
Step 7: Baking Until the Streusel Is Mahogany and the Center Has a Faint Wobble
Return the pan to the middle rack of your oven preheated to 325°F (160°C). Bake for 30 to 35 minutes — start checking at 30 minutes. Do not open the oven door before the 25-minute mark. Opening early causes a sudden temperature drop that deflates the cheesecake structure and the center will sink into a depression that will not recover.
The bars are done when all three of these conditions are met simultaneously: the streusel topping is deep mahogany brown and smells intensely of cinnamon and caramelized sugar; the edges of the cheesecake layer visible at the sides of the pan are ivory-pale and matte rather than shiny and wet-looking; and the center of the pan gives a faint, unified wobble — the whole surface moves as one piece rather than the center rippling independently of the edges. The ripple-in-center jiggle means underbaked. The no-wobble-at-all means overbaked and the texture will be rubbery.
Pull the pan at this exact moment. Waiting even 3 to 4 minutes longer will push the cheesecake from creamy and dense to tight and rubbery — the result you can see in the overhead close-up of a single bar where the cheesecake wall is smooth and ivory from edge to edge with no visible grain or tightening.
The finished surface should look like the overhead grid photo — deep mahogany streusel clusters with no pale sandy patches remaining, sitting above a cheesecake layer whose edges have just turned matte. This is your pull signal.
Step 8: Cooling, Chilling, and Slicing for Clean Edges
Remove the pan from the oven and set it on your wire cooling rack. Do not move it to the refrigerator yet. Let it cool at room temperature for a full 60 minutes — the cheesecake is still actively setting during this time and the center will be liquid beneath the surface. Moving a hot cheesecake bar slab into the refrigerator too early causes condensation on the surface and uneven setting at the base.
After 60 minutes at room temperature, cover the pan loosely with plastic wrap — do not press it down onto the surface — and transfer to the refrigerator. Refrigerate for a minimum of 6 hours. Overnight is better. The cheesecake continues to firm and set during the full chill period. Bars cut at the 3-hour mark will have a soft, almost molten center that collapses when sliced, even though the surface looks completely set. Six hours is not a suggestion.
To slice: fill a tall glass with very hot water. Dip your sharp chef’s knife into the hot water, wipe it clean and dry with a kitchen towel, then make one cut. Dip, wipe, cut. Repeat for every single cut. The warm blade melts cleanly through the cheesecake layer without dragging or tearing the streusel. A cold knife or a serrated knife produces ragged edges and displaces the streusel topping. Use the parchment overhang to lift the entire slab out of the pan onto a cutting board before slicing — cutting in the pan damages the parchment lining and makes the first and last rows harder to remove cleanly.
Cut into a 3×4 grid for 12 bars of approximately 2.5 inches (6.3cm) square.
The finished bars should look exactly like the stacked cross-section photos — four distinct layers visible from base to top: golden crust, ivory cheesecake, amber cinnamon band, mahogany streusel. If the layers are blurred or the cheesecake looks wet, return the remaining uncut bars to the refrigerator for another 2 hours before continuing.
The Science Behind Snickerdoodle Cheesecake Bars
Why Low Mixing Speed Is the Most Important Step in the Cheesecake Filling
I did not understand why my first two batches cracked across the top until I watched what happened in the oven. The surface looked perfect going in — smooth, level, no bubbles. By the 20-minute mark the center was visibly domed. By the time I pulled the pan the dome had collapsed and left a crater running the length of the filling. I thought I had underbaked it. I had not. The problem had already happened before the pan went into the oven.
Cheesecake filling is an emulsion — cream cheese fat, water from the eggs and sour cream, and protein from the eggs all suspended together in a structure that sets as the proteins coagulate in the oven heat. When you mix that emulsion on medium or high speed, you force air bubbles into the fat matrix. Those bubbles are invisible in the raw batter — the filling looks perfectly smooth. In the oven, as the temperature rises, those air pockets expand and push the filling upward. The surface domes. Then the proteins finish coagulating, the structure locks in, and as the bars cool the air contracts — but the proteins are already set. The surface tears. That is the crack.
Low speed throughout — and I mean the lowest setting on a hand mixer, not medium-low — keeps the emulsion intact without incorporating air. The filling goes into the oven as a dense, aerated-free mass and it sets exactly as it is. The ivory, tight, crack-free cheesecake layer visible in the close-up of a single bar is entirely a function of mixing speed. This is why a food processor and a stand mixer at anything above its lowest setting both produce inferior results for cheesecake filling. The mechanism is the same — too much air, same consequence.
What Cream of Tartar Actually Does to the Crust
Cream of tartar is the ingredient that separates a snickerdoodle from a sugar cookie, and most people have no idea why it is there. It is an acid — potassium bitartrate, a natural byproduct of wine fermentation — and it does two things in this crust simultaneously.
First, it reacts with the baking powder in the dough. Baking powder is itself a mixture of a base (baking soda) and an acid (cream of tartar or sodium aluminum sulfate). Adding additional cream of tartar shifts the acid balance further, which changes how quickly the leavening reaction happens and softens the crumb structure rather than creating lift. The result is the slightly tender, almost sandy texture of the par-baked snickerdoodle crust — not cakey, not brittle, but with a specific yielding crumble that holds together under the weight of the cheesecake layer without becoming hard or cracker-like.
Second, cream of tartar contributes the faint tang that makes a snickerdoodle taste like a snickerdoodle rather than a vanilla sugar cookie. That tang in the crust base contrasts against the neutral sweetness of the cheesecake filling above it — without it, the bar tastes uniformly sweet from base to top with no contrast. The layered flavor you get in each bite, where the base has a slightly different character from the filling, comes from this one ingredient. If you are making these and find yourself thinking the snickerdoodle flavour feels muted, check the cream of tartar first. It is almost certainly old. If it does not smell sharply acidic when you open the jar, replace it before baking.
🗒 Luna’s Note: I keep a separate small jar of cream of tartar labeled with the date I opened it. It goes stale faster than any other pantry ingredient I use, and in a recipe where it is the primary flavor driver of the crust, old cream of tartar is the difference between a bar that tastes like a snickerdoodle and one that tastes like a plain sugar cookie. Six months is the outer limit. I replace it sooner.
If you also bake snickerdoodle cookies, you will recognize exactly this mechanism — the same acid balance that gives a classic snickerdoodle cookie its distinctive chew and tang is operating in the crust of these bars.
How the Streusel Topping Protects the Cheesecake During Baking
A standard cheesecake — in a springform pan with an exposed top surface — requires either a water bath or a very low oven temperature to prevent the surface from browning, drying out, or cracking from uneven heat. These bars use neither. The streusel topping acts as an insulating layer that does the same work a water bath does for a traditional cheesecake.
Streusel is roughly 40% fat by weight — the cold butter coated in flour and sugar. As the oven heat rises, that fat melts slowly and the sugar begins to caramelize, but the mass of the streusel absorbs and distributes the heat before it reaches the cheesecake surface below. The cheesecake underneath bakes in a gentler, more diffused heat environment than its surface temperature would suggest — effectively lower than 325°F (160°C) even with the oven set to that temperature. This is why the cheesecake layer stays ivory-pale with no browning while the streusel above it reaches deep mahogany.
The consequence of this is that you cannot judge doneness in these bars the way you would judge a tray of cookies or even a brownie. The visible surface — the streusel — tells you one thing. The cheesecake underneath is telling you something different. The jiggle test is the only reliable signal: center wobble as one unified mass means the filling has set enough to hold but has not overcooked into a rubbery texture. That is the window. It is approximately 3 to 4 minutes wide at 325°F (160°C). This is why I check at 30 minutes and not a minute later.
Snickerdoodle Cheesecake Bars Troubleshooting & Pro-Tips
Common Mistakes
The cheesecake filling is lumpy after mixing
The cause is cold cream cheese. Block cream cheese that has not reached full room temperature — 65–68°F (18–20°C), which requires a minimum of 2 hours on the counter — does not break down smoothly under a mixer. The fat stays in cold, firm clumps and no amount of additional mixing will smooth them out. More mixing only incorporates more air and makes the cracking problem worse.
Fix: If you are mid-session and the filling is lumpy, stop. Do not bake it. Press a sheet of plastic wrap against the surface, leave it at room temperature for 30 more minutes, then beat again on low speed for 60 seconds. If the lumps are very small and the mixture looks mostly smooth, you can proceed — the bake will soften minor unevenness. If the lumps are large and distinct, the batch needs to be discarded and restarted with fully softened cream cheese. There is no oven fix for a lumpy cheesecake filling.
Prevention: Pull the cream cheese from the refrigerator first, before anything else, and set a timer for 2 hours. Do not use the microwave. Heat from the microwave melts the outer layer while the center stays cold — the fat structure breaks unevenly and the filling will be grainy even if it looks smooth.
The wrong pan was used and the bars overbaked at the edges
A dark non-stick pan or a glass pan used without adjusting the temperature will cause the edges of the crust to overbrown and harden before the cheesecake center sets. Dark pans absorb radiant heat from the oven walls more aggressively than light-colored aluminum — the base of the bar sees significantly more heat than the recipe was developed for. Glass pans retain heat after the oven is off and continue cooking the bars during the cooling period.
Fix: If the edges are already overbaked and hard, trim them when slicing — the center bars will be correctly baked even if the outermost row is overdone. A thin strip of well-done edge is not a failed batch.
Prevention: Use a light-colored aluminum pan. If you only have a dark non-stick pan, reduce the oven temperature by 25°F (15°C) to 300°F (150°C) and add 5 minutes to the par-bake and 5 minutes to the final bake. If you only have glass or ceramic, reduce by 25°F (15°C) and check 5 minutes earlier than the standard window — glass holds heat after the oven shuts off and the bars will continue cooking on the counter.
The cheesecake layer cracked across the top
This is the most common cheesecake bar failure and it has three possible causes: the filling was mixed on too high a speed and incorporated air; the oven temperature was too high; or the bars were moved from the oven to the refrigerator before cooling fully at room temperature.
Fix: A cracked top does not affect the flavor of these bars at all. The streusel topping covers the cheesecake surface completely — cracks in the cheesecake layer are invisible once the streusel is in place before baking. If you notice the cheesecake cracking through the streusel during baking, the oven is too hot. Reduce by 15°F (8°C) for the remainder of the bake.
Prevention: Mix the cheesecake filling on the lowest speed setting only. Confirm your oven temperature with a thermometer before the pan goes in. Cool the baked bars at room temperature for the full 60 minutes before refrigerating — the temperature transition from oven heat to refrigerator cold, when done too quickly, causes the set proteins in the cheesecake to contract rapidly and the surface tears.
The streusel is sandy and flat rather than clumpy and pebbled
The butter was too warm when it went into the streusel mixture. Butter that has softened even slightly at room temperature does not cut into the flour and sugar — it coats the dry ingredients and produces a sandy paste rather than discrete crumble clusters. This results in a flat, uniform topping that bakes into a thin crust rather than the irregular pebbled mahogany clusters visible in the photos.
Fix: If you catch this before the streusel goes on the bars, spread it on a plate and refrigerate for 15 minutes. Cold will re-firm the butter slightly and you can break the mixture apart with a fork into rough clusters before scattering. It will not be identical to properly made streusel but it will be closer.
Prevention: Use butter straight from the refrigerator, cut into ½-inch (1.2cm) cubes immediately before use. Work quickly — within 90 seconds of the butter leaving the refrigerator. If your kitchen runs warm — above 75°F (24°C) — cut the butter cubes and freeze them for 10 minutes before using.
The bars collapsed or became gummy when cut
The bars were not chilled for long enough. Cheesecake filling sets through a combination of egg protein coagulation during baking and gelatin-like firming of the cream cheese fat matrix during refrigeration. The bake sets the structure. The chill completes it. At the 3-hour mark the center of the bar is still soft enough to collapse under knife pressure even though the surface looks and feels completely set. Six hours is the minimum. Overnight is what I use.
Fix: Press the collapsed pieces into individual ramekins or small glasses, top with a spoonful of whipped cream or a dusting of cinnamon sugar, and serve as a deconstructed cheesecake cup. The flavor is identical — the presentation is just different.
Prevention: Six hours minimum in the refrigerator, covered loosely. Do not remove the pan from the refrigerator until you are ready to slice and serve. Use a hot knife wiped clean between every cut.
The crust separated from the cheesecake layer when sliced
The crust was either overbaked during the par-bake and became too firm to bond with the filling, or the filling was added to a crust that was still too hot and began setting before it could adhere to the crust surface. A fully bonded crust and filling move as one piece when the knife goes through.
Fix: If the crust is separating on slicing, press each bar gently back together with your fingers — the layers will hold once plated. Serve immediately after slicing rather than returning to the refrigerator separated.
Prevention: Par-bake only to pale and just-set — not golden. Cool the crust for the full 10 minutes before pouring the filling. The surface of the crust should feel warm but not hot to the touch before the cheesecake filling goes on.
Altitude and humidity adjustments
At high altitude (above 3,500 feet / 1,065m): reduce the baking powder in the crust to ¼ teaspoon (1g) — leavening acts more aggressively at altitude and the crust can puff and crack under the filling. Reduce oven temperature by 15°F (8°C) and extend the bake by 5 to 8 minutes — lower air pressure means moisture evaporates faster and the cheesecake can set unevenly.
In high humidity (above 70% relative humidity): the streusel topping will absorb ambient moisture and lose its crunch faster after baking. Serve within 24 hours of slicing for the best streusel texture. Store cut bars in a lidded hard-sided container rather than loosely covered — open air storage in humid conditions softens the streusel topping within a few hours.
Expert Pro-Tips
Chill the pan before pressing the crust dough. After lining with parchment, place the empty pan in the refrigerator for 10 minutes. A cold pan keeps the butter in the crust dough firm during pressing — warm butter softens under the heat of your hands and the dough can become greasy and stick to the offset spatula. A cold pan releases the dough cleanly and the pressed layer stays even.
Weigh your streusel directly over the cheesecake in three sections. Instead of making the full streusel batch and dumping it from the bowl — which concentrates clumps in the center — divide the bowl of streusel into thirds mentally and scatter each third over one section of the pan. Left third first, then center, then right. This produces the even distribution of clusters visible in the overhead photo of all 12 bars, where every bar has roughly identical streusel coverage rather than a heavy center and sparse edges.
Use the parchment overhang to check the crust layer before baking. After pressing the crust, lift the parchment slightly on one side — just enough to peek at the corner. The crust should reach fully into the corner with no thin spots. Thin corners overbake and crumble when sliced. Press additional dough into any thin areas before par-baking.
Score the slicing lines before the full chill. After the 60-minute room temperature cooling and before the refrigerator, use a sharp knife to very lightly score — just break the surface of the streusel — along the cutting lines of the 3×4 grid. These surface guides make the final cold slicing faster and reduce the risk of dragging the streusel sideways when the knife goes in. The scoring lines disappear visually under the streusel texture.
Slice with a rocking motion, not a pressing motion. A chef’s knife pressed straight down through a cheesecake bar compresses the layers before the blade cuts through them — the crust can crack outward and the cheesecake can bulge at the sides. A rocking motion — tip of the knife on the board, heel rocked down through the bar — cuts cleanly through all four layers in one controlled motion with significantly less pressure.
How to Store Snickerdoodle Cheesecake Bars
Room Temperature
These bars cannot be stored at room temperature for more than 2 hours after slicing. The cream cheese filling is a dairy product and sits in the food safety danger zone — 40°F to 140°F (4°C to 60°C) — after that window. Do not leave them on a serving platter at a party, on a counter while guests graze, or in a warm kitchen thinking they will be fine because they look set. They will not make anyone sick in two hours. Past two hours, the risk climbs. Refrigerate anything not eaten within that window.
The streusel topping will begin to soften at room temperature within 3 to 4 hours regardless of food safety — it absorbs ambient moisture from the cheesecake filling below and from the air. The pebbled, clumpy texture visible in the photos is a fresh-from-the-fridge texture. Plan to serve these cold or within 30 minutes of pulling them from the refrigerator for the best streusel crunch.
Refrigerator
This is the correct storage method for these bars. Store cut bars in a lidded hard-sided container — not a zip-lock bag, which compresses the streusel topping and flattens the clusters — with a single layer of parchment paper between stacked layers if you need to stack them. Do not store them in an open container or loosely covered with plastic wrap pressed directly onto the streusel — trapped moisture softens the topping within hours.
The bars keep well refrigerated for up to 5 days. The cheesecake layer actually improves from Day 1 to Day 2 — it firms slightly and the cinnamon flavor deepens as it sits. The streusel will lose some of its initial crunch by Day 3 but remains flavorful. By Day 4 and 5 the streusel texture is noticeably softer, though the flavor is still good. Eat the streusel-forward bars in the first two days and save the last few for Day 4 or 5 if you do not mind a softer topping.
Pull bars from the refrigerator 15 minutes before serving. The cheesecake filling is dense enough that it needs a few minutes to lose its refrigerator-cold firmness — straight from the fridge the texture is slightly harder than the creamy, yielding result shown in the bite photo. Fifteen minutes at room temperature is enough.
🗒 Luna’s Note: I store these uncut whenever possible. An uncut slab keeps the cheesecake filling from drying at the cut edges and the streusel stays crunchier longer because the exposed surface area is smaller. I cut only what I am serving immediately and return the rest of the slab to the refrigerator covered loosely. The difference in streusel texture on Day 3 between a cut bar and a just-sliced bar from an uncut slab is noticeable.
Freezer — Baked
These bars freeze well and the cheesecake filling holds its texture through the freeze-thaw cycle better than most cream-based desserts because of its high fat content.
To freeze: slice the bars first and allow them to chill fully in the refrigerator — minimum 6 hours. Wrap each bar individually in one layer of plastic wrap, pressing it snugly around all sides. Place the wrapped bars in a single layer in a freezer-safe zip-lock bag or a lidded hard-sided freezer container. Freeze for up to 2 months.
To thaw: transfer individual bars from the freezer to the refrigerator the night before you want to serve them — approximately 8 hours of thaw time in the refrigerator. Do not thaw at room temperature. Room-temperature thawing causes condensation to form on the surface of the cheesecake and the streusel absorbs it, turning soft and wet. Refrigerator thawing is slow and even and the streusel stays significantly drier.
The texture after freezing and thawing is very close to fresh — the cheesecake filling is indistinguishable from a freshly baked bar. The streusel will be slightly softer than fresh but still flavorful and intact. If you want to re-crisp the streusel after thawing, place the thawed bar on a parchment-lined baking sheet and warm at 300°F (150°C) for 8 minutes. The streusel will firm back up as it cools.
Freezer — Unbaked
The assembled, unbaked bars do not freeze well. The cheesecake filling releases water during freezing and thawing that pools between the filling and the crust, producing a soggy base and a separated layer structure. Freeze only after baking and fully chilling.
The crust dough can be made ahead and frozen separately — press it into the lined pan, cover tightly with two layers of plastic wrap, and freeze for up to 1 month. Bake the frozen crust directly from frozen at 325°F (160°C) for 16 to 18 minutes rather than the standard 12 to 14 minutes. Let it cool for 10 minutes before adding the cheesecake filling and proceeding as normal.
Serving Suggestion
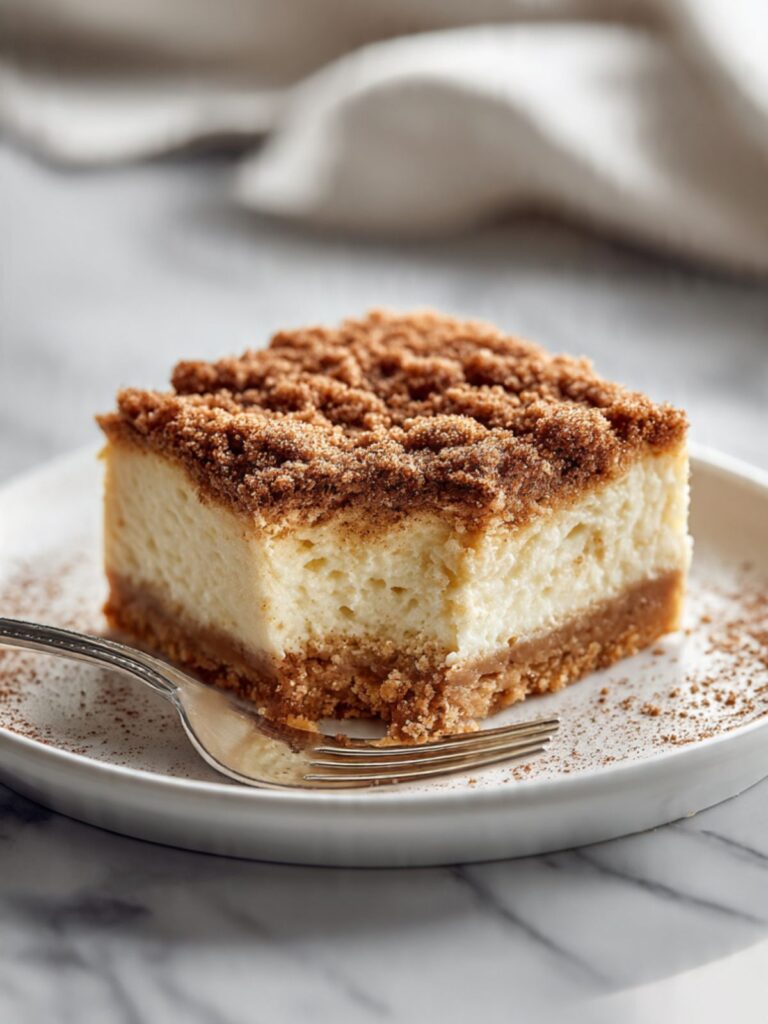
Serve these cold — pulled from the refrigerator 15 minutes before plating, not fully at room temperature. The cheesecake filling is designed to be dense and slightly firm, and that texture is most pronounced and most satisfying when the bar is still cool. A fully room-temperature snickerdoodle cheesecake bar loses some of that structured density and the filling feels softer and less defined against the crust.
I serve these with a small pour of lightly whipped cream — not sweetened, not piped, just heavy cream beaten to soft folds and spooned alongside. The unsweetened cream cuts through the cinnamon-sugar intensity of the streusel in a way that vanilla ice cream does not — ice cream competes with the bar’s sweetness rather than balancing it.
This is the recipe I make when I need something that looks more technically impressive than it actually is to produce. The layered cross-section does the work. Every time I have sliced these in front of someone they have asked how long they took to make, and the honest answer — mostly refrigerator time — is always a surprise. That is the occasion this recipe is built for: something that reads as an effort and delivers as a result.
Day 2 is genuinely better than Day 1 for the cheesecake flavor. The cinnamon deepens overnight, the cheesecake layer firms to a cleaner set, and the interface cinnamon-sugar band becomes more distinct. If you are making these for a specific occasion, bake them the night before. Do not make them day-of.
The honest limitation: these do not travel well once sliced. The streusel is fragile and the layers shift in transit. Make them where you are serving them, slice on site, and serve immediately from the refrigerator. If you need to transport them, keep the slab uncut, transport flat in the pan, and slice at the destination.
🗒 Luna’s Note: I always score the cut lines on the streusel surface before the overnight refrigeration and then cut in one clean motion the next day with a knife I have held under hot tap water for 30 seconds. The scoring guides the blade through the streusel before it reaches the cheesecake — the layers separate cleanly rather than the streusel sliding sideways under knife pressure. It takes ten seconds before the chill and makes the next-day slicing look professional.
Frequently Asked Questions About Snickerdoodle Cheesecake Bars
Can I make snickerdoodle cheesecake bars ahead of time?
Yes — and they are actually better made ahead. The cheesecake filling firms and the cinnamon flavor deepens significantly after an overnight refrigeration compared to a same-day bake. Bake the bars, cool at room temperature for 60 minutes, then refrigerate overnight in the pan loosely covered. Slice the following day using a hot knife wiped clean between cuts. The bars keep refrigerated for up to 5 days, so a two-day head start is well within the window. This is the recipe I specifically recommend making the night before any occasion rather than the morning of — the result is measurably better after a full overnight chill and the slicing is cleaner with a fully cold, fully set slab.
Can I use low-fat or spreadable cream cheese for cheesecake bars?
No — and the reason matters more here than in most recipes. Spreadable tub cream cheese has a higher water content than full-fat block cream cheese. That extra water releases during baking and pools between the filling and the crust, producing a wet, separated layer structure and a filling that never fully sets to the dense, sliceable texture shown in the photos. Low-fat block cream cheese produces a grainy, slightly rubbery texture after baking because the reduced fat content cannot maintain the smooth emulsion that gives the filling its creamy density. Full-fat block cream cheese only — two 8 oz blocks, softened for 2 full hours. This is the one ingredient substitution that reliably ruins the entire batch rather than just changing the result slightly.
Why did my cheesecake bars not set properly?
Three causes account for almost every setting failure. First, the bars were underbaked — the jiggle test was not passed before the pan came out. The center must wobble as one unified mass, not ripple independently from the edges. Second, the bars were cut before the full 6-hour refrigeration — the cheesecake filling sets during the chill, not just during the bake, and cutting at 3 hours produces a soft center even in an otherwise correctly baked bar. Third, the wrong cream cheese was used — spreadable or low-fat versions do not set to the same density as full-fat block. Check which of these three conditions applies, address it in the next batch, and if the current batch is too soft to slice cleanly, press individual portions into ramekins, top with cinnamon sugar, and serve as a cheesecake cup rather than a bar.
Can I make these snickerdoodle cheesecake bars in a different pan size?
Yes, with adjustments. For an 8×8 inch (20×20cm) pan: halve all ingredient quantities exactly, reduce the par-bake to 10 to 12 minutes, and reduce the final bake to 25 to 28 minutes. Yield will be 9 bars at a 3×3 cut. The bars will be slightly thicker than the 9×13 version — check for the jiggle test at 25 minutes. For a 9×9 inch (23×23cm) pan: use the same quantities as the 8×8 version with a slightly shorter bake — start checking at 23 minutes. Do not attempt to scale up to a larger pan — a 10×15 inch (25×38cm) pan with doubled quantities produces a filling layer too thin to set correctly and the crust-to-cheesecake ratio is off. The 9×13 inch pan is the optimal size for this recipe.
How do I know when cheesecake bars are done baking?
The jiggle test is the only reliable doneness indicator for cheesecake bars because the streusel topping obscures the cheesecake surface. At the 30-minute mark, open the oven and give the pan a single, gentle nudge. A correctly baked bar will wobble as one unified piece — the entire surface moves together, like a firm gelatin. An underbaked bar will show the center rippling independently of the edges, with the outer 2 inches looking set while the center sloshes. An overbaked bar will show no movement at all and the streusel will smell sharply of burnt sugar rather than caramelized cinnamon. Pull the pan the moment you see unified wobble — not before, not after. Baking these bars alongside a related cheesecake bar recipe like these chocolate chip cookie bars has taught me that the jiggle window for cream cheese-based fillings is consistently 3 to 4 minutes wide regardless of format — check early, not late.
Can I double this snickerdoodle cheesecake bar recipe?
Doubling is not straightforward for this recipe. The cheesecake filling scales linearly — double all filling ingredients exactly. The crust dough also scales linearly. The streusel topping scales linearly. However, you cannot bake a doubled batch in one larger pan — the filling layer becomes too thin relative to the crust and streusel and the texture ratios are wrong. Make two separate 9×13 inch pans simultaneously. On leavening: the baking powder and cream of tartar in the crust do not need to be doubled exactly — use 1¾ times the quantity rather than a full double. Over-leavened crust dough puffs during the par-bake and creates an uneven base that does not support the filling evenly. Two pans, same oven, same rack — rotate front to back at the 15-minute mark.
How do high altitude and humidity affect snickerdoodle cheesecake bars?
At high altitude above 3,500 feet (1,065m), reduce the baking powder in the crust to ¼ teaspoon (1g) — leavening acts more aggressively at altitude and an over-leavened crust will puff under the filling and crack. The cheesecake filling itself is not leavened so it is less affected, but lower air pressure means the oven environment is drier and the filling can set faster than expected — begin the jiggle test at 26 minutes rather than 30. In high humidity above 70% relative humidity, the primary impact is on the streusel — it absorbs ambient moisture quickly after baking and loses its crunch. Bake these bars as close to serving time as the 6-hour chill allows, store in a lidded hard-sided container rather than loosely covered, and plan to serve within 24 hours of slicing for the best streusel texture.
More Bars You’ll Love
If these snickerdoodle cheesecake bars are your kind of dessert, these are the ones to make next.
Peanut Butter Chocolate Chip Bars — dense, rich peanut butter bars with pockets of melted chocolate throughout. A different flavor profile from these but the same satisfying thickness.
Salted Caramel Chocolate Chip Cookie Bars — if the cinnamon-sugar streusel layer on these bars is what you liked most, the salted caramel layer in these will be the same kind of moment.
Snickerdoodle Cheesecake Bars Recipe
Ingredients
Equipment
Method
- Set oven rack to the middle position and preheat to 325°F (160°C). Line a 9×13 inch (23×33cm) light-colored aluminum baking pan with parchment paper, leaving a 2-inch overhang on both long sides.
- In a stand mixer fitted with the paddle attachment, beat 170g softened unsalted butter and 150g granulated sugar on medium speed for 3 full minutes until pale and fluffy. Scrape bowl sides and bottom thoroughly.
- Add 1 room-temperature egg and 1 teaspoon pure vanilla extract. Beat on low for 30 seconds, then medium for 30 seconds until glossy and just combined.
- In a separate bowl, whisk together 270g all-purpose flour, ½ teaspoon baking powder, ½ teaspoon cream of tartar, and ¼ teaspoon fine sea salt. Add to the butter mixture in two additions on low speed, mixing only until no dry flour streaks remain — approximately 20 seconds per addition.
- Mix 2 tablespoons granulated sugar and 1 teaspoon ground cinnamon for the crust coating. Scatter half over the parchment-lined pan base. Press the crust dough into an even ½-inch layer across the pan. Scatter remaining cinnamon-sugar over the surface.
- Par-bake the crust at 325°F (160°C) for 12 to 14 minutes until just set and pale — not golden. Transfer pan to a wire cooling rack and cool for 10 full minutes. Mix 1 tablespoon granulated sugar and ½ teaspoon cinnamon for the crust-to-cheesecake interface. After the crust has cooled 10 minutes, scatter this evenly across the par-baked crust surface. Then pour the cheesecake filling over it and spread level with an offset spatula.
- In a large bowl, beat 454g full-fat block cream cheese alone with a hand mixer on low speed for 90 seconds until completely smooth with no lumps. Scrape bowl once during beating.
- Add 100g granulated sugar and beat on low for 60 seconds. Scrape bowl thoroughly. Add 2 room-temperature eggs one at a time, beating on low for 20 seconds after each addition and scraping between each. Add 1 teaspoon vanilla extract, ¼ teaspoon ground cinnamon, and 30g full-fat sour cream. Beat on low for 20 seconds until just combined.
- Pour cheesecake filling over the cooled crust and spread into an even layer with an offset spatula. Mix 2 tablespoons granulated sugar and 1½ teaspoons ground cinnamon for the interface layer and scatter evenly over the filling surface — do not press in.
- In a medium bowl, whisk together 90g all-purpose flour, 110g packed light brown sugar, and 1½ teaspoons ground cinnamon. Add 57g cold cubed unsalted butter and cut in with a pastry cutter or two forks until the mixture forms irregular clumps ranging from pea-sized to almond-sized. Scatter evenly over the cheesecake filling — do not press down.
- Bake at 325°F (160°C) for 30 to 35 minutes. Begin checking at 30 minutes. The bars are done when the streusel is deep mahogany brown, the cheesecake edges look matte and ivory, and the center wobbles as one unified mass when the pan is gently nudged. Do not open the oven before the 25-minute mark.
- Remove from oven and cool on a wire rack at room temperature for 60 full minutes. Cover loosely with plastic wrap and refrigerate for a minimum of 6 hours or overnight.
- To slice: lift the slab from the pan using the parchment overhang and place on a cutting board. Dip a sharp chef's knife in very hot water, wipe dry with a clean towel, and cut — repeating the dip-wipe-cut process for every single cut. Slice into a 3×4 grid for 12 bars.