Oatmeal Chocolate Chip Bars Recipe
The batch that finally worked was the one I almost didn’t make. I had tested six versions of these oatmeal chocolate chip bars across two weeks — adjusting the oat-to-flour ratio, swapping brown sugar levels, trying both baking soda amounts — and every version had something wrong with it. Too cakey. Too dry at the edges. Oats that tasted raw in the center. The seventh batch, I changed two things at once out of impatience, which is something I tell people not to do. Both changes were right. That is the recipe below.
These are the bars I keep on my counter on a Tuesday and do not offer to share.
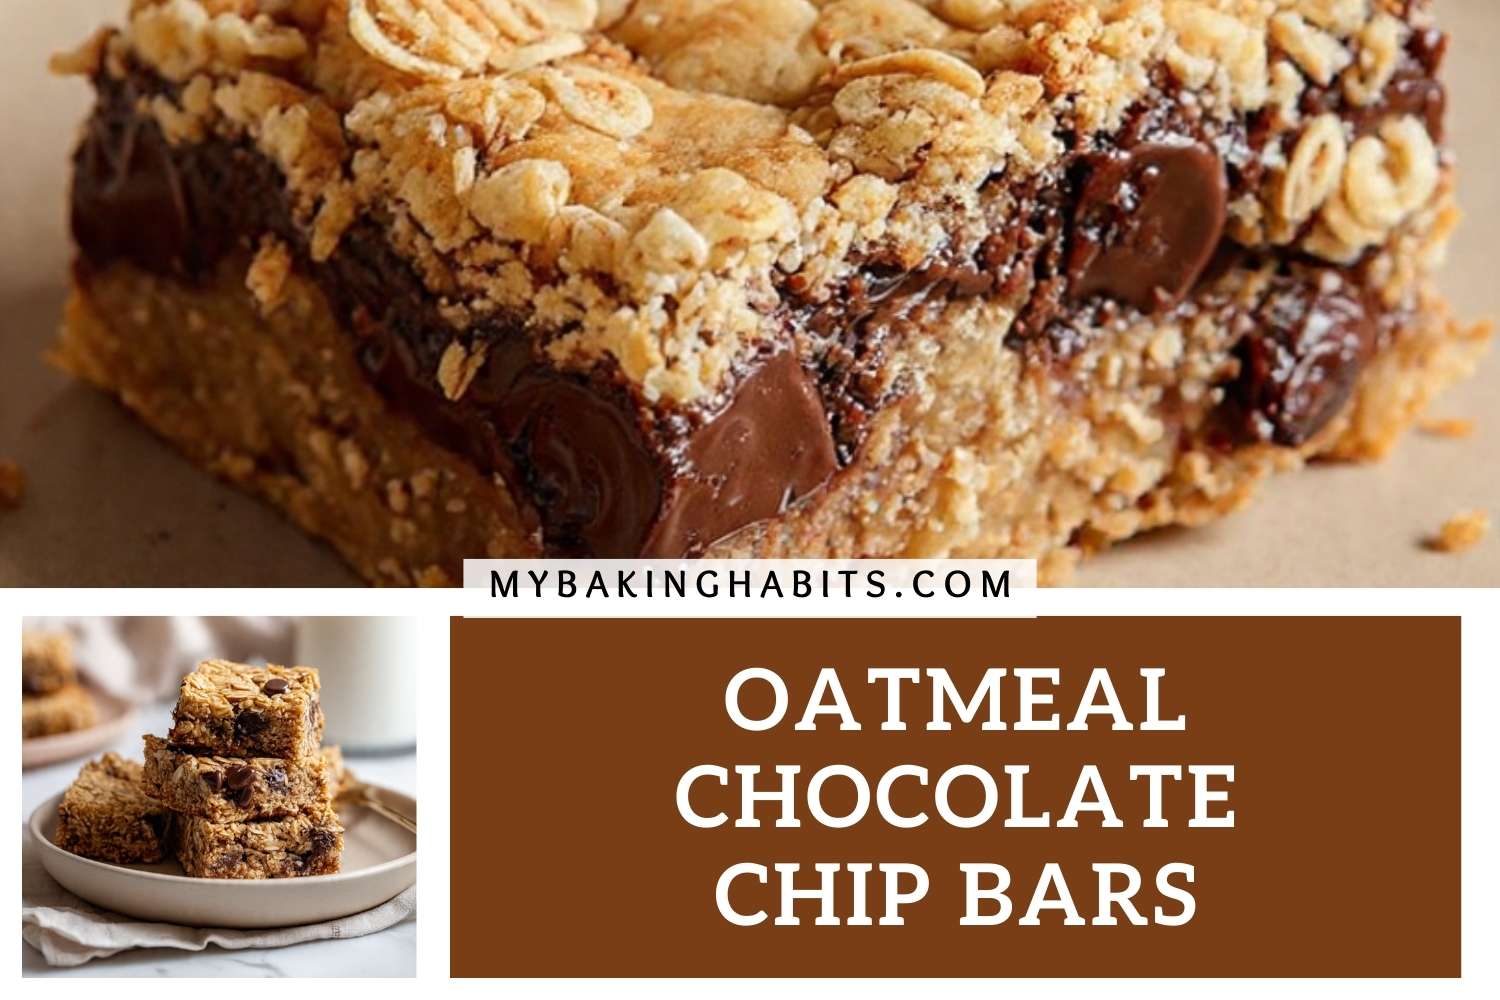
What these bars are: thick, dense, and chewy in the way a good oatmeal cookie is chewy — not cakey, not crumbly, not granola-bar firm. The edges set with a slight crisp and the centers stay soft for days. Every bite has a pocket of melted semi-sweet chocolate and that deep, toasty, brown-sugar-and-oat flavor that is completely different from a standard chocolate chip cookie bar. The oats are not background texture here. They are the whole point.
🗒 Luna’s Note: I tested these with quick oats on batch three because I was out of old-fashioned. The texture was noticeably pasty — the oats dissolved into the batter rather than holding their structure. Old-fashioned rolled oats are not a preference here. They are what makes the bar a bar.
I tested melted butter versus softened creamed butter in back-to-back batches. The creamed version baked up more cakey and open — closer to a thick blondie than a chewy oat bar. The melted butter version produced a denser, fudgier interior with a more cohesive bite. Melted butter also means no mixer, which matters for a recipe like this. I kept the melted butter version and I would not go back.
I tested the chip quantity at 1½ cups versus 2 cups. At 1½ cups, there were chips in every bite but the chocolate felt incidental. At 2 cups, every square had a visible chip pool and the chocolate was equal to the oat in every bite — which is what the photos show and what the recipe needs to deliver. Two cups is the correct amount.
No mixer required — this entire recipe comes together in one bowl with a silicone spatula. No chilling required. The batter goes straight into the pan. The only patience this recipe demands is the cooling time before cutting, and that part is non-negotiable.
| Prep Time | Cook Time | Total Time | Yield | Difficulty |
|---|---|---|---|---|
| 15 min | 25 min | 2 hrs 40 min (includes cooling) | 16 bars | Easy |
| Calories | Fat | Carbs | Sugar | Protein |
|---|---|---|---|---|
| ~310 kcal | ~14g | ~43g | ~27g | ~4g |
Macros are approximate and will vary based on ingredient brands and serving size.

Ingredients & Tools
For the Bars
- 1 cup (227g) unsalted butter, melted and cooled to room temperature
- 1½ cups (300g) packed brown sugar
- 2 large eggs (approximately 50g each without shell), room temperature
- 2 teaspoons pure vanilla extract
- 2 cups (240g) all-purpose flour, spooned into the measuring cup and leveled — or weighed at 240g
- 2 cups (180g) old-fashioned rolled oats — not quick oats, not instant oats
- 1 teaspoon baking soda, checked for freshness
- ½ teaspoon fine sea salt
- 2 cups (340g) semi-sweet chocolate chips (45–55% cacao), such as Nestle Toll House or Ghirardelli, divided — 1¾ cups folded into the batter, ¼ cup pressed on top before baking
Before You Start
Oven rack: Set to the middle position before preheating. The middle rack keeps the bars equidistant from the top and bottom heat sources — bottom rack overbrowns the base before the center sets, top rack dries the surface before the interior is cooked through. Set it now, before you forget.
Butter: Melt the butter and set it aside to cool for at least 15 minutes before using. Touch the bowl — it should feel room temperature, not warm. If the butter is still warm when the eggs go in, it will begin to cook them and the batter will look curdled. The bars will bake up greasy and dense rather than the soft, cohesive texture shown in the photos.
Eggs: Pull the eggs from the fridge 30 minutes before baking. Cold eggs do not emulsify smoothly into a melted butter batter and can cause the mixture to look broken or separated. If you forgot, place them in a bowl of warm (not hot) water for 10 minutes.
Flour: Spoon the flour into your measuring cup using a separate spoon and level it off with a straight edge — do not scoop the cup directly into the bag. Scooping packs 20–30% more flour than spooning and leveling. One extra tablespoon per cup turns a chewy bar into a dry, crumbly one. For guaranteed accuracy, weigh the flour at 240g. Gram weight always takes priority over volume in this recipe.
Gram weights: This recipe was developed and tested using a kitchen scale. The gram weights listed for every ingredient are what I tested with — they are the most reliable way to match the result shown in the photos. Volume measurements are included but gram weights are more accurate, especially for oats and flour where packing variation is significant.
Oats: Use old-fashioned rolled oats only. Quick oats and instant oats are pre-processed to a finer cut — they absorb liquid faster and dissolve into the batter rather than holding their shape during baking. The visible oat flakes throughout the finished bars require old-fashioned oats. This substitution changes the recipe fundamentally, not just slightly.
Brown sugar: Pack the brown sugar firmly into the measuring cup. Loosely measured brown sugar can read 30–40% less than packed and will produce bars that spread thinner and bake up less chewy than intended. If your brown sugar has hardened, place a damp paper towel over it and microwave in 20-second increments until pliable before measuring.
Baking soda freshness test: Drop ½ teaspoon (3g) of baking soda into a small bowl of hot water with a splash of white vinegar. It should bubble aggressively within 2 seconds. Weak fizz or no reaction means replace the box before baking — expired baking soda produces flat, dense bars with no lift.
Chocolate chips: Reserve ¼ cup (43g) of the chocolate chips before mixing begins. These go on the surface right before the pan enters the oven. Chips folded only into the batter get partially buried as the bars bake — pressing reserved chips onto the top guarantees visible, glossy chocolate across every bar exactly as shown in the finished photos.
Mixing equipment: This entire recipe comes together with a large mixing bowl and a silicone spatula — no electric mixer at any point. Do not use a hand mixer — the batter will be overmixed before the oats go in and the bars will bake up tough rather than tender and chewy.
Pan: Use a 9×13 inch (23x33cm) light-colored aluminum baking pan, lined with parchment paper and leaving a 2-inch overhang on both long sides. That overhang is your lifting handle — skip it and you will not be able to remove the bars cleanly from the pan without the bottom layer tearing. Anchor the parchment with a small amount of butter or non-stick spray underneath so it does not shift when the thick batter goes in. If you use a dark non-stick pan, reduce the oven temperature by 25°F (15°C) and start checking at 20 minutes — dark pans absorb more heat and overbrown the bottoms before the centers are set.
One note on the pan: I use the same light-colored aluminum 9×13 pan for every bar recipe I make. I own two. The second one was not a luxury — it was the decision that made baking two batches without waiting feel normal rather than inconvenient.
Necessary Tools
| Tool | Why It Matters |
|---|---|
| Kitchen scale | Gram weights eliminate flour and oat measurement error — the single biggest cause of dry, crumbly bars |
| Large mixing bowl | Big enough to fold oats and chips without spilling — at least 4-quart capacity |
| Silicone spatula | Folds batter gently without overdeveloping gluten — do not use a whisk after the flour goes in |
| 9×13 inch (23x33cm) light-colored aluminum baking pan | Light aluminum bakes evenly — dark pans overbrown the bottom before centers set |
| Parchment paper | Mandatory — skip it and the bars will not lift cleanly from the pan |
| Wire cooling rack | Bars must cool fully elevated — cooling in the pan on a flat surface traps steam and softens the bottom |
| Sharp chef’s knife | Clean cuts require a sharp blade wiped between each slice — a serrated knife drags the oats and tears the edges |
| Oven thermometer | Most home ovens run 15–25°F (8–14°C) off — confirm actual temperature before the pan goes in |
How to Make Oatmeal Chocolate Chip Bars
Step 1: The Oven Is Hot and the Pan Is Lined
Set your oven rack to the middle position and preheat to 350°F (175°C). If you have an oven thermometer, confirm the actual temperature before the pan goes in — most home ovens run 15–25°F (8–14°C) off, and a cooler oven produces pale, underbaked bars that look done on top but collapse when cut. This entire recipe is made with a large mixing bowl and a silicone spatula — no electric mixer at any point.
Line your 9×13 inch (23x33cm) light-colored aluminum baking pan with parchment paper, leaving a 2-inch overhang on both long sides. Press the parchment into the corners so it sits flat against the pan walls. Run a small piece of butter or a spray of non-stick cooking spray under the parchment to anchor it — loose parchment shifts when the thick batter goes in and creates uneven edges on the finished bars.
The pan should look like a sling — parchment flat on the bottom, two handles rising above the long sides. If the parchment is bunched or folded at the corners, smooth it out now before the batter goes in.
⚠️ Baker's Warning: If you skip the parchment overhang and try to cut the bars directly in the pan, the edges will break and the bottom layer will tear away from the cut. You will not be able to lift the slab cleanly. The overhang is the only way to remove the full batch intact for slicing.
Your pan is lined and your oven is heating — move to the batter.
Step 2: The Batter Base Is Smooth and Glossy
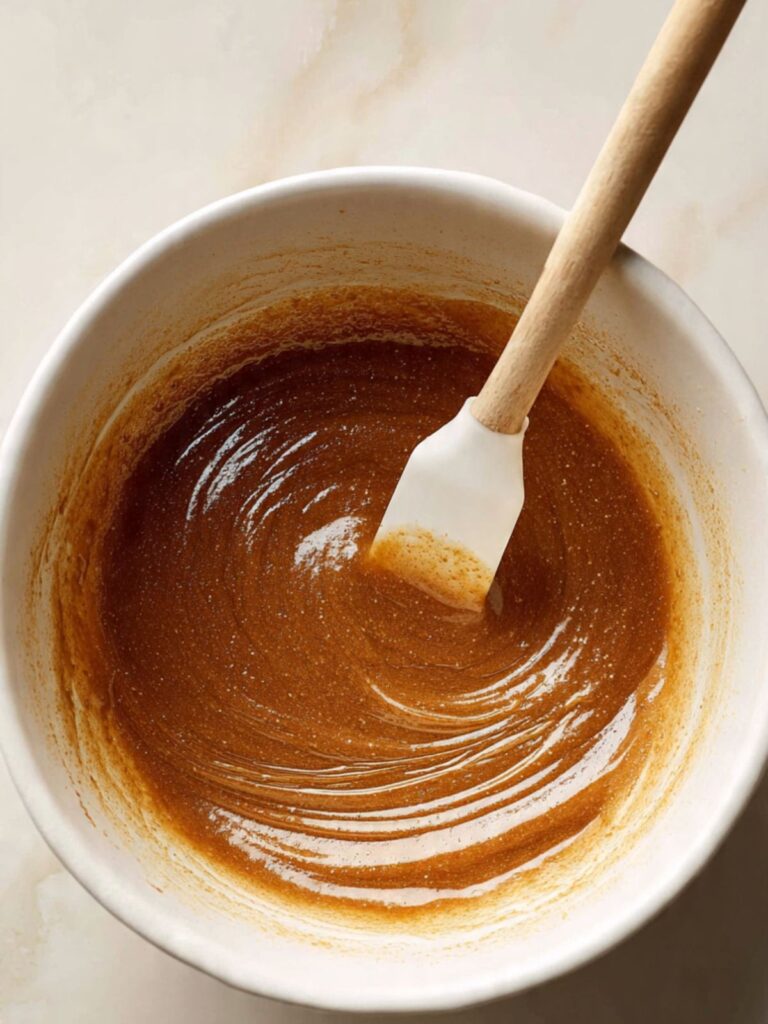
Pour the melted and cooled unsalted butter (1 cup / 227g) into your large mixing bowl. Add the packed brown sugar (1½ cups / 300g) and stir with your silicone spatula until fully combined — about 1 minute of steady stirring. The mixture will look thick and sandy at first, then will smooth out as the sugar begins to dissolve into the butter. Do not rush this step — undissolved sugar produces a gritty texture in the finished bar that no amount of baking will fix.
The mixture should look uniformly dark golden-brown, smooth at the edges, and slightly glossy with no visible dry sugar pockets and no streaks of butter floating on top. If you still see separation after 1 minute, stir for another 30 seconds and check again.
⚠️ Baker's Warning: If the butter is still warm when the sugar goes in, the mixture will look greasy and separated rather than smooth and cohesive — the fat has not cooled enough to properly combine. Touch the bowl before you start. Room temperature means the bowl feels neutral against your palm, not warm. If it feels warm at all, wait 10 more minutes.
The base is smooth — add the eggs next.
Step 3: The Batter Is Cohesive and Ready for Dry Ingredients
Add the room-temperature large eggs (2 eggs, approximately 50g each without shell) one at a time, stirring fully after each addition before the next egg goes in. Add the pure vanilla extract (2 teaspoons) with the second egg. Stir for about 30 seconds after the second egg is incorporated — the mixture should look smooth, slightly lighter in color, and uniform with no visible egg streaks.
One egg at a time is not a suggestion — it gives the fat and egg time to emulsify properly into a cohesive batter. Both eggs dumped in together produce a mixture that looks broken before it even goes into the oven.
The batter at this stage should look glossy and uniform — a deep caramel color, no visible egg streaks, no separation between the fat and liquid. If it looks broken or curdled, the eggs were too cold or the butter was still warm. The bars will still bake but the texture will be denser and greasier than intended.
⚠️ Baker's Warning: Do not add both eggs at once — the emulsification requires the fat and egg to incorporate gradually. A broken batter at this stage bakes up with an uneven, greasy crumb that you will be able to taste in the finished bar.
Eggs are in and the batter is cohesive — the dry ingredients go in next.
Step 4: The Batter Is Thick, Shaggy, and Oat-Loaded
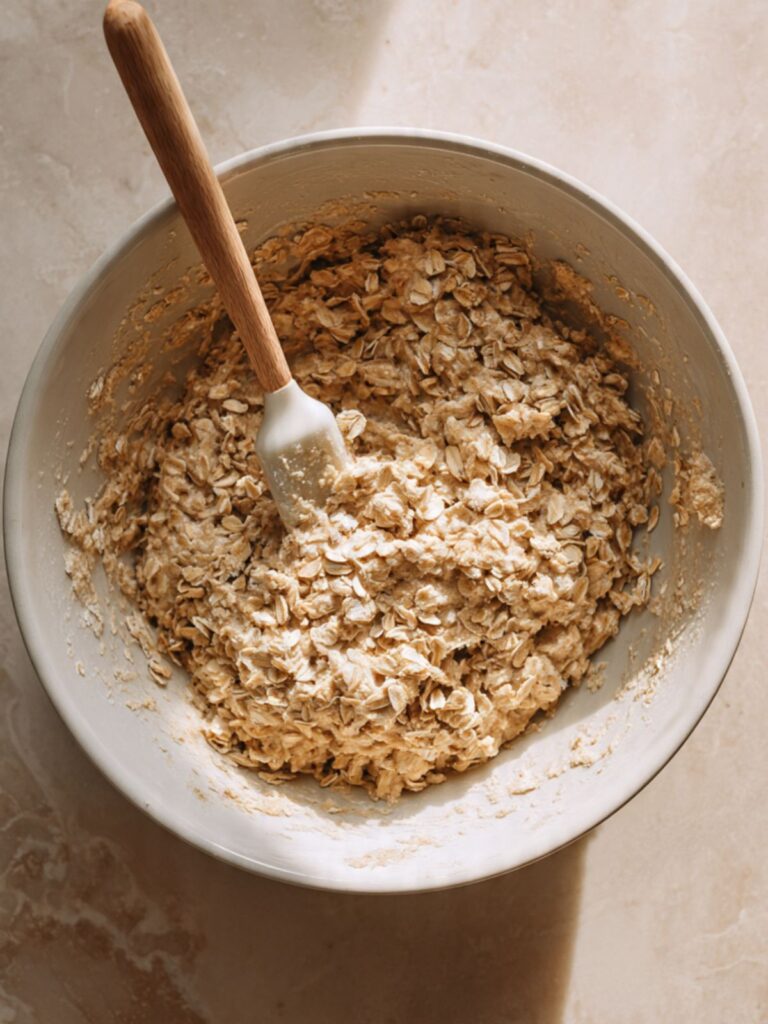
Add the all-purpose flour (2 cups / 240g, spooned and leveled), old-fashioned rolled oats (2 cups / 180g), baking soda (1 teaspoon, freshness-checked), and fine sea salt (½ teaspoon) directly to the bowl. Fold everything together with the silicone spatula using slow, wide strokes — scrape from the bottom of the bowl up and over the top, rotating the bowl as you go. Fold until no dry flour streaks remain and the oats are evenly distributed throughout the batter. This takes about 15–20 folds. Stop the moment the flour disappears.
Do not stir. Do not beat. Do not mix further.
The batter should look thick, rough, and slightly shaggy — you will see distinct oat flakes held throughout the mass, just as visible in the finished bars after baking. If the batter looks smooth and paste-like with no visible oat texture, the oats have been overmixed and partially broken down. The bars will still bake but the interior will be uniform and dense rather than the distinct oat-and-chocolate bite shown in the photos.
⚠️ Baker's Warning: Do not overmix after the flour goes in — the edges of the baked bars will look fine but the centers will bake up tough and dense rather than soft and chewy. Gluten development happens fast once flour meets liquid. Fifteen to twenty folds is all this batter needs. Count them if you need to.
Dry ingredients are in — fold the chocolate chips in last.
Step 5: The Pan Is Full and the Surface Chips Are Anchored
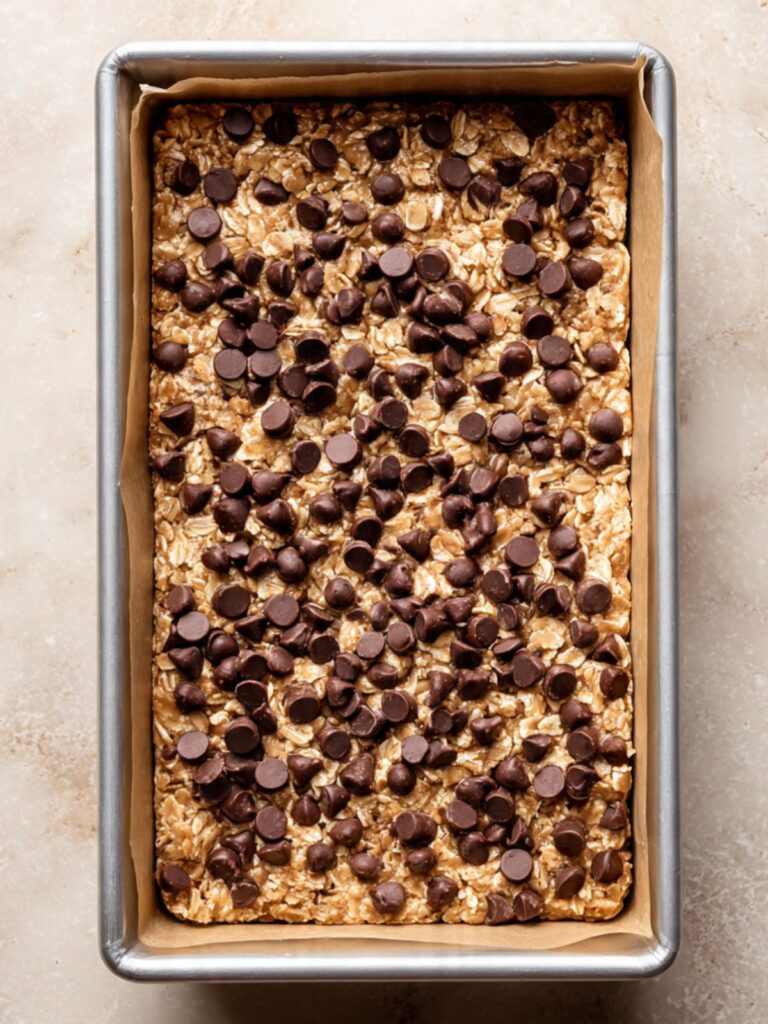
Add 1¾ cups (298g) of the semi-sweet chocolate chips (45–55% cacao) to the batter and fold them in with 8–10 strokes — just enough to distribute them evenly. The reserved ¼ cup (43g) stays out for the top.
Transfer the batter to your prepared 9×13 inch (23x33cm) pan. Use the silicone spatula to spread it into an even layer, pressing it gently into the corners and edges. The batter is thick — it will not self-level the way a cake batter does. Take 30 seconds to spread it flat with the back of the spatula so the bars bake to an even thickness across the full pan.
Scatter the reserved ¼ cup (43g) of chocolate chips evenly across the surface. Press each chip lightly with the flat of your palm — not your fingertips — so they sit anchored into the batter rather than resting loosely on top. A flat-palm press covers more surface area at once and takes about 10 seconds total.
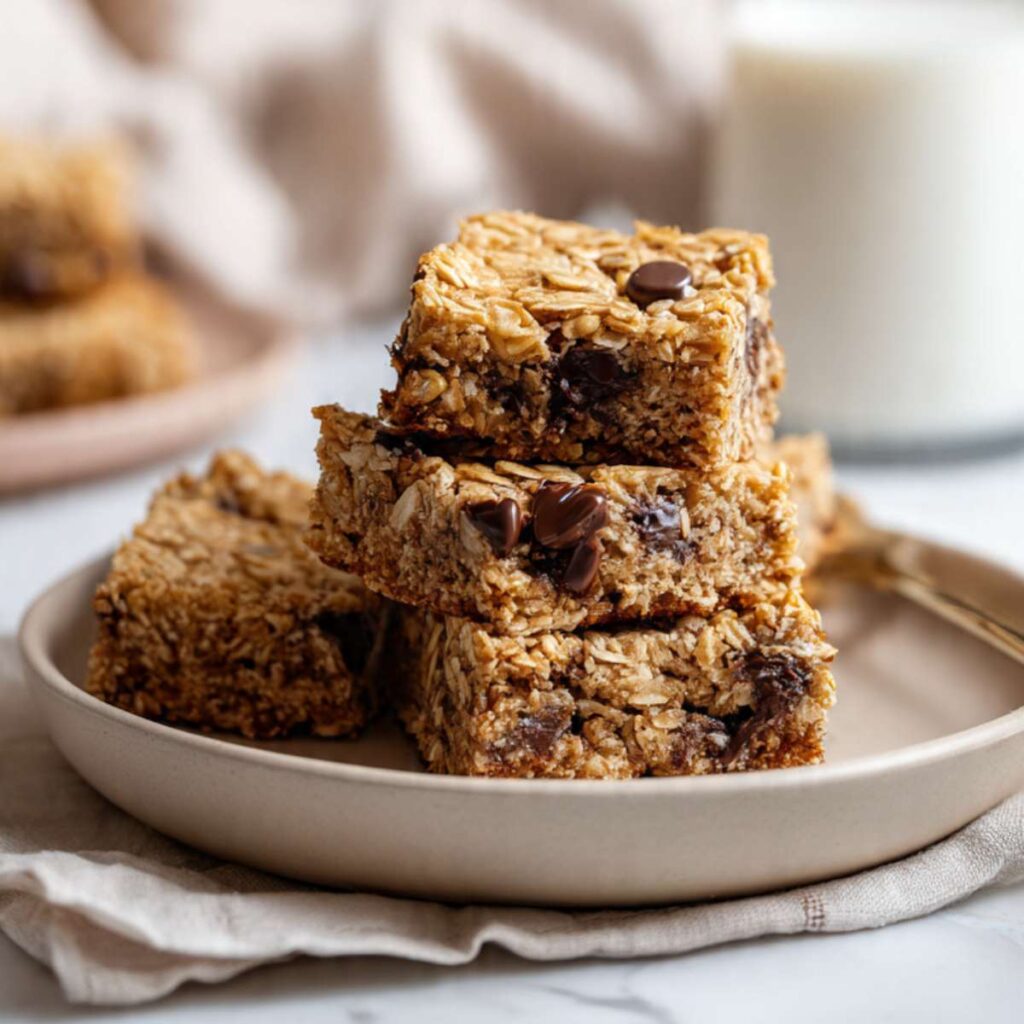
The surface should look evenly covered with batter reaching the edges and corners, chocolate chips distributed across the entire top with no large bare patches, and a roughly flat surface approximately ¾ inch (2cm) thick. This is exactly what the overhead shot of the cut bars shows before baking — even coverage, chips sitting in the batter, no piled-up edges.
🗒 Luna’s Note: I press the surface chips in with the flat of my palm rather than placing them individually. It anchors a wider area of chips at once and every bar gets a chip on top without me standing there for two minutes doing it one by one.
⚠️ Baker's Warning: Do not skip pressing the surface chips into the batter — chips that rest on top without being anchored roll to the edges of the pan when it moves and you will end up with chip-heavy perimeter bars and bare centers. The even chip distribution visible across every bar in the overhead photo requires this step.
Batter is in the pan — it goes into the oven now.
Step 6: The Edges Are Deep Golden and the Center Has a Faint Give
Place the pan on the middle rack of your preheated 350°F (175°C) oven. Bake for 22–26 minutes — start checking at 22 minutes. Do not open the oven door before 20 minutes.
Pull the pan the moment the edges look set and deep golden-brown, the surface looks matte and dry across the full pan, and the center still has the faintest jiggle when you nudge the pan gently. Not liquid movement — just a soft, subtle give. This is the correct moment to pull. The centers will continue to set as the pan cools on the wire rack over the next 30 minutes.
Look at the stacked bars in the finished photos — deep golden-brown edges with a matte, dry surface and a dense, cohesive interior. That edge color is your visual target. If the surface still looks wet or shiny in the center at 26 minutes, give it 2 more minutes and check again. If the edges are pulling away from the parchment and darkening at the corners, pull the pan immediately regardless of the timer.
⚠️ Baker's Warning: Do not bake until the center looks fully set and firm through the oven door — by the time the center looks done from the outside, the edges are already overbaked and the interior moisture that creates the chewy texture has evaporated. The bars will look underdone when you pull them. They are not. Set the timer and trust the pull cue.
The pan comes out — do not cut yet.
Step 7: The Bars Are Set, Cut, and Ready
Set the pan on a wire cooling rack immediately after pulling from the oven. Do not move the bars, do not lift the parchment, do not test the center with a toothpick. Leave the pan undisturbed for a minimum of 2 hours at room temperature.
During this time, carryover heat from the hot pan is finishing what the oven started — the centers are setting, the oat starch is completing its gelatinization, and the chocolate chips are resolidifying from molten to set. Cutting before 2 hours produces bars with gummy, molten centers that collapse when the knife goes through and crumble at the edges because the structure has not had time to firm up. Set a timer the moment the pan comes out of the oven.
After 2 hours, use the parchment overhang to lift the full slab out of the pan and onto a cutting board. For the cleanest edges, refrigerate the slab for 30 minutes before slicing — room temperature bars cut acceptably but refrigerated bars cut cleanly, with sharp edges and no dragging. Use a sharp chef’s knife and wipe the blade clean between each cut.
Cut into 16 bars — 4 columns by 4 rows. Each bar weighs approximately 85–90g at this cut size, which matches the serving size in the nutrition table. Weigh the first bar to calibrate — if it is significantly heavier or lighter than 85g, adjust your grid before completing the remaining cuts.
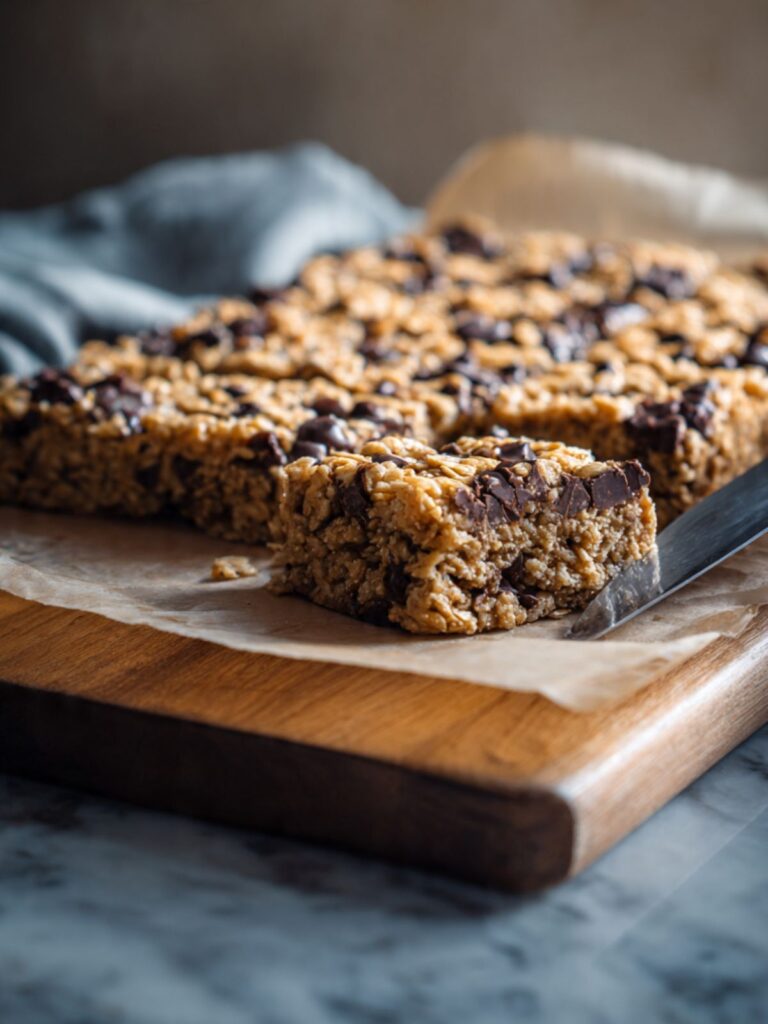
The fully cooled slab should feel firm and set across the entire surface when you press it lightly with a fingertip — no soft give anywhere, edges and center behaving the same. The cross-section of a correctly baked and cooled bar shows a dense, golden-brown interior with distinct oat flakes and pockets of set chocolate throughout, exactly as visible in the side-profile photo of the stacked bars.
🗒 Luna’s Note: I always refrigerate the slab for 30 minutes before cutting. Room temperature bars cut cleanly. Refrigerated bars cut perfectly. The chocolate firms up completely and the knife goes through in one clean pass. It takes 30 seconds of planning and the edges are noticeably sharper.
⚠️ Baker's Warning: Do not cut before the full 2-hour cool — the centers are still molten underneath the set surface and will collapse into a gummy, wet mass when the knife goes through. The bar shown in the stacked photo only holds that clean cross-section because it was given the full cooling time. There is no shortcut here that produces the same result.
The bars are cut. They are ready.
The Science Behind Oatmeal Chocolate Chip Bars
These bars work because three things happen in exactly the right order — melted butter builds density, oat starch provides structure, and brown sugar keeps everything soft for days after baking. Understanding each one means you can diagnose exactly what went wrong if a batch does not come out the way the finished photos show.
Why Melted Butter Produces a Denser, Chewier Bar
I noticed something on the third batch of these. The creamed-butter version — the one I made first because it is what I default to — baked up lighter and more open than I wanted. Not wrong, exactly. Just not the bar. The texture was closer to a thick blondie than a chewy oat bar, and the cross-section did not have that dense, tight crumb visible when you look at a properly made bar head-on.
What I was seeing was aeration doing its job — and doing it wrong for this recipe. Creaming butter traps air bubbles in the fat. Those bubbles expand in the oven heat and produce lift, which is exactly what you want in a cake or a cakey cookie. Melted butter contains no trapped air at all — nothing to expand, nothing to open up the crumb. The bars bake dense and low, with a tight interior that holds together cleanly when cut.
There is a tradeoff. Melted butter bakes dry faster than creamed butter because there is no aerated fat structure to insulate the interior from the heat. This is exactly why the pull cue is so specific — the center must still have a faint soft give when the pan comes out. A bar that looks done through the oven door is already past its peak. The same fat-state mechanism plays out differently in drop cookies — if you want to see how melted butter behaves without the oat structure holding everything together, the oatmeal chocolate chip cookies article shows it directly.
🗒 Luna’s Note: The melted butter method is also why this recipe takes one bowl and no mixer. That is not a shortcut — it is the correct method for the texture shown in the finished photos.
How Oat Starch Builds Structure Without Flour Alone
Old-fashioned rolled oats are not just texture here. They are doing structural work alongside the flour — and understanding this is the reason the oat type is genuinely non-negotiable.
When oat starch granules are exposed to heat and moisture during baking, they absorb the surrounding liquid and swell — a process called gelatinization. As the bars cool, those swollen starch granules firm up and hold their shape, contributing significantly to the sliceable, cohesive structure of the finished bar. This is the mechanism at work during the 2-hour cooling period — not just the chocolate setting, but the oat starch finishing its job off the heat.
Quick oats and instant oats have been pre-cut and partially pre-cooked before they reach the bag. Their starch granules are already partially broken down. They absorb liquid faster, gelatinize earlier, and dissolve into the batter rather than holding their shape during baking. The visible oat flakes throughout the finished bars — the texture you can see in the dense interior and across the surface — require old-fashioned oats gelatinizing at the correct rate for this bake time. Quick oats produce a smooth, pasty interior. That is a different bar with a different texture and it cannot be corrected after the fact.
The oat beta-glucan — the soluble fiber present in all oats — also plays a secondary role. It forms a gel-like matrix when hydrated during baking, which is part of why these bars stay measurably softer at room temperature for several days after baking than an all-flour bar of equivalent thickness would.
Why Brown Sugar Keeps These Bars Soft
Brown sugar is granulated white sugar with molasses added back in. The molasses does two distinct things in a baked bar, and both are visible in the finished result if you know what to look for.
The first is hygroscopicity — the ability to attract and hold moisture from the surrounding air. This is why these bars are noticeably softer on Day 2 than Day 1. As the bars sit at room temperature, the brown sugar draws ambient moisture into the crumb and redistributes it — the interior becomes more uniform, the chew deepens, and the edges, which bake slightly firmer, soften overnight to match the center. White sugar does not do this. An all-white-sugar bar would be crisper at the edges and would dry out faster because white sugar does not attract moisture from the air the same way.
The second is flavor development. Molasses deepens the Maillard reaction — the process by which proteins and sugars brown and develop complex flavor above 280°F (138°C). The deep golden-brown color at the edges of the baked bars is the Maillard reaction at full intensity, and brown sugar produces a richer, more caramel-forward version of that color and flavor than white sugar would. What looks like a simple color difference is actually a flavor difference. The bar made with all white sugar would taste noticeably flatter alongside this one.
Oatmeal Chocolate Chip Bars Troubleshooting & Pro-Tips
Common Mistakes
The bars are dry, crumbly, and fall apart when cut
You used quick oats or instant oats instead of old-fashioned rolled oats. This is the single most common failure in this recipe and the one that is hardest to diagnose because the bars look correct coming out of the oven. Quick oats are pre-cut to a finer particle size and partially pre-cooked before packaging — they absorb liquid faster than old-fashioned oats and dissolve into the batter during baking rather than holding their shape. The result is a bar with no cohesive oat structure, which crumbles the moment a knife goes through it. Check the oat package before your next batch. The label must say old-fashioned rolled oats. Quick, instant, and steel-cut oats are not substitutable.
If you used old-fashioned oats and the bars are still crumbly, the flour was over-measured. Scooping the measuring cup directly into the flour bag packs 20–30% more flour than spooning and leveling — one extra tablespoon per cup is enough to tip the texture from chewy and cohesive to dry and loose. Weigh the flour at 240g next time and this will not happen.
Fix for this batch: Crumbly bars cannot be reversed after baking. Serve them warm with vanilla ice cream — the texture reads differently warm and the contrast with the cold ice cream compensates.
Prevention: Old-fashioned rolled oats only. Flour weighed at 240g every time.
The bars stuck to the pan and the bottom layer tore when lifting
The parchment was missing, too short to create an overhang, or was not anchored before the batter went in. Without the parchment sling, the bars bond to the pan during baking and the bottom layer tears when you try to lift or cut them. There is no clean recovery from this — you are portioning from the pan.
If parchment was present but shifted during baking, it was not anchored. A small amount of butter or non-stick spray underneath the parchment holds it flat against the pan walls so it does not move when the thick batter goes in over it.
Fix for this batch: Run a thin offset spatula or butter knife along all four edges between the bar and the pan wall. Work slowly and do not force it. Portion directly in the pan with a sharp knife and lift individual bars with a flat spatula. Accept that the edges will not be clean.
Prevention: Parchment with a 2-inch overhang on both long sides, anchored underneath. Every time.
The centers are gummy and collapse when cut
The bars were cut before the cooling time was complete. The center of a freshly baked oatmeal bar is still molten underneath the set surface — the oat starch has not finished gelatinizing and the chocolate chips have not resolidified. A knife at this stage goes through liquid center, not set bar, and the cut collapses into a gummy, wet mass that sticks to the blade.
Two hours at room temperature is the minimum. For the cleanest result, an additional 30 minutes in the refrigerator after the initial cool is enough to firm the entire slab. The cross-section of a properly cooled and cut bar — visible in the stacked photos — holds its shape cleanly with a dense, set interior. That result requires the full cooling time.
Fix for this batch: If cut too early, press the bars gently back together, cover the pan loosely with foil, and refrigerate for 1 hour. They will not look perfect but they will set enough to be handled.
Prevention: Set a timer the moment the pan comes out of the oven. Do not negotiate with the 2-hour rule.
The bars are pale, dense, and taste undercooked in the center
The oven was not fully preheated, or it runs cooler than its dial indicates. An oven that has not reached 350°F (175°C) when the pan goes in produces bars that bake slowly and unevenly — the exterior sets before the interior has cooked through, leaving a pale, starchy center with no golden color at the edges.
The secondary cause is the wrong pan material. Glass and ceramic pans take significantly longer to heat up and transfer heat more slowly than light-colored aluminum — they produce uneven baking across the same time window. If you used a glass or ceramic pan, reduce the oven temperature by 25°F (15°C) and add 5–8 minutes to the bake time for your next batch.
Fix for this batch: If underbaked bars have already been cut, place them cut-side up on a parchment-lined baking sheet and return to a 325°F (165°C) oven for 8–10 minutes. Check at 8 minutes.
Prevention: Oven thermometer to confirm actual temperature. Twenty full minutes of preheating before the pan goes in. Light-colored aluminum pan only.
The edges are overbaked and dry while the center is correct
A dark non-stick pan, or the pan positioned too low in the oven, is the most common cause. Dark pans absorb more radiant heat and transfer it directly to the bottom and edges of the bars, overbrowning the perimeter before the center has time to set. The bottom rack compounds this — it sits closest to the heat source in most ovens.
The second cause is waiting for the center to look done through the oven door before pulling. The center will always look slightly underdone at the correct pull moment. That is the pull cue, not a sign to keep baking.
Fix for this batch: Trim the overbaked edges with a sharp knife before serving — the interior bars will be correctly textured.
Prevention: Light-colored aluminum pan on the middle rack. Pull at the first moment the faint-center-give test passes.
The bars are dry and tight throughout — no soft, chewy interior
The bars were left in the oven past the correct pull moment. The interior of an oatmeal chocolate chip bar sets quickly once the oat starch fully gelatinizes — once that happens, the residual moisture that creates the soft, chewy bite evaporates and cannot be recovered. An overbaked bar feels uniform and tight from edge to center with no textural variation. The dense-but-moist interior visible in the side-profile photo of the stacked bars — where the oat structure holds and the chocolate sits in pockets rather than disappearing — only exists if the bar is pulled while the center still shows that faint give.
Fix for this batch: Serve warm at 300°F (150°C) for 5 minutes — gentle reheating softens the texture slightly and the chocolate chips remelt, which helps. It is not the same bar but it is a better version of an overbaked one.
Prevention: Pull at the faint-center-give moment, not when the center looks firm. Trust the visual pull cue.
The baking soda did not activate and the bars are flat and dense
Expired baking soda. Baking soda loses potency after 3–6 months once the box is opened — a bar made with dead leavening bakes completely flat and dense with no lift and a slightly bitter, flat flavor. There is no fixing this after baking.
Run the freshness test before every batch: drop ½ teaspoon (3g) into a small bowl of hot water with a splash of white vinegar. Aggressive bubbling within 2 seconds means it is active. Weak fizz or no reaction means replace the box today.
Fix for this batch: None — expired leavening cannot be corrected after baking.
Prevention: Date the box when you open it. Replace every 3–6 months. Run the test every time.
The bars spread too thin and are crispy rather than chewy
The butter was too warm when the batter came together, or the brown sugar was not packed. Warm butter above room temperature does not hold the batter structure — the bars spread and flatten in the oven before the oat starch and eggs have time to set the interior. Loosely measured brown sugar reduces the batter’s moisture content and produces thinner, crisper bars.
The secondary cause is a pan that runs slightly larger than standard — even half an inch wider on each side increases the surface area enough to produce noticeably thinner bars.
Fix for this batch: Thin, crispy bars are still edible — they read differently as a thin oatmeal chocolate chip crisp rather than a bar.
Prevention: Confirm the butter is at room temperature before mixing. Pack the brown sugar firmly. Measure the pan before using it for the first time.
High altitude and humidity adjustments
At high altitude (above 3,500 feet / 1,067 meters): reduce the baking soda by ¼ teaspoon, increase the flour by 2 tablespoons (16g), and raise the oven temperature to 365°F (185°C). The bars may bake 3–5 minutes faster — start checking at 18 minutes. The same visual pull cues apply.
In high humidity (above 70% relative humidity): the oats will absorb ambient moisture before and during baking, which can produce a slightly tacky surface even when the bars are fully baked. This is surface moisture from the air, not underbaking — do not put them back in the oven. Extend the cooling time to 2.5 hours and refrigerate the slab for 45 minutes before cutting for the cleanest edges.
Expert Pro-Tips
Weigh the oats every time. Old-fashioned rolled oats are one of the most inconsistently measured ingredients in baking — they compress differently depending on how fresh the bag is, how it was stored, and how they settle into the cup. A volume cup of oats can vary by 15–20% between measurements. At 180g on a kitchen scale, the result is the same every batch.
Press the surface chips with the flat of your palm, not your fingertips. Individual chip placement takes too long and produces uneven coverage. A flat-palm press covers more surface area at once and anchors the chips into the batter so they do not migrate to the edges during baking — which is exactly the even distribution visible across every bar in the overhead finished photo.
Refrigerate the slab before cutting, not after. Thirty minutes in the refrigerator after the initial 2-hour cool firms the chocolate chips completely and tightens the oat structure just enough for the knife to pass through cleanly. The difference between room-temperature slicing and refrigerator slicing is visible in the edge quality — one is clean, one drags.
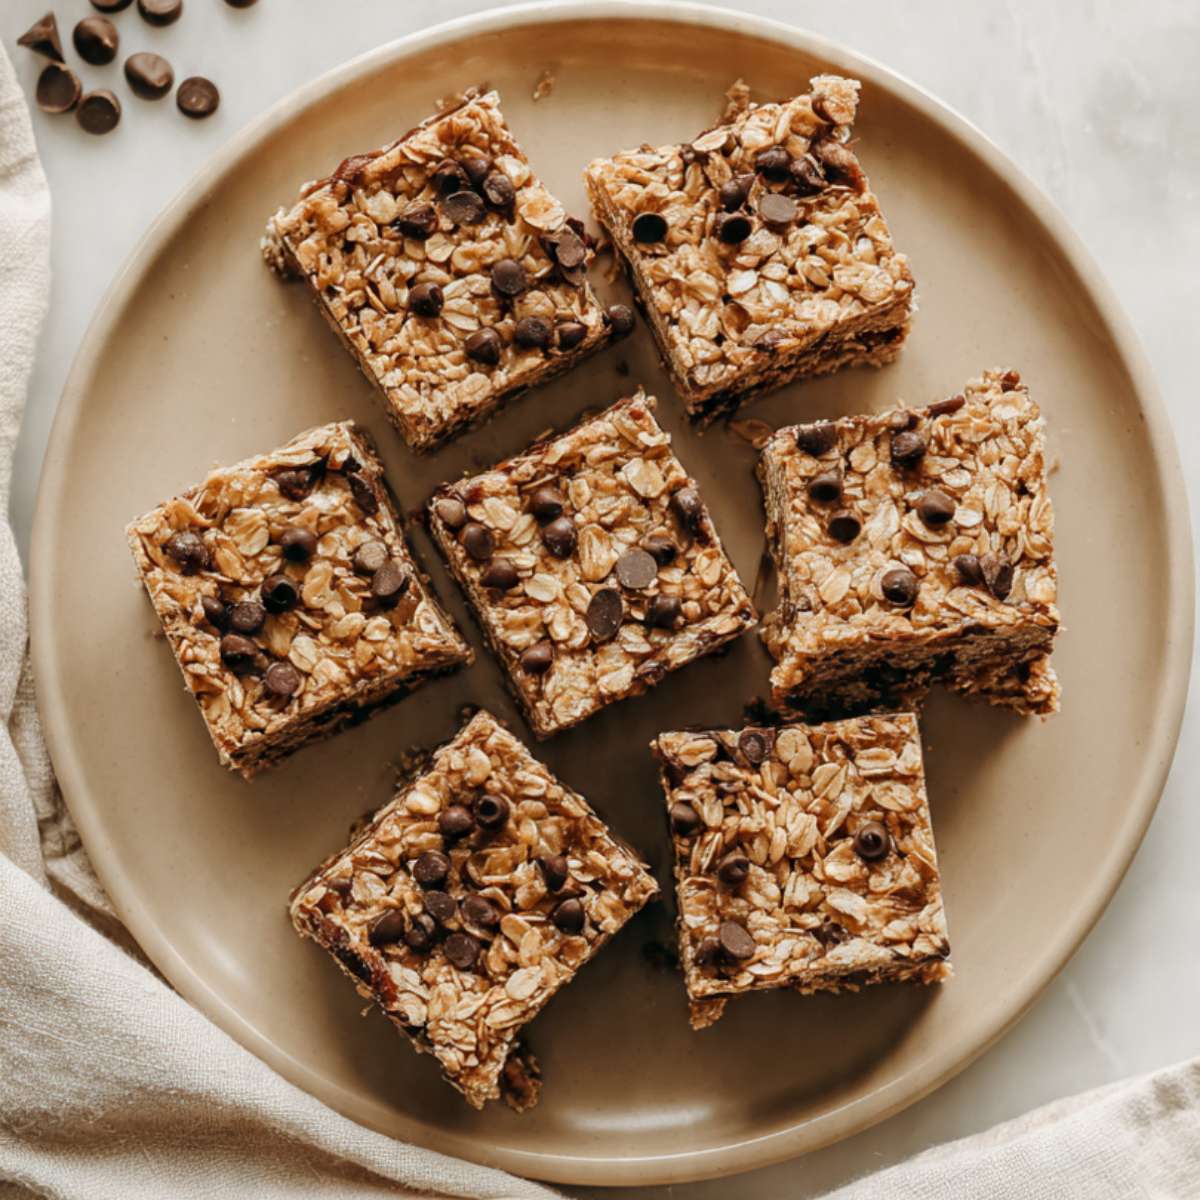
Score the slab before cutting. Mark the 4×4 grid lightly with the back of a knife before making any cuts. This produces 16 bars of equal size, which matters for presentation and for consistent serving size macros. A ruler takes 20 seconds and saves the uneven-bar problem entirely.
Wipe the knife blade between every cut. Chocolate chip residue and oat fragments on the blade drag through the next cut and tear the surface of the bar. A clean blade on every cut is the difference between the sharp-edged bars visible in the finished photos and bars with ragged, torn edges.
How to Store Oatmeal Chocolate Chip Bars
Room Temperature
Store the cut bars in a lidded hard-sided container — a glass or plastic container with a snap-fit lid, not a zip-lock bag. Zip-lock bags press against the surface of the bars and flatten the edges over time, and they do not protect against the humidity fluctuations that affect oat-based bakes more than all-flour bars. Layer parchment paper between each row of bars so the chocolate chips on the surface do not press into the bars below.
At room temperature, these bars keep well for up to 4 days. If you are not serving the full batch immediately, leave the slab uncut in the pan covered loosely with plastic wrap and cut only when ready to serve — uncut bars retain moisture at the edges significantly longer than pre-cut bars, which begin to dry out from the exposed sides within 24 hours.
Day 1 the edges are slightly firmer and the chocolate chips are fully set. Day 2 is the better bar — the brown sugar hygroscopicity has redistributed moisture through the crumb overnight, the chew deepens, and the edges soften to match the center. Day 3 and 4 are still good. Day 5 the oats begin to dry out at the edges and the texture becomes noticeably less cohesive.
Do not store near a heat source or in direct sunlight — the chocolate chips will soften and the bars will become greasy on the surface.
Refrigerator
Refrigeration is not necessary for the first 4 days but it extends the life of the bars to 7 days. If your kitchen runs warm or humid, refrigerating from Day 1 is the better call — oat-based bars absorb ambient moisture in humid conditions and can develop a sticky surface by Day 2 at room temperature.
Store in the same lidded hard-sided container with parchment between layers. Pull the bars from the refrigerator 20 minutes before serving — cold bars are firmer and denser than room temperature bars and the chocolate chips will be fully solid, which changes the texture of every bite. Twenty minutes at room temperature brings the crumb back to the soft, chewy texture shown in the photos.
Freezer — Baked
These bars freeze exceptionally well. Wrap each bar individually in a layer of plastic wrap, then place all wrapped bars into a zip-lock freezer bag or lidded freezer-safe container. The individual wrapping is the critical step — bars that go into a freezer bag without individual wrapping fuse together and cannot be separated cleanly without breaking.
Freeze for up to 2 months. To thaw, pull individual bars from the freezer and leave at room temperature for 45 minutes to 1 hour — do not microwave from frozen or the oats will turn rubbery and the chocolate chips will scorch before the center is thawed. Thawed bars at room temperature are indistinguishable from fresh bars on Day 2 — the texture is identical.
🗒 Luna’s Note: I keep a stash of individually wrapped bars in the freezer at almost all times. Forty-five minutes on the counter and they are back to Day 2 texture — which, for this recipe, is the best version anyway.
Freezer — Unbaked
The batter can be made ahead and frozen unbaked directly in the parchment-lined pan. Press the batter into the prepared pan, scatter the surface chips, wrap the entire pan tightly in two layers of plastic wrap, and freeze for up to 1 month. Do not thaw before baking — bake directly from frozen at 350°F (175°C) and add 10–12 minutes to the bake time, starting the visual check at 30 minutes. The doneness cues remain the same: set golden edges, matte dry surface, faint center give.
Serving Suggestion
Serve these bars at room temperature or slightly warm — if you want the chocolate chips partially melted, 12 seconds in the microwave is enough. Cold from the refrigerator is a different bar entirely: denser, firmer, more like a chocolate chip oat fudge square than the soft, chewy bar the recipe is designed to produce. Both are good. Room temperature is the intended version.
I make these with a strong black coffee — no sugar, no milk. The bitterness cuts through the sweetness of the brown sugar and the chocolate in a way that a glass of milk does not. Milk makes everything taste like dessert. Coffee makes these taste like something you chose deliberately.
These are the bars I bring when I need to bring something and I do not want to think about it. Not a dinner party recipe — a Tuesday recipe. A bring-to-the-office recipe. A leave-on-the-counter-and-let-people-find-them recipe. They do not require explanation or presentation. They are exactly what they look like.
Day 2 is the version I would serve to someone I wanted to impress. The chew is deeper, the flavor is more settled, and the bars hold their shape cleanly when cut cold and then brought to room temperature. Day 1 is good. Day 2 is the bar at its peak.
The one honest limitation: these do not travel well in warm weather. Above 75°F (24°C), the chocolate chips soften and the bars become greasy on the surface and harder to handle without breaking. Make them where you are serving them, or transport them in a cooler if the weather is warm.
Frequently Asked Questions About Oatmeal Bars
Can I make oatmeal chocolate chip bars ahead of time?
Yes — and they are actually better made a day ahead. Bake the bars fully, cool for the complete 2 hours, then store uncut in the pan covered loosely with plastic wrap at room temperature overnight. Cut them the next day after a 30-minute refrigerator chill for the cleanest edges. The brown sugar redistributes moisture through the crumb overnight, and the chew and flavor are noticeably deeper on Day 2 than Day 1. If you need to make them further ahead, freeze individually wrapped bars for up to 2 months and thaw at room temperature for 45 minutes before serving.
What is the difference between old-fashioned oats and quick oats?
Old-fashioned rolled oats are steamed and rolled flat — they hold their shape during baking and gelatinize at the correct rate for this recipe’s bake time. Quick oats are pre-cut and partially pre-cooked — they absorb liquid too fast and dissolve into the batter. The visible oat texture in the photos requires old-fashioned oats. There is no adjustment that makes quick oats produce the same result.
Can I substitute the butter in oatmeal chocolate chip bars?
Partially. Coconut oil (melted and cooled) works as a 1:1 substitution by weight — the bars will have a slightly thinner crumb and a faint coconut flavor, but the structure holds. Vegetable oil works at ¾ the quantity of butter (170g oil in place of 227g butter) — the bars will be slightly more tender and less flavorful. Do not substitute applesauce or mashed banana as a fat replacement — neither provides enough fat to bind the oat structure, and the bars will bake up gummy and collapse when cut. Brown butter is an excellent upgrade — melt the butter, cook it until golden and nutty-smelling, cool it fully to room temperature, and use it as a 1:1 replacement. Check out the chocolate chip cookie bars article for more on how fat type affects bar texture across different recipes.
How do I know when oatmeal chocolate chip bars are done baking?
Pull the pan when the edges are set and deep golden-brown, the surface looks matte and dry, and the center has the faintest soft give when you nudge the pan. Do not wait for the center to look firm — by that point the edges are overbaked. An instant-read thermometer should read 190–195°F (88–90°C) at the center.
Can I double or halve this recipe?
To double: multiply all ingredients by 2 except the baking soda — use 1½ teaspoons instead of 2 full teaspoons, or the bars will have a faint soapy aftertaste. Bake in two separate 9×13 inch (23x33cm) pans on separate oven racks, rotating halfway through. Bake time remains the same — do not combine into one larger pan, as the increased thickness changes the bake time and produces an underbaked center. To halve: use an 8×8 inch (20x20cm) pan and reduce the bake time to 18–22 minutes, checking at 18 minutes. All other ingredients halve linearly. Leavening does not scale linearly — this is the single most important scaling rule in baking.
How do oatmeal chocolate chip bars turn out at high altitude or in humid climates?
At high altitude (above 3,500 feet / 1,067 meters), leavening gases expand faster and liquid evaporates more quickly — the bars can set too fast on the outside before the interior is cooked through. Reduce the baking soda by ¼ teaspoon, increase the flour by 2 tablespoons (16g), and raise the oven temperature to 365°F (185°C). Start checking at 18 minutes. In high humidity (above 70% relative humidity), the oats absorb ambient moisture before and during baking — the surface may feel slightly tacky even when fully baked, which is surface moisture from the air, not underbaking. Extend the cooling time to 2.5 hours and refrigerate the slab for 45 minutes before cutting.
Why did my oatmeal chocolate chip bars come out cakey instead of chewy?
The most likely cause is creamed butter used instead of melted butter, or overmixing after the flour went in. Creamed butter traps air during beating — that air expands in the oven and produces a lighter, more open, cakey crumb rather than the dense, cohesive chew this recipe is designed for. Overmixing develops gluten in the flour and produces a tougher, more structured crumb that also reads as cakey. The fix for your next batch is straightforward: melt the butter fully, cool it to room temperature, and fold the dry ingredients in with a spatula using no more than 20 strokes after the flour goes in. Stop the moment no dry streaks remain.
More Cookie Bars You’ll Love
- Peanut Butter Chocolate Chip Bars — thick, fudgy bars with commercial peanut butter as the fat base and semi-sweet chips throughout — no dairy butter, one bowl, ready in under an hour
- Nestle Toll House Cookie Bars — the classic pressed-dough bar with the original Toll House chip ratio, golden edges, and a soft center that sets perfectly on cooling
- Pumpkin Chocolate Chip Cookie Bars — pumpkin purée replaces part of the fat for a tender, spiced bar with a moist, dense crumb and semi-sweet chips in every bite
Oatmeal Chocolate Chip Bars
Ingredients
Equipment
Method
- Step 1 — Prepare the oven and pan: Set the oven rack to the middle position and preheat to 350°F (175°C). Line a 9×13 inch (23x33cm) light-colored aluminum baking pan with parchment paper, leaving a 2-inch overhang on both long sides, and anchor the parchment with a small amount of butter or non-stick spray underneath.
- Step 2 — Combine butter and sugar: Pour the melted and cooled butter (227g) into a large mixing bowl, add the packed brown sugar (300g), and stir with a silicone spatula for about 1 minute until fully combined, smooth, and glossy with no dry sugar pockets remaining.
- Step 3 — Add eggs and vanilla: Add the room-temperature eggs one at a time, stirring fully after each addition, then add the pure vanilla extract (2 teaspoons) with the second egg and stir for 30 seconds until the batter is smooth, slightly lighter in color, and uniform with no visible egg streaks.
- Step 4 — Fold in dry ingredients: Add the all-purpose flour (240g), old-fashioned rolled oats (180g), baking soda (1 teaspoon), and fine sea salt (½ teaspoon) to the bowl and fold with a silicone spatula using slow, wide strokes for 15–20 folds until no dry flour streaks remain and the oats are evenly distributed — stop the moment the flour disappears and do not mix further.
- Step 5 — Add chips and fill pan: Fold in 1¾ cups (298g) of the semi-sweet chocolate chips with 8–10 strokes, transfer the batter to the prepared pan, spread into an even layer pressing into the corners, then scatter the reserved ¼ cup (43g) of chips across the surface and press lightly with the flat of your palm to anchor them.
- Step 6 — Bake: Bake on the middle rack at 350°F (175°C) for 22–26 minutes, starting the visual check at 22 minutes — pull the pan when the edges are set and deep golden-brown, the surface looks matte and dry across the full pan, and the center has the faintest soft give when nudged.
- Step 7 — Cool and cut: Set the pan on a wire cooling rack and leave undisturbed for a minimum of 2 hours, then use the parchment overhang to lift the slab onto a cutting board, refrigerate for 30 minutes, and cut into 16 bars (4 columns by 4 rows) with a sharp knife wiped clean between each cut.