
Sourdough Chocolate Chip Cookies
There is a moment when these cookies come out of the oven where every instinct says they are not done. The centers look raw. The edges look barely set. The whole pan looks like a mistake. I have made this recipe across fourteen batches and I pulled them too late for the first six of those. I pulled them anyway after that — because by batch seven, I had learned that the pan does the rest of the work. The cookies in these photos were pulled at exactly that moment. That is the result.
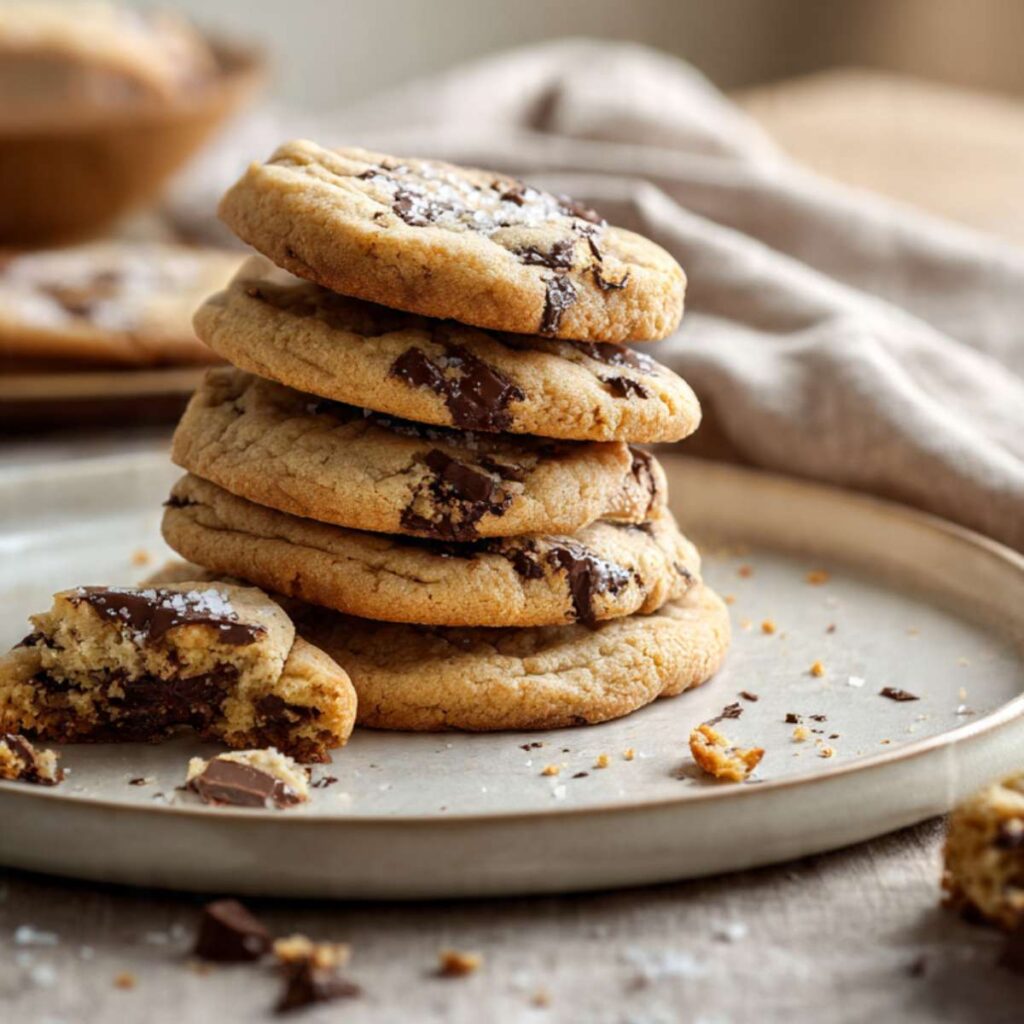
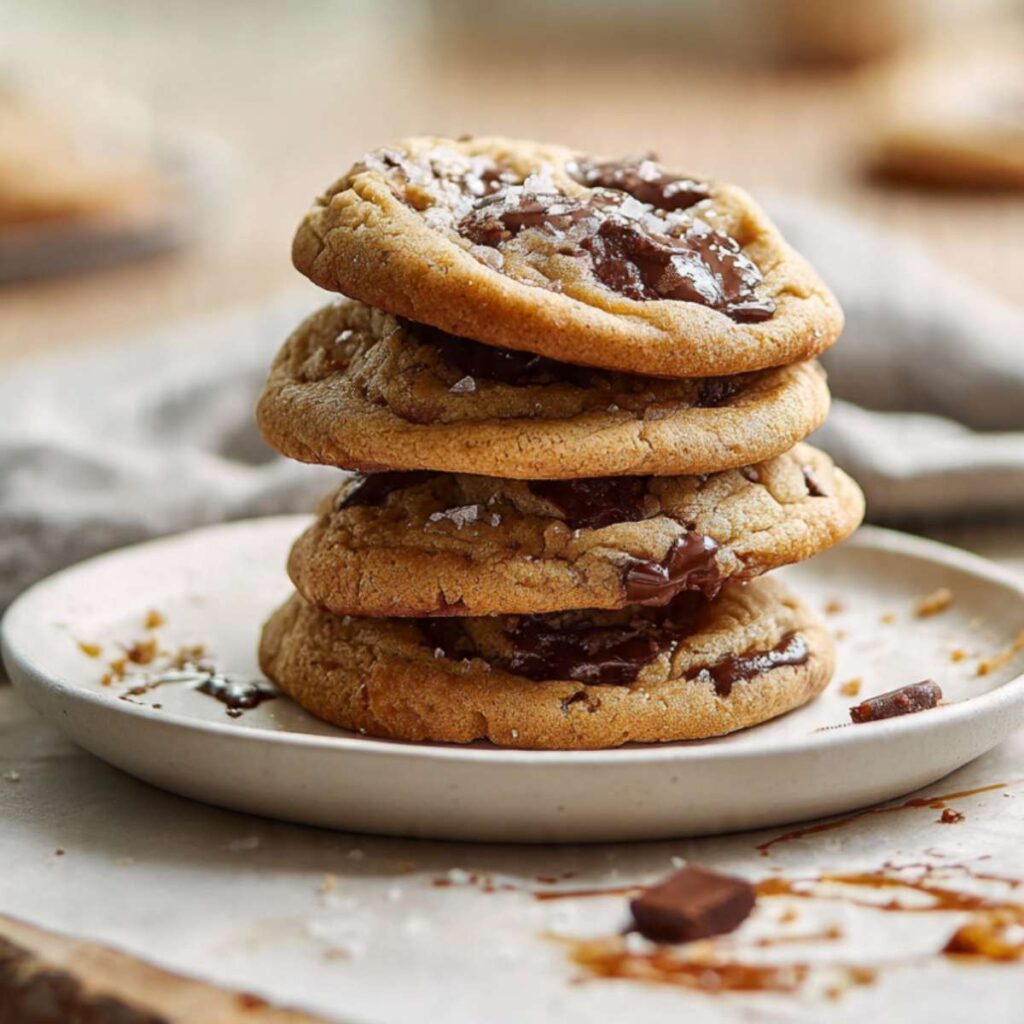
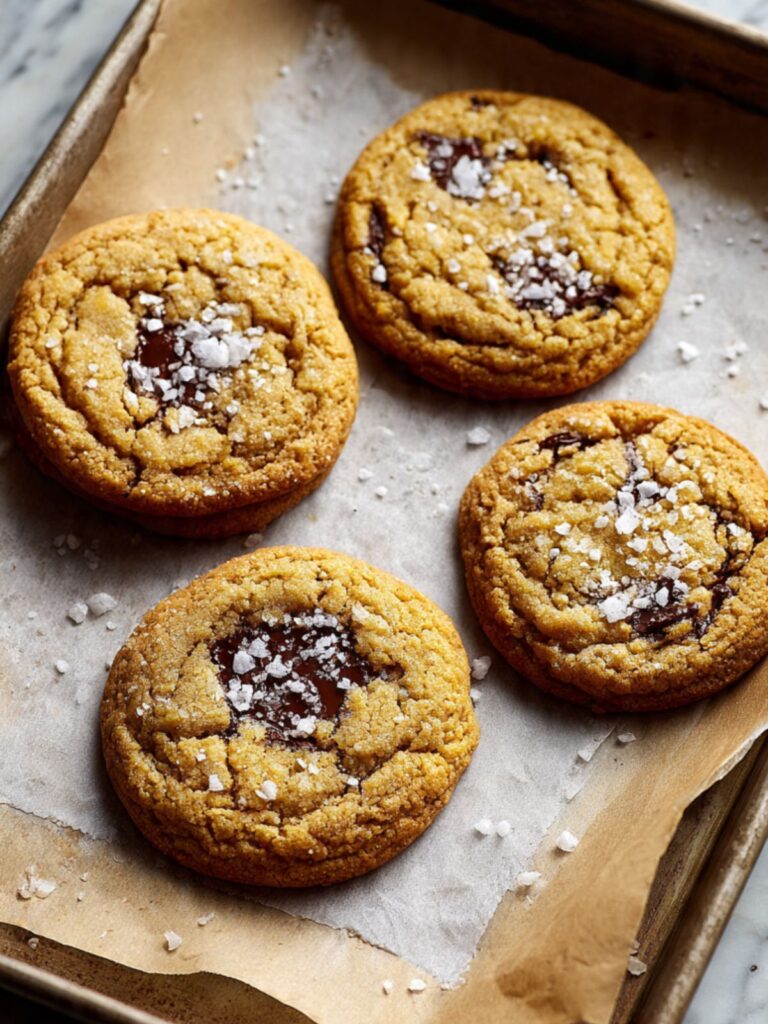
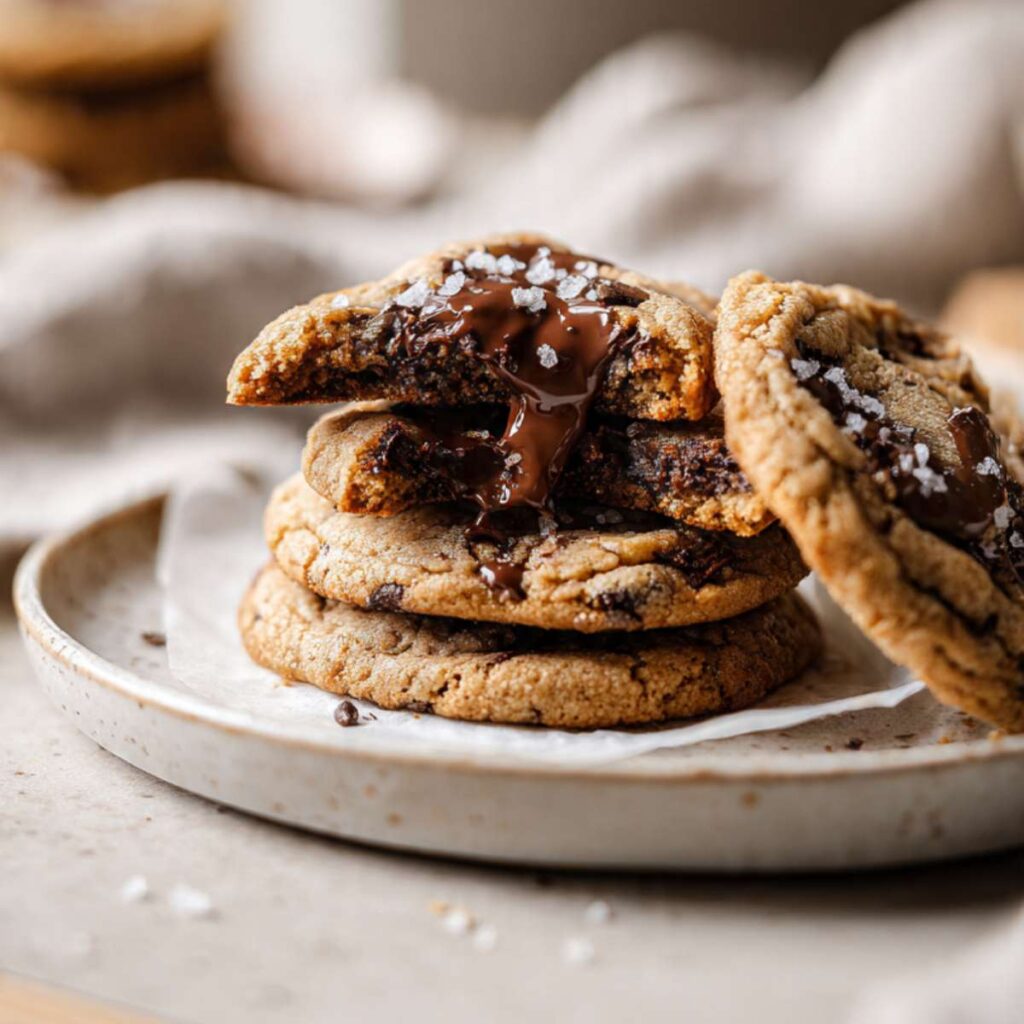
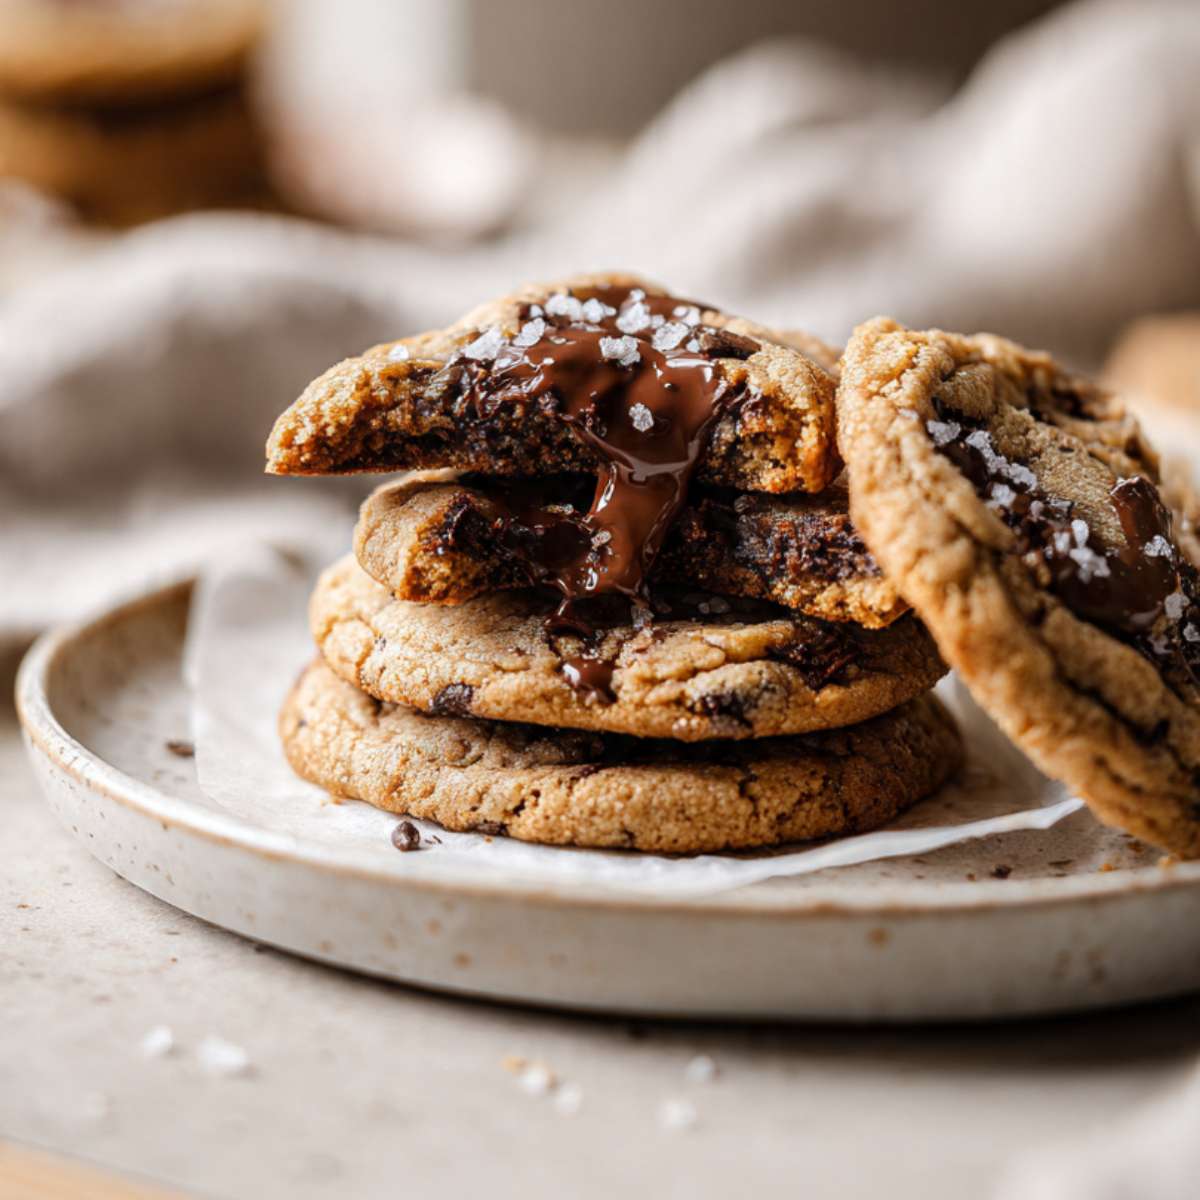
The finished cookies have a crisp, golden-amber edge that gives way immediately to a dense, fudgy center — the kind of center that holds together when you break it but does not bounce back like a cake. The dark chocolate chunks half-melt into the dough during baking and create distinct glossy pockets of chocolate throughout, exactly as visible in the stacked cookie photo above. The flaked sea salt on top is not decorative — every bite that hits a flake tastes different from every bite that does not.
Sourdough discard is not a gimmick in this recipe. It is doing something specific: the mild acidity in the discard reacts with the baking soda to create a slight lift, and the fermented flour adds a background complexity that plain cookie dough does not have. It is not a sour flavor. You will not bite into these and think sourdough bread. What you will notice is that the flavor is deeper than a standard chocolate chip cookie — more developed, with a faint tang that cuts through the sweetness without announcing itself.
The texture visible in the stacked cookie photos is what I was after from the beginning: crisp at the edge, dense and fudgy through the center, with pockets of dark chocolate that have half-melted into the dough. That result requires three things working together — brown butter, the right chocolate, and pulling the pan at the correct moment. Get all three right and the cookie is exactly what you see in the photos.
I tested this with sourdough starter at different hydration levels. A 100% hydration discard (equal parts flour and water by weight) produced the most consistent dough — not too wet, not too stiff. A thicker discard made the dough dry and the cookies spread less than I wanted. A thinner discard made the dough slack and the cookies spread too flat. 100% hydration is the version I kept and the one this recipe is written for.
I tested the chilling time from 30 minutes up to 48 hours. The 30-minute chill was the minimum that made a noticeable difference — the cookies held their shape better and the centers stayed thicker. The 48-hour chill produced the most developed flavor but the texture difference over 24 hours was marginal. I recommend a minimum 1-hour chill. Overnight is better. The dough needs to rest — do not skip it.
I tested dark chocolate chunks against semi-sweet chips. The chunks won by a significant margin. Chips are formulated to hold their shape during baking — they resist melting. Chunks melt into the dough and create the glossy, pooled chocolate pockets visible in the photos. Use a good-quality dark chocolate bar (60–70% cacao) and chop it yourself. Pre-bagged chunk pieces are a reasonable substitute. Pre-bagged chips are not.
No stand mixer required. One bowl. The dough comes together with a silicone spatula and a few minutes of active mixing. The most time-consuming part is browning the butter and waiting for it to cool — both of which are non-negotiable.
One important note before you start: this dough must be chilled for a minimum of 1 hour before baking, and overnight is better. That is not optional — unchilled dough spreads flat. Plan your timing accordingly before you begin mixing.
🗒 Luna’s Note: I have made this recipe with both fresh sourdough discard and discard that had been sitting in the fridge for up to two weeks. The older discard produced a slightly more pronounced tang and a cookie that spread a fraction less. Both worked. I now use whatever discard I have — this recipe is genuinely forgiving on that variable.
| Prep Time | Cook Time | Total Time | Yield | Difficulty |
|---|---|---|---|---|
| 25 min (+ 1 hr chill minimum) | 11 min | 1 hr 36 min | 14 cookies | Intermediate |
| Calories | Fat | Carbs | Sugar | Protein | Sodium |
|---|---|---|---|---|---|
| ~375 kcal | ~20g | ~46g | ~28g | ~4g | ~185mg |
Macros are approximate and will vary based on ingredient brands and serving size.
Ingredients & Tools for Sourdough Chocolate Chip Cookies Recipe
For the Brown Butter
- 1 cup (227g) unsalted butter — not salted, not margarine, not vegan butter substitute. Salted butter throws off the salt balance in the finished cookie. Margarine and vegan substitutes have different water content and will not brown the same way. Unsalted only.
For the Cookie Dough
- ¾ cup (165g) packed dark brown sugar — packed firmly, not spooned loosely. Dark brown sugar has a higher molasses content than light brown sugar and is what drives the deep amber color and caramel undertone visible in the finished cookies. Light brown sugar will work but the flavor will be noticeably flatter.
- ½ cup (100g) plain white granulated cane sugar — not coconut sugar, not raw sugar, not sugar substitutes. The granulated sugar is responsible for the slight crackle at the edges. Swapping it with an unrefined sugar changes the spread and eliminates the crackle.
- 2 large eggs + 1 egg yolk, room temperature — not cold straight from the fridge. The extra yolk adds fat and richness without adding extra moisture, which is what keeps the centers dense and fudgy rather than cakey. Cold eggs shock warm brown butter and cause the mixture to seize. Pull eggs from the fridge 30 minutes before you start.
- ½ cup (120g) sourdough discard, room temperature — 100% hydration (equal parts flour and water by weight), unfed. Do not use active bubbly starter — it will over-leaven the dough and produce a puffy, cakey cookie instead of the dense, fudgy result shown in the photos. Discard that has been refrigerated up to 2 weeks works. The discard should be pourable but not watery.
- 2 teaspoons (10ml) pure vanilla extract — not imitation vanilla flavoring. Imitation vanilla is made from synthetic vanillin and lacks the depth of pure extract. In a recipe with this many competing flavors it makes less difference than in a simple vanilla cookie — but pure extract is still what I use and recommend.
- 2 cups (240g) all-purpose flour, spooned and leveled — not bread flour, not cake flour, not self-rising flour. I use King Arthur all-purpose flour. It has a consistent protein content (11.7%) that produces reliable results batch to batch. Bread flour will make these tough. Cake flour will make them too delicate and they will fall apart when handled warm.
- 1 teaspoon (6g) fine sea salt — not table salt, not kosher salt measured by volume. Table salt is more concentrated by volume than fine sea salt. If substituting kosher salt, use 1¼ teaspoons (same weight, different grind). Fine sea salt distributes evenly through the dough.
- ¾ teaspoon (4g) baking soda — checked for freshness before using. To test: drop ½ teaspoon into 2 tablespoons of hot water with a splash of white vinegar. It should bubble vigorously within 5 seconds. Flat or slow bubbling means the baking soda is spent and needs replacing.
- 1½ cups (255g) dark chocolate, roughly chopped into uneven chunks — 60–70% cacao, good quality bar chocolate. Do not use chocolate chips. Chips are formulated with stabilizers that prevent them from fully melting — they hold their shape in the oven. Bar chocolate melts into the dough and creates the glossy, pooled chocolate pockets visible in the photos. I use Guittard or Valrhona 70% bars. Chop them yourself into irregular pieces ranging from small shards to ½-inch (1.2cm) chunks — the size variation is intentional and produces different textures in each bite.
For the Finish
- 1 teaspoon (3g) flaked sea salt — Maldon or Fleur de Sel. Do not substitute fine salt here. Flaked salt sits on the surface and delivers distinct bursts of salinity with each bite. Fine salt dissolves into the dough surface and disappears. The visible flakes in the photos are part of the finished result — this is not optional.
Before You Start
Temperature prep: Pull your 2 large eggs + 1 egg yolk and sourdough discard from the refrigerator at least 30 minutes before you start mixing. Eggs are ready when they no longer feel cold to the touch. Discard is ready when it feels room temperature and has relaxed slightly from its refrigerator consistency. Cold eggs added to warm brown butter will cause the fat to seize and the mixture will look broken and greasy. Cold discard added to warm dough stiffens the mixture unevenly and makes it harder to fold in the flour cleanly.
Brown butter cooling time: The brown butter must cool to room temperature — approximately 68–72°F (20–22°C) — before the sugars and eggs go in. This takes 25–30 minutes at room temperature or 15 minutes if you set the bowl over an ice bath and stir occasionally. If the butter is still warm when the eggs go in, it will begin to cook them and the dough will look curdled. Touch the bottom of the bowl — it should feel neutral, not warm, before you proceed.
Flour measuring method: Spoon the flour into your measuring cup using a separate spoon and level it off with a straight edge. Do not scoop the cup directly into the flour bag — scooping packs in 20–30% more flour than the recipe needs and will make the cookies dry and dense. For guaranteed accuracy, weigh the flour at 240g on a kitchen scale. Gram weight always takes priority over volume in this recipe.
Gram weight priority: For the most consistent results, use a kitchen scale set to grams. The gram weights in this recipe are the numbers I tested with — they are the most reliable way to match the result shown in the photos.
Mixing method: This entire recipe comes together with a large mixing bowl and a silicone spatula — no electric mixer needed. The brown butter replaces creamed butter entirely, which means there is no aeration step and no mixer required. Mixing by hand is correct for this recipe. Using an electric mixer will overdevelop the gluten and produce a tough cookie.
Chilling — do not skip: This dough must be chilled for a minimum of 1 hour before baking. Overnight (8–12 hours) produces the best flavor. Unchilled dough spreads significantly more in the oven and produces thin, greasy cookies instead of the thick, domed result shown in the photos. The chill also allows the sourdough discard to hydrate the flour fully, which improves both texture and flavor.
Oven position: Position your oven rack in the middle of the oven before preheating. Top rack burns the tops before the centers set. Bottom rack burns the bottoms before the edges crisp properly.
Baking soda freshness check: Drop ½ teaspoon of your baking soda into 2 tablespoons of hot water with a splash of white vinegar. It should bubble vigorously within 5 seconds. If it does not — replace it before baking. Spent baking soda produces flat, dense cookies with no crackle.
Chocolate prep: Chop your chocolate bar before you start mixing the dough. You want a mix of sizes — some fine shards, some pieces around ¼ inch (0.6cm), and some larger chunks up to ½ inch (1.2cm). The size variation is intentional. Uniform chunks produce a uniform result. The irregular pieces melt at different rates and create the varied chocolate pockets visible in the photos.
Pan prep: Line your light-colored aluminum baking sheets with parchment paper. Do not grease the pan. Do not use foil. Parchment creates a barrier between the cookie base and the pan that prevents overbrowning on the bottom. Foil conducts heat differently and will overbrown the bottoms before the centers set. Dark non-stick pans absorb more heat — if that is all you have, reduce the oven temperature by 25°F (15°C) and start checking at 9 minutes.
High altitude and humidity note: At altitudes above 3,500 feet (1,067m), reduce the baking soda to ½ teaspoon and increase the flour by 2 tablespoons (15g). In high-humidity climates, the sourdough discard may make the dough slightly stickier than expected — add 1 extra tablespoon (8g) of flour if the dough feels unworkably slack after chilling.
Necessary Tools
Required — in order of use:
- Light-colored saucepan (for browning the butter — a light-colored interior is essential so you can see the color change in the milk solids; dark pans hide the browning and cause burning)
- Large heatproof mixing bowl (for combining brown butter and sugars — must be heatproof since the brown butter goes in warm)
- Medium mixing bowl (for whisking together the dry ingredients — flour, baking soda, and fine sea salt — before adding to the wet mixture)
- Silicone spatula (for mixing the dough and folding in chocolate — do not substitute a wooden spoon, which does not scrape the bowl sides cleanly)
- Kitchen scale (strongly recommended — gram weights are more accurate than volume for every ingredient in this recipe)
- Measuring spoons (for baking soda, salt, vanilla, flaked sea salt)
- Chef’s knife and cutting board (for chopping the chocolate bar into irregular chunks)
- Plastic wrap or beeswax wrap (for covering the dough during chilling)
- 2 light-colored aluminum baking sheets (half-sheet size, 18×13 inch / 46×33cm — light-colored aluminum only; dark pans overbrown the bottoms)
- Parchment paper (cut to fit your baking sheets — not wax paper, not foil)
- Cookie scoop or large spoon (2-tablespoon / 45g capacity for consistent portioning)
- Wire cooling rack (cookies must transfer off the hot pan after exactly 5 minutes)
Optional but recommended:
- Oven thermometer (most home ovens run 15–25°F / 8–14°C off from the dial setting — an oven thermometer confirms actual temperature before the pan goes in)
- Instant-read thermometer (for confirming brown butter has cooled below 90°F / 32°C before eggs are added)
- Ice bath setup — large bowl + ice + water (for cooling the brown butter faster if you are short on time)
- Bench scraper (useful for portioning the dough cleanly and transferring cookies to the rack)
How to Make Sourdough Chocolate Chip Cookies
This recipe uses a melt-and-mix method — the brown butter replaces creamed butter entirely, which means no electric mixer is needed at any stage. Every step from browning the butter through folding in the chocolate is done by hand with a silicone spatula. Do not reach for a mixer. Mechanical mixing at any point in this recipe overdevelops the gluten and pushes the texture from fudgy toward tough.
Step 1: Browning the Butter Until the Milk Solids Turn Deep Amber and Smell Nutty
In your light-colored saucepan over medium heat, add your 1 cup (227g) unsalted butter, cut into roughly equal pieces. Cut butter melts more evenly than a single block — do not add it whole. The light-colored pan interior is not optional here: it is the only way to see the color change in the milk solids at the bottom of the pan before they go from golden to burnt. A dark or non-stick pan hides that color until it is too late.
Stir constantly with your silicone spatula once the butter has melted, scraping the bottom of the pan in slow, wide strokes. The butter will foam, then the foam will subside, then it will foam again — this second foam is the signal that the water is evaporating and the milk solids are beginning to brown. Keep stirring. The entire process takes 5–7 minutes from the moment the butter is fully melted — do not walk away.
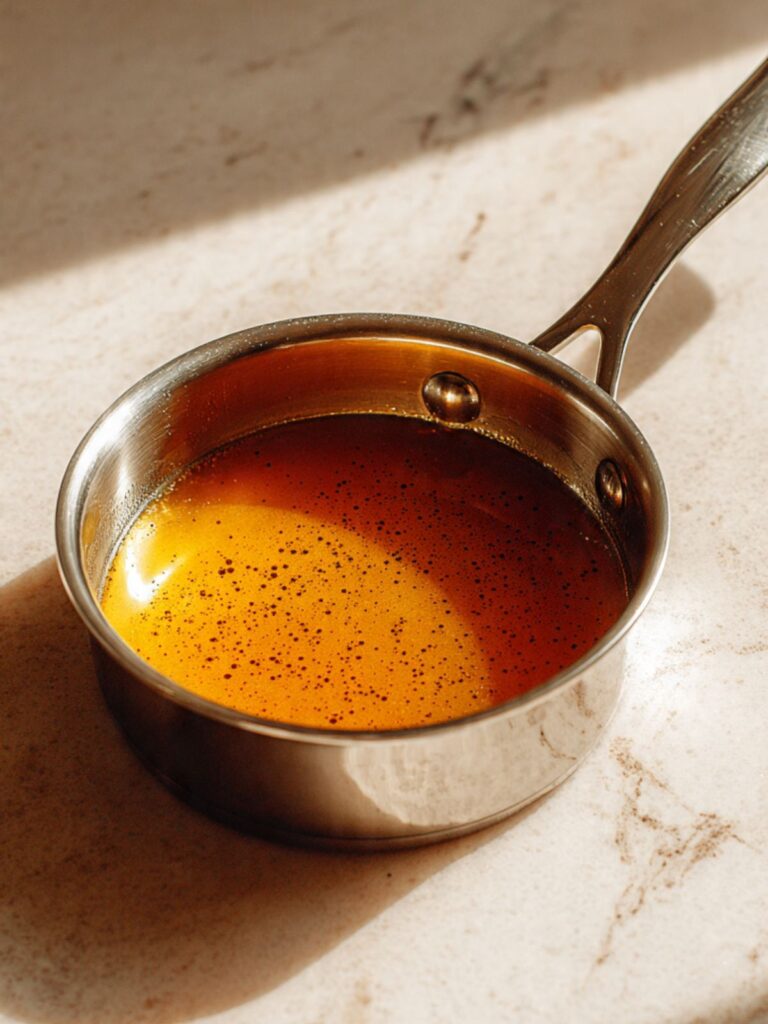
Watch the bottom of the pan, not the surface. The milk solids — small particles that collect at the base — will turn from white to pale gold to a deep amber-brown. The moment they reach deep amber and the butter smells intensely nutty, like toasted hazelnuts, pour the entire contents immediately into your large heatproof mixing bowl. Do not leave it in the pan — residual heat will continue cooking the solids and they will burn in the 30 seconds it takes to carry the pan to the sink.
Scrape every last drop from the pan with your spatula. The brown bits at the bottom of the bowl are not burnt sediment — they are the most flavorful part of the brown butter and they belong in the dough.
Now set the bowl aside and allow the brown butter to cool to room temperature — approximately 68–72°F (20–22°C). This takes 25–30 minutes at room temperature. If you are short on time, set the bowl over an ice bath and stir occasionally — 15 minutes. Do not proceed to Step 2 until the butter has cooled. Touch the bottom of the bowl — it must feel neutral, not warm, before anything else goes in.
The butter should be a deep amber liquid with small dark flecks settled at the bottom of the bowl — it will smell intensely nutty and slightly caramelized. If it smells sharp or acrid, it has burnt. Start over.
🗒 Luna’s Note: I use a small stainless steel saucepan with a light silver interior specifically for browning butter. I bought it for this purpose and it lives next to my stove. Trying to brown butter in a dark-coated pan is how I ruined my first three batches of this recipe.
Do not skip the cooling step — your cooled brown butter is ready for the sugars now.
Step 2: Combining the Brown Butter and Both Sugars Until Fully Incorporated
Once your brown butter has cooled to room temperature, add your ¾ cup (165g) packed dark brown sugar and ½ cup (100g) plain white granulated cane sugar directly into the bowl with the brown butter.
Dark brown sugar is doing two things here simultaneously: the molasses content keeps moisture locked into the finished cookie — which is what produces the dense, fudgy center visible in the broken cookie photo — and the slight acidity in the molasses works alongside the baking soda later to create a small amount of lift. Granulated sugar drives the crackle at the edges and controls how much the cookie spreads. The ratio of brown to white sugar is deliberate — do not adjust it.

Using your silicone spatula, stir from the bottom of the bowl upward in firm, wide circular strokes — approximately 30 to 40 strokes — until no dry sugar remains and the mixture looks uniform, dark, and slightly grainy. It will not look smooth at this stage. That is correct. The sugar will not fully dissolve until the eggs go in.
Do not rush this step and do not use an electric mixer. Vigorous mechanical mixing at this stage can incorporate too much air into the fat-sugar base and produce a cookie that bakes up cakey rather than dense. Hand mixing with a spatula gives you control over exactly how much is incorporated.
The mixture should look like wet, dark sand — uniform in color, no dry sugar pockets, and slightly glossy from the brown butter. If you can still see dry sugar streaks, keep stirring.
The sugar and brown butter are combined — add the eggs next.
Step 3: Adding the Eggs and Vanilla to Build the Emulsion
Before the eggs go in, confirm your brown butter mixture is genuinely at room temperature. Run your hand along the outside of the bowl — it should feel neutral. If it feels even slightly warm, wait another 5 minutes.
Do not rush the cooling step. If the butter is still warm when the eggs go in, the egg proteins will begin to cook on contact — the mixture will look greasy and broken, with small pale cooked egg pieces visible throughout, and the emulsion will not come together no matter how long you stir. There is no fix. Cool the butter fully, confirm it is neutral to the touch, then proceed.
Add your 2 large eggs + 1 egg yolk, room temperature one at a time. Add the first whole egg and stir vigorously with your silicone spatula for a full 60 seconds before adding the second. Each egg must be fully emulsified into the fat before the next one goes in. The extra yolk goes in last — it adds richness and fat without the extra white, which would add moisture and push the texture toward cakey.
Add your 2 teaspoons (10ml) pure vanilla extract after the last egg and stir for another 30 seconds.
After all three eggs and the vanilla are in, stir the mixture vigorously for a full 2 minutes — set a timer. This extended mixing is the one moment in this recipe where more effort produces a better result. The prolonged stirring builds the emulsion between the egg proteins and the butter fat, which is what gives the finished cookie its cohesive, fudgy structure rather than a greasy, broken crumb.
The mixture should look glossy, smooth, and slightly thickened — almost like a loose chocolate pudding without the chocolate. It should coat the spatula in a thin, even layer when you lift it. If it looks greasy or broken — the butter was still warm. The dough is salvageable: set the bowl over an ice bath for 5 minutes and stir again.
As you can see in the close-up photo of the broken cookie showing the dense, fudgy interior, that crumb structure begins here — the emulsion built in this step is what holds it together through baking.
Your emulsion is set — the sourdough discard and dry ingredients go in next.
Step 4: Adding the Sourdough Discard Without Disrupting the Emulsion
Add your ½ cup (120g) sourdough discard, room temperature to the bowl. Pour it in all at once — no need to add it gradually at this stage.
The sourdough discard is doing more than adding flavor here. The natural acidity in the fermented flour will activate the baking soda when it goes in, creating the carbon dioxide bubbles that give these cookies their slight lift and crackle. The fermented flour also has partially broken-down gluten strands, which means it hydrates the dough differently than fresh flour — it integrates faster and produces a more tender crumb.
Stir gently but thoroughly with your silicone spatula — 20 to 25 strokes — until the discard is fully incorporated and no streaks remain. Do not overmix at this stage. The emulsion you built in Step 3 is intact — aggressive mixing now can break it.
The mixture should look uniform and slightly thicker than before — a deep amber liquid with a faint sour smell underneath the vanilla. No white streaks of discard should be visible. If you can still see streaks, give it 5 more strokes and check again.
Discard is in — dry ingredients go in next.
Step 5: Folding in the Dry Ingredients Without Developing Gluten
In a separate medium bowl, whisk together your 2 cups (240g) all-purpose flour, spooned and leveled, ¾ teaspoon (4g) baking soda, and 1 teaspoon (6g) fine sea salt until evenly combined. Whisking the dry ingredients together before adding them ensures the baking soda and salt are evenly distributed through the flour — if you add them separately to the wet mixture, you risk pockets of concentrated baking soda, which creates uneven rise and a soapy aftertaste in the finished cookie.
Pour the entire dry mixture on top of the wet ingredients in the large bowl. Do not stir yet.
Using your silicone spatula, fold from the bottom of the bowl upward in slow, deliberate strokes — bringing the wet batter from the bottom up and over the dry flour on top. Count your strokes. Stop at 15 to 18 folds from the moment the flour touches the wet mixture. The dough will look shaggy and uneven with visible dry flour pockets at stroke 10. Keep folding — it comes together by stroke 15.
Do not stir in circles. Do not use an electric mixer. Do not keep mixing past the point where the flour disappears. Every stroke past that point develops gluten — and developed gluten turns a fudgy cookie into a tough, bready one. A few small flour streaks are acceptable at this stage. The chocolate chunks will incorporate the last of them.
The dough should look thick, cohesive, and slightly sticky — it will pull away from the sides of the bowl in one mass when you fold. It should not look smooth like a cake batter. Some texture and slight unevenness is correct. If it looks completely smooth, it has been overmixed.
Do not overmix — fold in the chocolate chunks now while the dough is at this stage.
Step 6: Folding in the Chocolate Chunks for Maximum Chocolate Coverage
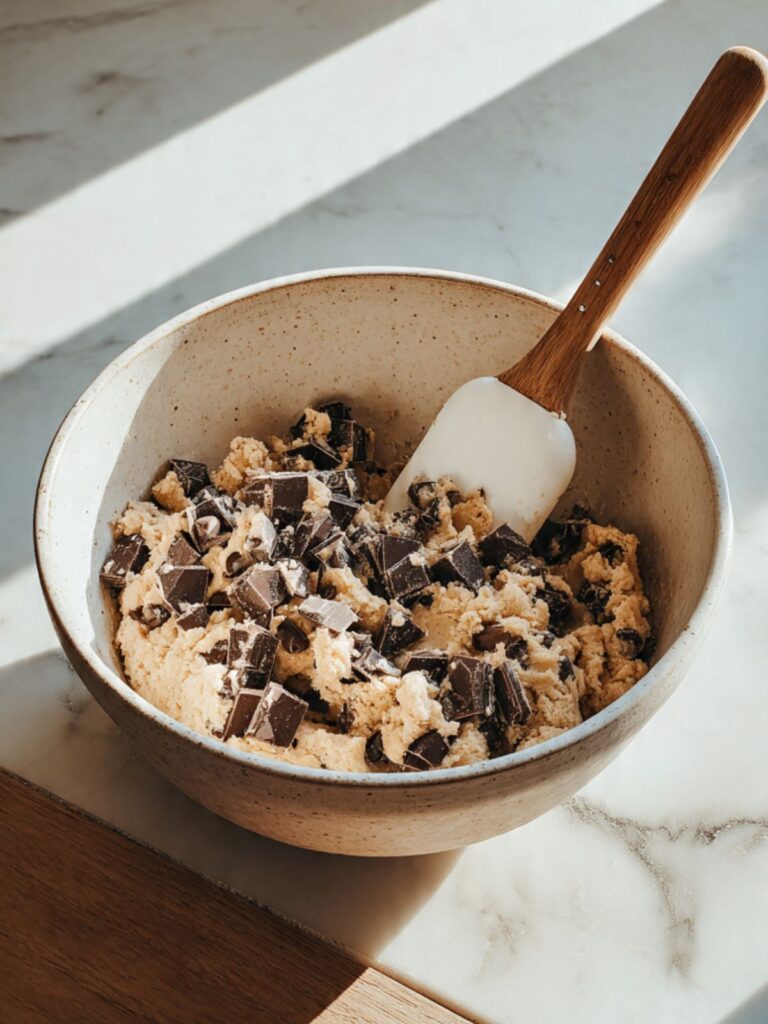
Add your 1½ cups (255g) roughly chopped dark chocolate chunks to the dough all at once.
Using your silicone spatula, fold the chocolate into the dough with the same slow, bottom-up strokes used for the flour — approximately 10 to 12 folds until the chunks are evenly distributed throughout. The irregular sizes matter here: the fine shards melt completely into the dough during baking and darken the crumb around them, while the larger chunks hold their form long enough to create the distinct glossy chocolate pockets visible in the stacked cookie photos. If all your pieces are the same size, you lose that layered chocolate effect.
Reserve a small handful of the larger chunks — approximately 2 tablespoons’ worth — to press onto the tops of the portioned dough balls immediately before the pan goes into the oven. This guarantees visible chocolate on the surface of every finished cookie, exactly as shown in the photos. Chunks folded entirely inside the dough get buried as the cookie spreads.
🗒 Luna’s Note: I always press extra chunks on top of the dough balls before baking. It takes 30 seconds and it is the single most effective thing you can do to make the finished cookies look intentional rather than accidental.
The dough should look thick and heavily studded with chocolate — chunks visible throughout, dough holding together without being sticky enough to coat your hands completely. This is the finished dough.
Cover the bowl tightly with plastic wrap pressed directly onto the surface of the dough and refrigerate for a minimum of 1 hour. Overnight (8–12 hours) produces the deepest flavor. The dough can be refrigerated for up to 48 hours.
Do not skip the chill — unchilled dough spreads flat and produces a greasy, thin cookie instead of the thick, domed result shown in the photos. The chill also continues the flavor development as the sourdough discard slowly ferments the flour — every hour in the fridge adds complexity.
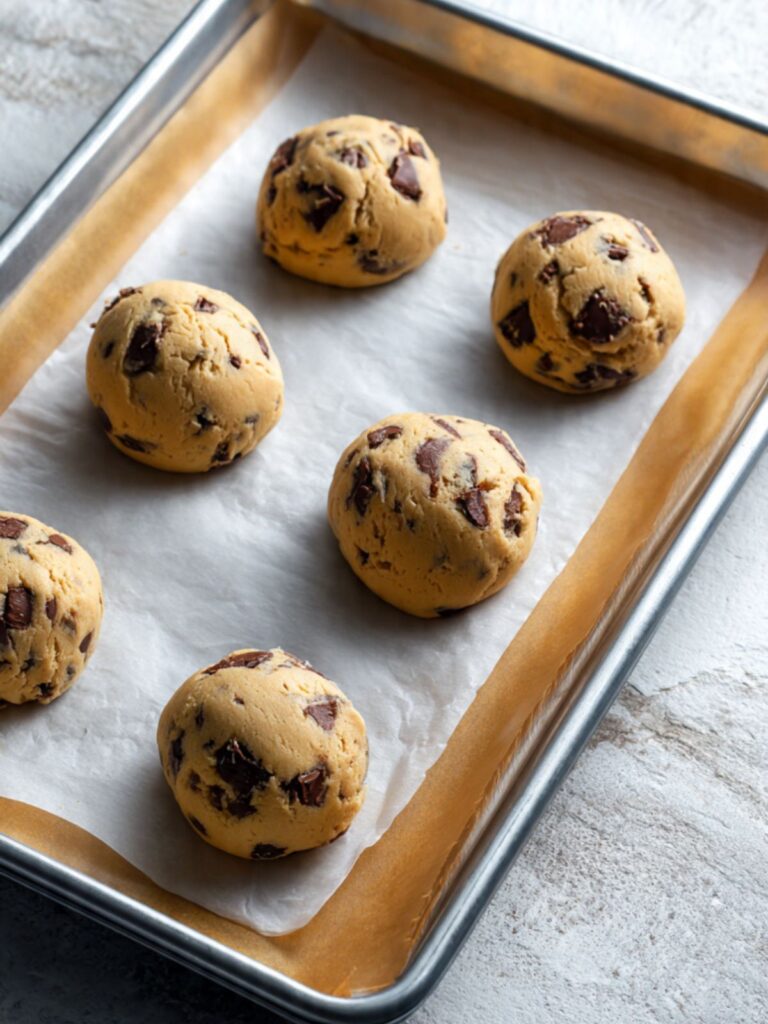
Step 7: Portioning the Chilled Dough for Consistent Baking
Remove the dough from the refrigerator. Preheat your oven to 375°F (190°C) and allow it to fully preheat for at least 15 minutes before the first pan goes in. Most home ovens run 15–25°F (8–14°C) off from the dial setting — if you have an oven thermometer, confirm the actual temperature now. A cold oven produces flat, greasy cookies. The oven must be fully up to temperature before the dough goes in.
Line your light-colored aluminum baking sheets with parchment paper. Do not grease them. Two sheet pans ready before you start portioning means you can load the second pan while the first is baking without the dough sitting at room temperature and warming up.
Using your 2-tablespoon cookie scoop or large spoon, portion the dough into balls of approximately 45g each. Weigh the first dough ball on your kitchen scale and use it as your reference for the rest. This recipe yields exactly 14 cookies at this scoop size — if your yield is significantly higher or lower, your scoop size is off. Place the dough balls at least 2 inches (5cm) apart on the parchment-lined baking sheet — these cookies spread moderately and need room.
Chilled dough is stiff and the scoop will require some pressure. Do not warm the dough in your hands to soften it — this begins to melt the chocolate chunks and warms the fat, which affects the spread. Work quickly.
Immediately press your reserved chocolate chunks onto the top of each dough ball — 2 to 3 larger pieces per cookie, pressed gently but firmly into the surface.
Each dough ball should look like a rough sphere approximately 1½ inches (3.8cm) tall — not flattened, not perfectly smooth. The chocolate chunks pressed on top should sit visibly proud of the dough surface. If your dough balls are flattened or the dough feels greasy and soft, it has warmed too much — return the tray to the fridge for 10 minutes before baking.
Dough is portioned — the pan goes into the oven now.
Step 8: Baking to the Exact Moment the Edges Set and the Centers Still Look Underdone
Place one baking sheet on the middle rack of your fully preheated 375°F (190°C) oven. Bake one pan at a time — two pans in the oven simultaneously creates uneven heat circulation and the cookies on the bottom rack will overbake before the ones on the top are done.
Bake for 10 to 12 minutes. Set a timer for 10 minutes and do not open the oven door before it goes off. The temperature drop from opening the oven early deflates the structure and the centers will not recover.
At 10 minutes, open the oven and look at the cookies without pulling the pan. The edges should look set and lightly golden. The centers should still look underdone, slightly puffy, and almost raw-looking. This is the correct moment to pull them.
Do not wait for the centers to look done. They will never look done at the correct pull time — that is the point. The pan continues to conduct heat into the cookie base for the next 5 minutes after it comes out of the oven. The centers set completely during this time. A cookie that looks done in the oven is a cookie that will be overbaked and dry by the time it cools.
As you can see in the stacked cookie photo showing the crisp set edges and the soft, matte center surface, that finish is achieved only by pulling at exactly this moment — not a minute later.
The moment the pan comes out of the oven, you will immediately drop it flat on the counter twice — this is covered in the next step. Have the counter space clear before the pan goes in.
Pull the pan at the 10 to 12 minute mark the instant the edges look set. Do not wait for the centers.
The edges should look lightly golden and firm. The centers should look pale, puffy, and underdone. The cookies will look wrong. Pull them anyway.
Do not move the cookies — leave them on the hot pan now.
Step 9: Resting on the Pan for Carryover Heat to Finish the Centers
Leave the cookies on the hot baking sheet for exactly 5 minutes after pulling from the oven. Set a timer. Do not move them before 5 minutes — the structural base is still setting and the cookies will break if transferred too early. Do not leave them longer than 8 minutes — the residual pan heat will begin to over-dry the bottoms.
The pan continues to conduct heat into the cookie base during this window. This carryover heat is what sets the centers to the dense, fudgy texture shown in the photos without the oven drying them out. It is the same mechanism that finishes a steak after it comes off the heat. The cookies are not done when they leave the oven — they finish on the pan.
While the first pan rests, load the second pan and place it in the oven.
After exactly 5 minutes, immediately sprinkle 1 teaspoon (3g) flaked sea salt over the tops of the cookies — the residual heat helps the flakes adhere slightly to the surface. Use your fingers to scatter them from a height of about 6 inches (15cm) above the cookies for even distribution. Do not dump the salt from the measuring spoon in one spot.
Using your bench scraper or spatula, transfer the cookies to your wire cooling rack. Allow them to cool on the rack for at least 15 minutes before eating. The centers will still feel very soft when you transfer them — this is correct. They will firm up to the dense, fudgy texture shown in the photos as they cool. Eating them before 15 minutes means the centers have not fully set and they will feel underbaked even if they are not.
The finished cookies should look like the stacked photo — golden-amber edges, slightly crinkled surface, visible melted chocolate chunks, and flaked sea salt on top. The center should feel soft but not liquid when you press gently with a fingertip.
Repeat with the remaining dough balls on the second pan.
The Science Behind Sourdough Chocolate Chip Cookies
Why Your Instinct to Leave Them in Longer Is Wrong Every Single Time
I pulled these cookies too late for the first six batches. Not by much — two minutes, sometimes three. The edges looked right but the centers still looked raw and I could not make myself pull the pan. Every batch that stayed in those extra minutes came out drier than the one before. By batch seven I understood what was actually happening, and I have not overbaked them since.
Here is the mechanism. Cookie dough contains water — from the eggs, the sourdough discard, and the moisture in the brown sugar. As the cookie bakes, that water converts to steam and creates an internal pressure that keeps the center soft and puffed. The egg proteins in the center are still liquid at the 10-minute mark — they have not coagulated yet. This is exactly what makes the center look raw. But the pan is sitting at 375°F (190°C) and it does not cool down the moment it leaves the oven. It stays hot for several minutes, continuing to conduct heat into the cookie base — a process called carryover cooking. During those 5 minutes on the pan, the internal temperature of the cookie center climbs the remaining degrees needed to coagulate the egg proteins and set the structure. The result is the dense, fudgy center visible in the broken cookie photo — fully cooked, not raw, achieved without the oven drying out the exterior.
A cookie pulled two minutes late has already lost that window. The egg proteins in the center coagulated inside the oven, the steam escaped, and the structure dried out before carryover heat had anything useful left to do. The difference between the correct pull and two minutes late is the difference between fudgy and dry. It is a narrow window and it is the most important moment in this recipe.
The visual cue is the only reliable guide — not time alone, not color alone. Edges set and lightly golden. Centers pale, puffy, and underdone-looking. Pull the pan at this exact moment, every time.
How Brown Butter Changes the Chemistry of the Dough
Brown butter is not simply melted butter with more flavor. The process of browning changes the chemistry of the fat in a way that affects the texture of the finished cookie.
When butter is heated past its melting point, the water it contains — approximately 16–18% by weight — evaporates out of the fat. Plain melted butter still retains some of that water. Brown butter has lost most of it. Less water in the fat means less steam during baking, which means less lift, less puff, and a denser, more compact crumb. This is one of the reasons the finished cookie in the photos has that tight, fudgy structure rather than the open, cakey crumb you get from a creamed or standard melted butter base.
The second change is the Maillard reaction happening inside the butter itself — the milk solids browning as the water cooks off. The same reaction that creates the golden color on toasted bread and seared meat is creating hundreds of new flavor compounds in the butter before it ever touches the dough. That deep amber color you see in the finished cookies is partly the brown sugar and partly those browned milk solids working through every layer of the baked cookie.
The practical consequence: brown butter must cool before the eggs go in. The fat is still hot enough to begin cooking the egg proteins even after it has left the pan. A cracked egg hitting butter above 90°F (32°C) will start to scramble at the edges before you can stir it in — the dough will look greasy and broken and there is no recovery from that. Cool the butter fully. Check the temperature. Then proceed.
For a deeper look at how fat temperature affects cookie texture, my brown butter chocolate chip cookies article covers the fat crystallization mechanics in more detail.
What Sourdough Discard Actually Does to Cookie Dough
Most bakers add sourdough discard to cookies expecting a sour flavor. That is not what it delivers — and understanding why explains what it is actually doing.
The discard used in this recipe is unfed — meaning the wild yeast is largely dormant and there is not enough active fermentation happening to produce significant leavening or a pronounced sour taste. What the discard contributes instead is two things: acidity and partially hydrolyzed gluten.
The acidity matters because this recipe uses baking soda as its leavening agent. Baking soda is sodium bicarbonate — it needs an acid to react and produce the carbon dioxide bubbles that create lift and the slight crackle at the cookie surface. The sourdough discard provides that acid. This is the same reaction that happens when baking soda meets brown sugar or buttermilk — the discard is functioning as the acid component in a leavening pair, not as a flavor agent.
The partially hydrolyzed gluten is the subtler contribution. During fermentation, the enzymes produced by wild yeast and bacteria begin breaking down the gluten strands in the flour. Discard that has been sitting in the fridge for a week has had those enzymes working slowly the entire time. When that discard goes into cookie dough, the pre-broken gluten strands integrate more easily and produce a more tender crumb than fresh flour alone would. This is why the texture of these cookies — even with 2 full cups of flour — stays dense and fudgy rather than tough or bready. The fermented flour is working with the fat and eggs to keep the structure open and soft.
🗒 Luna’s Note: I keep a dedicated discard jar in the back of my fridge specifically for baking. Every time I feed my starter, the discard goes in the jar. By the time I am ready to bake cookies, I have exactly the right amount of well-aged discard ready — no measuring from an active starter, no timing around feeding schedules.
Sourdough Chocolate Chip Cookies Troubleshooting & Pro-Tips
Common Mistakes
My Cookies Came Out Cakey and Puffy Instead of Dense and Fudgy
The symptom: The cookies baked up tall, dome-shaped, and soft in a cakey way — more like a muffin top than the dense, flat-topped cookie shown in the photos. The texture is open and airy rather than tight and fudgy.
The cause: The most common cause is using active bubbly starter instead of unfed discard. Active starter is full of live yeast producing carbon dioxide — it will over-leaven the dough and push the texture toward cakey. The second most common cause is too much flour — if the flour was scooped directly from the bag rather than spooned and leveled, the dough can be 20–30% heavier than intended and will bake up dry and puffy. The third cause is overmixing after the flour goes in, which develops gluten and creates a bready, structured crumb instead of a fudgy one.
The fix: Cakey cookies that have already baked cannot be made fudgy after the fact. Sandwich two together with a layer of ganache or Nutella pressed between them — the filling adds the richness the cookie texture is missing and the result is genuinely good.
The prevention: Use unfed discard only — not active starter. Spoon and level the flour or weigh it at 240g. Stop folding the flour in at 15 to 18 strokes — no more.
My Cookie Bottoms Are Burnt While the Tops Are Still Pale
The symptom: The bottoms of the cookies are dark brown or black and taste bitter while the tops still look underbaked and pale. The cookies may have pulled away from the parchment unevenly or stuck to the pan surface.
The cause: A dark-colored non-stick baking sheet is the primary culprit. Dark pans absorb significantly more radiant heat from the oven floor and transfer it directly into the cookie base — the bottoms overbake before the tops have had time to set. Placing the pan on the bottom oven rack produces the same result. Skipping parchment and baking directly on a greased pan also causes uneven bottom browning because the grease conducts heat differently than a parchment barrier.
The fix: Burnt bottoms on an already-baked cookie cannot be reversed. If the burn is light, use a microplane or fine grater to scrape the darkest part of the bottom off once the cookie has fully cooled. If the burn is deep, the cookie will taste bitter throughout — they are not salvageable for serving but can be crumbled and used as a topping for ice cream where the bitter note reads as intentional.
The prevention: Use light-colored aluminum baking sheets only. Line with parchment paper — not foil, not a greased surface. Position the oven rack in the middle of the oven, not the bottom. If dark pans are all you have, reduce the oven temperature by 25°F (15°C) to 350°F (175°C) and begin checking at 9 minutes.
My Cookies Spread Too Flat and Look Greasy
The symptom: The cookies spread into thin, flat discs during baking. The edges look greasy and lacy rather than set and golden. The centers never puff — the dough just melts outward across the pan.
The cause: Almost always one of three things — wrong sourdough discard consistency, butter that was not fully cooled before the eggs went in, or dough that was not chilled long enough before baking. A discard that is too thin (higher hydration than 100%) adds excess water to the dough and weakens its structure. Butter that was still warm when the eggs were added begins to melt the fat-sugar emulsion before it is built properly. Unchilled dough has no cold fat to slow the spread in the oven — the cookies hit the heat and immediately relax outward.
The fix: If the cookies are already flat and baked, they are not salvageable as a stacked presentation — but they are still delicious. Let them cool completely, they will crisp up as they cool and work well crumbled over vanilla ice cream or layered into a parfait.
The prevention: Use sourdough discard at 100% hydration. Confirm the brown butter has cooled to room temperature — neutral to the touch — before the eggs go in. Chill the dough for a minimum of 1 hour, preferably overnight. If your kitchen is warm (above 75°F / 24°C), chill the portioned dough balls on the sheet pan for 15 minutes before the pan goes into the oven.
My Cookies Are Dry and Overbaked
The symptom: The finished cookies feel dry and slightly crumbly when broken. The center has no fudgy quality — it tastes like a standard dry cookie rather than the dense, moist result shown in the photos.
The cause: The cookies were left in the oven past the correct pull point, or they were left on the hot pan for longer than 8 minutes after baking. Both extend the cooking time past what the recipe intends.
The fix: Dry, overbaked cookies are best served warm with a scoop of vanilla ice cream alongside — the ice cream provides the moisture and richness the cookie is missing. Alternatively, store them in a lidded container with a slice of bread overnight. The bread releases moisture into the container and the cookies will soften slightly by the next morning.
The prevention: Pull the pan at 10 to 12 minutes the moment the edges look set — do not wait for the centers to look done. Transfer to the wire rack at exactly 5 minutes on the pan.
The Brown Butter Looks Burnt and Smells Sharp
The symptom: The butter in the pan has gone past golden amber to a very dark brown or black. The smell is sharp and acrid rather than nutty and caramelized. The milk solids at the bottom of the pan look black rather than deep golden brown.
The cause: The heat was too high, the butter was left unattended, or a dark-colored pan hid the color change until it was too late. Brown butter goes from perfect to burnt in under 60 seconds at medium-high heat.
The fix: Do not use burnt butter in the dough. The bitter, acrid compounds formed in over-browned milk solids will carry through the entire batch and the finished cookies will taste bitter throughout. Start over with fresh butter — there is no salvaging burnt brown butter.
The prevention: Use medium heat only — not medium-high. Use a light-colored saucepan so you can see the milk solid color clearly. Stir constantly after the second foam appears. Pour into the bowl the moment the solids reach deep amber and the smell turns nutty — do not wait for a deeper color.
My Baking Soda Is Flat — The Cookies Have No Lift or Crackle
The symptom: The cookies baked up completely flat with no crackle on the surface and a dense, heavy texture rather than the slight lift at the edges shown in the photos. The surface looks smooth and matte rather than lightly crinkled.
The cause: Spent baking soda that has lost its reactivity. Baking soda absorbs moisture and odors from the air over time — a container that has been open for more than 6 months in a humid pantry may have lost significant reactivity even if it does not smell off. The sourdough discard provides the acid that baking soda needs to react, but if the baking soda itself is spent, no reaction occurs regardless of the acid source.
The fix: Cookies with spent baking soda cannot be corrected after baking. They are safe to eat but the texture and appearance will not match the recipe. Use them crumbled as a topping or ice cream mix-in.
The prevention: Test baking soda freshness before every batch: drop ½ teaspoon into 2 tablespoons of hot water with a splash of white vinegar. It must bubble vigorously within 5 seconds. If the bubbling is slow or minimal, replace the baking soda before proceeding. Replace open baking soda every 3 months for consistent results.
My Dough Is Too Sticky to Scoop After Chilling
The symptom: After the minimum 1-hour chill, the dough is still very soft, sticky, and difficult to portion cleanly. It sticks to the scoop and to your hands.
The cause: The sourdough discard was too thin (higher hydration than 100%), the butter was not fully cooled before mixing, or the dough did not chill long enough. In high-humidity climates, the dough absorbs moisture from the air even in the fridge.
The fix: Return the bowl to the fridge for another 30 to 60 minutes. If still unworkably sticky after a full 2-hour chill, work with lightly dampened hands rather than floured ones — flour pressed into the outside of the dough ball changes the surface texture and affects how the cookie bakes.
The prevention: Use discard at 100% hydration. Confirm the butter was fully cooled before mixing. In high-humidity climates, add 1 extra tablespoon (8g) of flour to the dough before chilling.
My Flaked Salt Disappeared Into the Cookie Surface
The symptom: The flaked sea salt is not visible on the finished cookie. The surface looks plain rather than showing the distinct white flakes visible in the photos.
The cause: The salt was added too late after the cookies had cooled and the surface set, or fine-ground salt was used instead of flaked salt. Fine salt dissolves into any residual surface moisture and disappears.
The fix: For already-cooled cookies, lightly brush the tops with a very small amount of water using a pastry brush, then press flaked salt gently onto the surface.
The prevention: Add the flaked salt at exactly the 5-minute mark — immediately after pulling the pan from the oven and before transferring to the rack. Use Maldon or Fleur de Sel only — not fine sea salt, not kosher salt.
High Altitude and High Humidity Adjustments
High altitude (above 3,500 feet / 1,067m): At altitude, lower air pressure causes carbon dioxide from the baking soda to expand faster and escape before the cookie structure sets. The result is excessive spread and a flat, cratered surface rather than the slight lift shown in the photos. Reduce the baking soda to ½ teaspoon (2g) and increase the flour by 2 tablespoons (15g). Increase the oven temperature by 15°F (8°C) to 390°F (198°C) and reduce the bake time by 1 to 2 minutes — start checking at 9 minutes.
High humidity: Excess moisture in the air is absorbed by the flour, brown sugar, and sourdough discard — all of which are hygroscopic. In humid climates above 70% relative humidity, the dough will feel stickier than expected even after chilling. Add 1 tablespoon (8g) of flour to the dough before chilling if the dough feels unworkably slack. Bake immediately after removing from the fridge — do not allow the portioned dough balls to sit at room temperature before baking in humid conditions.
Expert Pro-Tips
Bang the pan on the counter immediately after pulling from the oven. The moment the pan comes out of the oven, lift it 2 inches (5cm) above the counter and drop it flat. Do this twice. The impact deflates any remaining puffiness in the centers and encourages the cookies to settle into the crinkled, flat-topped profile visible in the photos. This technique — sometimes called pan-banging — is the difference between a cookie that looks puffy and domed and one that looks intentionally structured with crinkled edges. It takes one second and costs nothing.
Chill the portioned dough balls overnight on the sheet pan rather than chilling the whole bowl. If you have the fridge space, portion the dough immediately after mixing, place the dough balls on a parchment-lined sheet pan, cover loosely with plastic wrap, and refrigerate overnight. Pre-portioned dough balls chill more evenly than a bowl of bulk dough, they go straight from the fridge into the oven without any warm-up time at room temperature, and the bake is more consistent across the batch.
Use two different chocolate percentages in the same batch. Chop 1 cup (170g) of 70% dark chocolate and ½ cup (85g) of 60% or 54% semi-sweet chocolate and combine them. The higher percentage provides the deep, slightly bitter chocolate flavor visible in the darker pools in the photos. The lower percentage provides sweetness and a creamier melt. The contrast between the two creates a more complex chocolate experience than a single percentage delivers. This is what I do for every batch I photograph.
🗒 Luna’s Note: I do not measure the two chocolate percentages precisely when I chop them. I use roughly two-thirds of a 70% bar and one-third of whatever semi-sweet bar I have open. The exact ratio has never mattered enough to weigh carefully. The principle — darker for depth, lighter for sweetness — is what matters.
Add 1 teaspoon (2g) of espresso powder to the dry ingredients. Espresso powder does not make the cookies taste like coffee. What it does is amplify the chocolate flavor — the bitterness of the espresso and the bitterness of the dark chocolate reinforce each other and both taste more intense than either would alone. This is a standard technique in professional chocolate baking and it works every time. If you are using high-quality 70% chocolate, the espresso powder pushes the flavor further than the chocolate can get on its own.
How to Store Sourdough Chocolate Chip Cookies
Room Temperature
Store fully cooled sourdough chocolate chip cookies in a lidded hard-sided container — a cookie tin, a glass jar with a lid, or a hard plastic container with a snap-fit lid. Layer the cookies between sheets of parchment paper if stacking more than two high. Do not use zip-lock bags. Zip-lock bags press the cookies flat against each other and the moisture trapped inside softens the edges within hours — the crisp edge that took precise baking time to achieve disappears by the next morning.
These cookies keep at room temperature for 3 to 4 days. The sourdough discard contributes mild acidity that slows staling slightly compared to a standard chocolate chip cookie — but by day 4 the edges will have softened fully and the texture will be noticeably different from day 1.
Do not store near the stove or in direct sunlight. Heat accelerates fat oxidation in the chocolate and the cookies will develop a slightly waxy, off-flavor by day 2 if stored in a warm spot.
Refrigerator
Refrigerating baked cookies is not recommended for this recipe. The fridge pulls moisture out of the cookie crumb through a process called retrogradation — the starch structure in the flour tightens and recrystallizes in the cold, and the result is a cookie that tastes dry and dense in the wrong way. Room temperature storage in a lidded container preserves the texture far better than the fridge.
If your kitchen runs consistently above 78°F (25°C) — which is a realistic situation in summer — refrigerating in a lidded container is the better option over leaving them out in the heat. In that case, bring the cookies to room temperature for 20 minutes before eating. Cold cookies straight from the fridge have a compressed, almost gummy texture that does not represent the recipe correctly.
Freezer — Baked Cookies
Baked cookies freeze well for up to 2 months. Wrap each cookie individually in a layer of plastic wrap, then place all wrapped cookies into a zip-lock freezer bag with the air pressed out. The individual wrap prevents the cookies from fusing together and protects the surface salt from rubbing off during storage.
To thaw: remove as many cookies as needed and let them sit at room temperature for 30 to 45 minutes. Do not microwave to thaw — microwaving melts the chocolate chunks unevenly and turns the cookie base rubbery. For a just-baked texture, place thawed cookies on a parchment-lined baking sheet and warm at 300°F (150°C) for 4 to 5 minutes. The edges will re-crisp and the chocolate chunks will return to a soft, melted state.
Frozen and re-warmed cookies are genuinely very good. The texture after re-warming is approximately 90% of fresh-baked. The flaked salt will have softened during freezing — add a small pinch of fresh flaked salt to the top before serving if the surface looks plain.
Freezer — Unbaked Dough Balls
This is the method I use most often. Portion the chilled dough into balls, place them on a parchment-lined baking sheet, and freeze until solid — approximately 1 to 2 hours. Once frozen solid, transfer the dough balls to a zip-lock freezer bag. Label with the date and the baking temperature and time. Frozen dough balls keep for up to 3 months.
To bake from frozen: do not thaw. Place frozen dough balls directly onto a parchment-lined baking sheet and bake at 375°F (190°C) for 13 to 14 minutes — 2 to 3 minutes longer than the fresh-chilled bake time. The exterior will look set before the center is fully done — use the same pull cue as the fresh dough: edges golden and set, center still looking underdone. Add flaked salt immediately after pulling from the oven.
Baking from frozen dough produces a cookie that is nearly identical to the fresh-chilled result. The extra oven time compensates for the frozen core without drying out the edges. This is the method I use when I want two or three cookies on a Tuesday night without committing to a full batch.
Serving Suggestion
These cookies are best eaten warm — 15 to 20 minutes out of the oven, at the point where the centers have set but the chocolate chunks are still soft and slightly molten. That specific window — not hot enough to fall apart, not cool enough to fully firm up — is when the contrast between the crisp edge and the fudgy center is at its most distinct. It does not last long. If you are serving these to other people, time the bake accordingly.
I serve these with a strong black coffee, no sugar. The bitterness of the coffee cuts through the richness of the brown butter and dark chocolate in a way that milk or tea does not. It is the pairing I come back to every time, without exception.
This is the recipe I make when someone asks me to bring something and I want them to actually remember it. Not a layer cake, not a tart — something that looks simple and tastes like it took more thought than it appears to. These fit that description precisely.
On day 2, these cookies are still good — the centers firm up overnight and the flavor deepens as the sourdough discard continues to do its slow work. The texture shifts from fudgy to something closer to dense and chewy. Both versions are worth eating. Day 1 is better. Day 2 is not a consolation prize.
These do not travel particularly well fresh. The centers stay soft for the first few hours and the cookies are fragile if stacked without parchment between them. If you are bringing them somewhere, bake them the morning of, cool them fully, and transport them in a single layer in a lidded container. Do not wrap them in plastic while still warm — the steam softens the edges and you lose the crispness.
🗒 Luna’s Note: I always use a digital kitchen timer rather than my phone for the 5-minute pan rest. My phone leads to other things. Four minutes and forty seconds into a crucial rest is not the moment to get distracted by a notification.
Frequently Asked Questions About Sourdough Chocolate Chip Cookies
What does sourdough discard do in cookies?
Sourdough discard adds mild acidity that activates the baking soda, creating the lift and surface crackle in the finished cookie. The fermented flour also contains partially broken-down gluten strands that produce a more tender crumb than fresh flour alone. The result is a deeper, more complex flavor without a pronounced sour taste — the discard functions as a flavor enhancer and leavening acid, not a sourdough flavor agent.
Do sourdough chocolate chip cookies taste like sourdough bread?
No. Unfed sourdough discard in cookies does not produce a bread-like sour flavor. The acidity is mild and background — it reads as a slight complexity or depth rather than a distinct tang. Most people eating these cookies will not identify sourdough as an ingredient unless told. What they will notice is that the flavor is more developed than a standard chocolate chip cookie, with a richness that plain dough does not have.
Can I use unfed sourdough discard in cookies?
Yes — unfed discard is exactly what this recipe requires. Do not use active bubbly starter. Active starter is full of live yeast producing carbon dioxide and will over-leaven the dough, pushing the texture toward cakey and puffy rather than dense and fudgy. Discard refrigerated up to two weeks works well — older discard produces a slightly more pronounced tang and marginally less spread. Both are acceptable results.
Can I make sourdough cookie dough ahead of time?
Yes — this dough is specifically designed for make-ahead preparation. The dough can be refrigerated for up to 48 hours before baking, and the flavor improves with every hour it rests. For longer storage, portion the dough into balls, freeze until solid, and bake directly from frozen at 375°F (190°C) for 13 to 14 minutes. Frozen dough balls keep for up to 3 months. This is the most practical approach for having fresh-baked cookies available without committing to a full batch at once. For more make-ahead cookie strategies, see my chewy chocolate chip cookies article.
Why did my sourdough cookies spread too much?
Sourdough cookies spread too much when the discard is too thin, the brown butter was not fully cooled before mixing, or the dough was not chilled before baking. Excess water in a high-hydration discard weakens the dough structure and causes flat spreading. Warm butter begins melting the fat-sugar emulsion before it is properly built. Unchilled dough has no cold fat to slow the spread in the oven. Use 100% hydration discard, cool the butter to room temperature before adding eggs, and chill the dough for a minimum of 1 hour before baking.
How do you keep sourdough cookies chewy?
Sourdough cookies stay chewy when pulled from the oven before the centers look done and left on the hot pan for exactly 5 minutes to finish via carryover heat. The dark brown sugar in the dough is hygroscopic — it draws moisture from the surrounding air and keeps the crumb soft during storage. Store cooled cookies in a lidded hard-sided container at room temperature, layered with parchment. Do not refrigerate — cold temperatures cause starch retrogradation, which makes the crumb dry and compressed rather than chewy.
Do sourdough chocolate chip cookies need any adjustments at high altitude?
Yes. At altitudes above 3,500 feet (1,067m), reduce the baking soda to ½ teaspoon (2g) and add 2 extra tablespoons (15g) of flour. Lower air pressure causes leavening gases to expand faster, which produces excessive spread before the structure sets. Increase the oven temperature by 15°F (8°C) and begin checking at 9 minutes. In high-humidity climates, add 1 tablespoon (8g) of flour if the dough feels slack after chilling.
More Cookie Recipes You’ll Love
If these sourdough chocolate chip cookies hit the spot, these are the recipes I would make next:
- Brown Butter Chocolate Chip Cookies — the non-sourdough version of this cookie, with the same brown butter base and dark chocolate chunks. If you want the brown butter flavor without the sourdough discard variable, start here.
- Chewy Chocolate Chip Cookies — maximized chew and soft centers, no brown butter required. The go-to recipe when the priority is texture over complexity.
- Homemade Chocolate Chip Cookies — the foundational recipe. Classic proportions, reliable results, the version I recommend for first-time bakers before moving on to variations.
Sourdough Chocolate Chip Cookies (Brown Butter, Dark Chocolate Chunks)
Ingredients
Equipment
Method
- In a light-colored saucepan over medium heat, melt 1 cup (227g) unsalted butter, stirring constantly once melted. Continue cooking and stirring until the milk solids at the bottom turn deep amber and the butter smells nutty — approximately 5 to 7 minutes. Immediately pour into a large heatproof mixing bowl, scraping every drop from the pan. Cool to room temperature, approximately 25 to 30 minutes, until the bottom of the bowl feels neutral to the touch.
- Add ¾ cup (165g) packed dark brown sugar and ½ cup (100g) granulated sugar to the cooled brown butter. Stir with a silicone spatula in firm circular strokes for 30 to 40 strokes until no dry sugar remains and the mixture looks uniform and slightly grainy.
- Add 2 large eggs and 1 egg yolk one at a time, stirring vigorously for 60 seconds after each addition. Add 2 teaspoons (10ml) pure vanilla extract and stir for 30 seconds. Continue stirring for a full 2 minutes until the mixture looks glossy, smooth, and slightly thickened.
- Add ½ cup (120g) sourdough discard and stir gently for 20 to 25 strokes until fully incorporated with no white streaks remaining.
- In a separate bowl, whisk together 2 cups (240g) all-purpose flour, ¾ teaspoon (4g) baking soda, and 1 teaspoon (6g) fine sea salt. Add the dry mixture to the wet ingredients all at once and fold with a silicone spatula using slow bottom-up strokes — 15 to 18 folds only. Stop when no dry flour remains.
- Add 1½ cups (255g) dark chocolate chunks and fold in with 10 to 12 strokes until evenly distributed. Reserve a small handful of larger chunks for pressing onto the tops of the dough balls before baking.
- Cover the bowl tightly with plastic wrap pressed directly onto the dough surface. Refrigerate for a minimum of 1 hour and up to 48 hours. Overnight produces the best flavor.
- When ready to bake, preheat the oven to 375°F (190°C) for at least 15 minutes. Line two light-colored aluminum baking sheets with parchment paper.
- Scoop dough into balls of approximately 2 tablespoons (45g) each and place at least 2 inches (5cm) apart on the prepared baking sheet. Press 2 to 3 reserved chocolate chunks onto the top of each dough ball.
- Bake one pan at a time on the middle rack for 10 to 12 minutes — until the edges look set and lightly golden and the centers still look underdone and slightly puffy. Do not wait for the centers to look done.
- Remove from the oven. Immediately lift the pan 2 inches (5cm) and drop it flat on the counter twice to deflate any puffiness. Leave the cookies on the hot pan for exactly 5 minutes — do not move them. Immediately sprinkle flaked sea salt over the tops.
- Transfer to a wire cooling rack and cool for at least 15 minutes before eating. Repeat with the remaining dough balls.